1
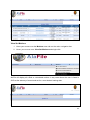
AlaFile
User Manual
Revised: 01/28/2014
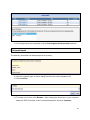
Table of Contents
Introduction
4
Getting Started
4
System Requirements
4
Initiating AlaFile
4
Logging into AlaFile
5
Registering with AlaFile
Special Notes about the AlaFile Registration Process
Navigating the AlaFile Application
5
7
9
Complaints
9
Discovery
9
Motions
9
Post Judgment
10
Miscellaneous
10
Email
10
Update Account
11
Payment Options
13
Filing Documents
18
Complaint
18
Amended Complaint
25
Answer
28
Notice of Discovery
31
Motion
34
Respond, Reply or Supplement to a Motion
39
Batch Motions
43
Search Existing Motions
47
View Pending Motions
48
View Set Motions
49
View Disposed Motions
50
View All Motions
51
Notice of Appearance
52
2
Subpoena
55
Alias Summons
59
Proposed Order
62
Miscellaneous Document
64
Affidavit of Substantial Hardship
68
Miscellaneous
71
Contact Information
71
Website Information
71
3
INTRODUCTION
AlaFile is a web-based application designed to allow registered users to file and
receive service copies of court documents electronically. It creates a more efficient
process for filing documents with the state court system.
GETTING STARTED
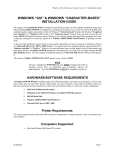
System Requirements
In order to use AlaFile the user needs a computer that has the ability to connect to the
internet. If your computer does not have internet access, please check with your local
system administrator. That individual should be able to determine whether or not you
are able to run AlaFile from your computer.
AlaFile is designed to run using Microsoft Internet Explorer 8 or 9. It is suggested that
you have the latest version of Internet Explorer available for your operating system.
AlaFile is NOT GUARANTEED to run properly when using other web browsers such as
Apple Safari, Google Chrome or Mozilla Firefox.
Initiating AlaFile
To initiate AlaFile, please follow the steps below:
1. Turn on your computer by clicking the power button.
2. Once you computer is on, open an Internet Explorer browser session. To open
Internet Explorer:
a.
Locate a shortcut to the program on your desktop.
OR
b.
Go to Start (located at the bottom left of your screen on the taskbar) and
i.
Click Start
ii.
Select All Programs
iii. Select Internet Explorer from the list.
4
3. Once the Internet Explorer browser session is opened, direct your browser to
the AlaFile website.
Logging into AlaFile
The AlaFile website address is https://alafile.alacourt.gov.
To log into AlaFile the user must first register with the application.
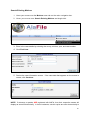
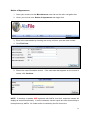
REGISTERING WITH ALAFILE
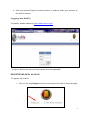
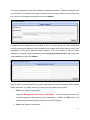
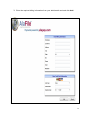
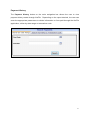
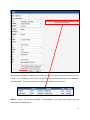
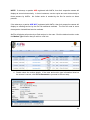
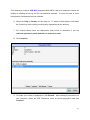
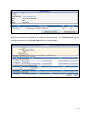
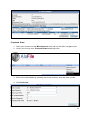
To register with AlaFile:
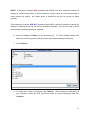
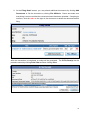
1. Click on the grey Register link at the top right of the AlaFile welcome page.
5
2. Completely fill in the AlaFile registration form.
3. Click Submit.
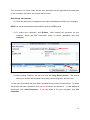
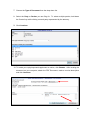
4. An email confirmation will be sent to the registered email address. This email
confirmation will contain a verification link. You MUST click that verification link
in order to be able to log into AlaFile.
6
Special Notes about the AlaFile Registration Process
Three types of users can register with AlaFile:
1. Attorneys. This is the primary group of e-filers within AlaFile .
2. Account Managers. This type of user will be able to log into
AlaFile
and
generate
payment
history
reports
(firm
administrators or bookkeepers).
3. Pro Se. Parties that are not represented by an attorney.
Your Attorney Code is issued by the Alabama Administrative Office of
Courts. It is a 6 digit code, usually starting with the first three letters of your
last name and ending in three numerical digits. If you do not know your
attorney code, please call 1.866.954.9411, Option 1, then Option 2 (the
State
Judicial
Information
Systems
{SJIS}
Help
Desk)
or
local
334.954.5000 Option 1, then Option 2.
Your ASB Bar ID is your identification number issued by the Alabama State
Bar. It is an 8 digit code and can be found on your Alabama State Bar
Membership Card. If you do not know your Alabama Bar ID, please call
1.800.354.6154 or local 334.269.1515.
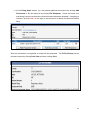
7
The designated Email and Password created at the registration process is what the
user will use to login to AlaFile. This information can be customized per the user’s
discretion.
The AlaFile password changes will be implemented in 2 phases:
Phase 1 - Effective September 24, 2012, all AlaFile users will be required to update their
passwords to a 9 character password plus the parameters listed below.
At least one upper case character
At least one lower case character
At least one number or one special character
NOTE: If you have already updated your password to the new 9 character password,
no further action is needed at this time.
Phase 2 - At a later date, AlaFile users who file or access confidential documents will be
required to enter a confidential access code in addition to the 9 character password required
to access the AlaFile application.
The CC (courtesy copy) fields are email addresses of legal secretaries, paralegals or
other staff that wish to receive courtesy copies of all notices served via AlaFile. When
service copies are sent through the application these CC email addresses will also
receive a copy.
8
NAVIGATING THE ALAFILE APPLICATION
The following section briefly describes various menu options that are currently
available within AlaFile. The specific workflow processes within each menu selection
are described in further detail within their respective sections.
Complaints
File New Complaint
File Amended Complaint
File Answer
File Counter Claim
File Cross Claim
File Third Party Complaint
Discovery
Notice of Discovery
Motions
File New Motion
Reply/Respond/Supplement to Motion
Search Existing Motion
View Pending Motions
View Set Motions
View Disposed Motions
View All Motions
9
Post Judgment
The Post Judgment menu (i.e. garnishments, writ of executions, etc.) is currently under
development. All post judgments items (other than post judgment motion filings)
should be submitted in paper to the clerk’s office until they are available within AlaFile.
Miscellaneous
The Miscellaneous menu contains the following selections:
Notice of Appearance
Subpoena
Alias Summons
Proposed Order
Miscellaneous Document
Affidavit of Substantial Hardship
Email / Update Account / Payment History Options
The Email tab found on the main navigation bar allows the user to view service copies
of court filings (e-notices) that have been sent through the application.
All court e-
notices are sent by AlaFile to two locations 1.) the Email inbox within AlaFile and 2.)
the registered email account.
In the event of technical difficulties with the registered email account (i.e. spam / server
issues or an account that has reached its size limit) the user will still have access to
their service copies within AlaFile. In this event, the user can log into AlaFile and click
on the Email tab to access a service copy of an electronically filed document.
10
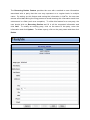
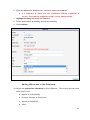
Update Account
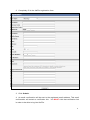
The Update Account tab on the main navigation bar allows the user to manage
personal information such as names, addresses, email addresses, passwords,
alternative email addresses, payment options and recurring parties.
Under Update Personal Information the user can update their personal information
including name, address, phone or fax numbers.
Whenever any relevant personal
information changes, the user must update their information with AlaFile as required by the
Administrative Polices & Procedures for Electronic Filing.
It is important to note that practicing attorneys will need to update their contact information
with the Alabama State Bar in which the Administrative Office of Courts receives nightly
updates into SJIS Mainframe (State Judicial Information Systems). That nightly update does
not apply to AlaFile. To update personal information, the user should type in the updated
information, then click Submit.
11
Under Change Email Address, the user can update their account to reflect a new email
address.
This email address update must be done anytime the user changes email
addresses pursuant to the Administrative Polices & Procedures for Electronic Filing.
The email address on record with AlaFile is the primary address used to provide service
copies. To complete the email address change, the user must click on the confirmation link
sent to the user’s new email address.
12
For security reasons the user may change their password anytime. Password changes must
be a minimum of 9 characters in length, contain at least one upper case, one lower case and
one number or one special character then clicking Submit.
If alternate email addresses are provided in the CC fields during the initial registration
process, those email addresses are provided service copies of all emails that are sent by the
application to the primary registered email address. If the user wishes to add new email
addresses or change existing addresses, click Change Alternative Emails, type in the new
email address(es) then click Submit.
AlaFile uses the utmost caution to protect credit card and bank information when making
online payments. To ensure security, you are given the following two options:
1. Enter Your Payment Information:
Using the Manage Payment Feature is OPTIONAL. You may continue to enter your
complete payment information at each transaction.
AlaFile will NOT store your
payment account identifying information in the AlaFile system.
2. Store Your Payment Information:
13
If you choose to store payment account information for your convenience or to share
your payment account information with others in your firm, then you should use this
option. This service stores your payment account identifying information (credit card
number or bank account information) securely in a 3rd party PCI Certified Data Center
which provides AlaFile with a token used to call your payment information for
processing. Please be aware that each time that you use the token, a $0.05
charge will be added to the payment convenience charge. By setting up a
Payment Option you agree to pay the tokenization charge.
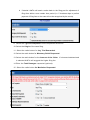
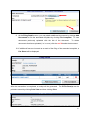
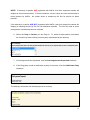
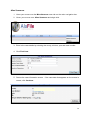
To add new payment accounts:
1. Click Manage Payment Options.
2. Within the manage payment options click Add a Payment Option.
14
3. Enter the required billing information from your debit/credit card and click Add.
15
The Recurring Parties Feature provides the user with a method to save information
associated with a party that the user may represent on a regular basis in multiple
cases. By setting up this feature and saving the information in AlaFile, the user can
access saved data during the filing process to avoid entering this information each time
a document is e-filed (such as a complaint). To utilize this feature for a new party, the
user should click on Recurring Parties and fill in all the requested information and
click Add.
To modify an existing party, click on the name of the party, enter the
information and click Update. To delete a party, click on the party name and then click
Delete.
16
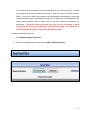
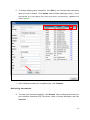
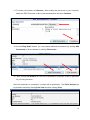
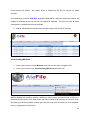
Payment History
The Payment History button on the main navigation bar allows the user to view
payment history made through AlaFile. Depending on the report desired, the user can
enter the appropriate parameters to obtain information on fees paid through the AlaFile
application, either by date range or transaction code.
17
FILING DOCUMENTS
Complaints
The process of e-filing a complaint in each of the five civil divisions is very similar
(circuit civil, district civil, small claims, domestic relations and child support).
The
general workflows and basic logic can be applied to the other civil divisions described
above. For simplicity, this tutorial will explain how to e-file a complaint in circuit civil
division.
Circuit Civil Complaint
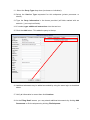
1. Hover your mouse over the Complaints menu on the main navigation bar.
2. Hover your mouse over File New Complaint within the Complaint menu.
3. Click Circuit Civil.
NOTE: Depending on the division chosen, the electronic cover sheet may look
different.
4. Select the County from the dropdown list.
5. Select the radio button for Emergency Relief.
6. Select the radio button for Filing on Behalf of State Agency.
7. Note the checkbox for the Affidavit of Substantial Hardship. It is important to point
out that if this option is selected AlaFile will not suggest the filing fee. When e-filed,
the request for a substantial hardship will go directly to the judge hearing the case.
8. At that time the judge will be able to grant or deny this hardship.
a. If granted: AlaFile will generate a summons and will proceed as a normal
complaint.
18
b. If denied: AlaFile will send a notice back to the filing part for adjustment of
filing fees within a sum certain time period (i.e. 5 business days to perfect
payment of filing fees or the case will not be recognized by the courts).
9. Select the Type of Complaint from the dropdown selections.
10. Select the Origin of the case filing.
11. Select the radio button for Jury Trial Demanded.
12. Select the radio button for Monetary Relief Requested.
13. Select the radio button for the Amount of the Claim. If unknown/undetermined
is selected AlaFile will suggest the higher filing fee.
14. Enter the Total Damages requested (optional).
15. Select the radio button for Mediation Requested.
19
Adding Parties to the Electronic Cover Sheet
16. Enter the Total Number of Case Parties for both plaintiff(s) and defendant(s).
17. Select the Party Type drop down (business, individual, government or other).
18. Type the Party Information in the boxes provided (all fields marked with an
asterisk (*) are required fields).
19. If additional attorneys are representing the party, click the Add Additional
Attorneys Besides Filer checkbox. Type in the attorney code of the other
attorneys in the boxes that wish to make an appearance in the case.
20. Click Add. This adds the party to the red box at the top.
21. When adding a defendant to the complaint you will need to choose the type of
service from the Service Type dropdown.
a. If you choose Sheriff service type, you will have to choose the county where
the complaint will be served.
b. If you choose Private Process Server service type, you will need to type in
the name of the process server.
c. If you choose Certified Mail service type there are two options for this
service.
i. Service to be perfected by the clerk.
ii. Service to be perfected by filer.
d. If you choose Service Waived a summons will not be generated.
20
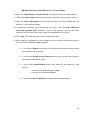
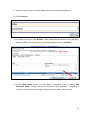
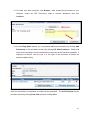
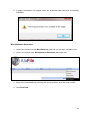
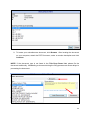
Once parties have been added to the case, the user will see a screen similar to the one
below. As an example, notice that one plaintiff and one defendant have been added to
this complaint. When all case parties have been added click continue.
NOTE: If there are multiple plaintiffs or defendants in the case, each party must be
added as described above.
21
The electronic civil cover sheet will be auto-generated by the application and attached
to the complaint and other documents that are filed.
Attaching documents
22. Once the data entry is completed in the steps outlined above, attach your complaint.
NOTE: All documents attached within AlaFile must be in PDF format.
23. To locate your Complaint, click Browse.
After locating the document on your
computer, attach the PDF Document, make a concise description and click
Continue.
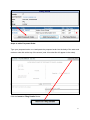
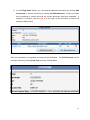
24. After clicking Continue, you will now see the Filing Detail Screen. This screen
allows you to check the attached document(s) before filing them with the court.
To view your documents that have been uploaded click the title of the document. To delete
documents that have uploaded, click the red X beside the document. To add additional
documents, click Add Documents.
If you are ready to file your complaint, click File
Complaint.
22
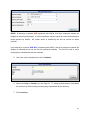
Explanation of the AlaFile Fee Sheet
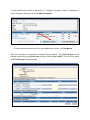
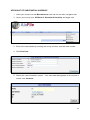
25. After clicking File Complaint, the user will see the Fee Sheet screen similar to
the screen below.
FAILURE TO ACCOMPANY A PLEADING WITH THE PROPER FILING FEE MAY
RESULT IN A LACK OF SUBJECT MATTER JURISDICTION OVER THE MATTER,
AND THE RENDITION OF A JUDGMENT WHICH COULD BE DEEMED VOID.
23
It is the filing party’s responsibility to verify that the correct filing fee is being paid. If
the correct filing fee is not suggested on the AlaFile Fee Sheet, please contact the
Alabama Administrative Office of Courts Information Technology Support Help Desk,
toll-free at 1.866.954.9411 Option 1, then Option 4.
26. By clicking Continue, you are completing payment of the filing fees for the complaint.
After the transaction is completed, a payment receipt will be generated. The E-File Receipt
can be printed or saved by clicking Print View and then clicking Print.
24
Amended Complaint
1. Hover your mouse over the Complaints menu on the main navigation bar.
2. Hover your mouse over Amended Complaint and single click.
3. Select the county, division, case year and case number from the dropdown list.
4. Click Find Case.
5. Please read the instructions hyperlinked before attempting to e-file an Amended
Complaint. Select the radio button to determine if you are amending the claim
amount. If you are amending the claim amount enter that amount in the claim
amount field below.
25
6. To change existing party information, click Edit by the corresponding case party
name you wish to amend. Click Update when finished updating the party. Once
completed, the case party(ies) that have been successfully updated will
reflect green.
7. Once satisfied amending the complaint party, click Continue.
Attaching documents
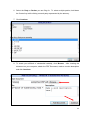
8. To locate your amended complaint, click Browse. After locating the document on
your computer, attach the PDF Document, make a concise description and click
Continue.
26
9. At the Filing Detail screen, you may attach additional documents by clicking Add
Documents or file the amended complaint by clicking File Complaint. To view
documents previously uploaded click the title of the document.
To delete
documents that have uploaded (i.e. in error) click the red X beside the document.
10. If additional fees are incurred as a result of the filing of the amended complaint, a
Fee Sheet will be displayed.
After the transaction is completed, a receipt will be generated. The E-File Receipt can be
printed or saved by clicking Print View and then clicking Print.
27
Answer
1. Hover your mouse over the Complaints menu on the main navigation bar.
2. Hover your mouse over File Answer and single click.
3. Select the county, division, case year and case number from the dropdown list.
4. Click Find Case.
5. Review the case information screen. If you are filing on behalf of a state agency
make sure and select the Yes radio button. Clicking Yes will bypass court filing fees
(as state agencies are exempt from filing fees).
6.
If the case data that appears on the screen is correct, click Continue.
28
7. Choose your specific Answer Type from the drop down menu.
8. Select the appropriate radio buttons for a Counterclaim, Cross-Claim and Third
Party Complaint.
9. Highlight the Party or Parties you are answering for. To select multiple parties, hold
down the Control Key while clicking on each party you represent.
10. If additional attorneys are representing the party, type in their attorney codes.
11. Select the appropriate radio button for Jury Trial.
12. Click Continue.
29
13. To locate your answer, click Browse. After locating the document on your computer,
attach the PDF Document, make a concise description and click Continue.
14. At the Filing Detail screen, you may attach additional documents by clicking Add
Documents or file the answer by clicking File Answer.
15. After clicking File Answer the user will be directed to a payment screen if applicable
for your filing situation.
After the transaction is completed, a receipt will be generated. The E-File Receipt can
be printed or saved by clicking Print View and then clicking Print.
30
Notice of Discovery
1. Hover your mouse over the Discovery menu on the main navigation bar.
2. Hover your mouse over Notice of Discovery and single click.
3. Select the county, division, case year and case number from the dropdown list.
4. Click Find Case.
5. Review the case information screen. If the case data that appears on the screen is
correct, click Continue.
31
NOTE: If attorneys or parties ARE registered with AlaFile, then their respective names will
display as served electronically. In those instances, service copies are sent electronically to
those persons by AlaFile. No further action is needed by the filer for service on these
persons.
If the attorneys or parties ARE NOT registered with AlaFile, then their respective names will
display as needing service by the filer via traditional methods. The filer will need to serve
these parties via traditional service methods.
6. Select the Party or Parties you are answering for. To select multiple parties, hold
down the Control key while clicking on each party represented by the attorney.
7. Click Continue.
8. To locate your notice of discovery, click Browse. After locating the document on
your computer, attach the PDF Document, make a concise description and click
Continue.
32
9. At the Filing Detail screen, you may attach additional documents by clicking Add
Documents or file the notice by clicking File Notice.
After the transaction is completed, a receipt will be generated. The E-File Receipt can be
printed or saved by clicking Print View and then clicking Print.
33
Motions
1. Hover your mouse over the Motions menu on the main navigation bar.
2. Hover your mouse over File New Motion and single click.
3. Enter in the case details by selecting the county, division, year and case number.
4. Click Find Case.
5. Review the case information screen. If the case data that appears on the screen is
correct, click Continue.
34
NOTE: If attorneys or parties ARE registered with AlaFile, then their respective names will
display as served electronically. In those instances, service copies are sent electronically to
those persons by AlaFile. No further action is needed by the filer for service on these
persons.
If the attorneys or parties ARE NOT registered with AlaFile, then their respective names will
display as needing service by the filer via traditional methods. The filer will need to serve
these parties via traditional service methods.
6. Select the Party or Parties you are filing for. To select multiple parties, hold down
the Control key while clicking on each party represented by the attorney.
7. If Oral Arguments are requested, click the Oral Arguments Requested checkbox.
8. If the filing party needs to add/create a party to the case, click the Add/Create Party
checkbox.
The attorney information will be displayed as a courtesy.
35
9. Select the specific type of motion being filed from the motion dropdown list.
10. Click Continue.
11. To locate your motion, click Browse. After locating the document on your computer,
attach the PDF Document, make a concise description and click Continue.
12. At the Filing Detail screen, you may attach a proposed order by clicking Add
Proposed Order.
Ensure the correct documents were uploaded.
If anything is
incorrect, click the red x to the right of the document to delete the document.
36
Steps to add a Proposed Order:
Type your proposed order or cut and paste the proposed order into the body of the order and
make an order title at the top of the screen (note: this order title will appear in the order).
Click the Insert to Filing Details Button.
37
To add additional documents to the motion (i.e. Affidavit in Support of Motion, Statement of
Facts, Deposition Excerpts, etc.) click Add Documents.
13. After all desired documents have been added and verified, click File Motion.
After the transaction is completed, a receipt will be generated. The E-File Receipt can be
printed or saved by clicking Print View and then clicking Print. NOTE: This is the only place
an E-File Receipt will be generated.
38
Respond, Reply or Supplement to a Motion
Use this option to e-file a response to a motion, reply to a motion or a supplement to a
previously filed motion.
1. Hover your mouse over the Motions menu tab on the main navigation bar.
2. Hover your mouse over Respond/Reply/Supplement to Motion and single click.
3. Enter in the case details by selecting the county, division, year and case number.
4. Click Find Case.
5.
Review the case information screen. If the case data that appears on the screen is
correct, click Continue.
39
NOTE: If attorneys or parties ARE registered with AlaFile, then their respective names will
display as served electronically. In those instances, service copies are sent electronically to
those persons by AlaFile. No further action is needed by the filer for service on these
persons.
If the attorneys or parties ARE NOT registered with AlaFile, then their respective names will
display as needing service by the filer via traditional methods. The filer will need to serve
these parties via traditional service methods.
AlaFile will display all previously e-filed motions in the case. Click the desired motion under
the Motion Type column that you wish to e-file into.
6. Double check the motion details. If the case and motion type information listed on
the screen is correct, click E-File Document to proceed to the next step.
40
7. Choose the Type of Document from the drop down list.
8. Select the Party or Parties you are filing for. To select multiple parties, hold down
the Control key while clicking on each party represented by the attorney.
9. Click Continue.
10. To locate your reply/response/supplement to motion, click Browse. After locating the
document on your computer, attach the PDF Document, make a concise description
and click Continue.
41
11. At the Filing Detail screen, you may attach additional documents by clicking Add
Documents or file the response by clicking File Response. Check and make sure
everything is correct and that the correct document has been uploaded. If anything is
incorrect, click the red x to the right of the document to delete the document before
filing.
After the transaction is completed, a receipt will be generated. The E-File Receipt can be
printed or saved by clicking Print View and then clicking Print.
42
Batch Motions
1. Hover your mouse over the Motions menu on the main navigation bar.
2. Hover your mouse over File Batch Motion and single click.
3. Enter in the case details by selecting the county, division, year and case number.
4. Click Add Case.
5. Enter in the additional case details by selecting the county, division, year and case
number. Notice the .01 case extension will be added to the master .00 filing.
6. Click Add Case.
43
7. Enter in the additional case details by selecting the county, division, year and case
number. Notice the .02 case extension will be added to the master .00 filing.
8. Click Add Case.
9. Review the case information screen. If the case data that appears on the screen is
correct, click Continue.
10. Select the Party you are filing for.
44
11. If Oral Arguments are requested, click the Oral Arguments Requested checkbox.
The attorney information will be displayed as a courtesy.
12. Select the specific type of motion being filed from the motion dropdown list.
13. Click Continue.
14. To locate your motion, click Browse. After locating the document on your computer,
attach the PDF Document, make a concise description and click Continue.
45
15. At the Filing Detail screen, if the attached document needs to be replaced for any
reason, click the red X to remove the document and then select the Add Document
button to browse to attach the replacement pdf document from your computer before
selecting the File Batch Motion button. You may attach a proposed order by clicking
Add Proposed Order. Please ensure the correct documents were uploaded before
proceeding.
Additional considerations:
I.
This feature is geared primarily towards criminal divisions that have the same case
style through different cases or point extensions.
II.
A good rule of thumb is batch orders on batch motions require the same disposition.
It is impossible to rule on a batch motion with different dispositions (i.e. a different
order for .01 then .02).
46
Search Existing Motions
1. Hover your mouse over the Motions menu tab on the main navigation bar.
2. Hover your mouse over Search Existing Motions and single click.
3. Enter in the case details by selecting the county, division, year, and case number.
4. Click Find Case.
5. Review the case information screen. If the case data that appears on the screen is
correct, click Continue.
NOTE: If attorneys or parties ARE registered with AlaFile, then their respective names will
display as served electronically. In those instances, service copies are sent electronically to
47
those persons by AlaFile. No further action is needed by the filer for service on these
persons.
If the attorneys or parties ARE NOT registered with AlaFile, then their respective names will
display as needing service by the filer via traditional methods. The filer will need to serve
these parties via traditional service methods.
6. AlaFile will display all motions that have previously been e-filed in the case.
View Pending Motions
1. Hover your mouse over the Motions menu tab on the main navigation bar.
2. Hover your mouse over View Pending Motions and single click.
AlaFile displays all pending motions, awaiting a court ruling, that have been e-filed or edocketed by the clerk in any case where the user is listed as an attorney of record in SJIS.
By clicking on the blue linkable motion type, the user may view the motion or file a response,
reply or supplement to the motion.
48
View Set Motions
1. Hover your mouse over the Motions menu tab on the main navigation bar.
2. Hover your mouse over View Set Motions and single click.
AlaFile will display all e-filed or e-docketed motions in any case where the user is listed in
SJIS as the attorney of record and set for a court docket hearing date.
49
View Disposed Motions
1. Hover your mouse over the Motions menu tab on the main navigation bar.
2. Hover your mouse over View Disposed Motions and single click.
AlaFile will display all e-filed or e-docketed motions that have been disposed of in any case
where the user is listed as the attorney of record in SJIS.
50
View All Motions
1. Hover your mouse over the Motions menu tab on the main navigation bar.
2. Hover your mouse over View All Motions and single click.
AlaFile will display all motions that have been e-filed or e-docketed in any case where the
user is listed as an attorney of record in SJIS, regardless of case action status.
51
Notice of Appearance
1. Hover your mouse over the Miscellaneous menu tab on the main navigation bar.
2. Hover your mouse over Notice of Appearance and single click.
3. Enter in the case details by selecting the county, division, year and case number.
4. Click Find Case.
5. Review the case information screen. If the case data that appears on the screen is
correct, click Continue.
NOTE: If attorneys or parties ARE registered with AlaFile, then their respective names will
display as served electronically. In those instances, service copies are sent electronically to
those persons by AlaFile. No further action is needed by the filer for service.
52
If the attorneys or parties ARE NOT registered with AlaFile, then their respective names will
display as needing service by the filer via traditional methods. The filer will need to serve
these parties via traditional service methods.
6. Select the Party or Parties you are filing for. To select multiple parties, hold down
the Control key while clicking on each party represented by the attorney.
7. For criminal cases check the appropriate radio button to determine if you are
retained, appointed, public defender or contract counsel.
8. Click Continue.
9. To locate your notice of appearance, click Browse. After locating the document on
your computer, attach the PDF Document, make a concise description and click
Continue.
53
10. At the Filing Detail screen, you may attach additional documents by clicking Add
Documents or file the notice of appearance by clicking File Notice. Check and
make sure everything is correct and that the correct document has been uploaded. If
anything is incorrect, click the red x to the right of the document to delete the
document before filing.
After the transaction is completed, a receipt will be generated. The E-File Receipt can be
printed
or
saved
by
clicking
Print
View
and
then
clicking
Print.
54
Subpoena
1. Hover your mouse over the Miscellaneous menu tab on the main navigation bar.
2. Hover your mouse over Subpoena and single click.
3. Enter in the case details by selecting the county, division, year and case number.
4. Click Find Case.
5. Review the case information screen. If the case data that appears on the screen is
correct, click Continue.
55
6. Enter the appearance date and time, courtroom location and address.
a. It is important to make sure the courthouse address suggested is
correct. If the address suggested is NOT correct please change.
7. Highlight the party requesting the subpoena.
8. Double check before proceeding and edit as necessary.
9. Click Continue.
Adding Witnesses to the Subpoena
10. Select the appropriate checkbox for this subpoena. The current options listed
within AlaFile are:
a. Appear at Trial/Hearing
b. Produce Records or Documents
c. Appear at Deposition
d. Other
56
11. Select the Party Type drop down (business or individual).
12. Select the Service Type requested for this subpoena (private processor or
sheriff).
13. Type the Party Information in the boxes provided (all fields marked with an
asterisk (*) are required fields).
14. If needed, type additional instructions into the text box.
15. Click the Add button. This adds the party to the top.
16. Additional witnesses may be added as needed by using the same logic as described
above.
17. Verify all information is correct then click Continue.
18. At the Filing Detail screen, you may attach additional documents by clicking Add
Documents or file the subpoena by clicking File Subpoena.
57
After the transaction is completed, a receipt will be generated. The E-File Receipt can be
printed or saved by clicking Print View and then clicking Print.
58
Alias Summons
1. Hover your mouse over the Miscellaneous menu tab on the main navigation bar.
2. Hover your mouse over Alias Summons and single click.
3. Enter in the case details by selecting the county, division, year and case number.
4. Click Find Case.
5. Review the case information screen. If the case data that appears on the screen is
correct, click Continue.
59
6. Please read the instructions hyperlinked before attempting to e-file an alias
summons.
7. To change existing party information, click Edit by the corresponding case party
name you wish to change. For this example, John Doe’s information will be updated.
8. Once the name has been highlighted, the party’s address can be changed. Once the
address has been updated, click Update Party.
9. After the party’s information has been updated, an asterisk will appear by the name
as shown below.
10. The case party(ies) that have been updated will reflect green.
11. Once the desired changes are completed, click Continue.
60
12. To locate your alias summons, click Browse. After locating the document on your
computer, attach the PDF Document, make a concise description and click
Continue.
13. At the Filing Detail screen, you may attach additional documents by clicking Add
Documents or file the alias summons by clicking File Alias Summons. Check and
make sure everything is correct and that the correct document has been uploaded. If
anything is incorrect, click the red x to the right of the document to delete the
document before filing.
After the transaction is completed, a receipt will be generated. The E-File Receipt can be
printed or saved by clicking Print View and then clicking Print.
61
Proposed Order
1. Hover your mouse over the Miscellaneous menu tab on the main navigation bar.
2. Hover your mouse over Proposed Order and single click.
3. Enter in the case details by selecting the county, division, year and case number.
4. Click Find Case.
62
NOTE: The user has the option to file a proposed order that is associated with a Case or
Motion. Depending on the case situation, the attorney can e-file a proposed order as a
separate document or they can associate the proposed order with a specific motion. Use
the Motion option when the proposed order relates to a specific motion. Otherwise, select
Case. In this example, the process for submitting a proposed order as a Case separate
document in a case will be demonstrated.
5. Verify the case details and click Create Proposed Order.
6. Type directly into the body of the order, or cut and paste the proposed order from
your word processing program (i.e. Microsoft Word) into the body of the order below.
7. Once the text has been properly entered into the body of the proposed order, make
an order title and click Insert to Filing Details in the top right corner of the window.
63
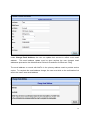
8. A popup confirmation will appear when the proposed order has been successfully
submitted.
Miscellaneous Document
1. Hover your mouse over the Miscellaneous menu tab on the main navigation bar.
2. Hover your mouse over Miscellaneous Document and single click.
3. Enter in the case details by selecting the county, division, year and case number.
4. Click Find Case.
64
NOTE: If attorneys or parties ARE registered with AlaFile, then their respective names will
display as served electronically. In those instances, service copies are sent electronically to
those persons by AlaFile. No further action is needed by the filer for service on these
persons.
If the attorneys or parties ARE NOT registered with AlaFile, then their respective names will
display as needing service by the filer via traditional methods. The filer will need to serve
these parties via traditional service methods.
5. Verify the case information then click Continue.
6. Select the Party or Parties you are filing for. To select multiple parties, hold down
the Control key while clicking on each party represented by the attorney.
7. Click Continue.
65
8. To locate your miscellaneous document, click Browse. After locating the document
on your computer, attach the PDF Document, make a concise description and click
Continue.
NOTE: If the document type is not listed in the Title Drop Down List, please file the
document traditionally. Mislabeling a document during the filing process can cause delays in
processing the document.
66
9. At the Filing Detail screen, you may attach additional documents by clicking Add
Documents or file the document by clicking File Miscellaneous. Check and make
sure everything is correct and that the correct document has been uploaded. If
anything is incorrect, click the red x to the right of the document to delete the
document before filing.
After the transaction is completed, a receipt will be generated. The E-File Receipt can be
printed or saved by clicking Print View and then clicking Print.
67
AFFADAVIT OF SUBSTANTIAL HARDSHIP
1. Hover your mouse over the Miscellaneous menu tab on the main navigation bar.
2. Hover your mouse over Affidavit of Substantial Hardship and single click.
3. Enter in the case details by selecting the county, division, year and case number.
4. Click Find Case.
5. Review the case information screen. If the case data that appears on the screen is
correct, click Continue.
68
6. Select the Party or Parties you are filing for. To select multiple parties, hold down
the Control key while clicking on each party represented by the attorney.
7. Click Continue.
8. To locate your affidavit of substantial hardship, click Browse.
After locating the
document on your computer, attach the PDF Document, make a concise description
and click Continue.
69
9. At the Filing Detail screen, you may attach additional documents by clicking Add
Documents or file the document by clicking File Affidavit. Check and make sure
everything is correct and that the correct document has been uploaded. If anything is
incorrect, click the red x to the right of the document to delete the document before
filing.
After the transaction is completed, a receipt will be generated. The E-File Receipt can be
printed or saved by clicking Print View and then clicking Print.
70
MISCELLANEOUS
To e-file an Attorney Fee Declaration please visit the Office of Indigent Defense
Services Website (OIDS) at http://oids.alabama.gov
CONTACT INFORMATION
Alabama Administrative Office of Courts Information Technology Support Helpdesk
1-866-954-9411 Option 1, then Option 4 or email [email protected]
WEBSITE INFORMATION
AlaFile Website: https://alafile.alacourt.gov
E-Filing Information and Promotional Webpage: http://efile.alacourt.gov
The Administrative Office of Courts Webpage: http://www.alacourt.gov
71