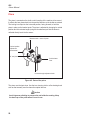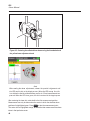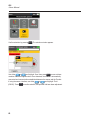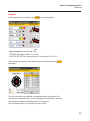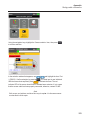
1
830
Laser Alignment Tool
Users Manual
July 2014 (English)
© 2014 Fluke Corporation. All rights reserved. Specifications are subject to change without notice.
All product names are trademarks of their respective companies.
LIMITED WARRANTY AND LIMITATION OF LIABILITY
Each Fluke product is warranted to be free from defects in material and workmanship under normal use and
service. The warranty period is two years and begins on the date of shipment. Parts, product repairs, and services
are warranted for 90 days. This warranty extends only to the original buyer or end-user customer of a Fluke
authorized reseller, and does not apply to fuses, disposable batteries, or to any product which, in Fluke's opinion,
has been misused, altered, neglected, contaminated, or damaged by accident or abnormal conditions of operation
or handling. Fluke warrants that software will operate substantially in accordance with its functional specifications
for 90 days and that it has been properly recorded on non-defective media. Fluke does not warrant that software
will be error free or operate without interruption.
Fluke authorized resellers shall extend this warranty on new and unused products to end-user customers only but
have no authority to extend a greater or different warranty on behalf of Fluke. Warranty support is available only if
product is purchased through a Fluke authorized sales outlet or Buyer has paid the applicable international price.
Fluke reserves the right to invoice Buyer for importation costs of repair/replacement parts when product purchased
in one country is submitted for repair in another country.
Fluke's warranty obligation is limited, at Fluke's option, to refund of the purchase price, free of charge repair, or
replacement of a defective product which is returned to a Fluke authorized service center within the warranty
period.
To obtain warranty service, contact your nearest Fluke authorized service center to obtain return authorization
information, then send the product to that service center, with a description of the difficulty, postage and insurance
prepaid (FOB Destination). Fluke assumes no risk for damage in transit. Following warranty repair, the product will
be returned to Buyer, transportation prepaid (FOB Destination). If Fluke determines that failure was caused by
neglect, misuse, contamination, alteration, accident, or abnormal condition of operation or handling, including
overvoltage failures caused by use outside the product’s specified rating, or normal wear and tear of mechanical
components, Fluke will provide an estimate of repair costs and obtain authorization before commencing the work.
Following repair, the product will be returned to the Buyer transportation prepaid and the Buyer will be billed for the
repair and return transportation charges (FOB Shipping Point).
THIS WARRANTY IS BUYER'S SOLE AND EXCLUSIVE REMEDY AND IS IN LIEU OF ALL OTHER
WARRANTIES, EXPRESS OR IMPLIED, INCLUDING BUT NOT LIMITED TO ANY IMPLIED WARRANTY OF
MERCHANTABILITY OR FITNESS FOR A PARTICULAR PURPOSE. FLUKE SHALL NOT BE LIABLE FOR ANY
SPECIAL, INDIRECT, INCIDENTAL OR CONSEQUENTIAL DAMAGES OR LOSSES, INCLUDING LOSS OF
DATA, ARISING FROM ANY CAUSE OR THEORY.
Since some countries or states do not allow limitation of the term of an implied warranty, or exclusion or limitation
of incidental or consequential damages, the limitations and exclusions of this warranty may not apply to every
buyer. If any provision of this Warranty is held invalid or unenforceable by a court or other decision-maker of
competent jurisdiction, such holding will not affect the validity or enforceability of any other provision.
Fluke Corporation
P.O. Box 9090
Everett, WA 98206-9090
U.S.A.
11/99
To register your product online, visit register.fluke.com.
Fluke Europe B.V.
P.O. Box 1186
5602 BD Eindhoven
The Netherlands
T a b le o f c o n te n ts
C o nt ent s
Table of contents
1 . P reface . . . . . . . . . . . . . . . . . . . . . . . . . . . . . . . . . . . . . . . . . . . . . . . . . . . . . . . . . . . . . 1
Introduction ........................................................................................................................1
How to Contact Fluke ........................................................................................................1
Safety information..............................................................................................................2
2 . P ack age . . . . . . . . . . . . . . . . . . . . . . . . . . . . . . . . . . . . . . . . . . . . . . . . . . . . . . . . . . . . 5
3 . S afety and operating notes . . . . . . . . . . . . . . . . . . . . . . . . . . . . . . . . . . . . . . . . . . . . 7
Operating information ........................................................................................................8
Handling precautions .......................................................................................................10
4 . F L U K E 8 3 0 – an ov erv iew . . . . . . . . . . . . . . . . . . . . . . . . . . . . . . . . . . . . . . . . . . . . . 1 3
Description.......................................................................................................................13
Power supply ...................................................................................................................15
Sensor ............................................................................................................................18
Prism ...............................................................................................................................20
Mini compact chain-type bracket ....................................................................................21
Using the wireless module ..............................................................................................22
5. Configuration and data management . . . . . . . . . . . . . . . . . . . . . . . . . . . . . . . . . . . 2 5
Configuration ...................................................................................................................25
6 . Getting started . . . . . . . . . . . . . . . . . . . . . . . . . . . . . . . . . . . . . . . . . . . . . . . . . . . . . . 3 9
Set up the product ...........................................................................................................39
Enter dimensions .............................................................................................................39
Wireless measurement ....................................................................................................41
Diagnose .........................................................................................................................45
7. Horizontal machine alignment . . . . . . . . . . . . . . . . . . . . . . . . . . . . . . . . . . . . . . . . . 4 7
Preparing for the alignment procedure ...........................................................................47
Check for soft foot ...........................................................................................................48
Mount the brackets ..........................................................................................................48
Mount wireless module, sensor and prism ......................................................................50
Connect the sensor .........................................................................................................52
Switch Product on and start application ..........................................................................53
Enter machine dimensions ..............................................................................................54
Machine set-up ................................................................................................................58
Laser beam adjustment ...................................................................................................60
Take measurements ........................................................................................................68
Diagnose .........................................................................................................................70
Align machine ..................................................................................................................73
Saving data and printing ..................................................................................................81
Soft foot ...........................................................................................................................91
Main types of soft foot .....................................................................................................92
i
830
Users Manual
Checking and correcting soft foot conditions ...................................................................92
Points to be observed during soft foot measurement ......................................................96
8. Alignment options . . . . . . . . . . . . . . . . . . . . . . . . . . . . . . . . . . . . . . . . . . . . . . . . . 1 0 1
Measurement modes .....................................................................................................101
9. Vertical flanged machines . . . . . . . . . . . . . . . . . . . . . . . . . . . . . . . . . . . . . . . . . . . 1 0 7
Typical configuration ......................................................................................................107
Set-up ............................................................................................................................108
1 0 . Appendix . . . . . . . . . . . . . . . . . . . . . . . . . . . . . . . . . . . . . . . . . . . . . . . . . . . . . . . . 1 2 1
Using the sensor cable ..................................................................................................121
Updating the 830 firmware to a newer version ..............................................................124
Sensor firmware update ................................................................................................131
830 Laser Alignment Tool technical data .......................................................................134
Suggested shaft alignment tolerances ..........................................................................136
Declaration of conformity ...............................................................................................137
I ndex . . . . . . . . . . . . . . . . . . . . . . . . . . . . . . . . . . . . . . . . . . . . . . . . . . . . . . . . . . . . . . . 1 3 9
ii
L is t o f fig u r e s
C o nt ent s
List of figures
Figure 2-1. Items included with the Product ......................................................................6
Figure 3-1. Laser safety warning .......................................................................................7
Figure 4-1. The Product at a glance ................................................................................13
Figure 4-2. Charging the non-removable rechargeable battery.......................................16
Figure 4-3. Dismounting the charger plug .......................................................................17
Figure 4-4. Parts of the sensor ........................................................................................19
Figure 4-5. Parts of the prism ..........................................................................................20
Figure 4-6. Standard and optional brackets ....................................................................21
Figure 4-7. Wireless module ON/OFF switch ..................................................................23
Figure 6-1. Mounting components across the coupling ...................................................39
Figure 6-2. Laser dot centered on prism dust cap ...........................................................41
Figure 6-3. Centering the reflected laser beam using
the thumbwheel and the yellow beam adjustment knob ..................................................44
Figure 7-1. Mounting the bracket step-by-step ................................................................49
Figure 7-2. Mounting wireless module and sensor ..........................................................51
Figure 7-3. Mounting and fastening prism .......................................................................51
Figure 7-4. Centering prism knob for maximum adjustment............................................52
Figure 7-5. Inserting sensor cable into the alignment tool ...............................................53
Figure 7-6. Machine dimensions to be entered ...............................................................55
Figure 7-7. Distance marking on the sensor and prism ...................................................55
Figure 7-8. Distance marking on the sensor....................................................................57
Figure 7-9. Horizontal and vertical adjustment of the laser beam ...................................65
Figure 7-10. Tolerance bar .............................................................................................72
Figure 7-11. Saving measurement report as PDF on a memory stick .............................85
Figure 7-12. Printing measurement report from Product directly to desired printer ........88
Figure 7-13. Parallel and angular soft foot ......................................................................91
Figure 7-14. Diagnosis of parallel and angular soft foot ..................................................99
Figure 9-1. Typical vertical machine configuration ........................................................107
Figure 9-2. Numbering the shaft ....................................................................................108
Figure 9-3. Numbering the housing ...............................................................................109
Figure 10-1. Replacing the wireless module cable with the sensor cable .....................121
Figure 10-2. Fastening the sensor cable .......................................................................122
Figure 10-3. Memory stick connected to the Product using the ‘short’ USB cable ........127
iii
830
Users Manual
iv
L is t o f ta b le s
C o nt ent s
List of tables
Table 1-1. Symbols ............................................................................................................3
Table 2-1. Package items ..................................................................................................5
Table 4-1. The Product keyboard and display at a glance...............................................14
Table 7-1. Measurement mode and relevant applications ...............................................68
Table 7-2. FLUKE 830 alignment condition LEDs ...........................................................72
v
830
Users Manual
v i
P r e fa c e
I nt ro d uc t i o n
1. Preface
Introduction
The Fluke 830 Laser Alignment Tool (Product) is a laser alignment device used
in industrial environments for shaft alignment only. This user-friendly tool, which
is used to determine the alignment condition of rotating machinery, features an
alphanumeric keyboard with strategically placed navigation keys that handle all
data entry functions. The Product possesses a high resolution color backlit TFT
screen, file storage capacity of up to 200 measurement files, and an alignment
condition LED that gives the instant alignment status of machines. The Product
uses rechargeable batteries as well as wireless communication between the
Product and its sensor.
H ow
to Contact Fluke
To contact Fluke, call one of the following telephone numbers:
● USA: 1-800-760-4523
● Canada: 1-800-36-FLUKE (1-800-363-5853)
● Europe: +31 402-675-200
● Japan: +81-3-6714-3114
● Singapore: +65-6799-5566
● Anywhere in the world: +1-425-446-5500
Or, visit Fluke’s website at www.fluke.com.
To register your Product, visit http://register.fluke.com.
To view, print, or download the latest manual supplement, visit
http://us.fluke.com/usen/support/manuals.
1
830
Users Manual
Safety information
A W arning identifies conditions and procedures that are dangerous to the user.
A Caution identifies conditions and procedures that can cause damage to the
Product or the equipment under test.
W arning
To prevent eye damage and personal injury:
• Do not look into the laser. Do not point laser directly at persons or
animals or indirectly off reflective surfaces.
• Do not look directly into the laser with optical tools (for example,
binoculars, telescopes, microscopes). Optical tools can focus the
laser and be dangerous to the eye.
• Use the Product only as specified or hazardous laser radiation
exposure can occur.
• Do not open the Product. The laser beam is dangerous to eyes. Have
the Product repaired only through an approved technical site.
2
W arning
To prevent possible electrical shock, fire, or personal injury:
• Read all safety information before you use the Product.
• Carefully read all instructions.
• Use the Product only as specified, or the protection supplied by the
Product can be compromised.
• Make sure machines are locked out, tagged out, and cannot be
started accidentally or deliberately during maintenance.
• Do not use the Product around explosive gas or vapour.
• Use only the external mains power supply included with the Product.
• Do not use the Product if it operates incorrectly.
• Use only specified replacement parts.
• Have an approved technician repair the Product.
S a fe ty n o te s
S y m b o ls
Table 1-1 is a list of symbols used on the Product and in this manual.
T able 1 -1 . Symbols
Symbol
D escription
Important information. See manual.
Warning. Laser.
Conforms to relevant Australian standards.
Conforms to requirements of European Union and European
Free Trade Association.
Conforms to relevant South Korean EMC standards.
Conforms to relevant North American Safety Standards.
This product complies with the WEEE Directive (2002/96/
EC) marking requirements. The affixed label indicates that
you must not discard this electrical/electronic product in
domestic household waste. Product Category: With reference to the equipment types in the WEEE Directive Annex I,
this product is classed as category 9 “Monitoring and Control
Instrumentation” product. Do not dispose of this product as
unsorted municipal waste. Go to Fluke’s website for recycling
information.
3
830
Users Manual
4
Page intentionally left blank
P a c k a g e
P ac k ag e i t em s
2. Package
Table 2-1 is a list of all the items included in the purchase of the Product. The
items are shown in Figure 2-1.
T able 2 -1 . Package items
Item
D escription
Part Number
1
Fluke 830 Laser Alignment Tool
4503893
2
Storage case
4462624
3
Sensor including dust cap and wireless module cable
4503893
4
Prism including dust cap
4476454
5
Chain-type bracket (2 no.) – each comprises two support
posts and chain
4503916
6
Wireless module
4476367
7
Sensor cable
4503940
8
Adapter/charger
4503957
9
PC cable
4503925
1 0
USB cable
4503933
1 1
USB memory stick
4473175
1 2
Cleaning cloth
2687537
1 3
Quick reference guide
4473130
1 4
Safety sheets
4473148
1 5
Users manual
N/A
5
830
Users Manual
1
2
830
SETUP
LASER ALIGNMENT TOOL
DIAGNOSE
MEASURE
ABC
2
3
JKL
MNO
4
7
5
6
TUV
WXYZ
8
9
space
+
0
MENU
DEF
1
GHI
PQRS
5
/
CLEAR
ENTER
. .
BACK
4
3
6
7
1 1
8
9
1 0
6
Figure 2-1. Items included with the Product
1 2
S a fe ty a n d o p e r a tin g n o te s
L aser saf et y
3. Safety and operating notes
The Product is to be used in industrial environments for shaft alignment only.
Care must be taken to ensure that the Product is not subjected to mechanical
knocks. It must be operated by properly trained personnel only. No liability will be
assumed when components or operating procedures as described in this manual
are not followed, or altered without permission of the manufacturer.
Operating tip
A N ote denotes general information and tips regarding operation of the Product.
IP classification
The Product is dust-tight and protected against water jets (IP65). The sensor and
prism comply with code IP67 (dust-tight and protected against immersion).
L aser safety
This product uses a Class 2 laser. The laser complies with the requirements of
IEC/EN 60825-1 and FDA 21 CFR 1040.10 and 1040.11 with Laser Notice 50.
The laser operates at a wavelength of 670 nm with a pulse duration of 128 μs,
a maximum radiated power of 0.8 mW and a maximum energy of 0.1 μJ. No
maintenance is necessary to keep the product compliant as outlined above.
W arning
• Do not stare into beam. Do not point laser directly at persons or
animals or indirectly off reflective surfaces.
• Do not look directly into the laser with optical tools (for example,
binoculars, telescopes, microscopes). Optical tools can focus the
laser and be dangerous to the eye.
LASER RADIATION
DO NOT STARE INTO BEAM
CLASS 2 LASER PRODUCT
λ=650nm,<1mW,EN60825-1:2007
COMPLIES WITH 21 CFR 1040.10
AND 1040.11
Figure 3-1. Laser safety warning
7
830
Users Manual
Operating information
Temperature range
The Product and its related system components must be used at temperatures
between 0° and 50° C (32° to 122° F). Outside of this range, the specified
accuracy may not be maintained.
Store the Product and its related components at temperatures between -20° C
and 60° C (-4° F to 140° F).
Temperature effects and fluctuations
Powerful heat sources or steam located near the laser beam could influence
the accuracy of measurements as a result of beam deflection. In practice,
however, this effect seldom occurs at distances up to 1 m. If in doubt, the effect
can be eliminated by shielding the system from the heat/steam source during
measurement and laser beam adjustment.
As with all precision optical measurement devices, sudden fluctuations in temperatures (e.g. resulting from sunlight), could result in erroneous measurements.
N o te
A llo w ad eq uat e t i m e f o r t h e P ro d uc t and i t s relat ed co
am b i ent t em p erat ure.
m p o nent s t o reach
th e
Incident light
Avoid exposing the Product to strong, hot light such as direct sunlight.
Dust and water seals
The Product is water and contamination resistant to specification IP65; the
sensor and prism are resistant to specification IP67. This specification requires
that each component be able to withstand a water jet spray from any direction
(the components are NOT guaranteed to withstand a full submersion). Note, as
with most water-resistant products, the resistance must be periodically checked
and re-sealed if necessary. This can be carried out during service and re-calibration of the system which should be carried out every two years.
I nterface connection
8
The Product is fitted with two interfaces: 1) data exchange with a PC/printer and
2) mains supply for the rechargeable battery, and the sensor.
S a fe ty a n d o p e r a tin g n o te s
N o t e reg ard i ng d at a st o rag e
N ote regarding data storage
N o te
W i t h any d at a p ro ce ssi ng so f t w are, d at a m ay b e lo st o r alt ered und er ce rt ai n
ci rcu m st ance s. I t i s st ro ng ly reco m m end ed t h at yo u ke ep a b acku p o r p ri nt ed
reco rd s o f all i m p o rt ant d at a.
F L UK E assum es no resp o nsi b i li t y f o r d at a lo st o r alt ered as a result o f i m p ro p er
use, rep ai rs, d ef ect s, b at t ery rep lace m ent / f ai lures o r any o t h er ca use.
FLUKE assumes no responsibility, directly or indirectly, for financial losses or
cl ai m s result i ng f ro m t h e use o f t h i s P ro d uct and any o f i t s f unct i o ns, such as
lo ss o r alt erat i o n o f st o red d at a.
N o te
A ny w ast e elect ri c al and elect ro ni c p art s o f t h e P ro d uct and i t s relat ed co m p o nent s, i ncl ud i ng m em o ry st i cks m ust b e d i sp o sed o f f i n acco
rd ance w i t h t h e
W E E E ( W ast e E lect ri ca l and E lect ro ni c E q ui p m ent ) D i rect i ve . S uch p art s m ust
b e t ake n t o t h e nearest co llect i o n f aci li t y .
9
830
Users Manual
Handling precautions
The Product and its related components are precision instruments and should not
be dropped or subjected to physical shock.
S torage
Use the supplied case to transport the Product and its related components. If the
Product is not used for an extended period, remove the related batteries from the
components and store the components in a cool, dry and well-ventilated location.
Caution
Observe the storage temperatures and humidity specified in the technical data.
C are
All optical surfaces (prism, sensor lens) must be kept clean. Use only the
supplied lens cleaning cloth. Avoid vigorous polishing to preserve the anti-reflective coatings of the glass elements. The housings of the Product, sensor, and
prism may be wiped clean using a soft cloth dampened with a mild, non-abrasive
detergent (use soapy water with only 1% mild soap in water). The display should
be cleaned using a soft dry cloth.
M aintenance
Although the Product and its related components are essentially maintenancefree, the following points should be observed:
● The calibration accuracy of the sensor should be checked every two years.
● Please return the system components to your authorized service center for
calibration checking.
W arning
• Do not open the Product. The laser beam is dangerous to eyes. Have
the Product repaired only through an approved technical site.
• Use only specified replacement parts.
• Have an approved technician repair the Product
Caution
When returning the Product and its battery operated components for
calibration, service or repair, ensure that the batteries are not defective. If you suspect a defect in the battery, DO NOT ship the unit with the
defective battery. You may contact your local representative for further
information.
1 0
S a fe ty a n d o p e r a tin g n o te s
H and li ng p rec aut i o ns
N o te
R ef er t o t h e releva nt saf et y d at a sh eet s f o r t h e b at t eri es used . T h e p acka g i ng
and d i sp at ch reg ulat i o ns f o r any g i v en b at t ery are d escr i b ed und er p arag rap h
1 4 i n t h e saf et y d at a sh eet s.
D isposal
Any waste electrical and electronics parts of the Product and its related
components including memory sticks must be disposed of according to
applicable safety and environmental regulations.
Customers in member states of the European Union must adhere to the EU
directive 2002/96/EC on waste electrical and electronic equipment (WEEE).
Items that fall under this directive are marked with the shown crossed-out
wheeled bin symbol and must be disposed of according to this directive.
● The marked components must be disposed of with FLUKE or their authorized
disposal partners.
● Such parts must be taken to the nearest collection facility.
● If you have any questions regarding the WEEE Directive, please contact your
local sales representative.
1 1
830
Users Manual
Page intentionally left blank
1 2
O v e r v ie w
D esc ri p t i o n
4. FLUKE 830 – an overview
D escription
5
6
830
7
LASER ALIGNMENT TOOL
4
8
3
9
2
1
1 5
SETUP
DIAGNOSE
MEASURE
ABC
1
2
3
GHI
JKL
MNO
4
5
6
PQRS
TUV
WXYZ
7
8
9
0
1 0
DEF
space
+
MENU
./
1 1
CLEAR
*
ENTER
BACK
1 2
1 3
1 4
Figure 4-1. The Product at a glance
1 3
830
Users Manual
The Product at a glance
Table 4-1. The Product keyboard and display at a glance
Item
Function
The ‘Setup’ key opens the machine dimensions screen.
SETUP
2
MEASURE
3
DIAGNOSE
The ‘Measure’ key is used to start the measure process.
The ‘Diagnose’ key is used to display measured and corrective
alignment results.
4
LED (battery status/
wireless communication
indicator)
Shows the battery and wireless communication statuses.
5
USB PC/printer port (grey)
The port is used to charge the Product, print and save measurement files, carry out firmware updates as well as display screen
on a PC.
6
Ambient light sensor
Use to regulate the Product’s display brightness.
7
Sensor port (blue)
The port is used to connect to Product when the wireless module
is not available.
8
Used for laser beam adjustment and as a tolerance check for
LED (alignment condition
and laser beam adjustment) measured alignment condition.
9
1 4
Element
1
The ‘Menu’ key is used to access the main menu which possesses the Product’s useful functions.
MENU
1 0
The ‘On’ key is used to switch the Product on. The Product is
switched off via the main menu item ‘Turn off’.
1 1
The navigation keys are used to navigate through the program
steps.
1 2
ENTER
1 3
BACK
1 4
CLEAR
1 5
0
–
The ‘Enter’ key is used to confirm entered values and access
any selected item.
The ‘Back’ key is used to return to previously selected screen.
The ‘Clear’ key is used to delete information entered inadvertently.
9
,
+
,
./
*
The data entry keys are used to enter machine dimensions and
file name.
O v e r v ie w
P o w er sup p ly
Power supply
The Product is powered using a non-removable 7.4 V 2.6 Ah Lithium-ion polymer
rechargeable battery, which is to be charged via the USB port only using the
universal adapter/charger. The rechargeable battery allows operation of up to 17
hours (33% active measurement, 33% computation, 33% ‘sleep’ mode).
The rechargeable battery may also be used to power the sensor when
measurement is carried using the sensor cable and not the wireless module.
Caution
The rechargeable battery is housed in a compartment that is held closed
using a special screw and must never be tampered with. When the
battery can no longer hold charge, the Product must be sent back for
serv ice.
Charging the battery
C h arg i ng
P ro d uct .
t h e no n- rem o va b le rech
N o te
arg eab le b at t ery
i s p o ssi b le o nly
v ia th e
To charge the rechargeable battery, connect the adapter/charger to the Product
USB port (grey) and to the mains supply (see Figure 4-2).
1 5
830
Users Manual
Charger/adapter is
connected to the Product
via the USB port.
USB port
(grey)
830
LASE
R AL
IGNM
ENT
MEN
DIAG
MEA
SETU
P
AB
I
4
RS
7
DE
O
6
WXY
V
8
e
spac
U
SE
F
3
MN
L
5
JK
TU
NO
RE
C
2
1
GH
PQ
SU
TOOL
9
Z
EN
CLEA
TE
R
R
BA
CK
. .
/
0
+
Figure 4-2. Charging the non-removable rechargeable battery
N o te
B ef o re ch arg i ng , t h e rech arg eab le b at t ery sh o uld b e d i sch arg ed as m uch as
p o ssi b le. T o ch arg e t h e b at t ery f ro m 0 % t o 1 0 0 % c ap aci t y t ake s ap p ro ix m at ely
4 h o urs.
The battery LED indicates the charging status of the battery. The LED flashes
green at initialization and during the charging process. A constantly lit green LED
denotes that the battery is fully charged.
830
SETUP
1
GHI
4
PQRS
7
LASER ALIGNMENT TOOL
DIAGNOSE
MEASURE
ABC
2
JKL
3
6
WXYZ
8
The charge level of the battery is displayed under the menu item ‘Device
settings’. With system switched on, pressing MENU , then using the navigation
keys to highlight ‘Config’. Confirm selection by pressing ENTER and from the
configuration menu use the navigation keys to highlight ‘Device setting’. Confirm
selection by pressing ENTER . The device settings are displayed.
1 6
0
MENU
DEF
MNO
5
TUV
9
space
+
/
CLEAR
ENTER
. .
BACK
O v e r v ie w
Mo unt i ng / D i sm o unt i ng uni v ersal ad ap t er/ c h arg er p lug
Mounting and dismounting the universal adapter/charger plug
The universal adapter/charger comes with three different regional plugs. The
available plugs are for the Euro zone, the US, and the UK. When mounting or
dismounting a plug, pay attention to the direction of the arrow on the plug just
above the pins, and the arrow on the latching nipple on the charger housing.
To dismount a plug, push the latching nipple in the forward direction [ 1 ] as
indicated by the arrow on it and hold, then push the plug to the right [ 2 ] as on
the arrow on the plug.
Latching nipple
The direction arrow on the
plug has the inscription
‘OPEN’ marked above it.
2
1
Figure 4-3. Dismounting the charger plug
1 7
830
Users Manual
To mount a plug, push the latching nipple in the forward direction [ 1 ] as
indicated by the arrow on it then slip the plug into the protruding prongs and slide
it to the left until it latches.
S ensor
The sensor is mounted using the chain type bracket on the shaft or solid coupling
of the stationary machine.
The sensor contains a laser diode which emits a beam of red light (wavelength
670 nm). The beam is visible at the point it strikes a surface. It is emitted with a
diameter of approx 5 mm (3/16”). Also located in the same housing is a beam
detector which measures the exact position of the laser beam as the shafts are
rotated. This component is a biaxial, analog, photoelectric semiconductor position
detector with a resolution of 1 µm. The sensor also contains an electronic
inclinometer with resolution better than 1° for measurement of the shaft rotation
angle.
The sensor has two indicator LEDs on its front side, one green for indicating
beam adjustment, and the other red when the laser is on. The sensor is powered
by using the wireless module which also transfers measurement data from the
sensor to the Product. The sensor may also be powered by the Product via a
cable through which measurement data also passes.
The sensor is IP67 protected to resist water spray and dust. The internal optics
and electronics are sealed to prevent any possible contamination. The sensor
lens, however, must be kept clean. Use the lens cleaning cloth or a fine dusting
brush such as that normally used to clean other optical devices. Keep the dust
cap on when not in use.
1 8
O v e r v ie w
S enso r
Green LED indicates
Red LED indicates sensor is
beam adjustment
powered and laser is on
laser is on
Housing mark = center of
bracket posts
IP 67 housing
Locking
knob
Scratch resistant lens
Figure 4-4. Parts of the sensor
Caution
Avoid polishing the lens too vigorously to prevent irreparable damage to
its anti-reflective coating.
Caution
Under no circumstances may the six smaller housing screws be removed, as that would result in loss of calibration and would void all
w arranty cov erage.
N o te
T h e ca li b rat i o n accu racy o f t h e senso r sh o uld b e ch ecke d eve ry t w o ye ars as
i nd i ca t ed b y t h e co lo red lab el lo ca t ed o n t h e b ack o f t h e senso r h o usi ng . P lease
ret urn t h e senso r t o yo ur aut h o ri ze d servi ce ce nt er f o r ca li b rat i o n ch ecki ng .
Do not stare into the beam.
W arning
1 9
830
Users Manual
Prism
The prism is mounted on the shaft or solid coupling of the machine to be moved.
It reflects the laser beam back into the position detector as the shafts are rotated.
The locking lever flips into the horizontal position, facing forward, to hold the
prism in place on the bracket posts. The prism is adjusted by changing its vertical
position and its horizontal angle (using the thumbscrews) so that the beam is
reflected directly back into the sensor.
Measure mark = center of posts
Vertical position
adjustment
thumbwheel
90° roof prism
Quick release
lever
Horizontal angle adjustment knob
Figure 4-5. Parts of the prism
The prism must be kept clean. Use the lens cleaning cloth or a fine dusting brush
such as that normally used to clean other optical devices.
Caution
Avoid vigorous polishing to preserve the anti-reflective coating. Keep
the dust cap on the prism when it is not in use.
2 0
O v e r v ie w
Mi ni c o m p ac t c h ai n- t y p e b rac k et
Mini compact chain-type bracket
Compact and lightweight, this bracket is designed to provide extremely rigid
support for the measurement components with a minimum of mounting time and
effort. The chain-type bracket fits onto shafts and couplings ranging from 15 to
200 mm (1/2” to 8”) in diameter. [Note that the brackets themselves cover the
full range of diameters; it is only the chain lengths that limit.] Chains of varying
lengths are also available. Mounting instructions are given in the section ‘Mount
the brackets’ on page 48.
Compact chain-type
bracket (2 no.)
Optional compact magnetic
bracket
Figure 4-6. Standard and optional brackets
P acka
g e co
N o te
nt ent s are sh o w n i n t h e “ P acka g e” sect i o n st art i ng o n p ag e 5 .
2 1
830
Users Manual
Using the wireless module
The wireless module powers the sensor laser and passes alignment readings
from the sensor to the Product. The module covers direct line of sight distances
of up to 10 m / 33’ depending on the prevailing environmental conditions. Its
electronic compartment complies with code IP65 (dust tight and protected against
water jets). The module is powered by two ‘AA’ size batteries. The operating
time for the alkaline batteries is 14 hours – based on an operating cycle of 50%
measurement, 50% standby. Lithium-ion AA batteries (such as for cameras) may
also be used, in place of alkaline batteries. For lithium-ion batteries, the operating
time is significantly longer; however, the drop-off rate when they become
depleted is much faster than with alkaline batteries, providing less advance
warning.
Mounting the wireless module
Mount the wireless module on the support posts of the bracket fixed on the
shaft of the left machine (usually stationary machine) as shown in Figure 7-2.
The module slides onto the support posts and is held in place by friction fit. It is
recommended to mount the wireless module on to the bracket frame.
Mount the sensor on the support posts, and then connect its cable to the wireless
module by inserting the longer 90-degree connector of the cable into the four-pin
socket on the side of the module with a groove (see Figure 7-2).
N o te
Mat ch t h e red d o t o n t h e p lug t o t h e g ro o e
v o n t h e so cke
o ri ent at i o n.
2 2
t t o ensure p ro p er p lug
O v e r v ie w
W i reless m o d ule
Switch the wireless module on
Wireless module ON/OFF switch
Figure 4-7. Wireless module ON/OFF switch
After connecting the sensor to the wireless module, switch the wireless module
on (see Figure 4-7).
The battery status LEDs blink for 3 seconds. The module is now ready for
operation. When the module is switched on, it supplies power to the sensor. If no
measurement action is activated in the Product, the power supply to the sensor
stops.
Operating time of battery status L ED
indicators
State of LEDs
Indicates
3 LEDs lit continuously
Operating time is between
75%–100%
2 LEDs lit continuously
Operating time is between
50%–75%
1 LED lit continuously
Operating time is between
25%–50%
Only 1 LED blinking (slowly)
Operating time is under 25%
Only 1 LED blinking (very fast)
Operating time in critical phase.
Measurement should not be taken
N o te
The operating time may vary significantly depending on the type of batteries
used .
2 3
830
Users Manual
Page intentionally left blank
2 4
C o n fig u r a tio n a n d d a ta m a n a g e m e n t
C o nf i g urat i o n
5. Configuration and data management
Configuration
The configuration menu is used to configure the Product’s settings, the regional
settings, default settings, printer, licence available applications, and display
specific system details.
The configuration menu may be accessed at any time and from any screen.
With the Product switched on, access “Configuration menu” screen by pressing
MENU . The “Main menu” screen appears. Use the navigation keys and highlight
the ‘Config’ icon.
With ‘Config’ highlighted, press ENTER to open the “Configuration menu” screen.
Any of the configuration menu items may be highlighted using the navigation
keys
2 5
830
Users Manual
D ev ice settings
To open the “Device settings” screen, use the navigation keys to highlight the
‘Device settings’ icon then confirm selection by pressing ENTER . The available
settings are displayed. These include brightness, keyboard beep, power scheme,
battery level, resume policy and Wireless. Use
/
to select item to be
set.
The Product possesses two modes to regulate display brightness – the auto
mode and the manual mode. Auto mode enables adaptive brightness, and uses
a light sensor to automatically adjust the display brightness to match the ambient
lighting conditions. Use ENTER / / to revert to the manual mode where display
brightness is manually controlled. Pressing
increases the brightness and
decreases display brightness.
Press ENTER to toggle between keyboard beep on/off. When the keyboard beep is
enabled (on), a beeping sound accompanies the pressing of any key.
2 6
C o n fig u r a tio n a n d d a ta m a n a g e m e n t
D ev i c e set t i ng s
The power scheme option is used to select setting that manages the power
usage within the Product. The three available options are: ‘Standard’ (the display
dims after 10 minutes and shuts down after 1 hour), ‘Full power’ (no dimming
and no shutdown), and ‘Long life’ (the display dims after 3 minutes and shutdown
takes place after 8 minutes). The required setting is selected using
/
and confirmed by pressing ENTER .
The capacity of the battery appears next to the battery level bar. This value
corresponds to the charge level indicated on the battery icon that appears on the
right top corner of the display, and appears in every screen.
2 7
830
Users Manual
“Resume policy” allows the user to specify the measurement file that opens
when the Product is turned on. The system may be set to open the last used
measurement file (‘Always resume’) or open a new measurement file (‘Resume
manually’). Press ENTER to toggle between the two resume options.
As an alternative, use can be made of / to toggle between the two resume
policies.
The item ‘Wireless’ is used to enable or disable the ‘wireless’ capability of
the Product. To turn the ‘wireless’ capability on/off, press ENTER with the item
highlighted. The on/off box appears. Use
/
to select either ‘on’ (to
enable ‘wireless’ capability) or ‘off’ (to disenable ‘wireless’ capability), then press
ENTER
to confirm selection.
2 8
C o n fig u r a tio n a n d d a ta m a n a g e m e n t
R eg i o nal set t i ng s
R egional settings
This option is used to set the units of measurement, the preferred country
language, current date and time.
N o te
T h e co unt ry lang uag e d et erm i nes t h e f o rm at i n w h i ch
p laye d .
t h e d at e ca n b e d i s-
The screen is opened from the configuration menu. Use the navigation keys to
highlight the “Regional settings” icon then confirm selection by pressing ENTER .
/
and confirming selection by pressing ENTER
Highlighting ‘Units’ using
reveals the available units of measurement. These are US imperial customary
units (inch/mils), imperial units (inch/thou) and the SI units (mm).
Select the required system of units using
/
. Press ENTER to confirm
selection.
/
and confirming selection by pressing
Highlighting ‘Language’ using
ENTER
displays a list of the available country languages. Select the preferred
country language using
/
. Press ENTER to confirm selection.
N o te
B ef o re t h e co unt ry lang uag e i s set , a h i nt ap p ears req uest i ng w h et h er t h e
uni t s, d at e and t i m e f o rm at sh o uld also b e ch ang ed t o m at ch t h e d ef ault
lang uag e va lues. Use
/
to select action required and confirm by
p ressi ng ENTER .
2 9
830
Users Manual
Highlighting ‘Time zone’ using
/
and confirming selection by pressing
ENTER
displays the different time zones. The required zone is selected using
/
and confirmed by pressing ENTER .
When a time zone is initially highlighted, a hint appears displaying major world
cities within the selected time zone. Note that changing the time zone automatically alters the time set.
Current date and time are set by highlighting the respective option using
and confirming selection by pressing ENTER .
N o te
T h e d at e f o rm at d i sp laye d h ere i s set iv a t h e o p t i o n ‘ D at e/ T i m e f o rm at ’ .
Use / to navigate through the date (day, month or year – dependent on
format). Use
/
to set the highlighted date component. Use
to
advance date and
to reverse date.
3 0
/
C o n fig u r a tio n a n d d a ta m a n a g e m e n t
R eg i o nal set t i ng s
Alternatively, use the data entry keys to set the date. With the required date
component highlighted, enter the new date component using the data entry keys.
On pressing the first key, the editing box appears.
Enter value then confirm entry using either
BACK
or
ENTER
.
N o te
T h e t i m e f o rm at d i sp laye d h ere i s set vi a t h e o p t i o n ‘ D at e/ T i m e f o rm at ’ .
/
to set the
Use / to toggle between hours and minutes. Use
highlighted time component. Use
to advance time and
to reverse
time.
Alternatively, use the data entry keys to set the time. With the required time
component highlighted, enter the new time component using the data entry keys.
On pressing the first key, the editing box appears. Enter value then confirm entry
using either BACK or ENTER .
3 1
830
Users Manual
Pressing ENTER with ‘Date/time format’ highlighted reveals a menu box with the
items ‘Date format’ and ‘Time format’. Use
/
to select either item,
confirming selection by pressing ENTER .
The time format is used to set either the 12h or 24h notation. The selected
notation is confirmed by pressing ENTER .
The date format is used to set dd-mm-yyyy or mm/dd/yyyy format.
3 2
C o n fig u r a tio n a n d d a ta m a n a g e m e n t
D ef ault set t i ng s
Default settings
To open the “Default settings” screen, use the navigation keys and highlight the
‘Default settings’ icon while in the configuration menu, then confirm selection by
pressing ENTER . The screen is used to set specific default parameters. Use
/
to cycle through the parameters. The default changes are effective upon
restart or if a new file is created.
● Default RPM – used to set the required default rpm. Highlight ‘Default RPM’
then use the data entry keys to enter the required default rpm. Confirm entry
by pressing ENTER / BACK .
● Reference diameter – used to set the required reference diameter. Highlight
‘Ref. diameter’ then use the data entry keys to enter the required reference
diameter. Confirm entry by pressing ENTER / BACK . Every new alignment file
started will then automatically be preconfigured with this RPM value already
entered. Every new alignment file started will then automatically be configured
with this coupling diameter value already entered.
3 3
830
Users Manual
● Tolerance table – the available options are 50 Hz and 60 Hz. The mains
supply frequency determines the standard RPM values that appear in the
tolerance table. Tolerance values based on these frequencies may be read off
the suggested tolerance table.
● Default mode – used to set the default measurement mode. Two
measurement modes are available, ‘Compass’ mode (for horizontal machines)
and ‘Clock’ mode (for vertical machines). In ‘Compass’ mode, measurement
points are taken at any three of the eight measurement sectors available.
In the ‘Clock’ mode measurements are taken at any three of the eight clock
positions ( 12:00, 1:30, 3:00, 4:30 6:00, 7:30, 9:00 and 10:30).
Printer configuration
This option is used to set up printers and the printing configuration within the
Product.
Four printing options can be set using “Printer configuration”.
“Type” – Selecting “Type” and then pressing ENTER displays a list with all
supported printers.
“Paper” – Used to select the required paper size
“Orientation” – Used to set the paper orientation. Select “Portrait” for a vertical
layout and “Landscape” for a horizontal layout.
“Color mode” – Used to set the color mode in which the measurement report
is to be printed. This can either be in full color or in grayscale.
3 4
C o n fig u r a tio n a n d d a ta m a n a g e m e n t
A b o ut ap p li c at i o n
About application
The information contained under this section is accessed by highlighting the
‘About’ icon while in the configuration menu screen. Confirm selection by
pressing ENTER . The displayed information depicts the current status of the device
and application.
Data management
The Product possesses an effective file and data management facility. To access
the file and data management options, press MENU then use the navigation keys
to highlight the ‘File’ icon.
Press
ENTER
to confirm selection. The “File menu” screen appears.
3 5
830
Users Manual
Use / to highlight any one of the four file and data management options.
These are ‘Files list’, ‘Save file’, ‘Resume’ (or ‘New file’) and ‘Print report’.
N o te
Note that the file menu items ‘Resume’ and ‘New file’ appear depending on the
selected file resume policy which is set under the configuration item ‘Device
set t i ng s’ . I f ‘ R esum e m anually’ i s t h e set p o li cy , t h en ‘ R esum e’ ap p ears o nly
when a file is opened and has not been saved. If ‘Always resume’ is the set
policy, ‘Resume’ appears when a file has been saved.
‘Files list’ – This option is used to load any stored file. Highlight ‘Files list’ using
/ then press ENTER to confirm selection. The Open file screen appears
displaying all the files saved.
By default, the files are listed in order of date and time of creation. This listing
order is not user-editable.
Use
/
to highlight file to be opened then press ENTER to open the file.
3 6
C o n fig u r a tio n a n d d a ta m a n a g e m e n t
D at a m anag em ent
N o te
An existing file may be deleted by highlighting it using
/
t h en p ressi ng CLEAR . W h en a h i nt scr een ap p ears, use
/
t o h i g h li g h t ‘ Y es’ . T h e
file is deleted by pressing ENTER to confirm deletion.
To rename an existing file, use
/
to highlight the file, then use the
data entry keys to edit file name and confirm changes by pressing ENTER .
‘Save file’ – This option is used to save the current file. If the file is new and does
not yet have a name, use the data entry keys to enter the new file name in the
editing box that appears.
N o te
W h en ent eri ng nam es t h at co nt ai n b o t h up p er and lo w er ca se ch aract ers as
w ell as num erals, use ./ * t o cyl
e t h ro ug h t h e t h ree o p t i o ns. P ress and h o ld
d o w n ./ * w h i le o b servi ng t h e st at us i nd i ca t o r at t h e t o p ri g h t co rner o f t h e ed i t i ng b o x. T h i s d i sp lays t h e t yp e o f ch aract er t o b e ent ered . E m p t y sp ace s are
ent ered b y p ressi ng 0 .
Press ENTER to confirm file name.
When saving an already existing file, the editing box appears with the existing
name highlighted. Confirm saving by pressing ENTER .
N o te
The Product stores up to 200 measurement files.
‘New file’ – This option is used to create a new measurement file.
‘Resume’ – This option toggles with ‘New file’ and is used to call up the last file
loaded before the instrument was switched off, depending on the resume policy
set.
3 7
830
Users Manual
‘Print report’ – This option is used to print the measurement report or the soft foot
measurement report.
The following report options are available:
● Complete report – this option prints a complete report that includes machine
graphics and measurement results in both numerical and graphical format.
● Text report – this option generates reports in text format only.
● Graphical report – reports printed using this option display only graphical
representation.
3 8
G e ttin g s ta r te d
S et - up
6. Getting started
Set up the product
1. Prepare the machines by making certain that they are locked out, tagged out
and all necessary safety precautions have been taken.
2. Mount brackets, wireless module, sensor and prism. The sensor connected
to the wireless module should be mounted to the left machine (usually
stationary).
3. Switch the product on by pressing
and holding down briefly. The right LED
lights up followed by a beep. Shortly afterwards, the “Setup” screen appears.
Enter dimensions
Sensor
Prism
Left
machine
(stationary)
Right machine
movable
830
LAS
ER ALI
GNM
ENT
TOO
L
MEN
DIAG
MEA
SE
TU
P
SU
Product FLUKE 830
U
SE
F
C
JK
6
5
WX
ST
4
EN
O
L
I
PQ
3
MN
2
1
GH
NO
RE
DE
AB
EA
TE
R
R
BA
9
8
spa
7
CL
YZ
U
RS
CK
/
. .
ce
0
-+
Figure 6-1. Mounting components across the coupling
3 9
830
Users Manual
Use the data entry keys to directly enter all required dimensions.
The editing box and a hint text for the dimension to be entered or edited appears.
Use the data entry keys to enter this dimension then press ENTER to confirm entry.
The dimension arrows advance automatically to the next required dimension,
and the corresponding hint text appears. Repeat the procedure until all required
dimensions have been entered.
N o te
T h e g reen b ar sca le at t h e t o p o f t h e scr een i nd i ca t es an i ncr em ent al p ro g ressi o n o f cu rrent act i vi t y – i n t h e ab o e
v ca se, ent eri ng m ach i ne d i m ensi o ns.
Dimensions to be entered include:
1. Sensor to prism
2. Sensor to center of coupling
3. Coupling diameter (default is 100 mm / 10”)
4. RPM
5. Center of coupling to front foot (right machine)
6. Front foot to back foot (right machine)
After the last required dimension has been entered, the measurement screen
appears.
The dimension screen can always be accessed by pressing SETUP .
4 0
G e ttin g s ta r te d
W i reless m easurem ent
Wireless measurement
T h em
th ism
‘C o m
h o ri zo
N o te
easurem ent m o d e t h at w i ll b e d escr i b ed h ere i s ‘ C o m p ass’ m o d e. I n
o d e, m easurem ent p o i nt s are t ake n at any 3 o f t h e 8 ava i lab le sect o rs.
p ass’ m o d e and ‘ C lo ck’ m o d es are t h e d ef ault m easurem ent m o d es f o r
nt al and ve rt i ca l m ach i nes resp ect i ve ly .
Switch the wireless module on using its little silver toggle switch. This will power
the sensor and initialize the laser beam. Center the laser dot on the prism dust
cap (see Figure 6-2).
Figure 6-2. Laser dot centered on prism dust cap
Do not stare into beam.
W arning
4 1
830
Users Manual
Press
icon.
MENU
then use the navigation keys and highlight the ‘Measure options’
Confirm selection by pressing
appears.
ENTER
. The “Measurement options” screen
Use the navigation keys and highlight the ‘Sensor selection’ icon, then confirm
selection by pressing ENTER .
4 2
G e ttin g s ta r te d
W i reless m easurem ent
Use
/
and highlight ‘Scan’ then press
modules within the neighbourhood.
ENTER
to scan any wireless
N o te
Make sure t h e w i reless m o d ule i s sw i t ch ed o n.
Once detected, the wireless module is selected automatically.
Adjust bracket if necessary to center beam horizontally onto the prism. Tighten
bracket. Slide the prism on the support posts to center beam vertically onto the
prism dust cap. When centered, remove the prism dust cap.
Use the yellow knob to make horizontal adjustments of the reflected laser beam,
and the thumbwheel to make vertical adjustments to position the dot at the center
of the target square or as near the center as possible.
4 3
830
Users Manual
Figure 6-3. Centering the reflected laser beam using the thumbwheel and
the yellow beam adjustment knob
N o te
W h en m aki ng t h e ab o ve ad j ust m ent s, o b serve t h e p ro d uct ’ s ali g nm ent co nd i t i o n L E D and t h e d o t o n t h e d i sp lay scr een. W h en t h e L E D t urns ye llo w , t h i s
is an indication that the reflected beam position is OK and measurement can
p ro ce ed . W h en t h e L E D t urns g reen, t h e d o t i s ce nt ered i n t h e t arg et sq uare.
After centering the laser dot, rotate shaft to the first measurement position.
Measurement can only be taken when the sector in which the shaft has been
positioned is highlighted green. Press ENTER to take the measurement point.
The sector is then highlighted orange, an indication that measurement has been
taken in that particular sector.
4 4
G e ttin g s ta r te d
D i ag no se
N o te
A lw ays t urn sh af t s i n t h e no rm al ro t at i o n d i rect i o n o f t h e m ach
i nes.
Rotate shaft to next measurement position and take point. Readings from any 3
of the 8 available positions (taken in any order) are required for results, which are
initiated automatically after the set measurement points have been taken.
D iagnose
Alignment results with both coupling and feet results are displayed automatically.
Coupling and feet results are displayed in both vertical and horizontal planes.
Coupling results are given in the form of gap and offset. With stationary machine
on the viewer’s left, gap is positive when open at the top or side away from
viewer. Offset is positive when the right coupling half is higher or further away
from viewer.
4 5
830
Users Manual
The foot results show the foot correction values relative to the stationary
machine. In foot results positive values indicate that right machine is downwards
(therefore add shims for correction) or towards viewer (therefore move away
from viewer for correction). Negative values indicate that movable machine
is upwards (therefore remove shims for correction) or away from the viewer
(therefore move towards viewer for correction). The alignment tolerance status
can be displayed using the tolerances feature.
N o te
T o lerance b ar i s 4 - leve l sca le o n scr een o f P ro d uct .
A li g nm ent co nd i t i o n L E D i s b elo w scr een.
Tolerance bar is green (alignment condition LED lights up
830
LASER ALIGNMENT TOOL
green) – values within excellent tolerances
SETUP
1
Tolerance bar is yellow (alignment condition LED lights up
yellow) – values in acceptable tolerances
Tolerance bar is either orange or red (alignment condition
LED lights up orange or red) – values out of tolerance
4 6
GHI
4
PQRS
7
DIAGNOSE
MEASURE
ABC
2
JKL
3
6
WXYZ
8
0
MENU
DEF
MNO
5
TUV
9
space
+
/
CLEAR
ENTER
. .
BACK
H o r iz o n ta l s h a ft a lig n m e n t
J o b p rep arat i o n
7. Horizontal machine alignment
Preparing for the alignment procedure
Before using the Product, prepare the machine for alignment as described below.
W arning
Make sure machines are locked out and tagged out and cannot be
started accidentally or deliberately while you are working on them!
Solid, flat foundation
A solid, rigid foundation is required to obtain correct, lasting shaft alignment that
allows long-term uninterrupted machine service.
Machine mobility
If the machine to be moved stands directly on the foundations, it cannot be
lowered for alignment correction. It is therefore advisable to start with about
2 mm (50 mils) of shims beneath the feet of both machines. Hydraulic or
screw-type positioning aids are recommended for horizontal movement.
Rigid couplings
Rigid couplings must be loosened before measurement so that they do not distort
the alignment condition.
Shaft play and coupling backlash
Axial shaft play of up to 3 mm (1/8”) has no adverse effect on the machine
diagnosis (but not necessarily for machine operation).
Turning the shaft or coupling end where the prism is mounted, engages the
mating parts of the coupling hence reducing the effects of coupling backlash. The
sensor measurement principle is also less susceptible to coupling backlash.
S oft foot
Soft foot causes the machine frame distortion every time the anchor bolts are
tightened, making proper alignment difficult or impossible.
Tolerances, thermal growth, alignment targets
These values can be obtained from the individual machine specifications, and
used to specify a position on a shaft centerline and the alignment condition at
that position. If a machine set is aligned ‘cold’, the growth factor at operation
must be considered. A misalignment value must be introduced when performing
cold alignment.
4 7
830
Users Manual
Measurement separation
Since the Product requires no mechanical connections (such as cantilevered dial
indicator brackets) to span over the coupling during measurement, alignment
may easily be performed over large sensor–prism separations.
Note that over very large distances the shafts and coupling may sag, and the
machines may need to be deliberately misaligned to take the catenary curve into
account, if such sag does not disappear when machines are put into operation.
Refer to the machine manufacturer’s specifications.
Check for soft foot
Refer to section on soft foot on page 91.
Mount the brackets
Mount the brackets on either side of the machine coupling, and both at the same
angular position.
Please note the following in order to obtain the highest possible measurement
accuracy and to avoid damage to equipment:
Caution
Ensure that the brackets fit solidly onto their mounting surfaces!
Do not use self-constructed mounting brackets, or modify the supplied
original bracket configuration (for example, do not use support posts
longer than those supplied).
Bracket mounting procedure
To fit the compact bracket chains, refer to the diagrams shown on the next page
and follow the instructions carefully.
1. Choose the shortest support posts which will still allow the laser beam to pass
over the coupling flange. Insert the support posts into the bracket.
N o te
I n so m e ca ses, i f t h e co up li ng i s larg e eno ug h , a c o up li ng b o lt ca n b e rem o ve d
and t h e laser b eam sh o t t h ro ug h t h e b o lt h o le, i n o rd er t o avo i d p ro t rud i ng
radially beyond the coupling’s outer diameter (OD).
4 8
H o r iz o n ta l s h a ft a lig n m e n t
Mo unt b rac k et s
2. Fasten the support posts in place by tightening the hex screws on the sides of
the bracket frame.
3. Place the bracket on the shaft or coupling. Wrap the chain around the shaft
and feed it through the other side of the bracket: If the shaft is smaller than
the width of the bracket frame, insert the chain from the inside of the bracket
as shown in Figure 7-1; if the shaft is larger than the bracket width, insert the
chain into the frame from the outside.
4. Catch the chain loosely on the anchor peg.
5. Turn the bracket thumbnut to tighten the assembly onto the shaft.
6. Clip the loose end of the chain back onto itself.
Anchor peg
1
3
4
5
2
6
Figure 7-1. Mounting the bracket step-by-step
The bracket should now be tight on the shaft. Do not push or pull on the bracket
to check, since this could loosen its mounting.
To remove the brackets, loosen the thumbnut, then remove the chain from its
anchor peg.
T h e co m p act ch ai n- t yp e b racke t s co
sp eci al ca ses, t h e o p t i o nal co m p act
N o te
ve r m o st si t uat i o ns, b ut i n cr am p ed o r
m ag net i c b racke t m ay b e usef ul.
4 9
830
Users Manual
Mount wireless module, sensor and prism
1. Mount the wireless module on the support posts of the bracket fixed on the
shaft of the left machine (usually stationary machine) – as viewed from
normal working position. The module fastens on the support posts. It is
recommended to slide the wireless module all the way down onto the bracket
frame (see Figure 7-2).
2. Mount the sensor on the same support posts as the wireless module. Ensure
that its yellow knobs are loosened enough to allow the sensor slide onto the
support posts. Lower the sensor as close to the wireless module as possible
(refer to Figure 7-2).
3. Clamp the sensor onto the support posts by tightening the yellow knobs.
4. Connect the sensor to the wireless module using the wireless module cable
(see Figure 7-2).
5. Mount the prism on the support posts of the bracket fixed on the shaft of the
right machine (usually movable machine) – as viewed from normal working
position.
N o te
T h e ye llo w kn o b o n t h e f ro nt o f t h e p ri sm allo w s yo u t o ad j ust t h e h o ri zo nt al
angle of the reflected laser beam. Before you mount the prism make sure that
t h i s kn o b i s ce nt ered t o allo w f o r m axi m um ad j ust m ent rang e lat er o n. T h e
bottom of the knob should be flush with the arrow on the prism housing (refer
t o F i g ure 7 - 3 ) .
6. Flip up the yellow quick-release lever on the side of the prism housing, then
slide the prism onto the right-hand bracket posts. Return the lever to its
horizontal position to secure the prism on the posts (see Figure 7-3).
Both sensor and prism should be at the same height, as low as possible, yet just
high enough for the beam to clear the coupling flange. They should also visually
appear to be rotationally aligned to each other.
Make the final adjustments, loosening the brackets slightly if necessary, then
rotating them and re-tightening.
5 0
H o r iz o n ta l s h a ft a lig n m e n t
Mo unt w i reless m o d ule, senso r and p ri sm
The wireless module slides
Fasten the sensor onto the
onto the support posts and
support posts by tightening
is held in place by friction
the yellow knobs
fit.
The 90-degree sensor
cable connector is
attached to the wireless
module
Figure 7-2. Mounting wireless module and sensor
Lever
Figure 7-3. Mounting and fastening prism
5 1
830
Users Manual
Arrow
Match the height of the
yellow knob approximately
to the tip of the arrow
Figure 7-4. Centering prism knob for maximum adjustment
Proceed to ‘Switch Product on and start application’ on page 47.
If using the sensor cable for data transmission, see ‘Connect the sensor’ below.
Connect the sensor
N o te
Measurem ent d at a m ay also b e t ransm i t t ed f ro m t h e senso r t o t h e P ro d uct
vi a ca b le. I f usi ng ca b le and no t t h e w i reless m o d ule t o t ransm i t m easurem ent
d at a, t h en i nsert t h e st rai g h t - end ed p lug o f t h e senso r ca b le i nt o t h e P ro d uct ’ s
b lue senso r p o rt ( see F i g ure 7 - 5 ) .
Caution
Match the direction arrows on the plug to the white arrow on the blue
port to ensure proper plug orientation; otherwise the pins inside the plug
may be damaged.
N o te
I nst ruct i o ns o n h o w t o rep lace t h e w i reless m o d ule ca b le w i t h t h e senso r ca b le
are i n t h e ‘ A p p end i x’ .
5 2
H o r iz o n ta l s h a ft a lig n m e n t
S t art ap p li c at i o n
830
LASE
R AL
IGNM
ENT
MEN
DIA
MEA
SETU
P
AB
PQ
7
sp
ace
F
3
9
8
U
OSE
O
6
WXY
V
TU
RS
DE
MN
L
5
JK
I
4
GN
RE
C
2
1
GH
SU
TOOL
Z
EN
CLEA
TE
R
R
BA
CK
. .
/
0
+
Figure 7-5. Inserting sensor cable into the alignment tool
Disconnecting the sensor cable
To disconnect, grasp the ribbed collar of the sensor plug and carefully pull it out
of the computer sensor port.
Switch Product on and start application
Press
and hold down for a few seconds. The Product’s right LED lights up
followed by a beep. Shortly afterwards, the “Setup” screen appears.
5 3
830
Users Manual
Enter machine dimensions
Machine dimensions are entered using the grey data entry keys.
An editing box and a hint text for the dimension to be entered or edited appear
on the dimensions screen. The required missing dimensions are entered directly
using the data entry keys.
Confirm the entered value by pressing ENTER . The dimension arrows advances
automatically to the next required dimension.
5 4
H o r iz o n ta l s h a ft a lig n m e n t
E nt er d i m ensi o ns
Enter dimensions as shown in Figure 7-6:
1
2
3
4
5
Figure 7-6. Machine dimensions to be entered
Sensor to prism
1
This is the distance between the markings on top of the sensor and the prism
(refer to Figure 7-7). The dimension is determined by measuring the distance
between the center of the prism and the sensor support posts.
Distance marking
Figure 7-7. Distance marking on the sensor and prism
5 5
830
Users Manual
Sensor to coupling center
2
This is the distance between the marking on top of the sensor and the coupling
center.
This dimension is calculated automatically as half the entered sensor to prism
distance. The value may be edited directly in the editing box that appears and
value confirmed by pressing ENTER .
Coupling diameter
3
The coupling diameter can be obtained by measuring the circumference of the
coupling and dividing the value by 3.142 (π).
The default value is 100 mm (10” if set to US imperial customary units). Should
there be need to edit the value, use the data entry keys to enter value in the
editing box that appears, then confirm entry by pressing ENTER . The dimension
arrows advance to the next required distance automatically.
RPM (revolutions per minute)
The default value is 1500 (1800 if set to US imperial customary units). Should
there be need to edit the value, use the data entry keys to enter value in the
editing box that appears, then confirm entry by pressing ENTER . The dimension
arrows advance to the next required distance automatically.
Coupling center to front foot, right machine
4
Front foot to back foot, right machine
5
This is the distance from the center of the coupling to the pair of feet on the right
machine nearest to the coupling.
This is the distance between the front and back feet of the right machine.
5 6
H o r iz o n ta l s h a ft a lig n m e n t
E nt eri ng neg at i v e d i m ensi o ns
Entering negative dimensions
In certain circumstances or unusual machine configurations, negative dimensions
may also be entered where needed, such as coupling center to front foot (right
machine) when this foot is behind the coupling center, or sensor to coupling
center if the sensor is mounted on the coupling such that the sensor distance
marking is in front of the coupling as shown in Figure 7-8. In the configuration,
the dimension sensor to coupling center has a negative value.
Figure 7-8. Distance marking on the sensor
5 7
830
Users Manual
Machine set-up
Machine properties may be set via the menu items ‘Left machine’ or ‘Right
machine’. The menu screen is accessed by pressing MENU .
Use the navigation keys and highlight either ‘Left machine’ or ‘Right machine’
icon. Pressing ENTER with the left or right machine icon highlighted, reveals the
machine properties that may be edited.
Machine properties
With ‘Left machine’ icon in the “Menu” screen highlighted, pressing
the machine parameters that can be edited.
I n t h e f o llo w i ng exa m p le, t h e lef t m ach
ENTER
reveals
N o te
i ne i s i ni t i ally d esi g nat ed st at i o nary .
Machines may be designated either stationary or movable or the flange position
can be defined.
5 8
H o r iz o n ta l s h a ft a lig n m e n t
C o up li ng t o leranc e t ab le
Use / to highlight machine parameter to be changed and confirm selection by
pressing ENTER .
Coupling tolerance table
With ‘Coupling Tol.’ icon highlighted, pressing
tolerance table.
ENTER
reveals the coupling
The highlighted RPM is the value entered in the “Set-up” screen. A different RPM
value may be set from the “Tolerance table” screen. Use the navigation keys and
highlight the desired machine RPM value, then press ENTER . A hint requesting
confirmation of RPM change appears on the display.
5 9
830
Users Manual
Use
/
and highlight ‘Yes’ then confirm selection by pressing ENTER .
The new RPM value overrides the value initially entered during set-up. Coupling
tolerances will now be based on this accepted RPM value.
Laser beam adjustment
After entering all required dimensions, the measurement screen appears automatically.
Switch the wireless module on using the little silver toggle switch found in the
back on the right side. The battery status LEDs blink for three seconds. The
module is now ready for operation. It activates the laser, if the wireless module is
connected to the sensor.
If using the RS232 interface, the laser is activated when the straight-ended plug
of the sensor cable is inserted into the Product’s blue sensor port.
The sensor and prism need to be adjusted so that the laser beam strikes the
prism and is reflected back into the sensor.
6 0
H o r iz o n ta l s h a ft a lig n m e n t
L aser b eam
ad j ust m ent
Remove sensor cap
Do not stare into beam.
W arning
The laser beam is now on! Leave the prism cap on. When the beam strikes the
cap it should be readily visible. Should the beam be so far off target that it misses
the prism completely, hold a sheet of paper in front of the prism to try and locate
the beam.
Adjust beam onto prism cap
With the prism dust cap still in place, adjust the beam onto the center of the
target (refer to Figure 6-2):
● To adjust vertically slide the prism and/or sensor up and down along the
support posts. Use the thumbwheel on the side of the prism housing. To move
the sensor, loosen the yellow knobs.
● To adjust horizontally you will have to loosen one of the brackets on the shaft
and rotate it slightly. Retighten.
Remove prism cap and establish communication between the
sensor and the Product
The Product collects measurement data using either the wireless module or via
the sensor interface.
Remove the prism dust cap to allow the beam to strike the prism and be reflected
back to the sensor, and then press MENU . The “Main menu” window opens. Use
the navigation keys and highlight the icon ‘Measure options’.
Press ENTER to confirm selection. The “Measurement options” window opens. Use
the navigation keys and highlight the icon ‘Sensor selection’.
6 1
830
Users Manual
Confirm selection by pressing
ENTER
. The selection window appears.
Use either
or
and highlight ‘Scan’ then press ENTER to scan wireless
modules within the neighbourhood. Once detected, the module is automatically
connected and communication established between the sensor and the Product.
If using the sensor interface, use either
or
and highlight “Port 1
(RS232)”. Press ENTER to confirm selection, and proceed with laser beam adjustment.
6 2
H o r iz o n ta l s h a ft a lig n m e n t
W i reless c o m m uni c at i o n
N o te
T h e seri al num b er o f t h e w i reless m o d ule i n use i s d i sp laye d o n t h e scr een
d uri ng m easurem ent .
Now proceed with laser beam adjustment.
All detected wireless modules are remembered by the Product, and are displayed
when ‘Sensor selection’ is selected.
In this case, the desired wireless module is highlighted using either
then pressing ENTER to confirm selection.
or
6 3
830
Users Manual
It may be necessary to delete some of these entries as they could no longer be
in use. To delete unwanted entries, access the ‘Sensor selection’ menu. Use the
navigation keys to highlight the wireless module to be deleted and press CLEAR .
Wireless modules deleted are remembered if detected during scanning.
6 4
H o r iz o n ta l s h a ft a lig n m e n t
L aser b eam
ad j ust m ent
Adjust prism until ONLY the GREEN sensor LED lights constantly,
the Product’s right LED turns blue
The sensor has a red and a green LED to indicate the beam adjustment
condition. This condition is simultaneously monitored on the Product’s alignment
condition LED (right LED).
N o te
Make sure t h at t h e p ri sm and senso r lens are cl ean. Use a so f t li nt - f ree cl o t h .
A lens cl eani ng lc o t h i s sup p li ed .
When the reflected beam fails to strike the detector surface, the Product’s right
LED turns red while the red sensor LED blinks quickly (0.3 s). The message ‘Laser
OFF’ appears on the display screen. Adjust the reflected beam using the prism
metal thumbwheel and the yellow adjustment knob on the prism as shown on
Figure 7-9. As the reflected beam strikes the edge of the detector, the Product’s
right LED turns orange with the red sensor LED still blinking quickly. The
message ‘Laser End’ appears on the display screen.
Vertical adjustment using
Horizontal adjustment
the metal thumbwheel
using the yellow
adjustment knob
Figure 7-9. Horizontal and vertical adjustment of the laser beam
6 5
830
Users Manual
Center beam such that the Product’s right LED turns blue
Adjust the laser beam such that the laser dot on the display screen is positioned
in the green square in the center of the detector display.
● Horizontal adjustment with yellow prism knob
● Vertical adjustment with the side metal thumbwheel.
The Product’s right LED turns blue.
RED sensor LED blinks quickly while GREEN is OFF and
Product’s RIGHT LED turns RED
Both sensor LEDs blink quickly and alternately, and the
Products RIGHT LED turns ORANGE
6 6
H o r iz o n ta l s h a ft a lig n m e n t
L aser b eam
ad j ust m ent
GREEN sensor LED blinks slowly and the Product’s RIGHT
LED turns GREEN
N o te
T h e red arro w o n t h e ye llo w kn o b assi st s t h e user b y i nd i ca t i ng w h i ch w ay t h e
k o b sh o uld b e t urned . T h e cl o ser t h e b eam oc m es t o b ei ng ce nt ered , t h e
n
sm aller t h i s arro w b eco m es
W h en t h e laser b eam i s i nsi d e t h e ce nt er sq uare, t h e G R E E N senso r L E D
li g h t s co nst ant ly .
830
SETUP
1
GHI
4
PQRS
7
LASER ALIGNMENT TOOL
DIAGNOSE
MEASURE
ABC
2
JKL
3
6
WXYZ
8
0
MENU
DEF
MNO
5
TUV
9
space
+
/
CLEAR
ENTER
. .
BACK
The RIGHT LED turns
BLUE
N o te
T h e b eam d o es no t h ave t o b e exa ct ly at t h e ce nt er o f t h e cr o ssh ai r, as t h i s
w i ll no t af f ect m easurem ent acu
c
racy . H o w eve r, m axi m um rang e f o r m easurem ent i s ava i lab le w h en t h e b eam i s w ell e
c nt ered .
N o te
Once centered, the sensor and prism must not be touched, as any movement
d uri ng m easurem ent w i ll b e i nt erp ret ed as m i sali g nm ent . T h ese co m p o nent s
m ay h o w eve r b e m o ve d w h en ext end i ng t h e m easurem ent rang e.
6 7
830
Users Manual
Take measurements
It is important to note which measurement mode is best suited for a particular
application. The table below gives a guide as to which measurement mode is
ideal for which measurement.
Table 7-1. Measurement mode and relevant applications
Measurement mode
Application
Compass mode
Horizontal machines (standard, uncoupled
shafts, nonrotatable shafts)
Clock mode
Vertical machines (four feet
or flange-mounted)
When the laser beam is centered such that the dot on the display screen is at the
center of the crosshair, the Product’s right LED turns blue.
830
SETUP
1
GHI
4
PQRS
7
LASER ALIGNMENT TOOL
DIAGNOSE
MEASURE
ABC
2
JKL
3
6
WXYZ
8
N o te
C o m p ass m o d e i s t h e d ef ault m easurem ent m o d e f o r h o ri zo nt al m ach i nes. I n
t h i s m o d e, m easurem ent p o i nt s are t ake n at any t h ree o f t h e ei g h t ava i lab le
sect o rs.
N o te
C lo kc m easurem ent m o d e w h i ch i s t h e d ef ault f o r ve rt i ca l m ach i nes, i s d escr i b ed i n ch ap t er 9 ‘ V ert i ca l sh af t ali g nm ent ’ st art i ng o n p ag e 1 0 7 .
N o te
I f co up li ng t o rsi o n p lay ( b ackl ash ) i s susp ect ed , t urn t h e sh af t o r co up li ng
end w h ere t h e p ri sm i s m o unt ed . E nsure sh af t i s t urned i n t h e no rm al ro t at i o n
d i rect i o n o f t h e m ach i ne.
6 8
0
MENU
DEF
MNO
5
TUV
9
space
+
/
CLEAR
ENTER
. .
BACK
H o r iz o n ta l s h a ft a lig n m e n t
T urni ng sh af t s
Turning shafts
To measure, rotate shaft to the first measurement position. Measurement
can only be taken when the sector in which the shaft has been positioned is
highlighted green. Press ENTER to take the first measurement point. The sector is
then highlighted orange, an indication that measurement has been taken in that
particular sector.
After taking point, rotate shaft to next measurement sector and repeat the step
above.
If the sensor rotational position is such that the sector is highlighted red,
measurement cannot be taken at this angular position.
N o te
I n C o m p ass m o d e, t h e elect ro ni c i ncl i no m et er i n t h e senso r i s act i ve and aut o m at i ca lly d et erm i nes t h e ro t at i o nal ang le o f t h e sh af t , eli m i nat i ng h um an erro r.
6 9
830
Users Manual
N o te
R em em b er no t t o t o uch m o unt ed co m p o nent s! T h i s i ncl ud es t h e b racke t s and
the support posts, which are NOT to be used to rotate the shafts .
I t i s ad vi sab le t o t urn sh af t s i n t h e sam e d i rect i o n as t h e m ach i ne no rm ally
ro t at es, i n ca se t h e sh af t s sh i f t f ro m t h ei r no rm al seat i ng i n t h e b eari ng s.
Y o u m ay b eg i n m easurem ent b y t urni ng t h e sh af t s eve n i f t h e b eam i s no t
ce nt ered exa ct ly at t h e ce nt er o f t h e cr o ssh ai r.
END or OFF? Extend
If ‘Laser END’ or ‘Laser OFF’ appears on the screen during the turning of the
shafts, the laser has shifted away from the detector due to gross or large misalignment or long beam travel. If this happens, then use the ‘Extend’ function to
expand the measurement range. This function is described on page 102.
D iagnose
The diagnosis is prompted automatically after the set number of measurements
points have been taken.
7 0
H o r iz o n ta l s h a ft a lig n m e n t
D i ag no se
Alignment condition in both vertical and horizontal directions
The coupling diagnosis is given in the form of gap and offset values in both
vertical and horizontal directions. The true gap being the difference in gap
between the coupling faces top to bottom (vertical) or side to side (horizontal) at
the diameter that was entered. Offset is the distance between two centerlines at
the transmission plane of the coupling.
The foot correction values are shimming or move values, and are either positive
or negative. In vertical results, positive foot values indicate raising machine foot
by the displayed value. In horizontal results, positive foot values indicate moving
the machine away from the viewer by the displayed value.
N o te
S ig n c o n v e n tio n
Gap is positive when open at top or side away from viewer. Offset is positive
w h en m ach i ne t o b e m o ve d i s h i g h er o r f urt h er f ro m vi ew er.
P o si t i ve f o o t co rrect i o n va lues i nd i ca t e t h at m o va b le m ach i ne h as t o b e m o ve d
up w ard s ( a d d s h i m s ) o r aw ay f ro m t h e vi ew er.
N eg at i ve f o o t co rrect i o n va lues i nd i ca t e t h at m o va b le m ach i ne h as t o b e
m o ve d d o w nw ard s ( r e m o v e s h i m s ) o r t o w ard s vi ew er.
If all four coupling values are within tolerance, you do not need to align the
machines. If no in-house standards or specifications from the coupling or
machine manufacturer are available, the alignment condition LED and the
tolerance bar provide a tolerance check based on the built in tolerance tables.
If the measured alignment falls within acceptable tolerance, the LED turns
yellow. The LED turns green when the measured alignment falls within excellent
tolerance. The LED turns orange when alignment is out of tolerance. A worsening
of the misalignment results in the LED turning red.
7 1
830
Users Manual
If the coupling diagnosis show that misalignment exceeds the tolerance, then the
machine must be realigned by shimming vertically and repositioning the machine
horizontally.
T olerances
The color-coded tolerance bars on the results screen indicate the degree to
which the measured alignment condition meets specified tolerances. The marking
on the tolerance bar shows the measured alignment condition. This ranges from
excellent tolerance to worse tolerance.
Excellent tolerance
Acceptable tolerance
Out-of-tolerance
Grossly misaligned
Figure 7-10. Tolerance bar
The Product’s alignment condition LED provides additional information on the
tolerance status.
Table 7-2. FLUKE 830 alignment condition LEDs
T olerance
T olerance bar
L ED
color
Excellent tolerance
Green
Acceptable tolerance
Yellow
830
SETUP
1
GHI
4
PQRS
7
LASER ALIGNMENT TOOL
DIAGNOSE
MEASURE
ABC
2
JKL
Out-of-tolerance
Orange
Grossly misaligned
Red
7 2
+
3
6
WXYZ
8
9
0
MENU
DEF
MNO
5
TUV
space
/
CLEAR
ENTER
. .
BACK
H o r iz o n ta l s h a ft a lig n m e n t
A li g ni ng m ac h i ne
T olerance table
N o te
S ug g est ed ali g nm ent t o lerance s are b ased up o n exp eri ence and sh o uld no t
b e exce ed ed . T h ey are t o b e used o nly i f exi st i ng i n- h o use st and ard s o r t h e
m anuf act urer o f t h e m ach i ne o r co up li ng p rescr i b e no o t h er va lues.
The tolerance table is accessed as described under ‘Coupling tolerance table’
on page 59 and is valid for standard equipment running between 600 – 7200
RPM.
Align machine
N o te
I f m easured m ach i ne ali g nm ent i s i n t o lerance ( t h e m arki ng o n t h e co lo rco d ed t o lerance b ar i s o n ei t h er t h e g reen o r ye llo w sect i o n, and t h e P ro d uct ’ s
alignment condition LED lights green or yellow respectively), there is NO need
t o ali g n t h e m ach i nes. I f t h e ali g nm ent i s o ut o f t o lerance , m ach i nes m ay b e
ali g ned b y p ro ce ed i ng as d escr i b ed b elo w .
To align your machine you need to move it vertically by shimming the feet, and
horizontally by shifting it sideways.
Shim first
N o te
It is recommended to perform vertical corrections first, since the horizontal
co nd i t i o n i s easi ly af f ect ed b y t h e p ro ce ss o f lo o seni ng anch o r b o lt s and
i nsert i ng / rem o vi ng sh i m s, w h ereas t h e ve rt i ca l co nd i t i o n i s less p ro ne t o b ei ng
af f ect ed w h en p erf o rm i ng h o ri zo nt al m o ve s. Y o u m ay need t o rech eck so f t f o o t
b ef o re p ro ce ed i ng .
P reparation
To shim the machine successfully, ensure the following:
1. The foot bolts are clean, intact and removable.
2. Soft foot has been eliminated. (Refer to page 91.)
3. The feet have enough shims under them should lowering the machine be
necessary.
4. Good quality shims are recommended.
7 3
830
Users Manual
L oosen bolts
Avoid moving the machine horizontally. If any foot comes off the ground when
loosened, suspect soft foot.
Shim feet accordingly
Shimming usually involves the jacking up of the machine and inserting or
removing shims of known thicknesses. (Some shims have the thicknesses
indelibly etched on them.)
Use the vertical foot correction values to shim BOTH front and back feet as
required. Negative feet correction values indicate that the respective machine
feet are high and therefore shims should be removed, while positive foot
correction values suggest addition of shims.
N o te
V ert i ca l sh i m m i ng ca n also b e ca rri ed o ut usi ng li ve ve rt i ca l Mo ve .
Retighten bolts
The machine should now have good vertical alignment.
Re-measure
Re-measure to verify vertical alignment results and determine the exact
alignment condition.
H orizo ntal liv e M ov e
Horizontal Move is used for the lateral positioning of the machine. This used to
be done with a dial gauge at the machine feet, but with the ‘Move’ function, live
horizontal movement is viewed on the display screen.
7 4
H o r iz o n ta l s h a ft a lig n m e n t
L i v e Mo v e
S tart live horizontal Move
While in results screen, press
ENTER
or
MENU
. The “Main menu” window opens.
Use the navigation keys and highlight the ‘Move’ icon then press ENTER to confirm
selection. The screen used to position the sensor in any of the four appropriate
45° positions appears.
Turn shafts to any 45° position
Rotate the shaft to any 45° position (this could be either the 10:30, 1:30, 4:30 or
7:30 o’clock position as viewed towards sensor).
If the laser beam has been centered, rotating the shaft to an angular position
corresponding to any of the four green sectors prompts the Move direction dialog
window.
7 5
830
Users Manual
Use either
or
to highlight “Horizontal” for horizontal machine movement.
Confirm selection by pressing ENTER . Live Move starts as soon as the direction of
movement has been confirmed.
Loosen bolts and move machine as required
After loosening the anchor bolts, move the machine feet in the direction of the
apex of the yellow triangles, keeping an eye on the marking on the color-coded
tolerance bar. Watch the display screen carefully to ensure that machine end
and direction moved are correct. The marking on the color-coded tolerance bar
and the Product’s right LED also give an indication of the alignment status as the
machine is moved. (Refer to the tolerances table on page 133.)
Caution
Do NOT attempt to move the machine using heavy sledgehammer blows.
This can cause bearing damage, and also produce inaccurate Move results. Jack bolts on the feet or other mechanical or hydraulic devices are
recommended for moving machines.
7 6
H o r iz o n ta l s h a ft a lig n m e n t
L i v e Mo v e
When the marking on the color-coded tolerance bar is on either the green or
yellow section, the alignment condition is within tolerance. Proceed to tighten the
anchor bolts.
Tighten the anchor bolts
Tighten anchor bolts, then press
condition after Move.
ENTER
or
BACK
to recheck the alignment
If machine moves while tightening correct soft foot first and also check for a
cocked anchor bolt and dished washer, then realign.
Re-measure after Move - machine in tolerance?
Since the machine has been moved, earlier results are no longer valid. With
‘Stop and Measure’ highlighted after Move is completed, press ENTER to confirm
selection. On confirmation, the measurement mode is initialized. If necessary,
center laser beam and take another set of measurements. If the diagnosis is
within required tolerance, then the machines are aligned.
7 7
830
Users Manual
S av ing data and printing
(Refer to page 81.)
F inally
Switch the Product off, and then remove the components from the shafts, and
store them in the case.
W arning
Replace guards before you switch the machine back on.
V ertical liv e M ov e
N o te
As it is recommended to first shim, and then move the machine laterally, the
ve rt i ca l li ve Mo ve f unct i o n m ay b e used t o ca rry o ut t h e sh i m m i ng .
For vertical live Move repeat all steps starting from ‘Start live horizontal Move’ (on
page 75) through to ‘Loosen bolts and move machine as required’ (on page
76) but with reference to the vertical foot corrections. In this case, shimming as
required.
7 8
H o r iz o n ta l s h a ft a lig n m e n t
P o i nt s t o o b serv e d uri ng t h e Mo v e
Points to observe during the Move
Closely observe all the following points:
Have shafts accidentally moved (rotated)?
The shafts, sensor and prism MUST remain steady during the entire Move
procedure.
Should the shaft move from the set 45° green sector while in Move, the angle
selection screen comes up indicating the angle to which the shaft has rotated.
The shafts must be rotated back into the narrow green sector.
N o te
L i ve Mo ve resum es aut o m at i ca lly w h en t h e sh af t s are ro t at ed b ack
sect o r.
i nt o t h i s
END or OFF? The ‘Extend’ function
If END or OFF appears on the screen during machine Move, then the laser beam
has shifted out of detection range due to gross misalignment or long beam travel.
In this case, the measurement range can be extended as described on page
102.
Nearing zero : watch the mark on the color-code tolerance bar and
the Product’s alignment condition LED
Proceed towards zero at both machine ends until the marking lands in the yellow
section of the tolerance bar. As the machine position moves towards zero,
the Product’s right LED changes from red (worse) to orange (bad) to yellow
(acceptable) to green (excellent).
7 9
830
Users Manual
S oft foot
If the machine suffers from excessive soft foot, the Move function may be
hampered by the fact that the machine changes its position on its own every time
the bolts are loosened and tightened. Correct this problem before aligning. (Refer
to page 92.)
I f poor repeatability is experienced
Possible causes include:
● Incorrect or loose bracket mounting
● Significant shaft bearing play or coupling backlash
● Soft foot can cause positioning errors that make repeat measurement
necessary
● Loose anchor bolts
● Yellow knobs on sensor loose, or prism not locked
● Sensor is mounted incorrectly or upside down
● Mounted components moved during shaft rotation
● Temperature changing: machines may have recently shut down
● Uneven shaft rotation
● Vibration
8 0
H o r iz o n ta l s h a ft a lig n m e n t
S av i ng d at a and p ri nt i ng
S av ing data and printing
Before switching off the instrument, dimensions, measurements, diagnosis
and all settings can be saved for analysis, future use or record purposes in the
instrument’s non-volatile memory. Full file names with up to 32 alphanumeric
characters are possible.
N o te
The length of the file name is limited depending on whether upper or lower
ca se let t ers h ave b een used .
T o save a file
The current measurement file can be saved at any time. To save the file, press
MENU
then use the navigation keys to highlight the ‘File’ icon.
Press
ENTER
to confirm selection. The “File menu” screen appears.
8 1
830
Users Manual
Use
ENTER
/ and highlight the “Save file” icon then confirm selection by pressing
. An empty editing box appears within the “Save file” screen.
When entering names that contain both upper and lower case characters as well
as numerals, use ./ * to cycle through the three options. Press and hold down
./
* while observing the status indicator at the top right corner of the editing box.
This displays the type of character to be entered. Empty spaces are entered by
pressing 0 .
Use the data entry keys to enter the file name and confirm entry by pressing
ENTER .
Measurement files may also be saved from the “Diagnose” screen after
measurement has been carried out. With the diagnosis displayed, press either
ENTER
or MENU . From the “Main menu” screen that appears, proceed to save
the measurement file as previously described. If however, the file had been
previously saved, the editing box appears with the file name highlighted within
the box.
8 2
H o r iz o n ta l s h a ft a lig n m e n t
S av i ng d at a and p ri nt i ng
In this particular example, the file “ACME-123” had previously been saved and
therefore the name appears highlighted in the editing box.
Press ENTER to save the measurement results under the displayed file name. A
hint requiring confirmation whether to overwrite the existing file appears.
Overwriting the existing file ensures that the measurement file is saved together
with the latest alignment results.
N o te
It is good practice to always have the current measurement file.
Use
/
to select ‘Yes’ then press
ENTER
to overwrite the existing file.
8 3
830
Users Manual
P rinting reports
Using the default printer type ‘PDF file’, measurement reports may be saved
directly to the connected USB memory stick as a PDF, and then printed from any
configured printer.
Reports can also be printed directly from the Product to a printer. This is done
using the USB cable and the printer USB cable (supplied with the printer or
readily available in most electronics stores).
Measurement reports may be printed in a variety of ways.
To print the current measurement report, press MENU then use the navigation
keys and highlight the ‘Print report’ icon.
Press
ENTER
to confirm selection. The “Print report” screen appears.
As may be seen from the screen header, the selected printer type is the default
– ‘PDF file’. In this case, the report will be saved as a PDF on the approved
memory stick.
8 4
H o r iz o n ta l s h a ft a lig n m e n t
P ri nt i ng rep o rt s
The Product provides the option of printing reports in the following three formats:
● Complete report – this option prints a complete report that includes machine
graphics and measurement results in both numerical and graphical format.
● Text report – this option generates reports in text format only.
● Graphical report – reports printed using this option display only graphical
representation.
Use
/
to highlight the desired format.
The report format selected in the previous example is a complete report. This
includes both graphics and text.
N o te
Before confirming the save action, ensure the ‘short’ USB cable is connected
t o t h e P ro d uct ’ s g rey p o rt , and t h e ap p ro ve d m em o ry st i ck ( aka j um p d ri ve o r
p en d ri ve ) at t ach ed t o t h e ‘ sh o rt ’ ca b le.
BA
CLE
/. .
0
sp
+7
PQ
ac
e
9
WX
8
TU
V
4
JK
L
GH 1
I
6
TU
O
TE
R
ME
3
DE
2
AB
SE
EN
YZ
MN
5
RS
CK
AR
C
ME
F
ASU
DIA
GN
NU
OSE
RE
P
83
0
LA
SER
AL
IGN
ME
NT
TO
OL
Grey USB port
Short USB cable
Figure 7-11. Saving measurement report as PDF on a memory stick
Press
ENTER
to print a report of the selected measurement file.
8 5
830
Users Manual
Configuring printer
If it is desired to print the report directly from the Product, the printer settings
must be set accordingly. This can be carried out from the menu. Press MENU and
use the navigation keys and highlight the ‘Config’ icon.
Press ENTER to confirm selection. The “Configuration menu” screen appears. Use
the navigation keys and highlight the ‘Printer configuration’ icon.
With the ‘Printer configuration’ icon highlighted, press
options that may be configured.
8 6
ENTER
to reveal the printing
H o r iz o n ta l s h a ft a lig n m e n t
A v ai lab le p ri nt i ng o p t i o ns
Av ailable printing options
The “Printer configuration” screen shows the options that can be selected.
Use either
/
to highlight the printer setting to be changed. In the
preceding example, the printer setting selected is printer type, and the currently
set printer type is the default – ‘PDF file’. The available printer types are
displayed by pressing ENTER .
/
to scroll through the available printers. The topmost printer type
Use
(in this case the default printer type – ‘PDF file’ – may be selected by pressing 0 .
Highlight a printer and then press ENTER to confirm selection.
The measurement report may now be printed directly to the desired printer (in
this case ‘HP DeskjetGeneric’). Refer to ‘Printing reports’ previously.
8 7
830
Users Manual
N o te
E nsure t h e P ro d uct i s co nnect ed t o t h e p ri nt er vi a t h e sh o rt US B a
c b le and
t h e p ri nt er US B ca b le ( sup p li ed w i t h t h e p ri nt er o r read i ly ava i lab le i n m o st
electronics stores) and the printer configuration completed.
BA
CLE
/. .
0
sp
+7
PQ
ac
e
9
WX
Y
8
TU
V
JK
4
G
HI
L
SE
6
TU
O
TE
R
ME
3
DE
2
A
1
EN
Z
MN
5
RS
CK
AR
BC
ME
AS
F
DIA
GN
OS
NU
E
UR
E
P
30
LA
SER
AL
IGN
ME
NT
TO
OL
8
Short USB cable
Printer USB cable
Figure 7-12. Printing measurement report from Product directly to desired
printer
8 8
H o r iz o n ta l s h a ft a lig n m e n t
A v ai lab le p ri nt i ng o p t i o ns
N o te
W h en p ri nt i ng a rep o rt d i rect ly t o a p ri nt er, t h e “ P ri nt rep o rt ” scr een p ro vi d es
an option to change to the default printer ‘PDF file’.
The printer setting ‘Paper’ is used to select paper size. With ‘Paper’ highlighted,
press ENTER then use
/
to scroll through the available paper sizes.
Highlight the required paper size and then press ENTER to confirm selection.
The printer setting ‘Orientation’ is used to change the page orientation. With
/
to change the page
‘Orientation’ highlighted, press ENTER then use
orientation between ‘Portrait’ for a vertical layout and ‘Landscape’ for a horizontal
layout. Confirm selection by pressing ENTER .
8 9
830
Users Manual
With the setting ‘Color mode’ highlighted, press ENTER then use
/
to
select the color in which the report will be printed. Selecting ‘Color’ results in full
color reports, while ‘Gray scale’ results in black and white reports.
N o te
Note that with the three printer settings ‘Paper’, ‘Orientation’ and ‘Color mode’, it
i s p o ssi b le t o t o g g le b et w een t h e t w o av ai lab le o p t i o ns usi ng
/ .
F o r ex am p le i f t h e set t i ng ‘ P ap er’ i s h i g h li g h t ed p ressi ng
/ t o g g les b et w een
t h e o p t i o ns ‘ A 4 ’ and ‘ L et t er’ .
9 0
H o r iz o n ta l s h a ft a lig n m e n t
S o ft fo o t
S oft foot
Soft foot is the condition of machine frame distortion. Any cause that results in
machine frame distortion when the machine is anchored to its foundation is a soft
foot. Some of the principal causes are:
●
●
●
●
●
Non-coplanar machine mounting surfaces
Deformed machine frame or feet
External forces e.g. from connecting pipe or bracketry
Improper shimming or soiled machine feet
Too many shims under a machine foot (a maximum of 5 shims should not be
exceeded)
The consequences of forcibly tightening down the feet are deformed machine
frames, bent shafts and distorted bearings. This leads to high vibration and
premature machinery failure.
Soft foot should be checked before aligning the shafts. This can be done quickly
and conveniently with the aid of the Product’s soft foot function. With the sensor
and prism mounted on the shaft in the usual way, the system is able to sense any
machine movement when individual machine bolts are loosened. By entering the
machine dimensions, the Product is able to calculate, from shaft movement, by
how much each foot has moved as it is loosened.
Once foot movements have been established, the results are interpreted and
translated into shim thicknesses to be placed under the feet. How straightforward
this is, depends on the type of soft foot present.
Parallel soft foot
Angular soft foot
Figure 7-13. Parallel and angular soft foot
9 1
830
Users Manual
M ain types of soft foot
The three main types of soft foot are parallel soft foot, angular soft foot, and
induced soft foot.
P arallel soft foot
One or more feet do not reach the foundation. This usually results in the machine
leaving a gap between the foundation and the feet. This is corrected by shimming
the feet not touching the foundation (refer to Figure 7-13).
Angular soft foot
The base of the foot is at an angle to its foundation and they are only partly in
contact. In this case, suspect foot is checked with a feeler gauge and corrected
by building a custom ‘shim wedge’ or machining the underside of the foot (refer to
Figure 7-13).
Induced soft foot
This type of soft foot is caused by forces that are external to the machine. It can
be the result of pipe strain, machine vibrations or drastic misalignment. This type
of soft foot may be eliminated by isolating the external force from the machine.
Checking and correcting soft foot conditions
There are instances where the soft foot is a combination of two or more types.
Checking for soft foot is part of machine and job preparation.
T h e m ach i ne( s) t o
m at ely sq uare f o rm
t h e m i d d le f eet lo o
i s m easured o nly o
N o te
b e ch ecke d i s/ are assum ed t o h ave f o ur f eet i n an ap p ro ix at i o n. I f t h e m ach i ne h as si x f eet , i t i s ad vi sab le t o leave
se and t reat t h e m ach i ne as a f o ur- f o o t ed m ach i ne. S o f t f o o t
n m ach i ne d esi g nat ed as m o va b le.
Set up the product in the normal way as described in “Getting started” (starting
on page 39).
Rotate shafts to position the sensor and prism at either the 3:00 or 9:00 o’clock
position.
Enter machine dimensions then press MENU . Use the navigation keys and
highlight the ‘Soft foot’ icon.
9 2
H o r iz o n ta l s h a ft a lig n m e n t
C h ec k i ng so f t f o o t c o nd i t i o ns
Press
ENTER
to confirm selection.
Once sensor initialization is completed and provided the laser beam was
correctly centered ( see ‘Laser beam adjustment’ in chapter 7) the ‘Laser READY’
hint appears on the Product’s display.
9 3
830
Users Manual
Use the navigation keys to select the foot to be measured. Press
foot selection.
ENTER
to confirm
Note the hint on the screen carefully. After selection of the foot to be measured,
pressing ENTER activates the process of identifying foot to be measured.
After foot to be measured has been identified, the value +0.00 appears in its
value box plus a hint indicating that the foot anchor bolt may be loosened.
Loosen the corresponding anchor bolt then press
9 4
ENTER
.
H o r iz o n ta l s h a ft a lig n m e n t
C h ec k i ng so f t f o o t c o nd i t i o ns
The calculated amount that the foot has moved is shown on the screen.
Retighten the bolt. The next foot is highlighted automatically, or any desired foot
can be selected using the navigation keys.
Repeat this procedure for each foot. Cycle through using the navigation keys.
The marker on the color-coded tolerance bar shows the tolerance value of the
measured soft foot.
As the set soft foot tolerance is 0.06 mm (0.002”), the marker on the color-coded
tolerance indicates that the measured soft foot is out of tolerance and shimming
corrections are necessary.
With the four foot values, the soft foot condition can be analyzed and diagnosed,
then the shimming corrections can be determined. Note that these values are
saved in the file along with the dimensions, measurement and diagnosis, and
appear in the printed report.
9 5
830
Users Manual
Points to be observed during soft foot measurement
Laser beam not centered
If initially the laser beam has not been centered, the following screen appears.
Use the on-screen instructions to adjust the laser beam. You may refer to ‘Laser
beam adjustment’ on page 60.
After centering the laser beam, press either
foot measurement.
9 6
BACK
or
ENTER
and proceed with soft
H o r iz o n ta l s h a ft a lig n m e n t
P o i nt s t o o b serv e d uri ng so f t f o o t m easurem ent
Dimension missing
N o te
If however, either of the two significant machine dimensions, “front foot-tob ack f o o t ” and “ senso r- t o - p ri sm ” , are m i ssi ng , t h e f o llo w i ng h i nt ap p ears.
Use
/
and highlight ‘Yes’, confirming selection by pressing
dimensions screen opens, and missing values may be entered.
ENTER
. The
Shafts have rotated accidentally or not positioned at either 3:00 or
9:00 o’clock position
If the shafts rotate away from the 3:00 or 9:00 o’clock position, an angle
correction hint appears as shown below.
Rotate the shafts back into the green sector to resume measurement.
9 7
830
Users Manual
When the message “angle in range” appears, you may press ENTER / BACK to
continue with soft foot measurement. Alternatively, you may wait for the process
to resume automatically.
I f t h e so f t f o o t p ro ce d ure i s f o llo w ed co
no t ari se.
N o te
rrect ly , t h e ab o ve m ent i o ned p o i nt s w i ll
P arallel soft foot correction
In parallel soft foot, the machine rocks on two diagonal feet which are lower than
the other two. If two diagonal values are roughly equal and significantly higher
than the other two, parallel soft foot can be assumed as a first solution.
In Figure 7-14, the correction would be to place a 0.89 mm shim under foot ‘b’
(the foot with the largest gap).
Angular soft foot correction
In angular soft foot, the base of one or more feet is at an angle to the foundation
and is only partly in contact. If one value is significantly higher than the others,
then angular soft foot can be suspected.
The ‘problem foot’ or machine frame is probably bent or distorted in some way. In
this case loosen the bolt and examine the foot more closely. Use a feeler gauge
to establish the variation of the gap and use these measurements to sketch the
shape and dimensions for a ‘stair stepped shim wedge’.
If the soft foot is purely ‘angular’ then the stepped shim will vary in thickness from
zero to twice the value displayed by the Product.
9 8
H o r iz o n ta l s h a ft a lig n m e n t
C o rrec t i ng so f t f o o t
a
0 .1 8
0 .8 9
b
a
0 .1 8
0 .1 3
b
c
0 .7 4
0 .1 0
d
c
0 .7 6
0 .1 0
d
P arallel soft foot
Angular soft foot
Figure 7-14. Diagnosis of parallel and angular soft foot
9 9
830
Users Manual
Page intentionally left blank
1 0 0
A lig n m e n t o p tio n s
Measurem ent m o d es
8. Alignment options
Measurement modes
The Product’s default measurement modes are Compass mode (for horizontal
mounted machines) and Clock mode (for vertical mounted machines).
Both measurement modes may be accessed via the menu.
N o te
T h e resp ect i ve d ef ault m o d e i s aut o m at i ca lly p resent w h en t h e “ Measure”
scr een i s acce ssed af t er ent eri ng all nece ssary m ach i ne d i m ensi o ns.
Press MENU to access the ‘Main menu’ screen. While in the menu screen, use the
navigation keys and highlight the ‘Measure options’ icon.
Press
ENTER
to confirm selection and enter the “Measurement options” screen.
1 0 1
830
Users Manual
N o te
T h e “ Measurem ent o p t i o ns” scr een i s acce ssi b le o nly w h en all nece ssary
machine dimensions, in the currently opened measurement file, have been
ent ered .
Using the navigation keys, highlight the required measurement mode, and then
press ENTER to confirm selection.
In the above case, the selected measurement mode is the ‘Clock’ mode which
is the default measurement mode for vertical mounted machines (described in
chapter 9 ‘Vertical flanged machines’.
Extending the measurement range
Gross misalignment of shafts or angular misalignment over large distances can
cause the laser beam to miss the detector surface during measurement. When
this happens, ‘Laser End’ appears on the display screen and the Product’s
‘extend’ function can be used.
1. When measuring and ‘Laser End’ message appears, rotate the shafts
backwards until the laser beam re-enters the measurement range. The
message ‘Laser READY’ reappears on the display.
1 0 2
A lig n m e n t o p tio n s
E x t end
2. Press MENU to access the “Main menu” screen. While in the menu screen use
the navigation keys and highlight the ‘Measure options’ icon and then confirm
selection by pressing ENTER . The “Measurement options” screen opens.
3. Use the navigation keys to highlight the ‘Extend’ icon, then press ENTER to
confirm selection. The program interrupts measurement and switches to the
beam adjustment screen. The current beam position is automatically recorded
and taken as the starting point for range extension.
1 0 3
830
Users Manual
4. Readjust the beam into the target square using the yellow prism knob and the
metal thumbwheel.
5. On centering the laser dot, the Product’s right LED turns blue. The adjusted
beam position is automatically recorded and taken as the end point of the
readjustment.
6. Continue measurement as before, rotating the shafts and pressing ENTER to
take measurements at the available positions.
The program includes the displacement of beam readjustment in its alignment
calculations.
N o te
‘Laser End’ is displayed when the reflected beam fails to strike the detector.
T h i s si t uat i o n o cu rs w h en m ach i nes are seve rely m i sali g ned , o r w h en t h e
b eam t rave l i s lo ng . Measurem ent i s no t t ake n w h en t h i s m essag e ap p ears.
Av eraging
In certain industrial conditions, it may be necessary to increase the number
of measurements to be averaged when taking readings to attain the desired
accuracy. Particular cases include applications with increased machinery
vibration. An increased averaging also improves the accuracy when measuring
sleeve bearings, white metal bearings and journal bearings.
The number of individual readings which are averaged together to form one
measurement are set via the “Measurement options” screen. Press MENU to
access the menu. While in the menu screen use the navigation keys to highlight
the ‘Measure options’ icon and confirm selection by pressing ENTER . The
“Measurement options” screen opens.
1 0 4
830
SETUP
1
GHI
4
PQRS
7
LASER ALIGNMENT TOOL
DIAGNOSE
MEASURE
ABC
2
JKL
3
6
WXYZ
8
0
MENU
DEF
MNO
5
TUV
9
space
+
/
CLEAR
ENTER
. .
BACK
A lig n m e n t o p tio n s
A v erag i ng
Use the navigation keys to highlight the ‘Averaging’ icon, then press
confirm selection.
ENTER
to
The average setting can be changed from a minimum averaging of 0.5 seconds
to a maximum averaging of 5.0 seconds.
N o te
T h e ave rag i ng set t i ng t h at i s select ed w i ll also b e act i ve i n so f t f o o t and Mo ve .
S h o uld h i g h ave rag i ng b e select ed , p at i ence m ust b e exe rci sed d uri ng Mo ve
t o allo w t h e P ro d uct eno ug h t i m e t o “ ca t ch - up ” as t h e m ach i ne i s m o ve d . I n t h i s
ca se, each read i ng t h at m ust b e ca lcu lat ed t o up d at e t h e g rap h i c d i sp lay w i ll
t ake a lo ng er t i m e. A ve rag i ng ca nno t b e ch ang ed o nce a m easurem ent h as
b een st art ed .
1 0 5
830
Users Manual
Page intentionally left blank
1 0 6
V e r tic a l fla n g e d m a c h in e s
T y p i c al c o nf i g urat i o n
9. Vertical flanged machines
Typical configuration
Typical vertical machine
arrangement comprised
of one machine mounted
on top of the other with a
bolted flange.
Figure 9-1. Typical vertical machine configuration
Figure 9-1 shows a typical vertical machine arrangement with one machine
mounted on top of the other using a bolted flange.
In flange-mounted machines, alignment corrections are made directly at the
flange.
Angularity is corrected by inserting or removing shims between the flanges.
The Product calculates the shimming thickness for each flange bolt. Offset is
corrected by positioning the flange laterally.
1 0 7
830
Users Manual
Set-up
N o te
B ef o re co m m enci ng w i t h t h i s sect i o n, p lease acq uai nt yo
t er ‘ H o ri oz nt al m ach i ne ali g nm ent ’ st art i ng o n p ag e 4 7 .
urself w i t h t h e ch
ap -
The sensor and prism are mounted on either side of the coupling as for horizontal
machines, with the sensor on the bottom half (‘Stationary’) and the prism on the
upper half (‘Movable’). In this set-up, the electronic inclinometer cannot detect
the rotation angle of vertical shafts. Measurement of vertical machines is carried
out using ‘Clock’ measurement mode. The eight 45° measurement positions used
with this procedure must be marked accordingly on the machine.
Marking measurement positions
The shaft is numbered
counterclockwise looking
down the shaft, starting
at 0 followed by the clock
4.30
0
1.30
3
positions 1:30, 3:00, 4:30,
6:00, 7:30, 9:00 and 10:30.
Figure 9-2. Numbering the shaft
1. Mark a reference position on the coupling housing close to the shaft and in
line with one of the pillars or bolts. Likewise, mark a starting point on the shaft.
This ensures that lateral corrections can be performed with the minimum of
effort.
2. Measure the circumference of the shaft and divide by eight.
3. Use this distance to make seven more evenly-spaced marks on the shaft
beginning at your chosen start point. Number the points counterclockwise as
seen from prism to sensor, beginning with 0 first, followed by 1:30, 3:00, 4:30,
6:00, 7:30, 9:00 and 10:30. (Refer to Figure 9-2.)
1 0 8
V e r tic a l fla n g e d m a c h in e s
Mo unt i ng c o m p o nent s
For circular housings, measure the circumference of the coupling housing and
divide by eight. Use this distance to make eight evenly-spaced marks on the
housing beginning at your chosen start point. Number the points clockwise
looking down onto the shaft with 0 as the first, followed by 1:30, 3:00, 4:30, 6:00,
7:30, 9:00 and 10:30. (Refer to figure 9-3.)
The circular housing is
numbered clockwise
looking down the shaft,
starting at 0 followed by
the clock positions 1:30,
3:00, 4:30, 6:00, 7:30, 9:00
and 10:30.
0
3
10.30
4.30
9
6
7.30
Figure 9-3. Numbering the housing
Mounting components and determining machine orientation
1. Mount the wireless module together with the sensor on one side of the
coupling, and prism on the opposite side of the coupling, ensuring that they
are aligned exactly with the 0 or reference mark.
2. Switch the Product on.
3. When the “Setup” screen appears, press MENU to access the “Main menu”
screen. Use the navigation keys and highlight the ‘Right machine’ icon.
1 0 9
830
Users Manual
4. Press ENTER to confirm selection then use the navigation keys and highlight
the ‘Change to flange’ icon.
5. Press ENTER to confirm selection. The “Edit flange” screen appears. This
indicates a vertical machine orientation.
1 1 0
V e r tic a l fla n g e d m a c h in e s
E d i t i ng f lang e c o nf i g urat i o n
Editing flange configuration
A typical vertical machine train arrangement consists of machines mounted
together using a bolted flange. To configure the flange proceed as follows:
1. Once in the “Edit flange” screen use the navigation keys to cycle through the
flange pattern parameters that may be edited. These include:
● Shape and dimensions of flange
● Bolt pattern and number of flange bolts
2. Use the navigation keys to cycle through the elements in the “Edit flange”
screen.
3. With the flange highlighted, press
ENTER
.
The following flange patterns are available:
● Circular flange – circular bolt pattern
● Square/Rectangle flange – square/rectangular bolt pattern
● Square/Rectangle flange – circular bolt pattern
● Circular flange – square/rectangular bolt pattern
1 1 1
830
Users Manual
4. Use the navigation keys to highlight the desired flange configuration, pressing
ENTER
to confirm selection.
5. To edit the dimensions of the selected flange pattern, use the navigation keys
to highlight dimension to be edited, then enter value directly using the data
entry keys.
Press ENTER or BACK to confirm entry.
6. Bolt pattern dimensions are edited in the same manner as the flange pattern
dimension. Use the navigation keys to highlight the dimension to be edited,
then enter value directly using the data entry keys.
Press
1 1 2
ENTER
or
BACK
to confirm entry.
V e r tic a l fla n g e d m a c h in e s
E nt er d i m ensi o ns
7. To edit the number of flange bolts, use the navigation keys to highlight
‘Number of flange bolts:’
With the button ‘Number of flange bolts:’ highlighted, edit value directly using
the data entry keys then confirm value by pressing either ENTER or BACK .
Enter dimensions
Press BACK or SETUP to return to the dimensions screen.
1. Enter the sensor-to-prism distance.
N o te
T h e senso r- t o - co up li ng ce nt er d i st ance i s ca lcu lat ed as h alf t h e senso r- t o p ri sm d i st ance aut o m at i ca lly . S h o uld need b e, t h i s va lue a
c n b e ed i t ed d i rect ly
usi ng t h e d at a ent ry ke sy .
1 1 3
830
Users Manual
2. Enter the coupling diameter. The default is 100 mm (10” if units option is set to
imperial units.)
3. Enter the RPM. The default is 1500. (1800 if units option is set to US
customary units.)
4. Enter the coupling center-to-flange distance.
1 1 4
V e r tic a l fla n g e d m a c h in e s
Measure
Measurements can now be made.
Measure
1. Switch the wireless module on to power the sensor. Press MEASURE then
proceed to adjust the laser beam and establish wireless communication
as described in the respective sections in Chapter 7 ‘Horizontal machine
alignment’.
2. Once the laser beam has been centered and wireless communication
established, the “Measure” screen shows the laser centered and the ‘Clock’
measurement mode activated.
3. Rotate the shafts to the first measurement position. The reference mark
and the measurement position 0 must be aligned with each other. Use the
navigation keys to place the screen hour hand to correspond with the position
of the prism and sensor on the shafts.
N o te
P ressi ng
/
p o si t i o ns t h e cl o ck h o ur h and at t h e next 4 5 ° p o si t i o n i n a
cl o ckw
i se d i rect i o n. P ressi ng
/
p o si t i o ns t h e cl o ck h o ur h and at t h e
next 4 5 ° p o si t i o n i n an ant i cl o ckw
i se d i rect i o n.
1 1 5
830
Users Manual
4. Press
ENTER
to take the first measurement point.
N o te
A f t er t aki ng m easurem ent p o i nt , t h e cl o ck h o ur h and m o ve s aut o m at i ca lly t o
the next clock position. (If the first measured position is 12:00 o’clock, then the
h o ur h and m o ve s t o t h e 1 . 3 0 o ’ cl o ck p o si t i o n) .
5. Rotate the shafts to the next measurement position (this could be either 1:30,
3.00, 4.30, 6.00, 7.30, 9.00 or 10.30 o’clock position).
N o te
I f sh af t ro t at i o n rest ri ct i o ns h i nd er t h e t aki ng o f m easurem ent at p art i cu lar
sh af t p o si t i o ns, b yp ass t h ese usi ng t h e navi g at i o n ke ys.
6. Press
ENTER
to take measurement point.
N o te
A m i ni m um o f t h ree m easurem ent p o si t i o ns are req ui red t o o b t ai n result s, b ut
i t i s reco m m end ed t h at a m axi m um num b er o f m easurem ent p o i nt s o ve r a
w i d er ro t at i o nal ang le b e t ake n t o enh ance t h e d i ag no si s.
1 1 6
V e r tic a l fla n g e d m a c h in e s
D i ag no se
D iagnose
When measurement is complete, press
DIAGNOSE
to view the diagnosis.
N o te
S i g n c o n v e n t i o n ( f o r ve rt i ca l m ach i nes)
POSITIVE GAP opens towards 0:00 or 3:00
POSITIVE OFFSET if the top coupling half is offset towards 0:00 or 3:00
Cycle through the coupling results and the flange corrections by pressing
repeatedly.
DIAGNOSE
The shim corrections are numbered to correspond with the bolt positions. The
bolt position corresponding to the currently highlighted calculated shim correction
value appears numbered and highlighted with an orange dot.
Use the navigation keys to cycle through the shim values.
1 1 7
830
Users Manual
Pressing the navigation keys long enough or +- changes the bolt correction
value mode. The following options are available:
● Bolt correction (+): means all shimming corrections are positive (add shims)
● Bolt correction (-): means all shimming corrections are negative (remove
shims)
● Bolt correction (+): means all shimming corrections are minimized (optimized).
Therefore half of the corrections will be negative and half of them positive.
This option results in zero axial movement of the shaft.
Machine alignment
Alignment is carried out by correcting angularity and offset at the flange.
Correcting angularity
1. Loosen the flange bolts and lift the upper machine.
Caution
The machine bolts must be undamaged and removable.
2. Angularity corrections are made by shimming. The “Bolt corrections” screen
shows the shimming values at the respective bolt locations. Insert (or remove)
shims with the correct thickness under the selected bolt.
3. Retighten the bolts and then re-measure to verify flange shimming results and
determine the exact alignment condition.
C orrecting offset
The correction of offset misalignment is carried out using the Live Move function.
1. Access the “Main menu” screen by pressing MENU . Use the navigation keys
and highlight the ‘Move’ icon.
1 1 8
V e r tic a l fla n g e d m a c h in e s
C o rrec t i ng o f f set
2. Confirm selection by pressing ENTER .
3. On confirmation the screen used to position the sensor and prism for optimal
moves appears.
4. Rotate shaft to any of the four positions highlighted in green. These are 1:30,
4:30, 7:30 and 10:30.
5. Use the navigation keys to position the sensor on the screen to correspond to
the position of the sensor and prism on the shafts.
6. Press ENTER to start Live Move. The Move direction dialog window appears.
or
or
7. Use either
be either
93
to highlight the required direction of movement. This could
. Confirm selection by pressing ENTER .
06
N o te
I f t h e laser b eam i s ce nt ered , L i ve Mo ve st art s aut o m at i ca lly . I f b eam
ce nt ered , a h i nt t o ce nt er t h e laser b eam ap p ears o n t h e d i sp lay .
i s no t
1 1 9
830
Users Manual
8. Loosen the flange bolts. Move the machine laterally in the direction of the
yellow triangle as indicated in the Live Move display.
9. Corrections should be brought as close as possible to zero. The marking on
the color-coded tolerance bar should change from red to orange to yellow and
finally green. At the same time the alignment condition LED also changes
color dependent on the position of the marking on the tolerance bar.
Use ap p ro p ri at e t o o
T ake ca re no t t o let
W h en m ach i ne i s co
m easure t o ch eck i f
1 2 0
ls, such
t h e sh i m
rrect ly p
t h e new
N o te
as leve rs, t o p o si t i o n t h e m ach i ne.
s sli p o ut o f p lace d uri ng lat eral p o si t i o ni ng .
o si t i o ned , t i g h t en t h e b o lt s b ack d o w n. R eali g nm ent co nd i t i o n i s w i t h i n t o lerance .
A p p e n d ix
Usi ng t h e senso r c ab le
10. Appendix
Using the sensor cable
If you need to use the sensor cable (due to flat batteries in the wireless module)
then it must be properly attached to the sensor. To attach the sensor cable
proceed as follows:
Open the front of the sensor housing
Unscrew the left-hand locking knob as shown in Figure 10-1, then lift off the front
of the sensor housing. Note how the wireless module cable is held in place by
grooves in the sensor frame.
Screw-type locking
Front housing
Clamping screw
Locking knob
Figure 10-1. Replacing the wireless module cable with the sensor cable
Unscrew and remove wireless module cable
Undo the screw-type locking, and carefully lift the wireless module cable out of its
guide grooves.
Attach sensor cable
Insert the angled plug into the sensor socket as shown in Figure 10-2; note the
keyway indicating proper plug orientation. Tighten the screw-type locking to
fasten the cable connection.
1 2 1
830
Users Manual
Figure 10-2. Fastening the sensor cable
Caution
Never turn the plug itself, as that can damage the cable pins.
Carefully thread the cable into its guide grooves as shown in Figure 10-2. Ensure
the cable remains in place.
Close the sensor housing
Return the front portion of the sensor housing to its position, then retighten the
yellow locking knob into place.
Test the cable connection
Insert the straight-ended plug of the sensor cable into the blue sensor port on the
Product (see Figure 7-5).
Caution
Match the direction arrows on the plug to the white arrow on the blue
port to ensure proper plug orientation; otherwise the pins inside the plug
may be damaged.
Switch the Product on then use the “Measurement options” screen to set the
required communication port.
1 2 2
A p p e n d ix
T est i ng c ab le c o nnec t i o n
Using the navigation keys, highlight the ‘Sensor selection’ icon, then press
to confirm selection.
ENTER
In the selection window that appears, use
/
and highlight the item ‘Port
1 (RS232)’. Confirm selection by pressing ENTER . The serial port is now initialized.
With the sensor dust cap fitted, press MEASURE to activate the laser. The red
indicator LED of the sensor should blink to indicate beam emission. If not, ensure
that the sensor cable has been properly connected; otherwise, contact FLUKE.
N o te
B o t h senso r and w i reless m o d ule ca b les m ay b e rep lace d i n t h e sam e m anner
as d escr i b ed i n t h i s ch ap t er.
1 2 3
830
Users Manual
Updating the 830 firmware to a newer version
N o te
● The Product firmware updates are carried out with the use of the
ap p ro ve d F L UK E US B m em o ry st i ck.
● Check the website www.fluke.com to ensure you have the latest version. If
i n d o ub t , co nt act F L UK E .
● I f yo u are acq ui ri ng t h e up d at e vi a t h e w eb si t e, yo u w i ll b e req ui red
t o t ransf er i t t o t h e ap p ro ve d m em o ry st i ck b ef o re co m m enci ng t h e
up g rad i ng .
N o te
Old memory sticks must be disposed of in accordance to the directive on
W ast e E lect ri ca l and E lect ro ni c E q ui p m ent ( W E E E ) .
Downloading the firmware from the website
The file available for download is an .exe file. Download the file to a directory.
Double-click the file to extract it to the approved memory stick. The following
screen with instructions on how to extract the firmware files into the memory stick
appears.
1 2 4
A p p e n d ix
C arry i ng o ut t h e f i rm w are up d at e
After selecting the location of the approved memory stick by clicking ‘Browse‘,
start file extraction by clicking ‘Extract‘.
Carrying out the firmware update
The firmware update is carried out using the memory stick and the ‘short’ USB
cable. The actual update does not require a PC.
Before starting the update verify that your memory stick has the following files on
it.
N o te
The displayed files and folder are viewed by expanding the folder ‘FLUKE830’.
The downloaded version is indicated by the prefix v1_xx_yyyy, where 1_xx
represents the firmware version and yyyy the build number.
1 2 5
830
Users Manual
1. Press
to switch the Product on. Wait for the “Setup” screen to appear.
N o te
B ef o re p ro ce ed i ng w i t h t h e up d at e ensure t h at t h e i nd i ca t ed no m i nal ca p aci t y
o f t h e b at t ery i s g reat er t h an 5 0 % . I f t h i s i s no t t h e a
c se, rech arg e t h e b at t ery
to full capacity first.
To check battery capacity proceed as follows:
● Press MENU .
● When in the “Main menu” screen use the navigation keys and highlight the
‘Config’ icon. Confirm selection by pressing ENTER .
● After accessing the “Configuration menu” screen use the navigation
keys and highlight the ‘Device settings’ icon then press ENTER to confirm
selection. The actual battery capacity is indicated in the screen that
appears.
2. Attach the ‘short’ USB cable to the Product’s grey USB port.
3. Insert the approved memory stick into the ‘short’ USB cable.
1 2 6
A p p e n d ix
C arry i ng o ut t h e f i rm w are up d at e
830
LASE
R AL
IGNM
ENT
MEN
DIA
MEA
SETU
P
AB
PQ
RS
7
ST
DE
3
6
WXY
9
8
e
spac
U
OSE
F
MNO
L
5
U
JK
I
4
GN
L
RE
C
2
1
GH
SU
TOO
Z
EN
CLEA
TE
R
R
BA
CK
. .
/
0
+
Figure 10-3. Memory stick connected to the Product using the ‘short’ USB
cable
4. A hint indicating the availability of a new firmware and the need to reboot the
Product appears.
1 2 7
830
Users Manual
5. When the hint above appears, press and hold down
until the device
reboots. The display goes dark.
6. The update process will start automatically (wait up to 10 seconds). The
system beeps and the right LED flashes as the process begins.
N o te
Do NOT turn off the device or remove the memory stick during the entire upd at e p ro ce ss, w h i ch t ake s up t o 5 m i nut es.
7. Just before the firmware update process comes to an end, the screen below
appears.
8. After the flashing process is completed, a hint indicating that the flashing
process for the new firmware has been carried out correctly appears.
1 2 8
A p p e n d ix
C arry i ng o ut t h e f i rm w are up d at e
9. When the hint above appears, press and hold down
reboots, and the “Setup” screen appears.
T h e ‘ sh o rt ’ US B ca b le m ay no w
N o te
b e d et ach ed f ro m
until the device
t h e P ro d uct .
10.When the “Setup” screen appears, press MENU . Use the navigation keys and
highlight the ‘Config’ icon. With the icon highlighted, press ENTER to access the
“Configuration menu” screen.
1 2 9
830
Users Manual
11. Use the navigation keys and highlight the ‘About’ icon. With the icon
highlighted, confirm selection by pressing ENTER . The “Application details”
window appears.
The Product is now ready for use with the uploaded version which may be
identified from the “Application details” screen. Also displayed is the current
application build.
1 3 0
A p p e n d ix
S enso r f i rm w are up d at e
Sensor firmware update
If a sensor with an older firmware version is connected to the Product, a hint
indicating that the sensor firmware requires updating appears on the display.
Use
/
and select ‘Yes’ to update the sensor. Press
selection. The sensor firmware update wizard appears.
ENTER
to confirm
The wizard guides the user through the sensor firmware update in self-explanatory steps.
Use / and highlight ‘Next’ then press ENTER to confirm selection. A hint
appears indicating the expected duration of the firmware update.
1 3 1
830
Users Manual
Use
/
and highlight ‘Next’ then press
ENTER
to confirm selection.
N o te
E nsure t h at at least t w o b at t ery st at us L E D s o n t h e w i reless m o d ule li g h t up
continuously. This guarantees enough operating time for the sensor firmware
up d at e.
A further hint to ensure proper connection of the wireless module to the sensor
appears on the screen.
Use / and highlight ‘Next’ then press
firmware update.
1 3 2
ENTER
to proceed with the sensor
A p p e n d ix
S enso r f i rm w are up d at e
Once the sensor firmware update is finalised, the final update screen appears.
Restart the Product.
N o te
The sensor firmware update may also be carried out using the sensor cable.
T h e senso r sh o uld b e at t ach ed t o t h e P ro d uct usi ng t h e senso r c ab le as
sh o w n i n F i g ure 7 - 5 .
1 3 3
830
Users Manual
830 Laser Alignment Tool technical data
Product
CPU
Intel XScale PXA270 running at 312 MHz
Memory
64 MB RAM, 32 MB Flash
Display
Type: TFT, transmissive (sunlight-readable), 65 535 colours, backlit
LED
Integrated light sensor for automated adjustment of the brightness
to the display according to the lighting conditions hence extending
battery life
Resolution: 320 x 240 Pixel
Dimensions: 3.5 inch [8.9 cm] diagonal
Keyboard elements: SETUP, MEASURE, DIAGNOSE, MENU,
CLEAR, ENTER, BACK keys, Navigation cursor cross, alphanumeric
keyboard and on/off button
LED indicators
Multicolour LED for laser status and alignment condition
Multicolour LED for battery status
Power supply
Integrated Lithium-ion polymer rechargeable battery: 7.4 V / 2.6 Ah
with typical operating time of 17 hours (based upon an operating cycle
of 33% measurement, 33% computation and 33% ‘sleep’ mode)
External interface
USB host
USB device (slave)
RS232 (serial) for sensor
AC adapter/charger socket
Environmental protection
IP 65 (dustproof and water spray resistant), shockproof
Relative humidity 10% to 90%
Temperature range
Operation: -10°C to 50°C [14°F to 122°F]
Storage: -20°C to 60°C [-4°F to 140°F]
Altitude
2000 m [6500 ft]
Dimensions
Approx. 220 x 165 x 45 mm [8.7” x 6.5” x 1.8”]
Weight
742 g [1.64 lb]
S ensor
Particulars
Measurement principle: Coaxial, reflected laser beam
Environmental protection: IP 67 (submersible, dustproof)
Ambient light protection: yes
Storage temperature: -20°C to 80°C [-4°F to 176°F]
Operating temperature: 0°C to 55°C [32°F to 131°F]
Dimensions: approx. 107 x 70 x 49 mm [4 1/4” x 2 3/4” x 2”]
Weight: approx. 177 g [6 1/2 oz.]
Laser
Type: AlGaInP semiconductor laser
Beam divergence: < 0.35 mrad
Wavelength (typical): 670 nm (red, visible)
Beam power: < 1 mW
Detector
Measurement area: unlimited, dynamically extendible
Resolution: 1 µm
Accuracy (avg): > 98%
Inclinometer
Measurement range: 0° to 360°
Resolution: <1°
1 3 4
A p p e n d ix
T ec h ni c al d at a
Prism
Particulars
Type: 90° roof prism
Accuracy (avg): > 99%
Environmental protection: IP 67 (submersible, dustproof)
Storage temperature: -20°C to 80°C [-4°F to 176°F]
Operating temperature: -20°C to 60°C [-4°F to 140°F]
Dimensions: approx. 100 x 41 x 35 mm [4” x 1 5/8” x 1 3/8”]
Weight: approx. 65 g [2 1/2 oz.]
Wireless module
Particulars
Class 1 connectivity, transmitting power 100 mW
Transmission distance: 10 m [33 ft.]
Complies with FCC rules part 15.247
LED indicators: 1 LED for Bluetooth communication,
3 green LEDs for battery status
Power supply: Batteries 2 x 1.5 V IEC LR6 (“AA“)
Operating time: 14 hours typical use (based upon an operating cycle
of 50% measurement, 50% standby)
Storage temperature: -20°C to 60°C [-4°F to 140°F]
Operating temperature: -10°C to 50°C [14°F to 122°F]
Environmental protection:IP 65 (dustproof and water spray resistant),
shockproof
Dimensions: Approx. 81 x 41 x 34 mm [3 1/8” x 1 11/16” x 1 5/16”]
Weight: Approx. 133 g [4.7 oz.] including batteries and cable
S afety
Electrical
IEC 61010-1
Battery
IEC 62133
Laser
IEC 60825-1, 21 CFR 1040.10, .11 with Laser Notice 50
Electromagnetic Environment
Particulars
IEC 61326-1: Basic
Radio Frequency Emissions
Particulars
IEC CISPR 11: Group 1, Class A.
Group 1 have intentionally generated and/or use conductively coupled
radio-frequency energy which is necessary for the internal functioning
of the equipment itself.
Class A equipment is suitable for use in non-domestic locations and/or
directly connected to a low-voltage power supply network.
C arrying case
Particulars
Case dimensions: approx. 560 x 330 x 130 mm [22 3/64” x 13” x 7 1/8”]
Weight, including all standard parts: approx. 4.8 kg [10.6 lb]
1 3 5
830
Users Manual
Suggested shaft alignment tolerances
Soft foot
Short “flexible”
couplings
Offset
[RPM]
metric [mm]
inch [mils]
any
0.06 mm
2.0 mils
Acceptable
Excellent
Acceptable
Excellent
9.0
5.0
900
6.0
3.0
1200
4.0
2.5
3.0
2.0
1.5
1.0
7200
1.0
0.5
600
15.0
10.0
900
10.0
7.0
1200
8.0
5.0
5.0
3.0
3.0
2.0
2.0
1.0
600
750
1500
0.19
0.09
0.09
0.06
1800
3000
0.06
0.03
3600
6000
Angularity
coupling gap
difference per 100 mm
or 10”
diameter
750
1500
0.03
0.13
0.07
0.02
0.09
0.05
1800
3000
0.04
0.03
3600
6000
7200
1 3 6
0.03
0.02
A p p e n d ix
D ec larat i o n o f c o nf o rm i t y
Declaration of conformity
N o te
Any amendments to the issued certificate will be posted on the FLUKE website – www.fluke.com.
P lease vi si t t h e w eb si t e o n a reg ular b asi s f o r i nf o rm at i o n o n new and cu rrent
p ro d uct s.
1 3 7
830
Users Manual
Page intentionally left blank
1 3 8
In d e x
A -L
Index
A
E
Alignment condition LED 44, 72
Averaging 104
Extend 79
measurement range 70
Extending
measurement range 102
B
F
Bar scale
green 40
Battery capacity 27
Bolt correction 118
Brackets
mounting 48
C
File
overwrite name 83
save 81
Firmware
downloading 124
update procedure 125
Firmware update 124
Flange configuration
editing 111
Flange patterns 111
Flashing process 128
Foot correction 71
Cable connection
test 122
Calibration 10
Care 10
Chain-type bracket 21
Charging battery 15
‘Clock’ mode 41
Clock mode 68, 101
‘Compass’ mode 41
Compass mode 68, 101
Conformity certificate 137
Contact
telephone numbers 1
website 1
Coupling backlash 47
Coupling tolerance table 59
G
Gap 71
I
IP classification 7
J
Job preparation 47
D
K
Data management 35
Data storage
note 9
Default measurement mode 34
Default RPM 33
Default settings 33
Device settings 26
Diagnose 45, 70
Dimensions
machine 39, 54
negative entries 57
Display brightness 26
Disposal 11
WEEE Directive 3
Keyboard beep 26
L
Laser beam
center 44
Laser beam adjustment 60
Laser END 70
Laser OFF 70
Laser safety 7
Live Move
horizontal 75
vertical 78
1 3 9
830
Users Manual
M
Machine properties 58
Machine set-up 58
Measurement mode 41
‘Clock’ 34
‘Compass’ 34
Measurement options 42, 61, 101
Sensor cable 121
disconnecting 53
Sensor firmware
update 131
Sensor selection 42, 61, 123
Shimming 73
Sign convention 71
vertical machines 117
Soft foot 47, 48
angular 91, 92
checking 92
induced 92
parallel 91, 92
principal causes 91
types 92
Storage 10
Switching on 53
Symbols 3
O
Offset 71
P
Package items 5
PDF file 84
Power scheme 27
Printer
configure 86
Printer configuration 34
Printing options 87
Printing reports 84
Prism 20
mounting 50
Prism knob 52
T
R
Technical data
830 Laser Alignment Tool 134
Tolerance bar 46
colour-coded 72, 95
marker 95
marking 72
Tolerances 72
Tolerance table 34, 73, 136
Torsion play 68
Reference diameter 33
Regional settings 29
Repeatability
poor 80
Report
save as PDF 84
Resume policy 28
RPM 59
U
Universal adapter/charger 17
V
Vertical machine
typical configuration 107
Vertical machines
mounting components 109
S
Safety information 2
Scan 43
Sensor 18
clamping screw 121
connecting 52
locking knob 121
mounting 50
screw-type locking 121
1 4 0
W
WEEE 124
Wireless communication
establishing 61
Wireless measurement 41
In d e x
M- W
Wireless module 22
delete 64
LED indicators 23
mounting 50
scan 62
Wireless module cable 121
1 4 1
830
Users Manual
1 4 2