1
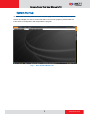
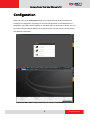
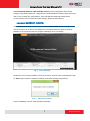
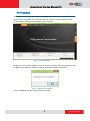
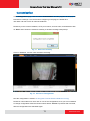
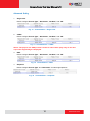
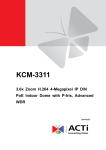
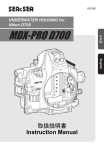
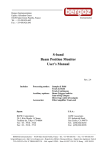
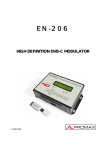
ACTi Camera Demo Tool
User Manual
Version 1.3
05/25/2011
Camera Demo Tool User Manual v1.3
Table of Contents
1 Overview
4
Introduction.................................................................................... 4
Main Specification .......................................................................... 4
System Requirements .................................................................... 4
Installation ...................................................................................... 4
System Startup ................................................................................ 5
2 Configuration
6
Lenovo X200/HP HDX16.................................................................. 7
Advanced Setting ........................................................................... 8
HP ProBook ..................................................................................... 9
Advanced Setting ......................................................................... 10
Customization .............................................................................. 11
Advanced Setting ......................................................................... 12
3 Live View
13
Single-view ................................................................................... 13
Record ......................................................................................... 14
4-VGA ........................................................................................... 16
DNR............................................................................................... 17
Snapshot: ...................................................................................... 18
Playback ........................................................................................ 19
2
www.acti.com
Camera Demo Tool User Manual v1.3
Figure List
Fig. 1
Fig. 2
Fig. 3
Fig. 4
Fig. 5
Fig. 6
Fig. 7
Fig. 8
ACTi Camera Demo Tool .......................................................... 5
Configuration ........................................................................... 6
Error message ........................................................................... 7
Saved successfully ..................................................................... 7
Preview in Configuration ......................................................... 8
Four modes in Configuration ................................................... 8
Error message ........................................................................... 9
Saved successfully ..................................................................... 9
Fig. 9
Fig. 10
Fig. 11
Preview in Configuration ....................................................... 10
Four modes in Configuration ................................................. 10
Saved successfully ................................................................... 11
Fig. 12
Fig. 13
Fig. 14
Fig. 15
Fig. 16
Fig. 17
Fig. 18
Fig. 19
Preview in Configuration ....................................................... 11
Customization – Single-view .................................................. 12
Customization – 4-VGA .......................................................... 12
Customization – DNR ............................................................. 12
Customization – Snapshot ...................................................... 12
Single-view ............................................................................. 13
Single-view recording ............................................................ 14
Recordings and video info ..................................................... 15
Fig. 20
Fig. 21
Fig. 22
Fig. 23
Fig. 24
4-VGA ..................................................................................... 16
DNR ........................................................................................ 17
Snapshot ................................................................................. 18
Snapshot – Zoom .................................................................... 18
Single-view recording ............................................................ 19
3
www.acti.com
Camera Demo Tool User Manual v1.3
Overview
Introduction
ACTi Camera Demo Tool is a Windows based programs to help users get started with ACTi’s
new products (KCM-series) quickly and easily. Users don’t need to install NVR, ActiveX, or any
image codec to do live streaming and snapshot. The program is programmed to be adaptive to
various PC hardware and improve its performance.
Main Specification
Category
Installation
Live View
Playback
Configuration
Specifications
Detail
ACTi Camera Demo Tool v1.3.msi
Demo Tool main program.
1.
2.
3.
4.
1.
2.
1.
2.
3.
High megapixel video streaming.
Cropped the single stream to 4-VGA streams.
DNR on/off.
Snapshot
Open pre-recorded RAW files.
Single-view
4-VGA
DNR
Snapshot
Open
Plyaback
Lenovo X200
HP ProBook
Customization
System Requirements
Windows 7 Professional/Enterprise/Ultimate
Installation
1
Download software package
2
Microsoft .NET Framework 2.0 SP2 - NetFx20SP2_x86.exe
3
Install software program - ACTi Camera Demo Tool v1.3.msi
4
www.acti.com
Camera Demo Tool User Manual v1.3
System Startup
To make video streaming easier for users, the main page will automatically connect to the last
session and display live view. If it is the first that a user runs the program, please follow the
instructions to Configuration and manipulate the program.
Fig. 1
ACTi Camera Demo Tool
5
www.acti.com
Camera Demo Tool User Manual v1.3
Configuration
Whenever users enter Configuration page, the program will load the last session’s info,
including PC Configuration, and device IP, account and password. PC Configurations are
supposed to help different PC hardware run smoothly while live streaming. In Demo Tool v1.0,
we provide Lenovo X200/HP HDX16, HP 4720s/HP 4310s, and the third one is reserved for
user-defined configuration.
Fig. 2
Configuration
6
www.acti.com
Camera Demo Tool User Manual v1.3
Lenovo X200/HP HDX16 and HP 4720s/HP 4310s are NOT configurable. Users cannot
modify a single field in these two configurations, including default IP address. Each time users
click on one of these two configurations, every field will be loaded with default values.
To start connect to an IP device and save changes, please do the following:
Lenovo X200/HP HDX16
In the Configuration page, click on button “Lenovo X200/HP HDX16” and the program will
start to connect to an IP device. The default IP is 192.168.0.100 due to ACTi IP cameras’
default IP. If the connection fails, the program will display an error message.
Fig. 3
Error message
Please key in the correct IP address, HTTP port number, Account name, and Password. Click
on “Save” and if values are saved successfully, a windows message shall prompt.
Fig. 4
Saved successfully
Click on “Connect”, and the video shall start streaming.
7
www.acti.com
Camera Demo Tool User Manual v1.3
Fig. 5
Preview in Configuration
Now the configuration is saved in C:\Program Files\ACTi\DemoKit\Active.config
Please be noticed that once users click on one of the configurations, then you are not allowed
to change configuration within this session unless button “Cancel” is pressed. After canceled,
all three configurations are selectable again.
Advanced Setting
Fig. 6
Four modes in Configuration
Users are NOT allowed to configure settings regarding four mode: Single-view, 4-VGA, DNR,
and Snapshot in Configuration Lenovo X200.
8
www.acti.com
Camera Demo Tool User Manual v1.3
HP ProBook
In the Configuration page, click on button “HP ProBook” and the program will start to connect
to an IP device. The default IP is 192.168.0.100 due to ACTi IP cameras’ default IP. If the
connection fails, the program will display an error message.
Fig. 7
Error message
Please key in the correct IP address, HTTP port number, Account name, and Password. Click
on “Save” and if values are saved successfully, a windows message shall prompt.
Fig. 8
Saved successfully
Click on “Connect”, and the video shall start streaming.
9
www.acti.com
Camera Demo Tool User Manual v1.3
Fig. 9
Preview in Configuration
Now the configuration is saved in C:\Program Files\ACTi\DemoKit\Active.config
Please be noticed that once users click on one of the configurations, then you are not allowed
to change configuration within this session unless button “Cancel” is pressed. After canceled,
all three configurations are selectable again.
Advanced Setting
Fig. 10 Four modes in Configuration
Users are NOT allowed to configure settings regarding four mode: Single-view, 4-VGA, DNR,
and Snapshot in Configuration HP ProBool.
10
www.acti.com
Camera Demo Tool User Manual v1.3
Customization
In the Configuration page, click on button “Customization” and the program will bring up the
last session’s settings. If it is the first time configuring in the page, the default IP is
192.168.0.100 due to ACTi IP cameras’ default IP.
Please key in the correct IP address, HTTP port number, Account name, and Password. Click
on “Save” and if values are saved successfully, a windows message shall prompt.
Fig. 11 Saved successfully
Click on “Connect”, and the video shall start streaming.
Fig. 12 Preview in Configuration
Now the configuration is saved in C:\Program Files\ACTi\DemoKit\Active.config
Please be noticed that once users click on one of the configurations, then you are not allowed
to change configuration within this session unless button “Cancel” is pressed. After canceled,
all three configurations are selectable again.
11
www.acti.com
Camera Demo Tool User Manual v1.3
Advanced Setting
1
Single-view:
Please configure “Encode Type”, “Resolution”, “Bit Rate”, and “FPS”.
Fig. 13 Customization – Single-view
2
4-VGA:
Please configure “Encode Type”, “Resolution”, “Bit Rate”, and “FPS”.
Fig. 14 Customization – 4-VGA
Notice: The purpose of 4-VGA preview is meant to show video quality only. So the first
crop of the original image is displayed.
3
DNR:
Please configure “Encode Type”, “Resolution”, “Bit Rate”, and “FPS”.
Fig. 15 Customization – DNR
4
Snapshot:
Please configure “Encode Type” and “Resolution” for still image snapshots.
Fig. 16 Customization – Snapshot
12
www.acti.com
Camera Demo Tool User Manual v1.3
Live View
After configuration is done, please switch to Liveview which is the main page of the program
and it will automatically connect to the IP address last time saved in Configuration. If users
leave the Liveview page on and switch to Configuration to do setup, and then switch back,
please wait for a couple of seconds for system synchronization
There are four modes to present KCM-series features in terms of high megapixel video
streaming on-demand, 4-VGA cropped video streaming on-demand, DNR technology, and still
image on-demand.
Single-view
Single-view display of resolution 2032x1920.
Fig. 17 Single-view
Green light meaning video is streaming normally.
With optical zoom modules, Zoom In and Zoom Out buttons with Speed are selectable. These
functions are also available in DNR mode.
Notice: Zoom In and Zoom Out buttons are for optical zoom ONLY. For digital zoom,
please click on ‘+’/’-‘on the display panel or use mouse wheel. Optical focus process is
13
www.acti.com
Camera Demo Tool User Manual v1.3
suggested to be conducted under none-digital-zoom-enabled condition, otherwise,
display image may not truly present focus result due to mosaic.
With dome camera, Mirror On and Flip On can do mirror and flip of the video. These functions
are also available in DNR mode.
When Fullscreen is clicked, image will fit to the entire screen without stretch. Double-click on
the screen to exit full screen mode.
Record
Single-view supports recording and playback. Click on Start Record, the button would
become Stop Record. Click on the button again to stop recording. While recording, the video
streaming indicator of both red and green light would light up. Red light indicates video in
recording.
After stop recording, the recorded video clip is saved under C:\[Users]\[User name]\My Picture\
Recordings are named by time code and in the format of RAW.
Video info will automatically be exported as plain text file under the same folder of each
recording file.
Fig. 18 Single-view recording
14
www.acti.com
Camera Demo Tool User Manual v1.3
Fig. 19 Recordings and video info
15
www.acti.com
Camera Demo Tool User Manual v1.3
4-VGA
Before users run 4-VGA mode display, please configure desired cropping positions in
Web Configurator in advance. Otherwise, the default position is centered in the image.
Fig. 20 4-VGA
16
www.acti.com
Camera Demo Tool User Manual v1.3
DNR
When DNR is selected, users may enable or disable via switching between “On” and “Off”
to compare image quality.
Fig. 21
DNR
17
www.acti.com
Camera Demo Tool User Manual v1.3
Snapshot:
When Snapshot is selected, streaming stops and the program display a single snapshot
of the channel. Move your mouse over the image and scroll up and down to zoom-in and
zoom-out.
Fig. 22 Snapshot
Use scroll bar to move in vertical or horizontal.
Fig. 23 Snapshot – Zoom
The snapshot image is saved under C:\[Users]\[User name]\My Picture\ The file is named by
time code and in JPG format.
18
www.acti.com
Camera Demo Tool User Manual v1.3
Playback
Click on Open File to open a RAW file to start playback.
Fig. 24 Single-view recording
Record and playback functions are also supported in DNR mode.
Special Notice:
If HDD doesn’t have enough space to save recordings, Record function will not be able
to carry out. Please make sure HDD status is health enough for recording.
19
www.acti.com