1
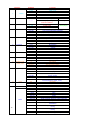
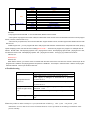
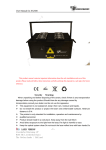
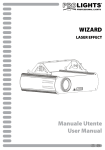
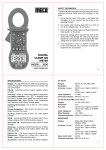
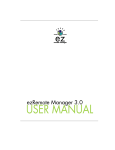
LASER SHOW SYSTEM Model: Xstar User's Manual This product manual contains important information about the safe installation and use of this product.Please read and follow these instruction carefully and keep this manual in a safe place for future reference. Security warning When unpacking and before disposing of the carton, check if there is any transportation damage before using the product.Should there be any damage caused by transportation,consult your dealer and do not use the apparatus. This equipment is not waterproof, keep it from rain, moisture and liquids. Do not install the product or project the beam onto inflammable surfaces. Minimum distance is 5 M The product is only intended for installation, operation and maintenance by qualified personnel. Product should install in a cool place. Keep away from the wall 50cm Avoid direct exposure to the light from the lamp.The light is harmful to eyes. Keep the optical system clean.Do not touch the laser reflect lens with bare hands.Do not use any alcohol liquid or any other liquit to clean the optical system.Use medicinal absorbent cotton to clean it. Please do not attempt to dismantle and/or modify the product inner structure.Otherwise,would not provide 1 year of free warranty. Electrical connection must only be carried out by qualified personnel. Before installation,ensure that the voltage and frequency of power supply match the power requirement of the product. It is essential that each product is correctly earthed and that electrical installation conforms to all relevant standards. Do not connect this device to any other types of dimmer apparatus. Make sure that the power-cord is never crimped or damaged by sharp edges. Never let the power-cord come into contact with other cables.Only handle the power-cord by the plug.Never pull out the plug by tugging th power-cord There is no user serviceable parts inside the product,do not open the housing and never operate the product with the cover removed. If you have any questions,don't hesitate to consult our dealer or manufacturer. Inside laser modules and structure: Product technical parameters 1.Voltage:AC90~240V 50~60HZ±10% 2.Power consumption: 200W 3.Laser power /wavelength: 4. laser module data sheet: 1x350mW 1x350mW 1 x 800mW Red G reen Blue (638nm) (532nm ) (445nm ) 5. laser beam data sheet: 6. Colors: RGB full color 7 .Modulation signal : TTL 0~30K or Analog 8. Scanner system: 20kpps, 30kpps 9. Control mode: Music, auto, master-slave and DMX-512, ILDA Control , SD-card play 10. Cooling system: fan 11. Operation environement : Indoor 12.Operation temperature:-10°C~40°C 13.Net Weight : 8.5 kg 14. Dimension Size : 22*22*22 cm ◆ Function Description : 1. Back panel introduction 2. ILDA control signal connection method: Connection built through product male/female DB 25 degree socket. Like above picture. In addition to the above connections, ILDA signal cannot be connected in any other way. Connect ILDA signal, the lighting fixtures will automatically shift to ILDA working mode. This lighting fixtures ILDA signal cable connection way is compliant to international standard. 3. DMX Connection method DMX control signal connection must be made with a two core-screened cable,with each core having at least a 0.5mm diameter. Please use the product's signal cable OUT and IN as connection. The signal OUT and IN cables connection shown as above picture. DMX512(1990).The amount of lighting fixtures This product accepts digital control signals in protocol connected in parallel is no more than 32.Connect the DMX controller's Output to the first lighting fixture's Input cable with a 2 core XLR signal cable(Shown as above ),connect the first lighting fixture's Output cable to the second the lighting fixture's Input cable and connect the rest light fixtures in same way.Eventually,connect the last lighting fixture's Output cable to a DMX terminator Under DMX-512 signal control mode,the last lighting fixture's DMX Output must be connected with a DMX terminator.This prevents electrical noise from disturbing and corrupting connector with a 120(ohm ) resistor connected the DMX control signals.The DMX terminator is simply an XLR across pins 2 and 3,which is then plugged into the output socket on the last projector in the chain.Then connections are illustrated above. Note:Please do not connect the signal cable OUT and IN in other way except above shown. 4. SD card laser operating system Operating Buttons: Mode Up Down Enter MODE: Change modes UP、DOWN:When it is at PRG and ILD mode, just change files. When it is at sound mode, just change the rhythm. Press and hold the Enter key for more than 3 seconds to save the current mode. Working Mode: Prg Mode :Play PRG FILES. The second line displays the playing list name. Press“UP”and“DOWN”to change playing list. ILDA Mode:Play ILDA FILES one by one.(Format is ILD) ,The second line displays the playing list name of ILDA Files, Press“UP”and“DOWN”to change playing list. Audio Mode:Play programs according to the music. Press“UP”and“DOWN”to change the rhythms. Auto Mode:Play programs automatically。 Dmx Mode:The first line shows the DMX IP, the second show the receiving status of the controller. DMX Channel Details: Description CHANNEL 1 2 Modes NUMBER 0-73 74-110 111-147 148-184 185-221 222-255 Pictures/Files 0-255 3 Flash/Files 4 X Direction 5 Y Directiom 6 Zooming 7 X-axis rotating 8 Y-axis rotating 9 Rotating with center point 10 Drawing 0-10 11-199 200-255 Files playing Adjust the position Auto LEFT AND RIGHT MOVING Auto jump moving circles between left and right Auto jump in disorder Audio jump in disorder Adjust position by hand Auto moving in circles between up and down Auto jumping in circles between up and down Auto jump in disorder Audio jump in disorder No zooming Adjust size by hand enlarge Zoom out Zoom in circles No rotation Adjust manually Auto rotation No rotation Adjust manually Auto rotation No rotation Adjust manually Auto clockwise rotation Auto counter clockwise rotation No change Manual operation 105-144 Auto(down) Auto in circles 225-255 wave Pictures changing,changed with each two numbers. Without flash AUTO Flash Sound Flash PRG/ILD mode Choosing files 0-125 126-185 186-225 226-245 246-255 0-125 126-185 186-225 226-245 246-255 0-10 11-100 101-150 151-200 201-255 0-10 11-110 111-255 0-10 11-110 111-255 0 1-180 181-217 218-255 0-10 10-74 75-104 145-184 185-224 11 FUCTION Light closing PRG mode ILD mode Audio mode Auto Mode Hand-operating Hand-operating 0-9 10-199 200-255 Auto(up) fore-and aft line in circle(up) fore-and aft line in circle(down) No speed speed range color RGB 0-16 17-33 34-50 51-67 68-84 85-101 102-118 119-135 136-152 153-169 170-186 12 187-203 204-220 221-237 White Red Green Blue Yellow Purple Cyan White red green blue four colors subsection Blue Yellow Purple Cyan four colors subsection White red green blue purple cyan seven colors subsections White red green blue four color subsection moving Blue Yellow Purple Cyan four colors subsection moving Blue yellow purple cyan four color moving Display according to breakpoint RGY Display mode 13 238-255 0-27 28-55 56-83 84-111 112-139 140-167 168-195 196-223 224-255 0-63 64-127 128-191 192-255 Change c White Red green Yellow Red green two colors subsection White red green yellow four color subsections Red green two colors moving 红绿双色流动 White red green yellow four colors moving Changing color with music Normal display Bright spot display Display in subsection Display dots Remarks: 1.Only support FAT32 SYSTEM,if use new SD CARD, Please format to FAT32. 2.This system only support short name of files,8 number letters name at most and 3 number letters extension at most.(support letters, numbers, underline and so on) 3.SD card only for special use, don’t mix with other files. Support 20 files at most, each file support 256 ILDA files and 10 PRG files at most. 4.PRG Program List:you can program with text to edit program with extension .PRG.The list is composed of file name, playing speed and playing times, then with Ishow ID CODE(i),block off with“,”.Each line only support one program. For example: file1.ild、 file2.ild、file3.ild 3 files,file1.ild playing speed is 12K,playing time is 3 times,file2.ild playing speed is 20K,playing time is 1 time, and file2 use ishow to edit,file3.ildplaying speed is 18K,playing time is 4times,Then prg1.prg contents are as follow: File1.ild,12,3 File2.ild,20,1,i File3.ild,18,4 When build a new file, you need to create a .PRG file with the same name of the new file in this new file. And then put all the programs in the .PRG file. The playing speed is the speed of “ILDA Mode”。For example,under aurora file,create a aurora.prg file。 After add ILDA file,need to put this file to PRG List. ◆Troubleshooting Problems The product doesn't switch on The product can turn on,but no light coming out. The beam appears dim Action Power connection is not correct.Re-connect the power. Power supply is damaged or abnormal.Call a qualified personnel to fix it. Connection of control board is not correct.Call a qualified personnel to fix it. Control mode is wrongly setting up.Resetting it according to instruction book Control section is damaged.Call a qualified personnel to fix it. The product is too hot.Take ventilation measures to make it cool. Note: This product is under warranty for 1 year (From the date of delivery), after 1 years can provide paid maintenance services. But if it is because of natural disasters or user's operation not according to manual.We won't provide warranty.