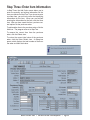
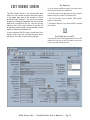
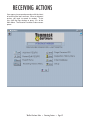
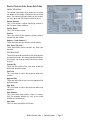
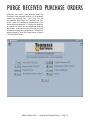
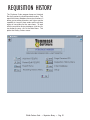
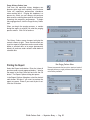
1
132 Venture Court, Suite 1
Lexington, KY 40511
http://www.tenmast.com
Support:
(877) 359-5492
[email protected]
Marketing:
(877) 836-6278
[email protected]
Fax:
(859) 367-7480
WINTEN PURCHASE ORDER
$
USER MANUAL VERSION 1/29/2002
FOR PROGRAM VERSION 9/20/2001 AND LATER
© 2002 TENMAST SOFTWARE
CONTENTS
Introduction
1
WinTen Basics
2
Program Overview
13
Purchase Order Cycle
15
Main Menu
17
Setup
19
Setup Screen
Default Settings Tab
Color Tab
Ship To Tab
Blanket Orders Tab
Create Blanket Order Sub-Screen
Comments Tab
20
20
22
23
24
26
31
Add New Purchase Order or Requisition
33
Add Type Dialog Box
Add Order Screen
Step One: Select Vendor
Step Two: Select Item
Step Three: Enter Item Information
Step Four: Select Shipping Address
Add Requisition Order Screen
Add Blanket Order Screen
Step One: Select Blanket Authorization
Step Two: Select Vendor
Step Three: Enter Item Information
Step Four: Select Shipping Address
34
35
36
38
40
44
46
47
47
49
49
49
Review/Edit Purchase Order or Requisition
51
Edit Type Dialog Box
Edit Orders Screen
Shipping and Notes Information Sub-Screen
52
53
59
Reports
61
Reports Screen
Default Report Formatting Options
Available Reports and Formatting Options
Producing a Report
62
63
64
65
Receiving Actions
67
Receive Purchase Orders Screen
Shipping and Notes Information Sub-Screen
68
74
Purge Received Purchase Orders
77
Requisition History
81
History Orders Screen
82
Index Databases
89
INTRODUCTION
The WinTen Purchase Order module is a program
designed for use on computers running the Windows 95, 98, ME, NT, or 2000 operating system.
The interface is designed in a Windows environment and includes point-and-click mouse actions,
pull-down menus, and Windows-based help functions. This manual contains all of the information
you need to use the WinTen Purchase Order
module (hereafter referred to as Purchase Order or
PO).
Version Information
This manual is written for the 9/20/2001 version
of Purchase Order. It does not apply to previous
versions of the program (including MS-DOS-based
ones) and some sections may be inaccurate with
regards to later versions.
Whenever Tenmast issues an update to this program, we will notify your agency through email. If
you have a current Update & Support Agreement
for this program, you may download and install
the update through the Tenmast Update Manager
program. During the download and installation
process, Update Manager will notify you of the
changes to the program.
We periodically update this manual to reflect significant changes to the program. You may download
this updated documentation from our Web site at
no charge.
Getting Help
Though we have made every effort to make this
manual as comprehensive as possible, no document
can cover all contingencies. If you encounter problems with Purchase Order, call the Tenmast Training
& Support Department toll-free at (877) 359-5492
or send email to [email protected].
Revisions
To better serve our clients, we constantly update
our manuals, just as we constantly make improvements in our programs. If you find an error or
omission in this documentation or have a suggestion for improving it, please call the Tenmast
Marketing/Communication Services Department
toll-free at (877) 836-6278 or send email to
[email protected].
WinTen Purchase Order • Introduction • Page 1
WINTEN BASICS
The WinTen modules are designed to provide quick
and easy access to commands and data throughout Tenmast’s programs. In WinTen, the mouse is
the primary navigation tool. You can also use the
keyboard to move through a WinTen program, but
navigation emphasis is on the mouse.
The WinTen system consists of more than 20
independent housing authority data management
programs that are capable of sharing data with
one another. Though each program has its own
unique functions and features, they all share certain common ones. This introduction explains these
common functions and features and how to use
them.
Navigation
Mouse Actions
In many instances, this manual will instruct you to
“click” something in order to give the program a
command. This refers to executing a command
with your mouse. These are the different ways in
which you may need to “click” to execute a command:
Click or Point-and-Click
Position the mouse pointer over the indicated object
on the screen, then press and release the left
mouse button once.
the mouse pointer
Double-Click
Position the mouse pointer over the indicated object
on the screen, then quickly press and release the
left mouse button twice.
Right-Click
Position the mouse pointer over the indicated object
on the screen, then press and release the right
mouse button once.
Drag and Drop
Position the mouse pointer over the indicated object
on the screen, then press and hold down the left
mouse button. While still holding down the button,
move the mouse pointer to where you want to place
the object and then release the button.
WinTen Purchase Order • WinTen Basics • Page 2
Keyboard Actions
There also are many ways to issue commands in
the WinTen programs with your keyboard. When
the manual instructs you to “press” a key or keys,
it is referring to the keys on your keyboard. The
manual indicates a key by enclosing it in less-than
and greater-than signs. For example, <Enter>
means “the Enter key.”
Moving Focus
When you first enter a screen, “focus” will be on a
particular button or data field. Focus is shown by a
dotted line around the inside of a button (as shown
at right) or a flashing cursor in a data field. When
a button has focus, you can activate it by pressing
<Enter>, which will have the same effect as if you
had clicked on it. When a data field has focus, you
can type data into it. You can move focus in either
situation by pressing <Tab>. If you are on a menu
of buttons, you can also move focus by using the
arrow keys.
with focus
Keyboard Shortcuts
Some commands have “keyboard shortcuts.” This
means you can execute the command through a
combination of keys. Keyboard shortcuts will use
a combination of a letter or number key plus either
the <Alt> (Alternate) or <Ctrl> (Control) key. The
manual abbreviates these commands in the format
<key+key>. For example, a command that you
give “by pressing <Alt+X>” is performed by holding
down <Alt> and pressing <X>.
The <Ctrl> and <Alt> keys are keys that modify
the way that the computer interprets other keys,
much like <Shift> does. When a key combination
includes one of these keys, it’s best to press and
hold the modifying key before pressing the other
key in the combination, because the modifying
key won’t type anything. To continue the previous
comparison, this is like using <Shift> to capitalize
the letter “a” while doing word processing. If you
pressed and held <A> before pressing <Shift>,
you’d type something like “aaaaaaaA.” However, if
you pressed and held <Shift> first, you’d just type
“A.” The same holds true for issuing commands
with key combinations that include <Alt> or <Ctrl>.
WinTen Purchase Order • WinTen Basics • Page 3
without focus
Buttons
In all WinTen programs, the screens contain buttons to access functions. Buttons are square or
rectangular and may contain pictures, text, or both.
This manual indicates a button with its name (“the
Reports button”) and/or a picture (as shown at
right). Buttons can be used in three ways:
1. Point-and-Click
2. Move focus to the button and press <Enter>
(remember, you move focus with <Tab> or the
arrow keys).
3. Press the key that corresponds to the underlined letter on the button (on the Reports button
shown to the right, this would be <R>), if there is
one.
Standard Buttons
Several buttons are standard in all WinTen programs. This means they always have the same
function regardless of the program in which they
are found.
Main Menu Buttons
These standard buttons are found on the Main
Menu screen.
Change Password Button
This button opens the Change Password dialog
box. In order to change your WinTen password,
you must first enter your old password, then type
your new password in two separate fields. This
keeps you from accidentally mistyping your new
password and setting it to something other than
what you intended. The OK button will remain disabled until you have the same thing in both new
password fields.
NOTE: The Change Password button is not visible if you do not have Tenmast Security activated.
Change Directories Button
This button opens the Program Directories dialog
box (shown at far right). This dialog box allows you
to change the data area in which you are working.
Click the desired data area to select it, then click
the OK button.
NOTE: The Change Directories button is not visible if your program only has one data area in
which to work.
WinTen Purchase Order • WinTen Basics • Page 4
Version Button
This button opens a dialog box (shown at far right)
that displays the version date of the program. Once
you have reviewed the version date of the program,
click the OK button to close this dialog box.
Reports Button
The Reports button opens the program’s Reports
screen. The specific reports you can view and print
from this screen vary depending on the program
in question. Please see the appropriate chapter of
this manual for details.
Index Button
The Index button allows you to re-index and/or pack
the program’s databases. Please see the appropriate chapter of that program’s manual for more
details on this process.
Setup Button
The Setup button opens the program’s Setup
screen. This screen allows you to change the
basic information that the program uses to generate reports and/or track data. Please see the
appropriate chapter of this manual for more details
on setup specifics.
Exit Button
The Exit button shuts down the program and closes
all associated windows.
Toolbar Icons
Many screens in the WinTen programs contain a
toolbar at the top of the screen. The toolbar contains the icons used to execute commands specific
to that screen. The example to the right is the standard toolbar found in many Add and Edit screens.
The following icons are standard in every WinTen
program, and most toolbars contain some or all of
them.
Exit Icon
The Exit icon is a picture of a doorway. This icon
closes the current screen or window and returns
you to the program’s Main Menu screen or the previous screen or window.
Add Button
The Add button is a plus sign. This button adds
a new record to the current database. After clicking the Add button, you will be able to enter the
appropriate information for the record that you are
adding.
WinTen Purchase Order • WinTen Basics • Page 5
Delete Icon
The Delete icon is a minus sign. This icon deletes
the record you are currently viewing from the database. In most cases, the program will prompt you
to confirm your intent to delete that record. This is a
safeguard to prevent accidental loss of data. Once
you have deleted a record, you cannot bring it back
— there is no “undo” feature in WinTen programs.
Edit Icon
The Edit icon is a wrench. Many data screens in
WinTen programs are “locked” when you first open
them. They display data but do not respond to any
attempt to change it. This is a safeguard to prevent
accidental loss of data. The Edit icon “unlocks” the
currently selected record and allows you to enter
updates or changes.
Save Icon
The Save icon is a page of data and a computer.
After editing or entering data, you must click this
icon to save your work on the currently selected
record to the database.
Cancel Icon
The Cancel icon is a circle with a line through it.
This icon allows you to abandon any changes you
have made to the currently selected record. In
many cases, the program will prompt you to confirm your cancellation. This is a safeguard to prevent accidental loss of data.
Previous Icon
The Previous icon is a left-pointing arrow. Clicking
on this icon takes you to the previous record in the
current database.
Next Icon
The Next icon is a right-pointing arrow. Clicking on
this icon takes you to the next record in the current
database.
Print Icon
The Print icon is a picture of a printer. If you are
in the Reports screen of a program, this button
prints the currently selected icon. If you are in any
other screen, this icon prints an image of the current screen.
Print Preview Icon
The Print Preview icon is a sheet of paper with
a starburst behind it. This icon opens a screen
that shows you what your document would look like
if you chose to print it. This feature allows you
to make sure that your print job is correct without
using paper for a test print run.
WinTen Purchase Order • WinTen Basics • Page 6
Search Icon
The Search icon is a flashlight. It saves you time by
opening a Search screen containing a table of all
the records in the current database. You can then
use this Search screen to quickly find the desired
record instead of scrolling through them one at a
time with the Previous and Next icons.
Report Generator Icon
The Report Generator icon is a page of data with
one corner folded down. This icon accesses the
user-defined data fields for the current database.
For more information, see the Tenmast Report Generator manual. If your agency does not use this
program, this icon will have no effect.
Other Standard Buttons
The following buttons appear throughout the WinTen
programs. They allow you to make choices on
screens and in dialog boxes.
OK and Yes Buttons
Click the OK or Yes button if you want to accept the
data presented or continue the action you started.
Some dialog boxes which only display information
without giving you command options will have OK
buttons that close them when clicked.
Cancel and No Buttons
Click the Cancel or No button if you want to abandon the current screen or the action you started.
Grayed Out Options
Some controls, buttons, or data fields may appear
light gray rather than appearing with their normal
full-color images (these buttons are colorized in the
WinTen programs, even though they may appear
in black-and-white in this manual). This condition
is referred to as “grayed out.” This indicates that
those options are disabled and cannot be accessed
at the present time. Grayed out options will be their
normal colors and accessible once the program
reaches a set of conditions that allows the option to
work again.
For example, when you initially enter an Edit/
Review screen to review data, the Save button will
be grayed out because you have not made any
changes that need to be saved. Once you click the
Edit button and edit the current item or items on the
screen, the Save button will become active, returning to full color. You can then use the Save button
to save your changes.
Save button grayed out
Save button active
WinTen Purchase Order • WinTen Basics • Page 7
Pull-Down Menus
Pull-down menus are located above the toolbar
and consist of one or more words, each with one
letter underlined. A pull-down menu is another way
to access the functions on the toolbar, and some
pull-down menus contain additional options that are
explained in each program’s documentation.
To open a pull-down menu, either click the word
or press <Alt+the underlined letter of the word>.
For example, to open the Tools menu shown to the
right, you would press <Alt+T>. When the menu
opens, it displays a list of commands that you can
execute, as shown to the right.
To execute pull-down menu commands with the
mouse, click on them. You can also use the keyboard to access the menu options in two ways:
1. Use the <up arrow> and <down arrow> keys
to move focus to the desired option, then press
<Enter> to execute it.
2. Some commands have a keyboard shortcut,
shown to the right of the menu option (see
Keyboard Shortcuts, above). These keyboard
shortcuts can be used at any time, even if the
pull-down menu is not open. Note that many of
the options that have keyboard shortcuts have
corresponding toolbar buttons.
Dialog Boxes
Occasionally, a small window will appear on top of
the screen in which you’re currently working. This
is called a dialog box. The contents of a dialog
box will vary. Some contain pertinent information
and have a single button which makes them disappear, while others allow you to specify options for a
procedure that you’ve told the program to perform.
WinTen Purchase Order • WinTen Basics • Page 8
Drop-Down Selection Boxes
Some screens have a data entry field with a small
black downward-pointing triangle at its immediate
right. Clicking on this triangle opens a small list of
pre-set options for that data field’s contents. This
is known as a drop-down selection box. Click an
option to select it.
Check Boxes
A small white box like the one shown to the right is
a check box. You can “check” and “uncheck” the
selection by clicking in the box. These are used just
like check boxes on pencil-and-paper forms — they
are simple yes-no conditions. In the example at
right, Receivables and Payables are checked and
Payroll is unchecked.
Radio Buttons
A cluster of small white circles, each with a label,
is a set of radio buttons. They have this name
because they work in a manner similar to the preset
station buttons on your car radio — you can only
have one radio station selected at a time. To select
a radio button, click on it and a black dot will appear
in the circle. Radio buttons are used when you
have two or more choices but only one of those
choices applies at any given time.
Scrollbars
Many times, a table of records holds more records
than the program can fit on the screen. The scrollbar is found on the right side of the table. To move
up or down through the table, click on the small
black triangles at the top and bottom of the scrollbar. The small box between the triangles is a rough
indicator of where you are within the table; think
of it as being similar to an elevator’s display that
shows how close to the top or bottom of the building the car is.
Some tables also have horizontal scrollbars if
they contain more information than will fit across
the screen. You can use the small black triangles
at the bottom left and right corners of the table to
move from side to side within it.
NOTE: Some drop-down selection boxes have
vertical scrollbars if they have more options
than will fit in the selection box when it is open.
WinTen Purchase Order • WinTen Basics • Page 9
These function in exactly the same manner as
the scrollbars on tables of records.
Tabs
Some screens have lots of information that must
be divided to be easier to track and access. In the
WinTen programs, these screens are divided into
tabs, which are so named because they resemble
the index tabs on file folders. Clicking on a tab will
WinTen Purchase Order • WinTen Basics • Page 10
change the data displayed on the screen and the
toolbar options available.
Function Keys
Across the top of your keyboard is a set of twelve
keys designated <F1> through <F12>. These are
the function keys. Currently, only <F1> and <F9>
have functions in the WinTen programs.
F1 Key (Help)
Pressing <F1> opens a Help dialog box for the program. Help is context-sensitive; the Help information shown will correspond to the current field or
screen in the program. The WinTen programs contain a Windows-based Help system. With this type
of Help, you can search for any Help topic, print the
current topic, mark a specific topic using a bookmark, or jump to another Help screen by clicking
the underlined keywords.
F9 Key (Change Password)
Pressing <F9> is equivalent to clicking the Change
Password button. This only works when you are at
WinTen Purchase Order • WinTen Basics • Page 11
WinTen Purchase Order • WinTen Basics • Page 12
PROGRAM OVERVIEW
The WinTen Purchase Order program is designed
to assist you in managing financial and logistical
information for all items your agency purchases.
It allows you to work with requisitions, purchase
orders, and blanket purchase authorizations.
When you issue a requisition or purchase order,
Purchase Order tracks the items to be purchased
and their vendor and shipping information. When
you receive the items, you can record their receipt
in the program. Because Purchase Order maintains a perpetual log of all previous orders, you can
“recycle” and re-issue previously-issued orders if
you need to purchase the same items again.
Program Integration
As with all WinTen software, Purchase Order is
designed to integrate with other programs in the
WinTen product line. This data sharing allows for
more efficient operation, as multiple programs can
pass data back and forth without the need for operator intervention. Purchase Order integrates with
the following other WinTen modules:
Consumable Inventory
Purchase Order reads standard consumable item
information from Consumable Inventory’s item database. This allows you to place standard items
directly on a purchase order without having to look
up part numbers or stock numbers. When you
mark a purchase order as “received,” Purchase
Order updates Consumable Inventory’s inventory
values for the items on the order.
General Ledger
Purchase Order reads General Ledger account
numbers from General Ledger’s database. This
allows you to record the account number against
which each purchased item’s cost should be
expensed.
Accounts Payable
Purchase Order reads vendor information from
Accounts Payable’s vendor database. This allows
you to place a vendor on a purchase order without
having to look up account numbers or addresses.
WinTen Purchase Order • Program Overview • Page 13
WinTen Purchase Order • Program Overview • Page 14
PURCHASE ORDER CYCLE
A purchase order goes through four basic steps in
its life.
Step One: Add Requisitions and Orders
Typically, you will create a requisition and pass it on
for approval. If you have the authority to do so, you
can also create a purchase order without sending it
through the requisition approval process first.
You should create a requisition or purchase order
as soon as the need for it arises. When you enter
the data into the program, Purchase Order gives
you a PO number, which you can provide to your
vendor to simplify the transaction process.
Step Two: Approval
Once you’ve created a requisition, a supervisor
needs to approve it, at which point it becomes a
purchase order. If you have supervisor authority,
you can create purchase orders without creating
them as requisitions first.
Step Three: Editing
Between the time you send the purchase order to
the vendor and the time you receive the items from
the vendor, you may need to edit the purchase
order several times. This can include entering shipping data, deleting items if the vendor didn’t have
them in stock, adding items if a last-minute need
arose, or changing minor details of the order.
Step Four: Receiving
As the items that you have ordered are delivered,
record them as received.
WinTen Purchase Order • Purchase Order Cycle • Page 15
Other Actions
Other actions may also become necessary at some
point in a purchase order’s life cycle:
Step One Variation: Restore from History
Purchase Order maintains a log of all previous purchase orders created. You can re-issue these for
repeated orders.
Step Three Variation: Cancel Order
Some orders may become invalid before they are
received – the vendor may go out of business, you
may discover a spare whatever-you-needed in the
supply closet, and so on. In such an event, you will
need to cancel the order. You can do this from the
Edit Order screen, the same screen from which you
edit purchase orders.
WinTen Purchase Order • Purchase Order Cycle • Page 16
MAIN MENU
The Main Menu is the starting point for using each
function of the Purchase Order program. This
manual details each of these functions in its respective chapter.
WinTen Purchase Order • Main Menu • Page 17
WinTen Purchase Order • Main Menu • Page 18
SETUP
The first time you run Purchase Order, the first
option you should select from the Main Menu is
Setup. All WinTen programs have Setup functions.
The settings in the Setup screen control the program environment, and you can change many
aspects of the program’s operation through these
settings. Be careful to enter the proper information,
as inaccurate settings can cause Purchase Order
to function in an unexpected manner.
The individual in charge of your WinTen programs
should periodically review each program’s Setup to
ensure that it is still correct. Access to the Setup
screen should be restricted through the Tenmast
Security program after the initial settings have been
entered in order to prevent accidental changes to
the settings.
To use the Setup functions, click the Setup button
or press <S> at the Main Menu.
WinTen Purchase Order • Setup • Page 19
SETUP SCREEN
The Setup screen has five tabs: Default Settings,
Color, Ship To, Blanket Orders, and Comments.
The Setup screen always opens on the Default Settings tab, as shown below.
Default Settings Tab
The Default Settings tab contains your agency’s
identifying information. It also holds financial information for sales tax and tax exemption, and data on
how Purchase Order integrates with other WinTen
programs. Edit the data on this tab and save or
cancel your changes with the standard WinTen
icons.
Default Settings Tab Data Fields
Organization Name
This is your agency’s name as it should appear on
printed purchase orders.
Address
This is your agency’s street address.
City, State, Zip
This is your agency’s city, state, and zip code.
WinTen Purchase Order • Setup • Page 20
Phone
This is your agency’s phone number.
PO Prefix
This field is for a one- or two-letter prefix for purchase order numbers. If you enter anything in this
field, each purchase order that the program generates will have its number prefixed with this field’s
contents.
Fed. Tax ID#
This is your agency’s federal taxpayer ID number.
Taxable Rate
This is your agency’s state sales tax.
State Tax Exempt #
This is your agency’s state tax exemption number.
Search Path
This is the path on your network to the directory in
which your WinTen program files are stored.
Hint: Taxable Rate
The Taxable Rate field is a percentage field. For example,
you should enter a 6% tax rate as 6.00, not as 0.06.
If your agency does not pay sales tax, leave this field set to
zero.
Cons. Inv. Directory
This is the path on your network to the directory
in which your WinTen Consumable Inventory databases are stored. If your agency does not use
Consumable Inventory, leave this field blank.
Pbl/Vendor Directory
This is the path on your network to the directory
in which your WinTen Accounts Payable databases
are stored. If your agency does not use Accounts
Payable, leave this field blank.
Ledger Directory
This is the path on your network to the directory
in which your WinTen General Ledger databases
are stored. If your agency does not use General
Ledger, leave this field blank.
Approved By signature line on POs?
If you want a signature line for approval to appear
on printed purchase orders, check this box.
Reviewed By signature line on POs?
If you want a signature line for review to appear on
printed purchase orders, check this box.
PO Number
This is the number that the program will assign to
the next purchase order created.
REQ Number
This is the number that the program will assign to
the next requisition created.
Hint: PO and REQ Numbers
You may want to change these number annually, using the
first two or four digits of the PO number to identify the year
(e.g. 02#### for 2002 purchase orders). You may not enter
a PO or REQ number that already exists, as the program
will not accept duplicates.
WinTen Purchase Order • Setup • Page 21
Color Tab
The Color tab allows you to set the colors used in
Purchase Order’s screens. The Foreground set of
radio buttons sets text color, while the Background
set of radio buttons sets the color of the background. The Bright check box sets the high-intensity version of that color. Select the color scheme
you want, then click the Save icon to save your
selections.
Hint: Color Settings
A color setting, like any other setting, is only applied to the
current data area. Many agencies use this feature to colorcode their data areas so users can tell at a glance what
data area they’re currently using.
WinTen Purchase Order • Setup • Page 22
Ship To Tab
The Ship To tab allows you to set up shipping label
information for different departments or locations
within your organization. When you create a purchase order, you usually will insert one of these
records into that purchase order.
The top of the tab contains a table of all shipping
label records. The bottom of the tab contains the
detailed information for the currently selected shipping label. Edit the data on this tab, add or delete
shipping information records, and save or cancel
your changes with the standard WinTen icons.
Ship To Tab Data Fields
Name
This is the name which should appear on the shipping label.
Address 1 and Address 2
These are the street address and additional information (e.g. “care of”) which should appear on the
shipping label.
City, State, Zip
This is the city, state, and zip code which should
appear on the shipping label.
WinTen Purchase Order • Setup • Page 23
Blanket Orders Tab
The Blanket Orders tab allows you to create blanket purchase authorizations. A blanket authorization is a pre-approved spending limit for a selected
type of item. A blanket authorization allows users
to create purchase orders for that item (referred
to as “blanket purchase orders”) without supervisor
approval, up to the spending limit authorized for the
item.
The left side of the Blanket Orders tab contains
a list of all blanket authorizations currently in Purchase Order’s database. The right side of the tab
contains the detailed information for the currently
selected blanket authorization. Edit the data on this
tab, add or delete blanket authorizations records,
and save or cancel your changes with the standard
WinTen icons.
Blanket Orders Tab Icons
Adjust Limit Icon
Click the Adjust Limit icon to edit the blanket limit
(see below) for the currently selected blanket authorization. When you are done, click the Save icon to
save your change or the Cancel icon to cancel it.
WinTen Purchase Order • Setup • Page 24
Blanket Orders Tab Data Fields
When you create a blanket authorization, Purchase
Order draws most of the data on this tab from the
WinTen Consumable Inventory item database and
the WinTen Accounts Payable vendor database.
Stock Number
This is the item’s stock number in Consumable
Inventory.
Part Number
This is the manufacturer’s part number for the
item.
Description
This is a short description of the item.
Model Number
This is the manufacturer’s model number for the
item.
Location
This is the item’s primary storage location in your
agency.
Unit Cost
This is the item’s per unit cost.
Vendor Pack
This is the quantity of the item that gives the best
per unit price.
Blanket Limit
This is the established spending limit for the item.
Amount Used
This is the amount that has been spent toward the
blanket limit on the item.
Amount Remaining
This is the amount of the blanket limit that is
unspent.
Default Vendor Number
This is the Accounts Payable vendor number for the
default vendor for this item.
Default Contact
This is the primary point of contact for the default
vendor.
Default Vendor Name
This is the name of the default vendor.
Who Created
These are the initials of the user who created the
blanket authorization.
Date Created
This is the date on which the blanket authorization
was created.
WinTen Purchase Order • Setup • Page 25
Create Blanket Order Sub-Screen
If you click the Add icon on the Blanket Orders
tab to add a new blanket authorization, the Create
Blanket Order sub-screen opens. This sub-screen
allows you to create a new blanket authorization.
The contents of this sub-screen change as you
move through the steps of adding the blanket
authorization.
Step One
When the Create Blanket Order sub-screen first
opens, it is on Step One. In this step, the screen
allows you to select or enter a vendor for this blanket authorization.
WinTen Purchase Order • Setup • Page 26
The left side of the screen contains a list of every
vendor in the Purchase Order database (which
is every vendor in the WinTen Accounts Payable
vendor database plus any vendors who have been
added to the Purchase Order database). This list
is sorted by vendor full name, vendor number, or
vendor last name, depending on which of the Sort
Order radio buttons is currently selected. The right
side of the screen contains the detailed information
for the currently selected vendor.
Enter a unique identifier for this blanket authorization in the Blanket ID field. Select a vendor by clicking on that vendor’s entry in the list. Then click the
Use Data icon. The program moves to Step Two.
Step One Data Fields
Blanket ID
This is the unique identifier for this blanket order.
This is the only field that you can edit in this step.
General Information
Initials
These are the initials of the user entering the purchase order. You cannot edit this field – the program fills it in automatically.
Date
This is the date of the purchase order. This field
defaults to the current system date,
Vendor Information
Vendor
This is the vendor’s name.
Vendor #
This is the vendor’s unique identifying number in
the Purchase Order database.
Tax ID #
This is the vendor’s taxpayer ID number. If you
are entering a custom vendor, you cannot edit this
field.
Cust. Acct.
This is your agency’s customer account number
with the vendor. If the vendor is not in the Purchase
Order vendor database, you cannot edit this field.
Phone
This is the vendor’s phone number. If you are entering a custom vendor, you cannot edit this field.
Contact
This is the name of your agency’s primary point of
contact with the vendor.
WinTen Purchase Order • Setup • Page 27
Address 1 and Address 2
These two fields are the vendor’s street address.
City, State, Zip Code
These three fields are the vendor’s city, state, and
zip code.
Minority
If this box is checked, the vendor falls under MBE
(Minority Business Enterprise) laws. You cannot
check this box for a custom vendor.
1099 Needed
If this box is checked, the vendor must receive a
1099 form at the end of every year. You cannot
check this box for a custom vendor.
WinTen Purchase Order • Setup • Page 28
Step Two
In Step Two, the Create Blanket Order sub-screen
allows you to select or enter an item for the blanket
authorization. The left side of the screen contains
a list of every item in the Purchase Order database
(which is every vendor in the WinTen Consumable
Inventory item database plus any items that have
been added to the Purchase Order database). This
list is sorted by stock number, item description,
part number, or consumable item storage location,
depending on which of the Sort Order radio buttons
is currently selected. The right side of the screen
contains the detailed information for the currently
selected item.
To select an existing item, enter a blanket limit in the
Blanket Limit field. Then click on that item’s entry
in the list and click the Use Data icon. The program
saves the blanket authorization and returns to the
Blanket Orders tab of the Setup screen.
WinTen Purchase Order • Setup • Page 29
To enter a new item, click the Custom Item icon.
The data fields required for the custom item data
become editable. Enter the data for the custom
item and the blanket limit and click the Use Data
icon. The program saves the blanket authorization
and returns to the Blanket Orders tab of the Setup
screen.
Step Two Data Fields
You cannot edit the data fields presented in Step
Two. They are displayed for informational purposes. If the item is one from the Consumable
Inventory program’s consumable item database,
Purchase Order automatically draws the item information from Consumables.
Blanket Limit
This is the pre-authorized spending limit for this
blanket authorization. This is the only field you can
edit in Step Two if you are not adding a custom
item.
Item Number
This is the item’s stock number.
Description
This is a short description of the item.
Unit Value
This is the item’s per unit value, calculated as the
average per unit price that your agency has previously paid for it.
L-Recv. Unit Cost
This is the last received cost of the item (the per
unit price your agency paid the last time this item
was ordered). This field may be blank if your
agency has not received this item recently.
Part Number
This is the manufacturer’s part number for the
item.
Model Number
This is the manufacturer’s model number for the
item.
Location
This is your agency’s primary storage location for
the item.
Vendor Pack
This is the quantity of this item that gives the best
per unit price.
WinTen Purchase Order • Setup • Page 30
Comments Tab
The Comments tab contains the default text for the
comment lines that will appear on every printed
purchase order and requisition. Edit the data on
this tab, add or delete shipping information records,
and save or cancel your changes with the standard
WinTen icons.
WinTen Purchase Order • Setup • Page 31
WinTen Purchase Order • Setup • Page 32
ADD NEW PURCHASE ORDER
OR REQUISITION
The primary purpose of the WinTen Purchase Order
program is to track and manage purchase order
and requisition data. To create a new purchase
order or requisition, click the Add button or press
<A> at the Main Menu.
WinTen Purchase Order • Add New Purchase Order/Requisition • Page 33
Add Type Dialog Box
When you begin the process of adding a new purchase order or requisition, the Add Type dialog box
opens. Click the button that corresponds to what
you are adding: a new purchase order, a new blanket purchase order, or a new requisition.
If you click the Standard Purchase Order button,
the Add Order screen opens.
If you click the Blanket Purchase Order button, the
Add Blanket Order screen opens.
If you click the Requisition button, the Add Requisition Order screen opens.
WinTen Purchase Order • Add New Purchase Order/Requisition • Page 34
ADD ORDER SCREEN
The Add Order screen controls the process of
adding a new purchase order or requisition. This
screen will change several times during the process, displaying new data fields for you to enter
new information about the purchase order. For
more details, see the following diagram:
Hint: What about requisitions and blanket orders?
The processes for adding requisitions and blanket orders
are nearly identical to the process for adding a standard
purchase order. This chapter will address the differences
after outlining the purchase order addition process, which is
the one most agencies will use the majority of the time.
WinTen Purchase Order • Add New Purchase Order/Requisition • Page 35
Step One: Select Vendor
When it first opens, the Add Order screen is on
Step One. In this step, the screen allows you to
select or enter a vendor for this purchase order.
The left side of the screen contains a list of every
vendor in the Purchase Order database (which
is every vendor in the WinTen Accounts Payable
vendor database plus any vendors who have been
added to the Purchase Order database). This list
is sorted by vendor full name, vendor number, or
vendor last name, depending on which of the Sort
Order radio buttons is currently selected. The right
side of the screen contains the detailed information
for the currently selected vendor.
To select an existing vendor, click on that vendor’s
entry in the list and click the Use Data icon. The
program moves to Step Two.
To enter a new vendor, click the Custom Vendor
icon. The data fields required for a custom vendor
become editable. Enter the data for the custom
vendor and click the Use Data icon. The program
moves to Step Two.
WinTen Purchase Order • Add New Purchase Order/Requisition • Page 36
Step One Data Fields
General Information
Initials
These are the initials of the user entering the purchase order. You cannot edit this field – the program fills it in automatically.
Hint: Adding a Custom Vendor
If you add a custom vendor in Purchase Order, the vendor
will not be entered in the WinTen Accounts Payable program. You must go into Accounts Payable and create a
new vendor record in that program as well.
Date
This is the date of the purchase order. This field
defaults to the current system date,
Vendor Information
Vendor
This is the vendor’s name.
Vendor #
This is the vendor’s unique identifying number in
the Purchase Order database.
Tax ID #
This is the vendor’s taxpayer ID number. If you
are entering a custom vendor, you cannot edit this
field.
Cust. Acct.
This is your agency’s customer account number
with the vendor. If you are entering a custom
vendor, you cannot edit this field.
Phone
This is the vendor’s phone number. If you are entering a custom vendor, you cannot edit this field.
Contact
This is the name of your agency’s primary point of
contact with the vendor.
Address 1 and Address 2
These two fields are the vendor’s street address.
City, State, Zip Code
These three fields are the vendor’s city, state, and
zip code.
Minority
If this box is checked, the vendor falls under MBE
(Minority Business Enterprise) laws. You cannot
check this box for a custom vendor.
1099 Needed
If this box is checked, the vendor must receive a
1099 form at the end of every year. You cannot
check this box for a custom vendor.
WinTen Purchase Order • Add New Purchase Order/Requisition • Page 37
Step Two: Select Item
In Step Two, the Add Order screen allows you to
select or enter an item for this purchase order. The
left side of the screen contains a list of every item
in the Purchase Order database (which is every
vendor in the WinTen Consumable Inventory item
database plus any items that have been added to
the Purchase Order database). This list is sorted
by stock number, item description, part number, or
consumable item storage location, depending on
which of the Sort Order radio buttons is currently
selected. The right side of the screen contains the
detailed information for the currently selected item.
To select an existing item, click on that item’s entry
in the list and click the Use Data icon. The program
moves to Step Three.
To enter a new item, click the Custom Item icon.
The program moves to Step Three and the data
fields required for the custom item data become
editable.
WinTen Purchase Order • Add New Purchase Order/Requisition • Page 38
Step Two Data Fields
You cannot edit the data fields presented in Step
Two. They are displayed for informational purposes.
For items that are in the Consumable Inventory
database, Purchase Order draws this data from
Consumables.
Item Number
This is the item’s stock number.
Description
This is a short description of the item.
Unit Value
This is the item’s per unit value, calculated as the
average per unit price that your agency has previously paid for it.
L-Recv. Unit Cost
This is the last received cost of the item (the per
unit price your agency paid the last time this item
was ordered). This field may be blank if your
agency has not received this item recently.
Part Number
This is the manufacturer’s part number for the
item.
Model Number
This is the manufacturer’s model number for the
item.
Location
This is your agency’s primary storage location for
the item.
Vendor Pack
This is the quantity of this item that gives the best
per unit price.
WinTen Purchase Order • Add New Purchase Order/Requisition • Page 39
Step Three: Enter Item Information
In Step Three, the Add Order screen allows you to
enter the quantity and pricing information for the
item you selected in Step Two. If you chose to enter
a custom item, you must also enter the identifying
information for this item. When you are finished
entering the information for the item, click the Save
icon. After you have saved the item, you have several options for the purchase order.
To add another item to the purchase order, click the
Add icon. The program returns to Step Two.
To remove the current item from the purchase
order, click the Delete icon.
To review the current total value of the purchase
order, click the Order Details icon. A dialog box
opens which displays the total number of items on
the order and their total value.
WinTen Purchase Order • Add New Purchase Order/Requisition • Page 40
To add additional information to the purchase order
regarding the current item, click the More Description button. The More Description dialog box opens.
Enter any additional information you want to appear
on the printed purchase order and click OK.
When you have added and saved the last item on
the purchase order, click the Finished icon to proceed to Step Four.
Step Three Data Fields
Vendor Information
The Vendor Information fields allow you to review
the details of the vendor selected for this purchase
order. You cannot edit these fields.
Cust. Acct.
This is your agency’s customer account number
with the vendor.
Vendor Name
This is the vendor’s name.
Contact
This is the name of your agency’s primary point of
contact with the vendor.
Address 1 and Address 2
These two fields are the vendor’s street address.
City, State, Zip Code
These three fields are the vendor’s city, state, and
zip code.
Vendor #
This is the vendor’s unique identifying number in
the Purchase Order database.
Tax ID #
This is the vendor’s taxpayer ID number.
1099 Needed
If this box is checked, the vendor must receive a
1099 form at the end of every year.
Minority
If this box is checked, the vendor falls under MBE
(Minority Business Enterprise) laws.
Phone
This is the vendor’s phone number.
WinTen Purchase Order • Add New Purchase Order/Requisition • Page 41
Purchase Order
The Purchase Order fields display the details of
the purchase order and the currently selected item.
Unless otherwise indicated, you cannot edit these
fields – the program automatically calculates them
or draws them from other WinTen programs.
Ordered By
These are the initials of the user who added the
item to the purchase order.
Ord. Date
This is the date on which the purchase order was
created.
Approved By
These are the initials of the user who approved the
purchase order.
App. Date
This is the date on which the purchase order was
approved.
Item Number
This is the item’s stock number. If this is a custom
item, the program defaults to “199” as the stock
number for custom items, but you can change this
to another stock number.
Item Ident
This is a short description of the item. If this is a
custom item, you can edit this field.
Quantity
This is the quantity of this item on the purchase
order. You can edit this field, or click the arrow buttons to the right of the field to adjust this number up
or down.
Unit Cost
This is the per unit cost of this item. You can edit
this field, or click the arrow buttons to the right of
the field to adjust this number up or down.
Tax Rate
This is the state sales tax rate on this item. The
default value of this field is the state sales tax rate
as set on the Default Settings tab of the Setup
screen. You can edit this field, or click the arrow
buttons to the right of the field to adjust this number
up or down.
Tax Cost
This is the total sales tax on the item.
Extended Cost
This is the total cost of the quantity of this item
ordered, without sales tax.
WinTen Purchase Order • Add New Purchase Order/Requisition • Page 42
Total Cost
This is the tax cost plus the extended cost.
PO Number
This is the purchase order number for this PO.
GL Acc. Number
This is the General Ledger account number against
which this item will be expensed.
Location
This is your agency’s primary storage location for
the item. If this is a custom item, you can edit this
field.
Hint: PO Number
While you are creating the purchase order, the program
assigns it a temporary PO number of “PO” and your initials.
Once you complete the purchase order, the program will
assign it a standard PO number.
Hint: GL Account Number
When you move to the GL Acc. Number field, the Add Order
changes to display a list of General Ledger account numbers, as shown below. Select the correct account number
and click the Use Data icon to return to Step Three.
Vendor Pack
This is the quantity of this item that gives the best
per unit price. If this is a custom item, you can edit
this field.
Receiving Actions
The Receiving Actions data fields record the last
three times your agency has ordered the current
item. You cannot edit these fields.
Date
This is the date on which your agency received the
shipment.
Qty.
This is the quantity of the item your agency
received.
Unit Cost
This is the unit cost for the item in the specified
shipment.
Total Cost
This is the total cost of the item in the specified
shipment.
Totals
These are the total quantity, unit cost, and total cost
of the item for the last three shipments received.
Still On Order
This is the quantity of the item that is still on order
(has been ordered but has not yet been received).
WinTen Purchase Order • Add New Purchase Order/Requisition • Page 43
Step Four: Select Shipping Address
In Step Four, the Add Order screen allows you to
select or enter a shipping address for this purchase
order. The top of the screen contains a list of every
shipping address set up on the Ship To tab of the
Setup screen. The bottom of the screen contains
the detailed information for the currently selected
address.
To select an existing address, click on that address’
entry in the list and click the Use Data icon. The
program completes the PO addition process and
saves the purchase order.
To enter a new item, click the Custom Information
icon. The data fields become editable. Enter the
shipping address for this PO and click the Use Data
icon. The program completes the PO addition process and saves the purchase order.
After the program saves the PO, a dialog box
appears that asks if you want to print the purchase
order. Click Yes to print it or No to return to the Main
Menu without printing the PO at this time.
WinTen Purchase Order • Add New Purchase Order/Requisition • Page 44
Step Four Data Fields
Name
This is the name which should appear on the shipping label.
Address 1 and Address 2
These are the street address and additional information (e.g. “care of”) which should appear on the
shipping label.
City, State, Zip
This is the city, state, and zip code which should
appear on the shipping label.
WinTen Purchase Order • Add New Purchase Order/Requisition • Page 45
ADD REQUISITION ORDER SCREEN
The Add Requisition Order screen is identical to
the Add Order screen, except for its name.
The process for adding a requisition is identical to
that for adding a purchase order, except that the
completed requisition receives a requisition number
instead of a purchase order number.
WinTen Purchase Order • Add New Purchase Order/Requisition • Page 46
ADD BLANKET ORDER SCREEN
The Add Blanket Order screen is similar to the Add
Order screen. However, some steps in the process
of adding a blanket order are different from those in
adding a regular purchase order.
Step One: Select Blanket Authorization
In Before you select a vendor for the blanket order,
you must select a blanket authorization against
which you are placing the order. The left side of
the Add Blanket Order screen displays a list of all
blanket authorizations that are set up on the Blanket Orders tab of the Setup screen. The right side
of the screen displays the detailed information for
the currently selected blanket authorization.
Select a blanket authorization and click the Use
Data icon to proceed to Step Two.
WinTen Purchase Order • Add New Purchase Order/Requisition • Page 47
Step One Data Fields
Stock Number
This is the item’s stock number in the Consumable
Inventory program.
Part Number
This is the manufacturer’s part number for the
item.
Description
This is a short description of the item.
Model Number
This is the manufacturer’s model number for the
item.
Location
This is the item’s primary storage location in your
agency.
Unit Cost
This is the item’s per unit cost.
Vendor Pack
This is the quantity of the item that gives the best
per unit price.
Blanket Limit
This is the established spending limit for the item.
Amount Used
This is the amount that has been spent toward the
blanket limit on the item.
Amount Remaining
This is the amount of the blanket limit that is
unspent.
Default Vendor Number
This is the vendor number in the Accounts Payable
program for the default vendor for this item.
Default Contact
This is the primary point of contact for the default
vendor.
Default Vendor Name
This is the name of the default vendor.
Who Created
These are the initials of the user who created the
blanket authorization.
Date Created
This is the date on which the blanket authorization
was created.
WinTen Purchase Order • Add New Purchase Order/Requisition • Page 48
Step Two: Select Vendor
Step Two of adding a blanket order works exactly
the same as Step One of adding a purchase order
or requisition.
Step Three: Enter Item Information
Step Three of adding a blanket order works exactly
the same as Step Three of adding a purchase order
or requisition, with the following exception:
When you click the Order Details icon, the Order
Details dialog box also displays the authorized
amount remaining on the blanket authorization
against which you are placing the order.
Step Four: Select Shipping Address
Step Four of adding a blanket order works exactly
the same as Step Four of adding a purchase order
or requisition.
WinTen Purchase Order • Add New Purchase Order/Requisition • Page 49
WinTen Purchase Order • Add New Purchase Order/Requisition • Page 50
REVIEW/EDIT PURCHASE ORDER
OR REQUISITION
Nice as it would be if this were the case, a purchase order or requisition doesn’t simply take care
of itself once you enter it into the database (discussed in the previous chapter). You may need
to edit or delete orders, and all requisitions need
to be approved before they can become purchase
orders. To review or edit an existing item record, or
to review, edit, and approve a requisition, click the
Edit button or press <E> at the Main Menu.
WinTen Purchase Order • Review/Edit Purchase Order or Requisition • Page 51
Edit Type Dialog Box
When you begin the process of reviewing a purchase order or requisition, the Edit Type dialog box
opens. Click the button that corresponds to what
you are reviewing: a purchase order or a requisition. The Edit Orders screen opens.
WinTen Purchase Order • Review/Edit Purchase Order or Requisition • Page 52
EDIT ORDERS SCREEN
The Edit Orders screen is the central point from
which you can review and edit purchase orders.
In the upper right area of the screen is a list of
purchase order numbers. The rest of the screen
displays the detailed information for the purchase
order that is selected in this list. You can use the
adjacent Sort Order radio buttons to sort the list
by purchase order number, vendor number, vendor
name, or blanket authorization ID.
Use the standard WinTen icons to add items to or
remove items from the selected purchase order,
edit items, and save or cancel your changes.
Hint: Requisitions
If you are editing requisitions instead of purchase orders,
this screen has several minor differences:
• The list of numbers in the upper right area of the screen is
labeled “Requisition” instead of “Purchase Order.”
• The first Sort Order option is labeled “REQ Number”
instead of “PO Number.”
• The Approve Requisition icon (shown below) is available
on the toolbar.
Hint: Multiple Items on One PO
If one purchase order contains multiple items, the list of PO
numbers has one copy of the PO number for each item.
You can only view one item at a time.
WinTen Purchase Order • Review/Edit Purchase Order or Requisition • Page 53
Adding an Item to an Existing Order
If you click the Add icon, the Edit Orders screen
changes to allow you to enter the new item. The left
side of the screen contains a list of every item in the
Purchase Order database (which is every vendor in
the WinTen Consumable Inventory item database
plus any items that have been added to the Purchase Order database). This list is sorted by stock
number, item description, part number, or consumable item storage location, depending on which of
the Sort Order radio buttons is currently selected.
The right side of the screen contains the detailed
information for the currently selected item.
To select an existing item, click on that item’s entry
in the list and click the Use Data icon. The screen
returns to its normal appearance and allows you to
enter the financial information for the item.
Hint: Adding an Item
When the Edit Orders screen is in this mode, the data fields
it displays are exactly the same as those shown on the Add
Order screen when it is in Step Two. See the previous
chapter for more information.
To enter a new item, click the Custom Item icon.
The screen returns to its normal appearance and
allows you to enter the identifying and financial
information for the item.
WinTen Purchase Order • Review/Edit Purchase Order or Requisition • Page 54
Edit Orders Screen Icons
Order Details Icon
If you click the Order Details icon, the Order Details
dialog box opens. This dialog box displays the total
number of items on the currently selected order
and their total value. If the order is a blanket purchase order, it also displays the remaining amount
for the corresponding blanket authorization.
Cancel Order Icon
Click the Cancel Order icon to delete the selected
purchase order. A dialog box appears that warns
you that you are about to delete the selected purchase order. Click OK to delete the order or No to
cancel the deletion.
Print Status Icon
Click the Print Status icon to change the selected
purchase order’s print status between “printed” and
“not printed.”
Edit Vendor Icon
The Edit Vendor icon allows you to edit the vendor
specified for the selected purchase order. When
you click this icon, the vendor information fields
become editable. Use the standard WinTen icons
to save or cancel your changes.
Edit Ship To Address Icon
Click this icon to edit the selected purchase order’s
shipping information. The Edit Orders screen
changes to display the order’s shipping information
(see right).
To manually edit the shipping address, make your
changes and click the Use Data icon. The Edit
Orders screen returns to its normal appearance.
To enter a new shipping address from the Purchase
Order database, click the Ship To List icon. A list
of all shipping addresses that are set up in the program appears in the middle of the screen. Select
the correct address from this list and click the Use
Data icon. The Edit Orders screen returns to its
normal appearance.
WinTen Purchase Order • Review/Edit Purchase Order or Requisition • Page 55
Approve Requisition Icon
Click this icon to approve a requisition and transfer
it to a purchase order. When you click this icon,
the program goes through a sequence of database
commands. When the process of transferring the
requisition is complete, a dialog box opens that tells
you what the new purchase order’s unique identifying number is.
NOTE: The Approve Requisition icon is only
available if you are reviewing and editing requisitions. It does not appear if you are reviewing
and editing purchase orders.
Shipping and Notes Info Icon
The Shipping and Notes Info icon opens the Shipping and Notes Information sub-screen (described
later in this chapter).
Edit Orders Screen Data Fields
Vendor Information
The Vendor Information fields allow you to review
the details of the vendor selected for this purchase
order. You cannot edit these fields normally; you
must use the Edit Vendor icon to edit them.
Vendor Number
This is the vendor’s unique identifying number in
the Purchase Order database.
Vendor Name
This is the vendor’s name.
Contact
This is the name of your agency’s primary point of
contact with the vendor.
Address 1 and Address 2
These two fields are the vendor’s street address.
City, State, Zip Code
These three fields are the vendor’s city, state, and
zip code.
Purchase Order
Ordered By
These are the initials of the user who added the
item to the purchase order.
Ord. Date
This is the date on which the purchase order was
created.
Approved By
These are the initials of the user who approved the
purchase order.
WinTen Purchase Order • Review/Edit Purchase Order or Requisition • Page 56
App. Date
This is the date on which the purchase order was
approved.
Item Number
This is the item’s stock number. If this is a custom
item, the program defaults to “199” as the stock
number for custom items.
Item Ident
This is a short description of the item.
Quantity
This is the quantity of this item on the purchase
order. You can edit this field, or click the arrow buttons to the right of the field to adjust this number up
or down.
Unit Cost
This is the per unit cost of this item. You can edit
this field, or click the arrow buttons to the right of
the field to adjust this number up or down.
Tax Rate
This is the state sales tax rate on this item. The
default value of this field is the state sales tax rate
as set on the Default Settings tab of the Setup
screen. You can edit this field, or click the arrow
buttons to the right of the field to adjust this number
up or down.
Tax Cost
This is the total sales tax on the item. You cannot
edit this field; the program automatically calculates
it.
Extended Cost
This is the total cost of the quantity of this item
ordered, without sales tax. You cannot edit this
field; the program automatically calculates it.
Total Cost
This is the tax cost plus the extended cost. You
cannot edit this field; the program automatically calculates it.
Hint: GL Account Number
When you move to the GL Acc. Number field, the Edit
Orders screen changes to display a list of General Ledger
account numbers, as shown below. Select the correct
account number and click the Use Data icon to return to the
Edit Orders screen.
PO Number
This is the purchase order number for this PO.
GL Acc. Number
This is the General Ledger account number against
which this item will be expensed.
Location
This is your agency’s primary storage location for
the item. If this is a custom item, you can edit this
field.
WinTen Purchase Order • Review/Edit Purchase Order or Requisition • Page 57
Vendor Pack
This is the quantity of this item that gives the best
per unit price. If this is a custom item, you can edit
this field.
Receiving Actions
The Receiving Actions data fields record the last
three times your agency has ordered the current
item. You cannot edit these fields.
Date
This is the date on which your agency received the
shipment.
Qty.
This is the quantity of the item your agency
received.
Unit Cost
This is the unit cost for the item in the specified
shipment.
Total Cost
This is the total cost of the item in the specified
shipment.
Totals
These are the total quantity, unit cost, and total cost
of the item for the last three shipments received.
Still On Order
This is the quantity of the item that is still on order
(has been ordered but has not yet been recorded
as received).
WinTen Purchase Order • Review/Edit Purchase Order or Requisition • Page 58
Shipping and Notes Information Sub-Screen
The Shipping and Notes Information sub-screen
contains additional information on the selected purchase order’s shipping arrangements, and space
for general notes on it. When you enter this subscreen, you are already in edit mode. Enter your
data and use the standard WinTen icons to save or
cancel your changes. When you save or cancel,
this sub-screen closes and the program returns to
the Edit Orders screen.
WinTen Purchase Order • Review/Edit Purchase Order or Requisition • Page 59
Shipping and Notes Information Sub-Screen
Data Fields
Contact
This is the contact person in your agency who is
listed as the recipient of this order.
Anticipated Ship Date
This is the date on which the order is scheduled to
ship.
Paid Date
This is the date on which your agency paid for the
order.
Check Number
This is the check number your agency used to pay
for the order.
Shipping Type
This is the shipping type (UPS, mail, FedEx) used
for the order.
Shipping Terms
This is the shipping term (ground, air, 3-day) used
for the order.
Shipping Amount
This is the order’s shipping cost.
Notes
These three fields are for short notes on the order.
WinTen Purchase Order • Review/Edit Purchase Order or Requisition • Page 60
REPORTS
Information needs to be summarized and presented
in an easy-to-understand form so the reader can
make informed decisions. The Reports screen is
where Purchase Order turns all of its data into
meaningful reports. To enter this screen, click the
Reports button or press <R> at the Main Menu.
WinTen Purchase Order • Reports • Page 61
REPORTS SCREEN
The Reports screen allows you to format and produce reports on Purchase Order’s databases. The
upper left area of the screen contains the Which
Report set of radio buttons, which allows you to
select a report to produce. The controls available
on the rest of the screen change depending on
which report is currently selected.
WinTen Purchase Order • Reports • Page 62
Default Report Formatting Options
The following options are visible on the Reports
screen regardless of which report is currently
selected (though they are grayed out for some
reports).
Report Order (Sort Options)
This set of radio buttons allows you to specify the
order in which the report is sorted. The available
report order options change depending on the currently selected report.
Search Selection (Filtering Options)
In most cases, you want to produce reports that
cover all applicable items. However, in some cases,
you may need to produce a report that is filtered to
only show specific items. This set of radio buttons
allows you to specify if the program should filter the
report for a specific set of data. Select the radio
button that corresponds to the data for which you
want to filter, then enter the specific target in the
“What is the ___?” data field immediately below the
radio buttons. For example, if you only want to see
purchase orders for Home Depot, select the Vendor
Name radio button and enter “Home Depot” in the
data field.
Which Conditions
The Which Conditions controls allow you to specify
dates for certain data (e.g. purchase order date).
When the Which Conditions controls are active,
you can select all data regardless of date, all data
whose date falls within a certain date range, or all
data corresponding to a single date. Use the radio
buttons to choose which of these options to use,
then enter the date(s) in the data fields if applicable.
WinTen Purchase Order • Reports • Page 63
Available Reports and Formatting
Options
Outstanding Purchase Order Items
This report shows all items that have been ordered
but have not yet been received. You can filter this
report by purchase order number, vendor name,
vendor number, or item number.
Below Stock Level Items
This report shows all consumable items whose current inventory levels are below their set minimum
levels. You can filter this report by vendor name,
vendor number, or item number.
The Below Stock Level Items report is only available
if you have tied Purchase Order to the Consumable
Inventory database (on the Default Settings tab of
the Setup screen).
Receiving Reports
This report shows all items that have been received.
All sorting and filtering options are available for this
report. You can also choose to include all items
received regardless of date, all items received
between two dates, or all items received on a single
selected date.
Item Listing Grouped by PO Number
This report shows all items that have been ordered,
grouped by purchase order number and subgrouped by the General Ledger account number
against which their purchase was charged. All filtering options are available for this report. You can
also choose to include all items ordered regardless
of date, all items ordered between two dates, or all
items ordered on a single selected date.
GL Account Summary Listing
This report contains a summary and subtotals of
the total value of all items whose purchase was
charged to each General Ledger account. All filtering options are available for this report. You can
also choose to include all items ordered regardless
of date, all items ordered between two dates, or all
items ordered on a single selected date.
Item Listing Grouped by GL Account Number
This report contains a list of all items ordered,
grouped and subtotaled by the General Ledger
accounts to which they were charged. All filtering
options are available for this report. You can also
choose to include all items ordered regardless of
date, all items ordered between two dates, or all
items ordered on a single selected date.
WinTen Purchase Order • Reports • Page 64
Requisition Listing
This report summarizes all requisitions within the
selection criteria. You can filter this report by requisition number, vendor number, vendor name, or
item number.
Print All Non-Printed POs
This option prints every purchase order that is not
already marked as previously printed.
Print All Non-Printed REQs
This option prints every requisition that is not
already marked as previously printed.
Overdue Purchase Order
When you create a purchase order, you can establish an estimated arrival date. This report is a list of
all items that are overdue as of the specified shipping date. You can filter this report by purchase
order number, vendor number, item number, and
location.
Producing a Report
Once you have selected the report you want
to produce and set the correct options, click
the OK button. The Report Options dialog box
opens. Select the correct destination for the report
(“window” if you are previewing the report, “printer”
if you are printing it) and click OK.
WinTen Purchase Order • Reports • Page 65
WinTen Purchase Order • Reports • Page 66
RECEIVING ACTIONS
Your agency issues purchase orders with the intent
of receiving the items on them. When a shipment
arrives, you need to record its receipt. To do
this, click the Recv button or press <C> at the
Main Menu. The Receive Purchase Orders screen
opens.
WinTen Purchase Order • Receiving Actions • Page 67
RECEIVE PURCHASE ORDERS SCREEN
The Receive Purchase Orders screen allows you
access to receiving actions. This screen appears
identical to the Edit Orders screen (see the previous chapter), except for the icons available on its
toolbar. In the upper right area of the screen is a list
of purchase order numbers. The rest of the screen
displays the detailed information for the purchase
order that is selected in this list. You can use the
adjacent Sort Order radio buttons to sort the list
by purchase order number, vendor number, vendor
name, or blanket authorization ID.
Hint: Multiple Items on One PO
If one purchase order contains multiple items, the list of PO
numbers has one copy of the PO number for each item.
You can only view one item at a time.
WinTen Purchase Order • Receiving Actions • Page 68
Receive Purchase Order Screen Icons
Order Details Icon
If you click the Order Details icon, the Order Details
dialog box opens. This dialog box displays the total
number of items on the currently selected order
and their total value.
Receive Partial Order Icon
The Receive Partial Order icon allows you to record
the receipt of part of the selected purchase order:
either a partial quantity of one item, or all of one
item when the PO contains multiple items.
When you click this icon, the Receiving Actions
data fields for the currently selected item become
editable. Record the date, quantity of the item
received, unit cost, and quantity still on order. Then
click the Save icon to save your changes or the
Cancel icon to cancel them.
Receive Full Order Icon
The Receive Full Order icon allows you to record
the receipt of a complete purchase order.
When you click this icon, a dialog box appears that
asks you to confirm your intent. Click Yes to continue or No to cancel. If you continue with the
process, the program marks every item on the purchase order as received.
WinTen Purchase Order • Receiving Actions • Page 69
Purge Receiving Log Icon
Purchase Order keeps a log file of all received
orders. The program uses this log file to generate
reports on received items. However, like any
log file, the receiving log can become large and
unwieldy if it is allowed to build up over time. The
purge Receiving Log icon allows you to purge all
receiving log entries older than a specified date.
When you click this icon, a dialog box appears that
informs you of what purging entails. Click Yes to
continue or No to cancel the process.
If you click Yes, the Purge Date data field appears
at the top of the Receive Purchase Order screen.
Enter the date from before which you want to purge
all receiving log entries and click the Purge Receiving Log icon again.
Another dialog box appears asking you to confirm
your intent to purge. Click Yes to continue or No
to abort the process. If you click Yes, the program
purges all receiving log entries with dates before
the specified date, then returns to the Receive Purchase Order screen.
Shipping and Notes Info Icon
The Shipping and Notes Info icon opens the Shipping and Notes Information sub-screen (described
later in this chapter).
WinTen Purchase Order • Receiving Actions • Page 70
Receive Purchase Order Screen Data Fields
Vendor Information
The Vendor Information fields allow you to review
the details of the vendor selected for this purchase
order. You cannot edit these fields on this screen;
you must go to the Edit Orders screen to do so.
Vendor Number
This is the vendor’s unique identifying number in
the Purchase Order database.
Vendor Name
This is the vendor’s name.
Contact
This is the name of your agency’s primary point of
contact with the vendor.
Address 1 and Address 2
These two fields are the vendor’s street address.
City, State, Zip Code
These three fields are the vendor’s city, state, and
zip code.
Purchase Order
These fields provide the details of the selected item
and purchase order. You cannot edit these fields on
this screen; you must go to the Edit Orders screen
to do so.
Ordered By
These are the initials of the user who added the
item to the purchase order.
Ord. Date
This is the date on which the purchase order was
created.
Approved By
These are the initials of the user who approved the
purchase order.
App. Date
This is the date on which the purchase order was
approved.
Item Number
This is the item’s stock number. If this is a custom
item, the program defaults to “199” as the stock
number for custom items.
Item Ident
This is a short description of the item.
WinTen Purchase Order • Receiving Actions • Page 71
Quantity
This is the quantity of this item on the purchase
order. You can edit this field, or click the arrow buttons to the right of the field to adjust this number up
or down.
Unit Cost
This is the per unit cost of this item. You can edit
this field, or click the arrow buttons to the right of
the field to adjust this number up or down.
Tax Rate
This is the state sales tax rate on this item. The
default value of this field is the state sales tax rate
as set on the Default Settings tab of the Setup
screen. You can edit this field, or click the arrow
buttons to the right of the field to adjust this number
up or down.
Tax Cost
This is the total sales tax on the item. You cannot
edit this field; the program automatically calculates
it.
Extended Cost
This is the total cost of the quantity of this item
ordered, without sales tax. You cannot edit this
field; the program automatically calculates it.
Total Cost
This is the tax cost plus the extended cost. You
cannot edit this field; the program automatically calculates it.
PO Number
This is the purchase order number for this PO.
GL Acc. Number
This is the General Ledger account number against
which this item will be expensed.
Location
This is your agency’s primary storage location for
the item. If this is a custom item, you can edit this
field.
Vendor Pack
This is the quantity of this item that gives the best
per unit price. If this is a custom item, you can edit
this field.
WinTen Purchase Order • Receiving Actions • Page 72
Receiving Actions
The Receiving Actions data fields record the last
three times your agency has ordered the current
item. You cannot edit these fields unless you use
the Receive Partial Order icon to record the receipt
of some of the items on an order.
Whenever you record an order’s receipt, the program updates these data fields to reflect the three
most recent receiving actions for the item.
Date
This is the date on which your agency received the
shipment.
Qty.
This is the quantity of the item your agency
received.
Unit Cost
This is the unit cost for the item in the specified
shipment.
Total Cost
This is the total cost of the item in the specified
shipment.
Totals
These are the total quantity, unit cost, and total cost
of the item for the last three shipments received.
Still On Order
This is the quantity of the item that is still on order
(has been ordered but has not yet been recorded
as received).
WinTen Purchase Order • Receiving Actions • Page 73
Shipping and Notes Information Sub-Screen
The Shipping and Notes Information sub-screen
contains additional information on the selected purchase order’s shipping arrangements, and space
for general notes on it. When you enter this subscreen, you are already in edit mode. Enter your
data and use the standard WinTen icons to save or
cancel your changes. When you save or cancel,
this sub-screen closes and the program returns to
the Receive Purchase Order screen.
WinTen Purchase Order • Receiving Actions • Page 74
Shipping and Notes Information Sub-Screen
Data Fields
Contact
This is the contact person in your agency who is
listed as the recipient of this order.
Anticipated Ship Date
This is the date on which the order is scheduled to
ship.
Paid Date
This is the date on which your agency paid for the
order.
Check Number
This is the check number your agency used to pay
for the order.
Shipping Type
This is the shipping type (UPS, mail, FedEx) used
for the order.
Shipping Terms
This is the shipping term (ground, air, 3-day) used
for the order.
Shipping Amount
This is the order’s shipping cost.
Notes
These three fields are for short notes on the order.
WinTen Purchase Order • Receiving Actions • Page 75
WinTen Purchase Order • Receiving Actions • Page 76
PURGE RECEIVED PURCHASE ORDERS
Whenever you create a new purchase order, the
Purchase Order program records it in a database
called the receiving log. Over time, this file
can become quite large and unwieldy, and Purchase Order will experience performance slowdowns when working with it. Purging this database
is a process by which you can remove old receiving
log records, reducing the overall file size and thus
improving the program’s performance. To begin the
purging process, click the Purge button or press
<P> at the Main Menu.
WinTen Purchase Order • Purge Received Purchase Orders • Page 77
When you begin the purging process, a caution
dialog box opens to remind you what the purging
process entails. Click OK to continue.
The Purge Options dialog box opens. This dialog
box allows you to print a report of all receiving log
records made before a selected date, or to purge
(permanently delete) all receiving log records made
before a selected date.
Printing the Report
Select the Report radio button. Enter the “show
all receiving log records made before...” date for
the report in the Start Date field and click the OK
button. The Report Options dialog box opens.
Hint: Purging Received Purchase Orders
Tenmast recommends that you print a report and review it
thoroughly before you purge receiving log records.
In the Report Options dialog box, select the desired
radio button: Window if you want to preview the
report on-screen, Printer if you want to print it out.
Click the OK button.
WinTen Purchase Order • Purge Received Purchase Orders • Page 78
Purging
Select the Purge radio button. Enter the “purge
all receiving log records made before...” date in the
Start Date field and click the OK button.
A dialog box opens that reminds you that all other
users need to be out of the program before you
purge. Click OK to continue.
A dialog box opens that asks you to confirm your
intent to purge all receiving log records generated
before the specified date. Click Yes to continue, or
No to cancel the procedure and return to the Main
Menu.
If you click Yes, the program purges all receiving log
records generated before the specified date. When
it is finished, all associated dialog boxes close and
it returns to the Main Menu.
WinTen Purchase Order • Purge Received Purchase Orders • Page 79
WinTen Purchase Order • Purge Received Purchase Orders • Page 80
REQUISITION HISTORY
The Purchase Order program keeps an historical
file of all previously created purchase orders. This
requisition history database serves two functions: it
allows you to review old orders, and it gives you the
capability to “recycle” these orders and issue them
again as new orders for the same items. To work
with the requisition history database, click the History button or press <H> at the Main Menu. This
opens the History Orders screen.
WinTen Purchase Order • Requisition History • Page 81
HISTORY ORDERS SCREEN
The History Orders screen appears identical to the
Edit Orders screen (discussed in the Review/Edit
Purchase Order or Requisition chapter), except for
the icons on its toolbar. In the upper right area of
the screen is a list of purchase order numbers. The
rest of the screen displays the detailed information
for the purchase order that is selected in this list.
You can use the adjacent Sort Order radio buttons
to sort the list by purchase order number, vendor
number, date approved, or requisition number.
You cannot edit the data on the History Orders
screen.
WinTen Purchase Order • Requisition History • Page 82
History Orders Screen Icons
Order Details Icon
If you click the Order Details icon, the Order Details
dialog box opens. This dialog box displays the total
number of items on the currently selected order
and their total value. If the order is a blanket purchase order, it also displays the remaining amount
for the corresponding blanket authorization.
Recycle History Order Icon
The Recycle History Order icon allows you to
re-use a previously-issued purchase order, issuing
a new requisition for the same items and quantities.
When you click this icon, the History Orders screen
changes to mimic Step One of the Add Order process (described in the Add Order chapter). Select
or enter a vendor for the new requisition.
The History Orders screen then changes to mimic
Step Four of the Add Order process. Select or
enter a shipping address for the new requisition.
The program saves the newly-created requisition.
A dialog box appears that asks if you want to print
the requisition. Click Yes to print it or No to return
to the Main Menu without printing the requisition.
WinTen Purchase Order • Requisition History • Page 83
Purge History Orders Icon
Over time, the requisition history database can
become quite large and unwieldy, and Purchase
Order will experience performance slowdowns
when working with it. Purging this database is a
process by which you can remove old purchase
order records, reducing the overall file size and thus
improving the program’s performance. To begin
the purging process, click the Purge History Orders
icon.
When you begin the purging process, a caution
dialog box opens to remind you what the purging
process entails. Click OK to continue.
The History Orders screen changes to display the
controls shown at right. These controls allow you
to print a report of all purchase order records made
before a selected date, or to purge (permanently
delete) all purchase order records made before a
selected date.
Hint: Purging Purchase Orders
Printing the Report
Select the Report radio button. Enter the “show all
purchase order records approved before...” date for
the report in the Start Date field and click the OK
button. The Report Options dialog box opens.
Tenmast recommends that you print a report and review it
thoroughly before you purge purchase orders from the requisition history database.
In the Report Options dialog box, select the desired
radio button: Window if you want to preview the
report on-screen, Printer if you want to print it out.
Click the OK button.
WinTen Purchase Order • Requisition History • Page 84
Purging
Select the Purge radio button. Enter the “purge all
history order records approved before...” date in the
Start Date field and click the OK button.
A dialog box opens that reminds you that all other
users need to be out of the program before you
purge. Click OK to continue.
A dialog box opens that asks you to confirm your
intent to purge all purchase order records approved
before the specified date. Click Yes to continue, or
No to cancel the procedure and return to the Main
Menu.
If you click Yes, the program purges all purchase
order records approved before the specified date.
When purging is finished, the program returns to
the Main Menu.
WinTen Purchase Order • Requisition History • Page 85
History Orders Screen Data Fields
Vendor Information
The Vendor Information fields allow you to review
the details of the vendor selected for this purchase
order.
Vendor Number
This is the vendor’s unique identifying number in
the Purchase Order database.
Vendor Name
This is the vendor’s name.
Contact
This is the name of your agency’s primary point of
contact with the vendor.
Address 1 and Address 2
These two fields are the vendor’s street address.
City, State, Zip Code
These three fields are the vendor’s city, state, and
zip code.
Purchase Order
These fields provide the details of the selected item
and purchase order.
Ordered By
These are the initials of the user who added the
item to the purchase order.
Ord. Date
This is the date on which the purchase order was
created.
Approved By
These are the initials of the user who approved the
purchase order.
App. Date
This is the date on which the purchase order was
approved.
Item Number
This is the item’s stock number. If this is a custom
item, the program defaults to “199” as the stock
number for custom items.
Item Ident
This is a short description of the item.
Quantity
This is the quantity of this item on the purchase
order.
Unit Cost
This is the per unit cost of this item.
WinTen Purchase Order • Requisition History • Page 86
Tax Rate
This is the state sales tax rate on this item.
Tax Cost
This is the total sales tax on the item.
Extended Cost
This is the total cost of the quantity of this item
ordered, without sales tax.
Total Cost
This is the tax cost plus the extended cost
PO Number
This is the purchase order number for this PO.
GL Acc. Number
This is the General Ledger account number against
which this item will be expensed.
Location
This is your agency’s primary storage location for
the item.
Vendor Pack
This is the quantity of this item that gives the best
per unit price
Receiving Actions
The Receiving Actions data fields record the last
three times your agency has ordered the current
item. Whenever you record an order’s receipt, the
program updates these data fields to reflect the
three most recent receiving actions for the item.
Date
This is the date on which your agency received the
shipment.
Qty.
This is the quantity of the item your agency
received.
Unit Cost
This is the unit cost for the item in the specified
shipment.
Total Cost
This is the total cost of the item in the specified
shipment.
Totals
These are the total quantity, unit cost, and total cost
of the item for the last three shipments received.
Still On Order
This is the quantity of the item that is still on order
(has been ordered but has not yet been recorded
as received).
WinTen Purchase Order • Requisition History • Page 87
WinTen Purchase Order • Requisition History • Page 88
INDEX DATABASES
This function rebuilds the indexes that Purchase
Order uses to search for specific records within its
databases. Index file are similar to a library’s card
catalog — they tell the computer the location of the
data for which you are searching. Indexing databases is safe to do at any time — it does not need
to be done at a specific time of the month or the
year. To initiate the reindexing process, click the
Reindex button or press <I> at the Main Menu.
WinTen Purchase Order • Index Databases • Page 89
When to Reindex
Occasionally, index files can become corrupted.
This means that such a file’s data is no longer complete, and it may not be in a form that Purchase
Order can read. The most common indicator of a
corrupted index file comes when you search for a
record that you know is present and the program
does not find it. Reindexing solves this problem
by going through each database and rebuilding the
index file for it.
CAUTION
You must make sure that no one else is using Purchase
Order before using this feature. Reindexing rewrites files,
which can cause damage to the data within those files if
they are already open when Rent Reasonableness attempts
to index them.
When to Pack
While you are reindexing, you also have the option
to pack Purchase Order’s databases. Packing is a
process by which the program removes all blank or
deleted entries from its databases, thereby reducing the size of the files.
CAUTION
Tenmast recommends that you do not perform packing
unless specifically instructed to do so by Tenmast Training &
Support personnel. Packing permanently removes deleted
records. Once you have packed, data that the packing process erases will be irrevocably gone.
WinTen Purchase Order • Index Databases • Page 90
Reindexing and Packing
When you begin the reindexing process, a dialog
box opens that asks you whether or not you want to
index the database. Click Yes to continue the process. Click No to return to the Main Menu.
If you click Yes, a second dialog box appears that
asks you if you want to pack the database. Click
Yes to pack in addition to indexing. Click No to
simply index.
Once you click either button in the second dialog
box, a “wait” dialog box appears that tells you that
the indexing/packing process is in progress. Once
this is complete, all associated dialog boxes close
and the program returns to the Main Menu.
WinTen Purchase Order • Index Databases • Page 91