1
BatchMaster Manufacturing
BMM User Manual
DOCNUMBER BMM\40012, Issue 02
Date of Document Release: Mar 15, 2011
BMM SAP version: BM.MFG.09.20.31.35.000
BatchMaster Software Inc.
BMM User Manual
Copyright and Legal Information
Copyright
BatchMaster Manufacturing – BMM User Manual © 2011 by BatchMaster Software, Inc.
All rights reserved.
Your right to copy this document is limited by copyright law and the terms of the license
agreement. As a software licensee, you may make a reasonable number of copies or
printouts for your own use. Making copies for any other purposes constitutes a violation
of copyright law.
Trademarks
The names of actual companies and products mentioned herein may be trademarks or
registered marks of - in the United States and/or other countries - of their respective
owners.
The names of companies, products, persons and/or data used in the examples are
fictitious and are in no way intended to represent any real individual, company, product,
or event, unless otherwise noted.
Warranty Disclaimer
BatchMaster Software disclaims any warranty regarding the example data in this
documentation, including the warranties of merchantability and fitness for a specific
business use.
Limitation of Liability
The content of this document provided for informational use only, is subject to change
without notice, and should not be construed as a commitment by BatchMaster Software.
BatchMaster Software assumes no responsibility or liability for any errors or inaccuracies
that may appear in this document. Neither BatchMaster Software nor anyone else who
has been involved in the creation, production, or delivery of this documentation shall be
liable for any indirect, incidental, special, exemplary or consequential damages, including
but not limited to any loss of anticipated profit or benefits, resulting from the use of this
documentation nor the examples contained herein.
License Agreement
Use of this product is covered by a license agreement provided by BatchMaster with the
software product. If you have any questions about the terms of this agreement, consult
the License Agreement as it is provided in the License Folder on the CD ROM, which
contains the product itself.
Doc. No. F/DV/15
Rev.No.
Date
BatchMaster Software Inc.
BMM User Manual
Contents
1
PREREQUISITES .............................................................................. 25
2
REGISTERING ADD-ONS .................................................................. 25
2.1
3
4
REGISTERING ADD-ON ADMINISTRATION .......................................................... 25
AUTHORIZATIONS ........................................................................... 34
3.1
BMM DATA OWNERSHIP AUTHORIZATIONS ........................................................ 34
3.2
SCREEN FIELDS DESCRIPTION: ...................................................................... 35
3.2.1
Data Ownership Exceptions Screen .................................................... 36
3.2.2
Differences between the Authorization in BMM and Business One .......... 41
3.2.3
Steps to associate the User .............................................................. 41
3.2.4
Steps to Specify the Password in the Users-Setup Screen..................... 42
3.2.5
Steps to associate the Password Example ........................................... 42
3.2.6
Steps to associate the Authorization .................................................. 42
3.2.7
Steps to Provide the SAP Data Ownership Exception ............................ 42
3.2.8
Steps to associate the Address.......................................................... 43
3.2.9
Steps to associate the Membership details.......................................... 43
3.2.10
Steps to associate the Administration details ...................................... 43
3.2.11
Steps to associate the Personal Information ....................................... 43
3.2.12
Steps to associate the Finance details ................................................ 44
3.2.13
Steps to associate the Remarks ........................................................ 44
3.2.14
Steps to Provide the BMM Data Ownership Authorization ...................... 44
3.2.15
Steps to associate the BMM Data Ownership Exceptions ....................... 45
CONFIGURATION ............................................................................. 45
4.1
BMM SETUP ............................................................................................ 45
4.1.1
Screen Fields Description: Server Settings Tab ................................... 45
4.1.2
Creating Server Setting.................................................................... 46
Doc. No. F/DV/15
Rev.No.
Date
BatchMaster Software Inc.
5
BMM User Manual
4.1.3
Screen Fields Description: SOP Configurator Tab ................................. 46
4.1.4
Setting up SOP Configurator ............................................................. 47
4.1.5
Screen fields Description: Bin‟s Options Tab ....................................... 47
SETUP .............................................................................................. 48
5.1
INVENTORY .............................................................................................. 48
5.1.1
Inventory types Setup ..................................................................... 48
5.1.2
Storage Condition ........................................................................... 50
5.1.3
Bins Setup...................................................................................... 50
5.2
FORMULATION SETUP .................................................................................. 52
5.2.1
Formula Class ................................................................................. 52
5.2.2
Formula Status ............................................................................... 53
5.2.3
Boilerplate Instruction...................................................................... 54
5.2.4
Formula Defaults ............................................................................. 55
5.2.5
Process Cell Screen ......................................................................... 60
5.3
MPS SETUP ............................................................................................. 62
5.3.1
Company Calendar Setup ................................................................. 62
5.3.2
Planning Calendar ........................................................................... 63
5.3.3
MPS Setup...................................................................................... 65
5.4
MSDS SETUP........................................................................................... 68
5.4.1
Boilerplate Group ............................................................................ 68
5.4.2
Boilerplate Maintenance ................................................................... 69
5.4.3
Hazard Type Maintenance ................................................................ 71
5.4.4
MSDS Setup ................................................................................... 71
5.4.5
MSDS Language Master ................................................................... 74
5.5
QUALITY CONTROL SETUP............................................................................. 75
5.5.1
QC Test Description ......................................................................... 75
Doc. No. F/DV/15
Rev.No.
Date
BatchMaster Software Inc.
5.5.2
5.6
QC Default Setup ............................................................................ 75
PRODUCTION SETUP ................................................................................... 77
5.6.1
Production Setup ............................................................................. 77
5.6.2
Shift Master .................................................................................... 80
5.6.3
Work Center ................................................................................... 81
5.6.4
Company Shift Setup ....................................................................... 85
5.7
LABORATORY SETUP ................................................................................... 86
5.7.1
5.8
5.9
Laboratory Setup ............................................................................ 87
COSTING SETUP ........................................................................................ 88
5.8.1
Costing Setup ................................................................................. 88
UNIT OF MEASUREMENT ............................................................................... 89
5.9.1
Define Units.................................................................................... 89
5.9.2
Define Unit Conversion .................................................................... 90
5.9.3
Define System Units ........................................................................ 91
5.10
6
BMM User Manual
UNIT CONVERSION UTILITY ........................................................................... 92
INVENTORY ..................................................................................... 94
6.1
ITEM MASTER DATA .................................................................................... 94
6.1.1
6.2
Inventory Data Tab ......................................................................... 94
ITEM MASTER DETAILS ................................................................................ 97
6.2.1
Screen Field Description ................................................................... 97
6.2.2
Maintaining Item Master Details .......................................................103
6.3
INVENTORY REPORTS .................................................................................103
6.3.1
Inventory Detail Report...................................................................103
6.3.2
Generating an Inventory Detail Report ..............................................105
6.4
INVENTORY TRANSACTIONS ..........................................................................106
6.4.1
Goods Receipt................................................................................107
Doc. No. F/DV/15
Rev.No.
Date
BatchMaster Software Inc.
6.4.2
Goods Issue ..................................................................................112
6.4.3
Inventory Transfer .........................................................................118
6.4.4
Inventory Putaway .........................................................................122
6.4.5
Initial Quantities, Inventory Tracking and Inventory Posting ................123
6.5
PURCHASE TRANSACTIONS ...........................................................................132
6.5.1
Goods Receipt PO ...........................................................................132
6.5.2
Goods Return ................................................................................141
6.5.3
A/P Invoice....................................................................................148
6.5.4
A/P Credit Memo ............................................................................157
6.6
SALES TRANSACTIONS ................................................................................164
6.6.1
Delivery ........................................................................................164
6.6.2
Return ..........................................................................................171
6.6.3
A/R Invoice ...................................................................................179
6.6.4
A/R Credit Memo ............................................................................186
6.7
PICK AND PACK ........................................................................................194
6.7.1
6.8
Inventory Detail Report...................................................................202
GENERAL ....................................................................................... 205
7.1
8
Pick List ........................................................................................194
INVENTORY REPORTS .................................................................................202
6.8.1
7
BMM User Manual
REPORT CUSTOM DATA WIZARD ....................................................................205
7.1.1
Screen Fields Description ................................................................206
7.1.2
Creating a New Table......................................................................209
PRODUCTION................................................................................. 209
8.1
ROUTING ...............................................................................................209
8.2
BILLS OF MATERIALS .................................................................................210
8.2.1
BOM Entry .....................................................................................210
Doc. No. F/DV/15
Rev.No.
Date
BatchMaster Software Inc.
BMM User Manual
8.2.2
BOM Explosion ...............................................................................221
8.2.3
Screen Fields Description: BOM Explosion Window..............................223
8.2.4
BOM Report ...................................................................................227
8.3
BATCH ENTRY ..........................................................................................230
8.3.1
Screen Fields Description ................................................................230
8.3.2
Key Operations ..............................................................................233
8.3.3
GoTo ............................................................................................234
8.4
BATCH TICKET .........................................................................................235
8.4.1
Screen Fields Description: Header ....................................................236
8.4.2
Screen Fields Description: Batch Information Tab ...............................237
8.4.3
Screen Fields Description: Formula Tab.............................................239
8.4.4
Screen Fields Description: Finished Goods Tab ...................................241
8.4.5
Screen Fields Description: ByProducts Tab ........................................244
8.4.6
Screen Fields Description: Cost Tab ..................................................245
8.4.7
Screen Fields Description: Routing Tab .............................................248
8.4.8
Printing a Batch Ticket ....................................................................250
8.4.9
Goto .............................................................................................250
8.5
BATCH CLOSE..........................................................................................260
8.5.1
Screen Fields Description: Basic Information .....................................261
8.5.2
Screen Fields Description: Finished Goods & Packaging Tab .................263
8.5.3
Screen Fields Description: Materials Tab ...........................................265
8.5.4
Screen Fields Description: ByProducts Tab ........................................266
8.5.5
Screen Fields Description: Labor and Overhead Tab ............................267
8.6
KEY OPERATIONS .....................................................................................267
8.7
GOTO ...................................................................................................268
8.8
SUPER BATCH ENTRY .................................................................................276
Doc. No. F/DV/15
Rev.No.
Date
BatchMaster Software Inc.
BMM User Manual
8.8.1
Mandatory Inputs ...........................................................................277
8.8.2
Screen Fields Description ................................................................277
8.8.3
Screen Fields Description: Top Items Tab ..........................................280
8.8.4
Screen Fields Description: All Items Tab............................................283
8.8.5
Creating a Super Batch ...................................................................284
8.8.6
Goto .............................................................................................285
8.9
SUPER BATCH CLOSE .................................................................................286
8.9.1
Mandatory Inputs ...........................................................................286
8.9.2
Screen Fields Description: Header ....................................................287
8.9.3
Screen Fields Description: Finished Goods Tab ...................................290
8.9.4
Screen Fields Description: Materials & Packaging Tab .........................292
8.9.5
Screen Fields Description: Byproducts Tab ........................................293
8.9.6
Key Operations ..............................................................................294
8.9.7
Goto .............................................................................................295
8.10
SUPER BATCH EXPLOSION ...........................................................................301
8.10.1
Mandatory Inputs ...........................................................................301
8.10.2
Screen Fields Description ................................................................302
8.10.3
Exploding a Super Batch .................................................................303
8.11
CURRENT BATCHES ...................................................................................303
8.11.1
8.12
Dashboard Screen Description .........................................................304
TRANSFER SO TO BATCHES..........................................................................311
8.12.1
Screen Fields Description ................................................................311
8.12.2
Steps to Transfer the Sales Order to Batches .....................................312
8.13
PRODUCTION QC ......................................................................................312
8.13.1
Screen Fields Description ................................................................313
8.13.2
Performing QC ...............................................................................315
Doc. No. F/DV/15
Rev.No.
Date
BatchMaster Software Inc.
8.14
BMM User Manual
SERIAL LOT EXPLOSION CRITERIA ..................................................................316
8.14.1
Screen Fields Description: Lot Explosion Criteria screen ......................316
8.14.2
Screen Fields Description: Lot Explosion/Lot Explosion-Where Used ......318
8.14.3
Goto .............................................................................................319
8.14.4
Viewing how certain serials/lots were created ....................................321
8.14.5
Viewing the serials/lots that were created using selected serials/lots ....321
8.15
BATCH SCHEDULING WITH PROCESS CELL .........................................................321
8.15.1
8.16
Dashboard Screen Description .........................................................322
PURGE BATCHES.......................................................................................330
8.16.1
Screen Fields Description ................................................................331
8.16.2
Steps to Purge Batches ...................................................................331
8.17
PURGE SUPER BATCHES ..............................................................................332
8.17.1
Screen Fields Description ................................................................332
8.17.2
Steps to Purge the Super Batches ....................................................333
8.18
EMPLOYEE SCHEDULE GENERATION .................................................................333
8.18.1
Screen fields description .................................................................334
8.18.2
Defining Employee Schedule Generation ...........................................335
8.19
EMPLOYEE WEEKLY SCHEDULE ......................................................................335
8.19.1
Screen fields description .................................................................336
8.19.2
Defining Employee Weekly Schedule .................................................337
8.20
WORK CENTER CAPACITY UTILIZATION ............................................................337
8.20.1
Mandatory Inputs ...........................................................................338
8.20.2
Screen fields description .................................................................338
8.20.3
Defining Work Center Capacity Utilization ..........................................339
8.21
QUICK LABOR/MACHINE ENTRY .....................................................................339
8.21.1
Screen fields description .................................................................339
Doc. No. F/DV/15
Rev.No.
Date
BatchMaster Software Inc.
8.21.2
8.22
Defining Quick labor entry ...............................................................340
PRODUCTION SCHEDULING BOARD .................................................................340
8.22.1
8.23
BMM User Manual
Dashboard Screen Description .........................................................341
SCHEDULING ...........................................................................................359
8.23.1
Screen fields description .................................................................359
8.23.2
Steps to generate scheduling ...........................................................360
8.24
PRODUCTION REPORTS ...............................................................................360
8.24.1
Batches in Process Report ...............................................................360
8.24.2
Batch Ticket Report ........................................................................362
8.24.3
Critical Material Report....................................................................365
8.24.4
Production History Summary Report .................................................367
8.24.5
Production History Detail Report.......................................................369
8.24.6
Batchwise Lot Details Report ...........................................................372
8.24.7
Super Batch Ticket Report ...............................................................374
8.24.8
SuperBatchwise Lot Details Report ...................................................376
8.24.9
Max. Producible by Stock ................................................................378
8.24.10
Material Where-Used Report .........................................................379
8.24.11
Raw Material Requirement Analysis ...............................................382
8.24.12
Pick List Report...........................................................................384
8.24.13
Production Cost Summary Report .................................................385
8.24.14
Production Summary Report.........................................................388
8.24.15
Formula Production Report ...........................................................390
8.24.16
Critical Batches and Raw Material Report .......................................393
8.24.17
Material Usage Report .................................................................395
8.24.18
Transfer Sales Order To Batch Report ............................................398
8.24.19
Super Batch Critical Material Report ..............................................399
Doc. No. F/DV/15
Rev.No.
Date
BatchMaster Software Inc.
8.24.20
9
BMM User Manual
Super Batch Explosion Report .......................................................400
MASTER PRODUCTION SCHEDULE.................................................. 401
9.1
FORECAST ENTRY .....................................................................................402
9.1.1
Mandatory Inputs ...........................................................................403
9.1.2
Screen Fields Description ................................................................403
9.1.3
Using Forecast Entry .......................................................................404
9.1.4
Goto .............................................................................................405
9.2
RUN MPS ..............................................................................................405
9.2.1
Mandatory Inputs ...........................................................................406
9.2.2
Screen Fields Description ................................................................407
9.2.3
Example........................................................................................408
9.2.4
Processing a Run MPS .....................................................................410
9.3
MPS PLANNING WORKSHEET ........................................................................411
9.3.1
Mandatory Inputs ...........................................................................411
9.3.2
Screen Fields Description: Header and Summary Tab .........................412
9.3.3
Screen Fields Description: Forecast Tab ............................................416
9.3.4
Screen Fields Description: Cust Orders Tab .......................................417
9.3.5
Screen Fields Description: WH Transfers Tab .....................................418
9.3.6
Screen Fields Description: Planned Prod Ord Tab ................................419
9.3.7
Screen Fields Description: Tab 6 (Planned Purch Ord) .........................421
9.3.8
Goto .............................................................................................423
9.3.9
Using the Planning Worksheet..........................................................424
9.4
TRANSFER MPS PURCHASE ORDER .................................................................425
9.4.1
Screen Fields Description ................................................................425
9.4.2
Transferring MPS Purchase Orders ....................................................427
9.4.3
Goto .............................................................................................427
Doc. No. F/DV/15
Rev.No.
Date
BatchMaster Software Inc.
9.5
BMM User Manual
TRANSFER MPS PRODUCTION ORDER ..............................................................428
9.5.1
Screen Fields Description ................................................................428
9.5.2
Transferring MPS Production Orders..................................................430
9.5.3
Goto .............................................................................................430
9.6
TIME FENCE MPS PURCHASE ORDER ...............................................................431
9.6.1
Screen Fields Description ................................................................431
9.6.2
Working with Time Fence MPS Purchase Order ...................................432
9.6.3
Goto .............................................................................................433
9.7
TIME FENCE MPS PRODUCTION ORDER ............................................................433
9.7.1
Screen Fields Description ................................................................434
9.7.2
Working with Time Fence MPS Production Order .................................435
9.7.3
Goto .............................................................................................435
9.8
MAINTAIN MPS ITEM .................................................................................436
9.8.1
Screen Fields Description ................................................................436
9.8.2
Maintaining a MPS Item ..................................................................437
9.9
PULL MPS ITEMS ......................................................................................437
9.9.1
Screen Fields Description ................................................................438
9.9.2
Using Pull MPS Items screen ............................................................439
9.10
MPS ORDER RANGE PROCESSING ..................................................................439
9.10.1
Screen Fields Description ................................................................439
9.10.2
Processing a Range of MPS Orders ...................................................440
9.11
MPS DASHBOARD.....................................................................................440
9.11.1
9.12
Summary Details: ..........................................................................443
MPS REPORTS .........................................................................................451
9.12.1
MPS Planning Report.......................................................................451
9.12.2
MPS Demand Report .......................................................................453
Doc. No. F/DV/15
Rev.No.
Date
BatchMaster Software Inc.
BMM User Manual
9.12.3
MPS Order Report ..........................................................................454
9.12.4
MPS Supply Report .........................................................................456
9.12.5
MPS Expedite PO Report..................................................................458
10 MATERIAL REQUIREMENT PLANNING ............................................ 460
10.1
RUN MRP ..............................................................................................461
10.1.1
Mandatory Inputs ...........................................................................462
10.1.2
Screen Fields Description ................................................................462
10.1.3
Processing a Run MRP .....................................................................463
10.2
PLANNED MRP PURCHASE ORDER ..................................................................464
10.2.1
Screen Fields Description ................................................................464
10.2.2
Working with Planned MRP Purchase Order ........................................465
10.2.3
Goto .............................................................................................466
10.3
PLANNED MRP PRODUCTION ORDER ...............................................................466
10.3.1
Screen Fields Description ................................................................466
10.3.2
Working with Planned MRP Production Order......................................467
10.3.3
Goto .............................................................................................468
10.4
TRANSFER MRP PURCHASE ORDERS ...............................................................468
10.4.1
Screen Fields Description ................................................................468
10.4.2
Transferring MRP Purchase Orders ....................................................470
10.4.3
Goto .............................................................................................470
10.5
TRANSFER MRP PRODUCTION ORDERS ............................................................471
10.5.1
Screen Fields Description ................................................................471
10.5.2
Transferring MRP Production Orders .................................................473
10.5.3
Goto .............................................................................................473
10.6
TIME FENCE MRP PURCHASE ORDER ...............................................................474
10.6.1
Screen Fields Description ................................................................474
Doc. No. F/DV/15
Rev.No.
Date
BatchMaster Software Inc.
BMM User Manual
10.6.2
Working with Time Fence MRP Purchase Order ...................................475
10.6.3
Goto .............................................................................................475
10.7
TIME FENCE MRP PRODUCTION ORDER ............................................................476
10.7.1
Screen Fields Description ................................................................476
10.7.2
Working with Time Fence MRP Production Order .................................477
10.7.3
Goto .............................................................................................477
10.8
MRP ORDER RANGE PROCESSING ..................................................................478
10.8.1
Screen Fields Description ................................................................478
10.8.2
Processing a Range of MRP Orders ...................................................479
10.9
PULL MRP ITEMS ......................................................................................479
10.9.1
Screen Fields Description ................................................................480
10.9.2
Using Pull MRP Items screen ............................................................481
10.10
MAINTAIN MRP ITEM ..............................................................................481
10.10.1
Screen Fields Description .............................................................481
10.10.2
Maintaining a MRP Item ...............................................................482
10.11
MRP DASHBOARD .................................................................................482
10.11.1
Planned Order/Open Purchase Order By Vendor ..............................483
10.11.2
Fetch Data Button:......................................................................483
10.11.3
MRP Order Summary ...................................................................483
10.11.4
Filter Criteria ..............................................................................484
10.12
MRP REPORTS .....................................................................................489
10.12.1
MRP Order Report .......................................................................489
10.12.2
MRP Supply Report .....................................................................491
10.12.3
MRP Demand Report ...................................................................493
10.12.4
MRP Planning Report ...................................................................495
10.12.5
MRP Expedite PO Report ..............................................................498
Doc. No. F/DV/15
Rev.No.
Date
BatchMaster Software Inc.
BMM User Manual
11 FORMULATION............................................................................... 500
11.1
FORMULA ENTRY .......................................................................................500
11.1.1
Screen Fields Description: Header and Formula Items Tab...................501
11.1.2
Screen Fields Description: By Products Tab .......................................503
11.1.3
Screen Fields Description: Formula Master Tab .................................504
11.1.4
Screen Fields Description: Safety Tab ...............................................506
11.1.5
Screen Fields Description: Cost Tab ..................................................507
11.1.6
Creating a Formula .........................................................................510
11.1.7
Goto .............................................................................................510
11.1.8
Example........................................................................................513
11.2
OVERHEAD COST ......................................................................................513
11.2.1
Mandatory Inputs ...........................................................................514
11.2.2
Screen Fields Description ................................................................514
11.2.3
Creating a Overhead Cost ...............................................................514
11.3
LABOR/ADDITIONAL COST ...........................................................................515
11.3.1
Mandatory Inputs ...........................................................................515
11.3.2
Screen Fields Description ................................................................515
11.3.3
Creating a Labor/Additional Cost ......................................................516
11.3.4
Example........................................................................................516
11.4
PROCESS CELL FORMULA CAPACITY ................................................................516
11.4.1
Mandatory Inputs ...........................................................................516
11.4.2
Screen Fields Description ................................................................517
11.4.3
Creating a Process Cell Formula Capacity ..........................................518
11.4.4
Example........................................................................................518
11.5
UTILITIES ..............................................................................................518
11.5.1
Compare Prior With Present .............................................................518
Doc. No. F/DV/15
Rev.No.
Date
BatchMaster Software Inc.
BMM User Manual
11.5.2
Revert To Prior Version ...................................................................521
11.5.3
Intermediate Expansion ..................................................................524
11.5.4
Material Substitution.......................................................................526
11.5.5
Purge Prior Formula Versions ...........................................................530
11.5.6
View Prior Version ..........................................................................533
11.5.7
Intermediate Density Override .........................................................536
11.6
FORMULA REPORTS ...................................................................................537
11.6.1
Master Formula ..............................................................................537
11.6.2
Boilerplate Where Used ...................................................................539
11.6.3
Material Where Used.......................................................................541
11.6.4
Multi Level Formula Ingredient .........................................................543
11.6.5
Multi Level Where Used ...................................................................545
11.6.6
Process Cell Formula Capacity Report ...............................................547
12 COSTING........................................................................................ 549
12.1
PRODUCT COST ANALYSIS ...........................................................................549
12.1.1
Mandatory Inputs ...........................................................................550
12.1.2
Screen Field Descriptions: Header and Formula Master Tab .................550
12.1.3
Screen Field Descriptions: Cost Tab ..................................................552
12.1.4
Screen Field Descriptions: Safety Tab ...............................................555
12.1.5
Screen Field Descriptions: Formula Items Tab ....................................556
12.1.6
Screen Field Descriptions: Byproducts Tab ........................................559
12.1.7
Screen Fields Description: Analysis Tab .............................................560
12.1.8
Creating a new Formula at the Product Cost Analysis Screen ...............561
12.1.9
Goto .............................................................................................561
12.2
FORMULA LOSS ADJUSTMENT ........................................................................569
12.2.1
Screen Fields Description ................................................................570
Doc. No. F/DV/15
Rev.No.
Date
BatchMaster Software Inc.
BMM User Manual
12.2.2
Processing an Formula Loss Adjustment ............................................570
12.2.3
Example........................................................................................571
12.3
INTERMEDIATE COST ROLLUP ........................................................................571
12.3.1
Screen Fields Description ................................................................572
12.3.2
Rolling up Intermediate Cost ...........................................................573
12.4
UPDATE FINISHED GOOD COSTS ....................................................................574
12.4.1
Screen Fields Description ................................................................575
12.4.2
Updating Finished Good Costs ..........................................................576
12.5
REVALUATE ITEM COST ...............................................................................577
12.5.1
Screen Fields Description ................................................................577
12.5.2
Revaluating Item Cost ....................................................................579
12.6
COSTING REPORTS ....................................................................................579
12.6.1
Detailed Product Cost .....................................................................579
12.6.2
Product Cost Summary ...................................................................582
12.6.3
Formula Cost Summary...................................................................584
12.6.4
Historical Vs Theoretical Cost Report.................................................587
12.6.5
Product Cost Analysis Report ...........................................................589
12.6.6
Historical Vs Theoretical Loss Report.................................................592
13 LABORATORY ................................................................................. 594
13.1
PHYSICAL PROPERTY ANALYSIS ......................................................................595
13.1.1
Mandatory Inputs ...........................................................................595
13.1.2
Screen Field Description: Header......................................................596
13.1.3
Screen Fields Description: Formula Items Tab ....................................597
13.1.4
Screen Fields Description: By Products Tab .......................................599
13.1.5
Screen Fields Description: Formula Master Tab ..................................600
13.1.6
Screen Fields Description: Safety Tab ...............................................602
Doc. No. F/DV/15
Rev.No.
Date
BatchMaster Software Inc.
BMM User Manual
13.1.7
Screen Fields Description: Cost Tab ..................................................603
13.1.8
Key Operations ..............................................................................606
13.1.9
Goto .............................................................................................607
13.1.10
13.2
Example ....................................................................................608
PHYSICAL PROPERTY FORMULA ......................................................................610
13.2.1
Screen Fields Description ................................................................611
13.2.2
Example........................................................................................612
13.3
COMPARATIVE PROPERTIES ANALYSIS ..............................................................612
13.3.1
Screen Fields Description ................................................................613
13.3.2
Performing a Comparative Property Analysis ......................................613
13.3.3
Goto .............................................................................................613
13.3.4
Example........................................................................................613
13.4
PHYSICAL PROPERTY SEARCH FILTER ...............................................................614
13.4.1
Screen Fields Description ................................................................614
13.4.2
Creating a Physical Property Search Filter..........................................615
13.5
MATERIAL PROPERTY MASTER .......................................................................615
13.5.1
Screen Fields Description ................................................................616
13.5.2
Defining a Physical Property ............................................................617
13.5.3
Example........................................................................................617
13.6
MATERIAL PHYSICAL PROPERTY .....................................................................618
13.6.1
Screen Fields Description ................................................................618
13.6.2
Specifying an Item‟s Material Property Value .....................................619
13.6.3
Example........................................................................................619
13.7
INTERMEDIATE PROPERTY ROLLUP ..................................................................619
13.7.1
Screen Fields Description ................................................................620
13.7.2
Rolling up Intermediate Property ......................................................621
Doc. No. F/DV/15
Rev.No.
Date
BatchMaster Software Inc.
13.8
BMM User Manual
LABORATORY REPORTS ...............................................................................621
13.8.1
Formula Material Analysis Report .....................................................621
13.8.2
Formula Physical Property Report .....................................................624
13.8.3
Physical Property Analysis Report .....................................................627
13.8.4
Physical Property Search Report .......................................................629
13.8.5
Physical Property Equation Report ....................................................632
13.8.6
Raw Material Physical Property Report ..............................................632
14 QUALITY CONTROL ........................................................................ 634
14.1
QC FORMULA TEST ...................................................................................634
14.1.1
Screen Field Descriptions ................................................................635
14.1.2
Creating a QC Formula/Item Test .....................................................636
14.2
QC ITEM TESTS .......................................................................................636
14.2.1
Screen Fields Description ................................................................637
14.2.2
Maintaining a QC Item Test .............................................................639
14.3
QC SAMPLE ............................................................................................639
14.3.1
Screen Fields Description ................................................................640
14.3.2
Creating a QC Sampling Plan ...........................................................640
14.4
INVENTORY QC ........................................................................................641
14.4.1
Mandatory Input ............................................................................641
14.4.2
Screen Fields Description ................................................................642
14.4.3
Performing Inventory QC.................................................................644
14.5
ORDER/POST INVENTORY QC .......................................................................645
14.5.1
Mandatory Input ............................................................................645
14.5.2
Screen Fields Description ................................................................645
14.5.3
Key Operations ..............................................................................647
14.5.4
Goto .............................................................................................648
Doc. No. F/DV/15
Rev.No.
Date
BatchMaster Software Inc.
14.6
BMM User Manual
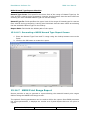
QC REPORTS ..........................................................................................649
14.6.1
QC Test Master Report ....................................................................649
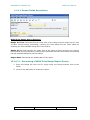
14.6.2
Formula-Test Report .......................................................................650
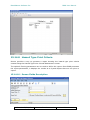
14.6.3
Production QC Report .....................................................................651
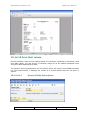
14.6.4
Inventory QC Result Report .............................................................653
14.6.5
Certificate of Analysis Report ...........................................................655
15 MSDS ............................................................................................. 657
15.1
BOILERPLATE OVERRIDE .............................................................................657
15.1.1
Screen Fields Description ................................................................657
15.1.2
Defining a Boilerplate Override.........................................................658
15.1.3
Example........................................................................................658
15.2
SUPPLEMENTARY FILE .................................................................................658
15.2.1
Mandatory Inputs ...........................................................................659
15.2.2
Screen Fields Description ................................................................660
15.2.3
Creating a Supplementary File .........................................................661
15.2.4
Example........................................................................................661
15.3
CAS NUMBER MASTER ...............................................................................661
15.3.1
Screen Fields Description ................................................................662
15.3.2
Creating a CAS Number ..................................................................668
15.4
HAZARD PRINT RANGE MAINTENANCE .............................................................668
15.4.1
Screen Fields Description ................................................................669
15.4.2
Creating a Hazard Print Range Table .................................................669
15.5
HAZARD PRINT CRITERIA MAINTENANCE ...........................................................670
15.5.1
Mandatory Inputs ...........................................................................670
15.5.2
Screen Fields Description ................................................................671
15.5.3
Creating a Hazard Section ...............................................................672
Doc. No. F/DV/15
Rev.No.
Date
BatchMaster Software Inc.
15.6
BMM User Manual
MATERIAL SAFETY INFORMATION ...................................................................672
15.6.1
Screen Fields Description ................................................................673
15.6.2
Creating Material Safety Information for an Item ...............................679
15.7
SARA PROCESSING...................................................................................679
15.7.1
Screen Fields Description ................................................................679
15.7.2
Performing Period-End SARA Processing ............................................680
15.7.3
Performing Year-End SARA Processing ..............................................680
15.8
MSDS MASTER FORMAT .............................................................................681
15.8.1
Screen Fields Description ................................................................681
15.8.2
Creating a MSDS Master Format.......................................................682
15.9
MSDS SCHEDULE GENERATION ....................................................................682
15.9.1
Screen Fields Description: Master Formula ........................................683
15.9.2
Generating a Schedule of Master Formula type ..................................684
15.9.3
Screen Fields Description: Finished Good ..........................................685
15.9.4
Generating a Schedule of Finished Good type ....................................686
15.9.5
Screen Fields Description: Raw Material ............................................687
15.9.6
Generating a Schedule of Raw Material type ......................................688
15.9.7
Screen Fields Description: Production Formula ...................................688
15.9.8
Generating a Schedule of Production Formula type .............................689
15.9.9
Screen Fields Description: Production Finished Good ...........................690
15.9.10
Generating a Schedule of Production Finished Good type .................691
15.9.11
Screen Fields Description: MSDS Customer History .........................692
15.9.12
Generating a Schedule of MSDS Customer History type ...................693
15.9.13
Screen Fields Description: BatchMaster Order History ......................694
15.9.14
Generating a Schedule of BatchMaster Order History type ................695
15.10
CUSTOMER HISTORY ..............................................................................696
Doc. No. F/DV/15
Rev.No.
Date
BatchMaster Software Inc.
BMM User Manual
15.10.1
Screen Fields Description .............................................................696
15.10.2
Creating a Customer History ........................................................696
15.11
UPDATE CUSTOMER HISTORY ....................................................................697
15.11.1
Screen Fields Description .............................................................697
15.11.2
Updating Customer History ..........................................................697
15.12
PRINT MSDS .......................................................................................697
15.12.1
Mandatory Inputs .......................................................................697
15.12.2
Screen Fields Description .............................................................698
15.12.3
Generating a MSDS .....................................................................700
15.13
PULL KEYWORDS ...................................................................................701
15.13.1
Screen Fields Description .............................................................702
15.13.2
Maintaining MSDS Keyword Information ........................................702
15.14
MSDS REPORTS ...................................................................................703
15.14.1
MSDS Setup Report.....................................................................703
15.14.2
Boilerplate Group Report..............................................................703
15.14.3
Boilerplate Maintenance Report.....................................................705
15.14.4
Boilerplate Override Report ..........................................................707
15.14.5
Supplementary File Report ...........................................................709
15.14.6
MSDS Hazard Type Report ...........................................................711
15.14.7
MSDS Print Range Report ............................................................712
15.14.8
Hazard Type Print Criteria ............................................................714
15.14.9
Material Safety Information Report ...............................................716
15.14.10
Print Mail Labels .........................................................................717
15.14.11
SARA Tier I/II Tracking Report .....................................................718
15.14.12
SARA Title III Tier I Report ..........................................................720
15.14.13
SARA Title III Tier II Report .........................................................722
Doc. No. F/DV/15
Rev.No.
Date
BatchMaster Software Inc.
BMM User Manual
15.14.14
MSDS Master Format Report ........................................................723
15.14.15
Customer History Report..............................................................724
15.14.16
INCI Report................................................................................726
16 DASHBOARD .................................................................................. 728
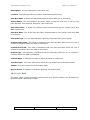
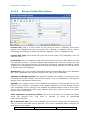
16.1
CUSTOM REPORTS VIEW .............................................................................728
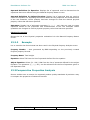
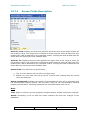
16.1.1
Working with View Custom Dashboard Wizard ...................................729
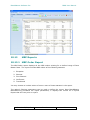
17 BIN MANAGEMENT ......................................................................... 730
17.1
BIN TRANSACTION REPORT ..........................................................................730
17.1.1
Generating Bin Details report ...........................................................731
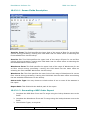
17.1.2
Bin Selection Form for Non Tracked Items .........................................733
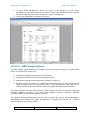
17.1.3
Batch Number Selection Form for Serial/Lot Tracked Items .................735
17.1.4
Batches Setup Form for Serial /Lot Tracked Items during Receipt
Transaction .................................................................................................737
17.2
INVENTORY TRANSACTIONS ..........................................................................739
17.2.1
Goods Receipt................................................................................740
17.2.2
Goods Issue ..................................................................................745
17.2.3
Inventory Transfer .........................................................................751
17.2.4
Inventory Putaway .........................................................................755
17.2.5
Initial Quantities, Inventory Tracking and Inventory Posting ................756
17.3
PURCHASE TRANSACTIONS ...........................................................................765
17.3.1
Goods Receipt PO ...........................................................................765
17.3.2
Goods Return ................................................................................774
17.3.3
A/P Invoice....................................................................................781
17.3.4
A/P Credit Memo ............................................................................790
17.4
SALES TRANSACTIONS ................................................................................797
17.4.1
Delivery ........................................................................................797
Doc. No. F/DV/15
Rev.No.
Date
BatchMaster Software Inc.
BMM User Manual
17.4.2
Return ..........................................................................................804
17.4.3
A/R Invoice ...................................................................................812
17.4.4
A/R Credit Memo ............................................................................819
17.5
PICK AND PACK ........................................................................................827
17.5.1
Pick List ........................................................................................827
Doc. No. F/DV/15
Rev.No.
Date
BatchMaster Software Inc.
BMM User Manual
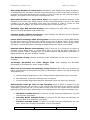
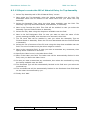
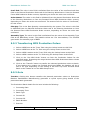
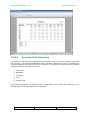
1 Prerequisites
The following components must be installed before you can install BMM.
• MS SQL Server 2005.
• SAP
If one of these components isn‟t installed on your computer you cannot attempt to install
BMM SAP. After all the components are installed, the installation of BMM SAP continues.
2 Registering ADD-Ons
Using the features of the SAP, you can register Add-Ons.
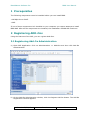
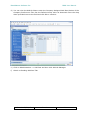
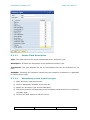
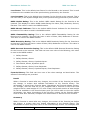
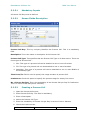
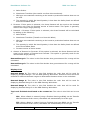
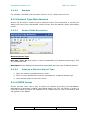
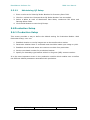
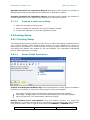
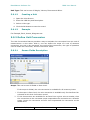
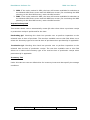
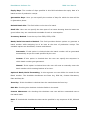
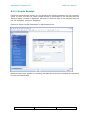
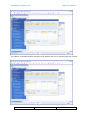
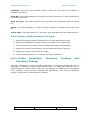
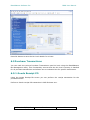
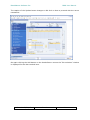
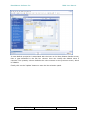
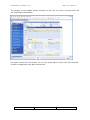
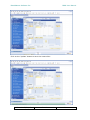
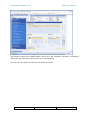
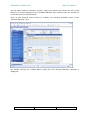
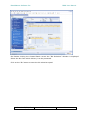
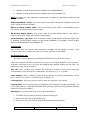
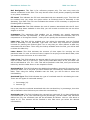
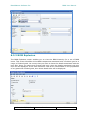
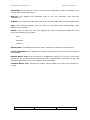
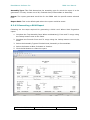
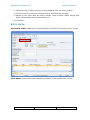
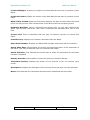
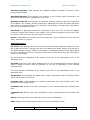
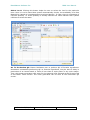
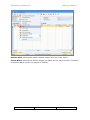
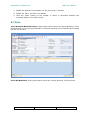
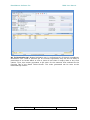
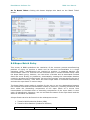
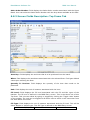
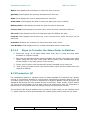
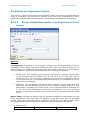
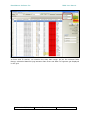
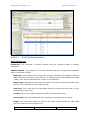
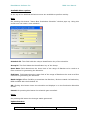
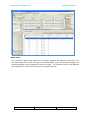
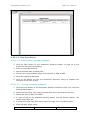
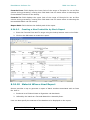
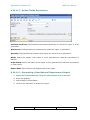
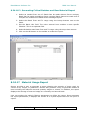
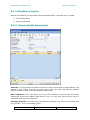
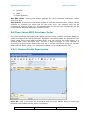
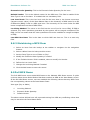
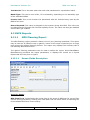
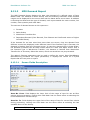
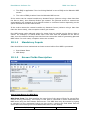
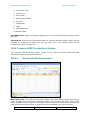
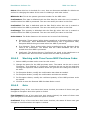
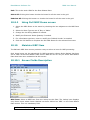
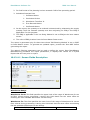
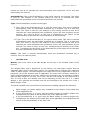
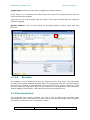
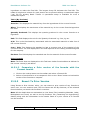
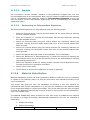
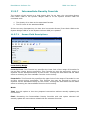
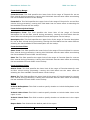
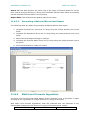
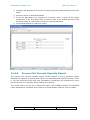
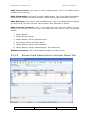
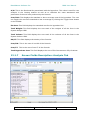
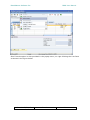
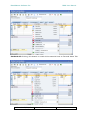
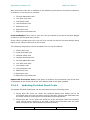
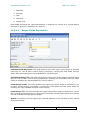
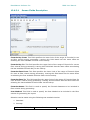
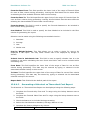
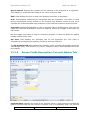
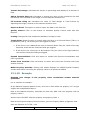
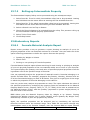
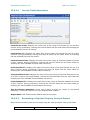
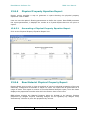
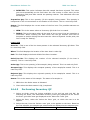
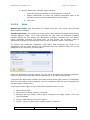
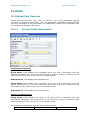
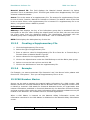
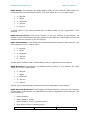
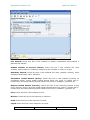
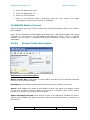
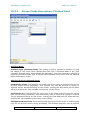
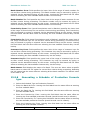
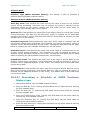
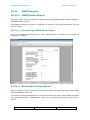
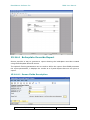
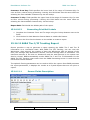
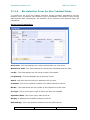
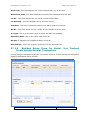
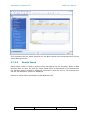
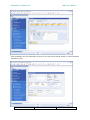
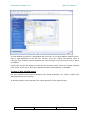
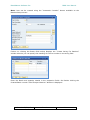
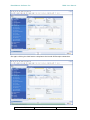
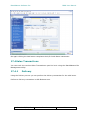
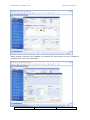
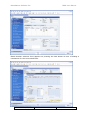
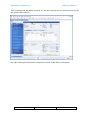
2.1 Registering Add-On Administration
a) Open SAP Application. Click on Administration >> Add-Ons and then click Add-On
Administration.
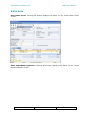
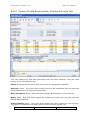
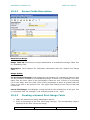
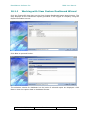
b) On the Add-On Administration window, click the Register Add-On button. The Add On
Registration window appears.
Doc. No. F/DV/15
Rev.No.
Date
BatchMaster Software Inc.
BMM User Manual
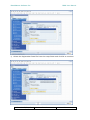
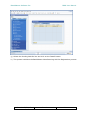
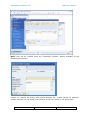
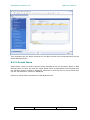
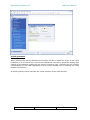
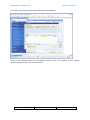
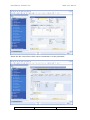
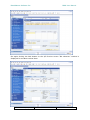
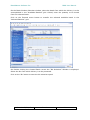
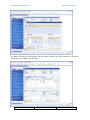
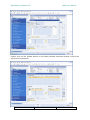
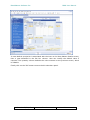
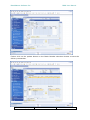
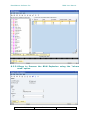
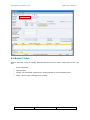
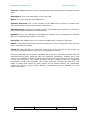
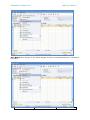
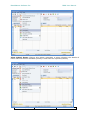
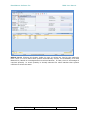
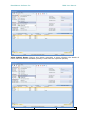
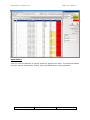
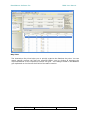
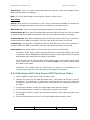
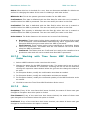
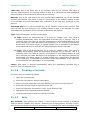
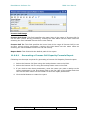
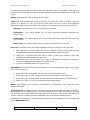
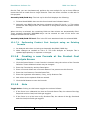
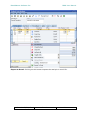
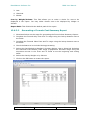
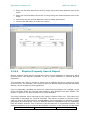
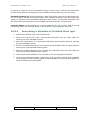
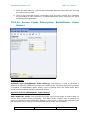
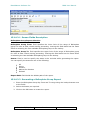
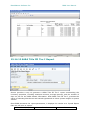
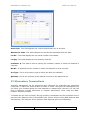
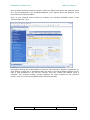
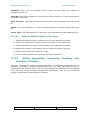
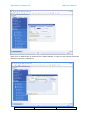
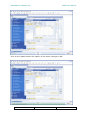
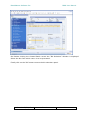
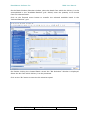
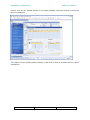
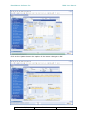
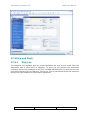
c) Select the Registration Data File from the setup folder and click Ok to continue.
Doc. No. F/DV/15
Rev.No.
Date
BatchMaster Software Inc.
BMM User Manual
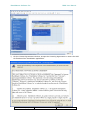
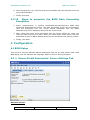
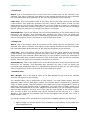
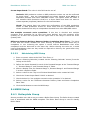
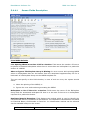
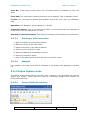
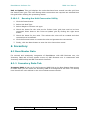
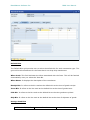
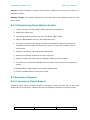
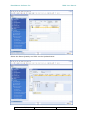
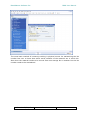
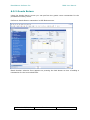
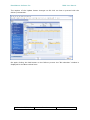
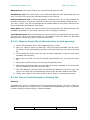
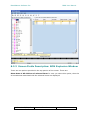
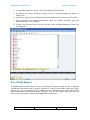
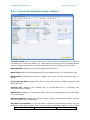
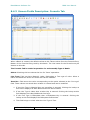
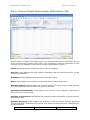
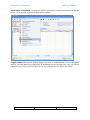
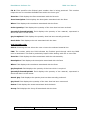
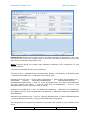
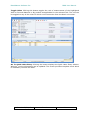
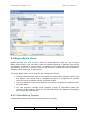
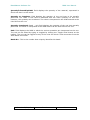
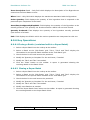
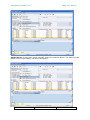
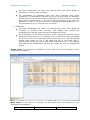
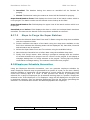
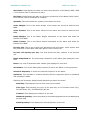
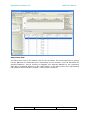
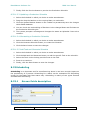
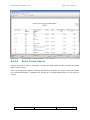
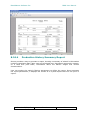
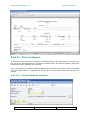
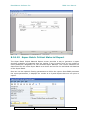
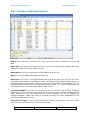
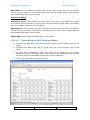
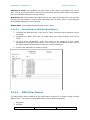
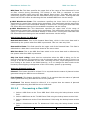
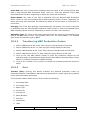
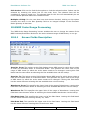
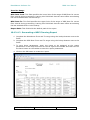
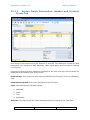
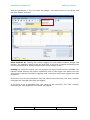
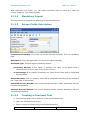
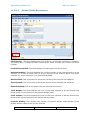
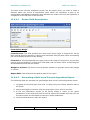
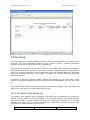
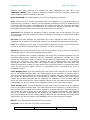
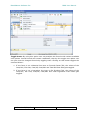
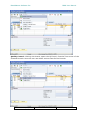
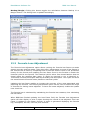
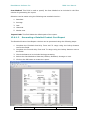
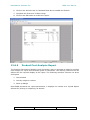
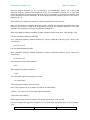
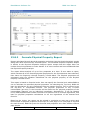
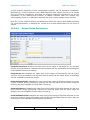
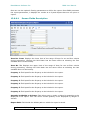
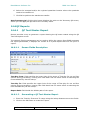
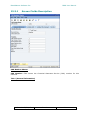
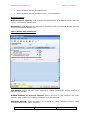
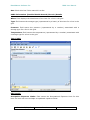
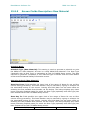
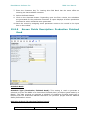
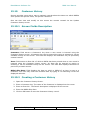
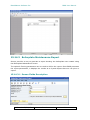
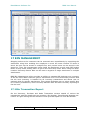
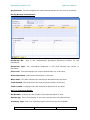
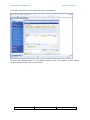
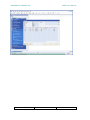
d) You can view the Add On Name under the Company Assigned Add-Ons Section of the
Company Preferences Tab. Set the Default Group value as Automatic from the drop
down provided next to the field and click Ok to continue.
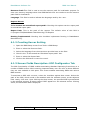
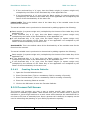
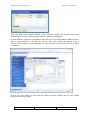
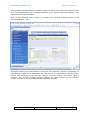
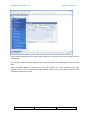
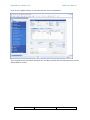
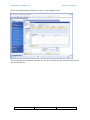
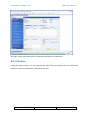
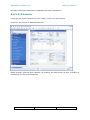
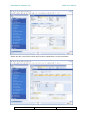
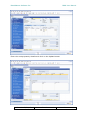
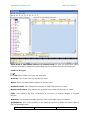
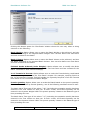
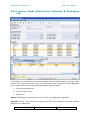
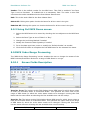
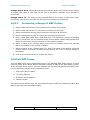
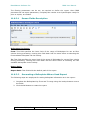
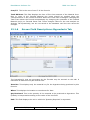
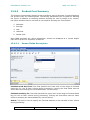
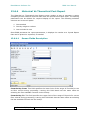
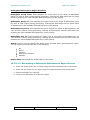
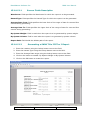
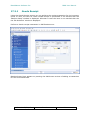
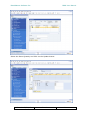
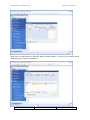
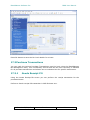
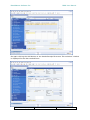
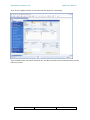
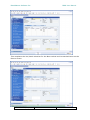
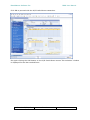
e) Click on Administration >> Add-Ons and then click Add-On Manager.
f) Switch to Pending Add-Ons Tab.
Doc. No. F/DV/15
Rev.No.
Date
BatchMaster Software Inc.
BMM User Manual
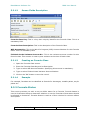
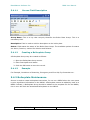
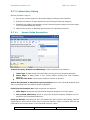
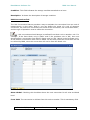
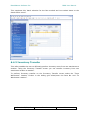
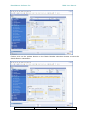
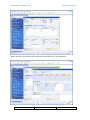
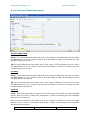
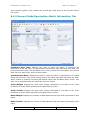
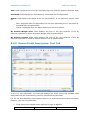
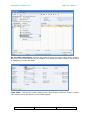
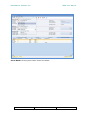
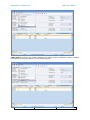
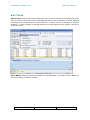
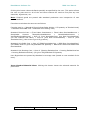
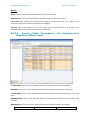
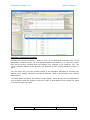
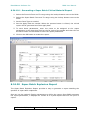
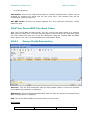
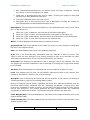
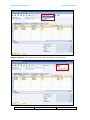
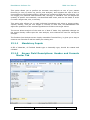
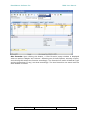
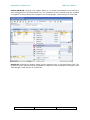
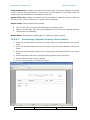
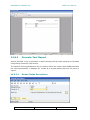
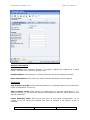
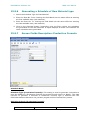
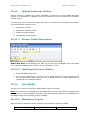
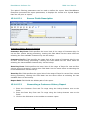
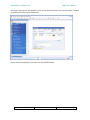
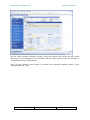
g) Select the Pending Add-On line and click on the Install button.
h) The system initializes the BatchMaster Manufacturing Add-On Registration process.
Doc. No. F/DV/15
Rev.No.
Date
BatchMaster Software Inc.
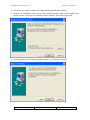
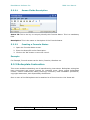
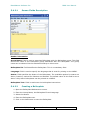
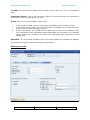
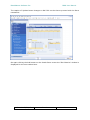
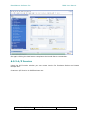
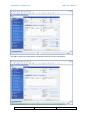
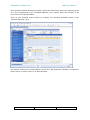
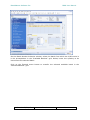
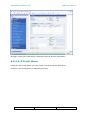
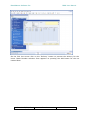
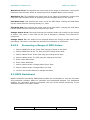
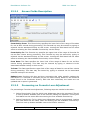
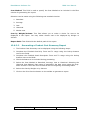
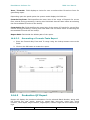
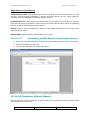
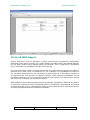
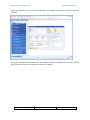
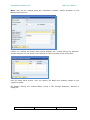
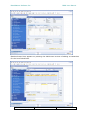
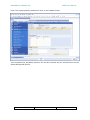
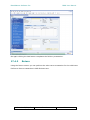
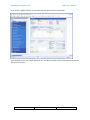
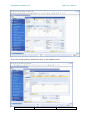
i)
BMM User Manual
On the License Agreement window, accept the Licensing Agreement to enter the AddOn Business One installation application.
Doc. No. F/DV/15
Rev.No.
Date
BatchMaster Software Inc.
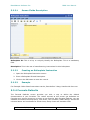
j)
BMM User Manual
Eventually the system searches for BatchMaster Manufacturing Setup.
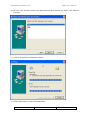
k) Choose the destination folder where Add-On Business One needs to be installed. Use
Browse button to access the available network options. Click Next to proceed.
l)
Clicking carries you to Start Installation Wizard. Click Next to continue.
Doc. No. F/DV/15
Rev.No.
Date
BatchMaster Software Inc.
BMM User Manual
m) On the next window choose the Sap Business One Version as 2008. Click Next to
proceed.
n) Clicking proceeds to installation wizard.
o) Click Finish button to exit the Installation.
Doc. No. F/DV/15
Rev.No.
Date
BatchMaster Software Inc.
BMM User Manual
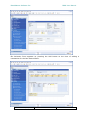
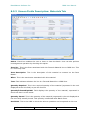
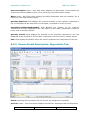
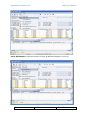
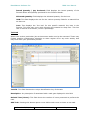
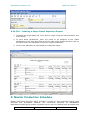
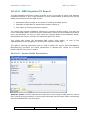
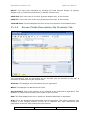
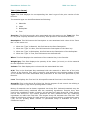
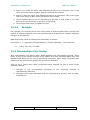
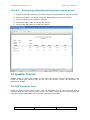
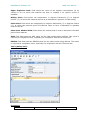
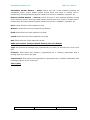
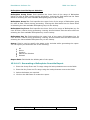
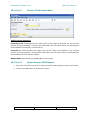
p) Eventually system displays the System Message. Click Yes if Add on Installation ends
up successfully.
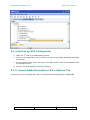
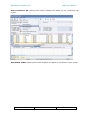
q) You can view the installed BMM SAP Add-On on the „Installed Add-Ons‟ tab.
Doc. No. F/DV/15
Rev.No.
Date
BatchMaster Software Inc.
BMM User Manual
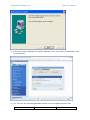
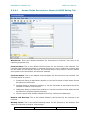
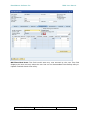
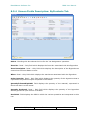
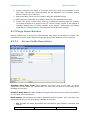
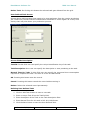
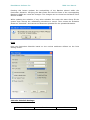
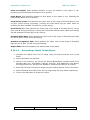
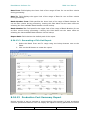
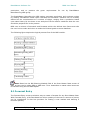
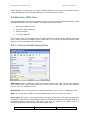
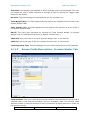
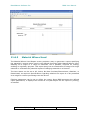
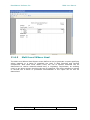
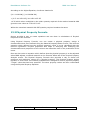
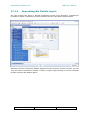
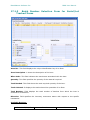
r) On the next window, enter the BatchMaster Password to continue.
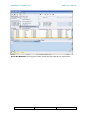
s) On the BatchMaster Database Install Window:
a. Type or select the Server
b. Type in the BatchMaster Password.
c. Click the Connect button.
d. Type in the SAP Super user and the associated SAP Super Password.
e. Select the SAP company from the drop down menu provided.
f.
Click the Update DB button.
Doc. No. F/DV/15
Rev.No.
Date
BatchMaster Software Inc.
BMM User Manual
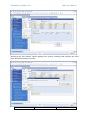
t) Further the System prompts confirmation message for successful updation of
database.
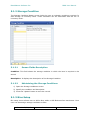
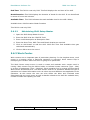
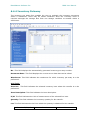
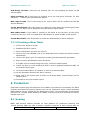
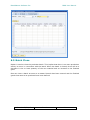
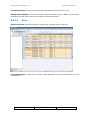
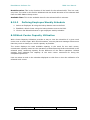
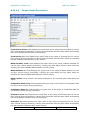
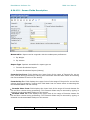
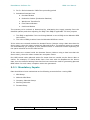
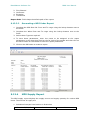
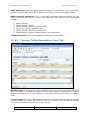
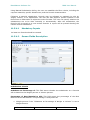
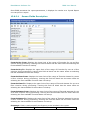
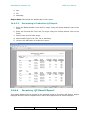
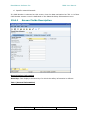
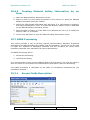
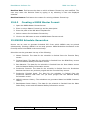
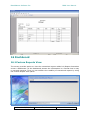
3 Authorizations
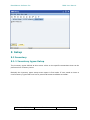
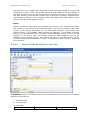
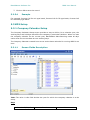
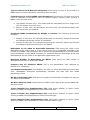
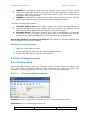
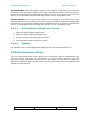
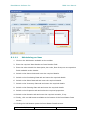
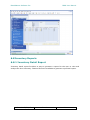
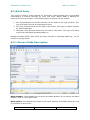
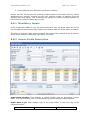
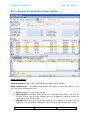
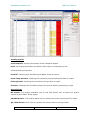
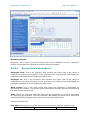
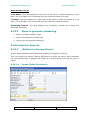
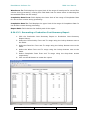
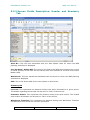
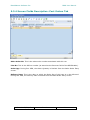
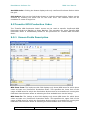
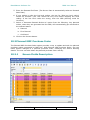
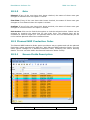
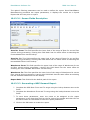
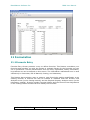
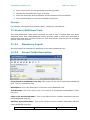
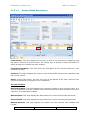
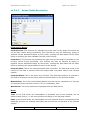
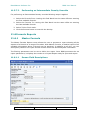
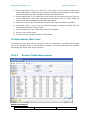
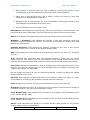
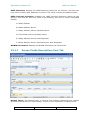
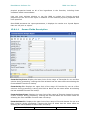
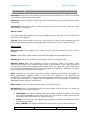
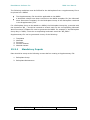
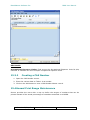
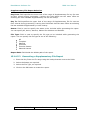
3.1 BMM Data Ownership Authorizations
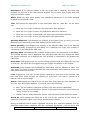
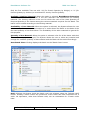
The Authorization tab enables you to provide the Data Ownership Authorization for the
related screens.
Doc. No. F/DV/15
Rev.No.
Date
BatchMaster Software Inc.
BMM User Manual
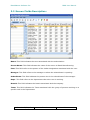
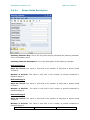
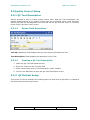
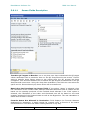
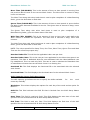
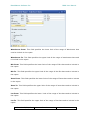
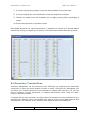
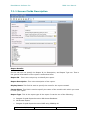
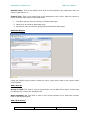
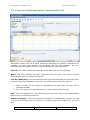
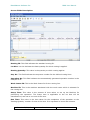
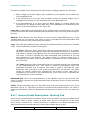
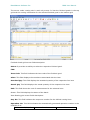
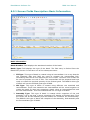
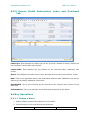
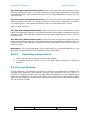
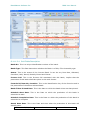
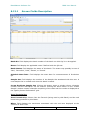
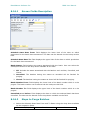
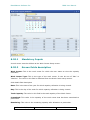
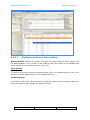
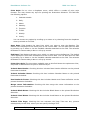
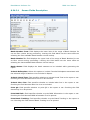
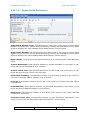
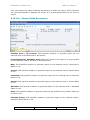
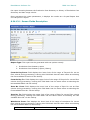
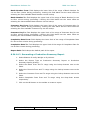
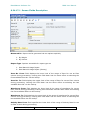
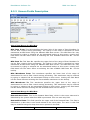
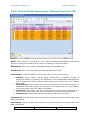
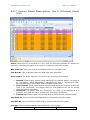
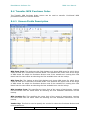
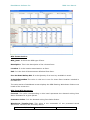
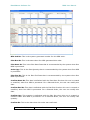
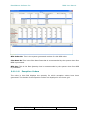
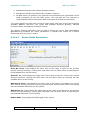
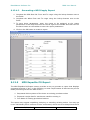
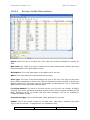
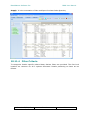
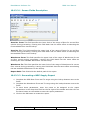
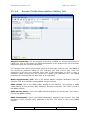
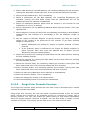
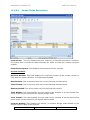
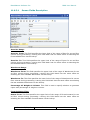
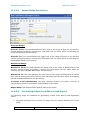
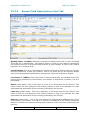
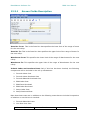
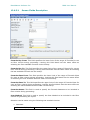
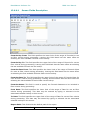
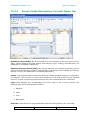
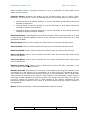
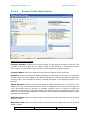
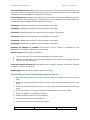
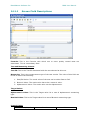
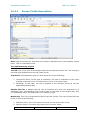
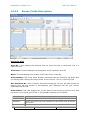
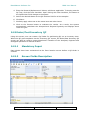
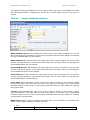
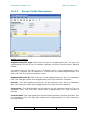
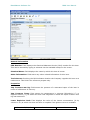
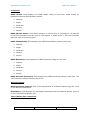
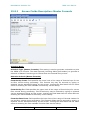
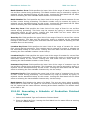
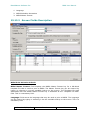
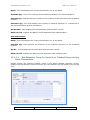
3.2 Screen Fields Description:
Name: This field indicates the users associated with the authorization.
Screen Name: This field indicates the name of the screen in Batch Manufacturing.
Peer: This field refers to the person of the similar designation associated with the user.
Manager: This field refers to the manager to whom the subordinate is reporting.
Subordinate: This field indicates the person who is the subordinate of the manager.
Dept: This field refers to the department where the user is working.
Branch: This field indicates the branch associated with the company.
Team: This field indicates the Team associated with the group of persons working on a
specific task in the Department.
Doc. No. F/DV/15
Rev.No.
Date
BatchMaster Software Inc.
BMM User Manual
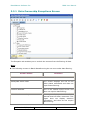
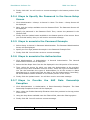
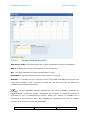
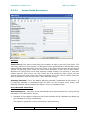
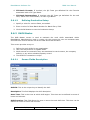
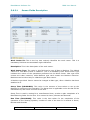
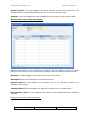
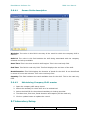
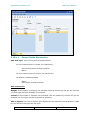
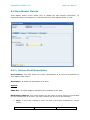
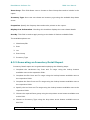
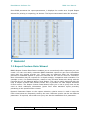
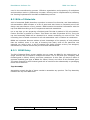
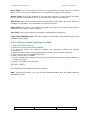
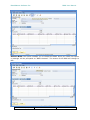
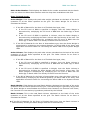
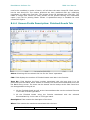
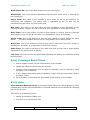
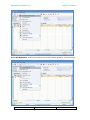
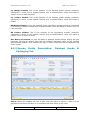
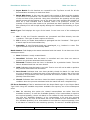
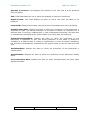
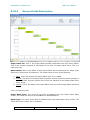
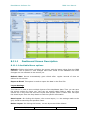
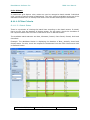
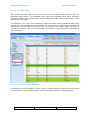
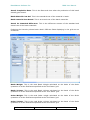
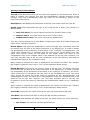
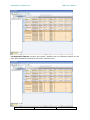
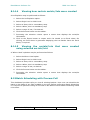
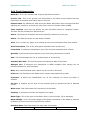
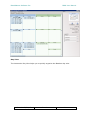
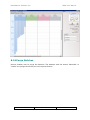
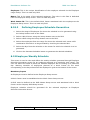
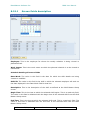
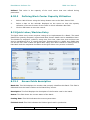
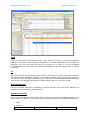
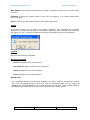
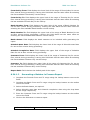
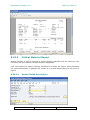
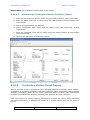
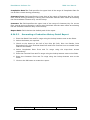
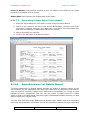
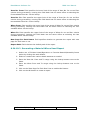
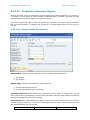
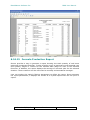
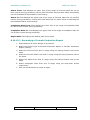
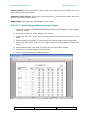
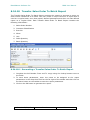
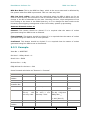
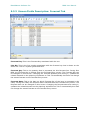
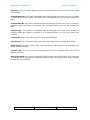
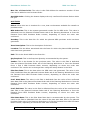
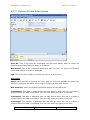
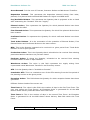
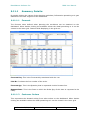
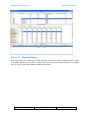
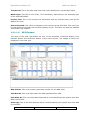
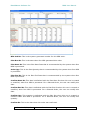
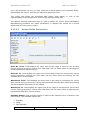
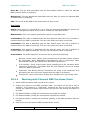
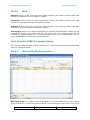
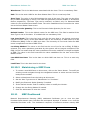
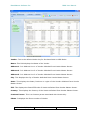
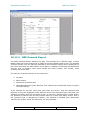
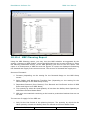
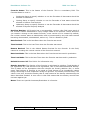
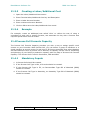
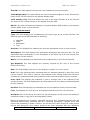
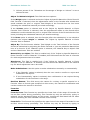
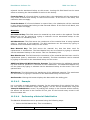
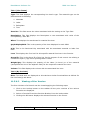
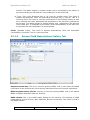
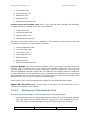
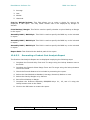
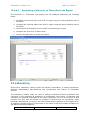
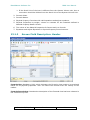
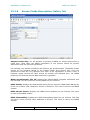
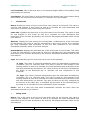
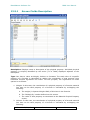
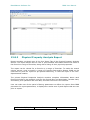
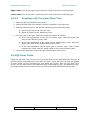
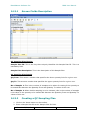
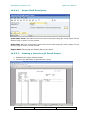
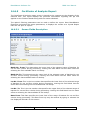
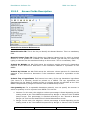
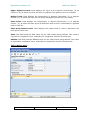
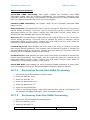
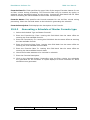
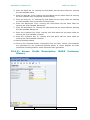
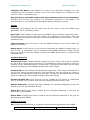
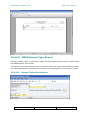
3.2.1 Data Ownership Exceptions Screen
The Exception tab enables you to exclude the screens from the filtering of data.
Note:
A. The following screens in Batch Manufacturing do not come under data filtering.
Screen Name
Remarks
FORMULATION
Boilerplate where used.
This screen displays the list of the
Boiler plates associated and does not
require data filtering.
Formula Defaults.
This is the default setup screen and
does not require data filtering.
Material where used report.
This report displays the list of the
material that has been consumed. This
report does not display sensitive
information, and thus do not require
data filtering.
Doc. No. F/DV/15
Rev.No.
Date
BatchMaster Software Inc.
BMM User Manual
Multi level formula ingredient.
This screen displays the ingredients of
the formula. This screen does not
display sensitive information, and thus
do not require data filtering.
Multilevel material where used report.
This report displays the multilevel list
of material that has been consumed.
This report does not display sensitive
information, and thus do not require
data filtering.
COSTING
Costing setup.
This is the default setup screen
associated with costing and does not
require data filtering.
Intermediate cost rollup.
This screen is used to roll up the
intermediate costs associated with the
items and does not require data
filtering.
Update finished good cost.
This screen is used to update the cost
of the finished good and does not
require data filtering.
Historical Vs theoretical loss report.
This report does not display any
sensitive data and thus does not
require data filtering.
LABORATORY
Physical property formula.
This is the common screen and thus
does not require data filtering.
Laboratory setup.
This is the default setup screen
associated with Laboratory setup and
does not require data filtering.
Physical property search filter.
This screen is used for the purpose of
searching and is the common screen
and thus does not require data
filtering.
Material property master.
This screen displays the material
properties. This is the common screen
and thus does not require data
filtering.
Material physical property.
This screen displays the physical
properties of the material. This is the
Doc. No. F/DV/15
Rev.No.
Date
BatchMaster Software Inc.
BMM User Manual
common screen and thus does not
require data filtering.
Intermediate property rollup.
This screen is used to roll up the
intermediate
properties
associated
with the items and does not require
data filtering.
Physical property search report.
This screen is used for the purpose of
searching and is the common screen
and thus does not require data
filtering.
Physical property equation report.
This report displays the equations
associated with the physical properties
of the material and do not contain
sensitive data. Thus this screen does
not require data filtering.
Raw material physical property report.
This report displays the physical
properties associated with the raw
material and do not contain sensitive
data. Thus this screen does not require
data filtering.
PRODUCTION
Production Setup
This is the default setup screen
associated with Production and does
not require data filtering.
Transfer SO to batches
This screen is used to transfer the
Sales Orders created to the respective
batches and thus does not require
data filtering.
Serial lot explosion criteria
This screen display the lot associated
with the items and does not require
data filtering.
Critical material report
This report displays the materials that
are critical and do not contain sensitive
data and thus does not require data
filtering.
Production history summary report
This
report
is
associated
with
Production. This report does not
contain sensitive data and thus do not
require data filtering.
Batch wise lot detail report
This report displays the details of the
lot for the batches and does not
Doc. No. F/DV/15
Rev.No.
Date
BatchMaster Software Inc.
BMM User Manual
contain sensitive data. This screen
does not require data filtering.
Super Batch wise lot details report
This report displays the details of the
lot for the super batches and does not
contain sensitive data. Thus this
screen does not require data filtering.
Max producible by stock
This report displays the maximum
amount of items that can be produced
and do not contain sensitive data.
Thus this screen does not require data
filtering.
Material where used report
This report displays the details of the
material that have been used and do
not contain sensitive data. Thus this
screen does not require data filtering.
Raw material requirement analysis
This report displays the details of the
raw material that is required for
production
and do not
contain
sensitive data. Thus this screen does
not require data filtering.
Pick list report
This report displays the details
associated with the pick list and do not
contain sensitive data.
Thus this
screen does not require data filtering.
Production cost summary report
This report displays the summary of
the costs associated with production
for the respective batches and do not
contain sensitive data.
Thus this
screen does not require data filtering.
Production History summary report
This report displays the complete
summary of the costs associated with
production of all the batches and do
not contain sensitive data. Thus this
screen does not require data filtering.
Material usage report
This report displays the quantity of
materials that have been used for a
particular batch and do not contain
sensitive data. Thus this screen does
not require data filtering.
Critical
report
batches
and
raw
Doc. No. F/DV/15
material
This report displays the batches and
the raw material that are critical and
do not contain sensitive data. Thus
this screen does not require data
Rev.No.
Date
BatchMaster Software Inc.
BMM User Manual
filtering.
Super Batch critical material report
This report displays the material that
are critical associated with the super
batches and do not contain sensitive
data. Thus this screen does not require
data filtering.
MSDS
This refers to the Material Safety Data
sheet and does not require data
filtering.
QC
QC test description
This screen enables you to maintain
the common data associated with QC
and thus do not require data filtering.
QC Formula Item tests
This is the common screen and thus do
not require data filtering.
QC test master report
This report does not contain any
sensitive data and thus do not require
data filtering.
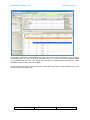
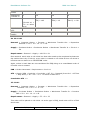
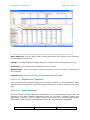
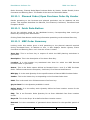
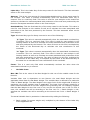
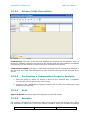
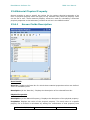
B. The following are the screens in Batch Manufacturing that are given special
consideration.
Screen
Remarks
FORMULATION
Intermediate Expansion
This screen enables you to expand the
intermediates associated with the formula and the
lower level of intermediates also.
Material Substitution
This screen enables the users to substitute the
formula for which the access has been provided.
Purge prior versions
This screen enables the users to purge the prior
versions of the formula for which access has been
provided.
COSTING
Formula loss adjustment
This screen enables the users to adjust the formula
for which the access has been provided.
BOM
Doc. No. F/DV/15
Rev.No.
Date
BatchMaster Software Inc.
BOM Explosion
BMM User Manual
This screen enables the user to filter the top level
BOM associated with the formula.
3.2.2 Differences between the Authorization in BMM and
Business One
Although the Batch Master Manufacturing Authorization follows the same concept similar
to that of Business One, there are certain differences which are explained in the
following table:
BatchMaster Manufacturing
Business One
The „Record User‟ field does filtering of
data. Each record in BMM is associated
with the last modified user and the
record date field. The modifications
done by the user will get recorded in
this User Id.
Filtering of data is done using the
„Record Owner‟ field.
The Data Ownership Exception can be
provided for the Rows only. This
implies that the user will be able to
modify the data of the line items
associated with the Batch Master
Manufacturing screen.
The Data Ownership Exception can be
provided for both Header and Rows.
This implies that the user will be able
to modify both the Header and the line
items associated with the Header.
The Authorization has to be provided
manually for all the users using the
Data Ownership Authorization Screen.
The Super – User is allowed Full
Authorization by default.
3.2.3
Steps to associate the User
1. Click Administration Setup General Users. The Users – Setup Screen will
be displayed.
2. Select the Superuser check box in case you want to provide the Super User rights
to the User.
3. Next, specify the User Code and the User Name in the User Code and the User
Name fields.
4. You can specify the E-Mail, Contact Number and the Fax Number details in the
respective fields.
5. Next, select the type of default using the lookup available near the Defaults field.
6. Select the Branch and the Department using the drop down available near the
Branch and the Department fields.
7. You can specify the password for the user using the lookup available near the
field.
Doc. No. F/DV/15
Rev.No.
Date
BatchMaster Software Inc.
BMM User Manual
8. Finally click Add. You will receive a success message in the bottom portion of the
screen.
3.2.4 Steps to Specify the Password in the Users-Setup
Screen
1. Click Administration Setup General Users. The Users – Setup Screen will
be displayed.
2. Next, click the lookup available near the Password field. The Password Screen will
be displayed.
3. Specify the password in the Password field. Then, reenter the password in the
Confirm field.
4. Finally click the Update button available in the bottom portion of the screen. Once
you click this button, then you will receive a success message.
3.2.5 Steps to associate the Password Example
1. Select Setup General Password Administration. The Password Administration
Screen will be displayed.
2. Specify the four digit password example in the Password Example field.
3. Finally Click OK. You will then receive a success message.
3.2.6 Steps to associate the Authorization
1. Click Administration Authorization General Authorization. The General
Authorization Screen will be displayed.
2. Select the Non Super User from the list displayed in the left portion of the screen.
3. Then, select the screen for which you want the Authorization to be provided.
Using the drop down available near the screen, select the type of Authorization.
You can also associate the types of Authorization for all the screens in Batch
Manufacturing in a single shot with the help of the Full Authorization, Read Only,
No Authorization buttons available in the bottom portion of the screen.
4. Finally Click the Update button. You will then receive a success message.
3.2.7 Steps to
Exception
Provide
the
SAP
Data
Ownership
1. Click Administration Authorization Data Ownership Exception. The Data
Ownership Exceptions Screen will be displayed.
2. Next, select the Enable Ownership Filtration check box provided in the top portion
of the screen.
3. Using the drop down available near the Filtered field, select the filtering option.
4. Finally Click OK. You will receive a success message.
Doc. No. F/DV/15
Rev.No.
Date
BatchMaster Software Inc.
BMM User Manual
3.2.8 Steps to associate the Address
1. Click Human Resources Employee Master Data. The Employee Master Data
Screen will be displayed. Select the Address tab.
2. Enter the First Name, Middle Name, Last Name, Employee Number, and Job Title
in the respective fields.
3. Select the Position, Department, Branch, Manager, User Code using the drop
down available near the respective fields.
4. You can also associate the Official contact number, Residential contact number,
Fax and the E-mail address in the respective fields.
5. Then, specify the complete Official and the Residential address along with the Zip
code, State and the Country in the columns provided under the Work Address and
the Home Address.
6. Finally Click the Update button available in the bottom portion of the screen. You
will then receive a success message.
3.2.9 Steps to associate the Membership details
1. Click Human Resources Employee Master Data. The Employee Master Data
Screen will be displayed. Select the Membership tab.
2. Select the Role associated with the employee using the drop down available in the
Role column.
3. Then, select the Team and the Team Role associated with the employee using the
drop down available in the Team and the Team Role columns.
4. Finally Click the Update button available in the bottom portion of the screen. You
will then receive a success message.
3.2.10
Steps to associate the Administration details
1. Click Human Resources Employee Master Data. The Employee Master Data
Screen will be displayed. Select the Administration tab.
2. Enter the Start Date in the Start Date field.
3. Next, select the status using the drop down available near the field.
4. In case of termination, you can associate the Termination Date in the Termination
Date field and the reason for Termination using the drop down available near the
Termination Reason field.
5. You can associate the details regarding the Absence, Education, Review, and
Previous Employment using the respective buttons available in the screen.
6. Finally Click the Update button available near the bottom portion of the screen.
You will then receive a success message.
3.2.11
Steps to associate the Personal Information
1. Click Human Resources Employee Master Data. The Employee Master Data
Screen will be displayed. Select the Personal Information tab.
Doc. No. F/DV/15
Rev.No.
Date
BatchMaster Software Inc.
BMM User Manual
2. Next, select the Gender of the employee using the drop down available near the
field.
3. Enter the Date of Birth of employee in the Date of Birth column.
4. Next, select the Country of Birth, the Marital Status using the drop down available
near the respective fields, and specify the number of children, ID Number,
Passport Number and the Passport Expiration Date associated with the employee
in the respective fields.
5. Finally Click the Update button available near the bottom portion of the screen.
You will then receive a success message.
3.2.12
Steps to associate the Finance details
1. Click Human Resources Employee Master Data. The Employee Master Data
Screen will be displayed. Select the Finance tab.
2. Enter the Salary amount of the employee in the Salary field.
3. Select the period for which the salary has been calculated using the drop down
available near the field.
4. You can also specify the Employee Costs in the Employee Costs field.
5. Next, select the name of the Bank using the drop down available near the Bank
field.
6. Specify the Account Number and the Branch associated with the Bank in the
respective fields.
7. Finally Click the Update button available near the bottom portion of the screen.
You will then receive a success message.
3.2.13
Steps to associate the Remarks
1. Click Human Resources Employee Master Data. The Employee Master Data
Screen will be displayed. Select the Remarks tab.
2. Specify the remarks in the column provided.
3. Finally Click the Update button available near the bottom portion of the screen.
You will then receive a success message.
3.2.14
Steps to Provide the BMM Data Ownership
Authorization
1. Select Administration System InitializationAuthorizations BMM Data
Ownership Authorizations Screen. The Data Ownership screen will be displayed.
2. Click the Authorization tab.
3. Next, select the name of the person associated with the Authorization from the
Name column.
4. Select the name of the screen for which you want the Authorization to be
provided from the Screen Name column.
5. Next, select the role associated with the authorization from the respective
columns. The role includes the Peer, Manager, Subordinate, Department, Branch,
and Team.
Doc. No. F/DV/15
Rev.No.
Date
BatchMaster Software Inc.
BMM User Manual
6. After selecting the role, click the drop down available near the field and select the
type of Authorization.
7. Finally click Save.
3.2.15
Steps to associate the BMM Data Ownership
Exceptions
1. Select Administration System InitializationAuthorizations BMM Data
Ownership Authorizations Screen. The Data Ownership screen will be displayed.
Click the Exceptions tab. The screen names associated with the Batch
Manufacturing will be displayed along with the check boxes.
2. Next, select the check boxes associated with the screen names for which you
want the data filtering to be done. Once you select these check boxes, then the
associated screens in Batch Manufacturing will be exempted from filtering of data.
3. Finally, click Save.
4 Configuration
4.1 BMM Setup
This screen is used to maintain default parameters that will be used system-wide. With
BMM Setup, one can maintain the language, default resource and report paths.
4.1.1 Screen Fields Description: Server Settings Tab
Resource Server:
Doc. No. F/DV/15
Rev.No.
Date
BatchMaster Software Inc.
BMM User Manual
Resource Path:This field is used to set the resource path for localization purpose. In
case user sets any language other than BMM default then one needs to set the resource
path field for localization.
Language: This field is used to indicate the language used by the user.
Reports Server:
To be treated as centralized report path?: Checking this option sets the report path
as centralized report path.
Report Path: This is the path of the reports. The default value of this field is
C:\Program File\BatchMaster Manufacturing\ CR Reports
Routing Implemented: Checking this checkbox implements Routing in BatchMaster
Manufacturing.
4.1.2 Creating Server Setting
1. Open the BMM Setup screen from Tools>>BMM Setup.
2. Enter or select the Resource Path.
3. Select the Language from the drop down provided next to the field.
4. Check in the „To be treated as Centralized report path?‟ box.
5. Enter or select the Report Path.
6. Click on the Ok button to save the record.
4.1.3 Screen Fields Description: SOP Configurator Tab
The SOP functionality of BMM enables associating Standard Operating Procedures on a
number of BMM screens. While entering important data, user can refer to these SOPs as
they are now available a click apart. This screen enables associating SOPs with various
BMM screens.
To associate a SOP with a screen, select the checkbox against that screen. Select the
path of the SOP, which needs to be attached with the selected screen, at the adjacent
field. Lastly, click save. Upon Clicking the Save button, the specified SOP‟s get attached
to the selected screens. A button named „SOP‟ appears on the selected screen. Clicking
which, the associated SOP is displayed.
Doc. No. F/DV/15
Rev.No.
Date
BatchMaster Software Inc.
BMM User Manual
4.1.4 Setting up SOP Configurator
1. Open the 2nd tab on the BMM Setup screen.
2. Check in the required screen on which you want to associate Standard Operating
Procedures.
3. At the adjacent field, select the path of the SOP which needs to be attached with
the selected screen.
4. Click on the Save button to save the settings.
4.1.5 Screen fields Description: Bin‟s Options Tab
Checking the ‟Allow multiple Bins‟ option implements Bin Management in BMM SAP.
Doc. No. F/DV/15
Rev.No.
Date
BatchMaster Software Inc.
BMM User Manual
5 Setup
5.1 Inventory
5.1.1 Inventory types Setup
The inventory types defined at this screen refers to the specific transactions that can be
performed on inventory items.
Basically the inventory types setup screen opens in find mode. If user needs to insert a
new Inventory Types than one has to press Add button available at toolbar.
Doc. No. F/DV/15
Rev.No.
Date
BatchMaster Software Inc.
5.1.1.1
BMM User Manual
Screen Field Description
Type: This field refers to the unique identification of an Inventory Type.
Description: It shows the description of the specified Inventory Type.
Transaction: This grid displays the list of Transactions that can be performed for an
item.
Available: Checking this checkbox shows that the respective transaction is applicable
for the Inventory type.
5.1.1.2
Maintaining a new inventory type
1) Open Inventory type setup screen.
2) Click on Add button available on the tool bar.
3) Specify an Inventory Type and its description.
4) Check the checkbox corresponding to the available transactions for the respective
inventory type.
5) Click on the „Add‟ button to add the record.
Doc. No. F/DV/15
Rev.No.
Date
BatchMaster Software Inc.
BMM User Manual
5.1.2 Storage Condition
The Storage Condition Master screen helps the user to maintain conditions required for
safe storage of inventory items. These conditions can be associated with the bin or
inventory items.
5.1.2.1
Screen Fields Description
Condition: This field shows the storage condition in which the item is required to be
stored.
Description: It displays the description of the Storage Condition.
5.1.2.2
Maintaining the Storage Conditions
1) Open the Storage conditions screen.
2) Specify the condition and description.
3) Press the „Update‟ button to save the record.
5.1.3 Bins Setup
Bin setup screen allows user to define bins within a SAP Business One warehouse. Here
user can also assign storage conditions to Bins.
Doc. No. F/DV/15
Rev.No.
Date
BatchMaster Software Inc.
5.1.3.1
BMM User Manual
Screen Field Description
Warehouse Code: This field denotes the unique identification code of a warehouse.
Name: It displays the name or description of the warehouse.
Bin: This field indicates the unique identification of a bin.
Description: The description of the bin can be given in this field.
Nettable: To consider the bin inventory items during MPS and MRP process user can
check this checkbox. Here it should be noted that the bins can only be defined as
nettable for the nettable warehouse.
: During MPS/MRP process determining the exact available inventory for
Demand/Supply need to be known. Sometimes the defective or reserved inventory is
prevented to use in manufacturing process. Hence the concept of nettable bin is
introduced in SAP Business One. Now flagging the warehouse and bin as nettable
consider such inventory in planning MPS/MRP.
Doc. No. F/DV/15
Rev.No.
Date
BatchMaster Software Inc.
BMM User Manual
As the warehouse setting supersede the bin setting hence incase the warehouse itself is
not checked as nettable then the associated bin level inventory type would not be
considered in manufacturing planning.
Inventory Type: The inventory type to be used for the selected bin is associated at this
field.
Aisle: This field displays the section in which the Bins are kept.
Row: It shows the series in which the bins are placed.
Rack: This field refers to the rack in which the bins are placed.
Storage Conditions
Condition: This field allows user to associate storage condition for the selected bin.
Description: It shows the description associated with the Storage condition.
5.1.3.2
Defining the BIN Setup
1. Open the Bin setup screen.
2. Choose the warehouse to which the bins need to be associated.
3. Enter the Bin Id and its description.
4. To consider the Inventory On hand of selected bin during MPS/MRP process
checks the „Nettable‟ checkbox.
5. Choose the inventory type to be used for the bin.
6. Enter the physical location of BIN in Aisle, Row and Rack fields.
7. Specify the storage condition and the description of the selected bin.
8. Click on the „Update‟ button to save the record.
5.2 Formulation Setup
5.2.1 Formula Class
This screen provides you with a way to create a Formula Class. The Formula class is used
to classify Formulas.
The Work in Progress account belonging to a Formula Class is used widely in Production.
The Formula Class is also used as a selection criterion in various utilities and reports.
5.2.1.1
Mandatory Inputs
Accounts should be available for attaching to the Formula Class.
Doc. No. F/DV/15
Rev.No.
Date
BatchMaster Software Inc.
5.2.1.2
BMM User Manual
Screen Fields Description
Formula Class Key: This is a key that uniquely identifies the Formula Class. This is a
mandatory field.
Formula Class Description: This is the description of the Formula Class.
WIP Account No.: This is the Work In Progress (WIP) Account Number for this Formula
Class. This is a mandatory field.
Finished Goods Variance Account No.: This is the variance account number for this
formula class. This account is used to post variance at the time of batch close.
5.2.1.3
Creating an Formula Class
1. Open the Formula Class screen.
2. Enter the Formula Class Key and its Description.
3. Type or select WIP Account Number. Specifying this account is mandatory.
4. Type or select Finished Good Variance Account Number.
5. Click on the „OK‟ button to save the record.
5.2.1.4
Example
For example, formulas can be classified as formula for beverages, metallic paints, acrylic
paints etc.
5.2.2 Formula Status
This screen provides you with a way to define status for a Formula. Formula Status is
used in Production Setup to determine whether or not the Formulas of that status should
be allowed in Production. Formula Status is used as a filter criterion for various utilities
and reports.
Doc. No. F/DV/15
Rev.No.
Date
BatchMaster Software Inc.
5.2.2.1
BMM User Manual
Screen Fields Description
Status ID: This is the key to uniquely identify this Formula Status. This is a mandatory
field.
Description: This is the name or description of the Formula Status.
5.2.2.2
Creating a Formula Status
1. Open the Formula Status screen.
2. Enter the Status ID and its Description.
3. Click on the „OK‟ button to save the record.
Example
For Example, Formula status can be Active, Inactive, Obsolete etc.
5.2.3 Boilerplate Instruction
This screen enables maintaining set of manufacturing instructions. Boilerplate writing has
been time-tested and strong enough for repeated reuse. Some typical boilerplates
include: mission statements, safety warnings, commonly used installation procedures,
copyright statements, and responsibility disclaimers.
One or more of the Boilerplates can be attached to a Formula at the Line Items tab.
Doc. No. F/DV/15
Rev.No.
Date
BatchMaster Software Inc.
5.2.3.1
BMM User Manual
Screen Fields Description
Boilerplate ID: This is a key to uniquely identify the Boilerplate. This is a mandatory
field.
Description: This is the set of manufacturing instructions for this boilerplate.
5.2.3.2
Creating an Boilerplate Instruction
1. Open the Boilerplate Instruction screen.
2. Enter a Boilerplate ID and Description.
3. Click on the OK button to save the record.
5.2.3.3
Example
For Example: Boiler Plate Instructions can be, Best before 3 days, Handle with Care etc.
5.2.4 Formula Defaults
The Formula Defaults screen provides you with a way to define the default
characteristics of your formulas. The values entered at this screen get defaulted on
Formula entry screen whenever we insert a new formula. With Formula Defaults, you can
establish the default markup factor, loss factor, loss constant, HMIS ratings, and all the
relevant labors and overheads for Fixed Costs, Setup Costs and Variable Costs.
Doc. No. F/DV/15
Rev.No.
Date
BatchMaster Software Inc.
5.2.4.1
BMM User Manual
Screen Fields Description: Master & HMIS Rating Tab
Warehouse: This is the default warehouse for formula to be inserted. This value is for
reporting purposes only.
Formula Class: This is the default Formula Class for the formula to be inserted. The
Formula Class provides the Work in Progress Account for use in production of items that
can be made via the specific formula. The Formula class is also used in various utilities
and reports of the Production and Formula modules.
Formula Status: This is the default Formula Status for the formula to be inserted. The
Formula Status is used in:
1. Production Setup to determine whether or not the Formulas of that status should
be allowed in Production
2. Costing Setup to determine whether or not the Formulas of that status should be
allowed in Product Cost Analysis.
3. Laboratory Setup to determine whether or not the Formulas of that status should
be allowed in Physical Property Analysis.
4. Certain reports and utilities related to Formula, Costing and Laboratory.
Reason Last Revised: This is the default Reason Last Revised for the formula to be
inserted.
Markup Factor: This is the default Markup Factor for the Formula to be inserted. This
value of a Formula is used for cost analysis.
Doc. No. F/DV/15
Rev.No.
Date
BatchMaster Software Inc.
BMM User Manual
Loss Factor: This is the default Loss Factor for the formula to be inserted. This is used
to determine the variable loss of the product being produced by the formula.
Loss Constant: This is the default Loss Constant for the formula to be inserted. This is
the fixed loss (in the System Weight Unit) of the product being produced by this formula.
HMIS Health Rating: This is the default HMIS Health Rating for the formula to be
inserted. This displays to define HMIS Health Rating like None, Mild, Moderate, Serious,
Extreme. This value is used in the MSDS module.
HMIS Chronic Indicator: This is the default HMIS Chronic Indicator for the formula to
be inserted. This value is used in the MSDS module.
HMIS Flammability Rating: This is the default HMIS Flammability Rating for the
formula to be inserted. This field can have a value of None, Mild, Moderate or Serious.
This value is used in the MSDS module.
HMIS Reactivity Rating: This is the default HMIS Reactivity Rating for the formula to
be inserted. This field can have a value of None, Mild, Moderate or Serious. This value is
used in the MSDS module.
HMIS Personal Protection Rating: This is the default HMIS Personal Protection Rating
for the formula to be inserted. This field can have one value of the following; this value
is used in the MSDS module:
1. Safety Glasses.
2. Safety Glasses, Gloves.
3. Safety Glasses, Gloves, Synthetic Apron.
4. Face Shield, Gloves, Synthetic Apron.
5. Safety Glasses, Gloves, Dust Respirator.
6. Safety Glasses, Gloves, Synthetic Apron, Dust Respirator.
Formula History: This field can have one of the three settings as listed below. The
effects of the settings are provided.
Detail:
When a formula is saved after any changes, the version of the formula just before
the change, is written with detailed information to the formula history. The
information is saved from Formula Items, Byproducts and Formula Master Screen.
For example, with this field set to yes, suppose that a formula is sized from total
weight of 50 to a total weight of 5. In such a case, the formula version of total weight
50 will be available in the formula history and you will be able to view the header
information, line items, byproducts of the this prior version via the formula utilities
such as View Prior Versions, Compare Prior with Present or Revert to Prior Versions.
Summary:
When a formula is saved after any changes, the version of the formula just before
the change, is written with very limited information to the formula history. The
information is saved only from Tab-1 of the Formula Entry screen. For example, with
Doc. No. F/DV/15
Rev.No.
Date
BatchMaster Software Inc.
BMM User Manual
this field set to yes, suppose that a formula is sized from total weight of 50 to a total
weight of 5. In such a case, the formula version of total weight 50 will be available in
the formula history but you will not be able to view the line items or byproducts of
this prior version via the formula utilities such as View Prior Versions, Compare Prior
with Present or Revert to Prior Versions. The Total Weight and Total Volume of the
prior version will in fact appear as zero.
None:
When a formula is saved after any changes, the version of the formula just before
the change is not written to the formula history. Any formula versions that were
written to the history previously are not eliminated, however. This means that
formula history is not updated when formulas are changed. For example, with this
field set to yes, suppose that a formula is sized from total weight of 50 to a total
weight of 5. In such a case, the formula version of total weight 50 will not be
available in the formula history; you will not be able to view this version via the
formula utilities such as View Prior Versions, Compare Prior with Present or Revert to
Prior Versions.
5.2.4.2
Screen Fields Description: Cost Tab
Cost Method: This is the default value of the cost Method for the formula. The available
options for this field are
1. Standard Cost
2. Average Cost
3. Last Cost
Doc. No. F/DV/15
Rev.No.
Date
BatchMaster Software Inc.
BMM User Manual
Fixed Cost
Hours: This is the default value of the hours of the fixed costs for the formula to be
inserted. This value is used for cost analysis in the Costing module as well as to calculate
the costs associated with production of the end item produced by the formula.
Labor Key: This is the default value of the Labor Key of the fixed costs for the formula
to be inserted. This Labor Key provides you with a way to define labor so that you can
assign them to your formulas. With Labor Key, you can create a unique key, associate it
with specific labor and variance accounts in your GL accounts, and use the key to assign
specific costs to a formula or to specific line items in a formula.
Overhead Key: This is the default value of the Overhead Key of the fixed costs for the
formula to be inserted. This Overhead Key provides you with a way to define the
overhead costs associated with your manufacturing process so that you can later assign
them to specific line items in a formula or to a formula as a whole.
Setup Cost
Hours: This is the default value of the hours of the setup costs for the formula to be
inserted. This value is used for cost analysis in the Costing module as well as to calculate
the costs associated with production of the end item produced by the formula.
Labor Key: This is the default value of the Labor Key of the setup costs for the formula
to be inserted. This Labor Key provides you with a way to define labor so that you can
assign them to your formulas. With Labor Key, you can create a unique key, associate it
with specific labor and variance accounts in your GL accounts, and use the key to assign
specific costs to a formula or to specific line items in a formula.
Overhead Key: This is the default value of the Overhead Key of the setup costs for the
formula to be inserted. This Overhead Key provides you with a way to define the
overhead costs associated with your manufacturing process so that you can later assign
them to specific line items in a formula or to a formula as a whole.
Variable Cost
Max. Weight: This is the default value of the Max Weight for this row of the variable
costs for the formula to be inserted.
The variable labor cost is dependent on two factors: The total batch weight, and the
applicable labor rate for that batch weight. The variable labor is defined for a particular
“slab” of batch weight. The Max Weight is the upper limit of the weight slab to which a
particular row of the variable costs is applicable. The lower limit of batch weight for a
slab is determined based on the max weight of the preceding row. For example, suppose
that the Max weight for the first row is 100, and the max weight of the second row is
500. In such a case, the variable cost will be according to the first row if 0 < Batch
Weight ≤ 100; whereas the variable cost will be according to the second row if 100 <
Batch Weight ≤ 500.
The actual variable cost in production is determined by adding together the following:
1. Batch weight (in system weight unit) multiplied by the Amount of the Labor Key
of the applicable row
Doc. No. F/DV/15
Rev.No.
Date
BatchMaster Software Inc.
BMM User Manual
2. If the overhead key is „$‟ type, then the Batch weight (in system weight unit)
multiplied by the Factor of the Overhead Key of the applicable row
3. If the Overhead Key is „%‟ type, then the Batch weight (in system weight unit)
multiplied by the Amount of the Labor Key of the applicable row multiplied by the
Factor of the Overhead Key of the same row.
LaborCostID: This is the default value of the Labor Key of the variable costs for the
formula to be inserted.
The actual variable cost in production is determined by adding together the following:
Batch weight (in system weight unit) multiplied by the Amount of the Labor Key of the
applicable row
If the overhead key is „$‟ type, then the Batch weight (in system weight unit)
multiplied by the Factor of the Overhead Key of the applicable row
If the Overhead Key is „%‟ type, then the Batch weight (in system weight unit)
multiplied by the Amount of the Labor Key of the applicable row multiplied by the
Factor of the Overhead Key of the same row.
Overhead ID: This is the default value of the Overhead Key of the variable costs for the
formula to be inserted.
The actual variable cost in production is determined by adding together the following:
Batch weight (in system weight unit) multiplied by the Amount of the Labor Key of the
applicable row.
If the Overhead Key is „$‟ type, then the Batch weight (in system weight unit)
multiplied by the Factor of the Overhead Key of the applicable row.
If the Overhead Key is „%‟ type, then the Batch weight (in system weight unit)
multiplied by the Amount of the Labor Key of the applicable row multiplied by the
Factor of the Overhead Key of the same row.
5.2.4.3
Creating Formula Defaults
1. Open the Formula Defaults screen.
2. Enter Formula Class. (This is a mandatory field for creating a Formula).
3. Enter Formula Status. (This is a mandatory field for creating a Formula).
4. Enter the remaining fields as needed.
5. Click on the OK button to save the Formula Defaults.
5.2.5 Process Cell Screen
The Process Cell provides you with a way to assign specific work centers to your
formulas or assembly type BOM‟s. With Process Cell, you can define either a group of
machines or just a single machine as a work center where batches are manufactured for
mix lines or fill lines or assembly lines. Once a process cell is defined, its capacity can be
used in scheduling and planning of your facility‟s productive capacity.
Doc. No. F/DV/15
Rev.No.
Date
BatchMaster Software Inc.
5.2.5.1
BMM User Manual
Mandatory Inputs
A Process Cell Key must be defined.
5.2.5.2
Screen Fields Description
Process Cell Key: This key uniquely identifies the Process Cell. This is a mandatory
field.
Description: This is the name or description of the Process Cell.
Process Cell Type: This specifies that the Process Cell Type is of what nature. There are
three types of Process Cell –
1. Mix: This type of a process cell can be attached to one or more formulas.
2. Fill: This type of a process cell can be attached to one or more formulas.
3. Assembly: This type of a process cell can be attached to one or more BOM‟s of
the assembly type.
Time From/To: Field is used to specify the usage duration of process Cell.
Continuous: Check this option to specify the process usage for twenty four hours.
No. of Hours Per Day: This is the availability of the Process Cell per Day for Production.
This is in terms of HH:MM (Hours: Minutes).
5.2.5.3
Creating a Process Cell
1. Open the Process Cell screen.
2. Enter Process Cell Key. This field is mandatory.
3. Enter a Description.
4. Select the Process Cell Type.
5. Enter the availability of Process Cell per Day in terms of Hours: Minutes.
6. Check the Continues box.
Doc. No. F/DV/15
Rev.No.
Date
BatchMaster Software Inc.
BMM User Manual
7. Click on OK to save the record.
5.2.5.4
Example
For example, Process Cell for mix type batch, Process Cell for fill type batch, Process Cell
for Assembly type batch.
5.3 MPS Setup
5.3.1 Company Calendar Setup
The Company Calendar Setup screen provides a way to define, for a calendar year, the
working days and holidays that affect the company‟s production facilities. When one sets
the company calendar for the current year, BatchMaster Manufacturing treats all days
earlier than the current date as non-working days.
The Company Calendar created here serves as the base calendar for running MPS for an
item.
5.3.1.1
Screen Fields Description
Year: The value in this field decides the year for which the company calendar is to be
setup.
Days
Doc. No. F/DV/15
Rev.No.
Date
BatchMaster Software Inc.
BMM User Manual
Select: Checking these boxes sets the corresponding day of the week as a holiday on
processing.
Day: The value in this field defines the day of the week. Checking the box next to the
respective days sets them as company holidays on processing. This is a read only field.
Calendar
Holiday: Checking these boxes sets the corresponding day of the week as a holiday.
This option can be used to define public holidays.
Work Date: The value in this field for a line defines the date of the day of the week for
the selected year. This is a read only field.
Day: The value in this field for a line is the day of the week corresponding to the date for
the selected year. This is a read only field.
5.3.1.2
Creating a Company Calendar
1. Select the Year for which the company calendar has to be created.
2. Check in the „Day‟ list, the days of the week that will be weekly holidays.
3. Click on the Process button on the toolbar to create the list of holidays. The
calendar so created is displayed at the „Calendar‟ section. All the days earlier than
the current date are displayed in the blue color and the check boxes for these
days are checked. The weekly holidays are marked with red color and the
checkbox is checked for these holidays.
4. To mark any other holiday, check the corresponding box at the „List of Holidays‟
section.
5. To change a holiday to a working day, uncheck the box for that date.
6. Click the OK button to save the record.
5.3.2 Planning Calendar
The Planning Calendar Setup option provides a way to create a calendar that the various
MPS options use when making calculations and estimations about forecast, demand,
purchase, and production. With Planning Calendar Setup, one can define up to three
demand ranges and establish periods within those demand ranges. The choices a user
makes in the planning calendar definitions, govern the overall time constraints
throughout the MPS and MRP options.
Doc. No. F/DV/15
Rev.No.
Date
BatchMaster Software Inc.
5.3.2.1
BMM User Manual
Screen Fields Description
Planning Calendar Key: This is the key that uniquely identifies the planning calendar.
This is a mandatory field.
Planning Calendar Description: This is the description of the Planning Calendar.
Demand Range1
Days Per Period: The value in this field is the number of days that a period would
consist of.
Number of Periods: The value in this field is the number of periods contained in
Demand Range 1.
Demand Range2
Days Per Period: The value in this field is the number of days that a period would
consist of.
Number of Periods:
Demand Range 2.
The value in this field is the number of periods contained in
Demand Range3
Days Per Period: The value in this field is the number of days that a period would
consist of.
Number of Periods: The value in this field is the number of periods contained in
Demand Range 3.
Doc. No. F/DV/15
Rev.No.
Date
BatchMaster Software Inc.
BMM User Manual
Totals
Number of Days in Calendar: The value in this field is the total number of days in this
planning calendar. This value is arrived at, by adding, for all three-demand ranges, the
product of the days per period and the number of periods. This is a read only field.
Number of Periods in Calendar: The value in this field is the total number of periods
in this planning calendar. This value is arrived at, by adding, for all three-demand
ranges, the number of periods. This is a read only field.
5.3.2.2
Creating a Planning Calendar
1. Click on the Insert button on the toolbar to create a Planning Calendar.
2. Enter a unique key at the „Planning Calendar Key‟ field to identify the Planning
Calendar.
3. Enter a description of the Planning Calendar.
4. For Demand Range1:
a. Enter a value at the „Days Per Period‟ field.
b. Enter a value at the „Number of Periods‟ field.
5. Define Demand Ranges 2 and 3 if needed.
6. Click the OK button to save the Planning Calendar.
5.3.3 MPS Setup
This screen is used to establish the necessary setup for Run MPS as well as Run MRP.
With MPS Setup one can define the length of time fences, how demand ranges calculate
gross demand, and the colors that demand ranges use in MPS graphic displays. With
MPS Setup, one can use a pre-defined planning calendar as well.
5.3.3.1
Mandatory Inputs
A Planning Calendar should have been created.
Doc. No. F/DV/15
Rev.No.
Date
BatchMaster Software Inc.
5.3.3.2
BMM User Manual
Screen Fields Description
Defaults
Time Fence 1: The value in this field is the number of days in the first Time Fence. The
user may define two Time Fences. An Exception order is generated for all the MPS orders
whose delivery date falls within this Time Fence. If the Time Fence enters into the bucket
(period of planning zone), then the Time Fence stretches to the end of that period.
Suppose the Time Fence is of 4 days and the number of days in a period is 3, then this
means that the Time Fence not only covers the first period but also enters into the
second period and hence the Time Fence stretches up to the entire second period as
well; the effective size of Time Fence 1 then becomes 6 days.
Planning Calendar: This is the default-planning calendar, established at this screen. If
no planning calendar is associated with the item via the forecast entry screen, this
planning calendar will be used as the default. This is a mandatory field.
Gross Demand Calculation
Demand Range 1: The value in this field decides how gross demand for a range will be
calculated. The value can be one of:
1. Demand: If this option is selected, the Gross Demand will be calculated by adding up
the following four types of demands:
This option is generally used for the shorter range planning.
Doc. No. F/DV/15
Rev.No.
Date
BatchMaster Software Inc.
BMM User Manual
a. Sales Orders.
b. Warehouse Transfers (the transfer out from this warehouse).
c. MPS type raw materials remaining to be issued to production batches that are not
on hold.
d. The quantity by which On Hand Quantity is less than the Safety Stock as defined
at the Item Master Data.
2. Forecast: If this option is selected, the Gross Demand will be equal to the demand
generating only from the forecast entries of Active status. This option is generally
used for the longer range planning.
3. Demand + Forecast: If this option is selected, the Gross Demand will be calculated
by adding up the following:
a. Sales Orders
b. Warehouse Transfers (Transfer out from this Whse)
c. MPS type raw materials remaining to be issued to production batches that are not
on hold.
d. The quantity by which On Hand Quantity is less than the Safety Stock as defined
at the Item Master Data.
e. Forecast entries of Active status
4. Greater of Demand or Forecast: If this option is selected, the Gross Demand will be
equal to the greater of Demand and Forecast. This option is generally used for the
intermediate range planning.
Demand Range 2: The value in this field decides how gross demand for a range will be
calculated.
Demand Range 3: The value in this field decides how gross demand for a range will be
calculated.
Display Color
Demand Range 1: The value in this field decides the color that will be used for
displaying Demand Range 1 on the MPS Planning Worksheet. Different colors should be
selected for different demand ranges to differentiate between them in the worksheet.
Demand Range 2: The value in this field decides the color that will be used for
displaying Demand Range 2 on the MPS Planning Worksheet.
Demand Range 3: The value in this field decides the color that will be used for
displaying Demand Range 3 on the MPS Planning Worksheet.
Top Level Finished Good batch to be created as: The value in this field can be one
of:
Mix: When a Batch is created (using a Finished Good type BOM) via the Transfer
MPS Production Order screen, that batch will automatically be of Mix type.
Fill: When a Batch is created (using a Finished Good type BOM) via the Transfer
MPS Production Order screen, that batch will automatically be of Fill type.
Doc. No. F/DV/15
Rev.No.
Date
BatchMaster Software Inc.
BMM User Manual
Create Super Batch: The value in this field can be one of:
Uncheck: MPS production orders or MRP production orders can not be confirmed
for those items
that are intermediates and whose demand arose only as a
dependent demand from other MPS/MRP orders. This option would be useful if
one transfers MPS Production Orders to a Super Batch and does not want to
create separate (duplicate) batches for the intermediates.
Check: This setting does not restrict the confirmation of the MPS production
orders or MRP production orders for those items that are intermediates and
whose demand arose only as a dependent demand from other MPS/MRP orders.
Use multiple economic order quantities: If this box is checked and multiple
economic order quantities for an item have been defined, then the economic order
quantity for an item will be picked as the upper limit of the range in which the order
quantity falls.
Difference between Delivery Data and Order Completion Days (Days): The value
in this field will decide whether the order delivery is possible on the same day of
completion or not. Selecting the option 0 would instruct BatchMaster that order
completed could be delivered on the same day. While selecting the value as 1 would
instruct BatchMaster that one day would be required to delivery the goods after they
have been produced.
5.3.3.3
Maintaining MPS Setup
1. Enter a numeric value at the field „Time Fence 1‟.
2. Select a Planning Calendar (created via the „Planning Calendar‟ screen) from the
lookup at this field.
3. Define the Gross Demand for each of the Demand Ranges at the „Demand Range
1‟, „Demand Range 2‟ and „Demand Range 3‟ fields.
4. Select a display color for Demand Range 1, Demand Range 2 and Demand Range
3 at their respective fields.
5. Select a value for the „Top Level Finished Good Batch to be created as‟ field.
6. Check the „Create Super Batch‟ field if so desired.
7. Check the box for „Use multiple economic order quantities‟ if so desired.
8. Select a value for the “Difference between Delivery Date and Order Completion
Date” field.
9. Click the OK button to save the MPS Setup.
5.4 MSDS Setup
5.4.1 Boilerplate Group
Screen provides user with a way to create a Boiler Plate Group. The Boiler Group created
here is associated with the MSDS template. The Boiler Plate Group is used to classify
Boiler Plates.
Doc. No. F/DV/15
Rev.No.
Date
BatchMaster Software Inc.
5.4.1.1
BMM User Manual
Screen Field Description
Group Name: This is a key that uniquely identifies the Boiler Plate Group. This is a
mandatory field.
Description: Field is used to add the description to the boiler plate.
Status: Field states the status of the Boiler Plate Group. The available options for status
are Active, Inactive, marked for deletion and Deleted.
5.4.1.2
Creating a Boilerplate Group
A Boilerplate Group may be created as follows:
1. Open the Boilerplate Group screen.
2. Enter Description and status.
3. Click the OK button to save the record.
5.4.1.3
Example
For Example, Conditions of Reactivity, Emergency and First Aid, Eye Protection etc.
5.4.2 Boilerplate Maintenance
Screen is used to create boilerplate instructions, for use on a MSDS when the user wants
to print significant information on the MSDS. A Boilerplate cannot be added by itself to a
MSDS. Instead, a Boilerplate Group should be added to the template file for the MSDS;
this in turn will fetch the associated boilerplates on the MSDS.
Doc. No. F/DV/15
Rev.No.
Date
BatchMaster Software Inc.
5.4.2.1
BMM User Manual
Screen Fields Description
Header Information
Group Name: Field is used to associate Boilerplate with the Boilerplate group. This field
stores the name of the boilerplate group associated with this boilerplate. The group
name can be selected via the associated lookup on this screen.
Boilerplate ID: Field identifies the Boilerplate. This is a mandatory field.
Language: Field is used to specify the language that is used for printing on the MSDS.
Status: Field specifies the Status of the Boilerplate. The available options for status are
Active, Inactive, marked for Deletion and Deleted. The default value of this field is set to
Active. Only Active boilerplates can be printed on a MSDS.
Boilerplate Text: Field is used enter the boilerplate instructions.
5.4.2.2
Creating a Boilerplate
1. Open the Boilerplate Maintenance screen.
2. Enter the Group Name, the Boilerplate ID and Language.
3. Select the Status.
4. Enter the Boilerplate text.
5. Click on the Add button to save the Boilerplate.
Doc. No. F/DV/15
Rev.No.
Date
BatchMaster Software Inc.
5.4.2.3
BMM User Manual
Example
For example, Use Mask, Eye Protection, Store it in coo, Handle with care etc.
5.4.3 Hazard Type Maintenance
Screen can be used to create a type of material hazard. This information is used on the
Safety Info tab of the CAS Number master screen and the Material Safety Information
screen.
5.4.3.1
Screen Fields Description
Material Hazard Type
Mat. Haz. Type. ID: Field stores a unique identification of a Material Hazard type. This
is a mandatory field.
Description: Field displays the description associated with this type of Material Hazard.‟
5.4.3.2
Creating a Material Hazard Type
1. Open the Hazard Type Maintenance screen.
2. Enter a unique identification and the description for a Material Hazard type.
3. Click the Add button to save the record.
5.4.4 MSDS Setup
Screen provides users with a way to define the defaults governing how BatchMaster
Manufacturing generates a MSDS. With MSDS Setup, the user can define a variety of
information which will affect the appearance of a MSDS and the kind of information that
will appear on the MSDS.
Doc. No. F/DV/15
Rev.No.
Date
BatchMaster Software Inc.
5.4.4.1
BMM User Manual
Screen Fields Description
Print MSDS Defaults
Line Spacing When more than 1 BP in a Section: Field stores the number of lines to
be placed in between boilerplates when there is more than one boilerplate in a particular
section of a MSDS.
Abort or Ignore if Boilerplate Group is Missing: An error occurs while printing MSDS
when no boilerplates that can be fetched from the associated supplementary file for a
bookmark of a Boilerplate Group on the MSDS template file.
The user can specify on this field whether, in case of such an error, the system should
either:
a. Abort the printing of the MSDS, or
b. Ignore the error and continue generating the MSDS.
Boilerplate to Use if None for a Section: Field stores the name of the Boilerplate
Group and the associated boilerplate ID that is to be used if there are no boilerplates
required for a particular Section.
Duplicate Material Detection: Field displays the method which is used to identify the
raw materials that are considered to be identical. The methods of identification are based
on Chemical Name, CAS Number or Item No.. An identification method can be selected
via the available lookup on the screen.
Doc. No. F/DV/15
Rev.No.
Date
BatchMaster Software Inc.
BMM User Manual
Text to Print for N/A Numeric Calculation: Field stores the text to be printed on a
MSDS when a numeric laboratory calculation does not apply.
Formula Level to use for MSDS Lab Calculations: Field stores a Formula Level to be
used for Laboratory calculations (such as Volatile Organic Content) while printing a
MSDS. There are two levels:
a. Top (Master Formula only): This means that the calculations are at a single level;
only the master formula is used.
b. Bottom: In this case, the calculations are multi-level; the calculations begin with
the lowest level raw material.
Sort/Print MSDS Components by Weight or Volume: The following choices are
available:
1. Weight: In this case, the reported components are sorted by Weight percent and
are displayed as weight percent on the MSDS.
2. Volume: In this case, the reported components are sorted by Volume percent and
are displayed as Volume percent on the MSDS.
Boilerplate to use when no Reportable Materials: Field stores the name of the
Boilerplate Group and ID that is to be used if there are no reportable materials to be
printed on a MSDS. This boilerplate can be printed on the MSDS based on the Boilerplate
Group bookmark on the MSDS template file provided that the Boilerplate Group and
Boilerplate ID and are listed on an applicable supplementary file.
Maximum Number of Boilerplates per MSDS: Field stores the total number of
Boilerplates that may be printed per MSDS.
Company Key for Chemtrec MSDS: This is the identification code assigned by
Chemtrec to a Company.
Last SARA Posting Date: Field displays the date on which last SARA processing was
done. BatchMaster Enterprise automatically maintains this date each time SARA
processing is done.
MS Word Template Path: Field stores the path of the MS-Word Template file that can
be used to print a MSDS.
MS Word Save File Path: Field stores the default output path of the printed MSDS MSWord document.
Ignore Material Key Supplementary File: Field stores whether to ignore (while
printing a MSDS) the Supplementary Files of Materials type.
Ignore Formula Key Supplementary File: Field stores whether to ignore (while
printing a MSDS) the Supplementary Files of Formulas type.
Ignore Material Class Supplementary File: Field stores whether to ignore (while
printing a MSDS) the Supplementary Files of Material Classes type.
Doc. No. F/DV/15
Rev.No.
Date
BatchMaster Software Inc.
BMM User Manual
Ignore Template Supplementary File: Field stores whether to ignore (while printing a
MSDS) the Supplementary Files of Template type.
Ignore Material Hazard Supplementary File: Field stores whether to ignore (while
printing a MSDS) the Supplementary Files of Material Hazard type.
Ignore Formula Class Supplementary File: Field stores whether to ignore (while
printing a MSDS) the Supplementary Files of Formula Classes type.
Emergency Phone: Field stores the Emergency Telephone Number to be printed on a
MSDS.
Last Schedule ID: Field stores the last Schedule ID generated at the MSDS Schedule
Generation screen. This is a read-only field.
5.4.4.2
Defining MSDS Setup
1. Open the MSDS setup screen.
2. Enter or specify the values for the Various fields as needed.
3. Click the Add button to save the record.
5.4.5 MSDS Language Master
Screen provides users with a way to maintain languages on which MSDSs were printed
for specific items, for specific customers.
5.4.5.1
Screen Fields Description
Language ID: Field displays the identification of the language used.
Description: Field displays the description associated with the language defined.
Creating Language
1. Enter the Language Id.
2. Enter the description in accordance with the language Id.
3. Click OK to save the language record.
Doc. No. F/DV/15
Rev.No.
Date
BatchMaster Software Inc.
BMM User Manual
5.5 Quality Control Setup
5.5.1 QC Test Description
Screen provides a way to create quality control tests. With QC Test Description, the
specific characteristics of the quality control test can be defined. Once a test has been
defined, QC test can be assigned to the formulas via the „QC Formula Tests‟ or inventory
items via the „QC Item Tests‟ screen.
5.5.1.1
Screen Field Description
Test ID: Mandatory Field displays the key that uniquely identifies the Test.
Test Description: Field displays the description of the Test.
5.5.1.2
Creating a QC Test Description
1. Open the QC Test Description Screen.
2. Enter the Test ID at the „Test ID‟ field.
3. Enter a description at the „Test Description‟ field if needed.
4. Click on the OK button to save the QC Test Description record.
5.5.2 QC Default Setup
This screen is used to maintain the settings that are used when a QC Order is created at
the Order/Post Inventory QC screen.
Doc. No. F/DV/15
Rev.No.
Date
BatchMaster Software Inc.
5.5.2.1
BMM User Manual
Screen Fields Description
QC Setup:
Next QC Order Number for Inventory Item: This is the QC Order Number to be
assigned to the next QC Order created via the „Order/Post Inventory QC‟ screen if any of
the following is true
1. The „Generate Auto QC Order Number‟ field at this screen is checked
2. The „Auto Entry‟ option is selected for the generation of QC Order Number on the
„Order/Post Inventory QC‟ screen.
Each time an auto generated QC Order Number is assigned to a QC Order, the value at
this field gets incremented by one.
This is a mandatory field.
Generate Auto QC Order Number: Check this option to generate QC order numbers
automatically.
Warehouse Pass Location: The location selected here would act as the Default
location where the QC Pass Inventory items (of the Inventory QC screen) could be
transferred upon clicking the Warehouse Transfer button available at the Order/Post
Inventory QC screen. This Whse can be changed later changed at the Warehouse
Transfer window, if required.
Warehouse Fail Location: The location selected here would act as the Default location
where the QC Failed Inventory items (of the Inventory QC screen) would be transferred
to upon clicking the Warehouse Transfer button available at the Order/Post Inventory QC
screen. This Whse can be changed later changed at the Warehouse Transfer window, if
required.
Damage Location: The Location selected here would act as the Default location where
the QC Failed Inventory items (of the Inventory QC screen) would be transferred to upon
clicking the Warehouse Transfer button available at the Order/Post Inventory QC screen.
This Whse can be changed later changed at the Warehouse Transfer window, if required.
Doc. No. F/DV/15
Rev.No.
Date
BatchMaster Software Inc.
5.5.2.2
BMM User Manual
Maintaining QC Setup
1. Enter a value at the „Next QC Order Number for Inventory Item‟ field.
2. Check or uncheck the „Generate Auto QC Order Number‟ box as needed.
3. Select a Whse at each of Warehouse Pass Whse, warehouse Fail Whse and
Damage Whse fields.
4. Click the OK button to save the QC Setup.
5.6 Production Setup
5.6.1 Production Setup
This screen provides a way to define the default setting for Production Module. With
Production Setup, user can:
1. Establish whether or not QC targets are to be transferred to results.
2. Determine whether labor or overhead costs should be based upon usage or yield.
3. Establish which formula status one wants to exclude from production.
4. Set the next batch number for production batches.
5. Specify for Assembly type batches a Work in Progress (WIP) account number.
It is the most important screen in the production module which enables user to define
the different default parameters associated with production.
Doc. No. F/DV/15
Rev.No.
Date
BatchMaster Software Inc.
5.6.1.1
BMM User Manual
Screen Fields Description
Transfer QC Targets to Results: Let us say that user have maintained the QC target
values associated with a particular Item on the QC Item/Formula test screen. Further
want to transfer these target values to the results after the QC process has been
completed. Thus this field enables user to default the QC targets as maintained in the QC
Item/Formula test screen. Using the drop down available in the field user can select the
option as Yes. Once selected yes, these values will be transferred.
Base Labor And Overhead On Usage/Yield: If the option „Usage‟ is selected, then
the calculation of the variable Labor and the associated Overhead cost of a Batch will be
based on the quantity produced of the Finished Good whereas if the „Yield‟ option is
selected, the calculation of the Labor and Overhead cost will be based on the total
quantity produced of the Finished Good as well as the Byproduct. The cost calculation is
made when a batch is closed.
Formula Status Not Allowed in Production: Field displays the Formula Statuses
disallowed for production. A batch cannot be created using a formula of the status
mentioned here. Field does not affect existing batches in any way.
Doc. No. F/DV/15
Rev.No.
Date
BatchMaster Software Inc.
BMM User Manual
Next Batch Number for Batch Entry: Mandatory field displays the Batch Number to
be assigned to the next batch created via the „Batch Entry‟ screen if the batch number is
to be auto generated. Each time this number is used to create an auto generated Batch
Number, the value at this field gets incremented by one.
Next Batch Number for Super Batch Entry: Field displays the Batch Number to be
assigned to the next super batch created via the „Super Batch Entry‟ screen if the batch
number is to be auto generated. Each time this number is used to create an auto
generated Batch Number, the value at this field gets incremented by one.
Assembly Type WIP Account Number: Field displays the WIP (Work In Progress)
Account used for Assembly Type of batches.
Finished Goods Variance Account No.: Field displays the Variance Account Number
used for Finished Goods Type of batches.
Check Yield Percentage while Closing Batch: Checking this box certain BMM checks
for the percentage of finished good yielded at the time of Batch Close. If the weight
yielded lies in the range of value given at „Percentage Fluctuation for order Weight yield‟,
the batch is closed otherwise a message is displayed and the batch is not closed.
Generate Batch Number Automatically: Only if this box is un-checked, an option is
provided during Batch Entry or Super Batch Entry to number the batch manually. If
checked, system doesn‟t prompts user to choose between Manual/Auto Generation of
Batch Numbers at the time of Batch creation.
Use Multiples of EOQ: Multiple Economic Order Quantities will be used if this box is
checked.
Percentage Fluctuation For Order Weight Yield: Field displays the allowable
percentage of fluctuation for Order weight yielded.
When lots are assigned automatically, assign Lots for: When the user chooses the
option of automatic lot assignment anywhere in Production module, lots will be assigned
automatically for
a. Finished Goods/ Byproducts, if the „Finished Goods/ Byproducts‟ box is checked.
b. Raw Materials, if the „Raw materials‟ box is checked.
c. Finished Goods/ Byproducts and Raw materials if both the boxes are checked.
Automatically insert QC Tests for the Following: When a batch is created, the QC
Tests associated with an end item or the formula get defaulted to the „Quality Control
Information‟ grid at the Tab-7 of the Batch Ticket screen for the related item or formula
depending upon the boxes checked here. The subsequent are the options available here:
a. Mix Batch Finished Goods: If checked, the QC Tests get defaulted for the end
item of a Mix Type Batch.
b. Assembly Batch Finished Goods: If checked, the QC Tests get defaulted for
the end item of an Assembly Type Batch.
c. Fill Batch Finished Goods: If checked, the QC Tests get defaulted for the end
item, which has a Finished Good BOM, of a Fill Type Batch.
Doc. No. F/DV/15
Rev.No.
Date
BatchMaster Software Inc.
BMM User Manual
d. Fill Batch Formula: If checked, the QC Tests get defaulted for the Formula
associated with a Fill Type Batch.
e. Fill Batch Intermediate: If checked, the QC Tests get defaulted for the end
item, which is an intermediate, of a Mix Type Batch.
5.6.1.2
Defining Production Setup
1. Specify a value for various fields, as needed.
2. Enter a value for „Next Batch Number for Batch Entry‟ field.
3. Click the OK button to save the Production Setup.
5.6.2 Shift Master
The Shift Master screen is used to maintain the work shifts asoociated within
BatchMaster Manufacturing used in routing. On this screen the user can maintain start
and end time of each shift as well as the shift and break duration.
This screen provides a way to:
1. Define the work shifts for an organization.
2. User can Add, Remove or update shifts.
3. Shifts cannot be removed if they are associated to work centers, the company
default, or any other schedule/capacity record.
4. The Shift ID‟s created are unique.
5.6.2.1
Screen Fields Description
Shift Id: This is the unique key to identify the shift.
Description: This field displays the shift description.
Start Time: This is the time at which shift begins. This time can be defined in terms of
hours and minutes.
Shift Duration: This field allows the user to enter the total shift time. This time can be
defined in terms of hours and minutes.
Doc. No. F/DV/15
Rev.No.
Date
BatchMaster Software Inc.
BMM User Manual
End Time: This field is read only field. This field displays the end time of the shift
Break Duration: This field displays the duration of break for the shift. It can be defined
in terms of hours and minutes.
Available Time: This field indicates the total available time for the shift. Where,
Available time= Shift duration-Break Duration
This field is read only field.
5.6.2.2
Maintaining Shift Setup Master
1. Open the Shift Setup Master Screen.
2. Enter the Shift Id at the „Shift ID‟ field.
3. Enter a shift description at Description field.
4. Enter the Start Time, Shift Time and Break duration as required.
5. Click on Add button to add the shift. Shift End Time and Available time gets
calculated automatically.
6. Click on OK to save the record.
5.6.3 Work Center
Work centers are an important part of production planning.. In the simplest terms, work
center is a location where a particular operation is executed. Work centers help in
identifying the location where the work is going to be performed.
The Work Center setup screen is used to create and maintain work centers used in
routing. Work centers may be defined either to indicate human resources (Type - Man)
or a piece of equipment (Type – Machine). Each operation line in routing requires that a
Work Center be defined for it. The Work Center used for an operation defines the type of
operation and related information such as Labor rate and Machine rate applicable to the
operation. At this screen the user can also define the labor and overhead costs
associated with the work center as well as details related to the shift like available time,
number of shifts and capacity per shift.
Doc. No. F/DV/15
Rev.No.
Date
BatchMaster Software Inc.
5.6.3.1
BMM User Manual
Screen Fields Description
Work Center ID: This is the key that uniquely identifies the work center. This is a
mandatory field that accommodates eight characters.
Description: This is the description of the work center.
Work Center Type: The value in this field can be one of Man or Machine. The default
value for a new Work Center is „Machine‟. This is a mandatory field. Work Center Type
indicates the nature of the operations performed on the Work Center. Man type work
centers are Labor intensive, while Machine type work centers are Machine intensive.
Machines can be linked only to a Machine type Work center.
A Machine type Work Center cannot be changed to Man type, after a Machine has been
attached to it.
Setup Time (DD:HH:MM): This value is the amount of time taken to set up the
Machine for performing the operation. The Setup time is applicable to the lot that will be
manufactured, and not to one unit of the item.
Setup Time is used in costing for a manufactured item, as also to plan completion of a
Manufacturing Order for the item. It is entered in Hours, Minutes and Seconds.
Run Time (DD:HH:MM): This value is the time taken for the completion of the
operation on the „Routing Quantity‟ number of units of the item. It is entered in Hours,
Minutes and Seconds
Doc. No. F/DV/15
Rev.No.
Date
BatchMaster Software Inc.
BMM User Manual
Move Time (DD:HH:MM): This is the amount of time an item spends in moving from
the previous Work Center to the current Work Center. The Move time is entered in days,
hours and minutes.
The Move Time along with other lead times is used to plan completion of a Manufacturing
Order, given the Start date or End date.
Queue Time (DD:HH:MM): This is the amount of time an item spends in queue before
the Work Center becomes available for the lot. The Queue time is entered in days, hours
and minutes.
The Queue Time along with other lead times is used to plan completion of a
Manufacturing Order, given the Start date or End date.
Wait Time (DD: HH:MM): This is the amount of time an item has to wait before the
Work Center is available for operation. The wait time is entered in days, hours and
minutes.
The Wait Time along with other lead times is used to plan completion of a Manufacturing
Order, given the Start date or End date.
NOTE: The values specified for Setup Time, Run Time, Move Time, Queue Time and Wait
Time are for reference purpose only.
Standard Labor ID: This will be the applicable Labor rate per hour.
Standard Labor Rate: This is the rate per hour applicable for the labor time spent in an
operation. This field is defaulted with the cost associated with the labor/additional cost
key established. This is a read-only field. This rate is used to calculate the Standard Cost
of manufactured items that use the Work Center in a Routing line.
Overhead ID: This field displays the Overhead ID to be associated with the selected
work Center.
Overhead Rate: This field displays the Overhead rate for the selected Work Center.
Shift/Capacity Screen fields description:
The shift capacity grid allows the user to specify the shifts available
center by weekday
for
the
work
Weekdays: This column displays the options for each day of the week and an option for
Mon-Fri.
Shift ID: This field indicates the Shift ID that is fetched from the Shift Setup Master
screen.
Start Time: This field is read only field. This field displays the start time of the shift
specified for the selected Shift ID at Shift Setup Master Screen.
End Time: This field is read only field. This field displays the End time of the shift
specified for the selected Shift ID at Shift Setup Master Screen
Doc. No. F/DV/15
Rev.No.
Date
BatchMaster Software Inc.
BMM User Manual
Break duration: This field displays the Break duration of the shift specified for the
selected Shift ID at Shift Setup Master Screen. This is the read only field.
Capacity: This field displays the total available time in minutes for the selected shift.
Machine tab screen fields description:
Machine tab indicates the information associated with the Machine Setup for BMMSAP.The field values are entered manually to specify different Machine Setup criterias.
Machine:This field displays the machine used in the work center.
Description:This is the description of specified machine.
Machine Rate:This field displays the machine rate for the selected machine of a
particular Work Center.
Capacity/Shift:This field displays the capacity of machine for the seleted shift.
Man/Machine ratio:This field indicates the number of man associated with a particular
machine.
Employee tab screen fields description:
Doc. No. F/DV/15
Rev.No.
Date
BatchMaster Software Inc.
BMM User Manual
Employee No.: This coloumn indicates the employee no. fetched from Sap business one
Employee master via lookup provided.
Name: This field displays the name of the respective employee.This is the read only
field.
Status: This field indicates the employee status as Active or Inactive.Default value is set
to Active.
Hourly Wage: This field indicates the Hourly Wage of the employee.
5.6.3.2
Maintaining Work Center Setup Master
1. Open the Work Center setup screen.
2. Enter the name and its description to uniquely identify the work center.
3. Select the Work center type.
4. Next, enter the values at various tabs as required on the basis of selected Work
Center type.
5. Click Add button to save the record.
5.6.4 Company Shift Setup
The Company shift setup screen is used to define shifts for a company available by
weekdays. At this screen, multiple shifts can be added per weekday and shift can be
used once per weekday.
Doc. No. F/DV/15
Rev.No.
Date
BatchMaster Software Inc.
5.6.4.1
BMM User Manual
Screen fields description
Weekday: The value in this field is the day of the week for which the company shift is
defined.
Shift Id: The value in this field decides the shift being associated with the company
selected via lookup available.
Start Time: This is the time at which shift begins. This is the read only field.
End Time: This field is read only field. This field displays the end time of the shift.
Break Duration: This field displays the duration of break for the shift. It can be defined
in terms of hours and minutes. This is the read only field.
Capacity: This field indicates the total available time for the shift. This is the read only
field.
5.6.4.2
Maintaining Company Shift master
1. Open the company shift setup screen.
2. Select the weekday for which shift is to be maintained.
3. Select the Shift ID for the selected weekday via lookup provided.
4. The Start time, End time, Break duration and capacity will be read only.
5. Click on update button to update the record.
5.7 Laboratory Setup
Doc. No. F/DV/15
Rev.No.
Date
BatchMaster Software Inc.
BMM User Manual
5.7.1 Laboratory Setup
Screen provides a way to:
1. Set up the printing layout for Physical Property Analysis of the Formula.
2. Exclude formulas of certain statuses from the Physical Property Analysis.
3. Establish the default presentation of the Formula Property Analysis on Plain Paper
or Pre-printed Stationary format.
4. Define the precision of Quantity and Property for Laboratory Reports.
5.7.1.1
Screen Fields Description
Include Property Analysis On What Page: Field comprises three options:
Own Page: A page break is forced before printing the next Property Analysis.
Same Page: A page break is not forced before printing the next Property
Analysis.
None-Do Not Print: The Property Analysis cannot be printed.
Status Not Allowed in Physical Property Analysis: Stores the Formula Statuses that
will be excluded from the Physical Property Analysis.
Print Property Analysis On: Field comprises two options:
1. Plain Paper: Used to print the Physical Property Analysis on a Plain Paper.
2. Pre-printed Stationary: Used to print the Physical Property Analysis on preprinted or pre formatted stationary.
Print QC Results: Checking the box will display the QC Formula Tests (along with the
Target Values and Control Limits when a Physical Property report is printed. Else the QC
information will not be shown on the Physical Property report.
Doc. No. F/DV/15
Rev.No.
Date
BatchMaster Software Inc.
BMM User Manual
Quantity Precisions for Laboratory Report: Selected number defines the number of
decimal places that will be displayed for quantities on laboratory reports.
Property Precisions for Laboratory Report: Selected number defines the number of
decimal places that will be displayed for properties on laboratory reports.
5.7.1.2
Creating a Laboratory Setup
1. Open the Laboratory Setup screen.
2. Enter or specify the values for the various fields as needed.
3. Click on the OK button to save the Laboratory Setup.
5.8 Costing Setup
5.8.1 Costing Setup
The Costing Setup screen provides you with a way to define the default characteristics of
your Costing Analysis. With Costing Setup screen, you can establish the layout for
printing your cost analysis, exclude formulas of certain statuses from the cost analysis,
and specify the default cost method for the cost analysis. The information maintained
here is used extensively in Costing.
5.8.1.1
Screen Fields Description
Include Cost Analysis On What Page: This field specifies on which page of the Master
Formula you would like to include the cost analysis. It has three options:
Own Page: A page break is forced before printing the next cost analysis.
Same Page: A page break is not forced before printing the next cost analysis.
None-Do Not Print: The cost analysis cannot be printed.
Default Finished Good Cost Method: This field specify whether you would like
BatchMaster to calculate the Sell Price or the Margin on the Analysis tab of the Product
Cost Analysis option, and on reports that display the MARKUP or MARGIN fields.
Doc. No. F/DV/15
Rev.No.
Date
BatchMaster Software Inc.
BMM User Manual
MARKUP is the markup factor that you entered in the master formula. If you
select C (for Calculate Sell Price), the sell price will be calculated as (total cost) +
(markup x total cost). Total cost is the total material, labor and overhead costs
associated with a finished good.
MARGIN is calculated by comparing the total costs associated with a finished
good to the base price that you have entered in Materials/Inventory.
This field consists of two options:
Calculate Selling Price: This stores whether you would like BatchMaster to
calculate the Sell Price on the Analysis tab of the Product Cost Analysis screen
and on reports that display the cost analysis of the finished good.
Calculate Margin: This stores whether you would like BatchMaster to calculate
the Markup % or the Margin on the Analysis tab of the Product Cost Analysis
screen and on reports that display the cost analysis of the finished good.
Status Not Allowed in Product Cost Analysis: This stores the Formula Statuses that
will be excluded from the Cost Analysis.
Creating a Costing Setup
1. Open the Costing Setup screen.
2. Enter or specify the values for the various fields as needed.
3. Click on the OK button to save the cost analysis.
5.9 Unit of Measurement
5.9.1 Define Units
Feature provides a way to define the inventory units of measure. With this feature, one
can create units of measure specific to the items that are commonly held in the
inventory. The units one defines here are used in unit conversion definitions.
5.9.1.1
Screen Fields Description
UOM Key: This is a unique key to identify the unit. This is a mandatory field.
Description: This is a description of the unit.
Doc. No. F/DV/15
Rev.No.
Date
BatchMaster Software Inc.
BMM User Manual
Unit Type: This can be one of Weight, Volume, Discrete and Other.
5.9.1.2
Creating a Unit
1. Open the Units Screen.
2. Enter the UOM key and Description.
3. Select a Unit type.
4. Click the OK button to save the record.
5.9.1.3
Example
For Example, Each, Grams, Kilograms etc.
5.9.2 Define Unit Conversion
The Unit Conversions feature provides a way to maintain the conversion from one unit of
measurement- to the other. With it, one can define the scope of a unit of measure
conversion, the unit to be converted, the result of the conversion, the type of operation
used to make the conversion, and the conversion factor.
5.9.2.1
Screen Fields Description
Scope: This can be one of Global or Item Level.
. If the scope is Global, the unit conversion is available for all inventory items.
i. If the scope is Item level, the unit conversion is available only for that Item No.
selected on this Unit Conversion record.
ii. If Unit Conversions are available for an Item from a given unit to another, then
the conversion at the narrowest scope supersedes the conversion at a broader
scope. Hence the conversion at Item level superseded the conversion at the
Global level.
Doc. No. F/DV/15
Rev.No.
Date
BatchMaster Software Inc.
BMM User Manual
Item No.: If the scope is Item level, this conversion factor is available for only this
Item.
From Unit: The conversion is defined from this unit to another. This is mandatory field.
To Unit: The conversion is defined from another unit to this unit. This is a mandatory
field.
Operation: The Operation can be „Multiply‟ or „Divide‟.
Conversion Factor: This is the Conversion factor for converting the unit selected at
„From Unit‟ to the unit selected at „To Unit‟.
Selected Conversion Example: This shows an example of the selected unit conversion.
5.9.2.2
Defining a Unit Conversion
1. Open the Define Unit Conversion Screen.
2. Select the scope of the conversion.
3. Select an Item No. if the field is enabled.
4. Select the From and the To Unit.
5. Select the Operation as Multiply or Divide.
6. Enter the conversion factor.
7. Click on the Save button to save the Unit Conversion record.
5.9.2.3
Example
For example: conversion from liters to milliliters or conversion from Kilograms to grams
etc.
5.9.3 Define System Units
The Define System Units feature provides a way to define a unit of measure for system
weight and volume. These units are used for calculating weights and volumes on
formulas and batches.
5.9.3.1
Screen Fields Description
Doc. No. F/DV/15
Rev.No.
Date
BatchMaster Software Inc.
BMM User Manual
System Weight: This is the system weight unit of measure. If the Stock Unit of an item
is different from the System Weight unit, then a conversion should be defined from the
Stock Unit to the System Weight Unit to enable the item to be used as a formula line
item or as a byproduct on the Formula Entry screen. This is a mandatory field.
System Volume: This is the system volume unit of measure. If the Stock Unit of an
item is different from the System Volume unit, then a conversion should be defined from
the Stock Unit to the System Volume Unit to enable the item to be used as a formula line
item or as a byproduct on the Formula Entry screen. This is a mandatory field.
5.9.3.2
Defining System Weight and Volume
1. Open the Define System UOM screen.
2. Select a unit for measuring system unit.
3. Select a unit for measuring system volume.
4. Click the Save button to save the record.
5.9.3.3
Example
For Example, lets us enter the System Weight as „Kg‟ and system volume as „Lt‟.
5.10 Unit Conversion Utility
The Unit Conversions Utility screen allows you to select the units of measurement you
want to convert and make the conversions in a group rather than use the Unit
Conversion option repeatedly to perform your conversions. You can select a number of
different pre-defined units from the option. An inter-conversion occurs at a global scope
among the selected units.
Doc. No. F/DV/15
Rev.No.
Date
BatchMaster Software Inc.
5.10.1.1
BMM User Manual
Screen Fields Description
Unit Sub Type: This is the system of measurement.
For the measurement of weight, the options are:
–
–
US and UK System of Measurements
Metric
For the measurement of volume, the options are:
US System of Measurements
–
–
Metric
UK System of Measurements
Unit Conversion:
Weight: If this button is selected, the standard units for measuring (as per the selected
unit sub type) become available for selection.
Volume: If this button is selected, the standard units for measuring volume (as per the
selected unit sub type) become available for selection.
Unit to Select: The „Unit to Select‟ grid displays all the standard units available in BMM
for the selected unit type and sub type.
Doc. No. F/DV/15
Rev.No.
Date
BatchMaster Software Inc.
BMM User Manual
Unit to Update: This grid displays the units that have been moved into this grid from
the „Select Units‟ grid. The units among which conversions are required are selected from
this grid before clicking the processing button.
5.10.1.2
Running the Unit Conversion Utility
1. Click the Insert button.
2. Select Unit Sub Type.
3. Select Weight or Volume unit type.
4. Check the boxes for the units at the „Select Units‟ grid that need to be inter
converted. Move them to the „Units to Update‟ grid by clicking the right arrow
button.
5. Check the boxes for the units. This selects the units will be created and their
conversions to be defined.
6. Click the Process button to create the units and generate the conversions.
7. Finally, click the Save button to save the Unit Conversion record.
6 Inventory
6.1 Item Master Data
For smooth and seamlessly integration of BatchMaster with SAP Business one, the
Inventory Data tab of Item master screen of SAP Business one is customized with
Inventory UOM lookup and BM Theoretical Cost field.
6.1.1 Inventory Data Tab
Inventory UOM: A look up for the Inventory UOM field on the Item Master Data screen
is added. Now you can select the Inventory UOM to be assigned for the item. The lookup
here lists all the units defined in the Unit of Measurement module.
Doc. No. F/DV/15
Rev.No.
Date
BatchMaster Software Inc.
BMM User Manual
BM Theoritical Cost: This field would store any cost entered by the user This field
displays the item cost only when the user has run the Intermediate Cost Rollup utility or
Update Finished Goods Cost utility.
Doc. No. F/DV/15
Rev.No.
Date
BatchMaster Software Inc.
6.1.1.1
BMM User Manual
Maintaining an item
1. Click on the Add button available on the toolbar.
2. Enter the required Item Number at Item Number field.
3. Enter the other details like description, bar code, Item Group etc at respective
fields available at the header.
4. Switch to the General tab and enter the required details.
5. Switch to the Purchasing Data tab and enter the required details.
6. Switch to the Sales Data tab and enter the required details.
7. Switch to the Inventory Data tab and enter the required details.
8. Switch to the Planning Data tab and enter the required details.
9. Switch to the Properties tab and select the required properties.
10. Switch to the Remarks tab and enter the required remarks, if any.
11. Finally, click on Add button available at the bottom of the Item Master Data
screen.
12. Clicking the Add button opens the Item Master Details screen.
Doc. No. F/DV/15
Rev.No.
Date
BatchMaster Software Inc.
BMM User Manual
6.2 Item Master Details
„Item Master Detail‟ screen allows user to update the item specific information. To
implement the bin management in SAP business one „Item Master Detail‟ is used.
6.2.1 Screen Field Description
Item Number: This field shows the unique identification of an Item.As maintained at
Item Master Data screen.
Description: It shows the description of an Item.
General
USDA Key: This field displays USDA Item key attached to the Item.
BM Planning Method: This is the method on the basis of which orders are generated
for the procurement of an item. The order method can be one of the following:
1. None: If the order method is none, the item will become available for normal
orders.
Doc. No. F/DV/15
Rev.No.
Date
BatchMaster Software Inc.
BMM User Manual
2. MPS: If the order method is MPS, the item will become available for selection at
the Maintain MPS Item screen and Pull MPS Item screen (for conducting the MPS
planning via the Run MPS screen) under the MPS module.
3. MRP: If the order method is MRP, the item will become available for selection at
the Maintain MRP Item screen and Pull MRP Item screen (for conducting the MRP
planning via the Run MRP screen) under the MRP module.
Inspection Required
This section allows user to automatically create QC order when either a purchase receipt
or production receipt is performed for the item.
Purchasing QC: Checking this check box permits user to perform inspection on the
selected item at time of purchase. The text box available next to this field allows us to
select the Inventory type to be used at time of purchase when purchase QC is applicable.
Production QC: Checking this check box permits user to perform inspection on the
selected item at time of production receipt. The text box available next to this field
allows us to select the Inventory type to be used at time of production receipt when
production QC is applicable.
Inventory Tab
Under this tab user can set default bins for inventory items and also specify the storage
conditions.
Doc. No. F/DV/15
Rev.No.
Date
BatchMaster Software Inc.
BMM User Manual
Default Bins
The Default Bins grid permits user to select the default bin for each transaction type. The
grid will list all warehouses for the Item that is not drop ship warehouses.
Whse Code: This field indicates the Whse associated with the Item. This will be fetched
automatically once you select the Item No.
Whse Name: It displays the description of the warehouse.
Receipt Bin: It refers to the bin used as the default bin at the time of goods receipt.
Issue Bin: It refers to the bin used as the default bin at the time of goods issue.
Pick Bin: It refers to the bin used as the default bin at the time goods are picked.
Ship Bin: It refers to the bin used as the default bin at the time of shipment of goods.
Storage Condition
Doc. No. F/DV/15
Rev.No.
Date
BatchMaster Software Inc.
BMM User Manual
Condition: This field indicates the storage condition attached to an item.
Description: It shows the description of storage condition.
UOM Conversions Tab
The Unit Conversions feature provides a way to maintain the conversion from one unit of
measurement- to the other. With it, one can define the scope of a unit of measure
conversion, the unit to be converted, the result of the conversion, the conversion factor ,
and the type of operation used to make the conversion.
: Unit conversions should always be defined from Stock unit to another unit. For
example: If the Item Stock unit is „EACH‟ and if the purchase unit is „KG‟, then one
should define a conversion from „EACH‟ (Stock unit) to „KG‟ (which is the Purchase unit).
If one defines a conversion from „KG‟ to „EACH‟ for this item, then this conversion will not
be utilized by BMM, since this conversion will not be from the Stock unit.
Show Global: Checking this checkbox shows the unit conversion for all units at Global
level.
From UOM: The conversion is defined from this unit to another. This is mandatory field.
Doc. No. F/DV/15
Rev.No.
Date
BatchMaster Software Inc.
BMM User Manual
To UOM: The conversion is defined from another unit to this unit. This is a mandatory
field.
Conversion Factor: This is the Conversion factor for converting the unit selected at
„From Unit‟ to the unit selected at „To Unit‟.
Scope: This can be one of Global or Item Level.
i.
ii.
iii.
If the scope is Global, the unit conversion is available for all inventory items.
If the scope is Item level, the unit conversion is available only for that Item No.
selected on this Unit Conversion record.
If Unit Conversions are available for an Item from a given unit to another, then
the conversion at the narrowest scope supercedes the conversion at a broader
scope. Hence the conversion at Item level supercedes the conversion at the
Global level.
Operation: The drop down available next to this field shows the operation as Multiply
and Divide that can be performed during unit conversion.
Batch Options Tab
Doc. No. F/DV/15
Rev.No.
Date
BatchMaster Software Inc.
BMM User Manual
Expiry Days: The number of days specified in this field calculates the expiry date of a
batch at time of production receipt.
Quarantine Days: Here you can specify the number of days for which the item will be
in Quarantine phase.
Default Batch Size: This field refers to the size of a batch.
Shelf Life: Here one can specify the time span of an items denoting that the items are
given before they are considered unsuitable for sale or consumption.
Inventory Method: It can be any from FIFO, FEFO, LIFO
Batch/Serial Generation Method: This field provides distinct options to generate a
batch number while assigning lot of an item at the time of production receipt. The
available options are Automatic, Custom and Manual.
Automatic: If this option is checked then the batch number will be generated
automatically as per the mask specified by the user.
Custom: If this option is checked then the user can specify the sequence in
which batch number gets generated.
Manual: If this option is checked then the user will need to manually enter the
batch number while creating batches of an item.
Optional Batch/Serial Formatting: In this segment one can define the mask for the
Batch number. The Available checkboxes are Item key, DOC No, Custom Characters,
Date and Seq No.
Item Key: If this checkbox is checked then the mask shows the Item key.
DOC NO: Checking this checkbox includes DocNo in the mask.
Custom Characters: On checking this checkbox user can add the customized text to
the batch mask.
Date: If checked this checkbox the date can be specified in any sequence of DD, MM and
YY.
Doc. No. F/DV/15
Rev.No.
Date
BatchMaster Software Inc.
BMM User Manual
Seq No: If this checkbox is checked than the box appears for entering the value for a
sequence number.
Default format: The textbox adjacent to this field shows the defined format for the
batch mask.
6.2.2 Maintaining Item Master Details
1. Lookup an Item number whose details need to be maintained.
2. Specify the USDA key
3. Choose BM planning method as any from None, MPS or MRP.
4. Map the BatchMaster item key and USDA Item key.
5. If require to perform QC during Purchase or production choose the respective
checkbox and can specify the Inventory Type in the text box available next to
these fields.
6. Switch to Inventory Tab and set the default bins.
7. Specify the storage conditions of item if required.
8. Switch to UOM conversion tab and Maintain UOM conversion details.
9. To make unit conversion available for all inventory items check the checkbox as
global.
10. Specify Batch related details under Batch Options tab.
11. Click on Update button to save the record.
6.3 Inventory Reports
6.3.1 Inventory Detail Report
Inventory detail report furnishes a way to generate a report for the user to view and
analyze bin level inventory. Distinct filters are available to generate a précised report.
Doc. No. F/DV/15
Rev.No.
Date
BatchMaster Software Inc.
BMM User Manual
Warehouse From: This field specifies the lower limit of the range of Warehouse that
need to include in the report.
Warehouse To: This field specifies the upper limit of the range of warehouse that need
to include in the report.
Bin From: This field specifies the lower limit of the range of Bin that need to include in
the report.
Bin To: This field specifies the upper limit of the range of the Bin that need to include in
the report.
Item From: This field specifies the lower limit of the range of Item that need to include
in the report.
Item To: This field specifies the upper limit of the range of item that need to include in
the report.
Lot From: This field specifies the lower limit of the range of lot that need to include in
the report.
Lot To: This field specifies the upper limit of the range of lot that need to include in the
report.
Doc. No. F/DV/15
Rev.No.
Date
BatchMaster Software Inc.
BMM User Manual
Item Group: This field allows user to choose an Item Group that need to include in the
report.
Inventory Type: Here user can choose an inventory type using the available drop down
arrow.
Properties: Specify the Property that needs to be printed on the report.
Display Cost Information: Checking this checkbox displays the cost related details.
Sort By: This field is used to apply sorting on the basis of distinct available fields.
The available options are:
1. Warehouse/Bin
2. Item
3. Lot
4. Item Group
5. Inventory Type
6.3.2 Generating an Inventory Detail Report
Inventory Detail report can be generated employing the following steps:
1. Complete the warehouse key from and To range using the lookup buttons
available next to the respective fields.
2. Complete the Bin from and To range using the lookup buttons available next to
the respective fields.
3. Complete the Item from and To range using the lookup buttons available next to
the respective fields.
4. Specify the Lot from and To range using the lookup buttons available next to the
respective fields.
5. Choose the required Item group using the drop down arrow button available next
to this field.
6. Choose an Inventory Type using the drop down arrow button available next to
this field.
Doc. No. F/DV/15
Rev.No.
Date
BatchMaster Software Inc.
BMM User Manual
7. If require specify the property in the text box available next to this field.
8. If need to display the cost information check the respective checkbox.
9. Choose any option from the available one to apply sorting before generating a
report.
10. Press Execute button to generate report.
Once BMM processes the report parameters, it displays the results as a Crystal Report
allowed for printing or exporting, as desired. The Report Generated Looks like as below.
6.4 Inventory Transactions
Inventory Managment can be performed more efficiently by organizing the warehouse
using bins, to track the exact location of items in stock. Using the bin managment you
can store your finished goods and raw materials in multiple bins. Morover you can use
bins to organize a single warehouse or multiple warehouses, when using the MultiLocation Inventory feature.
To handle the bin level inventory during inventory transactions the Bin selection form is
provided. Bin Selection form is accessible from various screen during SAP Business One
Transactions. The behavior of bin selection form depends upon the transaction.
Doc. No. F/DV/15
Rev.No.
Date
BatchMaster Software Inc.
BMM User Manual
6.4.1 Goods Receipt
Using the Goods Receipt screen you can perform the receipt transaction for the inventory
items. In case, the item for which Goods Receipt is processesd is Lot tracked then the
‟Batches Setup‟ window is displayed. Whereas in case the item is non tracked then the
the ‟Bin Selection‟ window is dispalyed.
Perform a Goods receipt transaction in SAP Business one.
Batches Setup form appears on pressing the Add button at time of adding a transaction
for the Lot tracked Item.
Doc. No. F/DV/15
Rev.No.
Date
BatchMaster Software Inc.
BMM User Manual
Note: Lots can be created using the “Automatic Creation” button available on the
Batches Setup screen.
Further on clicking the Batch field lookup displays the “Create String For Batches”
window wherein you can specify the masking for the lot number in the string field.
Doc. No. F/DV/15
Rev.No.
Date
BatchMaster Software Inc.
BMM User Manual
Enter the Batch and quantity details in the respective fields. On Double clicking the
Created Batch record a “Bin Receipt Selection” Window is displayed.
In case default receipt bin is assocaited with the item on the Item Master Details screen,
then it gets defaulted in the Bin No. column. User can modify the default value if
required. The quantity column defaults the value entered on the previous screen, which
is editable.
click on the „Ok‟ button to save the bin selection opted. Further click on the update
button to save the receipt.
Doc. No. F/DV/15
Rev.No.
Date
BatchMaster Software Inc.
BMM User Manual
The caption of Update button changes to Ok button click ok to proceed with the receipt.
Doc. No. F/DV/15
Rev.No.
Date
BatchMaster Software Inc.
BMM User Manual
On again clicking the Add button on the Good Receipt screen the ‟Bin Selection‟ window
is dispalyed for the non tracked item.
Enter the receipt quantity and click on the Update button.
Doc. No. F/DV/15
Rev.No.
Date
BatchMaster Software Inc.
BMM User Manual
This completes the bin /batch selection for the Non tracked and Lot tracked items on the
Goods Receipt screen.
6.4.2 Goods Issue
Goods Issue screen is used to perform Issue transaction for the Inventory Items in SAP
Business One. In case, the item for which Goods Issue is processesd is Lot tracked then
the ‟Batches Setup‟ window is displayed. Whereas in case the item is non tracked then
the the ‟Bin Selection‟ window is dispalyed.
Perform a Goods Issue transaction in SAP Business one.
Doc. No. F/DV/15
Rev.No.
Date
BatchMaster Software Inc.
BMM User Manual
Batch Number Selection form appears on pressing the Add button at the time of adding a
transaction for the Lot tracked Item.
Doc. No. F/DV/15
Rev.No.
Date
BatchMaster Software Inc.
BMM User Manual
On the Batch Number Selection window, select the batch from which the material issue
is to be accomplished in the “Available Batches” grid. Select/ enter the quantity to be
issued from the selected batch.
Click on the Forward arrow button to transfer the selected available batch in the
„Selected Batches” grid.
On Double clicking the Created Batch record the “Bin Selection” Window is displayed. In
case default receipt bin is associated with the item on the Item Master Details screen,
then it gets defaulted in the Bin No. column. User can modify the default value if
required. The selected quantity column defaults the value entered on the previous
screen. Click ok to return to BatchNumber Selection Window.
Doc. No. F/DV/15
Rev.No.
Date
BatchMaster Software Inc.
BMM User Manual
Click Update to proceed with the receipt.
Doc. No. F/DV/15
Rev.No.
Date
BatchMaster Software Inc.
BMM User Manual
The caption of Update button changes to OK Click on the that to proceed with the Issue
transaction.
On again clicking the Add button on the Goods Issue screen the ‟Bin Selection‟ window is
dispalyed for the non tracked item.
Doc. No. F/DV/15
Rev.No.
Date
BatchMaster Software Inc.
BMM User Manual
Select the Issue Quantity and Click on the Update button.
Doc. No. F/DV/15
Rev.No.
Date
BatchMaster Software Inc.
BMM User Manual
This completes bin/ batch selection for the Non tracked and Lot tracked items on the
Goods Issue screen.
6.4.3 Inventory Transfer
This utility enables the user to efficiently perform inventory move from one warehouse to
another. Using the Inventory Transfer screen you can transfer inventory from one
warehouse location to another.
To perform Inventory transfer on the Invnetory Transfer screen select the ”From
Warehouse” location. Further in the sliding grid select/enter the Item No. and ”To
Warehouse Location”.
Doc. No. F/DV/15
Rev.No.
Date
BatchMaster Software Inc.
BMM User Manual
Bin Selection Form appears on pressing the Add button at the time of adding a
transaction for the Non tracked Item.
Doc. No. F/DV/15
Rev.No.
Date
BatchMaster Software Inc.
BMM User Manual
Select the quantity bin line to be transferred, click Update to proceed with the Inventory
Transfer.
On again clicking the Add button the Bin selection Form is dispalyed for the Lot Tracked
item. Select the lots to be transferred and click update.
Doc. No. F/DV/15
Rev.No.
Date
BatchMaster Software Inc.
BMM User Manual
This completes the bin selection for the lot as well non tracked items on the Inventory
Transfer screen.
Doc. No. F/DV/15
Rev.No.
Date
BatchMaster Software Inc.
BMM User Manual
6.4.4 Inventory Putaway
The inventory put away form enables the user to maintain the inventory movement
within a warehouse. There may be certain situations when the inventory move is
required amongst the storage bins from one storage condition to another within a
warehouse.
No.: This field displays the automatically generated inventory put away number.
Document Date: This field displays the current server date that can be edited.
Warehouse: This field indicates the warehouse for which inventory put away is to be
performed.
Grid fields
Item No.: This field indicates the selected inventory item whose bin transfer is to be
performed.
Item Description: This field indicates the item description.
U/M: This field indicates the Unit of measurement of the selected line item.
Quantity: This field indicates the inventory quantity for bin transfer.
Lot: This field indicates the lot from which the quantity is obtained for bin transfer.
Doc. No. F/DV/15
Rev.No.
Date
BatchMaster Software Inc.
BMM User Manual
Container: This is the user editable field in which one can specify the number of
containers for the lot.
From Bin: This field indicates the From Bin from which inventory is to be transferred to
the other selected bin.
From Inv Type: This field shows the From Inventory type associated with the source
bin.
To Bin: This field indicates the To Bin to which inventory is transferred from the From
Bin.
To Inv Type: This field shows the To Inventory type associated with the destination bin.
6.4.4.1 Steps to define Inventory Put Away
1. Specify the document date if different from current default server date.
2. Select the warehouse for which inventory put away is to be performed.
3. Select the Item for inventory move amongst bins within the warehouse.
4. Specify the values in the Quantity, lot and container fields as required.
5. Select the From Bin and To Bin as needed.
6. Click on Add to perform the Inventory Put away transaction.
6.4.5 Initial
Quantities,
Inventory Posting
Inventory
Tracking
and
Inventory management system provides information to efficiently manage the flow of
materials. To improve inventory performance level, the BMM SAP Business one is
implementing the concept of Bin. Now user can maintain the BMM bin level information
of an inventory during Inventory Management transactions. This lets you determine
exactly in which bin a certain material is located.
Doc. No. F/DV/15
Rev.No.
Date
BatchMaster Software Inc.
BMM User Manual
Initial Quantities
When defining the opening balance for inventory the bin in which the entry of the initial
quantities is to be carried out, need to be maintained. The Bin no would be defined with
respect to the batches created for the specific inventory type. Providing the bin number
corresponding to the initial quantities of an inventory assists user in tracking the exact
location of inventory.
At initial quantity screen maintain the initial quantity of the required item.
Doc. No. F/DV/15
Rev.No.
Date
BatchMaster Software Inc.
BMM User Manual
Now click on Add button to maintain batch related details. In case of Lot tracked items
Batches Setup window is displayed.
Doc. No. F/DV/15
Rev.No.
Date
BatchMaster Software Inc.
BMM User Manual
Note: Lots can be created using the “Automatic Creation” button available on the
Batches Setup screen.
Further on clicking the Batch field lookup displays the “Create String For Batches”
window wherein you can specify the masking for the lot number in the string field.
Here at batch setup screen, user can specify the Batch and quantity details in the
respective fields.
On Double clicking the Created Batch record a “Bin Receipt Selection” Window is
displayed.
Doc. No. F/DV/15
Rev.No.
Date
BatchMaster Software Inc.
BMM User Manual
In case default receipt bin is associated with the item on the Item Master Details screen,
then it gets defaulted in the Bin No. column. User can modify the default value if
required. The quantity column defaults the value entered on the previous screen, which
is editable.
Finally click on the „Ok‟ button to save the bin selection opted. Thus bin number selected
here refers to the bin in which the respective batch initial quantity is available.
In case of Non tracked Items:
For non tracked items while processing the Initial quantities you need to define the
opening balance for inventory.
At initial quantity screen maintain the initial quantity of the required item.
Doc. No. F/DV/15
Rev.No.
Date
BatchMaster Software Inc.
BMM User Manual
Now click on Add button to maintain bin related details. In case of non tracked items Bin
Selection window is displayed.
Doc. No. F/DV/15
Rev.No.
Date
BatchMaster Software Inc.
BMM User Manual
Here at bin selection screen, user can specify the bin details in the respective fields.
Click on the update button to save the bin information.
Inventory Tracking and Posting
BMM SAP Business one now facilitates the user to manage inventory quantities during
Inventory tracking and posting.
Doc. No. F/DV/15
Rev.No.
Date
BatchMaster Software Inc.
BMM User Manual
The most basic method of inventory tracking is physical counts. So maintaining the bin
number lets user to know that which serial numbers of the material are in which bin.
Also when the material needs to be moved from one storage bin to another bin the bin
number needs to be maintained.
Doc. No. F/DV/15
Rev.No.
Date
BatchMaster Software Inc.
BMM User Manual
Hence while maintaining the stock posting details of an item the bin level details can be
maintained.
At Inventory Posting screen maintain the required details corresponding to the selected
item.
Press Reconcile button to specify the bin level details. The Bin selection form gets
opened where user can specify the Bin number along with an inventory type for the
selected quantity of an item.
Doc. No. F/DV/15
Rev.No.
Date
BatchMaster Software Inc.
BMM User Manual
Press Ok button to save the bin level details for an item.
6.5 Purchase Transactions
You can track the various Purchase Transactions upto bin level using the BatchMasters
Bin Managment utility. This functionality ensures that the bin level inventory is handled
for all purchase transactions and allows user to maintain bins for specific warehouses.
6.5.1 Goods Receipt PO
Using the Goods Receipt PO screen you can perform the receipt transaction for the
purchased items.
Perform a Goods receipt PO transaction in SAP Business one.
Doc. No. F/DV/15
Rev.No.
Date
BatchMaster Software Inc.
BMM User Manual
Batches Setup form appears on pressing the Add button at time of adding a transaction
for the Lot tracked Item.
Doc. No. F/DV/15
Rev.No.
Date
BatchMaster Software Inc.
BMM User Manual
Note: Lots can be created using the “Automatic Creation” button available on the
Batches Setup screen.
Further on clicking the Batch field lookup displays the “Create String For Batches”
window wherein you can specify the masking for the lot number in the string field.
Enter the Batch and quantity details in the respective fields. On Double clicking the
Created Batch record a “Bin Receipt Selection” Window is displayed.
Doc. No. F/DV/15
Rev.No.
Date
BatchMaster Software Inc.
BMM User Manual
In case default receipt bin is associated with the item on the Item Master Details screen,
then it gets defaulted in the Bin No. column. User can modify the default value if
required. The quantity column defaults the value entered on the previous screen, which
is editable.
Finally click on the „Update‟ button to save the bin selection opted.
Doc. No. F/DV/15
Rev.No.
Date
BatchMaster Software Inc.
BMM User Manual
Click on the Update button the caption of the button changes to OK.
Doc. No. F/DV/15
Rev.No.
Date
BatchMaster Software Inc.
BMM User Manual
Click OK to proceed with the Goods Receipt PO transaction.
Click on the Update button on the Batches Setup screen. The caption of the Update
button changes to OK click on that button.
Doc. No. F/DV/15
Rev.No.
Date
BatchMaster Software Inc.
BMM User Manual
On again clicking the Add button on the Goods Receipt PO screen “Bin selection” window
is displayed for the Non tracked Item.
Doc. No. F/DV/15
Rev.No.
Date
BatchMaster Software Inc.
BMM User Manual
Enter the receipt quantity details and click on the Update button.
This completes the bin/batch selection for the Non tracked and Lot tracked items on the
Goods Receipt PO Screen.
Doc. No. F/DV/15
Rev.No.
Date
BatchMaster Software Inc.
BMM User Manual
On again clicking the Add button completes the Goods PO Receipt transaction.
Doc. No. F/DV/15
Rev.No.
Date
BatchMaster Software Inc.
BMM User Manual
6.5.2 Goods Return
Using the Goods Return screen you can perform the goods return transaction for the
purchased inventory items.
Perform a Goods Return transaction in SAP Business one.
Batch Number selection form appears on pressing the Add button at time of adding a
transaction for the Lot tracked Item.
Doc. No. F/DV/15
Rev.No.
Date
BatchMaster Software Inc.
BMM User Manual
On the Batch Number Selection window, select the batch from which the material return
is to be accomplished in the “Available Batches” grid. Select/ enter the quantity to be
issued from the selected batch.
Click on the Forward arrow button to transfer the selected available batch in the
„Selected Batches” grid.
Doc. No. F/DV/15
Rev.No.
Date
BatchMaster Software Inc.
BMM User Manual
On Double clicking the Created Batch record the “Bin Selection” Window is displayed.
Select the bin from which return is to be processed.
Finally click on the „Ok‟ button to save the bin selection opted.
Doc. No. F/DV/15
Rev.No.
Date
BatchMaster Software Inc.
BMM User Manual
Further click on the update button on the Batch Number selection window to save the
Goods Return transaction.
Doc. No. F/DV/15
Rev.No.
Date
BatchMaster Software Inc.
BMM User Manual
The caption of the Update button changes to Ok click on that to proceed with the return
transaction.
On again clicking the Add button on the Goods Return screen the “Bin selection” window
is displayed for the Non tracked item.
Doc. No. F/DV/15
Rev.No.
Date
BatchMaster Software Inc.
BMM User Manual
Select the bin record from which return transaction is to be processed.
Doc. No. F/DV/15
Rev.No.
Date
BatchMaster Software Inc.
BMM User Manual
Click on the Update button to proceed with the return transaction.
This completes the bin/ batch selection for the Non tracked and Lot tracked items on the
Goods Return screen.
Doc. No. F/DV/15
Rev.No.
Date
BatchMaster Software Inc.
BMM User Manual
On again clicking the Add button completes the Goods Return transaction.
6.5.3 A/P Invoice
Using the A/P Invoice window you can create invoice for Purchase Orders and Goods
Receipt Pos.
Create an A/P Invoice in SAP Business one.
Doc. No. F/DV/15
Rev.No.
Date
BatchMaster Software Inc.
BMM User Manual
Batches Setup form appears on pressing the Add button at time of adding a transaction
for Lot tracked item.
Doc. No. F/DV/15
Rev.No.
Date
BatchMaster Software Inc.
BMM User Manual
Note: Lots can be created using the “Automatic Creation” button available on the
Batches Setup screen.
Further on clicking the Batch field lookup displays the “Create String For Batches”
window wherein you can specify the masking for the lot number in the string field.
Enter the Batch and quantity details in the respective fields. On Double clicking the
Created Batch record a “Bin Receipt Selection” Window is displayed.
Doc. No. F/DV/15
Rev.No.
Date
BatchMaster Software Inc.
BMM User Manual
In case default receipt bin is associated with the item on the Item Master Details screen,
then it gets defaulted in the Bin No. column. User can modify the default value if
required. The quantity column defaults the value entered on the previous screen, which
is editable.
Finally click on the „Update‟ button to save the bin selection opted.
Doc. No. F/DV/15
Rev.No.
Date
BatchMaster Software Inc.
BMM User Manual
Click on the Update button the caption of the button changes to OK.
Doc. No. F/DV/15
Rev.No.
Date
BatchMaster Software Inc.
BMM User Manual
Click OK to proceed with the Goods Receipt PO transaction
Click on the Update button on the Batches Setup screen. The caption of the Update
button changes to OK click on that button.
Doc. No. F/DV/15
Rev.No.
Date
BatchMaster Software Inc.
BMM User Manual
On again clicking the Add button on the A/P Invoice screen “Bin selection” window is
displayed for the Non tracked Item.
Doc. No. F/DV/15
Rev.No.
Date
BatchMaster Software Inc.
BMM User Manual
Enter the receipt quantity details and click on the Update button.
This completes the bin/batch selection for the Non tracked and Lot tracked items on the
A/P Invoice Screen.
Doc. No. F/DV/15
Rev.No.
Date
BatchMaster Software Inc.
BMM User Manual
On again clicking the Add button completes the A/P Invoice transaction.
Doc. No. F/DV/15
Rev.No.
Date
BatchMaster Software Inc.
BMM User Manual
6.5.4 A/P Credit Memo
Using the A/P Credit Memo window you can create a credit memo for purchase orders
and Goods Receipt Pos.
Create an A/P Credit Memo in SAP Business One.
Batch Number selection form appears on pressing the Add button at time of adding a
transaction for the Lot tracked Item.
Doc. No. F/DV/15
Rev.No.
Date
BatchMaster Software Inc.
BMM User Manual
On the Batch Number Selection window, select the batch from which the A/P Credit
Memo is to be accomplished in the “Available Batches” grid. Select/ enter the quantity to
be issued from the selected batch.
Click on the Forward arrow button to transfer the selected available batch in the
„Selected Batches” grid.
Doc. No. F/DV/15
Rev.No.
Date
BatchMaster Software Inc.
BMM User Manual
On Double clicking the Created Batch record the “Bin Selection” Window is displayed.
Select the bin from which return is to be processed.
Finally click on the „Ok‟ button to save the bin selection opted.
Doc. No. F/DV/15
Rev.No.
Date
BatchMaster Software Inc.
BMM User Manual
Further click on the update button on the Batch Number selection window to save the
A/P Credit Memo transaction.
Doc. No. F/DV/15
Rev.No.
Date
BatchMaster Software Inc.
BMM User Manual
The caption of the Update button changes to Ok click on that to proceed with the
A/P Credit Memo transaction.
On again clicking the Add button on the A/P Credit Memo screen the “Bin selection”
window is displayed for the Non tracked item.
Doc. No. F/DV/15
Rev.No.
Date
BatchMaster Software Inc.
BMM User Manual
Select the bin record from which A/P Credit Memo transaction is to be processed.
Doc. No. F/DV/15
Rev.No.
Date
BatchMaster Software Inc.
BMM User Manual
Click on the Update button to proceed with the A/ P Credit Memo transaction.
This completes the bin/ batch selection for the Non tracked and Lot tracked items on the
A/P Credit Memo screen.
Doc. No. F/DV/15
Rev.No.
Date
BatchMaster Software Inc.
BMM User Manual
On again clicking the Add button completes the A/P Credit Memo transaction.
6.6 Sales Transactions
You can track the varoius Sales Transactions upto bin level using the BatchMasters Bin
Management utility.
6.6.1 Delivery
Using the Delivery screen you can perform the delivery transaction for the sold items.
Perform a Delivery transaction in SAP Business one.
Doc. No. F/DV/15
Rev.No.
Date
BatchMaster Software Inc.
BMM User Manual
Batch Number selection form appears on pressing the Add button at time of adding a
transaction for the Lot tracked Item.
Doc. No. F/DV/15
Rev.No.
Date
BatchMaster Software Inc.
BMM User Manual
On the Batch Number Selection window, select the batch from which the delivery is to be
accomplished in the “Available Batches” grid. Select/ enter the quantity to be issued
from the selected batch.
Click on the Forward arrow button to transfer the selected available batch in the
„Selected Batches” grid.
On Double clicking the Created Batch record the “Bin Selection” Window is displayed.
Select the bin from which delivery is to be processed.
Click on the „Ok‟ button to save the bin selection opted.
Doc. No. F/DV/15
Rev.No.
Date
BatchMaster Software Inc.
BMM User Manual
Further click on the update button on the Batch Number selection window to save the
delivery transaction.
Doc. No. F/DV/15
Rev.No.
Date
BatchMaster Software Inc.
BMM User Manual
The caption of the Update button changes to Ok click on that to proceed with the
delivery transaction.
On again clicking the Add button on the Delivery screen the “Bin selection” window is
displayed for the Non tracked item.
Doc. No. F/DV/15
Rev.No.
Date
BatchMaster Software Inc.
BMM User Manual
Select the bin record from which Delivery transaction is to be processed.
Doc. No. F/DV/15
Rev.No.
Date
BatchMaster Software Inc.
BMM User Manual
Click on the Update button to proceed with the Delivery transaction.
This completes the bin/ batch selection for the Non tracked and Lot tracked items on the
Delivery screen.
Doc. No. F/DV/15
Rev.No.
Date
BatchMaster Software Inc.
BMM User Manual
On again clicking the Add button completes the Delivery transaction.
6.6.2 Return
Using the Return screen you can perform the sales return transaction for the sold items.
Perform a Return transaction in SAP Business one.
Doc. No. F/DV/15
Rev.No.
Date
BatchMaster Software Inc.
BMM User Manual
Batch Number selection form appears on pressing the Add button at time of adding a
transaction for the Lot tracked Item.
Doc. No. F/DV/15
Rev.No.
Date
BatchMaster Software Inc.
BMM User Manual
On the Batch Number Selection window, select the batch from which the material return
is to be accomplished in the “Available Batches” grid. Select/ enter the quantity to be
issued from the selected batch.
Click on the Forward arrow button to transfer the selected available batch in the
„Selected Batches” grid.
On Double clicking the Created Batch record the “Bin Selection” Window is displayed.
Enter the bin in which return is to be processed.
Doc. No. F/DV/15
Rev.No.
Date
BatchMaster Software Inc.
BMM User Manual
Click on the „Update‟ button to save the entered bin.
Doc. No. F/DV/15
Rev.No.
Date
BatchMaster Software Inc.
BMM User Manual
Further click on the update button on the Batch Number selection window to save the
Return transaction.
The caption of the Update button changes to Ok click on that to proceed with the return
transaction.
Doc. No. F/DV/15
Rev.No.
Date
BatchMaster Software Inc.
BMM User Manual
On again clicking the Add button on the Return screen the “Bin selection” window is
displayed for the Non tracked item.
Doc. No. F/DV/15
Rev.No.
Date
BatchMaster Software Inc.
BMM User Manual
Enter the bin value in which return transaction is to be processed.
Click on the Update button to proceed with the return transaction.
Doc. No. F/DV/15
Rev.No.
Date
BatchMaster Software Inc.
BMM User Manual
This completes the bin/ batch selection for the Non tracked and Lot tracked items on the
Return screen.
Doc. No. F/DV/15
Rev.No.
Date
BatchMaster Software Inc.
BMM User Manual
On again clicking the Add button completes the Return transaction.
6.6.3 A/R Invoice
Using the A/R Invoice window you can create a invoice for sales orders.
Create an A/R Invoice in SAP Business One.
Batch Number selection form appears on pressing the Add button at time of adding a
transaction for the Lot tracked Item.
Doc. No. F/DV/15
Rev.No.
Date
BatchMaster Software Inc.
BMM User Manual
On the Batch Number Selection window, select the batch from which the A/R Invoice is
to be accomplished in the “Available Batches” grid. Select/ enter the quantity to be
issued from the selected batch.
Click on the Forward arrow button to transfer the selected available batch in the
„Selected Batches” grid.
Doc. No. F/DV/15
Rev.No.
Date
BatchMaster Software Inc.
BMM User Manual
On Double clicking the Created Batch record the “Bin Selection” Window is displayed.
Select the bin from which A/R Invoice is to be processed.
Click on the „Ok‟ button to save the bin selection opted.
Doc. No. F/DV/15
Rev.No.
Date
BatchMaster Software Inc.
BMM User Manual
Further click on the update button on the Batch Number selection window to save the
A/R Invoice transaction.
Doc. No. F/DV/15
Rev.No.
Date
BatchMaster Software Inc.
BMM User Manual
The caption of the Update button changes to Ok click on that to proceed with the
A/R Invoice transaction.
On again clicking the Add button on the A/R Invoice screen the “Bin selection” window is
displayed for the Non tracked item.
Doc. No. F/DV/15
Rev.No.
Date
BatchMaster Software Inc.
BMM User Manual
Select the bin record from which A/R Invoice transaction is to be processed.
Doc. No. F/DV/15
Rev.No.
Date
BatchMaster Software Inc.
BMM User Manual
Click on the Update button to proceed with the A/R Invoice transaction.
This completes the bin/ batch selection for the Non tracked and Lot tracked items on the
A/R Invoice screen.
Doc. No. F/DV/15
Rev.No.
Date
BatchMaster Software Inc.
BMM User Manual
On again clicking the Add button completes the A/R Invoice transaction.
6.6.4 A/R Credit Memo
Using the A/R Credit Memo you can create a credit memo for sold items.
Create an A/R Credit Memo in SAP Business One.
Doc. No. F/DV/15
Rev.No.
Date
BatchMaster Software Inc.
BMM User Manual
Batch Number selection form appears on pressing the Add button at time of adding a
transaction for the Lot tracked Item.
Doc. No. F/DV/15
Rev.No.
Date
BatchMaster Software Inc.
BMM User Manual
On the Batch Number Selection window, select the batch from which the A/R Credit
Memo is to be accomplished in the “Available Batches” grid. Select/ enter the quantity to
be issued from the selected batch.
Click on the Forward arrow button to transfer the selected available batch in the
„Selected Batches” grid.
On Double clicking the Created Batch record the “Bin Receipt Selection” Window is
displayed.
Doc. No. F/DV/15
Rev.No.
Date
BatchMaster Software Inc.
BMM User Manual
In case default receipt bin is associated with the item on the Item Master Details screen,
then it gets defaulted in the Bin No. column. User can modify the default value if
required. The quantity column defaults the value entered on the previous screen, which
is editable.
Finally click on the „Ok‟ button to save the bin selection opted.
Doc. No. F/DV/15
Rev.No.
Date
BatchMaster Software Inc.
BMM User Manual
Click on the Update button the caption of the button changes to OK.
Doc. No. F/DV/15
Rev.No.
Date
BatchMaster Software Inc.
BMM User Manual
Click OK to proceed with the A/R Credit Memo transaction.
On again clicking the Add button on the A/R Credit Memo screen “Bin selection” window
is displayed for the Non tracked Item.
Doc. No. F/DV/15
Rev.No.
Date
BatchMaster Software Inc.
BMM User Manual
Enter the receipt quantity details and click on the Update button
Doc. No. F/DV/15
Rev.No.
Date
BatchMaster Software Inc.
BMM User Manual
This completes the bin/batch selection for the Non tracked and Lot tracked items on the
A/R Credit Memo Screen.
On again clicking the Add button completes the A/R Credit Memo transaction.
Doc. No. F/DV/15
Rev.No.
Date
BatchMaster Software Inc.
BMM User Manual
6.7 Pick and Pack
6.7.1 Pick List
The Business one standard pick list screen facilitates the user to pick items from the
warehouse and to pack them to shipping. To speed up the process the warehouse
inventory can be now managed to bin level. In BMM SAP Business one pick list user can
now select the bin prior to a delivery. The bin no. field is introduced at pick list screen to
specify the exact location of items within warehouse.
Doc. No. F/DV/15
Rev.No.
Date
BatchMaster Software Inc.
BMM User Manual
On the Pick List screen click on the „Delivery‟ button to process the delivery for the
items. Batch Number selection form appears on pressing the Add button for the Lot
tracked Item.
Doc. No. F/DV/15
Rev.No.
Date
BatchMaster Software Inc.
BMM User Manual
On the Batch Number Selection window, select the batch from which the delivery is to be
accomplished in the “Available Batches” grid. Select/ enter the quantity to be issued
from the selected batch.
Click on the Forward arrow button to transfer the selected available batch in the
„Selected Batches” grid.
Doc. No. F/DV/15
Rev.No.
Date
BatchMaster Software Inc.
BMM User Manual
On Double clicking the Created Batch record the “Bin Selection” Window is displayed.
Select the bin from which delivery is to be processed.
Click on the „Ok‟ button to save the bin selection opted.
Doc. No. F/DV/15
Rev.No.
Date
BatchMaster Software Inc.
BMM User Manual
Further click on the update button on the Batch Number selection window to save the
delivery transaction.
Doc. No. F/DV/15
Rev.No.
Date
BatchMaster Software Inc.
BMM User Manual
The caption of the Update button changes to Ok click on that to proceed with the
delivery transaction.
On again clicking the Add button on the Delivery screen the “Bin selection” window is
displayed for the Non tracked item.
Doc. No. F/DV/15
Rev.No.
Date
BatchMaster Software Inc.
BMM User Manual
Select the bin record from which Delivery transaction is to be processed.
Doc. No. F/DV/15
Rev.No.
Date
BatchMaster Software Inc.
BMM User Manual
Click on the Update button to proceed with the Delivery transaction.
This completes the bin/ batch selection for the Non tracked and Lot tracked items on the
Pick List screen.
Doc. No. F/DV/15
Rev.No.
Date
BatchMaster Software Inc.
BMM User Manual
6.8 Inventory Reports
6.8.1 Inventory Detail Report
Inventory detail report furnishes a way to generate a report for the user to view and
analyze bin level inventory. Distinct filters are available to generate a précised report.
Doc. No. F/DV/15
Rev.No.
Date
BatchMaster Software Inc.
BMM User Manual
Warehouse From: This field specifies the lower limit of the range of Warehouse that
need to include in the report.
Warehouse To: This field specifies the upper limit of the range of warehouse that need
to include in the report.
Bin From: This field specifies the lower limit of the range of Bin that need to include in
the report.
Bin To: This field specifies the upper limit of the range of the Bin that need to include in
the report.
Item From: This field specifies the lower limit of the range of Item that need to include
in the report.
Item To: This field specifies the upper limit of the range of item that need to include in
the report.
Item Group: This field allows user to choose an Item Group that need to include in the
report.
Inventory Type: Here user can choose an inventory type using the available drop down
arrow.
Doc. No. F/DV/15
Rev.No.
Date
BatchMaster Software Inc.
BMM User Manual
Properties: Specify the Property that needs to be printed on the report.
Display Cost Information: Checking this checkbox displays the cost related details.
Sort By: This field is used to apply sorting on the basis of distinct available fields.
The available options are:
6. Warehouse/Bin
7. Item:
8. Lot
9. Item Group
10. Inventory Type
6.8.1.1 Generating an Inventory Detail Report
Inventory Detail report can be generated employing the following steps:
1. Complete the warehouse key from and To range using the lookup buttons
available next to the respective fields.
2. Complete the Bin from and To range using the lookup buttons available next to
the respective fields.
3. Complete the Item from and To range using the lookup buttons available next to
the respective fields.
4. Specify the Lot from and To range using the lookup buttons available next to the
respective fields.
5. Choose the required Item group using the drop down arrow button available next
to this field.
6. Choose an Inventory Type using the drop down arrow button available next to
this field.
7. If require specify the property in the text box available next to this field.
8. If need to display the cost information check the respective checkbox.
9. Choose any option from the available one to apply sorting before generating a
report.
10. Press Execute button to generate report.
Doc. No. F/DV/15
Rev.No.
Date
BatchMaster Software Inc.
BMM User Manual
Once BMM processes the report parameters, it displays the results as a Crystal Report
allowed for printing or exporting, as desired. The Report Generated Looks like as below.
7 General
7.1 Report Custom Data Wizard
BMM‟s Report Custom Data feature enables you to conveniently tailor reports as per your
needs. You can now easily customize BMM‟s Standard reports to get extra information
more than the reports provide you. There may be instances when the information
provided in standard reports is quite not sufficient for the user to come to a decision.
More information may be required for in-depth analysis, comparison and evaluation. For
example a user, for detailed analysis, wants to have Formula Status also along with the
Formula Key on the Material Where Used Report. This can be easily achieved with the
help of Report Custom Data Wizard whose link is provided on each Report Selection
Criteria screen. The Report Custom Data Wizard helps you to set a query that can be
used to fetch additional information (apart from what standard report provides)
pertaining to the specified filter criteria.
Report‟s Parameter Name on the reports selection criteria screen is used to save the
Filter criteria that are frequently used by the user. Different queries can be set different
parameter. If required, more than one query can also be established for a parameter.
Doc. No. F/DV/15
Rev.No.
Date
BatchMaster Software Inc.
BMM User Manual
7.1.1 Screen Fields Description
Report Details:
On this tab one can specify the Report Id, its Description, and Report Type etc. That is
the general information of the report is maintained here.
Report ID: This is the unique key to identify the report.
Report Description: This is the description of the report.
Display Name: This field is used to specify the name for the report created.
Parent Menu: This field is used to specify the name of the module with which you want
to view your report.
Report Type: This is the report type of the report. It can be one of the following:
a. Seagate Crystal Report bound to MS Access Database.
b. MS Access Report.
c. Seagate Crystal Report bound to BME using PDSSQL.dll.
Doc. No. F/DV/15
Rev.No.
Date
BatchMaster Software Inc.
BMM User Manual
d. Seagate Crystal Report bound to OLEDB using PDSOLEDB.dll.
e. Seagate Crystal Report bound to ODBC DSN using PDSODBC.dll.
Note: Currently the only supported report type is Seagate Crystal Report bound to MS
Access Database
Report Database (.mdb): This is the path of the blank MS Access database where the
query results would be dumped.
Name of Linked (.mdb) Table: This is the name of the table in the database where
the results of the query are to be dumped.
MS Access Report Name: This is the name of the MS Access Report. The name is
entered here if the report type is MS Access Report;
Crystal Report (.rpt) path: This is the path of the Crystal Report when the report type
is Seagate Crystal Report Bound to MS Access Database or Seagate Crystal Report
Bound to BME database using PDSSQL.dll.
Companies:
This section lists the various SAP companies available on the logged in server. User
needs to select the company to which the custom report is to be added.
Set Parameters Tab
This tab is used to specify the parameter selection criteria‟s for the report.
Under the “Report‟s Selection Criteria Form” grid, one line gets added for each criterion.
If desired, the fields in the grid may be modified after double-clicking on the field. The
fields in the grid are given below:
Seq. No.: The numbers here denote the sequence numbers of the form control(s)
corresponding to the sequence of parameters on the query (1, 2, 3, and 4).
Label Caption: Enter a caption, which helps to identify the control that appears on the
form. (Item From, Item To, Location From, Location To)
Lookup Query: This query will be used to fetch the values for the lookup.
Lookup Field: This is the primary key displayed here is passed as report parameter. For
every lookup query, a lookup field needs to be specified; otherwise the associated lookup
button will not work properly.
Data Type: This is the Data type of the report parameter.
1. Text Box may be used for String or Boolean data type.
2. Dates may be used for Date data type.
3. PVnumeric may be used for Integer/Decimal/Double data types.
Doc. No. F/DV/15
Rev.No.
Date
BatchMaster Software Inc.
BMM User Manual
Default Value: This is the default value that will be passed to the parameter when no
value is specified for it.
Control Type: This is the control type to be displayed on the screen. Select a control to
match with the data type as discussed above.
1. Text Box may be used for String or Boolean data type.
2. Dates may be used for Date data type.
3. PVnumeric may be used for Integer/Decimal/Double data types.
Generate Report
Using the Prepare Query button create the query using which data on the report needs
to be fetched.
Add a Group:
Group on field: This field is used to group items on the MS Access report. A field may
be selected for it using the dropdown list.
Show summary of: This field is used to see group summary for a particular numeric
field on MS Access Report.
Add a Sub-Group:
Doc. No. F/DV/15
Rev.No.
Date
BatchMaster Software Inc.
BMM User Manual
Sub-Group on field: A field may be selected here for sub-grouping the items on MS
Access Report.
Show summary of: A field may be entered at to see sub-group summary for that
particular
numeric field on MS Access Report.
New report name: This is the name of the report which will be created into the MS
Access database.
Create New Report: Click this button to create the report based on selected group and
sub group. The report file is displayed using MS Access report builder.
New table name: A new table is created on the basis of the structure of the query
created by the user. Click on Create New Table button to create a table on MS Access.
Create New Table: Click this button to create the table based on above definition.
7.1.2 Creating a New Table
1. Click on the Insert to button.
2. Establish the filter criteria.
3. Enter a parameter and save the criteria.
4. Click on the icon available next to the Parameter field to open the Report Custom
Data Wizard.
5. Click on the Query grid. The sequence number gets automatically generated.
6. Enter a unique identification name for Query.
7. If a table is to be created using this query, select the status option.
8. Create the Query in the middle grid that is used to populate additional table for
the selected report grid.
9. Click the Create table 1 of 2 button in order to create the table.
10. On the populated window click Ok to continue.
11. Right click in the Control grid to enter the Friendly Name, Control Name and its
Default Value.
12. Click Add to save the custom report.
8 Production
Production module plays an important role in BMM. It provides the functionality for Batch
Creation and Order Processing. Batches can only be created for items, having Released
BOM. Batches can be created via the Batch Entry screen. This module also encompasses
provision for creating Super Batches for BOM‟s involving multi level formulas as well as
batches with runs.
8.1 Routing
BMM- SAP Routing Module provides an ideal platform for production planning and
control. Routing helps the user to define a specific sequence of work centers that are
Doc. No. F/DV/15
Rev.No.
Date
BatchMaster Software Inc.
BMM User Manual
used in the manufacturing process. Effective organization and preparing of workplaces
and schedules result in productivity increase. Routing can be implemented by checking
the „Routing Implemented‟ checkbox at BMM Setup screen.
8.2 Bills of Materials
A bill of materials (BOM) describes a product in terms of its formulas, and Intermediates,
sub-assemblies. BOM consists of a list of parts and also forms an essential part of the
design and manufacture of any product. BOM contains hierarchical information with the
top level BOM describing a list of components and sub-assemblies.
Let us say that you are preparing a finished good FG1 that is packed in 250 ml container.
Further this FG1 is packed in a carton. This carton can hold 10 packets of FG1. Thus, the
top level assembly BOM will be released for a carton containing 10 units of FG1. This
increasing level of detail continues for all sub-assemblies until it reaches its constituent.
BOMs are important because without a basic knowledge of the quantity of end products
that are needed, there is no way of knowing how many units of the particular raw
material you need to buy. A bill of material can define product as they are designed,
manufactured, ordered and as they are built and manufactured.
8.2.1 BOM Entry
The Bill of Material Entry screen enables you to create the BOM for the desired item. A
single formula can be linked to multiple End items. Let us say that your company sells
finished good in 250ml, 500ml, and 1litre containers. In this case you have to define 3
separate finished good type of BOMs for 250ml, 500ml, and 1litre of this finished good.
The same formula for this finished good will be used but the subassembly or packaging
items will be different.
Top Assembly:
Assemblies contain the list of items needed to assemble any product. The Top Assembly
indicates the top level BOM item.
Doc. No. F/DV/15
Rev.No.
Date
BatchMaster Software Inc.
BMM User Manual
8.2.1.1 Screen Fields Description: Header
Top Assembly: This field refers to the item for which the BOM is released.
Warehouse: This field indicates the warehouse associated with the top assembly. This
Whse will be automatically fetched in this field once you select the top assembly.
Assembly Type: This field indicates the type of the assembly. There are three types of
assemblies namely:
1. Finished Good: Finished Good indicates the item that is sold as the final product
to the customer.
2. Intermediate: An intermediate refers to an item that is produced using a formula.
The Intermediate is used for preparing this finished good.
3. Assembly: Assembly refers to the list of items that are needed to assemble any
product. This will include the top assembly and the sub assembly.
Formula Key: This field indicates the formula necessary to create the item. This field
will be enabled once you select the Assembly Type as Finished Good or Intermediate in
the Assembly Type field. Using the lookup available near the field, you need to select
this formula key.
Revision Number: This number will be automatically generated once the BOM entry is
saved. The Revision Number enables you to identify the BOM entry created by you. In
case the first revision number generated is 0001 and you are making some changes
Doc. No. F/DV/15
Rev.No.
Date
BatchMaster Software Inc.
BMM User Manual
associated with this revision number. Thus once you save these changes, a new revision
number will be generated as 0002 and these changes will be saved under this revision
number. These revision numbers are referred to as versions. These versions enable you
to track the changes made by you.
8.2.1.2 Screen Fields Description: Top Assembly Tab
BOM Status: This field indicates the status associated with the BOM. The following are
the different status of the BOM:
1. New: The New indicates the status when the BOM Entry is created for the first
time.
2. Rel: This indicates the status as Released associated with the BOM. When the
BOM is released using the Release BOM button, then the status changes to
release automatically. Once the BOM is released, it can be used in production.
3. Inactive: This indicates the status that the particular BOM cannot be used in
production. The BOM can be made inactive by clicking the „Inactivate BOM‟
function available in the Special Function menu.
Stock Unit: This field indicates the stock unit associated with the top assembly.
Entry Date: This field indicates the date on which the particular entry was made. By
default the server date will be associated in this field. Using the drop down available near
the field, you will be able to modify this date. In the above screen, this date has been
selected as 11/02/2007.
Doc. No. F/DV/15
Rev.No.
Date
BatchMaster Software Inc.
BMM User Manual
Ref. Designator: This field is for reference purpose only. The user may enter the
desired comments in this field. This may be the name of the person preparing the BOM
or any other comments.
Fill Level: This indicates the fill level associated with the assembly type. This field will
be enabled once you select the option either as Finished Good or Assembly in the
Assembly Type field. The Fill Level indicates the amount of fill necessary to prepare the
finished good or assembly.
Fill Measured In: This field indicates the unit of measure associated with the fill level.
Using the drop down available in this field, you will be able to select the unit as either
weight or volume.
Comments: The comments field enables you to maintain any special comments
associated with this Top Assembly. In case you want to include the comment “Mix in a
temperature of 20 degrees Celsius.” then you can specify the comment in this field.
Labor Key: This field will be enabled once you select the assembly type as Finished
Good or Assembly in the Assembly Type field. This labor may include the expenses
incurred for packing the finished good. Let us say that you have defined a labor key
associated with this labor. Then using the lookup available near the field, you will be able
to select this labor key.
Labor Hours: This field indicates the amount of time spent for carrying out the
particular labor. In case 10 Hours of time is spent for carrying out the above labor, then
you need to enter the hours as 10 in this field.
Labor Cost: This field indicates the amount paid for carrying out the particular labor. In
case the Labor cost is 15 per hour. Then for the total labor hours of 10, the labor cost
will be calculated as 15 x 10 = 150. This will be fetched in this field, once you select the
Labor Key and the Labor Hours in the respective fields.
Overhead Key: This field indicates the additional expenditure incurred for carrying out a
particular labor. Let us say that you have defined the overhead key associated with this
labor. Then using the lookup available near the field, you will be able to select this
overhead key.
Overhead Type: This field indicates the type of overhead used for calculating the cost.
There are two types of overheads namely:
1. Percentage (%).
2. Amount ($).
Let us say that the overhead associated with the overhead key is percentage, then this
will be fetched in this field once you select this overhead key.
Overhead Cost: This field indicates the cost paid as overhead. If you have defined the
overhead factor as 10; the overhead type as percentage; and the Labor cost has been
defined as 150, the overhead cost will be calculated as follows: 10% on 150 which is
equal to 15. This amount will be fetched in this field once you select the desired
overhead key.
Doc. No. F/DV/15
Rev.No.
Date
BatchMaster Software Inc.
BMM User Manual
8.2.1.3 Steps to create the Bill of Material Entry for Top Assembly
1. Select Top Assembly tab in „Bill of Material Entry‟ screen.
2. Next select the Top Assembly using the lookup available near the field. The
associated Whse will be fetched in the Whse field once you select this Top
Assembly.
3. Select the Assembly Type using the drop down available near the field. The
Assembly Type may be Finished Good, Intermediate, or Assembly.
4. Next is the Formula Key field. This field will be enabled in case you select the
Assembly Type as Finished Good or Assembly.
5. Select the entry date using the drop down available near the field.
6. Next is the Ref Designator field. In case you want to enter the name of the
person creating the BOM, then this has to be entered in this field.
7. The Fill Level field will be enabled in case you select the Assembly Type as
Finished Good or Assembly. Enter the Fill Level associated with the Finished Good
or Assembly.
8. Select the unit of measure of the fill level using the drop down available near the
field. The unit of measure may be either weight or volume.
9. Next is the comments field. In case you want to associate any comments, then
specify these comments in this field.
10. Specify the labor hours in the Labor Hours field.
11. Next is the Labor cost field. The Labor cost will be automatically fetched in this
field, once you define the labor hours.
12. In case you want to associate any overheads, then select the overhead key using
the lookup available near the field.
13. The Overhead Type will be automatically fetched in this field once you select the
overhead key.
14. The overhead cost will be automatically fetched in the Overhead Cost field based
on the Labor Hours defined by you.
15. Finally click „Add‟.
Doc. No. F/DV/15
Rev.No.
Date
BatchMaster Software Inc.
BMM User Manual
8.2.1.4 Screen Fields Description: Sub Assembly Tab
Assemblies contain the list of items needed to assemble any product. Assemblies are
classified into two types namely: Top Assembly and the Sub assembly. The subassembly associated with the finished good indicates the packing material.
Item No.: This field indicates the Item No. associated with the sub-assembly.
Whse: This field indicates the Whse associated with the Item. This will be fetched
automatically once you select the Item No.
Line No.(Make/Buy): This field indicates the type associated with this particular item.
Using the drop down available in this field, you will be able to select the type as:
1. Make: In case you are going to manufacture the item, then the type will be
classified as Make.
2. Buy: The type will be classified as Buy in case you purchase the item.
Unit: This field indicates the unit associated with the item. This will be automatically
fetched once you select the Item No.
Required Quantity: This field indicates the quantity of subassembly required. In case
10 units of a particular item are required, you need to specify the quantity as 10 in this
field.
Doc. No. F/DV/15
Rev.No.
Date
BatchMaster Software Inc.
BMM User Manual
Material Cost: This field indicates the cost associated with the item.
Ext.Material Cost: This field refers to the Extended Material Cost associated with the
item. The value for this will be calculated based on the formula.
Extended Material cost = Required Quantity X Material Cost. If you have defined the
quantity required as 10 and the material cost as 500, then the Extended Material Cost =
10 x 500 = 5000. This will be automatically calculated based on the values defined in the
Required Quantity and Material Cost fields.
Entry Date: This specifies the date on which this Sub assembly line was associated with
this BOM. By default it is the server date and can be changed, if desired.
Total Material Cost: This field indicates the total material cost associated with the item.
The value for this will be fetched from the Ext. Material Cost field. Since the Extended
Material Cost is 5000, this value is fetched in this field.
8.2.1.5 Steps to Create Bill of Material Entry for Sub Assembly
1. Select Sub Assembly tab in “Bill of Material Entry” screen.
2. Next you need to select the Item No. using the lookup available near the field.
The Whse will be automatically fetched in the Whse field once you select the Item
No.
3. In the Make/Buy field, select the type as either Make/Buy using the drop down
available near the field.
4. Next is the Unit field. This will be fetched automatically once you select the Item
No.
5. Specify the quantity required in the Required Quantity field.
6. Next select the desired date using the date drop down available in the Entry Date
field. By default this will be the server date.
7. The Total Material Cost field refers to the Extended Material Cost of the item. The
value in this field will be automatically fetched from the Ext. Material Cost field.
8. Finally, click “Add” to save this record or press “Cancel” to discard the entries.
8.2.1.6 Screen Fields Description: Routing Tab
Routing:
The BOM entry screen is enabled with a new tab labeled as Routing. This tab is visible on
BOM Entry Screen when routing check is implemented at BMM Setup screen. It provides
us with an ability to add routing to a particular BOM.
Doc. No. F/DV/15
Rev.No.
Date
BatchMaster Software Inc.
BMM User Manual
Screen Fields Description:
Routing ID: This field indicates the standard routing ID.
Lot Size: Lot size indicates the base quantity for which routing is applied.
Routing Quantity: This value is the quantity to which routing applies.
Seq. No: This field indicates the sequence number for the defined routing lines.
Operation No: This field indicates the automatically generated operation number in the
multiple of 10.
Work Center ID: This is the Work Center Id for the routing line.
Machine ID: This is the machine associated with the work center which is selected for
the routing line.
Setup Time: This value is the amount of time taken to set up the Machine for
performing the operation. The Setup time is applicable to the lot that will be
manufactured, and not to one unit of the item.
Run Time: This value is the time taken for the completion of the operation on the
„Routing Quantity‟ number of units of the item. It is expressed in hours and minutes.
Doc. No. F/DV/15
Rev.No.
Date
BatchMaster Software Inc.
BMM User Manual
Move Time: This is the amount of time an item spends in moving from the previous
Work Center to the current Work Center. It is expressed in hours and minutes.
Queue Time: This is the amount of time an item spends in queue before the Work
Center becomes available for the lot. It is expressed in hours and minutes.
Wait Time: This is the amount of time an item has to wait before the Work Center is
available for operation. It is expressed in hours and minutes.
Other Time: The value in this field is any other time that an item has to spend before
operation on the Work Center is started.
Line Text: This is a text field for information regarding the Routing line.
Total Labor/Machine Cost: This field displays the total labor and machine cost for all
the BOM routing steps.
8.2.1.7 Steps to apply Routing to a BOM
1. Enter the unique routing id.
2. Specify the lot size and routing quantity.
3. In the grid below, the sequence number and operation numbers are fetched
automatically
4. Select the Work center ID and machine ID by clicking their respective lookups.
5. Enter time for all the available time fields.
6. Enter the line text, if needed
7. Further to add more routing lines click on the next line and press the update button to
update the record.
8. Finally, Click OK to save and exit.
8.2.1.8 GoTo
The following are the special functions provided:
SOP: Through this button, you can view the SOPs associated with this BOM using the
BMM Setup screen.
Doc. No. F/DV/15
Rev.No.
Date
BatchMaster Software Inc.
BMM User Manual
Release BOM: This option enables you to release the BOM. Once you select this option
a message will be prompted as “BOM released”. The status of the BOM will change to
REL.
Doc. No. F/DV/15
Rev.No.
Date
BatchMaster Software Inc.
BMM User Manual
Inactivate BOM: This option enables you to make the BOM inactive. The Inactive status
indicates when the BOM is no longer required. Once you select this option, then a
message will be prompted as „BOM inactivated‟. The status of the BOM will change to
INACTIVE.
Toggle Units: This option enables you to toggle the units associated with the item.
Having focus on the item and toggling this button enables you to change the units
associated with the item.
Doc. No. F/DV/15
Rev.No.
Date
BatchMaster Software Inc.
BMM User Manual
8.2.2 BOM Explosion
The BOM Explosion screen enables you to view the BOM hierarchy for a set of BOM
items. This screen identifies all the BOM components associated with a finished good or a
range of finished good. Let us say that you want to know the details associated with the
item IM1. Once you select and process this item, then the details associated with this
item will be displayed. If this item has been used as an intermediate in the preparation
of any particular finished good, then those details also will be displayed.
Doc. No. F/DV/15
Rev.No.
Date
BatchMaster Software Inc.
BMM User Manual
8.2.2.1 Screen Fields Description
BOM Explosion: The BOM Explosion option enables you to view the BOM hierarchy of
the selected items.
Where Used: This option enables you to view the complete details as in which all
formulas it has been used.
Single Level: The Single Level option enables explodes the BOM just one level deep
meaning to say that only the details of the top level are displayed.
Multiple Level: Once you select this option, then the multi level in the hierarchy
associated with the BOM item will be displayed.
Item From: This field is the filter criteria used to select the lower limit from the range of
items available. Using the lookup available near the field you will be able to select this
item.
Item To: The Item To field is the filter criteria used to select the upper limit from the
range of items available. Using the lookup available near the field, you will be able to
select this item.
Warehouse From: This field is the filter criteria used to select the lower limit from the
range of warehouse available. Using the lookup available near the field, you will be able
to associate this warehouse.
Warehouse To: The warehouse To field indicates the filter criteria used to select the
upper limit from the range of warehouse available. Using the lookup available near the
field, you will be able to select this warehouse.
Process: Click this button to navigate to another window that provides an exploded view
of the selected item-warehouse combination.
Cancel: Click this button to discard the entered entries, if any, and close the BOM
Explosion window.
8.2.2.2 Steps to process the BOM Explosion
1. Select the “BOM Explosion” screen in Bill of Materials. The BOM Explosion screen
will be displayed as shown.
2. Select the option criteria as BOM Explosion
3. By default the option selected is Single Level. If required change the option to
Multi Level.
4. Select the range of items using the lookup available near the Item From and To
fields.
5. Next, associate the related Whse using the lookup available near the Whse From
and To fields.
6. Finally click Process. Once you click process, then the BOM Explosion screen will
be displayed as shown with the expanded view of the selected item.
Doc. No. F/DV/15
Rev.No.
Date
BatchMaster Software Inc.
BMM User Manual
8.2.3 Screen Fields Description: BOM Explosion Window
There are two options provided in the top portion of the screen. These are:
Show data of All children of selected Item: In case you select this option, then the
all constituents associated with the selected items are displayed.
Doc. No. F/DV/15
Rev.No.
Date
BatchMaster Software Inc.
BMM User Manual
Show data of immediate children of selected item: In case you select this option,
then the immediate constituents associated with the selected item will be displayed.
Fields on the grid
: All the fields in the grid are read-only.
Item No.: This is the item key for this line item.
WHse: This is the associated Location for the line item.
UsedInFormula: This displays the formula in which this line item is used.
MadeFromFormula: This displays the formula using which this line item is made.
Fillln: This displays the Unit of Measure of Fill Level in System Weight or System
Volume.
MakeBuy: This indicates whether this line item is Manufactured or Purchased.
QtyRequired: This is the quantity of the material required to make one Stock UOM of
the Top Assembly Item.
Doc. No. F/DV/15
Rev.No.
Date
BatchMaster Software Inc.
BMM User Manual
StockUOM: This displays the stock unit of measure applicable to the top assembly item
and the associated components.
StdCost: This displays the Standard Cost of the Top Assembly Item and the
components.
AvgCost: This displays the Average Cost of the Top Assembly Item and the components.
Type: This indicates whether this line item is a Finished Good, Intermediate, Raw
Material or By-product.
Status: This is a read-only field. This displays the status of production BOM. It can be
any of the following three types:
New
Released
Inactive
Parent Item: This displays the parent item to which the component is associated.
Parent_Warehouse: This displays the location for parent item to which the component
is associated.
Expand Whole Tree: Click this button to expand the entire tree in one go. This would
expand all the Finished Good (denoted as FG), Intermediates (Denoted as IN) and
Packaging (denoted as PK) lines together for all the BOMs.
Collapse Whole Tree: Clicking this button would collapse the entire tree together in
one go.
Doc. No. F/DV/15
Rev.No.
Date
BatchMaster Software Inc.
BMM User Manual
8.2.3.1 Steps to Process the BOM Explosion using the “where
used” option
Doc. No. F/DV/15
Rev.No.
Date
BatchMaster Software Inc.
BMM User Manual
1. In the BOM Explosion screen, select the option as Where Used.
2. By default the option selected is Single Level. If required change the option to
Multi Level.
3. Select the range of items using the lookup available near the From and To fields.
4. Next associate the related Warehouse using the lookup available near the
Warehouse From and To fields.
5. Finally click Process. Once you click process, then the BOM Explosion screen will
be displayed.
8.2.4 BOM Report
The BOM Report screen defines a way to generate a report showing the Bill of Material
components associated with a specific formula or a range of formulae. With the help of
this screen, you can classify the top assembly items, assembly types, and status of the
BOM components associated with the formulas. This can be helpful when you want to
know which formulas go with the available BOM components.
Doc. No. F/DV/15
Rev.No.
Date
BatchMaster Software Inc.
BMM User Manual
8.2.4.1 Screen Fields Description
Top Assembly Item
From: This field determines the lower limit of the range of Top Assembly item for which
the BOM Report is to be viewed. Leaving this field blank is same as selecting the first
available item from the list.
TO: This field determines the upper limit of the range of Top Assembly item for which
the BOM Report is to be viewed. Leaving this field blank is same as selecting the last
available item from the list.
Location
From: This field determines the lower limit of the range of Whses for the item for which
the BOM Report is to be viewed. Leaving this field blank is same as selecting the first
available Whse from the list.
TO: This field determines the upper limit of the range of Whses for the item for which
the BOM Report is to be viewed. Leaving this field blank is same as selecting the last
available Whse from the list.
Formula
From: This field determines the lower limit of the range of formulas for which the BOM
Report is to be viewed. Leaving this field blank is same as selecting the first available
formula key from the list.
To: This field determines the upper limit of the range of formulas for which the BOM
Report is to be viewed. Leaving this field blank is same as selecting the last available
formula key from the list.
Doc. No. F/DV/15
Rev.No.
Date
BatchMaster Software Inc.
BMM User Manual
Assembly Type: This field determines the assembly type for which the report is to be
generated. You may choose one of All, Finished Good, Intermediate or Assembly.
Status: The report generated would be for the BOMs with the specific status selected
here.
Report Path: This is the default path where the report would be saved.
8.2.4.2 Generating a BOM Report
Following are the steps required for generating a Multi Level Where Used Ingredient
report:
1. Complete the Top Assembly Item-Whse combination(s) From and To range using
the lookup buttons next to the fields.
2. Complete the Formula From and To range using the lookup buttons next to the
fields.
3. Select the Assembly Type as Finished Good, Assembly or Intermediate.
4. Select the Status as New, Released or Inactive.
5. Click the OK button to create the report.
Doc. No. F/DV/15
Rev.No.
Date
BatchMaster Software Inc.
BMM User Manual
8.3 Batch Entry
This screen is used to create batches for production. Batch Number can be generated
automatically or entered manually for every new order. Status „NEW‟ is assigned to
orders at the time of creation. The following types of batches can be created:
1. Mix: Intermediates and Finished Goods can be made in this type of batch. This
type of a batch requires an associated formula.
2. Fill: Only Finished Goods can be made in this batch. This type of a batch requires
an Intermediate Key.
3. Assembly: Only Finished Goods can be made in this batch. This type of a batch
requires an associated Assembly BOM key.
Multiple Finished Goods, that utilize the same formula or Assembly BOM key, can be
created in a single batch.
8.3.1 Screen Fields Description
Batch Number: Field enables user to specify the Batch Number. If not specify the Batch
Number, then it is auto generated.
Batch Status: Field displays the status of the batch. Batches with „NEW‟ status can only
be modified via this screen.
Doc. No. F/DV/15
Rev.No.
Date
BatchMaster Software Inc.
BMM User Manual
Batch Type: Field indicates the type of the batch. Using the drop down menu, user can
select the type as:
1. Mix: The Mix type of batch includes formulas and yields one or more
intermediates or finished goods.
2. Fill: The Fill type of batch includes an intermediate and includes one or more
finished goods.
3. Assembly: The Assembly type of batch uses Assembly Bill of Material and has no
formula associated with it.
Formula Key: Field displays the formula associated with the Batch. It is not mandatory
to select the Formula Key before entering the line items. When an item key is selected,
the associated formula key gets defaulted.
Warehouse: Field displays the warehouse associated with the end item being produced.
Start Date: Field displays the date of batch commencement. By default take value as
the server date. User can change the default date with the drop down available at this
field.
Due Date: Field displays the date on which the production of the batch is scheduled to
complete. The actual production of this batch is allowed to complete on a different date.
Start Time: Field displays the time of batch commencement.
Due Time: Field displays the time on which the production of this batch is scheduled to
complete.
Revision Number: Field displays the revision number associated with the formula. On
selecting the Formula Key its value automatically gets inserted.
Allocate By Due Date: Checking this option calculates the start date according to the
process cell assigned.
Process Cell Allocation: Clicking this button displays the process cell allocation window
displaying the Day wise, week wise and month wise allocation of various process cells to
this batch. Thus allowing user to track which all process cells are allocated for this batch
on different days, week and month.
Additional Information:
Process Cell for Top Item: Field displays the Process Cell associated with the batch.
User can select the Process Cell with the drop down available at this field.
Draw From Location: All materials (raw materials as well as packaging items) for this
batch will be issued only from this Whse.
Post To Location: Field displays the warehouse to which the end item(s) will be posted.
Customer Key: Field refers to the customer associated with the batch. User can select
the Customer Key with the drop down available at this field.
Doc. No. F/DV/15
Rev.No.
Date
BatchMaster Software Inc.
BMM User Manual
Sales Order Number: Field displays the Sales Order number associated with the batch.
User can select the Sales Order Number with the drop down available at this field.
Enter Finished Goods:
Order Weight: Field displays the total order weight calculated on the basis of the order
quantities of all the Items specified at the grid. The Order Weight for an Item is
calculated as follows:
1. If the Bill of Material for the Item is of Finished Good type, then,
a
If the Fill Level of BOM is specified in Weight, then the Order Weight is
determined by multiplying the Fill Level of BOM with the Order Qty in Stock
UOM.
b
If the Fill Level of BOM is specified in Volume, then the Order Weight is
determined by multiplying the Order Volume with the Density of the item. The
Order volume is determined by multiplying the Fill Level of BOM with the
Order Qty in Stock UOM. The Density is taken from the Formula.
2. If the Bill of Material for the Item is Intermediate type, then the Order Weight is
determined by multiplying the ordered Quantity (in Stock UOM of the Item) with
applicable conversion factor for converting the Stock UOM to the System Weight
UOM.
Order Volume: Field displays the total order volume calculated on the basis of the order
quantities of all the Items specified at the grid. The Order Volume for an Item is
calculated as follows:
1. If the Bill of Material for the Item is of Finished Good type, then,
a. If the Fill Level of BOM is specified in Volume, then the Order Volume is
determined by multiplying the Fill Level of BOM with the Order Qty in Stock
UOM.
b. If the Fill Level of BOM is specified in Weight, then the Order Volume is
determined by dividing the Order Weight with the Density of the item. The
Order Weight is determined by multiplying the Fill Level of BOM with the
Order Qty in Stock UOM. The Density is taken from the Formula.
2. If the Bill of Material for the Item is Intermediate type, then the Order Volume is
determined by multiplying the Ordered Quantity (in Stock UOM of the Item) with
applicable conversion factor for converting the Stock UOM to the System Volume
UOM.
Batch Weight: Field displays the total Batch Weight calculated on the basis of the order
quantities of all the Items specified at the grid. The Batch Weight is generally larger than
the Order Weight to accommodate the Formula Loss Constant, the Formula Loss Factor,
the Formula Line Loss and any byproducts produced by the formula.
Batch Volume: This is the total Batch Volume calculated on the basis of the order
quantities of all the Items specified at the grid. The Batch Volume for an Item is
calculated as follows:
If the Bill of Materials for the Item is Finished Good type, then the Batch Volume is
determined by dividing the Batch Weight with the Formula Density.
Doc. No. F/DV/15
Rev.No.
Date
BatchMaster Software Inc.
BMM User Manual
1. If the Bill of Material for the Item is Intermediate type, then the Batch Volume is
determined by dividing the Batch Weight with the density. This density is equal
to: (the conversion factor for converting the Stock UOM to the System Weight
UOM) / (the conversion factor for converting the Stock UOM to the System
Volume UOM).
Item key: Field refers to the item for which the batch is being created.
Whse: Field indicates the warehouse associated with the selected item.
Quantity to Produce: Field indicates the Quantity of the item to be produced.
Unit: Field refers to the Unit of the selected item.
SO Number: Field displays the Sales Order Number for the selected item.
Customer: Field displays the customer for whom the batch is being created.
8.3.2 Key Operations
8.3.2.1
Creating a Batch
1. Specify the batch number in the Batch Number field. There are two options
available. User can either specify the batch number manually or this will be auto
generated.
2. For a new Batch the default value for Batch Status is „New‟.
3. Select the type of the batch using the drop down available in the Batch Type field
as one of the following:
a. Mix
b. Fill
c. Assembly
2. Further, if the user specifies Batch Type as Mix then he needs to specify Formula
key with Whse, if chooses Batch Type as Fill then need to specify intermediate
key with Whse & if specify Batch type as Assembly then should specify Assembly
key with Whse. However, it is not mandatory to do so. On selecting the Item, the
desired information will be defaulted automatically on this field.
3. Specify the Start and Due dates using the drop down available in the respective
fields.
4. Next is the optional Additional Information portion of the screen. Select the
Process cell, Draw From Whse, Post To Whse, Customer Key, Sales Order Number
using the lookup available near the respective fields.
5. Select the Item No. using the lookup available near the field.
6. On selecting the Item Key, the related Whse will be automatically fetched in the
Whse field. If the Formula Key is not selected before, the desired key gets
defaulted on the „Formula Key‟ field.
7. Specify the quantity to produce.
8. On selecting the Item No. the Unit Fill Level and Fill type associated with the item
will be automatically fetched in the respective field.
Doc. No. F/DV/15
Rev.No.
Date
BatchMaster Software Inc.
BMM User Manual
9. Select the S.O. number using the lookup available near the field if require.
10. Further select the customer using the lookup available near the field.
11. Based on the input data the Order Weight, Order Volume, Batch Weight and
Batch Volume fields will be calculated as on.
12. Click Add.
8.3.3 GoTo
Goto Batch Ticket: Clicking this button displays this batch on the „Batch Ticket‟ screen.
Close Batch: Clicking this button displays this batch on the „Batch Close‟ screen.
Doc. No. F/DV/15
Rev.No.
Date
BatchMaster Software Inc.
BMM User Manual
8.4 Batch Ticket
Screen provides a way to modify batches that are not yet closed. Using this screen one
can:
Issue materials.
Hold a batch.
Modify raw materials, byproducts, finished goods or intermediate items.
Make various other changes to the batch.
Doc. No. F/DV/15
Rev.No.
Date
BatchMaster Software Inc.
BMM User Manual
8.4.1 Screen Fields Description: Header
Lookup Criteria: This is a filter criterion. It is used to filter the batches if you want to
find Batches of a particular status. E.g.: Selecting the Lookup Criteria as Closed and New
will only display the batches of „Closed‟ and „New‟ status on clicking the „Find‟ button.
Batch Number: Displays number associated with this Batch.
Batch Type: Read only field displaying the type of Batch as Mix, Fill or Assembly Type.
Batch Status: Displays the status of a Batch, can be one of New, Cancelled, Hold, or
Issued.
Issue/Allocate Date: Displays the date on which the Allocate or Issue operation took
place last time.
Formula key: Displays the Formula Key or Intermediate Key or Assembly Key
associated with this Batch.
Warehouse: Displays the warehouse allied with the Intermediate Key or the Assembly
Key of this Batch.
Revision Number: Displays the version number of the selected formula which is being
used to produce the selected batch.
Size RM by FG Posted: In case the batch is partially closed without issuing the raw
materials, clicking the button sizes the raw material quantities based on the finished
Doc. No. F/DV/15
Rev.No.
Date
BatchMaster Software Inc.
BMM User Manual
good quantity posted. Thus updates the “Actual Qty” field value on the Formula Tab of
the screen.
8.4.2 Screen Fields Description: Batch Information Tab
Scheduled Start Date: Displays the date on which the Batch is scheduled for
production, along with time. The actual date of production may differ from this date. This
field gets default value from the Batch Entry screen, which can be modified. The entered
date can be a date earlier than the Server date.
Scheduled End Date: Displays the date on which the batch is scheduled to be closed
along with the time. The actual closing date of the batch may differ from this due date.
When a batch is created, this date gets default value from the Batch Entry screen. This
date can be modified while the batch has not been closed.
Order Weight: Displays the total order weight calculated on the basis of the order
quantities of all the Items specified at the Batch Entry Screen.
Order Volume: Displays the total order volume calculated on the basis of the order
quantities of all the Items specified at the Batch Entry Screen.
Batch Weight: Displays the quantity of Raw Materials that have been consumed for this
batch.
Batch Volume: Displays the volume of Raw Materials that have been consumed for this
batch.
Doc. No. F/DV/15
Rev.No.
Date
BatchMaster Software Inc.
BMM User Manual
Produced Weight: Display the weight of the Raw Material that have to produce by this
batch.
Produced Volume: Display the volume of the Raw Material that have to produce by this
batch.
Batch Ticket Printed: Read only field which displays the date and time when this batch
ticket was last printed. Field remains blank if the batch ticket has not been printed
Estimated RunTime: Field is associated with Batch type. In case have selected the
Batch Type as Batch with Runs, then need to associate the Estimated Run Time in this
field.
Process Cell: Field is associated with the type of machine required to process this
batch.
Customer Key: Displays the Customer associated with this batch.
Sales Order Number: Displays the Sales Order Number associated with the customer.
Actual Start Date: Field displays the actual commencement date of the production of
the batch. This may be different from the scheduled start date.
Actual End Date: Field indicates the actual date on which the production for this batch
has been completed.
Density Override: Field enables override the previous mentioned density.
Theoretical Density: Displays the density of the formula as per the formula entry
screen.
Description: Displays the description of the formula which has been used by this batch.
Notes: Field indicates the comments that have been maintained with this batch.
Doc. No. F/DV/15
Rev.No.
Date
BatchMaster Software Inc.
BMM User Manual
8.4.3 Screen Fields Description: Formula Tab
When a Batch is created, the default values at this Tab are taken from the Formula Entry
Master of the Formula being used by this batch. The Line items for the Formula may be
altered on this tab.
The Formula Tab is render inoperative for an Assembly Type of Batch.
Select: Checking this box selects the line for „Issue‟ operations.
Line Type: Field can have Material, Labor, Boilerplate or Text type of value. When a
batch is created the values are saved and can be modified.
Item No.: Field stores the value corresponding to the option selected at the „Line type‟
field. These values are saved when a batch is created and can be modified.
1. If the Line Type is Material then an ingredient is entered. Clicking the lookup at
this field it displays all Item Whses that have Active status.
2. If the Line Type is Labor then a Labor Key is entered. Clicking the lookup at this
field displays the Labor/Additional Cost keys.
3. If the Line Type is Boilerplate then a Boilerplate Key is entered. Clicking the
lookup at this field displays the Boilerplate Instructions.
4. This field brings to a halt when the Line Type is Text.
Doc. No. F/DV/15
Rev.No.
Date
BatchMaster Software Inc.
BMM User Manual
Description: If the selected option at the Line Type field is „Material‟, then this field
contains the account of the raw material selected. For all other Item Types, this read
only field remains vacant.
Whse: Read-only field which display the associated warehouse of the Raw material
selected at the Item No. field.
Text: Field stores the Description or text associated with the “Item No.” on the same
row.
1. When the „Line Type‟ is Material, this field stores Item depiction.
2. When the „Line Type‟ is Labor, this field stores labor key depiction.
3. When the „Line Type‟ is Boilerplate, this field stores boilerplate depiction.
4. When the „Line Type‟ is Text, this field stores user-defined text.
Quantity Required: Field displays the quantity of the Labor Type (in hours) or of the
Material Type (expressed in the UOM displayed at the UNIT field).
Actual Quantity: Field displays the quantity of the selected Labor key or the Material
key to be actually consumed by this Batch. For a Material Line Type, this quantity is
interpreted in the UOM at the UNIT field.
Quantity Used: Field displays the quantity actually used in the production of this Batch.
The quantity actually used is displayed here after this batch has been closed and when
the screen refreshed. For a Material line, this quantity is interpreted in the UOM at the
UNIT field.
Stock Unit: Field displays the unit for the various quantity fields for a Material Line Type
on that row. The value can be toggled using the Toggle Unit button on the toolbar.
Overhead: Field displays the Overhead Key associated with the Material or Labor Line
Type item. The value is used to calculate the costs associated with production of the end
item produced by the formula.
Loss: Displays the „line loss‟ for the specific material line type item in the formula. The
loss may occur while bringing the material to shop floor. Line loss is entered as a
fraction, not as a percentage.
Status: Field displays the status of the line type item (Raw material). Not applicable for
any Line Type other than „Material‟. It could be one of the following:
a. New: The line status is displayed as „New‟ if no other status is applicable.
b. Issued: The line status becomes „Issued‟ if the material has been issued using the
“Issue” button on the toolbar.
c. Closed: The line status becomes „Closed‟ when the batch status becomes closed.
Group ID: Field displays the Group ID of the line for the purpose of mix control via
utilizing a customized report (.rpt) file for printing Batch Tickets.
Mixing of materials can be better organized via Group ID‟s. Selected materials may be
premixed before being combined with the remaining ingredients. Formula lines, that
Doc. No. F/DV/15
Rev.No.
Date
BatchMaster Software Inc.
BMM User Manual
need to be combined to make a Premix, will all share the same Group ID. Each premix
has its own Group ID. The various premixes are then combined with any remaining
ingredients to make the Final Mix. The largest Group ID indicates the Final Mix. The
totals of weight and volume for each premix can be printed utilizing the customized
report (.rpt) file for printing Batch Tickets. A specialized setup is available for such
customized report.
8.4.4 Screen Fields Description: Finished Goods Tab
Select: Checking this box selects the line for the „Issue‟ operations.
FG#: Field displays the number of Finished Goods used with in the formula.
Item No.: Field displays the Item number associated with the item that is to be
produced from this batch. When a batch is created, the items valued defaulted here from
the Batch Entry screen. The items can be altered via the lookup at this field. Item No.s
can be appended to the grid as:
1. All the Finished Goods as well as the intermediates that use the selected formula
in the case of a Mix type batch.
2. All the Finished Goods using the formula associated with the selected
Intermediate Key in the case of a Fill type batch.
Description: Field consist the description of the item.
Whse: Field consist the warehouse associated with the item.
Doc. No. F/DV/15
Rev.No.
Date
BatchMaster Software Inc.
BMM User Manual
Standard Quantity: Field displays the standard quantity needed as defined at the
formula Entry Screen.
QuantityToReceipt: Field displays the quantity of the finished good expected to be
produced from this batch, expressed in stock unit.
Quantity Produced: Field displays the quantity actually produced upon the completion
of the batch. The quantity actually produced is displayed here after this batch has been
part closed or closed and the screen refreshed. The quantity is interpreted in the UOM of
this row in the adjacent column.
StockUnit: The Quantity Produced is interpreted in this unit. This unit can be toggled
using the „Toggle Units‟ button on the toolbar. The unit can be toggled to any of the units
for which a unit conversion from the Stock unit exists.
Status: Field displays the status of the line (end item). The line status can have value as
„New‟, „Allocated‟ or „Closed‟.
BOM Information:
Fill Level: Field displays the Fill Level of the selected finished good as specified on the
Bill of Materials screen. Changing the Fill Level changes the Order weight. Any change in
the Order Weight requires resizing of the batch. A message prompts to this effect when
the user changes the Fill Level. Resizing of the batch can be done using the „Size Batch‟
button on the toolbar.
The field becomes immobilize if the selected end item is an Intermediate item or an
Assembly item.
Fill UOM: Read-only field which displays the Fill Unit of Measurement (System Weight
UOM or System Volume UOM as specified on the Bill of Materials) of the selected
Finished Good.
The field becomes immobilize if the selected end item is an Intermediate item or an
Assembly item.
SO Number: Field displays the sales order number associated with this Finished Good
which can be altered if require.
Customer key: Field displays the customer associated with this finished good. This
customer can be changed here.
Comment Line 1: User may enter description or any comment about the selected end
item.
Comment Line 2: User may enter description or any comment about the selected end
item.
Select: Checking this box will select the line fro issue or allocation.
FG#: Displays the Finished good number for which this BOM line exist.
Doc. No. F/DV/15
Rev.No.
Date
BatchMaster Software Inc.
BMM User Manual
Item No.: Displays the item code of the BOM Item associated with the selected finished
good.
Description: This is the description of the item code.
Whse: This is the location of the BOM item.
Quantity Required: This is the quantity of the BOM item required to produce the
required quantity of finished good as per the formula.
Quantitytoissue: Displays the actual quantity of the BOM item required to be issued to
produce the required quantity of finished good.
QtyUsed: This is the quantity of the BOM item actually used in production of finished
good. It is defaulted after partial or full close.
StockUnit: This displays the unit in which this BOM item is stocked in Inventory.
Status: Field displays the status of the line (end item). The line status can have value as
„New‟, „Allocated‟ or „Closed‟.
Group ID: Field displays the Group ID of the line for the purpose of mix control via
utilizing a customized report (.rpt) file for printing Batch Tickets.
Mixing of materials can be better organized via Group ID‟s. Selected materials may be
premixed before being combined with the remaining ingredients. Formula lines, that
need to be combined to make a Premix, will all share the same Group ID. Each premix
has its own Group ID. The various premixes are then combined with any remaining
ingredients to make the Final Mix. The largest Group ID indicates the Final Mix. The
totals of weight and volume for each premix can be printed utilizing the customized
report (.rpt) file for printing Batch Tickets. A specialized setup is available for such
customized report.
Doc. No. F/DV/15
Rev.No.
Date
BatchMaster Software Inc.
BMM User Manual
8.4.5 Screen Fields Description: ByProducts Tab
Once a batch is created, the default values are obtained from the Formula Entry screen
of the Formula being used by this batch. The byproduct(s) that are generated by the
Formula may be modified on this tab for a Batch whose Status is „New‟.
Select: Checking the box selects the line for „Issue‟ operation.
Item No.: Field displays the Item number associated with the item that will be the By
Product of this batch.
Description: Field displays the description of the By Product.
Whse: Field displays the warehouse associated with the Item (Byproduct).
Quantity Ordered: Field displays the ordered quantity of the By Product. This quantity
is in the proportion with the ordered quantity of the item.
QuantityToIssueDispUOM: Field displays the quantity of the material, expressed in
stock unit that is to be issued.
Quantity To Produced: Field displays the expected produced quantity of the By Product
through this item.
Quantity Produced: Field displays the quantity of the By Product actually produced
through this batch. Reflected value can be seen when the batch has been closed and the
screen refreshed.
Doc. No. F/DV/15
Rev.No.
Date
BatchMaster Software Inc.
BMM User Manual
Unit: Field expresses the unit of the „Quantity Required‟ and the „Quantity Ordered‟ field.
Overhead: Field displays the Overhead Key associated with the Byproduct.
Status: Field displays the status of the line (By Product). It can have any solitary value
as:
New: Displayed when the Byproduct has not been allocated yet or it has been deallocated after being allocated.
Closed: Displayed when the batch status turn out to be closed.
By Product Weight (KG): Field displays the sum of the „Qty Ordered‟ of the By
Products expressed in terms of System Weight Unit of Measurement.
By Product Volume (LT): Field displays the sum of the „Qty Ordered‟ of the By
Products expressed in terms of System Volume Unit of Measurement.
8.4.6 Screen Fields Description: Cost Tab
If this is a Mix type batch, the Cost tab displays the Fixed, Setup and Variable costs
associated with the formula being used for manufacturing this batch.
For the Fill and Assembly type batches, there is no formula cost allied with the batch.
However, the user may associate:
1. Fixed, Setup and Variable costs with the Fill type of batches.
Doc. No. F/DV/15
Rev.No.
Date
BatchMaster Software Inc.
BMM User Manual
2. Fixed and Setup costs with Assembly type of batches. Variable cost is not
applicable to Assembly type of batches.
Setup Cost
Setup Costs are the one-time costs that include, for instance, setting up the plant,
machinery and raw materials for production.
Hours: Field displays the number of the hours for which the setup costs would be
incurred on this batch which can be modified. The setup cost is fetched from the Formula
associated with this batch. The value is used to calculate the costs associated with
production of the end item produced by the formula.
Labor Key: Field displays the Labor Key which the setup costs would be acquire with
this batch and whose value can be altered.
Amount: Read-only field displays the cost amount for formula Labor / Additional key of
the setup costs for the formula. The value automatically gets pull in when the associated
labor key is entered. The value is used to calculate the costs associated with production
of the end item produced by the formula.
Overhead Key: Field displays the Overhead Key of the setup costs for the formula. The
value is used to calculate the costs associated with production of the end item produced
by the formula. This value can be tailored.
Type: Overhead Key type for fixed cost can be one of the following:
„$‟ Type: Read only field, determines that the overhead amount is a numeric
value. It is entered automatically when the associated overhead key is selected.
It is entered automatically when the associated overhead key is selected. This
value is used to calculate the costs associated with production of the end item
produced by the formula. The value of Hours on this line is multiplied by the
Factor of the Overhead Key to calculate the cost contribution of this overhead.
„%‟ Type: Read only field, determines that the overhead amount is a percentage
of the Labor/additional key. This value is entered automatically when the
associated overhead key is entered. This value is used to calculate the costs
associated with production of the end item produced by the formula. The value of
Hours on this line, multiplied by the Amount of the Labor Key, is multiplied by the
Factor of the Overhead Key of the same line to calculate the cost contribution of
this overhead.
Factor: If the Overhead type is „$‟, this factor acts as the Overhead Amount. But, if the
Overhead Type is „%‟, this factor is used to calculate the Overhead amount. The value is
entered automatically when the associated overhead key is entered. This is a read-only
field.
Fixed Cost
These are the costs that are incurred every time a batch is produced such as electricity
bill, land rent etc. This is the basic cost that will be always applied whenever a batch is
created.
Doc. No. F/DV/15
Rev.No.
Date
BatchMaster Software Inc.
BMM User Manual
Hours: Field displays the number of hours for which the fixed costs would be incurred
on this batch which can be modified. The fixed cost is fetched from the formula
associated with this batch. This value is used to calculate the costs associated with
production of the end item produced by the formula.
Labor Key: Field displays the Labor Key of which is used to calculate the costs
associated with production of the end item produced by the formula, whose value can be
tailored.
Amount: Field displays the cost amount for formula Labor / Additional key of the fixed
costs for the formula associated with this batch. The value is used to calculate the costs
associated with production of the end item produced by the formula.
Overhead Key: Field displays the Overhead Key of the fixed costs for the formula
associated with this batch. The value is used to calculate the costs associated with
production of the end item produced by the formula, whose value can be tailored.
Type: Overhead Key type for fixed cost can be one of the following:
„$‟ Type: Read only field, determines that the overhead amount is a numeric
value. It is entered automatically when the associated overhead key is selected.
This value is used to calculate the costs associated with production of the end
item produced by the formula. The value of Hours on this line is multiplied by the
Factor of the Overhead Key to calculate the cost contribution of this overhead.
„%‟ Type: Read only field, determines that the overhead amount is a percentage
of the Labor / Additional key. It is entered automatically when the associated
overhead key is entered. This value is used to calculate the costs associated with
production of the end item produced by the formula. The value of Hours on this
line, multiplied by the Amount of the Labor Key, is multiplied by the Factor of the
Overhead Key of the same line to calculate the cost contribution of this overhead.
Factor: If the Overhead type is „$‟, this factor acts as the Overhead Amount. But, if the
Overhead Type is „%‟, this factor is used to calculate the Overhead amount. The value is
entered automatically when the associated overhead key is entered. This is a read-only
field.
Variable Cost
Variable Costs are the costs that fluctuate with the quantity produced. A weight slab
needs to be defined for it.
Maxwt: Field displays the value of the Max Weight for this row of the variable costs for
the formula.
The variable labor cost is dependent on two factors: the total batch weight, and the
applicable labor rate for that batch weight. The variable labor is defined for a particular
“slab” of batch weight. The Max Weight is the upper limit of the weight slab to which a
particular row of the variable costs is applicable. The lower limit of batch weight for a
slab is determined based on the max weight of the preceding row. For example, suppose
that the Max weight for the first row is 100, and the max weight of the second row is
500. In such a case, the variable cost will be based on the first row if 0 < Batch Weight
≤ 100; whereas the variable cost will be based on the second row if 100 < Batch Weight
≤ 500.
Doc. No. F/DV/15
Rev.No.
Date
BatchMaster Software Inc.
BMM User Manual
The actual variable cost in production is determined by adding together the following:
1. Batch weight (in system weight unit) multiplied by the Amount of the Labor Key
of the applicable row.
2. If the overhead key is „$‟ type, then the Batch weight (in system weight unit) is
multiplied by the Factor of the Overhead Key of the applicable row.
3. If the Overhead Key is „%‟ type, then the Batch weight (in system weight unit)
multiplied by the Amount of the Labor Key of the applicable row multiplied by the
Factor of the Overhead Key of the same row.
Labor Key: Field displays the Labor Key of the variable costs for the formula. The value
is used to calculate the costs associated with production of the end item produced by the
formula.
Amount: Field displays the cost amount for the formula Labor/Additional key of the
variable costs for the formula. This value is used to calculate the costs associated with
production of the end item produced by the formula.
Type: This field gets defaulted while selecting the Overhead Key for this line of Variable
Costs. The Overhead Key consists of two types:
„$‟ Type: Read only field, determines that the overhead amount is a numeric
value. It is entered automatically when the associated overhead key is selected.
This value is entered automatically when the associated overhead key is entered.
This value is used to calculate the costs associated with production of the end
item produced by the formula. The Batch weight (in system weight unit) is
multiplied by the Factor of the Overhead Key to calculate the cost contribution of
this overhead.
„%‟ Type: Read only field, determines that the overhead amount is a percentage
of the Labor/additional key. This value is entered automatically when the
associated overhead key is entered. This value is used to calculate the costs
associated with production of the end item produced by the formula. The Batch
weight (in system weight unit) multiplied by the Amount of the Labor Key is
multiplied by the Factor of the Overhead Key of the same line to calculate the
cost contribution of this overhead.
Overhead Key: This is the Overhead Key of the variable costs for the formula. This
value is used to calculate the costs associated with production of the end item produced
by the formula.
Factor: IF the Overhead type is „$‟, this factor acts as the Overhead Amount. But, if the
Overhead Type is „%‟, this factor is used to calculate the Overhead amount. The value is
entered automatically when the associated overhead key is entered. This is a read-only
filed.
8.4.7 Screen Fields Description: Routing Tab
Once routing is implemented, the Batch Ticket screen provides you with an additional tab
of „Routing‟. When a batch created at batch entry screen is transferred to the batch
ticket screen, and then the routing information in addition to the BOM information for
each finished good is pulled under the routing tab of Batch ticket screen.
Doc. No. F/DV/15
Rev.No.
Date
BatchMaster Software Inc.
BMM User Manual
The screen under routing tab is read only screen. It lists the finished goods in the top
grid and the routing information for the selected finished good in the bottom grid.
Finished Goods grid screen fields description
Select: It provides an ability to select the respective finished good.
FG#:
Item Code: This field indicates the item code of the finished good.
whse: This field displays the warehouse associated with the item.
Standard Qty: This field displays the standard quantity of the respective line item
Actual Qty: This field displays the actual quantity of the respective line item
Unit: This field shows the unit of measurement for the selected item.
Status: This field displays the status of the batch.
Item Routing grid screen fields description:
Seq. No: This field indicates the sequence number for the defined routing lines.
Operation. No: This field indicates the automatically generated operation number in the
multiple of 10.
Doc. No. F/DV/15
Rev.No.
Date
BatchMaster Software Inc.
BMM User Manual
Work Center ID: This is the Work Center Id for the routing line.
Machine ID: This is the machine associated with the work center which is selected for
the routing line.
Setup Time: This value is the amount of time taken to set up the Machine for
performing the operation. The Setup time is applicable to the lot that will be
manufactured, and not to one unit of the item.
Run Time: This value is the time taken for the completion of the operation on the
„Routing Quantity‟ number of units of the item. It is expressed in hours and minutes.
Move Time: This is the amount of time an item spends in moving from the previous
Work Center to the current Work Center. It is expressed in hours and minutes.
Queue Time: This is the amount of time an item spends in queue before the Work
Center
becomes available for the lot. It is expressed in hours and minutes
Wait Time: This is the amount of time an item has to wait before the Work Center is
available for operation. It is expressed in hours and minutes.
Other Time: The value in this field is any other time that an item has to spend before
operation on the Work Center is started.
Line Text: This is a text field for information regarding the Routing line specified at BOM
Routing screen.
8.4.8 Printing a Batch Ticket
1. Select a Batch number via the lookup button on the toolbar.
2. Modify the values at various tabs as required.
3. Perform various operations such as Whse of materials, issue of materials, sizing
the batch, etc. as desired.
4. If any changes have been made to the Batch Ticket, click the Save button to save
the Batch Ticket.
5. Print the Batch Ticket using the „Print batch Ticket‟ button on the toolbar.
8.4.9 Goto
Issue Checked Materials Lines: Clicking this button issues the „Actual Quantity‟ of the
selected lines and the Formula Materials. A Formula material can be selected by checking
the box for this line.
This button is enabled only if the:
1. Status of the Batch is NEW, and
2. The focus is on the Formula Tab.
Doc. No. F/DV/15
Rev.No.
Date
BatchMaster Software Inc.
BMM User Manual
Issue All Materials: Clicking this button issues the „Actual Quantity‟ of all the lines.
Doc. No. F/DV/15
Rev.No.
Date
BatchMaster Software Inc.
BMM User Manual
Select Lot #: Clicking this button helps the user to select the lots for the particular
item. Here it is to be noted that system automatically checks, the availability of a Raw
Material lot, based on its assignments to various batches. In case, there is a shortage of
required quantity i.e. stock quantity is already selected for other batches then system
restricts to select the same.
Go To Production QC: Button facilitates user to perform QC of formula ingredients.
Sometimes necessitate performing QC on formula ingredients, may be due to delay in
production of an issued batch or issue of lots close to expiry date or any such reason.
Thus, this button generates a QC order for the material lines selected at the Formula Tab
of the Batch Ticket Screen. The order generated can be seen at the Production QC
screen.
Doc. No. F/DV/15
Rev.No.
Date
BatchMaster Software Inc.
BMM User Manual
Size Batch: Any change in the Order Weight should be accompanied with a resizing of
the batch.
Doc. No. F/DV/15
Rev.No.
Date
BatchMaster Software Inc.
BMM User Manual
Clicking this button opens the „Size Batch‟ window where the user may select a sizing
criterion on the following:
Batch Weight: Option allows user to enter the Batch Weight to be achieved, and size
the batch according to the targeted Batch Weight. User can also define new loss factor
and loss constant for the batch.
Batch Volume: Option allows user to enter the Batch Volume to be achieved, and size
the batch according to the targeted Batch Volume. User can also define new loss factor
and loss constant for the batch.
Finished Goods Ordered (Order Weight): Option allows user to modify the Order
Quantity of the end items. User can also define new loss factor and loss constant for the
batch. The Batch is then sized accordingly.
% of Formula in Process: Option allows user to scale the Formula being used based
on the percentage entered on the „Size Batch‟ window. For example, entering 200% at
the „% of Formula in Process‟ field will double the „Quantity Required‟ of all the Formula
lines which in turn will double the Batch Weight.
Premix Quantity: Option allows user to scale the Batch based on the premix quantity.
For a batch to be sized by Premix Quantity, one of the following conditions must be met:
The batch has a Text type of line where “^W” (excluding the quotation marks) has been
entered in the Text column on that row. In such a case, the Premix Quantity can be
entered in the System Weight UOM. This premix quantity relates to the Material type of
lines preceding this row.
The batch has a Text type of line where “^V” (excluding the quotation marks) has been
entered in the Text column on that row. In such a case, the Premix Quantity can be
entered in the System Volume UOM. This premix quantity relates to the Material type of
lines preceding this row.
Doc. No. F/DV/15
Rev.No.
Date
BatchMaster Software Inc.
BMM User Manual
Only the first available Text row with ^W (for Premix Quantity by Weight) or ^V (for
Premix Quantity by Volume) is considered for size by Premix Quantity.
Available (Limiting) Material: When the option is selected, BatchMaster Enterprise
considers the available quantities of the raw materials and determines the limiting
material. The limiting material is the one for which the ratio of On Hand Quantity to
Required Quantity is the lowest among the various materials required for this batch. The
batch is then scaled according to the limiting material.
Availability of One Material: When the option is selected, the System allows the user
to select any of the materials and scales up or scales down the Batch on the basis of the
On Hand quantity of this Item Whse. The availability of the other materials is ignored for
this purpose.
Quantity of One Material: When the option is selected a list for all the items with their
Whse will be displayed in a grid. The System allows the user to select any material and
change the available quantity of that material and the Batch will be scaled accordingly.
Goto Batch Close: Clicking displays the batch on the „Batch Close‟ screen.
Hold: Clicking this button holds the batch until get released using the „Release Hold‟
button. Holding a batch means the production of the batch has been suspended for a
while. No operations, other than Release Hold, can be undertaken for a batch under
Hold.
Doc. No. F/DV/15
Rev.No.
Date
BatchMaster Software Inc.
BMM User Manual
Release Hold: Clicking this button releases a batch from the „Hold‟ status.
Cancel Batch: Clicking this button cancels the Batch and its status become „Cancelled‟.
A cancelled Batch can be only purged or deleted.
Doc. No. F/DV/15
Rev.No.
Date
BatchMaster Software Inc.
BMM User Manual
View Critical Items: Clicking this button generates a report showing the details of
those materials whose available quantity is less than the required quantity.
Doc. No. F/DV/15
Rev.No.
Date
BatchMaster Software Inc.
BMM User Manual
View Batch Lot Details: Clicking this button generates a report showing the lot details
of the raw materials, byproducts and finished goods.
Toggle Units: Clicking this button toggles the unit of measurement of the highlighted
Item or Formula Material or Byproduct as applicable for the selected Tab. The unit can be
toggled to any of the units for which a unit conversion from the Stock unit exists.
Doc. No. F/DV/15
Rev.No.
Date
BatchMaster Software Inc.
BMM User Manual
Go To Quick Labor Entry: Clicking the button displays the Quick Labor Entry window.
Wherein, routing information can be updated. The screen provides complete check which
is mandatory to close the batch.
Label Print: Clicking the button displays the Label Printing Selection criteria window
that allows printing the labels for the finished goods.
Doc. No. F/DV/15
Rev.No.
Date
BatchMaster Software Inc.
BMM User Manual
8.5 Batch Close
Option is used to close the particular batch. This implies that there is no more production
activity to occur in connection with the batch. When the batch is closed, there will be a
decrease in the on hand quantity of the raw material and an increase in the finished
good.
One can close a batch as soon as a master formula has been entered and the finished
goods that need to be produced have been defined.
Doc. No. F/DV/15
Rev.No.
Date
BatchMaster Software Inc.
BMM User Manual
8.5.1 Screen Fields Description: Basic Information
Basic information:
Batch Number: Field displays the associated number of the batch.
Batch Type: Field displays the type of the batch. The field entry is fetched from the
Batch Entry Screen. It can have one of the subsequent sorts:
1. Fill Type: This type of batch is created using an intermediate. Let us say that the
raw materials RM1 and RM2 are used to prepare the intermediate IM1.
Considering that the fill level specified for FG1 is 10ml. Thus this 10ml of IM1 will
be used to prepare one unit of FG1. The intermediate will be prepared and kept
ready to create the required quantity of the finished good. The BOM for this type
of batch will use the finished good type of BOM.
2. Mix Type: This type of batch is created using different raw materials and
intermediates. These raw materials and intermediates will be mixed together to
create the batch. In case user preparing a batch using an intermediate IM1 and
the raw material RM1. Thus this indicates this is a mix type of a batch.
3. Assembly Type: This type of batch is created which comprises of the sub
assembly. Let us say that 1 carton comprises of 5 bottles of finished good. Thus
the carton will be the assembly and the bottles will constitute the sub assembly.
The BOM for this type of batch will comprise of the Assembly, Sub assembly and
the Intermediate type of BOM‟s.
Doc. No. F/DV/15
Rev.No.
Date
BatchMaster Software Inc.
BMM User Manual
Batch Status: Field displays the status associated with the batch. It can have one of
the subsequent sorts:
1. New: Indicates a newly created batch.
2. Issued: Indicates that the raw material has been issued for the particular batch
so that production for the batch can commence.
3. Closed: Indicates that the batch has been closed. The batch will be closed once
production has been completed and the material has been issued to the batch
completely.
Actual End Date: When a batch is closed, the date is taken as the batch closing date.
This date is user-defined. The time can also be defined along with date.
Formula Key: Read – only field displays formula key associated with the Batch.
Revision Number: Field displays Revision number associated with the formula.
Formula Description: Field displays the description associated with the formula.
Issue/Allocate Date: Field displays date of issuing the material.
Summary
Standard Batch Cost: Field displays the estimated cost of the batch. This cost is
calculated based on the values of the Quantity Required field in Tab-5 of the Batch Ticket
screen.
Order Weight: Field displays the quantity of the finished goods that have been
consumed for the selected batch.
Batch Weight: Field displays the quantity of Raw Materials that have been consumed
for the selected batch.
Actual Batch Cost: Field displays the actual cost of the batch.
Order Volume: Field displays the volume of the finished goods that have been
consumed for this batch.
Batch Volume: Field displays the volume of Raw Materials that have been consumed for
this batch.
Usage and Yield:
Total Weight Used: This is the quantity of raw materials actually consumed, expressed
in terms of the System Weight Unit of Measurement, for the completion of the batch.
This value is defaulted after batch close. This is a read-only field.
Total Volume Used: This is the quantity of the raw materials actually consumed,
expressed in terms of the System Volume Unit of Measurement upon the completion of
the batch. This is a read-only field.
Doc. No. F/DV/15
Rev.No.
Date
BatchMaster Software Inc.
BMM User Manual
Fg. Weight Yielded: This is the quantity of the finished goods actually produced,
expressed in terms of the System Weight Unit of Measurement, when the batch is
closed. This is a read-only field.
Fg. Volume Yielded: This is the quantity of the finished goods actually produced,
expressed in terms of the System Volume Unit of Measurement, when the batch is
closed.
BP Weight Yielded: This is the quantity of the byproducts actually produced, expressed
in terms of the System Weight Unit of Measurement, when the batch is closed. This is a
read-only field.
BP Volume Yielded: This is the quantity of the Byproducts actually produced,
expressed in terms of the System Volume Unit of Measurement, when the batch is
closed. This is a read-only field.
Size RM by FG Posted: In case the batch is partially closed without issuing the raw
materials, clicking the button sizes the raw material quantities based on the finished
good quantity posted. Thus updates the “Qty To Issue” field value on the Materials Tab
of the screen.
8.5.2 Screen Fields
Packaging Tab
Description:
Finished
Goods
&
Select: Check box enables the user to part close the batch on check in. Else it is not
possible to part close the batch is no selection has been made on the rows.
Doc. No. F/DV/15
Rev.No.
Date
BatchMaster Software Inc.
BMM User Manual
FG #: Field specifies the finished good number that is being produced. This number
helps the user to correlate the BOM items within the lower grid.
Item No.: Field displays the Item associated with the formula.
Item Description: Field displays the description associated with the Item.
Whse: Field displays the warehouse associated with the Item.
Order Quantity: Field displays the quantity of the item that has been ordered.
QuantityToIssueDispUOM: Field displays the quantity of the material, expressed in
stock unit that is to be issued.
Qty Completed: Field displays the quantity that has been actually produced.
Stock Unit: Field displays the unit associated with the item.
Sub Assemby grid:
Select: Checking the box allows the user to issue the selected material line.
FG#: The number within the field indicates the finished good through which the BOM
item is associated. This field is particularly helpful while dealing with one or more FGs.
Item No.: Field displays the Item associated with the sub assembly.
Description: Field displays the description associated with the Item
Whse: Field displays the warehouse associated with the Item
Qty Required: Field displays the quantity of the item which is required.
QuantityToIssueDispUOM: Field displays the quantity of the material, expressed in
stock unit that is to be issued.
Actual Qty: Field displays the quantity that has been actually produced.
Qty Used: Field displays the quantity of the item that has been consumed.
Status: Field displays the status associated with the batch.
Group: Field displays the Group Id associated with the item.
Doc. No. F/DV/15
Rev.No.
Date
BatchMaster Software Inc.
BMM User Manual
8.5.3 Screen Fields Description: Materials Tab
Select: Check box enables the user to close or close the batch. User can also perform
lot assignment operation by checking this option.
Item No.: This is the Item associated with this Formula Material Line or BOM Line. This
is a read-only field.
Item Description: This is the description of this material as entered on the Item
Master.
Whse: This is the warehouse associated with this material.
Text: Field indicates whether the line is a Formula Material or a BOM Line.
Quantity Required: This is the required quantity of the material (expressed in the unit
displayed at the Unit field) as per the formula.
QuantityToIssueDispUOM: Field displays the quantity of the material, expressed in
stock unit that is to be issued.
Quantity Issued: This is the quantity of the material (expressed in the unit displayed at
the Unit field) actually issued. This quantity is defaulted after Batch Close.
StockUnit: This is the UOM in which the various quantities are interpreted on this row
Doc. No. F/DV/15
Rev.No.
Date
BatchMaster Software Inc.
BMM User Manual
8.5.4 Screen Fields Description: ByProducts Tab
Select: Checking this box selects the line for the „Lot Assignment‟ operation.
Item No.: Read – Only field which displays the Item No. associated with this Byproduct
Item Description: Read – Only field which displays the description of the Byproduct as
entered on the Item Master screen.
Whse: Read – Only field which displays the warehouse associated with the Byproduct.
Order Quantity: Read – Only field which displays the quantity of this byproduct that is
expected to be produced upon completion of the batch
QuantityToIssueDispUOM: Field displays the quantity of the material, expressed in
stock unit that is to be issued.
Quantity Produced: Read – Only field which displays the quantity of the byproduct
actually produced upon closure of a batch.
StockUnit: Field displays the UOM in which the various quantities are interpreted on this
row
Doc. No. F/DV/15
Rev.No.
Date
BatchMaster Software Inc.
BMM User Manual
8.5.5 Screen Fields Description: Labor and Overhead
Tab
LaborType: Field displays the labor type as one of Fixed, variable or Setup, defined on
the cost tab of the formula entry screen.
LaborCostId: Field displays the key defined on the Formula Labor/ additional cost
screen.
Hours: Field displays the labor hour‟s value as maintained on the Formula Entry screen.
Rate: This is the applicable hourly rate associated with the labor additional cost key as
defined on the Labor/ additional cost screen.
OverHeadId: This is the overhead key as entered on the formula entry screen for the
labor line.
FinishedGood: This is the specifes the finished good produced by the batch.
8.6 Key Operations
8.6.1.1 Closing a Batch
1. Select a Batch via the lookup button on the toolbar.
2. Check the box for the end items to be produced.
Doc. No. F/DV/15
Rev.No.
Date
BatchMaster Software Inc.
BMM User Manual
3. Modify the „Quantity to Complete‟ for the end items, if needed.
4. Modify the Tab-1 and Tab-3 as needed.
5. Click the „Close‟ button on the toolbar. A report is generated showing the
resulting details on the Batch Close.
8.7 Goto
Issue Selected Materials Lines: Clicking this button issues the „Actual Quantity‟ of the
selected lines and the Formula Materials. A Formula material can be selected by checking
the box for this line.
Issue All Materials: Clicking this button issues the „Actual Quantity‟ of all the lines.
Doc. No. F/DV/15
Rev.No.
Date
BatchMaster Software Inc.
BMM User Manual
Select Lot #: Clicking this button helps the user to select the lots for the particular
item. Here it is to be noted that system automatically checks, the availability of a Raw
Material lot, based on its assignments to various batches. In case, there is a shortage of
required quantity i.e. stock quantity is already selected for other batches then system
restricts to select the same.
Doc. No. F/DV/15
Rev.No.
Date
BatchMaster Software Inc.
BMM User Manual
Partial Close: Clicking this button closes the Batch partially as specified by the user.
This option allows the user to post some or all of the end items without the need to first
post any raw materials, byproducts, etc.
Note: Finished goods are posted with standard production cost irrespective of cost
method defined.
Formulas to calculate the same are as follows:
Formula used is = (Standard Formula Cost/Order Weight * Fill quantity of finished Good)
+ Standard Unit BOM Cost + Standard Unit Routing cost).
Standard Formula Cost = {Fixed Labor CostAmount + Fixed Labor OverheadAmount +
SetupLabor
Amount
+SetupOverheadAmount
+
VariableLaborAmount
+
VariableOverheadAmount} + Sum of {Line ItemLaborCost+ Line Item OverheadCost}
(for raw material and labor} + Sum of {Line Item OverheadCost} – Sum of {Line
ItemLaborCost} (where item type is By product).
Standard Unit BOM Cost = Sum of {BOM ItemLaborCost + BOM Item OverheadCost}
(For BOMs items of given FG)/Standard FG Quantity + BOM Item LaborCost+BOM Item
OverheadCost
Standard Unit Routing Cost = Sum of {Routing EstLaborCost + Routing EstMachineCost
+ Routing EstOverhead Cost} (for given FG)/Standard FG Quantity
Here Byproducts are posted by Standard or average cost (based on cost method of the
item).
Doc. No. F/DV/15
Rev.No.
Date
BatchMaster Software Inc.
BMM User Manual
Close Batch: Clicking this button closes the batch.
Doc. No. F/DV/15
Rev.No.
Date
BatchMaster Software Inc.
BMM User Manual
Go To Production QC: Button facilitates user in performing QC of formula ingredients.
Sometimes user need to perform QC on formula ingredients, may be due to delay in
production of an issued batch or due to issue of lots close to expiry date or any such
reason. Thus, this button generates a QC order for the material lines selected at the
Formula Tab of the Batch Ticket Screen. The order generated can be seen at the
Production QC screen.
Doc. No. F/DV/15
Rev.No.
Date
BatchMaster Software Inc.
BMM User Manual
View Critical Items: Clicking this button generates a report showing the details of
those materials whose available quantity is less than the required quantity.
Doc. No. F/DV/15
Rev.No.
Date
BatchMaster Software Inc.
BMM User Manual
Toggle Units: Clicking this button toggles the unit of measurement of the highlighted
Item or Formula Material or By product as applicable for the selected Tab. The unit can
be toggled to any of the units for which a unit conversion from the Stock unit exists.
Go To Quick Labor Entry: Clicking the button displays the Quick Labor Entry window.
Wherein, routing information can be updated. The screen provides complete check which
is mandatory to close the batch.
Doc. No. F/DV/15
Rev.No.
Date
BatchMaster Software Inc.
BMM User Manual
Label Print: Clicking the button displays the Label Printing Selection criteria window
that allows printing the labels for the finished goods.
Doc. No. F/DV/15
Rev.No.
Date
BatchMaster Software Inc.
BMM User Manual
Go To Batch Ticket: Clicking this button displays this batch on the „Batch Ticket‟
screen.
8.8 Super Batch Entry
This screen of BMM symbolizes the resolution of the common process-manufacturing
problem of trying to produce a batch and its low-level intermediates in a single
operation. Often, manufacturers are required to produce, in separate batches, the
intermediates used in a formula and the formulas used to create Finished Goods. With
the Super Batch group, however, one can select a formula and its associated Finished
Good and move directly to production, automatically creating the intermediate batches
needed to produce the Finished Goods. As part of the process, one can specify the use of
non-committed inventory, close either the entire super batch or individual sub-batches,
and size the super batch in various ways.
The Super Batch group makes it possible for the user to see the relationships between
the Finished Good and the Intermediates needed to produce it, providing hierarchies that
show either the descending components of the super batch as it moves from
intermediates to Finished Good or ascending components of the super batch in their
order of manufacture. Moreover, one can see both the status of the super batch and the
status of individual sub-batches.
A Super Batch can also be formed via the subsequent screen:
1. Transfer MPS Production Orders (MPS)
2. Transfer SO to Batches (Production Utilities)
Doc. No. F/DV/15
Rev.No.
Date
BatchMaster Software Inc.
BMM User Manual
3. Create Batches from Schedules (Production Utilities)
Screen also has the provision for creating multiple batches of the same item by equally
distributing the quantity ordered into the user defined number of batches using the
Batches with Runs option. This eliminates the process of creating multiple batches for
the same item using the Batch Entry screen.
8.8.1 Mandatory Inputs
A Bill of Materials (BOM) for the Top Items associated with the Super Batch as well as
the sub-batches should have been created and released before a Super Batch is created.
The Work in Progress (WIP) account number should have been defined at the Production
Setup screen before an Assembly Type batch is created.
8.8.2 Screen Fields Description
Super Batch Number: Field displays a unique number used for identifying a Super
Batch. User can manually enter or automatically generate the Super Batch Number.
Super Batch Type: Field displays type of the super batch. It can have one of the
subsequent sorts:
Doc. No. F/DV/15
Rev.No.
Date
BatchMaster Software Inc.
BMM User Manual
1. Super Batch: In this batches are created for the Top Item as well for all the
Intermediates necessary to make that Item.
2. Batch With Runs: In this user can specify the number of Runs and the quantity
of the Item to be produced. The number of runs specifies the number of batches
of the end item to be produced. Using this information the quantity will be split
equally among all the batches. Let us say that user have specified the number of
Runs as 2. This indicates that 2 batches need to be produced. Further the
quantity of the items that needs to be produced has been specified as 10. Then
this quantity of 10 will be split equally among the 2 batches and resulting in 5 per
batch.
Batch Type: Field displays the type of the batch. It can have one of the subsequent
sorts:
1. Mix: In this the Formula materials are processed and filled directly into the
„container‟. This type of batch requires a formula.
2. Fill: In this a pre-made Intermediate is packaged into the „container‟. This type of
a batch requires an Intermediate Key.
3. Assembly: In this Finished Goods are repackaged, e.g., bottles in a case. This
type of a batch requires an assembly BOM.
Batch Status: Field displays the status associated with the batch. It can have one of the
subsequent sorts:
1. New: Indicates a newly created batch.
2. Cancelled: Indicates that the batch is cancelled and user does not want to
perform any process associated with the batch.
3. Allocated: Indicates that the item is allocated for a particular batch. Thus the
item is allocated and has not been issued.
4. Hold: Indicates that the batch is on hold. That is user will not be able to perform
any process associated with this batch.
5. Part Closed: Indicates that user have partially closed the batch. In case there
are 100 quantities of a particular item to be produced for a batch. Out of the 100
quantities, 50 quantities have been produced and need to release. Then user can
partially close this batch.
6. Closed: Indicates that user have closed the batch completely. This refers to the
condition when the process associated with the batch has been completed fully.
Fill From Inventory: Field is associated with the Super Batch type in the „Super Batch
Type‟ field. Using the available drop down available user opt any one of the subsequent
sorts:
1. Yes: On selecting this option the related intermediates are taken from the
available inventory. In case the „Available Quantity‟ of an intermediate is equal to
the required quantity, then a sub batch is not created for this intermediate. Let us
say that the „Available Quantity‟ of an intermediate is 20 and the required
quantity is also 20, then a sub batch will not be created for this intermediate. If
the „Available Quantity‟ of an intermediate is less than the required quantity, then
a sub batch is created for the remaining quantity. In case the „Available Quantity‟
Doc. No. F/DV/15
Rev.No.
Date
BatchMaster Software Inc.
BMM User Manual
of an intermediate is 20 and the required quantity is 50, then a sub batch will be
created for the remaining 30 quantities.
2. No: On selecting this option the available quantities of any related intermediates
are ignored when the super batch is created.
Formula Key / Intermediate Key / Assembly key: Mandatory field entry is filled in
accordance with the „Batch Type‟:
1. Formula Key: Caption is displayed if the Batch Type is Mix. Contain the formula
that is to be used for producing the end item of this batch.
2. Intermediate Key: Caption is displayed if the Batch Type is Fill. Refers to the
intermediate that is to be filled into a container for producing the end item of this
batch. The lookup display all those Released BOM‟s whose Assembly Type is
„Intermediate‟.
3. Assembly Key: Caption is displayed if the Batch Type is Assembly. The lookup at
this field displays all those Released BOM‟s whose Assembly Type is „Assembly‟.
Warehouse: Read – only field which displays the warehouse associated with the
Intermediate Key or the Assembly Key specified at the Intermediate Key/Assembly Key
field. Field is inapplicable for a Mix Type of batch.
Start Date: Field displays the date of the commencement of the super batch. The
Server Date is taken as the default Start Date. The date can be modified by using the
drop down accessible at the field.
Due Date: Field displays the date on which the process of this batch is expected to be
completed. The Server Date is taken as the default Due Date. The date can be modified
by using the drop down accessible at the field.
Number of Runs: If the selected SuperBatch Type is „Batch With Runs‟, then the
number of runs need to be defined here.
Formula Revision Number: Field displays the version of the selected formula from
which the particular Super batch is being ended.
Start Time: Field display the time when the batch is commenced.
Due Time: Field displays the time when the batch becomes due for completion.
Additional Information:
Process Cell For Top Item: Field displays the Process Cell associated with the Super
Batch. User can select the Process Cell with the drop down available at this field.
Draw From Location: All materials (raw materials as well as packaging items) for this
Super Batch will be issued only from this warehouse.
Post To Location: Field displays the warehouse to which the end item(s) will be posted.
Customer Key: Field refers to the customer associated with the Super Batch. User can
select the Customer Key with the drop down available at this field.
Doc. No. F/DV/15
Rev.No.
Date
BatchMaster Software Inc.
BMM User Manual
Sales Order Number: Field displays the Sales Order number associated with the Super
Batch. User can select the Sales Order Number with the drop down available at this field.
8.8.3 Screen Fields Description: Top Items Tab
Item Key.: Field displays the end-item that is to be produced from the batch.
Whse: Field displays the warehouse associated with the selected Item. Field gets default
value upon selecting the Item.
Quantity To Produce: Field displays the quantity of the item that needs to be
produced.
Unit: Field displays the unit of measure associated with the item.
Fill Level: Field displays the fill level associated with the Fill and Mix types of the
batches. The fill level is defined in the BOM Entry screen. This is the Stock unit of this
Top Item. This unit can edited by typing or toggled by clicking the „Toggle Units‟ button
on the toolbar. The unit can be toggled to all those units to which a unit conversion from
the Item Stock Unit exists.
Fill Type: Field displays the unit of measure associated with the fill level. This will be
either Weight or Volume type. This Fill Type is defined on the BOM Entry screen.
Doc. No. F/DV/15
Rev.No.
Date
BatchMaster Software Inc.
BMM User Manual
SO Number: Optional field which displays the Sales Order Number associated with this
Top Item. The sales order number, selected at the „Sales Order Number‟ field on the
header of this screen, gets defaulted to this field when this record is saved. This default
sales order number can be altered.
Customer: Optional field which displays the customer associated with this Top item. The
customer selected at the „Customer Key‟ field above the grid gets defaulted to this field
when the record is saved. This defaulted customer can be altered.
Order Weight: Field displays the total order weight calculated on the basis of the order
quantities of all the End Items specified at the „End Items‟ grid. The Order Weight for an
End Item is calculated as follows:
1. If the Bill of Material for the End Item is of Finished Good type, then,
a. If the Fill Level of BOM is specified in Weight, then the Order Weight is
determined by multiplying the Fill Level of BOM with the Order Qty in
Stock UOM
b. If the Fill Level of BOM is specified in Volume, then the Order Weight is
determined by multiplying the Order Volume with the Density of the item.
The Order volume is determined by multiplying the Fill Level of BOM with
the Order Qty in Stock UOM. The Density is taken from the Formula.
2. If the Bill of Material for the End Item is Intermediate type, then the Order
Weight is determined by multiplying the ordered Quantity (in Stock UOM of the
End Item) with applicable conversion factor for converting the Stock UOM to the
System Weight UOM. The conversion factor is taken from one of the following
scopes (in decreasing preference):
a. Item Master Level.
b. Item Class Level.
c. Global Level.
For an Assembly type of batch, the Order Weight is not considered.
Order Volume: Field displays the total order volume calculated on the basis of the order
quantities of all the End Items specified at the „End Items‟ grid. The Order Volume for an
End Item is calculated as follows:
1. If the Bill of Material for the End Item is of Finished Good type, then,
a. If the Fill Level of BOM is specified in Volume, then the Order Volume is
determined by multiplying the Fill Level of BOM with the Order Qty in
Stock UOM.
b. The Fill Level of BOM is specified in Weight, then the Order Volume is
determined by dividing the Order Weight with the Density of the item. The
Order Weight is determined by multiplying the Fill Level of BOM with the
Order Qty in Stock UOM. The Density is taken from the Formula.
2. If the Bill of Material for the End Item is Intermediate type, then the Order
Volume is determined by multiplying the ordered Quantity (in Stock UOM of the
End Item) with applicable conversion factor for converting the Stock UOM to the
System Volume UOM. The conversion factor is taken from one of the following
scopes (in decreasing preference):
Doc. No. F/DV/15
Rev.No.
Date
BatchMaster Software Inc.
BMM User Manual
a. Item Master Level.
b. Item Class Level.
c. Global Level.
For an Assembly type of batch, the Order Volume is not considered.
Batch Weight: Field displays the total Batch Weight calculated on the basis of the order
quantities of all the End Items specified at the „End Items‟ grid. The Batch Weight is
generally larger than the Order Weight to accommodate the Formula Loss Constant, the
Formula Loss Factor, the Formula Line Loss and any byproducts produced by the
formula.
For an Assembly type batch, the Batch Weight is not considered.
Batch Volume: Field displays the total Batch Volume calculated on the basis of the
order quantities of all the End Items specified at the „‟End Items‟ grid. The Batch Volume
for an End Item is calculated as follows:
If the Bill of Materials for the End Item is Finished Good type, then the Batch
Volume is determined by dividing the Batch Weight with the Formula Density.
If the Bill of Material for the End Item is Intermediate type, then the Batch
Volume is determined by dividing the Batch Weight with the density. This density
is equal to:(the conversion factor for converting the Stock UOM to the System
Weight UOM)/(the conversion factor for converting the Stock UOM to the System
Volume UOM).These conversion factors are taken from one of the following
scopes (in decreasing preference):
1. Item Master Level.
2. Item Class Level.
3. Global Level.
For an Assembly type batch, the Batch Volume is not considered.
Doc. No. F/DV/15
Rev.No.
Date
BatchMaster Software Inc.
BMM User Manual
8.8.4 Screen Fields Description: All Items Tab
BatchNo: Field displays the number that uniquely identifies the Batch (Top Batch or a
Sub-batch).
Item No.: Field displays the Item No. associated with the end item of the Batch (Top
Batch or a Sub-batch).
Whse: Field displays the warehouse associated with the end item of the Batch.
Quantity ToProduce: Field displays the quantity (of this end item) to be produced.
Unit: The Quantity Ordered is interpreted in this unit. This unit can be toggled using the
„Toggle Units‟ button on the toolbar. The unit can be toggled to any of the units for which
a unit conversion from the Stock unit exists.
Low Level Code: The Low Level code for an item is defined in the Item Master screen.
This is useful while processing the MPS and MRP run for an item. The field entry is
fetched automatically once user selects the item.
Sequence No: Field displays the sequence number associated with the items.
Doc. No. F/DV/15
Rev.No.
Date
BatchMaster Software Inc.
BMM User Manual
Batch Execution Sequence: Field displays the order of sequence in which user wants
the batches to be processed. In case user have created super batch entry for the
following batch numbers: 001, 002, and 003. Further want to process the batch number
003. Thus user can select the sequence as 003 in this field.
Required Date: Field displays the date on which user want the batch to be prepared.
Formula ID: Displays the formula using which this intermediate item will be produced.
Schedule Start date: Displays the Date on which the production of this batch/item is
scheduled to start. The actual production of this batch is allowed to commence on a
different date. If routing is implemented, in case of Backward scheduling, the start date
is automatically calculated by the system based on the Due Date and lead time.
ScheduleCompletionDate: Displays the Date on which the production of this
batch/item is scheduled to end. The actual production of this batch is allowed to
complete on a different date. If routing is implemented, in case of Forward scheduling,
the end date is automatically calculated by the system based on the Due Date and lead
time.
ActualStartDate: Displays the Date on which the production of this batch/item is
actually starts.
ActualEndDate: Displays the Date on which the production of this batch/item actally
starts.
ApplyDate:
8.8.5 Creating a Super Batch
1. Click Insert button.
2. Enter a unique identification number for the batch. If wants BatchMaster to
automatically generate a number, leave this filed blank. When the record has
been saved after entering mandatory data, the auto generated batch number
gets displayed on the field.
3. Select the Super Batch Type as one of „SuperBatch‟ or ‟BatchWithRuns‟.
4. If Super Batch type is „SuperBatch‟ check the „Fill From Inventory‟ box if desired.
If the Super Batch Type is „BatchWithRuns‟, enter a value in the „Number of runs‟
field.
5. Select the Batch Type as one of „Mix‟, „Fill‟ or „Assembly‟.
6. Select the Formula ID / Intermediate Key / Assembly Key as required.
7. Select a Customer key and a Sales Order number if needed.
8. Click on the Item No. lookup and select the item that is to be produced through
this batch.
9. Enter the Order Quantity for the Top Items.
10. Add more Top Items if so desired.
11. Click the OK button to save the Super Batch.
Doc. No. F/DV/15
Rev.No.
Date
BatchMaster Software Inc.
BMM User Manual
8.8.6 Goto
Goto Batch Close: Clicking this button displays this batch on the „Super Batch Close‟
screen.
GOto SuperBatch Explosion: Clicking this button displays this batch on the „Super
Batch Explosion‟ screen.
Doc. No. F/DV/15
Rev.No.
Date
BatchMaster Software Inc.
BMM User Manual
8.9 Super Batch Close
Option provides user with a way to close the Super Batches. With the help of Super
Batch Close Screen, User can either close the complete batches or partially close all the
sub batches contained in a super batch. In addition to this BMM makes the appropriate
adjustments to the Lot Tracked or Serial Tracked Items, registering them as closed or
partially closed whichever is appropriate.
The Super Batch Close screen provides the subsequent outlook:
The top most segments refer to the details like Super Batch Number, Batch Type
and Status. The second grid is collapsible and gives a comparison of quantity
required versus quantities actually used and yielded.
The third segment of the screen displays the various sub batches contained within
the super batch.
The last segment contains three separate groups of information about the
outcome of the batches. These are the Finished Goods tab, Material & Packaging
tab, and the By Products tab.
8.9.1 Mandatory Inputs
A Super Batch should have been created previous to closing.
Doc. No. F/DV/15
Rev.No.
Date
BatchMaster Software Inc.
BMM User Manual
8.9.2 Screen Fields Description: Header
Batch Information
Super Batch No.: Read – Only field displays the Super Batch Number.
Batch Status: Read – Only field which display the status of the Super Batch. It can
have one of the subsequent sorts:
1. New: Indicates a newly created batch.
2. Part Issued: Designated when the actual quantities of the BOM lines and the
Formula lines of one or more batches (but not all batches) contained within the
Super Batch have been issued.
3. Issued: Designated when the actual quantity of the BOM lines and the Formula
materials of all the batches contained within this Super Batch have been issued.
Doc. No. F/DV/15
Rev.No.
Date
BatchMaster Software Inc.
BMM User Manual
4. Partially Closed: Designated when one or more batches contained within this
Super Batch have been partially closed or one or more batches (but not all
batches) contained within this Super Batch have been closed.
5. Closed: Designated when the entire Super Batch has been closed.
Batch Type: Read – Only field which display the type of the Batch as defined on the
Super Batch Entry Screen. The Batch type may possibly be one of „Mix‟, „Fill‟, or
„Assembly‟.
Usage and Yield:
Total Weight Used: Read – Only field which display the quantity of raw materials
actually consumed, expressed in terms of the System Weight Unit of Measurement, for
the completion of this batch of the Super Batch.
Total Volume Used: Read – Only field which display the quantity of the raw materials
actually consumed, expressed in terms of the System Volume Unit of Measurement upon
the completion of this batch of the Super Batch.
Total Weight Yielded: Read – Only field which display the sum of the quantities of the
finished goods as well as of the Byproducts (if any) actually produced, expressed in
terms of the System Weight Unit of Measurement, when this batch of the Super Batch is
closed.
Total Volume Yielded: Read – Only field which display the sum of the quantities, of the
finished goods as well as the Byproducts (if any), actually produced, expressed in terms
of the System Volume Unit of Measurement, when this batch of the Super Batch is
closed.
FG Weight Yielded: Read – Only field which display the quantity of the finished goods
actually produced, expressed in terms of the System Weight Unit of Measurement, when
this batch is closed.
FG Volume Yielded: Field displays the quantity of the finished goods actually produced,
expressed in terms of the System Volume Unit of Measurement, when this batch is
closed.
BP Weight Yielded: Read – Only field which display the quantity of the byproducts
actually produced, expressed in terms of the System Weight Unit of Measurement, when
this batch is closed.
BP Volume Yielded: Read – Only field which display the quantity of the Byproducts
actually produced, expressed in terms of the System Volume Unit of Measurement, when
this batch is closed.
Sub Batches
BatchNo.: Read – Only field which display the Batch Number associated with this Batch.
Item No.: Field displays the item that would be produced from this batch.
Whse: Field displays the warehouse associated with the item.
Doc. No. F/DV/15
Rev.No.
Date
BatchMaster Software Inc.
BMM User Manual
Quantity to Produce: Field displays the quantity of the item that is to be produced
from this batch.
Unit: Field determines the unit in which the Quantity to Produce is measured.
Required Date: This Field displays the date on which user want the batch to be
prepared.
Formula ID: Displays the formula using which this intermediate item will be produced.
Schedule Start date: Displays the Date on which the production of this batch/item is
scheduled to start. The actual production of this batch is allowed to commence on a
different date. If routing is implemented, in case of Backward scheduling, the start date
is automatically calculated by the system based on the Due Date and lead time.
ScheduleCompletionDate: Displays the Date on which the production of this
batch/item is scheduled to end. The actual production of this batch is allowed to
complete on a different date. If routing is implemented, in case of Forward scheduling,
the end date is automatically calculated by the system based on the Due Date and lead
time.
ActualStartDate: Displays the Date on which the production of this batch/item is
actually starts.
ActualEndDate: Displays the Date on which the production of this batch/item actally
starts.
Issue/Allocation Date: Displays the date on which issue/allocation has been made
against this batch.
Doc. No. F/DV/15
Rev.No.
Date
BatchMaster Software Inc.
BMM User Manual
8.9.3 Screen Fields Description: Finished Goods Tab
This Tab displays the End Item associated with the batch selected, using the radio
button, at the „Sub Batches‟ grid.
Select: Checking this box select that line for the „Lot Assignment‟ operation.
Item No.: Read – Only field which display the Item No. associated with the end item
being produced from the selected super batch.
Item description: Read – Only field which display the description of the end item.
Whse: Read – Only field which display the warehouse to which the end item would be
posted after production.
Order Quantity: Read – Only field which display the order quantity for the end item.
The value is interpreted in the UOM entered at the Unit field on this row.
Doc. No. F/DV/15
Rev.No.
Date
BatchMaster Software Inc.
BMM User Manual
QuantityToIssueDispUOM: Field displays the quantity of the material, expressed in
stock unit that is to be issued.
Quantity to Complete: Field displays the quantity of the end item to be actually
produced. The value in this field is defaulted with the order quantity for this line.
However, this quantity can be altered. The value is interpreted in the UOM entered at the
Unit field on this row.
Quantity Completed: Read – only field displays the quantity of the end item actually
produced. The value is interpreted in the UOM entered at the Unit field on this row.
Unit: Field displays the UOM in which the various quantities are interpreted on the row.
The unit can be edited by typing or toggled by clicking the „Toggle Units‟ button on the
toolbar. The unit can be toggled to any of the units for which a unit conversion from the
Item Stock Unit exists.
Batch No.: This is the number that uniquely identifies this batch.
Doc. No. F/DV/15
Rev.No.
Date
BatchMaster Software Inc.
BMM User Manual
8.9.4 Screen Fields Description: Materials & Packaging
Tab
Tab displays the materials-to-be-used associated with the batch selected, using the radio
button, at the „Finished Goods‟ grid. The materials and their respective details displayed
at this Tab include the following items associated with this Batch:
a. Formula Raw Materials.
b. Formula Labor Lines.
c. BOM Lines.
Select: Checking this box selects the line for the „Lot Assignment‟ operation.
Item No.: Read – Only field which displays the Item No. associated with this Formula
Material Line or BOM Line.
Doc. No. F/DV/15
Rev.No.
Date
BatchMaster Software Inc.
BMM User Manual
Item Description: Read – Only field which displays the description of the material as
entered on the Item Master screen. For a Labor Key, this field remains empty.
Whse: Read – Only field which displays the Whse associated with this material. For a
Labor Key, this field remains empty.
Quantity Required: Field displays the required quantity of the material, expressed in
the unit displayed at the Unit field or of the Labor, expressed in terms of hours.
ActualRequiredQuantityDispUOM: Field displays the quantity of the material,
expressed in the unit displayed at the Unit field or of the Labor, expressed in terms of
hours, that is actually required.
Quantity Issued: Field displays the quantity of the material, expressed in the unit
displayed at the Unit field or of the Labor, expressed in terms of hours, actually issued.
Unit: Field displays the UOM in which the various quantities are interpreted on the row.
8.9.5 Screen Fields Description: Byproducts Tab
Select: Checking this box selects the line for the „Lot Assignment‟ operation.
Item No.: Read – Only field which displays the Item No. associated with this Byproduct.
Doc. No. F/DV/15
Rev.No.
Date
BatchMaster Software Inc.
BMM User Manual
Item description: Read – Only field which displays the description of the Byproduct as
entered on the Item Master screen.
Whse: Read – Only field which displays the warehouse associated with the Byproduct.
Order Quantity: Field displays the quantity of this byproduct that is expected to be
produced upon completion of the batch.
ActualRequiredQuantityDispUOM: Field displays the quantity of the Byproduct to be
actually produced. This quantity can be altered while a batch has not been closed.
Quantity Produced: Field displays the quantity of the byproduct actually produced
upon closure of a batch.
Unit: Field displays the UOM in which the various quantities are interpreted on this row.
8.9.6 Key Operations
8.9.6.1 Closing a Batch (contained within a Super Batch)
1. Select a Super Batch from the Lookup at the toolbar.
2. Select a Batch at the „Sub Batch‟ grid. Tab-1, Tab-2 and Tab-3 display the
information for the specific Batch selected at the „Sub Batch‟ grid.
3. Check the box for the end items to be produced.
4. Modify the „Quantity to Complete‟ for the end items, if needed.
5. Modify the Tab-2 and Tab-3 as needed.
6. Click the „Close‟ button on the toolbar. A report is generated showing the
resulting details on the Batch Close.
8.9.6.2 Closing a Super Batch
1. Select a Super Batch from the Lookup at the toolbar.
2. Select a Batch at the „Sub Batch‟ grid. Tab-1, Tab-2 and Tab-3 display the
information for the specific Batch selected at the „Sub Batch‟ grid.
3. Check the box for the end items to be produced.
4. Modify the „Quantity to Complete‟ for the end items, if needed.
5. Modify the Tab-2 and Tab-3 as needed.
6. Modify more Batches as needed.
7. Click the „Super Batch Close‟ button on the toolbar. A report is generated showing
the resulting details on the Super Batch Close.
Doc. No. F/DV/15
Rev.No.
Date
BatchMaster Software Inc.
BMM User Manual
8.9.7 Goto
Select Lot#: Clicking this button helps the user to select the lots for the particular item.
Here it is to be noted that system automatically checks, the availability of a Raw Material
lot based on its assignments to various batches. In case, there is a shortage of required
quantity i.e. stock quantity is already selected for other batches then system restricts to
select the same.
Close Batch: Clicking this button closes the selected Batch. The status of this Batch (of
the Super Batch) becomes „Closed‟.
Doc. No. F/DV/15
Rev.No.
Date
BatchMaster Software Inc.
BMM User Manual
Close All Batches: Click this button to close all batches together in one go.
Doc. No. F/DV/15
Rev.No.
Date
BatchMaster Software Inc.
BMM User Manual
Goto Production QC: Clicking this button displays this batch on the „Production QC‟
screen.
Goto Batch Ticket: Clicking this button displays this batch on the „Batch Ticket‟ screen.
Doc. No. F/DV/15
Rev.No.
Date
BatchMaster Software Inc.
BMM User Manual
Partial Close: Clicking this button partially closes the selected Batch. The status of this
Batch (of the Super Batch) becomes „PartClosed‟.
Doc. No. F/DV/15
Rev.No.
Date
BatchMaster Software Inc.
BMM User Manual
Clicking this button closes the Batch partially as specified by the user. This option allows
the user to post some or all of the end items without the need to first post any raw
materials, byproducts, etc.
Note: Finished goods are posted with standard production cost irrespective of cost
method defined.
Formulas to calculate the same are as follows:
Formula used is = (Standard Formula Cost/Order Weight * Fill quantity of finished Good)
+ Standard Unit BOM Cost + Standard Unit Routing cost).
Standard Formula Cost = {Fixed Labor CostAmount + Fixed Labor OverheadAmount +
SetupLabor
Amount
+SetupOverheadAmount
+
VariableLaborAmount
+
VariableOverheadAmount} + Sum of {Line ItemLaborCost+ Line Item OverheadCost}
(for raw material and labor} + Sum of {Line Item OverheadCost} – Sum of {Line
ItemLaborCost} (where item type is By product).
Standard Unit BOM Cost = Sum of {BOM ItemLaborCost + BOM Item OverheadCost}
(For BOMs items of given FG)/Standard FG Quantity + BOM Item LaborCost+BOM Item
OverheadCost
Standard Unit Routing Cost = Sum of {Routing EstLaborCost + Routing EstMachineCost
+ Routing EstOverhead Cost} (for given FG)/Standard FG Quantity
Here Byproducts are posted by Standard or average cost (based on cost method of the
item).
Issue Checked Material Lines: Clicking this button issues the selected material for
production.
Doc. No. F/DV/15
Rev.No.
Date
BatchMaster Software Inc.
BMM User Manual
Issue All Material: Clicking this button issues all the material for production.
Doc. No. F/DV/15
Rev.No.
Date
BatchMaster Software Inc.
BMM User Manual
v
8.10 Super Batch Explosion
Whenever one uses any of the Super Batch options, its almost certainly that user is
working with a number of intermediates, and may find it difficult to see how all the
intermediates relate to one another as super batch proceeds through production. The
Super Batch Explosion option resolves this challenge by giving a graphical view to analyze
the relationships between the intermediates contained in each sub-batch and the final
product, the finished good. Further one can easily identify the status of the batch as
different color codes are used to distinguish them. Thus this screen provides concise
presentation of the intermediates and the final product of a Super Batch.
8.10.1
Mandatory Inputs
A Super Batch should have been created before it can be exploded.
Doc. No. F/DV/15
Rev.No.
Date
BatchMaster Software Inc.
8.10.2
BMM User Manual
Screen Fields Description
Super Batch No: This is the Super Batch Number associated with this Super Batch.
This is the number assigned to the batch at the time of Super batch Entry. This is a
read-only field.
Batch Status: This is the status of this Super Batch which determines the stage it has
achieved in its process of production. The status could be one of the following:
1. New: This is the status of a Super Batch when it is created.
2. Issued: The status of a Super Batch becomes „Issued‟ when the actual quantity of
the BOM lines and the formula lines of all the batches of this Super Batch have
been issued.
3. Closed: This is the status of a Super Batch when the entire Super Batch has been
closed.
This is a read-only field.
Super Batch Type: The value in this field is defaulted from the Super Batch Entry
screen. The value can be one of SuperBatch or BatchWithRuns.
Batch Type: The value in this field is defaulted from the Super Batch Entry screen. The
value can be one of Mix, Fill or Assembly.
Doc. No. F/DV/15
Rev.No.
Date
BatchMaster Software Inc.
BMM User Manual
Sch. Start Date (Scheduled Start Date): This is the date when the production of this
batch is scheduled to start. The actual production of this batch is allowed to commence
on a different date. This field gets defaulted from the „Super Batch Entry‟ screen.This is a
read-only field.
Sch. Start Time (Scheduled Start Time): This is the time when the production of this
batch is scheduled to start. The actual production of this batch is allowed to commence
on a different time. This field gets defaulted from the „Super Batch Entry‟ screen.
This is a read-only field.
Sch. End Date (Scheduled End Date): This is the date on which the production of this
batch is scheduled to complete. The actual production of this batch is allowed to finish on
a different date. This field gets defaulted from the „Super Batch Entry‟ screen. This is a
read-only field.
Sch. End Time (Scheduled End Time): This is the time on which the production of this
batch is scheduled to complete. The actual production of this batch is allowed to finish on
a different time. This field gets defaulted from the „Super Batch Entry‟ screen. This is a
read-only field.
Description: This is the description of the Formula Key or the Intermediate Key or the
Assembly Key associated with the Top Batch of this Super Batch.
8.10.3
Exploding a Super Batch
1. Select a Super Batch using the Lookup at the toolbar.
2. If required drag the mouse to view the date range specified for individual
batches.
8.11 Current Batches
During production, the batches involved can be viewed in this dashboard. It displays the
Finished Good prepared, Raw Material required, Sub Assembly used etc. Here is a
provision of viewing the Date wise and also Status wise Batches. It also displays other
information pertaining to the batches like Batch Type, Formula Associated, Batch Weight,
Batch Volume, BOM item, Critical item if found during Production, By Product information
etc. Let‟s see all in detail.
Doc. No. F/DV/15
Rev.No.
Date
BatchMaster Software Inc.
8.11.1
BMM User Manual
Dashboard Screen Description
8.11.1.1 Available Menu options
Refresh: Clicking this button refreshes the screen with the latest values from the BMM
database. This is useful in case changes have been made to the database but those
changes are not reflected on the screen yet.
Refresh Rate: Screen automatically gets refresh after regular interval of time as
defined in this column.
Export to Excel: This option is used to export the data in the Excel file.
Layout Settings
This feature is used to store multiple layouts of the dashboard data. Thus you can save
the screen outline for future use. Let's say set specific table fields or apply any filter
criteria etc to any field and save the layout with specific name. Further user can open
the saved layout from the drop down to seek the specific information.
Save Layout: On clicking this button, the current layout, i.e. the settings made to the
grid, would be saved by the specified name.
Delete Layout: On clicking this button, current layout would be deleted.
Doc. No. F/DV/15
Rev.No.
Date
BatchMaster Software Inc.
BMM User Manual
Color Scheme
In dashboard grid distinct color codes are used to categorize batch details. Individual
color reveals to specific detail of dashboard. The color scheme available at the top of the
dashboard assists user to identify that which color denotes what specific information.
8.11.1.2 Filter Criteria
8.11.1.2.1 Batch Status
There is a provision of viewing the batch lines according to the batch status. In detail,
there we can view the batches of distinct status. For the same, check the checkbox of
the required status from the Filter Criteria and click on Refresh button.
The available batch statuses are New, Allocated, Issued, Part Closed, Closed, Hold and
Cancelled.
Example: The dashboard below is displaying the batches of New, partially closed and
Closed status. For this, check the respective checkboxes from the Filter Criteria and click
on Refresh button.
Doc. No. F/DV/15
Rev.No.
Date
BatchMaster Software Inc.
BMM User Manual
8.11.1.2.2 Date Type
We can view the data rows in the grid on the basis of any specific Date type and also in a
particular Date Range. The available Date types are Schedule Start Date, Schedule
Completion Date, Actual Start Date, Actual Completion Date, Entry Date, Batch Ticket
Date and Record Date.
For Example: Let‟s view all the batches of different status whose Scheduled Start Date
lies between 11/04/2008 and 06/16/2009. For this select the Date Type as Scheduled
Start Date, and also specify the start Date in the Date From column while end Date in
the Date To column. Click on refresh button. Accordingly, result gets fetch on dashboard
grid, as below.
8.11.1.2.3 Show Critical Batches
By checking out this checkbox in filter criteria, all those Batches whose line item key On
hand is less than the Actual Quantity required would be fetched in dashboard grid.
Doc. No. F/DV/15
Rev.No.
Date
BatchMaster Software Inc.
BMM User Manual
8.11.1.2.4 Grid Fields Description
Batch No: This is a unique identification number of the batch.
Batch Type: This field determines whether the Batch is of Mix, Fill or Assembly type.
Status: This is the status of the Current Batch. It can be any from New, Allocated,
Cancelled, Hold, Issued, Partially Closed and Closed.
Process Cell: This is the Process Cell associated with this batch, implies that the
production of this batch shall take place in this work Centre.
Formula Id/Item Key Location: This is the identification key of the formula used in
the production of the above selected batch.
Batch Ticket Printed Date: This is the date on which the batch ticket was last printed.
Schedule Start Date: This is the Date on which the production of this batch is
scheduled to start.
Schedule Completion Date: This is the Date on which the production of this batch is
scheduled to complete
Actual Start Date: This is the Date and time when the production of this batch will
actually start.
Doc. No. F/DV/15
Rev.No.
Date
BatchMaster Software Inc.
BMM User Manual
Actual Completion Date: This is the Date and time when the production of this batch
actually gets closed.
Batch Material Cost Std: This is the standard cost of the material in batch.
Batch material Cost Actual: This is an actual cost of the batch materials.
Actual Vs. Standard Difference: This is the difference amount of the standard and
actual cost of the batch materials.
Exploring the hierarchy shows batch detail. Different fields displaying in the grid are are
as follows:
Batch Weight: This is the total Batch Weight calculated on the basis of the Order
quantities of all the End Items specified at the „End Items‟ grid.
Batch Volume: This is the total Batch Volume calculated on the basis of the Order
quantities of all the End Items specified at the „‟End Items‟ grid.
Order Weight: This is the total Order weight calculated on the basis of the Order
quantities of all the End Items specified at the „End Items‟ grid.
Order Volume: This is the total Order volume calculated on the basis of the Order
quantities of all the End Items specified at the „End Items‟ grid.
Doc. No. F/DV/15
Rev.No.
Date
BatchMaster Software Inc.
BMM User Manual
Description: This is the description of an item key.
Entry Date: This is the Entry Date of the Batch.
Batch Ticket Printed Date: This is the Batch Ticket Printed Date defaulted from Batch
Ticket Screen.
Record Date: This is the record Date.
WIP Acct: This is Work In Progress Account number for this formula class.
TotalFgWeightYielded: This is the Quantity actually produced, expressed in terms of
the System Weight Unit of Measurement, upon the completion of the batch.
TotalFgVolumeYielded: This is the Quantity actually produced, expressed in terms of
the System Volume Unit of Measurement upon the completion of the batch.
TotalWeight Used: This is the Quantity of raw materials actually consumed, expressed
in terms of the System Weight Unit of Measurement, upon the completion of the batch.
TotalVolume used: This is the Quantity of the raw materials actually consumed,
expressed in terms of the System Volume Unit of Measurement upon the completion of
the batch.
TotalByproductWeightYielded: This the Quantity of By product in weight yielded,
upon completion of the batch.
TotalByproductVolumeYielded: This is the Quantity of By Product in Volume yielded,
upon completion of the batch.
TotalStdCost: This is the Total Standard cost of the Current Batch.
TotalActualCost: This is the Total Actual Cost of the Current Batch.
Further exploring the next level hierarchy shows details pertaining to Batch Line items.
Doc. No. F/DV/15
Rev.No.
Date
BatchMaster Software Inc.
BMM User Manual
Line type: It details the Finished Good prepared, Raw Material required, By Product
Yielded, and BOM of the line items.
Status: This is the Status of the Current Batch. It can be one of New, Allocated,
Cancelled, Hold, Issued, Partially Closed and Closed
Batch No: This is the unique identification number of the Batch.
Item Key: It is a unique key helps us to identify an item and is defaulted from item
master.
Location: This is the location associated to a line item.
Stock UOM: This is the Stock Unit of Measurement of the line item.
Actual Qty: This is the Quantity actually consumed by this batch.
Issued Qty: This is the Quantity actually Issued during the production of this batch.
On Hand: This is current On Hand Quantity available in stock.
Committed: This is an actual Quantity committed to sale.
Doc. No. F/DV/15
Rev.No.
Date
BatchMaster Software Inc.
BMM User Manual
8.12 Transfer SO to Batches
Screen enables user to transfer the Sales Orders created to the respective batches.
8.12.1
Screen Fields Description
Sales Order Delivery Date From: Field displays the lower limit of the Sales Order
Delivery Date. The date can be altered via the lookup at this field.
Sales Order Delivery Date To: field displays the upper limit of the Sales Order
Delivery Date. The date can be altered via the lookup at this field.
Get Sales Order: Clicking this button, fetch the respective range of Sales Orders in the
lower portion of the screen.
Create Super Batch: Checking this box creates batches for the intermediates of the
selected line items. If this box is not checked, then the batches will not be created for
the intermediates associated with a line item.
Select: Check in the box, enables the sales order associated with the line will be
selected for transfer to batches.
Sales Order Number: Field displays the number of the sales order.
Item No.: Field displays the item for which the sales order is made.
Doc. No. F/DV/15
Rev.No.
Date
BatchMaster Software Inc.
BMM User Manual
Whse: Field displays the warehouse in which the item is stored.
Quantity: Field displays the quantity associated with the item.
Units: Field displays the unit of measurement for this item.
Order Date: Field displays the date on which the particular item is ordered.
Delivery Date: Field displays the date on which the item is delivered.
Process Cell: Field displays the process cell in which this item would be produced.
Fill Level: Field displays the fill level associated with the BOM of this item.
Formula: Field displays the formula key of the formula from which this item can be
produced.
Customer: Displays the customer for whom this sales order exists.
Line Number: Field displays the line number associated with the sales order.
8.12.2
Steps to Transfer the Sales Order to Batches
1. Select the range of the Sales Order Date From and To using the drop down
available on respective fields.
2. Next click the Get Sales Order button available. On clicking, the range of the sales
orders along with the item, order date, delivery date in the selected date range
will be fetched in the lower portion of the screen.
3. Finally click „Process‟ from the Special Function available in the menu bar.
4.
After clicking „Process‟ button, the selected sales orders will be transferred to the
respective batches.
8.13 Production QC
For Compliance reasons, a separate screen is made available for Production QC. Quality
Control is a procedure intended to ensure that a manufactured product adheres to a set
of quality control norms. In order to implement an effective Quality Control program, the
standards associated with the product should be followed. These quality control actions
will include the percentage of units that need to be tested from each lot. Inspection is
performed for the products that are passing through the production process.
The Production QC Screen enables user to perform quality tests for the selected items
i.e. Allow selection of item and associate the related quality control tests for the items.
Doc. No. F/DV/15
Rev.No.
Date
BatchMaster Software Inc.
8.13.1
BMM User Manual
Screen Fields Description
Batch No: Field displays the batch number of the batch on which QC is to be applied.
Notes: Field display the applicable notes if defined with the QC test.
Batch Status: Field displays the status of this batch. The status may possibly be one of
„New‟, „Cancelled‟, „Hold‟, „Issued‟, or „Closed‟.
Schedule Start Date: Field displays the start date for commencement of Production
QC.
Sample Set: Field displays the number of the Sample Set associated with this test. A
new Sample Set is created each time this batch is tested.
Create Duplicate Sample Set: Clicking this button opens a window where a Sample
number and the description can be entered. Clicking the Save button on the „Create
Sample‟ window creates a Sample comprising of the tests and the results as displayed at
the „Quality Control Information‟ grid.
Item/Formula Key:
Item Formula Key: Column lists the Formula (being used by this Batch) and the end
items being produced by this Batch.
Whse: Field displays the warehouse associated with the end item displayed at the
„Formula or Item‟ field.
Doc. No. F/DV/15
Rev.No.
Date
BatchMaster Software Inc.
BMM User Manual
Quality Control Information:
Test ID: Field determines the ID of the tests to be applied on the selected row. When a
batch is created, the relevant Test ID‟s are automatically inserted according to the
settings under the „Automatically insert QC Tests for the following" frame on the
Production Setup screen.
Description: Field displays the description of this QC Test shown under the Test ID.
Result Type: Field determines the type of the result as one of Pass / Fail, Numeric or
Alphanumeric.
a. Pass/Fail Value: The result value of the test can be either Pass or Fail.
b. Numeric Value: The result value has to be a numeric value.
c. Alphanumeric Value: The result value can be alphanumeric.
This value can be tailored for an open Batch. Changing the value at this field changes the
value of the „TestType‟ field also.
Result Alpha: Field stores the alphanumeric result of the QC Test. The Result value can
be entered here for each of the tests irrespective of its „ResultType‟. In order to decide
the acceptability of the production of this batch, if the „TestType‟ is „Alphanumeric‟, the
result-value entered here is compared with the value at the „Target Alpha‟ field. The
result value should exactly be the same as the target value. The value at the
„TargetAlpha‟ field is the targeted value to be attained for this QC test. However, the
user may manually pass or fail the test irrespective of the test-result by selecting the
Passed/Failed option at the „TestStatus‟ field.
When a batch is created, this value is defaulted for the various Test IDs if the "Transfer
QC Targets to Results" field is set to "Yes" at the Production Setup screen.
Result Numeric: Field stores the numeric result of this QC Test. The Result value can
be entered here for each of the tests irrespective of its „ResultType‟. In order to decide
the acceptability of the production of this batch, if the „TestType‟ is „Numeric‟, the resultvalue entered here is compared with the value at the „TargetNumeric‟ field. The result
value should fall within the target range as specified by the „NumRangeHigh‟ and
„NumRangeLow‟ fields. The value at the „TargetNumeric‟ field is the targeted value to be
achieved for this QC test. However, the user may manually pass or fail the test
irrespective of the test-result by selecting the Passed/Failed option at the „TestStatus‟
field.
When a batch is created, this value is defaulted for the various Test IDs if the "Transfer
QC Targets to Results" field is set to "Yes" at the Production Setup screen.
Tested By: Field store the name of the person who has performed the QC test.
Test Date: Field clutches the date on which the QC test was performed.
TestStatus: Field displays the status of the test. The status can be one of the following:
1. Not-Tested: The test has not been performed yet.
Doc. No. F/DV/15
Rev.No.
Date
BatchMaster Software Inc.
BMM User Manual
2. Passed: The end item or the formula has passed this test.
3. Failed: The item or the formula has failed this test.
Test Type: Field display the type of the test being performed. The field value can be one
of the next:
1. Pass/Fail Value.
2. Numeric Value.
3. Alphanumeric Value.
Target Alpha: For an Alphanumeric Type of test, this is the target value to be achieved.
When a batch is created, this value is defaulted for the various Test IDs if the "Transfer
QC Targets to Results" field is set to "Yes" at the Production Setup screen.
Target Numeric: For a Numeric Type of test, this is the targeted value to be achieved.
When a batch is created, this value is defaulted for the various Test IDs if the "Transfer
QC Targets to Results" field is set to "Yes" at the Production Setup screen.
NumRangeHigh: For a Numeric Type of test, this is the upper limit of the acceptable
range of values. When a batch is created, this value is defaulted for the various Test IDs
if the "Transfer QC Targets to Results" field is set to "Yes" at the Production Setup
screen.
NumRangeLow: For a Numeric Type of test, this is the lower limit of the acceptable
range of values. When a batch is created, this value is defaulted for the various Test IDs
if the "Transfer QC Targets to Results" field is set to "Yes" at the Production Setup
screen.
Sample Set: Field displays the number of the Sample Set associated with this test. A
new Sample Set is created each time this batch is tested. A Sample Set can be created
using the „Initiate Retest‟ button.
8.13.2
Performing QC
1. Use the lookup button available on the tool bar and select the batch on which QC
is to be applied.
2. The formula and the Items associated with the batch get defaulted in the upper
grid while the tests associated with them get defaulted to Quality Control
Information grid.
3. If new samples are to be created, click on the „Create Samples‟ button and create
some.
4. Add more tests, if required, using the Add button available at the bottom of the
screen.
5. Enter the Result Type, Result Values, name of the person who performed QC,
date on which QC was performed, Test Type and Test Status.
6. Click on the save button to save the results.
Doc. No. F/DV/15
Rev.No.
Date
BatchMaster Software Inc.
BMM User Manual
8.14 Serial Lot Explosion Criteria
This screen is used to view hierarchical information about the use of a serial/lot and the
origin of a serial/lot. The hierarchy is depicted in the form of an expandable tree. Only
those items that are either serial tracked or lot tracked are available for Lot Explosion.
8.14.1
Screen Fields Description: Lot Explosion Criteria
screen
Options:
Lot Explosion: Processing a „Lot Explosion‟ displays the information about how the
serials/lots were created, and which serials/lots were used in producing these lots. It
does not show the untracked items that have been used in producing the serials/lots.
The „Lot Explosion‟ option can be processed with the following two options:
1. Single Level: The explosion goes only one level deep. For example, suppose that
Lot „A‟ has been used in producing Lot „B‟ and Lot „B‟ in turn has been used in
producing Lot „C‟. In such a case, processing a single level „Lot Explosion‟ for Lot
„C‟ will show that Lot „C‟ has been produced using Lot „B‟; the production of Lot „B‟
from Lot „A‟ is not shown.
2. Multilevel: This combination shows the entire hierarchy of the serials/lots that
have been used for producing a given lot. For example, suppose that Lot „A‟ has
been used in producing Lot „B‟ and Lot „B‟ in turn has been used in producing Lot
„C‟. In such a case, processing a multi-level „Lot Explosion‟ for Lot „C‟ will show
that Lot „C‟ has been produced using Lot „B‟ and Lot „B‟ has been produced using
Lot „A‟.
Where Used: Processing a „Where Used‟ lot explosion displays the information as to all
those transactions where the given lot appears or has been used such as purchase
receipt, sales issue, production issue, production receipt etc. The „Where Used‟ option
can be processed with the following two options to get the following information:
1. Single Level:
Doc. No. F/DV/15
Rev.No.
Date
BatchMaster Software Inc.
BMM User Manual
All those transactions via which the selected lots have been added to
inventory or removed from inventory.
The information of serials/lots that have been produced using these
serials/lots. This information is shown only up to one level deep. For example,
suppose that Lot „A‟ has been used in producing Lot „B‟ and Lot „B‟ in turn has
been used in producing Lot „C‟. In such a case, processing a single level „Lot
Explosion‟ for Lot „A‟ will show that Lot „B‟ has been produced using Lot „A‟;
the production of Lot „C‟ from Lot „B‟ is not shown.
2. Multilevel:
All those transactions via which the selected lots have been added to
inventory or removed from inventory. This display also reflects any
assignments (of this lot) made via the Lot Assignment screen.
The information of the entire hierarchy of the serials/lots that have been
produced using a given lot. For example, if Lot „A‟ has been used in producing
Lot „B‟ and Lot „B‟ in turn has been used in producing Lot „C‟, then processing
„Where Used‟ option for Lot „A‟ will show that Lot „A‟ has been used in
producing Lot „B‟ and Lot „B‟ has been used in producing Lot „C‟. This display
also reflects any assignments (of this lot) made via the Lot Assignment
screen.
Single Level: If this option is selected, only the first level of the hierarchy of the
information is displayed.
Multi Level: If this option is selected, all the levels down the hierarchy of the
information are displayed.
Doc. No. F/DV/15
Rev.No.
Date
BatchMaster Software Inc.
BMM User Manual
Select:
Item: This is the Item associated with the selection criteria.
Warehouse: This is the warehouse associated with the selection criteria.
Lot From: This is the lower limit of the range of the selected lots. If a range is not
selected, all the Lots of this item Whse are selected.
Lot To: This is the upper limit of the range of the selected lots. If a range is not
selected, all the Lots of this item Whse are selected.
8.14.2
Screen Fields Description: Lot Explosion/Lot
Explosion-Where Used
Lot Number: This is the Lot Number of the lot selected at the tree view pane.
ItemKey: This is the Item associated with the lot selected at the tree view pane.
LocationKey: This is the warehouse associated with the lot selected at the tree view
pane.
DateReceived: This is the date on which the lot selected at the tree view pane was
created.
Date Expiry: This is the expiry date of the lot selected at the tree view pane.
Doc. No. F/DV/15
Rev.No.
Date
BatchMaster Software Inc.
BMM User Manual
Transaction Type: This is the transaction associated with the selection line.
Receipt Doc Number: This is the number of the Purchase Order or Batch via which the
lot selected at the tree view pane has been received/produced.
8.14.3
Goto
Export To Excel: Click this button to export this explosion to an excel file.
Lot Recall Letter: Clicking this button would generate the Lot Recall Report for the
selected item.
Doc. No. F/DV/15
Rev.No.
Date
BatchMaster Software Inc.
BMM User Manual
Lot Explosion Report: Clicking this button, displays the Lot Explosion Report for the
Item and warehouse selected at the Filter criteria screen.
Doc. No. F/DV/15
Rev.No.
Date
BatchMaster Software Inc.
8.14.4
BMM User Manual
Viewing how certain serials/lots were created
A Lot Explosion may be performed as follows:
1. Select the Lot Explosion option.
2. Select Single Level or Multi Level.
3. Select an Item; this is a mandatory step.
4. Select a Whse; this is a mandatory step.
5. Select a range of lots, if so desired.
6. Click the Process button on the toolbar.
7. Processing the selection criteria opens a screen that displays the serial/lot
information.
8. Click on the Export button to export entire lot details to an Excel sheet. On
clicking, an Excel sheet is generated displaying the Lot Details. Save the Excel
Sheet, if required.
8.14.5
Viewing the serials/lots that were
using selected serials/lots
created
A „Where Used‟ explosion may be performed as follows:
1. Select the Where Used option.
2. Select Single Level or Multi Level.
3. Select an Item; this is a mandatory step.
4. Select a Whse; this is a mandatory step.
5. Select a range of lots, as desired.
6. Click the Process button on the toolbar.
7. Processing the selection criteria opens a screen that displays the serial/lot
information.
8.15 Batch Scheduling with Process Cell
This dashboard provides utility to view all existing batches. Here user can schedule the
batch on the basis of any field available in the grid. Before performing Batch Scheduling
it is required to perform sorting on the field on the basis of which batch scheduling needs
to be done.
Doc. No. F/DV/15
Rev.No.
Date
BatchMaster Software Inc.
8.15.1
BMM User Manual
Dashboard Screen Description
Batch Scheduling Tab
Available Menu options
Refresh: Clicking this button refreshes the screen with the latest values from the BMM
database. This is useful in case changes have been made to the database but those
changes are not reflected on the screen yet.
Time: Screen automatically gets refresh after regular interval of time as defined in this
column.
Export to Excel: This option is used to export the data in the Excel file.
Layout Settings
This feature is used to store multiple layouts of the dashboard data. Thus you can save
the screen outline for future use. Let's say set specific table fields or apply any filter
criteria etc to any field and save the layout with specific name. Further user can open
the saved layout from the drop down to seek the specific information.
Save Layout: On clicking this button, the current layout, i.e. the settings made to the
grid, would be saved by the specified name.
Delete Layout: On clicking this button, current layout would be deleted.
Doc. No. F/DV/15
Rev.No.
Date
BatchMaster Software Inc.
BMM User Manual
Color Scheme
In dashboard grid distinct color codes are used to categorize batch details. Individual
color reveals to specific detail of dashboard. The color scheme available at the top of the
dashboard assists user to identify that which color denotes what specific information.
Print Preview: Clicking this button displays the document as being printed.
Sequence Batches: This button allows user to reorder the batch. On pressing this
button the Schedule End date gets computed on the basis of „Time required’ field. Also
the planned date gets modified. Before resequencing a batch it is mandatory to perform
sorting on the field on the basis of which batches need to be reordered.
Show Search: Checking this checkbox displays distinct filters can be applied to search
particular value from the field.
Filter Criteria
To retrieve the selected data item in the dashboard grid, user has a provision to apply
distinct filters. The available filters are:
Date Filter
To view and scheduled the Batches during production on the basis of Batch Start Date,
we apply this filter.
Doc. No. F/DV/15
Rev.No.
Date
BatchMaster Software Inc.
BMM User Manual
In From and To section, we mention the start date range. As per the selected Date
Range, scheduled batches lying between Date From and Date To segment get displayed
in the grid.
Doc. No. F/DV/15
Rev.No.
Date
BatchMaster Software Inc.
BMM User Manual
Batch Status
User can view the Batches of specific status by applying this filter. The options available
are New, Issued, Part Closed, Closed, Hold, Late Batches and Today‟s Batches.
Doc. No. F/DV/15
Rev.No.
Date
BatchMaster Software Inc.
BMM User Manual
Printing Option
Print Dispatch: Pressing this button prints a Dispatch Report.
Print: On clicking this button the Batch Ticket report corresponding to the
selected batch gets printed.
Print BT: Checking this checkbox prints Batch Ticket on report.
Print Temp FG Label: Checking this checkbox print Finished good label on report.
Print QC Label: Checking this checkbox print QC label on report.
Preview: CHeckign this checkbox shows print preview before generating a report.
Setup Printer
BT Printer: THe lookup available next to this field allows user to select the printer
require to print Batch TIcket report
FG label Printer: THis lookup allows user to specify the printer used to print FG Label.
QC Label Printer: Here user can specify the printer used to print QC Label.
Doc. No. F/DV/15
Rev.No.
Date
BatchMaster Software Inc.
BMM User Manual
Grid Fields Description
Batch No: This is the number that uniquely identifies the batch.
Process cell: This is the process cell associated to the batch which implies that the
production of the batch shall takes place in this cell.
Planned date: By default this field shows the Batch Start date. Once resequenced after
applying the sequence, it shows the value from User6 of „Pnmast‟ table of BMM.
Time required: Here user can specify the time schedule require to complete a batch.
The time can be mentioned in Days and Hrs.
Select: Checking this checkbox select the respective batch line in the grid.
Status: This field shows the current status of batch.
Item: It is a unique key helps us to identify an item and is defaulted from item master.
Item Description: This is the description associated with an Item key.
Formula Id: It shows an identification key of the formula associated with a batch.
Quantity: It shows the actual quantity of an item being consumed in a batch.
Unit: This field displays the unit of measurement of an Item key.
Schedule End date: This field shows the schedule end date of the batch.
Allergen sort: If allergens are maintained in BMM Company then sorting can be
performed based on given allergens.
Note: Any note associated with a batch can be viewed in this field.
Order no: This field shows the Sales Order number associated with a batch.
Customer: It shows the identification key of the customer for whom the batch is
created.
Fill size: It displays the fill level of the finished good as specified at Bill of Material
screen.
Made from: This field shows the Formula key of the Batch.
Capacity: It shows the Process cell capacity of a batch.
Batch Type: This is the type of the Batch which is one from Mix, Fill or Assembly.
Batch Weight: This is the total Weight of the Batch calculated on the basis of required
quantities of formula line items specified for a Batch.
Schedule Date: This field shows the start date of the Batch.
Doc. No. F/DV/15
Rev.No.
Date
BatchMaster Software Inc.
BMM User Manual
Sequence No: It shows the sequence number assigned by the user to resequence the
batch.
Calendar View Tab
Calendar view tab provides a quick summary on batch scheduling according to the
calendar Month view, week view and day view. The information presented on this
dashboard ascertains complete analysis on batches.
Month View
The interactive Month View provides flexibility to obtain production schedule month wise.
Week View
The interactive Week View helps you to quickly organize the Batches week wise.
Doc. No. F/DV/15
Rev.No.
Date
BatchMaster Software Inc.
BMM User Manual
Day View
The interactive Day View helps you to quickly organize the Batches day wise.
Doc. No. F/DV/15
Rev.No.
Date
BatchMaster Software Inc.
BMM User Manual
8.16 Purge Batches
Screen enables user to purge the batches. The batches with the status „Cancelled‟ or
„Closed‟ are purged since they are not required further.
Doc. No. F/DV/15
Rev.No.
Date
BatchMaster Software Inc.
8.16.1
BMM User Manual
Screen Fields Description
Schedule Start Date From: Field displays the lower limit of the date on which
production for the batch has commenced. The date can be altered via the lookup at this
field.
Schedule Start Date To: Field displays the upper limit of the date on which production
for the batch has commenced.
Batch Status: Field displays the status associated with the batch. User can select the
subsequent status via the drop down available at this field:
1. All: Includes the status associated with the batches such as New, Cancelled, and
Closed.
2. Cancelled: The batches having the status as cancelled will be fetched for
purging.
3. Closed: The batches having the status as closed will be fetched for purging.
Batch Number From: Field displays the lower limit of the batch number which is to be
purged. The batch number can be altered via the lookup at this field.
Batch Number To: Field displays the upper limit of the batch number which is to be
purged.
Cancelled on or before: Field displays the date on which the selected batch has been
cancelled. The date can be altered via the drop down available on the field.
8.16.2
Steps to Purge Batches
1. Select the Schedule Start Date From and To Dates using the drop down available
on the respective fields.
Doc. No. F/DV/15
Rev.No.
Date
BatchMaster Software Inc.
BMM User Manual
2. Further associate the status of the batch using the drop down available on the
field. Once selected the following status will get displayed: All, Cancelled, Closed
&desire status can be selected.
3. Select the batch From and To numbers using the available lookup.
4. Next select the cancelled on or before date using the available drop down.
5. Finally click „Purge‟ button. After clicking, it prompts a message with the number
of records selected to be purged. Lets 01 record is to be purged. It will display a
message stating that „01 record selected to be purged‟. Clicking OK will prompt
confirmation message stating “The selected record has been purged”.
8.17 Purge Super Batches
Screen enables user to purge the super batches with status as cancelled or closed. The
cancelled and closed super batches are purged since these batches are not required.
8.17.1
Screen Fields Description
Schedule Start Date From: Field displays the lower limit of the date on which
production for the batch has commenced. The date can be altered via the drop down
available on the field.
Schedule Start Date To: Field displays the upper limit of the date on which production
for the batch has commenced.
Batch Status: Field displays the status associated with the batch. User can select the
subsequent status via the drop down available at this field:
1. All: Includes the status associated with the batches such as New, Cancelled, and
Closed.
Doc. No. F/DV/15
Rev.No.
Date
BatchMaster Software Inc.
BMM User Manual
2. Cancelled: The batches having the status as cancelled will be fetched for
purging.
3. Closed: The batches having the status as closed will be fetched for purging.
Super Batch Number From: Field displays the lower limit of the batch number which is
to be purged. The batch number can be altered via the lookup at this field.
Super Batch Number To: Field displays the upper limit of the batch number which is to
be purged.
Cancelled on or before: Field displays the date on which the selected batch has been
cancelled. The date can be altered via the drop down available on the field.
8.17.2
Steps to Purge the Super Batches
1. Select the Schedule Start Date From and To Dates using the drop down available
near the respective fields.
2. Further associate the status of the batch using the drop down available on the
field. Once selected the following status will be displayed: All, Cancelled, Closed &
desired status can be selected.
3. Select the Super Batch From and To numbers using the available lookup.
4. Next select the Cancelled on or before date using the available drop down.
5. Finally click „Purge‟ button. After clicking it prompts a message with the number
of records selected to be purged. Lets 01 record is to be purged. It will display a
message stating that „01 record selected to be purged‟. Clicking OK will prompt
confirmation message stating “The selected record has been purged”.
8.18 Employee Schedule Generation
Using the Employee Schedule Generation, user can generate employee schedule by
week. Employee schedule may be generated for a quarter of a year, at one time. Weekly
working schedule of employees can be planned at a work center by selecting the work
center and working days in a week. It also provides the facility of generating the
schedule for a range of employees for all selected working days in a quarter. Employees
selected in the „From Employee‟ to „To Employee‟ range will be displayed in the grid next
to employee selection. User can deselect employees from the list, before generating the
schedule. The selected Work Center and Shift Id populates the employee.
Doc. No. F/DV/15
Rev.No.
Date
BatchMaster Software Inc.
BMM User Manual
Mandatory Inputs:
Employee, Work Center and Shift should have been established at their respective
master screens before an Employee Schedule can be processed.
8.18.1
Screen fields description
Employee From: This is the employee that specifies the lower limit of the range of
employees for whom the schedule is to be generated. The lookup at this field displays all
employees maintained at the Employee Setup screen.
Employee To: This is the employee that specifies the upper limit of the range of
employees for whom the schedule is to be generated. The lookup at this field displays all
employees maintained at the Employee Setup screen.
Work Center: This is the work center with which the employee is associated for
generating the schedule. The lookup at the field displays all Work Centers maintained at
the Work Center setup screen.
Shift: This is the shift with which the employee and selected work center is associated
for generating the schedule. The lookup at this field displays the shifts which have been
associated with the selected work center at the Company Shift Setup.
Employee Details Grid:
Selected: Checking this box generates the schedule for the selected employee only.
Doc. No. F/DV/15
Rev.No.
Date
BatchMaster Software Inc.
BMM User Manual
Employee: This is the unique identification of the employee selected via the Employee
range lookup. This is a read-only field.
Name: This is the name of the selected employee. The value in this field is defaulted
from the Employee Setup screen. This is a read-only field.
Work Center Id: This is the default Work Center associated with the employee at the
Employee Setup screen. This is a read-only field.
8.18.2
Defining Employee Schedule Generation
1. Select the range of Employees for whom the schedule is to be generated using
the lookup buttons next to the fields.
2. Select a Work Center using the lookup button next to the field.
3. Select a Shift using the lookup button next to the field.
4. Select the employees from the range for whom the selected work center-shift
combination schedule is to be generated by checking the selected box.
5. Select the days from the calendar on the screen for which the schedule is to be
generated.
6. Click on the Generate Schedule button to generate the desired schedules.
8.19 Employee Weekly Schedule
This screen is used to view and define the weekly schedule generated through Employee
Schedule Generation screen for an employee assigned to a particular work center. The
user can define the shifts in which the selected employee will be working on a particular
day. Working schedule of employees planned at a Work Center for the week
corresponding to the day selected will be displayed in grid at the bottom of the screen.
Mandatory Inputs
An Employee must be defined at the Employee Setup screen.
A Work Center must be established at the Work Center Setup screen.
A Shift must be defined at the Shift Master Setup screen and associated with a Work
Center at the Company Shift Setup screen.
Employee schedule should be generated for the selected employee at Employee
Schedule Generation Screen
Doc. No. F/DV/15
Rev.No.
Date
BatchMaster Software Inc.
8.19.1
BMM User Manual
Screen fields description
Employee: This is the employee for whom the weekly schedule is being viewed or
planned afresh.
Work Center: This is the work center at which the planned schedule is to be viewed or
maintained.
Schedule details grid screen fields
Date Work: The value in this field is the date for which the shift details are being
viewed or modified.
Shift ID: The value in this field is the shift in which the selected employee will work on
the date displayed in the Date Work field for that line.
Description: This is the description of the shift as defined at the Shift Master Setup
screen.
Begin Time: This is the time at which the selected shift begins. This is a read-only field.
The value in this field is defaulted with the begin time of the selected shift from the Shift
Master Setup screen.
End Time: This is the time at which the selected shift ends. This is a read-only field. The
value in this field is defaulted with the end time of the selected shift from the Shift
Master Setup screen.
Doc. No. F/DV/15
Rev.No.
Date
BatchMaster Software Inc.
BMM User Manual
Break Duration: This is the duration of the break for the selected shift. This is a readonly field. The value in this field is defaulted with the break duration of the selected shift
from the Shift Master Setup screen.
Available Time: This is the available time for the selected shift in minutes.
8.19.2
Defining Employee Weekly Schedule
1. Select an Employee Id using the lookup button next to the field.
2. Establish a Work Center using the lookup button next to the field.
3. Click on Get Schedule button to get employee weekly schedule.
8.20 Work Center Capacity Utilization
Work Center Capacity Utilization provides a way to view the schedule of a given work
center over a week‟s span. With this information, one can plan and manage resources so
that they work as closely to a 100% capacity as possible.
The screen displays the total available capacity in the week for the work center;
commitment capacity based on the operations of Manufacturing Orders scheduled in the
selected week, remaining capacity as the difference of the above quantities. Utilized
capacity field indicates the capacity of the work center consumed for doing the
completed operations.
User can select a week in the calendar displayed on this form to view the utilization of a
selected work center.
Doc. No. F/DV/15
Rev.No.
Date
BatchMaster Software Inc.
8.20.1
BMM User Manual
Mandatory Inputs
A work center must be defined at the Work Center Setup screen.
8.20.2
Screen fields description
Work Center: This is the work center for which the user wants to view the capacity
utilization.
Work Center Type: This is the type of the work center. It can be one of „Man‟ or
„Machine‟. The value in this field is defaulted from the Work Center setup screen.
Grid details field description
Date: This is the date of the year for which capacity utilization is being viewed.
Day: This is the day of the week for which capacity utilization is being viewed.
Total Capacity: The value in this field is the total capacity of the Work Center.
Committed: This value is the capacity of the work center that has been committed to
production.
Remaining: This value is the remaining capacity after allocation to production.
Doc. No. F/DV/15
Rev.No.
Date
BatchMaster Software Inc.
BMM User Manual
Utilized: This value is the capacity of the work center that was utilized during
production.
8.20.3
Defining Work Center Capacity Utilization
1.
Select a Work Center using the lookup button next to the Work Center field.
2.
Select a date on the calendar displayed on the screen to view the capacity
utilization of the work center for the week in which utilization date falls.
Click on OK button to save the record.
3.
8.21 Quick Labor/Machine Entry
The Quick Labor entry screen requires routing to be implemented for a Batch. The batch
details like quantity accepted/ rejected and Work Center details can be established here.
The details for employee, machine, setup time, Run time, start time, and end time can
also be established here. If routing has been implemented for a batch then BMM does
not let the user close a batch till Quick labor entry have been closed for routing lines of
that batch and the completed checkbox at the Quick labor entry screen is checked.
8.21.1
Screen fields description
Batch No: This field displays the number that uniquely identifies this Batch. This field is
defaulted from the batch number at the Batch Entry screen.
Description: This field displays the description of the formula used in the batch.
Status: This field shows the current status of the batch.
Posting Date: This field indicates the current system date.
Finished Good: This field indicates the finished good used in production.
Doc. No. F/DV/15
Rev.No.
Date
BatchMaster Software Inc.
BMM User Manual
Warehouse: This field shows the warehouse attached with finished good.
Quantity: This is the quantity of the end item being produced in the selected batch. This
value is defaulted from the Batch Entry screen.
Setup Time: This is the read only field.
Run Time: This is the read only field.
Operation No.: This field indicates the operation number for the batch.
Machine: This is the machine on which the selected employee works.
Machine Rate: This field indicates the applicable machine rate for the selected machine.
Employee: This field indicates the employee for which labor entry is defined.
Employee Rate: This field indicates the employee rate for the selected employee.
Start Time: This field indicates the time at which labor initiates its work.
End Time: This field indicates the time at which labor ends its work.
Accepted Quantity: This field indicates the quantity accepted for production.
Rejected Quantity: This field indicates the quantity rejected for production.
Journal Remark: This field is for information purpose only.
8.21.2
Defining Quick labor entry
1. Select the batch for which Quick labor entry is to be maintained.
2. Select the finished good, Operation no. and employee as desired.
3. Specify the Start time and End time.
4. If all quantities processed through work center, check the checkbox for complete.
5. Specify journal remarks if any.
6. Click on Add to save the record.
8.22 Production Scheduling Board
The production scheduling dashboard allows user to view the production batches and
schedule them as per the needs. Its GUI interface allows user to visualize plan that the
resources are well used but not overloaded and the dates are consistent with the
expected planned deliveries.
Doc. No. F/DV/15
Rev.No.
Date
BatchMaster Software Inc.
8.22.1
BMM User Manual
Dashboard Screen Description
Refresh Button: Clicking this button refreshes the screen with the latest values from
the BMM database. This is useful in case changes have been made to the database but
those changes are not reflected on the screen yet.
Filter Criteria
To retrieve the specific production batches data item in the dashboard grid, user has a
provision to apply distinct filters. The available filters are:
Production Date
In this filter criteria user can prescribes the production date range according to which the
production batches gets listed in the dashboard grid.
Doc. No. F/DV/15
Rev.No.
Date
BatchMaster Software Inc.
BMM User Manual
From
This Field denotes the Production Date from which you want to list the Production
Batches. The default value displayed depends on the date specified while inserting the
schedule. You can also alter the date by scrolling up or down or via the available
calendar attached to the field. The calendar facilitates to choose today‟s date or roll up
by month.
To
This field denotes the Production Date to which you want to list the Production Batches.
The default value displayed depends on the date specified while inserting the schedule.
You can also alter the date by scrolling up or down or via the available calendar attached
to the field. The calendar facilitates to choose today‟s date or roll up by month.
Multi Month View
Here the monthly calendar is available to choose the date from where the batches are
viewed on scheduling scale of dashboard.
Schedule Intervals
Put on view a dropdown menu, which offers a number of Schedule Calendar formats. You
may choose any style for visualizing the Production Schedule. The available options are:
1. Daily
2. Weekly
Doc. No. F/DV/15
Rev.No.
Date
BatchMaster Software Inc.
BMM User Manual
3. Hourly
4. Monthly
You can choose any option by scrolling up or down or by choosing from the dropdown
menu provided on the field.
Show Tool Tip
If checked this checkbox shows the basic details of the batch by moving the mouse
pointer at the specific batch on the scaling board of the dashboard.
Color Scheme
In dashboard grid distinct color codes are used to categorize batch details. Individual
color reveals to specific detail of dashboard. The color scheme available at the bottom
left pane of dashboard assists user to identify that which color denotes what specific
information.
Schedule Id: This field shows the identification key of the production schedule.
Group Id: This field shows the group identification key of the production schedule.
Status: This field shows the current status of batch.
Batch Scheduling Scale
The scheduling scale available on the dashboard shows all the batches that matches the
currently offered production date. User can reschedule the Batches just by dragging the
Batches to the preferred schedule date, on the Schedule Calendar Grid. After saving the
schedule, the specific changes get reflected on the Date field of the Production Batch
Detail Grid. The same can be uploaded to BMM as well.
Doc. No. F/DV/15
Rev.No.
Date
BatchMaster Software Inc.
BMM User Manual
Production scheduling dramatically improves the performance, followed up by Process
Cell attachment. In order to provide an attachment, you can drag the unassigned Batch
to its default Process Cell. Tag along with saving and updating the Batches the same
alteration can be easily viewed in BMM.
At the right hand side of the production scale board the basic details pertaining to the
selected batch get displayed.
Doc. No. F/DV/15
Rev.No.
Date
BatchMaster Software Inc.
8.22.1.1
BMM User Manual
Grid Fields Description
Batch Details Tab
Scheduled: The checkbox if checked denotes that the respective batch is already
scheduled.
Update Batches: This checkbox if checked indicates that the corresponding scheduled
batch is uploaded in BMM.
Batch No: Field displays the number that uniquely identifies the Batches created in
BMM and which exist within that schedule. In addition to this it also displays the MPS
/ MRP / User Defined Task Number if exists in the Schedule.
Batch Type: Field displays the type of the Batch. The type of the Batch could be any
from Mix, Fill, Assembly or User Defined Task.
Item Key: This is the item key associated with the selected end item that is to be
produced from this batch.
Location: This is the location associated with the selected Item Key.
Formula ID: The field would fetch the Formula ID associated with the Batch.
Origin: This field would fetch the origin of the batch namely Production, MPS, MRP
and User depending on the batch type.
Doc. No. F/DV/15
Rev.No.
Date
BatchMaster Software Inc.
BMM User Manual
Start Date: Field displays the date on which the production of this Batch/ MRP / MPS
/ User Defined Task is scheduled to start.
End Date: Field displays the date on which the production of this Batch/ MRP / MPS /
User Defined Task is scheduled to complete.
Quantity: This field shows the quantity of the batch line item.
Order Weight: This is the Order Weight of the batch and would be fetched from
BMM.
Order Volume: This is the Order Volume of the batch and would be fetched from
BMM.
Batch Weight: This is the Batch Weight associated to the batch and would be
fetched from BMM.
Batch Volume: This is the Batch Volume associated to the batch and would be
fetched from BMM
Process Cell: This is the Process Cell associated with this batch, which implies that
the production of this batch shall take place in this Process Cell.
Process cell capacity per day: This field shows the daily capacity of the process
cell.
Batch Completed %: The percentage completion of the batch gets displayed in this
field.
Notes: Any note if associated with a batch gets displayed in this field.
SO Number: This is the Sales Order number for which the batch is being produced.
Schedule Sequence: It shows the schedule sequence of the batch.
Uploaded: This checkbox if checked denotes that the respective batch is scheduled
and uploaded in BMM.
Exploring the hierarchy displays detail pertaining to batch line items.
Item Key: Field displays the line item used via the batch.
Line Type: Field displays the type of the Item Key as of Finished Goods (FG),
Formula Items (FI), and BOM Item (BI) etc.
Location: Field displays the location of the item.
Standard Quantity: This is the quantity of the material (expressed in the unit displayed at
the UNIT field).
Actual Quantity: Field displays the Actual Quantity of the item.
Doc. No. F/DV/15
Rev.No.
Date
BatchMaster Software Inc.
BMM User Manual
Issued Quantity / Qty Produced: Field displays the issued quantity of the
Formula Items and quantity produced for the Finished Goods.
Allocated Quantity: Field displays the allocated quantity for the item.
UOM: This field displays the unit for the various quantity fields for a material line
on that row.
Loss: This displays the „line loss‟ for this specific material line item in the
formula. This loss may occur while bringing the material to shop floor. This line
loss is entered as a fraction, not as a percentage.
Task tab
Apart from routine production job at times some tasks need to be executed. These may
include machine maintenance schedules or some regular off or any such activity that
may slow down your production process.
Task Id: This field denotes the unique identification key of the task.
Description: Any description if associated with a task gets displayed in this field.
Default Time (Hours): This field shows the number of hours presumed to perform the
task.
Add Task: Pressing this button opens a user define task screen to insert a new task.
Doc. No. F/DV/15
Rev.No.
Date
BatchMaster Software Inc.
BMM User Manual
Delete Task: On clicking this button the selected task gets deleted from the grid.
User Defined Task Screen
Screen allows defining tasks that needs to be executed apart from the routine production
job. These may include machine maintenance schedules or some regular off or any such
activity that may slow down your production process.
Screen Fields Description
Task Id: In this field user can specify the unique identification key of the task.
Task Description: Here user can specify the description or note pertaining to the task.
Normal Time for Task: In this field user can specify the presumed time consumption
required to complete the task. This time is in DD: HH:MM format.
Ok: Pressing this button save the record.
Cancel: Pressing this button cancel the record without saving it.
Delete: Delete the selected record permanently.
Defining User Defined Task
1. Click on Add Task button to enter a new task.
2. Enter a unique Task Id on the Task Id field.
3. Enter description of the Task on the Task description field.
4. Enter Normal Time for this task in DD: HH: MM format.
5. Click the Save button to save the User Defined Task.
Doc. No. F/DV/15
Rev.No.
Date
BatchMaster Software Inc.
BMM User Manual
Available Menu options
At the top of the dashboard distinct menus are available to perform activity.
New:
On pressing this button “Insert New Production Schedule” window pops up. Using this
screen one can insert a new schedule.
Schedule Id: This field holds the unique identification key of the schedule.
Group Id: This field holds the identification key of the Group.
Start Date: Field determines the lower limit of the range of Batches to be used as a
filter criterion for generating the Schedule.
End Date: Field determines the upper limit of the range of Batches to be used as a filter
criterion for generating the Schedule.
Batch Origin: Offers flexibility to associate the Batches / Orders created via Production,
MPS and MRP with the Schedule Id.
Ok: Clicking this button insert the schedule and displays it on the Production Schedule
screen.
Cancel: On pressing this button the schedule gets cancelled.
Save:
On pressing this button the changes made gets saved.
Update Batches:
Doc. No. F/DV/15
Rev.No.
Date
BatchMaster Software Inc.
BMM User Manual
Pressing this button updates the rescheduling of the Batches altered within the
Production Schedule. Verifying the Start Date and the End Date of the corresponding
Batches in BMM can reveal the changes. The changes can be viewed on the Batch Ticket
Screen of BMM.
While updating the schedule, if any other schedule lies under the same Group ID the
system then convert the outstanding schedules to cancel. Thus causes the Schedule
Status as “Canceled”. And causes the Status as Uploaded for the uploaded Schedule.
Print
Print the Production Schedule based on the various attributes defined on the Print
Setting screen.
Calendar Schedule Settings:
Doc. No. F/DV/15
Rev.No.
Date
BatchMaster Software Inc.
BMM User Manual
Print Style: Put on view a dropdown menu, which offers a number of print style
formats. You may choose any style for printing the Production Schedule. The field has
the following options:
1. Calendar details.
2. Daily.
3. Memo.
4. Monthly.
5. Timeline
6. Trifold.
7. Weekly.
8. Yearly.
You can choose any option by scrolling up or down or by choosing from the dropdown
menu provided on the field.
Start Date: Field displays the date from which you want to print the Batches. The
default value displayed is one week prior to the current date. You can also alter the date
by scrolling up or down or via the available calendar attached to the field. The calendar
facilitates to choose today‟s date or roll up by month.
End Date: Field displays the date up to which you want to print the Batches. The default
value displayed is one week subsequent to the current date. You can also alter the date
by scrolling up or down or via the available calendar attached to the field. The calendar
facilitates to choose today‟s date or roll up by month.
Print Color Style: The drop down available next to this field shows the options as Color,
Grayscale or Monochrome to print in different style.
Include Date Header: Checking this box includes Date Header definition on the printed
Production Schedule.
Include Calendar Notes: Checking this box includes Calendar Notes on the printed
Production Schedule.
Use Header & Footer: Checking this box includes Header and Footer definition on the
printed Production Schedule.
Merge owner Information: Checking this box merge the owner information on the
printed Production Schedule.
Include Blank Notes: Checking this box includes Blank Notes on the printed Production
Schedule.
Include Lined Notes: Checking this box includes Lined Notes on the printed Production
Schedule.
Include Title Page: Checking this box activates the Page Title text box, present
subsequently to this field, where you can specify the Page Title.
Doc. No. F/DV/15
Rev.No.
Date
BatchMaster Software Inc.
BMM User Manual
Max Pages: Field defines the maximum number of pages or range to be included while
printing.
Preview: Clicking the button helps to look over the page(s) or to make adjustments
before printing.
Close: Clicking on this button exits the Print Setting Window.
Delete
This button allows user to delete the specific schedule. After selecting the schedule
whenever user press this button, a confirmation dialog box gets opened. Here choosing
the option as „Yes’, delete the respective schedule and made its status as Cancelled.
Lookup
Retrieve the Schedule Id details.
Navigation Button
First: Navigates to the first schedule.
Previous: Navigates to the previous schedule.
Next: Navigates to the next schedule.
Last: Navigates to the last schedule.
Month View
The interactive Month View provides flexibility to quickly organize the Batches month
wise. You can attach specific process cell with the specified batch, just by clicking &
dragging the required Batches to the respective Process cell grid. The changes made to
the Batches get replicated on the Process Cell field of the above section.
Doc. No. F/DV/15
Rev.No.
Date
BatchMaster Software Inc.
BMM User Manual
Week view
The interactive Week View helps you to quickly organize the Batches week wise. You
can attach specific process cell with the specified Batch, just by clicking & dragging the
required Batches to the respective Process cell grid. The changes made to the Batches
get replicated on the Process Cell field of the above section.
Doc. No. F/DV/15
Rev.No.
Date
BatchMaster Software Inc.
BMM User Manual
Day View
The interactive Day View helps you to quickly organize the Batches day wise. You can
attach specific process cell with the specified Batch, just by clicking & dragging the
required Batches to the respective Process cell grid. The changes made to the Batches
get replicated on the Process Cell field of the above section.
Doc. No. F/DV/15
Rev.No.
Date
BatchMaster Software Inc.
BMM User Manual
Gant Chart View
The Gant Char View is the default view for new schedule. The View helps you to quickly
list the Batches and illustrates their relationship to one another. You can Schedule the
specified Batches, just by clicking & dragging the required Batches to the respective
Gant Bars (Graphical element on the chart portion of the Gant Chart view representing
the duration of the Batches / Orders / Task across a timeline).
Doc. No. F/DV/15
Rev.No.
Date
BatchMaster Software Inc.
BMM User Manual
Full View of Schedule Calendar
Clicking this button provides a zoom-in view of the Schedule Calendar Grid of the
Production Schedule screen. As the displayed Batch information is in read only mode,
thus the full-screen window does not support any changes to be made by you. The
screen provides details of the process cell attached to the existing Batches / Orders /
Task.
You can often carry out the printed format of the Schedule Calendar by choosing the
desired print setting. Moreover the Batch Indicator easily communicates the relevant
batch source.
The Multi Month View and the various Views (Month, Week & Day) are incorporated in
such a manner that the selection made for a day in Multi Month View reflects the same
on Screen as and vice versa.
Doc. No. F/DV/15
Rev.No.
Date
BatchMaster Software Inc.
BMM User Manual
Generate Schedule
Generate Schedule is one of the greatest features of BM-SAP. After you have inserted
the Schedule or made the changes to the Batches just click this button, this would
schedule your Batch Start Date and End Date, based on the Process Cell Formula
Capacity.
Reset Sorting
Clicking the button will revert all the sorting done on the grid to the previous format.
Sorting can be applied to multiple columns via pressing Shift + clicking the required
columns one by one.
Add Task and Generate Schedule
You can use this feature to schedule a User Task or an activity or a program to run in
between manufacturing process for a specified time.
Dispatch Report
On pressing this button a report of scheduled batches gets generated as below.
Doc. No. F/DV/15
Rev.No.
Date
BatchMaster Software Inc.
BMM User Manual
8.22.1.2 Key Operations
8.22.1.2.1 Entering New Production Schedule
1. Click the New button on the Production Schedule toolbar. It pops up a new
Production Schedule windowpane.
2. Enter a unique Schedule Id.
3. Select the Start Date and End Date.
4. Check in the required Batch Origin as Production or MPS or MRP.
5. Save the Production Schedule.
6. Click on Ok button to save the Production Schedule, doing so displays the
schedule on the main screen.
8.22.1.2.2
Printing Production Schedule
1. Click the Print Button on the Production Schedule Toolbar It Pops up a new Print
Settings Windowpane.
2. Select the Print Style Type using the drop down menu provided on the field.
3. Select and enter a Start, End Date.
4. If required opt for the available printing options such as Include Header, Use
Header and Footer etc.
5. If checked Include Page Title option enter the page title in the Below Field.
6. Enter the Max. Pages count.
Doc. No. F/DV/15
Rev.No.
Date
BatchMaster Software Inc.
BMM User Manual
7. Finally Click the Preview button to preview the Production Schedule.
8.22.1.2.3 Updating a Production Schedule
1. Select the Schedule in which you desire to make amendments.
2. Drag the drop the batches on the required date, to reschedule.
3. Click the Update Batches button on the Toolbar to permanently save the changes
within BMM database.
4. You can check the rescheduling of Batches via the changed Start and End date on
the Production Schedule grid.
5. The system prompts a message and changes the status as Uploaded. Press ok to
continue.
8.22.1.2.4 Generating a Production Schedule
1. Select the Schedule in which you desire to make amendments.
2. Click the Generate Schedule button, to create the Schedule.
3. Click the Save button to save the changes.
8.22.1.2.5 Add Task and Generate Schedule
1. Select the Schedule in which you desire to make amendments.
2. Click the Add task And Generate button, to add the specific Task to the schedule.
3. Select the Task via the lookup provided next to the field.
4. Press ok to continue.
5. Finally, click the Save button to save the changes.
8.23 Scheduling
Scheduling is an important tool for manufacturing where it can have a major impact on
the productivity of a process. Scheduling for a batch can be maintained on Scheduling
screen for the Batch with New status only. Scheduling is mainly of two types-Forward
and Backward scheduling.
8.23.1
Screen fields description
Doc. No. F/DV/15
Rev.No.
Date
BatchMaster Software Inc.
BMM User Manual
Batch Number Range
From Batch: This field displays the lower limit of the batch to which scheduling is to be
done. The „from batch‟ can be selected from the values provided via lookup.
To Batch: This field displays the upper limit of the batch to which scheduling is to be
done. The „from batch‟ can be selected from the values provided via lookup.
Scheduling Method: This field displays the scheduling methods as Forward and
Backward scheduling.
8.23.2
Steps to generate scheduling
1. Specify the Batch number range.
2. Select the Scheduling method type.
3. Click on Run to generate scheduling.
8.24 Production Reports
8.24.1
Batches in Process Report
Screen makes available report generation showing the batches in process.
User can employ the option‟s filtering parameters to define the report. Once processes
the report parameters, it displays the results as a Crystal Report that one can print or
export.
8.24.1.1
Screen Fields Description
Doc. No. F/DV/15
Rev.No.
Date
BatchMaster Software Inc.
BMM User Manual
Formula Key From: Field displays the lower limit of the range of Formula Key for use as
filter criteria during processing. Leaving this field blank has the same effect as selecting
the first available Formula Key via the lookup.
Formula Key To: Field displays the upper limit of the range of Formula Key for use as
filter criteria during processing. Leaving this field blank has the same effect as selecting
the last available Formula Key via the lookup.
Batch Number From: Field displays the lower limit of the range of Batch Number for
use as filter criteria during processing. Leaving this field blank has the same effect as
selecting the first available Batch Number via the lookup.
Batch Number To: Field displays the upper limit of the range of Batch Number for use
as filter criteria during processing. Leaving this field blank has the same effect as
selecting the last available Batch Number via the lookup.
Batch Status: Field displays the batch statuses to be included while generating the
report.
Schedule Start Date: Field displays the lower limit of the range of Schedule start Date
for use as filter criteria during processing.
Schedule Completion Date: Field displays the upper limit of the range of Schedule
Date for use as filter criteria during processing.
Customer From: Field displays the lower limit of the range of Customer Key for use as
filter criteria during processing. Leaving this field blank has the same effect as selecting
the first available Customer Key via the lookup.
Customer To: Field displays the upper limit of the range of Customer Key for use as
filter criteria during processing. Leaving this field blank has the same effect as selecting
the last available Customer Key via the lookup.
Report Path: Field clutches the default path of the report.
8.24.1.2
Generating a Batches in Process Report
1. Complete the Formula From and To range using the lookup buttons next to the
fields.
2. Complete the Batch From and To range using the lookup buttons on the toolbar
next to the fields.
3. Select the Batch Status, as required.
4. Select Schedule start date and Schedule completion date using the drop-down
arrows range respectively.
5. Enter the Customer From and To range using the lookup buttons on the toolbar
next to the fields
6. Click on the Ok button to create a report.
Doc. No. F/DV/15
Rev.No.
Date
BatchMaster Software Inc.
8.24.2
BMM User Manual
Batch Ticket Report
Screen provides a way to generate a report showing batch tickets created using the
Batch Ticket screen.
User can employ the option‟s filtering parameters to define the report. Once processes
the report parameters, it displays the results as a Crystal Report that one can print or
export.
Doc. No. F/DV/15
Rev.No.
Date
BatchMaster Software Inc.
8.24.2.1
BMM User Manual
Screen Fields Description
Batch Number From: Field displays the lower limit of the range of Batch Number for
use as filter criteria during processing. Leaving this field blank has the same effect as
selecting the first available Batch Number via the lookup.
Batch Number To: Field displays the upper limit of the range of Batch Number for use
as filter criteria during processing. Leaving this field blank has the same effect as
selecting the last available Batch Number via the lookup.
Batch Status: Field displays the batch statuses to be included while generating the
report.
Include Boilerplate: Select this option to include Formula Boilerplates associated with
the selected range fo batches to be included in Report.
Include Literal Text: Field specifies whether to include Literal Text in the report or not.
Checking the field denotes literal Text is to be included.
Include labor line: Field specifies whether to include labor line in the report or not.
Checking the field denotes labor line is to be included.
Print QC: Field specifies whether to print QC in the report or not. Checking the field
denotes QC is to be printed.
Print BOM Info: Field specifies whether to print BOM Information in the report or not.
Checking the field denotes BOM information is to be printed.
Print Batch Tracking: Field specifies whether to print Batch Tracking in the report or
not. Checking the field denotes Batch Tracking is to be printed.
Doc. No. F/DV/15
Rev.No.
Date
BatchMaster Software Inc.
BMM User Manual
Print Lot Details: Field specifies whether to print Lot details in the report or not.
Checking the field denotes Lot details is to be printed.
Print Notes: Field specifies whether to print Notes in the report or not. Checking the
field denotes Notes is to be printed.
Formula Key From: Field specifies the lower limit of the range of Formula Key for use
as filter criteria during processing. Leaving this field blank has the same effect as
selecting the first available Formula Key via the lookup.
Formula Key To: Field specifies the upper limit of the range of Formula Key for use as
filter criteria during processing. Leaving this field blank has the same effect as selecting
the last available Formula Key via the lookup.
Schedule Start Date: Field specifies the lower limit of the range of Schedule start Date
for use as filter criteria during processing.
Schedule Completion Date: Field specifies the upper limit of the range of Schedule
Date for use as filter criteria during processing.
Report Path: Field encompasses the default path of the report.
8.24.2.2
Generating a Batch Ticket Report
1. Complete the Batch From and To range using the lookup buttons next to the
fields.
2. Select the Status, as required.
3. Check on the boxes to the left of the Include Boilerplates, Include Literal Text,
Include Labor Line, Print Batch Tracking, Print QC, Print BOM Info, Print Notes,
Print Byproduct Info, and Print Lot Details to enable these features as needed.
4. Enter the Formula From and To range using the lookup buttons next to the fields.
5. Select Schedule Start Date From and To range using the drop-down respectively.
6. Click on the OK button to create the report.
Doc. No. F/DV/15
Rev.No.
Date
BatchMaster Software Inc.
8.24.3
BMM User Manual
Critical Material Report
Screen provides a way to generate a report showing materials that are lacking in the
inventory and are needed to meet production obligations.
User can employ the option‟s filtering parameters to define the report. Once processes
the report parameters, it displays the results as a Crystal Report that one can print or
export.
8.24.3.1
Screen Fields Description
Doc. No. F/DV/15
Rev.No.
Date
BatchMaster Software Inc.
BMM User Manual
Formula Key From: Field displays the lower limit of the range of Formula Key for use as
filter criteria during processing. Leaving this field blank has the same effect as selecting
the first available Formula Key via the lookup.
Formula Key To: Field displays the upper limit of the range of Formula Key for use as
filter criteria during processing. Leaving this field blank has the same effect as selecting
the last available Formula Key via the lookup.
Batch Number From: Field displays the lower limit of the range of Batch Number for
use as filter criteria during processing. Leaving this field blank has the same effect as
selecting the first available Batch Number via the lookup.
Batch Number To: Field displays the upper limit of the range of Batch Number for use
as filter criteria during processing. Leaving this field blank has the same effect as
selecting the last available Batch Number via the lookup.
Item Type: Field specifies the Item Type to be included in the report.
Apply Date: Field specifies the date for which the report is to be generated.
Report Path: Field clasps the default path of the report.
8.24.3.2
Generating a Critical Material Report
1. Enter the Formula From and To range using the lookup buttons next to the fields.
2. Enter the Batch From and To range using the lookup buttons next to the fields.
3. Select Item Type, as per requirement.
4. Select Apply Date From using the drop-down. (When the process button is
clicked, the critical report will be generated as of this apply date.)
5. Click on the OK button to create the report.
Doc. No. F/DV/15
Rev.No.
Date
BatchMaster Software Inc.
8.24.4
BMM User Manual
Production History Summary Report
Screen provides a way to generate a report, showing a summary of a batch‟s information
including completion date, labor cost and overhead cost. Generated reports also contain,
on a used and yield basis, information about the batch‟s weight and volume
characteristics.
User can employ the option‟s filtering parameters to define the report. Once processes
the report parameters, it displays the results as a Crystal Report that one can print or
export.
Doc. No. F/DV/15
Rev.No.
Date
BatchMaster Software Inc.
8.24.4.1
BMM User Manual
Screen Fields Description
Formula Key From: Field displays the lower limit of the range of Formula Key for use as
filter criteria during processing. Leaving this field blank has the same effect as selecting
the first available Formula Key via the lookup.
Formula Key To: Field displays the upper limit of the range of Formula Key for use as
filter criteria during processing. Leaving this field blank has the same effect as selecting
the last available Formula Key via the lookup.
Batch Number From: Field displays the lower limit of the range of Batch Number for
use as filter criteria during processing. Leaving this field blank has the same effect as
selecting the first available Batch Number via the lookup.
Batch Number To: Field displays the upper limit of the range of Batch Number for use
as filter criteria during processing. Leaving this field blank has the same effect as
selecting the last available Batch Number via the lookup.
Batch Status: Field specifies the batch statuses to be included while generating the
report.
Completion Date From: Field specifies the lower limit of the range of Completion Date
for use as filter criteria during processing.
Completion Date To: Field specifies the upper limit of the range of Completion Date for
use as filter criteria during processing.
Customer From: Field specifies the lower limit of the range of Customer Key for use as
filter criteria during processing. Leaving this field blank has the same effect as selecting
the first available Customer Key via the lookup.
Customer To: Field specifies the upper limit of the range of Customer Key for use as
filter criteria during processing. Leaving this field blank has the same effect as selecting
the last available Customer Key via the lookup.
Doc. No. F/DV/15
Rev.No.
Date
BatchMaster Software Inc.
BMM User Manual
Report Path: Field clasps the default path of the report.
8.24.4.2
Generating a Production History Summary Report
1. Enter the Formula From and To range using the lookup buttons next to the fields.
2. Enter the Batch From and To range using the lookup buttons on the toolbar next
to the fields.
3. Select the Batch Status, as required.
4. Select Completion date Form and To range using the drop-down arrows
respectively.
5. Enter the Customer From and To range using the lookup buttons on the toolbar
next to the fields.
6. Click on the OK button to create the report.
8.24.5
Production History Detail Report
Screen provides a way to generate a report showing detailed information about a batch.
In addition to containing summary information about a batch, generated reports contain
detailed information about all the items contained within a batch. This information
includes item Warehouse, quantity specifics, cost specifics and cost variances.
User can employ the option‟s filtering parameters to define the report. Once processes
the report parameters, it displays the results as a Crystal Report that one can print or
export.
Doc. No. F/DV/15
Rev.No.
Date
BatchMaster Software Inc.
8.24.5.1
BMM User Manual
Screen Fields Description
Formula Key From: Field displays the lower limit of the range of Formula Key for use as
filter criteria during processing. Leaving this field blank has the same effect as selecting
the first available Formula Key via the lookup.
Formula Key To: Field displays the upper limit of the range of Formula Key for use as
filter criteria during processing. Leaving this field blank has the same effect as selecting
the last available Formula Key via the lookup.
Batch Number From: Field displays the lower limit of the range of Batch Number for
use as filter criteria during processing. Leaving this field blank has the same effect as
selecting the first available Batch Number via the lookup.
Batch Number To: Field displays the upper limit of the range of Batch Number for use
as filter criteria during processing. Leaving this field blank has the same effect as
selecting the last available Batch Number via the lookup.
Batch Status: Field specifies the batch statuses to be included while generating the
report.
Print QC Info: Field specifies whether to print QC in the report or not. Check this field if
QC is to be printed.
Print By Product Inf: Field specifies whether to print By Product Information in the
report or not. Check this field if By Product Information is to be printed.
Print Finished Goods Info: Field specifies whether to print Finished good details in the
report or not. Check this field if finished goods information is to be printed.
Completion Date From: Field specifies the lower limit of the range of Completion Date
for use as filter criteria during processing.
Doc. No. F/DV/15
Rev.No.
Date
BatchMaster Software Inc.
BMM User Manual
Completion Date To: Field specifies the upper limit of the range of Completion Date for
use as filter criteria during processing.
Customer From: Field specifies the lower limit of the range of Customer Key for use as
filter criteria during processing. Leaving this field blank has the same effect as selecting
the first available Customer Key via the lookup.
Customer To: Field specifies the upper limit of the range of Customer Key for use as
filter criteria during processing. Leaving this field blank has the same effect as selecting
the last available Customer Key via the lookup.
Report Path: Field clutches the default path of the report.
8.24.5.2
Generating a Production History Detail Report
1. Enter the Batch From and To range using the lookup buttons next to the fields.
2. Select the Status, as required.
3. Check on the boxes to the left of the Print QC Info, Print Lot Details, Print
Byproduct Info, Print Finished Good Info and Print Formula Lines to enable these
features as needed.
4. Select Completion Date From and To range using the drop-down arrows
respectively.
5. Enter the Formula From and To range using the lookup buttons next to the fields.
6. Enter the Customer From and To range using the lookup buttons next to the
fields.
7. Click on the OK button to create the report.
Doc. No. F/DV/15
Rev.No.
Date
BatchMaster Software Inc.
8.24.6
BMM User Manual
Batchwise Lot Details Report
Report shows the lot details for several items that are lot tracked from a batch. It
contains the subsequent in sequence:
1. Lot Number
2. Item No.
3. Whse
4. Quantity in Stock Unit
5. Stock Unit
6. Quantity in Display Unit
7. Display Unit
Doc. No. F/DV/15
Rev.No.
Date
BatchMaster Software Inc.
8.24.6.1
BMM User Manual
Screen Fields Description
Batch Number From: Field displays the lower limit of the range of Batch Number for
use as filter criteria during processing. Leaving this field blank has the same effect as
selecting the first available Batch Number via the lookup.
Batch Number To: Field displays the upper limit of the range of Batch Number for use
as filter criteria during processing. Leaving this field blank has the same effect as
selecting the last available Batch Number via the lookup.
Report Path: Field clutches the default path of the report.
8.24.6.2
Generating a Batch wise Lot Details Report
1. Enter the Batch From and To range using the lookup buttons next to the fields.
2. Click on the OK button to create a report.
Doc. No. F/DV/15
Rev.No.
Date
BatchMaster Software Inc.
8.24.7
BMM User Manual
Super Batch Ticket Report
Report Screen provides the means to create a report detailing the batch ticket
information for a super batch and its components sub-batches. With it, user can examine
when each component, super batch or sub-batch, began and finished production; its
formula and status, its order in the execution sequence and the low level code. User can
also create a unique name for a report that is used on a regular basis, save that report‟s
defined parameters and then run that defined report on a regular basis.
Super Batch Ticket Report can be useful when user wants to have an overview of the
production activity associated with a specific super batch or a range of super batches. It
is particularly helpful in those instances where the sub-batches in a super batch are at
different stages in the manufacturing flow. Each report produced by Super Batch Ticket
Report contains the following information:
1. Super Batch Number
2. Low Level Code
3. Batch Number
4. Execution Sequence Order
5. Status
6. Start Date
7. End Date
Doc. No. F/DV/15
Rev.No.
Date
BatchMaster Software Inc.
8.24.7.1
BMM User Manual
Screen Fields Description
Super Batch Number From: Field displays the lower limit of the range of Super Batch
Number for use as filter criteria during processing. Leaving this field blank has the same
effect as selecting the first available Super Batch Number via the lookup.
Super Batch Number To: Field displays the upper limit of the range of Super Batch
Number for use as filter criteria during processing. Leaving this field blank has the same
effect as selecting the last available Super Batch Number via the lookup.
Batch Status: Field specifies the batch statuses to be included while generating the
report.
Include BoilerPlate: Field specifies whether to include boilerplate in the report or not.
Check this field if boilerplate is to be included.
Include Literal Text: Field specifies whether to include Literal Text in the report or not.
Check this field if literal Text is to be included.
Print Batch Tracking: Field specifies whether to print Batch Tracking in the report or
not. Check this field if Batch Tracking is to be printed.
Print QC: Field specifies whether to print QC in the report or not. Check this field if QC is
to be printed.
Print BOM Info: Field specifies whether to print BOM Information in the report or not.
Check this field if BOM information is to be printed.
Print Notes: Field specifies whether to print Notes in the report or not. Check this field
if Notes is to be printed.
Print BY Product Info: Field specifies whether to print By-product Information in the
report or not. Check this field if By-Product information is to be printed.
Doc. No. F/DV/15
Rev.No.
Date
BatchMaster Software Inc.
BMM User Manual
Print Lot Details: Field specifies whether to print Lot details in the report or not. Check
this field if Lot details is to be printed.
Report Path: Field clutches the default path of the report.
8.24.7.2
Generating a Super Batch Ticket Report
1. Enter the Super Batch No. From and To range using the lookup button.
2. Check on the boxes to the left of the Include Boilerplates, Include Literal Text,
Print Batch Tracking, Print QC, Print BOM Info, Print Notes, Print Byproduct Info
and Print Lot Details to enable these features as needed.
3. Select the Status, as required.
4. Click on the OK button to create the report.
8.24.8
SuperBatchwise Lot Details Report
The Super Batchwise Lot Details Report provides the means to produce reports on the
critical details for lots associated with each super batch and its component sub-batches.
User can create a report for a single super batch and its components, or a range of super
batches and their components. The user can also create a unique name for a report
which is used on a regular basis, save that report‟s defined parameters and then run that
defined report on a regular basis.
The user may find Using Super Batchwise Lot Details report helpful when it is required to
determine the production information for the lots operations without having to open each
Doc. No. F/DV/15
Rev.No.
Date
BatchMaster Software Inc.
BMM User Manual
super batch in one of the Super Batch screens. Each report produced by Super Batchwise
Lot Details Report contains the following information:
1. Super Batch Number
2. Batch Number (of the sub-batch)
3. Lot Number
4. Item No.
5. Whse
6. Quantity in Stock
7. Stock Unit
8. Quantity in Display Unit
9. Display Unit
8.24.8.1
Screen Fields Description
Super Batch Number From: Field displays the lower limit of the range of Super Batch
Number for use as filter criteria during processing. Leaving this field blank has the same
effect as selecting the first available Super Batch Number via the lookup.
Super Batch Number To: Field displays the upper limit of the range of Super Batch
Number for use as filter criteria during processing. Leaving this field blank has the same
effect as selecting the last available Super Batch Number via the lookup.
Report Path: Field clutches the default path of the report.
8.24.8.2
Creating a Super Batchwise Lot Details Report
1. Enter the Super Batch No. From and To range using the lookup buttons next to
the fields.
2. Click on the OK button to create the report.
Doc. No. F/DV/15
Rev.No.
Date
BatchMaster Software Inc.
8.24.9
BMM User Manual
Max. Producible by Stock
Screen provides a way to generate a report showing the Maximum Producible quantity of
an end item with respect to the limiting availability of an ingredient.
User can employ the option‟s filtering parameters to define the report. Once processes
the report parameters, it displays the results as a Crystal Report that one can print or
export.
8.24.9.1
Screen Fields Description
Doc. No. F/DV/15
Rev.No.
Date
BatchMaster Software Inc.
BMM User Manual
Formula From: Field displays the lower limit of the range of Formula for use as filter
criteria during processing. Leaving this field blank has the same effect as selecting the
first available Formula via the lookup.
Formula To: Field displays the upper limit of the range of Formula for use as filter
criteria during processing. Leaving this field blank has the same effect as selecting the
last available Batch via the lookup.
Report Path: Field clutches the default path of the report.
8.24.9.2
Creating a Max Producible by Stock Report
1. Enter the Formula From and To range using the lookup buttons next to the fields.
2. Click on the OK button to create the report.
8.24.10 Material Where-Used Report
Screen provides a way to generate a report of batch numbers associated with an Item
No. that is:
1. Produced as a Finished Good or Byproduct via that batch.
2. Utilized by the batch as a Formula Material or Assembly Item.
User can also specify the statuses of the batches to be displayed on the report.
Doc. No. F/DV/15
Rev.No.
Date
BatchMaster Software Inc.
BMM User Manual
User can employ the option‟s filtering parameters to define the report. Once processes
the report parameters, it displays the results as a Crystal Report that one can print or
export.
8.24.10.1 Screen Fields Description
Finished Good / By Product: Field specifies whether to generate report for the
material used in Finished Good or By Product.
Formula Material/ Assembly Item: Select this option if the report is to be generated
for the materials used in Formula or Assembly Item.
New: Field specifies whether to generate report for the material used in „New„type of
Batch or not.
Issued: Field specifies whether to generate report for the material used in Issued Batch
or not.
Cancelled: Field specifies whether to generate report for the material used in Canceled
Batch or not.
Closed: Field specifies whether to generate report for the material used in „Closed „Batch
or not.
Allocated: Field specifies whether to generate report for the material used in „Allocated
„Batch or not.
Hold: Field specifies whether to generate report for the material used in Batch which are
on Hold or not.
Partially Closed: Field specifies whether to generate report for the material used in
„Partially Closed „Batch or not.
Doc. No. F/DV/15
Rev.No.
Date
BatchMaster Software Inc.
BMM User Manual
Item No. From: Field specifies the lower limit of the range of Item No. for use as filter
criteria during processing. Leaving this field blank has the same effect as selecting the
first available Item No. via the lookup.
Item No. To: Field specifies the upper limit of the range of Item No. for use as filter
criteria during processing. Leaving this field blank has the same effect as selecting the
last available Item No. via the lookup.
Whse From: Field specifies the lower limit of the range of Whse for use as filter criteria
during processing. Leaving this field blank has the same effect as selecting the first
available Whse via the lookup.
Whse To: Field specifies the upper limit of the range of Whse for use as filter criteria
during processing. Leaving this field blank has the same effect as selecting the last
available Whse via the lookup.
New Page For Each Items: Field specifies whether to generate the report with new
page for each item or not.
Report Path: Field clutches the default path of the report.
8.24.10.2 Generating a Material Where Used Report
1. Select one of Finished Good/Byproduct or Formula Material/Assembly Items
option by clicking the radio button.
2. Select or unselect the various batch statuses as needed.
3. Enter the Item No. From and To range using the lookup buttons next to the
fields.
4. Enter the Whse From and To range using the lookup buttons next to the
fields.
5. Click on the „New Page For Each Item‟ box to enable this feature.
6. Click on the OK button to create a report.
Doc. No. F/DV/15
Rev.No.
Date
BatchMaster Software Inc.
BMM User Manual
8.24.11 Raw Material Requirement Analysis
Screen provides a way to generate a report showing the quantities of formula items
required to produce a specific quantity of an end item. Sizing the requirement of raw
material for a Batch or a Super Batch can also be done via this Report screen.
User can employ the option‟s filtering parameters to define the report. Once processes
the report parameters, it displays the results as a Crystal Report that one can print or
export.
Doc. No. F/DV/15
Rev.No.
Date
BatchMaster Software Inc.
BMM User Manual
8.24.11.1 Screen Fields Description
Finished Good Key: Field specifies the finished good key for which the report is to be
generated.
Warehouse: Field specifies the warehouse for which the report is generated.
Quantity: Field specifies the quantity with which the report is to be generated.
Batch: Select this option if the report is to be generated for material requirement in
batches.
Super Batch: Select this option if the report is to be generated for material requirement
in super batch.
Report Path: Field clutches the default path of the report.
8.24.11.2 Generating a Raw Material Requirement Report
1. Select the Finished Good Key using the lookup button next to the field.
2. Enter the Quantity.
3. Select Batch or Super Batch.
4. Click on the OK button to create the report.
Doc. No. F/DV/15
Rev.No.
Date
BatchMaster Software Inc.
BMM User Manual
8.24.12 Pick List Report
It lists the items required to make the selected batches. Any applicable lot numbers of
the items are also displayed for allocated or issued items. The Actual Quantity should be
interpreted as the quantity to be issued.
User can employ the option‟s filtering parameters to define the report. Once processes
the report parameters, it displays the results as a Crystal Report that one can print or
export.
8.24.12.1 Screen Fields Description
Doc. No. F/DV/15
Rev.No.
Date
BatchMaster Software Inc.
BMM User Manual
Date From: Field displays the lower limit of the range of Date for use as filter criteria
during processing.
Date To: Field displays the upper limit of the range of Date for use as filter criteria
during processing.
Batch Number From: Field specifies the lower limit of the range of Batch Number for
use as filter criteria during processing. Leaving this field blank has the same effect as
selecting the first available Batch Number via the lookup.
Batch Number To: Field specifies the upper limit of the range of Batch Number for use
as filter criteria during processing. Leaving this field blank has the same effect as
selecting the last available Batch Number via the lookup.
Report Path: Field clutches the default path of the report.
8.24.12.2 Generating a Pick List Report
1. Select the Batch From and To range using the lookup buttons next to the
fields.
2. Click on the OK button to create the report.
8.24.13 Production Cost Summary Report
Screen provides a way to generate a report showing the summary of total production
costs for production batches. User can employ the option‟s filtering parameters to define
Doc. No. F/DV/15
Rev.No.
Date
BatchMaster Software Inc.
BMM User Manual
the report choosing between the Production Cost Summary or History of Production Cost
Summary and date range criteria.
Once processes the report parameters, it displays the results as a Crystal Report that
one can print or export.
8.24.13.1 Screen Fields Description
Report Type: This report can be generated with two options namely
1. Production Cost Summary report
2. Production Cost Summary report (History)
Formula Key From: Field displays the lower limit of the range of Formula for use as
filter criteria during processing. Leaving this field blank has the same effect as selecting
the first available Formula via the lookup.
Formula Key To: Field displays the upper limit of the range of Formula for use as filter
criteria during processing. Leaving this field blank has the same effect as selecting the
last available Batch via the lookup.
Item No. From: Field displays the lower limit of the range of Item for use as filter
criteria during processing. Leaving this field blank has the same effect as selecting the
first available Item No. via the lookup.
Item No. To: Field displays the upper limit of the range of Item for use as filter criteria
during processing. Leaving this field blank has the same effect as selecting the last
available Item No. via the lookup.
Warehouse From: Field displays the lower limit of the range of warehouse for use as
filter criteria during processing. Leaving this field blank has the same effect as selecting
the first available Whse via the lookup.
Doc. No. F/DV/15
Rev.No.
Date
BatchMaster Software Inc.
BMM User Manual
Warehouse To: Field displays the upper limit of the range of warehouse for use as filter
criteria during processing. Leaving this field blank has the same effect as selecting the
last available Whse via the lookup.
Completion Date From: Field displays the lower limit of the range of Completion Date
for use as filter criteria during processing.
Completion Date To: Field displays the upper limit of the range of Completion Date for
use as filter criteria during processing.
Report Path: Field clutches the default path of the report.
8.24.13.2 Generating a Production Cost Summary Report
1. Click the Production Cost Summary Report or Production Cost Summary
Report History.
2. Select the Formula Key From and To range using the lookup buttons next to
the fields.
3. Select the Item No. From and To range using the lookup buttons next to the
fields.
4. Select the Whse From and To range using the lookup buttons next to the
fields.
5. Select Completion Date From and To range using the drop-down arrows
respectively.
6. Click on the OK button to create the report.
Doc. No. F/DV/15
Rev.No.
Date
BatchMaster Software Inc.
BMM User Manual
8.24.14 Production Summary Report
Screen provides a way to generate a report showing the total production, by volume or
by weight, for end items. It also includes Completion date, Customer Key and unit raw
material cost by system weight or by system volume.
User can employ the option‟s filtering parameters to define the report. Once processes
the report parameters, it displays the results as a Crystal Report that one can print or
export.
8.24.14.1 Screen Fields Description
Measured In: Report can be engender with the subsequent preferences
1. By Weight
2. By Volume
Report Type: Options accessible for report type are
1. Formula Production Report
2. Formula Production Report (History)
Formula Key From: Field displays the lower limit of the range of Formula for use as
filter criteria during processing. Leaving this field blank has the same effect as selecting
the first available Formula via the lookup.
Formula Key To: Field displays the upper limit of the range of Formula for use as filter
criteria during processing. Leaving this field blank has the same effect as selecting the
last available Batch via the lookup.
Doc. No. F/DV/15
Rev.No.
Date
BatchMaster Software Inc.
BMM User Manual
Batch Number From: Field displays the lower limit of the range of Batch Number for
use as filter criteria during processing. Leaving this field blank has the same effect as
selecting the first available Batch Number via the lookup.
Batch Number To: Field displays the upper limit of the range of Batch Number for use
as filter criteria during processing. Leaving this field blank has the same effect as
selecting the last available Batch Number via the lookup.
Customer Key From: Field displays the lower limit of the range of Customer Key for
use as filter criteria during processing. Leaving this field blank has the same effect as
selecting the first available Customer Key via the lookup.
Customer Key To: Field displays the upper limit of the range of Customer Key for use
as filter criteria during processing. Leaving this field blank has the same effect as
selecting the last available Customer Key via the lookup.
Completion Date From: Field displays the lower limit of the range of Completion Date
for use as filter criteria during processing.
Completion Date To: Field displays the upper limit of the range of Completion Date for
use as filter criteria during processing.
Report Path: Field clamps the default path of the report.
8.24.14.2 Generating a Production Summary Report
1. Select Measure In as By Weight or By Volume.
2. Select the Report Type as Production Summary Report or Production
Summary Report (History).
3. Select the Batch From and To range using the lookup buttons next to the
fields.
4. Select the Formula From and To range using the lookup buttons next to the
fields.
5. Select the Customer From and To range using the lookup buttons next to the
fields.
6. Select Completion Date From and To range using the drop-down arrows
respectively.
7. Click on the OK button on the toolbar to create a report.
Doc. No. F/DV/15
Rev.No.
Date
BatchMaster Software Inc.
BMM User Manual
8.24.15 Formula Production Report
Screen provides a way to generate a report showing the total quantity of end items
produced via selected formulas. It also provides a way to generate overall material cost
and quantity weight or volume for the selected date range for each of the selected
formulas. In addition, the report displays the average of cost and yield for the selected
duration. These numbers are also converted to monthly and annualized averages.
User can employ the option‟s filtering parameters to define the report. Once processes
the report parameters, it displays the results as a Crystal Report that one can print or
export.
Doc. No. F/DV/15
Rev.No.
Date
BatchMaster Software Inc.
BMM User Manual
8.24.15.1 Screen Fields Description
Measured In: Report can be engender with the subsequent preferences
1. By Weight
2. By Volume
Report Type: Options accessible for report type are
1. Formula Production Report
2. Formula Production Report (History)
Formula Key From: Field displays the lower limit of the range of Formula for use as
filter criteria during processing. Leaving this field blank has the same effect as selecting
the first available Formula via the lookup.
Formula Key To: Field displays the upper limit of the range of Formula for use as filter
criteria during processing. Leaving this field blank has the same effect as selecting the
last available Batch via the lookup.
Formula Class From: Field displays the lower limit of the range of formula classes for
use as filter criteria during processing. This Formula Class may be entered by typing or
selected via the associated lookup on this screen.
Formula Class To: Field displays the upper limit of the range of formula classes for
use as filter criteria during processing. This Formula Class may be entered by typing or
selected via the associated lookup on this screen.
Doc. No. F/DV/15
Rev.No.
Date
BatchMaster Software Inc.
BMM User Manual
Status From: Field displays the lower limit of the range of Formula status for use as
filter criteria during processing. Leaving this field blank has the same effect as selecting
the first available Formula status via the lookup.
Status To: field displays the upper limit of the range of Formula status for use as filter
criteria during processing. Leaving this field blank has the same effect as selecting the
last available status via the lookup.
Completion Date From: Field displays the lower limit of the range of Completion Date
for use as filter criteria during processing.
Completion Date To: Field displays the upper limit of the range of Completion Date for
use as filter criteria during processing.
Report Path: Field clamps the default path of the report.
8.24.15.2 Generating a Formula Production Report
1. Select Measure In as By Weight or By Volume.
2. Select the Report Type as Formula Production Report or Formula Production
Report (History).
3. Select the Formula From and To range using the lookup buttons next to the
fields.
4. Select the Formula Class From and To range using the lookup buttons next to
the fields.
5. Select the Status From and To range using the lookup buttons next to the
fields.
6. Select Completion Date From and To range using the drop-down arrows
respectively.
7. Click on the OK button to create a report.
Doc. No. F/DV/15
Rev.No.
Date
BatchMaster Software Inc.
BMM User Manual
8.24.16 Critical Batches and Raw Material Report
Screen provides a way to generate a report displaying Critical Batches and Raw
Materials.
User can employ the option‟s filtering parameters to define the report. Once processes
the report parameters, it displays the results as a Crystal Report that one can print or
export.
Doc. No. F/DV/15
Rev.No.
Date
BatchMaster Software Inc.
BMM User Manual
8.24.16.1 Screen Fields Description
Report can be engender with the subsequent preferences
1. Batch -can be made without future receipts
2. Batch -can be made considering future receipts
3. Batch –cannot be made even if receipts are considered
4. Batch –Item Shortage Report
Batch Number From: Field displays the lower limit of the range of Batch Number for
use as filter criteria during processing. Leaving this field blank has the same effect as
selecting the first available Batch Number via the lookup.
Batch Number To: Field displays the upper limit of the range of Batch Number for use
as filter criteria during processing. Leaving this field blank has the same effect as
selecting the last available Batch Number via the lookup.
Batch Like: This field is used to specify the text of the batch number to be included in
the report.
Schedule Start Date: Field displays the lower limit of the range of Schedule start Date
for use as filter criteria during processing.
Schedule Start Date To: Field displays the upper limit of the range of Schedule Start
Date for use as filter criteria during processing.
Report Path: Field clasps the default path of the report.
Doc. No. F/DV/15
Rev.No.
Date
BatchMaster Software Inc.
BMM User Manual
8.24.16.2 Generating Critical Batches and Raw Material Report
1. Select as needed from one of: Batch-Can be made without future receipts,
Batch-Can be made considering future receipts, Batch-Cannot be made even if
receipts are considered or Batch-Items Shortage Report.
2. Select the Batch From and To range using the lookup buttons next to the
fields.
3. Set the Batch Like field. The value entered here enables a more specific
filtration. This is an optional field.
4. Select Schedule start Date From and To range using the drop-down arrows.
5. Click on the OK button on the toolbar to create the report.
8.24.17 Material Usage Report
Screen provides a way to generate a report showing the quantity of items used, by
volume or by weight, in production. Screen also provides a way to generate details of
item including the material cost and quantity weight or volume. In addition, the report
displays the average of cost and usage on a monthly and annual basis.
User can employ the option‟s filtering parameters to define the report. Once processes
the report parameters, it displays the results as a Crystal Report that one can print or
export.
Doc. No. F/DV/15
Rev.No.
Date
BatchMaster Software Inc.
BMM User Manual
8.24.17.1 Screen Fields Description
Measured In: Report can be generated via two options explicitly
1. By Weight
2. By Volume
Report Type: Options accessible for report type are
1. Raw Material Usage Report
2. Raw Material Usage Report (History)
Item No. From: Field displays the lower limit of the range of Item for use as filter
criteria during processing. Leaving this field blank has the same effect as selecting the
first available Item No. via the lookup.
Item No. To: Field displays the upper limit of the range of Item for use as filter criteria
during processing. Leaving this field blank has the same effect as selecting the last
available Item No. via the lookup.
Warehouse From: Field displays the lower limit of the range of warehouse for use as
filter criteria during processing. Leaving this field blank has the same effect as selecting
the first available Whse via the lookup.
Warehouse To: Field displays the upper limit of the range of warehouse for use as filter
criteria during processing. Leaving this field blank has the same effect as selecting the
last available Whse via the lookup.
Activity Date From: Field specifies the lower limit of the range of Activity Date for use
as filter criteria during processing.
Doc. No. F/DV/15
Rev.No.
Date
BatchMaster Software Inc.
BMM User Manual
Activity Date To: Field specifies the upper limit of the range of Activity Date for use as
filter criteria during processing.
Suppress if zero Usage: If the item is not used then by checking this option that item
will not be included in the report.
Report Path: Field clasps the default path of the report.
8.24.17.2 Generating a Material Usage Report
1. Select as needed one of Raw Material Usage Report or Raw Material Usage Report
(History) options.
2. Select as needed one of By Weight or By Volume.
3. Select the Item No. From and To range using the lookup buttons next to the
fields.
4. Select the Whse From and To range using the lookup buttons next to the fields.
5. Select the Item Class From and To range using the lookup buttons next to the
fields.
6. Select Activity Date From and To range using the drop-down arrows.
7. Check box to enable Suppress if Zero Usage.
8. Click on the OK button to create the report.
Doc. No. F/DV/15
Rev.No.
Date
BatchMaster Software Inc.
BMM User Manual
8.24.18 Transfer Sales Order To Batch Report
The Transfer Sales Order To Batch Report provides the means to generate a report on
sales orders transferred to a batch. One can create a unique name for a report that is
used on a regular basis, save that report‟s defined parameters and then run that defined
report on a regular basis. Each Transfer Sales Order To Batch Report contains the
following information:
1. Sales Order Number
2. Customer Identification
3. Item No.
4. Whse
5. Unit
6. Order Quantity
7. Batch Quantity.
8.24.18.1 Generating a Transfer Sales Order To Batch Report
1. Complete the SO Number From and To range using the lookup buttons next to
the fields.
2. To save these parameters, enter the name to be assigned to the report
parameters in the drop-down field on the far right of the toolbar and then click on
the Save button on the toolbar to save the report parameters.
3. Click on the OK button to generate the report.
Doc. No. F/DV/15
Rev.No.
Date
BatchMaster Software Inc.
BMM User Manual
8.24.19 Super Batch Critical Material Report
The Super Batch Critical Material Report screen provides a way to generate a report
showing quantities of materials that are lacking in the inventory and so are unable to
meet production obligations for the selected Super Batches. The critical materials are
determined for the entire Super Batch as a whole and not for the individual sub-batches
of the Super Batch.
One can use the option‟s filtering parameters to define the report. Once BMM processes
the report parameters, it displays the results as a Crystal Report that one can print or
export.
Doc. No. F/DV/15
Rev.No.
Date
BatchMaster Software Inc.
BMM User Manual
8.24.19.1 Generating a Super Batch Critical Material Report
1. Select the Formula From and To range using the lookup buttons next to the fields.
2. Select the Super Batch From and To range using the lookup buttons next to the
fields.
3. Set the Item Type as needed.
4. Set the Apply Date as needed. When the process button is clicked, the critical
report will be generated as of this apply date.
5. To save these parameters, enter the name to be assigned to the report
parameters in the drop-down field on the far right of the toolbar and then click on
the Save button on the toolbar to save the report parameters.
6. Click on the OK button to create the report.
8.24.20 Super Batch Explosion Report
The Super Batch Explosion Report provides a way to generate a report detailing the
specifics of super batch explosions.
One can use the option‟s filtering parameters to define the report. Once BMM processes
the report parameters, it displays the results as a Crystal Report that one can print or
export.
Doc. No. F/DV/15
Rev.No.
Date
BatchMaster Software Inc.
BMM User Manual
8.24.20.1 Creating a Super Batch Explosion Report
1. Complete the Super Batch No. From and To range using the lookup buttons next
to the fields.
2. To save these parameters, enter the name to be assigned to the report
parameters in the drop down field on the far right of the toolbar and then click on
the Save button on the toolbar to save the report parameters.
3. Click on the OK button on the toolbar to create the report.
9 Master Production Schedule
Master Production Schedule (MPS) provides a means to plan production based upon
forecasts and anticipated demand. The information produced by BatchMaster
Manufacturing MPS group makes it possible for the user to schedule both purchases and
Doc. No. F/DV/15
Rev.No.
Date
BatchMaster Software Inc.
production, and to produce
Manufacturing MRP group.
BMM User Manual
the
gross
requirements
for
use
by
BatchMaster
The BatchMaster Manufacturing MPS option generates production and purchase orders
by making calculations based upon forecasts and demands. Demand can be broadly
defined as the commitments to a number of things, ranging from a prediction based
upon sales history for the items or an analysis of future market conditions that the user
should be prepared for in the present.
MPS uses a mixture of demands and forecasts within the defined time frame and tells
the user how to make and when to make the finished goods to meet deadlines.
The following figure depicts the logical process flow of the MPS module.
Note: Based on the BM Planning Method field of the Item Master Data screen of
SAP, an item can be either MPS or MRP type. Thus, depending on opted value items can
be fetched using the Pull MPS Option.
9.1 Forecast Entry
The Forecast Entry screen provides a way to create a forecast for any Item Master Data.
With Forecast Entry, a forecast based on either quantity of the item or amount of money
can be established. It also has provision for setting a cost method and defining a
forecast quantity.
Doc. No. F/DV/15
Rev.No.
Date
BatchMaster Software Inc.
BMM User Manual
9.1.1 Mandatory Inputs
Data at the following screens should be maintained before a forecast entry is made:
1. Item Master Data
2. Planning Calendar
9.1.2 Screen Fields Description
Item No.: This field stores the Item number for which the forecast is being defined. The
lookup in this field is restricted to those items that have their BM Planning Method
defined as MPS or MRP at the Item Master Data screen.
Unit of Measure: This is the stock unit of the item selected in the Inventory Uom field,
maintained at the Item Master Data screen. This is a read only field and this value is
defaulted when an item is selected.
Planning Calendar: This field stores the planning calendar key, which is associated with
the Item No.. This is a mandatory field.
Doc. No. F/DV/15
Rev.No.
Date
BatchMaster Software Inc.
BMM User Manual
Forecast Type
Quantity: This box should be checked if the forecast is in terms of quantity in UOM.
Amount: This box should be checked if the forecast is in terms of monetary amount.
Cost Method: This field is enabled when the forecast type is amount. The cost method
can be one of Base, Average, Standard or Last. The cost is taken from the Item Master
Data screen. The quantity of the item to be forecasted is then automatically calculated
using the forecast amount and the cost as per the selected cost method.
Forecast Start Date: This is the date from which the forecast period starts. This date is
defaulted to the current server date.
Forecast Entry Grid
Clicking the Insert Forecast button on the toolbar the user can insert forecast
Information. The Forecast Entry Grid displays the lines as per the defined parameter.
Forecast Key: This is the identification key for the forecast in this line. The data within
the field gets defaulted via the Insert Forecast Screen, which can be editable.
Whse: This is the warehouse for the item selected in the Item No. field for which the
forecast key is applicable.
Status: This is the status of the forecast key for the line. This field can have value as
Active, Inactive or Hidden. Only Active forecasts are considered during Run MPS or Run
MRP.
9.1.3 Using Forecast Entry
1. Click on the Insert button on the toolbar to create a new forecast.
2. Type or select an Item No. using the lookup button next to this field.
3. Select a Planning Calendar (created via the „Planning Calendar‟ screen) using the
lookup button next to this field.
4. Select a Forecast Type. If the „Amount‟ option is selected, then the field „Cost
Method‟ becomes enabled.
5. If the option selected at the „Forecast Type‟ field is „Amount‟, then select a Cost
Method as one of „Base‟, „Standard‟, „Average‟, or „Last‟.
6. Enter a Forecast Start Date.
7. Click on the Insert Forecast button to insert a new line into the grid with the
specified parameters.
8. Enter a Forecast Key.
9. Select a Whse for the selected item from the lookup in this field.
10. Select a status as one of „Active‟, „Inactive‟, or „Hidden‟.
11. Enter forecast values in the grid.
12. Click the Add button to save the forecast.
Doc. No. F/DV/15
Rev.No.
Date
BatchMaster Software Inc.
BMM User Manual
9.1.4 Goto
Insert Forecast: This button pops up a window that enables the user to insert a forecast
with the same forecast quantity/amount for all periods.
Fill Forecast: This button is used to change the quantity/amount in the forecast. The
change can be in terms of an increase in percentage as well as value of the
quantity/amount. This utility can also be used to replace all values in the Forecast Entry
grid with a value specified in the Quantity/Amount field in this window. The Effective
Start and End Dates can be used to define a date range in which the forecast being
defined can be filled.
Zero Forecast: This button is used to set the forecast value to zero for the selected
lines.
9.2 Run MPS
The Run MPS option provides a way to perform MPS planning calculations. This screen is
used to run the MPS for a range of items in regenerative mode. From Run MPS, MPS
scheduling needs can be defined and the MPS Planning Worksheet needed to see the
schedule can be generated.
Processing a Run MPS takes the various values and settings from the Maintain MPS Item
screen; these values will supersede any conflicting values on the Item Master Data
screen. MPS cannot be run for an item that is not present on the Maintain MPS Item
screen.
Run MPS can generate production orders only if the Item Master Data is of type “Make”
on the Maintain MPS Item screen and a released BOM exists for it. For all other Item
Master Data, Run MPS can generate purchase orders only. (This is different from Run
MRP. In Run MRP, production or purchase orders are created depending whether the
item is Make type or Buy type respectively at the Item Master Data screen).
The sources of demand for Run MPS are:
1. Forecast (depending on the setting for the Demand Range on the MPS Setup
screen)
2. Sales Orders and Warehouse Transfers Out (depending on the setting for the
Demand Range on the MPS Setup screen)
3. Dependent Demand (from Planned, Firm Planned and Confirmed orders of higher
level MPS Items)
4. The quantity by which On Hand Quantity is less than the Safety Stock as defined
at the Item Master Data.
5. MPS type raw materials remaining to be issued to production batches that are not
on hold.
The sources of supply for Run MPS are:
1. Only for the first Period: The quantity by which the On Hand quantity exceeds the
Safety Stock as defined at the Item Master Data screen.
Doc. No. F/DV/15
Rev.No.
Date
BatchMaster Software Inc.
BMM User Manual
2. For 2nd Period onwards: PAB of the preceding period
3. Scheduled Receipts from
a. Purchase Orders
b. Production Orders (Production Batches)
c. Warehouse Transfers In
d. Firm Planned Orders
e. Confirmed Orders
The quantity to be ordered is determined by subtracting the supply quantity from the
demand quantity and then adjusting for EOQ if the EOQ is applicable. For this purpose:
1. The EOQ is applicable if the Lot Sizing Method is set to EOQ at the Maintain MPS
item screen.
2. The value of EOQ is taken from the Maintain MPS Item screen.
If the orders are created outside the demand fences (without using a date less than the
Server date), then the orders created are Planned Orders. The planned orders so created
can automatically get changed to firm planned orders or confirmed orders depending on
the option selected at the Run MPS screen.
If the orders are created inside the demand fences (without using a date less than the
Server date), then the orders created are exception orders.
Run MPS cannot make planned orders for items that are needed on the Server date or
earlier. For example, if a Sales Order has a line item with the ReqDate as the Server
date, then the demand arising from that line item cannot be used for generating planned
MPS orders. In such cases, exception orders are generated.
9.2.1 Mandatory Inputs
Data should have been maintained at the following screens before running MPS.
1. MPS Setup.
2. Maintain MPS Item.
3. Company Calendar Setup.
4. Planning Calendar.
5. Forecast Entry.
Doc. No. F/DV/15
Rev.No.
Date
BatchMaster Software Inc.
BMM User Manual
9.2.2 Screen Fields Description
Select Item Range for MPS Run
MPS Item From: This field specifies the lower limit of the range of Item Numbers for
use as filter criteria during processing. The lookup in this field is restricted to items
maintained as MPS items using the Maintain MPS Item screen. This MPS Item No. may
be entered by typing or selected via the associated lookup on this screen. Leaving this
field blank has the same effect as selecting the first available MPS Item No. via the
lookup.
MPS Item To: This Item No. specifies the upper limit of the range of Item Numbers for
use as filter criteria during processing. The lookup in this field is restricted to items
maintained as MPS items using the Maintain MPS Item screen. This MPS Item No. may
be entered by typing or selected via the associated lookup on this screen. Leaving this
field blank has the same effect as selecting the last available MPS Item No. via the
lookup.
MPS Warehouse From: This warehouse specifies the lower limit of the range of
warehouses for use as filter criteria during processing. This warehouse may be entered
by typing or selected via the associated lookup on this screen. Leaving this field blank
has the same effect as selecting the first available warehouse via the lookup.
MPS Warehouse To: This warehouse specifies the upper limit of the range of
warehouses for use as filter criteria during processing. This warehouse may be entered
by typing or selected via the associated lookup on this screen. Leaving this field blank
has the same effect as selecting the last available Whse via the lookup.
Select Item Range for MPS Run
Demand Start Date: This is the Demand Start Date, which is the server date and is
defaulted by the system when Run MPS is processed. This is a read-only field.
Demand End Date: This field specifies the upper end of the Demand Date. This field is
defaulted to a date that is one month ahead of the server date. The value in this field
may be modified using the drop down menu present in the field.
Doc. No. F/DV/15
Rev.No.
Date
BatchMaster Software Inc.
BMM User Manual
MPS Run Date: This is the MPS Run Date, which is the server date and is defaulted by
the system when Run MPS is processed. This is a read-only field.
Skip low level coding: Leave this box unchecked when the MPS is being run for an
item for the first time. For successive runs for the same item check this box if there is no
change in the Bill of Materials for the item. Checking this box, skips assignment of low
level coding to the items in the BOM hierarchy, so if no change has been made to the
hierarchy then skipping reassignment of low-level codes, speeds up processing.
Generate Planned Orders as
Planned: This button should be clicked if it is required that the status of orders
generated using Run MPS be set to Planned.
Firm-planned: This button should be clicked if it is required that the status of orders
generated using Run MPS be set to Firm-planned.
Confirmed: This button should be clicked if it is required that the status of orders
generated using Run MPS be set to Confirmed.
9.2.3 Example
Item No. = ADDITIVE
On Hand – Safety Stock = 0
Stock Unit = EACH
Bucket Size = 1 day
EOQ defined for the item = 200
Gross Demand calculation as “Demand + Forecast”
24-11-08
25-11-08
26-11-08
27-11-08
Sales
Orders
100
50
250
300
Forecast
10
25
150
50
Warehouse
transfer Out
10
0
0
5
PAB
0
(200-33) = 167
200-171=29
400-283
117
MPS orders
(50+25-1022-10)
=33
but eoq =200
(250+150-25-2710 -167) = 171
but eoq = 200
(300+50+5-1231-29) =283 but
EOQ=200
= 400 (200*2)
MPS
Production
Orders
0
Doc. No. F/DV/15
200
200
400
10
25
12
Rev.No.
Date
=
BatchMaster Software Inc.
BMM User Manual
Purchase
orders
59
22
27
31
Warehouse
Transfer in
0
10
10
0
ATP
0
(200+10+22+1050) = 192
(200+25+27+10250) = 12
(400+31+12300-5) = 138
192
204
342
(59-100-10 =
-51 so taken
as 0)
Cumulative
ATP
0
Exception
Orders
(120-59) = 61
On 24-11-08:
Demand = Customer Orders + Forecast + Warehouse Transfer Out + Dependent
Demand = 100 + 10 + 10 + 0 = 120
Supply = Purchase Orders + Production Orders + Warehouse Transfer In = 59+0+0 =
59
Requirement = Demand – Supply = 120-59 = 61
One needs 61 stock units on 16-09-04 but that order needs to be completed at least one
day earlier that is by 15-09-04, so an order is created on 15-09-04 & since 15-09-04 is
less than server date it is an „EXCEPTION‟ order.
Again, orders in back date are not considered for EOQ sizing so a consolidated order of
61 stock units is created.
PAB = Orders Generated - Requirement = 61-61=0
ATP = Supply (MPS + Prod.Ord + Purch.Ord + WT. In) – Demand (Cust. Ord. + WT Out
+ Dep. Dmd) = 59 – 100 – 10 = -51 which is taken as 0.
Cumulative ATP = 0
25-11-08:
Demand = Customer Orders + Forecast + Warehouse Transfer Out + Dependent
Demand = 50 + 25 + 0 + 0 = 75
Supply = Purchase Orders + Production Orders + Warehouse Transfer In + Previous
PAB = 22 + 10 + 10 + 0 = 42
Requirement = Demand – Supply = 75 - 42 = 33
This order will be placed on 16-09-04. As order type is EOQ, sized order will be of 200
stock units.
Doc. No. F/DV/15
Rev.No.
Date
BatchMaster Software Inc.
BMM User Manual
PAB = Orders Generated – Requirement = 200-33 = 167
ATP = Supply (MPS + Prod.Ord + Purch.Ord + WT. In) – Demand (Cust. Ord. + WT Out
+ Dep. Dmd) = (200+10+22+10) – (50 + 0 + 0) = 192
Cumulative ATP = 0 + 192 = 192
26-11-08:
Demand = Customer Orders + Forecast + Warehouse Transfer Out + Dependent
Demand = 250 + 150 + 0 +0 = 400
Supply = Purchase Orders + Production Orders + Warehouse Transfer In + Previous
PAB = 25 + 27 + 10 + 167 = 229
Requirement = Demand – Supply = 400 – 229 = 171
This order will be placed on 17-09-04. As order type is EOQ, sized order will be of 200
stock units.
PAB = Orders Generated – Requirement = 200 - 171 = 29
ATP = Supply (MPS + Prod.Ord + Purch.Ord + WT. In) – Demand (Cust. Ord. + WT Out
+ Dep. Dmd) = (200 +25 +27 +10) – (250) = 12
Cumulative ATP = 192 + 12 = 204
27-11-08:
Demand = Customer Orders + Forecast + Warehouse Transfer Out + Dependent
Demand = 300 + 50 + 5 + 0 = 355
Supply = Purchase Orders + Production Orders + Warehouse Transfer In + Previous
PAB =12 + 31 + 0 + 29 = 72
Requirement = Demand – Supply = 355 – 72 = 283
This order will be placed on 18-09-04. As order type is EOQ, sized order will be of 400
stock units.
PAB = Orders Generated – Requirement = 400 - 283 = 117
ATP = Supply (MPS + Prod.Ord + Purch.Ord + WT. In) – Demand (Cust. Ord. + WT Out
+ Dep. Dmd)= (400 + 12 + 31)– (300 + 5) = 138
Cumulative ATP = 204 + 138 = 342
9.2.4 Processing a Run MPS
1. Select a MPS Item at the „MPS Item From‟ field using the lookup button at this
field.
Doc. No. F/DV/15
Rev.No.
Date
BatchMaster Software Inc.
BMM User Manual
2. Select a MPS Item at the „MPS Item To‟ field using the lookup button at this field.
3. Select a Whse at the „MPS Whse From‟ field using the lookup button at this field.
4. Select a Whse at the „MPS Whse To„ field using the lookup button at this field.
5. Enter the Demand End Date. (The Server Date is automatically taken as Demand
Start Date).
6. If one wishes to skip the low-level coding, the box for „Skip low level coding‟
should be checked. (The user should be very sure before skipping low level
coding. If the low level codes are wrong, then the MPS planning could be
incorrect).
7. Select a „Generate Planned Orders as‟ option from the following. Any planned
orders, when they are generated via Run MPS, will automatically get converted to
the selected status:
a. Planned
b. Firm Planned
c. Confirmed
8. Click on the Process button to run MPS.
9.3 MPS Planning Worksheet
From the MPS Planning Worksheet, one can see the summary as well as details of the
demand and orders, the forecast details, warehouse transfers and customer orders. The
user can also manage:
1. Planned MPS Purchase Orders
2. Planned MPS Production Orders
On this Planning Worksheet various sources of demand and supply like Customer Orders,
Gross Demand, Forecast, Purchase Orders, Warehouse Transfer orders etc are displayed
as aggregate of all the order existing for an item in a particular bucket. User can, with
ease, find the order wise breakup of various supply and demand quantities existing in a
particular bucket. Drill Down facility is provided in each bucket, clicking which a window
pops up displaying all the Orders existing for that particular quantity in that particular
bucket.
9.3.1 Mandatory Inputs
Run MPS should have been processed for an Item Master Data.
Doc. No. F/DV/15
Rev.No.
Date
BatchMaster Software Inc.
BMM User Manual
9.3.2 Screen Fields Description: Header and Summary
Tab
Item No.: This the item associated with the Item Master Data for which the MPS
planning worksheet is displayed.
Curr On Hand - Safety Stk: The value in this field is the difference between the current
on hand quantity of the item and the safety stock level defined for the item at the Item
Master Data.
Warehouse: This the warehouse associated with the Item for which the MPS planning
worksheet is displayed.
Unit: This is the Stock UOM for the item shown on this screen.
Summary tab
Forecast: This represents the demand arising from Active forecasts for a given period.
The details regarding the forecast can be seen on Tab-2 of this screen.
Customer Orders: This represents the demand arising from sales orders. The related
sales orders information can be seen on Tab-3 of this screen.
Warehouse Transfers: This represents the demand arising from Warehouse Transfers
out that have been saved but not been processed.
Doc. No. F/DV/15
Rev.No.
Date
BatchMaster Software Inc.
BMM User Manual
The details of the related warehouse transfers can be seen on Tab-4 of this screen.
Gross Demand: As per the setting for the applicable Demand Range on the MPS Setup
screen, this field represents the gross demand determined from the Forecast, Customer
Orders and Warehouse Transfers.
Dependent Demand: This represents the dependent demand arising from other,
planned, firm planned and confirmed MPS Orders for higher-level MPS items.
Proj Available Balance: This represents the quantity that is projected to be on hand
after subtracting the “demand” from the “supply”. For this purpose, the “demand” and
the “supply” are taken as follows:
The sources of “demand” for calculating the PAB are:
1. Forecast (depending on the setting for the Demand Range on the MPS Setup
screen)
2. Sales Orders and Warehouse Transfers Out (depending on the setting for the
Demand Range on the MPS Setup screen)
3. Dependent Demand (from Planned, Firm Planned and Confirmed orders of higher
level MPS Items)
4. The quantity by which On Hand Quantity is less than the Safety Stock as defined
at the Item Master Data.
5. MPS type raw materials remaining to be issued to production batches that are not
on hold.
The sources of “supply” for calculating the PAB are:
1. Only for the first Period: The quantity by which the On Hand quantity exceeds the
Safety Stock as defined at the Item Master Data.
2. For 2nd Period onwards: PAB of the preceding period
Scheduled Receipts from
1. Purchase Orders
2. Production Orders (Production Batches)
3. Warehouse Transfers In
4. Planned Orders
5. Firm Planned Orders
6. Confirmed Orders
Planned Orders: This represents the quantity for which planned orders have been
created via Run MPS. The related details can be seen on Tab-5 or Tab-6 depending on
whether the item is of purchase type or of manufacture type at the Maintain MPS Item
screen. Planned orders cannot be transferred to a purchase order or to a batch. Planned
orders get regenerated (that is deleted and then re-written) via Run MPS.
Firm Planned Orders: This represents the quantity for which firm planned orders have
been created. The related details can be seen on Tab-5 or Tab-6 depending on whether
Doc. No. F/DV/15
Rev.No.
Date
BatchMaster Software Inc.
BMM User Manual
the item is purchase type or manufacture type at the Maintain MPS Item screen. The
firm planned orders cannot be transferred to a purchase order or to a batch. The firm
planned orders do NOT get regenerated (that is, the firm planned orders are NOT
deleted and then re-written) via Run MPS.
Confirmed Orders: This represents the quantity for which confirmed orders have been
created. The related details can be seen on Tab-5 or Tab-6 depending on whether the
item is purchase type or manufacture type at the Maintain MPS Item screen. The
confirmed orders can be transferred to a purchase order or to a batch. The confirmed
orders do NOT get regenerated (that is, the confirmed orders are NOT deleted and then
re-written) via Run MPS.
MPS Release: This is the sum of the quantities of Planned Orders, Firm Planned Orders
and Confirmed Orders on the same column.
MPS: This is the expected quantity to be received in a given period from “Total Order
Release” of this or prior periods.
Production Orders: This is the scheduled quantity that is to be received from existing
production batches that have not yet been closed.
Purchase Orders: This is the scheduled quantity that is to be received from existing
purchase orders of New or Open statuses.
Warehouse Orders: This represents the supply arising from Warehouse Transfers In
that exist but have not been processed yet.
ATP: This represents the quantity that is Available To Promise.
The calculation of ATP starts backwards, that is, from the last period used for the MPS
planning.
The sources of “demand” for calculating the ATP are:
1. Sales Orders and Warehouse Transfers Out (depending on the setting for the
Demand Range on the MPS Setup screen)
2. Dependent Demand (from Planned, Firm Planned and Confirmed orders of higher
level MPS Items)
3. The quantity by which On Hand Quantity is less than the Safety Stock as defined
at the Item Master Data.
4. Quantities of this MPS type raw material remaining to be issued to production
batches that are not on hold
5. The quantity by which the demand exceeds the supply for the immediately
following period (if the demand exceeds the supply for the immediately following
period).
Note that, for calculating the ATP, Forecast is not considered as demand.
The sources of “supply” for calculating the ATP are:
Doc. No. F/DV/15
Rev.No.
Date
BatchMaster Software Inc.
BMM User Manual
1. Only for the first Period of planning horizon: The quantity by which the On Hand
quantity exceeds the Safety Stock as defined at the Item Master Data.
2. For 2nd Period of the planning horizon onwards: PAB of the preceding period
Scheduled receipts (as long as their schedule receipt date is not less than the Server
Date) from
1. Purchase Orders
2. Production Orders (Production Batches)
3. Warehouse Transfers In
4. Planned Orders
5. Firm Planned Orders
6. Confirmed Orders
While calculating the ATP, if the “demand” exceeds “supply” for any period, the
difference is carried over to the immediately preceding period for adjusting the ATP value
of the preceding period.
Cumulative ATP: For any given period, this is a cumulative sum of the ATPs starting
from the first period of the planning horizon to the given period.
Exception Orders: This field shows the quantity for which exception orders have been
generated.
Doc. No. F/DV/15
Rev.No.
Date
BatchMaster Software Inc.
BMM User Manual
9.3.3 Screen Fields Description: Forecast Tab
Forecast Key: This is the Forecast Key associated with the row.
Line No: This is the line number associated with the forecast key that is shown on the
same row. This is a system-generated field.
Forecast Qty: This is the quantity that is requested via this forecast line. During Run
MPS, the Forecast Qty is fetched from the Forecast Entry screen. The Forecast Qty can
be changed on this screen. Changing the Forecast Quantity and saving it, updates the
related demand on the planning worksheet on Tab-1 automatically but does not change
the actual forecast on the Forecast Entry screen.
Forecast Date: This is the date on which Forecast Qty of the item is requested to be
ready. During Run MPS, the Request date is fetched from the Forecast Entry screen. The
Request date can be changed on this screen. Changing the Request date and saving it,
updates the related demand on the planning worksheet on Tab-1 automatically but does
not change the actual forecast on the Forecast Entry screen.
Doc. No. F/DV/15
Rev.No.
Date
BatchMaster Software Inc.
BMM User Manual
9.3.4 Screen Fields Description: Cust Orders Tab
Sales Order No: This is the sales order number associated with this row.
Line No: This is the SO line number (as stored at the Rownum field of the OELIN table).
Order Qty: During Run MPS, the Order Quantity is fetched from the Sales Order Entry
screen.
Delivery Date: This is the date on which the Order Qty of this item is to be delivered.
During Run MPS, the delivery date is fetched from the Sales Order Entry screen.
Doc. No. F/DV/15
Rev.No.
Date
BatchMaster Software Inc.
BMM User Manual
9.3.5 Screen Fields Description: WH Transfers Tab
Document No: This is an automatic generated count for Document numbering. The next
automatically generated document number will be this number plus one. This is a readonly field. The last used number for this is set at the Administration.
Line No: This is the line number for the warehouse transfer order.
Transfer Qty: This is the quantity that is requested via the Warehouse Transfer Order.
During Run MPS, the Transfer Quantity is fetched from the Warehouse Transfer screen.
The Transfer Quantity can be changed on this screen. Changing the Transfer Quantity
and saving it, updates the related demand on the planning worksheet on Tab-1
automatically but does not change the actual Warehouse Transfer quantity on the
Warehouse Transfer screen.
Delivery Date: This is the date on which the Transfer Quantity of this item is expected
to deliver.
Doc. No. F/DV/15
Rev.No.
Date
BatchMaster Software Inc.
BMM User Manual
9.3.6 Screen Fields Description: Planned Prod Ord Tab
Select: When this box is checked for a row, that row becomes available for deletion as
well as for changing the status of the order or clubbing it with other orders.
MPS Ord No: This is the system-generated number for this MPS order.
Plan Run Dt: This is the date when Run MPS generated this order.
Order Status: The Order Status on this screen can be one of the following:
1. Planned: These orders, before being transferred to Purchase Orders or
Production Orders, will need to be „Confirmed‟. Since BatchMaster Manufacturing
has a regenerative MPS, Planned MPS Orders get erased when Run MPS is
processed.
2. Firm Planned: These orders before being transferred to the Purchase Order or
Production Order will need to be „Confirmed‟. The Orders that are „Firm Planned‟
will not be erased when Run MPS is processed.
3. Confirmed: The Orders that are „Confirmed‟ are ready to be transferred to a
batch or a purchase order and will not be erased when Run MPS is processed.
4. Transferred: These orders have already been transferred to a batch.
Plan Start Dt: This is the Plan Start Date that is recommended by the system when Run
MPS is processed.
Plan End Dt: This is the Plan End Date that is recommended by the system when Run
MPS is processed.
Doc. No. F/DV/15
Rev.No.
Date
BatchMaster Software Inc.
BMM User Manual
Plan Qty: This is the Plan Quantity that is recommended by the system when Run MPS
is processed.
Confirm Start Dt: This date is defaulted with the Plan Start Dt when this row is created
or modified, when Run MPS is processed. For a Planned Order, the user can modify this
date.
Confirm End Dt: This date is defaulted with the Plan End Dt when this row is created or
modified, when Run MPS is processed. For a Planned Order, the user can modify this
date.
Confirm Qty: This quantity is defaulted with the Plan Qty when this row is created or
modified when Run MPS is processed. For a Planned Order, the user can modify this
quantity.
Confirm Dt: This is the date when this order was confirmed.
Transfer Dt: This is the date when this order was transferred to a production batch.
Batch Type: This can be one of Mix, Fill or Assembly, depending on the assembly type
of the associated BOM.
Process Cell: This is the Process Cell associated with the formula being used by the
BOM of this item.
Hours Required: This value is assigned by the system during Run MPS. This value can
be changed at the Process Cell Formula Capacity screen. The value can also get modified
when orders get clubbed.
Doc. No. F/DV/15
Rev.No.
Date
BatchMaster Software Inc.
BMM User Manual
9.3.7 Screen Fields Description: Tab 6 (Planned Purch
Ord)
Select: When this box is checked for a row, that row becomes available for deletion as
well as for changing the status of the order or clubbing it with other orders.
MPS Order No: This is the system-generated number for the MPS order.
Plan Run Dt: This is the date when the MPS order was generated.
Order Status: The Order Status on this screen can be one of the following:
1. Planned: These orders, before being transferred to Purchase Orders, will need to
be „Confirmed‟. Since BatchMaster Manufacturing has a regenerative MPS,
Planned MPS Orders get erased when Run MPS is processed.
2. Firm Planned: These orders before being transferred to the Purchase Orders will
need to be „Confirmed‟. The Orders that are „Firm Planned‟ will not be erased
when Run MPS is processed.
3. Confirmed: The Orders that are „Confirmed‟ are ready to be transferred to a
purchase order and will not be erased when Run MPS is processed.
4. Transferred: These orders have already been transferred to a purchase order.
Plan Start Dt: This is the Plan Start Date that is recommended by the system.
Plan End Dt: This is the Plan End Date that is recommended by the system.
Plan Qty: This is the Plan Quantity recommended by the system.
Doc. No. F/DV/15
Rev.No.
Date
BatchMaster Software Inc.
BMM User Manual
Confirm Start Dt: This date is defaulted to the Plan Start Dt when this row is created
via Run MPS. For a Planned Order, the user can modify this date.
Confirm End Dt: This date is defaulted to the Plan End Dt when this row is created via
Run MPS. For a Planned Order, the user can modify this date.
Confirm Qty: This quantity is defaulted to the Plan Qty when this row is created via Run
MPS. For a Planned Order, the user can modify this quantity.
Confirm Dt: This is the date when the order was confirmed.
Transfer Dt: This is the date when the order was transferred to a purchase order.
Vendor: This is the Vendor that can be associated with the line. The user can select the
vendor from the lookup provided with this field.
Check All: Clicking this option checks the boxes for all the rows in the grid.
Check / Uncheck: Clicking this option checks or unchecks the boxes for the rows in the
grid.
Uncheck All: Clicking this option un-checks the boxes for all the rows in the grid.
Delete Line: If any of the rows have their boxes checked, such rows get deleted when
this option is clicked.
Planned: If any of the rows have their boxes checked, the status of those rows gets
changed to Planned when this option is clicked.
Firm Planned: If any of the rows have their boxes checked, the status of those rows
gets changed to Firm Planned when this option is clicked.
Confirmed: If any of the rows have their boxes checked, the status of those rows gets
changed to Confirmed when this option is clicked.
Club Orders: Club Orders For rows that have their Select boxes checked, the orders of
such rows get clubbed together. Only Planned Orders can be clubbed together. For
clubbing rows and combining the values for all the fields of the rows being clubbed, the
system searches for the row that has the earliest Confirm End Dt. If multiple rows have
a common earliest Confirm End Dt, then the system picks the row having the lowest MPS
Order No amongst them. When orders get clubbed, the clubbed rows get replaced with a
single row on which the following fields are set as follow:
MPS Order No.: This is set to the MPS Order No of the row picked as explained
above.
Plan Start Dt: This is set to the Plan Start Dt of the row picked as explained
above.
Plan End Dt: This is set to the Planned End Dt of the row picked as explained
above.
Plan Qty: This is set to the sum of the Plan Qty‟s of the clubbed rows.
Doc. No. F/DV/15
Rev.No.
Date
BatchMaster Software Inc.
BMM User Manual
Confirm Start Dt: This is set to the Confirm Start Dt of the row picked as
explained above.
Confirm End Dt: This is set to the Confirm End Dt of the row picked as explained
above.
Confirm Qty: This is set to the sum of the Confirm Qty‟s of the clubbed rows.
Confirm Dt: This is set to the Confirm Dt of the row picked as explained above.
Vendor: This is set to the Vendor of the row picked as explained above.
9.3.8 Goto
Planned: If any of the rows have their boxes checked, the status of such rows gets
changed to Planned when this button is clicked or selected via the right click options.
Firm Planned: If any of the rows have their boxes checked, the status of such rows
gets changed to Firm Planned when this button is clicked or selected via the right click
options.
Confirmed: If any of the rows have their boxes checked, the status of such rows gets
changed to Confirmed when this button is clicked or selected via the right click options.
Club Orders: For rows that have their Select boxes checked, the orders of such rows
get clubbed together. Only Planned Orders can be clubbed together. For clubbing rows
and combining the values for all the fields of the rows being clubbed, the system
searches for the row that has the earliest Confirm End Dt. If multiple rows have a
common earliest Confirm End Dt, then the system picks the row having the lowest MPS
Order No amongst them. When orders get clubbed, the clubbed rows get replaced with a
single row on which the following fields are set as follow:
MPS Order No.: This is set to the MPS Order No of the row picked as explained
above.
Plan Start Dt: This is set to the Plan Start Dt of the row picked as explained
above.
Plan End Dt: This is set to the Planned End Dt of the row picked as explained
above.
Plan Qty: This is set to the sum of the Plan Qty‟s of the clubbed rows.
Confirm Start Dt: This is set to the Confirm Start Dt of the row picked as
explained above.
Confirm End Dt: This is set to the Confirm End Dt of the row picked as explained
above.
Confirm Qty: This is set to the sum of the Confirm Qtys of the clubbed rows.
Confirm Dt: This is set to the Confirm Dt of the row picked as explained above.
Doc. No. F/DV/15
Rev.No.
Date
BatchMaster Software Inc.
BMM User Manual
Process Cell: This is set to the Process Cell of the row picked as explained
above.
Hours Required: This is set to the sum of the Hours Required of the clubbed
rows.
Export to Excel: This option is used to export the data in the Excel file.
9.3.9 Using the Planning Worksheet
1. Click on the lookup button on the toolbar to select an MPS Item.
2. Click on Tab-1. All the fields on this tab are read-only. This tab displays, for
various periods, information related to supply, demand and orders such as:
a. Forecast
b. Customer Orders
c. Warehouse Transfers Out
d. Gross Demand
e. Dependent Demand
f.
Projected Available Balance
g. Planned Orders
h. Firm Planned Orders
i.
Confirmed Orders
j.
Total Order Release
k. MPS
l.
Production Orders
m. Purchase Orders
n. Warehouse Transfers In
o. ATP
p. Cumulative ATP
q. Exception Orders
3. Click on Tab-2. This Tab displays the demand generated from forecasting.
4. Click on Tab-3. This Tab displays the sales orders, which have contributed to the
generation of demand.
5. Click on Tab-4. This Tab displays the demand generated from warehouse
transfers out.
6. Click on Tab-5. This Tab displays the Production Orders generated as a result of
this MPS Run. Various dates, quantities and statuses for line items can be
modified if so desired.
7. Click on Tab-6. This Tab displays the Purchase Orders generated as a result of
this MPS Run. Various dates, quantities and statuses for line items can be
modified if so desired.
8. Click the OK button to save the changes.
Doc. No. F/DV/15
Rev.No.
Date
BatchMaster Software Inc.
BMM User Manual
9.4 Transfer MPS Purchase Order
The Transfer MPS Purchase Order screen can be used to transfer „Confirmed‟ MPS
purchased orders to Purchase Orders.
9.4.1 Screen Fields Description
MPS Item From: The lookup at this field displays only those MPS items for which there
exists at least one „Confirmed‟ Purchase Order. This specifies the lower limit of the range
of MPS items for which the Purchase Orders need to be transferred. Leaving this field
blank has the same effect as selecting the first available item via the lookup.
MPS Item To: The lookup at this field displays only those MPS items for which there
exists at least one „Confirmed‟ Purchase Order. This specifies the upper limit of the range
of MPS items for which the Purchase Orders need to be transferred. Leaving this field
blank has the same effect as selecting the last available item via the lookup.
MPS Location From: This specifies the lower limit of the range of warehouses. Leaving
this field blank has the same effect as selecting the first available warehouse via the
lookup.
MPS Location To: This specifies the upper limit of the range of warehouses. Leaving
this field blank has the same effect as selecting the last available warehouse via the
lookup.
Vendor Key: This field is used to specify the vendor for whom the Purchase Orders need
to be transferred.
Doc. No. F/DV/15
Rev.No.
Date
BatchMaster Software Inc.
BMM User Manual
Max. No. of Lines in PO: The value in this field defines the maximum number of lines
that can be added to one Purchase Order.
Get MPS Order: Clicking the button displays the only confirmed Purchase Orders within
the grid.
Grid Fields
Select: When this box is checked for a row, that row becomes available for transfer to
purchase order.
MPS Order No: This is the system-generated number for the MPS order. This value is
defaulted from the Planned Purchase Order tab of the Planning Worksheet or from the
Demand fence MPS Purchase Order screens, depending on where the order was
confirmed.
ItemKey: This is the Item No. for which the planned MPS purchase order has been
generated.
Item Description: This is the description of the item.
Location: This the Whse associated with the Item for which the planned MPS purchase
order has been generated.
Unit: This is the Stock UOM for the Item No..
Qty Required: This is the Required Quantity recommended by the system.
Vendor: This is the Vendor for the purchase order. The value in this field is defaulted
from the planned Purchase Order tab of the Planning Worksheet or from the Demand
fence 1 and 2 MPS Purchase Order screens, depending on where the order was
confirmed. The vendor can be changed here using the lookup button in the field.
Plan Run Date: This is the date when the MPS order was generated. The value in this
field is defaulted from the planned Purchase Order tab of the Planning Worksheet or from
the Demand fence MPS Purchase Order screens, depending on where the order was
confirmed.
Conf. Start Date: The value in this field is defaulted from the value of the confirmed
start date field in the planned Purchase Order tab of the Planning Worksheet or from the
Demand fence MPS Purchase Order screens, depending on where the order was
confirmed.
Conf. End Date: The value in this field is defaulted from the value of the confirmed end
date field in the planned Purchase Order tab of the Planning Worksheet or from the
Demand fence MPS Purchase Order screens, depending on where the order was
confirmed.
Plan Start Date: This is the Plan Start Date that is recommended by the system. The
value in this field is defaulted from the value of the plan start date field in the planned
Purchase Order tab of the Planning Worksheet or from the Demand fence MPS Purchase
Order screens, depending on where the order was confirmed.
Doc. No. F/DV/15
Rev.No.
Date
BatchMaster Software Inc.
BMM User Manual
Plan End Date: This is the Plan End Date that is recommended by the system. The
value in this field is defaulted from the value of the plan end date field in the planned
Purchase Order tab of the Planning Worksheet or from the Demand fence MPS Purchase
Order screens, depending on where the order was confirmed.
Confirm_Quantity: This is the Confirm Quantity recommended by the system. The
value in this field is defaulted from the planned Purchase Order tab of the Planning
Worksheet or from the time fence Purchase Order screens, depending on where the
order was confirmed.
Formula Id: This is the Formula id for which the planned MPS purchase order has been
generated.
9.4.2 Transferring MPS Purchase Orders
1. Select a MPS Item at the „From‟ field using the lookup button at this field.
2. Select a MPS Item at the „To‟ field using the lookup button at this field.
3. Select a Whse at the „From‟ field using the lookup button at this field.
4. Select a Whse at the „To‟ field using the lookup button at this field.
5. Click on the Get MPS Order button to fetch the Purchase Orders for the specified
range. Processing the range fetches those MPS Purchase Orders whose status is
„Confirmed‟.
6. At the „Max. No. of Lines in PO‟ field, enter the maximum number of lines that can
be added to one Purchase Order.
7. Click on the „Transfer‟ button to transfer the selected orders to purchase orders.
9.4.3 Goto
Process: Clicking this button transfers the planned purchase orders to Purchase Order.
BatchMaster Manufacturing generates a crystal report giving details of the purchase
order generated.
The PO details for the item include the following:
1. Processing Date
2. Processing Time
3. Vendor key
4. PO number
5. MPS Order Number
6. Item Key
7. Location
8. UOM
9. Order Quantity
10. Request date
Doc. No. F/DV/15
Rev.No.
Date
BatchMaster Software Inc.
BMM User Manual
Get MPS Order: Clicking the button displays the only confirmed Purchase Orders within
the grid.
Club Orders: Click on the Club Orders button to club the selected orders. Orders can be
selected by checking the select box for the order lines. The selected lines will be
combined to create a single line.
9.5 Transfer MPS Production Order
The „Transfer MPS Production Order‟ screen can be used to transfer Confirmed MPS
Production Orders to Batches or Super Batches. The procedure for using Transfer MPS
Production Order is substantially similar to the procedure for Transfer MPS Purchase
Order.
9.5.1 Screen Fields Description
MPS Item From: The lookup at this field displays only those MPS items for which there
exists at least one „Confirmed‟ Production Order. This specifies the lower limit of the
range of MPS items for which the Production Orders need to be transferred. Leaving this
field blank has the same effect as selecting the first available item via the lookup.
MPS Item To: The lookup at this field displays only those MPS items for which there
exists at least one „Confirmed‟ Production Order. This specifies the upper limit of the
range of MPS items for which the Production Orders need to be transferred. Leaving this
field blank has the same effect as selecting the last available item via the lookup.
Doc. No. F/DV/15
Rev.No.
Date
BatchMaster Software Inc.
BMM User Manual
MPS Location From: This specifies the lower limit of the range of warehouse. Leaving
this field blank has the same effect as selecting the first available Whse via the lookup.
MPS Location To: This specifies the upper limit of the range of warehouse. Leaving this
field blank has the same effect as selecting the last available Whse via the lookup.
Get MPS Order: Clicking the button displays the only confirmed Production orders
within the grid.
Grid Fields
Select: When this box is checked for a row, that row becomes available for transfer to
production order.
MPS Ord NO: This is the system-generated number for the MPS order. This value is
defaulted from the Planned Production Order tab of the Planning Worksheet or from the
Demand Fence MPS Production Order screens, depending on where the order was
confirmed.
Item key: This is the Item key for which the planned MPS production order has been
generated.
Location: This the location associated with the Item for which the planned MPS
production order has been generated.
UOM: This is the Stock UOM for the Item No..
Req Qty: This is the Required Quantity in stock UOM to be produced in a batch, which is
recommended by the system.
Formula Key: This is the formula key associated with the BOM of this line item.
Batch No: If the user has manually entered the Batch Number then the Batch Number
so entered gets displayed here. The line items that have been assigned a common batch
number are clubbed in a single batch. The line items that have not been assigned any
batch number are clubbed with those line items that use the same formula as the one
used by these line items.
Batch Type: This is the type of the batch. It can be one of Mix or Assembly. If the
assembly type of the BOM associated with this line item is „Finished Good‟ or
„Intermediate‟, then the Batch created will be „Mix‟ type. If it is „Assembly‟, the Batch
type will be „Assembly‟.
ProcessCell: This is the Process Cell associated with the formula (via the „Process Cell
Formula Capacity‟ screen) being used by the BOM of this line item.
Conf. Start: The value in this field is defaulted from the value of the confirmed start
date field in the Planned Production Order tab of the Planning Worksheet or from the
Demand Fence MPS Production Order screens, depending on where the order was
confirmed.
Doc. No. F/DV/15
Rev.No.
Date
BatchMaster Software Inc.
BMM User Manual
Conf. End: The value in this field is defaulted from the value of the confirmed end date
field in the Planned Production Order tab of the Planning Worksheet or from the Demand
Fence MPS Production Order screens, depending on where the order was confirmed.
Order Status: The value in this field is defaulted from the planned Production Order tab
of the Planning Worksheet or from the Demand Fence MPS Production Order screens,
depending on where the order was confirmed. The status of all the orders is „Confirmed‟,
for this screen.
Plan Qty: This is the Plan Quantity recommended by the system. The value in this field
is defaulted from the Planned Production Order tab of the Planning Worksheet or from
the Demand Fence MPS Production Order screens, depending on where the order was
confirmed.
Assembly Type: The value in this field is defaulted from the value of the Assembly Type
field at the BOM Entry screen. The possible values are I for intermediate, F for finished
good and A for assembly type of BOM.
9.5.2 Transferring MPS Production Orders
1. Select a MPS Item at the „From‟ field using the lookup button at this field.
2. Select a MPS Item at the „To‟ field using the lookup button at this field.
3. Select a MPS Location at the „From‟ field using the lookup button at this field.
4. Select a MPS Location at the „To‟ field using the lookup button at this field.
5. Click on the „Get MPS Order‟ button to fetch the Production Orders for the
specified range. Processing the range fetches those MPS Production Orders whose
status is „Confirmed‟.
6. Click on the „Transfer‟ button to transfer the selected production orders to batch.
If any batches are created via Finished Good type BOMs, the batches will be of
Mix or Fill type depending on the setting of the field „Top Level Finished Good
Batch to be created as‟ on the MPS Setup screen.
9.5.3 Goto
Transfer: Clicking this button transfers the planned production orders to Production
Batches. BatchMaster Manufacturing generates a crystal report giving details of the
production batch generated.
The Production Batch details for the item include the following:
1. Processing Date
2. Processing Time
3. Batch Type
4. Formula Id
5. Process Cell
6. Batch Number
7. Item No.
Doc. No. F/DV/15
Rev.No.
Date
BatchMaster Software Inc.
BMM User Manual
8. Location
9. UOM
10. Order Quantity
Get MPS Order: Clicking the button displays the only confirmed Production orders
within the grid.
Club Orders: Click on the Club Orders button to club the selected orders. Orders can be
selected by checking the select box for the order lines. The selected lines will be
combined to create a single line. The planned date for this line will automatically be set
to the earliest planned date of the combined lines.
9.6 Time Fence MPS Purchase Order
The Time Fence MPS Purchase Order option provides a way to define the order status for
a MPS Purchase Order having status as „Exception‟ and falling under the periods of Time
Fence. With Time Fence MPS Purchase Order, one can convert the order status of a
selected MPS order and MPS item, moving it from Exception to Firm Planned or
Confirmed. Once the order status has been set, it can be transferred using the Transfer
MPS Purchase Order option. The confirmation dates can be established as well.
9.6.1 Screen Fields Description
Item No.: This is the Item No. associated with the Item Master Data for which the
Demand Fence MPS Purchase Order is displayed.
Doc. No. F/DV/15
Rev.No.
Date
BatchMaster Software Inc.
BMM User Manual
Warehouse: This is the Whse associated with the Item for which the Demand Fence
MPS Purchase Order is displayed.
Unit: This is the Stock UOM for the Item No. shown on this screen.
Grid Fields
Select: When this box is checked for a row, that row becomes available for deletion as
well as for changing the status of the order or clubbing it with other orders.
MPS Order No: This is the system-generated number for the MPS order.
Confirm Start Dt: This date is defaulted with the Plan Start Dt when this row is created
or modified when Run MPS is processed. The user can modify the value in this field.
Confirm End Dt: This date is defaulted with the Plan End Dt when this row is created or
modified when Run MPS is processed. The user can modify the value in this field.
Confirm Qty: This quantity is defaulted with the Plan Qty when this row is created or
modified when Run MPS is processed. The user can modify the value in this field.
Order Status: The Order Status on this screen can be one of the following:
Exception: These orders, before being transferred to Purchase Orders need to be
„Confirmed‟. Since BatchMaster Manufacturing has a regenerative MPS, Exception
MPS Orders get erased when Run MPS is processed.
Firm Planned: These orders before being transferred to the Purchase Order need
to be „Confirmed‟. The Orders that are „FIRM PLANNED‟ will not be erased when
Run MPS is processed.
Confirmed: The Orders that are „Confirmed‟ are ready to be transferred to a
purchase order and will not be erased when Run MPS is processed..
9.6.2 Working with Time Fence MPS Purchase Order
1. Select a MPS purchase order record on this screen.
2. Change the status for the MPS purchase order. The status can be set to one of
„Exception‟, „Firm Planned‟ or „Confirmed‟. Checking the box on the line and then
clicking the respective status button below the grid can also change the status of
an order.
3. For Exception Orders, modify the confirmation start date as needed.
4. For Exception Orders, modify the confirmation end date as needed.
5. For Exception Orders, modify the confirmed quantity of the MPS purchase order
as needed.
6. Click the OK button to save the Time Fence MPS Purchase Order record.
Doc. No. F/DV/15
Rev.No.
Date
BatchMaster Software Inc.
BMM User Manual
9.6.3 Goto
Exception: If any of the rows have their boxes checked, the status of those rows gets
changed to Exception when this option is clicked.
Firm Planned: If any of the rows have their boxes checked, the status of those rows
gets changed to Firm Planned when this option is clicked.
Confirmed: If any of the rows have their boxes checked, the status of those rows gets
changed to Confirmed when this option is clicked.
Club Orders: Click on the Club Orders option to club the selected orders. Orders can be
selected by checking the select box for the order lines. The selected lines will be
combined to create a single line. The planned date for this line will automatically be set
to the earliest planned date of the combined lines.
Multiples of EOQ: For the rows that have their boxes checked, clicking on this option
converts the value in the Plan Quantity field to an integral multiple of the Economic
Order Quantity of that item. The value of EOQ defined at item Whse is overridden by the
value established at the Maintain MPS Item or Pull MPS Item screens.
9.7 Time Fence MPS Production Order
The Time Fence MPS Production Order option provides a way to define the order status
for a MPS Production Order having status as „Exception‟ and falling under the periods of
Time Fence. With time Fence MPS Production Order, one can convert the order status of
a selected MPS order and MPS item, moving it from Exception to Firm Planned or
Confirmed. Once the order status has been set, it can be transferred using the Transfer
MPS Production Order option. The confirmation dates can be established as well.
Doc. No. F/DV/15
Rev.No.
Date
BatchMaster Software Inc.
BMM User Manual
9.7.1 Screen Fields Description
Item No.: This is the Item No. associated with the Item Master Data for which the
Demand Fence MPS Production Order is displayed.
Warehouse: This is the warehouse associated with the Item for which the Demand
Fence MPS Production Order is displayed.
Unit: This is the Stock UOM for the Item No. shown on this screen.
Grid Fields
Select: When this box is checked for a row, that row becomes available for deletion as
well as for changing the status of the order or clubbing it with other orders.
MPS Order No: This is the system-generated number for the MPS order.
ConfirmStart: This date is defaulted with the Plan Start Dt when this row is created or
modified when Run MPS is processed. The user can modify the value in this field.
ConfirmEnd: This date is defaulted with the Plan End Dt when this row is created or
modified when Run MPS is processed. The user can modify the value in this field.
ConfirmQty: This quantity is defaulted with the Plan Qty when this row is created or
modified when Run MPS is processed. The user can modify the value in this field.
Doc. No. F/DV/15
Rev.No.
Date
BatchMaster Software Inc.
BMM User Manual
Order Status: The Order Status on this screen can be one of the following:
Exception: These orders, before being transferred to Production Orders need to
be „Confirmed‟. Since BatchMaster Manufacturing has a regenerative MPS,
Exception MPS Orders get erased when Run MPS is processed.
Firm Planned: These orders before being transferred to Production Orders need to
be „Confirmed‟. The Orders that are „FIRM PLANNED‟ will not be erased when Run
MPS is processed.
Confirmed: The Orders that are „Confirmed‟ are ready to be transferred to
Production Orders and will not be erased when Run MPS is processed.
Batch Type: This can be one of Mix, Fill or Assembly, depending on the assembly type
of the associated BOM.
Process Cell: This is the Process Cell associated with the formula (via the „Process Cell
Formula Capacity‟ screen) being used by the BOM of this item.
9.7.2 Working with Time Fence MPS Production Order
1. Select a MPS Production order record on this screen.
2. Change the status for the MPS Production order. The status can be set to one of
„Exception‟, „Firm Planned‟ or „Confirmed‟. Checking the box on the line and then
clicking the respective status button below the grid can also change the status of
an order.
3. For Exception Orders, modify the confirmation start date as needed.
4. For Exception Orders, modify the confirmation end date as needed.
5. For Exception Orders, modify the confirmed quantity of the MPS Production order
as needed.
6. Click Ok to save the Time Fence MPS Production Order record.
9.7.3 Goto
Exception: If any of the rows have their boxes checked, the status of those rows gets
changed to Exception when this option is clicked.
Firm Planned: If any of the rows have their boxes checked, the status of those rows
gets changed to Firm Planned when this option is clicked.
Confirmed: If any of the rows have their boxes checked, the status of those rows gets
changed to Confirmed when this option is clicked.
Club Orders: Click on the Club Orders option to club the selected orders. Orders can be
selected by checking the select box for the order lines. The selected lines will be
combined to create a single line. The planned date for this line will automatically be set
to the earliest planned date of the combined lines.
Multiples of EOQ: For the rows that have their boxes checked, clicking on this option
converts the value in the Plan Quantity field to an integral multiple of the Economic
Doc. No. F/DV/15
Rev.No.
Date
BatchMaster Software Inc.
BMM User Manual
Order Quantity of that item. The value of EOQ defined at item Whse is overridden by the
value established at the Maintain MPS Item or Pull MPS Item screens.
9.8 Maintain MPS Item
The Maintain MPS Item screen provides a way to select an item for MPS processing. With
Maintain MPS Item, one can establish a selected Item Master Data:
1. Item type (Make or Buy)
2. Economic Order Quantity
3. Default Vendor
4. Lot sizing Method
Only those items can be maintained for MPS processing whose Order Method has been
set to „MPS‟ at the Item Master screen. MPS can be run only for those Item Master Data
that have been maintained at this screen.
9.8.1 Screen Fields Description
MPS Item: Select a MPS Item from the lookup at this field. The lookup here displays
only those items whose Order Method has been defined as „MPS‟ on the Item Master
screen. This is a mandatory field.
Warehouse: This is the warehouse associated with the item. This is a mandatory field.
Unit: This is the stock UOM for the Item Master Data. This is a read only field.
Item Type: The value in this field decides the type of the item. The type can be either
Purchase or Manufacture depending on which, Run MPS will generate Purchase Orders or
Production Orders respectively. The Item Type can be selected, as „Make‟ only if a
Released BOM exists for the selected Item Master Data.
Doc. No. F/DV/15
Rev.No.
Date
BatchMaster Software Inc.
BMM User Manual
Economic Order Quantity: This is the Economic Order Quantity for the item..
Default Vendor: This is the default vendor for the MPS item. This field is enabled if the
Item Type is set to Purchase. If enabled this is a mandatory field.
Low Level Code: This is the low level code for the item that is, the lowest occurrence
(largest numeric value) of this Item Master Data in the hierarchy of MPS items for a Bill
of Materials (BOM) if this is a MPS type item. The hierarchy of Low Level Codes for MRP
items is separate from that of MPS items.
Lot Sizing Method: The value in this field can be one of Lot for Lot or EOQ. If EOQ is
selected, any order quantities generated by the system will be integral multiples of the
EOQ. Lot for Lot means that the order quantities will not be modified to integral multiples
of EOQ.
Last MPS Run Date: This is the date on which MPS was last run. This is a read only
field.
9.8.2 Maintaining a MPS Item
1. Select an item from the lookup at the toolbar or navigate via the navigation
buttons.
2. Select a Whse from the lookup at this screen.
3. Set the Item Type as one of „Make or „Buy‟.
4. Modify the Economic Order Quantity if needed.
5. If the „Default Vendor‟ field is enabled, select or modify the Vendor.
6. Define the Low Level Code.
7. Change the Lot Sizing Method if needed.
8. Click the Add button to save the record.
9.9 Pull MPS Items
The Pull MPS Items screen adds MPS Items to the Maintain MPS Items screen. It picks
up those items whose Order Method has been marked as MPS at the Item Master screen.
At the Pull MPS Items screen, one can establish the following values that may differ from
the corresponding values at the Item Master Data:
Item type (Buy or Make)
1.
Lot sizing Method.
2.
Economic Order Quantity
3.
Default Vendor.
The above values defined here will supersede during Run MPS any conflicting values that
may be stored at the Item Master Data.
Doc. No. F/DV/15
Rev.No.
Date
BatchMaster Software Inc.
BMM User Manual
9.9.1 Screen Fields Description
Select: When this box is checked for a row, that row becomes available for pulling for
MPS.
MPS item: The value in this field contains those items whose Order Method has been
defined as „MPS‟ on the Item Master screen.
Description: This is the description of the MPS item for the line.
Whse: This is the Whse associated with the item.
Item Type: The value in this field decides the type of the item. The type can be either
Purchase or Manufacture depending on which, Run MPS will generate Purchase Orders or
Production Orders respectively. The Item Type can be selected, as „Manufacture‟ only if a
Released BOM exists for the selected Item Master Data. The value established here
overrides the value set at the Item Master Data screen.
Lot Sizing Method: The value in this field can be one of Lot for Lot or EOQ. If EOQ is
selected, any order quantities generated by the system will be integral multiples of the
EOQ. Selecting Lot for Lot means that the order quantities will not be modified to
integral multiples of EOQ. The value in this field overrides the value established for the
item at the Item Master screen.
Economic Ord Qty: This is the Economic Order Quantity for the item. The value in this
field overrides the EOQ defined at Item Master Data.
Doc. No. F/DV/15
Rev.No.
Date
BatchMaster Software Inc.
BMM User Manual
Vendor: This is the default vendor for the MPS item. This field is enabled if the Item
Type is set to Purchase. If enabled this is a mandatory field. The value in this field
overrides the vendor established at the Item Master Data screen.
Unit: This is the stock UOM for the Item Master Data.
Select All: Clicking this option checks the boxes for all the rows in the grid.
UnSelect All: Clicking this option un-checks the boxes for all the rows in the grid.
9.9.2 Using Pull MPS Items screen
1. Select the MPS Items to be saved by checking the box adjacent to the MPS Item
line.
2. Select the Item Type as one of „Make‟ or „Buy‟.
3. Change the Lot Sizing Method if needed.
4. Modify the Economic Order Quantity if needed.
5. For a Purchase type item, enter or modify the „Default Vendor‟ as needed.
6. Click the Pull button to complete the Pull MPS Items for the selected line items.
9.10 MPS Order Range Processing
The „MPS Order Range Processing‟ screen enables the user to change the status of the
MPS Purchase/Production Orders for a range of MPS Items in one go.
9.10.1
Screen Fields Description
Item No. From: The lookup at this field displays those MPS items for which there exists
at least one Purchase Order or Production Order. This specifies the lower limit of the
range of MPS items for which the order status needs to be changed. Leaving this field
blank has the same effect as selecting the first available item via the lookup.
Item No. To: The lookup at this field displays those MPS items for which there exists at
least one Purchase Order or Production Order. This specifies the upper limit of the range
of MPS items for which the order status needs to be changed. Leaving this field blank
has the same effect as selecting the last available item via the lookup.
Doc. No. F/DV/15
Rev.No.
Date
BatchMaster Software Inc.
BMM User Manual
Warehouse From: This specifies the lower limit of the range of warehouse. Leaving this
field blank has the same effect as selecting the first available Whse via the lookup.
Warehosue To: This specifies the upper limit of the range of warehouse. Leaving this
field blank has the same effect as selecting the last available Whse via the lookup.
Plan Date Start: This specifies the lower end of the Plan Dates. Leaving this field blank
has the same effect as entering January 01, 1900.
Plan Date End: This specifies the upper end of the Plan Dates. Leaving this field blank
has the same effect as entering the current Server date.
Change Status From: The Orders having this selected status will qualify for the change
of status. The value in this field can be one of Exception, Planned, Firm Planned or
Confirmed.
Change Status To: The status of the selected Orders will change to this status upon
processing. The value in this field can be either Firm Planned or Confirmed.
9.10.2
Processing a Range of MPS Orders
1. Select a MPS Item at the „From‟ field using the lookup at this field.
2. Select a MPS Item at the „To‟ field using the lookup at this field.
3. Select a Whse at the „From‟ field using the lookup at this field.
4. Select a Whse at the „To‟ field using the lookup at this field.
5. Enter a Plan Start Date.
6. Enter a Plan End Date.
7. Select a status at the „Change Status From‟ field.
8. Select a status at the „Change Status To‟ field.
9. Click on the Process button to change the status.
9.11 MPS Dashboard
Master Production scheduling dashboard provides the functionality to view the Purchase
and production schedule based on forecasts and anticipated demand. The dashboard
displays the generated planning worksheet and also gives details pertaining to the
worksheet values in its lower section.
Doc. No. F/DV/15
Rev.No.
Date
BatchMaster Software Inc.
BMM User Manual
MPS Items Section:
MPS_Item: It shows the MPS type of Item.
Description: This is the description of the relevant Item.
Location: It is the location associated to an Item.
Unit: It is the Unit of Measurement defaulted from Item.
Curr On Hand-Safety Stk: It is the Quantity of an item key available in stock.
IncludedInLastRun:The value in this box is true for those Item Location included in
last MPS Run.
The main section of dashboard screen displays the MPS Planning Worksheet. Distinct row
heads of the screen are:
MPS Item With Summary:
Forecast: The value corresponding to this head represents the demand arising from
Active forecasts for a given period.
Customer Orders: It is the demand arising from Sales Orders.
Warehouse Transfer/Out: This value is the summation of non processed saved
Warehouse Transfers and Inventory Moves.
Doc. No. F/DV/15
Rev.No.
Date
BatchMaster Software Inc.
BMM User Manual
Gross Demand: It is the sum of Forecast, Customer Orders and Warehouse Transfers.
Dependant Demand: This represents the dependent demand arising from other,
planned, firm planned and confirmed MPS Orders for higher level MPS items
Proj Available Balance: This represents the Quantity that is projected to be on hand
after subtracting the "demand" from the "supply".
Planned Orders: This represents the Quantity for which planned Orders have been
created via Run MPS.
Firm Planned Orders: This represents the Quantity for which firm planned Orders have
been created.
Confirmed Orders: It represents the Quantity for which confirmed Orders have been
created.
Total Order Release: It is the summation of the quantities of Planned Orders, Firm
Planned Orders and Confirmed Orders on the same column.
MPS: This is the Quantity expected to be received in a given period from "Total Order
Release" of this or prior periods.
Production Orders: This is the Quantity that is scheduled to be received from existing
production batches that have not yet been closed.
Purchase Orders: It shows the Quantity, scheduled to be received from existing
Purchase Orders of New or Open statuses.
Warehouse Orders: The value in this field represents the supply arising from
unprocessed saved Warehouse Transfer In and Inventory moves.
ATP: It is the Quantity that is “Available to Promise”.
Cumulative ATP: This is a cumulative sum of the ATPs starting from the first period of
the planning horizon to the given period.
Exception Orders: This field shows the Quantity for which exception Orders have been
generated.
Different Column heads of the screen are:
Time Fence 1: The value in this field is the number of days in the first Time Fence. The
user may define two Time Fences. An Exception Order is generated for all the MPS
Orders whose delivery Date falls within this Time Fence.
Time Fence 2: This is the number of days in the second Time Fence. An Exception
Order is generated for all the MPS Orders whose delivery Date falls within this Time
Fence.
Doc. No. F/DV/15
Rev.No.
Date
BatchMaster Software Inc.
9.11.1
BMM User Manual
Summary Details:
By double clicking the values of the planning worksheet, Information pertaining to it gets
detailed at the lower segment of the dashboard.
9.11.1.1
Forecast
The forecast value defined when planning the worksheet can be obtained on the
dashboard. When double clicking the available values the detail pertaining to it can be
viewed in the lower grid. Distinct fields displaying in the grid are:
Forecast Key: This is the Forecast Key associated with the row.
Line No: It shows the line number of the order.
Forecast Qty: This is the Quantity that is requested via this forecast line.
Request Date: This is the Date on which the Order Qty of this item is requested to be
ready.
9.11.1.2
Customer Orders
This represents the demand arising from sales orders on the dashboard. When double
clicking the available values the detail pertaining to it can be viewed in the lower grid.
Doc. No. F/DV/15
Rev.No.
Date
BatchMaster Software Inc.
BMM User Manual
Sales Order No: It is the Sales Order number generated with respect to the Customer
for the specific line item key.
Line No: This fields display the Sales Order line number of the selected line item key.
Order Qty: It is the Sales Order Quantity for the line item.
Request Date: This is the Date by which the delivery of this line item is requested by
the Customer.
Customer Key: It is the Customer key associated with Sales Order.
9.11.1.3
Warehouse Transfers
This represents the demand arising from inventory transfers on the dashboard. When
double clicking the available values the detail pertaining to it can be viewed in the lower
grid.
9.11.1.4
Gross Demand
As per the setting for the applicable Demand Range on the MPS Setup screen, this field
represents the gross demand determined from the Forecast, Customer Orders and
Warehouse Transfers. Thus by double clicking the values of the planning worksheet,
Information pertaining to it gets detailed at the lower segment of the dashboard.
Doc. No. F/DV/15
Rev.No.
Date
BatchMaster Software Inc.
9.11.1.5
BMM User Manual
Planned Orders
This represents the quantity for which planned orders have been created via Run MPS.
The related details can be seen on lower grid. Depending on whether the item is of Make
type or of Buy type at the Maintain MPS Item screen.
Doc. No. F/DV/15
Rev.No.
Date
BatchMaster Software Inc.
BMM User Manual
MPS Ord No: This is the system-generated number for this MPS order.
Plan Run Dt: This is the date when Run MPS generated this order.
Plan Start Dt: This is the Plan Start Date that is recommended by the system when Run
MPS is processed.
Order Qty: This is the Plan Quantity that is recommended by the system when Run MPS
is processed.
Plan End Dt: This is the Plan End Date that is recommended by the system when Run
MPS is processed.
Confirm Start Dt: This date is defaulted with the Plan Start Dt when this row is created
or modified, when Run MPS is processed. For a Planned Order, the user can modify this
date.
Confirm End Dt: This date is defaulted with the Plan End Dt when this row is created or
modified, when Run MPS is processed. For a Planned Order, the user can modify this
date.
Confirm Qty: This quantity is defaulted with the Plan Qty when this row is created or
modified when Run MPS is processed. For a Planned Order, the user can modify this
quantity.
Confirm Dt: This is the date when this order was confirmed.
Doc. No. F/DV/15
Rev.No.
Date
BatchMaster Software Inc.
BMM User Manual
Transfer Dt: This is the date when this order was transferred to a production batch.
Batch Type: This can be one of Mix, Fill or Assembly, depending on the assembly type
of the associated BOM.
Process Cell: This is the Process Cell associated with the formula being used by the
BOM of this item.
Hours Required: This value is assigned by the system during Run MPS. This value can
be changed at the Process Cell Formula Capacity screen. The value can also get modified
when orders get clubbed.
9.11.1.6
MPS Release
The value in this field repsresents the sum of the quantities of Planned Orders, Firm
Planned Orders and Confirmed Orders of the same column. The details of which are
dispalyed in the lower grid.
MPS Ord No: This is the system-generated number for this MPS order.
Plan Run Dt: This is the date when Run MPS generated this order.
Plan Start Dt: This is the Plan Start Date that is recommended by the system when Run
MPS is processed.
Order Qty: This is the Plan Quantity that is recommended by the system when Run MPS
is processed.
Doc. No. F/DV/15
Rev.No.
Date
BatchMaster Software Inc.
BMM User Manual
Plan End Dt: This is the Plan End Date that is recommended by the system when Run
MPS is processed.
Confirm Start Dt: This date is defaulted with the Plan Start Dt when this row is created
or modified, when Run MPS is processed. For a Planned Order, the user can modify this
date.
Confirm End Dt: This date is defaulted with the Plan End Dt when this row is created or
modified, when Run MPS is processed. For a Planned Order, the user can modify this
date.
Confirm Qty: This quantity is defaulted with the Plan Qty when this row is created or
modified when Run MPS is processed. For a Planned Order, the user can modify this
quantity.
Confirm Dt: This is the date when this order was confirmed.
Transfer Dt: This is the date when this order was transferred to a production batch.
Batch Type: This can be one of Mix, Fill or Assembly, depending on the assembly type
of the associated BOM.
Process Cell: This is the Process Cell associated with the formula being used by the
BOM of this item.
Hours Required: This value is assigned by the system during Run MPS. This value can
be changed at the Process Cell Formula Capacity screen. The value can also get modified
when orders get clubbed.
9.11.1.7
MPS
This field dispalys the quantity expected to be received in a given period from "Total
Order Release" of this or prior periods. The details of the same are dispalyed in the lower
grid.
Doc. No. F/DV/15
Rev.No.
Date
BatchMaster Software Inc.
BMM User Manual
MPS Order No: This is the system-generated number for this MPS order.
Plan Start Dt: This is the Plan Start Date that is recommended by the system when Run
MPS is processed.
MPS Qty: This is the Plan Quantity that is recommended by the system when Run MPS
is processed.
9.11.1.8
Exception Orders
The value in this field displays the quantity for which exception orders have been
generated. The detials of the expection orders are dispalyed in the lower grid.
Doc. No. F/DV/15
Rev.No.
Date
BatchMaster Software Inc.
BMM User Manual
MPS Ord No: This is the system-generated number for this MPS order.
Plan Run Dt: This is the date when Run MPS generated this order.
Plan Start Dt: This is the Plan Start Date that is recommended by the system when Run
MPS is processed.
Order Qty: This is the Plan Quantity that is recommended by the system when Run MPS
is processed.
Plan End Dt: This is the Plan End Date that is recommended by the system when Run
MPS is processed.
Confirm Start Dt: This date is defaulted with the Plan Start Dt when this row is created
or modified, when Run MPS is processed. For a Planned Order, the user can modify this
date.
Confirm End Dt: This date is defaulted with the Plan End Dt when this row is created or
modified, when Run MPS is processed. For a Planned Order, the user can modify this
date.
Confirm Qty: This quantity is defaulted with the Plan Qty when this row is created or
modified when Run MPS is processed. For a Planned Order, the user can modify this
quantity.
Confirm Dt: This is the date when this order was confirmed.
Doc. No. F/DV/15
Rev.No.
Date
BatchMaster Software Inc.
BMM User Manual
Transfer Dt: This is the date when this order was transferred to a production batch.
Batch Type: This can be one of Mix, Fill or Assembly, depending on the assembly type
of the associated BOM.
Process Cell: This is the Process Cell associated with the formula being used by the
BOM of this item.
Hours Required: This value is assigned by the system during Run MPS. This value can
be changed at the Process Cell Formula Capacity screen. The value can also get modified
when orders get clubbed.
9.12 MPS Reports
9.12.1
MPS Planning Report
The MPS Planning report provides a handy view of your planning worksheet. This report
may be seen as an effective way to gather a sense of the scope of planning for a single
item across the defined planning horizon. The report only displays the summary tab of
the Planning Worksheet screen.
The option‟s filtering parameters can be used to define the report. Once BatchMaster
Manufacturing processes the report parameters, it displays the results as a Crystal
Report that one can print or export.
9.12.1.1
Screen Fields Description
Item No. Range
MPS Item From: Field displays the lower limit of the range of MPS item for use as filter
criteria during processing. Leaving this field blank has the same effect as selecting the
first available MPS Item via the lookup.
Doc. No. F/DV/15
Rev.No.
Date
BatchMaster Software Inc.
BMM User Manual
MPS Item To: Field displays the upper limit of the range of MPS item for use as filter
criteria during processing. Leaving this field blank has the same effect as selecting the
last available MPS Item via the lookup.
Warehouse Range
Warehouse From: Field displays the lower limit of the range of warehouse for use as
filter criteria during processing. Leaving this field blank has the same effect as selecting
the first available warehouse via the lookup.
Warehouse To: Field displays the upper limit of the range of warehouse for use as filter
criteria during processing. Leaving this field blank has the same effect as selecting the
last available MPS Item via the lookup.
Report Path: Field clasps the default path of the report.
9.12.1.2
Generating an MPS Planning Report
1. Complete the MPS Item From and To range using the lookup buttons next to the
fields.
2. Complete the Whse From and To range using the lookup buttons next to the
fields.
3. To save these parameters, enter the name to be assigned to the report
parameters in the drop-down field on the far right of the toolbar and then click on
the Save button on the toolbar to save the report parameters.
4. Click on the OK button to create a report.
Doc. No. F/DV/15
Rev.No.
Date
BatchMaster Software Inc.
9.12.2
BMM User Manual
MPS Demand Report
The MPS Demand Report displays the date wise demand of a defined range of Item
Master Data. The demand is taken directly from the Planning Calendar‟s three demand
ranges and is displayed for the server date and the dates above server date. In addition
to showing the Whse and the type of demand, each report details the order number, line
number, order quantity and order date.
The sources of demand shown on this report are:
1. Forecast
2. Sales Orders
3. Warehouse Transfers Out
4. Dependent Demand (from Planned, Firm Planned and Confirmed orders of higher
level MPS Items)
If the demand for an item exist from more than one source, then the demand from
different sources are displayed under different head. If the Demand Type is Forecast, the
demand is fetched from the Forecast screen. In case the demand type is Sales Order,
the demand is fetched from all those orders that are in „New‟ and „Open‟ status. And, if
the Demand Type is „Warehouse Transfer‟, the demand is fetched from Warehouse
Transfer Out or Inventory Move Out orders, which are saved but not yet processed.
The option‟s filtering parameters can be used to define the report. Once BatchMaster
Manufacturing processes the report parameters, it displays the results as a Crystal
Report that one can print or export.
9.12.2.1
Screen Fields Description
Item No. From: Field displays the lower limit of the range of item for use as filter
criteria during processing. Leaving this field blank has the same effect as selecting the
first available Item via the lookup.
Item No. To: Field displays the upper limit of the range of item for use as filter criteria
during processing. Leaving this field blank has the same effect as selecting the last
available Item via the lookup.
Doc. No. F/DV/15
Rev.No.
Date
BatchMaster Software Inc.
BMM User Manual
Warehouse From: Field displays the lower limit of the range of warehouse for use as
filter criteria during processing. Leaving this field blank has the same effect as selecting
the first available warehouse via the lookup.
Warehouse To: Field displays the upper limit of the range of warehouse for use as filter
criteria during processing. Leaving this field blank has the same effect as selecting the
last available MPS Item via the lookup.
Report Path: Field clasps the default path of the report.
9.12.2.2
Generating an MPS Demand Report
1. Complete the MPS Item No. From and To range using the lookup buttons next to
the fields.
2. Complete the Whse From and To range using the lookup buttons next to the
fields.
3. To save these parameters, enter the name to be assigned to the report
parameters in the drop-down field on the far right of the toolbar and then click on
the Save button on the toolbar to save the report parameters.
4. Click on the OK button to create a report.
9.12.3
MPS Order Report
The MPS Order report displays all the MPS orders existing for a defined range of Item
Master Data. The report includes MPS orders of the following statuses:
1. Exception
2. Planned
Doc. No. F/DV/15
Rev.No.
Date
BatchMaster Software Inc.
BMM User Manual
3. Firm Planned
4. Confirmed
5. Transferred
You may choose to include orders of one or more of these statuses.
The option‟s filtering parameters can be used to define the report. Once BatchMaster
Manufacturing processes the report parameters, it displays the results as a Crystal
Report that one can print or export.
9.12.3.1
Screen Fields Description
Item No. From: Field displays the lower limit of the range of item for use as filter
criteria during processing. Leaving this field blank has the same effect as selecting the
first available Item via the lookup.
Item No. To: Field displays the upper limit of the range of item for use as filter criteria
during processing. Leaving this field blank has the same effect as selecting the last
available Item via the lookup.
Warehouse From: Field displays the lower limit of the range of warehouse for use as
filter criteria during processing. Leaving this field blank has the same effect as selecting
the first available warehouse via the lookup.
Warehouse To: Field displays the upper limit of the range of warehouse for use as filter
criteria during processing. Leaving this field blank has the same effect as selecting the
last available MPS Item via the lookup.
Select Order Type: Field provides option to select order types to be included in the
filter criteria. The available options are:
1. Planned
Doc. No. F/DV/15
Rev.No.
Date
BatchMaster Software Inc.
2.
3.
4.
5.
BMM User Manual
Firm Planned
Confirmed
Exception
Transferred
Report Path: Field clasps the default path of the report.
9.12.3.2
Generating a MPS Order Report
1. Complete the MPS Item No. From and To range using the lookup buttons next to
the fields.
2. Complete the Whse From and To range using the lookup buttons next to the
fields.
3. Select Order Types as required.
4. To save these parameters, enter the name to be assigned to the report
parameters in the drop-down field on the far right of the toolbar and then click on
the Save button on the toolbar to save the report parameters.
5. Click on the OK button to create a report.
9.12.4
MPS Supply Report
The MPS supply report displays the supply source and supply quantity for various MPS
items. The sources of supply are:
1. Scheduled Receipts from batches in Production
Doc. No. F/DV/15
Rev.No.
Date
BatchMaster Software Inc.
BMM User Manual
2. Scheduled Receipts from existing Purchase Orders
3. Scheduled Receipts from Warehouse Transfers coming in
4. All MPS orders (of planned, firm planned and confirmed type) generated via the
latest processing on the Run MPS screen. This excludes any firm planned or
confirmed MPS orders that existed before the latest Run MPS was processed.
The report displays the date wise record of supply along with their source and Projected
Available Balance. Moreover, the report also displays Oversold Quantity, Planned
Purchase Orders and Planned Production Orders.
The option‟s filtering parameters can be used to define the report. Once BatchMaster
Manufacturing processes the report parameters, it displays the results as a Crystal
Report that one can print or export.
9.12.4.1
Screen Fields Description
Item No. From: Field displays the lower limit of the range of item for use as filter
criteria during processing. Leaving this field blank has the same effect as selecting the
first available Item via the lookup.
Item No. To: Field displays the upper limit of the range of item for use as filter criteria
during processing. Leaving this field blank has the same effect as selecting the last
available Item via the lookup.
Warehouse From: Field displays the lower limit of the range of warehouse for use as
filter criteria during processing. Leaving this field blank has the same effect as selecting
the first available warehouse via the lookup.
Warehouse To: Field displays the upper limit of the range of warehouse for use as filter
criteria during processing. Leaving this field blank has the same effect as selecting the
last available MPS Item via the lookup.
Report Path: Field clasps the default path of the report.
Doc. No. F/DV/15
Rev.No.
Date
BatchMaster Software Inc.
9.12.4.2
BMM User Manual
Generating a MPS Supply Report
1. Complete the MPS Item No. From and To range using the lookup buttons next to
the fields.
2. Complete the Whse From and To range using the lookup buttons next to the
fields.
3. To save these parameters, enter the name to be assigned to the report
parameters in the drop-down field on the far right of the toolbar and then click on
the Save button on the toolbar to save the report parameters.
4. Click on the OK button to create a report.
9.12.5
MPS Expedite PO Report
The MPS Expedite PO Report screen provides a way to generate a report that displays
suggested changes, if any, in the following, to meet requirements of that item as per the
latest processing on the Run MPS screen:
1. Requested delivery dates of line items on existing purchase orders
2. Expected receipt date for warehouse transfers coming in
3. Due dates of existing production batches
The report may suggest expediting, delaying or canceling existing orders. You may opt
to see individually which orders are to be accelerated, which are to be delayed and which
Doc. No. F/DV/15
Rev.No.
Date
BatchMaster Software Inc.
BMM User Manual
are to be cancelled. For this, you may select the required option out of Expedite, Delay,
No Expedite and Cancel, and can see individual reports for them.
This report also shows the suggested MPS orders (with dates), in view of the
expedite/delay/cancel suggestions, to meet the demand of that item
The option‟s filtering parameters can be used to define the report. Once BatchMaster
Manufacturing processes the report parameters, it displays the results as a Crystal
Report that one can print or export.
9.12.5.1
Screen Fields Description
Item No. From: Field displays the lower limit of the range of item for use as filter
criteria during processing. Leaving this field blank has the same effect as selecting the
first available Item via the lookup.
Item No. To: Field displays the upper limit of the range of item for use as filter criteria
during processing. Leaving this field blank has the same effect as selecting the last
available Item via the lookup.
Warehouse From: Field displays the lower limit of the range of warehouse for use as
filter criteria during processing. Leaving this field blank has the same effect as selecting
the first available warehouse via the lookup.
Warehouse To: Field displays the upper limit of the range of warehouse for use as filter
criteria during processing. Leaving this field blank has the same effect as selecting the
last available MPS Item via the lookup.
Expedite Status: Field provides option to select order statuses to be included in the
filter criteria. The available options are:
1. Expedite
2. Delay
3. Non Expedite
Doc. No. F/DV/15
Rev.No.
Date
BatchMaster Software Inc.
BMM User Manual
4. Cancel
Report Path: Field clasps the default path of the report.
9.12.5.2
Generating a MPS Expedite PO Report
1. Complete the MPS Item No. From and To range using the lookup buttons next to
the fields.
2. Complete the Whse From and To range using the lookup buttons next to the
fields.
3. Select Expedite Statuses as required.
4. To save these parameters, enter the name to be assigned to the report
parameters in the drop-down field on the far right of the toolbar and then click on
the Save button on the toolbar to save the report parameters.
5. Click on the OK button to create a report.
10 Material Requirement Planning
Material Requirements Planning (MRP) provides a means to plan purchases based upon
forecasts and anticipated demand. The information produced by BatchMaster
Manufacturing's MRP group makes it possible for the user to schedule both purchases and
production.
Demand can be broadly defined as the commitments that have to be met because there
are open production batches, warehouse transfers, or dependent demands. Forecast, on
the other hand, represents an estimate of future demand, and can represent a number
Doc. No. F/DV/15
Rev.No.
Date
BatchMaster Software Inc.
BMM User Manual
of things, ranging from a prediction based upon production history or an analysis of
future market conditions that one believes one should be prepared for in the future.
Note: Based on the BM Planning Method field of the Item Master Data screen of
SAP, an item can be either MPS or MRP type. Thus, depending on opted value items can
be fetched using the Pull MRP Option.
10.1 Run MRP
With Run MRP, one can define MRP scheduling needs and generate a MRP schedule for
those items whose order method is marked as „MRP‟ at the Item Master screen. This
screen is used to Run MRP for a range of items in regenerative mode.
Run MRP generates MRP production orders or MRP purchase orders depending whether
the item is Make type or Buy type respectively, as defined at the Item Master Data
screen. (This is different from Run MPS. Run MPS can generate production orders only if
the Item Master Data is “Manufacture” type on the Maintain MPS Item screen and a
released BOM exists for it. For all other Item Master Datas, Run MPS can generate
purchase orders only).
The sources of demand for Run MRP are:
1. Forecast (depending on the setting for the Demand Range on the MPS Setup
screen)
2. Sales Orders and Warehouse Transfers Out (depending on the setting for the
Demand Range on the MPS Setup screen)
3. Dependent Demand (from Planned, Firm Planned and Confirmed orders of MPS
Items and higher level MRP Items)
4. The quantity by which On Hand Quantity is less than the Safety Stock Quantity as
defined at the Item Master Data.
5. MRP type raw materials remaining to be issued to production batches those are
not on hold.
The sources of supply for Run MRP are:
1. Only for the first Period of the planning horizon: The quantity by which the On
Hand quantity exceeds the Safety Stock as defined at the Item Master Data.
2. For 2nd Period of the planning horizon onwards: PAB of the preceding period.
3. Scheduled Receipts from
a. Purchase Orders
b. Production Orders
c. Warehouse Transfers In
d. Firm Planned Orders
e. Confirmed Orders
The quantity to be ordered is determined by subtracting the supply quantity from the
demand quantity and then adjusting for EOQ if the EOQ is applicable. For this purpose:
Doc. No. F/DV/15
Rev.No.
Date
BatchMaster Software Inc.
BMM User Manual
1. The EOQ is applicable if the Lot Sizing Method is set to EOQ at the Maintain MRP
screen.
2. The value of EOQ is taken from the Maintain MRP screen.
If the orders can be created outside any demand fences (without using a date less than
the Server date), then Planned Orders get created. The planned orders so created can
automatically get changed to firm planned orders or confirmed orders depending on the
option selected at the Run MRP screen.
If the orders cannot be created outside any demand fences (without using a date less
than the Server date), then exception orders get created.
Run MRP cannot make planned orders for items that are needed on the Server date or
earlier. For example, if a Sales Order has a line item with the ReqDate as the Server
date, then the demand arising from that line item cannot be used for generating planned
MRP orders. In such cases, exception orders are created.
10.1.1
Mandatory Inputs
Data should have been maintained at these screens before Run MRP is processed.
1. Item Master Data
2. MRP Setup
10.1.2
Screen Fields Description
Select Item Range for MRP Run
MRP Item From: This field specifies the lower limit of the range of Item for use as filter
criteria during processing. The lookup in this field is restricted to items maintained as
MRP items using the Item Master Data screen. This MRP Item may be entered by typing
or selected via the associated lookup on this screen. Leaving this field blank has the
same effect as selecting the first available MRP Item via the lookup.
Doc. No. F/DV/15
Rev.No.
Date
BatchMaster Software Inc.
BMM User Manual
MRP Item To: This Item specifies the upper limit of the range of Item Numbers for use
as filter criteria during processing. The lookup in this field is restricted to items
maintained as MRP items using the Item Master Data screen. This MRP Item may be
entered by typing or selected via the associated lookup on this screen. Leaving this field
blank has the same effect as selecting the last available MRP Item via the lookup.
MRP Warehouse From: This warehouse specifies the lower limit of the range of
warehouse for use as filter criteria during processing. This warehouse may be entered by
typing or selected via the associated lookup on this screen. Leaving this field blank has
the same effect as selecting the first available warehouse via the lookup.
MRP Warehouse To: This Warehouse specifies the upper limit of the range of
warehouse for use as filter criteria during processing. This warehouse may be entered by
typing or selected via the associated lookup on this screen. Leaving this field blank has
the same effect as selecting the last available warehouse via the lookup.
Select Date Range for MRP Run
Demand Start Date: This is the Demand Start Date, which is the server date and is
defaulted by the system when Run MRP is processed. This is a read-only field.
Demand End Date: This field specifies the upper end of the Demand Date. This field is
defaulted to a date that is one month ahead of the server date.
MRP Run Date: This is the MRP Run Date which is the server date and is defaulted by
the system when Run MRP is processed.
Skip low level coding: Leave this box unchecked when the MRP is being run for an
item for the first time. For successive runs for the same item check this box if there is no
change in the Bill of Materials for the item. Checking this box, skips assignment of low
level coding to the items in the BOM hierarchy, so if no change has been made to the
hierarchy then skipping reassignment of low-level codes, speeds up processing.
Generate Planned Orders as
Planned: This button should be clicked if it is required that the status of planned orders
generated using Run MRP be set to Planned.
Firm Planned: This button should be clicked if it is required that the status of planned
orders generated using Run MRP be set to Firm-planned.
Confirmed: This button should be clicked if it is required that the status of planned
orders generated using Run MRP be set to Confirmed.
10.1.3
Processing a Run MRP
1. Select a MRP Item at the „From MRP Item‟ field using the lookup button at this
field.
2. Select a MRP Item at the „To MRP Item‟ field using the lookup button at this field.
3. Select a Warehouse at the „From Warehouse‟ field using the lookup button at this
field.
4. Select a Warehouse at the „To Warehouse‟ field using the lookup button at this
field.
Doc. No. F/DV/15
Rev.No.
Date
BatchMaster Software Inc.
BMM User Manual
5. Enter the Demand End Date. (The Server Date is automatically taken as Demand
Start Date).
6. If one wishes to skip the low-level coding, the box for „Skip low level coding‟
should be checked. (The user should be very sure before skipping low level
coding. If the low level codes are wrong, then the MRP planning could be
incorrect).
7. Select a „Generate Planned Orders as‟ option from the following. Any planned
orders, when they are generated via Run MRP, will automatically get converted to
the selected status:
a. Planned
b. Firm Planned
c. Confirmed
8. Click on the Process button.
10.2 Planned MRP Purchase Order
The Planned MRP Purchase Order option provides a way to update and edit the planned
purchase orders generated by MRP Run. With Planned MRP Purchase Order, one can
make specific changes to a planned purchase order, modifying the order‟s defining
details. The user can also delete the planned purchase order entirely.
10.2.1
Screen Fields Description
Doc. No. F/DV/15
Rev.No.
Date
BatchMaster Software Inc.
BMM User Manual
Item No.: This the Item associated with the Item Master Data for which the Planned
MRP Purchase Order is displayed.
Warehouse: This the Warehouse associated with the Item for which the Planned MRP
Purchase Order is displayed.
Unit: This is the Stock UOM for the Item shown on this screen.
Grid Fields
Select: When this box is checked for a row, that row becomes available for deletion as
well as for changing the status of the order or clubbing it with other orders.
MRPOrderNo: This is the system-generated number for the MRP order.
ConfirmStart: This date is defaulted with the Plan Start Dt when this row is created or
modified when Run MRP is processed. The user can modify the value in this field.
ConfirmEnd: This date is defaulted with the Plan End Dt when this row is created or
modified when Run MRP is processed. The user can modify the value in this field.
ConfirmQty: This quantity is defaulted with the Plan Qty when this row is created or
modified when Run MRP is processed. The user can modify the value in this field.
Order Status: The Order Status on this screen can be one of the following:
Planned: These orders, before being transferred to Purchase Orders need to
be „Confirmed‟. Since BatchMaster Manufacturing has a regenerative MRP,
Planned MRP Orders get erased when Run MRP is processed.
Firm Planned: These orders before being transferred to the Purchase Order
need to be „Confirmed‟. The Orders that are „Firm Planned‟ will not be erased
when Run MRP is processed.
Confirmed: The Orders that are „Confirmed‟ are ready to be transferred to a
purchase order and will not be erased when Run MRP is processed.
Transferred: These orders have already been transferred to a purchase order.
10.2.2
Working with Planned MRP Purchase Order
1. Select a MRP purchase order record on this screen.
2. Change the status for the MRP purchase order. The status can be set to one of
„Planned‟, „Firm Planned‟ or „Confirmed‟. Checking the box on the line and then
clicking the respective status button below the grid can also change the status of
an order.
3. For Planned Orders, modify the confirmation start date as needed.
4. For Planned Orders, modify the confirmation end date as needed.
5. For Planned Orders, modify the confirmed quantity of the MRP purchase order as
needed.
6. Click Ok to save the Planned MRP Purchase Order record.
Doc. No. F/DV/15
Rev.No.
Date
BatchMaster Software Inc.
10.2.3
BMM User Manual
Goto
Planned: If any of the rows have their boxes checked, the status of those rows gets
changed to Planned when this option is clicked.
Firm Plan: If any of the rows have their boxes checked, the status of those rows gets
changed to Firm Planned when this option is clicked.
Confirm: If any of the rows have their boxes checked, the status of those rows gets
changed to Confirmed when this option is clicked.
Club Orders: Click on the Club Orders option to club the selected orders. Orders can be
selected by checking the select box for the order lines. The selected lines will be
combined to create a single line. The planned date for this line will automatically be set
to the earliest planned date of the combined lines.
10.3 Planned MRP Production Order
The Planned MRP Production Order option provides a way to update and edit the planned
Production orders generated by MRP Run. With Planned MRP Production Order, one can
make specific changes to a planned Production order, modifying the order‟s defining
details. The user can also delete the Planned Production Order entirely.
10.3.1
Screen Fields Description
Doc. No. F/DV/15
Rev.No.
Date
BatchMaster Software Inc.
BMM User Manual
Item No.: This the Item associated with the Item Master Data for which the Planned
MRP Production Order is displayed.
Warehouse: This the warehouse associated with the Item for which the Planned MRP
Production Order is displayed.
Unit: This is the Stock UOM for the Item shown on this screen.
Grid Fields
Select: When this box is checked for a row, that row becomes available for deletion as
well as for changing the status of the order.
MRPOrderNo: This is the system-generated number for the MRP order.
ConfirmStart: This date is defaulted with the Plan Start Dt when this row is created or
modified when Run MRP is processed. The user can modify the value in this field.
ConfirmEnd: This date is defaulted with the Plan End Dt when this row is created or
modified when Run MRP is processed. The user can modify the value in this field.
ConfirmQty: This quantity is defaulted with the Plan Qty when this row is created or
modified when Run MRP is processed. The user can modify the value in this field.
Order Status: The Order Status on this screen can be one of the following:
Planned: These orders, before being transferred to Production Orders need to
be „Confirmed‟. Since BatchMaster Manufacturing has a regenerative MRP,
Planned MRP Orders get erased when Run MRP is processed.
Firm Planned: These orders before being transferred to Production Orders
need to be „Confirmed‟. The Orders that are „Firm Planned‟ will not be erased
when Run MRP is processed.
Confirmed: The Orders that are „Confirmed‟ are ready to be transferred to a
production order and will not be erased when Run MRP is processed.
Transferred: These orders have already been transferred to a production
batch.
10.3.2
Working with Planned MRP Production Order
1. Select a MRP Production order record on this screen.
2. Change the status for the MRP Production order. The status can be set to one of
„Planned‟, „Firm Planned‟ or „Confirmed‟. Checking the box on the line and then
clicking the respective status button below the grid can also change the status of
an order.
3. For Planned Orders, modify the confirmation start date as needed.
4. For Planned Orders, modify the confirmation end date as needed.
5. For Planned Orders, modify the confirmed quantity of the MRP Production order
as needed.
6. Click OK to save the Planned MRP Production Order record.
Doc. No. F/DV/15
Rev.No.
Date
BatchMaster Software Inc.
10.3.3
BMM User Manual
Goto
Planned: If any of the rows have their boxes checked, the status of those rows gets
changed to Planned when this option is clicked.
Firm Plan: If any of the rows have their boxes checked, the status of those rows gets
changed to Firm Planned when this option is clicked.
Confirm: If any of the rows have their boxes checked, the status of those rows gets
changed to Confirmed when this button is clicked.
Club Orders: Click on the Club Orders option to club the selected orders. Orders can be
selected by checking the select box for the order lines. The selected lines will be
combined to create a single line. The planned date for this line will automatically be set
to the earliest planned date of the combined lines.
10.4 Transfer MRP Purchase Orders
The „Transfer MRP Purchase Orders‟ screen can be used to transfer the confirmed MRP
orders to purchase orders.
10.4.1
Screen Fields Description
MRP Item From: The lookup at this field displays only those MRP items for which there
exists at least one „Confirmed‟ Purchase Order. This specifies the lower limit of the range
Doc. No. F/DV/15
Rev.No.
Date
BatchMaster Software Inc.
BMM User Manual
of MRP items for which the Purchase Orders need to be transferred. Leaving this field
blank has the same effect as selecting the first available item via the lookup.
MRP Item To: The lookup at this field displays only those MRP items for which there
exists at least one „Confirmed‟ Purchase Order. This specifies the upper limit of the range
of MRP items for which the Purchase Orders need to be transferred. Leaving this field
blank has the same effect as selecting the last available item via the lookup.
Warehouse From: This specifies the lower limit of the range of Warehouse. Leaving this
field blank has the same effect as selecting the first available Warehouse via the lookup.
Warehouse To: This specifies the upper limit of the range of Warehouse. Leaving this
field blank has the same effect as selecting the last available Warehouse via the lookup.
Vendor Key: This field is used to specify the vendor for whom the Purchase Orders need
to be transferred.
Max. No. Of Lines in PO: The value in this field defines the maximum number of lines
that can be added to one Purchase Order.
Get MRP Order: Clicking the button displays the only confirmed Purchase Orders within
the grid.
Grid Fields
Select: When this box is checked for a row, that row becomes available for transfer to
purchase order.
MRP Order No: This is the system-generated number for the MRP order. This value is
defaulted from the Planned MRP Purchase Order screen or from the Demand Fence MRP
Purchase Order screens, depending on where the order was confirmed.
Item No.: This is the Item for which the confirmed MRP purchase order has been
generated.
Item Description: This is the description of the item.
Whse: This the Warehouse associated with the Item for which the confirmed MRP
purchase order has been generated.
Unit: This is the Stock UOM for the Item No..
Qty Required: This is the Required Quantity recommended by the system.
Vendor: This is the Vendor for the purchase order. The value in this field is defaulted
from the Planned MRP Purchase Order screen or from the Demand Fence MRP Purchase
Order screens, depending on where the order was confirmed. The vendor can be
changed here using the lookup button in the field.
Plan Run Dt: This is the date when the MRP order was generated. The value in this field
is defaulted from the Planned MRP Purchase Order screen or from the Demand Fence
MRP Purchase Order screens, depending on where the order was confirmed.
Doc. No. F/DV/15
Rev.No.
Date
BatchMaster Software Inc.
BMM User Manual
Conf. Start Date: The value in this field is defaulted from the value of the confirmed
start date field in the Planned MRP Purchase Order screen or from the Demand Fence
MRP Purchase Order screens, depending on where the order was confirmed.
Conf. End Date: The value in this field is defaulted from the value of the confirmed end
date field in the Planned MRP Purchase Order screen or from the Demand Fence MRP
Purchase Order screens, depending on where the order was confirmed.
Plan Start Date: This is the Plan Start Date that is recommended by the system. The
value in this field is defaulted from the value of the plan start date field in the Planned
MRP Purchase Order screen or from the Demand Fence MRP Purchase Order screens,
depending on where the order was confirmed.
Plan End Date: This is the Plan End Date that is recommended by the system. The
value in this field is defaulted from the value of the plan end date field in the Planned
MRP Purchase Order screen or from the Demand Fence MRP Purchase Order screens,
depending on where the order was confirmed.
Confirm_Quantity: This is the Confirm Quantity recommended by the system. The
value in this field is defaulted from the planned Purchase Order tab of the Planning
Worksheet or from the time fence Purchase Order screens, depending on where the
order was confirmed.
FormulaId: This is the Formula id for which the planned MRP Purchase Order has been
generated.
10.4.2
Transferring MRP Purchase Orders
1. Select a MRP Item at the „From‟ field using the lookup button at this field.
2. Select a MRP Item at the „To‟ field using the lookup button at this field.
3. Select a Warehouse at the „From‟ field using the lookup button at this field.
4. Select a Warehouse at the „To‟ field using the lookup button at this field.
5. Select a Vendor key using the lookup button at this field.
6. Click on the Get MRP order button to fetch the Purchase Orders for the specified
range. Processing the range fetches those MRP Purchase Orders whose status is
„Confirmed‟.
7. At the „Max. No. of Lines in PO‟ field, enter the maximum number of lines that can
be added to one Purchase Order.
8. Click on the „Transfer‟ button to transfer the selected orders to purchase orders.
10.4.3
Goto
Transfer (F11): Clicking this button transfers the planned purchase orders to Purchase
Order. BatchMaster Manufacturing generates a crystal report giving details of the
purchase order generated.
The PO details for the item include the following:
1. Processing Date
Doc. No. F/DV/15
Rev.No.
Date
BatchMaster Software Inc.
BMM User Manual
2. Processing Time
3. Vendor key
4. PO number
5. MPS Order Number
6. Item No.
7. Warehouse
8. UOM
9. Order Quantity
10. Request date
Get MRP Order: Clicking the button displays the only confirmed Purchase Orders within
the grid.
Club Orders: Click on the Club Orders button to club the selected orders. Orders can be
selected by checking the select box for the order lines. The selected lines will be
combined to create a single line.
10.5 Transfer MRP Production Orders
The „Transfer MRP Production Order‟ screen can be used to transfer Confirmed MRP
Production orders to production batches.
10.5.1
Screen Fields Description
MRP Item From: The lookup at this field displays only those MRP items for which there
exists at least one „Confirmed‟ Production Order. This specifies the lower limit of the
range of MRP items for which the Production Orders need to be transferred. Leaving this
field blank has the same effect as selecting the first available item via the lookup.
Doc. No. F/DV/15
Rev.No.
Date
BatchMaster Software Inc.
BMM User Manual
MRP Item To: The lookup at this field displays only those MRP items for which there
exists at least one „Confirmed‟ Production Order. This specifies the upper limit of the
range of MRP items for which the Production Orders need to be transferred. Leaving this
field blank has the same effect as selecting the last available item via the lookup.
Warehouse From: This specifies the lower limit of the range of Warehouse. Leaving this
field blank has the same effect as selecting the first available Warehouse via the lookup.
Warehouse To: This specifies the upper limit of the range of Warehouse. Leaving this
field blank has the same effect as selecting the last available Warehouse via the lookup.
Get MRP Order: Clicking the button displays the only confirmed Purchase Orders within
the grid.
Grid Fields
Select: When this box is checked for a row, that row becomes available for transfer to
production order.
MRP Ord NO: This is the system-generated number for the MRP order. This value is
defaulted from the Planned Production screen or from the Demand Fence MRP Production
Order screens, depending on where the order was confirmed.
Item No.: This is the Item for which the confirmed MRP production order has been
generated.
Whse: This the Warehouse associated with the Item for which the Confirmed MRP
Production Order has been generated.
UOM: This is the Stock UOM for the Item No..
Req Qty: This is the Required Quantity in stock UOM recommended by the system to be
produced in a batch.
Formula Key: This is the formula key associated with the BOM of this line item.
Batch No: If the user has manually entered the Batch Number then the Batch Number
so entered gets displayed here. The line items that have been assigned a common batch
number are clubbed in a single batch. The line items that have not been assigned any
batch number are clubbed with those line items that use the same formula as the one
used by these line items.
Batch Type: This is the type of the batch. It can be one of Mix or Assembly. If the
Assembly Type of the BOM associated with this line item is „Finished Good‟ or
„Intermediate‟, then the Batch created will be „Mix‟ type. If it is „Assembly‟, the Batch
type will be „Assembly‟.
ProcessCell: This is the Process Cell associated with the formula (via the „Process Cell
Formula Capacity‟ screen) being used by the BOM of this line item.
Conf. Start: The value in this field is defaulted from the value of the confirmed start
date field in the Planned MRP Production Order screen or from the Demand Fence MRP
Production Order screens, depending on where the order was confirmed.
Doc. No. F/DV/15
Rev.No.
Date
BatchMaster Software Inc.
BMM User Manual
Conf. End: The value in this field is defaulted from the value of the confirmed end date
field in the Planned MRP Production Order screen or from the Demand Fence MRP
Production Order screens, depending on where the order was confirmed.
Order Status: The value in this field is defaulted from the Planned MRP Production
Order screen or from the Demand Fence MRP Production Order screens, depending on
where the order was confirmed. By default the status of all the orders is „Confirmed‟ on
this screen.
Plan Qty: This is the Plan Quantity recommended by the system. The value in this field
is defaulted from the Planned MRP Production Order screen or from the Demand Fence
MRP Production Order screens, depending on where the order was confirmed.
Assembly Type: The value in this field is defaulted from the value of the Assembly Type
field at the BOM Entry screen. The possible value are I for intermediate, F for finished
good and A for assembly type of BOM.
10.5.2
Transferring MRP Production Orders
1. Select a MRP Item at the „From‟ field using the lookup button at this field.
2. Select a MRP Item at the „To‟ field using the lookup button at this field.
3. Select a Warehaouse at the „From‟ field using the lookup button at this field.
4. Select a Warehouse at the „To‟ field using the lookup button at this field.
5. Click on the „Get MRP Orders‟ button to fetch the Production Orders for the
specified range. Processing the range fetches those MRP Production Orders whose
status is „Confirmed‟ and have a BOM released.
6. Click on the „Transfer (F11)‟ button to transfer the selected production orders to
batch.
10.5.3
Goto
Transfer (F11): Clicking this button transfers the planned production orders to
Production Batches. BatchMaster Manufacturing generates a crystal report giving details
of the production batch generated.
The Production Batch details for the item include the following:
1. Processing Date
2. Processing Time
3. Batch Type
4. Formula Id
5. Process Cell
6. Batch Number
7. Item No.
8. Warehouse
9. UOM
Doc. No. F/DV/15
Rev.No.
Date
BatchMaster Software Inc.
BMM User Manual
10. Order Quantity
Club Orders: Click on the Club Orders button to club the selected orders. Orders can be
selected by checking the select box for the order lines. The selected lines will be
combined to create a single line.
Get MRP Order: Clicking the button displays the only confirmed Production orders
within the grid.
10.6 Time Fence MRP Purchase Order
With Time Fence MRP Purchase Order, one can convert the order status of a selected
MRP order of a MRP item, moving it from Exception to Firm Planned or Confirmed. Once
the order status has been set, it can be transferred using the Transfer MRP Purchase
Order option. The user can also establish the confirmation dates.
10.6.1
Screen Fields Description
Item No.: This the Item associated with the Item Master Data for which the Demand
Fence MRP Purchase Order is displayed.
Warehouse: This the Warehouse associated with the Item for which the Demand Fence
MRP Purchase Order is displayed.
Unit: This is the Stock UOM for the Item shown on this screen.
Grid Fields
Doc. No. F/DV/15
Rev.No.
Date
BatchMaster Software Inc.
BMM User Manual
Select: When this box is checked for a row, that row becomes available for deletion as
well as for changing the status of the order or clubbing it with other orders.
MRPOrder No: This is the system-generated number for the MRP order.
ConfirmStart: This date is defaulted with the Plan Start Dt when this row is created or
modified when Run MRP is processed. The user can modify the value in this field.
ConfirmEnd: This date is defaulted with the Plan End Dt when this row is created or
modified when Run MRP is processed. The user can modify the value in this field.
ConfirmQty: This quantity is defaulted with the Plan Qty when this row is created or
modified when Run MRP is processed. The user can modify the value in this field.
Order Status: The Order Status on this screen can be one of the following:
Exception: These orders, before being transferred to Purchase Orders need to
be „Confirmed‟. Since BatchMaster Manufacturing has a regenerative MRP,
Exception MRP Orders get erased when Run MRP is processed.
Firm Planned: These orders before being transferred to the Purchase Order
need to be „Confirmed‟. The Orders that are „FIRM PLANNED‟ will not be
erased when Run MRP is processed.
Confirmed: The Orders that are „Confirmed‟ are ready to be transferred to a
purchase order and will not be erased when Run MRP is processed.
10.6.2
Working with Time Fence MRP Purchase Order
1. Select a MRP purchase order record on this screen.
2. Change the status for the MRP purchase order. The status can be set to one of
„Exception‟, „Firm Planned‟ or „Confirmed‟. Checking the box on the line and then
clicking the respective status button below the grid can also change the status of
an order.
3. For Exception Orders, modify the confirmation start date as needed.
4. For Exception Orders, modify the confirmation end date as needed.
5. For Exception Orders, modify the confirmed quantity of the MRP purchase order
as needed.
6. Click Ok to save the Demand MRP Purchase Order record.
10.6.3
Goto
Exception: If any of the rows have their boxes checked, the status of those rows gets
changed to Exception when this option is clicked.
Firm Planned: If any of the rows have their boxes checked, the status of those rows
gets changed to Firm Planned when this option is clicked.
Confirmed: If any of the rows have their boxes checked, the status of those rows gets
changed to Confirmed when this option is clicked.
Doc. No. F/DV/15
Rev.No.
Date
BatchMaster Software Inc.
BMM User Manual
Club Orders: Click on the Club Orders option to club the selected orders. Orders can be
selected by checking the select box for the order lines. The selected lines will be
combined to create a single line. The planned date for this line will automatically be set
to the earliest planned date of the combined lines.
Multiples of EOQ: For the rows that have their boxes checked, clicking on this option
converts the value in the Plan Quantity field to an integral multiple of the Economic
Order Quantity of that item.
10.7 Time Fence MRP Production Order
The Time Fence MRP Production Order option provides a way to define the order status
for a MRP Production Order having status as „Exception‟ and falling under the periods of
Time Fence. With Time Fence MRP Production Order, one can convert the order status of
a selected MRP order and MRP item, moving it from Exception to Firm Planned or
Confirmed. Once the order status has been set, it can be transferred using the Transfer
MRP Production Order option. The user can also establish the confirmation dates.
10.7.1
Screen Fields Description
Item No.: This the Item associated with the Item Master Data for which the Demand
Fence MRP Production Order is displayed.
Warehouse: This the Warehouse associated with the Item for which the Demand Fence
MRP Production Order is displayed.
Unit: This is the Stock UOM for the Item shown on this screen.
Grid Fields
Doc. No. F/DV/15
Rev.No.
Date
BatchMaster Software Inc.
BMM User Manual
Select: When this box is checked for a row, that row becomes available for deletion as
well as for changing the status of the order or clubbing it with other orders.
MRPOrder No: This is the system-generated number for the MRP order.
ConfirmStart: This date is defaulted with the Plan Start Dt when this row is created or
modified when Run MRP is processed. The user can modify the value in this field.
ConfirmEnd: This date is defaulted with the Plan End Dt when this row is created or
modified when Run MRP is processed. The user can modify the value in this field.
ConfirmQty: This quantity is defaulted with the Plan Qty when this row is created or
modified when Run MRP is processed. The user can modify the value in this field.
Order Status: The Order Status on this screen can be one of the following:
Exception: These orders, before being transferred to Production Orders need
to be „Confirmed‟. Since BatchMaster Manufacturing has a regenerative MRP,
Exception MRP Orders get erased when Run MRP is processed.
Firm Planned: These orders before being transferred to Production Orders
need to be „Confirmed‟. The Orders that are „Firm Planned‟ will not be erased
when Run MRP is processed.
Confirmed: The Orders that are „Confirmed‟ are ready to be transferred to a
production order and will not be erased when Run MRP is processed.
10.7.2
Working
Order
with Time
Fence
MRP
Production
1. Select a MRP Production order record on this screen.
2. Change the status for the MRP Production order. The status can be set to one of
„Exception‟, „Firm Planned‟ or „Confirmed‟. Checking the box on the line and then
clicking the respective status button below the grid can also change the status of
an order.
3. For Exception Orders, modify the confirmation start date as needed.
4. For Exception Orders, modify the confirmation end date as needed.
5. For Exception Orders, modify the confirmed quantity of the MRP Production order
as needed.
6. Click OK to save the Time Fence MRP Production Order record.
10.7.3
Goto
Exception: If any of the rows have their boxes checked, the status of those rows gets
changed to Exception when this option is clicked.
Firm Planned: If any of the rows have their boxes checked, the status of those rows
gets changed to Firm Planned when this option is clicked.
Confirmed: If any of the rows have their boxes checked, the status of those rows gets
changed to Confirmed when this option is clicked.
Doc. No. F/DV/15
Rev.No.
Date
BatchMaster Software Inc.
BMM User Manual
Club Orders: Click on the Club Orders option to club the selected orders. Orders can be
selected by checking the select box for the order lines. The selected lines will be
combined to create a single line. The planned date for this line will automatically be set
to the earliest planned date of the combined lines.
Multiples of EOQ: For the rows that have their boxes checked, clicking on this option
converts the value in the Plan Quantity field to an integral multiple of the Economic
Order Quantity of that item.
10.8 MRP Order Range Processing
The „MRP Order Range Processing‟ screen enables the user to change the status of the
MRP Purchase/Production Orders for the entire selected range of MRP Items, in one go.
10.8.1
Screen Fields Description
Item No. From: The lookup at this field displays those MRP items for which there exists
at least one Purchase Order or Production Order. This specifies the lower limit of the
range of MRP items for which the order status needs to be changed. Leaving this field
blank has the same effect as selecting the first available item via the lookup.
Item No. To: The lookup at this field displays those MRP items for which there exists at
least one Purchase Order or Production Order. This specifies the upper limit of the range
of MRP items for which the order status needs to be changed. Leaving this field blank
has the same effect as selecting the last available item via the lookup.
Warehouse From: This specifies the lower limit of the range of Warehouse. Leaving this
field blank has the same effect as selecting the first available Warehouse via the lookup.
Warehouse To: This specifies the upper limit of the range of Warehouse. Leaving this
field blank has the same effect as selecting the last available Warehouse via the lookup.
Plan Date Start: This specifies the lower end of the Plan Dates. Leaving this field blank
has the same effect as entering January 01, 1900.
Plan Date End: This specifies the upper end of the Plan Dates. Leaving this field blank
has the same effect as entering the current Server date.
Doc. No. F/DV/15
Rev.No.
Date
BatchMaster Software Inc.
BMM User Manual
Change Status From: The Orders having this selected status will qualify for the change
of status. The value in this field can be one of Exception, Planned, Firm Planned or
Confirmed.
Change Status To: The status of the selected Orders will change to this status upon
processing. The value in this field can be either Firm Planned or Confirmed.
10.8.2
Processing a Range of MRP Orders
1. Select a MRP Item at the „From‟ field from the lookup at this field.
2. Select a MRP Item at the „To‟ field from the lookup at this field.
3. Select a Warehouse at the „From‟ field from the lookup at this field.
4. Select a Warehouse at the „To‟ field from the lookup at this field.
5. Enter a Plan Date Start and a Plan Date End. This specifies a range of Planning
period. The Orders (for the selected range of Item Master Datas) falling within this
range of Plan Dates will be processed for the change of status.
6. Select a status at the „Change Status From‟ field. The Orders having this selected
status will qualify for the change of status.
7. Select a status at the „Change Status To‟ field. The status of the Orders (from the
filtered orders) that have the status as specified at the „From‟ field will change to
this status.
8. Click on the Process button to change the status.
10.9 Pull MRP Items
The Pull MRP Items screen adds MRP Items to the Maintain MRP Items screen. It picks
up those items whose Order Method has been marked as MRP at the Item Master screen.
At the Pull MRP Items screen, one can establish the following values that may differ from
the corresponding values at the Item Master Data:
1. Item type (Buy or Make)
2. Lot sizing Method.
3. Economic Order Quantity.
4. Default Vendor.
The above values defined here will supersede during Run MPS any conflicting values that
may be stored at the Item Master Data.
Doc. No. F/DV/15
Rev.No.
Date
BatchMaster Software Inc.
10.9.1
BMM User Manual
Screen Fields Description
Select: When this box is checked for a row, that row becomes available for pulling for
MPS.
MRP item: The value in this field contains those items whose Order Method has been
defined as „MRP on the Item Master screen.
Description: This is the description of the MRP item for the line.
Whse: This is the Warehouse associated with the item.
Item Type: The value in this field decides the type of the item. The type can be either
Buy or Make depending on which, Run MRP will generate Purchase Orders or Production
Orders respectively. The Item Type can be selected, as „Manufacture‟ only if a Released
BOM exists for the selected Item Master Data.
Lot Sizing Method: The value in this field can be one of Lot for Lot or EOQ. If EOQ is
selected, any order quantities generated by the system will be integral multiples of the
EOQ. Selecting Lot for Lot means that the order quantities will not be modified to
integral multiples of EOQ.
Economic Ord Qty: This is the Economic Order Quantity for the item.
Vendor: This is the default vendor for the MRP item. This field is enabled if the Item
Type is set to Purchase. If enabled this is a mandatory field.
Doc. No. F/DV/15
Rev.No.
Date
BatchMaster Software Inc.
BMM User Manual
Unit: This is the stock UOM for the Item Master Data.
Select All: Clicking this button checks the boxes for all the rows in the grid.
UnSelect All: Clicking this button un-checks the boxes for all the rows in the grid.
10.9.2
Using Pull MRP Items screen
1. Select the MRP Items to be saved by checking the box adjacent to the MRP Item
line.
2. Select the Item Type as one of „Buy or „Make‟.
3. Change the Lot Sizing Method if needed.
4. Modify the Economic Order Quantity if needed.
5. For a Purchase type item, enter or modify the „Default Vendor‟ as needed.
6. Click the Pull button to complete the Pull MPS Items for the selected line items.
10.10
Maintain MRP Item
The Maintain MRP Item screen provides a way to select an item for MRP processing.
Only those items can be maintained for MRP processing whose Order Method has been
set to „MRP‟ at the Item Master Data screen. MRP can be run only for those Item Master
Data that have been maintained at this screen.
10.10.1 Screen Fields Description
MRP Item: Select a MRP Item from the lookup at this field. The lookup here displays
only those items whose Order Method has been defined as „MRP‟ on the Item Master
Data screen. This is a mandatory field.
Doc. No. F/DV/15
Rev.No.
Date
BatchMaster Software Inc.
BMM User Manual
Warehouse: This is the Warehouse associated with the item. This is a mandatory field.
Unit: This is the stock UOM for the Item Master Data. This is a read only field.
Item Type: The value in this field decides the type of the item. The type can be either
Buy or Make depending on which, Run MRP will generate Purchase Orders or Production
Orders respectively. The Item Type can be selected, as „Make‟ only if a Released BOM
exists for the selected Item Master Data. The value established here overrides the value
set at the Item Master Data screen.
Economic Order Quantity: This is the Economic Order Quantity for the item..
Default Vendor: This is the default vendor for the MRP item. This field is enabled if the
Item Type is set to Purchase. If enabled this is a mandatory field.
Low Level Code: This is the low level code for the item that is, the lowest occurrence
(largest numeric value) of this Item Master Data in the hierarchy of MRP items for a Bill
of Materials (BOM) if this is a MRP type item. The hierarchy of Low Level Codes for MRP
items is separate from that of MRP items.
Lot Sizing Method: The value in this field can be one of Lot for Lot or EOQ. If EOQ is
selected, any order quantities generated by the system will be integral multiples of the
EOQ. Lot for Lot means that the order quantities will not be modified to integral multiples
of EOQ. The value in this field overrides the value established for the item at the Item
Master screen.
Last MRP Run Date: This is the date on which MRP was last run. This is a read only
field.
Lead Time: This is the lead time for the item.
10.10.2 Maintaining a MRP Item
1. To create a new MPS Item on this screen, click on the Insert button. To modify an
existing record navigate through the navigation buttons or select an item from the
lookup at the toolbar.
2. Select a Warehouse from the lookup at this screen.
3. Set the Item Type as one of „Manufacture‟ or „Purchase‟.
4. Modify the Economic Order Quantity if needed.
5. If the „Default Vendor‟ field is enabled, select or modify the Vendor.
6. Change the Lot Sizing Method if needed.
7. Click the Add button to save the record.
10.11
MRP Dashboard
Material Requirements Planning (MRP) dashboard facilitates you to view the plan
Purchase Order based upon forecasts and anticipated demand. It assists us to view the
scheduled Purchase order. The dashboard comprises of different sections namely MRP
Doc. No. F/DV/15
Rev.No.
Date
BatchMaster Software Inc.
BMM User Manual
Order Summary, Planned Order/Open Purchase Order by Vendor, Vendor Details, Active
Contracts and Planning Zone. The details of the same are discussed below.
10.11.1 Planned Order/Open Purchase Order By Vendor
Details pertaining to the Purchase and planned production can be obtained via this
screen. This segment describes the Planned, Firm Planned, Confirmed, Transferred and
Exception Orders.
10.11.2 Fetch Data Button:
As per the selection made on the dashboard screen, Corresponding data would get
fetched by clicking Fetch Data button.
Clicking Fetch Data button would bring information pertaining to the selected Item key
10.11.3 MRP Order Summary
Looking under this section gives a brief pertaining to the planned material required
during Purchased Item. In addition to this, it also displays Vendor Quotes, Active
Contracts and Planning Zone. Let‟s view the screen in detail.
Item Key: This is an Item key in respect of which the MRP planning worksheet is
generated.
Description: This is the description of the above Item Key.
Location: It is the location key associated with Item for which the MRP Planned
Purchase Order is generated.
Status: This is the Order status defined at Demand fence 1 and 2 of MRP Purchase
Order. Different statuses are Exception, Confirmed, Firm Planned and Planned.
MRP Qty: It is the total Quantity for the specific status at Planned MRP Purchase Order.
Vendor: This is the Vendor key corresponding to the Purchase Order item.
UOM: This is the stock Unit of Measurement of an Item key.
Qty On hand: It is the Quantity available in stock.
Safety Stock: It is the safety stock Quantity defined at Item Location screen for the
respective item.
EOQ: This is an Economic Order Quantity for an Item defaulted from Item Location
screen.
Buyer Id: This is the Buyer Id as defined at Item Location screen.
Demand: It is the summation of generated Gross demand for the specified period of
time.
Doc. No. F/DV/15
Rev.No.
Date
BatchMaster Software Inc.
BMM User Manual
Supply: It is the summation of New and Open Purchase Order Quantity.
10.11.4 Filter Criteria
To categorize Vendor specific ordered data, distinct filters are provided. The first level
headers are common for all 3 options discussed. Details pertaining to those are as
follows.
Doc. No. F/DV/15
Rev.No.
Date
BatchMaster Software Inc.
BMM User Manual
Vendor: This is the default Vendor key for Purchase Order or MRP Order.
Name: This field displays the Name of the Vendor.
Address 1: It is Address Line-1 of Vendor defaulted from Vendor Master Screen.
Address 2: It is Address Line-2 of Vendor defaulted from Vendor Master Screen.
Address 3: It is Address Line-3 of Vendor defaulted from Vendor Master Screen.
City: This displays the City of Vendor defaulted form Vendor Master Screen.
State: This displays the State, Province or region of the Vendor defaulted form Vendor
Master Screen.
ZIP: This displays the Postal ZIP code of Vendor defaulted form Vendor Master Screen.
Country: This displays the Country of the Vendor defaulted from Vendor Master Screen.
Contract Person: This is a Contract person associated with Vendor Key.
Phone: It displays the Phone number of Vendor.
Doc. No. F/DV/15
Rev.No.
Date
BatchMaster Software Inc.
BMM User Manual
10.11.4.1 PO
The Vendor and other details associated to New and Open Purchase Order can be
obtained by clicking the „PO‟ option.
Clicking the first level header link would display the purchase order created by the
selected Vendor.
Order Date: It specifies the Date on which Purchase Order is generated.
Requested Date: It shows an expected Receipt Date for the line item.
PO No: This field specifies the generated Purchase Order number
Vendor Key: It is the Vendor key associated with the Purchase Order.
Item Key: This is an Item key against which the Purchase Order is generated.
Description: It is the description associated with an Item key.
Location: This field specifies the location associated with an Item key.
Qty Order: This is the required Quantity going to be Ordered for the line item.
Doc. No. F/DV/15
Rev.No.
Date
BatchMaster Software Inc.
BMM User Manual
Qty Remaining: It displays the number of units yet to be received on the Order line.
UOM: This is the unit of measurement of the line item defaulted from Item location
screen.
Unit Price: It shows the unit price of an Item key.
Line Net: This field displays the total amount paid against a Purchase Order line.
Vendor Name: It shows the Name of the Vendor.
Phone: This field displays the contact number of the Vendor.
Lead Time: This is the time that the selected Vendor takes to deliver the item.
10.11.4.2 MRP
The option „MRP‟ details the Order pertaining to the Vendors who are associated to MRP
type of item. The second level headers for MRP option would mean to schedule
Purchases and production.
MRP Order No: This is the system-generated number for the MRP Order.
Item: This shows the Item Key associated with the Item Location for which MRP
Purchase Order is generated.
Doc. No. F/DV/15
Rev.No.
Date
BatchMaster Software Inc.
BMM User Manual
Description: It is the description of the Item key.
Location: This field specifies the location associated with Item key.
Plan Run Date: It shows an anticipated Date on which MRP Run is processed.
Order Status: This field displays an Order status of the line item key. It can be one
from Planned, Firm Planned, Exception, and Confirmed.
Plan Start Date: It shows the planned start recommended by the system when Run
MRP is processed.
Plan End Date: This is the Plan End Date recommended by the system when Run MRP
is processed.
Plan Order Qty: It is the Planned Order Quantity recommended by the system.
Confirm Start Date: This Date is defaulted with the Plan Start Date when the row is
created or modified when Run MRP is processed.
Confirm End Date: This Date is defaulted with the Plan End Date when the row is
created or modified when Run MRP is processed.
Confirm Qty: This Quantity is defaulted with the Plan Qty when the row is created or
modified when Run MRP is processed.
Confirm Date: It displays the Date on which an Order is confirmed.
Transfer Date: This is the Date when the Order was transferred to Purchase Order.
Vendor: It is the Vendor for the Purchase Order.
Qty On Order: It displays an Ordered Quantity during Run MRP.
10.11.4.3 Both
An option „Both‟ would commonly describe the item whose Vendors are associated to
Purchase Order, MRP Order or Both.
Doc. No. F/DV/15
Rev.No.
Date
BatchMaster Software Inc.
10.12
BMM User Manual
MRP Reports
10.12.1 MRP Order Report
The MRP Order report displays all the MRP orders existing for a defined range of Item
Master Data. The report includes MRP orders of the following statuses:
1. Exception
2. Planned
3. Firm Planned
4. Confirmed
5. Transferred
You may choose to include orders of one or more of these statuses in the report.
The option‟s filtering parameters can be used to define the report. Once BatchMaster
Manufacturing processes the report parameters, it displays the results as a Crystal
Report that one can print or export.
Doc. No. F/DV/15
Rev.No.
Date
BatchMaster Software Inc.
BMM User Manual
10.12.1.1 Screen Fields Description
Item No. From: This field specifies the lower limit of the range of Item for use as filter
criteria during processing. Leaving this field blank has the same effect as selecting the
first available Item via the lookup.
Item No. To: This field specifies the upper limit of the range of Item for use as filter
criteria during processing. Leaving this field blank has the same effect as selecting the
last available Item via the lookup.
Warehouse From: This field specifies the upper limit of the range of Warehouse for use
as filter criteria during processing. Leaving this field blank has the same effect as
selecting the first available Warehouse via the lookup.
Warehouse To: This field specifies the lower limit of the range of Warehouse for use as
filter criteria during processing. Leaving this field blank has the same effect as selecting
the last available Warehouse via the lookup.
Select Order Type: You may choose to include orders of one or more of the statuses in
the report.
Report Path: This field holds the default path of the report.
10.12.1.2 Generating a MRP Order Report
1. Complete the MRP Item From and To range using the lookup buttons next to the
fields.
2. Complete the Warehouse From and To range using the lookup buttons next to the
fields.
3. Check Order Types, as required.
Doc. No. F/DV/15
Rev.No.
Date
BatchMaster Software Inc.
BMM User Manual
4. To save these parameters, enter the name to be assigned to the report
parameters in the drop-down field on the far right of the toolbar and then click on
the Save button on the toolbar to save the report parameters.
5. Click on the OK button to create the report.
10.12.2 MRP Supply Report
The MRP supply report displays the supply source and supply quantity for various MRP
items. The sources of supply are:
1. Scheduled Receipts from batches in Production
2. Scheduled Receipts from existing Purchase Orders
3. Scheduled Receipts from Warehouse Transfers coming in
4. All MRP orders (of planned, firm planned and confirmed type) generated via the
latest processing on the Run MRP screen. This excludes any firm planned or
confirmed MPS orders that existed before the latest Run MRP was processed.
The report displays the date wise record of supply along with their source and Projected
Available Balance. Moreover, the report also displays Oversold Quantity, Planned
Purchase Orders and Planned Production Orders.
The option‟s filtering parameters can be used to define the report. Once BatchMaster
Manufacturing processes the report parameters, it displays the results as a Crystal
Report that one can print or export.
Doc. No. F/DV/15
Rev.No.
Date
BatchMaster Software Inc.
BMM User Manual
10.12.2.1 Screen Fields Description
Item No. From: This field specifies the lower limit of the range of Item for use as filter
criteria during processing. Leaving this field blank has the same effect as selecting the
first available Item via the lookup.
Item No. To: This field specifies the upper limit of the range of Item for use as filter
criteria during processing. Leaving this field blank has the same effect as selecting the
last available Item via the lookup.
Warehouse From: This field specifies the upper limit of the range of Warehouse for use
as filter criteria during processing. Leaving this field blank has the same effect as
selecting the first available Warehouse via the lookup.
Warehouse To: This field specifies the lower limit of the range of Warehouse for use as
filter criteria during processing. Leaving this field blank has the same effect as selecting
the last available Warehouse via the lookup.
Report Path: This field holds the default path of the report.
10.12.2.2 Generating a MRP Supply Report
1. Complete the MRP Item From and To range using the lookup buttons next to the
fields.
2. Complete the Warehouse From and To range using the lookup buttons next to the
fields.
3. To save these parameters, enter the name to be assigned to the report
parameters in the drop-down field on the far right of the toolbar and then click on
the Save button on the toolbar to save the report parameters.
4. Click on the OK button to create the report.
Doc. No. F/DV/15
Rev.No.
Date
BatchMaster Software Inc.
BMM User Manual
10.12.3 MRP Demand Report
The MRP Demand Report displays the date wise demand of a defined range of Item
Master Data with order method set to „MRP‟ at the Item Master Data screen. The demand
is taken directly from the Planning Calendar‟s three demand ranges and is displayed for
the server date and the dates above server date. In addition to showing the Warehouse
and the type of demand, each report details the order number, line number, order
quantity and order date.
The sources of demand shown on this report are:
1. Forecast
2. Sales Orders
3. Warehouse Transfers Out
4. Dependent Demand (from Planned, Firm Planned and Confirmed orders of higher
level MPS Items)
If the demand for an item exist from more than one source, then the demand from
different sources are displayed under different head. If the Demand Type is Forecast, the
demand is fetched from the Forecast screen. In case the demand type is Sales Order,
the demand is fetched from all those orders that are in „New‟ and „Open‟ status. And, if
the Demand Type is „Warehouse Transfer‟, the demand is fetched from Warehouse
Transfer Out orders, which are saved but not yet processed.
Doc. No. F/DV/15
Rev.No.
Date
BatchMaster Software Inc.
BMM User Manual
The option‟s filtering parameters can be used to define the report. Once BatchMaster
Manufacturing processes the report parameters, it displays the results as a Crystal
Report that one can print or export.
10.12.3.1 Screen Fields Description
Item No. From: This field specifies the lower limit of the range of Item for use as filter
criteria during processing. Leaving this field blank has the same effect as selecting the
first available Item via the lookup.
Item No. To: This field specifies the upper limit of the range of Item for use as filter
criteria during processing. Leaving this field blank has the same effect as selecting the
last available Item via the lookup.
Warehouse From: This field specifies the upper limit of the range of Warehouse for use
as filter criteria during processing. Leaving this field blank has the same effect as
selecting the first available Warehouse via the lookup.
Warehouse To: This field specifies the lower limit of the range of Warehouse for use as
filter criteria during processing. Leaving this field blank has the same effect as selecting
the last available Warehouse via the lookup.
Report Path: This field holds the default path of the report.
10.12.3.2 Generating a MRP Demand Report
1. Complete the MRP Item From and To range using the lookup buttons next to the
fields.
2. Complete the Warehouse From and To range using the lookup buttons next to the
fields.
3. To save these parameters, enter the name to be assigned to the report
parameters in the drop-down field on the far right of the toolbar and then click on
the Save button on the toolbar to save the report parameters.
4. Click on the OK button to create the report.
Doc. No. F/DV/15
Rev.No.
Date
BatchMaster Software Inc.
BMM User Manual
10.12.4 MRP Planning Report
Using the MRP Planning report, you may view the MRP schedule as suggested by the
system. Contrary to MPS module, where the MPS planning can be seen directly by using
the Planning Worksheet screen, to see MRP planning you need to use this report. The
report is a consequence of MRP Run and the figures on report are displayed considering
the demand and supply from various sources. The sources of demand and supply are:
Sources of Demand:
1. Forecast (depending on the setting for the Demand Range on the MPS Setup
screen
2. Sales Orders and Warehouse Transfers Out (depending on the setting for the
Demand Range on the MPS Setup screen)
3. Dependent Demand (from Planned, Firm Planned and Confirmed orders of MPS
Items and higher level MRP Items)
4. The quantity by which On Hand Quantity is less than the Safety Stock Quantity as
defined at the Item Master Data.
5. MRP type raw materials remaining to be issued to production batches that are not
on hold.
The sources of supply for Run MRP are:
1. Only for the first Period of the planning horizon: The quantity by which the On
Hand quantity exceeds the Safety Stock as defined at the Item Master Data.
Doc. No. F/DV/15
Rev.No.
Date
BatchMaster Software Inc.
BMM User Manual
2. For 2nd Period of the planning horizon onwards: PAB of the preceding period.
3. Scheduled Receipts from
i. Purchase Orders
ii. Production Orders
iii. Warehouse Transfers In
iv. Firm Planned Orders
v. Confirmed Orders
4. On the report, the quantity to be ordered is determined by subtracting the supply
quantity from the demand quantity and then adjusting for EOQ if the EOQ is
applicable. For this purpose:
5. The EOQ is applicable if the Lot Sizing Method is set to EOQ at the item master
screen.
6. The value of EOQ is taken from the Item Master Data screen.
The report is generated only for those item whose „BM Planning Method‟ is set to „MRP‟
on Item Master screen. To generate an updated report, process the „Run MRP‟ before
generating the report.
The option‟s filtering parameters can be used to define the report. Once BatchMaster
Manufacturing processes the report parameters, it displays the results as a Crystal
Report that one can print or export.
10.12.4.1 Screen Fields Description
Warehouse Range
Warehouse From: This field specifies the upper limit of the range of Warehouse for use
as filter criteria during processing. Leaving this field blank has the same effect as
selecting the first available Warehouse via the lookup.
Warehouse To: This field specifies the lower limit of the range of Warehouse for use as
filter criteria during processing. Leaving this field blank has the same effect as selecting
the last available Warehouse via the lookup.
Doc. No. F/DV/15
Rev.No.
Date
BatchMaster Software Inc.
BMM User Manual
Item No. Range
MRP Item From: This field specifies the lower limit of the range of MRP Item for use as
filter criteria during processing. Leaving this field blank has the same effect as selecting
the first available Item via the lookup.
MRP Item To: This field specifies the upper limit of the range of MRP Item for use as
filter criteria during processing. Leaving this field blank has the same effect as selecting
the last available Item via the lookup.
Report Path: This field holds the default path of the report.
10.12.4.2 Generating a MRP Planning Report
1. Complete the Warehouse From and To range using the lookup buttons next to the
fields.
2. Complete the MRP Item From and To range using the lookup buttons next to the
fields.
3. To save these parameters, enter the name to be assigned to the report
parameters in the drop-down field on the far right of the toolbar and then click on
the Save button on the toolbar to save the report parameters.
4. Click on the OK button to create the report.
Doc. No. F/DV/15
Rev.No.
Date
BatchMaster Software Inc.
BMM User Manual
10.12.5 MRP Expedite PO Report
The MRP Expedite PO Report screen provides a way to generate a report that displays
suggested changes, if any, in the following, to meet requirements of that item as per the
latest processing on the Run MRP screen:
1. Requested delivery dates of line items on existing purchase orders
2. Expected receipt date for warehouse transfers coming in
3. Due dates of existing production batches
The report may suggest expediting, delaying or canceling existing orders. You may opt
to see individually which orders are to be accelerated, which are to be delayed and which
are to be cancelled. For this, you may select the required option out of Expedite, Delay,
No Expedite and Cancel, and can see individual reports for them.
This report also shows the suggested MRP orders (with dates), in view of the
expedite/delay/cancel suggestions, to meet the demand of that item.
The option‟s filtering parameters can be used to define the report. Once BatchMaster
Manufacturing processes the report parameters, it displays the results as a Crystal
Report that one can print or export.
10.12.5.1 Screen Fields Description
Item No. From: This field specifies the lower limit of the range of MRP Item for use as
filter criteria during processing. Leaving this field blank has the same effect as selecting
the first available Item via the lookup.
Doc. No. F/DV/15
Rev.No.
Date
BatchMaster Software Inc.
BMM User Manual
Item No. To: This field specifies the upper limit of the range of MRP Item for use as
filter criteria during processing. Leaving this field blank has the same effect as selecting
the last available Item via the lookup.
Warehouse From: This field specifies the upper limit of the range of Warehouse for use
as filter criteria during processing. Leaving this field blank has the same effect as
selecting the first available Warehouse via the lookup.
Warehouse To: This field specifies the lower limit of the range of Warehouse for use as
filter criteria during processing. Leaving this field blank has the same effect as selecting
the last available Warehouse via the lookup.
Expedite Status: By checking the box, you may choose to include orders of one or
more of the statuses.
Report Path: This field holds the default path of the report.
10.12.5.2 Generating a MRP Expedite PO Report
1. Complete the MRP Item From and To range using the lookup buttons next to the
fields.
2. Complete the Warehouse From and To range using the lookup buttons next to the
fields.
3. Check Expedite Statuses, as required.
4. To save these parameters, enter the name to be assigned to the report
parameters in the drop-down field on the far right of the toolbar and then click on
the Save button on the toolbar to save the report parameters.
5. Click on the OK button to create the report.
Doc. No. F/DV/15
Rev.No.
Date
BatchMaster Software Inc.
BMM User Manual
11 Formulation
11.1 Formula Entry
Formula Entry Screen provides a way to define formulas. This feature centralizes your
formulas and provides you with the means to maintain library for the formulas you can
use in production. Critical characteristics such as costs, ingredients, safety information,
by-products etc can be defined on this screen. The information maintained here is used
extensively in Production, Bill of Material, Costing, and Laboratory.
This feature also provides a way to create a new formula by making modification to an
existing formula. A formula can also be created or modified from the Product Cost
Analysis screen (in the Costing module) and the Physical Property Analysis screen (in the
Laboratory module). Running certain Formula Utilities and the Formula Loss Adjustment
in the Costing Utilities module can also modify the formulas.
Doc. No. F/DV/15
Rev.No.
Date
BatchMaster Software Inc.
BMM User Manual
11.1.1
Screen Fields Description: Header and Formula
Items Tab
Line items for the Formula may be entered on this tab. The Maximum number of lines
permissible on a Formula is 999. Materials, Labor, Boilerplate, and Text can be entered
in a Formula.
Formula Line Item and their details are displayed in the form of a grid. Various totals are
displayed at the bottom right of the screen.
Formula Key: This is the key that uniquely identifies the Formula. This is a mandatory
field.
Formula Description: This is the description of the Formula.
Type: This field has the following options:
1. Materials
2. Labor
3. Text
4. Boilerplate
Item No.: This field stores the value associated with the setting on the Type field.
Doc. No. F/DV/15
Rev.No.
Date
BatchMaster Software Inc.
BMM User Manual
1. Raw material/Intermediates can be entered when the Type is Material. Clicking
the lookup on this field displays the Items.
2. Labor Key is entered when the Type is Labor. Clicking the lookup on this field
displays the Labor/Additional Cost keys.
3. The field is disabled when the Type is Text.
4. Boilerplate Key is entered when the Type is Boilerplate. Clicking the lookup on
this field displays the Boilerplate Instruction keys.
Description: This field stores the Description or text associated with value of the “Item
No.” on the same row.
When
When
When
When
the
the
the
the
„Type‟
„Type‟
„Type‟
„Type‟
is
is
is
is
Material, this field stores the Item Description.
Labor, this field stores the Description of the labor key.
Boilerplate, this field stores the Description of the boilerplate.
Text, this field stores user-defined text.
Whse: This field displays the Warehouse for material line item.
Qty Required: This is the quantity of the Labor (in hours) or of the material (interpreted
the Unit in the adjacent field).
Unit: This field displays the unit for the „Quantity Required‟.
O/H: This is the Overhead Key associated with this material or labor line item. This
value is used for cost analysis in the Costing module as well as to calculate the costs
associated with production of the end item produced by the formula.
Cost/Unit: This displays the standard or last or average cost of the material. The user
can toggle the cost from standard to last to average by clicking the Toggle Costs button
on the toolbar.
Ext Cost: This field displays the extended cost for the material or labor line item.
Loss: This displays the „line loss‟ for this specific material line item in the formula. This
number is entered as a fraction, not as a percentage.
Group ID: This is the Group ID of this line for the purpose of mix control via utilizing a
customized report (.rpt) file for printing Batch Tickets.
Mixing of materials can be better organized via Group ID‟s. Selected materials may be
premixed before being combined with the remaining ingredients. Formula lines, that
need to be combined to make a Premix, will all share the same Group ID. Each premix
has its own Group ID. The various premixes are then combined with any remaining
ingredients to make the Final Mix. The largest Group ID indicates the Final Mix.
Total Weight (KG): This field displays the sum total of the weight of all the lines in the
System Weight UOM.
Total Volume (LT): This field displays the sum total of the volume of all the lines in the
System Volume UOM.
Doc. No. F/DV/15
Rev.No.
Date
BatchMaster Software Inc.
BMM User Manual
KG/LT: The value gets calculated by dividing the Total Formula Weight (in System
Weight unit) by Total Formula Volume (in System Volume unit).
COST/KG: This is the cost of one Unit (System Weight Unit) of the formula.
COST/LT: This is the cost of one Unit (System Volume Unit) of the formula.
Total RM Cost: This field displays the Sum of Ext Cost amounts of the Material lines.
11.1.2
Screen Fields Description: By Products Tab
The byproduct(s) that are generated by the Formula may be entered on this tab. A
maximum of 999 lines may be entered here.
Item No.: This displays only the material key for byproduct.
Whse: This displays the Warehouse for Item.
Qty Produced: This is the quantity of the material to be produced as byproduct. This
quantity is interpreted according to the value of the Unit field.
Unit: This field displays the unit in which the „Quantity Required‟ is expressed.
O/H: This is the Overhead Key associated with the byproduct. This value is used for cost
analysis in the Costing module as well as to calculate the costs associated with
production of the end item produced by the formula.
Doc. No. F/DV/15
Rev.No.
Date
BatchMaster Software Inc.
BMM User Manual
Cost/Unit: This displays the standard or last or average cost of the byproduct. The user
can toggle the cost to either standard or average or last by clicking the Toggle Costs
button on the toolbar.
Ext Cost: This field displays the extended cost for the byproduct line.
Total Weight (KG): This field displays the sum total of the weights of all the lines in the
System Weight UOM.
Total Volume (LT): This field displays the sum total of the volumes of all the lines in
the System Volume UOM.
KG/LT: The value gets calculated by dividing the Total Formula Weight (in System
Weight unit) by Total Formula Volume (in System Volume unit).
COST/KG: This is the cost of one Unit (System Weight Unit) of the formula.
COST/LT: This is the cost of one Unit (System Volume Unit) of the formula.
Total Byproduct Cost: This field displays the sum of Ext Cost amount of Raw Materials.
11.1.3
Screen Fields Description: Formula Master Tab
Formula Class: This is the class of the Formula. Default Formula Class for the formula is
inserted when a new formula is created. This is a mandatory field. The Formula Class
provides a Work in Progress Account for use in production of items that can be made via
the specific formula.
Doc. No. F/DV/15
Rev.No.
Date
BatchMaster Software Inc.
BMM User Manual
Formula Status: This is the Status of the Formula. This is a mandatory field. The
Formula Status is used in:
Production Setup to specify whether or not the Formulas of that status should be
allowed in Production
Costing Setup to specify whether or not the Formulas of that status should be
allowed in Product Cost Analysis
Laboratory Setup to specify whether or not the Formulas of that status should be
allowed in Physical Property Analysis
Revision Number: All Formula has a corresponding revision; this field keeps track of
the revision number associated to every change made to the Formula. Hence whenever
you commit a change to the master Formula, a new version of it is created. By default,
the revision number starts at 0000000001 and is incremented by one with each commit
becoming 0000000002, 0000000003, and so on). This is a Read only field.
Date Revised: This is the Last Date when the Formula was saved.
Time Revised: This is the Last Time when the Formula was saved
Reason Revised: This is the default Reason Revised for the formula. In this field,
reason for creating the revised version of the formula is entered.
Date Last Made: This is the Last Date when the Formula was last used in production.
Time Last Made: This is the Last Time when the Formula was last used in production.
Default Process Cell: This field is for information only.
Density Override: The Density of the formula is calculated by dividing, Total Weight of
the ingredients by Total Volume of its ingredients, this is also called theoretical density.
This is based on the assumption that the volumes are linearly additive. But, in some
cases Total Volume of Formula is not equal to Total Volume of its ingredients, reason
being a shrinkage or bulk expansion during the process. The density override field, if its
value is non-zero, stores the density that is used instead of the density calculated by the
above described method. A zero value in this field means that the density override has
not been applied yet.
Notes: These are special Comments/Reminders in a formula.
Doc. No. F/DV/15
Rev.No.
Date
BatchMaster Software Inc.
11.1.4
BMM User Manual
Screen Fields Description: Safety Tab
Output Formula Key: For the purpose of printing a MSDS, an output formula key is
listed here. This is used when the MSDS information of the product can not be directly
determined from the formula ingredients.
For example, the reaction of hydrogen gas and chlorine gas produces HCl. The MSDS of
HCl cannot be prepared based on the hydrogen gas and chlorine gas, since the
properties of HCl are very different from each of the ingredients. In such a case, a
separate output formula for HCl should be created and attached here. For MSDS
purposes, this formula may list HCL itself as an ingredient.
MSDS Supplementary File: This is the default MSDS Template associated with this
Formula. This ID is used for printing MSDS for this Formula.
HMIS Health: This is the HMIS Health Rating for this formula. This displays a HMIS
Health Rating as one of None, Mild, Moderate, Serious or Extreme. This value is used in
the MSDS module.
HMIS Chronic Factor: This is the HMIS Chronic Indicator for the formula. This value is
used in the MSDS module.
HMIS Flammability: This is the HMIS Flammability Rating for the formula. This field
can have a value of None, Mild, Moderate or Serious. This value is used in the MSDS
module.
Doc. No. F/DV/15
Rev.No.
Date
BatchMaster Software Inc.
BMM User Manual
HMIS Reactivity: This is the HMIS Reactivity Rating for the formula. This field can have
its value as None, Mild, Moderate or Serious. This value is used in the MSDS module.
HMIS Personal Protection: This is the HMIS Personal Protection Rating for the
formula. This field can have one value of the following; this value is used in the MSDS
module:
1.
2.
3.
4.
5.
6.
Safety Glasses.
Safety Glasses, Gloves.
Safety Glasses, Gloves, Synthetic Apron.
Face Shield, Gloves, Synthetic Apron.
Safety Glasses, Gloves, Dust Respirator.
Safety Glasses, Gloves, Synthetic Apron, Dust Respirator.
HMIS Information: This is the WHMIS information for this formula.
11.1.5
Screen Fields Description: Cost Tab
Markup Factor: Markup is the amount added to the cost to cover overhead and profit
by a manufacturer. The Markup Factor is used for cost analysis. Multiplying this number
gives the markup factor as a percentage. A value of zero means that there is no markup
at all.
Loss Constant: This value represents the loss that is bound to happen when we use this
formula irrespective of how you produce. This is the fixed loss (in the System Weight
Unit) of the product being produced by this formula.
Doc. No. F/DV/15
Rev.No.
Date
BatchMaster Software Inc.
BMM User Manual
Loss Factor: The Loss Factor is used to determine the variable loss of the product being
produced by the formula. This number is entered as a fraction, not as a percentage.
Fixed Cost
Hours: This is the value of hours of the fixed costs for the formula. This value is used for
cost analysis in the Costing module as well as to calculate the costs associated with
production of the end item produced by the formula.
Labor Key: This is the Labor Key of the fixed costs for the formula. This value is used
for cost analysis in the Costing module as well as to calculate the costs associated with
production of the end item produced by the formula.
Amount: This is the cost amount for formula labor/additional key of the fixed costs for
the formula. This value is used for cost analysis in the Costing module as well as to
calculate the costs associated with production of the end item produced by the formula.
Overhead Key: This is the Overhead Key of the fixed costs for the formula. This value is
used for cost analysis in the Costing module as well as to calculate the costs associated
with production of the end item produced by the formula.
Type: The Overhead Key type can be one of the following:
„$‟ Type: This is the Overhead Key of „$‟ type for fixed costs. This value is entered
automatically when the associated overhead key is entered. This is a read-only
field. This value is used for cost analysis in the Costing module as well as to
calculate the costs associated with production of the end item produced by the
formula. The value of Hours on this line is multiplied by the Factor of the
Overhead Key to calculate the cost contribution of this overhead.
„%‟ Type: This is the Overhead Key of „%‟ type for fixed costs. This value is entered
automatically when the associated overhead key is entered. This is a read-only
field. This value is used for cost analysis in the Costing module as well as to
calculate the costs associated with production of the end item produced by the
formula. The value of Hours on this line, multiplied by the Amount of the Labor
Key, is multiplied by the Factor of the Overhead Key of the same line to calculate
the cost contribution of this overhead.
Factor: This value is entered automatically when the associated overhead key is
entered. This is a read-only field.
Setup Cost
Hours: This is the value of the hours of the setup costs for the formula. This value is
used for cost analysis in the Costing module as well as to calculate the costs associated
with production of the end item produced by the formula.
Labor Key: This is the Labor Key of the setup costs for the formula.
Amount: This is the cost amount of formula labor/additional key of the setup costs for
the formula. This value is entered automatically when the associated labor key is
entered. This is a read-only field. This value is used for cost analysis in the Costing
Doc. No. F/DV/15
Rev.No.
Date
BatchMaster Software Inc.
BMM User Manual
module as well as to calculate the costs associated with production of the end item
produced by the formula.
Overhead Key: This is the Overhead Key of the setup costs for the formula. This value
is used for cost analysis in the Costing module as well as to calculate the costs
associated with production of the end item produced by the formula.
Type: The Overhead Key consists of two types:
„$‟ Type: This is the Overhead Key of „$‟ type for setup costs. This value is entered
automatically when the associated overhead key is entered. This is a read-only
field. This value is used for cost analysis in the Costing module as well as to
calculate the costs associated with production of the end item produced by the
formula. The value of Hours on this line is multiplied by the Factor of the
Overhead Key to calculate the cost contribution of this overhead.
„%‟ Type: This is the Overhead Key of „%‟ type for setup costs. This value is entered
automatically when the associated overhead key is entered. This is a read-only
field. This value is used for cost analysis in the Costing module as well as to
calculate the costs associated with production of the end item produced by the
formula. The value of Hours on this line, multiplied by the Amount of the Labor
Key, is multiplied by the Factor of the Overhead Key of the same line to calculate
the cost contribution of this overhead.
Factor: This value is entered automatically when the associated overhead key is
entered. This is a read-only field.
Variable Cost
Maxwt: This is the value of the Max Weight for this row of the variable costs for the
formula.
The variable labor cost is dependent on two factors: the total batch weight, and the
applicable labor rate for that batch weight. The variable labor is defined for a particular
“slab” of batch weight. The Max Weight is the upper limit of the weight slab to which a
particular row of the variable costs is applicable. The lower limit of batch weight for a
slab is determined based on the max weight of the preceding row. For example, suppose
that the Max weight for the first row is 100, and the max weight of the second row is
500. In such a case, the variable cost will be according to the first row if 0 < Batch
Weight ≤ 100; whereas the variable cost will be according to the second row if 100 <
Batch Weight ≤ 500.
The actual variable cost in production is determined by adding together the following:
Batch weight (in system weight unit) multiplied by the Amount of the Labor Key
of the applicable row.
If the overhead key is „$‟ type, then the Batch weight (in system weight unit)
multiplied by the Factor of the Overhead Key of the applicable row.
If the Overhead Key is „%‟ type, then the Batch weight (in system weight unit)
multiplied by the Amount of the Labor Key of the applicable row multiplied by the
Factor of the Overhead Key of the same row.
Doc. No. F/DV/15
Rev.No.
Date
BatchMaster Software Inc.
BMM User Manual
Labor Key: This is the Labor Key of the Variable costs for the formula. This value is
used for cost analysis in the Costing module as well as to calculate the costs associated
with production of the end item produced by the formula.
Amount: This is the cost amount for the formula labor/additional key of the variable
costs for the formula. This value is used for cost analysis in the Costing module as well
as to calculate the costs associated with production of the end item produced by the
formula.
Overhead Key: This is the Overhead Key of the variable costs for the formula. This
value is used for cost analysis in the Costing module as well as to calculate the costs
associated with production of the end item produced by the formula.
Type: The Overhead Key consists of two types:
„$‟ Type: This is the Overhead Key of „$‟ type for variable costs. This value is
entered automatically when the associated overhead key is entered. This is a
read-only field. This value is used for cost analysis in the Costing module as well
as to calculate the costs associated with production of the end item produced by
the formula. The Batch weight (in system weight unit) is multiplied by the Factor
of the Overhead Key to calculate the cost contribution of this overhead.
„%‟ Type: This is the Overhead Key of „%‟ type for variable costs. This value is
entered automatically when the associated overhead key is entered. This is a
read-only field. This value is used for cost analysis in the Costing module as well
as to calculate the costs associated with production of the end item produced by
the formula. The Batch weight (in system weight unit), multiplied by the Amount
of the Labor Key, is multiplied by the Factor of the Overhead Key of the same line
to calculate the cost contribution of this overhead.
Factor: This value is entered automatically when the associated overhead key is
entered. This is a read-only filed.
11.1.6
Creating a Formula
A Formula may be created as follows:
1. Open the Formula Entry.
2. Enter the Formula Key and the Description.
3. Enter a Formula Class and a Formula Status if not present on this formula.
4. Enter the Formula Items on Formula Items Tab.
5. Enter the byproduct information, if any, on By Products Tab.
6. Add values at the optional fields as needed.
7. Click the Add button to add & to save the formula.
11.1.7
Goto
Size Formula: Upon clicking this button, a „Size Formula‟ popup window is displayed
with two options „Weight‟ and „Volume‟. Selecting one of these options, entering a value,
and clicking OK resizes the formula accordingly. The formula line items of Material Type
Doc. No. F/DV/15
Rev.No.
Date
BatchMaster Software Inc.
BMM User Manual
and the byproducts (if any) are sized accordingly. The sized formula is not saved until
the Save button is clicked.
View Formula In: Clicking this button toggles the View Mode between Weight and
Volume. The Quantity required and the Unit field on the grid is toggled accordingly the
conversions defined for System Weight and Volume master screen.
Costing: By using this option user can analyze the formula with various available cost
options. Actual formula will remain unaffected, thus by this toggle cost option user can
just view the changed formula by toggling costs. Clicking on this button toggles the costs
as follows:
If the focus is on the Formula Items Tab, the values of the Cost/Unit, Ext. Cost, Cost/LB,
Cost/GAL and Total RM Cost field get toggled.
If the focus is on a byproduct Tab, the values of the Cost/Unit, Ext. Cost, Cost/LB,
Cost/GAL and Total Byproduct Cost fields get toggled.
Doc. No. F/DV/15
Rev.No.
Date
BatchMaster Software Inc.
BMM User Manual
Export to Excel: This option is used to export the data in the Excel file.
Doc. No. F/DV/15
Rev.No.
Date
BatchMaster Software Inc.
BMM User Manual
Toggle Units: Clicking on this button toggles the units as follows:
If the focus is on a Formula Line Items Tab, the values of the Qty Required and the
Cost/Unit fields get toggled.
If the focus is on a By Products Tab, the values of the Qty Produced and the Cost/Unit
fields get toggled.
Quality Control: Click on this button to associate Quality Control tests with this
formula.
11.1.8
Example
For example, we are creating a formula for preparing a Dry Fruit Cake. The ingredients
for cake are Almonds, Walnuts and Milk Maid. The ingredients with the required quantity
and cost are declared at Formula items tab of formula entry screen. Secondly, if the
formula yields any byproduct that can be declared on the Byproducts Tab. Summary
section displays Total weight, Total volume and Total raw material cost.
11.2 Overhead Cost
The Overhead Cost screen provides you with a way to define the overhead costs
associated with your manufacturing process so that you can later assign them to specific
line items in a formula or to a formula as a whole.
Doc. No. F/DV/15
Rev.No.
Date
BatchMaster Software Inc.
BMM User Manual
With Overhead Cost screen, you can define overhead costs to mean any costs not
directly related to your finished goods.
11.2.1
Mandatory Inputs
Accounts should be available for attaching to the Overhead Cost.
11.2.2
Screen Fields Description
Formula Overhead Key: This is the key for the Formula Overhead. This is a mandatory
field.
Description: This is the description for the Formula Overhead Key.
Overhead Type: This field has the following options:
$-Currency Amount: If this option is selected, the value of the Factor field is
interpreted as an hourly rate in the Home Currency.
%-Percentage: If this option is selected, the value of the Factor field is interpreted
as percentage.
Overhead Factor: This is a numeric value that is interpreted according to the setting at
the „Type‟ field on this screen.
Overhead Account Number: This is the overhead account number associated with this
Formula Overhead Key.
Variance Account Number: This is the variance account number associated with this
Formula Overhead Key.
11.2.3
Creating a Overhead Cost
1. The following steps can be taken to create an Overhead Cost:
2. Open the Overhead Cost screen.
3. Enter a unique key at the field „Formula Overhead Key‟.
Doc. No. F/DV/15
Rev.No.
Date
BatchMaster Software Inc.
BMM User Manual
4. Enter a description for the Overhead Cost being created.
5. Change the Overhead Cost Type, if needed.
6. Enter the Overhead Account Number and the Variance Account Number.
7. Click the OK button to save the Overhead Cost Record.
Example
For Example, Overhead on permanent Labor, Temporary overhead etc
11.3 Labor/Additional Cost
The Labor/Additional Costs screen provides you with a way to define labor and other
additional costs. With Labor/Additional Costs, you can create a unique key, associate it
with specific labor and variance accounts in your GL accounts, and use the key to assign
specific costs to a formula.
11.3.1
Mandatory Inputs
Accounts should be available for attaching to the Labor/Additional Cost:
11.3.2
Screen Fields Description
Formula Labor/Additional Cost key: This is the Key for the Formula Labor/Additional
Cost. This is a mandatory field.
Description: This is the Description of Formula Labor/Additional Cost.
Cost Amount: This is the hourly rate. This amount is interpreted in BatchMaster Home
Currency.
Labor Cost Account Number: This is the labor account number associated with this
Labor/Additional Cost Key.
Variance Account Number: This is the variance account number associated with this
Labor/Additional Cost Key.
Doc. No. F/DV/15
Rev.No.
Date
BatchMaster Software Inc.
11.3.3
BMM User Manual
Creating a Labor/Additional Cost
1. Open the Labor/ Additional Cost screen.
2. Enter Formula Labor/Additional Cost key and Description.
3. Enter a Labor Account Number.
4. Enter a Variance Account Number.
5. Click on OK to save the Labor/Additional Cost record.
11.3.4
Example
For example, create an additional cost called „LC01‟ to reflect the cost of using a
consultant to work with a specific formula, and associate the key with a formula that
requires special labor costs to create.
11.4 Process Cell Formula Capacity
The Process Cell Formula Capacity provides you with a way to assign specific work
centers to your formulas. With Process Cell, you can define a group of machines or a
single machine as a work center for mix lines or fill lines or assembly lines where batches
are manufactured. Once a process cell is defined, its capacity can be used in scheduling
and planning of your facility‟s productive capacity with the help of Process Cell Formula
Capacity. The Process Cell is used in Production, MRP and MPS.
11.4.1
Mandatory Inputs
1. A Process Cell should be created.
2. If the Process Cell Type is Mix, a Formula should be created.
3. If the Process Cell Type is Fill, an Intermediate Type Bill of Materials (BOM)
should be created.
4. If the Process Cell Type is Assembly, an Assembly Type Bill of Materials (BOM)
should be created.
Doc. No. F/DV/15
Rev.No.
Date
BatchMaster Software Inc.
11.4.2
BMM User Manual
Screen Fields Description
Process Cell: This is a work center for mix lines, fill lines or assembly lines where
batches are manufactured. Once a process cell is defined, its capacity can be used in
scheduling and planning of facility‟s productive capacity. This is a mandatory field.
Process Cell Type: The Process Cell Type can be one of Mix, Fill or Assembly. This is a
read only field.
Formula ID: This is a mandatory field when the Process Cell Type is Mix. When you click
the attached Lookup, a window appears that displays the Formula records you can
choose from. The lookup also lets you search for records by specifying selection criteria
(matching records based on the contents of particular fields), and lets you vary the order
in which records are displayed.
Warehouse: This is the Location associated with the Intermediate Key or the Assembly
Key. This is displayed only when the Process Cell Type is Fill or Assembly.
Capacity by Weight/Volume: This specifies whether the capacity of the process cell,
as mentioned at the Capacity field of this screen, is to be interpreted in the System
Weight Unit or the System Volume Unit.
Capacity: The number entered here specifies the capacity of this process cell for this
formula. This number is interpreted in the System Weight Unit or the System Volume
Unit, depending on the setting of the „Capacity by Weight/Volume‟ field on this screen.
This is used in determining how many batches would be needed to produce a certain
amount of the end product.
Time required to process one batch: This is the time taken to complete one Batch
using this Process Cell. This time is entered in terms of DD:HH:MM
(Days:Hours:Minutes).
No of Hours Per Day: This is the availability of the Process Cell per day for production.
This is in terms of HH:MM (Hours: Minutes). This value is defaulted when a process cell
is selected on this screen.
Doc. No. F/DV/15
Rev.No.
Date
BatchMaster Software Inc.
BMM User Manual
Size the Time Required with Batch Size: This specifies whether or not the time
calculated to complete a batch will be prorated as per the Batch Size if the Batch Size is
less than the Capacity of the process cell.
Preferred Ranking: This ranking is for reporting purposes only. This field is used to
grade the Process Cell Formula Capacity. This field is particularly useful in case if more
than one Process Cell Formula Capacity for an item exists, in such situation the process
cell to be assigned will be decided on priority of this ranking field.
11.4.3
Creating a Process Cell Formula Capacity
1. Open the Process Cell Formula Capacity screen.
2. Enter or select a Process Cell. This field is mandatory.
3. Depending on the Process Cell Type, Enter a Formula ID, an Intermediate Key or
an Assembly Key. This field is also mandatory.
4. Set a value for Capacity by Weight/Volume.
5. Enter the Capacity of the Process Cell.
6. Enter the Time required to process one batch. This is in terms of Days: Hours:
Minutes.
7. Specify whether or not to Size the Time Required with Batch Size.
8. Enter a Preferred Ranking.
9. Click on OK to save the record.
11.4.4
Example
For Example, we desire to assign fill type work center to apple juice formula then we can
create a Process Cell formula capacity. Thus via this screen we can define a group of
machines where batches are manufactured for filling apple juice can. Here, we can also
specify the no. of hours per day, preferred ranking etc
11.5 Utilities
11.5.1
Compare Prior With Present
The „Compare Prior with Present‟ screen provides you with a method to compare two
different versions of the same formula.
Using „Compare Prior with Present‟ Utility, the user can compare the current version of a
formula with earlier versions of the same formula with respect to its characteristics. In
addition to comparing general identifying information and characteristics of the formulae,
the user can also compare their line items and by-products details such as item
Warehouse, quantity required, system weight, system volume, losses, amount etc.
Doc. No. F/DV/15
Rev.No.
Date
BatchMaster Software Inc.
11.5.1.1
BMM User Manual
Screen Fields Description
Formula Key: This field displays the current version of the formula for comparing with
the earlier versions of same formula. The lookup here is limited to those Formulae for
which at least one revision has been created.
Formula Description: This field gives the description of the formula selected in the
Formula Key field.
Versions: This field displays the version of the formula that needs to be compared with
the current version.
Show: Clicking this button, the user can view all the details of the prior version of the
current formula that is selected for the comparison
Current Formula:
Revision Number: This field displays the reference number of the current version. It is
used to keep track of all the versions of the formula which have been modified, for future
reference. It is generated by BMM.
Date Revised: This field displays the date when the current Formula was last saved.
Time Revised: This field displays the time when the current Formula was last saved.
Reason Revised: This field displays the reason why this formula was modified and
revised.
Doc. No. F/DV/15
Rev.No.
Date
BatchMaster Software Inc.
BMM User Manual
User ID: This field displays the last user who modified the current formula.
Total Weight (KG): This field defines the sum of the total weights of all the formula line
items of the current formula in the System Weight UOM.
Total Volume (LT): This field defines the sum of the total volumes of all the formula
line items of the current formula in the System Volume UOM.
KG/LT: This field calculates the Density (in System Weight UOM divided by the System
Volume UOM) of the current formula.
Tab-1 (Formula Items)
Type: This field displays the corresponding line item‟s type of the current formula. The
material type can be differentiated as following:
1.
2.
3.
4.
Materials
Labor
Boilerplate
Text
Item No.: This displays the material key from the byproducts of the current formula.
Description: This field displays the description associated with the Item No., the text
associated with a boilerplate, or the description of the labor key from the formula line
items of the current formula.
Whse: This field displays the warehouse of the material key in the current formula.
Qty Required: This field displays the quantity required by the user in the current
formula line items.
Unit: This field displays the unit for the „Quantity required‟ e.g. litre, kg etc.
O/H: This is the Overhead Key associated with the selected material or labor line of the
current formula. This value is used for cost analysis in the Costing module as well as to
calculate the costs associated with production of the end item produced by the formula.
Cost/ Unit: This displays the standard or last or average cost of the material of the
current formula. The cost displayed on this field depends on the costing method assigned
for the company.
Ext Cost: This field displays the extended cost for the material of the current formula.
Loss: This displays the „line loss‟ for this specific material line item in the formula.
Group ID: This is the Group ID of this line for the purpose of mix control via utilizing a
customized report (.rpt) file for printing Batch Tickets.
Mixing of materials can be better organized via Group ID‟s. Selected materials may be
premixed before being combined with the remaining ingredients. Formula lines, that
need to be combined to make a Premix, will all share the same Group ID. Each premix
has its own Group ID. The various premixes are then combined with any remaining
Doc. No. F/DV/15
Rev.No.
Date
BatchMaster Software Inc.
BMM User Manual
ingredients to make the Final Mix. The largest Group ID indicates the Final Mix. The
totals of weight and volume for each premix can be printed utilizing a customized report
(.rpt) file for printing Batch Tickets. A specialized setup is available for such a
customized report.
Tab-2 (By Products)
Item No.: This displays the material key from the byproducts of the current formula.
Whse: This displays the warehouse of the material key in the current formula byproduct
line item.
Quantity Produced: This displays the quantity produced in the current formula as a
byproduct.
Unit: This field displays the unit for the „Quantity Produced‟ e.g. litre, kg etc.
O/H: This is the Overhead Key associated with the associated material or labor line of
the current formula.
Cost / Unit: This displays the standard or last or average cost of the material of the
current formula. The cost displayed on this field depends on the costing method assigned
for the company.
Ext Cost: This field displays the extended cost for the material of the current formula.
Prior Formula:
Note: The fields that are displayed on this Tab have similar functionalities as defined for
the current version(s) tab above.
11.5.1.2 Comparing a Prior version of the formula with the
Present version
1. Click on the Lookup button on the toolbar and select a Formula ID.
2. Select a formula that is to be compared. Click on the „Show‟ button to load earlier
version of the formula to compare.
11.5.2
Revert To Prior Version
Using „Revert to Prior Version‟ utility, you can restore a prior version of any formula to
active use. You can examine both, the Line Items and the By-Products, of the selected
formula before you launch the formula‟s reversion.
Note: All the details that are maintained on Line Items Tab (containing Materials, Labor,
Boilerplates and Texts) as well as the By-Products Tab (containing the byproduct(s)
details) along with the information in the Header fields of a prior version of a Formula
can be reverted.
Doc. No. F/DV/15
Rev.No.
Date
BatchMaster Software Inc.
11.5.2.1
BMM User Manual
Screen Fields Description
Formula Key: This key displays the prior version(s) of formula required for reversion.
The lookup here is limited to those Formulae for which at least one revision has been
created.
Formula Description: This field displays the description for the Formula.
Revision Number: This field displays the revision number of the formula which is to be
reverted. It is used to keep track of all the versions of the formula which have been
reverted, for future reference. It is generated by BMM.
Date Revised: This is the date on which this revision of the formula was obtained.
Time Revised: This is the time at which this revision of the formula was obtained.
Reason Revised: This is the reason why this formula was revised.
Total Weight: This field displays the sum of the total weights of all the formula line
items of the current formula in the System Weight UOM.
Total Volume: This field displays the sum of the total volumes of all the formula line
items of the current formula in the System Volume UOM.
Formula Density: This displays the Density (in System Weight UOM divided by the
System Volume UOM) of the current formula.
Doc. No. F/DV/15
Rev.No.
Date
BatchMaster Software Inc.
BMM User Manual
Tab-1 (Line Items)
Type: This field displays the corresponding line item‟s type of the prior version of the
formula.
The material type can be differentiated as following:
1. Materials
2. Labor
3. Boilerplate
4. Text
Item No.: This field stores the value associated with the setting on the Type field. This
is a key that uniquely identifies the inventory Item present in the selected formula.
Description: This field stores the Description or text associated with value of the "Item
No." on the same row.
1. When the „Type‟ is Material, this field stores the Item Description.
2. When the „Type‟ is Labor, this field stores the Description of the labor key.
3. When the „Type‟ is Boilerplate, this field stores the Description of the boilerplate.
4. When the „Type‟ is Text, this field stores user-defined text.
Whse: This field displays the warehouse of the material key in the formula.
Weight/Qty: This field displays the quantity of the Labor (in hours) or of the material
for the respective line item.
Volume: This field displays the volume with the associated line item.
O/H: This is the Overhead Key associated with the material or labor line of the prior
version of the formula. This value is used for cost analysis in the Costing module as well
as to calculate the costs associated with production of the end item produced by the
formula.
Loss: This displays the „line loss‟ for this specific material line item in the formula.
Group ID: This is the Group ID of this line for the purpose of mix control via utilizing a
customized report (.rpt) file for printing Batch Tickets.
Mixing of materials can be better organized via Group ID‟s. Selected materials may be
premixed before being combined with the remaining ingredients. Formula lines, that
need to be combined to make a Premix, will all share the same Group ID. Each premix
has its own Group ID. The various premixes are then combined with any remaining
ingredients to make the Final Mix. The largest Group ID indicates the Final Mix. The
totals of weight and volume for each premix can be printed utilizing a customized report
(.rpt) file for printing Batch Tickets. A specialized setup is available for such a
customized report.
Doc. No. F/DV/15
Rev.No.
Date
BatchMaster Software Inc.
BMM User Manual
Tab-2 (By Products)
Note: The fields that are displayed on this Tab have similar functionalities as defined for
the Line Item(s) tab above.
11.5.2.2
Reverting To a Prior Version
1. Click on the Lookup button on the toolbar. All the prior versions of the various
Formulas are displayed.
2. Select a Formula Version to which the current formula needs to be reverted.
3. Click on the „Revert to Prior Version‟ button.
4. Click on Yes to revert to prior version of the Formula. BMM displays a message
when the formula is successfully reverted.
11.5.3
Intermediate Expansion
The Intermediate Expansion screen enables user to exhibit all the raw materials
contained in an intermediate. When a formula has been changed via this utility, the
previous version gets saved in the formula history.
When the user expands an intermediate associated with a Formula, the user can exercise
any or both of the following options:
1. Replace an Intermediate line item (used on the Formula Entry screen) with the
formula line items that are used to produce that intermediate.
2. Replace a Byproduct line item (listed on the Formula Entry screen) with the
byproduct lines that get created when the intermediate (being replaced) is
produced.
11.5.3.1
Mandatory Inputs
At least one formula with an intermediate line item should exist.
Doc. No. F/DV/15
Rev.No.
Date
BatchMaster Software Inc.
11.5.3.2
BMM User Manual
Screen Fields Description
Formula Key Range
Formula From: This Formula key specifies the lower limit of the range of formulas for
use as filter criteria during processing. This Formula key may be entered by typing or
selected via the associated lookup on this screen. Leaving this field blank has the same
effect as selecting the first available Formula via the lookup.
Formula To: This Formula key specifies the upper limit of the range of formulas for use
as filter criteria during processing. This Formula key may be entered by typing or
selected via the associated lookup on this screen. Leaving this field blank has the same
effect as selecting the last available Formula via the lookup.
Formula Class: This is the class associated with a Formula. The data that needs to be
entered in this field is selected from the lookup table of formula class in the Formula
module.
Formula Status: This is the status of a Formula. The data that needs to be entered in
this field is selected from the lookup table of formula Status in the Formula module.
Material Key: This is the intermediate Material key that will be expanded on a Formula
or Formulas (as per the filter criteria). This is a mandatory field.
Warehouse: This is the warehouse associated with the Material key.
Mode:
Trial: In the Trial mode, the intermediate is expanded into its raw material, but no
actual change occurs, i.e. the formula does not change in the Formula module.
Final: In the Actual mode, the intermediate not only expands into its corresponding raw
materials, but also the changes associated with the formula can be seen in the Formula
module.
Doc. No. F/DV/15
Rev.No.
Date
BatchMaster Software Inc.
11.5.3.3
BMM User Manual
Example
Let us consider a simple example. Suppose, in the production of Apple Juice, the user
has used Apple pulp as an intermediate. Now, the user wants to expand the intermediate
into its corresponding raw materials. Using the „Intermediate Expansion‟ screen, the
user can branch out the intermediate (Apple pulp) into its corresponding raw materials
(Apple and water).
11.5.3.4
Performing an Intermediate Expansion
The Intermediate Expansion can be processed using the following steps:
1.
Enter the „Formula From‟: Leaving this field blank has the same effect as entering
the first available formula.
2.
Enter the „Formula To‟: Leaving this field blank has the same effect as entering
the last available formula.
3.
Select the Formula Class using the lookup button the remaining classes get
excluded. Leaving this field blank means that none of the formula classes has
been excluded.
4.
Select the Formula Status using the lookup buttons the remaining statuses get
excluded. Leaving this field blank means that none of the formula statuses has
been excluded.
5.
Select the Material Key that needs to be expanded. This is mandatory.
6.
Select the Warehouse of Intermediate key to replace the single line denoting an
intermediate with a list of all the ingredients found in the intermediate in formula
lines and Byproduct lines.
7.
Select the Expansion Scope by clicking button Formula Lines & Byproduct Lines,
Formula Lines Only or Byproduct Lines Only.
8.
Select Trial or Final mode.
9.
Click Process to perform the expansion. A report is displayed.
11.5.4
Material Substitution
Material substitution screen has been provided by BMM to enable the user to substitute
or replace a raw material used in an item by some other raw material according to the
user‟s preferences.
This screen also gives the user, the advantage of selecting a new raw material for
replacement with various combinations e.g. the user can substitute a raw material based
on its weight percentage or volume percentage. This screen also gives the user an option
to select an additional material that must be present in the formula for the substitution.
This is an optional field.
The Material Substitution Utility provides the user with a way to substitute one material
for another in a range of formulae. With Material Substitution, the user can substitute a
material by:
1. Weight percentage
2. Volume percentage
Doc. No. F/DV/15
Rev.No.
Date
BatchMaster Software Inc.
BMM User Manual
Using Material Substitution Utility, the user can establish the filter criteria, including the
required materials, specific Warehouses, and the formula characteristics.
Following a material substitution, formula may be adjusted to maintain its size by
weight, volume, or no adjustment. The user can also adjust a specific material in the
formula as an alternative to adjust the entire formula. The user can specify whether the
substitutions are to be done manually or automatically. After the substitution, the
formula will be saved as a new revised formula. A report will be printed showing the
results of each substitution.
11.5.4.1
Mandatory Inputs
At least one formula should be created.
11.5.4.2
Screen Fields Description
Substitution Criteria
Substitute as Percentage of: This field stores whether the substitution on a formula
will be based on the Weight percent or Volume percent.
Percentage of New Material to Old: This field stores the percentage of the New
Material to the Old Material. This percentage is interpreted as:
1. Weight percent if the “Substitute as Percentage of Weight or Volume” is set to
Weight Percent.
Doc. No. F/DV/15
Rev.No.
Date
BatchMaster Software Inc.
BMM User Manual
2. Volume percent if the “Substitute as Percentage of Weight or Volume” is set to
Volume Percent.
Adjust To Maintain Original: This field has three options:
If the Weight option is selected and at the „Adjust by Specific Material or Entire Formula‟
field „Formula‟ is selected, then the adjustments made on the formula after substitution
would maintain the prior or original Total Weight of the Formula but the line items
(including the substituted material) are sized accordingly.
If the Volume option is selected and at the „Adjust by Specific Material or Entire
Formula‟ field „Formula‟ is selected, then the adjustments made on the formula after
substitution would maintain the prior or original Total Volume of the Formula but the line
items (including the substituted material) are sized accordingly.
If the None option is selected, then the formula (after the substitution) is not resized to
maintain the original weight or volume. The „Adjust by Specific Material or Entire
Formula‟ field is disabled.
Adjust By: This field stores whether Total Weight or the Total Volume of the formula
should be maintained by adjusting the Entire Formula or just one particular Material line
item of a formula. If the „Material‟ option is selected, the „Material Key to Adjust‟ field
and the „Warehouse‟ field are enabled.
Material Key to Adjust: This field is enabled only if the “Adjust by Specific Material or
Entire Formula” is set to “Material”. If enabled, this field stores the line item of a formula
for which adjustments has to be made.
Warehouse: This field is enabled only if the “Adjust by Specific Material or Entire
Formula” is set to “Material”. If enabled, this field stores the Warehouse of the material
key for which adjustment has to be made.
Make Substitutions: Use this option to make substitutions manually or automatically.
1. If the „Manually‟ option is selected, then the user needs to confirm or reject each
substitution one by one.
2. If the „Automatically‟ option is selected, then confirmation is not required during
substitution for the formulas in the range.
Revision Reason: This field stores the reason for revising a specific material on a
Formula. When a formula gets modified via this screen, the reason for modification and
revision needs to be entered in this field.
Formulas
Formula From: This Formula key specifies the lower limit of the range of formulas for
use as filter criteria during processing. This Formula key may be entered by typing or
selected via the associated lookup on this screen. Leaving this field blank has the same
effect as selecting the first available Formula via the lookup.
Formula To: This Formula key specifies the upper limit of the range of formulas for use
as filter criteria during processing. This Formula key may be entered by typing or
Doc. No. F/DV/15
Rev.No.
Date
BatchMaster Software Inc.
BMM User Manual
selected via the associated lookup on this screen. Leaving this field blank has the same
effect as selecting the last available Formula via the lookup.
Formula Class: If a Formula Class is entered here, the substitution will be restricted to
only those formulas that belong to that Formula Class. If this field is left blank, this
restriction does not apply.
Formula Status: If a Formula Status is entered here, the substitution will be restricted
to only those formulas that belong to that Formula Status. If this field is left blank, this
restriction does not apply.
Materials
Old Material Key: This field stores the material key that needs to be replaced. The Old
Material key can be entered by typing or selected via the associated lookup on the
screen. This is a mandatory field.
Old Warehouse: This field stores the warehouse of the material that is being replaced
(that is, warehouse of old material). The Old warehouse can be entered by typing or
selected via the associated lookup on the screen.
New Material Key: This field stores the material key that has been used for
replacement or substitution. The New Material key can be entered by typing or selected
via the associated lookup on the screen. This is a mandatory field.
New Warehouse: This field stores the warehouse of the material that has been used for
replacement (that is, warehouse of new material). The New warehouse can be entered
by typing or selected via the associated lookup on the screen.
Additional Material Which Must be Present: This field stores the additional material
key that must be present in a formula for the substitution. The Additional Material key
can be entered by typing or selected via the associated lookup on the screen. This is an
optional field.
Warehouse: This field stores the warehouse of the additional material. The warehouse
can be entered by typing or selected via the associated lookup on the screen.
Get Records: Clicking this button displays the data within the sliding grid.
11.5.4.3
Example
Let us consider a simple example. Suppose, for the production of Low calorie Fruit Juice,
the user wants to substitute sugar with jaggery. He can do this substitution using the
„Material Substitution‟ screen. By making this change in the formula utilities module,
the effects can be seen in the formula of Fruit juice on the formula entry screen in the
formula master tab.
11.5.4.4
Performing a Material Substitution
The Material Substitution can be processed using the following steps:
1. Select the Old Material Key. This is mandatory.
Doc. No. F/DV/15
Rev.No.
Date
BatchMaster Software Inc.
BMM User Manual
2. Select a Warehouse for the Old Material; the remaining Warehouses get excluded.
Leaving this field blank means that none of the warehouses has been excluded.
3. Select the New Material Key. This is mandatory.
4. Select a Warehouse for the New Material; the remaining Warehouses get
excluded. Leaving this field blank means that the Warehouses will not be
substituted when the material is substituted.
5. Select the Additional Material Which Must Be Present in the formula for the
substitution to occur if so desired.
6. Select a Warehouse for the Additional Material Which Must be Present. This is an
optional field.
7. Select Weight or Volume and enter the corresponding percentage to allow BMM to
substitute the new material as a percentage of the old material‟s weight or
volume.
8. Set the „Adjust to Maintain Original‟ to specify whether you want the original
weight or the volume to be preserved for the formula. If you have selected
Weight or Volume here:
i. Specify additionally the setting for „Adjust by Specific material or Entire
Formula‟.
ii. If the „Material‟ option is selected at the „Adjust by Specific material or
Entire Formula‟ field, then enter the Material Key to Adjust and the
Warehouse using the lookup buttons.
9. Select the Formula From. Leaving this field blank has the same effect as entering
the first available formula.
10. Select the Formula To. Leaving this field blank has the same effect as entering
the last available formula.
11. Select the Formula Class; the remaining classes get excluded. Leaving this field
blank means that none of the formula classes has been excluded.
12. Select Formula Status; the remaining statuses get excluded. Leaving this field
blank means that none of the formula statuses has been excluded.
13. Select to make the substitution either manually or automatically.
14. Enter the Revision Reason. This is mandatory.
15. Save the changes by clicking on the Save button
16. Click the Substitute button to process the substitutions.
11.5.5
Purge Prior Formula Versions
The „Purge Prior Versions‟ Utility provides the user with a way to eliminate old or unused
versions of formulas from BMM.
Using Purge Prior Versions, the user can delete unwanted formulas to free the record
space, prevent the reversion to an unwanted version of a formula or comply with a
security protocol. The user can enable the Detail setting so that limited information
about the purged formula continues to appear. You can also retain a number of prior
versions of formulas. The purging can be done in the Trial mode or Final mode.
Doc. No. F/DV/15
Rev.No.
Date
BatchMaster Software Inc.
BMM User Manual
The Formulas purged using the „Detail only‟ option can be viewed at the View Prior
Version screen. The current versions of the formulas remain unaffected by this screen.
11.5.5.1
Mandatory Inputs
At least one prior version of a Formula should be available to purge.
11.5.5.2
Screen Fields Description
Formula Key Range
Formula From: This Formula key specifies the lower limit of the range of formulas for
use as filter criteria during processing. This Formula key may be entered by typing or
selected via the associated lookup on this screen. Leaving this field blank has the same
effect as selecting the first available Formula via the lookup.
Formula To: This Formula key specifies the upper limit of the range of formulas for use
as filter criteria during processing. This Formula key may be entered by typing or
selected via the associated lookup on this screen. Leaving this field blank has the same
effect as selecting the last available Formula via the lookup.
Order By
Formula Key/Date: Checking this option enables the date range (From Date and To
Date) fields. In this case, all prior versions that were created in the specified date range
(for selected formulas) will become available for purging.
Formula Key/All But Last „N‟ Formulas: Checking this option enables the „All but Last
„N‟ Formulas‟ field. When Purge Prior Versions option is processed, N number of latest
versions (if that many versions exist) does NOT get purged, while all the other versions
prior to the Last N versions, get purged.
Doc. No. F/DV/15
Rev.No.
Date
BatchMaster Software Inc.
BMM User Manual
Purge Criteria
From Date: If enabled, this date (the date when a formula was created) specifies the
lower limit of the range of dates for use as filter criteria during processing. This date may
be entered by typing or selected via the associated calendar on this screen. Leaving this
field blank has the same effect as entering January 01, 1900.
To Date: If enabled, this date (the date when a formula was created) specifies the
upper limit of the range of dates for use as filter criteria during processing. This date
may be entered by typing or selected via the associated calendar on this screen. Leaving
this field blank has the same effect as entering as entering January 01, 3001.
All but Last „N‟ Formulas: This field is enabled only when the “Formula Key/All but
Last „N‟ Formulas” option has been selected. If enabled, this field stores how many of the
last formula versions are not to be purged.
Scope
Detail Only: When a formula is purged with this option selected, only the details
maintained on Formula Items Tab and By Products Tab of the Formula Entry screen get
purged. The Formulas purged using this option can be viewed at the View Prior Version
screen.
Entire Formula: Selecting this option purges and clears out the entire formula of the
prior version that has been chosen by the user to be purged.
Mode:
Trial: In the Trial mode, the intermediate is expanded into its raw material, but no
actual change occurs, i.e. the formula does not get changed on the Formula Entry screen
in the Formula module.
Final: In the Actual mode, the intermediates not only expand into its corresponding raw
materials, but also the changes associated with the formula can be seen on the Formula
Entry screen in the Formula module.
11.5.5.3
Purging Prior Versions by Formula Key and Date
1. Select the „Formula Key / Date‟ option.
2. Select the Formula Key From. Leaving this field blank has the same effect as
entering the first available formula.
3. Select the Formula Key To. Leaving this field blank has the same effect as
entering the last available formula.
4. Select the From Date. Leaving this field blank has the same effect as entering
January 01, 1900.
5. Select the To Date. Leaving this field blank has the same effect as entering
January 01, 3001.
6. Select the Purge Scope as one of the following:
a. Detail Only: In this case, the data maintained for a formula under Formula
Item Tab and By Products Tab (at the Formula Entry screen) are purged.
Doc. No. F/DV/15
Rev.No.
Date
BatchMaster Software Inc.
BMM User Manual
b. Entire Formula: In this case, the formula version is purged completely.
7. Select the Purge Mode by clicking on Trial or Final.
8. Click the Purge button.
11.5.5.4
Purging Prior Versions to Preserve Last „N‟ versions
1. Select the „Formula Key / All But Last N Formulas‟ option.
2. Select the Formula Key From. Leaving this field blank has the same effect as
entering the first available formula.
3. Select the Formula Key To. Leaving this field blank has the same effect as
entering the last available formula.
4. Enter the desired number for “All But Last N Formulas”.
5. Select the Purge Scope as one of the following:
a. Detail Only: In this case, the data maintained for a formula under Formula
Items Tab and By Products Tab (of the Formula Entry screen) are purged.
b. Entire Formula: In this case, the formula version is purged completely.
6. Select the Purge Mode by clicking on Trial or Final.
7. Click the Purge button
11.5.6
View Prior Version
The View Prior Versions option provides look into the prior versions of defined formulas.
This is a read only screen.
Doc. No. F/DV/15
Rev.No.
Date
BatchMaster Software Inc.
11.5.6.1
BMM User Manual
Screen Fields Description
Formula Key: This key displays the prior version(s) of formula required for reversion.
The lookup here is limited to those Formulae for which at least one revision has been
created.
Formula Description: This displays the description for the Formula.
Current Formula:
Revision Number: This field displays the reference number of the current version to
keep track for future reference. It is generated by BMM.
Date Revised: This is the date when the current Formula was last saved.
Time Revised: This is the time when the current Formula was last saved.
Reason Revised: This is the reason why this formula was revised.
Total Weight: This field displays the sum total of the weights of all the formula line
items of the current formula in the System Weight UOM.
Total Volume: This field displays the sum total of the volumes of all the formula line
items of the current formula in the System Volume UOM.
Formula Density: This displays the Density (in System Weight UOM divided by the
System Volume UOM) of the formula.
Doc. No. F/DV/15
Rev.No.
Date
BatchMaster Software Inc.
BMM User Manual
Tab-1 (Line Items)
Type: This field displays the corresponding line item‟s type. The material type can be
differentiated as following:
1. Materials
2. Labor
3. Boilerplate
4. Text
Item No.: This field stores the value associated with the setting on the Type field.
Description: This field displays the Description or text associated with value of the
corresponding "Item No.".
Whse: This displays the warehouse for material line item.
QtyInDisplayUOM: This is the quantity of the item displayed in stock UOM.
O/H: This is the Overhead Key associated with the associated material or labor line
item.
Loss: This displays the „line loss‟ for this specific material line item in the formula.
Group ID: This is the Group ID of this line for the purpose of mix control via utilizing a
customized report (.rpt) file for printing Batch Tickets.
Weight/Qty: This displays the quantity of the Labor (in hours) or of the material
(interpreted the Unit in the adjacent field) for the respective material line item.
Volume: This field displays the volume with the associated line item.
Tab-2 (By Products)
Note: The fields that are displayed on this tab have similar functionalities as defined for
the Line Item(s) tab above.
11.5.6.2
Viewing a Prior Version
The Prior Versions of a formula can be viewed applying the following steps:
1. Click on the Lookup button on the toolbar All the prior versions of the various
Formulae are displayed.
2. Select a Formula ID and the Revision Number from the lookup table.
3. Clicking the OK button displays the selected formula on the screen.
Doc. No. F/DV/15
Rev.No.
Date
BatchMaster Software Inc.
11.5.7
BMM User Manual
Intermediate Density Override
The purpose of this screen is to help ensure that, for an item, the conversion factors
from Stock UOM to the System Weight UOM or to the System Volume UOM are
consistent with:
1. The density of an item at the associated formula
2. The Fill Level of the associated BOM
If there are any discrepancies, the item level conversion factors (from Stock UOM to the
System Weight UOM or to the System Volume UOM) are updated.
11.5.7.1
Screen Field Descriptions
Formula Key Range
Formula From: This Formula key specifies the lower limit of the range of formulas for
use as filter criteria during processing. This Formula key may be entered by typing or
selected via the associated lookup on this screen. Leaving this field blank has the same
effect as selecting the first available Formula via the lookup.
Formula To: This Formula key specifies the upper limit of the range of formulas for use
as filter criteria during processing. This Formula key may be entered by typing or
selected via the associated lookup on this screen. Leaving this field blank has the same
effect as selecting the last available Formula via the lookup.
Mode:
Trial: Use this option to view the proposed conversions without actually updating the
conversions.
Final: Processing the Intermediate Density Override with this option selected will
actually update the conversions related with the selected formulas.
Doc. No. F/DV/15
Rev.No.
Date
BatchMaster Software Inc.
11.5.7.2
BMM User Manual
Performing an Intermediate Density Override
For performing an Intermediate Density override following steps is applied:
1. Select the Formula From. Leaving this field blank has the same effect as entering
the first available formula.
2. Select the Formula To. Leaving this field blank has the same effect as entering
the last available formula.
3. Select Trial or Final mode.
4. Click the Process button to override the density.
11.6 Formula Reports
11.6.1
Master Formula
The Master Formula Report screen allows the user to generate a report showing all the
aspects of a formula or a range of formulas. With Master Formula, a detailed report of all
available information about a formula can be obtained. In addition to all this, you can
also specify whether the report should contain literal text and boilerplate information.
The filtering parameters can be set to define the report. Once BMM processes the set
report parameters, it displays the results as a Crystal Report ready for print and export.
11.6.1.1
Screen Field Descriptions
Doc. No. F/DV/15
Rev.No.
Date
BatchMaster Software Inc.
BMM User Manual
Formula Key Range
Formula From: This field specifies the lower limit of the range of Formula for use as
filter criteria during processing. Leaving this field blank has the same effect as selecting
the first available Formula via the lookup.
Formula To: This field specifies the upper limit of the range of Formula for use as filter
criteria during processing. Leaving this field blank has the same effect as selecting the
last available Formula via the lookup.
Formula Description Range
Description From: This field specifies the lower limit of the range of Formula
description for use as filter criteria during processing. Leaving this field blank has the
same effect as selecting the first available Formula description via the lookup.
Description To: This field specifies the upper limit of the range of Formula description
for use as filter criteria during processing. Leaving this field blank has the same effect as
selecting the last available Formula description via the lookup.
Formula Class Filter
Class From: This field specifies the lower limit of the range of Formula Class for uses as
filter criteria during processing. Leaving this field blank has the same effect as selecting
the first available Formula Class via the lookup.
Class To: This field specifies the upper limit of the range of Formula Class for uses as
filter criteria during processing. Leaving this field blank has the same effect as selecting
the last available Formula Class via the lookup.
Formula Status Filter
Status From: This field specifies the lower limit of the range of Formula status for uses
as filter criteria during processing. Leaving this field blank has the same effect as
selecting the first available Formula status via the lookup.
Status To: This field specifies the upper limit of the range of Formula status for uses as
filter criteria during processing. Leaving this field blank has the same effect as selecting
the last available Formula Class via the lookup.
Action
Include Boilerplates: This field is used to specify whether to include boilerplates in the
report or not.
Include Labor Lines: This field is used to specify whether to include Labor Lines in the
report or not.
Include Literal Text: This field is used to specify whether to include text in the report
or not.
Report Path: This field holds the default path of the report.
Doc. No. F/DV/15
Rev.No.
Date
BatchMaster Software Inc.
11.6.1.2
BMM User Manual
Generating a Master Formula Report
The Master Formula Report can be generated employing the following steps:
1. Complete the Formula Key From and To range using the lookup buttons next to
the fields.
2. Complete the Formula Description From and To range using the lookup buttons
next to the fields.
3. Complete the Formula Class From and To range using the lookup buttons next to
the fields.
4. Complete the Formula Status From and To range using the lookup buttons next to
the fields.
5. Check/Un-check Action boxes to Include Boilerplate, Labor Lines
Literal text.
and Include
6. Click the OK button to create the report.
11.6.2
Boilerplate Where Used
The Boilerplate Where Used Report screen provides a way to generate a report detailing
where the boilerplate paragraphs that are created using the Boilerplate Instruction
screen, are used. With Boilerplate Where Used, a single boilerplate paragraph or a range
of boilerplate paragraphs can be located.
Doc. No. F/DV/15
Rev.No.
Date
BatchMaster Software Inc.
BMM User Manual
The filtering parameters can be set, as required to define the report. Once BMM
processes the set report parameters, it displays the results as a Crystal Report ready for
print or export, as needed.
11.6.2.1
Screen Fields Description
Boilerplate Key Range
From: This field specifies the lower limit of the range of Boilerplate for use as filter
criteria during processing. Leaving this field blank has the same effect as selecting the
first available boilerplate via the lookup.
To: This field specifies the upper limit of the range of Boilerplate for use as filter criteria
during processing. Leaving this field blank has the same effect as selecting the last
available boilerplate via the lookup.
Report Path:
Report Path: This field holds the default path of the report.
11.6.2.2
Generating a Boilerplate Where Used Report
The following steps are employed for setting boilerplate information as in the report:
1. Complete the Boilerplate Key From and To range using the lookup buttons next to
the fields.
2. Click the OK button to create the report.
Doc. No. F/DV/15
Rev.No.
Date
BatchMaster Software Inc.
11.6.3
BMM User Manual
Material Where Used
The Material Where Used Report screen provides a way to generate a report specifying
the material(s) as and where used in the defined formula(s).With Material Where Used,
detailing for a single or a range of materials‟ use is possible, required for costing,
auditing or regulatory purpose. This report also gives an examination of usage of a single
material or evaluates the potential impact of changing materials in a formula.
The item status can be set to All, Active, No New Purchase/Discontinued, Obsolete, or
Deactivated, as required. Specifications regarding whether the report is to be presented
as a weight or volume percentage can also be set.
Filtering parameters can be set to define the report. Once BMM processes the defined
report parameters, it displays the results as a Crystal Report set for export or printing,
as needed.
Doc. No. F/DV/15
Rev.No.
Date
BatchMaster Software Inc.
11.6.3.1
BMM User Manual
Screen Fields Description
Item No. Range
Item No. From: This field specifies the lower limit of the range of Item for use as filter
criteria during processing. Leaving this field blank has the same effect as selecting the
first available Item via the lookup.
Item No. To: This field specifies the upper limit of the range of Item for use as filter
criteria during processing. Leaving this field blank has the same effect as selecting the
last available Item via the lookup.
Warehouse Range
Warehouse From: This field specifies the upper limit of the range of Warehouse for use
as filter criteria during processing. Leaving this field blank has the same effect as
selecting the first available Warehouse via the lookup.
Warehouse To: This field specifies the lower limit of the range of Warehouse for use as
filter criteria during processing. Leaving this field blank has the same effect as selecting
the last available Warehouse via the lookup.
Percentage Of Weight Or Volume: This field is used to specify whether to generate
report with percentage of weight or volume.
Formula Status Filter
Status From: This field specifies the upper limit of the range of Formula status for use
as filter criteria during processing. Leaving this field blank has the same effect as
selecting the first available Formula status via the lookup.
Doc. No. F/DV/15
Rev.No.
Date
BatchMaster Software Inc.
BMM User Manual
Status To: This field specifies the lower limit of the range of Formula status for use as
filter criteria during processing. Leaving this field blank has the same effect as selecting
the last available Formula status via the lookup.
Report Path: This field holds the default path of the report.
11.6.3.2
Generating a Material Where Used Report
The following steps are taken for generating a Material Where Used report:
1. Complete the Item No. From and To range using the lookup buttons next to the
fields.
2. Complete the Warehouse From and To range using the lookup buttons next to the
fields.
3. Select the Percentage of Weight or Volume.
4. Complete the Formula Status From and To range using the lookup buttons next to
the fields.
5. Click the OK button to create the report.
11.6.4
Multi Level Formula Ingredient
The Multi Level Formula Ingredient Report screen provides a way to generate a report
showing all the ingredients in a single formula or a range of formulas.
With Multi Level Formula Ingredients, both raw materials and raw materials of any
intermediate contained in the formula or range of formulas can be viewed.
Doc. No. F/DV/15
Rev.No.
Date
BatchMaster Software Inc.
BMM User Manual
The Multi Level Formula Ingredient screen can be helpful when you need to make a
decision about the choice of ingredients used. When the ingredient is part of an
intermediate, BatchMaster Enterprise also indicates the relative level of the ingredient in
comparison to the top level of the formula.
11.6.4.1
Screen Field Descriptions
Formula Key Range
Formula From: This field specifies the lower limit of the range of Formula for use as
filter criteria during processing. Leaving this field blank has the same effect as selecting
the first available Formula via the lookup.
Formula To: This field specifies the upper limit of the range of Formula for use as filter
criteria during processing. Leaving this field blank has the same effect as selecting the
last available Formula via the lookup.
Weight Or Volume: This field is used to specify whether to generate report with weight
or volume.
Report Path: This field holds the default path of the report.
11.6.4.2
Generating a Multi Level Formula Ingredient Report
The following steps are essential for generating a Multi Level Formula Ingredient report:
1. Complete the Formula Key From and To range using the lookup buttons next to
the fields.
2. Select the Weight or Volume using the drop-down menu next to the field.
3. If the set parameters require to be saved, assign a name to the report
parameters in the drop-down field on the far right of the toolbar and then click on
the Save button on the toolbar to save the report parameters.
4. Click the OK button to create the report.
Doc. No. F/DV/15
Rev.No.
Date
BatchMaster Software Inc.
11.6.5
BMM User Manual
Multi Level Where Used
The Multi Level Where Used Report screen defines a way to generate a report specifying
where material or a range of materials are used in both formulas and formula
components. With Multi Level Where Used, the use of specific materials can be
determined to resolve material-related issue, a regulatory requirement, an auditing
need, or any other concern involving the use of a material. The choice whether to include
or exclude the in-house or purchased intermediates in the report can as well be
determined.
Doc. No. F/DV/15
Rev.No.
Date
BatchMaster Software Inc.
11.6.5.1
BMM User Manual
Screen Fields Description
Item Key Range
Item No. From: This field specifies the lower limit of the range of Item for use as filter
criteria during processing. Leaving this field blank has the same effect as selecting the
first available Item via the lookup.
Item No. To: This field specifies the upper limit of the range of Item for use as filter
criteria during processing. Leaving this field blank has the same effect as selecting the
last available Item via the lookup.
Warehouse Range
Warehouse From: This field specifies the upper limit of the range of Warehouse for use
as filter criteria during processing. Leaving this field blank has the same effect as
selecting the first available Warehouse via the lookup.
Warehouse To: This field specifies the lower limit of the range of Warehouse for use as
filter criteria during processing. Leaving this field blank has the same effect as selecting
the last available Warehouse via the lookup.
In House or All Intermediate: This field specifies whether you want to include or
exclude the in-house or purchased intermediates in the report.
Report Path: This field holds the default path of the report.
11.6.5.2
Generating a Multi Level Where Used Report
The following steps are essential for generating a Multi Level Where Used Ingredient
report:
1. Complete the Item No. From and To range using the lookup buttons next to the
fields.
Doc. No. F/DV/15
Rev.No.
Date
BatchMaster Software Inc.
BMM User Manual
2. Complete the Warehouse From and To range using the lookup buttons next to the
fields.
3. Select In-House or All Intermediates.
4. If the set parameters are required to be saved, enter a name to the report
parameters in the drop-down field on the far right of the toolbar and then click
the Save button on the toolbar to save the report parameters.
5. Click the OK button to create the report.
11.6.6
Process Cell Formula Capacity Report
The Process Cell Formula Capacity Report screen renders a way to generate reports
detailing the capacity of each process cell as it is associated with specific formulas. From
it, you can review the cell‟s type, how its capacity is measured, the process time, hours
per day the cell is to operate, sizing setting, and ranking.
The screen filter‟s can be set to define the report. Once BMM processes the specified
report parameters, it displays the results as a Crystal Report ready for print or export.
Doc. No. F/DV/15
Rev.No.
Date
BatchMaster Software Inc.
BMM User Manual
Process Cell Range
Process Cell From: This field specifies the upper limit of the range of Process Cell for
use as filter criteria during processing. Leaving this field blank has the same effect as
selecting the first available Process Cell via the lookup.
Process Cell To: This field specifies the lower limit of the range of Process Cell for use
as filter criteria during processing. Leaving this field blank has the same effect as
selecting the last available Process Cell via the lookup.
Report Path: This field holds the default path of the report.
11.6.6.1
Generating a Process Cell Capacity Formula Report
Following are the steps required for generating a Process Cell Capacity Formula report:
1. Select the Process Cell from using the lookup button next to the field.
2. Select the Process Cell To using the lookup button next to the field.
3. If you wish to save these parameters, enter the name you want to assign to the
report parameters in the drop-down field on the far right of the toolbar and then
click on the Save button on the toolbar to save the report parameters.
4. Click the OK button to create the report.
Doc. No. F/DV/15
Rev.No.
Date
BatchMaster Software Inc.
BMM User Manual
12 Costing
The Costing Module provides a powerful tool to automate the process of costing of your
products. The most important function of the module is that it enables interactive
analysis of the cost of the products you manufacture.
The analysis is interactive in the sense that you can adjust labor, overhead, materials,
and material quantities “on the fly” and see how those changes affect the total product
cost. The analysis considers costs of materials, fixed and variable labor and overhead
(adjusted to total batch size), loss factors, container and bill-of-materials items, and
markup or margin.
A number of reporting options enable viewing and printing of your cost data. These
reports can provide detailed as well as just-the-required information, the way you want
it.
This module also renders powerful utilities to automatically update your cost data and
adjust your loss factors to reflect historical accuracy.
12.1 Product Cost Analysis
The Product cost analysis screen provides a powerful tool to automate the process of
costing of your products. This cost analysis is a comparative study of Finished Products
Cost on the basis of some common formulae for measuring outcomes (e.g. Formula
Material Cost, Labor Cost, Line Item Loss Cost etc). This screen provides you with a way
to perform in-depth analysis of the formula.
Doc. No. F/DV/15
Rev.No.
Date
BatchMaster Software Inc.
BMM User Manual
This option allows you to perform an accurate cost analysis on one of your master
formulas (or one you make up just for cost analysis), and compare the cost of two or
three different-size finished goods or different-size containers filled with the formula. You
can toggle your material costs between last, average, or standard. You can adjust the
quantity of specific raw materials, overhead and labor costs, and size the batch in order
to reach a target cost, size, or density.
This option also allows you to mark individual ingredients and select a target weight,
volume, density, cost per unit weight or volume, or total cost, and BatchMaster will
adjust the quantities of the marked ingredients to achieve the target values.
The screen allows analysis of the costs on a „what if‟ basis. Any applicable changes on
the screen directly reflect upon the cost analysis, even without the need for saving the
changes.
The Product Cost Analysis screen closely resembles Formula Entry, it gives you a way to
create a new formula as well as modify an existing one.
12.1.1
Mandatory Inputs
A Bill of Materials, of Finished Goods type or Assembly type, should be created and
released.
12.1.2
Screen Field Descriptions: Header and Formula
Master Tab
Doc. No. F/DV/15
Rev.No.
Date
BatchMaster Software Inc.
BMM User Manual
Formula Key: This is the key that uniquely identifies the formula.
Formula Description: This field is used to enter the Formula description.
Formula Class: This is the class of the Formula. The Formula Class provides a Work in
Progress Account for use in production of items that can be made via this formula.
Formula Status: This is the Status of the Formula.
The Formula Status is used in:
1. Production Setup to specify whether or not the Formulas of that status should be
allowed in Production.
2. Costing Setup to specify whether or not the Formulas of that status should be
allowed in Product Cost Analysis.
3. Laboratory Setup to specify whether or not the Formulas of that status should be
allowed in Physical Property Analysis.
Revision Number: This is the revision number for this formula. Every time the formula
is saved with some changes, this revision number is incremented by one.
Date Revised: This is the Date when the Formula was last saved.
Time Revised: This is the Last Time when the Formula was saved
Reason Revised: This is the default Reason Revised for the formula. In this field reason
for creating the revised version of the formula is entered.
Date Last Made: This is the Last Date when the Formula was last used in production.
Time Last Made: This is the Last Time when the Formula was last used in production.
Default Process Cell: This field is for information only.
Density Override: The Density of the formula is calculated by dividing, Total Weight of
the ingredients by Total Volume of its ingredients, this is also called theoretical density.
This is based on the assumption that the volumes are linearly additive. But in some
cases Total Volume of Formula is not equal to Total Volume of its ingredients, reason
being a shrinkage or bulk expansion during the process. The density override field, if its
value is non-zero, stores the density that is used instead of the density calculated by the
above described method. A zero value in this field means that the density override is not
applicable.
Notes: These are special Comments/Reminders in a formula.
Doc. No. F/DV/15
Rev.No.
Date
BatchMaster Software Inc.
12.1.3
BMM User Manual
Screen Field Descriptions: Cost Tab
Markup Factor x (100%): Markup is the amount added to the cost to cover overhead
and profit by a manufacturer. The Markup Factor is used for cost analysis. Multiplying
this number with 100 % gives the markup factor as a percentage. A value of zero means
that there is no markup at all.
Loss Constant: This value represents the loss that is bound to happen when we use this
formula irrespective of how you produce. This is the fixed loss (in the System Weight
Unit) of the product being produced by this formula. This Loss is bound to happen.
Loss Factor x (100%): The Loss Factor is used to determine the variable loss of the
product being produced by the formula. This number is entered as a fraction, not as a
percentage.
Hours (Fixed Costs): This is the value of hours of the fixed costs for the formula. This
value is used for cost analysis in the Costing module as well as to calculate the costs
associated with production of the end item produced by the formula.
Labor Key (Fixed Costs): This is the Labor Key of the fixed costs for the formula. This
value is used for cost analysis in the Costing module as well as to calculate the costs
associated with production of the end item produced by the formula.
Amount (Fixed Costs): This is the cost amount for formula labor/additional key of the
fixed costs for the formula. This value is used for cost analysis in the Costing module as
well as to calculate the costs associated with production of the end item produced by the
formula.
Doc. No. F/DV/15
Rev.No.
Date
BatchMaster Software Inc.
BMM User Manual
Overhead Key (Fixed Costs): This is the Overhead Key of the fixed costs for the
formula. This value is used for cost analysis in the Costing module as well as to calculate
the costs associated with production of the end item produced by the formula.
Type (Fixed Costs): The Overhead Key type can be one of the following:
„$‟ Type: This is the Overhead Key of „$‟ type for fixed costs. This value is entered
automatically when the associated overhead key is entered. This is a read-only
field. This value is used for cost analysis in the Costing module as well as to
calculate the costs associated with production of the end item produced by the
formula. The value of Hours on this line is multiplied by the Factor of the
Overhead Key to calculate the cost contribution of this overhead.
„%‟ Type: This is the Overhead Key of „%‟ type for fixed costs. This value is entered
automatically when the associated overhead key is entered. This is a read-only
field. This value is used for cost analysis in the Costing module as well as to
calculate the costs associated with production of the end item produced by the
formula. The value of Hours on this line, multiplied by the Amount of the Labor
Key, is multiplied by the Factor of the Overhead Key of the same line to calculate
the cost contribution of this overhead.
Factor (Fixed Costs): This value is entered automatically when the associated overhead
key is entered. This is a read-only field.
Setup Cost
Hours (Setup Costs): This is the value of the hours of the setup costs for the formula.
This value is used for cost analysis in the Costing module as well as to calculate the costs
associated with production of the end item produced by the formula.
Labor Key (Setup Costs): This is the Labor Key of the setup costs for the formula.
Amount (Setup Costs): This is the cost amount for formula labor/additional key of the
setup costs for the formula. This value is entered automatically when the associated
labor key is entered. This is a read-only field. This value is used for cost analysis in the
Costing module as well as to calculate the costs associated with production of the end
item produced by the formula.
Overhead Key (Setup Costs): This is the Overhead Key of the setup costs for the
formula. This value is used for cost analysis in the Costing module as well as to calculate
the costs associated with production of the end item produced by the formula.
Type (Setup Costs): The Overhead Key consists of two types:
„$‟ Type: This is the Overhead Key of „$‟ type for setup costs. This value is entered
automatically when the associated overhead key is entered. This is a read-only
field. This value is used for cost analysis in the Costing module as well as to
calculate the costs associated with production of the end item produced by the
formula. The value of Hours on this line is multiplied by the Factor of the
Overhead Key to calculate the cost contribution of this overhead.
„%‟ Type: This is the Overhead Key of „%‟ type for setup costs. This value is entered
automatically when the associated overhead key is entered. This is a read-only
Doc. No. F/DV/15
Rev.No.
Date
BatchMaster Software Inc.
BMM User Manual
field. This value is used for cost analysis in the Costing module as well as to
calculate the costs associated with production of the end item produced by the
formula. The value of Hours on this line, multiplied by the Amount of the Labor
Key, is multiplied by the Factor of the Overhead Key of the same line to calculate
the cost contribution of this overhead.
Factor (Setup Costs): This value is entered automatically when the associated overhead
key is entered. This is a read-only field.
Variable Cost
Maxwt (Variable Costs): This is the value of the Max Weight for this row of the variable
costs for the formula.
The variable labor cost is dependent on two factors: the total batch weight, and the
applicable labor rate for that batch weight. The variable labor is defined for a particular
“slab” of batch weight. The Max Weight is the upper limit of the weight slab to which a
particular row of the variable costs is applicable. The lower limit of batch weight for a
slab is determined based on the max weight of the preceding row. For example, suppose
that the Max weight for the first row is 100, and the max weight of the second row is
500. In such a case, the variable cost will be according to the first row if 0 < Batch
Weight ≤ 100; whereas the variable cost will be according to the second row if 100 <
Batch Weight ≤ 500.
The actual variable cost in production is determined by adding together the following:
Batch weight (in system weight unit) multiplied by the Amount of the Labor Key of
the applicable row.
If the overhead key is „$‟ type, then the Batch weight (in system weight unit)
multiplied by the Factor of the Overhead Key of the applicable row.
If the Overhead Key is „%‟ type, then the Batch weight (in system weight unit)
multiplied by the Amount of the Labor Key of the applicable row multiplied by the
Factor of the Overhead Key of the same row.
Labor Key (Variable Costs): This is the Labor Key of the Variable costs for the formula.
This value is used for cost analysis in the Costing module as well as to calculate the costs
associated with production of the end item produced by the formula.
Amount (Variable Costs): This is the cost amount for the formula labor/additional key of
the variable costs for the formula. This value is used for cost analysis in the Costing
module as well as to calculate the costs associated with production of the end item
produced by the formula.
Overhead Key (Variable Costs): This is the Overhead Key of the variable costs for the
formula. This value is used for cost analysis in the Costing module as well as to calculate
the costs associated with production of the end item produced by the formula.
Type (Variable Costs): The Overhead Key consists of two types:
„$‟ Type: This is the Overhead Key of „$‟ type for variable costs. This value is entered
automatically when the associated overhead key is entered. This is a read-only
field. This value is used for cost analysis in the Costing module as well as to
calculate the costs associated with production of the end item produced by the
Doc. No. F/DV/15
Rev.No.
Date
BatchMaster Software Inc.
BMM User Manual
formula. The Batch weight (in system weight unit) is multiplied by the Factor of
the Overhead Key to calculate the cost contribution of this overhead.
„%‟ Type: This is the Overhead Key of „%‟ type for variable costs. This value is
entered automatically when the associated overhead key is entered. This is a
read-only field. This value is used for cost analysis in the Costing module as well
as to calculate the costs associated with production of the end item produced by
the formula. The Batch weight (in system weight unit), multiplied by the Amount
of the Labor Key, is multiplied by the Factor of the Overhead Key of the same line
to calculate the cost contribution of this overhead.
Factor (Variable Costs): This value is entered automatically when the associated
overhead key is entered. This is a read-only filed.
12.1.4
Screen Field Descriptions: Safety Tab
Output Formula Key: This key is used for printing MSDS. This is used when the MSDS
information of the product can not be directly determined from the formula ingredients.
MSDS Supplementary File ID: This Key is used for printing MSDS. This is the default
MSDS Template associated with this Formula.
HMIS Health: This is the HMIS Health Rating for this formula. This displays a HMIS
Health Rating as one of None, Mild, Moderate, Serious or Extreme. This value is used in
the MSDS module.
Doc. No. F/DV/15
Rev.No.
Date
BatchMaster Software Inc.
BMM User Manual
HMIS Chronic Factor: This value is used in MSDS Module. This is the HMIS Chronic
Indicator for the formula.
HMIS Flammability: This value is used in MSDS Module. This is the HMIS Flammability
Rating for the formula. This field can have a value of None, Mild, Moderate or Serious.
HMIS Reactivity: This value is used in MSDS Module. This is the HMIS Reactivity Rating
for the formula. This field can have value as None, Mild, Moderate or Serious.
HMIS Personal Protection: This is the HMIS Personal Protection Rating for the
formula. This field can have one value of the following; this value is used in the MSDS
module:
1. Safety Glasses.
2. Safety Glasses, Gloves.
3. Safety Glasses, Gloves, Synthetic Apron.
4. Face Shield, Gloves, Synthetic Apron.
5. Safety Glasses, Gloves, Dust Respirator.
6. Safety Glasses, Gloves, Synthetic Apron, Dust Respirator.
WHMIS Information: This is the WHMIS information for this formula.
12.1.5
Screen Field Descriptions: Formula Items Tab
Doc. No. F/DV/15
Rev.No.
Date
BatchMaster Software Inc.
BMM User Manual
Formula ingredients are entered on this tab. Materials, Labor, Boilerplate, and Text can
be entered in a Formula. Formula Line Item and their details are displayed in the form of
a grid.
Check: The checkbox offer to select the line item.
Type: This field identifies the mode of the line on which the cursor is located. With the
cursor on a blank line, you can click the drop-down list box to select from Material,
Boilerplate, Instruction, and Labor Cost modes. The purpose of each mode is as follows:
Material - This mode allows you to enter raw materials.
Boilerplate - This option allows you to insert previously-defined manufacturing
instructions.
Instruction - This option allows you to insert manufacturing instructions directly into
your formula.
Labor Cost - This option allows you to insert pre-defined labor cost keys.
Item No.: This field stores the value associated with the setting on the Type field.
1. Raw material is entered when the Type is Material. Clicking the lookup on this
field displays those Item Warehouses that have their status as Active.
2. Labor Key is entered when the Type is Labor. Clicking the lookup on this field
displays the Labor/Additional Cost keys.
3. Boilerplate Key is entered when the Type is Boilerplate. Clicking the lookup on
this field displays the Boilerplate Instruction keys.
4. The field is disabled when the Type is Text.
Description: This field stores the Description or text associated with value of the “Item
No.” on the same row.
1. When the „Type‟ is Material, this field stores the Item Description.
2. When the „Type‟ is Labor, this field stores the Description of the labor key.
3. When the „Type‟ is Boilerplate, this field stores the Description of the boilerplate.
4. When the „Type‟ is Text, this field stores user-defined text.
Whse: This displays the inventory item-location or Warehouse from which the item
would be relieved.
Qty Required: In material mode, the amount of the material which has been included in
this formula will be displayed here. In labor/additional cost mode, the number of times
the amount in the Labor/Additional Cost file will be applied, or the factor with which the
system needs to multiply the labor/additional cost value will be displayed here.
Adjusting the quantities for materials will change the value displayed on the Analysis tab
in the MATERIALS field.
Doc. No. F/DV/15
Rev.No.
Date
BatchMaster Software Inc.
BMM User Manual
Entering new labor amounts will change the value displayed on Cost tab in the
FORMULA LABOR field. Changing material quantities will also instantly update the
totals displayed near the bottom of the tab.
QtyInStockUOM: This field displays the unit for the „Quantity Required‟.
O/H: If this line item requires overhead costs to be applied to it, perhaps because of
preprocessing, handling or storing, the appropriate overhead key will be displayed here
to account for those costs. Overhead keys are defined through the Formulas Overhead
Cost. This value is used for cost analysis in this module as well as to calculate the costs
associated with production of the end item produced by the formula.
Cost/Unit: This displays the standard or last or average cost of the material. The user
can toggle the cost from standard to last to average by clicking the Toggle Costs button
on the toolbar.
Ext Cost: This field displays the extended cost for the material or labor line item. The
extended cost is based on the selected cost per unit multiplied by the quantity entered.
Loss: This displays the „line loss‟ for this specific material line item in the formula. This
number is entered and interpreted as a fraction, not as a percentage.
Group ID: This is the Group ID of this line for the purpose of mix control via utilizing a
customized report (.rpt) file for printing Batch Tickets.
Mixing of materials can be better organized via Group ID‟s. Selected materials may be
premixed before being combined with the remaining ingredients. Formula lines, that
need to be combined to make a Premix, will all share the same Group ID. Each premix
has its own Group ID. The various premixes are then combined with any remaining
ingredients to make the Final Mix. The largest Group ID indicates the Final Mix. The
totals of weight and volume for each premix can be printed utilizing a customized report
(.rpt) file for printing Batch Tickets. A specialized setup is available for such a
customized report.
Total Weight (KG): This field displays the sum total of the weights of all the Material
lines in the System Weight UOM. This Total Weight can be changed, if required. One or
more of the formula Material line items should be marked using the „Check/Uncheck‟ or
the „Check All‟ button before the Total Weight is changed. Changing the Total Weight
resizes the formula automatically by changing the quantities of the marked Material
line(s) on Formula Items Tab. These changes reflect on the cost analysis on Analysis Tab
dynamically, but are not saved to the database until the user saves the changes.
Total Volume (LT): This field displays the sum total of the volumes of all the Material
lines in the System Volume UOM. This Total Volume can be changed, if required. One or
more of the formula Material line items should be marked using the „Check/Uncheck‟ or
the „Check All‟ button before the Total Volume is changed. Changing the Total Volume
resizes the formula automatically by changing the quantities of the marked Material
line(s) on Formula Items Tab. These changes reflect on the cost analysis on Analysis Tab
dynamically, but are not saved to the database until the user saves the changes.
KG/LT: This field displays the density of the formula.
Cost/KG: This is the cost of one KG of the formula.
Doc. No. F/DV/15
Rev.No.
Date
BatchMaster Software Inc.
BMM User Manual
Cost/LT: This is the cost of one LT of the formula.
Total RM Cost: This field displays the Sum of Ext Cost amounts of the Material lines.
One or more of the formula Material line items should be marked using the
„Check/Uncheck‟ or the „Check All‟ button before the Total Cost is changed. Changing the
Total Cost resizes the formula automatically by changing the quantities of the marked
Material line(s) on Formula Items Tab. These changes reflect on the cost analysis on
Analysis Tab dynamically, but are not saved to the database until the user saves the
changes.
12.1.6
Screen Field Descriptions: Byproducts Tab
The byproduct(s) that are generated by the Formula may be entered on this tab. A
maximum of 999 lines may be entered here.
Item No.: This displays only the material key for the byproduct being produced by this
formula.
Whse: This displays the location or warehouse for Item.
Qty Produced: This is the quantity of the material to be produced as byproduct. This
quantity is interpreted according to the value of the Unit field.
Unit: This field displays the unit in which the „Quantity Required‟ is expressed.
Doc. No. F/DV/15
Rev.No.
Date
BatchMaster Software Inc.
BMM User Manual
O/H: This is the Overhead Key associated with the byproduct. This value is used for cost
analysis in the Costing module as well as to calculate the costs associated with
production of the end item produced by the formula.
Cost/Unit: This displays the standard or last or average cost of the byproduct. The user
can toggle the cost from standard to last to average by clicking the Toggle Costs button
on the toolbar.
Ext Cost: This field displays the extended cost for the byproduct line.
Total Weight: This field displays the sum total of the weights of all the lines in the
System Weight UOM.
Total Volume: This field displays the sum total of the volumes of all the lines in the
System Volume UOM.
KG/LT: This field displays the density of the formula.
Cost/KG: This is the cost of one KG of the formula.
Cost/LT: This is the cost of one LT of the formula.
Total Byproducts Cost: This field displays the sum of Ext Cost amount of By Products.
12.1.7
Screen Fields Description: Analysis Tab
Doc. No. F/DV/15
Rev.No.
Date
BatchMaster Software Inc.
BMM User Manual
On this Tab, you can simultaneously perform the cost analysis for up to three different
items that can be made from a single formula. There are three columns on this tab for
this purpose.
Assembly BOM/BOM Key: The look up for this field displays the following:
1. Finished Good BOM‟s that use this formula and have Released status
2. Assembly type BOM‟s that has been released and have Fill Level > 0. This option
allows the cost analysis as if the container is being filled with the product of this
formula.
When this key is selected, the remaining fields on that column are automatically filled.
Three separate Assembly BOM/BOM Keys can be entered on each of the three cost
analysis columns on this screen.
Assembly BOM/BOM Fill level: This is the fill level associated with the selected BOM.
12.1.7.1 Performing Product Cost Analysis using an Existing
formula
1. On Analysis tab select via lookup an Assembly Key BOM / BOM Key.
2. Make changes as needed on Tab 1-5. The Cost Analysis on Analysis Tab is
updated appropriately in response to changes.
12.1.8
Creating a new Formula at the Product Cost
Analysis Screen
1. Click the Insert Button. A new formula is inserted using the values of the Formula
Defaults. These defaulted values may be changed.
2. Enter the Formula Key and the Description.
3. Enter a Formula Class and a Formula Status if not present on this formula.
4. Enter the Line Items on Formula Items Tab.
5. Enter the byproduct information, if any, on By Products Tab.
6. Add values at the optional fields as needed.
7. Click the OK button to save the formula.
12.1.9
Goto
Toggle Units: Clicking on this button toggles the units as follows:
1. If the focus is on a Material line item on Formula Items Tab, the values of the Qty
Required and the Cost/Unit fields get toggled.
2. If the focus is on a line item on By Products Tab, the values of the Qty Produced
and the Cost/Unit fields get toggled.
Doc. No. F/DV/15
Rev.No.
Date
BatchMaster Software Inc.
BMM User Manual
Toggle Costs: By using this option user can analyze the formula with various available
cost options. Actual formula will remain unaffected, thus by this toggle cost option user
can just view the changed formula by toggling costs. Clicking on this button toggles the
costs as follows:
1. If the focus is on a Material line item on Formula Items Tab, the values of the
Cost/Unit, Ext Cost, Cost/LB, Cost/GAL and Total RM Cost field gets toggled.
2. If the focus is on a byproduct line item on By Products Tab, the values of the
Cost/Unit, Ext Cost, Cost/LB, Cost/GAL and Total Byproduct Cost fields gets
toggled.
Doc. No. F/DV/15
Rev.No.
Date
BatchMaster Software Inc.
BMM User Manual
Size Formula: Upon clicking this button, a „Size Formula‟ popup window is displayed
with two options „Weight‟ and „Volume‟. Selecting one of these options, entering a value,
and clicking OK resizes the formula accordingly. The formula line items of Material Type
and the byproducts (if any) are sized accordingly. The size formula is not saved until the
Save button is clicked.
Doc. No. F/DV/15
Rev.No.
Date
BatchMaster Software Inc.
BMM User Manual
Size Formula option is also provided in the popup menu, on right Clicking the Line Item
as shown in the figure below.
Doc. No. F/DV/15
Rev.No.
Date
BatchMaster Software Inc.
BMM User Manual
Export to Excel: Clicking on this button exports the analysis in excel file.
Doc. No. F/DV/15
Rev.No.
Date
BatchMaster Software Inc.
BMM User Manual
Quality Control: Clicking this button opens the QC Item/ Formula Test screen of the
selected formula. Here the user can define various tests for the formula.
Doc. No. F/DV/15
Rev.No.
Date
BatchMaster Software Inc.
BMM User Manual
Check/Uncheck: Clicking, this option marks or un-marks the Material lines that have
been highlighted on Formula Items Tab. The quantities of the marked lines are updated
in response to any subsequent changes in the Total Weight, Total Volume or Total Cost.
Check All: Clicking this button marks all the material lines on Formula Items Tab. The
quantities of the marked lines are updated in response to any subsequent changes in the
Total Weight, Total Volume or Total Cost.
Doc. No. F/DV/15
Rev.No.
Date
BatchMaster Software Inc.
BMM User Manual
Uncheck All: Clicking, this button un-mark all the material lines on Formula Items Tab.
Doc. No. F/DV/15
Rev.No.
Date
BatchMaster Software Inc.
BMM User Manual
Markup/Margin: Clicking this button toggles the calculations between Markup % or
Margin Amount. The Selling Price is updated accordingly.
12.2 Formula Loss Adjustment
The Formula Loss Adjustment option allows revising the formula loss factors to attain
greater accuracy and less waste. Using this utility, adjustments in terms of loss factors in
the formula can be done by comparing them to the loss factors found in the production
history for the formula and updating the loss factor found in the formula to match the
historical yield for the formula. The historical yield is taken from closed batches that are
closed within the specified date range. It might be required to run a Historical vs.
Theoretical Formula Loss Report before proceeding with this option. This report will show
the actual historical formula losses, based on historical yields.
Updating the loss factor enables to increase the accuracy of the costs associated with
producing the formula. The Filtering Parameters option can be used to define the range
of formulas for having losses adjusted. To have the losses adjusted, enable the Update
Loss check box.
The formula loss is calculated by maintaining the formula loss constant, then calculating
the loss factor.
When BMM has finished updating the Loss Factor field, the Formula Loss Adjustment
option will then display or print a report showing the records it has adjusted. This Loss
Factor is updated in the master formula. A report is generated displaying the formula
key, description, old loss, new loss, and variance.
Doc. No. F/DV/15
Rev.No.
Date
BatchMaster Software Inc.
12.2.1
BMM User Manual
Screen Fields Description
Formula Key From: This Formula key specifies the lower limit of the range of formulas
for use as filter criteria during processing. This Formula key may be entered by typing or
selected via the associated lookup on this screen. Leaving this field blank has the same
effect as selecting the first available Formula Key via the lookup.
Formula Key To: This Formula key specifies the upper limit of the range of formulas for
use as filter criteria during processing. This Formula key may be entered by typing or
selected via the associated lookup on this screen. Leaving this field blank has the same
effect as selecting the last available Formula Key via the lookup.
From Date: This Date specifies the lower limit of the range of dates for use as filter
criteria during processing. This date may be entered by typing or selected via the
associated calendar lookup on this screen.
To Date: This Date specifies the upper limit of the range of dates for use as filter criteria
during processing. This date may be entered by typing or selected via the associated
calendar lookup on this screen.
Update Loss: Checking this box and then processing this utility actually updates the
loss factors in a formula or formulas (as per the filter criteria) based on the historical
losses found in the Production History. With this box unchecked, the losses are not
updated and a report is generated.
12.2.2
Processing an Formula Loss Adjustment
For processing a Formula Loss Adjustment, following steps are needed to be taken:
1. Select Formula Key From for which Loss Adjustment has to be processed. There‟s
a look-up button available next to the field for making the selection. Leaving this
field blank has the same effect as entering the first available Formula Key.
2. Select Formula Key To for which Loss Adjustment has to be processed. Leaving
this field blank has the same effect as entering the last available Formula Key.
There‟s a look-up button available next to the field for selection.
Doc. No. F/DV/15
Rev.No.
Date
BatchMaster Software Inc.
BMM User Manual
3. Select From Date for which Loss Adjustment has to be processed. This is the
lower end of the range of dates when the batches were closed.
4. Select To Date for which Loss Adjustment has to be processed. This is the upper
end of the range of dates when the batches were closed.
5. Check Update Loss box for the processing to be done in final mode or un-check
this box for the processing to be done in trial mode.
6. Click the Process button to update the loss.
12.2.3
Example
For example, let‟s presume there were 100 pounds of finished goods which required 130
pounds of formula materials. Let‟s also presume that a 20 pound loss constant had been
assigned to this formula.
BMM uses those values to calculate the loss factor as follows:
Loss Factor = 1 – (Quantity of Finished Good) / (Formula Quantity - Loss Constant)
= 1 – (100)/ (130-20) = 0.0909
12.3 Intermediate Cost Rollup
With Intermediate Cost Rollup utility, BMM expands each intermediate formula, which
forms a part of the master formula, to its bottom level and calculates Sales Price and
standard cost based on the cost of ingredients. Optionally, labor and/or overhead costs
attached to the formula line item(s) can as well be calculated.
This roll up is useful when these prices/costs have changed for one or more of the
following reasons:
1. Changes in the corresponding
manufacturing that Item
price/cost
of
the
materials
required
in
2. Changes in the costs associated with the manufacturing process, such as labor,
overhead, etc.
Doc. No. F/DV/15
Rev.No.
Date
BatchMaster Software Inc.
12.3.1
BMM User Manual
Screen Fields Description
Item No. From: This is the Item No. that specifies the lower limit of the range of items
for the cost rollup.
Item No. To: This is the Item No. that specifies the upper limit of the range of items for
the cost rollup.
Warehouse From: This specifies the lower limit of the range of Warehouses for the cost
rollup.
Warehouse To: This specifies the upper limit of the range of Warehouses for the cost
rollup.
Include Labor and Overhead Cost: Only if this box has been checked, the following
components will be included in the roll up calculations:
1. Formula Labor Cost
2. Formula Labor Overhead Cost
3. Formula Material Overhead Cost
4. BOM Labor Cost
5. BOM Item Overhead
6. BOM Labor Overhead
7. Setup Labor Cost
8. Setup Overhead Cost
Note that these costs are in addition to the following costs that are included irrespective
of whether or not this box is checked:
1. Formula Materials Costs
2. Line Item Loss Cost
Doc. No. F/DV/15
Rev.No.
Date
BatchMaster Software Inc.
BMM User Manual
3. Loss Factor Cost
4. Loss Constant Cost
5. BOM Item Cost
6. Byproduct Cost
7. Byproduct Overhead Cost
Include Fixed and Variable Cost: Only if this box has been checked, the following
components will be included in the roll up calculations:
1. Fixed Labor Cost
2. Fixed Overhead Cost
3. Variable Labor Cost
4. Variable Overhead Cost
Note that these costs above are in addition to the following costs that are included
irrespective of whether or not this box is checked:
1. Formula Materials Costs
2. Line Item Loss Cost
3. Loss Factor Cost
4. Loss Constant Cost
5. BOM Item Cost
6. Byproduct Cost
7. Byproduct Overhead Cost
Formula Weight: This field becomes enabled only if the option „Include Fixed and
Variable Cost‟ is checked. This is so because the Variable Costs may vary with the
Formula weight. If this value is greater than zero, then the variable cost will be picked
from the applicable formula weight slab. The slabs for the variable costs are mentioned
on the Cost tab of the Formula Entry screen. If several item Warehouses are processed
simultaneously with a non-zero value in this field, then the same formula weight value
will be used for the roll up for all those item Warehouses.
If this value is zero, the Cost Rollup will be based on the default formula weight.
Update BM Theoretical Cost: If this option is selected, the BM Theoretical Cost is
included for updating via Cost Rollup.
12.3.2
Rolling up Intermediate Cost
An Intermediate Cost Rollup can be processed using the following steps:
1. Select Item No. From for which intermediate rollup has to be processed. Leaving
this field blank has the same effect as entering the first available Item No..
There‟s a look-up button available next to the field to make your selection.
Doc. No. F/DV/15
Rev.No.
Date
BatchMaster Software Inc.
BMM User Manual
2. Select Item No. To for which intermediate rollup has to be processed. There‟s a
look-up button available next to the field to make your selection. Leaving this
field blank has the same effect as entering the last available Item No..
3. Select Warehouse From for which intermediate rollup has to be processed. Using
the look-up button next to the field, user can make the selection. Leaving this
field blank has the same effect as entering the first available Warehouse.
4. Select Warehouse To for which intermediate rollup has to be processed. This can
be decided with the help of look-up button available next to the field. Leaving this
field blank has the same effect as entering the last available Warehouse.
5. Check or un-check the „Include Labor & Overhead Cost‟ checkbox as needed.
6. Check or un-check the „Include Fixed & Variable Cost‟ checkbox as needed.
7. Check or un-check the „Update BM Theoretical cost‟ checkbox as needed.
8. As needed, enter a zero or non-zero formula weight at „Formula Weight‟ field for
calculating Variable Cost.
9. Process using the Roll Up button.
12.4 Update Finished Good Costs
The Update Finished Good Costs screen provides with a way to update one or more of
Standard costs and the Sale Price of the Finished Goods and update their
Materials/Inventory cost data. This update is useful when these prices/costs have
changed for any reasons such as:
1. Changes in the corresponding price/cost of the finished good to manufacture.
2. Changes in the costs associated with the manufacturing of finished good, such as
labor and overhead cost.
Processing Update Finished Good Costs Utility updates the selected cost(s) from the
associated formula and BOM. This utility goes only one level deep and does not attempt
to first update the costs of the materials used in the formula or the BOM. If the include
labor and overhead field is not checked, the costs will be based on only the cost of raw
materials, containers and bill-of-materials items.
Using Update Finished Good Costs, the costs required for update can be selected and
specified if the labor and overhead costs attached to the formula should get updated as
well.
The update mode can be set to Trial or Final as required.
Doc. No. F/DV/15
Rev.No.
Date
BatchMaster Software Inc.
12.4.1
BMM User Manual
Screen Fields Description
Item No. From: This is the Item that specifies the lower limit of the range of items for
the cost update.
Item No. To: This is the Item that specifies the upper limit of the range of Item for the
cost update.
Warehouse From: This specifies the lower limit of the range of Warehouse for the cost
update.
Warehouse To: This specifies the upper limit of the range of Warehouse for the cost
update.
Include Labor and Overhead Cost: Only if this box has been checked, the following
components will be included in the update calculations:
1. Formula Labor Cost
2. Formula Labor Overhead Cost
3. Formula Material Overhead Cost
4. BOM Labor Cost
5. BOM Item Overhead
6. BOM Labor Overhead
7. Setup Labor Cost
8. Setup Overhead Cost
Doc. No. F/DV/15
Rev.No.
Date
BatchMaster Software Inc.
BMM User Manual
Note that these costs are in addition to the following costs that are included irrespective
of whether or not this box is checked:
1. Formula Materials Costs
2. Line Item Loss Cost
3. Loss Factor Cost
4. Loss Constant Cost
5. BOM Item Cost
6. Byproduct Cost
7. Byproduct Overhead Cost
Formula Weight: If this value is zero, the roll up is based on the actual Formula Weight
as listed on the Formula Entry screen.
If this value is greater than zero, the roll up is carried out with the Formula Weight being
taken as the value of this field on this screen.
The following components will be included in the roll up calculations:
1. Fixed Labor Cost
2. Fixed Overhead Cost
3. Variable Labor Cost
4. Variable Overhead Cost
5. Formula Materials Costs
6. Line Item Loss Cost
7. Loss Factor Cost
8. Loss Constant Cost
9. BOM Item Cost
10. Byproduct Cost
11. Byproduct Overhead Cost
Update BM Theoretical Cost: If this option is selected, the theoretical cost of the item
as displayed at the fourth tab of the Item Master Data record gets updated.
12.4.2
Updating Finished Good Costs
The Update Finished Good Costs can be processed using the following steps:
1. Select Item No. From for which the Finished Goods Cost Rollup has to be
processed using the look-up button next to the field. Leaving this field blank has
the same effect as entering the first available Finished Good Key.
2. Select Item No. To for which the rollup has to be processed. Make the selection
using lookup button adjacent to the field. Leaving this field blank has the same
effect as entering the last available Finished Good Key.
Doc. No. F/DV/15
Rev.No.
Date
BatchMaster Software Inc.
BMM User Manual
3. Select Warehouse From for which the rollup has to be processed. Select the
source Warehouse using the look-up button. Leaving this field blank has the same
effect as entering the first available Finished Good Warehouse.
4. Select Warehouse To for which the rollup has to be processed using the look-up
button adjacent to the field. Leaving this field blank has the same effect as
entering the last available Finished Good Warehouse.
5. Check or un-check the „Include Labor & Overhead Cost‟ checkbox as needed.
6. As needed, enter a zero or non-zero formula weight at „Formula Weight‟ field for
calculating Fixed and Variable costs.
7. Check the boxes for the Costs that need to be updated.
8. Select Trial or Final mode.
9. Process using the Update button on the toolbar.
12.5 Revaluate Item Cost
The Revaluate Item Cost screen provides a way to revaluate or recalculate the actual
cost of the Finished Good or Intermediate inventory. The utility calculates and updates
accordingly the actual cost of the inventory.
12.5.1
Screen Fields Description
Header Information
Doc. No. F/DV/15
Rev.No.
Date
BatchMaster Software Inc.
BMM User Manual
Item From: This field is the filter criteria used to select the lower limit from the range of
items available. Using the lookup available near the field you will be able to select this
item.
Item To: The Item To field is the filter criteria used to select the upper limit from the
range of items available. Using the lookup available near the field, you will be able to
select this item.
Item Group From: This field is the filter criteria used to select the lower limit from the
range of items group available. Using the lookup available near the field you will be able
to select this item group.
Item Group To: This field is the filter criteria used to select the upper limit from the
range of items group available. Using the lookup available near the field, you will be able
to select this item group.
Warehouse From: This field is the filter criteria used to select the lower limit from the
range of warehouse available. Using the lookup available near the field, you will be able
to associate this warehouse.
Warehouse To: The warehouse To field indicates the filter criteria used to select the
upper limit from the range of warehouse available. Using the lookup available near the
field, you will be able to select this warehouse.
Posting Date: This is the date on which the revaluation transaction is to be posted. By
default the system fetches the current server date.
Doc. Date: This is the date on which this revaluation cost is updated, by default the
system fetches the current server date.
Remarks: This field is used to enter any extra information.
Journal Memo: This field displays the GL fired while posting the data.
Series: This field shows the defined series.
Grid Details
Select: Checking this box selects the line to revaluate.
Item No.: Field displays the Item number associated with the item whose cost is to be
revaluated.
Whse: This is the warehouse associated with the item.
Instock: This field shows the On hand quantity i.e. quantity of the material currently in
stock.
Current Cost: This is the actual item cost.
New Cost: This is the current cost or the latest price that you want to get replaced with
the existing cost. In case BM Theoretical Cost exists for that item then this field would
display the same else user can manually enter a new cost for revaluation.
Doc. No. F/DV/15
Rev.No.
Date
BatchMaster Software Inc.
BMM User Manual
Current Value: This field displays the calculated value of item cost multiplied by In
stock quantity.
New Value: This field displays the calculated value of new cost (manually entered at the
New Cost field) multiplied by In stock quantity.
Result:
12.5.2
Revaluating Item Cost
1. Select Item From for which the Revaluate Item Cost has to be processed using
the look-up button next to the field. Leaving this field blank has the same effect
as entering the first available Item Key.
2. Select Item No. To for which the Revaluate Item Cost has to be processed. Make
the selection using lookup button adjacent to the field. Leaving this field blank
has the same effect as entering the last available Item Key.
3. Select Item Group From for which the Revaluate Item Cost has to be processed
using the look-up button next to the field. Leaving this field blank has the same
effect as entering the first available Item Group.
4. Select Item Group To for which the Revaluate Item Cost has to be processed.
Make the selection using lookup button adjacent to the field. Leaving this field
blank has the same effect as entering the last available Item Group.
5. Select Warehouse From for which the Revaluate Item Cost has to be processed.
Select the source Warehouse using the look-up button. Leaving this field blank
has the same effect as entering the first available Warehouse.
6. Select Warehouse To for which the Revaluate Item Cost has to be processed
using the look-up button adjacent to the field. Leaving this field blank has the
same effect as entering the last available Warehouse.
7. Change the Posting Date or Doc Date if required.
8. Enter any comment or note on the remark field if required.
9. Select the series from the drop down provided next to the field.
10. Click the Get Data button, item satisfying the filter criteria will get displayed on
the sliding grid.
11. Check the required rows for which you want to run the Revaluate Item Cost
utility.
12. Enter the New cost for the items in the New Cost field.
13. Click the Revaluate button to recaluculate the actual item cost.
12.6 Costing Reports
12.6.1
Detailed Product Cost
The Detailed Product Cost Report screen provides with a way to generate a report
showing the costs associated with finished goods and formulas. The filtering parameters
can be defined to the report as required. Also selection can be made using the following
cost method criterion:
Doc. No. F/DV/15
Rev.No.
Date
BatchMaster Software Inc.
BMM User Manual
1. Standard
2. Average
3. Last
4. Historical
5. Market cost
Once BMM processes the report parameters, it displays the results as a Crystal Report
that can be printed or exported, as required.
12.6.1.1
Screen Fields Description
Finished Good Key From: This field specifies the lower limit of the range of Finished
Good Key for use as filter criteria during processing. Leaving this field blank has the
same effect as selecting the first available Key via the lookup.
Finished Good Key To: This field specifies the upper limit of the range of Finished Good
Key for use as filter criteria during processing. Leaving this field blank has the same
effect as selecting the last available Key via the lookup.
Formula Key From: This field specifies the lower limit of the range of Formula for use
as filter criteria during processing. Leaving this field blank has the same effect as
selecting the first available Formula via the lookup.
Formula Key To: This field specifies the upper limit of the range of Formula for use as
filter criteria during processing. Leaving this field blank has the same effect as selecting
the last available Formula via the lookup.
Status: This field is used to specify the Formula Statuses to be included in filter criteria
during processing.
Doc. No. F/DV/15
Rev.No.
Date
BatchMaster Software Inc.
BMM User Manual
Cost Method: This field is used to specify the Cost Method to be included in the filter
criteria for generating the report.
Selection can be made using the following cost method criterion:
1. Standard
2. Average
3. Last
4. Historical
5. Market cost
Report Path: This field holds the default path of the report.
12.6.1.2
Generating a Detailed Product Cost Report
The Detailed Product Cost Report criterion can be processed using the following steps:
1. Complete the Finished Good Key From and To range using the lookup buttons
next to the fields.
2. Complete the Formula Key From and To range using the lookup buttons next to
the fields.
3. Check the Status to be included during processing.
4. Select the Cost Method to Historical, Market, Standard, Average or Last.
5. Click on the OK button to create the report.
Doc. No. F/DV/15
Rev.No.
Date
BatchMaster Software Inc.
12.6.2
BMM User Manual
Product Cost Summary
The Product Cost Summary Report screen provides a way to generate a report displaying
the product costs for finished goods. The filtering parameters can be opted for defining
the report. In addition to choosing between showing the cost by weight or by volume,
the below enlisted criterion can also be recruited for showing the cost method:
1. Standard
2. Average
3. Last
4. Historical
5. Market Cost
Once BMM processes the report parameters, results are displayed as a Crystal Report
that can be printed or exported, as desired.
12.6.2.1
Screen Fields Description
Finished Good Key From: This field specifies the lower limit of the range of Finished
Good Key for use as filter criteria during processing. Leaving this field blank has the
same effect as selecting the first available Key via the lookup.
Finished Good Key To: This field specifies the upper limit of the range of Finished Good
Key for use as filter criteria during processing. Leaving this field blank has the same
effect as selecting the last available Key via the lookup.
Status: This field is used to specify the Formula Statuses to be included in filter criteria
during processing.
Doc. No. F/DV/15
Rev.No.
Date
BatchMaster Software Inc.
BMM User Manual
Cost Method: This field is used to specify the Cost Method to be included in the filter
criteria for generating the report.
Selection can be made using the following cost method criterion:
1. Standard
2. Average
3. Last
4. Historical
5. Market cost
Cost by Weight/Volume: This field allows you to make a choice for cost to be
displayed in the report. You may either choose cost to be displayed by Weight or
Volume.
Report Path: This field holds the default path of the report.
12.6.2.2
Generating a Product Cost Summary Report
1. The Product Cost Summary can be displayed using the following steps:
2. Complete the Finished Good Key From and To range using the lookup buttons
next to the fields.
3. Complete the Finished Good Description From and To range using the lookup
buttons next to the fields.
4. Check the Status to be included during processing.
5. Select the Cost Method to Standard, Average, Last or Historical. Selecting the
Historical Cost Method, Date range is populated. Set date range using the dropdown arrows in the From and To fields to set the beginning and ending dates.
6. Select the Cost by Weight or by Volume.
7. Click on the Print Preview button on the toolbar to generate a report.
Doc. No. F/DV/15
Rev.No.
Date
BatchMaster Software Inc.
12.6.3
BMM User Manual
Formula Cost Summary
The Formula Cost Summary Report screen provides a way to generate a report screening
the formulas. The filtering parameters can be opted for defining the report. In addition to
choosing between showing the cost by weight or by volume, the following cost method
selection criterion can also be elected:
1. Historical
2. Standard
3. Average
4. Last
5. Market Cost
Once BMM processes the defined report parameters, the results are displayed as a
Crystal Report that can be printed or exported.
Doc. No. F/DV/15
Rev.No.
Date
BatchMaster Software Inc.
12.6.3.1
BMM User Manual
Screen Fields Description
Formula Key From: This field specifies the lower limit of the range of Formula for use
as filter criteria during processing. Leaving this field blank has the same effect as
selecting the first available Formula via the lookup.
Formula Key To: This field specifies the upper limit of the range of Formula for use as
filter criteria during processing. Leaving this field blank has the same effect as selecting
the last available Formula Key via the lookup.
Formula Class From: This field specifies the lower limit of the range of Formula Class
for uses as filter criteria during processing. Leaving this field blank has the same effect
as selecting the first available Formula Class via the lookup.
Formula Class To: This field specifies the upper limit of the range of Formula Class for
uses as filter criteria during processing. Leaving this field blank has the same effect as
selecting the last available Formula Class via the lookup.
Formula Status: This field is used to specify the Formula Statuses to be included in
filter criteria during processing.
Cost Method: This field is used to specify the Cost Method to be included in the filter
criteria for generating the report.
Selection can be made using the following cost method criterion:
1. Standard
2. Average
Doc. No. F/DV/15
Rev.No.
Date
BatchMaster Software Inc.
BMM User Manual
3. Last
4. Historical
5. Market
Cost by Weight/Volume: This field allows you to make a choice for cost to be
displayed in the report. You may either choose cost to be displayed by Weight or
Volume.
Report Path: This field holds the default path of the report.
12.6.3.2
Generating a Formula Cost Summary Report
1. Mentioned below are the steps for generating the Formula Cost Summary Report:
2. Complete the Formula Key From and To range using the lookup buttons next to
the fields.
3. Complete the Formula Class From and To range using the lookup buttons next to
the fields.
4. Check the Status to be included during processing.
5. Select the Cost Method to Standard, Average, Market, Last or Historical. Selecting
the Historical Cost Method, Date range is populated. Set date range using the
drop-down arrows in the From and To fields to set the beginning and ending
dates.
6. Select the Cost by Weight or by Volume.
7. Click on the OK button to create the report.
Doc. No. F/DV/15
Rev.No.
Date
BatchMaster Software Inc.
12.6.4
BMM User Manual
Historical Vs Theoretical Cost Report
The Historical vs. Theoretical Cost Report screen renders a way to generate a report
comparing actual historical formula costs with the theoretical formula costs. The filtering
parameters can be defined for required display of the report. The following selection
criterion can be as well opted:
1. Cost method
2. Cost by weight or volume
3. Loss included in cost
Once BMM processes the report parameters, it displays the results as a Crystal Report
that can be printed or exported, as needed.
12.6.4.1
Screen Fields Description
Formula Key From: This field specifies the lower limit of the range of Formula for use
as filter criteria during processing. Leaving this field blank has the same effect as
selecting the first available Formula via the lookup.
Formula Key To: This field specifies the upper limit of the range of Formula for use as
filter criteria during processing. Leaving this field blank has the same effect as selecting
the last available Formula via the lookup.
Doc. No. F/DV/15
Rev.No.
Date
BatchMaster Software Inc.
BMM User Manual
Formula Class From: This field specifies the lower limit of the range of Formula Class
for uses as filter criteria during processing. Leaving this field blank has the same effect
as selecting the first available Formula Class via the lookup.
Formula Class To: This field specifies the upper limit of the range of Formula Class for
uses as filter criteria during processing. Leaving this field blank has the same effect as
selecting the last available Formula Class via the lookup.
Formula Status: This field is used to specify the Formula Statuses to be included in
filter criteria during processing.
Cost Method: This field is used to specify the Cost Method to be included in the filter
criteria for generating the report.
Selection can be made using the following cost method criterion:
1. Standard
2. Average
3. Last
4. Market cost
Cost by Weight/Volume: This field allows you to make a choice for cost to be
displayed in the report. You may either choose cost to be displayed by Weight or
Volume.
Include Loss in Calculated Cost: This field is used to specify whether loss is to be
included or not while calculating the cost. Check this field if loss is to be included while
calculating cost.
From Date: This field specifies the lower limit of the range of Date for use as filter
criteria during processing. This date may be entered by typing or selected via the
associated calendar lookup on this screen.
To Date: This field specifies the upper limit of the range of Date for use as filter criteria
during processing. This date may be entered by typing or selected via the associated
calendar lookup on this screen.
Report Path: This field holds the default path of the report.
12.6.4.2
Generating a Historical vs Theoretical Cost Report
The Historical vs. Theoretical Cost Report can be displayed using the following steps:
1. Complete the Formula Key From and To range using the lookup buttons next to
the fields.
2. Complete the Formula Class From and To range using the lookup buttons next to
the fields.
3. Check the Status to be included during processing.
4. Select the Cost Method to Standard, Average, Market or Last.
5. Complete the Cost by Weight or by Volume.
Doc. No. F/DV/15
Rev.No.
Date
BatchMaster Software Inc.
BMM User Manual
6. Click on the Include Loss in Calculated Cost box to enable this feature.
7. Complete the From and To Date range.
8. Click on the OK button to create the report.
12.6.5
Product Cost Analysis Report
The Product Cost Analysis Report screen furnishes a way to generate a report for product
cost analysis for up to three finished goods or containers. The filtering criterions can be
defined for the required display of the report. The following selection criterion can be as
well opted:
1. Cost method
2. Cost by weight or volume
3. Mark up Margin
Once BMM processes the report parameters, it displays the results as a Crystal Report
allowed for printing or exporting, as desired.
Doc. No. F/DV/15
Rev.No.
Date
BatchMaster Software Inc.
12.6.5.1
BMM User Manual
Screen Fields Description
Formula Key From: This field specifies the lower limit of the range of Formula for use
as filter criteria during processing. Leaving this field blank has the same effect as
selecting the first available Formula via the lookup.
Formula Key To: This field specifies the upper limit of the range of Formula for use as
filter criteria during processing. Leaving this field blank has the same effect as selecting
the last available Formula via the lookup.
Formula Class From: This field specifies the lower limit of the range of Formula Class
for uses as filter criteria during processing. Leaving this field blank has the same effect
as selecting the first available Formula Class via the lookup.
Formula Class To: This field specifies the upper limit of the range of Formula Class for
uses as filter criteria during processing. Leaving this field blank has the same effect as
selecting the last available Formula Class via the lookup.
Formula Status: This field is used to specify the Formula Statuses to be included in
filter criteria during processing.
Cost Method: This field is used to specify the Cost Method to be included in the filter
criteria for generating the report.
Selection can be made using the following cost method criterion:
1. Standard
Doc. No. F/DV/15
Rev.No.
Date
BatchMaster Software Inc.
BMM User Manual
2. Average
3. Last
4. Market
5. Historical
Cost by Weight/Volume: This field allows you to make a choice for cost to be
displayed in the report. You may either choose cost to be displayed by Weight or
Volume.
Print Markup/ Margin: This field is used to specify whether to print Markup or Margin
in the report.
Assembly BOM / BOM Key1: This field is used to specify the BOM key to be included
in report.
Assembly BOM / BOM Key2: This field is used to specify the BOM key to be included
in report.
Assembly BOM / BOM Key3: This field is used to specify the BOM key to be included
in report.
Report Path: This field holds the default path of the report.
12.6.5.2
Generating a Product Cost Analysis Report
The Product Cost Analysis Report can be displayed employing the following steps:
1. Complete the Formula Key From and To range using the lookup buttons next to
the fields.
2. Complete the Formula Class Range From and To range using the lookup buttons
next to the fields.
3. Check the Formula Status to be included in processing the report.
4. Select the Cost Method to Standard, Average, Historical, Market or Last.
5. Select the Cost by Weight or by Volume.
6. Set to Print Markup or Margin.
7. Complete the Products Assembly BOM/BOM Keys #1, #2, and #3 using the
lookup buttons next to the fields.
8. Click on the OK button to create the report.
Doc. No. F/DV/15
Rev.No.
Date
BatchMaster Software Inc.
12.6.6
BMM User Manual
Historical Vs Theoretical Loss Report
The Historical Vs Theoretical Loss Report shows what the historical formula losses have
been, based on historical yields. After Historical Vs Theoretical Loss Report has been
produced, it may be discovered that some of the formula loss factors are not as accurate
as they should be.
Use the option‟s filtering parameters to define the report as per the requirements. Once
BMM processes your report parameters, it displays the results as a Crystal Report that
can be printed or exported as needed.
Doc. No. F/DV/15
Rev.No.
Date
BatchMaster Software Inc.
12.6.6.1
BMM User Manual
Screen Fields Description
Formula Key From: This field specifies the lower limit of the range of Formula for use
as filter criteria during processing. Leaving this field blank has the same effect as
selecting the first available Formula via the lookup.
Formula Key To: This field specifies the upper limit of the range of Formula for use as
filter criteria during processing. Leaving this field blank has the same effect as selecting
the last available Formula via the lookup.
Formula Class From: This field specifies the lower limit of the range of Formula Class
for uses as filter criteria during processing. Leaving this field blank has the same effect
as selecting the first available Formula Class via the lookup.
Formula Class To: This field specifies the upper limit of the range of Formula Class for
uses as filter criteria during processing. Leaving this field blank has the same effect as
selecting the last available Formula Class via the lookup.
Formula Status: This field is used to specify the Formula Statuses to be included in
filter criteria during processing.
From Date: This field specifies the lower limit of the range of Date for use as filter
criteria during processing. This date may be entered by typing or selected via the
associated calendar lookup on this screen.
To Date: This field specifies the upper limit of the range of Date for use as filter criteria
during processing. This date may be entered by typing or selected via the associated
calendar lookup on this screen.
Report Path: This field holds the default path of the report.
Doc. No. F/DV/15
Rev.No.
Date
BatchMaster Software Inc.
12.6.6.2
BMM User Manual
Generating a Historical vs Theoretical Loss Report
The Historical vs. Theoretical Lost Report can be displayed employing the following
steps:
1. Complete the Formula Key From and To range using the lookup buttons next to
the fields.
2. Complete the Formula Class From and To range using the lookup buttons next to
the fields.
3. Check the Formula Status to be included in processing the report.
4. Complete the From and To Date range.
5. Click on the OK button to create the report.
13 Laboratory
As the term „Laboratory‟ reflect a place for practice, observation, or testing procedures.
Similarly, BatchMaster Manufacturing has incorporated this feature in Laboratory
module.
The Laboratory module helps the user to analyze production formula properties with
reference to the properties & quantities of constituents used within. It manages and
evaluates the physical properties of the entire ingredient used in the formula. It also
provides the user with the facility to compare a formula and its ingredients, make
necessary adjustments (if require) and reformulate finished goods to a new target value.
It supports complete analysis of formulae on the same screen and creates equations for
the defined physical properties.
Doc. No. F/DV/15
Rev.No.
Date
BatchMaster Software Inc.
BMM User Manual
Based on the properties of raw materials one can calculate or derive the property of an
intermediate. The Lab module also gives the user the advantage to make necessary
adjustments in the formula.
The Laboratory module also provides with the „Intermediate Rollup‟ utility. This utility
helps the user to adjust and update the formula of the intermediates based on the
physical properties of the ingredients or the raw materials that have been used in the
intermediates.
13.1 Physical Property Analysis
This screen provides the user with a way to examine the physical properties of the
formulae with respect to the physical properties of its corresponding raw materials.
The physical properties of the ingredients of the formula are used to calculate the
physical properties of the finished goods. The physical properties of the raw materials
are defined in the „Item Properties‟ screen. This module also helps the user to set the
physical properties of the ingredients to a desired assessment thereby changing the
constituency and properties of the finished goods. Once the user enters the target value,
BMM calculates the changes required in material quantities in order to achieve those
target values. All these changes can be seen in the formula of that item.
With Physical Property Analysis screen, the user can also:
1. Identify characteristics of a formula from the Formula Item Tab.
2. Examine all the physical properties for a formula by marking specific or all
material lines for adjustment, make adjustments to material line item, toggle
units of measure, and toggle costs. User can also size the formula and toggle the
view mode for the formula from the Line Item Tab. The Line Item tab is the
critical area of preference.
3. Examine the by-product quantity produced from the formula, its units, and the
overhead and other costs associated with it from the By-Product Tab.
4. Examine the output formula, the MSDS boilerplate template associated with the
formula, and the HMIS settings from the Safety Tab.
5. Examine markup factor, loss factor, loss constant, and all three types of costs
from the Cost Tab.
Note: Through the Physical Property Analysis screen the user always works with the
stockpile formula records. Thus should be aware of the potential impact on the formula
before saving a significant change to an active formula, through the Physical Property
Analysis screen.
13.1.1
Mandatory Inputs
The following data should be upheld:
1. Unit Conversions: For an Item used as a formula line item or a formula byproduct
If the Stock unit of the item is different from the System Weight unit, then a
conversion should be defined from the Stock unit to the System Weight Unit.
Doc. No. F/DV/15
Rev.No.
Date
BatchMaster Software Inc.
BMM User Manual
If the Stock Unit of the item is different from the System Volume unit, then a
conversion should be defined from the Stock Unit to the System Volume Unit.
2. Formula Class.
3. Formula Status.
4. Physical Property Formulas with valid equations and adjust equations.
5. Physical Properties by weight, volume or constant for the materials defined in
Material Property Master Screen.
6. The values of the Material Properties for Items used in a formula.
7. Equations and Adjust Equations in Physical Property Formula screen.
13.1.2
Screen Field Description: Header
Formula Key: Mandatory field, which delineate the Formula, that needs to be analyzed
based on its physical properties. User can select the formula from the lookup on the
toolbar.
Formula Description: Contains the description of the Formula that has been selected in
the „Formula key‟ field.
Doc. No. F/DV/15
Rev.No.
Date
BatchMaster Software Inc.
13.1.3
BMM User Manual
Screen Fields Description: Formula Items Tab
Summary (Show/Hide): By Clicking this box, the summary of the line items grid on
Tab-4 (which displays the total weight, total volume, kg/Lt, cost/kg, total RM cost) are
displayed or concealed respectively.
Physical Property (Show/Hide): By Clicking this tab, the Physical Properties grid on
formula Items Tab (which contains Total Weight, Total Volume, Std Cost/Kg, Std Cost/Lt,
Density, to test) are displayed or concealed respectively.
Check: The checkbox offer to select the Item No. Whose physical property is required to
be analyzed. This is done by ticking the checkbox of the desired item of the selected
formula. In case of physical property analysis only the checked Item No. is affected.
Type: Field displays the corresponding line item‟s type of the current formula. The
material type can be discriminate as follow:
1. Material.
2. Labor.
3. Text.
4. Boilerplate.
Item No.: Field stores the value associated with the setting done on the Type field.
Doc. No. F/DV/15
Rev.No.
Date
BatchMaster Software Inc.
BMM User Manual
1. Raw material is entered when the Type is Material. Clicking the lookup on this
field displays those Item Warehouses that have their status as Active.
2. Labor Key is entered when the Type is Labor. Clicking the lookup on this field
displays the Labor/Additional Cost keys.
3. Boilerplate Key is entered when the Type is Boilerplate. Clicking the lookup on this
field displays the Boilerplate Instruction keys.
4. The field disables when the Type is Text.
Description: Field displays the material key, labor key description, customized text, and
text associated with a boilerplate, from the formula line items of the current formula.
Whse: Field displays the Warehouse of the key item used in the current formula.
Weight% / Volume%: Field displays the density of the item produced using this
formula in terms of weight and volume. The density is calculated by dividing the Total
Weight by Total volume.
Quantity Required: Field displays the quantity requisite by the user in the current
formula line items. It is in terms of the System Weight UOM.
Unit: Field displays the unit intended for the „Quantity required‟ e.g. Liter (LT), Kilogram
(KG) etc.
O/H: Overhead Key associated with the selected material or labor line item of the
current formula. This value is used for cost analysis in the Costing module as well as to
calculate the costs associated with production of the end item produced by the formula.
Cost/Unit: Displays the Standard or Last or Average cost of the material of the current
formula. The user can toggle the cost from standard, last or average by selecting the
Toggle Costs options on the toolbar
But the toggle cost button is only for reference purposes. It does not affect the default
costing method of the item.
Ext Cost: Field displays the Extended Cost for the material or labor line item. The value
is calculated by multiplying the Quantity required with the Cost/Unit.
Loss: Displays the „line loss‟ for this specific material line item in the formula.
Group ID: Displays the Group ID of this line for the purpose of mix control via utilizing a
customized report (.rpt) file for printing Batch Tickets.
Total Weight (KG): Field displays the sum total of the weights of all the Material lines
in the System Weight UOM.
Total Volume (LT): Field displays the sum total of the volumes of all the Material lines
in the System Volume UOM.
KG/LT: Field calculates the Density (in System Weight UOM divided by the System
Volume UOM) of the current formula.
Doc. No. F/DV/15
Rev.No.
Date
BatchMaster Software Inc.
BMM User Manual
Cost/KG: Field defines the cost per unit weight of the item used in the formula. This is
calculated by dividing the Total Raw Material Cost by Total Weight.
Cost/LT: Field defines the cost per unit volume of the item used in the formula. This is
calculated by dividing the Total Raw Material Cost by Total Volume.
Total RM Cost: Field displays the sum of the Extended Cost of the Material lines.
Property: Displays the Property Name stored at Physical Property Formula screen. An
asterisk is suffixed to the Property Name when the Value of that property is outside the
minimum or maximum values as specified at the Physical Property screen.
Value: This is the value of the property on a given row on this grid. This field is editable.
Before a new value is entered, mark one or more material line items using the
„Check/Uncheck‟ button or the „Check All‟ button on the tool bar. Then change the value
for the property and click outside this field. This will update the quantities of the marked
formula ingredients accordingly. The values of all the properties then get recalculated as
per their respective equations defined at the Physical Property Formula screen.
13.1.4
Screen Fields Description: By Products Tab
Item No.: Displays the material key for the byproduct.
Whse: Displays the Warehouse for Item.
Doc. No. F/DV/15
Rev.No.
Date
BatchMaster Software Inc.
BMM User Manual
Qty Produced: Displays the quantity of the material to be produced as a byproduct.
This quantity is interpreted according to the value of the Unit field.
Unit: Field displays the unit in which the „Quantity Produced‟ is expressed.
O/H: Field displays Overhead Key associated with the byproduct. This value is used
during cost analysis of the formula on the Product Cost Analysis screen as well as to
calculate the costs associated with production of the end item produced by the formula.
Cost/Unit: Display the Standard or Last or Average Cost of the Byproduct. The user can
toggle the cost from Standard to Last to Average by clicking the Toggle Costs button on
the toolbar.
But this toggle cost button is only for reference purposes. It does not affect the default
costing method of the item.
Ext Cost: Field displays the extension cost for the byproduct line. This value is
calculated by multiplying the Quantity Produced with the Cost/Unit.
The By-Products Tab also displays the summary which provides information about the
Total Weight (KG), Total Volume (LT), KG/LT, Cost/KG, Cost/LT and Total RM Cost of the
By-Products.
13.1.5
Screen Fields Description: Formula Master Tab
Formula Class: Displays the class of the Formula. When a new formula is created the
Default Formula Class for the formula is inserted. This is a mandatory field. The Formula
Doc. No. F/DV/15
Rev.No.
Date
BatchMaster Software Inc.
BMM User Manual
Class provides a Work in Progress Account for use, in production of items that can be
made via this formula.
Formula Status: Displays the Status of the Formula which can be Active, Hold,
Obsolete, or Cancelled etc. This is a mandatory field. The Formula Status is used within:
1. Production Setup to specify whether or not the Formulas of that status should be
allowed in Production.
2. Costing Setup to specify whether or not the Formulas of that status should be
allowed in Product Cost Analysis.
3. Laboratory Setup to specify whether or not the Formulas of that status should be
allowed in Physical Property Analysis.
Revision Number: Field displays the reference number of the current version. It is used
to keep track of all the modified versions of the formula for future reference. It is auto
generated via BMM.
Date Revised: Field is used to define the Date when the Formula was last saved.
Time Revised: Field is used to define the Time when the Formula was last saved
Reason Revised: Field is used to define the default cause for altering the Formula.
Date Last Made: Field is used to define the Date when the Formula was most recent
used in Production.
Time Last Made: Field is used to define the Time when the Formula was most recent
used in Production.
Default Process Cell: Field is used to define the Process Cell (Mix, Assembly or Fill
Type) used for the selected Formula.
Density Override: The Density of a formula is calculated by dividing Total Weight of the
ingredients by Total Volume of its ingredients. It is also known as Theoretical Density.
This is based on the assumption that the volumes are linear additive. But in some cases
Total Volume of Formula is not equal to Total Volume of its ingredients, reason being a
shrinkage or bulk expansion during the process. The density override field, if its value is
non-zero, stores the density that is used instead of the density calculated by the
theoretical density method. A zero value in this field means that the density override is
not applicable.
Notes: Special Comments / Reminders associated with the formula.
Doc. No. F/DV/15
Rev.No.
Date
BatchMaster Software Inc.
13.1.6
BMM User Manual
Screen Fields Description: Safety Tab
Output Formula Key: For the purpose of printing a MSDS, an output formula key is
listed here. Used when the MSDS information of the product cannot be directly
determined from the formula ingredients.
For example, the reaction of Sodium and Chlorine gas produces NaCl. The MSDS of NaCl
should not be prepared based on the Sodium Metal and Chlorine Gas, since the
properties of NaCl are very different from each of the ingredients. In such a case, a
separate output formula for NaCl should be created and attached here. For MSDS
purposes, this formula may list NaCl itself as an ingredient.
MSDS Supplementary File ID: Displays the default MSDS Template associated with
this Formula. This ID is used for printing MSDS for this Formula.
HMIS Health: Displays the HMIS Health Rating for this formula. HMIS Health Rating can
be as one of None, Mild, Moderate, Serious or Extreme. This value is used in the MSDS
module.
HMIS Chronic Factor: Displays the HMIS Chronic Indicator for the formula. This value
is used in the MSDS module.
HMIS Flammability: Displays the HMIS Flammability Rating for the formula. This field
can have a value of None, Mild, Moderate or Serious. This value is used in the MSDS
module.
Doc. No. F/DV/15
Rev.No.
Date
BatchMaster Software Inc.
BMM User Manual
HMIS Reactivity: Displays the HMIS Reactivity Rating for the formula. This field can
have value as None, Mild, Moderate or Serious. This value is used in the MSDS module.
HMIS Personal Protection: Displays the HMIS Personal Protection Rating for the
formula. This field can have one value of the following; this value is used in the MSDS
module:
A: Safety Glasses.
B: Safety Glasses, Gloves.
C: Safety Glasses, Gloves, Synthetic Apron.
D: Face Shield, Gloves, Synthetic Apron.
E: Safety Glasses, Gloves, Dust Respirator.
F: Safety Glasses, Gloves, Synthetic Apron, Dust Respirator.
WHMIS Information: Displays the WHMIS information for this formula.
13.1.7
Screen Fields Description: Cost Tab
Markup Factor: The Markup Factor is used for cost analysis. Multiplying this number
gives the markup factor as a percentage. A value as zero represents no markup at all.
Doc. No. F/DV/15
Rev.No.
Date
BatchMaster Software Inc.
BMM User Manual
Loss Constant: This is the fixed loss (in the System Weight UOM) of the product being
produced by this formula.
Loss Factor: The Loss Factor is used to determine the variable loss of the product being
produced by the formula. Entered number is in fraction not in percentage.
Fixed Costs
Hours: Display the value of hours of the fixed costs used for the formula. This value is
used for cost analysis in this screen as well as to calculate the costs associated with
production of the end item produced by the formula.
Labor Key: Displays the Labor Key of the fixed costs for the formula. This value is used
for cost analysis in this screen as well as to calculate the costs associated with
production of the end item produced by the formula. Encompass automatic effect on the
cost analysis.
Amount: Displays the cost amount for formula Labor / Additional key of the fixed costs
for the formula. This value is used for cost analysis in this screen as well as to calculate
the costs associated with production of the end item produced by the formula.
Encompass automatic effect on the cost analysis.
Overhead Key: Displays the Overhead Key of the fixed costs for the formula. This value
is used for cost analysis in this screen as well as to calculate the costs associated with
production of the end item produced by the formula. Encompass automatic effect on the
cost analysis.
Type: Overhead Key type for fixed cost can be one of the following: „$‟ Type: This value is entered automatically when the associated overhead key
is entered. This is a read-only field. This value is used for cost analysis in the
Costing module as well as to calculate the costs associated with production of the
end item produced by the formula. The value of Hours on this line is multiplied by
the Factor of the Overhead Key to calculate the cost contribution of this
overhead.
„%‟ Type: This value is entered automatically when the associated overhead key
is entered. This is a read-only field. This value is used for cost analysis in the
Costing module as well as to calculate the costs associated with production of the
end item produced by the formula. The value of Hours on this line, multiplied by
the Amount of the Labor Key, is multiplied by the Factor of the Overhead Key of
the same line to calculate the cost contribution of this overhead.
Factor: This is a read only field which automatically encloses the value when the
associated overhead key is entered.
Setup Costs
Hours: This is the value of the hours of the setup costs for the formula. This value is
used for cost analysis in this screen as well as to calculate the costs associated with
production of the end item produced by the formula. Encompass automatic effect on the
cost analysis.
Doc. No. F/DV/15
Rev.No.
Date
BatchMaster Software Inc.
BMM User Manual
Labor Key: This is the Labor Key of the setup costs for the formula. This has automatic
effect on the cost analysis.
Amount: This is the cost amount for formula labor/additional key of the setup costs for
the formula. This value is entered automatically when the associated labor key is
entered. This is a read-only field. This value is used for cost analysis in this module as
well as to calculate the costs associated with production of the end item produced by the
formula. Encompass automatic effect on the cost analysis.
Overhead Key: This the Overhead Key of the setup costs for the formula. This value is
used for cost analysis in this module as well as to calculate the costs associated with
production of the end item produced by the formula. This has automatic effect on the
cost analysis.
Type: Overhead Key type for Setup cost can be one of the following: „$‟ Type: This value is entered automatically when the associated overhead key
is entered. This is a read-only field. This value is used for cost analysis in the
Costing module as well as to calculate the costs associated with production of the
end item produced by the formula. The value of Hours on this line is multiplied by
the Factor of the Overhead Key to calculate the cost contribution of this
overhead.
„%‟ Type: This value is entered automatically when the associated overhead key
is entered. This is a read-only field. This value is used for cost analysis in the
Costing module as well as to calculate the costs associated with production of the
end item produced by the formula. The value of Hours on this line, multiplied by
the Amount of the Labor Key, is multiplied by the Factor of the Overhead Key of
the same line to calculate the cost contribution of this overhead.
Factor: This is a read only field which automatically encloses the value when the
associated overhead key is entered.
Variable Costs
Max. Wt: This is the value of the Max Weight for this row of the variable costs for the
formula.
Variable labor cost is dependent on two factors: the total Batch Weight and the
applicable Labor Rate for that Batch Weight. The variable labor is defined for a particular
“slab” of Batch Weight. The Max Weight is the upper limit of the weight slab to which a
particular row of the variable costs is applicable. The lower limit of batch weight for a
slab is determined based on the max weight of the preceding row. For example, suppose
that the Max Weight for the first row is 100, and for the second row is 500. In such a
case, the variable cost will be according to the first row if 0 < Batch Weight ≤ 100;
whereas the variable cost will be according to the second row if 100 < Batch Weight ≤
500.
The actual Variable Cost in production is determined by adding the following:
1. Batch weight (in system weight unit) multiplied by the Amount of the Labor Key
of the applicable row.
Doc. No. F/DV/15
Rev.No.
Date
BatchMaster Software Inc.
BMM User Manual
2. If the overhead key is „$‟ type, then the Batch weight (in System Weight Unit)
multiplied by the Factor of the Overhead Key of the applicable row.
3. If the Overhead Key is „%‟ type, then the Batch weight (in System Weight Unit)
multiplied by the Amount of the Labor Key of the applicable row multiplied by the
Factor of the Overhead Key of the same row.
Labor Key: Displays the Labor Key of the variable costs for the formula. This value is
used for cost analysis in this module as well as to calculate the costs associated with
production of the end item produced by the formula. Encompass automatic effect on the
cost analysis.
Amount: Displays the cost amount for the formula Labor / Additional key of the variable
costs for the formula. This value is used for cost analysis in this module as well as to
calculate the costs associated with production of the end item produced by the formula.
Encompass automatic effect on the cost analysis.
Overhead Key: This is the Overhead Key of the variable costs for the formula. This
value is used for cost analysis in this module as well as to calculate the costs associated
with production of the end item produced by the formula. Encompass automatic effect on
the cost analysis.
Type: Overhead Key type for Variable cost can be one of the following: „$‟ Type: This value is entered automatically when the associated overhead key
is entered. This is a read-only field. This value is used for cost analysis in the
Costing module as well as to calculate the costs associated with production of the
end item produced by the formula. The Batch weight (in system weight unit) is
multiplied by the Factor of the Overhead Key to calculate the cost contribution of
this overhead.
„%‟ Type: This value is entered automatically when the associated overhead key
is entered. This is a read-only field. This value is used for cost analysis in the
Costing module as well as to calculate the costs associated with production of the
end item produced by the formula. The Batch weight (in system weight unit)
multiplied by the Amount of the Labor Key is multiplied by the Factor of the
Overhead Key of the same line to calculate the cost contribution of this overhead.
Factor: This is a read only field which automatically encloses the value when the
associated overhead key is entered.
13.1.8
Key Operations
13.1.8.1 Modifying a Formula to obtain a desired Physical
Property
1. Mark the materials lines of interest using the „Check/Uncheck‟ button or the
„Check All‟ button on the tool bar.
2. Click on the property value to be modified for selection. Change the value of the
property. Click anywhere exterior this field. Automatically effects that can be
seen:
3. The material quantities get recalculated accordingly.
Doc. No. F/DV/15
Rev.No.
Date
BatchMaster Software Inc.
BMM User Manual
4. The various property values of the formula also get recalculated accordingly. The
Physical Property Adjust Equation is used when raw material quantities are
changed to meet a physical property "Target" value that has been specified. The
other property values are then recalculated using the Physical Property Equation.
5. Edit specific material quantities as needed. The formula totals and the various
formula material properties get recalculated accordingly.
6. If one wishes to save these changes to the Formula, click the Save button.
7. Clicking on the Arrow button on Item No. user can access the Item Master Data,
Bill of Material Entry & Formula Entry Screen. Also by double clicking on the field
entry user can have the access of Item master Data Screen.
8. Clicking on the arrow button of Whse field user can access the Warehouse
(Default) Setup screen.
9. By double clicking on the unit field entry user can access the Unit master screen.
10. By double clicking on the O/H field entry user can access the Overhead Cost
master screen.
13.1.8.2 Creating a new Formula at the Physical Property
Analysis screen
This procedure is effectively similar to creating a formula at the Formula Entry screen.
1. Click the Insert Button. A new formula in inserted using the values of the Formula
Defaults. These defaulted values may be changed.
2. Enter the Formula Key and the Description.
3. Enter a Formula Class and a Formula Status if not present for this formula.
4. Enter the Line Items on Tab-1.
5. Enter the byproduct information, if any, on Tab-2.
6. Add values at the optional fields as needed.
7. Click the Add button to save the formula.
13.1.9
Goto
Size Formula: Button Function is viewed when the focus is on Formula Items (Tab-1) or
By-Products (Tab-2). On clicking the function a „Size Formula‟ popup window get
displayed with two options „Weight‟ and „Volume‟. Opting one of these options, entering a
value, and clicking OK resizes the formula accordingly. The formula line items of Material
Type and the By-Products (if any) are sized accordingly. The size formula is not saved
until the Save button is clicked.
View Formula In: Clicking this button toggles the View Mode between Weight and
Volume. The Quantity required and the Unit field on the grid is toggled accordingly the
conversions defined for System Weight and Volume master screen.
Weight Percentage: Calculates the weight in percentage and displays it on Weight %
field. The check box in front shows the selection.
Doc. No. F/DV/15
Rev.No.
Date
BatchMaster Software Inc.
BMM User Manual
Volume Percentage: Calculates the Volume in percentage and displays it on Volume %
field.
Adjust Formula Using %: Calculates or change the value of the unchecked row with
the altered value entered in the weight % of the selected checked row.
Fill Formula Using %: Calculates the value of Total Weight or Total Volume by
adjusting the weight, entered on the selected checked rows.
Export to Excel: This option is used to export the data in the Excel file.
Quality Control: Click on this button to associate Quality Control tests with this
formula.
Costing: Changes the cost method as Standard, Average or Last.
Toggle Units: Button function is viewed when the focus is on Formula Items (Tab-1) or
By-Products (Tab-2). On clicking the unit toggles as follow:
1. If the focus is on a Material line item on Formula Items Tab, the values of the Qty
Required, Units and the Cost/Unit fields get toggled.
2. If the focus is on a line item on By Products Tab, the values of the Qty Produced,
Unit and the Cost/Unit fields get toggled.
Expand Intermediates: Click this button to expand the formula intermediates with
their ingredients.
Insert From Formula: Click this button to select and insert the Formula Lines from
another formula.
MSDS Property Override: Clicking this button displays the MSDS Physical Property
window that allows overriding the property value to be printed on MSDS.
13.1.10 Example
Showing how change in the property value recalculates related material
quantities:
Let us consider an example:
At the Material Property Master screen, user has to first define the property „w1‟ of type
weight and multiplication factor 1.
Now at the Material Property, associate the item say „ASA‟ with this property with its
property value 2
And the item „LSS-INT‟ with this property and property value 1.
Next at the Physical Property Formula screen, give the Property Name as pigment wt%.
Give the Equation as T1/TW * 100
Doc. No. F/DV/15
Rev.No.
Date
BatchMaster Software Inc.
BMM User Manual
And the Adjust Equation as (U1-.01*N*UW)/ (.01*N*MW-M1) where, U1 is the total
material property (defined as weight here) for the unmarked material, M1 is the total
material property for the marked material, UW is the weight of unmarked materials, MW
is the weight of marked materials, N is the target physical property which in this case is
pigment wt. %
Also mention the Minimum Value as 1 and the Maximum Value as 100.
Next on the Physical Property Analysis screen, choose the formula LSS-ASA which has
both the line items i.e. ASA with its Quantity Required and System Weight as 12.5 and
LSS-INT with Quantity Required and System Weight 9.5
Mark item ASA and leave Camphor Powder unmarked such that their Total Weight =22
For the Unmarked Material LSS-INT,
U1= (material property master multiply by value)*(material property prop. value)*(wt.
at formula)
=1*1*9.5= 9.5
For the Marked Material ASA,
M1= (material property master multiply by value)*(material property prop. value)*(wt
at formula)
=1*2*12.5= 25
UW=weight of unmarked material
=9.5
MW=weight of marked material
=12.5
T1 is the total material property=U1+M1
=9.5+25=34.5
TW is the total weight=12.5+9.5=22
Here, the pigment wt % is shown as 156.81 as calculated:
T1/TW * 100 where T1 is the total material property
=34.5/22*100=156.81
Now suppose user want to achieve the target pigment wt % N as 150
For this change the pigment weight% to 150 and click anywhere else on the property
grid.
Doc. No. F/DV/15
Rev.No.
Date
BatchMaster Software Inc.
BMM User Manual
According to the Adjust Equation, the factor obtained is
(U1-.01*N*UW)/ (.01*N*MW-M1)
= (9.5-.01*150*9.5)/.01*150*12.5-25
=0.76 which when multiplied to the older quantity required of the marked material ASA
gives the new value as 0.76*12.5=9.5
While the unmarked material LSS-INT quantity required remains the same.
13.2 Physical Property Formula
Screen provides a way to create equations and use them in calculations of Physical
Properties of the Formula.
Using Physical Property Formula, one can create a physical property, assign it
characteristics that were defined using the Material Property Master screen, and write an
equation which defines how the physical property‟s value is to be calculated with the
formula ingredients. Physical properties also helps in analyzing and modifying the
characteristics and properties of the various raw materials used in the production of the
items.
One can also write an equation which defines how the physical property is to be adjusted
when BMM adjusts a marked material on the Formula Items tab of the Physical Property
Analysis screen. The Physical Property Formula also provides a way to define the
minimum and maximum values for a physical property. The Physical Property Adjust
Equation is used when raw material quantities are changed to meet a physical property
"Target" value that has been specified. The other property values are then recalculated
using the Physical Property Equation.
Doc. No. F/DV/15
Rev.No.
Date
BatchMaster Software Inc.
13.2.1
BMM User Manual
Screen Fields Description
Physical Property Formula
Property Number: Displays the serial number of the Physical Property Formula. The
number is auto-generated by the system when a new property is created and saved.
This number is generated to keep a track of all the physical property formula.
Property Name: Stores the name for the Physical Property of the formulas.
Equation: Stores the Physical Property Equation for the Formula. The user can enter the
equation here by either typing or by double clicking the various operands and operators
on the screen. This equation is used to calculate the value of the physical property of a
formula.
Adjust Equation: Stores the Physical Property Adjust Equation for the Formula. This
equation is used to calculate the factor which is multiplied with the line items weight so
as to proportion them to achieve a targeted property value. It helps to create the
equation for adjusting the formula based on the properties and characteristics of the raw
materials, whose quantity has been changed to meet the desired physical property value
that has been specified.
Minimum Value: Stores a number that is interpreted as the lower limit for the physical
property value.
Maximum Value: Stores a number that is interpreted as the upper limit for the physical
property value
Doc. No. F/DV/15
Rev.No.
Date
BatchMaster Software Inc.
BMM User Manual
Operand Definition for Equation: Displays list of operands used to characterize the
equations that were defined using the Material Property Master screen.
Operand Definition for Adjust Equation: Display list of operands that are used to
create the equation for adjusting the formula based on the properties and characteristics
of the raw materials, whose quantity has been changed to meet the desired physical
property value that has been specified.
Operators: Display list of arithmetic operators (+, *, /, - etc) that are used to create
equations based on the properties and characteristics of the raw materials whose
quantities are changed to meet a physical property value that has been specified.
Physical Properties
Shows the list of the Physical properties maintained via the Material Property Master
screen.
13.2.2
Example
Let us consider the formula that has been used in the Physical Property Analysis screen.
Property Number – Auto generated by BMM depending on the previously created
Physical property formula.
Property Name: Total weight
Equation: Select TW from the list of operands defined for the equation.
Adjust Equation: Select (N - UW) / MW from the list of operands defined for the adjust
Equation. The operators (+,-,*, / etc.) can be selected from the list of operators given in
the Operators field.
13.3 Comparative Properties Analysis
Screen enables user to ensure the expected product quality standards & provides a way
to compare the properties of selected formulas.
Doc. No. F/DV/15
Rev.No.
Date
BatchMaster Software Inc.
13.3.1
BMM User Manual
Screen Fields Description
Formula Key: The look up on this row displays the formulas for comparison. When a
formula is selected remaining cell value on the column grid get auto inserted. A separate
Formula Key can be entered on each of the five columns on this screen.
Formula Description: The value in this field is defaulted when a Formula is selected in
the Formula Key field. This description of the Formula comes from the Formula Entry
screen.
13.3.2
Performing a Comparative Property Analysis
1. Enter by typing or select via lookup a value for the „Formula Key‟. A separate
Formula key can be entered on each column.
2. Printing of the comparative property analysis can be done via clicking the Print
button on the tool bar.
13.3.3
Goto
Export to Excel: Clicking it export the analysis in excel file format.
13.3.4
Example
For example, comparing a Formula for Apple Juice with Formula for Orange Juice, Enter
the Formula for Apple Juice in the first column. Similarly enter the Formula for Orange
Doc. No. F/DV/15
Rev.No.
Date
BatchMaster Software Inc.
BMM User Manual
Juice on the second column. The Physical properties value for each formula gets
defaulted in their respective columns. Now the user can analyze and compare the
various property values for the above selected formulas. The screen provide five such
column definition for formula comparison
13.4 Physical Property Search Filter
Screen provides a way to create filtering criteria for use while generating the Physical
Property Search Report.
Using Physical Property Search, one can establish a numeric search filter key and a
description of the filter, and then define an equation specifying the filtering criteria. By
means of the filtering criteria it can serve to reduce the number of formulae eligible for
inclusion in the report.
13.4.1
Screen Fields Description
Search Filter Key: Key that uniquely identifies the Search Filter. This is a mandatory
field which supports up to four numeric characters.
Description: Displays the description of the Search Filter.
Doc. No. F/DV/15
Rev.No.
Date
BatchMaster Software Inc.
BMM User Manual
Equation: System generated read-only field in which the contents are automatically
updated as the user enters or changes the equation on the grid displayed below.
And/Or: The first line BMM adds to the field defines the qualifier of And/ Or field as IF.
Only the lines which follow the first line can have qualifiers of And or Or.
(((: Displays the number of opening parentheses that can be maintained in the search
filter criteria. One can opt up to three parentheses.
Type: Determines type of values available for lookup in the Type Key field. The field
consist 4 options:
a. Physical Property
b. Weight %
c. Volume %
d. QC Target
Type Key: The lookup in this field is determined by the value established in the Type
field.
Type Description: Displays the description on the Type Key.
Operator: Displays the operator that will be used to compare or equate the Type Key
value with the numeric value defined in the Value field.
Value: Contains a numeric value used during comparison with the Type Key value field.
))): Displays the number of closing parentheses that can be maintained in the search
filter criteria. One can opt up to three parentheses.
13.4.2
Creating a Physical Property Search Filter
1. Open the Physical Property Search Filter screen.
2. Enter a unique Search Filter Key and the respective Description.
3. Add Line to Enter the Equation in the grid.
4. Enter values on the various columns of the grid as needed to create the desired
equation.
5. Click Add button to save the Physical Property Search Filter.
13.5 Material Property Master
Screen allows one to define the names and attributes of the specified raw material, also
known as physical properties. The values of these properties for specific items can be
specified on the Material Physical Property screen. A maximum of 999 physical properties
can be defined with this screen. To calculate formulas physical properties the values of
physical properties are used in the Laboratory module as well as in MSDS module.
Doc. No. F/DV/15
Rev.No.
Date
BatchMaster Software Inc.
13.5.1
BMM User Manual
Screen Fields Description
Description: Displays name or description of the physical property. Individual physical
property is uniquely identified by the series (T1 to T999) displayed adjacent to the
description.
Type: Can have a value as Weight, Volume or Constant. The total value of a specific
property of a formula is calculated by adding the contribution of that property from
individual formula ingredient line items. For this purpose, the significance of these
options is as follows:
1. Weight: In this case, the contribution of a physical property of a formula material
line item to the total property of a formula is calculated by multiplying the
following:
a. The weight (in System Weight UOM) of this item in the formula.
b. The „Multiply By‟ number defined on this screen.
c. The value of that property as mentioned at the Material Physical Property
screen.
2. Volume: In this case, the contribution of a physical property of a formula material
line item to the total property of a formula is calculated by multiplying the
following:
Doc. No. F/DV/15
Rev.No.
Date
BatchMaster Software Inc.
BMM User Manual
a. The volume (in System Volume UOM) of this item in the formula.
b. The „Multiply By‟ number defined on this screen.
c. The value of that property as mentioned at the Material Physical Property
screen.
3. Constant: In this case, the contribution of a physical property of a formula
material line item to the total property of a formula is equal to the value of that
property as mentioned at the Material Physical Property screen; there is no effect
of the line item‟s weight or volume or the „Multiply By‟ factor.
Multiply By: Contain a numeric value. The total value of a specific property of a formula
is calculated by adding the contribution of that property from individual formula
ingredient line items. For this purpose, depending on the value of the „Type‟ field as
mentioned below, the Multiply by factor is used as follows:
1. Weight: In this case, the contribution of a physical property of a formula material
line item to the total property of a formula is calculated by multiplying the
following:
a) The weight (in System Weight UOM) of this item in the formula
b) The „Multiply By‟ number defined on this screen
c) The value of that property as mentioned at the Material Physical Property
screen.
2. Volume: In this case, the contribution of a physical property of a formula material
line item to the total property of a formula is calculated by multiplying the
following:
a) The volume (in System Volume UOM) of this item in the formula
b) The „Multiply By‟ number defined on this screen
c) The value of that property as mentioned at the Material Physical Property
screen.
3. Constant: In this case, the contribution of a physical property of a formula
material line item to the total property of a formula is equal to the value of that
property as mentioned at the Material Physical Property screen; there is no effect
of the line item‟s weight or volume or the „Multiply By‟ factor.
13.5.2
Defining a Physical Property
1. Enter the Description for the property.
2. Select the Property Type.
3. Enter the Multiplication factor via the „Multiply By‟ Field.
4. Click the OK button to save the record.
13.5.3
Example
For example Properties such as % color; % density etc can be created for associating
them with various items.
Doc. No. F/DV/15
Rev.No.
Date
BatchMaster Software Inc.
BMM User Manual
13.6 Material Physical Property
Screen provides a way to specify the values for the various physical properties of an
item. If physical property does not apply to any selected item, then the property value
can be set to zero. These material property values are used for calculating a formula‟s
physical properties in the Laboratory module as well as in the MSDS module.
13.6.1
Screen Fields Description
Item Details
Item No.: Displays the Item No. for which these material properties values are defined.
This is a mandatory field.
Description (of the Item No.): Displays the description of the selected Item No..
Physical Properties
Description (of the Material Property): Displays the description of the physical property.
PropValue: Displays the value of the physical property. The total value of a specific
property for a formula is calculated by adding the contribution of that property from
Doc. No. F/DV/15
Rev.No.
Date
BatchMaster Software Inc.
BMM User Manual
individual formula ingredient line items. For this purpose, the significance of these
options is as follows:
1. Weight: In this case, the contribution of a physical property of a formula material
line item to the total property of a formula is calculated by multiplying the
following:
a. The weight (in System Weight UOM) of this item in the formula
b. The „Multiply By‟ number defined on the Material Property Master screen
c. The value of that property as mentioned at the Material Property screen.
2. Volume: In this case, the contribution of a physical property of a formula material
line item to the total property of a formula is calculated by multiplying the
following:
a. The volume (in System Volume UOM) of this item in the formula
b. The „Multiply By‟ number defined on the Material Property Master screen
c. The value of that property as mentioned at the Material Property screen.
3. Constant: In case of constant PropValue, the contribution of a physical property
of a formula material line item to the total property of a formula is equal to the
value of that property as mentioned at the Material Property screen; there is no
effect of the line item‟s weight or volume or the „Multiply By‟ factor as defined at
the Material Property Master.
13.6.2
Specifying an Item‟s Material Property Value
1. Open the Material Physical Property screen.
2. Type or select an item.
3. Enter value for the applicable Physical properties at the PropValue field.
4. Click the OK button to save the record.
13.6.3
Example
For Example, we can associate Color property value as 20 with an Item Sucrose.
13.7 Intermediate Property Rollup
Utility provides a way to adjust intermediates properties. The user can calculate or
derive the property of an intermediate, based on the properties of raw materials used to
create the intermediate. The option ensures that the intermediates reflect the properties
of current composition.
Doc. No. F/DV/15
Rev.No.
Date
BatchMaster Software Inc.
13.7.1
BMM User Manual
Screen Fields Description
Item No. From: Displays the Item that specifies the lower limit of the range of items for
the property rollup. The lookup here is limited to those items for which at least one item
location has a Bill of Materials of the „Released‟ status. Leaving this field as blank has the
same effect as entering the first available Item.
Item No. To: Displays the Item that specifies the upper limit of the range of items for
the property rollup. The lookup here is limited to those items for which at least one item
location has a Bill of Materials of the „Released‟ status. Leaving this field as blank has the
same effect as entering the last available Item.
Search level: This field has two preferences:
1. Top: In such case the roll-up will be of single-level.
2. Bottom: In such case, the roll-up will be of multi-level, starting with the lowest
level raw materials.
Status not Allowed: Displays the specific Formula Statuses that will be excluded from
the Intermediate Property Rollup. This prevents rolling up the intermediates material
property specifications. Checking represents the excluded status from roll up.
Mode
Trial: Option is used to view the proposed changes without actually making the changes.
Actual: Processing a roll up with this option selected will write the changes to the
databases.
Doc. No. F/DV/15
Rev.No.
Date
BatchMaster Software Inc.
13.7.2
BMM User Manual
Rolling up Intermediate Property
The Intermediate Property Rollup can be processed using the subsequent steps:
1. Select Item No. From for which intermediate rollup has to be processed. Leaving
this field blank has the same effect as entering the first available Item No..
2. Select Item No. To for which intermediate rollup has to be processed. Leaving this
field blank has the same effect as entering the last available Item No..
3. Select a Search Level as Top or Bottom.
4. Check the Formula Status to be excluded from the rollup. This prevents rolling up
the intermediates material property specifications.
5. Select Trial or Final mode.
6. Click Rollup button.
13.8 Laboratory Reports
13.8.1
Formula Material Analysis Report
Report screen provides a way to generate a report showing an analysis of up to six
physical properties of the raw materials enclosed in a formula. User can make use of the
option‟s filtering parameters to define the report. One can also specify:
1. Quantity by Weight or Volume
2. Search level
3. Printing or non-printing of Formula Properties
Formula Material Analysis option allows searching for and viewing or printing an analysis
of up to six physical properties of the raw materials within one or more of your formulas.
The report displays the quantity used and value of specified physical properties of all the
ingredients used in the specified range of formulas.
User can optionally analyze the properties of materials used in formulas belonging to a
specific Formula Class. For example, properties like Density, Viscosity, Glucose level etc
of all the formulas belonging to class of Oil Paints. This gives a rough figure of the range
in which the properties of formulas belonging to this class lie.
User can, at the most, analyze six properties at a time. The report calculates the value of
the specified properties by multiplying the property factor as maintained at the Material
Property Master screen, property value (T1, T2, T3…T999) of the item as maintained on
the Material Property screen, with the quantity (expressed in system weight/volume) of
the item used in the formula.
BMM allows print the Material Property either by Weight or by Volume. Printing
properties by Weight requires user to select „Weight‟ at the „Quantity By Weight‟ field,
alternatively „Volume‟ to print the properties by volume.
Again, the specified properties can be analyzed just by considering the top-level
formulas included within the selected range. Here, BMM will not search through any
intermediates used in the formula. Instead, user can instruct BMM to report formula
Doc. No. F/DV/15
Rev.No.
Date
BatchMaster Software Inc.
BMM User Manual
physical properties based on all of the ingredients in the formulas, including those
contained within intermediates.
User can even indicate whether or not like BMM to include the formula physical
properties at the end of the report in addition to the material physical properties that
have specified.
Once BMM processes the report parameters, it displays the results as a Crystal Report
that one can print or export.
13.8.1.1
Screen Fields Description
Formula Key From: Display the lower limit of the range of Formulas for use as filter
criteria during processing. Leaving this field as blank has the same effect as selecting the
first available Formula via lookup.
Formula Key To: Displays the upper limit of the range of Formulas for use as a filter
criterion during processing. Leaving this field as blank has the same effect as selecting
the last available Formula via lookup.
Formula Class From: Displays the lower limit of the range of Formula classes for use as
a filter criterion during processing. Leaving this field as blank has the same effect as
selecting the first available Formula class via lookup.
Formula Class To: Displays the upper limit of the range of Formula classes for use as a
filter criterion during processing. Leaving this field as blank has the same effect as
selecting the last available Formula class via lookup.
Doc. No. F/DV/15
Rev.No.
Date
BatchMaster Software Inc.
BMM User Manual
Formula Status From: Displays the lower limit of the range of Formula statuses for use
as a filter criterion during processing. Leaving this field as blank has the same effect as
selecting the first available Formula Status via lookup.
Formula Status To: Displays the upper limit of the range of Formula statuses for use as
a filter criterion during processing. Leaving this field as blank has the same effect as
selecting the last available Formula Status via lookup.
Property1: Displays the Property to be included in the report.
Property2: Displays the Property to be included in the report.
Property3: Displays specify the Property to be included in the report.
Property4: Displays the Property to be included in the report.
Property5: Displays the Property to be included in the report.
Property6: Displays the Property to be included in the report.
Quantity by Weight or Volume: Field allows user a choice for quantities to be
displayed in the report as Weight or Volume wise.
Search Level: Field consist two options:
Top: In this case, the report gets displayed up to single-level.
Bottom: In this case, the report gets displayed up to multi-level, starting with the
lowest level raw materials.
Print All Formula Properties: Field allows user to specify whether to Print All Formula
Properties or Not in the report.
Report Path: Field holds the default path of the report.
Generating a Formula Material Analysis Report
1. Enter the Formula Key From and To range using the lookup buttons next to the
field.
2. Enter the Formula Class From and To range using the lookup buttons next to the
fields.
3. Enter the Formula Status From and To range using the lookup buttons next to the
fields
4. Enter the Property 1-6 range using the lookup buttons next to the fields.
5. Enter the Quantity by Weight or Volume.
6. Select the Search Level as Top or Bottom.
7. Enter the Print All Formula Properties.
8. Click on the OK button to create the report.
Doc. No. F/DV/15
Rev.No.
Date
BatchMaster Software Inc.
13.8.2
BMM User Manual
Formula Physical Property Report
Report calculates formula physical properties and prints just the physical analysis results
along with each formula‟s key and description. The Formulas Physical Properties Report
is similar to the Physical Properties Analysis report except that this report does not
include formula ingredients or other details. It is more concise and less confidential than
the Physical Property Analysis.
The report allows analysis of up to four properties at a time. If user wants a report,
which includes all of the formula physical properties for the formulas that have selected,
then leave the Property1 through Property 4 fields blank. The Physical properties are
calculated using the equation maintained for the physical property at the Physical
Property Formula screen.
This report is based on formula levels. User can specify the formula level wishes BMM to
use to calculate the specified physical properties. On selecting the Top level, BMM will
base its calculations on only ingredients from the master formula. This is referred to as
the top-level or unexploded formula. The physical properties of any in-house
intermediate (pre-mix) in the formulas will be based on the physical properties of the
intermediate material, not its individual ingredients. Alternatively, if opt for Bottom
Level, BMM explodes each master formula to its lowest level of in-house ingredients, and
base its physical properties calculations on all the ingredients of the bottom-level
formula.
Based on the choice, the report can be printed in continuity or may opt to print each
formula and its physical properties at the top of a new page. If no new page is required
for each formula, BMM will print the formulas and properties one after another without
page breaks.
Doc. No. F/DV/15
Rev.No.
Date
BatchMaster Software Inc.
BMM User Manual
Once BMM processes the report parameters, it displays the results as a Crystal Report
one can print or export.
13.8.2.1
Screen Fields Description
Formula Key From: Displays the lower limit of the range of Formulas for use as filter
criteria during processing. Leaving this field as blank has the same effect as selecting the
first available Formula via lookup.
Formula Key To: Displays the upper limit of the range of Formulas for use as a filter
criterion during processing. Leaving this field as blank has the same effect as selecting
the last available Formula via lookup.
Formula Class From: Displays the lower limit of the range of Formula classes for use as
a filter criterion during processing. Leaving this field as blank has the same effect as
selecting the first available Formula class via lookup.
Formula Class To: Displays the upper limit of the range of Formula classes for use as a
filter criterion during processing. Leaving this field as blank has the same effect as
selecting the last available Formula class via lookup.
Formula Status From: Displays the lower limit of the range of Formula statuses for use
as a filter criterion during processing. Leaving this field as blank has the same effect as
selecting the first available Formula Status via lookup.
Formula Status To: Displays the upper limit of the range of Formula statuses for use as
a filter criterion during processing. Leaving this field as blank has the same effect as
selecting the last available Formula Status via lookup.
Property1: Field is used to specify the Property to be included in the report.
Doc. No. F/DV/15
Rev.No.
Date
BatchMaster Software Inc.
BMM User Manual
Property2: Field is used to specify the Property to be included in the report.
Property3: Field is used to specify the Property to be included in the report.
Property4: Field is used to specify the Property to be included in the report.
Search Level: Field consist two options:
Top: In this case, the report gets displayed up to single-level.
Bottom: In this case, the report gets displayed up to multi-level, starting with the
lowest level raw materials.
New Page Each Formula: Field specifies whether to generate report with each formula
on new page or not.
Report Path: Field holds the default path of the report.
13.8.2.2
Generating a Formula Physical Property Report
1. Enter the Formula Key From and To range using the lookup buttons next to the
fields.
2. Enter the Formula Class From and To range using the lookup buttons next to the
fields.
3. Enter the Formula Status From and To range using the lookup button next to the
fields.
4. Enter the Property 1-4 range using the lookup buttons next to the fields.
5. Enter the Search Level as Top or Bottom.
6. Enter the New Page Each Formula.
7. Select the Report path for saving the generated report.
8. Click on the OK button to create the report.
Doc. No. F/DV/15
Rev.No.
Date
BatchMaster Software Inc.
13.8.3
BMM User Manual
Physical Property Analysis Report
Report provides a printed copy of the Line Items Tab of the Physical Property Analysis
Screen. The report allows user to view or print detailed information about line items of
the formula or range of formulas, along with a listing of their physical properties.
The report can be viewed for a formula or a range of formulas. To make the search
criteria narrow, need to specify a range of Formula Class and/or Status. BMM can be
instructed to print the report on pre-printed stationary, in case the report is for interdepartmental rotation.
The printed Physical Properties Analysis contains complete information about each
formula included in the analysis, such as the formula Key and description, formula class,
and status, plus quantities and cost data, and each line item in the formula.
User can make use of the option‟s filtering parameters to define the report. Once BMM
processes the report parameters, it displays the results as a Crystal Report that one can
print or export.
Doc. No. F/DV/15
Rev.No.
Date
BatchMaster Software Inc.
13.8.3.1
BMM User Manual
Screen Fields Description
Formula Key From: Displays the lower limit of the range of Formulas for use as filter
criteria during processing. Leaving this field as blank has the same effect as selecting the
first available Formula via lookup.
Formula Key To: Displays the upper limit of the range of Formulas for use as a filter
criterion during processing. Leaving this field as blank has the same effect as selecting
the last available Formula via lookup.
Formula Class From: Displays the lower limit of the range of Formula classes for use as
a filter criterion during processing. Leaving this field as blank has the same effect as
selecting the first available Formula class via lookup.
Formula Class To: Displays the upper limit of the range of Formula classes for use as a
filter criterion during processing. Leaving this field as blank has the same effect as
selecting the last available Formula class via lookup.
Formula Status From: Displays the lower limit of the range of Formula statuses for use
as a filter criterion during processing. Leaving this field as blank has the same effect as
selecting the first available Formula Status via lookup.
Formula Status To: Displays the upper limit of the range of Formula statuses for use as
a filter criterion during processing. Leaving this field as blank has the same effect as
selecting the last available Formula Status via lookup.
Use Pre-Printed stationary: Check this if desire to print the report on pre-printed
stationary, in case the report is for inter-departmental rotation.
Report Path: This field holds the default path of the report.
13.8.3.2
Generating a Physical Property Analysis Report
Enter the Formula Key From and To range using the lookup buttons next to the fields.
Doc. No. F/DV/15
Rev.No.
Date
BatchMaster Software Inc.
BMM User Manual
1. Enter the Formula Class From and To range using the lookup buttons next to the
fields.
2. Enter the Formula Status From and To range using the lookup buttons next to the
fields.
3. Check the Use Pre-printed Stationary box to enable this feature.
4. Click on the OK button to create the report.
13.8.4
Physical Property Search Report
Screen supports quick search through the entire formula database to determine which
formulas have user-defined quantities of one or more materials or formula physical
properties.
The formulas user wish to include in search can be defined directly by entering a range
of formula key. For example, user wants to search a defined range of formulas that have
Density, which exceeds current regulations.
User can optionally, establish the search on certain Formula Classes. For example, to see
all the formulas within the formula class „Additive‟ with Weight% less than 25000. The
search, if required, can also be based on Formula Statuses.
The most important input required for this report is Search Filter key. This search key
helps BMM in selecting the required formulas. The search is based on formula levels.
User can specify the formula level, wishes BMM to use to calculate the specified physical
properties. On selecting the Top level, BMM will base its calculations only on ingredients
from the master formula. This is referred to as the top-level or unexploded formula. The
physical properties of any in-house intermediate (pre-mix) in the formulas will be based
Doc. No. F/DV/15
Rev.No.
Date
BatchMaster Software Inc.
BMM User Manual
on the physical properties of the intermediate material, not its individual ingredients.
Alternatively, if opt for Bottom Level, BMM explodes each master formula to its lowest
level of in-house ingredients, and base its physical properties calculations on all the
ingredients of the bottom-level formula. If Master Formula does not contain any
intermediates, there is no difference between top-level versus bottom-level formulas.
One can use the option‟s filtering parameters to define the report. Once BMM processes
the report parameters, it displays the results as a Crystal Report that one can print or
export.
13.8.4.1
Screen Fields Description
Formula Key From: Display the lower limit of the range of Formulas for use as filter
criteria during processing. Leaving this field as blank has the same effect as selecting the
first available Formula via lookup.
Formula Key To: Displays the upper limit of the range of Formulas for use as a filter
criterion during processing. Leaving this field as blank has the same effect as selecting
the last available Formula via lookup.
Formula Class From: Displays the lower limit of the range of Formula classes for use as
a filter criterion during processing. Leaving this field as blank has the same effect as
selecting the first available Formula class via lookup.
Formula Class To: Displays the upper limit of the range of Formula classes for use as a
filter criterion during processing. Leaving this field as blank has the same effect as
selecting the last available Formula class via lookup.
Formula Status From: Displays the lower limit of the range of Formula statuses for use
as a filter criterion during processing. Leaving this field as blank has the same effect as
selecting the first available Formula Status via lookup.
Doc. No. F/DV/15
Rev.No.
Date
BatchMaster Software Inc.
BMM User Manual
Formula Status To: Displays the upper limit of the range of Formula statuses for use as
a filter criterion during processing. Leaving this field as blank has the same effect as
selecting the last available Formula Status via lookup.
Search Filter Key: Display the search key on the basis of which the report is filtered.
This key sets a numeric search filter criteria, with an equation.
Search Level: Field consists of two options:
Top: In this case, the report gets displayed up to single-level.
Bottom: In this case, the report gets displayed up to multi-level, starting with the
lowest level raw materials.
Report Path: Field holds the default path on which the report is saved.
13.8.4.2
Generating a Physical Property Search Report
1. Enter the Formula Key From and To range using the lookup buttons next to the
fields.
2. Enter the Formula Class From and To range using the lookup buttons next to the
fields.
3. Enter the Formula Status From and To range using the lookup buttons next to the
fields.
4. Select the Search Filter Key using the lookup button next to the field.
5. Set the Search Level to top or bottom.
6. Click on the OK button to create the report.
Doc. No. F/DV/15
Rev.No.
Date
BatchMaster Software Inc.
13.8.5
BMM User Manual
Physical Property Equation Report
Report screen provides a way to generate a report showing the physical property
equations used in BMM.
User can use the option‟s filtering parameters to define the report. Once BMM processes
the report parameters, it displays the results as a Crystal Report that one can print or
export.
13.8.5.1
Generating a Physical Property Equation Report
Click on the Physical Property Equation Report icon.
13.8.6
Raw Material Physical Property Report
Report allows user to print or view an analysis of up to six physical properties of the raw
materials, irrespective of formulas in which it is used. The report can be generated for a
range of items. This report is reverse of Formula Material Analysis report, since the latter
displays the properties formulas wise while the former does it item wise.
BMM allows printing the Material Property either by Weight or by Volume. Printing
properties by Weight requires selecting „Weight‟ at the „Quantity By Weight‟ field,
alternatively „Volume‟ to print the properties by volume.
Doc. No. F/DV/15
Rev.No.
Date
BatchMaster Software Inc.
BMM User Manual
One can use the option‟s filtering parameters to define the report. Once BMM processes
the report parameters, it displays the results as a Crystal Report that one can print or
export.
13.8.6.1
Screen Fields Description
Item No. From: Displays the lower limit of the range of Item for use as filter criteria
during processing. Leaving this field blank has the same effect as selecting the first
available Item via the lookup.
Item No. To: Displays the upper limit of the range of Item for use as filter criteria
during processing. Leaving this field blank has the same effect as selecting the last
available Item via the lookup.
Property 1: Field specifies the Property to be included in the report.
Property 2: Field specifies the Property to be included in the report.
Property 3: Field specifies the Property to be included in the report.
Property 4: Field specifies the Property to be included in the report.
Property 5: Field specifies the Property to be included in the report.
Property 6: Field specifies the Property to be included in the report.
Quantity by Weight or Volume: Field allows user to make a choice for quantities to be
displayed in the report. User can either choose Quantity to be displayed by Weight or
Volume.
Report Path: Field holds the default path on which the report is saved.
Doc. No. F/DV/15
Rev.No.
Date
BatchMaster Software Inc.
13.8.6.2
BMM User Manual
Generating a Raw Material Physical Property Report
1. Enter the Item No. From and To range using the lookup buttons next to the field.
2. Enter the Property 1-6 range using the lookup buttons next to the fields.
3. Enter the Quantity by Weight or Volume.
4. Select the Report Path for saving the report.
5. Click on the OK button to create the report.
14 Quality Control
Module helps to check the quality of the items at the time of their production. User
needs to define the various tests at the QC Test screen. These can thereafter be
attached to specific
14.1 QC Formula Test
Using the „QC Formula Tests‟ screen, one can associate one or more QC tests with a
formula. With the „QC Formula Test‟ screen, the target values and the control limits for
each of the tests associated with a formula can also be specified.
Doc. No. F/DV/15
Rev.No.
Date
BatchMaster Software Inc.
14.1.1
BMM User Manual
Screen Field Descriptions
Formula: This is the Formula with which one or more quality control tests are
associated. This is a mandatory field.
Test and Measuring Criteria
Test ID: This is the Test ID associated with the test selected at this row.
Measuring: This is the measurement type of the test-results. The value of this field can
be set to one of the following:
1. Pass/Fail Value: The result value of the test can be either Pass or Fail.
2. Numeric Value: The result value has to be a numeric value.
3. Alphanumeric Value: The result value can be alphanumeric.
Target Values
Alphanumeric Value: This is the Target value for a test of alphanumeric measuring
type.
Nominal Value: This is the Target value for a test of Numeric measuring type.
Control Limits
Doc. No. F/DV/15
Rev.No.
Date
BatchMaster Software Inc.
BMM User Manual
Upper Value: This is the upper control limit for a test of Numeric measuring type.
Lower Value: This is the lower control limit for a test of Numeric measuring type.
14.1.2
Creating a QC Formula/Item Test
1. Open the QC Formula/Item Test Screen.
2. Select formula from the lookup if formula is selected in the type field.
3. Maintain various rows on the grid as needed using the following steps:
a) Select a QC Test at the „Test ID‟ field.
b) Select an option at the „Measuring‟ field.
4. For each row on the grid, enter the target test values as follows:
a) If the test highlighted on the grid is numeric type, enter the target test
value at the „Numeric Value‟ field.
b) If the test highlighted at the upper grid is alphanumeric type, enter the
target test value at the „Alphanumeric Value‟ field.
c) If the test highlighted at the upper grid is numeric type, enter control
limits at the „Lower‟ and the „Upper‟ fields in the „Control Limits‟ frame.
5. Click on the OK button to save the QC Formula/Item Test record.
14.2 QC Item Tests
Using the „QC Item Test‟ screen one or more QC tests can be associated with an item. A
QC test can be associated with more than one item. These QC tests can then be applied
to these items via the „Purchase QC‟ and „Sales QC‟ screen. With the „QC Item Test‟
screen one can also specify the Inspection type, the Sampling type, the Measuring type,
the target values and the control limits for each of the tests associated with an item.
Doc. No. F/DV/15
Rev.No.
Date
BatchMaster Software Inc.
14.2.1
BMM User Manual
Screen Fields Description
Item: This is the Item No. with which one wants to associate one or more quality control
tests. This is a mandatory field.
Test and Measuring Criteria
Test ID: This is the Test ID associated with the test selected at this row. The lookup at
this field gets defaulted from the QC Tests screen.
Inspection: The Inspection type of a test can be one of the following:
1. Continuous 100%: In this type of inspection, the test is conducted on the entire
quantity of this item or a lot of this item if this is a lot tracked item.
2. Sampling: In this case, the test is applied to the samples picked as per the
applicable Sampling Plan.
Sample Plan ID: A Sample Plan ID can be selected only when the Inspection is of
„Sampling‟ type. The sampling of this test is done on the basis of this sample plan. This
is a mandatory field if the Inspection is of „Sampling‟ type.
Measuring: This is the measurement type of the test-results. The value of this field can
be set to one of the following:
1. Pass/Fail Value: The result value of the test can be either Pass or Fail.
2. Numeric Value: The result value has to be a numeric value.
Doc. No. F/DV/15
Rev.No.
Date
BatchMaster Software Inc.
BMM User Manual
3. Alphanumeric Value: The result value can be alphanumeric.
Sampling Type: The Sampling type can be one of the following:
1. X- Applicable only for Continous Type.
2. Single: If this option is selected, the item is accepted or rejected on the basis of a
single sampling test. Selecting this Sampling type enables the fields in the
„Control Limits‟ frame. Not applicable for Continous Type.
3. Double: If this option is selected, the item can be subjected to QC twice if the
first test fails but the results of the first test qualify the item for the second
sampling test. Selecting this Sampling type enables the fields in the „Control
Limits for Double Sampling‟ frame. Not applicable for Continous Type.
Chart Used: This is the type of chart that will be used for / are available for selection:
1. X-Chart: X-chart is available only for the numeric type of test. If the measuring
criterion is selected as „Numeric Value‟, this option gets defaulted at this field. It
may be changed to „C-Chart‟ only.
2. C-Chart: C-chart can be selected only for Numeric type of test. C-Chart is used to
display data such as number of defects per sample, defect density per sample or
a weighted value of various defects in a sample.
3. P-Chart: If the measuring criterion is selected as „Pass/Fail‟, this option gets
defaulted at this field. It cannot be modified. This type of chart is available for
alphanumeric type of test also.
4. No Chart: Selecting this option shows no pictorial data. This option can be
selected only for numeric type of test.
Target Values
Alphanumeric Value: This is the Target value for a test of alphanumeric measuring
type.
Nominal Value: This is the Target value for a test of Numeric measuring type.
Control Limits
Upper Value: This is the upper control limit for a test of Numeric measuring type.
Lower Value: This is the lower control limit for a test of Numeric measuring type.
Max Allowable % Defective – 1: This field stores the value in percentage. In case of a
Single Sampling type of test, it is this percentage of the defective samples (calculated
with respect to the total number of samples taken) that determines whether the test has
passed or failed.
Control Limits for Double Sampling
Upper Value: This is the upper control limit for Double Sampling for a test of Numeric
measuring type.
Doc. No. F/DV/15
Rev.No.
Date
BatchMaster Software Inc.
BMM User Manual
Lower Value: This is the lower control limit for Double Sampling for a test of Numeric
measuring type.
Max Allowable % Defective – 2: This field stores the value in percentage. In case of a
double Sampling type of test, it is this percentage of the defective samples (calculated
with respect to the total number of samples taken) that determines whether the second
test has passed or failed.
14.2.2
Maintaining a QC Item Test
1. Click on the Insert button on the toolbar. Clicking this button opens a lookup that
displays all the items maintained in inventory.
2. Select an item from the lookup.
3. Maintain various rows on the grid as needed using the following steps:
a. Select a QC Test at the „Test ID‟ field.
b. Select an Inspection type at the „Inspection‟ field.
c. If the Inspection type is „Sampling‟, select an option at the „Sampling Plan‟
field.
d. Select an option at the „Measuring‟ field.
e. If the Inspection type is „Sampling‟ and one wishes to set the Sampling
type as „Double‟, can do so at the „Sampling Type‟ field.
f.
Select the „Chart To Use‟ as applicable.
4. For each row on the grid, enter the target test values as follows:
a. If the test highlighted on the grid is numeric type, enter the target test
value at the „Numeric Value‟ field.
b. If the test highlighted at the upper grid is alphanumeric type, enter the
target test value at the „Alphanumeric Value‟ field.
c. If the test highlighted at the upper grid is numeric type, enter control
limits at the „Lower‟ and the „Upper‟ fields in the „Control Limits‟ frame.
5. Enter control limits at the „Lower‟ and the „Upper‟ fields in the „Control Limits for
Double Sampling‟ frame if enabled.
6. Enter value at the Max Allowable % Defective-1 field if it is enabled.
7. Enter value at the Max Allowable % Defective-2 field if it is enabled.
8. Click on the OK button to save the QC Item Test record.
14.3 QC Sample
The QC Sample screen provides a way to define a QC sampling plan to use when one
wants to apply quality control to items selected from a lot rather than perform
continuous sampling. With QC Sample, one can establish the sampling plan‟s details and
the number of samples to be used in the test.
The QC Samples created here become available for selection at the „Sample_Plan_ID‟
field of the „Purchase QC‟, „Sales QC‟ and the „Inventory QC‟ screens.
Doc. No. F/DV/15
Rev.No.
Date
BatchMaster Software Inc.
14.3.1
BMM User Manual
Screen Fields Description
QC Sampling Plan Header
Sample Plan ID: This is the key that uniquely identifies this Sample Plan ID. This is a
mandatory field.
Sample Plan Description: This is the description of this Sample Plan.
QC Sampling Plan Details
Qty From: This stores a number that specifies the lower quantity limit for a given row.
Qty To: This stores a number that specifies the upper quantity limit for a given row.
No of Sample 1: This is the number of samples to be taken for testing if the quantity to
be tested falls between the Quantity From and Quantity To values of this row.
No of Sample 2: When double sampling is to be initiated, this is the number of samples
to be taken if the quantity to be tested falls between the Quantity From and Quantity To
values of this row.
14.3.2
Creating a QC Sampling Plan
1. Click on the Insert button on the toolbar.
2. Enter a Sample Plan ID at the „Sample Plan ID‟ field.
Doc. No. F/DV/15
Rev.No.
Date
BatchMaster Software Inc.
BMM User Manual
3. Enter a description at the „Sample Plan Description‟ field as needed.
4. Create as many rows on the grid as needed by following these steps:
a. Enter a value at the „Qty From‟ and the „Quantity To‟ fields.
b. Enter a value at the „No of samples 1‟ field.
c. Enter a value at the „No of samples 2‟ field if needed.
5. Click on the Add button to save the QC Sample record.
14.4 Inventory QC
This screen can be used to perform the QC for the Inventory QC orders that were
generated and released via the Order Inventory QC screen. With this screen, one can
apply QC tests to an inventory item. This screen even allows you to create QC orders for
lots that are close to expiry.
14.4.1
Mandatory Input
Data should have been maintained at the following screens before QC is performed:
1. An Order for the Inventory QC should have been released via the „Order/Post
Inventory QC‟ screen.
2. QC Item Test should have been maintained for the items for which QC has to be
performed.
Doc. No. F/DV/15
Rev.No.
Date
BatchMaster Software Inc.
14.4.2
BMM User Manual
Screen Fields Description
Select the Item
Item No. : This displays the selected Item for which the test is conducted. This is a
read-only field.
Item Desc: This field displays the description of the respective Item No.
Whse: This field displays the location of the item that is under QC.
Order Number: This is the Order Number associated with the Inventory QC Order that
one fetches after clicking the Insert button on the tool bar. This is a read-only field.
Ref. Document No.: This is used for document numbering. In case, the item entries are
fetched from PO this number is automatically gets defaulted with the Doc number
associated with the PO.
Order Status: This field displays the current status of the Inventory QC line item that
has focus on the upper grid of Tab-1. The possible statuses are as follows:
Status
Description
NEW
This is the status when an order for inventory QC is created.
Released
When the Order has been released via the Order Post Inventory
QC screen.
QC Complete
When the QC quantities for all the QC lines of this order have
Doc. No. F/DV/15
Rev.No.
Date
BatchMaster Software Inc.
BMM User Manual
been evaluated.
Description: Read only field displays the description associated to the Order, as defined
on the Order/ Post inventory QC screen.
Released: Check this option to filter the „Find‟ lookup of the screen with the order status
as „Release‟.
Completed: Check this option to filter the „Find‟ lookup of the screen with the order
status as „QC_Completed.
Select a Test:
The Tests associated with the item will be displayed under this grid. User can select the
test that is to be applied.
Test Id: This is the Test ID for this row. The Test ID‟s on this grid are populated as per
the tests specified for this item at the QC Item Test screen. This is a read-only field.
Sliding Grid
Serial/Lot No: This displays the number of the selected serial/lot (if the item is
tracked).
Bin No.: If the Item I sBin tracked, this field will displays the associated Bin no.
Sample_No: This is the number of this sample. This is a read-only field.
Numeric Value: When the measuring criterion is „Numeric Value‟, the numeric value
entered at this field is the measured test value of this sample. If the value entered at
this field falls within the applicable control limits, then the „Pass‟ box gets checked and
the value at the „QCDecision‟ field is set to „Accepted‟ automatically; otherwise, the value
at the „QCDecision‟ field becomes „Rejected‟.
Pass: Checking or un-checking this box specifies whether the sample has passed or
failed respectively. Changes made in this field are reflected in QC Decisions as
„ACCEPTED‟ or „REJECTED‟. This box becomes checked automatically if the result entered
(at the „Numeric Value‟ or „Alpha‟ field as applicable) for this sample is within the
applicable control limits for the QC test.
Alpha Value: This is the target alphanumeric value for this test.
QC Decision: This is the decision status for this sample of this QC test. The value for
this field can be one of the following:
1. ACCEPTED: This option indicates that this sample has been accepted. This value
gets set automatically at this field when the user enters a result value (at the
respective field) that meets the passing criterion.
2. HOLD: For any reason, the sample can be placed on hold by changing the value
on this field to „HOLD‟.
3. NOT_TESTED: This option indicates that this sample has not been tested yet.
Doc. No. F/DV/15
Rev.No.
Date
BatchMaster Software Inc.
BMM User Manual
4. REJECTED: This option indicates that this sample has been rejected. This value
gets set automatically at this field when the user enters a result value (at the
respective field) that falls outside the passing criterion. This defaulted value can
be changed.
Inspection Qty: This is the quantity (of this sample) being tested. This quantity is
interpreted in the unit mentioned on the header of this screen. This is a read-only field.
Status: This field displays the current status of the line item. The possible statuses are
as follows:
1. NEW: This is the status when an Inventory QC Order line is created.
2. READY: This is the status when all the tests of one or more lines are complete or
eliminated. While checking the Pass check box the QC decision field sets to
Accepted or double clicking the same sets the value to Rejected. At this point, the
line is ready for „Posting‟.
Lower Grid
Item No. : This is one of the line items present in the selected Inventory QC Order. This
is a read-only field.
Whse: This field displays the location of the item that is under QC.
Unit: This field displays the Stock UOM of the Item-Location.
Serial/Lot No: This displays the number of the selected serial/lot (if the item is
tracked). This is a read-only field.
Order Qty: This is the quantity (of this sample) being ordered. This is a read-only field.
Accepted Qty: This displays the accepted quantity of the sample/lot tested. This is a
read-only field.
Rejected Qty: This displays the rejected quantity of the sample/lot tested. This is a
read-only field.
Status: This is the status of this sample. The status of a sample is:
1. NEW when the Order status is Released.
2. Close when the Order status is QC_Completed.
14.4.3
Performing Inventory QC
1. Select an Order using the lookup available on the tool bar and click OK. On
selecting the Order, the associated inventory items get displayed at the „Select
the Item‟ grid while tests get displayed at the „Select the Tests‟ grid.
2. Select the Item, under the „Select the Item‟ grid, on which the test is to be
applied.
3. Select the test, from the „Select a test‟ grid, to be applied on the item. Based on
the Test selected, the samples get created and are displayed at the adjacent grid.
Doc. No. F/DV/15
Rev.No.
Date
BatchMaster Software Inc.
BMM User Manual
4. Enter the Numeric/Alphanumeric Values, whichever applicable. To simply pass the
QC Test, click the Pass checkbox. Upon clicking the Pass checkbox, the status at
the QCDecision Field changes to Accepted.
5. Select the desired Status at the QC Decision field for all the samples.
6. Click Save.
7. Similarly apply other test to the same item and other items.
8. Click on the Process button to evaluate the results. As a result, the system
automatically calculates the Accepted and Rejected Quantity and displays them
under the grid.
14.5 Order/Post Inventory QC
Using this screen, one can create a QC Order for performing QC on an inventory item.
When the QC gets completed via the „Inventory QC‟ screen, the Order/Post Inventory QC
screen can also be used to create Warehouse Transfers of the Accepted, Rejected and
Scrapped quantities to desired location.
14.5.1
Mandatory Input
Data should have been maintained at the Item location screen before a QC Order is
created.
14.5.2
Screen Fields Description
Doc. No. F/DV/15
Rev.No.
Date
BatchMaster Software Inc.
BMM User Manual
Header Info
Order Number: This is the number that uniquely identifies this Order. This is a readonly field.
Order Date: This is the date on which this Order is created. When a new QC Order is
created, the Server date is displayed here by default.
Default Order Location: The location selected here gets defaulted with the „Location‟
field of each line added to the grid. The default Location at the „Location‟ field of the grid
can be changed.
Order Status: This is the status of this Order. The status of an Order is displayed as:
1. New until it is saved.
2. Released after the Order has been released (processed) using the „Process‟ button
on the toolbar. An Order can be released only when the status of all the Order
lines is „Ready‟.
3. QC Completed when the QC quantities for all the QC lines of this order have been
posted via the „Inventory QC‟ screen.
Description: This is a user-defined description of this Order.
Ref. Document No.: This is used for document numbering. In case, the item entries are
fetched from PO this number is automatically gets defaulted with the Doc number
associated with the PO.
QC Type:
This is the measurement type of the test-results.
New: Check this option to filter the „Find‟ lookup of the screen with the order status as
„New‟.
Released: Check this option to filter the „Find‟ lookup of the screen, with the order
status as „Release‟.
Completed: Check this option to filter the „Find‟ lookup of the screen with the order
status as „QC_Completed.
Fill From Goods Receipt Purchase: Clicking this button offers you a list of Purchase
Order maintained in BMM. When you select any purchase order the line item entry
contained within the PO gets defaulted to the sliding grid. If require you can alter the
any value.
Detail Grid
Select: Checking this box selects the row for the Warehouse Transfers that can be done
via the Transfer QC Order button on the toolbar.
Item No.: This is the Item key associated with this item selected for QC. All the
inventory items qualify for QC; none of the QC options (Purchase, Sales or Production)
needs to have been checked for an item on the Item Master screen for the item to
qualify for Inventory QC.
Doc. No. F/DV/15
Rev.No.
Date
BatchMaster Software Inc.
BMM User Manual
Whse: This is the warehouse associated with the item.
Unit: This is the Stock unit of this item. The quantity entered at the „Order Qty‟ field for
this row is interpreted in this unit of measurement.
Order Qty: This is the quantity (of this Item Warehouse) being ordered for Inventory
QC.
Accepted Qty: This displays the accepted quantity of the sample/lot tested. This field
gets populated with the accepted quantities that were posted via the „Inventory QC‟
screen.
Rejected Qty: This displays the rejected quantity of the sample/lot tested. This field
gets populated with the rejected quantities that were posted via the „Inventory QC‟
screen.
Scrapped Qty: This displays the scrapped quantity of the sample/lot tested. This field
gets populated with the scrapped quantities that were posted via the „Inventory QC‟
screen.
Select/View Lot: This button is enabled if the item on highlighted line is serial/lot
tracked on Multiple BINs type. Clicking this button opens the „Serial Lot Maintenance
screen‟ where the user can
1. Select serial/lots/bins for the Order quantity if not selected yet
2. View the previously selected serial/lots/bins for the Order quantity
14.5.3
Key Operations
14.5.3.1
Creating a QC Order
1. Click on the Insert button on the toolbar. If the option „Generate Auto QC Order
Number‟ has not been selected on the „QC Default Setup‟ screen, you need to
manually enter the Order number.
2. Enter the Order Date as needed.
3. Select a location at the „Default Order Location‟ field if needed.
4. Create as many rows on the grid as needed by following these steps:
a. Select an item at the „ItemKey‟ field.
b. Select or modify a location at the „Location‟ field.
c. Enter the order quantity at the „Order Qty‟ field.
5. Click on the Add button to save the QC Order.
14.5.3.2
Transferring QC Orders
1. Select an order via the lookup button on the toolbar.
2. Select the checkbox adjacent to the item(s) to be transferred.
3. Click the „Transfer QC Order' button on the toolbar. The following window
appears:
Doc. No. F/DV/15
Rev.No.
Date
BatchMaster Software Inc.
BMM User Manual
a. On the „Warehouse Transfer‟ popup window:
i. Check the boxes as needed for the Accepted or Rejected.
ii. Specify Warehouse to which the selected Quantities have to be
transferred via the lookup attached next to the fields.
iii. Click „OK‟.
14.5.4
Goto
Release QC Order: Click this button to release the order. This action would set the
Order status to Release.
Transfer QC Order: The transfer QC order button when clicked populates the Inventory
Transfer Options screen. This screen provides the user with two different inventory
transfer options as „Put Aways and „Warehouse Transfer‟. Selecting the „Put Aways‟
option populates Inventory Put Away form. At this screen, the inventory move is
maintained amongst the storage bins from one bin to another within a warehouse.
To perform the PutAways transaction from Order Post Inventory QC screen it is
mandatory that the order status is QC completed,else the respective data will not be
displayed on the Inventory Put Away form.
Using the Warehouse transfer option one can move accepted and rejected quantities,
from the warehouse where QC has been performed, to the desired warehouse.
To perform the Warehouse transfer from Order Post Inventory QC screen it is mandatory
that the order status is QC completed, else the respective data will not be displayed on
the Warehouse transfer form.
Clicking this button opens a pop up window as follows where one can:
1. Select the On Date.
2. Select the „Put Aways „option‟ if required.
3. Selecting the „Put Aways‟ option opens “Inventory Put Away‟ screen. Fill in the
required details.
4. Click on „Add‟ button to save the record.
5. Further, select the Warehouse transfer option if required.
Doc. No. F/DV/15
Rev.No.
Date
BatchMaster Software Inc.
BMM User Manual
6. Select the accepted and/or the rejected quantities location where the quantities
need to be transferred.
7. Click OK to perform the warehouse transfer.
Goto Inventory QC: Clicking this button displays the order on the Inventory QC screen,
where you can apply the QC test to the inventory items.
14.6 QC Reports
14.6.1
QC Test Master Report
Screen provides a way to generate a report showing the QC tests created using the QC
Test Description screen.
The option‟s filtering parameters can be used to define the report. Once BMM processes
the report parameters, it displays the results as a Crystal Report that one can print or
export.
14.6.1.1
Screen Fields Description
Test Key From: Field specifies the lower limit of the range of Test Key for use as filter
criteria during processing. Leaving this field blank has the same effect as selecting the
first available Key via the lookup.
Test Key To: Field specifies the upper limit of the range of Test Key for use as filter
criteria during processing. Leaving this field blank has the same effect as selecting the
Last available Key via the lookup.
Report Path: Field holds the default path of the report.
14.6.1.2
Generating a QC Test Master Report
1. Enter the Test Key From and To range using the lookup buttons next to the fields.
2. Click on the OK button to create the report.
Doc. No. F/DV/15
Rev.No.
Date
BatchMaster Software Inc.
14.6.2
BMM User Manual
Formula-Test Report
Screen provides a way to generate a report showing the QC tests assigned to formulas
using the QC Formula/ Tests screen.
The option‟s filtering parameters can be used to define the report. Once BMM processes
the report parameters, it displays the results as a Crystal Report that one can print or
export.
14.6.2.1
Screen Fields Description
Doc. No. F/DV/15
Rev.No.
Date
BatchMaster Software Inc.
BMM User Manual
Item / Formula: Field displays a choice for user to select either Formula or Item for
generating report.
Depending upon the opted option the system would display the fields as:
Formula Key From: Field specifies the lower limit of the range of Formula for use as
filter criteria during processing. Leaving this field blank has the same effect as selecting
the first available Formula via the lookup.
Formula Key To: Field specifies the upper limit of the range of Formula for use as filter
criteria during processing. Leaving this field blank has the same effect as selecting the
last available Formula via the lookup.
Report Path: Field holds the default path of the report.
14.6.2.2
Generating a Formula-Tests Report
1. Enter the Formula Key From and To range using the lookup buttons next to the
fields.
2. Click on the OK button to create the report.
14.6.3
Production QC Report
Report will display the pertinent information for the selected Batch Number, along with
the formula key, test, status, tested by, tested date, test type, result type, result
numeric, result alpha, target number, target alpha, number range low and number range
high.
Doc. No. F/DV/15
Rev.No.
Date
BatchMaster Software Inc.
BMM User Manual
The option‟s filtering parameters can be used to define the report. Once BMM processes
the report parameters, it displays the results as a Crystal Report that one can print or
export.
14.6.3.1
Screen Fields Description
Batch Number From: Field specifies the lower limit of the range of Batches for use as
filter criteria during processing. Leaving this field blank has the same effect as selecting
the first available Batch via the lookup.
Batch Number To: Field specifies the upper limit of the range of Batch for use as filter
criteria during processing. Leaving this field blank has the same effect as selecting the
last available Batch via the lookup.
Formula ID From: Field specifies the lower limit of the range of Formula for use as filter
criteria during processing. Leaving this field blank has the same effect as selecting the
first available Formula via the lookup.
Formula ID To: Field specifies the upper limit of the range of Formula for use as filter
criteria during processing. Leaving this field blank has the same effect as selecting the
last available Batch via the lookup.
From Date: Field specifies the lower limit of the range of dates for use as filter criteria
during processing. This date may be entered by typing or selected via the associated
calendar lookup on this screen. Leaving this field blank has the same effect as entering
the system date.
To Date: Field specifies the upper limit of the range of dates for use as filter criteria
during processing. This date may be entered by typing or selected via the associated
calendar lookup on this screen. Leaving this field blank has the same effect as entering
as entering the system date.
Batch Type: Field is used to specify the Batch Type to be included for processing the
report. The available options for Batch Type are:
1. ALL
Doc. No. F/DV/15
Rev.No.
Date
BatchMaster Software Inc.
BMM User Manual
2. Mix
3. Fill
4. Assembly
Report Path: Field holds the default path of the report.
14.6.3.2
Generating a Production QC Report
1. Enter the Batch Number From and To range using the lookup buttons next to the
fields.
2. Enter the Formula ID From and To range using the lookup buttons next to the
fields.
3. Select From and To Date range.
4. Select Batch Type to All, Mix, Fill or Assembly.
5. Click on the OK button to create the report.
14.6.4
Inventory QC Result Report
This report displays the Qc results of the specified range of Inventory QC Orders. Report
Displays Numeric Values, Alphanumeric Values and QCDecision for all the samples.
Doc. No. F/DV/15
Rev.No.
Date
BatchMaster Software Inc.
14.6.4.1
BMM User Manual
Screen Field Description
Order Date From: This determines lower limit of the date range QC result report for the
Orders lying in which is to be printed.
Order Date To: This determines upper limit of the date range QC result report for the
Orders lying in which is to be printed.
Report Path: Field holds the default path of the report.
14.6.4.2
Creating a Inventory QC Result Report
1. Establish the range of Order Dates.
2. Click on the OK button to generate the report.
Doc. No. F/DV/15
Rev.No.
Date
BatchMaster Software Inc.
14.6.5
BMM User Manual
Certificate of Analysis Report
The Certificate of Analysis report screen is issued to the customer at the dispatch of the
material sold. This report displays the pertinent information regarding the QC test
applied on the Finished Goods along with the results obtained.
The option‟s filtering parameters can be used to define the report. Once BatchMaster
Enterprise processes the report parameters, it displays the results as a Crystal Report
that one can print or export.
14.6.5.1
Screen Fields Description
Batch No. From: This determines the lower limit of the selected range of batches for
use as filter criteria during processing. Leaving this field blank has the same effect as
selecting the first available batch via lookup.
Batch No To: This determines the upper limit of the selected range of batches for use
as filter criteria during processing. Leaving this field blank has the same effect as
selecting the last available batch via lookup.
Lot No. From: This is the Lot number that specifies the lower limit of the selected range
of batches for use as filter criteria during processing. Leaving this field blank has the
same effect as selecting the first available lot via lookup.
Lot No. To: This is the Lot number that specifies the upper limit of the selected range of
batches for use as filter criteria during processing. Leaving this field blank has the same
effect as selecting the last available lot via lookup.
Date From: This Date specifies the lower limit of the range of batches for use as filter
criteria during processing. This Date From key may be entered by typing or selected via
the displayed calendar on this screen.
Doc. No. F/DV/15
Rev.No.
Date
BatchMaster Software Inc.
BMM User Manual
Date To: This Date specifies the upper limit of the range of printed dates for use as filter
criteria during processing. This Date To key may be entered by typing or selected via the
displayed calendar on this screen.
Report Path: This field stores the path of the MS-Word Template file that is used to
print a Certificate of Analysis. This path can point to a file on the local machine or a
machine on the network.
14.6.5.2
Generating a Certificate of Analysis
1. The Batch Number From and To range using the lookup buttons next to the fields.
2. Complete the Lot No. From and To range using the lookup buttons next to the
fields.
3. Select From and To Date range.
4. To save these parameters, enter the name to be assigned to the report
parameters in the drop-down field on the far right of the toolbar and then click on
the Save button on the toolbar to save the report parameters.
5. Click on the OK button to create a report.
Doc. No. F/DV/15
Rev.No.
Date
BatchMaster Software Inc.
BMM User Manual
15 MSDS
15.1 BoilerPlate Override
Screen provides the users with a way to replace a set of two boilerplates (having
conflicting or duplicate information) with one boilerplate. BatchMaster Manufacturing
uses this information during generation of a MSDS that contains two boilerplates with
contradictory or duplicate information.
15.1.1
Screen Fields Description
Conflicting Boilerplates
Group Name: Field displays the boilerplate group key that is associated with the
adjacent boilerplate key. The group name can be entered by typing or selected via the
associated lookup on this screen. This is a mandatory field.
Boilerplate ID: Field displays the boilerplate key.
Group Name: Field displays the boilerplate group key that is associated with the
adjacent boilerplate key. The group name can be entered by typing or selected via the
associated lookup on this screen. This is a mandatory field.
Boilerplate ID: Field displays the boilerplate key.
Replace with Boilerplate
Group Name: Field displays the name of the group that is associated with the
replacement boilerplate. The group name can be entered by typing or selected via the
associated lookup on this screen. This is a mandatory field.
The replacement boilerplate could be either of the following:
Doc. No. F/DV/15
Rev.No.
Date
BatchMaster Software Inc.
BMM User Manual
1. One of the two contradictory or conflicting boilerplates.
2. A third boilerplate
boilerplates.
that
replaces
the
set
of
two
contradictory/duplicate
The position (on the MSDS template file) of the bookmark for the Boilerplate Group of
the replacement boilerplate determines where this boilerplate will be printed on the
MSDS.
Boilerplate ID: Field displays the identification associated with the replacement
boilerplate.
The replacement boilerplate could be either of the following:
1. One of the two contradictory or conflicting boilerplates.
2. A third boilerplate which replaces the set of two contradictory/duplicate
boilerplates.
Reason: This is the reason for replacing a set of two boilerplates containing
contradictory or duplicate information.
Status: Field displays the status of the Boilerplate Override record. The status of the
boilerplate can be one of Active, Inactive, and Marked for Deletion or Deleted. The
default value of this field is set to „Active‟. The replacement is effective only if the status
is „Active‟ on this screen and the status of the replacement boilerplate is „Active‟ at the
Boilerplate Maintenance screen.
15.1.2
Defining a Boilerplate Override
1. Open the Boilerplate Override screen.
2. Select the boilerplate group for the first boilerplate to be replaced.
3. Select the boilerplate group for the second boilerplate to be replaced.
4. Select the boilerplate group for the replacement boilerplate.
5. Enter the reason for the replacement.
6. Select the Status of the replacement boilerplate.
7. Click on OK button to save the record.
15.1.3
Example
For Example, there are two boilerplates „Keep away from Fire‟ and „Fire Extinguisher‟.
These two are contradictory boilerplates so you may replace these with the boilerplate
„Fire Extinguisher‟
15.2 Supplementary File
It is a collection of MSDS boilerplates. The Supplementary files are used in determining
which boilerplates will be printed on a MSDS.
Doc. No. F/DV/15
Rev.No.
Date
BatchMaster Software Inc.
BMM User Manual
The following conditions must be fulfilled for the boilerplates from a supplementary file to
be printed on a MSDS:
The Supplementary File should be applicable to the MSDS.
A bookmark should have been inserted on the MSDS template file (the Microsoft
Word Document Template) for the Boilerplate Group of the Boilerplate contained
in the Supplementary File.
For a Boilerplate Group to be added to a MSDS, the Boilerplate Group Key, preceded with
the characters “BP_,” should be inserted as a book mark on the corresponding Microsoft
Word Document Template file used to generate the MSDS. For example, if the Boilerplate
Group Key is “GRP1,” then the corresponding bookmark would be “BP_GRP1”.
Supplementary file can be generated via any of the following:
1.
2.
3.
4.
5.
Templates
Materials
Formulas
Formula Classes
Material Hazard
15.2.1
Mandatory Inputs
Data should be setup at the following screens before creating a Supplementary File:
1. Boilerplate Group
2. Boilerplate Maintenance
Doc. No. F/DV/15
Rev.No.
Date
BatchMaster Software Inc.
15.2.2
BMM User Manual
Screen Fields Description
Header Information
Supplementary File Type: Field stores the type of a supplementary file. The type of a
supplementary file can be one of Template, Materials, Formula, Formula Class or Material
Hazard.
The default value of this field is set to „Template‟ when a new supplementary file is
inserted. A Template can be attached to a Formula at the „MSDS Supplementary File‟
field under Tab-4 of the Formula Entry screen.
Supplementary File ID: This is the key for this supplementary file. This is a mandatory
field. This field gets visible when Supplementary File Type selected is Template.
Item No. : This field displays the Item No. for the respective item. This is a mandatory
field. This field gets visible when Supplementary File Type selected is Material.
Formula Key : This field displays the Formula Key for the respective Formula. This is a
mandatory field. This field gets visible when Supplementary File Type selected is
Formula.
Formula Class: This field displays the Formula Class selected via lookup provided. This
is a mandatory field. This field gets visible when Supplementary File Type selected is
Formula Classes.
Doc. No. F/DV/15
Rev.No.
Date
BatchMaster Software Inc.
BMM User Manual
Material Hazard ID: This field displays the Material Hazard selected via lookup
provided. This is a mandatory field. This field gets visible when Supplementary File Type
selected is Material Hazard.
Status: This is the status of a supplementary file. The status of a supplementary file can
be one of Active, Inactive, Marked for Deletion or Deleted. The default value of this field
is set to Active when a new supplementary file is inserted. If a supplementary file is not
Active, it is ignored when a MSDS is printed.
Boilerplates grid
BPGroup: Field displays the key of the boilerplate group that is associated with the
boilerplate on this line. After clicking the ellipsis button on this field, the user can select
the group name from the displayed lookup. The identification associated with the
selected group name is displayed at the field „BPID‟. This is a mandatory field.
BPID: Field displays the boilerplate key for this line.
15.2.3
Creating a Supplementary File
1. Click the Supplementary File screen.
2. Select the type of Supplementary File.
3. Enter or select a value for Supplementary File ID or Item No. or Formula Key or
Formula Class or Material Hazard Type ID.
4. Select a Status for the supplementary file.
5. Click on the ellipsis button under the field BPGroup to add the Boiler plate group.
6. Select a row on the look up form and click OK.
7. Click on the Add button to save the supplementary file.
15.2.4
Example
For Example, you want to associate „Eye Protection‟ and „Use Gloves‟ boiler palates with
formula for „redo primer‟. Then you can Supplementary File to do so.
15.3 CAS Number Master
Screen can be used to maintain the material safety information for a CAS number. CAS
Number stands for Chemical Abstracts Service Number that is an assigned number used
to identify a chemical. CAS stands for Chemical Abstracts Service, an organization that
indexes information published in Chemical Abstracts by the American Chemical Society
and that provides index guides by which information about particular substances may be
located in the abstracts. The numbers have no chemical significance.
When a CAS Master is inserted on the Material Safety Information screen, the
information contained in the CAS Master is defaulted on the Material Safety Information
screen.
Doc. No. F/DV/15
Rev.No.
Date
BatchMaster Software Inc.
15.3.1
BMM User Manual
Screen Fields Description
CAS Number Master
CAS Number: Field stores the Chemical Abstracts Service (CAS) number for this
material.
Tab-1 (General Information)
Doc. No. F/DV/15
Rev.No.
Date
BatchMaster Software Inc.
BMM User Manual
General Information
Trade Secret: Field indicates whether a Company regards this material as a trade
secret. This field is for reference purpose only.
Chemical Name: Field stores the chemical name by which this material is known.
Other Information: Field stores any other related information for this material.
Properties
Vap. Pressure mm Hg: Field stores the pressure of a saturated vapor of this material in
terms of millimeters of mercury.
Vap. Pressure Temp: Field stores the temperature in degrees Fahrenheit (◦F) or
degrees Celsius (◦C), to which this material was subjected when the Vapor Pressure mm
Hg was measured.
Lower Explosive Limit: Field stores the value of the lowest concentration (% by
volume in air) at which this material will burn or explode if an ignition source is
available.
Doc. No. F/DV/15
Rev.No.
Date
BatchMaster Software Inc.
BMM User Manual
Upper Explosive Limit: Field stores the value of the highest concentration (% by
volume in air) at which this material will burn or explode if an ignition source is
available.
Boiling Point: Field stores the temperature in degrees Fahrenheit (◦F) or degrees
Celsius (◦C), at which this material will boil at an atmospheric pressure of 760 mmHg.
Flash Point: Field stores the temperature in degrees Fahrenheit (◦F) or degrees Celsius
(◦C), at which this material gives off sufficient vapor to form a flammable or ignitable
mixture with air.
Flash Point Method Used: Field stores the method that is used to determine the flash
point of this material.
INCI: This field holds the INCI name for the CAS number being defined. This name is
required for compliance issue, especially for compliance with Bio Terrorism Act.
EINICS: This field holds the EINECS name for the CAS number being defined. This name
is required for compliance issue, especially for compliance with Bio Terrorism Act.
Tab-2 (Safety Info)
Properties
Doc. No. F/DV/15
Rev.No.
Date
BatchMaster Software Inc.
BMM User Manual
HMIS Health: Field displays the HMIS Health rating for this material. HMIS stands for
Hazardous Material Information System. The valid values are 0-4 or a blank space.
•
0 - Minimal
•
1 - Slight
•
2 - Moderate
•
3 – Serious
•
4 – Severe
A blank space in this field indicates that no HMIS Health rating is applicable to this
material.
HMIS Chronic Factor: Field stores whether or not this material is carcinogenic. An
asterisk in this field indicates that this material is carcinogenic. A blank space in this field
indicates that this material is not carcinogenic.
HMIS Flammability: Field displays the HMIS Flammability rating for this material. The
valid values are 0-4 or a blank space.
•
0 - Minimal
•
1 - Slight
•
2 - Moderate
•
3 – Serious
•
4 – Severe
A blank space indicates that no Flammability rating is applicable to this material.
HMIS Reactivity: Field displays the HMIS Reactivity rating for this material. The valid
values are 0-4 or a blank space.
•
0 - Minimal
•
1 - Slight
•
2 - Moderate
•
3 – Serious
•
4 – Severe
A blank space indicates that no Reactivity rating is applicable to this material.
HMIS Personal Protection: Field displays the HMIS Reactivity rating for this material.
A blank space indicates that no HMIS Reactivity rating is applicable to this material. The
valid values are:
•
Safety Glasses
•
Safety Glasses, Gloves
•
Safety Glasses, Gloves, Synthetic apron
•
Face Shield, Gloves, Synthetic apron
Doc. No. F/DV/15
Rev.No.
Date
BatchMaster Software Inc.
BMM User Manual
•
Safety Glasses, Gloves, Dust Respirator
•
Safety Glasses, Gloves, Synthetic apron, Dust Respirator
Material Hazard
Material Hazard Type ID: Field displays the identification of a Material Hazard type for
a line in the Material Hazard grid.
Description: Field displays the description associated with the Material Hazard type for
a line in the Material Hazard grid.
Tab-3 (Safety Info continued)
Fire Hazard: Check this box if this material is readily combustible and/or presents a
potential fire hazard.
Sudden Release of Pressure Hazard: Check this box if this material will react
violently when pressure is suddenly released from this material.
Reactivity Hazard: Check this box if this material will react, possibly violently, when
combined with certain other materials.
Doc. No. F/DV/15
Rev.No.
Date
BatchMaster Software Inc.
BMM User Manual
Immediate Health Hazard – Acute: Check this box if this material presents an
immediate and/or severe health hazard should some one come in contact with it.
Contact may be interpreted as physical contact on the skin, inhalation, ingestion etc.
Delayed Health Hazard – Chronic: Check this box if this material presents a long
term, delayed, and/or recurring health hazard should some one come in contact with it.
Contact may be interpreted as physical contact on the skin, inhalation, ingestion etc.
Pure: Check this box if this material is Pure.
Mixture: Check this box if this material is a Mixture.
Solid: Check this box if this material is a Solid.
Liquid: Check this box if this material is a Liquid.
Gas: Check this box if this material is a Gas.
SARA Information (Delayed Health Hazard (Chronic) Details
Type: Field stores the storage type (represented by a letter) of this item for a line in the
grid.
Pressure: Field stores the pressure (represented by a number) associated with a
storage type for a line in the grid.
Temperature: Field stores the temperature (represented by a number) associated with
a storage type for a line in the grid.
Tab-4 (OEL)
Doc. No. F/DV/15
Rev.No.
Date
BatchMaster Software Inc.
BMM User Manual
OEL Details
Occupational Exposure Limits: Field stores the Occupational Exposure Limit for this
material. A material can have multiple occupational exposure limits.
15.3.2
Creating a CAS Number
1. Open the CAS Number screen.
2. Enter the various data on Tabs 1-4 as needed.
3. Click on the Add button to save a CAS Number Master record.
15.4 Hazard Print Range Maintenance
Screen provides the users with a way to define the ranges of numbers that can be
printed instead of the actual percentage of hazardous materials on a MSDS.
Doc. No. F/DV/15
Rev.No.
Date
BatchMaster Software Inc.
15.4.1
BMM User Manual
Screen Fields Description
Hazard Print Range
Range Table ID: Field stores a unique identification of a Hazard Print Range Table. This
is a mandatory field.
Description: Field displays the description associated with this Hazard Print Range
Table.
Range Details
For Percentage Through: Field displays the percentages (of a hazardous material) that
can be printed on a MSDS as a corresponding range. If there is no preceding row in this
table, than the lower value of the percentage is taken as zero. If there is a preceding
row in this table, than the lower value of the percentage is taken as greater than the
value of this field in the previous row. The upper limit extends to the value of this field
on this row.
List As This Range: Field displays a range format for the selected line of the grid. This
is a read-only field. For example: 11% could be printed as 0% - 20%.
15.4.2
Creating a Hazard Print Range Table
1. Open the Hazard Print Range Maintenance Screen.
2. Enter a percentage at the field „Percentage Through‟. The corresponding range is
displayed at the field „List as this Range‟.
Doc. No. F/DV/15
Rev.No.
Date
BatchMaster Software Inc.
BMM User Manual
3. Enter the identification and the description of the Hazard Print Range Table.
4. Click on the Add button to save the Hazard Print Range Table record.
15.5 Hazard Print Criteria Maintenance
Screen provides users with a way to establish how the information about material
hazards is to appear on a MSDS.
The following conditions must be fulfilled for a hazardous material to be listed in the
Hazard Section of the MSDS:
a. „The Material Hazard Type ID‟ of this screen should be attached to an ingredient
of the formula on Tab-2 of the Material Safety Information or CAS Number Master
screen. (A material is considered to be hazardous only if a Material Hazard Type
ID has been attached to it at the Material Safety Information or the CAS Number
Master screen).
b. The Material should be reportable. A material is considered reportable if its
quantity in the formula meets at least one of the threshold requirements on this
screen, namely “Include by Wt > = %”, “Include by Vol > = %” and “Include Top
n Ingredients”.
c. The Hazard Section ID, preceded with the characters “TBL_”, should be inserted
as a book mark on the corresponding Microsoft Word Document Template file
used to generate the MSDS. For example, if the Hazard Section ID is
“USAMSDSII”, then the corresponding bookmark would be “TBL_USAMSDSII”.
The Hazard Section to be printed on a MSDS should be added under tab-2 of the
Material Safety Information screen.
d. The Hazard section ID, prefixed with the characters “HRZ_”, and followed by one
of (ICH, IVT, IWT, ICS, IVP, OEL) keywords can be inserted as a bookmark in the
Word Document Template file used to generate the MSDS. For example, if the
hazard section id is “SECTIONA” and it is required to print the chemical name of a
reportable component in one of the tables in the MSDS, the column header in the
table should be the bookmark “HRZ_SECTIONA_ICH”.
15.5.1
Mandatory Inputs
Data should be setup at the following screens before creating a Hazard Print Criteria:
1. Hazard Type Maintenance
2. Hazard Print Range Maintenance (if „Range‟ is selected at the „List Qty As‟ field)
Doc. No. F/DV/15
Rev.No.
Date
BatchMaster Software Inc.
15.5.2
BMM User Manual
Screen Fields Description
Hazard Print Criteria Maintenance
Hazard Section ID: This is the key to identify this Hazard Section. This is a mandatory
field.
Material Hazard Type ID: Field displays the Material Hazard type for which a Hazard
Section is to be printed on a MSDS. The Material Hazard Type ID may be entered by
typing or selected via the associated lookup on this screen. This is a mandatory field.
Include by Weight >= %: Field stores the minimum weight percent of a hazardous
material in the formula to determine if the hazardous material is reportable on the
MSDS.
Include by Volume >= %: Field stores the minimum volume percent of a hazardous
material in the formula to determine if the hazardous material is reportable on the
MSDS.
Include Top n Ingredients: Field stores how many of the top hazardous ingredients
(line items of a formula) should be printed on a MSDS. The top ingredients are
determined on the basis of weight percent or volume percent as specified at the „Sort
MSDS Components by Weight or Volume‟ field of MSDS Setup screen.
List Quantity as: For a reportable hazardous material, one can specify the manner in
which its quantity is to be reported on a MSDS. This can be:
1. Number: In this case, the weight or volume percentage is listed depending on the
setting made at the „Sort MSDS Components by Weight or Volume‟ field of MSDS
Setup screen. This percentage is rounded according to the “Round to Nearest
Range n%” field on the Hazard Print Criteria Maintenance screen.
2. Range: In this case, the weight or volume percentage is listed depending on the
setting made at the „Sort MSDS Components by Weight or Volume‟ field of MSDS
Doc. No. F/DV/15
Rev.No.
Date
BatchMaster Software Inc.
BMM User Manual
Setup screen. This percentage is listed as a range according to the value of the
“Range Table ID to Use” field on the Hazard Print Criteria Maintenance screen.
3. Do Not List: In this case, the material itself gets listed on the MSDS, but the
material‟s quantity is not shown on the MSDS.
Round to Nearest Range n %: Field stores a rounding criterion in percentage (if the
“List Qty as” field is set to „Number‟).
Range Table ID to use: Field stores a Range Table ID (if the “List Qty as” field is set to
„Range‟).
Chemical Name Prefix: Field stores a prefix that is used to print the Chemical Name
(as specified on tab-1 of the Material Safety Information or the CAS Number Master
screen) of the materials associated with the selected material hazard type on a MSDS.
For example, one can store an asterisk (*) to flag a certain material.
15.5.3
Creating a Hazard Section
1. Open the Hazard Print criteria Maintenance screen.
2. Enter a Hazard Section ID.
3. Enter a Material Hazard Type ID.
4. Enter the weight (in percentage) as needed.
5. Enter the volume (in percentage) as needed.
6. Enter value for the “Include Top n Ingredients” as needed.
7. Make a selection for the “List Qty As” field.
8. Enter a value at the field „Round to Nearest Range n%‟ (if „Number‟ is selected at
the field „List Qty As‟).
9. Select a Range Table (if „Range‟ is selected at the field „List Qty As‟).
10. Click on the Ok button to save this Hazard Section record.
15.6 Material Safety Information
Screen can be used to define the safety information associated with a specific inventory
item. The user can specify the general information such as CAS number, Trade Secret
status and specific item properties. These properties may include vapor pressures,
explosive limits, flash point, boiling point and flash point method being used. The SARA
information, delayed health hazards and occupational exposure limits may also be
specified here.
The user may also set the HMIS values for:
1. Health
2. Chronic factor
3. Flammability
4. Reactivity
5. Personal protection
Doc. No. F/DV/15
Rev.No.
Date
BatchMaster Software Inc.
BMM User Manual
6. Specific material hazards
If a CAS Number is selected on this screen, then the data maintained on Tab 1-4 of that
CAS Number master record is defaulted on the Material Safety Information screen.
15.6.1
Screen Fields Description
Material Safety information
Item Key: Field displays the Item Key for which the safety information is defined.
Tab-1 (General Information)
Doc. No. F/DV/15
Rev.No.
Date
BatchMaster Software Inc.
BMM User Manual
General Information
CAS Number: Field displays the Chemical Abstracts Service (CAS) number for this item.
This can be entered by typing or selected via the available lookup on the screen.
Chemical Name: Field displays the name by which this item is known.
Other Information: Field stores any other related information for this item.
Trade Secret: Checking the field indicates whether the Company regards this item as a
trade secret. This field is for reference purpose only.
Properties
Vap. Pressure mm Hg: Field stores the pressure of a saturated vapor of the item in
terms of millimeters of mercury.
Vap. Pressure Temp: Field stores the temperature in degrees Fahrenheit (◦F) or
degrees Celsius (◦C), at which this item was subjected to when the Vapor Pressure mm
Hg was measured.
Lower Explosive Limit: Field displays the value of the lowest concentration (% by
volume in air) at which this item will burn or explode if an ignition source is available.
Doc. No. F/DV/15
Rev.No.
Date
BatchMaster Software Inc.
BMM User Manual
Upper Explosive Limit: Field displays the value of the highest concentration (% by
volume in air) at which this item will burn or explode if an ignition source is available.
Boiling Point: Field displays the temperature in degrees Fahrenheit (◦F) or degrees
Celsius (◦C), at which this item will boil at an atmospheric pressure of 760 mmHg.
Flash Point: Field displays the temperature in degrees Fahrenheit (◦F) or degrees
Celsius (◦C), at which this item gives off sufficient vapor to form a flammable or ignitable
mixture with air.
Flash Point Method Used: Field displays the method that is used to determine the
flash point of this item.
INCI: This field holds the INCI name for the CAS number being defined. This name is
required for compliance issue, especially for compliance with Bio Terrorism Act.
EINICS: This field holds the EINECS name for the CAS number being defined. This name
is required for compliance issue, especially for compliance with Bio Terrorism Act.
Tab-2 (Safety Info)
Doc. No. F/DV/15
Rev.No.
Date
BatchMaster Software Inc.
BMM User Manual
Properties
HMIS Health: Field displays the HMIS Health rating for this item. HMIS stands for
Hazardous Material Identification System.
1. Minimal
2. Slight
3. Moderate
4. Serious
5. Severe
HMIS Chronic Factor: Field stores whether or not this item is carcinogenic. An asterisk
in this field indicates that this item is carcinogenic. A blank space in this field indicates
that this item is not carcinogenic.
HMIS Flammability: Field displays the HMIS Flammability rating for this item.
1. Minimal
2. Slight
3. Moderate
4. Serious
5. Severe
HMIS Reactivity: Field displays the HMIS Reactivity rating for this item.
1. Minimal
2. Slight
3. Moderate
4. Serious
5. Severe
HMIS Personal Protection: Field displays the HMIS Reactivity rating for this item. The
valid values are Safety Glasses, Gloves etc.
Material Hazard
Material Hazard Type ID: This is the identification of a Material Hazard type for a line
in the Material Hazard grid.
Description: Field displays the description associated with the Material Hazard type for
a line in the Material Hazard grid.
Tab-3 (Safety Info continued)
Doc. No. F/DV/15
Rev.No.
Date
BatchMaster Software Inc.
BMM User Manual
Fire Hazard: Check this box if this material is readily combustible and presents a
potential fire hazard.
Sudden Release of Pressure Hazard: Check this box if this material will react
violently when pressure is suddenly released on the container in which it is kept.
Reactivity Hazard: Check this box if this material will react, possibly violently, when
combined with certain other materials.
Immediate Health Hazard (Acute): Check this box if this material presents an
immediate and/or severe health hazard should some one come in contact with it.
Contact may be interpreted as physical contact on the skin, inhalation, ingestion etc.
Delayed Health Hazard (Chronic): Check this box if this material presents a long
term, delayed, and/or recurring health hazard should some one come in contact with it.
Contact may be interpreted as physical contact on the skin, inhalation, ingestion etc.
Pure: Check this box if this material is Pure.
Mixture: Check this box if this material is a Mixture.
Solid: Check this box if this material is a Solid.
Liquid: Check this box if this material is a Liquid.
Doc. No. F/DV/15
Rev.No.
Date
BatchMaster Software Inc.
BMM User Manual
Gas: Check this box if this material is a Gas.
SARA Information (Detailed Health hazard (Chronic) Details
Whse: Field displays the Warehouse of the item for a line in the grid.
Type: Field stores the storage type (represented by a letter) of this item for a line in the
grid.
Pressure: Field stores the pressure (represented by a number) associated with a
storage type for a line in the grid.
Temperature: Field stores the temperature (represented by a number) associated with
a storage type for a line in the grid.
Tab-4 (OEL)
OEL Details
Occupation Exposure Limits: Field stores the Occupational Exposure Limit for this
item. An item can have multiple occupational exposure limits.
Doc. No. F/DV/15
Rev.No.
Date
BatchMaster Software Inc.
BMM User Manual
15.6.2
Creating Material Safety Information for an
Item
1. Open the Material Safety Information screen.
2. Select an Item (via the lookup presented on the screen) for which the Material
Safety Information has to be created.
3. Select the CAS Number associated with this Item. If a CAS Number is selected,
then data maintained on Tab 1-4 of that CAS Number master record is defaulted
on the Material Safety Information screen.
4. Enter the data on Tabs 1-4 (if the data is not defaulted on Tab 1-4) or modify the
data on Tabs 1-4 as needed.
5. Click on the OK button to save the Material Safety Information record.
15.7 SARA Processing
This option provides a way to perform Hazard Communication Standard, Superfund
Amendment and Reauthorization Act (SARA) Title III compliance. This screen can be used
to report the amounts of hazardous materials and the durations for which those
hazardous materials were maintained at various Warehouses.
The SARA processing can be:
1. Period-End Processing.
2. Year-End Processing.
It is recommended to back up the database before the processing. This may be useful in
case one needs to revert back to the data before Period-End or Year-End Processing.
The SARA processing is calculated on the basis of transactions maintained for the
hazardeous material.
15.7.1
Screen Fields Description
Doc. No. F/DV/15
Rev.No.
Date
BatchMaster Software Inc.
BMM User Manual
Select Processing Criteria
Period-End SARA Processing: This option updates the Inventory with SARA
information based upon the Inventory transactions. This processing examines every
reportable material (including intermediates) and determines how long a material has
been on a particular Warehouse and in how much quantity.
Year-End SARA Processing: This option resets all the reportable materials SARA
values to zero.
Item Key From: Field specifies the lower limit of the range of Item Key for use as filter
criteria during processing. This Item may be entered by typing or selected via the
associated lookup on this screen. Leaving this field blank has the same effect as
selecting the first available Item Key via the lookup.
Item Key To: Field specifies the upper limit of the range of Item Key for use as filter
criteria during processing. This Item may be entered by typing or selected via the
associated lookup on this screen. Leaving this field blank has the same effect as
selecting the last available Item Key via the lookup.
Location Key From: Field specifies the lower limit of the range of Location for use as
filter criteria during processing. This Location may be entered by typing or selected via
the associated lookup on this screen. Leaving this field blank has the same effect as
selecting the first available location via the lookup.
Location Key To: Field specifies the upper limit of the range of Location for use as filter
criteria during processing. This Location may be entered by typing or selected via the
associated lookup on this screen. Leaving this field blank has the same effect as
selecting the last available Location via the lookup.
Period End Date: Field displays on which Period-End SARA processing is being done.
This is a mandatory field if the „Period-End SARA Processing‟ option is selected.
15.7.2
Performing Period-End SARA Processing
1. Select the „Period-End SARA Processing‟ option.
2. Enter the Item No. From.
3. Enter the Item No. To.
4. Enter the Warehouse From.
5. Enter the Warehouse To.
6. Enter the Period End Date.
7. Click on the Process button. Depending upon the filter criteria, the Inventory will
be updated with SARA information of the reportable materials.
15.7.3
Performing Year-End SARA Processing
1. Select the „Year-End SARA Processing‟ option.
2. Enter the Item No. From.
3. Enter the Item No. To.
Doc. No. F/DV/15
Rev.No.
Date
BatchMaster Software Inc.
BMM User Manual
4. Enter the Warehouse From.
5. Enter the Warehouse To.
6. Enter the Year End Date.
7. Click on the Process button. Depending upon the filter criteria, the SARA
information in the Inventory will be re-initialized.
15.8 MSDS Master Format
Screen provides users with a way to specify the MS-Word templates that can be used to
print a MSDS.
Note: During installation of BatchMaster Manufacturing, a MS-Word template file named
“USA.dot” is generated in the BatchMaster Manufacturing folder. This is a sample
template file for printing a MSDS and provides examples of using various types of
bookmarks.
15.8.1
Screen Fields Description
MSDS Master Format Description
Master Format Key: Field stores a unique Master Format key for a MS-Word template
file that is used to print a MSDS.
Description: Field displays the description associated with a Master Format key.
Status: Field displays the status of this Master Format. The status of a Master Format
can be one of Active, Inactive, Marked for Deletion or Deleted. Only Active master
formats are fetched in the lookup for Print MSDS.
Report Template Filename: Field stores the path of the MS-Word Template file that is
used to print a MSDS. This path can point to a file on the local machine or a machine on
the network.
Doc. No. F/DV/15
Rev.No.
Date
BatchMaster Software Inc.
BMM User Manual
Revision Date: Field stores the date on which a Master Format key was modified. The
user may enter the Revision Date by typing or by selecting it from the displayed
calendar.
Revision Reason: Field stores the reason for revising a Master Format key.
15.8.2
Creating a MSDS Master Format
1. Open the MSDS Master Format Screen.
2. Enter a unique Master Format key and the description.
3. Enter the path of the MS-Word Template file.
4. Select a status for the Master Format key.
5. Click on the OK button to save a MSDS Master Format record.
15.9 MSDS Schedule Generation
Screen can be used to generate Schedule ID‟s from which MSDSs may be printed
subsequently. Printing a MSDS is a two step process. MSDS Schedule Generation is the
first step while Print MSDS is the second step.
Schedules can be generated via any of the following:
1. Master Formula: The data for the schedule is fetched from the Formula Entry
screen.
2. Finished Good: The data for the schedule is fetched from the BOM Entry screen
and the Material Safety Information screen
3. Raw Material: The data for the schedule is fetched from the Item Master screen
and the Material Safety Information screen.
4. Production Formula: The data for the schedule is fetched from the Production
batches that have not yet been purged and the Formula Entry screen.
5. Production Finished Good: The data for the schedule is fetched from the
Production batches that have not yet been purged and the Material Safety
Information screen.
6. MSDS Customer History: The schedules are generated based on MSDS Customer
History.
7. BatchMaster Order History: The data for the schedule is fetched from the Sales
Order Entry screen and the Material Safety Information screen.
Doc. No. F/DV/15
Rev.No.
Date
BatchMaster Software Inc.
15.9.1
BMM User Manual
Screen Fields Description: Master Formula
Schedule Basis
Schedule Type (Master Formula): This setting is used to generate a schedule to print
the MSDS of a Formula. The data required (including Safety Information) to generate a
schedule of Master Formula type is fetched from the Formula Entry screen.
Selection Criteria (Master Formula)
Formula Key From: Field specifies the lower limit of the range of formula keys for use
as filter criteria during processing. This Formula key may be entered by typing or
selected via the associated lookup on this screen. Leaving this field blank has the same
effect as selecting the first available Formula Key via the lookup.
Formula Key To: Field specifies the upper limit of the range of formula keys for use as
filter criteria during processing. This Formula key may be entered by typing or selected
via the associated lookup on this screen. Leaving this field blank has the same effect as
selecting the last available Formula Key via the lookup.
Formula Class From: Field specifies the lower limit of the range of formula classes for
use as filter criteria during processing. This Formula Class may be entered by typing or
selected via the associated lookup on this screen. Leaving this field blank has the same
effect as selecting the first available Formula Class via the lookup.
Doc. No. F/DV/15
Rev.No.
Date
BatchMaster Software Inc.
BMM User Manual
Formula Class To: Field specifies the upper limit of the range of formula classes for use
as filter criteria during processing. This Formula Class may be entered by typing or
selected via the associated lookup on this screen. Leaving this field blank has the same
effect as selecting the last available Formula Class via the lookup.
Formula Status: Field specifies the formula statuses for use as filter criteria during
processing. Check the Formula status to be included in generating the schedule.
Formula Description: Field displays the description of the Formula.
15.9.2
Generating a Schedule of Master Formula type
1. Select the Schedule Type as „Master Formula‟.
2. Enter the Formula Key From. Leaving this field blank has the same effect as
entering the first available formula.
3. Enter the Formula Key To. Leaving this field blank has the same effect as entering
the last available formula.
4. Enter the Formula Class From. Leaving this field blank has the same effect as
entering the first available formula class.
5. Enter the Formula Class To. Leaving this field blank has the same effect as
entering the last available formula class.
6. Check the formula statuses to be included in schedule.
7. Enter the Formula Description.
8. Click on the Generate button. Depending upon the filter criteria, the schedules
are generated for the formulas. A report displays all those formulas for which
schedules were generated.
Doc. No. F/DV/15
Rev.No.
Date
BatchMaster Software Inc.
15.9.3
BMM User Manual
Screen Fields Description: Finished Good
Schedule Basis
Schedule Type (Finished Good): This setting is used to generate a schedule to print
the MSDS of only those Item- Warehouses that have a Released BOM of any type
(including Finished Good, Intermediate and Assembly). The data required to generate a
schedule of Finished Good type is fetched from the BOM Entry screen and the Material
Safety Information screen.
Selection Criteria (Finished Good)
Formula Key From: Field specifies the lower limit of the range of formula keys for use
as filter criteria during processing. This Formula key may be entered by typing or
selected via the associated lookup on this screen. Leaving this field blank has the same
effect as selecting the first available Formula Key via the lookup.
Formula Key To: Field specifies the upper limit of the range of formula keys for use as
filter criteria during processing. This Formula key may be entered by typing or selected
via the associated lookup on this screen. Leaving this field blank has the same effect as
selecting the last available Formula Key via the lookup.
Finished Good Key From: Field specifies the lower limit of the range of finished good
keys for use as filter criteria during processing. This Finished Good key may be entered
Doc. No. F/DV/15
Rev.No.
Date
BatchMaster Software Inc.
BMM User Manual
by typing or selected via the associated lookup on this screen. Leaving this field blank
has the same effect as selecting the first available Finished Good Key via the lookup.
Finished Good Key To: Field specifies the upper limit of the range of finished good keys
for use as filter criteria during processing. This Finished Good key may be entered by
typing or selected via the associated lookup on this screen. Leaving this field blank has
the same effect as selecting the last available Finished Good Key via the lookup.
Formula Status: Field specifies the formula statuses for use as filter criteria during
processing. Check the Formula status to be included in generating the schedule.
15.9.4
Generating a Schedule of Finished Good type
1. Select the Schedule Type as „Finished Good‟.
2. Enter the Formula Key From. Leaving this field blank has the same effect as
entering the first available formula.
3. Enter the Formula Key To. Leaving this field blank has the same effect as entering
the last available formula.
4. Enter the Finished Good Key From. Leaving this field blank has the same effect as
entering the first available finished good.
5. Enter the Finished Good Key To. Leaving this field blank has the same effect as
entering the last available finished good.
6. Check the formula statuses to be included in the generating the schedule.
7. Click on the Generate button. Depending upon the filter criteria, the schedules
are generated for the finished goods. A report displays all those finished goods for
which schedules were generated.
Doc. No. F/DV/15
Rev.No.
Date
BatchMaster Software Inc.
15.9.5
BMM User Manual
Screen Fields Description: Raw Material
Schedule Basis
Schedule Type (Raw Material): This setting is used to generate a schedule to print
the MSDS of a Raw Material. An item is a valid „MSDS Raw Material‟ if its Item Type
(optionally with its Sub Type) is maintained at Tab-2 of MSDS Setup screen. The data
required to generate a schedule of raw material type is fetched from the Item Master
screen and the Material Safety Information screen.
Selection Criteria (Raw Material)
Item Key From: Field specifies the lower limit of the range of Items for use as filter
criteria during processing. This Item Number may be entered by typing or selected via
the associated lookup on this screen. Leaving this field blank has the same effect as
selecting the first available Item Number via the lookup. The lookup displays only those
items (excluding finished goods) for which the Item Type (optionally with Sub Type) has
been maintained at Tab-2 of MSDS Setup screen.
Item Key To: Field specifies the upper limit of the range of Items for use as filter
criteria during processing. This Item Number may be entered by typing or selected via
the associated lookup on this screen. Leaving this field blank has the same effect as
selecting the last available Item Number via the lookup. The lookup displays only those
items (excluding finished goods) for which the Item Type (optionally with Sub Type) has
been maintained at Tab-2 of MSDS Setup screen.
Doc. No. F/DV/15
Rev.No.
Date
BatchMaster Software Inc.
15.9.6
BMM User Manual
Generating a Schedule of Raw Material type
1. Select the Schedule Type as „Raw Material‟.
2. Enter the Item No. From. Leaving this field blank has the same effect as entering
the first available item (raw material).
3. Enter the Item No. To. Leaving this field blank has the same effect as entering
the last available item (raw material).
4. Click on the Generate button. Depending upon the filter criteria, the schedules
are generated for the raw materials. A report displays all those raw materials for
which schedules were generated.
15.9.7
Screen Fields Description: Production Formula
Schedule Basis
Schedule Type (Production Formula): This setting is used to generate a schedule to
print the MSDS of a Production Formula (the actual formula used in a Batch). The data
required to generate a schedule of Production Formula type is fetched from the
Production batches that have not yet been purged and the Formula Entry screen.
Selection Criteria (Production Formula)
Doc. No. F/DV/15
Rev.No.
Date
BatchMaster Software Inc.
BMM User Manual
Batch Number From: Field specifies the lower limit of the range of batch numbers for
use as filter criteria during processing. This Batch number may be entered by typing or
selected via the associated lookup on this screen. Leaving this field blank has the same
effect as selecting the first available Batch Number via the lookup.
Batch Number To: Field specifies the lower limit of the range of batch numbers for use
as filter criteria during processing. This Batch number may be entered by typing or
selected via the associated lookup on this screen. Leaving this field blank has the same
effect as selecting the first available Batch Number via the lookup.
Formula Key From: Field (actual formulations used in Batches) specifies the lower limit
of the range of formula keys for use as filter criteria during processing. This Formula key
may be entered by typing or selected via the associated lookup on this screen. Leaving
this field blank has the same effect as selecting the first available Formula Key via the
lookup.
Formula Key To: Field (actual formulations used in Batches) specifies the upper limit of
the range of formula keys for use as filter criteria during processing. This Formula key
may be entered by typing or selected via the associated lookup on this screen. Leaving
this field blank has the same effect as selecting the last available Formula Key via the
lookup.
Customer Key From: Field specifies the lower limit of the range of customer keys for
use as filter criteria during processing. This Customer key may be entered by typing or
selected via the associated lookup on this screen. Leaving this field blank has the same
effect as selecting the first available Customer Key via the lookup.
Customer Key To: Field specifies the upper limit of the range of customer keys for use
as filter criteria during processing. This Customer key may be entered by typing or
selected via the associated lookup on this screen. Leaving this field blank has the same
effect as selecting the last available Customer Key via the lookup.
Batch Status: Field displays the status of a Batch. The user can either select a specific
batch status or select the „All‟ option for use as filter criteria during processing. Selecting
the „All‟ option has the same effect as selecting all the batch statuses. The default value
of this field is „All‟.
15.9.8
Generating a Schedule of Production Formula
type
1. Select the Schedule Type as „Production Formula‟.
2. Enter the Batch No From. Leaving this field blank has the same effect as entering
the first available batch.
3. Enter the Batch No To. Leaving this field blank has the same effect as entering
the last available batch.
4. Enter the Formula Key From. Leaving this field blank has the same effect as
entering the first available production formula (actual formula used in a Batch).
5. Enter the Formula Key To. Leaving this field blank has the same effect as entering
the last available production formula (actual formula used in a Batch).
6. Enter the Customer Key From. Leaving this field blank has the same effect as
entering the first available customer.
Doc. No. F/DV/15
Rev.No.
Date
BatchMaster Software Inc.
BMM User Manual
7. Enter the Customer Key To. Leaving this field blank has the same effect as
entering the last available customer.
8. Select the Batch Status.
9. Click on the Generate button. Depending upon the filter criteria, the schedules
are generated for the production formulas. A report displays all those production
formulas for which schedules were generated.
10. Save the record by assigning some parameter name to the record in the input
box on the toolbar.
15.9.9
Screen Fields Description: Production Finished
Good
Schedule Basis
Schedule Type (Production Finished Good): This setting is used to generate a
schedule to print the MSDS of a Production Finished Good (a finished good made by a
Batch). The data required to generate a schedule of production finished good type is
fetched from the Production batches that have not yet been purged and the Material
Safety Information screen.
Selection Criteria (Production Finished Good)
Doc. No. F/DV/15
Rev.No.
Date
BatchMaster Software Inc.
BMM User Manual
Batch Number From: Field specifies the lower limit of the range of batch numbers for
use as filter criteria during processing. This Batch number may be entered by typing or
selected via the associated lookup on this screen. Leaving this field blank has the same
effect as selecting the first available Batch Number via the lookup.
Batch Number To: Field specifies the lower limit of the range of batch numbers for use
as filter criteria during processing. This Batch number may be entered by typing or
selected via the associated lookup on this screen. Leaving this field blank has the same
effect as selecting the first available Batch Number via the lookup.
Item Key From: Field specifies the lower limit of the range of Item for use as filter
criteria during processing. This Item may be entered by typing or selected via the
associated lookup on this screen. Leaving this field blank has the same effect as
selecting the first available Item via the lookup.
Item Key To: Field specifies the upper limit of the range of Item for use as filter criteria
during processing. This Item may be entered by typing or selected via the associated
lookup on this screen. Leaving this field blank has the same effect as selecting the last
available Item via the lookup.
Location Key From: Field specifies the lower limit of the range of Location for use as
filter criteria during processing. This Location may be entered by typing or selected via
the associated lookup on this screen. Leaving this field blank has the same effect as
selecting the first available Location via the lookup.
Location Key To: Field specifies the upper limit of the range of Location for use as filter
criteria during processing. This Location may be entered by typing or selected via the
associated lookup on this screen. Leaving this field blank has the same effect as
selecting the last available Location via the lookup.
Customer Key From: Field specifies the lower limit of the range of customer keys for
use as filter criteria during processing. This Customer key may be entered by typing or
selected via the associated lookup on this screen. Leaving this field blank has the same
effect as selecting the first available Customer Key via the lookup.
Customer Key To: Field specifies the upper limit of the range of customer keys for use
as filter criteria during processing. This Customer key may be entered by typing or
selected via the associated lookup on this screen. Leaving this field blank has the same
effect as selecting the last available Customer Key via the lookup.
Batch Status: Field displays the status of a Batch. The user can either select a specific
batch status or select the „All‟ option for use as filter criteria during processing. Selecting
the „All‟ option has the same effect as selecting all the batch statuses. The default value
of this field is „All‟.
15.9.10 Generating a Schedule of Production Finished
Good type
1. Select the Schedule Type as „Production Finished Good‟.
2. Enter the Batch No From. Leaving this field blank has the same effect as entering
the first available batch.
Doc. No. F/DV/15
Rev.No.
Date
BatchMaster Software Inc.
BMM User Manual
3. Enter the Batch No To. Leaving this field blank has the same effect as entering
the last available batch.
4. Enter the Item No. From. Leaving this field blank has the same effect as entering
the first available item (Production Finished Good).
5. Enter the Item No. To. Leaving this field blank has the same effect as entering
the last available item (Production Finished Good).
6. Enter the Warehouse From. Leaving this field blank has the same effect as
entering the first available Warehouse.
7. Enter the Warehouse To. Leaving this field blank has the same effect as entering
the last available Warehouse.
8. Enter the Customer Key From. Leaving this field blank has the same effect as
entering the first available customer.
9. Enter the Customer Key To. Leaving this field blank has the same effect as
entering the last available customer.
10. Select the Batch Status.
11. Click on the Generate button. Depending upon the filter criteria, the schedules
are generated for the production-finished goods. A report displays all those
production finished goods for which schedules were generated.
15.9.11 Screen
History
Doc. No. F/DV/15
Fields
Description:
Rev.No.
MSDS
Customer
Date
BatchMaster Software Inc.
BMM User Manual
Schedule Basis
Schedule Type (MSDS Customer History): This setting is used to generate a
schedule based on MSDS Customer History.
Selection Criteria (MSDS Customer History)
Item Key From: Field specifies the lower limit of the range of Item for use as filter
criteria during processing. This Item may be entered by typing or selected via the
associated lookup on this screen. Leaving this field blank has the same effect as
selecting the first available Item via the lookup.
Item Key To: Field specifies the upper limit of the range of Item for use as filter criteria
during processing. This Item may be entered by typing or selected via the associated
lookup on this screen. Leaving this field blank has the same effect as selecting the last
available Item via the lookup.
Customer Key From: Field specifies the lower limit of the range of customer keys for
use as filter criteria during processing. This Customer key may be entered by typing or
selected via the associated lookup on this screen. Leaving this field blank has the same
effect as selecting the first available Customer Key via the lookup.
Customer Key To: Field specifies the upper limit of the range of customer keys for use
as filter criteria during processing. This Customer key may be entered by typing or
selected via the associated lookup on this screen. Leaving this field blank has the same
effect as selecting the last available Customer Key via the lookup.
Printed Date From: Field specifies the lower limit of the range of printed dates for use
as filter criteria during processing. This Printed Date key may be entered by typing or
selected via the displayed calendar on this screen. The default value of this field is the
current server date.
Printed Date To: Field specifies the upper limit of the range of printed dates for use as
filter criteria during processing. This Printed Date key may be entered by typing or
selected via the displayed calendar on this screen. The default value of this field is the
current server date.
15.9.12 Generating
History type
a
Schedule
of
MSDS
Customer
1. Select the Schedule Type as „MSDS Customer History‟.
2. Enter the Item No. From. Leaving this field blank has the same effect as entering
the first available Item.
3. Enter the Item No. To. Leaving this field blank has the same effect as entering
the last available Item.
4. Enter the Customer Key From. Leaving this field blank has the same effect as
entering the first available customer.
5. Enter the Customer Key To. Leaving this field blank has the same effect as
entering the last available customer.
6. Enter the Ship Date From. Leaving this field blank has the same effect as entering
the current server date.
Doc. No. F/DV/15
Rev.No.
Date
BatchMaster Software Inc.
BMM User Manual
7. Enter the Ship Date To. Leaving this field blank has the same effect as entering
the current server date.
8. Click on the Generate button. Depending upon the filter criteria, the schedules
are generated for the Customers. A report displays all those customers for which
schedules were generated.
15.9.13 Screen Fields Description: BatchMaster Order
History
Schedule Basis
Schedule Type (BatchMaster Order History): This setting is used to generate a
schedule to print the MSDS of line items on a Sales Order. The data required to generate
a schedule of BatchMaster Order History type is fetched from the Sales Order Entry
screen and the Material Safety Information screen.
Selection Criteria (BatchMaster Order History)
Sales Order No. From: Field specifies the lower limit of the range of sales orders for
use as filter criteria during processing. This Sales Order number may be entered by
typing or selected via the associated lookup on this screen. Leaving this field blank has
the same effect as selecting the first available Sales Order via the lookup.
Doc. No. F/DV/15
Rev.No.
Date
BatchMaster Software Inc.
BMM User Manual
Sales Order No. To: Field specifies the upper limit of the range of sales orders for use
as filter criteria during processing. This Sales Order number may be entered by typing or
selected via the associated lookup on this screen. Leaving this field blank has the same
effect as selecting the last available Sales Order via the lookup.
Customer Key From: Field specifies the lower limit of the range of customer keys for
use as filter criteria during processing. This Customer key may be entered by typing or
selected via the associated lookup on this screen. Leaving this field blank has the same
effect as selecting the first available Customer Key via the lookup.
Customer Key To: Field specifies the upper limit of the range of customer keys for use
as filter criteria during processing. This Customer key may be entered by typing or
selected via the associated lookup on this screen. Leaving this field blank has the same
effect as selecting the last available Customer Key via the lookup.
Order Date From: Field specifies the lower limit of the range of order dates for use as
filter criteria during processing. This Order Date key may be entered by typing or
selected via the displayed calendar on this screen. The default value of this field is the
current server date.
Order Date To: Field specifies the upper limit of the range of order dates for use as
filter criteria during processing. This Order Date key may be entered by typing or
selected via the displayed calendar on this screen. The default value of this field is the
current server date.
15.9.14 Generating a Schedule of BatchMaster Order
History type
2. Select the Schedule Type as „BatchMaster Order History‟.
3. Enter the Sales Order No. From. Leaving this field blank has the same effect as
entering the first available Sales Order.
4. Enter the Sales Order No. To. Leaving this field blank has the same effect as
entering the last available Sales Order.
5. Enter the Customer Key From. Leaving this field blank has the same effect as
entering the first available customer.
6. Enter the Customer Key To. Leaving this field blank has the same effect as
entering the last available customer.
7. Enter the Order Date From. Leaving this field blank has the same effect as
entering the current server date.
8. Enter the Order Date To. Leaving this field blank has the same effect as entering
the current server date.
9. Click on the Generate button. Depending upon the filter criteria, the schedules
are generated for the line items of the Sales Orders. A report displays all those
line items of Sales Orders for which schedules were generated.
Doc. No. F/DV/15
Rev.No.
Date
BatchMaster Software Inc.
15.10
BMM User Manual
Customer History
Screen provides users with a way to maintain records about the dates on which MSDSs
were printed for specific items, for specific customers.
One can also view and modify on this screen the records created via the Update
Customer History screen.
15.10.1 Screen Fields Description
Customer: Field stores a Customer‟s key when a new record is inserted using the
Customer History screen. A Customer key can be entered by typing or selecting it via the
available lookup on the screen. This field also displays the Customer key for previously
created records.
Item: Field stores an Item No. of which a MSDS has been printed when a new record is
inserted using the Customer History screen. An Item can be entered by typing or
selecting it via the available lookup on the screen. This field also displays the Item for
previously created records.
MSDS Ship Date: Field displays the date on which a MSDS of an item is sent to a
Customer. The user may enter the Revision Date by typing or via selecting it from the
displayed calendar.
15.10.2 Creating a Customer History
1. Open the Customer History Screen.
2. Enter a Customer key. The name of the Customer is displayed on the screen.
3. Enter an Item No.. The Item‟s description is displayed on the screen.
4. Enter the MSDS Ship Date.
5. Click on OK button to save the Customer History record.
Doc. No. F/DV/15
Rev.No.
Date
BatchMaster Software Inc.
15.11
BMM User Manual
Update Customer History
Screen inserts or updates the records regarding a Customer for whom MSDS has been
printed. The appended or updated record of a Customer can be viewed at the Customer
History screen.
The following type of schedules (that also have a customer key associated with them)
can be processed via this screen:
1. Production Formula
2. Production Finished Goods
3. MSDS Customer History
4. BatchMaster Order History
15.11.1 Screen Fields Description
MSDS Ship Date: Field displays the date up to which the schedules were generated
from which the MSDSs were printed. This is a mandatory field.
15.11.2 Updating Customer History
1. Enter the MSDS Ship Date.
2. Click on the Add button. A record for such a schedule that was generated during
the specified date range and has got a MSDS printed is either appended or
updated at the Customer History.
15.12
Print MSDS
Screen can be used to generate a MSDS based upon a Schedule.
Note: The parameters maintained at the MSDS Setup screen also affect the appearance
and content of a printed MSDS. Therefore, the users should maintain the parameters at
the MSDS Setup screen before printing a MSDS.
15.12.1 Mandatory Inputs
Data should be maintained at the following screens before printing a MSDS:
Doc. No. F/DV/15
Rev.No.
Date
BatchMaster Software Inc.
BMM User Manual
1. Language
2. MSDS Schedule Generation
3. MSDS Master Format
15.12.2 Screen Fields Description
MSDS Print Selection Criteria
MSDS Master Format: Field displays the MSDS Master Format key for a MS-Word
template file that is used to print a MSDS. The Master Format key can be entered by
typing or selecting it via the available lookup on the screen. The Template file path
associated with this MSDS Master Format key is defaulted at the „Template File Path‟
field. This is a mandatory field.
Language: Field stores the language that may be used to print a MSDS. The Language
can be entered by typing or selecting it via the available lookup on the screen. This is a
mandatory field.
Doc. No. F/DV/15
Rev.No.
Date
BatchMaster Software Inc.
BMM User Manual
Template File Name: Field displays the path of the MS-Word Template file. The
Template file path can point to either a file on the local machine or a machine on the
network. This is a mandatory field.
Skip printing of reportable components when chemical name is not maintained:
Checking this box will skip printing of a reportable component on the MSDS if its
chemical name is not maintained at the Material Safety Information screen.
Output
Filename: Field displays the file name that will be used to save the MSDS being
generated. This is a mandatory field.
Save Path: Field displays he path where the MSDS will be saved as a Word document.
This path can point to either the local machine or a machine on the network. This path
can be entered by typing or selecting it via the associated button on the screen. This is a
mandatory field.
View Document: Check this box to view the MSDS document on the screen when the
MSDS is generated.
Debug Mode: Check this box if one wishes to generate the MSDS in Debug mode. In
such a case, an explanation will be provided on the MSDS regarding the data sources
that were used to create the MSDS, including the MSDS Setup (Tab-1), keywords and
boilerplate keys.
Schedule Selection
Schedule ID From: This Schedule ID specifies the lower limit of the range of schedules
for use as filter criteria during processing. This Schedule ID may be entered by typing or
selected via the associated lookup on this screen. Leaving this field blank has the same
effect as selecting the first available Schedule ID via the lookup.
Schedule ID To: This Schedule ID specifies the upper limit of the range of schedules for
use as filter criteria during processing. This Schedule ID may be entered by typing or
selected via the associated lookup on this screen. Leaving this field blank has the same
effect as selecting the last available Schedule ID via the lookup.
Re-Use Schedule ID: Check this box to print a MSDS for the second or subsequent
time. If this box is un-checked, then only the pending schedules will be used.
Refresh Schedules: Clicking this button displays the schedules depending as per the
setting on the „Re-Use Schedule ID‟ box.
Select All: Clicking this button selects all the schedules displayed in the grid for
generation of their MSDSs.
Select None: Clicking this button unselects all the schedules displayed in the grid for
generation of their MSDSs.
Fields on the grid
Sel: Clicking this field selects or unselects a Schedule ID for generation of the MSDS.
Doc. No. F/DV/15
Rev.No.
Date
BatchMaster Software Inc.
BMM User Manual
Sch. ID: This field displays the Schedule ID against which a MSDS is being generated.
Item or Formula: This field displays an Item or a Formula, depending upon the type of
the Schedule for which a MSDS is generated for a line in the grid.
Type: This field displays the status of the Item or formula, depending upon the type of
the Schedule for which a MSDS is generated for a line in the grid.
Customer: This field displays the Customer associated with a Schedule ID, depending
upon the schedule type for a line in the grid.
Description: This field displays either the description of an Item or a Formula,
depending upon the type of the Schedule for which a MSDS is generated for a line in the
grid.
Batch No: This field displays the Batch Number associated with a Schedule ID,
depending upon the schedule type for a line in the grid.
Order No: This field displays the Order Number associated with a Schedule ID,
depending upon the schedule type for a line in the grid.
HMIS Codes: This field displays the HMIS Code associated with a Schedule ID,
depending upon the schedule type for a line in the grid.
Spec.Grav: This field displays the Specific Gravity associated with a Schedule ID
depending upon the schedule type for a line in the grid.
Formula: This field displays the Formula associated with a Schedule ID for a line in the
grid.
Formula Class: This field displays the Formula Class associated with the Formula for a
line in the grid.
WHIMIS: This field displays the WHIMIS information associated with a Schedule ID for a
line in the grid.
Template Key: This field displays the Template key associated with a Schedule ID for a
line in the grid.
Date Printed: This field displays the date on which a MSDS was last generated for a
specific Schedule ID.
15.12.3 Generating a MSDS
1. Enter a file name to save the MSDS being generated. Specifying a file name is
mandatory.
2. Enter the output path where the MSDS will be generated. This path can be
entered by typing or selecting it via the associated button on the screen.
Specifying the output path is mandatory.
3. To view on screen, the MSDS, when it gets generated, check the „View Document‟
box.
Doc. No. F/DV/15
Rev.No.
Date
BatchMaster Software Inc.
BMM User Manual
4. To generate the MSDS in Debug mode, check the box for „Debug Mode‟.
5. Enter a MSDS Master Format key by typing or selecting it via the available lookup
on the screen.
6. Enter a Language by typing or selecting it via the available lookup on the screen.
Specifying a Language is mandatory.
7. Enter the Template file path associated with the MSDS Master Format key is
defaulted at the „Template File Path‟ field. Specifying a Master Format key is
mandatory.
8. Select the Formula range to be included while printing the MSDS.
9. Select the Formula Class range to be included while priniting the MSDS.
10. Check the Formula statues to be included while printing the MSDS.
11. Click on the Process button. The MSDS is generated. The MSDS is displayed on
the screen if the field „View Document‟ was checked.
15.13
Pull Keywords
Screen provides users with a way to generate Schedule maintained for the item (FG &
IN) records.
The following type of data value can be processed via this screen for generating the
schedule for the material:
1. Length
2. Width
3. Height
4. Volume
5. Weight
Doc. No. F/DV/15
Rev.No.
Date
BatchMaster Software Inc.
BMM User Manual
15.13.1 Screen Fields Description
MSDS Keyword: Field displays the MSDS Keyword that will be used to save the MSDS
being generated. This is a mandatory field.
Description: Field displays the description associated with the MSDS Keyword.
Part of Reportable Component Table: Check this box to view the schedule as a part
of the reportable component table on the screen when the MSDS is generated.
Based on Query: Field contains query, based on which the next grid Based on Key put
on values for schedule generation.
Based on Key: Activated only when user write query on the based on Query grid. It
displays a list of keys for schedule generation.
15.13.2 Maintaining MSDS Keyword Information
1. Enter the MSDS keyword.
2. Check in the Part of Reportable Component Table.
3. Enter the description associated with the MSDS keyword.
4. Enter the query based on the MSDS key.
5. Select the key from Based on key grid.
6. Click on save button to save the MSDS Keyword Information.
Doc. No. F/DV/15
Rev.No.
Date
BatchMaster Software Inc.
15.14
BMM User Manual
MSDS Reports
15.14.1 MSDS Setup Report
Screen provides a way to generate a report showing the MSDS Setup settings defined in
the MSDS Setup screen.
Once BMM processes the report, it displays the results as a Crystal Report that one can
print or export.
15.14.1.1 Generating a MSDS Setup Report
Click on the MSDS Setup Report icon. This Crystal Report is viewable on the screen for
exporting or printing.
15.14.2 Boilerplate Group Report
Screen provides a way to generate a report showing the boilerplate groups created using
the Boilerplate Group screen.
The option‟s filtering parameters can be used to define the report. Once BMM processes
the report parameters, it displays the results as a Crystal Report that one can print or
export.
Doc. No. F/DV/15
Rev.No.
Date
BatchMaster Software Inc.
BMM User Manual
15.14.2.1 Screen Fields Description
Boilerplate Group Report Selection
Boilerplate Group From: Field specifies the lower limit of the range of Boilerplate
group for uses as filter criteria during processing. Leaving this field blank has the same
effect as selecting the first available Boilerplate group via the lookup.
Boilerplate Group To: Field specifies the upper limit of the range of Boilerplate group
for uses as filter criteria during processing. Leaving this field blank has the same effect
as selecting the last available Boilerplate group via the lookup.
Status: Field is used to specify the status to be included while generating the report.
You can specify the status as one of the following:
All
Active
Inactive
Marked for Deletion
Deleted
Report Path: Field holds the default path of the report.
15.14.2.2 Generating a Boilerplate Group Report
1. Enter the Boilerplate Group Key From and To range using the lookup buttons next
to the fields.
2. Select the Status, as required.
3. Click on the OK button to create the report.
Doc. No. F/DV/15
Rev.No.
Date
BatchMaster Software Inc.
BMM User Manual
15.14.3 Boilerplate Maintenance Report
Screen provides a way to generate a report showing the boilerplate text created using
the Boilerplate Maintenance screen.
The option‟s filtering parameters can be used to define the report. Once BMM processes
the report parameters, it displays the results as a Crystal Report that one can print or
export.
15.14.3.1 Screen Fields Description
Doc. No. F/DV/15
Rev.No.
Date
BatchMaster Software Inc.
BMM User Manual
Boilerplate Maintenance Report Selection
Boilerplate Group From: Field specifies the lower limit of the range of Boilerplate
group for uses as filter criteria during processing. Leaving this field blank has the same
effect as selecting the first available Boilerplate group via the lookup.
Boilerplate Group To: Field specifies the upper limit of the range of Boilerplate group
for uses as filter criteria during processing. Leaving this field blank has the same effect
as selecting the last available Boilerplate group via the lookup.
Boilerplate Key From: Field specifies the lower limit of the range of Boilerplate key for
uses as filter criteria during processing. Leaving this field blank has the same effect as
selecting the first available Boilerplate key via the lookup.
Boilerplate Key To: Field specifies the upper limit of the range of Boilerplate key for
uses as filter criteria during processing. Leaving this field blank has the same effect as
selecting the last available Boilerplate key via the lookup.
Status: Field is used to specify the status to be included while generating the report.
You can specify the status as one of the following:
All
Active
Inactive
Marked for Deletion
Deleted
Report Path: Field holds the default path of the report.
15.14.3.2 Generating a Boilerplate Maintenance Report Screen
1. Enter the Group From and To range using the lookup buttons next to the fields.
2. Enter the Key From and To range using the lookup buttons next to the fields.
3. Select the Status, as required.
4. Click on the OK button to create the report.
Doc. No. F/DV/15
Rev.No.
Date
BatchMaster Software Inc.
BMM User Manual
15.14.4 Boilerplate Override Report
Screen provides a way to generate a report showing the boilerplate overrides created
using the Boilerplate Override screen.
The option‟s filtering parameters can be used to define the report. Once BMM processes
the report parameters, it displays the results as a Crystal Report that one can print or
export.
15.14.4.1 Screen Fields Description
Doc. No. F/DV/15
Rev.No.
Date
BatchMaster Software Inc.
BMM User Manual
Boilerplate Override Report Selection
Boilerplate Group From: Field specifies the lower limit of the range of Boilerplate
group for uses as filter criteria during processing. Leaving this field blank has the same
effect as selecting the first available Boilerplate group via the lookup.
Boilerplate Group To: Field specifies the upper limit of the range of Boilerplate group
for uses as filter criteria during processing. Leaving this field blank has the same effect
as selecting the last available Boilerplate group via the lookup.
Boilerplate Key From: Field specifies the lower limit of the range of Boilerplate key for
uses as filter criteria during processing. Leaving this field blank has the same effect as
selecting the first available Boilerplate key via the lookup.
Boilerplate Key To: Field specifies the upper limit of the range of Boilerplate key for
uses as filter criteria during processing. Leaving this field blank has the same effect as
selecting the last available Boilerplate key via the lookup.
Status: Field is used to specify the status to be included while generating the report.
You can specify the status as one of the following:
All
Active
Inactive
Marked for Deletion
Deleted
Report Path: Field holds the default path of the report.
15.14.4.2 Generating a Boilerplate Override Report
1. Enter the Group From and To range using the lookup buttons next to the fields.
2. Enter the Key From and To range using the lookup buttons next to the fields.
3. Select the Status, as required.
4. Click on the OK button to create the report.
Doc. No. F/DV/15
Rev.No.
Date
BatchMaster Software Inc.
BMM User Manual
15.14.5 Supplementary File Report
Screen provides a way to generate a report showing the boilerplate groups and
boilerplate IDs associated with template or material file types.
The option‟s filtering parameters can be used to define the report. Once BMM processes
the report parameters, it displays the results as a Crystal Report that one can print or
export.
15.14.5.1 Screen Fields Description
Doc. No. F/DV/15
Rev.No.
Date
BatchMaster Software Inc.
BMM User Manual
Supplementary File Report Selection
Key From: Field specifies the lower limit of the range of Supplementary file key for uses
as filter criteria during processing. Leaving this field blank has the same effect as
selecting the first available Supplementary File via the lookup.
Key To: Field specifies the upper limit of the range of Supplementary File for uses as
filter criteria during processing. Leaving this field blank has the same effect as selecting
the last available Supplementary via the lookup.
Status: Field is used to specify the status to be included while generating the report.
You can specify All, Active, Inactive, Marked for deleltion and Deleted.
File Type: Field is used to specify the file type to be included while generating the
report. You can specify the file type as one of the following:
All
Template
Material
Formulas
Formula Classes
Material Hazard
Report Path: Field holds the default path of the report.
15.14.5.2 Generating a Supplementary File Report
1. Enter the Key From and To range using the lookup buttons next to the fields.
2. Select the Status, as required.
3. Select the File Type, as required.
4. Click on the OK button to create the report.
Doc. No. F/DV/15
Rev.No.
Date
BatchMaster Software Inc.
BMM User Manual
15.14.6 MSDS Hazard Type Report
Screen provides a way to generate a report showing material hazard types created using
the MSDS Hazard Type screen.
The option‟s filtering parameters can be used to define the report. Once BMM processes
the report parameters, it displays the results as a Crystal Report one can print or export.
15.14.6.1 Screen Fields Description
Doc. No. F/DV/15
Rev.No.
Date
BatchMaster Software Inc.
BMM User Manual
MSDS Hazard Type Report Selection
Hazard Type From: Field specifies the lower limit of the range of Hazard Type key for
uses as filter criteria during processing. Leaving this field blank has the same effect as
selecting the first available Hazard Type File via the lookup.
Hazard Type To: Field specifies the upper limit of the range of Hazard type for uses as
filter criteria during processing. Leaving this field blank has the same effect as selecting
the last available Hazard Type via the lookup.
Report Path: Field holds the default path of the report.
15.14.6.2 Generating a MSDS Hazard Type Report Screen
1. Enter the Hazard Type From and To range using the lookup buttons next to the
fields.
2. Click on the OK button to create the report.
15.14.7 MSDS Print Range Report
Screen provides a way to generate a report showing the material hazard print ranges
defined using the MSDS Print Range screen.
The option‟s filtering parameters can be used to define the report. Once BMM processes
the report parameters, it displays the results as a Crystal Report that one can print or
export.
Doc. No. F/DV/15
Rev.No.
Date
BatchMaster Software Inc.
BMM User Manual
1.1.1.1 Screen Fields Description
MSDS Print Range Report Selection
Range ID From: Field specifies the lower limit of the range of print range key for uses
as filter criteria during processing. Leaving this field blank has the same effect as
selecting the first available Range ID via the lookup.
Range ID To: Field specifies the upper limit of the range of print range key for uses as
filter criteria during processing. Leaving this field blank has the same effect as selecting
the last available Range ID via the lookup.
Report Path: Field holds the default path of the report.
15.14.7.1 Generating a MSDS Print Range Report Screen
1. Enter the Range ID From and To range using the lookup buttons next to the
fields.
2. Click on the OK button to create the report.
Doc. No. F/DV/15
Rev.No.
Date
BatchMaster Software Inc.
BMM User Manual
15.14.8 Hazard Type Print Criteria
Screen provides a way to generate a report showing the hazard type print criteria
created using the Hazard Type Print Criteria Maintenance screen.
The option‟s filtering parameters can be used to define the report. Once BMM processes
the report parameters, it displays the results as a Crystal Report that one can print or
export.
15.14.8.1 Screen Fields Description
Doc. No. F/DV/15
Rev.No.
Date
BatchMaster Software Inc.
BMM User Manual
Hazard Type Print Report Selection
Hazard ID From: Field specifies the lower limit of the range of Hazard ID for uses as
filter criteria during processing. Leaving this field blank has the same effect as selecting
the first available Hazard ID via the lookup.
Hazard ID To: Field specifies the upper limit of the range of Hazard ID for uses as filter
criteria during processing. Leaving this field blank has the same effect as selecting the
last available Hazard ID via the lookup.
Hazard Type From: Field specifies the lower limit of the range of Hazard type for uses
as filter criteria during processing. Leaving this field blank has the same effect as
selecting the first available Hazard type via the lookup.
Hazard Type To: Field specifies the upper limit of the range of Hazard type for uses as
filter criteria during processing. Leaving this field blank has the same effect as selecting
the last available Hazard type via the lookup.
Report Path: Field holds the default path of the report.
15.14.8.2 Generating a Hazard Type Print Criteria Screen
1. Enter the Hazard ID From and To range using the lookup buttons next to the
fields.
2. Enter the Hazard Type From and To range using the lookup buttons next to the
fields.
3. Click on the OK button to create a report.
Doc. No. F/DV/15
Rev.No.
Date
BatchMaster Software Inc.
BMM User Manual
15.14.9 Material Safety Information Report
Screen provides a way to generate a report showing the material safety associated with
specific items using the Material Safety Information screen.
The option‟s filtering parameters can be used to define the report. Once BMM processes
the report parameters, it displays the results as a Crystal Report that one can print or
export.
15.14.9.1 Screen Fields Description
Material Safety Information Report Selection
Item Key From: Field specifies the lower limit of the range of Item for uses as filter
criteria during processing. Leaving this field blank has the same effect as selecting the
first available Item via the lookup.
Item Key To: Field specifies the upper limit of the range of Item for uses as filter
criteria during processing. Leaving this field blank has the same effect as selecting the
last available Item via the lookup.
Report Path: Field holds the default path of the report.
15.14.9.2 Generating a Material Safety Information Report
1. Enter the Item Key From and To range using the lookup buttons next to the
fields.
2. Click on the OK button to create a report.
Doc. No. F/DV/15
Rev.No.
Date
BatchMaster Software Inc.
BMM User Manual
15.14.10 Print Mail Labels
Screen provides a way to print mailing labels for customers contained on schedules. With
Print Mail Labels, one can specify a Customer range for all the MSDS scheduled items
and print labels addressed to them.
The option‟s filtering parameters can be used to define the report. Once BMM processes
the report parameters, it displays the results as a Crystal Report that one can print or
export.
15.14.10.1
Screen Fields Description
Doc. No. F/DV/15
Rev.No.
Date
BatchMaster Software Inc.
BMM User Manual
Customer From Key: Field specifies the lower limit of the range of Customer Key for
uses as filter criteria during processing. Leaving this field blank has the same effect as
selecting the first available Customer Key via the lookup.
Customer To Key: Field specifies the upper limit of the range of Customer Key for uses
as filter criteria during processing. Leaving this field blank has the same effect as
selecting the last available Customer Key via the lookup.
Report Path: Field holds the default path of the report.
15.14.10.2
Generating Print Mail Labels
1. Complete the Customer From and To range using the lookup buttons next to the
fields.
2. Click the box for Add Attention Person Name to enable this feature.
3. Click on the Print Preview button on the toolbar to create a report.
15.14.11 SARA Tier I/II Tracking Report
Screen provides a way to generate a report showing the SARA Tier I and Tier II
information on a cumulative basis. With SARA Tier I/II Tracking, one can view the
Warehouse, date entered, the number of days the Warehouse held no amount of the
item, the average daily Warehouse amount, and the average date of calculation. The
maximum amount of the item on Warehouse and the total amount in the system can
also be viewed. BMM automatically tracks SARA Tier I and Tier II information for the
SARA Tier I/II Tracking report each time the SARA Processing screen is used with the
Period-End criteria selected.
The option‟s filtering parameters can be used to define the report. Once BMM processes
the report parameters, it displays the results as a Crystal Report that one can print or
export.
15.14.11.1
Screen Fields Description
Doc. No. F/DV/15
Rev.No.
Date
BatchMaster Software Inc.
BMM User Manual
Item Key From: Field specifies the lower limit of the range of Items Key for uses as
filter criteria during processing. Leaving this field blank has the same effect as selecting
the first available Item via the lookup.
Item Key To: Field specifies the upper limit of the range of Item for uses as filter
criteria during processing. Leaving this field blank has the same effect as selecting the
last available Item via the lookup.
Warehouse From: Field specifies the lower limit of the range of Warehouse for uses as
filter criteria during processing. Leaving this field blank has the same effect as selecting
the first available Warehouse via the lookup.
Warehouse To: Field specifies the upper limit of the range of Warehouse for uses as
filter criteria during processing. Leaving this field blank has the same effect as selecting
the last available Warehouse via the lookup.
Average Date From: Field specifies the lower limit of the range of date for uses as filter
criteria during processing.
Average Date To: Field specifies the Upper limit of the range of date for uses as filter
criteria during processing.
Report Path: Field holds the default path of the report.
15.14.11.2
Generating a SARA Tier I/II Tracking Report
1. Enter the Item Number From and To range using the lookup buttons next to the
fields.
2. Enter the Location From and To range using the lookup buttons next to the fields.
3. Enter the Average From and To date range using the lookup buttons next to the
fields.
4. Click on the OK button to create the report.
Doc. No. F/DV/15
Rev.No.
Date
BatchMaster Software Inc.
BMM User Manual
15.14.12 SARA Title III Tier I Report
Screen provides a way to generate a SARA Title III Tier I report summarizing the
inventory quantities, including maximum amount, average amount, and the number of
days on site for the SARA hazard information. With SARA Title III Tier I, provides the
option of selecting Warehouse and hazard type based on either system weight or system
volume.
Once BMM processes the report parameters, it displays the results as a Crystal Report
that one can print or export.
Doc. No. F/DV/15
Rev.No.
Date
BatchMaster Software Inc.
15.14.12.1
BMM User Manual
Screen Fields Description
Warehouse: Field specifies the Warehouse for which the report is to be generated.
Hazard Type: Field specifies the Hazard Type for which the report is to be generated.
Average Date From: Field specifies the lower limit of the range of date for uses as filter
criteria during processing.
Average Date To: Field specifies the Upper limit of the range of date for uses as filter
criteria during processing.
By System Weight: Field is used when the report is to be generated by system weight.
By System Volume: Field is used when the report is to generate by system volume.
Report Path: Field holds the default path of the report.
15.14.12.2
Generating a SARA Title III Tier I Report
1. Enter the Location using the lookup button next to the field.
2. Enter the Hazard Type using the lookup button next to the field.
3. Enter the Average Date range using the lookup button next to the field.
4. Click on the button to enable: By System Weight or By System Volume.
5. Click on the OK button to create the report.
Doc. No. F/DV/15
Rev.No.
Date
BatchMaster Software Inc.
BMM User Manual
15.14.13 SARA Title III Tier II Report
Screen provides a way to generate a report summarizing specific hazardous ingredient
information for each material, including Chemical Abstract Service (CAS) number,
physical hazards, health hazards, composition, storage codes, maximum and average
amount of inventory on hand, and the number of days on site.
The option‟s filtering parameters can be used to define the report. Once BMM processes
the report parameters, it displays the results as a Crystal Report that one can print or
export.
15.14.13.1
Screen Fields Description
SARA Title III Tier II Report Selection
Item No. From: Field specifies the lower limit of the range of Items for uses as filter
criteria during processing. Leaving this field blank has the same effect as selecting the
first available Item via the lookup.
Item No. To: Field specifies the upper limit of the range of Items for uses as filter
criteria during processing. Leaving this field blank has the same effect as selecting the
last available Item via the lookup.
Average From Date: Field specifies the lower limit of the range of date for uses as filter
criteria during processing.
Average To Date: Field specifies the Upper limit of the range of date for uses as filter
criteria during processing.
Report Path: Field holds the default path of the report.
15.14.13.2
Generating a SARA Title III Tier II Report Screen
1. Enter the Item number From and To range using the lookup buttons next to the
fields.
2. Enter the Average From and To date range using the lookup buttons next to the
fields.
Doc. No. F/DV/15
Rev.No.
Date
BatchMaster Software Inc.
BMM User Manual
3. Click on the OK button to create the report.
15.14.14 MSDS Master Format Report
Report is established from the MSDS Master Format record. On clicking the MSDS Master
Format Report icon, BMM uses the data from the MSDS Master Format record and
displays the Crystal Report for viewing on the screen.
The option‟s filtering parameters can be used to define the report. Once BMM processes
the report parameters, it displays the results as a Crystal Report that one can print or
export.
15.14.14.1
Screen Fields Description
Doc. No. F/DV/15
Rev.No.
Date
BatchMaster Software Inc.
BMM User Manual
MSDS Master Format Report
Formula Key From: Field specifies the lower limit of the range of Format Key for uses
as filter criteria during processing. Leaving this field blank has the same effect as
selecting the first available Format Key via the lookup.
Formula Key To: Feld specifies the upper limit of the range of Format Key for uses as
filter criteria during processing. Leaving this field blank has the same effect as selecting
the last available Format Key via the lookup.
Status: Field is used to specify the status of the MSDS Formats to be included while
generating the report.
Report Path: Field holds the default path of the report.
15.14.14.2
Generating a MSDS Master Format Report Screen
1. Enter the Formula From and To range using the lookup buttons next to the fields.
2. Select the Status, as required.
3. Click on the OK button to create the report.
15.14.15 Customer History Report
Screen provides a way to generate a report showing the customer histories created using
the Customer History screen.
Doc. No. F/DV/15
Rev.No.
Date
BatchMaster Software Inc.
BMM User Manual
The option‟s filtering parameters can be used to define the report. Once BatchMaster
Enterprise processes the report parameters, it displays the results as a Crystal Report
that one can print or export.
15.14.15.1
Screen Fields Description
Customer History Report Selection
Customer Key From: Field specifies the lower limit of the range of Customer Key for
use as filter criteria during processing. Leaving this field blank has the same effect as
selecting the first available Customer Key via the lookup.
Customer Key To: Field specifies the upper limit of the range of Customer Key for use
as filter criteria during processing. Leaving this field blank has the same effect as
selecting the last available Customer Key via the lookup.
Item Key From: Field specifies the lower limit of the range of Items for uses as filter
criteria during processing. Leaving this field blank has the same effect as selecting the
first available Item via the lookup.
Item Key To: Field specifies the upper limit of the range of Item for use as filter criteria
during processing. Leaving this field blank has the same effect as selecting the last
available Item via the lookup.
Report Path: Field holds the default path of the report.
15.14.15.2
Generating a Customer History Report
1. Enter the Customer From and To range using the lookup buttons next to the
fields.
2. Enter the Item Key From and To range using the lookup buttons next to the
fields.
3. Click on the Ok button on the toolbar to create a report.
Doc. No. F/DV/15
Rev.No.
Date
BatchMaster Software Inc.
BMM User Manual
15.14.16 INCI Report
Screen provides a way to generate a report showing the ingredients nomenclature
statement used within formula. The report displays the INCI name and EINCIS Number
for the CAS number being defined within the formula. This is required for compliance
issue, especially for compliance with Bio Terrorism Act.
For consumer safety certain accurate information is a requirement to appear on labels of
products as of Food, Drug or cosemetic etc. For example, the ingredients are listed on
the ingredient declaration for the purchaser to reduce the risk of an allergic reaction to
an ingredient the user has had an allergy to before. INCI names are mandated on the
ingredient statement of every consumer personal care product. The INCI system allows
the consumer to identify the ingredient content.
INCI stands for International Nomenclature of Cosmetic Ingredients. Basically the INCI is
a system for naming cosmetic ingredients that is multilingual, multinational and based
on Latin language. It is a nomenclature based on international lists of ingredients known
and used by pharmacists and scientists worldwide.
Doc. No. F/DV/15
Rev.No.
Date
BatchMaster Software Inc.
15.14.16.1
BMM User Manual
Screen Fields Description
INCI Formula Selection
Formula From: Field specifies the lower limit of the range of Formula for use as filter
criteria during processing. Leaving this field blank has the same effect as selecting the
first available Formula Key via the lookup.
Formula To: Field specifies the upper limit of the range of Formula for use as filter
criteria during processing. Leaving this field blank has the same effect as selecting the
last available Formula via the lookup.
Report Path: Field holds the default path of the report.
15.14.16.2
Generating an INCI Report
1. Enter the Formula From and To range using the lookup buttons next to the fields.
2. Click on the OK button to create the report.
Doc. No. F/DV/15
Rev.No.
Date
BatchMaster Software Inc.
BMM User Manual
16 Dashboard
16.1 Custom Reports View
The screen provides option to view the customized reports added via Report Generation
screen a Dashboard. As the dashboard present the information in a format that is easy
to use and interpret. Thus you can enhance the usability of customized reports by using
the Custom Report View option.
Doc. No. F/DV/15
Rev.No.
Date
BatchMaster Software Inc.
16.1.1
BMM User Manual
Working with View Custom Dashboard Wizard
Click the “Report ID drop down on the View Custom Dashboard board wizard screen. The
drop displays all the customized reports generated in the logged In company using the
Report Generation screen.
Click Next to proceed further.
The selection criteria for dashboard on the basis of selected report are displayed. Click
Next to view the reports data in dashboard format.
Doc. No. F/DV/15
Rev.No.
Date
BatchMaster Software Inc.
BMM User Manual
17 BIN MANAGEMENT
Shipping orders to the customers can be executed more expeditiously by organizing the
warehouse using bins enabling the employee to track the exact location of items in
stock. An item can be stored in multiple bins, and various items can be stored in the
same bin. Thus, Bin management utility helps the Employees to pick and fulfill orders
faster as they know exactly where to go for the items they need. When using the MultiLocation Inventory feature Bins can be used to organize a single warehouse or multiple
warehouses.
BMM Bin Management utility provides an ability to manage SAP business one inventory
at the bin level rather than the generic warehouse level. This functionality ensures that
the bin level inventory is handled for all inventory transactions and allows user to
maintain bins for specific warehouses. This system facilitates user to select specific bins
for inventory transactions, move inventory between bins and have inventory reporting to
the bin level.
17.1 Bin Transaction Report
On the Inventory, Purchase and Sales Transaction screens details of various bin
transactions with the details such as container, Bin Number, Issue/Receipt Quantity etc.
Further on right clicking the Bin selection screen provides option to view “Bin Details”.
Doc. No. F/DV/15
Rev.No.
Date
BatchMaster Software Inc.
17.1.1
BMM User Manual
Generating Bin Details report
On right clicking the Issue or Receipt transaction screen from Inventory Transactions,
Purchase or Sales Transaction screens provides the Bin Transaction Report option.
Selecting the Bin Transaction Report displays the Bin selection window wherein you can
view the various transaction details. Further on again right clicking on the Bin selection
window provides Bin details option.
Doc. No. F/DV/15
Rev.No.
Date
BatchMaster Software Inc.
BMM User Manual
Selecting the “Bin Details” option displays the system message that displays the Row,
Rack and Aisle details of the Bin.
Doc. No. F/DV/15
Rev.No.
Date
BatchMaster Software Inc.
17.1.2
BMM User Manual
Bin Selection Form for Non Tracked Items
To handle the bin level non tracked inventory during inventory transactions the Bin
selection form is provided. Bin Selection form is accessible from various screen during
SAP Business One Transactions. The behavior of bin selection form depends upon the
transaction.
During Issue Transaction:
Item Code: This field displays the unique identification key of an Item.
Warehouse Code: This field indicates the warehouse associated with the Item.
Lot No.: This field displays the lot/ serial number of the batch.
Lot Quantity: This field displays the lot quantity issued.
Select: Click this field to select the respective line for issue
Container: This is the container number from which material is issued.
Bin No.: This field shows the bin number of the selected lot of the item.
Inv Type: This is an Inventory type to which the bins are available.
Expiration Date: This is the expiry date of the lot.
Bin Qty: It displays the available quantity of the bin.
Selected Qty: This is the quantity selected from the particular bin.
Doc. No. F/DV/15
Rev.No.
Date
BatchMaster Software Inc.
BMM User Manual
Qty Selected: This field displays the total selected quantity for the item to be issued.
During Receipt Transactions:
Document No.: This is the automatically generated document number for the
transaction.
Document Type: The information displayed in this field denotes the source of
document.
Item Code: This field displays the unique identification key of an Item.
Item Description: It shows the description of an Item.
Whse Code: This field indicates the warehouse associated with the Item.
Total Needed: This field shows the total required quantity of the item.
Total Created: It displays the total selected lot quantities of the Item.
Bin, Lot and Serial Detail:
Bin Number: It shows the bin number of the selected batch of item.
Receipt Qty: This is the quantity of the item received from the particular bin.
Inventory Type: This is an Inventory type to which the bins are available.
Doc. No. F/DV/15
Rev.No.
Date
BatchMaster Software Inc.
BMM User Manual
17.1.3
Batch Number Selection Form for Serial/Lot
Tracked Items
Item No.: This field displays the unique identification key of an Item.
Item Description: it shows the description of the item.
Whse Code: This field indicates the warehouse associated with the item.
Quantity: This field specifies the quantity of the material required.
Total Needed: This field shows the total required quantity of the item.
Total Selected: It displays the total selected lot quantities of an Item.
Total Batches: Field displays the total number of batches from which the item is
selected for transaction.
Direction: Field specifies the inventory movement status with respect to the specific
transaction.
Available Batches:
Doc. No. F/DV/15
Rev.No.
Date
BatchMaster Software Inc.
BMM User Manual
Batch: This field displays the unique identification key of the batch.
Available Qty: This is the quantity of the material available in the particular batch.
Selected Qty: field specifies the quantity of the material to be selected out the available
quantity.
Allocated Qty: This field displays the quantity of material allocated i.e. transferred in
the selected batches grid for transaction.
Bin Number: field displays the bin associated with the batch record.
Batch Line Id: displays the Batch Line Id associated with material batch.
Selected Batches:
Batch: This field displays the unique identification key of the batch.
Selected Qty: field specifies the quantity of the material selected out the available
quantity.
Bin No.: field displays the bin associated with the batch record.
Batch Line Id: displays the Batch Line Id associated with material batch.
17.1.3.1 Bin Selection Form for Serial/Lot Tracked Items during
Issue Transaction
Double clicking the selected batches record in the Batch Number Selection screen,
displays the Bin Selection window wherein you can maintain the bin details of the issued
item.
Doc. No. F/DV/15
Rev.No.
Date
BatchMaster Software Inc.
BMM User Manual
Item Code: This field displays the unique identification key of an Item.
Warehouse Code: This field indicates the warehouse associated with the Item
Lot No.: This field displays the lot/ serial number of the batch.
Lot Quantity: This field displays the lot quantity issued.
Container: This is the container number from which material is issued
Bin No.: This field shows the bin number of the selected lot of the item.
Inv Type: This is an Inventory type to which the bins are available.
Expiration Date: This is the expiry date of the lot.
Bin Qty: It displays the available quantity of the bin.
Selected Qty: This is the quantity selected from the particular bin.
17.1.4
Batches Setup Form for Serial /Lot Tracked
Items during Receipt Transaction
During Receipt transaction for Serial/ Lot tracked items on double clicking the Add button
displays the Batches Setup window.
Doc. No. F/DV/15
Rev.No.
Date
BatchMaster Software Inc.
BMM User Manual
Doc No.: This is the automatically generated document number for the transaction.
Item Number: This field displays the unique identification key of an Item.
Item Description: it shows the description of the item.
Whse Code: This field indicates the warehouse associated with the item.
Total Needed: This field shows the total required quantity of the item.
Total created: This field displays the total created quantity of the material.
Created Batches:
Batch: It shows the serial/batch number of the batch.
Qty: This field specifies the quantity of the material received.
Batch Attribute1: This field is used to specify additional details for the material batch
received.
Batch Attribute2: This field is used to specify additional details for the material batch
received.
Expiration Date: This field is used to specify the expiry date of the lot.
Mfr Date: This field is used to specify the date on which the material received is
manufactured.
Admission Date: This field is used to specify the date on which the material lot is
received.
Location: This field is used to specify the location on which the material is received.
Details: any extra details or information related to the lot received can be entered in
this field.
Bin Number: Bin number of the received batch is entered in this field.
Batch Line ID: Batch Line Id for the received material batch can be entered here.
17.1.4.1 Bin Receipt Selection Form for Serial/Lot Tracked Items
during Receipt Transaction
Double clicking the created batches record in the Bin Setup screen, displays the Bin
Selection window wherein you can maintain the bin details of the received item.
Doc. No. F/DV/15
Rev.No.
Date
BatchMaster Software Inc.
BMM User Manual
Item Code: This field displays the unique identification key of an Item.
Warehouse Code: This field indicates the warehouse associated with the Item
Lot No.: This field displays the lot/ serial number of the batch.
Lot Qty: This field displays the lot quantity received.
Container #: This field is used to specify the container number in which the material is
received.
Bin No.: It specifies the bin number in which the material is to be received.
Inv Type: This is an Inventory type to which the bins are available.
Quantity: This is the quantity of the material received in the particular bin.
17.2 Inventory Transactions
Inventory Managment can be performed more efficiently by organizing the warehouse
using bins, to track the exact location of items in stock. Using the bin managment you
can store your finished goods and raw materials in multiple bins. Morover you can use
bins to organize a single warehouse or multiple warehouses, when using the MultiLocation Inventory feature.
To handle the bin level inventory during inventory transactions the Bin selection form is
provided. Bin Selection form is accessible from various screen during SAP Business One
Transactions. The behavior of bin selection form depends upon the transaction.
Doc. No. F/DV/15
Rev.No.
Date
BatchMaster Software Inc.
17.2.1
BMM User Manual
Goods Receipt
Using the Goods Receipt screen you can perform the receipt transaction for the inventory
items. In case, the item for which Goods Receipt is processesd is Lot tracked then the
‟Batches Setup‟ window is displayed. Whereas in case the item is non tracked then the
the ‟Bin Selection‟ window is dispalyed.
Perform a Goods receipt transaction in SAP Business one.
Batches Setup form appears on pressing the Add button at time of adding a transaction
for the Lot tracked Item.
Doc. No. F/DV/15
Rev.No.
Date
BatchMaster Software Inc.
BMM User Manual
Note: Lots can be created using the “Automatic Creation” button available on the
Batches Setup screen.
Further on clicking the Batch field lookup displays the “Create String For Batches”
window wherein you can specify the masking for the lot number in the string field.
Doc. No. F/DV/15
Rev.No.
Date
BatchMaster Software Inc.
BMM User Manual
Enter the Batch and quantity details in the respective fields. On Double clicking the
Created Batch record a “Bin Receipt Selection” Window is displayed.
In case default receipt bin is assocaited with the item on the Item Master Details screen,
then it gets defaulted in the Bin No. column. User can modify the default value if
required. The quantity column defaults the value entered on the previous screen, which
is editable.
click on the „Ok‟ button to save the bin selection opted. Further click on the update
button to save the receipt.
Doc. No. F/DV/15
Rev.No.
Date
BatchMaster Software Inc.
BMM User Manual
The caption of Update button changes to Ok button click ok to proceed with the receipt.
Doc. No. F/DV/15
Rev.No.
Date
BatchMaster Software Inc.
BMM User Manual
On again clicking the Add button on the Good Receipt screen the ‟Bin Selection‟ window
is dispalyed for the non tracked item.
Enter the receipt quantity and click on the Update button.
Doc. No. F/DV/15
Rev.No.
Date
BatchMaster Software Inc.
BMM User Manual
This completes the bin /batch selection for the Non tracked and Lot tracked items on the
Goods Receipt screen.
17.2.2
Goods Issue
Goods Issue screen is used to perform Issue transaction for the Inventory Items in SAP
Business One. In case, the item for which Goods Issue is processesd is Lot tracked then
the ‟Batches Setup‟ window is displayed. Whereas in case the item is non tracked then
the the ‟Bin Selection‟ window is dispalyed.
Perform a Goods Issue transaction in SAP Business one.
Doc. No. F/DV/15
Rev.No.
Date
BatchMaster Software Inc.
BMM User Manual
Batch Number Selection form appears on pressing the Add button at the time of adding a
transaction for the Lot tracked Item.
Doc. No. F/DV/15
Rev.No.
Date
BatchMaster Software Inc.
BMM User Manual
On the Batch Number Selection window, select the batch from which the material issue
is to be accomplished in the “Available Batches” grid. Select/ enter the quantity to be
issued from the selected batch.
Click on the Forward arrow button to transfer the selected available batch in the
„Selected Batches” grid.
On Double clicking the Created Batch record the “Bin Selection” Window is displayed. In
case default receipt bin is associated with the item on the Item Master Details screen,
then it gets defaulted in the Bin No. column. User can modify the default value if
required. The selected quantity column defaults the value entered on the previous
screen. Click ok to return to BatchNumber Selection Window.
Doc. No. F/DV/15
Rev.No.
Date
BatchMaster Software Inc.
BMM User Manual
Click Update to proceed with the receipt.
Doc. No. F/DV/15
Rev.No.
Date
BatchMaster Software Inc.
BMM User Manual
The caption of Update button changes to OK Click on the that to proceed with the Issue
transaction.
On again clicking the Add button on the Goods Issue screen the ‟Bin Selection‟ window is
dispalyed for the non tracked item.
Doc. No. F/DV/15
Rev.No.
Date
BatchMaster Software Inc.
BMM User Manual
Select the Issue Quantity and Click on the Update button.
Doc. No. F/DV/15
Rev.No.
Date
BatchMaster Software Inc.
BMM User Manual
This completes bin/ batch selection for the Non tracked and Lot tracked items on the
Goods Issue screen.
17.2.3
Inventory Transfer
This utility enables the user to efficiently perform inventory move from one warehouse to
another. Using the Inventory Transfer screen you can transfer inventory from one
warehouse location to another.
To perform Inventory transfer on the Invnetory Transfer screen select the ”From
Warehouse” location. Further in the sliding grid select/enter the Item No. and ”To
Warehouse Location”.
Doc. No. F/DV/15
Rev.No.
Date
BatchMaster Software Inc.
BMM User Manual
Bin Selection Form appears on pressing the Add button at the time of adding a
transaction for the Non tracked Item.
Doc. No. F/DV/15
Rev.No.
Date
BatchMaster Software Inc.
BMM User Manual
Select the quantity bin line to be transferred, click Update to proceed with the Inventory
Transfer.
On again clicking the Add button the Bin selection Form is dispalyed for the Lot Tracked
item. Select the lots to be transferred and click update.
Doc. No. F/DV/15
Rev.No.
Date
BatchMaster Software Inc.
BMM User Manual
This completes the bin selection for the lot as well non tracked items on the Inventory
Transfer screen.
Doc. No. F/DV/15
Rev.No.
Date
BatchMaster Software Inc.
17.2.4
BMM User Manual
Inventory Putaway
The inventory put away form enables the user to maintain the inventory movement
within a warehouse. There may be certain situations when the inventory move is
required amongst the storage bins from one storage condition to another within a
warehouse.
No.: This field displays the automatically generated inventory put away number.
Document Date: This field displays the current server date that can be edited.
Warehouse: This field indicates the warehouse for which inventory put away is to be
performed.
Grid fields
Item No.: This field indicates the selected inventory item whose bin transfer is to be
performed.
Item Description: This field indicates the item description.
U/M: This field indicates the Unit of measurement of the selected line item.
Quantity: This field indicates the inventory quantity for bin transfer.
Lot: This field indicates the lot from which the quantity is obtained for bin transfer.
Doc. No. F/DV/15
Rev.No.
Date
BatchMaster Software Inc.
BMM User Manual
Container: This is the user editable field in which one can specify the number of
containers for the lot.
From Bin: This field indicates the From Bin from which inventory is to be transferred to
the other selected bin.
From Inv Type: This field shows the From Inventory type associated with the source
bin.
To Bin: This field indicates the To Bin to which inventory is transferred from the From
Bin.
To Inv Type: This field shows the To Inventory type associated with the destination bin.
17.2.4.1
Steps to define Inventory Put Away
7. Specify the document date if different from current default server date.
8. Select the warehouse for which inventory put away is to be performed.
9. Select the Item for inventory move amongst bins within the warehouse.
10. Specify the values in the Quantity, lot and container fields as required.
11. Select the From Bin and To Bin as needed.
12. Click on Add to perform the Inventory Put away transaction.
17.2.5
Initial Quantities,
Inventory Posting
Inventory
Tracking
and
Inventory management system provides information to efficiently manage the flow of
materials. To improve inventory performance level, the BMM SAP Business one is
implementing the concept of Bin. Now user can maintain the BMM bin level information
of an inventory during Inventory Management transactions. This lets you determine
exactly in which bin a certain material is located.
Doc. No. F/DV/15
Rev.No.
Date
BatchMaster Software Inc.
BMM User Manual
Initial Quantities
When defining the opening balance for inventory the bin in which the entry of the initial
quantities is to be carried out, need to be maintained. The Bin no would be defined with
respect to the batches created for the specific inventory type. Providing the bin number
corresponding to the initial quantities of an inventory assists user in tracking the exact
location of inventory.
At initial quantity screen maintain the initial quantity of the required item.
Doc. No. F/DV/15
Rev.No.
Date
BatchMaster Software Inc.
BMM User Manual
Now click on Add button to maintain batch related details. In case of Lot tracked items
Batches Setup window is displayed.
Doc. No. F/DV/15
Rev.No.
Date
BatchMaster Software Inc.
BMM User Manual
Note: Lots can be created using the “Automatic Creation” button available on the
Batches Setup screen.
Further on clicking the Batch field lookup displays the “Create String For Batches”
window wherein you can specify the masking for the lot number in the string field.
Here at batch setup screen, user can specify the Batch and quantity details in the
respective fields.
On Double clicking the Created Batch record a “Bin Receipt Selection” Window is
displayed.
Doc. No. F/DV/15
Rev.No.
Date
BatchMaster Software Inc.
BMM User Manual
In case default receipt bin is associated with the item on the Item Master Details screen,
then it gets defaulted in the Bin No. column. User can modify the default value if
required. The quantity column defaults the value entered on the previous screen, which
is editable.
Finally click on the „Ok‟ button to save the bin selection opted. Thus bin number selected
here refers to the bin in which the respective batch initial quantity is available.
In case of Non tracked Items:
For non tracked items while processing the Initial quantities you need to define the
opening balance for inventory.
At initial quantity screen maintain the initial quantity of the required item.
Doc. No. F/DV/15
Rev.No.
Date
BatchMaster Software Inc.
BMM User Manual
Now click on Add button to maintain bin related details. In case of non tracked items Bin
Selection window is displayed.
Doc. No. F/DV/15
Rev.No.
Date
BatchMaster Software Inc.
BMM User Manual
Here at bin selection screen, user can specify the bin details in the respective fields.
Click on the update button to save the bin information.
Inventory Tracking and Posting
BMM SAP Business one now facilitates the user to manage inventory quantities during
Inventory tracking and posting.
Doc. No. F/DV/15
Rev.No.
Date
BatchMaster Software Inc.
BMM User Manual
The most basic method of inventory tracking is physical counts. So maintaining the bin
number lets user to know that which serial numbers of the material are in which bin.
Also when the material needs to be moved from one storage bin to another bin the bin
number needs to be maintained.
Doc. No. F/DV/15
Rev.No.
Date
BatchMaster Software Inc.
BMM User Manual
Hence while maintaining the stock posting details of an item the bin level details can be
maintained.
At Inventory Posting screen maintain the required details corresponding to the selected
item.
Press Reconcile button to specify the bin level details. The Bin selection form gets
opened where user can specify the Bin number along with an inventory type for the
selected quantity of an item.
Doc. No. F/DV/15
Rev.No.
Date
BatchMaster Software Inc.
BMM User Manual
Press Ok button to save the bin level details for an item.
17.3 Purchase Transactions
You can track the various Purchase Transactions upto bin level using the BatchMasters
Bin Managment utility. This functionality ensures that the bin level inventory is handled
for all purchase transactions and allows user to maintain bins for specific warehouses.
17.3.1
Goods Receipt PO
Using the Goods Receipt PO screen you can perform the receipt transaction for the
purchased items.
Perform a Goods receipt PO transaction in SAP Business one.
Doc. No. F/DV/15
Rev.No.
Date
BatchMaster Software Inc.
BMM User Manual
Batches Setup form appears on pressing the Add button at time of adding a transaction
for the Lot tracked Item.
Doc. No. F/DV/15
Rev.No.
Date
BatchMaster Software Inc.
BMM User Manual
Note: Lots can be created using the “Automatic Creation” button available on the
Batches Setup screen.
Further on clicking the Batch field lookup displays the “Create String For Batches”
window wherein you can specify the masking for the lot number in the string field.
Enter the Batch and quantity details in the respective fields. On Double clicking the
Created Batch record a “Bin Receipt Selection” Window is displayed.
Doc. No. F/DV/15
Rev.No.
Date
BatchMaster Software Inc.
BMM User Manual
In case default receipt bin is associated with the item on the Item Master Details screen,
then it gets defaulted in the Bin No. column. User can modify the default value if
required. The quantity column defaults the value entered on the previous screen, which
is editable.
Finally click on the „Update‟ button to save the bin selection opted.
Doc. No. F/DV/15
Rev.No.
Date
BatchMaster Software Inc.
BMM User Manual
Click on the Update button the caption of the button changes to OK.
Doc. No. F/DV/15
Rev.No.
Date
BatchMaster Software Inc.
BMM User Manual
Click OK to proceed with the Goods Receipt PO transaction.
Click on the Update button on the Batches Setup screen. The caption of the Update
button changes to OK click on that button.
Doc. No. F/DV/15
Rev.No.
Date
BatchMaster Software Inc.
BMM User Manual
On again clicking the Add button on the Goods Receipt PO screen “Bin selection” window
is displayed for the Non tracked Item.
Doc. No. F/DV/15
Rev.No.
Date
BatchMaster Software Inc.
BMM User Manual
Enter the receipt quantity details and click on the Update button.
This completes the bin/batch selection for the Non tracked and Lot tracked items on the
Goods Receipt PO Screen.
Doc. No. F/DV/15
Rev.No.
Date
BatchMaster Software Inc.
BMM User Manual
On again clicking the Add button completes the Goods PO Receipt transaction.
Doc. No. F/DV/15
Rev.No.
Date
BatchMaster Software Inc.
17.3.2
BMM User Manual
Goods Return
Using the Goods Return screen you can perform the goods return transaction for the
purchased inventory items.
Perform a Goods Return transaction in SAP Business one.
Batch Number selection form appears on pressing the Add button at time of adding a
transaction for the Lot tracked Item.
Doc. No. F/DV/15
Rev.No.
Date
BatchMaster Software Inc.
BMM User Manual
On the Batch Number Selection window, select the batch from which the material return
is to be accomplished in the “Available Batches” grid. Select/ enter the quantity to be
issued from the selected batch.
Click on the Forward arrow button to transfer the selected available batch in the
„Selected Batches” grid.
Doc. No. F/DV/15
Rev.No.
Date
BatchMaster Software Inc.
BMM User Manual
On Double clicking the Created Batch record the “Bin Selection” Window is displayed.
Select the bin from which return is to be processed.
Finally click on the „Ok‟ button to save the bin selection opted.
Doc. No. F/DV/15
Rev.No.
Date
BatchMaster Software Inc.
BMM User Manual
Further click on the update button on the Batch Number selection window to save the
Goods Return transaction.
Doc. No. F/DV/15
Rev.No.
Date
BatchMaster Software Inc.
BMM User Manual
The caption of the Update button changes to Ok click on that to proceed with the return
transaction.
On again clicking the Add button on the Goods Return screen the “Bin selection” window
is displayed for the Non tracked item.
Doc. No. F/DV/15
Rev.No.
Date
BatchMaster Software Inc.
BMM User Manual
Select the bin record from which return transaction is to be processed.
Doc. No. F/DV/15
Rev.No.
Date
BatchMaster Software Inc.
BMM User Manual
Click on the Update button to proceed with the return transaction.
This completes the bin/ batch selection for the Non tracked and Lot tracked items on the
Goods Return screen.
Doc. No. F/DV/15
Rev.No.
Date
BatchMaster Software Inc.
BMM User Manual
On again clicking the Add button completes the Goods Return transaction.
17.3.3
A/P Invoice
Using the A/P Invoice window you can create invoice for Purchase Orders and Goods
Receipt Pos.
Create an A/P Invoice in SAP Business one.
Doc. No. F/DV/15
Rev.No.
Date
BatchMaster Software Inc.
BMM User Manual
Batches Setup form appears on pressing the Add button at time of adding a transaction
for Lot tracked item.
Doc. No. F/DV/15
Rev.No.
Date
BatchMaster Software Inc.
BMM User Manual
Note: Lots can be created using the “Automatic Creation” button available on the
Batches Setup screen.
Further on clicking the Batch field lookup displays the “Create String For Batches”
window wherein you can specify the masking for the lot number in the string field.
Enter the Batch and quantity details in the respective fields. On Double clicking the
Created Batch record a “Bin Receipt Selection” Window is displayed.
Doc. No. F/DV/15
Rev.No.
Date
BatchMaster Software Inc.
BMM User Manual
In case default receipt bin is associated with the item on the Item Master Details screen,
then it gets defaulted in the Bin No. column. User can modify the default value if
required. The quantity column defaults the value entered on the previous screen, which
is editable.
Finally click on the „Update‟ button to save the bin selection opted.
Doc. No. F/DV/15
Rev.No.
Date
BatchMaster Software Inc.
BMM User Manual
Click on the Update button the caption of the button changes to OK.
Doc. No. F/DV/15
Rev.No.
Date
BatchMaster Software Inc.
BMM User Manual
Click OK to proceed with the Goods Receipt PO transaction
Click on the Update button on the Batches Setup screen. The caption of the Update
button changes to OK click on that button.
Doc. No. F/DV/15
Rev.No.
Date
BatchMaster Software Inc.
BMM User Manual
On again clicking the Add button on the A/P Invoice screen “Bin selection” window is
displayed for the Non tracked Item.
Doc. No. F/DV/15
Rev.No.
Date
BatchMaster Software Inc.
BMM User Manual
Enter the receipt quantity details and click on the Update button.
This completes the bin/batch selection for the Non tracked and Lot tracked items on the
A/P Invoice Screen.
Doc. No. F/DV/15
Rev.No.
Date
BatchMaster Software Inc.
BMM User Manual
On again clicking the Add button completes the A/P Invoice transaction.
Doc. No. F/DV/15
Rev.No.
Date
BatchMaster Software Inc.
17.3.4
BMM User Manual
A/P Credit Memo
Using the A/P Credit Memo window you can create a credit memo for purchase orders
and Goods Receipt Pos.
Create an A/P Credit Memo in SAP Business One.
Batch Number selection form appears on pressing the Add button at time of adding a
transaction for the Lot tracked Item.
Doc. No. F/DV/15
Rev.No.
Date
BatchMaster Software Inc.
BMM User Manual
On the Batch Number Selection window, select the batch from which the A/P Credit
Memo is to be accomplished in the “Available Batches” grid. Select/ enter the quantity to
be issued from the selected batch.
Click on the Forward arrow button to transfer the selected available batch in the
„Selected Batches” grid.
Doc. No. F/DV/15
Rev.No.
Date
BatchMaster Software Inc.
BMM User Manual
On Double clicking the Created Batch record the “Bin Selection” Window is displayed.
Select the bin from which return is to be processed.
Finally click on the „Ok‟ button to save the bin selection opted.
Doc. No. F/DV/15
Rev.No.
Date
BatchMaster Software Inc.
BMM User Manual
Further click on the update button on the Batch Number selection window to save the
A/P Credit Memo transaction.
Doc. No. F/DV/15
Rev.No.
Date
BatchMaster Software Inc.
BMM User Manual
The caption of the Update button changes to Ok click on that to proceed with the
A/P Credit Memo transaction.
On again clicking the Add button on the A/P Credit Memo screen the “Bin selection”
window is displayed for the Non tracked item.
Doc. No. F/DV/15
Rev.No.
Date
BatchMaster Software Inc.
BMM User Manual
Select the bin record from which A/P Credit Memo transaction is to be processed.
Doc. No. F/DV/15
Rev.No.
Date
BatchMaster Software Inc.
BMM User Manual
Click on the Update button to proceed with the A/ P Credit Memo transaction.
This completes the bin/ batch selection for the Non tracked and Lot tracked items on the
A/P Credit Memo screen.
Doc. No. F/DV/15
Rev.No.
Date
BatchMaster Software Inc.
BMM User Manual
On again clicking the Add button completes the A/P Credit Memo transaction.
17.4 Sales Transactions
You can track the varoius Sales Transactions upto bin level using the BatchMasters Bin
Management utility.
17.4.1
Delivery
Using the Delivery screen you can perform the delivery transaction for the sold items.
Perform a Delivery transaction in SAP Business one.
Doc. No. F/DV/15
Rev.No.
Date
BatchMaster Software Inc.
BMM User Manual
Batch Number selection form appears on pressing the Add button at time of adding a
transaction for the Lot tracked Item.
Doc. No. F/DV/15
Rev.No.
Date
BatchMaster Software Inc.
BMM User Manual
On the Batch Number Selection window, select the batch from which the delivery is to be
accomplished in the “Available Batches” grid. Select/ enter the quantity to be issued
from the selected batch.
Click on the Forward arrow button to transfer the selected available batch in the
„Selected Batches” grid.
On Double clicking the Created Batch record the “Bin Selection” Window is displayed.
Select the bin from which delivery is to be processed.
Click on the „Ok‟ button to save the bin selection opted.
Doc. No. F/DV/15
Rev.No.
Date
BatchMaster Software Inc.
BMM User Manual
Further click on the update button on the Batch Number selection window to save the
delivery transaction.
Doc. No. F/DV/15
Rev.No.
Date
BatchMaster Software Inc.
BMM User Manual
The caption of the Update button changes to Ok click on that to proceed with the
delivery transaction.
On again clicking the Add button on the Delivery screen the “Bin selection” window is
displayed for the Non tracked item.
Doc. No. F/DV/15
Rev.No.
Date
BatchMaster Software Inc.
BMM User Manual
Select the bin record from which Delivery transaction is to be processed.
Doc. No. F/DV/15
Rev.No.
Date
BatchMaster Software Inc.
BMM User Manual
Click on the Update button to proceed with the Delivery transaction.
This completes the bin/ batch selection for the Non tracked and Lot tracked items on the
Delivery screen.
Doc. No. F/DV/15
Rev.No.
Date
BatchMaster Software Inc.
BMM User Manual
On again clicking the Add button completes the Delivery transaction.
17.4.2
Return
Using the Return screen you can perform the sales return transaction for the sold items.
Perform a Return transaction in SAP Business one.
Doc. No. F/DV/15
Rev.No.
Date
BatchMaster Software Inc.
BMM User Manual
Batch Number selection form appears on pressing the Add button at time of adding a
transaction for the Lot tracked Item.
Doc. No. F/DV/15
Rev.No.
Date
BatchMaster Software Inc.
BMM User Manual
On the Batch Number Selection window, select the batch from which the material return
is to be accomplished in the “Available Batches” grid. Select/ enter the quantity to be
issued from the selected batch.
Click on the Forward arrow button to transfer the selected available batch in the
„Selected Batches” grid.
On Double clicking the Created Batch record the “Bin Selection” Window is displayed.
Enter the bin in which return is to be processed.
Doc. No. F/DV/15
Rev.No.
Date
BatchMaster Software Inc.
BMM User Manual
Click on the „Update‟ button to save the entered bin.
Doc. No. F/DV/15
Rev.No.
Date
BatchMaster Software Inc.
BMM User Manual
Further click on the update button on the Batch Number selection window to save the
Return transaction.
The caption of the Update button changes to Ok click on that to proceed with the return
transaction.
Doc. No. F/DV/15
Rev.No.
Date
BatchMaster Software Inc.
BMM User Manual
On again clicking the Add button on the Return screen the “Bin selection” window is
displayed for the Non tracked item.
Doc. No. F/DV/15
Rev.No.
Date
BatchMaster Software Inc.
BMM User Manual
Enter the bin value in which return transaction is to be processed.
Click on the Update button to proceed with the return transaction.
Doc. No. F/DV/15
Rev.No.
Date
BatchMaster Software Inc.
BMM User Manual
This completes the bin/ batch selection for the Non tracked and Lot tracked items on the
Return screen.
Doc. No. F/DV/15
Rev.No.
Date
BatchMaster Software Inc.
BMM User Manual
On again clicking the Add button completes the Return transaction.
17.4.3
A/R Invoice
Using the A/R Invoice window you can create a invoice for sales orders.
Create an A/R Invoice in SAP Business One.
Batch Number selection form appears on pressing the Add button at time of adding a
transaction for the Lot tracked Item.
Doc. No. F/DV/15
Rev.No.
Date
BatchMaster Software Inc.
BMM User Manual
On the Batch Number Selection window, select the batch from which the A/R Invoice is
to be accomplished in the “Available Batches” grid. Select/ enter the quantity to be
issued from the selected batch.
Click on the Forward arrow button to transfer the selected available batch in the
„Selected Batches” grid.
Doc. No. F/DV/15
Rev.No.
Date
BatchMaster Software Inc.
BMM User Manual
On Double clicking the Created Batch record the “Bin Selection” Window is displayed.
Select the bin from which A/R Invoice is to be processed.
Click on the „Ok‟ button to save the bin selection opted.
Doc. No. F/DV/15
Rev.No.
Date
BatchMaster Software Inc.
BMM User Manual
Further click on the update button on the Batch Number selection window to save the
A/R Invoice transaction.
Doc. No. F/DV/15
Rev.No.
Date
BatchMaster Software Inc.
BMM User Manual
The caption of the Update button changes to Ok click on that to proceed with the
A/R Invoice transaction.
On again clicking the Add button on the A/R Invoice screen the “Bin selection” window is
displayed for the Non tracked item.
Doc. No. F/DV/15
Rev.No.
Date
BatchMaster Software Inc.
BMM User Manual
Select the bin record from which A/R Invoice transaction is to be processed.
Doc. No. F/DV/15
Rev.No.
Date
BatchMaster Software Inc.
BMM User Manual
Click on the Update button to proceed with the A/R Invoice transaction.
This completes the bin/ batch selection for the Non tracked and Lot tracked items on the
A/R Invoice screen.
Doc. No. F/DV/15
Rev.No.
Date
BatchMaster Software Inc.
BMM User Manual
On again clicking the Add button completes the A/R Invoice transaction.
17.4.4
A/R Credit Memo
Using the A/R Credit Memo you can create a credit memo for sold items.
Create an A/R Credit Memo in SAP Business One.
Doc. No. F/DV/15
Rev.No.
Date
BatchMaster Software Inc.
BMM User Manual
Batch Number selection form appears on pressing the Add button at time of adding a
transaction for the Lot tracked Item.
Doc. No. F/DV/15
Rev.No.
Date
BatchMaster Software Inc.
BMM User Manual
On the Batch Number Selection window, select the batch from which the A/R Credit
Memo is to be accomplished in the “Available Batches” grid. Select/ enter the quantity to
be issued from the selected batch.
Click on the Forward arrow button to transfer the selected available batch in the
„Selected Batches” grid.
On Double clicking the Created Batch record the “Bin Receipt Selection” Window is
displayed.
Doc. No. F/DV/15
Rev.No.
Date
BatchMaster Software Inc.
BMM User Manual
In case default receipt bin is associated with the item on the Item Master Details screen,
then it gets defaulted in the Bin No. column. User can modify the default value if
required. The quantity column defaults the value entered on the previous screen, which
is editable.
Finally click on the „Ok‟ button to save the bin selection opted.
Doc. No. F/DV/15
Rev.No.
Date
BatchMaster Software Inc.
BMM User Manual
Click on the Update button the caption of the button changes to OK.
Doc. No. F/DV/15
Rev.No.
Date
BatchMaster Software Inc.
BMM User Manual
Click OK to proceed with the A/R Credit Memo transaction.
On again clicking the Add button on the A/R Credit Memo screen “Bin selection” window
is displayed for the Non tracked Item.
Doc. No. F/DV/15
Rev.No.
Date
BatchMaster Software Inc.
BMM User Manual
Enter the receipt quantity details and click on the Update button
Doc. No. F/DV/15
Rev.No.
Date
BatchMaster Software Inc.
BMM User Manual
This completes the bin/batch selection for the Non tracked and Lot tracked items on the
A/R Credit Memo Screen.
On again clicking the Add button completes the A/R Credit Memo transaction.
Doc. No. F/DV/15
Rev.No.
Date
BatchMaster Software Inc.
BMM User Manual
17.5 Pick and Pack
17.5.1
Pick List
The Business one standard pick list screen facilitates the user to pick items from the
warehouse and to pack them to shipping. To speed up the process the warehouse
inventory can be now managed to bin level. In BMM SAP Business one pick list user can
now select the bin prior to a delivery. The bin no. field is introduced at pick list screen to
specify the exact location of items within warehouse.
Doc. No. F/DV/15
Rev.No.
Date
BatchMaster Software Inc.
BMM User Manual
On the Pick List screen click on the „Delivery‟ button to process the delivery for the
items. Batch Number selection form appears on pressing the Add button for the Lot
tracked Item.
Doc. No. F/DV/15
Rev.No.
Date
BatchMaster Software Inc.
BMM User Manual
On the Batch Number Selection window, select the batch from which the delivery is to be
accomplished in the “Available Batches” grid. Select/ enter the quantity to be issued
from the selected batch.
Click on the Forward arrow button to transfer the selected available batch in the
„Selected Batches” grid.
Doc. No. F/DV/15
Rev.No.
Date
BatchMaster Software Inc.
BMM User Manual
On Double clicking the Created Batch record the “Bin Selection” Window is displayed.
Select the bin from which delivery is to be processed.
Click on the „Ok‟ button to save the bin selection opted.
Doc. No. F/DV/15
Rev.No.
Date
BatchMaster Software Inc.
BMM User Manual
Further click on the update button on the Batch Number selection window to save the
delivery transaction.
Doc. No. F/DV/15
Rev.No.
Date
BatchMaster Software Inc.
BMM User Manual
The caption of the Update button changes to Ok click on that to proceed with the
delivery transaction.
On again clicking the Add button on the Delivery screen the “Bin selection” window is
displayed for the Non tracked item.
Doc. No. F/DV/15
Rev.No.
Date
BatchMaster Software Inc.
BMM User Manual
Select the bin record from which Delivery transaction is to be processed.
Doc. No. F/DV/15
Rev.No.
Date
BatchMaster Software Inc.
BMM User Manual
Click on the Update button to proceed with the Delivery transaction.
This completes the bin/ batch selection for the Non tracked and Lot tracked items on the
Pick List screen.
Doc. No. F/DV/15
Rev.No.
Date
BatchMaster Software Inc.
Doc. No. F/DV/15
BMM User Manual
Rev.No.
Date