1
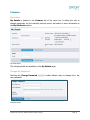
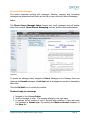
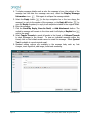
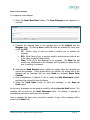
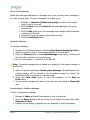
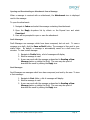
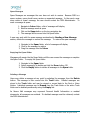
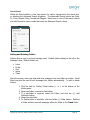
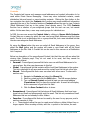
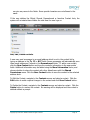
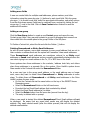
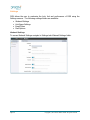
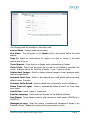
Direct Secure Messaging
End User Manual
Orion Health
Limited
PO Box 8273
Symonds Street
Auckland, New Zealand
Ph +64-9-638 0600
Fax +64-9-638 0699
[email protected]
Legal Notice
©2012 Orchestral Developments Limited. All rights reserved.
Trademarks displayed in this document are the property of Orchestral
Developments Limited or their respective owners, and may not be used
without written permission of the owner.
Oracle is a registered trademark of Oracle Corporation and/or its
affiliates. Windows, SQL Server and IIS are registered trademarks of
Microsoft Corporation and/or its affiliates. UNIX is a registered
trademark of The Open Group and/or its affiliates. Acrobat and Reader
are registered trademarks of Adobe Systems Incorporated and/or its
affiliates. Linux is a registered trademark of Linus Torvalds and/or his
affiliates. IBM is a registered trademark of International Business
Machines Corporation and/or its affiliates. Mozilla and Firefox are
registered trademarks of the Mozilla Foundation. Mac OS is a registered
trademark of Apple Computer, Inc.
This document is provided subject to the terms of the license and
support agreement relating to the software application. Orchestral
Developments Limited has made reasonable efforts to ensure that all
information contained in this document is accurate, but no liability is
accepted by Orchestral Developments Limited, its agents or suppliers
for use of the documentation by the end user or any other party.
Questions or concerns relating to this documentation should be
addressed to the supplier from whom the product was obtained.
ii
Copyright © 2012 Orion Health Group of Companies. All rights reserved
Contents
Revision History ................................................... 5
Direct Secure Messaging 1.0
Introduction ................................................................. 6
Purpose ....................................................................... 6
Disclaimer .................................................................... 6
Getting Acquainted with the User Interface
Logging into HIE Clinical Portal ...................................... 7
Logging out of HIE Clinical Portal ................................... 7
Automatic Logout ......................................................... 7
User Homepage ............................................................ 8
Menu Bar ............................................................ 9
Icons.. ...............................................................10
Additional Menu Bar Elements ..............................10
Shortcut Keys .....................................................10
Common
My Details .................................................................. 11
Change My Password .................................................. 11
Password Policy .......................................................... 12
Homepage ................................................................. 12
Inactivity Timeout ....................................................... 12
Important Message Notification ................................... 12
Roles I Perform .......................................................... 13
Groups I Belong To ..................................................... 13
Additional Attributes ................................................... 13
Users.. ...............................................................13
Direct Secure Messaging
Secure Mailbox Icons ..........................................14
Working With Messages .............................................. 15
Inbox.. ...............................................................15
Send a new message ..........................................17
Send a Group Message ........................................18
Forward A Message .............................................18
Downloading or Printing a Message ......................18
Copyright © 2012 Orion Health Limited. All rights reserved
iii
Opening and Downloading an
Attachment from a Message ................................19
Draft Messages ...................................................19
Sent Messages ....................................................19
Spam Messages ..................................................20
Emptying the Spam Folder ...................................20
Deleting a Message .............................................20
Search Email ......................................................21
Contacts .................................................................... 22
Settings ..................................................................... 26
Webmail Settings ................................................26
Anti-Spam Settings .............................................29
Email Filters........................................................30
Mail Options .......................................................30
iv
Copyright © 2012 Orion Health Group of Companies. All rights reserved
Revision History
Nam e
Tami Jones
Date
April 1, 2013
R eason For Changes
Direct Secure Messaging User Manual
Copyright © 2012 Orion Health Limited. All rights reserved
Version
1.0
Page 5
Direct Secure Messaging 1.0
Introduction
Direct Secure Messaging (Secure Messaging) utilizes national standards to communicate
health information between healthcare organizations, providers and patients. Secure
Messaging is an easy-to-use, secure communication method that replaces mail and fax
transmissions between known parties, such as providers, labs, and public health
departments. Key feature and functions of Direct Secure Messaging are:
•
•
•
Ability to easily send encrypted messages between Orion Health HISP
subscribers and non-Orion subscribers (trusted HISPs, e.g. HealthVault)
Direct Message Portal (webmail)
“New Secure Mail” notifications sent to a non-secure email address
Purpose
The purpose of this document is to identify the key concepts within Direct Secure
Messaging that will allow the user to effectively utilize the application. Specifically, this
document provides Direct Secure Messaging End User details.
Disclaimer
Page 6
Copyright © 2012 Orion Health Limited. All rights reserved
Getting Acquainted with the User Interface
Logging into HIE Clinical Portal
The HIE Clinical Portal Login screen is shown below. A username and password are
required to gain access to the application. A temporary password will be assigned when
the account is established. Once the user has entered the username and temporary
password the system will prompt the user to change the password. Note: The
username is not case-sensitive, the password is case-sensitive.
HIE Clinical Portal Login Screen
Logging out of HIE Clinical Portal
The Logout button is used to exit the HIE Clinical Portal. It is located in the upper
portion of the menu bar, just above the Patients menu.
Logout Button
It is important to use the Logout button as opposed to clicking on the X button
located in the upper right hand corner of the browser. The logout button will log the
user out of the system. If it is not used, the session will remain active for a pre-defined
period of time before the auto-logout feature is activated.
Automatic Logout
The inactivity timeout feature in HIE Clinical Portal ensures robust security by logging
out the user if he or she has been inactive for a pre-defined set of time. The inactivity
timeout period is currently set to 30 minutes but may be edited by the user on the My
Details screen. See The My Details section of this document for more information.
The timeout period may be set to a lower amount of time than set by the HIE, but not
more.
The screen below provides an example of the warning a user may see if the user has
been inactive for a set period of time.
Copyright © 2012 Orion Health Limited. All rights reserved
Page 7
Automatic Logout
Clicking cancel will allow the user to remain active.
User Homepage
The User Homepage automatically appears when a user logs into HIE Clinical Portal. It
displays summary information relevant to the user.
The layout of each user’s homepage is composed of one or many windowlets.
Windowlets allow a screen to be partitioned allowing a user to see more than one view
on a single screen. The homepage defaults to the screen:
Homepage Screen
Homepage Screen
Page 8
Copyright © 2012 Orion Health Limited. All rights reserved
Menu Bar
Found on the left hand side of the HIE Clinical Portal window, it is the primary
navigation method. Each menu contains one or more icons which are graphical links to
entry points (screens). Access to menus and items within it are dependent on access
privileges granted to the user.
The Menu Bar
If more icons are available than can be displayed, Up and Down scroll arrows will
become available.
The following menus are available:
Menu
Description
Entry Point (Screen)
Common
Maintain user details
•
My Details
•
Worklists
•
Recent Patients
•
Worklists
Patients
Worklists
Messaging
Locate a patient’s medical records
Worklists allow users to quickly access •
and manage patient records that may
•
be of special interest
•
Blue
Yellow
•
Greeen
•
Orange
•
Purple
Compose, receive and send messages to •
other clinical users and receive detailed
•
notification messages
•
Direct Secure Compose, receive and send messages to •
Messaging
other Direct Secure Mail users.
Copyright © 2012 Orion Health Limited. All rights reserved
Red
New Message
Received Messages
Sent Messages
Secure Mail
Page 9
Icons
Icon Function
Autohide
Description
Hide the menu bar, making more screen space
available for viewing user information
Displays the User Search Homepage
Displays My Details screen
Provides context specific help
Home
Settings
Help
Additional Menu Bar Elements
Element
<username>
Description
The HIE Portal user name.
End the current HIE Portal session.
Shortcut Keys
The following shortcut keys are available:
Keys
F11
F5
Tab
Shift+Tab
Enter
Page 10
Description
Toggles between a full screen and a standard Windows ®
display. This feature is not available on Mac OS machines.
Refreshes the screen display.
Moves to the next field on a screen.
Moves to the previous field on a screen.
Activates the current selected button or option.
Copyright © 2012 Orion Health Limited. All rights reserved
Common
My Details
My Details is located in the Common tab of the menu bar. It allows the user to
change passwords, set the inactivity timeout period, and select or enter information in
the My Attributes section.
My Details Screen
The following fields are available on the My Details page:
Change My Password
Selecting the Change Password
user password.
button allows a user to change his or her
Password Change
Copyright © 2012 Orion Health Limited. All rights reserved
Page 11
Password Policy
The password policy for all users is as follows:
•
Passwords must be at least 8 characters long, have at least one number, one symbol
(e.g. #, $,%), one capital letter and not match any previous passwords
•
Password will expire every 90 days for all users
•
Passwords must be ‘strong’. Note: the method for determining password strength is
documented in detail in the Solution Design document.
•
Accounts will be locked out after 5 bad login attempts (counter and account reset
after 15 minutes)
Homepage
Select the format of the homepage (Start Screen) to display following login.
Inactivity Timeout
In order to provide a secure environment, a default timeout of 30 minutes has been set
by the administrator. On this screen, a user can set up an inactivity timeout period for
his/her account that is less than the 30 minute maximum timeout. This setting ensures
that the user will be logged out of HIE Portal if he/she does not use his/her computer
for the number of minutes equal to the inactivity timeout value.
•
If a timeout of less than 30 minutes is preferred by the user, he or she can re-set
the timeout to 2, 3, 4, 5, 10, 15 or 20 minutes.
•
HIE Portal counts mouse movement over the menu or context bar as activity. As
such, if a user is viewing a document and the mouse pointer does not move over
these areas, a timeout may be triggered.
Important Message Notification
An important message is one that has been tagged important by the user who sent it.
The HIE Portal user who receives the message will see an alert at the bottom of the
screen. The message that displays is based on the alert selected on the My Details
screen. The following options are available:
•
Show alert until dismissed: If selected, displays the message until the alert is
closed by the user
•
Show alert for <n> seconds: If selected, displays the message for the set
number of seconds
•
Do not show alert: If selected, the important message alert will never be displayed
Page 12
Copyright © 2012 Orion Health Limited. All rights reserved
•
Use default (Display for <n> seconds): If selected, displays for the period of
time set by the administrator
An example of the message notification is provided below:
Important Message Notification
Roles I Perform
This section lists the user’s role membership which determines access to the portal
screen and functions.
Groups I Belong To
This section lists the user’s group membership which determines access to the different
portal screens and functions.
Additional Attributes
Group attributes may be added to a group to allow an administrator to gather additional
information about the user or to provide additional features to the user. The following
attributes have been pre-configured for a user:
Users
This field displays the user’s email address.
Copyright © 2012 Orion Health Limited. All rights reserved
Page 13
Direct Secure Messaging
Once a Direct mailbox has been established by the DSM Administrator, the user may
access the Secure Mail feature. Secure Mail is used to information via Direct (an
encrypted email delivery channel) manually to a trusted provider. The Send to Direct
functionality is not automatically enabled and must be enabled and configured by an
Administrator. The DSM Administrator will assign, register and grant permission to the
user in order for the user to send and receive secure messages via the Direct Secure
Email system.
Click Secure Mail to access the Direct Mailbox.
Secure Mailbox Icons
Email: Email section of the mailbox
Contacts: Saved Email contacts
Settings: Webmail, Anti-Spam, Email Filters and Mail Options settings
New: Select Email or Contact from the dropdown
Get Mail: Refreshes Inbox
Reply: Reply to sender of active email
Reply All: Reply to all email addresses on the email distribution (cc’s and bcc’s
included)
Forward: Forward active email to another recipient
Spam: Move active (checked) email(s) to the Spam folder. Note: A user should never
receive Spam emails, as DSM is a secure network. However, should something appear
in this folder, please contact the network administrator.
Delete: Deletes active (checked) email(s) and moves into Trash folder
More: Select from dropdowns including:
• Select All: Allows user to Select All emails that have been received or sent.
• Deselect: Allows user to Deselect items selected
• Flag: Allows user to Flag emails to stand out
• Remove Flag: Allows user to Remove Flags previously selected
• Mark as Read: Allows user to mark emails received as Read
• Mark as Unread: Allows user to mark emails as Unread
Compose: Tab signifies a new message in the draft stage (without subject) and can
be deleted by clicking the ‘X’ to the right of Compose
Page 14
Copyright © 2012 Orion Health Limited. All rights reserved
Working With Messages
This section describes working with messages. Sending, receiving and forwarding
messages and attachments will make up the bulk of user work with Secure Messaging.
Inbox
The Direct Secure Message Inbox houses user email messages and will display
when first received. Direct Secure Messaging is set up just like most email systems.
DSM Inbox
To access the Message Inbox, navigate to Inbox. Messages in the Message Inbox are
displayed as Unread messages in bold text and all messages are sorted in descending
date order.
Click the Get Mail icon to refresh the mailbox.
Read and reply to a message
1. Navigate to the Message Inbox.
2. Select a message to open. The message displays in the right pane.
3. A message will be marked as read 3 seconds after selection. A User may mark
the message as Unread again by selecting the Mark as Unread dropdown of
the More tab
Copyright © 2012 Orion Health Limited. All rights reserved
Page 15
4. To display message details such as who the message is from, the subject of the
message and the date the message was sent, select the Display Message
5.
6.
7.
8.
9.
Information icon.
. Click again to collapse the message details
Select the Reply button
(in the top navigation bar or the icon above the
message) to reply to the sender of the message, or the Reply All button
(or
open the Reply dropdown) to reply to all recipients included in the original email.
Enter the message.
Click the Send My Reply, Save As Draft, or Add Attachment button. The
replied to message will remain in the inbox and it will display a Replied icon
next to the email.
Select Toggle Threads to reveal all emails in the thread, or Collapse Threads
to stack messages in the thread. To view an individual message within the
thread, click on the bolded sender name to reveal the message. Select Quoted
Text if available to reveal original email.
Standard editing options are available in the message body such as, font
changes, insert hyperlink, add image, bullet and numbering.
DSM New Email
Page 16
Copyright © 2012 Orion Health Limited. All rights reserved
Send a new message
To compose a new message:
1. Select the New>New Email button. The New Message screen displays in a
new tab:
2. Complete the required fields in the message such as To, Subject and the
Message body. By clicking More, additional fields are revealed for entry such
as CC and BCC.
• CC: Carbon Copy; to send an email to another per on besides the
recipient
• BCC: Blink Carbon Copy; to send an email to another person without any
of the other recipients being notified
• Files: A list of the files attached to the message. The Files field will
contain any attachments to the Message with the ability to delete the file
prior to sending if necessary.
3. Selecting the Read Receipt option notifies the sender when the recipient has
opened the message. If the sender asks to be notified, the subject line of the
message will be preceded with the word Read: for example, Read: John
Cardinal
4. Add an attachment, if desired. To do so, select the Add Attachment button,
and select the correct file from the library.
5. Select the Send Email button to send the message, or the Save as
Draft button.
At any point, a message can be saved as a draft by clicking Save As Draft button. The
message will be stored in the Draft Messages folder. By default, a message is
automatically saved as a draft every two minutes.
Once a message has been sent it cannot be recalled. A copy of the message will be
stored in the Sent folder.
Copyright © 2012 Orion Health Limited. All rights reserved
Page 17
Send a Group Message
Rather than add email addresses to a message one by one, you may send a message to
an entire group at once. To send a message to a contact group:
1. Navigate to Contacts>[Contact List group] and click on the contact
group to add to the email
2. Click the More button and Select All (all email addresses in the group
are selected)
3. Click the Mail button and a new message screen displays with all selected
contacts in the To field
4. Complete the email as usual, as described previously
5. Click the Send Email button
Forward A Message
To forward a message:
1. Navigate to the Message Inbox by selecting Direct Secure Messaging>Inbox.
2. Select a message to open it. The message displays in the right pane.
3. Select the Forward button. The Forward Message screen opens, containing all
the information included in the original email.
4. Enter a new recipient, or recipients, in the To field.
Note: Forwarded messages do not include any recipients of the original message in
the To field.
5. Write the email as described in Sending New Messages. All attachments in the
original message will be included in the forwarded message by default. The
attachments may be removed or new ones added.
6. Select the Send Email button to send the message, or the Save as
Draft button
7. The forwarded message will remain in the inbox and will display a Forwarded
icon
Downloading or Printing a Message
To print or download a message:
1. Navigate to Inbox and select the message to print or download
2. Open the Reply dropdown list by clicking on the Expand icon and select either
Download or Print
3. A dialog box will display, prompting the user download or print the message.
Page 18
Copyright © 2012 Orion Health Limited. All rights reserved
Opening and Downloading an Attachment from a Message
When a message is received with an attachment, the Attachment icon is displayed
next to the message.
To open the attachment:
1. Navigate to Inbox and select the message containing the attachment.
2. Open the Reply dropdown list by clokcin on the Expand icon and select
Download
3. User will be prompted to open or save the attachment.
Draft Messages
Draft Messages are messages which have been composed, but not sent. To save a
message as a draft, click the Save as Draft button. The message is then sent to your
drafts folder. By default, a message is automatically saved as a draft every two
minutes. To view a draft message:
1. Navigate to Drafts folder, a list of messages will display
2. Select a message to read
3. A user may work with the message as described in Sending a New
Message section or delete the Draft. The user may also print of
download the email by clicking the Reply icon.
Sent Messages
Sent Messages are messages which have been composed, and sent by the user. To view
a Sent message:
1. Navigate to Sent folder, a list of messages will display
2. Select a message to read
3. A user may work with the message as described in Sending a New
Message section or delete the Draft. The user may also print of
download the email by clicking the Reply icon.
Copyright © 2012 Orion Health Limited. All rights reserved
Page 19
Spam Messages
Spam Messages are messages the user does not wish to receive. Because DSM is a
secure system, users should never receive an unwanted message. In the event a user
does receive a ‘spam’ message, the user should contact the DSM Administrator. To
mark a message as spam:
1.
2.
3.
4.
Navigate to Inbox folder, a list of messages will display
Select a message mark as spam
Click on the Spam button on the top navigation bar
The message will be moved into the Spam folder.
A user may work with the spam message as described in Sending a New Message
section, delete the message or restore the message. To restore the spam message:
1. Navigate to the Spam folder, a list of messages will display
2. Click on the message to restore
3. Drag the message into the Inbox
Emptying the Spam Folder
Messages will remain the the Spam folder until the user erases the messages or empties
the Spam Folder. To empty the Spam folder:
1. Navigate to the Spam folder
2. Select message(s) to delete and click the Erase button, OR
3. Click the Empty button to delete all messages in the Spam folder
Deleting a Message
Users may delete a message at any point by selecting the message, then the Delete
button. The message is then moved into the Trash folder. Deleted messages are
stored in the Trash folder and may be viewed or moved back to the Sent or Inbox
folders. Individual messages can be Erased from the Trash folder or the entire Trash
folder can be deleted permanently using the Empty link.
As Secure Mail messages may represent Personal Health Information or medical
documents, all messages are archived. If a deleted message must be retrieved, contact
the DSM Administrator.
Page 20
Copyright © 2012 Orion Health Limited. All rights reserved
Search Email
Within the Direct mailbox, a user may search for mail by typing text in the search box,
or selecting the Advanced Search dropdown. The Advanced Search options are Date,
To, From, Subject, Body, Unread and Flagged. Select one or more of the search criteria
and click Search to return results that meet the Advanced Search criteria.
Adding and Deleting Folders
Folders allow a user to sort and manage email. Default folders display to the left of the
Message Inbox. Default folders are:
•
•
•
•
•
Inbox
Drafts
Sent
Spam
Trash
Using the mouse, users may drag and drop messages from one folder to another. Email
filters may also be used to sort messages into folders automatically. To add or delete
folders:
1. Click the Add (or Delete) Folder button (+ or -) at the bottom of the
folders pane.
2. Name the folder (required to Add folder)
3. If a sub-folder is required, select the Folder and click the (+) Add
Subfolder button.
4. Name the sub-folder
5. To Delete folder or subfolder, click the Delete (-) Folder button. Deleting
a folder will also move all messages within the folder to the Trash folder.
Copyright © 2012 Orion Health Limited. All rights reserved
Page 21
Contacts
The Contacts tab houses and manages email addresses and contact information to be
used within Direct Secure Messaging. Users may store individual contacts, create
distribution lists and import or export existing contacts. Clicking the Sync button in the
top navigation bar when the Contacts tab is active may access additional information
regarding the use of the Contacts functions. Contacts allows the user to view Contacts
(Email Addresses) that are in the system (local domain users). The DSM Contacts
function has a number of pre-configured groups that the user can use, but cannot
delete. At the same time, a user may create groups for individual use.
In DSM, the user can access the Contact Lists by clicking in Secure Mail>Contacts.
Contact lists are a means by which the user can group Email Addresses and find them
easily. The list is not a distribution list or a group email list, but a user identified list that
the user can categorize Email Addresses.
By using the More button the user can select all Email Addresses in the group, then
select the Mail button and the system will create a new Email with all the Email
Addresses in the To: field. A Contact list can be used in this manner as a Distribution
List if required.
Below is a description of the preconfigured Contact Lists that the user will see when first
viewing their Contacts page. They do not need to be used, but they cannot be
permanently deleted.
• Personal: Preconfigured personal list that a user can add Email Addresses to for
personal use. No other user has access to this list.
• Global: Preconfigured list that contains all the local Email Addresses in the system.
This list is displayed to all users and cannot be copied from this list into other lists.
• Shared: Preconfigured list that a user can share with other users. To share with
another user:
1. Navigate to Contacts and select the Shared list
2. Select a contact and click the Edit button. The Edit screen displays
3. Turn on Shared Contact and add at least on user email address
(Permissions field) to share the contact with. A smart list will display
as the username is typed into this field.
4. Click the Save Contact button to share
•
•
•
Remembered: Preconfigured list that stores all Email Addresses that have been
typed into an Email and subsequently sent the email. This list only remembers Email
Addresses that are not already in other folders.
Favorites: Preconfigured list that can be used by the user for any purpose, and is
another example of a list.
+ - : These symbols allow the user to create more folders or delete folders they no
longer require. When creating a folder, with the + symbol or the button, the user
Page 22
Copyright © 2012 Orion Health Limited. All rights reserved
can give any name to the folder. Some special characters are not allowed in the
name.
If the user deletes the Global, Shared, Remembered or favorites Contact Lists, the
system will re-instate these folders the next time the user logs on.
Add, Edit, Delete contacts
A user may send a message to an email address which is not in the contact list by
typing an address in the To, CC or BCC fields. Secure messaging will automatically save
these email address as Contacts in the Remembered folder. To add a new contact,
click the New Contact button and type the contact's information in the appropriate
fields. Additional information may be added using the More Information menu, and
choose whether to share the contact with other Atmail users with the Shared
Permissions menu. Click the Save Contact button to save the contact to the selected
address book.
To Edit the Contact, navigate to the Contacts screen and select a contact. Click the
Edit button to make required changes to the contact and click Save Contact button.
To Delete the Contact, navigate to the Contacts screen and select a contact. Click the
Delete button to remove the contact. No warning will be displayed and the contact is
deleted without a prompt.
Copyright © 2012 Orion Health Limited. All rights reserved
Page 23
Adding more fields
A user can create fields for multiple email addresses, phone numbers, and other
information using the green plus sign (+) buttons by each input field. Click the green
plus sign (+) to create a new field, enter the appropriate information, and select options
from the drop-down menus. Fields may be removed from a contact by clicking the red
minus sign (-) next to the field. Click on Save Contact when finished to save the
additional information.
Adding a new group
Click the New Group button to create a new Contact group and name the new
Contact group folder. User may add contacts to groups by dragging their names from
the contact list in the middle pane to the group's folder in the left pane.
To Delete a Contact List, select the list and click the Delete (-) button.
Deleting Remembered or Sticky Email Addresses
As with all email systems, users send messages to many email address that are not in
their contacts or address book and the system will ‘remember’ these email addresses.
These Remembered email addresses are sometimes referred to as Sticky email
addresses or Saved email addresses and are normally automatically displayed when the
user starts typing in an email address in the To, CC or BCC lines in the email.
Some systems store these addresses in the contacts / address book lists, and others
place these addresses in a separate file on the system. Orion Health’s system stores
these emails in the Contacts list under the Remembered folder.
As a user may type in the wrong email address, or the email address may no longer
exist, users may want to delete these Remembered or Sticky addresses at some
stage. To delete these old Remembered or old Sticky email addresses in the Orion
Health’s system the user must:
• Go into the Contacts list via the menu button on the top of the DIRECT Secure
Messaging screen
• Select the Remembered folder on the left hand menu
• De-select the top Direct Email address that is selected by default
• Select the Direct Email address(es) to delete
• Select the Delete button from the menu bar (second from the top)
• The entry is deleted with no prompt
When a new email is started this deleted Remembered Direct Email address will not
be displayed. Be aware that any saved draft emails may still display the deleted
address. Only newly started emails (after the delete process) that will not display the
deleted email address.
Page 24
Copyright © 2012 Orion Health Limited. All rights reserved
Exporting and Importing Contacts
A user may import or export contacts in vcard.vcf format. A vcf or vCard is an electronic
business card. The standard format allows data to be shared between different mail
programs.
DSM supports the vCard format for address book import and export. To save contacts to
a vCard file, select the check-boxes next to the contacts you'd like to export, then click
the "Export" button. Select the name and location to save your .vcf (vCard) file and
confirm (e.g. Outlook). To import contacts from a vCard file, click "Import" and choose
the .vcf file from the file selection dialog. Click the More button and select Export All
to export all users in a contact list.
Sync
The Sync link provides Email, Address Book and Settings help. Some features and
options accessed from the Sync link may not be available to all users.
Copyright © 2012 Orion Health Limited. All rights reserved
Page 25
Settings
DSM allows the user to customize the look, feel and performance of DSM using the
Settings screens. The following settings folders are available:
•
•
•
•
Webmail Settings
Anti-Spam Settings
Email Filters
Mail Options
Webmail Settings
To access Webmail Settings navigate to Settings tab>Webmail Settings folder.
Page 26
Copyright © 2012 Orion Health Limited. All rights reserved
The following fields are available to view and/or edit:
Account Name: Displays email account name.
Real Name:
address.
This will appear in the Sender field of sent emails before the email
Reply To: Specify an email address for replies to be sent to, instead of the email
address used to log in.
Thread Support: Check this box to display email conversations as threads.
Thread Limit: Select from dropdown age of email to be included or excluded from
thread. Available options are 3 months, 6 months, 1 year, 2 years or infinite.
Display Email Images: Select to display extermal images in email messages rather
than as an attachment.
Automatic Draft Save: Select to automatically save draft emails while composing,
default is every 2 minutes.
Automatic Folder Reload: Select to enable auto reload and/or sound notifications
Delete Trash on Logout: Select to automatically delete all mail from Trash folder
upon logout
Default View: Select 2 pane or 3 pane view
Interface Language: Select preferred language for the Webmail interface.
Date Display: Select display format for date received on email headers (MM/DD/YY or
DD/MM/YY)
Messages per page: Select the number of simultaneous messages to display in the
Webmail interface. Reduce the number if the user connection is slow.
Copyright © 2012 Orion Health Limited. All rights reserved
Page 27
Timezone: Specify the time-zone for user location.
Signature: Specify a message that will be added to the end of every email sent from
Webmail. Options include plain text or HTML for the signature.
After modification of settings, click the Save Settings button to preserve Webmail
Settings.
Page 28
Copyright © 2012 Orion Health Limited. All rights reserved
Anti-Spam Settings
As the DIRECT system is a Trusted network of Email providers, a user should never get
any spam emails in this folder unless a filter has been set up to move emails in this
folder. Changing the standard settings is not recommended.
The following options are available if the user opts to change the settings:
Spam Filter Sensitivity: Set the degree (1-20) to which the spam filter looks for
spam within emails. A lower score indicates more aggressive spam marking.
Message Classification: The default action to take on emails that are classified as
spam. (Mark as Spam, Move to Spam Folder, Purge Message)
Spam Tag: The wording to be added to the email header if an email is considered to
be spam.
Whitelist senders: Senders or sender domains that send emails but the spam filter
picks up as spam. Placed in this field, all emails from these senders or sender domains
are delivered regardless of their content.
Blacklist senders: Senders or sender domains that are believed to be sending spam.
Senders or sender domains placed in this field will be blocked.
After changing settings, click Save Settings button.
Copyright © 2012 Orion Health Limited. All rights reserved
Page 29
Email Filters
Email filters allow users to sort and manage emails into folders automatically.
Optional Email Filters
Optional email filters and settings are:
Add New Rule: Use this option to create email filters. Select from the drop down list
'From', 'To' or 'Subject'. Then select from second drop down list 'is', 'is not', 'contains' or
'does not contain'. In the text box enter criteria to be filtered, then specify which folder
the rule will deliver to. For example, New Rule: 'From', 'is' and '[email protected]'.
Move To: 'Trash'. This will move all emails received from [email protected] to the
trash folder. To add a new rule:
1. Navigate to Settings>Email Filters
2. Create a new rule using the dropdown lists
3. Click Add Filter to add the new rule
A user may also Delete or Modify a filter by selecting the rule and clicking on
Delete/Modify button. Select the filter to delete (tick the box) and click Delete
Selected.
Mail Options
Mail options in DSM include features such as auto-reply and notifications. The auto-reply
feature allows th automatic reply to any received email. This feature may be useful if
the user is unavailalbe to answer emails for a period of time. The notifications feature
allows a user to be notified of a DSM email to a separate nominated email account
which will direct the user to the DSM system. The notification messages do not contain
message details, only a link to DSM. Sign-on and validation must occur prior to viewing
the DSM email.
Page 30
Copyright © 2012 Orion Health Limited. All rights reserved
Enable Notifications: Check this box to enable notification of new email to a nonDirect email address.
Only one email account may be designated to forward
notifications. (In most cases, you must enable Notifications through your Clinical Portal
My Details. Where this screen is not available, you may enable Notifications through
Secure Messaging.)
Notifications Address: Specify the email address to forward incoming notifications.
Enable Autoreply: Check this box to enable automatic reply (Vacation or Out of
Office) to incoming messages.
Autoreply message: Enter the message to send to the senders of all incoming email.
After making changes to Notifications or Auto-Reply, click Save Settings button.
Copyright © 2012 Orion Health Limited. All rights reserved
Page 31
Any questions regarding this documentation can be directed to:
Tami Jones
Senior Change Management Specialist | Orion Health
d 909.895.3131 m 310.625.4753 f 310.496.2835
e [email protected] s tami.jones0426
www.orionhealth.com
Page 32
Copyright © 2012 Orion Health Limited. All rights reserved