1
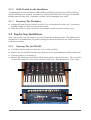
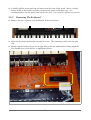
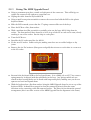
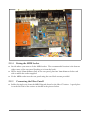
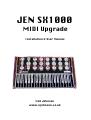
JEN SX1000 MIDI Upgrade Installation & User Manual Neil Johnson www.njohnson.co.uk Copyright © 2008 Neil Johnson. All rights reserved. First edition, February 2008. Minor corrections, April 2008. For the latest version of this manual please refer to the website: http://www.njohnson.co.uk/Jen/SX1000 Support questions may be sent by email to: [email protected] - ii - Contents 1 Introduction................................................................................................................ .....4 1.1 Features 4 1.2 A Short History 4 2 Installation..................................................................................................................... ..5 2.1 Preparation 5 2.1.1 Tools and Equipment You Will Need 5 2.1.2 Skills Needed for the Installation 5 2.1.3 Preparing The Workplace 6 2.2 Step-by-Step Installation 6 2.2.1 Opening The Jen SX1000 6 2.2.2 Removing The Keyboard 7 2.2.3 Fitting The MIDI Upgrade Board 7 2.2.4 Fitting the MIDI Socket 9 2.2.5 Connecting the Filter Cutoff 9 2.2.6 Calibration 10 2.2.7 Replacing The Keyboard 10 2.2.8 Closing The Case 10 2.2.9 And Finally... 11 3 Using the MIDI Upgrade............................................................... .................................12 3.1 Keyboard Playing 12 3.2 MIDI Playing 12 4 MIDI Implementation Chart............................................................................. ..............13 - iii - 1 Introduction Welcome to a fun new way of playing your Jen SX1000. As one satisfied customer put it so aptly: “It adds a whole new world of playing when you can bend the notes”. This manual guides you through the process of installing the Jen SX1000 MIDI Upgrade, and explains how to use it. 1.1 Features The MIDI Upgrade provides the following features: ● Receive MIDI messages on MIDI Channel 1 ● Responds to all 128 MIDI Notes ● Responds to Pitch Bend with ±2 semitone range ● Responds to Modulation Wheel (routed to filter cutoff) 1.2 A Short History The JEN SX1000 was originally released in 1978, with production ending in 1982. The heart of the SX1000 is a single-voice organ chip, the M110 from SGS-ATES. Unfortunately this chip is no longer made, and the design of the SX1000 lends itself to stressing the output drivers of the M110 amongst other things. As a result, together with age, the M110 often dies. And once it is dead there is little you can do but replace it, since as well as generating the basic tone the M110 also scans the keyboard and produces the glide (portamento) between notes. The impetus for this MIDI Upgrade was when I bought a non-working SX1000. The M110 was dead, and finding a replacement proved very difficult. So in the end I decided to design a replacement using modern components. A micro-controller emulates the main functions of the M110, and adds a MIDI input so the SX1000 can be played by a sequencer. Over the years the design of the MIDI Upgrade has been revised and refined. Some features have been removed, others refined, and others added in response to requests. -4- 2 Installation Installing the MIDI Upgrade to your Jen is a difficult task. But if you allow yourself plenty of time (2-3 quiet hours) and follow these instructions then you should be able to do this task. Some important advice: – DO NOT RUSH – take your time. Try to do this with no-one else around. Put on some quiet classical music. Put your mind in a relaxed state. – DO NOT FORCE ANYTHING – if something will not move or unscrew then stop and work out why not. Do not apply all your strength, you will only break or snap a screw. And that is bad mojo. – SPREAD YOURSELF OUT – use plenty of space to lay things out as you go. Give yourself room to move. The instructions are presented as tick lists. Follow each item in the list and tick them off as you go. That way you can go away, and return to the installation and know exactly where you were. 2.1 Preparation As in all things, preparation is paramount. Before starting the installation please check through the following sections to make sure you have the required tools, the required skills, and a suitable work place. 2.1.1 Tools and Equipment You Will Need You will need to provide some tools yourself. The following list sets out everything you will need to complete this installation: □ small cross-head screwdriver □ large cross-head screwdriver □ snipe-nose pliers □ pair of wire cutters □ wire stripper □ soldering iron □ desolder pump □ trimmer tool □ 22 SWG solder □ permanent marker pen □ 3mm metal drill □ 15mm metal drill □ electric drill & safety glasses -5- 2.1.2 Skills Needed for the Installation A combination of basic mechanical skills (drilling and filing) and electronic skills (soldering and de-soldering) are required. If you do not possess these skills then I strongly recommend finding someone who does. Otherwise you may end up damaging your synth. 2.1.3 Preparing The Workplace □ Unplug the synth from the electrical socket. Do not just turn the socket off – you need to actually unplug the cable from the power socket. □ Place the synth on a dry, soft surface, for example a table covered in a large towel. 2.2 Step-by-Step Installation Once you are all set up and ready to go, proceed with the following steps. Throughout these instructions it is assumed that the synth is arranged with the keyboard at the front, as shown in the picture below. 2.2.1 Opening The Jen SX1000 □ Carefully turn the synth over and rest it on a cloth or pillow. □ Remove the two keyboard screws near the front of the synth and them and keep them safe. □ Turn the synth so it is facing up. □ Remove the six fixing screws that hold the main panel to the wooden base. There are three on each side, with one on the front and two on the rear. Keep them safe in a tin or bag. -6- □ Carefully pull the front panel up and away from the front of the synth. Move it slowly, being careful of the bundle of cables connecting the panel to the main case. It is recommended to rest the metal panel on the rear face. Use a towel or pillow to protect it. 2.2.2 Removing The Keyboard □ Remove the two or four screws holding the keyboard in place. □ Move the keyboard mechanism towards the front. The connecting cable is on the right side. □ Slowly turn the keyboard over on its right side so that the underneath is facing upwards. You should now see the M110, as highlighted below. -7- 2.2.3 Fitting The MIDI Upgrade Board □ Using a permanent pen place a mark on both parts of the connector. This will help you replace the connector the right way round later on. □ Unplug the cable from the keyboard PCB. □ Using a small cross-point screwdriver remove the screws that hold the PCB to the plastic keyboard frame. □ Slide the PCB towards you so that the 37 spring contacts slide out of the keys. □ Place the PCB on a flat, firm surface. □ With a medium sized flat screwdriver carefully prise out the large M110 chip from its socket. The best method I have found is to lever it up a little bit at each end in turn, slowly working it out of the socket. Put the chip is a safe place. □ Turn the PCB over. □ Desolder the IC socket used for the M110. □ Fit the new IC socket. Solder each pin, making sure there are no solder bridges or dry joints. □ Remove the six 5k6 resistors (blue-green-red-gold) that sit next to each other in a row next to the IC socket. □ Re-attach the keyboard PCB to the keyboard frame. It is a fiddly job as all 37 key contact springs must be re-aligned with the small holes in the keys. Any springs which are not seated in their locating holes can be fitted with long-nosed pliers, making sure you do not squeeze too hard and squash them. □ With the keyboard on a flat firm surface bring the MIDI Upgrade board to sit on top of the keyboard PCB. It should be arranged so that the connecting wires follow the same direction as the connecting cable disconnected earlier. The photo below shows the general arrangement (this is an older version of the MIDI Upgrade but the alignment is the same). -8- 2.2.4 Fitting the MIDI Socket □ Decide where you want to fit the MIDI socket. The recommended location is the bottom right corner of the rear panel (looking at it from the back). □ Drill a single 15mm diameter hole in the rear panel, plus two 3mm diameter holes each side to match the socket supplied. □ Fit the MIDI socket into the rear panel using the two black screws provided. 2.2.5 □ Connecting the Filter Cutoff Solder the single wire from the MIDI Upgrade board to the filter CV mixer. A good place is on the left lead of the resistor as shown in the picture below. -9- 2.2.6 Calibration BE CAREFUL – MAINS VOLTAGE present inside the synth when it is turned on □ Connect the synth to a loudspeaker via an amp or mixer, or to an oscilloscope. □ Connect the mains. □ Turn on. □ Switch to Pulse, 50%, no PWM modulation. □ Play middle-C and adjust the trimpot on MIDI Upgrade board for a sound closest to square wave. On the 'scope adjust for best shape closest to a square wave. □ Turn off and disconnect from the mains power socket. 2.2.7 Replacing The Keyboard □ Turn the keyboard over and slide it back into the wooden base. □ Refit the screws inside the case (Section 2.2.2). □ Using the cable ties provided tie down the MIDI and Filter modulation wires, keeping them away from the metal heatsink on the power supply. 2.2.8 Closing The Case □ Replace the front panel back on the wood base (Section 2.2.1). □ Replace all six black panel screws. □ Turn the synth over on to its front and refit the two keyboard screws. - 10 - 2.2.9 And Finally... □ Turn the synth back onto its base. □ Plug it into the mains. □ Connect a MIDI lead from a MIDI controller (computer, sequencer, master keyboard, etc). □ Turn on the synth and set up a voice. □ Operate the MIDI controller and check the synth responds to the MIDI messages. Once you are satisfied with the operation of your modified synth you may wish to sell your M110 chip to another SX1000 owner whose M110 has died. A suggested price is £20/€30/$30. If you contact me I can add your name to a list I keep for when people ask me where they can get an M110. - 11 - 3 Using the MIDI Upgrade There are two ways to play with the MIDI Upgrade: from the keyboard and over MIDI. 3.1 Keyboard Playing Playing the synth from the keyboard is almost as before, but with a few small changes. The processor stores up to eight keys pressed, and plays the highest note. If you release the highest note it then plays the next highest note, and so on until the last key is released. This makes it easy to keep a low bass note held, then play higher notes, and in between the high notes the synth will play the bass note. 3.2 MIDI Playing Playing the synth over MIDI is very easy. The MIDI Upgrade receives messages on MIDI Channel 1. This cannot be changed. Connect your synth to a MIDI device (keyboard, computer, sequencer, etc). Then play. Pitchbend is set to move up and down two semitones. The Modulation wheel opens up the filter cutoff, so with a high resonance you can manually sweep the filter as you are playing. This really comes into its own when you use a sequencer, such as Apple's Logic, where you can literally draw Modulation curves on screen. The front panel glide control also works when playing from MIDI. ~ And that's all there is. No complicated menus. No tedious setting up. No loading OS disks before you can make a sound. Turn on, tune up, play it. - 12 - 4 MIDI Implementation Chart Jen SX1000 MIDI Upgrade Date: Feb 2008 MIDI Implementation Chart Version: 1.0 ++ : Function : Transmitted : Recognized : Remarks : :+++: :Basic Default : : 1 : : :Channel Changed : : x : : :+++: : Default : : 4 : OMNI OFF,MONO : :Mode Messages : : x : : : Altered : : x : : :+++: :Note : : : : :Number: True Voice : : 1127 : : :+++: :Velocity Note On : : x : : : Note Off : : x : : :+++: :After Key : : x : : :Touch Channel : : x : : :+++: :Pitch Bender : : o 2 semi : 14bit : :+++: :Control Change 1 : : o : Mod. Wheel : :+++: :Prog : : x : : :Change : True # : : x : : :+++: :System Exclusive : : x : : :+++: :System : Song Pos : : x : : : : Song Sel : : x : : :Common : Tune : : x : : :+++: :System : Clock : : x : : :Realtime : Commands : : x : : :+++: :Aux : Local ON/OFF : : x : : : : All Notes OFF : : o : : :Mess: Active Sense : : x : : :ages : Reset : : o : : ++ o : Yes x : No - 13 -