1
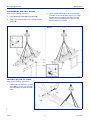
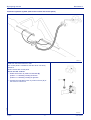
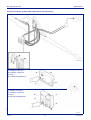
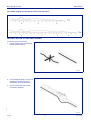
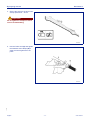
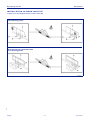
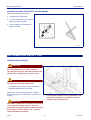
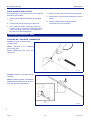
Booklet
9
user manual
Spraying boom
Serial number
Edition 1
05 - 2008
INDEX
tittle
pag
tittle
TECHNICAL INFORMATION .................2
INFORMATION ABOUT
ADJUSTMENTS .................................. 20
equipment general description ................2
instructions for adjustments ................. 20
technical specifications ...........................2
adjustment of the swinging sliding
shoes.................................................... 20
technical specification diagram ....................2
fittings on demand ..................................3
adjustment of the automatic blocking
device ................................................... 20
safety devices .........................................3
safety distance table ....................................3
adjustment of arm alignment ................ 21
safety distance diagram ...............................3
boom folding support adjustment ......... 22
identification plate position ......................4
position of signals ...................................4
INFORMATION ABOUT USE .............. 22
INFORMATION ABOUT
HANDLING AND INSTALLATION .........4
boom folding and unfolding .................. 23
operating advice ................................... 22
adjustment of tilt ................................... 23
handling instructions ...............................4
packing and unpacking ...........................4
loading and transportation ......................5
INFORMATION ABOUT
MAINTENANCE ................................... 24
handling and lifting ..................................5
maintenance schedule table ................ 24
installation instructions ............................5
lubrication points diagram .................... 25
installation of disassembled parts ...........5
cleaning nozzles ................................... 25
equipment installation .............................6
prolonged inactivity .............................. 26
installation of arm ....................................6
TROUBLESHOOTING ......................... 26
installation of the hydraulic system .........7
2-function hydraulic system (with electric
switch and control panel) .............................8
troubles, causes, remedies .................. 26
installation of line filters (if required)
and jets .................................................14
INFORMATION ABOUT
REPLACEMENTS ............................... 28
number of jets on each boom section ...15
replacement of spring and terminal
joint pin ................................................. 28
jet number diagram for each boom s
ection (500 mm pitch) .................................16
replacement of corrector of position
spring ................................................... 29
installation of water hoses ....................16
5-supply water connection diagram ...........18
disposing of the equipment .................. 29
installation of rear light kit .....................19
332.068
pag
necessary that you carefully read the Safety is also in
the hands of all the operators who interact general
safety regulations published in Booklet 1 and those
with the machine.
IMPORTANT SAFETY NOTE
The information published in this booklet regards the
pointed out with relevant symbols in order to
safeguard operational aspects of the operator unit
installed on the people from risks. Remember that
prudence is irreplaceable. machine. It is however
English
-1-
user manual
Spraying boom
Booklet 9
TECHNICAL INFORMATION
EQUIPMENT GENERAL DESCRIPTION
The spraying boom, from now on called equipment,
was designed and built to be installed on a machine for
spraying chemical products on tilled land and/or products.
parallel with the ground, even in the event the ground
is uneven.
The equipment is divided into folding boom sections in
order to adapt it to the spraying width and so as to
reduce the space occupied during transfer.
It is to be put on the height adjustment device and on
the self-levelling device so that it remains perfectly
TECHNICAL SPECIFICATIONS
Size
A mm
B mm
C mm
(*) Weight
(kg)
12
2450
350
2420
290
24
15,5
2520
350
2900
315
30
Width (m) W
Qty. Jets
(500 mm)
(*) Boom with self-levelling devices on maximum configuration.
332.068
Technical specification diagram
Hydraulic Drive
English
233001001
-2-
user manual
Spraying boom
Booklet 9
FITTINGS ON DEMAND
Integral protection kit that protects nozzles from
impacts (ground, plants, etc.).
SAFETY DEVICES
Extension articulation (in case of hydraulic tilt): to
allow the end of the extension to turn so as to get past
obstacles. In order to get past the obstacle without
damaging the equip- ment, it is necessary to keep a
distance higher than the value (D) given in the table.
Stop valve: it allows to stop movements of the
various boom sections during use and/or transport of
the equipment and to prevent accidental movements
in the event of an hydraulic hose failure.
Safety distance table
Width
W
Width
W1
Safety
distance
D
12
6
5,4
15,5
7,5
6,8
Safety distance diagram
extension articulation
extension articulation
332.068
233001002
English
-3-
user manual
Spraying boom
Booklet 9
IDENTIFICATION PLATE POSITION
The figure points out the positions of the
identification plates of the components.
233001003.TIF
POSITION OF SIGNALS
The figure shows the location of all
safety plates, while their meaning is
explained in booklet 1.
The plates (A and B) supplied with the
manual have to be placed inside the
tractor cab, in a visible position.
233001004.TIF
INFORMATION ABOUT HANDLING AND INSTALLATION
HANDLING INSTRUCTIONS
Comply with the information provided by the manufacturer, found on the equipment and in the instruction
manual, when carrying out handling and loading operations.
PACKING AND UNPACKING
- When unpacking, check that all the components
are intact and in the exact quantities.
- The packing material is to be disposed of properly,
in observance of the laws in force.
332.068
- The equipment is to be placed on a loading platform, protected and adequately secured. To make
trans- port easier, it can be shipped with several
compo- nents disassembled.
English
-4-
user manual
Spraying boom
Booklet 9
LOADING AND TRANSPORTATION
Depending on the destination, loading
and transport can be carried out with
different means. The diagram shows
the most commonly used solutions.
Secure the means properly during
transportation in order to prevent untimely shifting.
233001005.TIF
HANDLING AND LIFTING
The equipment can be handled with a
lifting device with forks or hooks having
a sufficient capacity.
Position the lifting device as shown in
the figure.
Avoid sudden manoeuvres.
Danger - Warning
Lifting and handling operations must
be carried out by using appropriate
means and by skilled staff specialized
in this kind of manoeuvres.
233001006.TIF
INSTALLATION INSTRUCTIONS
Whoever performs the installation must prepare satisfactory safety conditions in advance in order to ensure
their own safety and that of the operators involved.
INSTALLATION OF DISASSEMBLED PARTS
332.068
Follow the instructions given below so as to install and
assemble the spraying boom properly.
English
-5-
user manual
Spraying boom
Booklet 9
EQUIPMENT INSTALLATION
Keep to the following instructions.
3 - Lift the middle frame (A) of the boom already
mounted on the self-levelling device (see “Selflevelling Device” booklet) and fasten it to the
sliding frame of the lifting device (B) or to the
shock absorber, if required.
1 - Insert fastening plates (D) into guides (B).
2 - Insert nylon washers (C) into the screws outside
guides (B).
Installation on a slide lifting device
Installation on guide or parallelogram lifting
device
233001007.TIF
INSTALLATION OF ARM
Keep to the following instructions.
1 - Lift arm (A) and fasten it to central
frame (B) by means of its pins (E)
after lubricating the parts and their
seats.
332.068
233001008.TIF
English
-6-
user manual
Spraying boom
Booklet 9
2 - Remove the rod of cylinder (C) and
fasten it to arm (D) and tie-rod (E)
by means of pins (F).
3 - Install cable (G) as shown in the
figure.
4 - Install the opposite arm by
following the same instructions.
233001009.TIF
INSTALLATION OF THE HYDRAULIC SYSTEM
Proceed in the way indicated.
1 - Connect the hoses to the cylinders
(see the hydraulic diagram).
Important
Do not tighten the unions too much so
as to damage the sealing taper fit.
332.068
233001010.TIF
English
-7-
user manual
Spraying boom
Booklet 9
2-function hydraulic system (with electric switch and control panel)
233001011.TIF
The control is performed from the control panel and is activated from the tractor’s driver’s seat.
The control panel is installed so that the driver can easily
activate it.
Electric switch with control panel
How to use the controls
1 - Select the function by means of switches (E)
position 1 = Unfolding / folding of left arm
position 0 = Unfolding / folding of right arm
332.068
2 - Activate the selected function by means of lever (C) of
the tractor’s control unit.
233001012.TIF
English
-8-
user manual
Spraying boom
Booklet 9
Boom unfolding and folding
The figure indicates the procedure to follow when unfolding and folding the boom.
332.068
Please note: the two arms can be folded or
unfolded independently of each other.
233001013.TIF
English
-9-
user manual
Spraying boom
Booklet 9
3-function hydraulic system (with electric switch and control panel)
233001011.TIF
332.068
The control is performed from the control panel and is activated from the tractor’s driver’s seat.
The control panel is installed so that the driver can easily
activate it.
Electric switch with control panel
How to use the controls
1 - Select the function by means of switches (E) and
activate the selected function by means of lever (C) of
the tractor’s control unit
E1 Pos. 0 / E2 Pos. 0 = Correction of position
E1 Pos. 1 / E2 Pos. 0 = Unfolding / folding of left arm
E1 Pos. 0 / E2 Pos. 1 = Unfolding / folding of right arm.
233001012.TIF
English
- 10 -
user manual
Spraying boom
Booklet 9
Boom unfolding and folding
The figure indicates the procedure to follow when unfolding and folding the boom.
332.068
Please note: the two arms can be folded or
unfolded independently of each other.
233001013.TIF
English
- 11 -
user manual
Spraying boom
Booklet 9
4-function hydraulic system (with double effect solenoid valves)
233001011.TIF
CGA CONTROL BOARD
A) Unfolding of left arm
B) Unfolding of right arm
C) Lifting
D) Hydraulic tilt adjustment
A
B
D
C
MÜLLER CONTROL BOARD
A) Unfolding of left arm
B) Unfolding of right arm
C) Lifting
D) Hydraulic tilt adjustment
B
C
A
332.068
D
233001012.TIF
English
- 12 -
user manual
Spraying boom
Booklet 9
Boom unfolding and folding
The figure indicates the procedure to follow when unfolding and folding the boom.
332.068
Please note: the two arms can be folded or
unfolded independently of each other.
233001013.TIF
English
- 13 -
user manual
Spraying boom
Booklet 9
INSTALLATION OF LINE FILTERS (IF REQUIRED) AND JETS
Proceed in the way indicated.
1 - Install the line filters (A) as shown
in the figure.
233001016.TIF
2 - Mount the jets (B) next to the outlet
holes of the stainless steel pipes
(C) (see the “Jet Layout” diagram,
page 12).
Uni-Jet
Tri-Jet Compact
Important
Properly mount the seals (D).
332.068
233001017.TIF
English
- 14 -
user manual
Spraying boom
Booklet 9
Fasten stainless steel pipes (C) and guards (E) to the
spraying boom with the special supports.
Important
The type of support must be chosen according to the
type of installed boom and jets (see picture)
Clamps for booms set up
with “Uni-Jet” jets.
Clamps for booms set up with “Tr
jet“ jet.
NUMBER OF JETS ON EACH BOOM SECTION
Position the nozzle holder hoses
depending on the boom length (see
diagram).
The diagram shows as well position
and number of supports on each hose
and installation instructions, depending
on the number of supplies.
If the equipment is supplied disassembled, the diagram is enclosed
with the small items of the boom.
Important
For hoses with up to four jets use two
pairs of clamps (A); for hoses with
more than four jets use three pairs of
233001018.TIF
332.068
clamps (B).
English
- 15 -
user manual
Spraying boom
Booklet 9
Jet number diagram for each boom section (500 mm pitch)
INSTALLATION OF WATER HOSES
Proceed in the way indicated.
1 - Lay the hoses down on the boom
linearly (see the figure).
233001020.TIF
2 - Leave sufficient length so as to not
impede the movements at the
articulation points of the boom.
332.068
3 - Connect the hoses (see “water
connection diagram”).
233001021.TIF
English
- 16 -
user manual
Spraying boom
Booklet 9
4 - Secure the hoses to the boom with
clamps spaced out ~ 20 cm.
Important
Do not tighten the clamps too much
so as to avoid throttling.
233001022.TIF
5 - Use the Teflon seal (A) and tighten
the stainless steel clamps (B) in
order to ensure tightness in the
joints.
332.068
233001023.TIF
English
- 17 -
user manual
Spraying boom
Booklet 9
5-supply water connection diagram
332.068
233001024.TIFF
English
- 18 -
user manual
Spraying boom
Booklet 9
INSTALLATION OF REAR LIGHT KIT
Install the rear light kit (A) and fasten it with U bolts (B).
Rear light kits for mounted units with
rear-reflecting panels
Rear light kits for trailed tanks with
rear-reflecting panels
332.068
233001025.TIFF
English
- 19 -
user manual
Spraying boom
Booklet 9
INFORMATION ABOUT ADJUSTMENTS
INSTRUCTIONS FOR ADJUSTMENTS
Whoever makes the adjustments must prepare satisfactory safety conditions in advance in order to ensure
their own safety and that of the operators involved.
ADJUSTMENT OF THE SWINGING SLIDING SHOES
In order to ensure the correct swinging
of the device, adjust play between
surfaces according to the sliding shoes
wear. Proceed as indicated.
1 - Use nuts (A) to bring nylon pads
(C) closer.
2 - If play between surfaces is still too
much, remove Belleville washers
(B).
3 - If the situation does not change
despite all these operations,
replace nylon pads (C).
233001026.TIF
ADJUSTMENT OF THE AUTOMATIC BLOCKING DEVICE
2 - Loosen nut (A).
Important
For this adjustment the extension of the spraying
3 - Adjust the position of support (B) until the
indicated levels are obtained (see picture).
boom must be folded (see booklet 9).
4 - After completing this operation, tighten nut (A).
Keep to the following instructions.
332.068
1 - Insert the blocking device (see page 8).
233001023.TIF
English
- 20 -
user manual
Spraying boom
Booklet 9
ADJUSTMENT OF ARM ALIGNMENT
Proceed in the way indicated.
1 - Unfold boom completely
2 - Loosen counter-nuts (A) and align
the arms by means of screws (B).
3 - Tighten counter-nuts (A).
4 - Make the same adjustment on the
other arm.
233001026.TIF
5 - When the boom is folded, make
sure that distance (X) does not
exceed 4 mm.
Important
If the desired adjustment cannot be
obtained, move one or more pairs of
springs from area (C) to (D), or vice
versa, according to needs.
6 - Perform the same adjustment on
the other arm.
332.068
233001023.TIF
English
- 21 -
user manual
Spraying boom
Booklet 9
BOOM FOLDING SUPPORT ADJUSTMENT
Keep to the following instructions.
1 - Fold the arms of the boom.
2 - Loosen nuts (A) and move support
(B) to the desired position.
3 - After completing this adjustment,
tighten nuts (A).
233001026.TIF
INFORMATION ABOUT USE
OPERATING ADVICE
Important
During operation, disconnect blocking device (A) of
the self-levelling device in order to allow the
spraying boom to swing, and keep it parallel to the
ground, also in sloping and / or uneven areas.
Important
Blocking device (A) must be used only when the
equipment is moved with folded boom.
- Locking device (A) must be used only during
transport while the boom is closed.
233001023.TIF
Please note: if the blocking operation is difficult,
lightly swing the boom until the pin is inserted in its
housing.
The information mentioned is not published in the
manual if the equipment is installed on units belonging to other manufacturers.
Important
Information on hydraulic connections is to be found
in the "Hydraulic system" diagram. The boom
332.068
unfolding and folding procedure, variable depending
on the type of control installed, is de- scribed in
“Boom Unfolding and Folding”.
English
- 22 -
user manual
Spraying boom
Booklet 9
BOOM FOLDING AND UNFOLDING
Important
The environmental and territorial
conditions of the area where you plan
to operate have to be checked every
time the equipment is set up for
spraying.
Evaluate the following requirements.
- Check whether or not there are
electric lines and assess the risks of
contact with the spraying boom.
- Check the gradient of the land so as
to evaluate the most suitable conditions for operating in safety. Always bear in mind
the maximum gradient limits allowed.
- In the event of spraying with progress transversal
to the gradient, carefully follow the instructions
given:
1) Boom unfolding stage: always unfold the one
uphill first, and then the one downhill.
2) Boom folding stage: always fold the one
downhill first, and then the one uphill.
- Never work if just the downhill arm is open.
- Keep the forward speed moderate (8-10 km/h
max) so as to prevent the boom from swinging and
getting uneven spraying.
233001027.TIF
Danger - Warning
Prevent strangers from approaching the working
area when the machine is in use. Should it become
necessary, stop it immediately and make the peo- ple
found in the risk area move away.
ADJUSTMENT OF TILT
Equipment tilt can be modified according to the
different ground slopes.
Proceed as indicated.
- Disengage locking device
Tilt with adjustable connecting rod
Important
If it is windy, also stay below the maximum allowed
- Loosen the lock nut (A) and rotate the register (B)
to adjust the tilt.
- Tighten the lock nut (A) when the operation is
completed.
limits (5 m/sec) so as to prevent the product from
being dispersed in the surrounding environment.
Keep the boom at a lower height and increase the
Tilting with electric or hydraulic control
Use the special control
332.068
volume of the droplets.
233001023.TIF
English
- 23 -
user manual
Spraying boom
Booklet 9
INFORMATION ABOUT MAINTENANCE
MAINTENANCE SCHEDULE TABLE
Interval
Component
Type of intervention
Jets and nozzles
Clean and rinse the wa- Make the clean water
ter supply
come out of the nozzles
Jets and nozzles
Check operation
Clean and replace if ne- See “nozzle cleacessary
ning”, page 25
Jets, nozzles antidrip
valve
Check installation
Install properly
Complete equipment
Clean and wash
Use a clean jet of water
Check the greased parts
Grease if necessary
Check the condition and
tightness of the screws
Tighten and replace if
necessary
Check the painted surfaces
Touch up the parts the
paint has come off of if
necessary
Check its condition
Replace if necessary
Each working day and
with each interval
higher than one hour
Each working day
Complete equipment
Every 40 hours of
work
Boom limit stop bumper
(A) (see figure below)
Endpiece articulation
springs
Check its effectiveness
Page
See “Lubrication
points diagram”
page 25
Replace if necessary
See “Replacement
of spring and terminal joint pin”
page28
Replace if necessary
See “Replacement
of corrector of position springs” page
29
332.068
Belleville springs (B)
corrector of position
Check its effectiveness
Operation
English
- 24 -
user manual
Spraying boom
Booklet 9
LUBRICATION POINTS DIAGRAM
233001029.TIFF
Use PERSIAN POLIGREASE 2 grease
CLEANING NOZZLES
1 - Wear protective gloves for this
operation.Disassemble the bayonet (A) and nozzle (B).
2 - Clean the nozzle with a jet of air
and a small soft-bristle brush.
Important
Do not use pointed or sharp objects
so as to not damage the hole of the
nozzle.
332.068
233001030.TIF
English
- 25 -
user manual
Spraying boom
Booklet 9
PROLONGED INACTIVITY
If the equipment is not used for a long time, adopt the
procedures given below.
4 - Disconnect the hoses from the pressure gauges.
5 - Grease all the components provided with a grease
nipple.
1 - Perform the scheduled maintenance (see page
27).
6 - Place the equipment in a sheltered place
accessible only to the operators.
2 - Perform the general cleaning (see page 29).
3 - Put in antifreeze fluid or completely empty the
hoses in order to prevent the components (pump,
control unit, filters, hoses, etc.) from breaking in
the case of severe temperatures.
TROUBLESHOOTING
TROUBLES, CAUSES, REMEDIES
Trouble: the boom unfolds halfway
and then stops.
Cause: impurities in the calibrated
joints of the jacks.
Cures: disassemble the joints and
clean them.
233001031.TIF
Trouble: the boom is not aligned when
unfolded.
Cause: unfolding cylinder not adjusted.
Cures: adjust the alignment of the arms
(see “arm alignment adjustment”)
332.068
233001038.TIF
English
- 26 -
user manual
Spraying boom
Booklet 9
Trouble: when the boom is unfolded
and / or folded, the complete extension
moves in relation with the primary arm
Cause: anomaly in the adjustment of
tie-rods.
Cures: adjust the tie-rods so that the
arms stop against the adjusting screws.
233001039.TIF
Trouble: the endpiece extension is not
steady enough with the boom unfolded.
Cause: the articulation is loose.
Cures: replace pin (D) and / or spring
(E) (see "Replacement of spring and
terminal joint pin").
332.068
233001034.TIF
English
- 27 -
user manual
Spraying boom
Booklet 9
INFORMATION ABOUT REPLACEMENTS
REPLACEMENT OF SPRING AND TERMINAL JOINT PIN
Proceed in the way indicated.
1 - Unscrew screws (A) and remove
terminal joint (B).
2 - Remove pin (C) and spring (D).
3 - Insert the new spring and pin (C).
233001035.TIF
IDM-3320510542.TIF
4 - When terminal joint (B) is rotated
by 90° in relation with the primary
arm, insert first screw (A).
5 - Align the terminal joint and the
primary arm and insert second
screw (A).
Important
Screws (A) must not be tightened
because the terminal joint must be
free to rotate.
332.068
233001036.TIF
English
- 28 -
user manual
Spraying boom
Booklet 9
REPLACEMENT OF CORRECTOR OF POSITION SPRING
Proceed in the way indicated.
1 - Unscrew nut (B) and remove Belleville springs (C).
2 - Unscrew screw (E) and remove
cylinder (F)
3 - Remove Belleville springs (D).
4 - Replace and divide the springs
(see figure).
C) 15 double pack springs + 1 spring.
D) 15 double pack springs + 1 spring.
5 - Reposition the cylinder, tighten
screw (E) and nut (B) so that 2
threads protrude.
233001037.TIF
IDM-3320510542.TIF
DISPOSING OF THE EQUIPMENT
Important
This intervention has to be carried out by skilled
technicians and in accordance with the current
safety regulations. Do not disperse in the
environment non-biodegradable products,
lubricating oils and non-ferrous components
(rubber, PVC, resins, etc.).
Dispose of them according to the local regulations in
332.068
force.
English
- 29 -
user manual
Spraying boom
332.068
Booklet 9
English
- 30 -
user manual