1
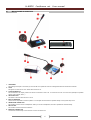
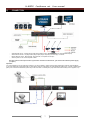
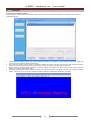
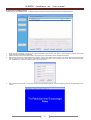
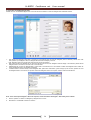
H-6800 Conference set
1
User manual
H-6800 Conference set
User manual
A) Specifications……………………………………………………………….................
B) Description………………………………………………………………......................
a. Main Unit Description…………...........……………………………................
b. Microphone Description ……………………................................................
C) Connections……………………………………………………………........................
D) Operating……………………………………………………………………….............
E) Main Unit Menu......................................................................................................
a. Conference Mode……………………………………………………...............
b. Video…..…………………………………………………................................
c. LCD Contrast………………………………………………………..................
d. Code Setting.........……………………………………………………..............
e. High-frequency Compensation……………………………………….............
F) Microphone Menu…………………………………...................................................
a. Volume..........…………………………………………………………..............
b. LCD Contrast...…………………………………………………......................
c. Video…………………………………………………......................................
G) Auto-track function……………………….….………………………………..............
H) Technical specifications………..…………………………………………….............
I) Operation of Software……………………….….……………………………............
a. System Setting..........……………………………………………....................
i. Basic setting….……………………………………………................
ii. Video Setting………………………………………………................
iii. Venue Configuration………………………………………................
b. Line Detect...………………………………………………....…......................
c. Preparation…………………………………………………............................
i. Create/Edit Conference….……………………………….................
ii. Create/Edit Proposal………………………………………...............
iii. Create/Edit Delegate Data……………………………….................
d. Start Conference……………………………………………….......................
i. Discuss….………………………………..........................................
ii. Sign In........……………………………………….............................
iii. Start Ballot………………………………..........................................
iv. Documents……………………………….........................................
v. Insert Display………………………………......................................
e. After Conference……………………………………………….......................
i. Conference Management………………….....................................
ii. Sign In Report........………………………………………..................
iii. Print Results……………………………….......................................
iv. Documents……………………………….........................................
f. Help………………………………………………...........................................
g. Exit……………………………………………….............................................
2
3
4
4
6
7
8
9
9
9
9
10
10
11
11
11
11
12
13
15
17
17
18
19
21
22
22
23
24
25
25
26
27
29
30
30
30
31
31
31
32
32
H-6800 Conference set
User manual
A)
SPECIFICATIONS
Sound
-
/ Video conference set
The main unit can control up to 50 mic ( 1 chairman & 49 delegates )
This set can be use with or without computer
Touch screen on main unit and mic
Main unit and mic can display videos from camera or external video devices
Built-in speaker on mic and main unit
3 conference mode : mode free, mode FIFO , mode limit ( 1 to 9 mic in same time )
Mode vote ( yes, no, abstain )
Mode elect ( up to 5 candidates )
Mode score
1 aux input ( RCA)
1 line output(RCA )
1 rec output (RCA )
1 master output ( XLR )
2 DVD video inputs ( RCA )
8 cameras ( or domes ) inputs ( RCA )
2 auto-tracking cameras control
2 video output ( BNC )
5 mic connectors
1 computer control connector ( RS-232 )
IEC914 & ISO
3
H-6800 Conference set
B)
DESCRIPTION
a)
MAIN UNIT DESCRIPTION
User manual
Front panel :
in speaker. Correctly adjust the level to don’t saturate the
sound of the speaker.
5. MASTER LEVEL CONTROL
Main unit have a master output to send conference sound to
an external sound system. This button is used to adjust the
level of the line/rec/master output (8,9,10).
1. POWER SWITCH
Use this button to switch on or to switch off the main unit
2. TOUCH SCREEN DISPLAY
On this touchscreen, you can display the video devices
connected on the main unit (camera 1 to 8 iputs, dvd 1 and 2
inputs) and setup system working mode
3. AUX LEVEL CONTROL
This button is used to adjust the level of the input volume the
audio device connected on the input (7). This device will be
listen on all the mic connected to the system. Correctly adjust
the level do don’t saturate the sound.
6. MIC SPEAKER LEVEL CONTROL
The mic are composed of built-in speakers. This button is used
to adjust the maximum volume level of these speakers.
4. BUILT-IN SPEAKER LEVEL CONTROL
Main unit is composed of a built-in speaker to monitor the
conference. This button is used to adjust the level of the built-
Rear panel :
7. AUX IN INPUT
Aux level type. Connect on this input a device with level line such as a cd player, a dvd player, a mixer,… This device will be diffused on
the speakers of all the micro connected to the system.
8. LINE OUTPUT
This socket is used to connect an external sound system (power amplifier or mixer). The conference is reproduced on a system more
powerfull
9. REC OUTPUT
This output is used to record the conference. Connect on it a recording device as cd recorder or tape recorder
10. MASTER OUTPUT
This socket is used to connect an external sound system (power amplifier or 100v power amplifier). The conference is reproduced on a
system more powerful
4
H-6800 Conference set
User manual
XLR socket
1- GND
2- +
3- 11. VIDEO DVD INPUTS
This system allows the display of video devices on the built-in touchsreen. Video can be movies from DVD player or video from cameras.
Connect on these inputs devices as DVD player, video ouput from computer,...
Device (DVD 1 or 2 inputs ) is selected directly from touchscreen display of main unit ( A = DVD 1, B = DVD 2 ).
12. MIC CONNECTORS
Use this connectors to connect all the mic. If you have more than 4 mic, you must to use connection box (in option). You can connect up to
50 mic
Note: Video & sound of the mic are in the same cable.
13. LINK OUTPUT
If you have more than 32 mic, use this connector to connect an additional power supply.
14. DATA CONNECTOR
Connect to this socket a central control system
RJ-45
1- GND
2- GND
3- RS-485A+
4- RS-485B-
5678-
NC
NC
GND
GND
15. POWER SOCKET
Connect on this socket the power supply cable ( 220V )
The fuse is used to protect the main unit. If the fuse use is defect replace it by a fuse with same size and same value
16. CAMERA CONTROLE CONNECTOR
If you use dome in place of camera you can control pan and tilt move directly from software. Connect this socket to the control connector of
domes..
Note : To know connections, read the user manual of the dome.
RS-232 Male (Red LED)
1.NC
2.TXD
3.RXD
4.NC
5.GND
6.NC
7.NC
8.NC
9.NC
RS-422 (Green LED)
1- TXD +
2- TXD 3- RXD +
4- RXD –
5- GND
17. PC CONNECTOR
Connect this socket to your computer to setupr the auto-track function.
RS-232 (PC) female
6- NC
1- NC
7- NC
2- TXD
8- NC
3- RXD
9- NC
4- NC
5- GND
18. VIDEO OUTPUT
Use this output to display camera video on an external video screen.
Note : You cannot display video from camera inputs directly on the mic touchscreen ( except special connection explain later )
19. VIDEO CAMERA INPUTS
Connect these inputs to your camera. Up to 8 cameras max.
5
H-6800 Conference set
b)
User manual
MICROPHONE DESCRIPTION
1. CARTRIDGE
The cartridge is the part of mic where you must to talk. Don’t speak too near from cartridge otherwise the sound will be saturate
2. LIGHT
This light is on when the mic is on and off when the mic is off.
3. TOUCHSCREEN LCD
This touchscreen can display video from devices connected on main unit. It’s used also to enter in all the menu (Microphone speaker
volume, LCD contrast, video…).
4. ON/OFF BUTTON
This button is used to switch the mic on or off.
5. BUILT-IN SPEAKER
All the mic are composed of a built-in speaker. You can adjust the volume of this speaker directly on the system setup menu
6. HEADPHONE CONNECTOR
This socket is used to connect a headphone. When you connect a headphone, the built-in speaker will off automatically.
7. REC OUTPUT
This socket is used to record the conference.
8. MAIN UNIT CONNECTOR
Connect this socket directly on the main unit or on the connection box
6
H-6800 Conference set
C)
User manual
CONNECTION
-
Video devices can be : camera output, DVD player, Blueray outpur, MP4 player output or computer(video output)
Sound devices can be : CD player, MP3 player, Tape player, computer ( sound output ) or a mixer
Record devices can be : Mp3 recorder, Tape recorder, a computer sound input,...
Sound system can be : Power amplifier / Mixer.
The main unit can control up to 50 mic. If you want to control more than 50 mic, you must to use extension power supply
( in option ).
Important :
You cannot display on mic the video from camera. If you want to display , please connect Video output (RCA) to DVD1 or DVD2 (RCA).
If you want display the camera video both on Video screen and mic LCD, please use video distributor (video input) connect to Video output
(RCA), then connect vieo distributor (video out) to main unit DVD 1 or DVD2 (RCA )input and extral Video screen( such as projector, TV)
7
H-6800 Conference set
D)
User manual
OPERATING
When all the system is full connected, the operating is very simple.
Delegate mic :
To talk, push the ON/OFF button (A). When the mic is on, the light on goosneck mic is on
( red light )
Push another time the ON/OFF button (A) to switch off the mic.
Touch the LCD enter in the menu of delegate mic. You can setup volume, contrast of LCD
and video..
Chairman Mic :
The chairman mic have the same operaing as delegate mic but the chairman mic have the
priority button (B). When you push the priority button (B), you switch off all the delegate mic.
All the delegate mic stay off until the priority function of chairman will be on.
Please note: if chairman mic has only one on/off button and does not have priority button
please hold the button 2 secs,to achieve priority function
Note :
In limit/Fifo mode, only some mic can be on in same time
This number is setup in main unit ( in conference mode menu ) ( between 1 to 9 mic in same time ) or by software. If the max number of active
mic is reached, system cannot switch on the mic until another mic will be off .
.
..
8
H-6800 Conference set
E)
User manual
MAIN UNIT MENU ( )
The main unit control some the functions of the system : conference mode
setup, setup code, high-frequency compensation, system video input and
main unit LCD contrast.
.
a)
Conference mode
You have the choice between 3 modes :
Free mode :
There is no limit in the number of active mic. All the mic can be on
in same time
-
-
b)
Limit mode :
In this mode, only some delegate mic can be on in same time.
Push on the A part to select the number of active delegate mic ( 1
to 9 mic ). For example, if you setup 3, only 3 delegates mic
(plus the chairman mic) can be active in same time.
This limit is not available for chairman mic
FIFO mode :
In this mode, you can adjust the max number of simultaneous delegates between 1 to 9.
Push on the A part to select the number of active delegate mic ( 1 to 9 mic ). For example, if you setup 2, only 2 delegates mic
(plus the chairman mic) can be active in same time.
When the number 1 is setup:
o
Push the on/off button; you switch off directly the mic of the precedent delegate.
When the setup number is 2 to 9 :
o
Push the on/off button of the mic
o
If no delegate mic is active, you can talk directly.
o
If the setup delegate number is reached, the mic of the first active delegate mic is switch off and your mic switch on.
o
If another delegate push the on/off button, the second active mic delegate is switched off and the mic of the new delegate is
switched on.
This limit is not available for chairman mic
Video
Note: a.The main unit LCD will display video if there has video input the system (DVD1, DVD2 ) , touch the LCD to enter the main menu.
b. Please select the video input by VIDEO A & VIDEO B
c. The main unit LCD will display the standby picture if there has no video input the system, touch the LCD to enter the main menu and
select the video input.
c)
LCD Contrast
You can adjust the contrast of the touch screen.
Push + and – buttons to adjust then push Back button if you want to leave menu
without save the setup
9
H-6800 Conference set
d)
User manual
Code Setting
Each mic has a number ID which is affected (very important to setup the autotrack function (this function will be explained later).
Main unit:
- The main unit starts the setup of the mic code by selecting the number. For
that, use the buttons + and - touch screen.
- Once the selected number, press on button OK, usually system setup the
code from 1
- In general, you assign number 1 to the chairman mic.
- The following codes are transmitted to all the delegate mic.
- When all the mic ID are affected, press on the button Back for exit of the menu
.
Main unit diplay
Mic display
e)
Microphone:
- This message is displayed on all the microphone touch screen. Press the
on/off button of the corresponding mic to the affected the number.
- The other mic are always this message posted but with an incremented
number of a unit. Press then on button on/off of the mic concerned and so on
until all the mic are assigned to a number.
- All mic LED will start flash during setup code, the LCD will off after setup code.
- Please restart the system to save the system code setup of mic
High-frequency Compensation
You can adjust the treble of the system audio output.
Push + and – buttons to adjust then push Back button if you want to leave menu
without save the setup
10
H-6800 Conference set
F)
User manual
MICROPHONE MENU
You can adjust volume level, contrast,video of touchscreen.
a)
Volume menu
All the mic have a built-in speaker returning the debates much clearer. The max
volume for all mic is adjusted from main unit but you can also adjust the volume of
each desk individually. Press on the buttons + and - touch screen to increase or
decrease the volume of the speaker then press on button Back to leave the menu
b)
LCD Contrast
You can adjust the contrast of the touch screen.
Push + and – buttons to adjust then push Back button if you want to leave menu
without save the setup
c)
Video
If there has video input from main unit, microphone LCD will display the
video, if there is no video input, LCD will disply no signals and back to
standby picture
11
H-6800 Conference set
G)
User manual
AUTO-TRACK FUNCTION
This conference set control sound but also video. The built-in displays of mic is used to show videos from video devices ( as DVD player or mp4
player ) but also video from cameras or domes.
You can display in real time the person who talk during the conference. This function is called auto-track function.
Please find an example :
This system is composed of 4 mics ( 1 chairman and 3 delegates ).
The video is porvided by a dome connected and controled by the main
unit .
The main unit is conneted to an external video screen.
When the chairman mic 1 switch his mic on, the dome will be moved
directly on him so the chairman is display on all the mic touch screen
and on the video screen. ( figure 1 )
Figure 1
When the delegate mic 2 switch his mic on, the dome will be moved
directly on him so the delegate mic 2 is display on all the mic touch
screen and on the video screen. ( figure 2 )
Figure 2
When the delegate mic 3 switch his mic on, the dome will be moved
directly on him so the delegate mic 3 is display on all the mic touch
screen and on the video screen. ( figure 3 )
Figure 3
12
H-6800 Conference set
User manual
When all the mic are switched off, the dome move on the chairman
mic 1 (if the chairman mic 1 is record ad default preset) (video home
button on the software)
Warning: The moves are automatics but the place of mic must be
setup. You need to connect the system to a computer to setup the
place of all the mic. When the preset are saved, you can disconnect
the computer
We will explain you the operating of the auto-track function
IMPORTANT :
Cameras cannot be displayed directly on touch screen. You
must to connect video output to DVD input ( 1 or 2 ) to show
video from cameras on touch screen..
13
H-6800 Conference set
H)
User manual
TECHNICAL SPECFICATIONS
Main unit :
Max mic number :
Mic connector :
Aux input:
Video input:
DVD input:
Master output:
Rec output:
Line output:
Video output:
PC connector:
Video processor connector:
Max resolution LCD:
LCD type:
Dimensions:
Power supply:
Fuse:
N.Weight :
50
5 (DIN 8P )
RCA
8x RCA
2x RCA
XLR (male)
RCA
RCA
2x RCA
RS-232
RJ-45
480x272
4.3’’ 24 bit TFT
488 x 84 x 324mm (19’’ / 2U )
220V / 50Hz
8A / 250V
8Kg
Microphone
Connector:
Cable:
Headphone output:
Rec output:
Talking distance:
Frequency response:
Sensitivity:
S/N ratio :
Max resolution LCD :
LCD type:
Gooseneck mic :
Consumption:
Dimensions :
DIN 8P
3m
Mini Jack
Mini Jack
20 – 50cm
40Hz – 16 KHz
-44dB +/-2dB
85dB
480x272
4.3’’ 24 bit TFT
41cm (17’’)
<2W
Fig1 : 217 x 127 x 50mm ;
Fig2 : 230 x 132 x 64mm
Fig1 : 1Kg
;
Fig 2 : 1.3Kg
Weight :
Fig 1
Fig2
14
H-6800 Conference set
I)
User manual
OPERATING OF SOFTWARE
Before you must to connect system as showed on the following draw:
You must :
WITH MAIN UNIT OFF
Connect the main unit ( RS-232 ) to a computer ( port COM, RS-232 or USB )
Connect all mic to the main unit
Connect all domes ( or cameras ) to the video inputs ( RCA )
Connect domes control output to all the domes
Connect the video output to a DVD input ( 1 or 2 )
You can connect the main unit to an external video screen
If you want to display video output directly on you computer, it must be composed of a video capture card.
The connection between main unit and domes depends of the norm of communication ( Protocol ) of the domes. You must to check the user
manual of the dome to check the protocols used.
15
H-6800 Conference set
User manual
Important : Before to switch on the computer and start the software, you must to connect the dongle (A) on the USB socket on the computer (the
dongle is provided with the set ). If the dongle is not connected, the software cannot start.
A
When the computer is on, Check if the main unit is conencted to the computer and
switch the main unit on.
Start the software.
If the main unit is not connected, an alert message will be displayed on computer
screen
If the main unit is connected to the computer, a panel will be displayed and you must to enter the password to enter in the software. The
password is 1234. Enter the password and push the login button..
Software Main Interface
There are seven parts of the software main interface” System Setting”, “Preparation”, “Start Conference”, “After Conference”, “Help”, “Line
Detect” and “Exit”
16
H-6800 Conference set
a)
User manual
System Setting
A. System Setting-Basic Setting
Click “System Setting” to enter system setting interface, and then click icon “Basic Setting” on the left side of the software to enter system basic
setting. (Fig B)
Details as below:
1. System number setting: System number setting function usually only used when install the conference system equipments, please input
the total microphone (include chairman and delegate microphone) quantity, then click “OK” to confirm. This number will not change if the
microphone number not changes.
Note: If system number changes succeed, software will switch to “Venue Configuration” interface, and refresh the microphone icon
quantity. Operator can move the microphone icon if necessary
2. Chairman number setting: Please set the correct chairman microphone number according the system.
3. COM Port Setting: Communication port should be within the setting, or the operator can not enter the software. Default port setting is from
1 to 10.
4. Sub-Screen Setting:
a. Screen Size: Please select the proper size in the list to support projector or LCD display.
b. Background Color: Please select the screen background color in the list.
c. Font Color: Please select the screen font color in the list.
d. Open/Colse Sub-Screen.
5. Change Password: If operator wants change the software password, please input current password and new password two times, then
click “OK” to confirm.
17
H-6800 Conference set
User manual
B.System Setting-Video Setting
Please click icon “Video Setting” on the left side of the software to enter system video setting.
1. Please select correct camera protocol and communication interface in the software.
2. Please tick off before "Preset", turn on microphone by "Talk" key first (or input the Mic ID in the Mic number textbox, then click "Turn on
Mic"), and please debug the camera with the software to get the clear image.
3. Please click "Save Preset" to save the preset data after operator finish the camera debug setting of that microphone.
4. If operator need to set video-home function, please debug camera 1 (camera id must 1) to get the video-home image, then click “videohome" icon to save the preset.
5. Repeat the operation to finish all microphones preset.
6. If operator wants clear the preset data, please click "Default", then software will delete all preset datas.
7. Please click "Preview" to check the preset and un-preset microphone address.
8. Operator can open or close the video in software when preset microphone.
9. If system use more than 1 camera, please select the correct camera number and confirm (click "OK") when debug the video of each
microphone.
10. Operator can check the video image in the software if computer installed video capture card.
Note : When all the preset is saved, you can disconnect the computer from the main unit . All the preset are saved on the memory of the main
unit. No need to do this auto-track setup before each use of the conference. You must to do this setup if you move some mic of the conference.
18
H-6800 Conference set
User manual
C. System Setting-Venue Configuration
Please click icon “Venue Configuration” on the left side of the software to enter the conference room configuration. Operator can set meeting
place and seats according to the real situation
1.
Create Seat: Please click “Create Seat” icon, system will create the microphone icon automatically, icon quantity will same the microphone
number that operator set in basic setting interface, operator also can defined the icon configuration by “Operator-defined”, such as row
quantity, level & Apeak distance.
19
H-6800 Conference set
User manual
2. Delete Seat: If operator click “Create Seat” icon, the icon will change to “Delete Seat”, all seat setting will delete if click” Delete Seat” icon.
Refresh Seat: If operator change the data of “User-Defined” or change the system microphone number in “Basic Setting”, seats setting will
change after click “Refresh Seat”. For example: System Number Setting 100, Row 15, Level 11, Apeak 25. The seat configuration will as
following:
3.
Import Configuration: Please click “ Import Configuration” to choose the bmp format picture as following: (Operator can make the
configuration picture with the real situation of conference room).
Warning : The software can not import the bmp format picture (Meeting configuration) if the file insoftware system patch
20
H-6800 Conference set
4.
User manual
The icon will change to “Delete Configuration” after system import configuration. If operator click delete configuration, the imported
configuration picture will deleted.
Move Mic Icon: Please click “Move Mic icon”, then choose the microphone icon that operator want moving with the left mouse button, move
the mouse (no need to hold the left and right mouse button) to move the Mic icon to the correct position and them click left mouse button
again to fix up Mic icon. After operator move all Mic icon to the correct position, please click “ Fixup Mic Icon” to finish the setting.
D. System Setting-Exit
Please click “Exit” to exit the System setting interface, back to software main interface.
b)
Line Detect
1.
Click “Line Detect” to enter the system detect interface, click icon to detect the microphone connection status in the system. The
system will display the results automatically after click line detect. Microphone offline means that microphone has problem or
disconnected.
2. Please click “Exit” to exit line detect interface, back to software main interface.
21
H-6800 Conference set
c)
User manual
Preparation
A. Preparation-Create/Edit Conference
Click “Preparation” to enter conference preparation interface, and then click icon “Create/Edit Conference” on the left side of the software to
create/edit conference.
1.
2.
3.
4.
Create Conference Heading: Please click “Create Conference heading”, then operator can input conference information, please click
“Save” to save the conference data after finish setting.
Edit Conference Heading: Please choose one conference heading that operator want edit, and then click “Edit Conference heading”,
operator can edit the conference data in the text box, then click “Save ” to save the conference data after finish edit.
Delete Conference Heading: Please choose one conference heading that operator want delete, and then click “Delete Conference
Heading”, the conference heading will deleted.
Conference Heading Display: Please choose one conference heading that operator want setting, and then click “Conference Heading
Display”, system will pop-up one text box. Operator can edit the conference heading which displayed on sub-screen.
22
H-6800 Conference set
User manual
B. Preparation-Create/Edit Proposal
Please click icon “Create/Edit Proposal” on the left side of the software to enter the conference proposal create/edit interface.
1.
2.
3.
4.
Please click “New Proposal”, and then input proposal information in the text box, click “Save” to save the data. If operator choose elect
mode, please input candidates’ information.
Delete Proposal: Choose one proposal listed in the software, then click “Delete Proposal” to delete this proposal.
Edit Proposal: Choose one proposal listed in the software, and then click “Edit Proposal”, operator can edit the proposal information in the
text box, please click “Save” after operator finish edit the proposal information. If the proposal is elect mode, after choose this proposal,
click “Candidate List” to edit the candidate’s data in the pop-up text box.
Edit Proposal Format: Choose one proposal, and then click “Edit Proposal Format”, operator can edit the proposal which displayed on subscreen.
23
H-6800 Conference set
User manual
C. Preparation-Create/Edit Delegate Data
Please click icon “Create/Edit Delegate Data” on the left side of the software to enter the delegate data create/edit interface.
1.
2.
3.
4.
Add: Please input delegate information in the text box, and operator also can load the delegate’s photo if necessary. Please click “Add”
after operator input delegate’s data, the delegate data will saved and display in the list.
Note: Delegate’s data must include S/N, Name and Sex, others are optional
Edit: Please choose the delegate S/N or name that operator want to edit, this delegate’s data will display in the software, please edit the
delegate’s data in the textbox, and click “Edit” to save the data.
Delete/Delete All: Choose one delegate S/N or name listed in the software, then click “Delete” to delete this delegate’s data. “Delete All”
means all delegate listed in the software will deleted
Load/Save Data: If software already include delegate’s data, please click “Save Data”, system will pop-up one text box, operator can save
the delegate’s data in excel format, or operator canload the delegate’s data from computer if he/she create the data file first.
Note : If user want import delegate’s data from computer, he/she must delete all delegate’s data already in the software.
5.
6.
Search: Operator can search the delegate by delegate’s S/N or name.
Back: Back to “Create/Edit Conference” interface.
24
H-6800 Conference set
d)
User manual
Start Conference
Click “Start Conference” to enter conference start interface to select the conference that operator want start.
If operator has prepared the conference, the conference heading will display in the software, please select the conference S/N or heading that
operator want start, and then click “Start Conference” to enter the conference starting interface, click exit back to software main interface.
A. Start Conference-Discuss
The default interface is “Discuss” after software enter conference start interface.
1.
Mic Mode: The default mode is “Free”, operator can select the Mic mode such as “Limit, Free, FIFO” in the software.
a. Free: All microphones can turn on without limit.
b. Limit: In this mode, only some delegate mic can be on in same time. Choose the number of active delegate mic ( 1 to 8 mic ). For example,
if you setup 3, only 3 delegates mic (plus the chairman mic) can be active in same time.This limit is not available for chairman mic
c. FIFO: In this mode, you can adjust the max number of simultaneous delegates between 1 to 8.Choose the number of active delegate mic
( 1 to 8 mic ). For example, if you setup 2, only 2 delegates mic (plus the chairman mic) can be active in same time.
When the number 1 is setup:
o
Push the on/off button; you switch off directly the mic of the precedent delegate.
When the setup number is 2 to 9 :
o
Push the on/off button of the mic
o
If no delegate mic is active, you can talk directly.
o
If the setup delegate number is reached, the mic of the first active delegate mic is switch off and your mic switch on.
o
If another delegate push the on/off button, the second active mic delegate is switched off and the mic of the new delegate is
switched on.
This limit is not available for chairman mic
25
H-6800 Conference set
2.
3.
User manual
Mic Control: Please choose the Mic icon (the icon will display the microphone ID or delegate
name) or input Mic ID in the software, operator can turn on or turn off the microphone by
software. Mic icon will display the microphone status with different color.
Open Video Window: Please Click “Open Video Window” to debug the camera by the video
setting window. Click “Close Video Window” back to discuss interface.
B. Start Conference-Sign In
Please click icon “Sign In” on the left side of the software to enter conference sign in interface.
1.
2.
3.
Expected Number: Please setting the correct expected number of the vote/elect/scoring, and then confirm.
Quorum Rate: Please setting the quorum rate of the delegation, and then confirm.
Sign In: Please click “Sign In Start” and “Sign In End” to start and end the sign in, sign in result will display in the software and sub-screen.
( If some delegates forgot sign in or delay in arrival, operator can use “Re-Sign In” function)
26
H-6800 Conference set
User manual
C. Start Conference-Start Ballot
Please click icon “Start Ballot” on the left side of the software to enter conference ballot interface. If this ballot does not sign in first, system will
display warning message to ask operator finishing sign in first.
1. Time: Operator can setting vote/elect time of this proposal by software.
2. Pass Rate: Operator can setting the pass rate of the proposal, this function only use for vote, elect can not use.
3. Start Vote/Elect: Operator can start ballot after setting the time and pass rate, please choose one proposal that operator want ballot, then
start.
4. End Vote/Elect: After ballot end, result will display on both software and sub-screen.
a. The system will end the ballot and display result automatically if operator setting the limit time.
b. If operator selects “No Limited”, then need to end the ballot manual.
c. Operator can end the ballot any time.
5. Check Results: Operator can check the ballot results in three types.
a. Numeric: Ballot results will display in numeric type in the software.
27
H-6800 Conference set
b. Bar: Ballot results will display in bar type in the software.
c. Pie: Ballot results will display in pie type in the software.
Operator can send the results to sub-screen after choose the display type.
8.Click exit back to conference start interface.
28
User manual
H-6800 Conference set
User manual
D. Start Conference-Documents
Please click icon “Documents” on the left side of the software to enter documents reading interface.
1. Basic Setting
a. Please input the pause symbol in the textbox, when operator click “Previous/Next Sentence” or choose auto reading, the documents content
will pause with the setting symbol.
b. Clew Speed: This function only use for documents auto reading. The documents auto reading speed will follow the clew speed setting with
the pause symbol.
c. Clew Color: Set the color of clew sentence.
d. Font Color: Set the color of documents content
e. Font Setting:
2. Documents Reading
a. Open: Click “Open” to choose the document (document should be in txt format) that operator wants use; the document content will display in
software and sub-screen.
29
H-6800 Conference set
User manual
b. Turn Page
Next Page: The documents content in software and sub-screen will turn to next page.
Previous Page: The documents content in software and sub-screen will turn to previous page.
First Page: The documents content in software and sub-screen will turn to first page.
Last Page: The documents content in software and sub-screen will turn to Last page.
c.Manual Reading:
Previous Sentence: The document content will move to previous sentence by the pause symbol that operator setting in software; this sentence
color will change to clew color. Both software and sub-screen will display the clew sentence.
Next Sentence: The document content will move to next sentence by the pause symbol that operator setting in software; this sentence color will
change to clew color. Both software and sub-screen will display the clew sentence.
d. Auto Reading: Click “Auto”, the icon will change to “Pause”. The document content will move to next sentence by the pause symbol that
operator setting in software one by one. Moving speed is the clew speed that operator setting in software, sentence will change to clew color.
Click “Pause”, Auto reading will stop; icon will change “Auto”.
e. Restore: System will exit documents reading state.
E. Start Conference-Insert Display
Please click icon “Insert Display” on the left side of the software to enter insert display interface. Operator can input the contents in the text box,
and click right mouse button to edit the content, this content will send to sub-screen.
F. Start Conference-Exit
Click exit back to software main interface.
e)
After Conference
A. After Conference- Conference Management
Click “After Conference” to enter conference management interface, operator can check the conference data that already finished.
30
H-6800 Conference set
User manual
B. After Conference-Sign In Report
After select conference heading, “Sign In Report” and “Print Results” is available. “Sign In Report” interface can check the sign in details.
1.
2.
3.
4.
5.
Expected: Software will display expected delegates’ details
Presented: Software will display presented delegates’ details
Absent: Software will display absent delegates’ details
Save: If software include delegates’ data in the list, please click “Save”, system will pop-up one text box, operator can save the sign in
results in excel format. This function is null if the list does not include any delegates’ information.
Back: Back to heading management interface.
Note: Please make sure the software (Preparation-Create/Edit Delegate Data part) already include the delegate data, or the sign in report list
can not display any delegate’s information.
C. After Conference-Print Results
After select conference heading, “Sign In Report” and “Print Results” is available. “Print Results” interface can check and print proposal ballot
results.
31
H-6800 Conference set
1.
2.
3.
4.
5.
f)
Display All: Software will display all proposals of the selected proposal type.
Display ballot proposal: Software will display the proposal title that already balloted.
Save: Save the results as excel file.
Print: Software will display all ballot reuslt if operator use this function, he/she can use
Back: Back to heading management interface.
Help
Operator can get software usage information with help file.
g)
User manual
Exit
Exit the software.
32
or
to select the proposal results.