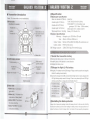
1
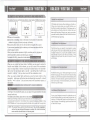
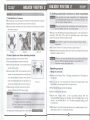
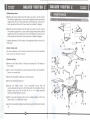
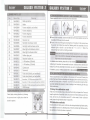
V/hit~ ~nd
f]/;::ck ----- ~J~~v
f~5hion in th~ "kIJ=
.
Nine Eagles@
2
VISITOR
CiALAXY
4-~
~~~
1111
1.11
~:F"F.l1
Flying is a life style!
SHANGHAI NINE EAGLES ELECTRONIC TECHNOLOGY CO.,LTD
ADD:No.818,Fengrao Road,Malu,Jiading District,Shanghai,p.r:c.
Tel:0086-21 -52919366
Fax:0086-21-52919361
http//WNW.nineeagle.com
E-rnail:[email protected]
Galaxy Visitor 2 2.46Hz 4CH
NE-MASFII Instruction Manual
~:?!j>.
FJR F~~
This model is compatible with
FUTABA FHSS 2.4GHz Transmitter
CATALOG
I . INTRODUCTION & INFORMATION
Please read the manual through before flying to ensure safety in flight.
1.lntroduction ......................................................................................... .1
(1).1 ntroduction
(2).Warranty and technical support
(3).RTF Kit contents
(4).Specifications
2.Preparation before flight ......................................................................4
The inte"ectual property of this product and manual belong to Shanghai Nine Eagles
Electronic Technology Co., LTD. Copy in any form by any institution or individual
is illegal without Shanghai Nine Eagles' written consent.
II. BASIC FLIGHT CHAPTER
1.Basic knowledge in flight ...................................................................... 6
2.Basic flight training ...............................................................................7
III. ADVANCED FLIGHT CHAPTER
[HUBBY]
RTF
«!I.~
FEATURES
• Compatible of conventional control mode and intelligent control mode
(Patent application number: 201310193041.2)
• Easy switch between two modes through just pressing one button
• "Headless Flying" under intelligent control mode make it extremely
easy for beginner to manage flying a R/C quadcopter
l.Conventional control mode and intelligent control mode ................... .8
2.The switch between 2 control modes ..................................................10
3.The switch between low rate and high rate .............. .......................... 11
4.Swifch on/off the acceleration sensor.............................................................. .11
S.Trimming ........ .................................................. ....................................11
6.Auto-Return function .......................................................................... 13
7.Aircraft's flying direction in AutO-Return process ............................... 14
8.Ways to turn the aircraft during Auto-Return ......................................14
9.How to use camera ..............................................................................1S
10.5etting picture/video function on other transmitters ............................... 16
IV. MAINTENANCE
• Colorful LED navigation lights
l.Structures of aircraft{Exploded view) .......................................... ........ 18
2.Spare parts list .................... .................................................................19
3.Check propeller rotating direction ...................................................... 19
4.Binding between aircraft and transmitter........................................... 20
S.Calibrating of the acceleration sensor............ .. ................ ................... 20
6.Calibration of geomagnetic sensor................ .. .................................... 21
7.Gains setting ........................................................................................ 21
8.Adjustment of AutO-Return speed ...................................................... 21
9.Connecting between motor and circuit board .................................... 21
• Fashionable white and black appearance design
\. SAFETY AND ENVIRONMENTAL PROTECTION
• "Auto-Return" function - the safety guard against lose control of aircraft
• Brake function
• Anti -crash protector
• Switch on/off of accelerometer
• On board micro digital video/picture camera (optional)
l.Warning and FCC information ............................................................. 22
IIII
III
Description
1.INTRODUCTIQN_ _ _ _~_ _ _ _ ___'
(1 )Introduction
Galaxy Visitor 2 is the newest 2.4GHz 4CH mini quadcopter (Hereinafter called aircraft),
it has excellent control performance with the adoption of advanced 9-axis gyro stablization
system. Easy to control, steady in flight, this product is the best choice for beginners. The
maneuverability of this product is adjustable and can be set in high sensitivity by skillful
operators to further enjoy the thrill and excitement in flight! It can also fly outdoor freely
in the wind force of Grade 3 (around 12 -1 9km/h) . Independently developed by Nine
Eagles as mini leisure quadcopter, this aircraft can fly both indoor and outdoor. Small in
size, light in weight, with high security, this product wi II bring you much more enjoyment
and fun in flight!
Description
Qty
Qty
O.Galaxy Visitor 2
1
0.5crewdriver
1
f}.JFN 4CH transmitter
1
ClUi-Po battery
1
€).Camera(optional)
1
€ID.USB charger
1
O.2G Micro SD card(optional)
1
m.User's manual "
1
0.Card reader(optional)
1
@.Blade protector
4
0.AA battery
4
f!l.5crew
4
O.Propelier
4
mUpj)![.le, Camera/SD card and card
reader are subject of optional parts depending
on the model you bought.
(2)Warrantyand technical support
Nine Eagles guarantees all the aircrafis have been strictly inspected, tested before export
from factory .Please contact the seller where you bought this model or local distributor to get
the techn ical support and purchase the spare parts .If unable to contact the appropriate
distributor, pis contact us through email at sales@nineeagle . com or phone call at
0086-21-52919366. The detail explorer drawing can be found in the page 15&16, it will
help you identify the needed spare parts.
• Aircraft introduction
Blue navigation light
Red indicator light
(3,RTF Kit contents
\..
"
I\l'
I\l'
I\l'm
..
~
Battery
compartment cover
Blue navigation light
f])
Red navigation light
--------------------~C»
E)
II
II
(4 )Specification
• Transmitter introduction
o Quadcopter specification
(Note : This transmitter is not transferable)
Main rotor diameter:2.2"(56mm)
o Front side
Overalilength:4 .0"(102mm)
(Take Mode 2 for example.)
Overall width:4 .0"(1 02mm)
Throttle trim
Elevator trim
Rudder!
Throttle stick
Aileron/Elevator stick
(also switch between
high/low rate)
Overall height 1.65" (42mm)
Whole weightAbout 1.50z(44g)
Model No.:
TX:NE-TXOS 215-B (4CH 2.4GHz)
RX :NE-MASF11:4 in 1(including : 9 axis
gyroscope, ESC , Mixer, 2.4GHz receiver.)
Motor system: 0 7.0 coreless motorX4
Battery:3.7V 350mAh Li-Po
f} Camera Specifications
Memory:
Size:
Codec Video :
Codec Audio :
Still Image capture :
Accepts up to 32G Micro SD card
40mm LX20mm WX8mm H
Motion JPEG,1280x720,30fps,file extension .aci
PCM S16 LE,mono
1280x720,96 dpi,file extension,jpg
.........., :-HT
-=-_~
Rudder trim
Aileron trim
(1 )Install the transmitter battery
f} LCD display screen
Throttle reading
TX
Throttle trim
indicator
000
Rudder trim indicator
Radio electric
quantity indicator
Elevator trim
indicator
Aileron trim indicator
high/low/rate
€) Back side
• Button AUX 2 : Acceleration
gyro switch.
AUX 1
VIDEO
• Button AUX 1: This button is for
mode switch on Galaxy Visitor 2.
• Button VIDEO: This button is
AUX 2
PICTURE
for camera shooting.
_ _ _~..:J
=='
O.Remove the battery cover on the back of transmitter.
8.lnstall 4 pieces of AA batteries in correct direction .
@). Replace the battery cover.
(2)Charge the flight (Li-Po) battery
O .Plug the Li-Po battery into the USB charger ( Please note the posotive and negative
poles of the battery should match) .
8. Connect the charger to the USB connector.Red LED light solid on means charging ; Red
LED light flashing slowly means full charge . If there is any abnormitY,the red LED light
will flash quicklyWhen no charge,the red LED light will be off.
Be careful in charging 1 r
"
rr---~r----T"""'i
Li-Po batteries, please
read' SAFETY and
ENVIRONMENTAL
PROTECTION 'for
reference.
(Picture A)
(Picture B)
(3)lnstalling the blade protector
Galaxy visitor 2 spare parts package includes the blade protector For safe use and protecting
the aircraft, we advise you to fly it after installing the blade protector The blade protector can
reduce the chances of crash to Galaxy visitor 2 and reduce the lose caused by misoperation.
• Button PICTURE: This button
is for picture shooting.
~
~.~----------------------------------..
III
III
The steps of Installing the propeller protector
O.Put the blade protector over through the blade and fix it around the motor ensurf'! the
screw hole of the protector and the screw whole on the aircraft aligning.
8.Turn the screw from the spare parts package to fix the blade protector.
0.1nstall the other 3 blade protectors in the same way.
,:;;::::w,
A
J
O.Hold the aircraft (from bottom) in hand, move the throttle stick up slowly, the 4 blades
start to rotate and the rotating speed increases simultaneously, the aircraft should have
not obvious vibration . Move other sticks when the throttle stick is placed to middle
position, then the rotating speed changes.
0.Shake slighfly the aircraft when the throttle stick is placed to middle position and no
movement on the other sticks, there should be changes in the 4 blades' rotating speed.
(i).Pull the throttle stick to the bottom, disconnect the power of aircraft, turn off the
transmitter, the inspection is finished.
@iiij.m.u'
Mitwum
During inspection, if the aircraft doesn't react like above requirement,
please operate according to guidance in'maintenance'.
After assembling the blade protector, the flight time may be reduced.
(4)Appearance checking
II . BASIC FLIGHT CHAPTER
Please ensure the aircraft has complete appearance, no defect, no obvious deformation
on blades.
ASIC KNOWLEDGE IN FLIGHT
(S)Power-on inspection
--
O.Power on the transmitter.
Please replace the AA battery if there is no display on the transmitter screen while the signal
indicator light is on.
Please replace the AA battery if the battery mark on the transmitter flashes and alarms.
h1!tm1!1.I.i please
keep the throttle stick at bottom before switching on the transmitter, loosen the
other sticks , the function of stick's auto-return to center position can ensure the aircraft
being in best status.
8.0pen the battery cover on the aircraft. Connect the battery to the power socket on
the aircraft.
left
(!)Ieft
0.Then slide Li- Po battery into the battery compartment, close the battery cover.
~
0
9h~
I~
•
down
77TnTT"",rrr""""""N",,,,,,,,,,,,,,,,,,,,,,,,,
tail toward the controller
tail toward the controller
O.when the aileron stick moves leftward/rightward, 8.when the throttle stick moves up/down, the
the aircraft flies leftward/rightward simultaneously.
aircraft flies up/down simultaneously.
r.;.1!tm1!1.I.iAircraft must stay quiet for 3 seconds after powering on, it can not move until the signal
indicator light flashes quickly.
UP~
nght
~
~
--
-~
forward
backward
~
Power on the transmitter.
!I·~"\WJI.I Aircraft~
head
Ain:raft
lai
il
t
i'f
/1)<
0.when the rudder stick moves leftward/rightward,
the aircraft tums leftward/rightward simultaneously.
O.when the elevator stick moves up/down, the
aircraft flies forward/backward simultaneously .
•
I1II1
Nine
Eagles "
INSTRUCTION MANUAL
,= 11I11 )( 'I
,
•
~
"'''III'
IC: 1-1- 'J I':'
,..
~m1iJj[.],' Among above 4 actions, only in picture 4 , the aircraft head is leftward, the
others all occurred in condition that the aircraft tail all faces the controller,
you can assume what the pilot see in the aircraft. After the aircraft changes
its direction, the above reactions are correct for the aircraft itself, but there will
be changes for the operator on the ground. So the beginners should try best
to keep the aircraft's head direction , learn and observe the flight attitude of
the aircraft, experience the operation reaction of the aircraft and grasp the
operation skills gradually.
~~~i"tm1~~itl!!'.]II!!,IIA Because there is magnetic sensor in both transmitter and receiver. Please
keep away from the metal objects which is magnetic when flying, otherwise
it will cause out control of the aircraft or invalidation of some functions .
'2 . BASIC
FLlGH
--:..T
~
T,;;,.,,:,
RA
,-,-I-N,-,-,,- IN
..;;,.,:G
::=..--_ _ _ _ _ __
(1) Flying area
Choose a place suitable for flight , for example a big room without obstacles. For
beginners, if he/she wants to fly outside, it must be breezy and ensure no trees, electric
wires or other obstacles around .
(2) Flight training
O .After inspecting the aircraft and transmitter, power on the transmitter and aircraft.
f).Put the aircraft in front of you at about 2 meters with its tail facing to you .
@).Push the throttle stick gently but decidedly till it takes off. Hold the throttle in time after
take-off to control the flying altitude. The best altitude would be about 0.5 meter above
the ground . Pay attention to the status of aircraft, take necessary operation if needed
to keep the aircraft steady. If there is any instability, vibration or out of control, please
throttle back immediately for landing.
9. Beginners should focus on the altitude control , best to keep the aircraft flying at about
0.5 meters above the ground(almost the range betweeri knee and waist). Don 't fly it
lower than 0.3 meters, otherwise there will be ground effect caused by the propellers'
downward airflow which makes the flight unsteady, nor flying it too high to avoid crash
caused by faulty operation.
0 .when you are able to keep the flight altitude and control well the throttle for steady
take-off and soft landing, you can practice the direction control. Keep the tail always
facing to you .
(i). Flight skills: Pay close attention to the aircraft's pose. Move the corresponding sticks
to correct the bias at its first view.
rt.1ir:tjln.,iH
b:Stop flying and landing immediately when Li-Po battery is in shortage of power like:
it can fly only at the altitude lower than 0.5 meters. Don't fly it again before charging
the battery full .
U
'''111
"'''III'
IC"I-I- 'J I',~.
.,
, . 11)( 'I
~
Nine
Eagles R
INSTRUCTION MANUAL
1
f).Take out Li- Po battery immediately after flight, then turn off the transmitter.
@).If the aircraft crashes due to colliding with something during flight, pull the throttle
stick to the bottom to avoid any damage. Check whether there is damage on the aircraft
parts after crash .
9.Please take out the Li-Po battery from the aircraft and ensure the voltage of Li- Po
battery not lower than 3.85V if you don't use the aircraft for a long time, please also
take out the AA batteries from the transmitter.
(3)Brake function
Galaxy visitor 2 has brake function
For ordinary aircraft, when it flies towards one direction, for example when it flies forward, if
you put the transmitter aileron /elevator bar in the middle, the aircraft will keep on flying
forward a certain distance due to inertance before it changes to hover.
But for Galaxy visitor 2 which has the brake function, when you loosen the transmitter aileron
/elevator bar, Galaxy visitor 2 will stop flying forward immediately and change to hover at
once.
The brake function of Galaxy visitor 2 will largely reduce its chances to crash.
III. ADVANCED FLIGHT CHAPTER
L.CONVENTIONAL CONTROL MODE AND INTELLIGENT CONTROL MODE
Throughout history, after aircraft model receives
order from transmitter, the direction of its
movement is decided according to controller's
orientation in assuming he/she sits in the cabin
of the aircraft, so called this flight mode 'Pilot
dominated mode', or it can be called
'conventional control mode' as well. The flight
mentioned in the basic chapter is this kind
of conventional flight mode.
Take the aileron stick on the transmitter for
example , when the tail faces to controller, the
direction of the aircraft's movement is consistent
with that of controller's operation on the stick.
(As shown in picture C)
It changes when the aircraft changes its direction
in the air. If the aircraft flies with its head facing
to the controller, the aileron stick on the
(Picture C)
transmitter still moves leftward and rightward,
the action will not change in the direction of 'pilot dominated'. However, in the view of
the controller who is on the ground, the direction of model's movement and that of
controller's operation on the transmitter stick are reverse.
f:Jt------------t
III
Nine
Eaglesil\l
INSTRUCTION
MANUAL
I~_
III 11)( 'I " IC·I-I- II I' ., ,
•
The same operations on transmitter will have
different visual effects from aircrafts whose
direction are different.(As shown in picture 0)
The action change of pushing and pulling
elevator sticker is similar to that of aileron stick.
When the aircraft changes its pose in the air,
the aircraft's movement direction is changing
continuously in the view of controller. Thus the
controller should distinguish all the time the
pose of the aircraft in the air, he/she should
control the aircraft according to 'pilot dominated
mode'. This is relatively difficult for beginners,
especially it is more difficult to distinguish where
the head orients in the air for multi-copter whose
head and tail has no obvious difference . In
order to solve this problem, we provide one
solution which is particular with controller
dominating direction in flight control , it is
'controller dominated mode'.
..
,
,~_
.... ,
III 11)( 'I " IC·I-I- II I' .,
I~_ .
..
,
.... ,
,
~_
Nine Eagles
INSTRUCTION
MANUAL ®
~i(§jim.]i8After the aircraft turns left for 90 degrees, its head towards left. At this
movement direction
moment, the aileron stick moves left/right, the aircraft stili moves left/
right in the controller's view. So we call it 'Intelligent control mode'.
In the 'Intelligent control mode' , the controller doesn't need to attentively judge the
direction of the aircraft head, you can move the control stick to any direction if you want
the aircraft to fly toward that direction. Thus there is no longer the concept of 'aircraft
head', so it can also be called 'headless flying mode'.
~ilmlj[.le'When you are operating the aircraft in 'Intelligent control mode'. You should
hold well the transmitter by pointing generally the antenna to the aircraft in
flight, so that you would have better performance.
2_ THE SWIT...QH BETWEEN 2 CONTROL MODES
'+mtmjRThe aircraft 's moving direction is
reverse from that of transmitter's control bar.
(Picture 0)
movement direction
left__ ~ right
~
after the aircraft tums left for 90 degrees
• UN',,;; ;;,..
~ =. /'f
mode and intelligent control mode .(As shown in
Pilot dominated mode: When the aircraft flies in this mode , no matter to which direction
its head points , it will always move toward the controller's operation direction on the
aileron stick.(As shown in picture E)
»»;;;;;;;0"';,..
Power on the aircraft, press the AUX 1 button (for 1
second) and loosen it after the indication light changes.
You can then switch between conventional control
)))))))
picture F)
For beginners, we advise you to set the control mode
before flying instead of transferring it during flight.
(Picture F)
(1 ) Status of conventional control mode
When the model is in conventional control mode, the red indicator light is solid on,
the aircraft reacts to the control operation on transmitter on basis of the 'pilot' 's
fronUbacklleftlright direction .
(2) Status of intelligent control mode
When the model is in intelligent control mode, the red indicator light will flash quickly,
the aircraft reacts to the control operation on transmitter on basis of the controller's
fronUbacklleftlright direction.
~i@j1j[.],H During take-off in intelligent control mode, the direction of transmitter ' s
(Picture E)
•
antenna must face to the red indicator light in the aircraft tail , otherwise
the control direction may be changed to influence flight.
II
'1111
("'11111
"1.,'
IC--I-I-() I',.:.
-,
J
• )( 'I
..
Nine
Eagles R
INSTRUCTION MANUAL
("'11111
"1.,'
IC--I-I-() I',.:.
-,
J . )( 'I
..
R
Nine
Eagles
INSTRUCTION MANUAL
II
3_ SWITCH BETWEEN LOW RATE AND HIGH RATE
.•.-. -.
Throttle Trim Adjustment
roduct has low and high rate setting to meet needs of different level users.
•
...,
.-. -. -.
I'
TX<=
o
I_I I_I I J
_ _D~_ •
0
_ _D~_
i
TX<=
o
I_I I_I I_I
0
_~D_f) _~D_
Low rate
High rate
O.Power on the transmitter.
f).Check the currentsetting shown on the bottom of LCD screen in the transmitter,
whether it is high rate (full circle) or low rate (half circle).
O.Just press aileron stick one time, the rate will be changed with a sound.
If you are newly practicing flight, we advise you to choose low rate on which the
aircraft is easy to control.
When you have certain experience in flight, we advise you to try high rate, in
which the aircraft is sensitive and will bring you more fun.
For detailed rate setting, please refer to video website: http://www.nineeagle.com
I
Yaw(Rudder) Trim Adjustment
If while hovering, your aircraft's nose begins to rotate
when no yaw control input is being added, you will need
to adjust the yaw trim . If aircraft head rotates to the left,
push the yaw trim lever to the right until it stops. If nose
rotates to the right push the yaw trim lever to the left
until it stops .
When you can control the Galaxy Visitor 2 skillfully, you may need to control its
function more flexible. At this moment, you can try to turn off the acceleration
sensor on Galaxy Visitor 2' receiver via pressing the button AUX2 on the transmitter'
right corner. The red indicator light on aircraft' s tail will flash like "l)l),off for one
second,aa , solid on" , thus you have turned off the acceleration sensor.
When you need a stable flight performance, press the button AUX2 on the
transmitter' right corner. at this time the red indicator light on aircraft' s tail will
flash like "tltl,tltl, solid on" ,thus you have turned on the acceleration sensor on
the receiver.
r.ijit:1i\n.J.'The acceleration sensor on the aircraft' s receiver is default on.
S_TRIMMING
In the flight, if the aircraft drifts aside, you can adjust it through transmitter trim button
(except throttle trim).
http://www.nineeagle.com
For detailed control methods, please refer to video website:"""!'I-IIIII!"'!""!~_~
Before your first flight, make sure your trim levers are in the middle position
excluding the throttle trim. The throttle trim is required to always at bottom or the
aircraft blades won 't stop spinning when the throttle stick is pulled all the way back.
NOTE: The aircraft has a built in throttle fail safe. The aircraft propellers
will not turn on during initial power up unless the trim tab is below
center and the throttle stick is all the way back.
If the blades start to spin without adding any throttle or
if they do not spin when you do add throttle , your
throttle trim needs to be adjusted . If the blades start to
spin without any throttle, slide the throttle trim lever
down until they stop. If they do not spin, even when
you add throttle, please push the throttle trim lever
until the blade start spinning.
Pitch(Elevator) Trim Adjustment
~
If while hovering, your helicopter begins to move
forward or backward when no pitch control input is being
added, you will need to adjust the forward/back pitch
trim lever. If it moves forward, push the pitch trim lever
down until it stops . If it moves backward, push the pitch
trim lever up until it stops.
11
RoII(Aileron) Trim Adjustment
If your aircraft begins to move left or right when no roll
control is being added, you will need to adjust the roll
trim lever. If it moves left, push the roll trim lever to the
right till it stops . If it moves right, push the roll trim lever
to the left till it stops .
III
I
II
6.A~TO-RETURN ~
FU~N
~C
~T
~I~O~
N~~
________~
In Auto-Return process, the aircraft flies towards the antenna of the transmitter.(As
shown in picture H)
(1) What is 'Auto-Return' ?
Auto-Return means during flight, no matter where
7 .AIRCRAFT'S FLYING DIRECTION IN AUTO-RETURN PROCESS
¥-" ; ; : . /1'
For detailed control methods, please refer to video website: http://www.nineeagle.com
the aircraft is and what direction its altitude is, or
no matter in 'conventional 'or 'intelligent' control
mode, once you press the button AUX 1 quickly,
the aircraft will fly back to you immediately.
(2) When to use 'Auto-Return' function?
(Picture G)
When you find the aircraft is very far away
from you in flight and you can not see clearly its flight altitude to control it back, you
can press the button AUX 1 immediately, and then what you needs to do is just waiting
it flying back by itself. After switching to the 'Auto-Return' mode, the red signal light on
its tail flashes slowly.(As shown in picture G)
(3) Attentions when using 'Auto-Return' function
The aircraft's Auto-Return direction changes when the transmitter direction changes.
(Picture H)
O.Control the flight height to be obviously higher than the crowd.
@.The transmitter must face to the aircraft correctly. There should be no objections
between the aircraft and transmitter.
@l.When the aircraft flies over back to your head, you should turn round immediately.
You should still make the transmitter face to the aircraft. Otherwise the aircraft will go
on flying farther after passing your head .
9.'Auto-Return' function should be performed in large place like an area of lOmXIOm,
or even larger. So there would be enough time for you to enjoy the process of AutoReturn .
(4) Way to quit AUTO-RETURN
Method 1. At anytime during Auto-Return performance, once you move the elevator
or aileron bar obviously, the aircraft will quit the Auto-Return status. For
example, when it flies back, if you push the elevator bar quickly, the aircraft
will be controlled by you at once to be in former flight status.
Method 2: Press the button AUX 1 quickly.
8. WAYS TO TURN THE AIRCRAFT DURING AUTO-RETURN
During Auto-Return, you can turn the aircraft without control on the aileron bars or even
make the aircraft fly circle. You can turn the transmitter in regulars as shown in picture
above, avoiding the antenna pointing to the aircraft on purpose, so the aircraft can turn .
Suitable control on the direction of the transmitter can make the aircraft fly circle in the air.
During Auto-Return, we can amend the course of aircraft by turning the transmitter
horizontally. For example: If we turn the transmitter left, the aircraft will fly right; if we
turn the transmitter right, the aircraft will fly left.
When the aircraft flies to the designated place, press the button AUX 1 quickly, or rock
the aileron or elevator bar, then the aircraft will quit the Auto-Return mode and be back
into former flying mode.
~ilW1n.],H The aircraft has Auto-Return function in both conventional control mode
and intelligent control mode
II
II
1II
.HOW TO USE CAMERA
10. Setting picture/video function on other transmitters
(1' Installation of camera
t.ijltiUt."'When you are using other transmitters, the" headless mode
O.Fix rubber plug on the screw column in the bottom of the aircraft (As shown in picture I)
8.lnstall camera on the column with screw.( As shown in picture J)
@).Plug the camera's connection wire into the connector on the bottom of the aircraft.
(controller dominated mode)" and "auto-return function" etc
will not work on Galaxy Visitor 2.
'iur.titn.J.iWhen you are using other transmitters, the Aircraft Type must
be set as ACRO, never set mix-control mode.
(As shown in picture K)
When you are self-defining the picture/video button on the transmitter, it
must be in 5CH, 6CH, 7CH or 8CH. The self-define order: video function
button first, picture function button second.
t.ij1t§iUt."'Galaxy Visitor 2 supports the picture/video setting for below
equipment:
(Picture I)
(Picture J)
(Picture K)
O.NE J5 and J6 which is of same protocol as Galaxy Visitor 2.
8.0ther brands of transmitters above 6CH which use NE general link same
protocol as Galaxy Visitor 2.
(2' Use of photo and video shooting function
Mil9iU (.JiiWhen you are using the General
O .Ensure to plug the SD card into the camera.
8 .Turn on the transmitter, then power on the aircraft.
@).Press the button 'PICTURE ' on the transmitter, then the
----t:"""
camera will take a photo.
Operating process:
O.Press the button 'VIDEO' on the transmitter, then the
(1,Step into set mode
camera is in video shooting status, the indicator light
O.Power on the Galaxy Visitor 2 through connecting the Li-Po battery to
the receiver.
on the camera flashes constantly. Press again the
button, the indicator light is solid on , that means it has
Link, because of the difference
between different brands and types of transmitters, the
transmitter model data needs reset.
(Picture L)
quit the video shooting mode.(As shown in picture L)
O.Before taking out the SD card,ensure to quit the
camera mode,then cut off the power supply.
M"q... t.n,O. Ensure to operate like above,otherwise some functions may perform
abnormity.
8.For storage need, you should make the interval between making
two pictures no less than 2 seconds.
@).Ifthe SD card can not store data,plug it into the computer to format
it before use it again.
For detailed control methods, please refer to video website: http://www.nineeagle.com
8.Turn on the J5 or J6 transmitter, or connect the General Link to the
transmitter in normal way.Ensure it in normal work.
8.Push the throttle bar to OCto the bottom).
O. Push the aileron bar rightmost.
0.Ensure the Galaxy Visitor 2 has successfully bound with the
transmitter(When they are off binding, the red indicator light on the
aircraft' s tail will flash like ~--- ,~, ~, ~, ~.After successful binding, it will
turn solid on);
0.After about 2 seconds, loosen the aileron bar to middle position. At this
time, Galaxy Visitor 2 is in self-define mode.
II
II
(2)Operating steps
O.Setting the camera button: Dial the switch you want to set (it must be
two-position toggle switch, or two-position toggle among three position
toggle switch) for more than three times. If the button you want to set is
knob, please dial the knob for three times from smallest to biggest.
IV. MAINTENANCE
• STRUCTURES OF AIRCRAFT(EXPLODED VIEW)
8.Setting the picture button: Dial the switch you want to set (it must be
two-position toggle switch, or two-position toggle among three position
toggle switch) for more than three times. If the button you want to set is
knob, please dial the knob for three times from smallest to biggest.
In above operations, the final status of the appointed switch or knob is its
initial state.
(3)Quit setting mode
After above operations, push the direction bar leftmost, then it quits the self-define
mode, and you can take video or picture.
(4)Unlock setting
O.Power on the Galaxy Visitor 2 through connecting the Li-Po battery to
the receiver.
8.Turn on J5 or J6 transmitter, connect the General Link to the transmitter.
Ensure it in normal work.
8.Push the transmitter throttle bar to O( the bottom).
O .Push the aileron bar rightmost.
0 .Ensure the Galaxy Visitor 2 has successfully bound with the
transmitter(when the aircraft is off binding with the transmitter, the red
indicator light on its tail will flash like ~---,~, ~, ~, ~,after successful
binding, the light will turn solid on)
0.After 2 seconds, loosen the aileron bar to middle position. At this time,
Galaxy Visitor 2 is in Self-define mode.
8.Push the transmitter direction bar leftmost to unlock the button function
set.
$---f~ ,
~
~
~
$---f~' ~
~~
If
~
-tr
.,
m
, ,
~,
•
~
III
III
12. SPARE PARTS LIST
• BINDING BETWEEN AIRCRAFT AND TRANSMITTER
Name
No
Item No
01
02
NE400833
NE400654
blade protector
NE400804
NE400821
NE400822
NE400834
Frame
Frame
Frame
Frame
NE480268
NE400805
Receiver set
Red light clockwise motor
NE400806
NE400807
NE400808
Red light anticlockwise motor
Blue light anticlockwise motor
Blue light clockwise motor
NE400652
Rubber plug set
NE400810
NE480220
NE480305
NE400465
NE400653
NE400811
NE400823
NE480278
NE480269
NE480270
NE480146
Receiver holder set
Li-Po battery (300mAh)
Li-Po battery (350mAh)
03
04
05
06
07
08
09
10
11
12
13
14
Please operate like below to bind the aircraft and transmitter:
, t
blade
set(black and white)
set(black)
set(grey)
set(white)
.1/'
t
8. Power on the aircraft through connecting the Li-Po battery to the receiver, leave
the aircraft still. When the aircraft off binding with the transmitter, the red
indicator light on aircraft' s tail will flash like "~---,~,~,~, ~ " .when the
indicator light turn solid on, binding succeeds.
41itmlit•JI' During take- off, the transmitter antenna must point to the signal indicator
light on the aircraft's tail, otherwise it will cause big deviation to the headless
flight mode and auto-return function!
For detailed control methods, please refer to video website: http://www.nineeagle.com
Calibrating of transmitter: the transmitter has been calibrated before delivery from
factory. If you find any abnormity in its function, you can try to calibrate the transmitter.
Camera set
Screw set
For detailed operation methods, please refer to video website: http://www.nineeagle.com
Foot stool plastic pad set(black)
Foot stool plastic pad set(white)
• CALIBRATING OF THE ACCELERATION SENSOR
Transmitter ( FUTABAprotocol,white,MODE2 )
Transmitter ( FUTABA protocol,white and black ,MODE2 )
Transmitter ( FUTABA protocol,white and black ,MODEl)
USB charger
There is acceleration sensor setting on the receiver of the aircraft. Usually the
product has been finished calibrating and debugging before delivery from factory,
you can fly it once power on. However, if you find too big deviation during the flight,
you must calibrate the sensors to make it working in best status to gain the best
flight performance.
('i) Entry the calibration mode
5. CHECK BLADE J
Check blade rotating direction by following
"
"
O.Power on the transmitter, move the throttle stick to the lowest position and put the
transmitter 30CM away from the aircraft.
counterclockwise
clockwise
.~
the process shown in right picture after the
aircraft is repaired.
left
-=.
~..
~
counterclockwise
back
t
right
Firstly turn on the transmitter, then put the aircraft horizontally, and power it on. Press and
keep the right stick of transmitter down, then press the left stick continuously for three
times. At this time, the transmitter sounds '01', which means it enter calibration
mode, loosen the right stick(As shown in picture M).
(2) Calibration methods
Push the throttle trim button upward, at this time, the red signal indicator light flashes slowly,
the acceleration sensor is in calibrating status. When the indicator light flashes quickly,
the calibration is finished .(As shown in picture N)
III
III
(3) Quit calibration mode
Press the left stick, the transmitter sounds 'Oi' meaning have quit the calibration mode,
now you can fly. (As shown in picture 0)
v . SAFETY AND ENVIRONMENTAL PROTECTION
1. WARNING AND FCC INFORMATION
r---------------~
The Nine Eagles Galaxy Visitor 2 is not a tOy.Children under 14 years old are strictly
forbidden from flying this aircraft.
You must fly this aircraft safely.
~
When flying or preparing the aircraft for flight you should strictly adhere to the
instructions. Ensure that yours and other people's hands,and face are kept away
from the rotating parts.
Always unplug the aircraft battery before turning off the transmitter when the aircraft
is stopped .
(Picture M)
(Picture N)
(Picture 0)
Aircraft uses a lithium polymer battery.Always adhere to operating instructions for
the lithium polymer battery to avoid accidents such as combustion or explosion.
6. CALIBRATION OF GEOMAGNETIC SENSOR
When you find there is serious bias between the aircraft's back course direction and
transmitter antenna's reverse direction, the geomagnetic sensor may have been
carelessly magnetized, it is necessary to calibrate it. -http://www.nineeagle.com
7. GAINS SETTING
This product enables you to set the control gains as you like so that you could play your
control skill to the maximum and your flying needs will be well satisfied. Detailed setting
method video could be downloaded from Nine Eagles website: http://www.nineeagle.com
Always use a genuine Nine Eagles charger and power adaptor designed for this
aircraft.
Always unplug the charger and adapter from the electrical outlet after completion
of each charge.
Never overcharge the battery,avoid use in direct sunlight or near fire. Ensure the
battery is kept dry.
Never store or transport the battery with metal objects.
Never disassemble the battery.
Never use wet hands when in contact with the charger,battery or power adaptor.
8. ADJUSTMENT OF AUTO-RETURN SPEED
This products enables you to adjust the Auto-Return speed according to your needs.
For outdoor flight, In strong wind, it should return at high speed, for indoor flight, the speed
should be low. For detailed, please refer to the video at website: http://www.nineeagle.com
MIAil!t",gPlease connect the motor
wire correctly after repair.
i
A
FCC statement
1. This device complies with Part 15 of the FCC Rules . Operation is subject to the
following two conditions:
9. CONNECTING BETWEEN MOTOR AND CIRCUIT BOARD
• Connect the motor wire
A to the connector A on the PCB
• Connect the motor wire
B to the connector B on the PCB
• Connect the motor wire
C to the connector C on the PCB
• Connect the motor wire
o to the connector 0 on the PCB
When you fly the aircraft,keep distance from other electrical equipment,magnetic
objects,wireless devices.etc,to avoid interference and accidents.
o
O· This device may not cause harmful interference.
8.This device must accept any interference received, including interference that
may cause undesired operation.
2. Changes or modifications not expressly approved by the party responsible for
compliance could void the user's authority to operate the equipment.
NOTE: This equipment has been tested and found to comply with the limits for a
Class B digital device, pursuant to Part 15 of the FCC Rules. These limits are
designed to provide reasonable protection against harmful interference in a
residential installation.
III
Nine
Eagles
INSTRUCTION MANUAL
R
I~,
III 11)( 'I " IC·I-I'II' II II .,~_
•
.I,~ III·11)( 'I.. " IC·I-I·
'II' II II .,_
..
~
This equipment generates uses and can radiate radio frequency energy and,if not
installed and used in accordance w ith the instructions, may cause harmful
interference to radio communications . However, there is no guarantee that
interference will not occur in a particular installation. If this equipment does cause
harmful interference to radio or television reception , which can be determined by
turning the equipment off and on, the user is encouraged to try to correct the
interference by one or more of the following measures:
Warning
Charging and discharging the batteries has the potential for fire, serious injury fo
persons and damage to property. The user of this battery agrees to accept responsibility
for all such risks . Nine Eagles ®, its affiliates , distributors , and retail partners can
not control the use , application, charging or installation of this product and shall not
be held responsible for any accident, injury to persons, or damage to property resulting
from the use of this product. Read ali safety guidelines, charging instructions, and
battery disposal instructions before using batteries . Store battery packs out of the
reach of children and pets . Children under the age of 18 must be supervised by a
responsible adult. Children under 14 years of age should not be permitted to use this
product under any circumstances . This product contains no chemicals known to the
State of California to cause cancer, birth defects and other reproductive harm.
Reorient or relocate the receiving antenna .
Increase the separation between the equipment and receiver.
Connect the equipment into an outlet on a circuit different from that to which
the receiver is connected .
Li-Po battery warranty
Consult the dealer or an experienced radio/TV technician for help.
This product is warranted against defects in original material and workmanship
only. No term warranty is offered with this product. In no case shall Nine Eagles®
liability be greater than the actual retail purchase price of this product.
CE:2200
Specific safety guidelines
Instructions for disposal of WEEE by users in the european union
)1
This product must not be disposed of with other waste. Instead , it is
the user's responsibility to dispose of their waste equipment by
handing it over to a designated collections point for the recycling of
waste electrical and electronic equipment. The separate collection
and recycling of your waste equipment at the time of disposal will
help to conserve natural resources and ensure that it is recycled in a
manner that protects human health and the environment. For more
information about where you can drop off your waste equipment for
recycling , please contact your local city office, your household waste
disposal service or where you purchased the product
Li-Po battery safety guidelines
&
'~
t'J
Lithium Polymer batteries are Significantly more volatile than
alkaline or NiCd/NiMH batteries used in RC applications. All
manufacturer's instructions and warnings must be followed closely.
Mishandling of LiPo batteries can result in fire . Always follow the
manufacturer's instructions when disposing of Lithium Polymer
batteries.
If you are unsure of how to charge the battery included in this product, please seek the
advice ofyour local hobby shop.
The packaging and instruction manual contain important infonnation, please keep ~ forever.
------------------~~
Nine Eagles R
INSTRUCTION MANUAL
I
.1
O.Store in a fire proof container and charge on an open fire proof surface.
8.Charge in a protected area devoid of combustibles. Never leave the charging
process unattended .
8.ln the event of damage carefully remove the battery to a safe place to obs erve for
at least half an hour. Damaged batteries are likely to explode . Never attempt to
charge a damaged battery, no matter how slight the damage. Dispose of damaged
batteries as the instructions in part 'Disposal of Li-Po batteries'.
O.Only use the Nine Eagles balanced charger designed for this battery. Never use
chargers designed for Ni-CD batteries . If the batteries show any sign of swelling ,
remove them to a safe place outside as they could erupt into flames .
0 .MOST IMPORTANT - Never plug in a battery and leave to charge overnight.
S~rious fires have been resulted from this practice.
0 .00 not attempt to make your own battery packs from individual cells .
If the battery pack involved in a crash or is otherwise damaged
O .Remove the pack from the model.
8 .lnspect the pack for damage to the wiring or connections
8 .lf necessary, disassemble the pack and dispose of any damaged cells
Disposal of Li-Po batteries
O .Put the pack in a safe open area and connect a moderate resistance across the
cell terminals until the cell is completely discharged .
CAU nON : The pack may get extremely hot during discharge .
8 .Puncture the plastic envelope and immerse in salt water for several hours .
8.Placo In your regular rubbish bin .
~
II
V/hitp rind fj/;::Jr;k ----- N~~l/ F;:!5nion in th
Nine Eagles@
2
VISITOR
CiALAXY
\
(
4-~
,z,.
A<>;;::'
1111
,z,7
1111
Flying is a life style!
SHANGHAI NINE EAGLES ELECTRONIC TECHNOLOGY CO.,LTD
ADD:No.818,Fengrao Road,Malu,Jiading District,Shanghai,p.r:c.
Tel:0086-21 -52919366
Fax:0086-21 -52919361
httpj/W.WI.nineeagle.com
E-mail:[email protected]
Galaxy Visitor 2 24GHz 4CH
NE-MASFII Instruction Manual
F.~, FU~~
~
----,.
INSiDE
This model is compatible with
FUTABA FHSS 2.4GHz Transmitter