1
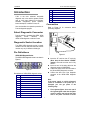
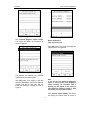
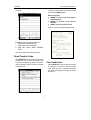
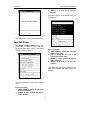
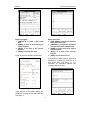
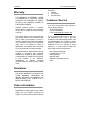
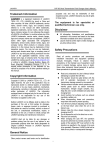
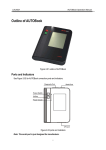
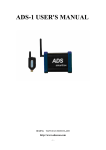
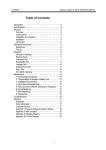
LAUNCH
X-431 Porsche Diagnosis
damages, losses, costs, or expenses incurred
by purchaser or third parties as a result of:
accident, misuse, or abuse of this unit, or
unauthorized modifications, repairs, or
alterations to this unit, or failure to strictly
comply with LAUNCH operating and
maintenance instructions.
Trademark Information
LAUNCH is a registered trademark of
LAUNCH TECH CO., LTD. (also called
LAUNCH for short) in China and other countries.
All other LAUNCH trademarks, service marks,
domain names, logos, and company names
referred to in this manual are either trademarks,
registered trademarks, service marks, domain
names, logos, company names of or are
otherwise the property of LAUNCH or its
affiliates. In countries where any of the
LAUNCH trademarks, service marks, domain
names, logos and company names are not
registered, LAUNCH claims other rights
associated with unregistered trademarks,
service marks, domain names, logos, and
company names. Other products or company
names referred to in this manual may be
trademarks of their respective owners. You may
not use any trademark, service mark, domain
name, logo, or company name of LAUNCH or
any third party without permission from the
owner of the applicable trademark, service
mark, domain name, logo, or company name.
You may contact LAUNCH by visiting Launch at
http:// www. cnlaunch. com, or writing to
LAUNCH, Xinyang Building, Bagua 4th Road,
Shenzhen, Guangdong Province, P. R. C., to
request written permission to use Materials on
this manual for purposes or for all other
questions relating to this manual.
LAUNCH shall not be liable for any damages or
problems arising from the use of any options or
any consumable products other than those
designated as Original LAUNCH Products or
LAUNCH Approved Products by LAUNCH.
General Notice
z
z
Other product names used herein are for
identification purposes only and may be
trademarks of their respective owners.
LAUNCH disclaims any and all rights in
those marks.
There is a possibility that this unit is
inapplicable to some of the vehicle models
or systems listed in the diagnosis section
due to different countries, areas, and/or
years. Do not hesitate to contact LAUNCH
if you come across such questions. We are
to help you solve the problem as soon as
possible.
Disclaimer
Copyright Information
z
z
Copyright © 2000 by LAUNCH TECH. CO., LTD.
All rights reserved. No part of this publication
may be reproduced, stored in a retrieval system,
or transmitted in any form or by any means,
electronic, mechanical, photocopying, recording
or otherwise, without the prior written
permission of LAUNCH. The information
contained herein is designed only for the use of
this unit. LAUNCH is not responsible for any
use of this information as applied to other units.
Neither LAUNCH nor its affiliates shall be liable
to the purchaser of this unit or third parties for
i
To take full advantage of the unit, you
should be familiar with the engine.
All
information,
illustrations,
and
specifications contained in this manual are
based on the latest information available at
the time of publication. The right is
reserved to make change at any time
without notice.
LAUNCH
X-431 Porsche Diagnosis
Table of Contents
Introduction............................................ 1
Select Diagnostic Connector.............. 1
Diagnostic Socket Location................ 1
Pin Definitions.................................... 1
Connection......................................... 1
Operation............................................... 2
Entering Function Menu..................... 2
Read Trouble Code............................ 4
Clear Trouble Code............................ 4
Read Data Stream ............................. 5
ii
LAUNCH
X-431 Porsche Diagnosis
11
12
13
14
15
16
Introduction
X-431 is the most advanced automobile
diagnostic unit in the world at present. Please
refer to X-431 User’s Manual for its features,
hardware configuration, printer operation,
button description, conditions for test, etc.
Manufacturer’s discretion
Manufacturer’s discretion
Manufacturer’s discretion
Manufacturer’s discretion
ISO 9141 L Line
Vehicle Battery Positive
Connection
Here we describe the operation procedure for
Porsche diagnostic program.
Refer to Figure 02 for connection before
performing diagnosis.
Select Diagnostic Connector
Porsche vehicle is equipped with OBDII-16PIN
diagnostic
socket.
Therefore,
select
OBDII-16PIN diagnostic connector for test.
Diagnostic Socket Location
The OBDII-16PIN diagnostic socket is usually
located in the cab under the instrument, but the
location may vary for different vehicle type.
Pin Definitions
Figure 02
OBDII-16PIN Diagnostic Socket
The OBDII-16PIN diagnostic socket is as shown in
Figure 01.
z Insert the CF card into the CF card slot,
(Note: keep the face labeled “UPSIDE”
upward), and make sure the card is fully
seated.
z Insert one end of the main cable into the
diagnostic socket on SMARTBOX.
z Connect the other end of the main cable to
the [Smart OBDII] diagnostic connector.
z Connect the other end of the diagnostic
connector to the 16PIN OBDII diagnostic
socket.
Figure 01
PIN definition of 16PIN OBDII diagnostic socket
PIN
Definition
1
Manufacturer’s discretion
2
SAE J1850 Line (Bus +)
3
Manufacturer’s discretion
4
Chassis Ground
5
Signal Ground
6
Manufacturer’s discretion
7
ISO 9141 K Line
8
Manufacturer’s discretion
9
Manufacturer’s discretion
10 SAE J1850 Line (Bus -)
Note:
If the power supply on vehicle diagnostic
socket is insufficient or the power pin is
damaged, you can get power in the
following ways:
♦ From cigarette lighter: insert one end of
the cigarette lighter cable into the lighter
socket in vehicle and connect the other
end to the power connector of X-431
1
LAUNCH
X-431 Porsche Diagnosis
main cable.
♦ [START]: to start diagnosis.
♦ From battery: clamp the two clips of
battery cable on the positive and
negative poles of battery and insert
another end of the cable into the power
connector of X-431 main cable.
Click [START] button, the screen will display
the vehicle make menu as shown in Figure
04.
♦ From power adapter: connect the power
adapter to the 100-240V AC outlet with
power cord. Insert the 12V DC plug of
power adapter into the power connector
of X-431 main cable.
Operation
Entering Function Menu
After connection, press [POWER] key to start
X-431.
After starting the main unit, press [HOTKEY] (or
click [Start] button on the main menu, and
select [GAG]→[GD Scan] on the pop-up menu).
The screen will display the home page of
vehicle diagnosis as shown in Figure 03.
Figure 04
Button descriptions:
♦ [BACK]: to return to the previous
interface.
♦ [PAGE UP]: to display the previous page,
it is inactive if the current page is the
first page.
♦ [PAGE DOWN]: to display the next page,
it is inactive if the current page is the
last page.
♦ [HELP]: to display the help information.
Click the icon of Porsche on the vehicle make
menu. The screen as shown in Figure 05 will
appear.
Figure 03
Button descriptions:
♦ [QUIT]: to exit the diagnostic program.
♦ [BOX INFO.]: to display hardware and
software version of SMARTBOX.
♦ [HELP]: to display help information.
2
LAUNCH
X-431 Porsche Diagnosis
Figure 05
Figure 07
Click [Porsche Diagnose System V10.02].
The screen will display the information as
shown in Figure 06.
Button descriptions:
[OK]: to go on the test.
Click [OK] button. The screen will display the
following menu. See Figure 08.
Figure 06
The software can diagnose the electronic
control systems of Porsche vehicle.
Figure 08
Click [OK] button. X-431 begins to reset and
check the SMARTBOX, and load the diagnostic
program from the CF card. After that, the
screen will display the message as shown in
Figure 07.
Note:
If you are not sure where the diagnostic
socket is located, please click [Diagnostic
socket location]. An illustration with a
blinking icon will appear on the screen to
show where the diagnostic socket is. Click
the blinking icon to get further details.
Click [Porsche Engine System]. The screen
will display the function menu as shown in
3
LAUNCH
X-431 Porsche Diagnosis
Figure 09.
If printer is ready, the test result can be printed
out by clicking [PRINT] button.
Button description:
♦ [HOME]: to return to the home page of
vehicle diagnosis.
♦ [BACK]: to go back to the previous
interface.
♦ [PRINT]: to print out the test result.
Figure 11 shows an example of printed report.
Figure 09
The following functions can be performed:
1. Read trouble code (READ DTC).
2. Clear trouble code (CLEAR DTC).
3. Read data stream (READ CURRENT
DATA).
Here we describe the functions one by one.
Read Trouble Code
Figure 11
Click [READ DTC] in the function menu shown
in Figure 09. X-431 starts to read trouble code.
The screen will display the result if the code is
read successfully. Figure 10 shows an example
of the test result.
Clear Trouble Code
Click [CLEAR DTC] in the function menu shown
in Figure 09. X-431 starts to clear the trouble
code. When the code is cleared successfully,
the screen will display the message as shown
in Figure 12.
Figure 10
4
LAUNCH
X-431 Porsche Diagnosis
♦ [BACK]: to go back to the previous
interface.
As shown in Figure 14, the selected items will
be highlighted.
Figure 12
Click [OK] button to return to the function menu.
Read Data Stream
Click [READ CURRENT DATA] in the function
menu shown in Figure 09. The screen will
display the data stream menu of the tested
vehicle as shown in Figure 13.
Figure 14
Button description:
♦ [PAGE DOWN]: to display the next page
of data stream items.
♦ [OK]: to display the live value of the
selected data stream items.
♦ [HOME]: to return to the home page of
vehicle diagnosis.
♦ [BACK]: to go back to the previous
interface.
Click [OK] button. The screen displays the live
value of the selected data stream items. See
Figure 15.
Figure 13
Click one or more items to select what you want
to see.
Button description:
♦ [PAGE DOWN]: to display the next page
of data stream items.
♦ [HOME]: to return to the home page of
vehicle diagnosis.
5
LAUNCH
X-431 Porsche Diagnosis
Figure 15
Figure 17
Button description:
♦ [GRAPHIC-1]: to graph a data stream
item.
♦ [HOME]: to return to the home page of
vehicle diagnosis.
♦ [BACK]: to go back to the previous
interface.
♦ [PRINT]: to print the test result.
Button description:
♦ [PAGE DOWN]: to display the waveform
of next data stream item.
♦ [GRAPHIC-2]: to display the waveforms
of 2 data stream items simultaneously.
♦ [HOME]: to return to the home page of
vehicle diagnosis.
♦ [BACK]: to go back to the previous
interface.
♦ [PRINT]: to print the test result.
Figure 16 shows an example of printed report.
In the interface of single waveform display, click
[GRAPHIC-2] to display the waveforms of 2
data stream items. See Figure 18. It is
convenient for comparison between two
correlative data stream items.
Figure 16
In the interface of data stream display, click
[GRAPHIC-1] to graph the first data stream item.
See Figure 17.
Figure 18
6
LAUNCH
X-431 Porsche Diagnosis
Note:
♦ The screen will display the live value of
data stream again if the [DIGITAL] button
is clicked in the interface.
♦ The three display modes -- [DIGITAL],
[GRAPHIC-1] and [GRAPHIC-2] can be
switched in turn.
7
LAUNCH
Warranty
THIS WARRANTY IS EXPRESSLY LIMITED
TO PERSONS WHO PURCHASE LAUNCH
PRODUCTS FOR PURPOSES OF RESALE
OR USE IN THE ORDINARY COURSE OF
THE BUYER’S BUSINESS.
X-431 Porsche Diagnosis
information:
1. Quantity
2. Part number
3. Item description
Customer Service
LAUNCH electronic product is warranted
against defects in materials and workmanship
for one year (12 months) from date of delivery
to the user.
If you have any questions on the operation of
the unit, please contact us:
Tel: 86-755-82269474,
Fax: 86-755-82264570,
E-mail: overseasales @ cnlaunch. com.
This warranty does not cover any part that has
been abused, altered, used for a purpose other
than for which it was intended, or used in a
manner inconsistent with instructions regarding
use. The exclusive remedy for any automotive
meter found to be defective is repair or
replacement, and LAUNCH shall not be liable
for any consequential or incidental damages.
If your unit requires repair service, return it to
the manufacturer with a copy of the sales
receipt and a note describing the problem. If the
unit is determined to be in warranty, it will be
repaired or replaced at no charge. If the unit is
determined to be out of warranty, it will be
repaired for a nominal service charge plus
return freight. Send the unit pre-paid to:
Final determination of defects shall be made by
LAUNCH in accordance with procedures
established by LAUNCH. No agent, employee,
or representative of LAUNCH has any authority
to bind LAUNCH to any affirmation,
representation, or warranty concerning
LAUNCH automotive meters, except as stated
herein.
Disclaimer
THE ABOVE WARRANTY IS IN LIEU OF ANY
OTHER WARRANTY, EXPRESSED OR
IMPLIED, INCLUDING ANY WARRANTY OF
MERCHANTABILITY OR FITNESS FOR A
PARTICULAR PURPOSE.
Order Information
Replaceable and optional parts can be ordered
directly from your LAUNCH authorized tool
supplier. Your order should include the following
Attn: Overseas Department
LAUNCH TECH. CO., LTD.
Xinyang Building,
Bagua 4th Road,
Shenzhen, Guangdong Province,
China