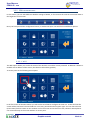
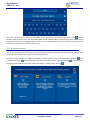
1
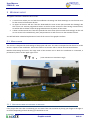
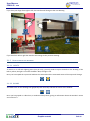
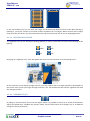
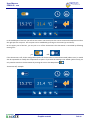
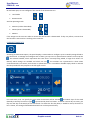
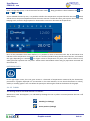
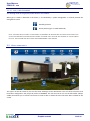
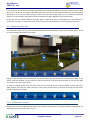
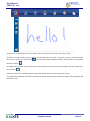
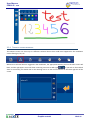
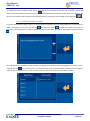
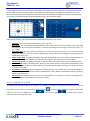
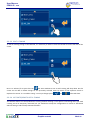
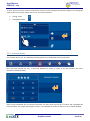
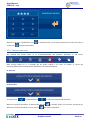
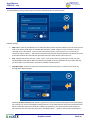
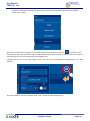
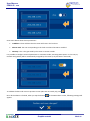
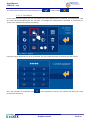
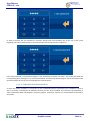
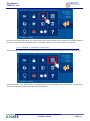
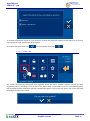
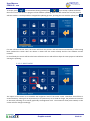
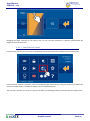
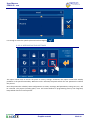
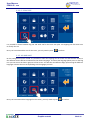
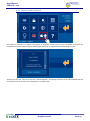
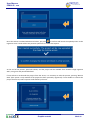
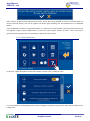
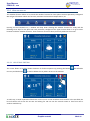
Graphic controls PPKL4-G V2.8 USER MANUAL Parque Tecnológico de Asturias, Parcela 50, 33428 Llanera – Asturias - Spain Tel (+34) 985 118 859 Fax (+34) 984 283 560 [email protected] www.ingeniumsl.com TECHNICAL SERVICE Tel (+34) 985 113 339 [email protected] USER MANUAL PPKL4-G - V2.8 Index 1 General description ______________________________________________________________ 2 2 Technical Description _____________________________________________________________ 3 3 Working mode __________________________________________________________________ 4 3.1 3.1.1 3.1.2 3.2 3.2.1 3.2.2 3.3 3.3.1 3.3.1 3.3.2 3.3.3 3.3.4 3.3.5 3.3.6 3.4 3.4.1 3.4.2 3.4.3 3.4.4 Main screen _______________________________________________________________________ 4 Navigation from one drawing to another ________________________________________________________ 4 Usual icons on the drawing ___________________________________________________________________ 5 Upper events rail __________________________________________________________________ 11 Run an event _____________________________________________________________________________ 12 Event configuration ________________________________________________________________________ 12 Lower control rail __________________________________________________________________ 14 Whiteboard for notes ______________________________________________________________________ Technical alarms warnings __________________________________________________________________ Timings __________________________________________________________________________________ Intrusion Alarm ___________________________________________________________________________ Presence simulation _______________________________________________________________________ PPKL configurations ________________________________________________________________________ Weather forecast __________________________________________________________________________ 14 16 18 21 22 23 38 Recovery screen ___________________________________________________________________ 39 Reboot panel _____________________________________________________________________________ Wifi settings ______________________________________________________________________________ Synchronize ______________________________________________________________________________ Restore factory settings_____________________________________________________________________ Graphic controls 1 de 41 40 40 40 40 USER MANUAL PPKL4-G - V2.8 1 G ENERAL DESCRIPTION PPKL4-G is a colour touch screen, size 4,3”.It allows monitoring and control of the KNX home automation system. It is simple, quick and intuitive thanks to the icons on 3D drawings or photographs. It also includes a web server to manage the installation in remote or local mode, via Smartphone, Tablet or PC. It has a configurable Wi-Fi connection which makes it possible to connect to the net for different purposes such as live updating of the software version or showing the weather information of previously configured locations. It incorporates events’ edition, allowing the user to add new events/scripts to the already existing ones (included in SIDE) by using the status of the different nodes associated to the icons of the installations’ drawings. It also allows to control the technical alarms of the installation such as flood, gas, fire, etc., as well as the management of the intrusion alarm by a 4 characters code. It also can simulate real presence, program yearly temporizations, graphic whiteboard for notes, weather forecast, etc. Graphic controls 2 de 41 USER MANUAL PPKL4-G - V2.8 2 T ECHNICAL D ESCRIPTION 4,3" COLOR CAPACITIVE TOUCH SCREEN - Resolution: 800 x 480 pixels - Colors: 18 bits - Supply - 29 Vcc from auxiliary power supply. - Consumption - Auxiliary Power Supply 18-30Vdc o 250 mA from auxiliary power supply. o 1mA from KNX BUS - Size – 129x88x4mm (13 mm depth). - Mounting: o Surface. Flush mounting with box (included) o On universal distribution box, screwed on wall o Easily mounting on plasterboard wall Graphic controls 3 de 41 USER MANUAL PPKL4-G - V2.8 3 W ORKING MODE The graphic interface is divided in three zones: A central zone where you can find the installation’s drawings. On these drawings we can find the icons for the control of the diverse devices. An upper rail that we will see if we slice downwards the main screen (the one with the drawings). On this rail we can activate programmed events as well as create new ones. After having created events, we will be able to delete or edit the programmed events by means of the screen. A lower rail that we will see if we slice upwards the main screen (the one with the drawings). On this rail we can access to the whiteboard, yearly temporizations as well as access to the weather forecast. You will find below a detailed explanation of each of the zones of this graphic interface. 3.1 M AIN SCREEN This screen is composed of the drawings of the project and icons. The icons correspond to the devices or to the devices’ outputs of the installation. These icons allow us to monitor and to control the associated devices. Besides the drawings and icons, the range level of the wireless net to which the installation is connected, is permanently shown on the upper right corner. (From maximum to minimum range) 3.1.1 NAVIGATION FROM ONE DRAWING TO ANOTHER If the project has more than one drawing you can move from one to another by slicing your finger to the right or to the left, depending of which drawing you would like to see. Graphic controls 4 de 41 USER MANUAL PPKL4-G - V2.8 If you slice your finger from right to left, the interface will change to the next drawing. If you slice from left to right the interface will change to the previous drawing. 3.1.2 USUAL ICONS ON THE DRAWING 3.1.2.1 LIGHTS To switch on or off each lighting point (one per one), you only need to tap on the bulb on the drawing. If the bulb is yellow, the light is on and if the bulb is blue, the light is off. Once you have taped the system will address the command and the associated status of the output will change. 3.1.2.2 BLINDS The blinds icons on the drawings will graphically and numerally indicate the status of the window. Once you have taped on a blind icon, a window will drop down, giving us information about the window’s status and a value in %. Graphic controls 5 de 41 USER MANUAL PPKL4-G - V2.8 In this new window you can slice with your finger on the blind and adjust the level of the blind (raising or lowering it, just by the contact to the screen and the movement of your finger). When the user lifts his finger from the screen, the level is set, the window will close and the actuator will act on the corresponding output. 3.1.2.3 LIGHTING REGULATION The regulation icons on the drawings indicate graphically as well as numerically the value (in percentage) of the lighting. 100% 60% 0% 30% By taping on a regulation icon, a box will appear where you can see the status of the associated circuit. On this new box you can adjust the light intensity. You only need to slice your finger upwards or downwards on the screen. Once you lift your finger the light intensity is set, the window will close and the regulator will show the changes just done. 3.1.2.4 THERMOSTAT(KT) By taping on the thermostat icon a box will appear where it is possible to switch on or switch off thermostat, adjust the temperature, establish the function mode, check historical data and configure up to 10 different timings for chrono-thermostat. Graphic controls 6 de 41 USER MANUAL PPKL4-G - V2.8 In the middle part of the box you will see two values. On the left part the current measured temperature and on the right part the set-point. This set point can be modified by pressing on the arrows (up and down). On the upper part of the box, you can put on or off the thermostat. The thermostat is controlled by following moving icon: On: Off: If the thermostat is off, all the configurable options of the thermostat remain deactivated (White icons). It would also be impossible to modify the temperature set point. If you wish the settings to be edited (yellow icons) you only need to switch on the thermostat by moving the icon to the ON position: . Thermostat off, example: Graphic controls 7 de 41 USER MANUAL PPKL4-G - V2.8 On the lower part, we can configure if the control of the thermostat is in Local mode Remote mode And the operating mode: Summer (Cold is demanded) Winter (Heat is demanded) Mixture If the images on the icons are white it means that the function is deactivated. If they are yellow, it means that the function is active and it is working in this moment. CHRONOTERMOSTATS Accessing to thermostats option, the panel displays a new window to configure up to 10 weekly timings linked to the thermostat. To manage and configure each of them, just tap over its representative numbers on the top line . The selected number, which represents the scene that is currently being edited, is larger than others. To identify which timings are enabled and which are not , the numbers are represented in white when chronotermostat is not active, and is shown in yellow when if it is. To enable or disable simply check or uncheck the box provided for this purpose in the left upper corner. For each scene, user can specify the time when thermostat will be activate and which days of the week (Monday to Sunday from left to right) represented by their first letters. To add or remove days to scene, just tap over the day of the week you are interested. If it shows the first day letter, it would be active, whereas if a bar is shown, the timing will be disabled and will not run that particular day. Graphic controls 8 de 41 USER MANUAL PPKL4-G - V2.8 Other configurable point, is the thermostat function mode , mix or Off . , being possible to select between cold , hot As last editable element by user, it is possible to define the temperature set point linked to the scene which will be the net set point temperature when the scene executes. To edit this value, just tap over the number and, keeping touch, move the finger upward or downward to increase or decrease the temperature. Once all the parameters have been defined, it is possible to check a horizontal color bar at the bottom that indicates which temperature set point for the next 24 hours (00:00 h being the left end of the bar, and 23:59 h the right) depending on schedules . For higher values of temperature set point, color will be nearest to red, while green will represent low set points. Yellow means intermediate values and gray represents time with the thermostat off. HISTORICAL DATA In the right upper corner, this icon gives access to a historical of temperatures measured by the thermostat, presented in a graphic displayed in a new window. In this new interface, we can check information on a daily, weekly or monthly graphic. User can define the period just selecting the mode in the bottom of the graph. 3.1.2.5 FLOOD The working mode for the flood detector is as follows: Whenever a water leak happens, it is indicated by showing the icon in yellow. In neutral position the icon is off (blue colour) Stand by (no leakage) Active position (leakage) Graphic controls 9 de 41 USER MANUAL PPKL4-G - V2.8 It is not possible modify the status of the icon by pressing on it; the icon will not change its status. It will only change its status if it detects leakage or not. 3.1.2.6 PRESENCE SENSORS Stand-by Active detector This icon is used to show the status of the presence detectors of the installation. Switch on detector : This icon is used to switch on manually the detector. It means that if you press on this icon the SRBUS will detect any movement and will work normally. Switch off detector : This icon is used to switch off manually the detector. It means that if you press on this icon the SRBUS will not detect any movement and consequently will not work. Graphic controls 10 de 41 USER MANUAL PPKL4-G - V2.8 3.1.2.7 GAS, FIRE OR SMOKE The working mode of the gas/fire/smoke detector is as follows: When gas or smoke is detected in the house, it is indicated by a yellow extinguisher. In neutral position the extinguisher is blue. Stand-by position. Active position (gas or smoke detected) NOTE: FOR GAS/FIRE DETECTORS IT IS NECESSARY TO PROGRAM THE RELEASE AND THE END OF DETECTION IN THE ACTIVATION AND DEACTIVATION SCRIPTS IN ORDER TO ENSURE THAT THE ICON WILL CHANGE ITS STATUS WHEN IT DETECTS. FOR LEAK AND BUS DETECTORS THIS PROGRAMMING IS NOT NEEDED. 3.2 U PPER EVENTS RAIL The upper rail will be visible if you slice the main drawings screen downwards. This rail shows all events that have been configured in the project by means of SIDEKNX. This rail also has an icon on the left border (always visible) that allows you to create new events as well as edit or delete the ones that have been created on the screen. Graphic controls 11 de 41 USER MANUAL PPKL4-G - V2.8 3.2.1 RUN AN EVENT To run an event that have been edited on the screen you will need to go to the last positions (on the right) of the rail. That is where you can find the events that have been programmed by the user. Once you have found it, you only need to tap on the icon. 3.2.2 EVENT CONFIGURATION To edit a new event we should tap on the following icon (left on the upper rail) This window serves to configure events. , a new window will open. You can see in the window displayed a list on the left side with the events saved in memory. From this window you can add more events, delete and edit existing (only events which have been created from the touch screen). 3.2.2.1 ADD AN EVENT Taping on the icon for adding a new event , a keyboard will be shown on the screen. We should use this keyboard to name the new event. Afterwards we will be able to link the event with icons and the corresponding status. Graphic controls 12 de 41 USER MANUAL PPKL4-G - V2.8 3.2.2.2 DELETE AN EVENT By taping on the delete icon configured on the screen) , we can delete the selected event (only those events that have been 3.2.2.3 EDIT AN EVENT Through this icon we will access to the events configuration of our PPKL4-G , we will be able to modify those events that have been previously created on the graphic interface. The events list appears on the left side of the screen. We only need to tap on it. On the lower horizontal rail the icons are shown. Once we are in the event we will be able to add or eliminate icons. If you wish to add scripts to an event, you only need to drag and drop the corresponding icons from the lower rail to the icons box in the upper right part. If you are interested in deleting a script, you will only need to tap on the icon and then press on the delete button . Graphic controls 13 de 41 USER MANUAL PPKL4-G - V2.8 If you add icons, the status of the output connected to the icon will be linked to the event. It means that in case the event is executed, the devices will adopt the status they had in the moment that the event was edited. Selecting an icon in the list and pressing on pencil icon you can change status icon for actuators, blinds and dimmers. A new window is displayed to do that and what it displays depends on the selected icon. During the events’ edition, PPKL4-G will only allow to add icons that are represented on the drawings as mentioned in section 3.1 of this manual and only in the status they had when they were linked to the event. 3.3 L OWER CONTROL RAIL You will see the lower rail if you tap and slice upwards the main drawings’ screen. So you will be able to access to all functionality described in this section. Taping on the available icons on the lower rail, new windows will drop down with its own functionality. If you wish to close the window you only need to confirm the actions in the drop down window or you can tap again on the same icon you used to open. To make out which option from the lower menu we are working, all icons will be redraw in black and white, while choosen tool from the menu will stay in color. Next picture shows an example choosing the sixth menu option (adjustments for PPKL). 3.3.1 WHITEBOARD FOR NOTES PPKL4-G has a touch whiteboard that allows you to draw or to take notes. If you have used the whiteboard you will see a notice on the main users’ screen. Graphic controls 14 de 41 USER MANUAL PPKL4-G - V2.8 To access to the whiteboard you should tap on the icon located on the lower rail of the screen. To draw or to take a note you only need to slice the finger on the screen. If you wish to erase, you should select the eraser, see icon on the left side below the eraser) . To erase the whole whiteboard please select the bin icon (located . To validate the note and return to the main screen please press on the tick icon located in the lower left corner of the screen . If there is a note on the whiteboard the system will always show a notice on the main screen. The graphical whiteboard also allows to choose the width and the colour of the line to get a more graphical and attractive result. Graphic controls 15 de 41 USER MANUAL PPKL4-G - V2.8 3.3.1 TECHNICAL ALARMS WARNINGS The PPKL4-G screen can show up to 5 different technical alarms that could have happened in the installation such as flood, gas, fire, etc. Whenever a technical alarm is triggered in the installation, the appropriate warning icon on the main screen will blink, and the right upper corner will show a warning icon next to Wifi signal . If you wish to know which alarm is concerned, you should click on the warning icon or on the concerned icon on the lower right bar of the screen. Graphic controls 16 de 41 USER MANUAL PPKL4-G - V2.8 To confirm that we have been made aware of the alarm’s warning and to stop the icon to blinker, you should press on the delete button of the central part , located between the alarms’ arrows in the vertical rail. If you do not want to delete the warning you should press on the confirmation icon located on the right side . 3.3.1.1 NOTIFICATIONS VIA MAIL From the main technical alarms menu, it is also possible to configure up to 10 email addresses to send technical alarm notifications. To do that, tap the icon and select the option to add a new email to the mail list, using the screen keyboard. To remove an address from list, just select the specific mail address and tap the icon . For each alarm, it is possible to link IP cameras, sending pictures with the mail warning when the alarm is shoot. Tapping this icon , user will access to a new interface where he can choose which ip cameras from project he wants to link to each alarm. Just mark or unmark each IP camera to link them to the selected alarm. Graphic controls 17 de 41 USER MANUAL PPKL4-G - V2.8 3.3.2 TIMINGS The timings allows you to program date and hour you wish the PPKL4-G to execute some of the events from its memory. The timings can be programmed yearly. To access to the timings menu press on the icon shown below. This icon is located in the lower right bar of the screen. The initial timings screen display a list with the timings saved. From this screen you can select add and modify the timings, touching on plus sign, bin and pen respectively icons. You also can enable or disable one timing touching on the corresponding check box. 3.3.2.1 ADD A TIMING When you press the plus sign the follow screen is displayed to you select the event. You must first select the event and then press on the tick button to access to the following step or press on Graphic controls to cancel. 18 de 41 USER MANUAL PPKL4-G - V2.8 If you accept the event a new windows is displayed . First of all you must set the time you whish for the event be executed. Touch on the upper right corner where the selected hour is displayed to change the hour, and touch on bottom right corner where the selected minutes are displayed to change the minutes. After pressing on this zones a numerical keyboard will drop down to let you introduce the data. After setting the time you can now set other repetition parameters in this screen: Add year: The event will be executed every day of the year. Add month: The event will be executed all days of the month selected on the calendar on the right side. For instance if we have chosen the May 21st, PPKL4-G will configure the timing for all days from the 1st to 31st of May. Add week day: The event will be executed on a certain day (the one chosen on the calendar on the right). For instance if we have selected a Wednesday in May, PPKL4-G will configure the timing for every Wednesday of the year. Add a certain date: Using this option the timing will be executed only on the date we have selected. For instance if we have selected May 21st, PPKL4-G will configure the timing only the 21st of May. Delete year: Deletes the timing of all days of the year. Borra la temporización de todos los días del año. Delete month: Deletes the timing from all days of the month we have selected on the calendar on the right. For example if we have selected May 21st, PPKL4-G will eliminate the timing for all days from the 1st till the 31st of May. Delete day of the week: With this option we delete the even on a certain day of the week throughout the year. For example if we have selected a Wednesday in May, PPKL4-G will delete the timing for every Wednesday of the year. Delete date: We delete the event only for the selected date. For instance if we have selected May 21st, PPKL4-G will delete the timing only for the 21st of May. 3.3.2.2 ELIMINATE A TIMING To eliminate an existing timing on the PPKL4-G, it is necessary to select it first from the vertical list on the left side of the screen. Once it is selected we press the icon confirm if we want to delete the timing selected event not the checked ones. , a confirmation message will appear. We should or cancel the action Graphic controls .. It deletes the previous 19 de 41 USER MANUAL PPKL4-G - V2.8 3.3.2.3 EDIT A TIMING To edit an existing timing on the PPKL4-G, it is necessary to select it from the vertical list on the left side of the screen. Once it is selected, if we press the icon , the same window we use to add a timing will drop down. On this screen we can add or delete timings for the previously selected event by means of the repetition levels as explained in section “3.3.3.1 Add a timing”. To accept changes press or to discard them. 3.3.2.4 ACTIVATE/DEACTIVATE A TIMING The PPKL4-G allows to activate/deactivate a timing without deleting it. This option is interesting when you need a timing not to be temporary executed, but you would like to keep the configuration to recover it afterwards without having to edit all steps mentioned before. Graphic controls 20 de 41 USER MANUAL PPKL4-G - V2.8 To do it, you only need to check or uncheck the icon left to the timing on the vertical timing list. To change the status of the icon you just need to press on it. The status would be: Timing active Timing deactivated 3.3.3 INTRUSION ALARM The intrusion alarm icon, see marked icon below, allows us to set/disable the intrusion alarm. Once we have pressed the icon, a numerical keyboard is shown in order to let you introduce the users’ password: 1234 (by default) After having introduced the 4-carachters password, you only need to press Ok to confirm and set/disable the intrusion alarm. The system will change its status; if it is disabled, it will be set and if it is set, it will be disabled. Graphic controls 21 de 41 USER MANUAL PPKL4-G - V2.8 When the intrusion is disabled the icon set the icon is statically shown on the lower horizontal rail. Once the alarm is will continuously blink. 3.3.4 PRESENCE SIMULATION The marked icon below allows us to activate/deactivate the presence simulation in the house. After having clicked on it, a message will be shown asking if you want to confirm or cancel the activation/deactivation of the presence simulation. It is shown here below: To activate: To deactivate: To accept press or otherwise press to cancel the activation/deactivation. When the presence simulation is deactivated, the icon When the presence simulation is active, the icon is statically shown on the lower horizontal rail. will continuously blink. Graphic controls 22 de 41 USER MANUAL PPKL4-G - V2.8 3.3.5 PPKL CONFIGURATIONS In this section, you can edit different editable settings of PPKL4, as for instance the internet connection data or the brightness of the screen. Once you have pressed the configuration button, a window will open. You will find nine different options. 3.3.5.1 WI-FI The WiFi option allows you to edit the name of the wireless net and the access password. In addition it allows to establish the IP address of the screen, the subnet mask and the gateway. To access press on the following menu option: In the first screen of the WiFi edition you will see the text fields to configure the local net. To this local net the screen will be connected. The text fields are: net name, password and encryption type. You can also tick an AP (Access Point) field to create an own wireless net for the screen and so devices as PCs, tablets or Smartphones can connect directly to the screen without an access point. Graphic controls 23 de 41 USER MANUAL PPKL4-G - V2.8 To edit the fields you only need to tap on it and use the keyboard that will drop down. Editable settings: SSID: Public name of the Wireless net to which the PPKL will be connected. When user taps over the ssid field, a list will be shown whit all available Wifi networks in PPKL range. For each network in the list, coverage level is also shown. In case of active AP (Access Point), in the shown list, it is necessary to choose the option “Other…” and edit the network name with the shown keyboard. This will be the name of the Wifi network that the PPKL will generate and which other devices will connect to. Pass: Password of the wireless net. Leave “none” if you do not want any password. In case you have selected AdHoc (and WEP or WPA) it will be the password of the net generated by the screen and that you will need to introduce when you wish to establish communication. Encryption type: It allows to select the characteristics of the encryption to connect to the local net through WiFi: WEP and WPA... Choosing AP (Access Point), PPKL allows to generate an own wifi network acting like Access point (being not necessary to use an intermediate network device). To this Wifi network will connect all devices from which installation will be controlled (PCs, tablets, Smartphones, etc). New network will be visible for other devices with the name that user edit in Ssid field (“Other…” option in the list) and the password Graphic controls 24 de 41 USER MANUAL PPKL4-G - V2.8 included. In reference to password, the encryption type will be the option selected in the last field (none, wep or wpa). When AP is selected, the coverage icon in the right upper corner changes for this one , to notify user the working mode. Once the AP mode is active, the Wifi module takes some minutes to reboot, and it is necessary to wait some minutes to have the Wifi network available to use. Tapping over the icon in the right upper corner, user can access to parameters configuration in the local network. This option allows to set the IP address of the screen, subnet mask and the gateway. Graphic controls 25 de 41 USER MANUAL PPKL4-G - V2.8 Some more details about these parameters: IP Address: The IP address that the screen will have in the local net. Subnet mask: the one corresponding to the local net where the PPKL is installed. Gateway: This is the gate used by the screen to access outside. It is possible to configure network parameters in automatic mode, activating DHCP option. In this case, IP, netmask and gateway will be automatically assigned by the router (or by the PPKL in AP mode). To validate the data and return to previous screen (data are not saved yet) press Once all the edition is finished, when you tap the button appear: . on the SSID edition screen, following message will Graphic controls 26 de 41 USER MANUAL PPKL4-G - V2.8 To confirm that we want to save the changes tap on , to discard them . 3.3.5.2 PASSWORD In this option from the menu, the user can modify the screen administrator’s password. This password is used for action like activate/deactivate the intrusion. To manage this administrator’s password it is necessary to access to the marked menu option (see below): Firstly the system demands the current password. This is an imperative step to continue with the process. Once the password is introduced press password (4 characters). . If this password is correct, the systems will ask for the new Graphic controls 27 de 41 USER MANUAL PPKL4-G - V2.8 In order to ensure that the password is correctly written and avoid mistakes due to the use of the touch keyboard, the system will demands to write the password a second time for comparison. If the new password is introduced wrongly or two consecutive trials do not match, the screen will show the corresponding error message. If it is correctly introduced, it will show an OK message on the screen and this new password will be the one in use to set/disable the intrusion alarm. 3.3.5.3 CONSUMPTION MANAGEMENT To have this option available, it is necessary to have a MeterBUS device connected to the installation, which is able to measure consumptions in different electrical circuits. Once installed, user will have the possibility to check information about consumptions, historics, graphics, evolutions, reports, etc. All information structured as client likes. Graphic controls 28 de 41 USER MANUAL PPKL4-G - V2.8 User will save information about his consumption habits, being possible to do comparisons between different periods of time. Information could be shown in energetic values or in economic values, as user prefers. 3.3.5.4 BLINDS – CONTROL BY POSITION This menu option allows user to establish different kind of control for each blind (proportional control or not). Selecting this tool, a list will be shown including all blinds in the installation, each of them with a check box to activate or deactivate proportional blind control individually. Graphic controls 29 de 41 USER MANUAL PPKL4-G - V2.8 To activate proportional control, it is just necessary to mark the check box assigned to each blind. To not control in proportional mode, just unmark the check box. To confirm changes and exit, tap , to leave without save, press . 3.3.5.5 UPDATING This option automatically downloads from Ingenium server the latest available software version for PPKL equipment (only if it is different from the one in use and the PPKL is connected to Internet). The updating will be fully automatic and the equipment will also automatically reboot. If you choose this option, the screen will show following message on the screen: Graphic controls 30 de 41 USER MANUAL PPKL4-G - V2.8 To accept, press , to exit without having updated press . If you accept a yellow bar below the menu’s icons will show the progress of the software updating. When this bar reaches the end, the process will have ended. It is also possible to stopped the updating process, pressing the icon with the yellow cross . If a new software version exists, the screen will finish the process and will reboot automatically. If after having been updated the screen does not reboot it means that the screen already had the last software version installed. In a brief delay the screen will have the latest software version and will have kept the same project it had before starting the updating. 3.3.5.6 BRIGTHNESS This option of the menu let us establish the brightness level of the touch screen. Therefore we will have a vertical slide bar, values go from 0 (minimum) to 15 (maximum). As we slide our finger, the yellow area increases or decreases, allowing us to control graphically the brightness level. The numerical value (3min-15max) on the screen will also change accordingly. Graphic controls 31 de 41 USER MANUAL PPKL4-G - V2.8 Dragging the finger vertically on the yellow area, we can increase (upwards) or decrease (downwards) the brightness level of the screen. 3.3.5.7 TIME ZONE SETTINGS From here you can set your time zone. It will display several cities names from which you must select yours. If the panel has internet connection, time is automatically get from Internet, being just necessary to define the time zone where screen is installed, to adapt it to the international time. This tool has a searcher to not have to go over the full list, and being possible to select directly the specific place. Graphic controls 32 de 41 USER MANUAL PPKL4-G - V2.8 It is enough to select the specific place and confirm tapping . 3.3.5.8 RESTORE FACTORY SETTINGS This option allows user to restore the panel to Factory settings. Sometimes this option could solve stability problems in the panel functionality. When this tool is selected, the panel will ask for user password to confirm the process. Once the password is included, some configurations as scenes, timmings, Wifi parameters, timing zone, etc., will be removed. The project (including plans, icons and scenes defined in programming time by the integrator) keeps whole after the restore process. Graphic controls 33 de 41 USER MANUAL PPKL4-G - V2.8 3.3.5.9 ICONS SIZE It is possible to choose between big size and small size for the icons over plan. Just tapping over the menu icon to modify the size. Once you have selected the size for the icons, you only need to press to confirm. 3.3.5.10 LANGUAGE On the configuration panel of PPKL it is possible to select the language for the screen. So that the texts shown in the different menus will be translated into the chosen language. To choose the language please press on the flag icon you can see on the lower right part of the screen. You will then see different flags representing the different languages. Choose the one corresponding to the language you wish. Once you have selected the language for the screen, you only need to press Graphic controls to confirm. 34 de 41 USER MANUAL PPKL4-G - V2.8 3.3.5.11 DEVICE REGISTRATION This option is necessary to register the project at ingenium server, and to have it available to control the installation in remote mode using our official applications for PC, iOS, Android and Samsung SmartTV. Accessing to this tool, user has to tap over “Device Register”, introducing values for user and password that the final user will use to connect to his installation in remote mode. Graphic controls 35 de 41 USER MANUAL PPKL4-G - V2.8 Once that values are edited whit desired values, just press to confirm and launch the upload process to the ingenium server. Panel will do two previous questions to validate the request. At the end of the process, panel will reboot, and the project will be available from outside trough ingenium APP’s, using user and password defined. If user wishes to unsubscribe the project from the server, it is necessary to redo the process, pressing “Restore data” (This option is only available if the project has been previously registered). If user decides to remove the project from server, PPKL requests confirmation by the user. Graphic controls 36 de 41 USER MANUAL PPKL4-G - V2.8 After confirm, project will be removed from server, and it will not be possible to control in remote mode. To recover external control, user has to register the device again, defining user and password as it is explained before. If one modification is done in a registered project, it is necessary to “Restore data” (remove project from server) and register it again (“Device Registration”), to have the latest project version at server. This is the way to guarantee that the project we are controlling via APP is the latest version. 3.3.5.12 INFORMATION In this tool, a little description of each menu option is shown. This is a help for users. It is also possible to activate/deactivate a screen navigation assistant, to guide users about which movements it is able to do. Graphic controls 37 de 41 USER MANUAL PPKL4-G - V2.8 3.3.6 WEATHER FORECAST The weather forecast allows us to consult the weather forecast for those places we have previously configured. We will get information about rain forecast, maximum and minimum temperatures, etc. Pressing on the indicated icon, a window will drop down showing the weather forecast for today and the following three days for the place we have previously configured. The upper arrows allow us to go to other locations and their weather forecasts. These locations must have been previously added to the screen. 3.3.6.1 LOCATIONS EDITION The screen allows us to add or delete locations for further enquiries. By pressing the button new city and the button we will add a is used to delete the city where we are at the moment. To add a city, a touch keyboard will be shown on the screen. As we introduce the characters in the text field, the list will shorten till we see the one we are looking for. We can use the vertical arrows to slice from one to another available city. Graphic controls 38 de 41 USER MANUAL PPKL4-G - V2.8 Once the city we want to add is in the middle of the vertical list, we should press on the icon located between both vertical arrows. The city will be added to the PPKL4-G memory. This new city will be added in the last position of the list of configured cities. To access to its weather forecast we only need to use the horizontal arrows to the end of the list on the initial screen. 3.4 R ECOVERY SCREEN This screen is shown when PPKL goes into an inconsistency mode, to provide user some tools to restore some values and recover the panel from its functionality problems. Recovery screen provide four different possibilities: reboot panel solving small functionality problems , wifi configuration screen , restore from ingenium server necessary files for panel functionality (for this option, panel must have internet connection) and as last option, restore factory settings . Graphic controls 39 de 41 USER MANUAL PPKL4-G - V2.8 3.4.1 REBOOT PANEL With this first option, PPKL will reboot, solving small problems that panel could have. Is the fastest solution to recover a system error and the first option at all time. If the error persists, check other options from this recovery screen 3.4.2 WIFI SETTINGS It allows to configure Wifi settings, using the same interface explained in paragraph 3.3.5.1 Wi-fi. Just pressing over blue rectangle to access to the tool. 3.4.3 SYNCHRONIZE Synchronize option download all necessary files for the properly functionality of PPKL, reinstalling them and updating the device to the latest firmware version available. To use this tool, just press over central blue rectangle. After the sync process, screen will reboot. To complete this process, PPKL must have internet connection. 3.4.4 RESTORE FACTORY SETTINGS This tool generates the same process explained in paragraph 3.3.5.8 Restore factory settings. Press over right blue rectangle to launch it. After the restore process, screen will reboot. Graphic controls 40 de 41 Parque Tecnológico de Asturias, Parcela 50, 33428 Llanera – Asturias - Spain Tel (+34) 985 118 859 Fax (+34) 984 283 560 [email protected] www.ingeniumsl.com