1
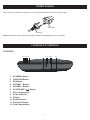
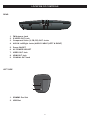
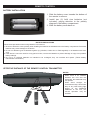
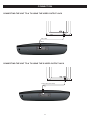
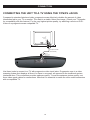
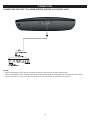
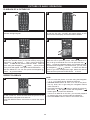
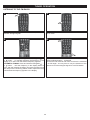
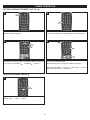
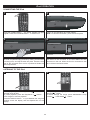
All-in-one Multimedia Home Cinema
USER MANUAL
Please read and keep these instructions
Important safety instructions – please read carefully
and keep for future reference
To reduce the risk of fire or electric shock, do not expose this product to water, rain or moisture.
To prevent the risk of electric shock, do not remove the cover or back of this product. In case of
product failure, only qualified personnel can repair. There are no user-serviceable parts inside.
Use of controls, adjustments, or performance of procedures other than those specified herein may
result in dangerous radiation exposure. This product is rated as LASER CLASS 1 PRODUCT.
CAUTION: Laser radiation when open - never stare into the laser beam.
CAUTION !
Dangerous tension inside the product ! Do not open. Risk of electric shock ! No parts can be
repaired by the end-user. Only qualified personnel can repair and maintain this product.
If the electric cord is damaged, it must be replaced by the manufacturer or qualified after-sales personnel in order to avoid any
danger.
The product must be installed in accordance with local laws.
Damaged batteries must be properly disposed. In order to protect the environment, please dispose the batteries properly, in
accordance with local laws (information is available at your reseller).
Where to install the product
Place the product on a straight, rigid and stable place. Do not place the product on a carpet.
Do not place the product on top of another that may cause overheating (for example, a receiver or amplifier).
Do not place anything underneath the product (for example, CDs or magazines).
Proper ventilation
Place the product in a sufficiently–aerated place to avoid overheating. Allow at least 10cm spacing at the back and
top of the product, and 5cm spacing on both sides to prevent overheating.
Do not place items such as newspapers, tablecloth, curtains, in front of the ventilating openings.
Do not expose the product to high temperatures, moisture, water and dust.
The apparatus shall not be exposed to dripping or splashing. No object filled with liquids, such as vases, shall be
placed on the apparatus.
Do not place other items close to this product that may damage it (for example, objects containing water or lightened
candles).
No naked flame sources, such as lighted candles, should be placed on the apparatus.
Electric supply
Please unplug the product in case of prolonged non-use.
This product is intended to be used under temperate climate and should not be used under tropical climate.
If the supply cable is damaged, it must be replaced by the manufacturer or qualified after-sales personnel to avoid
any danger.
This product must be connected to an electrical supply 230V ~ 50Hz.
The plug must be accessible after installation.
1
DVD Compatibility
This product can only play ZONE 2 DVD.
This product is compliant with directives 2006/95/CE (abrogating the directive 73/23/CEE modified
by the directive 93/68/CEE) and 2004/108/CE (abrogating the directive 89/336CEE).
- This logo set on the product means that the recycling of this apparatus comes within the framework of the directive
2002/96/EC of January 27, 2003 concerning the waste on electrical and electronic equipment (WEEE).
- The presence of dangerous substances in the electrical and electronic equipments can have potential consequences
on the environment and human health in the cycle of reprocessing this product.
- Therefore, at the end of its lifetime, this product shall not be disposed with other non-recycled waste.
- As the end user, your role is of prime importance in the cycles of re-using, recycling, and other forms of valorization of
this electrical and electronic equipment. Local authorities and resellers have set special procedures for the purpose of
collecting and recycling this product.
- You have the obligation to use the selective waste collection systems put in place by your local authorities.
2
CONTENTS
Power Source...........................................................................................................................................4
Location of controls ................................................................................................................................4
Remote Control........................................................................................................................................7
Connection ...............................................................................................................................................8
About discs . .............................................................................................................................................13
Setup Menu ..............................................................................................................................................14
Basic Operation .......................................................................................................................................19
DVD Basic Operation ............................................................................................................................. 21
MP3 Basic Operation............................................................................... ............................................... 25
.
CD Basic Operation.................................................................................... ............................................ 27
Picture CD Basic Operation ........................................................ ............................ ............................. 29
Tuner Operation .......................................................................................................................................30
iPod Operation ........................................................................................................................................32
USB Operation .........................................................................................................................................34
Sleep Timer ..............................................................................................................................................36
Troubleshooting Guide ....................................................................... ...................................................37
Care and Maintenance ..................................... ......................................................................................39
Specifications ................................................... ... ................................................................................... 40
Important remarks about reading MPEG-4 videos on this unit ...................................................... 41
3
POWER SOURCE
Insert the AC plug (with the 2 blades) into a conveniently located AC outlet having 230V, 50Hz.
AC Outlet
AC Plug
NOTE: Please first connect the audio and video cables before plugging the unit to the mains.
LOCATION OF CONTROLS
TOP/FRONT
123456
1.
2.
3.
4.
5.
8 9
STANDBY Button
FUNCTION Button
EQ Button
VOLUME – Button
VOLUME + Button
6. PLAY/PAUSE (
7.
8.
9.
10.
11.
12.
7
) Button
Disc Compartment
Power Indicator
Display
Remote Sensor
Disc Eject Button
iPod Compartment
4
1011
12
LOCATION OF CONTROLS
REAR
1 2
5
6
7
3
8
4
9
1. FM Antenna Jack
2. S-VIDEO OUT Jack
3. Component Video (Y, PB, PR) OUT Jacks
4. AUX IN Left/Right Jacks (AUDIO CABLE (LEFT & RIGHT)
5. Power ON/OFF
6. AC POWER SOCKET
7. VIDEO OUT Jack
8. HDMI OUT Jack
9. COAXIAL OUT Jack
LEFT SIDE
1
2
1. SD/MMC Pro Slot
2. USB Slot
5
LOCATION OF CONTROLS
REMOTE
1. POWER Button
2. SLEEP Button
3. SHUFFLE Button
4. EQ Button
5. GOTO Button
6. iPod Button
7. FM Button
8. DVD Button
9. USB Button
10. SETUP Button
11. ZOOM Button
12. LEFT / RIGHT Navigation (
13. A-B Button
14. MENU Button
15. SLOW Button
16. PLAY / PAUSE (
) Button
17. STEP Button
18. STOP ( ) Button
19. FWD Button
20. REV Button
21. PREVIOUS Button
22. NEXT Button
23. MUTE Button
24. EJECT Button
25. 0-9 Button
26. DISPLAY Button
27. 10+ Button
28. AUX Button
29. SD Button
30. PRESET Button
31. TUN+/- (
) Button
32. MEMORY Button
33. CLEAR Button
34. ENTER Button
35. REPEAT Button
36. VIDEO Button
37. BASS+/- Button
38. VOLUME+/- Button
39. ANGLE Button
40. SUBTITLE Button
41. AUDIO Button
42. TITLE Button
6
) Button
REMOTE CONTROL
BATTERY INSTALLATION
1. Slide the battery cover towards the bottom of
the remote to remove.
2. Install two (2) AAA size batteries (not
included), paying attention to the polarity
diagram in the battery compartment.
3. Slide the battery cover back on.
BATTERY PRECAUTIONS
Follow these precautions when using batteries in this device:
1. Be sure to follow the correct polarity when installing the batteries as indicated next to the battery compartment. Reversed
batteries may cause damage to the device.
2. Do not mix different types of batteries together (e.g. Alkaline, Carbon-zinc or Rechargeable) or old batteries with fresh
ones.
3. If the device is not to be used for a long period of time, remove the batteries to prevent damage or injury from possible
battery leakage.
4. Do not try to recharge batteries not intended to be recharged; they can overheat and rupture. (Follow battery
manufacturer’s directions.)
EFFECTIVE DISTANCE OF THE REMOTE CONTROL TRANSMITTER
NOTES:
• When there is an obstacle
between the unit and the
transmitter, the transmitter may
not operate.
45
45
6 meters
20ft
7
• When direct sunlight, an
incandescent lamp, fluorescent
lamp or any other strong light
shines on the REMOTE
SENSOR of the unit, the
remote operation may be
unstable.
CONNECTION
Remarks before the connections:
• When connecting this unit to the TV, make sure the power is off and both units are unplugged before making any connections.
• When connecting this unit, refer to the owner’s manual of the TV, as well as this manual.
• Connect the unit to your TV directly. If you connect the unit through a VCR, the playback picture will be distorted because
DVD video discs are copy protected.
• If S-Video is used, set the Video Output option (see page 17) to S-Video.
• To watch iPod videos, you must have the unit connected to a TV via S-video or Video Out. You cannot connect the unit to a
TV via HDMI or composite video out and watch videos from your iPod.
• HDMI cable is not provided.
CONNECTING THE UNIT TO A TV USING THE HDMI OUTPUT JACK
The High-Definition Multimedia Interface (HDMI) is a digital audio/ video connector interface for transmitting uncompressed
digital streams. HDMI supports, on a single cable (HDMI cable not supplied), all video formats including standard, enhanced,
and high- definition, as well as multi-channel digital audio. To enjoy the enhanced audio and video quality that HDMI offers,
you need an HD Ready television with HDMI connection.
You then simply need to select the maximum resolution supported by your television in the menu:
- 1280 x 720p (720p)
- 1920 x 1080i (1080i)
- 1920 x 1080p (1080p)
Note: “p” signifies progressive, while “I” signifies interlaced.
HDMI Mode Display Problem - When you select an HDMI display mode which is not supported by your television (if you
choose, for example, 1080i while your television supports up to 720p only), you get a black screen. As a result, you cannot
change the HDMI resolution in the setup menu. In this case, plug the Video Composite cable (included) and press the VIDEO
button of the remote control repeatedly until the correct video mode is selected and the picture appears on the screen again.
Then you can press the SETUP button in order to choose a lower resolution that is supported by your television.
To
HDMI IN
HDMI Cable (Not Included)
From
HDMI OUT
Remarks:To view the videos on your TV from iPod, please plug the cable composite Video which is provided.
8
CONNECTION
CONNECTING THE UNIT TO A TV USING THE VIDEO OUTPUT JACK
To
Video In
Video Cable
From
Video Out
CONNECTING THE UNIT TO A TV USING THE S-VIDEO OUTPUT JACK
To S-Video In
S-Video Cable (Not Included)
From
S-Video
Out
9
CONNECTION
CONNECTING THE UNIT TO A TV USING THE Y/PB/PR JACKS
Compared to standard interlaced video, progressive scan effectively doubles the amount of video
information fed to your TV or monitor. The result is a stable, flicker-free image. (Check your TV/monitor
for compatibility with this feature.) For the very highest picture quality, try watching a movie on DVDVideo on a progressive-scan compatible TV.
To
Component
Video In
Y
PB
PR
Component Cable
(Not Included)
From
Component
Video Out
Use these jacks to connect to a TV with progressive video input jacks. Progressive scan is a video
scanning system that displays all lines in a frame in one pass, as opposed to the traditional system,
interlaced scan. This connection provides optimum quality. To ensure maximum picture quality, use
three video-grade cables for connections. Note that it is essential to match the color-coded connectors
with a compatible TV.
10
CONNECTION
CONNECTING THE UNIT TO A HOME STEREO SYSTEM VIA COAXIAL JACK
NOTES:
• When connecting this unit, refer to the owner’s manual of the receiver, as well as this manual.
• When connecting this unit, make sure the power is off and both units are unplugged before making any connections.
• When connected to a home stereo, the sound will come from this speaker as well as from the receiver.
11
CONNECTION
CONNECTING AN EXTERNAL UNIT
You can connect an external unit, such as a TV, receiver, cable box, etc., to this unit so its audio is output through this unit’s
speakers. Simply connect an audio cable from the Left and Right Audio Out of the external unit to the Left and Right AUX
IN jacks on this unit. To select the external unit, press the AUX Mode button on the remote.
CONNECTING THE FM ANTENNA
FM
hm
75 o
FM ANTENNA
While listening to FM, reposition the antenna for best reception.
12
ABOUT DISCS
The region code for this DVD player is listed on the back of the player.
PLAYABLE DISCS:
The following discs can be played back on this DVD player:
MP3
When playing an MP3, the total number of files will appear in the display, and the TV screen will list the folders/tracks.
MP3 is the abbreviation of “MPEG1 Audio Layer 3”. MPEG Audio is a format that compresses the audio portion only.
DISC TYPES:
DVD
Data on most DVDs is divided into sections called “titles” and
then into subsections called “chapters”, each of which is
given a title or chapter number. Some features of this DVD
player will not operate with some DVD discs, as they are
preset. If a function you selected does not run as desired,
refer to the manual accompanying the DVD disc.
AUDIO CD
Data on an audio CD is divided into sections called “tracks”,
each of which is given a track number.
PICTURE CD
Data on a picture CD is usually not divided into separate
folders, they should appear in the root directory.
IMPORTANT:
It is important that you read the manual that accompanies the DVD disc, as there are features that are
on the DVD player that cannot be used with certain DVDs. There are also extra features on the DVD disc
that are different for each DVD disc, so they are not explained in this owner’s manual.
13
SETUP MENU
The setup menu lets you customize the unit by allowing you to select various language
preferences, turn captions and screen saver on and off, adjust what type of television screen
you have, and more.
Below, find the menu, and then find the corresponding page that describes the features of the
selected menu option.
1. While in the DVD mode, press the SETUP button 1 to enter the Setup menu.
2. Select one of the Setup icons at the top of the screen using the Navigation ② and
Navigation ③ buttons, then press the Navigation† button ④ to select it.
3. Use the Navigation ④ / ⑤ buttons to select one of the Setup options, then press the
Navigation ② button to select it.
4. Use the Navigation ④ / ⑤ buttons to select the desired setting, then press the ENTER
button ⑥ to make the change.
NOTES:
• To return to the previous menu, simply press the Navigation
• To exit the menus, press the SETUP button.
• Most menus only work with the DVD player.
Video Preferences
Video
On
Hdcd
button.
Preferences
Video Preferences
- - Audio Setup Page - -
- - Dolby Digital Setup - -
Speaker Setup
SPDIF Setup
Dual Mono
Dynamic
Stereo
L-Mono
R-Mono
Mix-Mono
Off
On
Off
Go To Speaker Se tup Page
Video Preferences
Video
- - Preferences Page - -
- - Video Setup Page - Video
Output
Resolution
Quality
HDMI Setup
YUV
TV Type NTSC
Audio
ENG
Subtitle
ENG
Disc Menu ENG
Default
S-Video
YUV
Video
Set TV Standard
Please see page 15-18 for details.
14
PAL
Auto
NTSC
Preferences
SETUP MENU
GENERAL SETUP PAGE:
Select General and then select the desired option using the Navigation ( , , , ) buttons to navigate through the
menus/screens and press the ENTER button to select (see page 14 for details).
TV DISPLAY
ANGLE MARK
1
1
Video Preferences
On
On
16:9
O ff
On
Off
Hdcd
Video
On
Off
Off
On
Off
Hdcd
Set TV Shape Mode
Preferences
Set Angle Mark
NORMAL/PS: Pan Scan. Select when the unit is connected to a
conventional TV. Video material formatted in the Pan Scan style
is played back in that style (the left and right edges are cut off).
NORMAL/LB: Letter Box. Select when the unit is
connected to a normal TV. Wide-screen images are shown
on the screen with a black band at the top and bottom.
WIDE: Select when the unit is connected to a wide-screen TV.
Select ON to turn the angle marks on and OFF to turn them
off. Angle marks are not available on all DVDs.
OSD LANGUAGE
CAPTIONS
1
1
Video Preferences
On
Off
On
Off
Hdcd
Video
Preferences
On
English
French
Spanish
Portuguese
Dutch
Hdcd
Set OSD Language
On
On
Off
On
Off
Closed Caption
Select the desired language ( ENGLISH,FRENCH,SPANISH,
PORTUGUESE, DUTCH ) for the On-Screen display to
display text. Note that the DVD must have the language
included in order to display it.
When this Captions is set to ON, closed captions will appear
on the screen for the hearing impaired (if originally recorded
on the DVD). When this option is OFF, the closed captions
will not appear.
NOTE: The Caption function is for AV or S-Video connection
with CC1 only.
SCREEN SAVER
HDCD
1
1
Video Preferences
Video Preferences
On
Hdcd
On
On
Off
On
On
Off
Hdcd
Set Screen Saver
On
On
Off
Off
1X
2X
Hdcd
When this option is set to ON, the screen saver will come
on when the unit stops or the image is paused for
approximately 4 minutes.
When this option is OFF, the screen saver will not come on.
Select Hdcd to adjust the decoding speed when playing CD
disc.
Note: the option can only be used when playing CD disc,
and this option should be default OFF state.
15
SETUP MENU
AUDIO SETUP PAGE:
Select Audio and then select the desired option using the Navigation ( ,
menus/screens and press the ENTER button to select (see page 14 for details).
SPEAKER/DOWNMIX
1
,
, ) buttons to navigate through the
SPDIF SETUP
Video
1
Preferences
--Audio Setup Page --
Video
P references
--Audio Setup Page - -
Speaker Setup
SPDIF Setup
Speaker Setup
SPDIF Setup
Go To Speaker Setup Page
Select Speaker Setup, then press the ENTER button; the
Downmix menu will appear.
LT/RT: Select to hear the sound in theatrical downmix
mode.
STEREO: Select to hear the sound in Stereo downmix
mode.
Go To SPDIF Setup Page
Select SPDIF Setup, then press the ENTER button; the
Speaker Setup menu will appear.
Select SPDIF and then set as desired:
SPDIF OFF: Digital audio output is off.
SPDIF/RAW: Dolby Digital signals are going out unchanged
to the digital output. MPEG-2 multi-channel signals are
converted to PCM (Pulse Code Modulation).
SPDIF/PCM: Dolby Digital and MPEG-2 multi-channel
signals are converted to PCM (Pulse Code Modulation).
Select LPCM and set as desired:
LPCM is the method of encoding, and is usually set to 48K.
However, if 96K sampling frequency is used, select 96K.
DOLBY DIGITAL SETUP PAGE:
Select Dolby and then select the desired option using the Navigation ( ,
menus/screens and press the ENTER button to select (see page 14 for details).
DUAL MONO
1
,
, ) buttons to navigate through the
DYNAMIC
1
VideoPreferences
--Dolby Digital Setup -Dual Mono
Dynamic
VideoPreferences
--Dolby Digital Setup - -
Stereo
L-Mono
R-Mono
Mix-Mono
Dual Mono
Dynamic
FULL
3/4
1/2
1/4
OFF
Set DRC To Full
STEREO: Select this to set the Dolby Digital output to
Stereo mode.
L-MONO: Select this to set the Dolby Digital output to left
mono mode, meaning it will reproduce the left mono signal
to the Left and Right channels.
R-MONO: Select this to set the Dolby Digital output to right
mono mode, meaning it will reproduce the right mono signal
to the Left and Right channels.
MIX-MONO: Select this to reproduce both channels mixed
together.
Use the slider to set the Dynamic Range. Set to OFF to turn
Dynamic Range Off. This setting will make loud sounds
quieter and soft sounds louder to give an overall more
acceptable sound output.
16
SETUP MENU
VIDEO SETUP PAGE:
Select Video and then select the desired option using the Navigation ( ,
menus/screens and press the ENTER button to select (see page 14 for details).
VIDEO OUTPUT
1
YUV
1
Video Preferences
S- Video
YUV
General
--Video Setup Page - -
Video Preferences
Video Output
Resolution
Quality
HDMI Setup
720p(60Hz)
1080i(60Hz)
1080p(60Hz)
576i
576p(720)
720p(50Hz)
1080i(50Hz)
1080p(50Hz)
YUV
Resolution
Video
Select the color video type to fit your connector type:
S-VIDEO: Select when using S-Video OUT.
YUV: Select when using Component Video OUT.
This setting is not affected when connecting with other
connections.
When connected via an HMDI cable, select the desired
resolution to match your TV. For example, if your TV is 720p
and you are using the HDMI cable, set this to 720p (50Hz).
NOTES:
•
QUALITY
1
, ) buttons to navigate through the
RESOLUTION (HDMI ONLY)
General
--Video Setup Page -Video Output
Resolution
Quality
HDMI Setup
,
This option can only be used when HDMI option is set to
ON (see below).
HDMI SETUP
General
--Video Setup Page -Video Output
Resolution
Quality
HDMI Setup
1
Video Preferences
YUV
Video Output
Resolution
Quality
HDMI Setup
Go To Video Quality Setup Pa ge
Select Quality, then press the ENTER button; the Video
Q uality Setup menu will appear.
Adjust the settings as follows:
SHARPNESS
BRIGHTNESS
CONTRAST
HUE
SATURATION
General
--Video Setup Page - -
Video Preferences
YUV
HDMI Setup
Select HDMI Setup, then press the ENTER button; the HMDI
Setup menu will appear. Adjust the options as follows:
HDMI: Select ON when connected to the TV using an HMDI
cable or OFF when connected via another source.
AUDIO SOURCE: When connected to an external TV via an
HMDI cable and the HDMI option is on, set as follows:
AUTO: The HDMI audio output will be the same as the audio
stream being played back.
PCM: Downmix the audio signals to linear-PCM (2 channel).
17
SETUP MENU
PREFERENCES SETUP PAGE:
Select Preference and then select the desired option using the Navigation ( , , , ) buttons to navigate through the
menus/screens and press the ENTER button to select (see page 14 for details).
Remarks:While proceeding with Preferences operation in OSD menu, please take out the disc from the disc tray first, or
please press STOP button twice before operation.
TV TYPE
1
AUDIO
General
- - Preferences Page - -
Video
TV Type
NTSC
Audio
ENG
Subtitle
ENG
Disc Menu ENG
D efault
PAL
Auto
NTSC
1
Preferences
General
- - Preferences Page - TV Type
Audio
Subtitle
Disc Menu
Default
Set TV Stan dard
NTSC
ENG
ENG
ENG
Preferences
Video
English
French
Portuguese
Spanish
Dutch
Preferred Audi o Lang uage
NTSC: Select when using an NTSC/ATSC TV.
PAL: Select when using a PAL TV.
AUTO: Select when using a multi-system TV.
IMPORTANT: In Europe, the standard is PAL.
NOTE: If your TV has an ATSC signal, you can select NTSC
also. The HDMI must be set to OFF before you set the TV
Type (see previous page).
Select the language the DVD will be played back in
(ENGLISH, FRENCH, PORTUGUESE , SPANISH,DUTCH ).
The DVD must be recorded in the selected language,
otherwise the default language of the DVD will be played.
SUBTITLE
DISC MENU
1
General
- - Preferences Page - TV Type
Audio
Subtitle
Disc Menu
Default
NTSC
ENG
ENG
ENG
Video
1
Preferences
TV Type
Audio
Subtitle
Disc Menu
Default
English
French
Portuguese
Spanish
Dutch
Select the language the Subtitle (OSD) will be in (ENGLISH,
FRENCH, PORTUGUESE , SPANISH, DUTCH ). The DVD
must be recorded in the selected language, otherwise the
default language of the DVD will be shown.
TV Type
Audio
Subtitle
Disc Menu
Default
NTSC
ENG
ENG
ENG
Video
Preferences
English
French
Portuguese
Spanish
Dutch
Select the language the DISC MENU will be in (ENGLISH,
FRENCH, PORTUGUESE , SPANISH, DUTCH ). The DVD’s
DISC MENU must be written in the selected language,
otherwise the default language of the DVD will be shown.
DEFAULT
General
- - Preferences Page - -
NTSC
ENG
ENG
ENG
Video
Preferred Me nu Language
Preferred Su bti tle Langu age
1
General
- - Preferences Page - -
Preferences
Reset
Load Factory Sett ing
Select this option to reset all the preferences to their original
factory settings.
18
BASIC OPERATION
IMPORTANT:
When “ ” appears while pressing a button, this means that the corresponding
function cannot be performed either on the disc inserted, or in the selected mode.
MUTE
VOLUME
1
1
1
2
Adjust the VOLUME Up ① /Down ② buttons as desired; the
volume number will appear in the display.
Press the MUTE button once to mute the sound; “MUTE”
will appear in the display. Press the MUTE button again to
restore the sound.
DISPLAY
BASS
1
1
1
While playing a DVD or CD, repeatedly press the DISPLAY
button to view the Elapsed Time, Remaining Time, etc.
2
Press the BASS Up button ① to increase or BASS Down
button ② to decrease the overall bass sound.
CLEAR
1
If you incorrectly start entering a number, press the CLEAR
button to clear the data.
19
BASIC OPERATION
EQ
FUNCTION
1
1
This manual gives instructions on selecting the source via
the remote. However, you can also press the FUNCTION
button repeatedly on the main unit to select the desired
source (FM, USB, SD, iPod, Aux, DVD).
EQ (Sound Retrieval System) is an effect that will create a
3D Surround Sound effect using front speakers only.
Repeatedly press the SRS button to cycle through the
preset settings:
BYPASS: Select to bypass the sound effects.
WOW: SRS WOW® signficantly improves the playback
quality of audio, delivering a dynamic 3D entertainment
experience with deep, rich bass.
TSXT: SRS TruSurround XT® creates a truly immersive
surround sound experience with rich bass and clear dialog.
DC: SRS TruSurround XT® - Dialog Clarity Mode
enhances the vocals so dialog is clear and easy to
understand.
VIDEO
and
are trademarks of SRS Labs, Inc. TruSurround XT
and WOW technologies are incorporated under license from SRS Labs, Inc.
1
When connected via an HMDI cable, select the desired
resolution to match your TV. For example, if your TV is
720p and you are using the HDMI cable, set this to 720p
(60Hz).
NOTES:
• This option can only be used when HDMI option is set
to ON (see page 17).
• If the TV screen is blank, press the VIDEO button
repeatedly until the picture appears on the screen
again.
20
DVD BASIC OPERATION
IMPORTANT NOTES:
• After plugging in, the unit will be in the Standby mode (the Power indicator will be dimly lit). Press the POWER button on
the main unit or the remote to turn on the unit; the Power indicator will light brighter.
•
•
•
•
“
” will appear on the TV screen during operation if you try to access a function that is not available on the disc.
Some discs may take a few seconds to load.
If a disc is inserted incorrectly, is dirty and/or damaged or is not present at all, “NO DISC” will appear in the display.
Always hold the disc without touching either of its surfaces. When inserting a disc, position it with the printed title side facing
up, align it with the guides and place it in its proper position.
It is important that you read the manual that accompanies the DVD disc as there are features that are on this DVD player
that cannot be used with certain DVDs. There are also extra features that are different for each DVD disc, so they are not
explained in this owner’s manual.
If the unit is in Stop mode, Pause mode, or if there is no disc in the disc tray, the screen saver will appear on the screen
after four minutes.
•
•
PLAYBACK OF A DVD
1
2
Press the POWER button to turn on the unit; the Power
indicator will light brighter.
While in DVD mode, insert a disc with the label side facing
up into the disc slot. “CLOSE” will appear briefly on the
screen and in the display, and the disc will be loaded.
3
4
1
2
1
After loading, the menu screen of the DVD should appear.
Use the Navigation ( , , , ) buttons ① to select the
desired option and the ENTER button ② to select it.
Adjust the Volume, EQ and Bass as shown on pages 19
and 20.
2
To stop playback, press the Stop ( ) button ① ; “Press Play
Key To Continue” will appear on the screen. Because the
unit will remember where you stopped, simply press the
Play/Pause (
) button ② to resume playback where you
left off (resuming playback). If the Stop ( ) button ① is
pressed twice, the screen shows “ ” and the unit will
stop completely.
NOTES:
• If a MENU appears on the TV screen, press the Navigation ( , , , ) buttons to select the desired option/item, then
press the ENTER button. Please make sure to refer to the disc’s jacket or case for additional information.
• Resuming playback may not work on all discs.
21
DVD BASIC OPERATION
SKIP
SEARCH
1
1
3
1
2
2
Press the Skip Forward ( ) button ① to advance the DVD
to the beginning of the next chapter.
1
Press the Skip Backward ( ) button ② to move the DVD to
the beginning of the previous chapter.
During playback, press either the Search Forward >> button ①
or Search Backward << button ② to move the DVD forward or
backward at double (x2) speed to locate a specific section.
Repeatedly press these buttons and the speed will increase to
x4, x8, x16, x32 and resume normal playback. When in Search
mode, the DVD will move forward or backward at high speed
until the Play/Pause (
) button ③ is pressed again; normal
playback will resume at that point.
SLOW MOTION
PAUSE
Use this feature to move the DVD in slow motion.
1
1
2
1
During playback, repeatedly press the SLOW button ① to
move the DVD forward in slow motion speeds of 1/2-1/16
and resume normal playback. The sound will be muted.
You can also resume normal playback by pressing the
Play/Pause (
) button ②.
Press the Play/Pause (
picture.
) button once to pause the
To resume normal playback, press the Play/Pause (
button again.
)
STEP
1
Press the STEP button ① once to pause the unit and
repeatedly press to advance the DVD frame by frame.
Press the Play/Pause (
) button ② to resume normal
playback.
2
1
22
DVD BASIC OPERATION
TITLE/CHAPTER SEARCH
Use this feature to directly go to a specific title and/or chapter.
4
▲
2
▲
▲
Press the GO TO button ① twice.
Press the Navigation ( , ) buttons ② to select TITLE, then use the Number (0-9)
buttons ③ to select the desired title number; playback will start immediately.
Press the Navigation ( , ) buttons ② to select TIME, then use the Number (0-9)
buttons ③ to enter a time to go to in the selected title.
▲
1
▲
3
▲
▲
Press the GO TO button ① once.
Press the Navigation ( , ) buttons ② to select TITLE, then use the Number (0-9)
buttons ③ to select the desired title number; playback will start immediately.
Press the Navigation ( , ) buttons ② to select CHAPTER, then use the Number
(0-9) buttons ③ to select the desired chapter number; playback will start immediately.
▲
1
▲
▲
▲
▲
Press the GO TO button ① three times.
Press the Navigation ( , ) buttons ② to select CHAPTER, then use the Number
(0-9) buttons ③ to select the desired chapter number; playback will start immediately.
Press the Navigation ( , ) buttons ② to select TIME, then use the Number (0-9)
buttons ③ to enter a time to go to in the selected chapter.
NOTES:
• If an invalid time, title or chapter is entered, “INVALID INPUT” will appear on
the screen.
• For numbers over nine, repeatedly press the 10+ button ④ to enter the first digit
followed by the second digit; playback will start immediately.
REPEAT PLAYBACK
While playing back a DVD, this unit can repeatedly play back
a chapter or title.
A-B REPEAT PLAYBACK
While playing back a DVD, this unit can repeatedly play back
a specific section.
1
1
While in the Playback mode, press the REPEAT button
once; “CHAPTER” will appear on the screen for a few
seconds and the Chapter currently playing will repeat
continuously.
Press the REPEAT button twice; “ALL” will appear on the
screen for a few seconds and the disc will repeat over and
over.
Press the REPEAT button a third time to cancel the repeat
mode.
While in the Playback mode, press the Repeat A-B button to
define where you want the section to start. Press the Repeat
A-B button again to define where you would like the section
to end; the unit will then play the selected area continuously.
Press the Repeat A-B button again to cancel Repeat A-B
mode.
23
DVD BASIC OPERATION
AUDIO MENU
SUBTITLE MENU
1
1
1
1
Press the AUDIO button repeatedly to change the audio
language. This feature is not available on all discs.
Press the SUBTITLE button repeatedly to select a subtitle
language or to turn the subtitle menu on/off. This feature is
not available on all discs.
DVD MENU
TITLE MENU
1
1
2
1
2
3
3
1
Press the MENU button ; the Main Menu of the disc will
appear. Use the Navigation ( , , , ) buttons ② to select
the desired option and then press the ENTER button ③ .
This feature is not available on all discs.
Press the TITLE button ① , and the Title Menu of the disc will
appear. Use the Navigation ( , , , ) buttons ② to select
the desired option and then press the ENTER button ③ .
This feature is not available on all discs.
ZOOM
The image on the screen can be magnified as follows:
1
1
2
Press the ZOOM button ① once during Normal, Slow or Still
playback modes, and the unit will zoom x2. Repeatedly
press to cycle through the following options: x3, x4, 1/2, 1/3,
1/4 and OFF to resume normal view. Use the Navigation
( , , , ) buttons ② to move the image on the TV
screen. This feature is not available on all discs.
24
MP3 BASIC OPERATION
PLAYBACK OF AN MP3 CD
1
2
Press the POWER button to turn on the unit; the Power
indicator will light brighter.
While in DVD mode, insert a disc with the label side facing
up into the disc slot. “CLOSE” will appear briefly on the
screen and in the display, and the disc will be loaded.
3
4
3
1
2
4
1
You should be connected to a TV when using an MP3
CD with multiple folders:
After loading, the folders and mp3 files will appear on the
TV screen.
Select the desired folder (if CD has folders) using the
Navigation ( , ) button ① . Then, press the ENTER button
② to show all the tracks inside the folder. Select a file using
the Navigation ( , ) button 1 then press the ENTER
button ② to play the selected track.
You can also press the Navigation
button ① to select the
folder again.
2
To stop playback, press the Stop ( ) button ① .
Adjust the VOLUME +/– buttons ② , EQ button
BASS Up/Down buttons ④ as desired.
③
and the
PAUSE
1
Press the Play/Pause (
) button to pause playback; “ ”
will appear on the screen and “PAUSE” will appear on the
display.
Press the Play/Pause (
playback.
25
) button again to resume
MP3 BASIC OPERATION
SELECTING FOLDERS/TRACKS USING THE
SKIP BUTTONS
SEARCH
1
1
3
1
2
2
Press the Skip Forward (
beginning of the next file.
Press the Skip Backward (
beginning of the previous file.
) button
①
1
During playback, press either the Search Forward >> button
① or Search Backward << button ② to move the file forward
or backward at double (x2) speed. Repeatedly press these
buttons and the speed will increase to x4, x8, x16, x32 and
resume normal playback. When in Search mode, the disc
will move forward or backward at high speed until the
Play/Pause (
) button ③ is pressed again; normal
playback will resume at that point.
to advance to the
) button ② to move to the
SELECTING FOLDERS/TRACKS USING THE
NUMBER BUTTONS
REPEAT PLAYBACK
1
1
1
2
Press the REPEAT button once; “Repeat One” will appear
on the screen for a few seconds and the file currently
playing will repeat continuously.
Press the REPEAT button twice; “Repeat Folder” will appear
on the screen for a few seconds and the disc will repeat
over and over.
Press the REPEAT button a third time to cancel the repeat
mode.
During playback, press the three Number buttons
corresponding to the track/folder numbers to select your
desired track/folder, then it will playback the track or enter
the folder automatically.
26
CD BASIC OPERATION
PLAYBACK OF A CD
1
2
Press the POWER button to turn on the unit; the Power
indicator will light brighter.
While in DVD mode, insert a disc with the label side facing
up into the disc slot. “CLOSE” will appear briefly on the
screen and in the display, and the disc will be loaded. After
loading, playback will start automatically.
3
PAUSE
1
2
1
To stop playback, press the Stop ( ) button ① ; “Press Play
Key To Continue” will appear on the TV screen. Because
the unit will remember where you stopped, simply press the
Play/Pause (
) button ② to resume playback where you
left off. If the Stop ( ) button ① is pressed twice, the TV
screen shows “ ” and the unit will stop completely.
SELECTING TRACKS/FILES USING THE
NUMBER BUTTONS
Press the Play/Pause (
) button to pause playback; “ “
will appear on the screen and “PAUSE” will appear on the
display.
Press the Play/Pause (
) button again to resume
playback.
SKIP
1
1
1
2
1
Press the Number buttons ① corresponding to the track
number you would like to play, and the unit will playback the
desired track automatically.
For tracks over nine, repeatedly press the 10+ button ① to
enter the first digit followed by the second digit; the unit will
playback the desired track automatically.
2
Press the Skip Forward ( ) button ① to advance to the
beginning of the next track.
Press the Skip Backward ( ) button ② to move to the
beginning of the previous track.
27
CD BASIC OPERATION
SEARCH
REPEAT PLAYBACK
1
1
3
2
1
During playback, press either the Search Forward >> button
or Search Backward << button ② to move the DVD
forward or backward at double (x2) speed. Repeatedly press
these buttons and the speed will increase to x4, x8, x16, x32
and resume normal playback. When in Search mode, the
disc will move forward or backward at high speed until the
Play/Pause (
) button ③ is pressed again; normal
playback will resume at that point.
Press the REPEAT button once; “TRACK” will appear on the
screen for a few seconds and the track currently playing will
repeat continuously.
Press the REPEAT button twice; “ALL” will appear on the screen
for a few seconds and the disc will repeat over and over.
Press the REPEAT button a third time to cancel the repeat
mode.
①
28
PICTURE CD BASIC OPERATION
PLAYBACK OF A PICTURE CD
1
2
Press the POWER button to turn on the unit; the Power
indicator will light brighter.
While in DVD mode, insert a disc with the label side facing
up into the disc slot. “CLOSE” will appear briefly on the
screen and in the display, and the disc will be loaded.
3
4
4
5
1
2
3
1
After loading, the folders and photo files will appear on the TV.
Select the desired folder (if CD has folders) using the
Navigation ( , ) buttons ① . Then, press the ENTER
button ② to show all the photos inside the folder. Select a
photo using the Navigation ( , ) button ① and a preview
of the photo will appear. Then press the ENTER button ② to
start the slideshow. You can also press the Navigation
button ① to go back folders.
2
② button to
Press the Skip Forward
① or Backward
select the next or previous picture. After the slideshow is
done, it will go to thumbnail view. You can press the Stop ( )
button ③ to stop the slideshow before it is finished; then the
thumbnail view will appear. In thumbnail view, you can press
the Navigation ( , , , ) buttons ④ to select the desired
picture or go to the next/previous page. Select the desired
picture and then press the ENTER button ⑤ to view it.
REPEAT PLAYBACK
NOTE:
• You can rotate the picture on-screen using the Navigation
( , , , ) buttons during slideshow playback.
• Press the ZOOM button to zoom in or out on the photo.
Pan up, down, left or right using the navigation buttons
while zoomed in.
• Press the Play/Pause (
) button to pause the picture on
the screen, “ ” will appear. Press the Play/Pause (
)
button again to resume the slideshow.
• If there is an MP3 file on the disc, you can start playback
for background music and then start the slideshow.
• Press the MENU button to return to the Folder menu.
1
Press the REPEAT button twice; “Repeat Folder” will appear
on the screen for a few seconds and the photos in the
selected folder will repeat over and over.
Press the REPEAT button a third time to cancel the repeat
mode.
29
TUNER OPERATION
LISTENING TO THE FM RADIO
1
2
Press the POWER button to turn on the unit; the Power
indicator will light brighter.
Press the FM Mode button on the remote to select the FM
Tuner mode.
3
4
2
1
2
3
MANUAL TUNING: Repeatedly press the Navigation ①
or
button ② to manually advance the frequency in the
display up or down until the desired frequency appears.
AUTOMATIC TUNING: Press and hold the Navigation ①
or
button ② until the frequency in the display starts to
scan, and then release the button; the tuner will search and
then stop on the next strong station it finds. Repeat this step
until the desired frequency appears in the display.
1
Adjust the VOLUME +/– buttons ① , EQ button ② and the
BASS Up/Down buttons ③ as desired.
Connect the FM Antenna and make sure that it is extended
to its full length. You may have to vary the direction of the
antenna to find the strongest signal for each FM station.
30
TUNER OPERATION
SETTING FM RADIO PRESETS (UP TO 10)
1
2
Press the POWER button to turn on the unit; the Power
indicator will light brighter.
Press the FM Mode button to select the FM Tuner mode
and tune an FM station as described on the previous page.
3
4
2
3
3
1
1
4
Press the Memory button ① once and the program number
will blink in the display. Select the desired preset number (up
to 10) using the PRESET ② / PRESET ③ buttons.
2
Press the Memory button ① again and the station will be
stored in the selected preset.
Repeat steps 2 and 3 to program additional presets.
Adjust the VOLUME +/– buttons ② , EQ button ③ and the
BASS Up/Down buttons ④ as desired.
RECALLING RADIO PRESETS
1
2
1
While in the FM mode, simply select a preset using the
PRESET Up ① /Down ② buttons.
31
iPod OPERATION
CONNECTING THE iPod
1
2
1
2
Press the POWER button ① ; the Power indicator will light
brighter. Press the iPod Mode button ② to select iPod.
Press in on the iPod Dock and it will release.
NOTE: To close the iPod Dock, press it back into place.
3
4
(B)
(A)
Slide the iPod into the Universal Dock (as shown). Gently
push down so the connector on the iPod slides onto the
connector on this unit. When the iPod is connected to this
unit, it will be in the Pause mode.
Insert the Universal Dock included with your iPod (A) into
the iPod compartment (B) (as shown), making sure the tabs
are facing front, and slip the tabs into place. Press the rear
side of the Universal Dock until it is positioned inside the
iPod compartment.
LISTENING TO THE iPod
1
2
2
2
1
1
To skip through the songs, press the Skip Forward
① or
Backward ② button.
To search through the songs, press and hold the Skip
② button.
① or Backward
Forward
To start playback, press the Play/Pause (
) button ① ; the
selected track will play.
To pause playback, press the Play/Pause (
) button ① .
Press it again to resume playback.
Press the DISPLAY button ② to cycle between the song title
scrolling across the display and the elapsed time on the
display.
32
iPod OPERATION
3
4
1
3
4
2
While your iPod is in a menu, you can press the Navigation
② buttons on the remote to navigate up or down
① or
in the menus, and you can press the ENTER ③ button to
enter your selection. Also, press the MENU ④ button to go
back to the previous menu.
NOTE: The MENU button operates just like the Menu
button on the iPod.
Press the REPEAT button once; “ONE” will appear on the
display and the currently playing track will repeat
continuously.
Press the REPEAT button twice; “ALL” will appear on the
screen for a few seconds and the tracks will repeat over
and over.
Press the REPEAT button a third time to cancel the repeat
mode.
5
6
2
3
Press the SHUFFLE button. The Shuffle indicator will
appear in the display and the disc will randomly play back
all of the tracks and then stop. To cancel random playback,
press the SHUFFLE button until the Shuffle indicator
disappears from both the iPod’s display and the unit’s
display.
1
Adjust the VOLUME +/– buttons ① , EQ button ② and the
BASS Up/Down buttons ③ as desired.
NOTES:
• If this unit is turned on and in another mode, once the iPod is connected, this unit will change to iPod mode automatically.
When the iPod is removed, the unit will remain in iPod mode.
• To remove the Dock, insert your finger (or other object) into the gap in the Dock, then gently pull the Dock out to remove it.
• CHARGING: When the iPod is inserted into the dock, whether this unit is on or off, the iPod’s battery will charge until it is full.
• To watch iPod videos, you must have the unit connected to a TV via S-video or Video Out as described on page 9. You
cannot connect the unit to a TV via HDMI or composite video out and watch videos from your iPod.
33
USB OPERATION
PLAYING THE FILES ON THE CONNECTED USB DEVICE/INSERTED SD/MMC CARD
1
2
1
2
2
1
3
Connect a USB Flash or other USB storage device (up to
16 GB)to the USB jack ① or insert desired media (up to 16 GB)
(Memory Stick Pro/Memory Stick Duo with adaptor/SD,
Memory Stick or MMC) ② . You can play music in MP3
format or pictures in JPEG format.
Press the POWER button ① ; the Power indicator will light
brighter. Press the USB Mode button ② to select the unit
connected to the USB jack or the SD Mode button ③ to
select the inserted card. After a short while, the
device/card’s contents will appear on the TV screen
3
4
2
1
2
3
3
1
If viewing a slideshow, see page 29 for details.
If listening to an MP3 file, see pages 25-26 for details.
Adjust the VOLUME +/- buttons ① , EQ button ② and the
BASS Up/Down buttons ③ as desired.
Select the desired folder using the Navigation ( , )
buttons 1 . Then, press the ENTER button ② to show all the
files inside the folder. Select a photo or MP3 file using the
Navigation ( , ) button ① , then press the ENTER button
② to select.
While viewing a slideshow, the MENU button ③ can be
pressed to return to the folders. While viewing the folders,
you can press the Navigation
button ① to go back to
previous folders.
34
USB CONNECTION
Remarks:
• FM/AUX/IPOD Mode(with Disc in the disc tray) switch to USB/SD mode, press USB/SD button once to enter DVD
mode, then press USB/SD button again to switch to USB/SD mode.
Connecting a USB device
1) Power-on the unit.
2) Make sure no disc has been inserted inside the tray.
3) Insert a USB key inside the connector.
4) Press the USB key from the remote control to start.
Remark: Depending on the capacity of the device, the reading can take more than 1 minute before lauching the video.
The unit cannot read my USB device.
- Once you have plugged your device to the unit, you may need to switch on the USB device before it can operate.
- This unit does not support a direct USB connection with a computer. You need to use a USB device, a MP3 player
or a PMP (Portable Multimedia Player with hard disk).
- If you are using a USB external hard disk: you need to connect your device simultaneously to an external power
source and to the unit. If you are using a self-powered PMP, make sure that the battery is sufficiently loaded.
- Check that the files system of your USB device is formatted into the FAT or FAT 32 format. USB device formatted
into NTFS are not compatible with this unit. Caution: if you attempt to modify your file system, formatting your device
will erase all data. Please refer to your USB device’s instruction manual first.
- Warning: Connect your USB device directly to the USB port of the device. Using an extension cable is not
recommended and may cause interference and failure of data transfer.
Connecting a memory card
1) Power-on the unit.
2) Make sure no disc has been inserted inside the tray.
3) Insert a compatible memory card inside the connector.
4) Press the SD key from the remote control to start.
Remark: Depending on the capacity of the device, the reading can take more than 1 minute before lauching the video.
The unit cannot read my memory card.
- Check firstly that your memory card is compatible with the unit. Supported memory cards are SD, SDHC, MMC
formats. We have tested this unit with most of the market’s memory cards ; we cannot however guarantee a full
compatibility with all the cards in the market because of the multiple technology standards in use. Should you have
a compatibility problem: please use a memory card with a lower capacity (2GB or lower) or else connect the unit
through a USB device.
35
SLEEP TIMER
SLEEP TIMER
1
2
With the unit on and playing the selected source, press the
SLEEP button repeatedly to set the sleep time from 10
minutes to 60 minutes, in 10 minute increments.
Press the SLEEP button at any time to view the sleeping
time left.
3
To turn the Sleep option off, press the SLEEP button
repeatedly until “SLEEP 00 MIN” appears.
36
TROUBLESHOOTING GUIDE
Check the following before requesting service:
SYMPTOM GENERAL
No power
Plug the AC cord into an AC outlet.
An ON/OFF switch is located on the unit’s rear panel. Please set the commuter to ON position.
Power on, but unit not functioning properly
Unplug the unit and wait about one totwo hours to allow the player to dry.
Press the POWER button, then unplug the power cord. Wait one minute and then plug the unit back in.
Clean disc and insert label side-up.
This is normal; try another function.
No picture
Connect the equipment according to the instructions in this manual.
Select the appropriate video input mode, usually VIDEO or AV.
Connect the video cables securely.
Turn the TV on.
HDMI Mode Display Problem
When you select an HDMI display mode which is not supported by
your television (if you
choose, for example, 1080i while your television supports up to 720p only), you get a black
screen. As a result, you cannot change the HDMI resolution in the setup menu. In this case, plug
the Video Composite cable (included) and press the VIDEO button of the remote control repeatedly until the correct video mode is selected and the picture appears on the screen again. Then
you can press the SETUP button in order to choose a lower resolution that is supported by your
television.
iPod Mode Display Problem
Please connect this device to a TV via the composite video output cable (included) or with S-Video
cable. The playback of HDMI is not supported.
No sound
Connect the equipment according tothe instructions in this manual.
Connect as per this manual, and press the AUX Mode button on the remote.
Connect the speaker cables securely.
Turn the external unit on.
SYMPTOM DVD
The unit does not start playback.
Make sure to insert a DVD.
Insert DVD correctly.
Clean the disc.
Some functions do not operate as stated.
This is normal; try another function.
37
TROUBLESHOOTING GUIDE
Selected language is not being shown or spoken in the subtitles.
This is normal; try another disc.
Subtitles are not working properly.
This is normal; try another disc.
Turn the subtitles on.
Angle cannot be changed.
Try another disc or wait for a scene which allows a different camera angle.
The unit cannot read my USB device.
Once you have plugged your device to the unit, you may need to switch on the USB device
before can it operate.
This unit does not support a direct USB connection with a computer. You need to use a USB
device, a MP3 player or a PMP (Portable Multimedia Player with hard disk).
If you are using a USB external hard disk: you need to connect your device simultaneously to an
external power source and to the unit. If you are using a self-powered PMP, make sure that the
battery is sufficiently loaded.
Check that the files system of your USB device is formatted into the FAT or FAT 32 format. USB
device formatted into NTFS are not compatible with this unit. Caution: if you attempt to modify
your file system, formatting your device will erase all data. Please refer to your USB device’s
instruction manual first.
Warning: Connect your USB device directly to the USB port of the device. Using an extension
cable is not recommended and may cause interference and failure of data transfer.
The unit cannot read my memory card.
Check firstly that your memory card is compatible with the unit. Supported memory cards are
SD, SDHC, MMC formats. We have tested this unit with most of the market’s memory cards ; we
cannot however guarantee a full compatibility with all the cards in the market because of the
multiple technology standards in use. Should you have a compatibility problem: please use a
memory card with a lower capacity (2GB or lower) or else connect the unit through a USB
device.
38
CARE AND MAINTENANCE
Caring for Discs
• Treat the disc carefully. Handle the disc only by its edges. Never allow your fingers to come in contact with the shiny, unprinted
side of the disc.
•
•
•
•
Do not attach adhesive tape, stickers, etc. to the disc label.
Clean the disc periodically with a soft, lint-free, dry cloth. Never use detergents or abrasive cleaners to clean the disc. If
necessary, use a CD cleaning kit.
If a disc skips or gets stuck on a section of the disc, it is probably dirty or damaged (scratched).
When cleaning the disc, wipe in straight lines from the center of the disc to the outer edge of the disc. Never wipe in circular
motions.
B E NZE N E
•
•
•
C LEA NE R
Discs should be stored in their cases after each use to avoid damage.
Do not expose discs to direct sunlight, high humidity, high temperatures or dust, etc. Prolonged exposure or extreme
temperatures can warp the disc.
Do not stick or write anything on either side of the disc. Sharp writing instruments or the ink, may damage the surface.
Cleaning the Unit
• To prevent fire or shock hazard, disconnect your unit from the AC power source when cleaning.
• The finish on your unit may be cleaned with a dust cloth and cared for as other furniture. Use caution when cleaning and
wiping the plastic parts.
• Mild soap and a damp cloth may be used on the front panel.
39
SPECIFICATIONS
Power Requirements..........................................................................................................AC230V, 50Hz
Power Consumption ...........................................................................................................................90W
Signal System ..........................................................................................................................NTSC/PAL
Discs Played:
DVD-VIDEO Disc
12cm single-sided, single layer
12cm single-sided, dual layer
12cm double-sided, single layer
8cm single-sided, single layer
8cm single-sided, dual layer
8cm double-sided, single layer
COMPACT DISC (VIDEO CD)
12cm disc
8cm disc
Video Output Level ..........................................................................................................................1Vp-p
Audio Signal Output Characteristics:
Frequency Responses:
DVD (Linear Audio)......................................................................20Hz-20KHz (48KHz/96KHz sampling)
CD Audio ...............................................................................................................................20Hz-20KHz
S/N Ratio......................................................................................................................................70dB
“Made for iPod ” means that an electronic
accessory has been designed to connect
specifically to iPod and has been certified by the
developer to meet Apple performance standards.
Apple is not responsible for the operation of this
device or its compliance with safety and
regulatory standards.
iPod is a trademark of Apple Inc., registered in
the U.S. and other countries.
* iPOD not included
40
Important remarks about reading MPEG-4 videos on this unit
If you encounter any problems when playing MPEG4 videos, please check the below points:
1)
There is a wide variety of codecs and compression methods in use. It is possible that some
videos, including those downloaded from unofficial websites, are not fully compatible with
this unit.
2)
This player does not support MPEG4 videos recorded using a High Definition format. The
MPEG-4 HD and H.264 formats are different from the standard-resolution one. For the time
being, videos encoded in High Definition are only readable on computers.
3)
Maximum resolutions supported by MPEG-4 codecs and this unit are: 720x480@30fps /
720x576@25fps
4)
Videos must be encoded with a soundtrack in MP3 format, since other formats, such as AC3,
are not supported. If there is no sound, it means that the audio codec is not compatible.
5)
If your MPEG-4 video file does not appear on the unit’s screen, check that the file name ends
with the extension “.AVI”. If this is not the case, you can rename the file on your personal
computer.
SAV
ADMEA / LOGISAV
ZI du clos des charmes
26 rue du clos des charmes
77090 COLLEGIEN - FRANCE
41