1
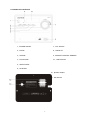
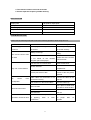
MMP-390
CD MP3 MICROSYSTEM
USER MANUAL
Please read and keep these instructions
Important safety instructions – please read carefully
and keep for future reference
To reduce the risk of fire or electric shock, do not expose this product to water, rain or
moisture. To prevent the risk of electric shock, do not remove the cover or back of this
product. In case of product failure, only qualified personnel can repair. There are no
user-serviceable parts inside.
Use of controls, adjustments or performance of procedures other than those specified
herein may result in dangerous radiation exposure. This product is rated as LASER
CLASS 1 PRODUCT.
CAUTION: Laser radiation when open -
never stare into the laser beam.
CAUTION !
Dangerous tension inside the product ! Do not open. Risk of electric shock ! No parts can be
repaired by the end-user. Only qualified personnel can repair and maintain this product.
If the electric cord is damaged, it must be replaced by the manufacturer or qualified after-sales
personnel in order to avoid any danger.
The product must be installed in accordance with local laws.
Damaged batteries must be properly disposed. In order to protect the environment, please dispose the
batteries properly, in accordance with local laws (information is available at your reseller).
Where to install the product
-
Place the product on a straight, rigid and stable place. Do not place the product on a carpet.
-
Do not place the product on top of another that may cause overheating (for example, a receiver
-
Do not place anything underneath the product (for example, CDs or magazines).
or amplifier).
Proper ventilation
-
Do not install this equipment in a confined or building-in space such as a book case or similar
unit, and remain a well ventilation conditions. The ventilation should not be impeded by
covering the ventilation openings with items such as newspaper, table-cloths, curtains etc.
Place the product in a sufficiently–aerated place to avoid overheating. Allow at least 10cm
spacing at the back and top of the product, and 5cm spacing on both sides to prevent
overheating.
-
Do not place items such as newspapers, tablecloth, curtains, in front of the ventilating
openings.
Do not expose the product to high temperatures, moisture, water and dust.
-
The apparatus shall not be exposed to dripping or splashing. No object filled with liquids, such
as vases, shall be placed on the apparatus.
-
Do not place other items close to this product that may damage it (for example, objects
containing water or lightened candles).
2
-
No naked flame sources, such as lighted candles, should be placed on the apparatus.
-
The batteries shall not be exposed to excessive heat such as sunshine, fire or the like.
Electric supply
-
Please unplug the product in case of prolonged non-use.
-
If the supply cable is damaged, it must be replaced by the manufacturer or qualified after-sales
personnel to avoid any danger.
-
This product must be connected to an electrical supply 230V ~ 50/60Hz.
-
The plug must be accessible after installation.
-
The mains plug is used as disconnect device, the disconnect device shall remain readily
operable.
This product is compliant with directives 2006/95/CE (abrogating the directive
73/23/CEE modified by the directive 93/68/CEE) and 2004/108/CE (abrogating
the directive 89/336CEE).
- This logo set on the product means that the recycling of this apparatus comes within the framework
of the directive 2002/96/EC of January 27, 2003 concerning the waste on electrical and electronic
equipment (WEEE).
- The presence of dangerous substances in the electrical and electronic equipments can have
potential consequences on the environment and human health in the cycle of reprocessing this
product.
- Therefore, at the end of its lifetime, this product shall not be disposed with other non-recycled waste.
- As the end user, your role is of prime importance in the cycles of re-using, recycling, and other forms
of valorization of this electrical and electronic equipment. Local authorities and resellers have set
special procedures for the purpose of collecting and recycling this product.
- You have the obligation to use the selective waste collection systems put in place by your local
authorities.
3
INTRODUCTION
Thank you for choosing this product. Here are the main characteristics of your new microsystem:
-
Equipped with a digital PLL tuner, you can easily search and memorize FM radios during playing.
-
With its compact with elegant design, this system can easily find its place at home and be installed in
just a couple of minutes.
-
Thanks to its USB input, it becomes a real multimedia player, able to play all your favorite songs in MP3
and WMA format,
-
Finally, you can enjoy an uncompromised music experience with convenient and easy-to-use audio
settings thanks to the EQ.
FUNCTION
COMPATIBLE WITH AUDIO CD/CD-R(W)MP3/CD-R(W)WMA
LCD DISPLAY
MATCHED TWO SPEAKERS WITH OUTPUT POWER : 2 X 8W
DIGITAL PLL FM TUNER
USB FUNCTION
LIST OF MAIN PARTS
Master Unit
2 Speakers
Remote Control
Manual
4
LOCATION OF CONTROLS
1、POWER ON/OFF
7、VOL ADJUST
2、CD/FM
8、USB SLOT
3、CD/USB
9、REMOTE CONTROL SENSOR
4、PLAY/PAUSE
10、LCD DISPLAY
5、OPEN/CLOSE
6、CD DOOR
12、Speaker Output
13、FM antenna
5
1.
STANDBY
2.
NUMBER KEY
3.
MUTE
4.
RANDOM
5.
SEEK-/LEFT
6.
REWIND
7.
FORWARD
8.
CD/FM
9.
BASS
10. AUTO
11. TREBLE
12. OPEN/CLOSE
13. EQ
14. PROG
15. REPEAT
16. CH+/UP
17. SEEK+/RIGHT
18. PLAY/PAUSE
19. CH-/DOWN
20. NEXT
21. PREV
22. STOP
23. CD/USB
24. VOL25. SAVE
26. VOL+
27. ST/MO
28. PREVIEW
6
INSTALL THE REMOTE CONTROL BATTERY
1. Remove the battery cover.
2. Install 2pc ``AAA`` battery into the battery compartment. Make sure that the + symbol is respected
3. Close the battery cover.
Note:
1. Battery chemicals can cause a rash. If the batteries leak, clean the battery compartment with a
cloth. If chemicals touch you skin, wash immediately.
2. If the remote control is not going to be used for an extended period of time, remove the batteries.
3. Dispose of used battery by following your local hazardous waste regulations.
SYSTEM CONNECTION
You can connect the player to the speakers and enjoy listening.
Connect the speaker cables to the SPEAKER jacks which on the back of the player.
BASIC OPERATION
PREPARATIVE
1). Before turning on, check whether all the connection are correct and reliable. Plug the power
cord at last.
2). Press POWER button on the front panel to turn on.
3). Press OPEN/CLOSE button on the front panel or remote control to open the disc door, put
the disc into the CD compartment, and then close the disc door. The unit starts reading and
playing.
POWER
Press the POWER button in front panel to turn on/off.
STANDBY
Press the STANDBY button in remote control for Standby.
NUMBER BUTTONS
While playing songs, press the NUMBER buttons on the remote control to select the songs
you need. For example, the second song is required: press button 2; for the 16 th song,
press the 10+ and 6 buttons.
7
MUTE
In play status, If the MUTE button is pressed, there will be no audio output, the sound is
eliminated. Then press this button again or press VOL+/- buttons to exit the mute status, the
sound resumes to be its normal status.
RANDOM
While playing the CD disc, press the RANDOM button to play the disc in random.
FAST REWIND / FAST FORWARD
While playing the CD disc, press the
button or
button, the disc will play fast rewind or
fast forward. Press the PLAY/PAUSE button to exit this status and resume to normal playing.
CD/FM
To exchange between CD and FM.
AUTO
While in radio mode, press the AUTO button to search the bands automatically.
OPEN/CLOSE
To Open/Close the Disc tray
EQUALIZER
In play status, press EQ button in the remote control, you can select different sound field effects
(for example: Rock/Pop/Live/Classic, etc).
Note: Some disc content is unsuitable for this EQ format, it may arouse distortion while
selecting.
PROGRAMMED PLAYBACK
Up to 20 tracks can be programmed for playing in any desired sequence.
1. In stop mode, press the PROG button, the display shows"PO1" in the display.
2. Press number key to input the desired track to be memorized.
3. Press the PROG again, the display shows "PO2" after the first program is OK.
4. Similarly, Press the PROG again after the 2 program is OK. you’ll have the 3 been programmed.
5. after finishing the Program, Press PLAY/PAUSE to start playing. To cancel program play, Press
STOP .
Note: when you operate this function, please make sure the mode is STOP.
Note: unit could read more than 20 tracks (subject to CDs), but, could only select and program
20 tracks inside this CD.
Note: once Power off, the previous Programmed won’t be memorized, you have to re-program
what you want.
REPEAT
Wile playing the CD discs, press the REPEAT button to separately select the different contents
for repetition: Track repeat, All repeat.
8
PLAY/PAUSE
In play status, press the PLAY/PAUSE button, the play will be paused, and press it again to
continue playing.
STOP
While playing CD disc, press the STOP button on the remote control, and then press
PLAY/PAUSE button, the disc will be played from the beginning.
CD/USB
To exchange between CD and USB
VOLUME ADJUSTMENT
Press the VOL-/+ buttons on the remote control to turn up or down the volume of this unit.
You can also turn the VOLUME KNOB on the front panel to control volume.
SEEK-/+
While in radio mode, press the SEEK- button or SEEK+ button, the player will seek the
frequency up or down.
PREVIEW
To preview the initial 10 second of every song in the CD, you could PREVIEW again or STOP
to stop the preview, then, press “Play/Pause” for playing.
PREVIOUS/NEXT
While playing the CD disc, press
or
button to go to the previous or next song.
CH+/CHWhile in radio mode, press CH- or CH+ button to go to the previous or next band.
MONO/STEREO
While in radio mode, press the MO/ST button in the remote control to exchange/select the
mono or stereo.
Note: There’s no tip of MO/ST shown in the display in your selection. Unit swapping
MO/ST by your press times.
SAVE
While in radio mode, press the SAVE button in the remote control to store the current
bands.
Note: once Power off, the previous SAVE won’t be memorized, you have to re-search the bands.
BASS/TREBLE
In play status, press the BASS and TREBLE button in the remote control , and then press
VOL-/+ to adjust the BASS and TREBLE value.
This function provides a better quality of BASS and TREBLE sound.
9
PLAYING USB
Press the “CD/USB” button to switch to CD / USB playback.
NOTE:
If in FM mode, please press CD/FM first to switch to CD mode before switch to USB.
Connecting a USB device
1) Insert a USB in the slot.
2) Press the CD / USB key to start.
Remark: Depending on the capacity of the device, the detection and initialization takes around
15 seconds.
The unit cannot read the USB device.
-
Once you have plugged your device to the unit, you may need to switch on the USB device
before it can operate.
-
This unit does not support a direct USB connection with a computer.
-
Check that the files system of your USB device is formatted into the FAT 32. USB device
formatted into NTFS are not compatible with this unit.
Caution: if you attempt to modify your file system, formatting your device will erase all data.
Please refer to your USB device’s instruction manual first.
FM RADIO OPERATION
1. Enter FM Function
In the turn-on or playing status, press the CD/FM button on the remote control (or front panel) to
enter FM status. Press this button again to switch between FM and CD playing.
2. Select Bands
1) Select band by pressing SEEK- or SEEK+ button: under some frequency, press the button, the
frequency will be up or down on the step. The step of FM is 0.05 MHz
2) Select band by pressing number buttons: you may select the bands that have been saved by
pressing the number buttons. For example: press 10+ button once, 5 button once, you may
select the 15th band. Press the CH- or CH+ button, the band will be switched up or down.
3) Automatically search bands: press the AUTO button, this unit will start to search bands from the
lowest part to highest part automatically. Meanwhile the searched bands will be saved orderly.
Press the button again to stop searching.
3. Soundtrack Selection
Press the MO/ST button on the remote control, you may select Mono and Stereo soundtrack output
in FM status. If the signal is not strong enough, you cannot select Stereo.
4. Exit FM Status
Press the CD/FM button on the remote control (or front panel) to exit FM status, and press
CD/USB switch to other modes.
Remark: FM Frequency range: 87.5-108 MHz
NOTE: 1. You may adjust the best radio effect by adjusting the antenna.
2. You can search further bands by pressing AUTO button when adjusted the antenna in
a right position.
3. If the band is not clear by auto search, you choose the way manual search adjustment
by press SEEK-/SEEK+ button.
10
4. The channel number could not exceed 20
5. Cannot input the frequency number directly.
SPECIFICATION
Output ports
L/R speaker output ports
Input ports
USB In
Power supply
230V~
Max power
30W
Frequency
20Hz-20KHz ±3dB
50/60Hz
TROUBLE SHOOTING
Please use the following methods to solve the following problems while using this unit.
Fault Phenomenon
Possible Cause
Handing
Power supply cannot be
Power plug is not fully inserted into
Insert the power plug into
turned on
the socket
the socket securely
Replace
Battery is used up
The remote control does
not work
The front end of the remote control
is
not
aimed
with
a
new
battery
at
the
infrared
reception part of the player
The disc door is not close well
Please aim at the remote
control window
Close the disc door
Place
No disc inserted
a
disc
in
the
compartment
Play can not be realized
Be sure that the side with
Inverse placement of disc
pictures of the disc points
upwards
No
sound
from
Audio cable not connected or not
Connect the cable as the
connected securely
diagram
The volume is in the lowest status
Turn the volume up
loudspeaker
Use a piece of clean and
Disc not clean
Discontinuous sound
Operation cannot be done
soft cloth to clean the disc
Disc scratched
Replace the disc with a
Disc distorted
new one
Embedded micro computer fails due
Power OFF, and restart
to
the
lightning,
static
interference
or
other
player
seconds
11
after
10
12