1
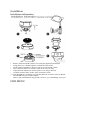
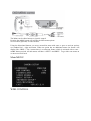
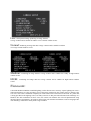
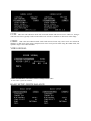
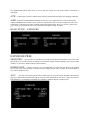
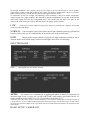
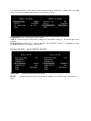
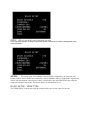
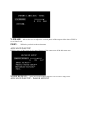
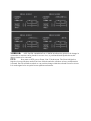
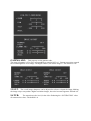
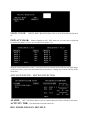
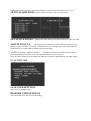
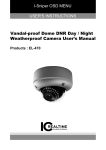
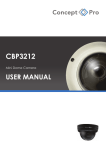
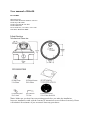
User manual of DA650
FEATURES
●Pixm Seawolf
●Horizontal Resolution 690TVL effective
●with 21pcs IR LEDs
●with removable IR-Cut filter
●with OSD menu
●Vari-focal lens, f=4-9mm, f=2.8-11mm.
●3D Noise Reduction DNR
Identification
Mechanical Drawing
Note: Make sure you don’t have any missing parts before you make the installation.
Incorrect installation could void the warranty if instructions are not followed correctly. Please
call technical for assistance if you are unsure about any procedures.
Installation
Installation information
•
•
•
•
•
•
7.
Remove the dome and the camera cover using the supplied L-Wrench(D)
Using the base as a drilled template, pre-drill all requires holes.
Fit the waterproof Pad(F) to the base, with sticky side against camera.
Now refit back camera, be careful of cable so not to cut or snag.
Adjust position and Focus & Zoom, replace cover using L-Wrench
Carefully clean the dome surface with a soft lint free cloth.
Check IR LEDs are working by covering the photocell of camera with your thumb,
The IR LEDs will give a faint red glow.
(Don’t’ look at IR LEDs for long periods of time, as you could damage your eyes.)
OSD MENU
The Menu can be either buttons or joystick control.
Pressing the middle button will activate the OSD menu options
Service cable (optional) on some models.
Using the directional buttons you move around the menu with enter or press to activate options
are standard left - right movement. When an option has an additional menu the feature will
display like <IRIS8 > The 8 means there is a sub-menu feature which is activated with a enter /
middle button pressed. All sub-menus will have a NEXT. And PREV. To go either one menu on
or one menu level back.
Main MENU
WDR CONTROL
Low:
The Dynamic Range producing an image that has
average contrast and is suitable for indoor or low-contrast outdoor scenes.
Normal: Producing an image that has average contrast and is suitable for indoor
or average contrast outdoor scenes.
Medium:
Producing an image that has average contrast and is suitable for a lobby or high-contrast
outdoor scenes.
HIGH:
Producing and image that has average contrast and is suitable for high-contrast outdoor
scenes.
Florescent:
Color Roll Reduction-Ballast controlled lighting such as fluorescent or mercury vapour lighting can cause a
phenomenon known as color roll where areas of the image produced by the camera appear to change color
over time. This can be eliminated completely in cameras that can be line locked to the same AC power that
is being provided to the lighting source, but many cameras are DC powered and cannot take advantage of a
hardware line lock mechanism. In these cases, the camera can eliminate the color roll phenomenon using
internal software mechanisms. All software-based color roll reduction mechanisms result in imaging tradeoffs including a reduction in the dynamic range available.
CCR:
This color roll reduction mode will work with manual and auto-iris lenses. However, Using it
with auto-iris lenses typically results in noticeable levels of noise in shadows or dark areas in the image.
CRR2
: This color roll reduction mode works with auto-iris lenses only. Noise levels are reduced in
shadows or dark areas in the image compared to he noise levels present when using the CRRs mode, but
dynamic range is also reduced further.
VIDEO SIGNAL
VIDEO STANDARD: PAL/NTSC selector. Changes NTSC video
or PAL video system for camera.
BASIC SETUP -WHITE BALANCE
The WHITE BALANCE menu item is used to tell the camera how the white balance mechanism is
controlled.
ATW:
Continuously calculates white balance settings and dynamically adjusts for changing conditions.
AWB:
When selected WHITE BALANCE menu item is set to AWB the user is taken to the PUSH
AWB CONFIRM menu in order to force oneshot re-calculation of the scene color temperature. The color
temperature is calculated once when enabled and not adjusted thereafter. Here you can use a neutral 18%
grey card to put in front of the lens to get a more balanced picture image for white.
BASIC SETUP – EXPOSURE
EXPOSURE PREF
SHADOWS:
The exposure set to shadows to provide the best detail in the darker areas of the scene.
This produces an excellent image for indoor scenes that have higher contrast lighting such as from backlit
windows or glass doors found in many business lobbies.
HIGHLIGHTS:
exposure preference is set to highlights to provide the best detail in the brighter
areas of the scene. This produces an image that has average contrast and is suitable for normal indoor or
low-contrast outdoor scenes.
AGC:
The AGC menu item tells the camera which types of scene the camera should be optimized for.
The gain is determined automatically and the exposure value measured by the camera. Under extreme lowlight conditions, several different methods are available to maintain he best possible picture.
In low-light conditions, AGC property can be used to improve the over all exposure as well as produce
usable images. Under normal light conditions the camera will display a normal picture. However, when the
light level drops below a certain value the camera will begin o boost the signal
to compensate for the lack of light. The advantage of this technique is that your camera will produce
images in much lower light conditions. The downside is that the amplification is not only on the usable
data in the image but also the background noise. This means that the more you gain up the
camera, the more noise you will see and the poorer the image quality will be.
LOW:
Camera gives lowest amount of gain where camera is positioned in a high lite area which
would overexpose the image.
NORMAL:
Camera applies typical gain control in low light conditions showing typical detail
in darker areas at the cost of a small amount of increased noise in the overall image.
HIGH:
Camera applies larger amounts of gain in low light conditions resulting in lots of
detail in darker areas but the image will have much higher noise in the overall image.
SHUTTER MODE
OFF:
OFF disables any slow shutter function
AUTO:
The camera uses a combination. of applied gain and slow shutter to compensate for
decreased light levels. If select the “SLOW SHUTTER” mode,shutter speed limit can be set.
Shutter speed limits:X2,X4,X8,X16, X32, X64 optional. The default is X2
NOTE:X2 means the shutter speed is normal divided by 2.For example: normal value of the shutter speed is
1/50,X2 will be 1/25.In low light condition,leaving the shutter open longer can optimise image, but with motion
the image can be blurred. Higher noise in gain mode,You do not suffer from blurred motion as compared to slow
shutter mode.
BASIC SETUP -CAMERA ID
A user defined TITLE can be shown on the displayed image all the time, which will be recorded
also, if you need to change this then here is the options to do so.
ID DISPLAY: ON / OFF master TITLE on/off.
TITLE: Actual displayed information, change the information using up - down left-right menu
controls.
ID POSITION: DOWN-LEFT / DOWN-RIGHT /UP-CENTER/ UP-LEFT / UP-RIGHT location
of the ID-Display to be located on the screen.
BASIC SETUP - DAY/NIGHT SETUP
NIGHT:
DAY:
light.
Will set camera to be B/W mode.
Will keep camera in color mode and not change over to B/W image even with low
GPIO:
Will let external IO control day/night operation.
Note: Only when option is available on particular models, and will not be shown if unsupported in the
camera hardware.
AUTO:
The system gain, set manually or automatically computed by the exposure subsystem, will be used to determine whether the camera should be in day or night mode. Night mode
will be entered when the system gain is above a threshold. If the gain falls bellow this value the
mode will change to day mode. Sub-menu allows the threshold to be set.
BASIC SETUP - LENS TYPE
The LENS SELECT menu item tells the camera which type of lens control to invoke.
MANUAL:
When the LEN SELECT menu item is set to MANUAL the camera disables
auto iris control.
DC:
When the LENS SELECT menu item is set to DC the camera to forces the DC autoiris open.
BASIC SETUP – SYNC
The SYNC menu item is used to tell the camera which type of video synchronization will be
Utilized. If SYNC is set to internal, the vertical rate for
NTSC video is 59.94 Hz. If SYNC is set to linelock, video timing synchronization will be locked
to the AC line input. PAL video is 50 Hz and thus would be used if camera is in PAL mode.
INTERNAL:
Disables linelock autosense feature, the camera will always use internal
synchronization.
LINELOCK
Enables the linelock auto-sense feature by setting. When enabled, linelock
autosense automatically detects if an AC power source is Present. Linelock synchronization is
achieved if the line frequency is within ±2.25 Hz of the selected video standard (NTSC or PAL).
If no appropriate AC source is available, the camera automatically uses internal synchronization.
When the SYNC menu item is set to LINELOCK the user is taken to the LINELOCK MENU
V-PHASE: Allows the user to adjust the vertical phase of the output video when SYNC is
set to Line-Lock.
PREV. Will take you back to the main menu
ADVANCED SETUP
Offering more of the lower level control feature of the camera are all in this menu tree.
NOISE REDUCE: Noise Level can be adjusted from 0-127 to remove image noise.
ADVANCED SETUP - IMAGE ADJUST
MIRROR:
OFF / BOTH / HORIZONTAL/ VERTICAL allows the picture to be change in
orientation so cameras can be placed for reverse view, or positioned install upside down, this
allows picture to be corrected.
PTZ:
Press enter on PTZ goes to Zoom / Pan / Tilt sub-menu. The Zoom is digital so
high level zoom will show artefacts in form of blocks and also will show as lower resolution this
is normal. Pan Tilt will allows subtle or vast position change within the selected Zoom Level area.
It is not designed to be an optical zoom replacement function.
GAMMA ADJ: This property set the gamma value.
The range of gamma is 25 to 100, corresponding to practical 0.25 to 1. Gamma correction controls
the overall brightness of an image. The higher value is, the darker image is. The default is 0.45.
SHARP:
The overall image sharpness can be adjusted to soften or crispen the image. Making
the image crisper can produce higher resolution images, but noise becomes apparent. Default is 0.
SATUR:
The saturation (color level) in the video. Reducing the “SATURATION” value
de-saturates the colors. The default is 0.
MASK COLOR:
WHITE / RED / BLACK defines color to cover the mask selection area
in.
PRIVACY MASK:
Selects if masks are ON / OFF, when on, you can enter to sub-menu
to enable each mask 1-6 to be set, use NEXT for masks 7-12.
With the selected mask set to ON↙8You enter into the selection area as show at top right image
of this page. Here you use the movement buttons and enter to change the location and size of the
mask area.
ADVANCED SETUP - MOTION DETECTION
ALARM: OFF / ON allows alarm event on a motion detection. Enter will show sub-menu
ACTIVITY THR: The threshold of motion sensitivity.
DIG. ZOOM, DIG.PAN, DIG.TILT:
Each setting allows the alarm to product a Digital zoom area apon the alarm event to occur.
SETUP ALARM ZONE: Allows position of alarm event area to be setup.
SET ACTIVE ZONES:
Changes the zone selection for detection from 1 Zone to 4 Zone
ADJUST ZONE 1-4: On each Zone you selection to enter the Zone setup where you
edit the region of interest. Press enter to shift the box color of image from white, green and red.
Hold enter for several seconds to return to the previous page.
NOTE: If selecting “ADJUST ZONE 4↙ ” The white box can be invisible because zone 4 is
preset by default as the full area of sensor and the white box is out of screen.
Press the centre button twice to change the white box to red box and shrink the area until visible.
SAVE/RESTORE
SAVE USER SETTINGS
Saves current settings as user
RESTORE USER SETTINGS
Will reset back to the last user saved settings.