1
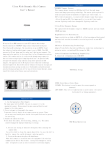
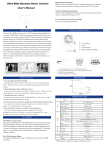
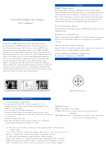
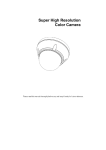
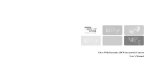
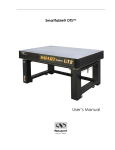
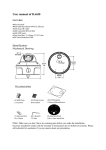
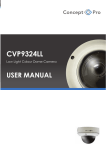
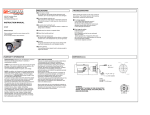
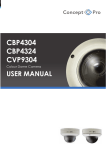
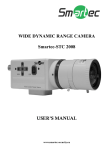
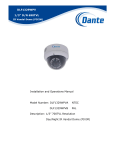
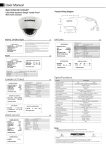
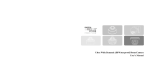
FEATURES
Ultra Wide Dynamic Mini Camera
SEAWOLF Image Sensor
This camera adopts innovative DPS(Digital Pixel System) image
User's Manual
sensor and image processing technology. The sensor picks up details
from each pixel based on hundreds of samples per video frame. vs
CCD's limited exposures, to ensure wider dynamic range than isposs
-ible with analog CCD. The image quality is even brilliant under
extreme lighting conditions.changeable lighting condition.
Ultra Wide Dynamic Range
The captured wide dynamic range is 102dB typical and can reach
120dB maximum.
High Effective Resolution
Image resolution as high as 690TVL-E, offering enhanced horizontal
DESCRIPTION
and vertical resolution useable in existing as well as new CCTV
SW series Ultra WDR cameras are new CCTV cameras which adopt
Pixim'sinnovative “SEAWOLF” image sensor chip based on Digital
Pixel System ® technology. The resolution is up to 690TVL-E and
the industry-leading wide dynamic range is up to 120dB. This WDR
ensures brilliant image quality under any lighting environment. The
image and color quality is also excellent in low illumination environ
-ments. This camera series is a ultra wide dynamicrange camera in
the real sense using digital sampling which can't be paralleledby
average wide dynamic range cameras using older generation CCD
imagers. The application of 3D digital noise reduction technology
ensures higher S/N, which efficiently reduces the digital storage and
transmission data saving system cost. Fashionable and professional
exterior design and special all-in-one all directional bracket, makes
round-the-clock surveillance easy and convenient.
Average camera with BLC off
Average camera with BLC on
Ultra Wide Dynamic Range camera
systems.
3D Noise Eliminating Technology
Adopts Pixim fully digitalized 3D noise reduction technology to
minimize noise, extending DVR storage by 30%+.
Lower Illumination Working Capability
0.1Lux low illumination (IR OFF)
PARTS INSTRUCTION
6
1.lens
5
4
2.adjustment acrew
3
3.bracket
2
4.bracket retaining screw
5.installation panel
6.retaining screw hole on installation panel
camera vertical angle adjustment
camera horizontal angle adjustment
1.loose bracket retaining screw, take off the installation panel
2.fix the installation panel by screw to the place needed
PRECAUTIONS
1. Use the Appropriate Power Supply
The input power will be DC12V . Be sure to connect it to the
appropriate power. Wrong connection may cause malfunction and
damage to the video camera.
2. Do not attempt to disassemble the camera.
To prevent electric shock, do not remove screws or covers. There
are no user serviceable parts inside. Ask a qualified service person
for servicing.
3. Handle the camera with care.
Do not abuse the camera. Avoid striking, shaking, etc. The camera
could be damaged by improper handling or storage.
3.install the bracket to the installation panel
4.loose the adjustment screw, adjust the vertical and horizontal
angle then fix the adjustment screw
OSD Menu Setup
ENTER: Enter Menu or Select Menu
UP/DOWN: This button is used to move the cursor upward or
downward.
LEFT/RIGHT: This left or right button is used to move the cursor
horizontally or change parameter.
Up
Left Enter Right
4. Do note use strong or abrasive detergents when cleaning the
camera body
Use a dry cloth to clean the camera when dirty. In case the dirt is
hard to remove Use a mild detergent and wipe gently.
5. Do not put the camera in a place with interference
When this camera is installed near the equipment like wireless
communication device which emits strong electromagnetic field,
some irregularity such as noise on monitor screen may happen.
Down
OSD Menu Operation
OSD MENU OPERATION
CAMERA SETUP
MEDIUM (LOW/NORMAL/MEDIUM/HIGH)
OFF
(OFF/ON)
ATW
(ATW/AWB)
NORMAL (LOW/NORMAL/HIGH)
DC
(MANUAL/DC)
(OFF/CRR/CRR2)
OFF
AUTO
(OFF/AUTO/GPIO)
ENGLISH (ENGLISH/CHINESE)
DEFAULT (CANCEL)
WDR CONTROL
BLC
WHITE BALANCE
AGC
LENS SELECT
FLUORESCENT
D/N CONTROL
LANGAGE SELECT
SAVE
D/N Control:
Move cursor to D/N Control by Up and Down button, set D/N by Left
andRight button as: OFF; Auto;GPIO: External Control; On. The
illumination is very low at night, so we need to rise the sensitivity and
improve imaging quality, then we can get better image quality. Set
D/N in accordance with different actual need.
SAVE&EXIT:
Move cursor to SAVE&EXIT by Up and Down button, set by Left
and Right button as : SAVE&EXIT;DEFAULT,CANCEL.
WDR ZONE SELECT:
NORMAL METER PRESETS
PRESETS
PRE
WD NROMAL
SAVE
DIMENSIONS
WD NROMAL/SAFE AREA/ATM/LOW1/3
CANCEL
*Specialists press "Left, Right, Left, Right, Down" button enter superior menu.
WDR Control:
Press Enter to show the menu, move the cursor to WDR Control, set
MEDIUM, NORMAL, LOW, HIGHby left and right button; choose
the setting for WDRinaccordance with the lighting condition, set
High in strong lighting contrast to realize higher quality image.
WDR ZONE SELECT:WD NROMAL/SAFE AREA/ATM/LOW 1/3.
BLC:
SPECIFICATION
move to BLC by Up and Down button, set BLC by Left and Right
button: On and Off.
Sensor
Sensor
WHITE BALANCE:
Move to White Balance by Up and Down button, set White balance by
WDR control
BLC
-ting condition, so the white color in video image changes if the light
AGC
Control
lighting condition,The color's temperature changes in different ligh
D/N
keep the same color temperature , ATW setting can keep a fixed color
SYNC Mode
Right Button as : NORMAL, LOW and HIGH. Setting AGC is better
for cameras to work in wider lighting range, if the illumination is low,
can set AGC high to rise the sensitivity of cameras.
LENS SELECT:
Move cursor to LENS SELECT, set LENS SELECT by Right and Left
button as :MANUAL,DC:DC Automatically. MANUAL FOR
MANUAL IRIS LENS, DC for AUTO IRIS LENS.
FLUORESCENT:
Move cursor to FLUORESCENT by Up and Down button, set by Left
and Right buttonas: OFF, CRR2: Color Rolling Restrain. Cameras
output color rolling image under fluorescent lamp, CRR can restrain
color rolling, keep the image stable.
LANGAGE SELECT:
Move cursor to LANGAGE SELECT by Up and Down button, set by
Left and Right button as : ENGLISH;CHINESE.
Power
Move cursor to AGC by Up and Down button, set AGC by Left and
0.1Lux
medium, normal, low, high
ON,OFF
normal, low, high
Mode
Tracking White Balance, Auto White Balance(ATW)
White
Balance Automatic
Auto White Balance
temperature automatically. In some special environment, in orderto
AGC:
690HTVL-E
Resolution
S/N Ratio
-ing White Balance. The color's temperature are different in different
temperature
DPS Sensor
PAL/NTSC
Mini illumination
Left and Right button: AWB: Auto White Balance; ATW: Auto Track
-ing condition changes. AWB means cameras can compensate color
1/3
Video Format
OFF, External Control, Auto; ON
INTERNAL
DC12V
Voltage
Current
Lens
<150mA
2.8mm pinhole
Working Temperature
Size
Weight
56(
)*57( H )
100g
*Specification is subject to change without prior notice