1
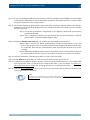
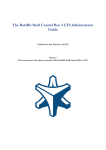
syslog-ng Store Box 3 LTS Packaging Checklist
May 12, 2015
Copyright © 1996-2015 BalaBit S.a.r.l.
Table of Contents
1. Preface ............................................................................................................................................ 3
2. Preparing syslog-ng Store Box for delivery ........................................................................................ 4
Appendix A. syslog-ng Store Box Hardware Installation Guide ......................................................... 5
A.1. Installing the SSB hardware .................................................................................................. 5
A.2. Installing two SSB units in HA mode ..................................................................................... 7
A.3. Installing a SAN storage module to SSB ................................................................................ 7
A.4. Hardware Troubleshooting .................................................................................................... 8
A.5. Hardware specifications ........................................................................................................ 8
Appendix B. syslog-ng Store Box Software Installation Guide ........................................................... 9
B.1. Installing the SSB software ................................................................................................... 9
www.balabit.com
2
Preface
1. Preface
This guide provides a detailed description on how to prepare SSB for delivery to a customer.
www.balabit.com
3
Preparing syslog-ng Store Box for delivery
2. Preparing syslog-ng Store Box for delivery
To prepare the syslog-ng Store Box for delivery, complete the following steps:
Step 1. Install SSB on the server hardware. Complete the following steps:
Step a. Carefully unpack all server components from the packing cartons.
Step b. When installing a server for , install the QLogic iSCSI host bus adapter card into the
server. For details on installing these cards, see the X8SIE/X8SIE-F/X8SIE-LN4/X8SI6-F
User's Manual.
Step c. Upgrade the server BIOS and the IPMI firmware to the latest available version. See
the following documents for details:
■ The Onboard BMC/IPMI User's Guide, Chapter 3, available at the BalaBit
Hardware Documentation page.
Step d. Set the Supervisor BIOS password to changeme.
Step e. Install the syslog-ng Store Box firmware to the server. See Appendix B, syslog-ng Store
Box Software Installation Guide (p. 9) for details.
Step f. Attach the labels received from BalaBit to the network interfaces on the back panel of
the server. syslog-ng Store Box is equipped with a dedicated IPMI interface and four
Gigabit Ethernet interfaces. Attach the labels in the following order:
Step i. Attach the IPMI label to the IPMI interface of the server.
Step ii. Attach the EXT label to the upper-left Ethernet interface of the server.
S t e p Attach the MGMT label to the upper-right Ethernet interface of the server.
iii.
S t e p Attach the INT label to the lower-left Ethernet interface of the server.
iv.
Step v. Attach the HA label to the lower-right Ethernet interface of the server.
Step g. Connect the external interface (labeled as EXT) to the network or directly to a
computer, and verify that the Welcome Wizard is accessible from a web browser.
Warning
Do not complete the Welcome Wizard, only verify its accessibility.
Note that your computer must be in the 192.168.1.0/24 network to be able to access
the Welcome Wizard. See Chapter 3, The Welcome Wizard and the first login in The
syslog-ng Store Box 3 LTS Administrator Guide for details.
Step h. Set the password for the IPMI to changeme.
Step i. Attach the syslog-ng Store Box label received from BalaBit to the front panel of the
server.
Step j. Return the server into the packing cartons.
www.balabit.com
4
syslog-ng Store Box Hardware Installation Guide
Note
When shipping two SSB units in high-availability mode, complete the above steps for both units.
Step 2.
Step 3. Put the syslog-ng Store Box accessory kit received from BalaBit into the packing cartons. Verify that
the kit contains the following:
■ Delivery note
■ syslog-ng Store Box License Agreement
■ syslog-ng Store Box Certificate
■ A printed version of the syslog-ng Store Box Hardware Installation guide (Appendix A,
syslog-ng Store Box Hardware Installation Guide (p. 5)).
Step 4. Seal the packing cartons.
Appendix A. syslog-ng Store Box Hardware Installation Guide
This leaflet describes how to set up the syslog-ng Store Box (SSB) hardware. Refer to the following documents
for step-by-step instructions:
■ syslog-ng Store Box SSB1000: For details on installing SSB into a rack, see the SC811 CHASSIS
Series User's Manual, Chapter 6: Rack Installation. For details on connecting the cables to SSB see
the X8SIE/X8SIE-F/X8SIE-LN4/X8SI6-F User's Manual, Section 2-5 Connectors/IO Ports.
■ syslog-ng Store Box SSB1000d and SAN Connect: For details on installing SSB into a rack, see the
SC825M CHASSIS Series User's Manual, Chapter 5: Rack Installation. For details on connecting
the cables to SSB see the X8DT3/X8DTi/X8DT3-F/X8DTi-F/X8DT3-LN4F/X8DTi-LN4F User's
Manual, Section 2-5 Control Panel Connectors/IO Ports.
■ syslog-ng Store Box SSB5000, and SSB10000 : For details on installing SSB into a rack, see the
SC826 CHASSIS Series User's Manual, Chapter 6: Rack Installation. For details on connecting the
cables to SSB see the X8DT3/X8DTi/X8DT3-F/X8DTi-F/X8DT3-LN4F/X8DTi-LN4F User's Manual,
Section 2-5 Control Panel Connectors/IO Ports.
The manuals are available online at the BalaBit Documentation page.
■ For details on how to install a single SSB unit, see Procedure A.1, Installing the SSB hardware (p. 5).
■ For details on how to install a two SSB units in high availability mode, see Procedure A.2, Installing
two SSB units in HA mode (p. 7).
■ If you have an external storage module, and you have purchased the SSB SAN Connect edition, see
Procedure A.3, Installing a SAN storage module to SSB (p. 7).
A.1. Procedure – Installing the SSB hardware
Purpose:
To install a single SSB unit, complete the following steps.
www.balabit.com
5
syslog-ng Store Box Hardware Installation Guide
Steps:
Step 1. Unpack SSB.
Step 2. Optional step: Install SSB into a rack with the slide rails. Slide rails are available for all SSB appliances.
Step 3. Connect the cables.
Step a. Connect the Ethernet cable facing your LAN to the Ethernet connector labeled as EXT.
This is the external interface of SSB and is used to configure SSB. (For details on the
roles of the different interfaces, see Section 2.5, Network interfaces in The syslog-ng
Store Box 3 LTS Administrator Guide.)
Step b. Connect an Ethernet cable that you can use to remotely support the SSB hardware to
the IPMI interface of SSB. For details, see the following documents:
■ The Onboard BMC/IPMI User's Guide, available at the BalaBit Hardware
Documentation page.
Warning
Connect the IPMI before plugging in the power chord. Failing to do so will result in
IPMI failure.
It is not necessary for the IPMI interface to be accessible from the Internet, but the
administrator of SSB must be able to access it for support and troubleshooting purposes
in case vendor support is needed.
Warning
Access to information available only via the IPMI interface is a not mandatory, but
highly recommended to speed up the support and troubleshooting processes.
Step c. Optional step: Connect the Ethernet cable to be used for managing SSB after its initial
configuration to the Ethernet connector labeled as MGMT. This is the management
interface of SSB. (For details on the roles of the different interfaces, see Section 2.5,
Network interfaces in The syslog-ng Store Box 3 LTS Administrator Guide.)
Step d. Optional step: Connect the Ethernet cable connecting SSB to another SSB node to the
Ethernet connector labeled as HA. This is the high availability (HA) interface of SSB.
(For details on the roles of the different interfaces, see Section 2.5, Network interfaces
in The syslog-ng Store Box 3 LTS Administrator Guide.)
Step 4. Power on the hardware.
Step 5. Change the BIOS and IPMI passwords on the syslog-ng Store Box. The default password is changeme.
Step 6. Connect to the SSB web interface from a client machine and complete the Welcome Wizard. This
might require you to configure an alias interface on the client machine. Step 5 is described in detail in
Chapter 3, The Welcome Wizard and the first login in The syslog-ng Store Box 3 LTS Administrator
Guide.
www.balabit.com
6
syslog-ng Store Box Hardware Installation Guide
Note
The syslog-ng Store Box Administrator Guide is available on the SSB on the BalaBit Documentation page.
A.2. Procedure – Installing two SSB units in HA mode
Purpose:
To install SSB with high availability support, complete the following steps.
Steps:
Step 1. For the first SSB unit, complete Procedure A.1, Installing the SSB hardware (p. 5).
Step 2. For the second SSB unit, complete Steps 1-2 of Procedure A.1, Installing the SSB hardware (p. 5).
Step 3. Connect the two units with an Ethernet cable via the Ethernet connectors labeled as HA.
Step 4. Power on the second unit.
Step 5. Connect to the SSB web interface of the first unit from a client machine and enable the high availability
mode. Navigate to Basic Settings > High Availability . Click Convert to Cluster, then reload the
page in your browser.
Step 6. Reboot the slave unit, then reboot the master unit. Wait a few minutes until the master unit boots, then
reload the page in your browser.
Step 7. Wait until the slave unit synchronizes its disk to the master unit. Depending on the size of the hard
disks, this may take several hours. You can increase the speed of the synchronization via the SSB web
interface at Basic Settings > High Availability > DRBD sync rate limit.
A.3. Procedure – Installing a SAN storage module to SSB
Purpose:
If you have an external storage module, and you have purchased the SSB SAN Connect edition, complete the
following steps.
Steps:
Step 1. Install the SSB unit(s) as described in Procedure A.1, Installing the SSB hardware (p. 5). If you have
purchased two units for high availability, complete Procedure A.2, Installing two SSB units in HA
mode (p. 7).
Step 2. Connect iSCSI port of SSB to the storage module with a crosslink cable.
Warning
If you have two SSB SAN Connect units in high availability mode, and your storage module has multiple
iSCSI controllers, connect both units to the same controller, otherwise the second SSB unit might not be able
to access the storage module after a failover.
Step 3. Power on the storage module hardware.
www.balabit.com
7
Hardware Troubleshooting
Step 4. Configure the storage module to accept connections from SSB. Refer the manual of your storage
module for details.
Warning
Ensure that the LUN numbers assigned to the volume mappings of the storage are between 1 and 30 (including
1 and 30). Do NOT use the 0 or the 31 LUN, because SSB will not be able to access the volumes.
Step 5. Power on the SSB hardware.
Step 6. Configure SSB to access the storage module. For details, see Procedure 3.3, Configuring storage
access in SSB in The syslog-ng Store Box 3 LTS Administrator Guide and Section 6.11, Managing SAN
access in SSB in The syslog-ng Store Box 3 LTS Administrator Guide.
For details on SAN troubleshooting, see Procedure 14.8, SAN troubleshooting in The syslog-ng Store
Box 3 LTS Administrator Guide.
A.4. Hardware Troubleshooting
Refer to the Setup Troubleshooting chapter of the respective guide if you encounter any problems. If you still
experience problems, contact the BalaBit Support Team via phone or e-mail:
To access the BalaBit Online Support System (BOSS), sign up for an account at the MyBalaBit page and request
access to the BalaBit Online Support System (BOSS). Online support is available 24 hours a day.
BOSS is available only for registered users with a valid support package.
Support e-mail address: <[email protected]>.
Support hotline: +36 1 398 6700 (available from 9 AM to 5 PM CET on weekdays)
A.5. Hardware specifications
SSB appliances are built on high performance, energy efficient, and reliable hardware that are easily mounted
into standard rack mounts.
Product
Unit Redundant Processor
Power
Supply
Memory
SSB1000
1
No
INTEL X3430
2,4GHz QUAD
SSB1000d
2
Yes
SSB5000
2
Yes
www.balabit.com
Capacity
RAID
IPMI
4 GB RAM 2x 1 TB
SATA
Software raid
Yes
2x INTEL XEON
E5620 2,4GHz
6x DDR3
4GB
2x 1 TB
SATA
Software raid
Yes
2x INTEL XEON
E5620 2,4GHz
6x DDR3
4GB
12x 500 GB ADAPTEC 5405
SATA
SAS RAID
Controller
Yes
8
syslog-ng Store Box Software Installation Guide
Product
Unit Redundant Processor
Power
Supply
Memory
Capacity
RAID
IPMI
SSB10000
2
6x DDR3
4GB
12x 1 TB
SATA
ADAPTEC 5405
SAS RAID
Controller
Yes
Yes
2x INTEL XEON
E5620 2,4GHz
Table A.1. System related traps
Appendix B. syslog-ng Store Box Software Installation Guide
This leaflet describes how to install the syslog-ng Store Box (SSB) software on a certified hardware. The list
of certified hardware is available at BalaBit.
B.1. Procedure – Installing the SSB software
Purpose:
To install a new SSB on a server, complete the following steps:
Steps:
Step 1. Login to your MyBalaBit account and download the latest syslog-ng Store Box installation ISO file.
Note that you need to have partner access to download syslog-ng Store Box ISO files. If you are a
partner but do not see the ISO files, you can request partner access within MyBalaBit.
Step 2. Mount the ISO image, or burn it to a CD-ROM.
Step 3. Connect your computer to the IPMI interface of SSB. For details, see the following documents:
■ The Onboard BMC/IPMI User's Guide, available at the BalaBit Hardware Documentation
page.
Step 4. Power on the server.
Step 5. Login to the IPMI web interface, and boot the syslog-ng Store Box installation CD on the server using
a virtual CD-ROM. For details, see the following documents:
■ The Onboard BMC/IPMI User's Guide, available at the BalaBit Hardware Documentation
page.
Step 6. When the syslog-ng Store Box installer starts, select Installer, press Enter, and wait until the server
finishes the boot process.
Step 7. Select Install a new SSB and press Enter to start the installation process. Depending on the size of
the disks, the installation process takes from a few minutes to an hour to complete. The progress of
the installation is indicated in the Installation Steps window.
Step 8. The installer displays the following question: Warning, all data on the hard drive(s) will be erased.
Are you sure? Select Yes and press Enter.
Step 9. The installer displays the MAC addresses of the network interfaces found in the SSB unit. Record
these addresses.
www.balabit.com
9
syslog-ng Store Box Software Installation Guide
Step 10. If you are installing an SSB SAN Connect edition, the device includes an iSCSI HBA card. The installer
will display the IQN number of the card during the installation. Record this number as it will be needed
during the installation of the storage module.
Step 11. The installer displays the product name, name of the SSB configuration that was installed, for example,
SSB1000. If the product name displayed does not match the product you wanted to install, complete
the following steps:
Step a. Check that the hardware configuration of the appliance matches the specifications
provided by BalaBit.
Step b. If the configuration matches the specifications but the installer displays a different
product name, contact the BalaBit Support Team.
Step 12. During the Finishing the Setup step, the installer performs RAID synchronization.
■ Select Yes to perform the RAID synchronization. RAID synchronization is a two-step
process, the progress of the active step is indicated on the progress bar. Wait until both steps
are completed. Note that this synchronization takes several hours (about 8 hours on the
average).
■ Select No to skip the RAID synchronization. Note that the system will automatically perform
the synchronization after the first boot, but in this case the process will take several days.
Step 13. After the installation is finished, press Enter to return to the main menu.
Step 14. Select Reboot and press Enter to restart the system. Wait until the system reboots.
Step 15. Connect your computer to the EXT interface of SSB. Create an alias IP address for your computer that
falls into the 192.168.1.0/24 subnet (for example 192.168.1.10). For details, see Section 3.1,
The initial connection to SSB in The syslog-ng Store Box 3 LTS Administrator Guide.
Step 16. Open the http://192.168.1.1 URL in your web browser and verify that the Welcome Wizard of the
syslog-ng Store Box is available.
Note
For details on the supported web browsers and operating systems, see Section 4.1, Supported web browsers
and operating systems in The syslog-ng Store Box 3 LTS Administrator Guide.
www.balabit.com
10
syslog-ng Store Box Software Installation Guide
Figure B.1. The Welcome Wizard
Step 17. Power off the system.
www.balabit.com
11