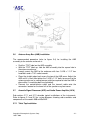
1
Doppler miniSoDAR System
Operation and Maintenance Manual
July 2008
Atmospheric Systems Corporation
24900 Anza Dr., Unit D
Valencia, CA 91355
Tel: +1.661.294.9621
Fax: +1.661.294.9667
e-mail: [email protected]
Copyright © Atmospheric Systems Corp.
1999-2008
IMPORTANT
This manual may not be reproduced in any manner (photocopy, facsimile,
electronic copy or any other manner) without the expressed written
consent of Atmospheric Systems Corporation.
Written consent for reproduction of this manual must be obtained from:
Atmospheric Systems Corporation
24900 Anza Dr., Unit D
Santa Clarita, CA 91355
+1.661.294.9621 (office)
+1.661.294.9667 (fax)
[email protected]
Copyright © Atmospheric Systems Corp.
1999 - 2008
-2-
PRODUCT LIMITED WARRANTY STATEMENT
Products manufactured by Atmospheric Systems Corporation (ASC) are warranted
to the original user to be free of defects in material and workmanship for a period of
12 months from date of installation, but not more than 18 months from date of
shipment from ASC’s facility, if installed, operated and maintained according to
ASC’s product manual.
ASC's liability under this warranty shall be limited to repairing or replacing defective
material, at ASC's option, F.O.B. ASC's factory or authorized service station. ASC
will not be liable for any costs of removal, installation, transportation, or any other
charges, which may arise in connection with a warranty claim. This warranty shall
be voided by damage or wear to products caused by abnormal operating conditions,
accident, abuse, misuse, unauthorized alteration or repair, or if the product was not
installed, operated and maintained in accordance with ASC's printed installation,
operation and maintenance instructions.
This limited warranty does not cover replacement of expendable items, such as
fuses, switches, connectors and speakers.
To obtain service under this warranty, the defective product must be returned to
Atmospheric Systems Corporation from whom it was purchased together with proof
of purchase and installation date, failure date, and supporting installation data. Any
defective product to be returned must be sent freight prepaid with documentation
supporting the warranty claim and/or a Return Material Authorization must be
included if so instructed.
SELLER SHALL NOT BE LIABLE FOR ANY INCIDENTAL OR
CONSEQUENTIAL DAMAGES, LOSSES, OR EXPENSES ARISING FROM
INSTALLATION, USE OR ANY OTHER CAUSES. THERE ARE NO EXPRESS OR
IMPLIED WARRANTIES, INCLUDING MERCHANTABILITY OR FITNESS FOR A
PARTICULAR PURPOSE, WHICH EXTEND BEYOND THE WARRANTY
DESCRIBED ABOVE.
NO REPRESENTATIONS BEYOND THE ABOVE WARRANTY, BY ANY
ATMOSPHERIC SYSTEMS CORPORATION REPRESENTATIVE, SHALL HAVE
ANY VALIDITY UNLESS CONFIRMED IN WRITING BY AN OFFICER OF
ATMOSPHERIC SYSTEMS CORPORATION.
For an RMA number, contact:
Atmospheric Systems Corporation
24900 Anza Dr., Unit D
Santa Clarita, CA 91355
+1.661.294.9621 (office)
+1.661.294.9667 (fax)
[email protected]
Copyright © Atmospheric Systems Corp.
1999 - 2008
-3-
CAUTION
Acoustic emission
The miniSoDAR system, when operating, emits high frequency (4500 Hz) pulses
of amplified acoustic energy within the threshold of human hearing. The antenna
enclosure assembly is designed to protect the immediate surroundings from the
effects of the transmit pulse and to keep service and operational personnel from
placing their ears directly into the path of this focused acoustic energy.
For further information or questions, contact:
Atmospheric Systems Corporation
24900 Anza Dr., Unit D
Santa Clarita, CA 91355
+1-661-294-9621 (voice)
+1-661-294-9667 (fax)
[email protected]
Copyright © Atmospheric Systems Corp.
1999 - 2008
-4-
Table of Contents
1.0
2.0
3.0
4.0
Manual reproduction restriction
Product limited warranty statement
Precautionary statement
Table of Contents
Introduction
System Operation
2.1
How does a SoDAR work?
2.2
Acoustic Signal Processor
2.2.1 Microprocessor
2.2.2 Data Acquisition and Control Boards
2.2.3 Analog Control and Conditioning Board
2.2.4 Audio Power Amplifier
2.3
Antenna Array Box (AAB)
2.3.1 Beam Steering
2.4
Reflector enclosure
2.5
Speaker Monitor Board
Installation
3.1
Unpacking the unit
3.2
Site selection
3.3
Site preparation
3.4
Orienting the enclosure
3.5
Enclosure and cuff installation
3.6
Antenna Array Box (AAB) installation
3.7
Acoustic Signal Processor and Power Amplifier
3.7.1 Table Top installation
3.7.2 Rack Mount installation
3.8
System connections
3.9
System checkout
3.10 Verification of system performance
System operation
4.1
Operating parameters
4.2
Generic user interface
4.2.1 Console Port
4.2.2 Date and time configuration
4.2.3 Operating parameters
4.2.4 Network parameters
4.2.5 Network support
4.3
Graphical user interface
4.3.1 Station menu
4.3.2 Output display menu
4.3.3 Printer menu
4.3.4 Window menu
4.3.5 System menu
Copyright © Atmospheric Systems Corp.
1999 - 2008
Page
2
3
4
5
7
8
8
10
11
12
12
13
13
13
13
14
15
15
16
17
18
20
21
21
21
22
22
22
23
24
24
24
24
25
26
27
27
28
29
30
30
30
30
-5-
Table of Contents (continued)
5.0
Preventative Maintenance
5.1
Acoustic Signal Processor
5.2
Audio Power Amplifier
5.3
Array beam forming electronics
5.4
Speakers
5.5
Speaker monitor board
5.6
System cables
5.6.1 Transmit cable
5.6.2 Receive / control cable
5.7
Uninterruptible power supply (option
5.8
List of Line Replaceable Units (LRU)
5.9
LRU installation and removal procedures
5.9.1 ASP installation
5.9.2 ASP removal
5.9.3 APA installation
5.9.4 APA removal
5.9.5 AAB installation
5.9.6 AAB removal
5.9.7 TC installation
5.9.8 TC removal
5.9.9 CRC installation
5.9.10 CRC removal
5.9.11 STA installation
5.9.12 STA removal
5.9.13 SMB installation (optional feature)
5.9.14 SMB removal (optional feature)
5.9.15 UPS installation (optional feature)
5.9.16 UPS removal (optional feature)
Copyright © Atmospheric Systems Corp.
1999 - 2008
Page
31
33
33
33
34
34
34
35
35
35
36
36
36
36
36
37
37
37
37
38
38
38
39
39
39
39
41
42
-6-
1.0 Introduction
Atmospheric Systems Corporation (ASC) is the commercial successor of
AeroVironment, Inc, a pioneer in the development and manufacture of Doppler
SoDAR (Sound Detection And Ranging) systems. ASC purchase the rights to
the product line from AeroVironment, Inc. on 1 May 2005.
The first system was introduced as a commercial product in 1978. Since then
over 500 customers have used these SoDAR systems. In early 1988
AeroVironment, Inc. was awarded a Small Business Innovative Research (SBIR)
Phase I grant to develop a Doppler SoDAR system that could measure the three
dimensional wind and turbulence field with helicopters hovering at an altitude
range of 20 to 30 meters and 100 meters away. In the final report for the Phase I
study AeroVironment, Inc. concluded that a high frequency system could be
designed to meet the requirements of this application. Subsequently in 1991
AeroVironment, Inc. was awarded a phase II grant to develop the system
proposed in Phase I. The miniSoDAR product was developed from the SoDAR
system designed to complete phase II. That project included the development
of the high frequency SoDAR system or the miniSoDAR, networking three (3)
trailer mounted systems via a radio modem link and the presentation of the realtime wind and turbulence profiles at a central computer operating in the
Windows graphical user interface environment.
The miniSoDAR was first introduced as a commercial product in 1994. That sale
included three networked miniSoDAR systems installed on the top of building
around the campus at the Lawrence Berkeley Laboratory (LBL). These systems
were operated as a key component of the LBL emergency response-monitoring
network for almost 10 years continuously. Subsequently, these systems have
been used to collect high-resolution measurements of the wind and turbulence
profiles within the lowest 250 meters of the atmosphere for over 100 customers
throughout the world. The miniSoDAR is particularly suited for (1) the
replacement of wind towers, (2) to complement microwave wind profiler
systems, (3) for wind energy studies, (4) emergency response monitoring
systems and (5) low altitude operational measurements of wind fields.
Copyright © Atmospheric Systems Corp.
1999 - 2008
-7-
2.0
System Operation
The miniSoDAR operates at audio frequencies near 4500 Hz. It emits a high
intensity sound pulse and samples the atmospheric echo from that pulse. This
echo contains information that is used to produces three-dimensional wind and
turbulence profiles in 5-meter increments beginning at 15 meters to a maximum
altitude of 250 meters above ground level (AGL). An overview of the
miniSoDAR operating principles and design features of the phased-array
antenna are presented in this section.
The following table lists the performance and physical features of the ASC
miniSoDAR system.
Maximum sampling height
Minimum sampling height
Height resolution
Operating frequency range
Wind table averaging interval
Wind speed range
Wind speed accuracy
Wind direction range
Wind direction accuracy
Operating voltage (AC option)
Power consumption (AC option)
Operating voltage (DC option)
Power consumption (DC option)
Antenna base dimensions
Antenna base weight
Antenna base and cuff dimensions
Antenna base and cuff weight
2.1
250 meters
10 meters
5 meters
4500 to 5500 Hz
30 sec to 1 hour
0 to 50 meters/sec
<0.50 meters/sec
0 to 359 degrees
±5.0 degrees
120VAC/ 60 Hz or 230 VAC/50 Hz
200 watts (average)
12 VDC
75 watts (average)
1.4 m (wide) x 1.6 m (long) x 1.3 m (high)
200 kg
1.4 m (wide) x 1.6 m (long) x 2.2 m (high
68 kg
How does a SODAR work?
The miniSoDAR system is comprised of three major components: (1) the
acoustic antenna enclosure, (2) the acoustic antenna (an array of speakers or
speaker(s) and a parabolic dish) and (3) the acoustic signal processor (ASP)
which is the computer that controls the miniSoDAR functions and process the
information echoed by the atmosphere. A user-interface computer may be
employed for local operation and real-time data display. And the ASP may be
networked for remote access, data transfer and operation.
Copyright © Atmospheric Systems Corp.
1999 - 2008
-8-
The acoustic antenna is an array of 32 speakers that are used to both transmit
and receive acoustic signals. This speaker array is electrically steered to
generate at least three independent beams. The speaker array design is the
subject of U.S. Patent No. 4,558,594. The acoustic enclosure is constructed
using fiberglass material. It consists of (1) a housing for the speaker array, (2) a
base that is used to hold the speaker array and the tilted reflector surface, and
(3) enclosure cuffs that improve the performance of the sodar system by
reducing the impact of diffraction side lobes. The enclosure is designed to
optimize the performance of the miniSoDAR in most weather conditions. An AC
(120 or 230 VAC) electric heater is available (as an option) to keep the reflecting
surface free from ice and snow. The Speaker Monitor Board (SMB) verifies that
each of the 32 speaker elements is properly emitting the acoustic signals. The
status of the speaker array as sensed by the SMB is included as part of the
header information included with every wind table output.
The received signal is the product of the interaction of the transmitted acoustic
pulse with small-scale atmospheric temperature and moisture variations (or
fluctuations). The amplitude (or intensity) of the acoustic echo is related to the
strength of these small-scale temperature variations. When presented
graphically as a function of time, these data reveal critical information about the
temporal variation of the turbulent structure of the lower atmospheric. This
information is extremely useful in the general characterization of the stability of
the local atmosphere.
Grey-scaled presentation of miniSoDAR facsimile data
The frequency of the received signal is directly proportional to the radial motion
of the scattering volume (or echo volume) relative to the antenna. The radial
motions as determined from the Doppler shift from at least 3 independent
directions (or beams) is combined to produce vertical profile of the horizontal
wind field. These profiles when plotted as a function of time present a graphical
display of the time variation of the wind field in a column of air directly above the
miniSoDAR system. An example of this presentation is
Copyright © Atmospheric Systems Corp.
1999 - 2008
-9-
Time-Height presentation of the horizontal winds
2.2
Acoustic Signal Processor (ASP)
The acoustic signal processor (ASP) digitally generates the transmitted signal
and digitally processes the received signal using spectral analysis techniques.
The ASP is designed around the powerful and flexible 32-bit, 68040
microprocessor. It utilizes a multi-tasking and multi-user UNIX-type operating
system (OS-9) to schedule the data acquisition and processing tasks. The ASP
is configured with a minimum with 4 MB RAM, four (4) high-speed serial
communication ports, one SCSI interface port and one ethernet port. The SCSI
interface is designed to communicate and control the hard disk drive and other
compatible storage devices. The ethernet port is the primary network link. The
version of OS-9 delivered as part of this miniSoDAR system includes network
TCP/IP support.
The acoustic signal processor (ASP) performs the following SoDAR
system, data acquisition and data processing functions:
•
•
•
•
•
•
•
Generation of transmit signal pulse
Amplification of transmit signal pulse
Analog filtering of receive signal data
Digital sampling of receive signal data
Multiple gated Fast Fourier Transform (FFT) of receive signal
Peak detection and reduction into three dimensional wind profile
System control and data communications
Copyright © Atmospheric Systems Corp.
1999 - 2008
- 10 -
•
•
Network support
Data storage
A functional block diagram of the ASP is given in Figure 2-1. A brief description
of each major component is presented below.
2.2.1 Microprocessor
The Motorola 68040 based microprocessor system is designed to interface to
the 32-bit VME data bus. It serves as the computational heart of the ASP.
Digital data is processed using Fast Fourier Transform based algorithms to
extract “raw” data such as the Doppler shift and the intensity of the received
signal. These “raw” data are processed into wind component and turbulence
information and formed into data packets.
In the stand-alone configuration the data packets are transferred to the PCbased user interface computer through a serial data communications link. This
computer is running the SodarPro program that is designed for the creation,
storage and display of wind tables and the digital facsimile data.
Copyright © Atmospheric Systems Corp.
1999 - 2008
- 11 -
In the networked configuration the wind table data is stored on the local hard
disk drive for transfer over the network to another computer for further
processing and display.
2.2.2 Data Acquisition and Control Boards
The data acquisition boards consist of two daughter modules that are installed
on the Motorola MVME162-213 processor board (refer to the microprocessor
board drawing 3300-01210 in section 6.5). The module in port A is an eight
channel, 12 bit, analog to digital converter. The module in port B is a 48
channel digital I/O. The specification sheets for these two data acquisition and
control modules are also included as part of section 6.5.
2.2.3 Analog Control and Conditioning Board (ACCB)
The ACCB is installed as the top card in the ASP. It is interfaced to the
microprocessor through the data acquisition and control boards. It performs the
following operations: (1) select the active beam, (2) generate the transmit signal
and (3) filter the received signal. The ACCB is designed to facilitate computer
control of both the frequency and amplitude of the transmit signal. It also
includes the low pass analog filter that is used to condition the received signal
prior to digitization. Figure 2-2 shows the ACCB block diagram. Located on the
front panel of the board is a 10 position rotary switch labeled ramp rate. The
ramp rate is pre-set at the factory.
Copyright © Atmospheric Systems Corp.
1999 - 2008
- 12 -
2.2.4 Audio Power Amplifier (APA)
The audio power amplifier selected for the Model 4000 sodar is a high
performance, stereo commercial unit. The amplifier has very low distortion, and
is very robust under field conditions. It performs the function of in-line
amplification of the acoustic signals generated on the analog control board.
2.3
Antenna Array Box (AAB)
The miniSoDAR antenna utilizes a single, steered beam speaker array to create
three independent beam patterns during both the transmit and receive functions.
This antenna consists of 32 piezo-ceramic acoustic transducers excited with
phase-controlled electronics to provide the appropriate beam steering (see
Figure 2-3). A pulse of acoustic energy is generated for each beam. Normally
this pulse has a duration of 30 milliseconds. In this case the corresponding
physical length of the pulse is 5 meters. The pulse propagates through the
atmosphere at approximately 340 meters per second. However, the round trip
propagation speed of the acoustic pulse is approximately 170 meters per
second.
2.3.1 Beam steering
In the transmit mode, two complementary signals (sine and cosine) are supplied
by the audio power amplifier and input to a switching board located on the back
of the antenna speaker array. Three transmit-axis logic signals are used to
enable the corresponding set of triacs for each transducer group. The
distribution of these signals forms the three independent beams as determined
by the beam select signals.
In the receive mode the speakers are divided into eight groups of 4
speakers. These grouped signals are then appropriately phase shifted
using simple op-amp integrator circuits and applied to a final differential
input amplifier for each axis. All three receive signals are generated
continuously but only one is sampled for each beam.
The phased array is enclosed in a box-like structure approximately 28 inches
square. This enclosure provides mechanical support and structure for wiring
and the on-board circuit cards. In fair weather conditions the Model 4000
antenna can be operated pointing vertically. However most applications utilize
the reflector enclosure to protect the speakers from rain, dust or snow.
2.4
Reflector enclosure
The Model 4000 acoustic enclosure is an open structure with a reflector surface
for the acoustic signals. This structure serves three purposes: (1) it shields the
Copyright © Atmospheric Systems Corp.
1999 - 2008
- 13 -
antenna from external noise sources, (2) it provides acoustic damping of the
transmitted signal in the region surrounding the unit, and (3) it permits the Model
4000 antenna to be mounted in a weather-resistant manner.
The main reflecting surface is tilted at a 45-degree angle from the vertical, and is
sized so that all three monostatic beams are to be transmitted with minimal
interference. An optional heater, which covers the surface of the reflector panel,
is available for regions with significant snowfall during winter months. The other
three sides to the antenna assembly are covered with acoustic absorbing foam
to dampen spurious noise from the immediate surroundings, and to reduce the
noise level nearby the unit. A drain panel is provided at the bottom of the
assembly, which can be lifted for debris removal.
2.5
Speaker monitor board
The Speaker Monitor Board (SMB) is designed to provide an indication to the
sodar operator that one or more transducers (speaker) have failed. The
principle on which the SMB operates is to sense the current going to each
transducer during the transmit pulse. If the current is above an acceptable level,
the transducer is considered good; if the current is below an acceptable level,
the transducer is considered faulty. When a bad transducer is detected, the
corresponding LED is illuminated and communicated to the ASP for inclusion in
the wind table header. The SMB has three sections: (1) the fault detection
section, (2) the timing section, and (3) the beam selection section.
Copyright © Atmospheric Systems Corp.
1999 - 2008
- 14 -
3.0
INSTALLATION
The following section provides step-by-step procedures for the installation and
testing of the Model 4000 miniSoDAR.
3.1
Unpacking the System
Unpack the Model 4000 miniSoDAR, and identify each of the following
components or sub-assemblies. Figure 3-1 is a pictorial guide. The packing list
will vary based on the type of system purchased. For example the standalone
miniSoDAR consists of four major components (reflector enclosure, speaker
array, acoustic signal processor and PC/terminal computer) while the networked
miniSoDAR has only three major components (reflector enclosure, speaker
array and the acoustic signal processor).
Packing List
A packing list is included as part of the shipping documentation. Please refer to
the packing list for the actual items shipped. At a minimum, the following items
are included as part of the system:
•
•
•
•
•
•
Model 4000 Antenna Enclosure:
- base (one unit)
- cuff (4 panels)
- hardware
Acoustic Signal Processor (ASP)
Antenna Signal Cable
(30/150/300 feet)
Antenna Transmit Cable
(30/150/300 feet)
Model 4000 miniSoDAR User Manual
CDROM containing system and data processing software (will
vary according to actual purchase)
The PC/terminal is an optional item. If your unit is a stand-alone unit (i.e. not
networked) then the PC is the user interface and primary data storage device.
Required Tools
The following are a list of the recommended tools for unpacking and installing
the unit:
• Straight-edged level (digital preferred)
• Protractor gauge
• 7/16” socket
Copyright © Atmospheric Systems Corp.
1999 - 2008
- 15 -
•
•
•
•
Ratchet driver
Universal socket extension
#2 Phillips screwdriver
Compass
If any portion of the Model 4000 unit is damaged or missing, please immediately
contact Atmospheric Systems Corporation, at 661-294-9621 (phone), 661-2949667 (fax) or [email protected].
3.2
Site selection
The quality of the measurements, the maximum altitude of those measurements
and the percentage of data recovered during the operational period are most
often used to evaluate system performance. And system performance is directly
related to the location selected for operation, the acoustic integrity of that
location and the operational procedures employed during the monitoring period.
The received signal intensity is directly proportional to the strength of the
interaction of sound energy with the constantly varying atmospheric turbulence.
In the best of conditions, the performance altitude of the miniSoDAR will vary as
a function of the background noise level, the time of day and the operational
status of the system components. For example the altitude performance of a
SODAR will characteristically be better in the morning when the local mixing is
the greatest than in the afternoon when the atmosphere is well mixed.
The first step is to identify local sources of ambient noise. Generators, air
conditioners, vehicle traffic, and animal noise are examples of typical identifiable
sources. A location removed from these interfering factors is preferred. An
equally effective solution is to site the antenna behind a sound-blocking
obstacle, such as an existing building or a local terrain feature.
Reflections of the transmitted energy from stationary objects can be a significant
issue in congested areas. The tilted beams from the instrument are nominally
15 to 17 degrees from vertical. This small deflection angle minimizes the
occurrence of reflections. Reflections or echoes of the transmitted pulse will be
detected by the miniSoDAR antenna and may affect the accuracy of the
measurements.
Common sense empirical testing is often the best method for determining the
best operational site. Since the miniSoDAR is easily moveable, experimenting
with several orientations at the desired location often yields surprisingly positive
results.
Copyright © Atmospheric Systems Corp.
1999 - 2008
- 16 -
Access to the site is also a consideration. Appropriate access to the monitoring
location is important for site preparation. After the miniSoDAR system is
installed and operational, access will be required for routine service.
Unless the miniSoDAR is operated on batteries the system requires a stable AC
power source. It is preferable that commercial power is available, but the
system can be operated from a low noise commercial grade generator. An uninterruptible power supply (UPS) is recommended if maximizing data recovery is
an operational objective. The combination of the AC line conditioner and an
UPS system has been found extremely effective for protection from damage by
nearby lightning strikes.
Both the acoustic signal processor and PC microcomputer should be installed in
an environmentally controlled shelter. If an existing building is used to house
the equipment, make sure that there is an entry point for the system cables. If
the shelter is to be constructed or moved onto the site, make sure that it can be
located so that it will not create any obstruction to the system operation.
Environmental control equipment such as air conditioners can be active noise
sources. The shelter should be oriented so that this noise source does not
directly radiate toward the miniSoDAR. Also ensure that the system cables that
connect the ASP to the miniSoDAR antenna are not subject to damage by traffic
or animals. If the installation is for long-term operation these cables should be
placed in conduit and buried in the ground as a preventative measure.
Finally, equipment security is also an important consideration. This includes the
security of the antenna, cables, miniSoDAR electronics and peripherals. If the
system is to be installed in an open area that is not protected by a fence, you
must consider what additional steps need to be taken to protect the equipment.
3.3
Site Preparation
If the antenna and acoustic enclosure are to be located permanently, a concrete
or asphalt pad should be utilized, approximately 4 foot square and 4 inches
thick. The pad should be level. For shorter monitoring periods, the ground can
be leveled and two, 2" x 8" x 4' planks can be placed under the acoustic
enclosure’s leveling feet. The enclosure must be secured with guy-wires.
An initial pointing direction should be selected at this time. The system can be
oriented in any direction relative to True North, as long as the enclosure is level.
This enables the antenna to be oriented such that local sources and ground
clutter objects are in the quadrant opposite that of the tilted beams.
Copyright © Atmospheric Systems Corp.
1999 - 2008
- 17 -
3.4
Orienting the enclosure
Once the acoustic enclosure is assembled, position the antenna so that the X
and Y beams are directed away from any potential noise or fixed echo sources
(see Figure 3-3). The Y beam is tilted toward the reflector board and forms the
basis for determining the rotation angle of the antenna with respect to True
North. Both the X and Y beams are nominally deflected 15 to 17 degrees from
the local vertical.
The antenna rotation angle is defined as the angle (clockwise direction) between
True North and the Y beam axis. The rotation angle which ranges from 0
degrees to 359 degrees is used to correct the horizontal wind direction as
sensed by the miniSoDAR to produce the wind direction with respect to True
North. A rotation angle of 0 degrees means that the Y beam points toward True
North and the X beam points to the East.
The antenna must also be leveled so that it senses the actual vertical velocity.
The antenna base (single unit for the fiberglass version) must be leveled before
the enclosure cuffs are installed. The antenna enclosure can be leveled using
Copyright © Atmospheric Systems Corp.
1999 - 2008
- 18 -
the leveling feet supplied with the shipment or mounting hardware if the unit is to
be installed on a concrete pad. The recommended procedure for leveling the
array is:
(1) Remove the antenna array box assembly (if installed), from the antenna
enclosure by removing four 1/4-20 x 1 1\2” hex head bolts with a 7/16”
socket wrench.
(2) Reach inside the enclosure and remove the acoustic foam covering the
flat base (bottom) of the enclosure. Place a straightedge level on the flat
base surface so that the straightedge level is perpendicular to the fall line
of the reflector board. Adjust the mounting hardware (or leveling feet) to
level this axis of the enclosure.
(3) Move the straightedge level to the vertical array box mounting side of the
enclosure (smooth outside). Adjust the mounting hardware (or leveling
feet) to level this axis of the enclosure.
(4) Move the level back to the flat base surface and make adjustments for
level.
(5) Verify that the reflector surface is tilted 45 degrees from vertical using a
bubble protractor (or digital level).
(6) Repeat steps (2) through (5) as needed to level the miniSoDAR
enclosure.
(7) Once the antenna enclosure is level and the reflector surface is tilted 45
degrees from vertical, secure the antenna enclosure frame to the
concrete pad anchor bolts by tightening the top nuts (if used). Recheck
the enclosure level at the previous mentioned locations.
(8) Reinstall the acoustic foam covering the flat base of the enclosure.
Loosely mount the antenna array box assembly to the enclosure with four
1\4-20 x 1 1\2” hex head bolts.
(9) Place the straightedge level on top of the cover of the antenna array box.
Adjust the array box until it is level, and then tighten the bolts to secure (a
second person may be required to hold the array box in place while it’s
mounting bolts are tightened).
The antenna rotation angle (defined above) is now measured with a compass.
Looking from behind the array box toward the antenna enclosure for reference,
move the compass to the left of the antenna enclosure and sight the compass
along the X-axis edge (vertical) of the enclosure, as shown in Figure 3-3.
Record this magnetic direction of the X-axis. Next, verify this measurement by
taking the compass to the direct opposite side of the enclosure and again sight
the compass along the X-axis in the reverse direction. For consistency the Xaxis reverse direction should be 180 degrees greater than the first X-axis
magnetic
Copyright © Atmospheric Systems Corp.
1999 - 2008
- 19 -
direction sighting. The antenna rotation angle entered into the ASP and/or
SodarPro program is the angle between the first X-axis sighting minus 90
degrees and True North, corrected for the local declination angle.
The magnetic declination value (in degrees) is used to determine the True North
in relation to magnetic compass measurement. For example, Los Angeles has
o
a magnetic declination of approximately 14.5 East. Using a level compass, find
the magnetic North heading. Rotate the compass 14.5o counterclockwise (for
East declination). The resulting North pointing direction is the true North
heading. For a West declination, the compass would be rotated clockwise from
the magnetic North heading for True North. The appropriate declination angle
for any location in the World is available from the U.S. Geological Service at
(800) 358-2663. Their GEOMAG program utilizes the latitude, longitude and
altitude of the antenna site to compute the local declination angle.
3.5
Enclosure and cuff installation
The miniSoDAR enclosure base needs to be mounted, leveled and oriented
before the cuff extensions are installed (see figure 3-4, below). Place the
miniSoDAR base and frame on to the mounting pad (for temporary installation it
can be installed on level ground). For the reasons identified in section 3.2 it is
prudent to temporarily install the miniSoDAR enclosure until a complete 24 hour
data set is obtained. These data need to be carefully examined for evidence of
reflections, interfering noises and natural sounds that can inhibit the miniSoDAR
operation. Once these potential interference conditions are discovered they can
be removed (or greatly reduced) by rotating the enclosure at the same location.
However there are situations that may require the re-location of the miniSoDAR
enclosure and antenna. After the system is performing satisfactorily then the
enclosure can be permanently installed.
Copyright © Atmospheric Systems Corp.
1999 - 2008
- 20 -
3.6
Antenna Array Box (AAB) installation
The recommended procedure (refer to figure 3-4) for installing the AAB
assembly to the antenna enclosure is:
3.7
Find the “TOP” label on the AAB assembly.
With the “TOP” label up, slide the AAB assembly into the square hole in
the antenna enclosure.
Loosely mount the AAB to the enclosure with four 1/4-20 x 1 1\2” hex
head bolts and a 7/16” socket wrench.
Place the straight edge level across the top of the AAB cover. Adjust the
AAB until it is level then tighten the 1/4-20 x 1 1\2” bolts to secure it to the
antenna enclosure (a second person might be required to hold the AAB in
place while it’s mounting bolts are tightened).
Connect the control/receive cable and the transmit cable onto the
connectors located on the lower left of the speaker array box cover.
Acoustic Signal Processor (ASP) and Audio Power Amplifier (APA)
Sub-sections 3.7.1 and 3.7.2 describe typical installations of the instruments.
Refer to figures 3-1 and 3-2 for system diagrams showing sub assemblies and
components of the model 4000 miniSoDAR.
3.7.1 Table Top Installation
Copyright © Atmospheric Systems Corp.
1999 - 2008
- 21 -
Remove the ASP and the APA from their shipping boxes and place them
in close proximity to each other on a sturdy table top.
Locate the two 1/4-inch phone cables packed in the APA shipping box.
These cables are for the amplifier input from the ASP. Both cables have
tags at each of their ends identifying them as CH1 and CH2. Plug these
cables into the appropriate jacks on the ASP and the APA (rear). It’s
EXTREMELY important that these two cables are plugged in properly
(CH1 to CH1 and CH2 to CH2).
Locate the AC power cord for the ASP in its shipping box. Plug one end
of the cord into the AC input module on the unit and the other end into an
AC power receptacle.
Plug the APA AC power cord into an AC power receptacle.
Connect the Transmit cable assembly into the CH1 and CH2 amplifier
output dual banana jacks located on the rear of the APA. Special
attention MUST be paid to the orientation of these connectors (refer to
figure 3-2).
Connect the Control \ Receive cable assembly to the antenna connector
on the ASP.
The Acoustic Signal Processor and the Audio Power Amplifier are now ready to
operate. The output of the amplifier has been set at the factory for 100 volts
peak to peak (each output channel).
3.7.2 Rack Mount Installation
Install the FL-20 rack mount shelf to the desired location in the instrument
cabinet (standard 19” rack), per the manufactures instructions included in
it’s shipping box.
Remove the ASP and the APA from their shipping boxes.
Once the rack mount shelf has been installed, place the ASP on the shelf
and secure it by passing the Velcro strap through the vent slots in the
shelf on each side of the instrument, looping it around and fastening it.
The Velcro strap will restrict side-to-side movement.
Mount the two nylon bumper stops in front and behind the instrument.
These bumper stops will restrict movement forward or backward. Make
sure the bumper stops don’t block any of the switches or jacks on the
ASP.
Mount and secure the APA to the 19” instrument rack in close proximity
to the ASP.
Refer to section 3.7.1 steps 2 through 6 above to complete this installation.
3.8
System connections
Cables are supplied to connect the ASP to both the Model 4000 antenna and
Copyright © Atmospheric Systems Corp.
1999 - 2008
- 22 -
optionally to a PC microcomputer. Each cable connector is labeled to
correspond to labels on the miniSoDAR sub-assemblies. Simply insert the
connectors into the corresponding receptacles, and secure. Of all the
connections the most critical is the connection from the ASP to the power
amplifier and the power amplifier to the antenna. It is important that the proper
output channel is connected to the correct cable and that the polarity of that
connection is correct, (refer to figure 3-2). Please read the cable designations
and connect according to these designations.
3.9
System Checkout
Once the system is set up, a verification of operation needs to be performed.
The specific approach depends on site conditions and availability of local wind
data.
Switch system power on to the ASP, Amplifier and PC (if equipped) and
verify that the antenna is emitting sound pulses at nearly equal time
intervals (from one to the next). If the miniSoDAR maximum height is set
to 200 meters for example, the sound pulses should emit approximately
once every 1.2 seconds.
Set the data-averaging interval to 1 minutes (refer to the SodarPro
system manual).
Observe wind speed and direction at the antenna site by watching trees,
flags, smoke stacks or other indicators including a hand held anemometer
which might provide an external confirmation of approximate wind speed
and direction.
If local meteorological tower data is available, this is an excellent source
of corroborating data for sodar system verification.
Once several measurements have been performed, and results compared to
observational and external instrument data, the system is ready for the
performance verification step.
3.10
Verification of system performance
The miniSoDAR system performance must be verified after the system checkout
is completed. To do this, set the miniSoDAR averaging time to the reporting
interval for your monitoring application and operate the system over at least a
24-hour period. Each wind table produced should be analyzed to determine if
the data indicates the presence of reflections, transient interfering noises,
persistent noises, etc. If any of these conditions are indicated then attempt to
determine the source of these reflections or noises. Adjust the enclosure to
direct the X, Y and Z beams away from these conditions. If a modem (optional)
is available, verify the system operation in near real time by installing it to the PC
(see SodarPro USER’S Manual). Download data files via modem link with the
PC (running SodarPro). Carefully check the collected data for continuity and
Copyright © Atmospheric Systems Corp.
1999 - 2008
- 23 -
reasonableness. The optional Digital Facsimile System (DFS) data must be
examined for recurring fixed echoes throughout the sampling period. Fixed
echoes appear as uniform horizontal lines on the DFS display. If fixed echoes
are present, identify the reflection surface and orient the enclosure to direct the
X, Y and Z beams away from that (those) surface(s).
Copyright © Atmospheric Systems Corp.
1999 - 2008
- 24 -
4.0
System operation
The miniSoDAR is designed to begin operation when power is applied. The
ASP unit is booted from the EPROM(s) located on the microprocessor board. In
the network configuration the operating parameters are stored on the HDD so
that they can be modified and then used during the boot process to recover the
operating configuration. In the stand-alone configuration these parameter are
stored in the non-volatile RAM disk. In either case if the disk files are corrupted
in any fashion the unit will use the default parameters contained in the
EPROM(s).
4.1
Operating parameters
The operating parameters are presented in appendix A. In the network version
of the miniSoDAR these parameters are changeable through the SETSODAR
user interface that is part of the Generic User Interface. In the stand-alone
configuration with SodarPro as the primary user interface, these parameters are
changeable as part of the SodarPro ASP configuration menu.
4.2
Generic user interface
The miniSoDAR is supplied with a generic user interface as part of the ASP
applications software. This software utilizes a text or ASCII based interface that
provides the user with complete control over the system operation. This
interface is available through either the console port or through the Ethernet
port. The method of access is different depending upon the method (i.e. port) of
access.
4.2.1 CONSOLE port
The miniSoDAR is supplied with an RJ45 to 9-pin RS232 connector cable. This
cable is used to connect to any one of the ASP serial ports including the system
console port.
The HyperTerminal accessory supplied as part of the Windows operating
systems is a cost effective and simple way to gain access to the miniSoDAR
Generic User Interface. Activate the HyperTerminal accessory and configure it
as a direct connection to the free serial communications port (i.e. COM1, COM2,
COM3, COM4). The CONSOLE port is always set to 9600 baud, 8 bits, 1 stop
bit and no parity bit (9600,8,1,N). Configure the HyperTerminal communications
port with the same selections. Then connect the cable to the console port (left
most serial port) and the microcomputer.
Entering a return with the
HyperTerminal activated activates the OS9 interface. After the return is sensed
by the ASP HyperTerminal will display:
Copyright © Atmospheric Systems Corp.
1999 - 2008
- 25 -
OS-9/68K V3.0.3 Motorola VME162 - 68040 99/01/11 09:12:49
User name?:
When this display appears communications have been established with the ASP
and it is ready for configuration. If there is no response then HyperTerminal
must be checked to ensure that it is configured properly to communicate on the
CONSOLE port.
The ASP uses application specific login accounts to operate the miniSoDAR.
These support (1) changing system operating parameters, (2) setting the ASP
date and time, (3) setting the network parameters and (4) entering the yearly
climatic temperatures. The ASP is delivered with default parameters in all four
cases. The user must configure the local date and time and network parameters
(if applicable). These application accounts are also available to the user via the
network link after the initial network configuration is established.
4.2.2 Date and time configuration
If the login account SETIME is entered in response to the OS9 user name with
the password DASS the user must enter a new date and time. The ASP is set
to local date and time at the factory (GMT-8). The following is the procedure to
change the date and time as needed. The response to the login is:
OS-9/68K V3.0.3 Motorola VME162 - 68040 99/01/11 09:16:09
User name?: setime
Password:
Process #38 logged on
Welcome!
99/01/11 09:16:20
******************************************************************************
Welcome to AV DASP sodar system using MVME162LX OS-9 V3.0.3.
4 MB CPU memory. /r0 is 512KB volatile RAMdisk. /h0 is system disk.
/term : 9600 port console port, /t1 : 19200 DOPLMAIN port.
/t2 : 2400 baud Liebert UPS port /t3 : 9600 baud dialin modem port.
Sodar data collects in /h0/DATA areas.
******************************************************************************
yy/mm/dd hh:mm:ss [am/pm]
Time:
At this point the user must enter the desired date and time information in the
Copyright © Atmospheric Systems Corp.
1999 - 2008
- 26 -
format indicated just before the Time prompt. If the time is entered in twenty
four hour time format there is no reason to indicate whether it is the morning
(am) or the afternoon (pm). After the time is entered terminate the entry with a
return. The account then performs a logout and the OS9 login in prompt must
be re-activated using a return.
4.2.3 Setting operating parameters
If the login account SETSODAR is entered with the password DASS the user is
presented with the following display:
AeroVironment Sodar at wsmr=SiteName:N
METEOROLOGICAL PARAMETERS:
200m=Maxht:M1
15m=MinHt:M2
5m=GateSpac:M3 60sec=AveTime:M4
5pul=GustAv:M5 10%=Good:M6
4.00m/s=WCorMax:M7 10mv=MixHtDel:M8
DIGITAL SAMPLING PARAMETERS:
960Hz=SmpRate:D1 64=NFFT:D2
7=MinSNR10:D3
15mv=MinAmp:D4
-150=BackLevel:D5 0Hz=BandWid:D6
6=ClutAxes:D7
10pul=NoiseTC:D8
0ms=NoiseLen:D9
SODAR PARAMETERS:
100%=AudioAmp:S1 40ms=PulseLen:S2 5smp=PulRise:S3 4500Hz=XmtFreq:S4
270deg=PntDir:S5 16deg=UTilt:S6
16deg=Vtilt:S7
2=AxesOn:S8
1=UseRefl:S9
0=CheckAC:S10 990=CheckArray:S11 0=EndFlag:S12
VELOCITY RANGE PARAMETERS:
-6.00m/s=Umin:V1 6.00m/s=Umax:V2 -6.00m/s=Vmin:V3 6.00m/s=Vmax:V4
-6.00m/s=Wmin:V5 6.00m/s=Wmax:V6
5bins=PkWid:V7
RAW DATA COLLECTION PARAMETERS:
0=AxesRec:R1
2=MinGate:R2
5=NumGates:R3
2=GateStep:R4
-1=PulAve:R5
20=daysold:R6
Last reboot was 83:21:26 hr:mn:sc ago. Time now is Mon Jan 11 09:14:17 1999
Enter parameter (e.g. M1=200 or <esc> to exit) :
This account provides the user with a direct interface to the miniSoDAR critical
operating parameters.
These parameters are sub-divided into (1)
meteorological parameters, (2) digital sampling parameters, (3) sodar
parameters, (4) velocity range parameters and (5) raw data collection
parameters. The format of the display is
<parameter value>=(parameter name):(parameter designator).
Modifications to the parameters are entered after the enter parameter query.
The format of the change command is:
(parameter designator)=<new parameter value>
For example if the user desires to change the frequency of operation from 4500
Hz to 5000 Hz (see sodar parameters above). The output frequency as follows:
Copyright © Atmospheric Systems Corp.
1999 - 2008
- 27 -
s4=5000 (enter)
Parameter changes should be made very carefully. It may take up to 24 hours
to evaluate the effect of a parameter change. Some parameter changes (such
as the digital sampling parameters) can be detrimental to the operation of the
miniSoDAR. The ASP utilizes a powerful Motorola 68040 microprocessor (32
bit) and can support the output of both time averaged and raw data to either the
HDD or network share files.
4.2.4 Network parameters
The account SETNETWORK also utilizes the password DASS. This account is
used to establish the networking parameters for the miniSoDAR. The user
interface in this case is
OS-9/68K V3.0.3 Motorola VME162 - 68040 99/01/11 09:18:06
User name?: setnetwork
Password:
Process #47 logged on 99/01/11 09:18:28
Welcome!
*****************************************************************************
*
Welcome to AV DASP sodar system using MVME162LX OS-9 V3.0.3.
4 MB CPU memory. /r0 is 512KB volatile RAMdisk. /h0 is system disk.
/term : 9600 port console port, /t1 : 19200 DOPLMAIN port.
/t2 : 2400 baud Liebert UPS port /t3 : 9600 baud dial in modem port.
Sodar data collects in /h0/DATA areas.
*****************************************************************************
*
This program will create a new network config file /dd/setnet.cfg.
The current network settings file contains:
iaddr=192.168.1.66
isubnet=0xffffff00
ibroadcast=192.168.1.255
ihostname=miniSoDAR
ndefault=192.168.1.1
To continue with changes you must enter "yes" without quotes :
The interface enables all of the network parameters to be changed as needed.
These parameters configure the ability for access through the ethernet AUI
connection on the microprocessor board.
4.2.5 Network support
Copyright © Atmospheric Systems Corp.
1999 - 2008
- 28 -
Once the network link has been configured the user is able to execute any of
these Generic User Interface tasks using a TELNET link. The interfaces are as
described. Data is available using FTP protocol at two locations on the ASP: (1)
the non-volatile RAM disk (/r0) and (2) the ASP hard disk drive directory
(/h0/data). The data files are stored on the ASP hard disk drive for the time
period specified in the RAW DATA COLLECTION parameters (see section 4.3):
20=daysold:R6.
In this case the data are stored for 20 days in a circular file that utilizes first
stored – first deleted protocol. These data are available for FTP transfer via the
ethernet link as needed.
4.3 Graphical user interface
In addition to the Generic User Interface the ASP continues to support the data
transfer protocol to support the SodarPro interface. The user interface for the
Model 4000 miniSoDAR system is provided through an IBM PC-compatible
software package titled SodarPro. A complete description of the installation and
features of this software is provided in the SodarPro user manual; an overview
is presented here for completeness.
The software, which runs as a Windows application, requires the following
minimum system configuration:
•
•
•
•
•
•
•
•
•
Pentium 1.0 GHZ or faster
512 MB RAM or greater
Windows XP Professional operating system
Either one serial port (COM1) or one USB 2.0 port with USB to
Serial converter
Ethernet interface (10/100 Base T)
Hard disk drive (80.0 GB or greater)
Color monitor (Flat screen preferable)
Mouse and Keyboard
Data modem (V.92 compatible)
The main user interface screen is shown in Figure 4-1. All major functions can
be accessed through the pull-down menus on the upper toolbar of this screen.
A brief discussion of the selections available under each of these menus is
given below.
Copyright © Atmospheric Systems Corp.
1999 - 2008
- 29 -
Figure 4-1:
Main user interface screen for SodarPro system control and
data reduction software.
4.3.1 Station Menu
The station menu (see also Figure 4-1) is responsible for all changes that affect
the collection, processing, and storage of the data from the ASP. The subheadings include:
•
•
•
•
•
•
Storage Area - defines the DOS path for the storage of data files.
Station Storage - turns on automatic data storage of each new wind
table to the hard disk.
Station Naming - assigns a unique name to every wind table header.
Port and Line Settings - configures the internal serial port to match
the settings of the ASP.
Antenna Angles - modifies parameters (angles) for zenith,
separation and rotation, when non-standard angles are used.
Configure Station - controls how the MiniSoDAR is configured to
run.
Copyright © Atmospheric Systems Corp.
1999 - 2008
- 30 -
•
•
Configure at Boot Time - enables SodarPro to reset the MiniSoDAR
when the system is started.
Mode of Operation - changes the output data stream to the
secondary ASP output ports.
4.3.2 Output display menu
The display menu has four options; three of them are toggles to select the
various displays, and the fourth is used for setting up the display of time/height
sections. The sub-headings include:
•
•
•
•
Plots - toggle to turn on plotting function.
Text - toggle to display text values of data on screen.
Time/Height - toggle to display time/height section plots
Time/Height Average Interval - selects the averaging intervals for
time/height section plots.
4.3.3 Printer menu
This menu contains all functions for sending data graphically or in text format to
a printer. The sub-headings include:
•
•
•
Configure - configures the printer, using the Windows control panel.
Print Station - determines whether a screen print will be performed.
Text on Receive - provides real-time text table hard copies.
4.3.4 Window menu
The window menu gives the users of multiple ASP stations an easy way of
arranging the display layout. Options allow the user to cascade, tile and
otherwise arrange both windows and icons.
4.3.5 System menu
Allows the user to set or modify the date and time, and allows engagement of a
watchdog timer system. The sub-headings include:
•
•
Set Date and Time - allows for setting and modifying date/time.
Watchdog Timer - allows the PC to monitor the stability of the
SodarPro software. If data should fail to be updated due to a system
hang-up, the watchdog timer will automatically reboot the system.
Copyright © Atmospheric Systems Corp.
1999 - 2008
- 31 -
5.0 Preventative Maintenance
The Model 4000 antenna enclosure requires regular maintenance to ensure
continued good performance and reliable operation. This includes procedures
that should be followed daily, weekly, monthly, seasonally and annually. A brief
description of these activities is presented here and summarized in Table 5-1
(see end of this section).
The acoustic foam that lines all non-reflecting surfaces are secured with RT.
type glue and hence are easily removed and replaced. It is good practice to
inspect the acoustic foam quarterly and replace if noticeably worn or spaces
appear where the foam sections should join up against each other.
Regular inspection of the relative angle between the reflector and the antenna
array is important to ensure the accuracy of the data. If this angle should
changes significantly, errors will result. This is the principle reason for
maintaining the enclosure joints carefully. Always make sure that the enclosure
bolts connecting the antenna array box and the antenna enclosure are securely
fastened. Also check that all other bolts, nuts and screws are securely tight on
the antenna.
Water damage is the principle enemy of the piezo-ceramic speaker elements
that make up the phased array. Since the enclosure is open to precipitation,
there will certainly be water collected on the reflector. Drain holes located at the
base of the reflector under the array box should be checked frequently while the
instrument remains uncovered. Dust and leaves can block the drain holes and
should be cleared at regular intervals. Refer to section 5.9.8 (antenna array box
removal instructions) to gain access to the drain holes. There is a piece of
acoustic foam covering the base of the antenna enclosure (the drain holes are
located underneath the foam). By lifting out this foam piece the drain holes are
exposed for cleaning. There is a coarse mesh screen covering each drain hole
to prohibit vermin, such as mice and crickets, from encroaching into the
apparatus. After cleaning, reinstall Antenna Array Box per section 5.9.7.
Snow requires additional attention since it will not flow through the drain holes
unless melted. If your system does not have a reflector board heater, then it is
recommended that the antenna enclosure be cleared of snow by removing the
antenna array box from the antenna enclosure periodically and clearing by hand
or shovel.
It is good practice to place a cover over the top of the reflector opening during
periods when the instrument is not being used. A thin sheet of plywood works
nicely with a weight placed on it to prevent strong winds from lifting it. Soft
fabrics such as canvas will not work well, since they sag and tend to fill with
water, making removal difficult if not impossible.
Copyright © Atmospheric Systems Corp.
1999 - 2008
- 32 -
The transmit cable and the control/receive cables attach to a connector plate on
the antenna access door. These cable connectors should be checked regularly
for a secure connection. Any cables not in conduit should be visually inspected
for cracks, breaks, abrasions and animal gnawing.
Table 5-1. Recommended maintenance schedule.
Maintenance Task
Wind table data review (via network / modem
link).
Check file available (or free) space on hard
disk drive.
Site Visit (if regular review of wind table data
is followed)
Inspect enclosure and all system cables.
Check for breaks to cable cover.
Inspect and remove debris from enclosure
and clear drain holes. Repair as needed
Inspect interior of the Array Box for moisture
or residue buildup (on walls, foam, receive
board and transmit board). Repair as
needed.
Verify that the antenna enclosure remains
level. (Refer to installation notes)
Perform receive speaker test (replace
speakers as needed)
Analog Control Board (ACB) zero offset test
(readjust zero if needed)
Verify antenna enclosure orientation angle
(or rotation angle-refer to installation notes).
Check the available space on the ASP HDD
(change storage partition If needed)
Perform transmit speaker check (not required
if Speaker Monitor Board is installed)
Copyright © Atmospheric Systems Corp.
1999 - 2008
1
day
X
7
days
30
days
90
days
180
days
360
days
X
X
X
X
X
X
X
X
X
X
X
- 33 -
5.1
Acoustic Signal Processor (ASP)
The ASP performs the data acquisition and processing functions of the
miniSoDAR system. The only adjustment necessary (or possible) on the ASP is
the in-phase and quadrature zero adjusts on the analog control and conditioning
board. These zero dc levels should be checked on a quarterly schedule as
noted in table 5-1 above. Use the following procedure to zero the in-phase and
quadrature offsets:
5.2
With the ASP running, switch off the audio power amplifier power.
Disconnect the control/receive cable from the antenna connector J6 on
the rear of the ASP. There should be no signal input to the analog control
board.
Connect a digital multi-meter (DMM) to BNC connector J9. If the voltage
does not read 0.00 volt DC, adjust pot R24 until 0.000 volt DC ±0.003
volts is attained.
Repeat step 3 for BNC connector J10 using pot R25 to adjust for 0.000
volt DC ±0.003 volts DC.
Disconnect the DMM from the analog control board.
Connect the control/receive cable to the antenna connector J6 on the
rear of the ASP.
Switch on the audio power amplifier power.
System is now operational.
Audio Power Amplifier (APA)
The operating output voltage of channels one and two is 100 Vp-p in the stereo
mode. The output voltages are factory set and the gain control knobs on the rear
of the amplifier are sealed with silicone glue. On the front panel of the amplifier
is a 10 amp breaker reset button, power switch, green power “on” light and red
clip lights for channel one and channel two outputs. Whenever visiting the
SoDAR site, verify the clip lights DO NOT flash or illuminate continuously.
Flashing clip light(s) (during transmit) is usually an indication there could be a
short in the cabling, antenna wiring or speaker(s). Should the clip lights
illuminate continuously, an indication of a faulty APA, switch off the power to the
APA and replace it. Refer to sections 5.9.3 (3.7) and 5.9.4 for APA installation
and removal.
5.3 Array Beam Forming Electronics
Note: The Antenna Array Box (AAB) includes the array beam forming
electronics, antenna array board, 32 speakers, wire harness assemblies
and speaker monitor board (SMB)(optional).
Copyright © Atmospheric Systems Corp.
1999 - 2008
- 34 -
To gain access to the interior of the AAB, remove the rear door on the (AAB) by
removing twelve 10-32 x 5/8” Phillips head screws (with a #2 Phillips screw
driver). Set the door aside so the rear of the antenna array is exposed. Mounted
on the back of the antenna array board are two printed circuit board assemblies
which control and form the acoustic beams: (1) receive board and (2) transmit
board.
These boards have no adjustments and should require little maintenance.
Visually inspect both boards to assure there is no moisture or residue buildup on
them. If moisture or residue buildup is found, shut down the power to the ASP
and APA. Remove the two boards from their standoffs on the antenna array
board and place them in anti-static bags. The boards can be cleaned with a
cleaner that is safe for printed circuit boards, (i.e. flux remover). If there is any
residual moisture inside the AAB, wipe it dry with paper or cloth towels. Reinstall
the clean boards in the AAB and secure the AAB door.
5.4 Speakers
The antenna array board consists of 32 piezo-ceramic tweeter speakers. A good
preventive maintenance technique is to visually inspect the 32 speaker horn
openings whenever the AAB is removed from the antenna enclosure. Removing
any blockages from the speaker horns (spider webs, leaves, twigs, dead bugs,
etc.) will help to optimize miniSoDAR performance.
5.5
Speaker Monitor Board (SMB) [optional feature]
The Speaker Monitor Board (SMB) is mounted over the Transmit Board on the
AAB assembly (remove the AAB rear door for inspection). Its purpose is to
monitor the current draw of each of the 32 speakers during each transmit pulse.
Should a speaker(s) fail, an LED will illuminate on the board corresponding to
the faulty speaker(s). A fault signal will also be sent to the ASP to let the user
know of a possible speaker(s) problem. Monitor the 32 LED’s mounted down the
center of the SMB (also refer to section 2.5). The LED’s should briefly flash
during a transmit pulse and remain off until the next transmit pulse. Faulty
speaker(s) should be replaced per section 5.9.13 and 5.9.14. The three LED’s
next to switch S1, LED33, LED34 and LED35, display which antenna beam is
active (A, B or C). Only one antenna beam can be active at any one time so
these LED’s will illuminate sequentially. Remount the rear door of the AAB when
inspection is complete.
5.6
System Cables
There are two cables that carry control and analog signals from the ASP/APA to
the antenna. These cables need to be placed to reduce the possibility of
damage from animals and equipment. If damage occurs it is sometimes difficult
to find the point of damage and the entire cable may need to be replaced.
Copyright © Atmospheric Systems Corp.
1999 - 2008
- 35 -
Copyright © Atmospheric Systems Corp.
1999 - 2008
- 36 -
5.6.1 Transmit Cable (TC)
The Transmit Cable (TC) is normally ordered 9, 45 or 90 meters long. The TC is
a non-shielded 4-conductor cable terminated at one end with a 5 conductor
round receptacle (antenna) and two dual banana plugs at the other end
(amplifier).
5.6.2 Control/Receive Cable (CRC)
The Control/Receive Cable (CRC) is available in 30, 150 or 300 feet lengths. It
is recommended that the cable length is not so long that it must be coiled for
storage. The CRC is a shielded 10 conductor cable terminated at one end with a
10 pin (male) round connector (ASP) (shield connected to connector housing)
and a 10 receptacle (female) round connector at the other end (antenna). The
cable performs three tasks:
•
•
•
Carries +/-12 VDC to antenna circuits
Controls the transmit beam forming
Carries the receive signal from the antenna to the ASP
Any exposed parts of the cables should be inspected at least monthly for visible
damage.
5.7
Un-interruptible Power Supply (UPS) [optional feature]
The UPS will supply battery backup AC power to operate the miniSoDAR
system should the site AC power be interrupted. The normal battery backup
running time is 30 minutes or more if a Liebert Model GXT-1000RT-120 is
installed with the SODAR system. Refer any preventative maintenance issues to
the UPS operating manual supplied with each UPS. No other UPS is supported
with this feature.
Copyright © Atmospheric Systems Corp.
1999 - 2008
- 37 -
5.8
Line Replaceable Units (LRU)
The LRU for the miniSoDAR are parts of the system that can be replaced
relatively quickly and easily by trained technicians. The LRU are:
Part No.
Acoustic Signal Processor (ASP)
Audio Power Amplifier (APA)
Un-interruptible Power Supply (UPS)
Antenna Array Box (AAB)
Transmit Cable (TC)
Control/Receive Cable (CRC)
Speaker Transducer Assembly (STA)
04305-004
04195
05586
03021
02166
02250
02757
In Section 6.3, diagnostic procedures and flow charts are utilized to identify
potentially faulty LRU.
5.9 LRU Installation and Removal Procedures
Sub-sections 5.9.1 through 5.9.16 describe typical LRU installation and removal
procedures (refer to figure's 3-1, 3-2 and 3-4 for system interconnects diagrams
and assembly drawings).
5.9.1 ASP Installation Procedure
Refer to section 3.7 for installation procedures for rack mount or table top use.
5.9.2 ASP Removal Procedure
Turn off the ASP power switch located on the rear of the unit and
Remove the AC power cord from its receptacle.
Unplug the Ch.1 and Ch.2 1\4” phono cables from the rear of the ASP.
Disconnect the CRC from the antenna connector on the rear of the ASP.
Unplug any RJ45 serial cables connected to the ASP microprocessor.
The ASP is now ready to be removed. Uncouple the Velcro strap and
remove one of the nylon bumpers if rack mounted removal is necessary.
5.9.3 APA Installation Procedure
Refer to section 3.7 for installation procedures for rack mount or table top use.
Copyright © Atmospheric Systems Corp.
1999 - 2008
- 38 -
5.9.4 APA Removal Procedure
Turn off the APA power switch located on its lower left front panel and
remove the AC power cord from the AC power receptacle.
Unplug the Ch.1 and Ch.2 1/4” phono cables from the rear of the APA.
Unplug the TC from the dual banana jacks on the rear of the APA.
The APA is now ready to be removed. Remove the mounting bolts from
the APA faceplate if rack mount removal is necessary.
5.9.5 AAB Installation Procedure
Caution: The AAB weights about 45 pounds. Take proper precautions
when lifting or moving it.
Loosely mount the AAB on the antenna enclosure (in the large square
opening on one of the vertical sides), with four 1/4-20 x 1 1/2” hex head
bolts. Refer to figure 3-4.
Place a straight-edge level on top of the cover of the AAB. Adjust the
AAB until it is level, then tighten the bolts to secure with a 7/16” socket
wrench (a second person may be required to hold the AAB in place while
its mounting bolts are tightened).
Connect the TC and CRC to the AAB assembly (lower left side of the
door) by plugging in the cable end connectors to their appropriate mates
by twisting the lock rings clockwise until secure (refer to figures 3-1 and
3-2).
5.9.6 AAB Removal Procedure
Disconnect the TC and CRC from the AAB assembly (lower left side of
the door) by twisting the lock rings on the cable ends counterclockwise
until free from their connector mates on the door. Refer to figure 3-1 and
3-2.
Remove the AAB assembly from the antenna enclosure by removing four
1/4-20 x 1 1/2” hex head bolts with a 7/16” socket wrench. Refer to figure
3-4.
Remove the AAB from the antenna enclosure. Caution: The AAB
weights about 45 pounds. Take proper precautions when lifting or moving
it.
.
5.9.7 TC Installation Procedure
Refer to section 3.2 Site Selection for recommended installation guidelines for
the system antenna cables.
Locate the end of the TC with the two dual banana plugs mounted on it.
Copyright © Atmospheric Systems Corp.
1999 - 2008
- 39 -
Insert the dual banana plug labeled CH1 AMP OUT into the APA CH1
OUTPUT jack on the rear of the unit.
Insert the dual banana plug labeled CH2 AMP OUT into the APA CH2
OUTPUT jack on the rear of the unit.
Special attention MUST be paid to the orientation of these two dual
banana plug connections (refer to figure 3-2) to ensure proper
miniSoDAR operation.
The AAB end of the TC has a round 5 pin female connector mounted on
it. Plug this connector into its mate on the AAB door (lower left side)
labeled P1. Twist the lock ring clockwise until securely fastened (refer to
figure's 3-1 and 3-2).
5.9.8 TC Removal Procedure
Disconnect the TC from the AAB door connector plate labeled P1 (lower
left side) by twisting the lock ring counterclockwise until it can be pulled
free (refer to figure's 3-1 and 3-2).
Unplug the two dual banana plugs from the CH1 and CH2 OUTPUT jacks
located on the rear of the APA (refer to figure 3-2).
The TC can now be removed.
5.9.9 CRC Installation Procedure
Refer to section 3.2 Site Selection for recommended preventative installation
measures for the system antenna cables.
Locate the round 10 pin male connector on the CRC. Plug this end of the
CRC into the ASP connector labeled Antenna on the rear of the ASP.
Twist the locking ring clockwise until securely fastened (refer to figure's 31 and 3-2).
The AAB end of the CRC has a round 10 pin female connector mounted
on it.
Plug this connector into its mate on the AAB door (lower left side) labeled
P2.
Twist the locking ring clockwise until securely fastened (refer to figure's 31 and 3-2).
5.9.10 CRC Removal Procedure
Disconnect the CRC from the AAB door connector plate labeled P2
(lower left side) by twisting the connector lock ring counterclockwise until
it can be pulled free (refer to figures 3-1 and 3-2).
Copyright © Atmospheric Systems Corp.
1999 - 2008
- 40 -
Disconnect the CRC from the connector labeled Antenna on the rear of
the ASP by twisting the connector lock ring counterclockwise until it can
be pulled free (refer to figure's 3-1 and 3-2).
The CRC can now be removed.
5.9.11 STA Installation Procedure
Connect the replacement STA to its Molex connector. Insert the STA into
the antenna array board hole for mounting.
Using a #2 Phillips screw driver, secure the speaker to the antenna array
board by installing four 6-32 x 3/8” truss head screws. Refer to section
6.6, drawing number 4200-01214.
Caution: The AAB weights about 45 pounds. Take proper precautions
when lifting or moving it. Loosely mount the AAB on the antenna
enclosure (in the large square opening on one of the vertical sides), with
four 1/4-20 x 1 1/2” hex head bolts (refer to figure 3-4).
Place a straight-edge level on top of the cover of the AAB. Adjust the
AAB until it is level, then tighten the bolts to secure with a 7/16” socket
wrench (a second person may be required to hold the AAB in place while
its mounting bolts are tightened).
Connect the TC and CRC to the AAB assembly (lower left side of the
door) by plugging in the cable end connectors to their appropriate mates
by twisting the lock rings clockwise until secure (refer to figures 3-1 and
3-2).
5.9.12 STA Removal Procedure
Disconnect the TC and CRC from the AAB (lower left side of the door) by
twisting the lock rings on the cable ends counterclockwise until free from
their connector mates on the door (refer to figure 3-1 and 3-2).
Remove the AAB from the antenna enclosure by removing four 1/4-20 x 1
1/2” hex head bolts with a 7/16” socket wrench (refer to figure 3-4).
Caution: The AAB weights about 45 pounds. Take proper precautions
when lifting or moving it.
Using a #2 Phillips screwdriver, remove the four 6-32 x 3/8” truss head
screws securing the STA to be changed from the antenna array board,
and remove the speaker.
Pull the STA out of its hole until its Molex connector is exposed. From the
horn side of the antenna array, unplug the Molex connection to free the
STA from the antenna wiring harness.
5.9.13 SMB Installation Procedure [OPTION]
Switch off the power to both the ASP and APA.
Remove the rear door on the AAB by removing twelve 10-32 x 5/8”
Phillips head screws (with a #2 Phillips screw driver). Set the door aside
so the rear of the antenna array is exposed.
Copyright © Atmospheric Systems Corp.
1999 - 2008
- 41 -
5.9.14
Locate the Transmit Board Assembly (drawing 3600-01032) mounted on
the rear of the Antenna Array Board Assembly (drawing 4200-01214).
The SMB is mounted directly over the Transmit Board on 8-32 x 1”
standoffs.
Unplug the nine Molex connectors, JP1 through JP9, from the Transmit
Board. Grasp and pull on the plastic connectors on the end of the wiring
harness while lifting on the locking tabs (on the board).
Locate the six 8-32 mounting screws for the SMB and securely mount the
board to the standoffs directly over the Transmit Board.
Plug the nine Molex connectors from the SMB into the Transmit Board.
The wire harnesses on the SMB, with female receptacles, are located
next to their corresponding male plug counterparts. Example: JP1 is next
to J1, JP2 is next to J2, etc. These Molex receptacles must connect to
the Transmit Board Molex plugs directly underneath them. Make sure the
barb (catch) on the Molex receptacle locks under the tab on the Molex
male plug.
Plug the nine Molex connectors, JP1 through JP9, of the AAB Assembly
wiring harness into the nine male Molex plugs on the SMB. JP1 plugs into
J1, JP2 plugs into J2, etc.
Mount the rechargeable NiCad battery pack to the Velcro hooks on the
inside of the AAB close to the SMB. Plug the rechargeable battery into
connector J11 and the speaker monitor status wire into connector J12 on
the SMB.
Switch on the power to the ASP and the APA. Verify the antenna is
issuing transmit pulses at regular intervals.
Monitor the 32 LED’s mounted down the center of the SMB (refer to
sections 2.5 and 5.5). The LED’s should briefly flash during a transmit
pulse and remain off until the next transmit pulse. The three LED’s next to
switch S1, LED33, LED34 and LED35, display which antenna beam is
active (A, B or C). Only one antenna beam can be active at any one time
so these LED’s will illuminate sequentially.
Remount the rear door of the AAB.
SMB Removal Procedure [OPTION]
Switch off the AC power to the ASP and APA.
Remove the rear door on the (AAB) by removing twelve 10-32 x 5/8”
Phillips head screws (with a #2 Phillips screw driver). Set the door aside
so the rear of the antenna array is exposed.
Locate the Transmit Board Assembly (drawing 3600-01032) mounted on
the rear of the Antenna Array Board Assembly (drawing 4200-01214).
The SMB is mounted directly over the Transmit Board on 8-32 x 1”
standoffs.
Unplug the nine Molex connectors, JP1 through JP9, from the SMB.
Grasp and pull on the plastic connectors on the end of the wiring harness
while lifting on the locking tabs (on the board) to remove the connectors.
Copyright © Atmospheric Systems Corp.
1999 - 2008
- 42 -
Unplug the nine Molex connectors, JP1 through JP9, from the Transmit
Board utilizing the same technique as in step 4.
Unplug the rechargeable NiCad battery pack* from connector Jll and the
speaker monitor status wire from connector J12 on the SMB.
Remove the six 8-32 screws securing the SMB to the 1” standoffs.
Remove the SMB and place it in anti-static packaging material for storage
or shipment.
Refer to the SMB Installation Procedure (section 5.9.15) to mount and
connect a replacement board. If no SMB is to be installed at this time, the
AAB wiring harness can be connected to the Transmit Board at JP1
through JP9. Secure the six 8-32 screws to the standoffs for safe keeping
until a SMB is reinstalled.
Switch on the power to the ASP and the APA. Verify the antenna is
issuing transmit pulses at regular intervals.
Remount the rear door of the AAB.
* The rechargeable NiCad battery pack is attached with Velcro to the inside wall
of the AAB can be easily removed and replaced.
5.9.15 UPS Installation Procedure [OPTION]
Section 5.9.5 UPS installation and 5.9.6 UPS removal procedures assume the
use of a Liebert GXT-1000RT-120 UPStation. Refer to the manufactures users
manual for specific instructions.
Remove the UPS and any accessories from their shipping container.
Caution: The UPS is heavy (see specifications in user manual page 24).
Take proper precautions when lifting or moving it.
Place the UPS upright in its support bases, close enough to the
miniSoDAR system ASP, APA and PC (optional), so that these
components can easily plug their AC cords into the AC output
receptacles on the rear of the UPS (refer to figure 3-2). Ensure the load
equipment is switched off, then plug all loads into the UPS AC output
receptacles.
Plug the UPS into a dedicated AC wall receptacle properly protected by a
circuit breaker or fuse in accordance with national and local codes. The
wall receptacle must be grounded and rated for at least 15 amp service.
Turn on the UPS by pressing the On button for at least one half second
(see UPS user manual page 10 for switch and LED diagram); then switch
on the connected load equipment.
A RJ45 to DB9 RS-232 cable is provided with the Liebert GXT-1000RT120 UPStation so that UPS status information can be monitored by the
ASP. Connect the DB9 RS-232 to the DB9 connector on the rear (top) of
the UPS. The RJ45 connector plugs into the serial 3 jack on the ASP
processor board. Refer to figure 3-2.
Copyright © Atmospheric Systems Corp.
1999 - 2008
- 43 -
The UPS is ready for normal operation.
For UPS maintenance issues refer to the user manual page 10.
5.9.16 UPS Removal Procedure [OPTION]
Switch off the power to the load equipment plugged into the rear AC
output receptacles of the UPS.
Press the Off/Bypass button once (see UPS user manual page 10 for
switch and LED diagram). This will cause the load to be transferred to
bypass power. Pressing this button again within 4 seconds will result in
loss of power to the output receptacles and connected loads. Again,
perform all necessary shutdown procedures on connected loads before
pressing this button twice.
Unplug the UPS from the AC wall receptacle.
Unplug the load equipment from the AC output receptacles on the rear of
the UPS. Refer to figure 3-2.
Unplug the DB9 RS-232 cable from the top rear of the UPS.
The UPS is now ready for removal. Caution: The UPS is heavy (see
specifications in user manual page 24). Take proper precautions when
lifting or moving it.
Copyright © Atmospheric Systems Corp.
1999 - 2008
- 44 -