1
PSYTASK
User Manual
2
Table of content
1. INTRODUCTION. .............................................................................................................................................. 3
2. MINIMAL IBM PC SPECIFICATION. ........................................................................................................... 3
3. PSYTASK INSTALLATION. ............................................................................................................................ 3
4. HOW TO RUN PSYTASK, MAIN DIALOG WINDOW................................................................................ 7
5. MAIN DEFINITION. PRESENTATION PROTOCOL.................................................................................. 7
6. STIMULI PREPARATION PROCEDURE. .................................................................................................. 11
7. PREPARATION OF STIMULI PRESENTATION PROTOCOLS............................................................. 13
7.1. Editor of parameters of stimuli presentation protocol. .............................................14
7.1.1. Definition of task properties................................................................... 15
7.1.2. Modification of list of stimuli.................................................................. 17
7.1.3. Modification of list of trials..................................................................... 19
7.1.4. Modification of list of presentation commands. ................................... 22
7.1.5. Modification of response processing parameters................................ 26
7.2. Editing of stimuli presentation protocol manually.....................................................28
7.2.1. Task name definition: ............................................................................. 28
7.2.2. Stimuli list definition:.............................................................................. 29
7.2.3. Trials list definition ................................................................................. 29
7.2.4. Presentation commands list definition. ................................................ 29
7.2.5. Subject response processing commands list definition. .................... 30
7.3. Optimization of the stimuli presentation protocol. ....................................................31
9. HOW TO DISPLAY RESULTS OF INVESTIGATION (WORKING WITH DATABASE).................... 34
10. WORKING SYNCHRONOUSLY WITH THE WINEEG OR ANOTHER PROGRAM........................ 38
10.1. Definition of parameters of synchronization. ...........................................................38
10.2. Working in Master Mode. ..........................................................................................40
10.3. Working in Slave Mode...............................................................................................40
APPENDIX. THE SHORT DESCRIPTION OF TASKS, INCLUDED AS EXAMPLES.............................. 41
1. Reversible chess patterns. ................................................................................................41
2. Test of Variables of Attention (Tova). ............................................................................41
3. Visual Odd-Ball task (P300). ...........................................................................................41
4. Auditory Odd-Ball task (P300)........................................................................................41
5. Visual GoNogo task. .........................................................................................................42
6. Auditory GoNogo task. ....................................................................................................42
7. Left-Right task. .................................................................................................................42
8. VCPT task. ........................................................................................................................42
9. Mathematical task. ...........................................................................................................43
10. Reading task....................................................................................................................43
11. Auditory task. .................................................................................................................43
11. Mismatch negativity task. ..............................................................................................43
3
1. Introduction.
PSYTASK is a program for preparation and carry out both psychophysics and psychophysiology
investigations.
PSYTASK main features are:
1. Visual (on the monitor screen) and auditory (using sound card and speakers) stimuli
presentation.
2. Reaction time measurement. To measure the reaction time keyboard and mouse can be used.
3. PSYTASK is working together with “Mitsar” digital EEG recorder (WinEEG software) and
provides a synchronous stimuli presentation with EEG acquisition. In this case two
computers connected via COM ports are used. PSYTASK program works on the first
computer and WinEEG program works on the second computer. WinEEG program send
synchronization codes to PSYTASK program to control its work and provides a synchronous
stimuli presentation with EEG acquisition. The recoded data can be used to calculate and
analyze event related potentials (ERP) and/or event related desynchronization (ERD).
4. PSYTASK program can send synchronization codes to another program via COM port. This
feature provides a possibility to carry out ERP studies using another amplifiers and another
program that is able to detect synchronization codes.
5. PSYTASK program have a users friendly interface that provide a possibility to design
psychological tasks.
6. PSYTASK program measures the reaction time and task performance parameters (omission
and commission errors) and save them to build-in database for the future analysis and final
report preparation.
2. Minimal IBM PC specification.
The time limitations of PSYTASK program strongly depend on parameters of computer: its CPU
speed, total amount of RAM, speed of hard disk and video card. It is difficult to say definitely
when these limitations will be critical. That is why we recommend you to test the performance of
PSYTASK for each new designed task.
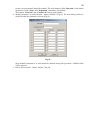
The PSYTASK was tested on the computer with the specification presented below and its
performance was measured. The results were rather good.
CPU
RAM
HDD
Video Card
Sound Card
Monitor
OS
Pentium IV 2000
256 Mb
80 Gb (7200, ATA 100)
SVGA 64 Mb, AGP, with graphics accelerator
(GF2MX400).
Creative Labs SB Live! 5.1.
17 “
MS Windows XP and DirectX 9.0
3. PSYTASK Installation.
To install PSYTASK program:
1. Insert the CD to the corresponding drive
2. Open folder with name “PSYTASK”
3. Run SETUP.EXE program.
4. Follow the instructions on the screen
4
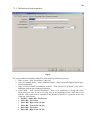
Fig.1.
Press “Next” button to continue installation.
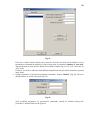
Fig.2.
Press “Browse…” button if you would like to change location of PSYTASK program. Press
“Next” button to continue installation.
5
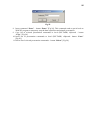
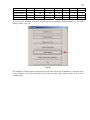
Fig.3.
Type a new folder name if you want. Press “Next” button to continue installation.
Fig.4.
Select components you want to install.
6
Fig.5.
Type a new folder name if you want. Press “Next” button to continue installation.
Fig.6.
Press “Finish” button to complete Setup. Please don’t forget to set the correct synchronization
parameters if you want to use PSYTASK program together with WinEEG program or another
software.
7
4. How to run PSYTASK, Main Dialog Window.
To run PSYTASK find executable file PSYTASK.EXE and double click it. After that the “Main
window” of PSSYTASK program will appear on the screen
Fig.7.
The Main Window of PSYTASK program is a dialog window. Using buttons of MainWindow
user can perform different commands of PSYTASK program.
The button Start New Task is used for the start of new psychological test with presentation of
stimuli and measurement of the reaction time and other performance parameters.
The button Display Database is used to open build-in database to display results of testing and
to prepare final report.
The button Display List of Tasks is used to run build-in editor of presentation protocols list.
The button Switch to Save Mode is used to start the slave mode in which the PSYTASK is
waiting for a control and synchronization commands from WinEEG program that is working on
another computer connected to this computer via COM port.
The button Setup Database is used to modify the database pathname to open another existing
database or create new one.
The button Modify Synchronization Parameters is used to change parameters of COM port
that is used for synchronization.
The button Quit is used to close PSYTASK program.
5. Main definition. Presentation protocol.
Different stimuli (both visual and acoustic) are presented during each task. The subject should
respond to presentation of stimuli by pressing a buttons or ignore them in dependence on subject
task. Each stimulus has its own file. The file of visual stimulus is a file of pixel images such as
.BMP, .JPEG file. The file of audio stimulus is a standard .WAV file.
8
The sequence of stimuli, their expositions, inter-stimuli time intervals and types of subject
responses are described in so named stimuli presentation protocol (the file with extension .PRO). Each stimuli presentation protocol together with stimulus files is stored in the List of
Tasks. The description of each task includes usually a name of task (simple text), name of folder
in which the stimuli files and file of stimuli presentation protocol are stored and some
additional files. The working folder is created in the root folder of PSYTASK program (usually
C:\PSYTASK folder). The list of tasks is written in the file with the name PSYTASK.CFG. It
stored together with PSYTASK.EXE program in the same folder. For example see the figure 8.
Fig.8.
The stimuli presentation protocol is a text (ASCII) file. It includes a list of stimuli, list of trials,
list of presentation commands (the sequence of trials in simplest case) and list of response
processing commands.
The list of stimuli should include all files used in stimuli presentation protocol. Such as:
1) All picture and sound files presented in the task.
2) All picture files displayed during inter-stimuli time intervals (so named background
pictures).
3) All picture files used as description of subject task.
Each stimulus is described by its type (Sound or Image), name (text identifier) and name of
corresponding file. The example of list of stimuli is presented below.
StimuliList
Sound H H.WAV
Sound L L.WAV
EndStimuli
Where a low frequency tone have a name “L” and high frequency tone – “H” 1 .
1
Please see a chapter “Editing of stimuli presentation protocol manually” for details.
9
The description of all trials should be placed after description of stimuli list. The trial is a
minimal time interval where a number (one or more) of stimuli are presented within. And this
sequence of stimuli defines unique subject response. Each trial includes “background” time
interval (time interval before first stimulus), time interval of first stimulus presentation, between
stimuli intervals, time interval of second stimulus presentation, …, and post-stimuli interval
during which the subject should respond. Each trial is described by its name (text identifier),
duration and list of stimuli. Each stimulus in the trial is described by its name (text identifier),
offset from a beginning of trial to stimulus onset and stimulus exposition. It should be stressed
that the exposition of sound is equal its length as defined in corresponding stimulus file.
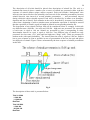
The description of two stimuli GoNogo task will be considered below as example. In this task
two different tones (1000 Hz – low tone and 1300 Hz – high tone) are presented. The exposition
of each tone is equal to 100 ms. Stimuli are presented by pairs, corresponding to trials.
Interstimulus interval in a pair is equal to 1000 ms. Two different pairs of stimuli are only
presented: low-low tones (“Go” trial) and low-high tone (“Nogo” trial). Trials are presented in
random order with equal probability. The interval between trials is equal to 1500 ms. Subject
has to press a button as soon as possible in case of presentation of the low-low pair and ignore
low-high pair of stimuli. Figure 9 shows schematically the time sequence of stimuli presentation
in this task.
Fig.9.
The description of these trials is presented below.
Trial LL 2500
L 300 100
L 1300 100
EndTrial
Trial LH 2500
L 300 100
H 1300 100
EndTrial
10
The description of presentation command should be placed below the description of trials. The
list of presentation command defines the sequence of trials and inter-trials intervals. A number of
additional presentation commands can be used, such as: continuously display a picture (can be
used as description of subject task), set background picture (that is displayed on the screen
between stimuli) and expectation of pending of a number of seconds before presentation of next
trial. The last command is useful in case when it is necessary to make a delay after changing
background picture.
Each presented trial is described by its name (text identifier), after trials delay and numeric label.
The after trial delay helps to present trial with a random inter-trial interval. The numeric labels is
used to sort the trials by means for future computation of reaction time, omission and
commission errors. The short list of presentation commands is shown below.
PsyTest 640x480x256Colors LeftTop
Wait 2000
LL 100 2
LH 100 1
LH 100 1
LH 100 1
LH 100 1
LH 100 1
LH 100 1
LH 100 1
LH 100 1
LL 100 2
EndTest
Finally the description of response processing commands can be added to stimuli presentation
protocol. The example is shown below. 2
ResponseProcessing
"Go" 2 100 1000 VK_RIGHT Press None None 2
"NoGo" 2 100 1000 VK_RIGHT Skip None None 1
EndProcessing
2
Please see a chapter “Editing of stimuli presentation protocol manually” for details.
11
6. Stimuli preparation procedure.
Each stimulus should be prepared manually before starting of task design (except simplest
sounds).
The pictures – graphic pixel files – can be prepared using any graphic editor such as Paint,
PhotoShop and other. PSYTASK can use graphics pixel files with some formats such as .BMP,
JPEG and some other. If some graphics file format is not compatible with PSYTASK (for
example: PCX) this file can be converted to another format using the graphics editor.
The some simple rules should be kept in the mind during the preparation of pictures:
1) Don’t use picture with the resolution (size) more then screen resolution. These pictures
can be used, but the PSYTASK program will work slower and time limitation will be
stronger. The color distortions can appear also in some cases. The optimal resolution is
equal to screen resolution.
2) Don’t use picture with the high color resolution if this is not necessary. This increases the
time of processing.
3) PSYTASK can use the picture with 1 bit colors (monochrome) 4 bits colors, 8 bits colors,
16 bits colors and 24 (32) bits colors. PSYTASK can also set different video modes: 8
bits colors, 16 bits colors and 24 (32) bits colors. Don’t use the pictures with color
resolution higher than video mode color resolution. The color distortions will appear in
this case.
4) If the size (in pixels) of picture is lower then screen resolution there are different ways to
display it, depending on picture processing mode. Please keep in mind that pictures are
displayed on black screen.
The sounds can be prepared by different ways: using build-in sound generator, coping from any
library of sounds, recording new sounds using sound card from any source of sounds (CD player
or microphone).
The optimal format of sound files for PSYTASK is: sampling rate - 44100 Hz, 16 bits, stereo.
The build-in sound generator can be used for preparation of simplest sounds. This generator
provides a possibility to generate a sound consisting of a number (up to 8) of consequent tones
modulated by trapezium. The parameters of tones for left and right channel are defined
separately. The next dialog window helps to define parameters of tones (Fig.10).
Fig.10.
12
The field “Name” is used to define text identifier of stimulus (only letters and digits without
space and any delimiters). The name should be defined without errors.
The field “File name” is used to define name of corresponding file without extension (only
letters and digits with out space and any delimiters). The file name should be defined without
errors.
Following set of parameters should be defined for each simple tone.
“Duration” – length of tone in milliseconds.
“Attack” – duration of tone attack in milliseconds.
“Decay” – duration of tone decay in milliseconds.
“Type” – type of sound. It could be “Off” (silence), “Sine”, “Square”, “Noise”, “R-click” and
“C-click”, The type of tone for left and right channel is defined separately.
“Frequency” – tone frequency in hertz. This parameter is used for Sine or Square tones only.
The frequency of tone for left and right channel is defined separately.
“Volume” – tone volume in dB. The volume type of tone for left and right channel is defined
separately.
Button “OK” is used for generation of sound and for saving.
Button “Play” is used for generation of sound and playing it.
Button “Display” is used for generation of sound and displaying its waveforms (see Fig. 11).
Fig.11.
Button “Play” is used for playing the sound.
13
7. Preparation of stimuli presentation protocols.
The build-in editor of stimuli presentation protocol can be used for creating new protocol, editing
and deleting any existing protocol. To open the build-in editor of stimuli presentation protocol
press “Display List of Tasks” button [Fig.12].
Fig.12.
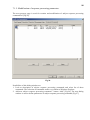
The “List of Tasks” will appear on the screen [Fig.13].
Fig.13.
Possibilities of this dialog window are:
14
1. Create a new stimuli presentation protocol – button “New”. Editor of parameters of
stimuli presentation protocol will appear on the screen.
2. Add any existing stimuli presentation protocol to the list of tasks – button “Add
from…”. During this procedure user should select a file of stimuli presentation protocol
using a standard File Dialog Box. If the file of stimuli presentation protocol is selected
correctly, PSYTASK automatically create new working folder and copies the file of
stimuli presentation protocol and all files of stimuli. The name of task will be added also
to the end of list of tasks.
3. Modify parameters of stimuli presentation protocol using the editor of parameters of
stimuli presentation protocol – button “Modify”.
4. Modify stimuli presentation protocol using simplest text editor – button “Edit”. This
command is useful for experienced users preferring to work with text file versus dialog
windows. This command includes also a simple debugger for finding syntactic errors (not
a logical) in the stimuli presentation protocol.
5. Delete any existing stimuli presentation protocol from task list – button “Delete”
6. Change the order of tasks in the task list – buttons “Up” and “Down”.
7. Save the changes in the task list – button “OK” – and return to the main dialog window.
7.1. Editor of parameters of stimuli presentation protocol.
During both creation new and editing existing stimuli presentation protocol the “Modify task
parameters“ dialog window will appear on the screen. This dialog window consists of five
property pages:
1. Task properties [Fig.14].
2. Stimuli list [Fig.15].
3. Trials list [Fig.16].
4. Presentation order [Fig.20].
5. Response processing [Fig.26].
Using this property pages it is possible to define or modify all parameters of stimuli presentation
protocol.
15
7.1.1. Definition of task properties.
Fig.14.
The next parameters should be defined for each stimuli presentation protocol.
1. Name of task – field “Task Name” (any text)
2. Name of working folder – field “Subfolder Name” (only letters and digits without space
and any delimiters).
3. Name of file of stimuli presentation protocol – field “Protocol File Name” (only letters
and digits without space and any delimiters).
4. Video mode – field “Screen Resolution”. There is no possibility to change the video
mode during the task. It can be set only once at the beginning of task. After the end of
task the video mode will be restored to the Windows default. It is possible to use the
following video modes:
• Default – (640 x 480 - 256 Colors)
• 640 x 480 - 256 Colors
• 640 x 480 - High Color (16 bit)
• 640 x 480 - True Color (24 bit)
• 800 x 600 - 256 Colors
• 800 x 600 - High Color (16 bit)
16
• 800 x 600 - True Color (24 bit)
• 1024 x 768 - 256 Colors
• 1024 x 768 - High Color (16 bit)
• 1024 x 768 - True Color (24 bit)
• 1280 x 1024 - 256 Colors
• 1280 x 1024 - High Color (16 bit)
• 1280 x 1024 - True Color (24 bit)
• 1600 x 1280 - 256 Colors
• 1600 x 1280 - High Color (16 bit)
• 1600 x 1280 - True Color (24 bit)
Attention!!! Some video modes can’t be supported by video card or monitor of your
computer. The good idea is to try to set video mode using “Control panel” before
selecting it. Otherwise you can receive unpredictable results.
Attention!!! During changing the video mode, PSYTASK tries to set the current
(Windows) refresh rate. But some video modes can’t be supported by video card or
monitor of your computer. The good idea is to try to set video mode with selected
refresh rate using “Control panel” if you plan to use the screen resolution higher
than screen resolution used by Windows. Otherwise you can receive unpredictable
results.
5. Image processing method – field “Image processing. There are tree options:
• Fit to screen The picture will be enlarged or collapsed to the screen size. The aspect
ratio can change.
• Centered The picture will be displayed at the center on the screen. The unused areas
on the screen will be filled by black color.
• Left/Top The picture will be displayed at the left top cornet of the screen. The
unused areas on the screen will be filled by black color.
There is a difference in work of this property page during creation of new stimuli presentation
protocol and during modification of an existing. So, it is impossible to modify the name of
working folder and the name of file of stimuli presentation protocol. That is why the
corresponding fields are disabled during modification of parameters of existing stimuli
presentation protocol.
17
7.1.2. Modification of list of stimuli.
The next property page is used for creation and modification of stimulus list [Fig.15].
Fig.15.
Described stimulus list is placed at left side of window. Additional information about selected
stimulus is displayed at the right top corner of window.
Place mouse pointer to the corresponding name of stimulus and click left button to select
stimulus. “Up Arrow” and “Down Arrow” keys can be also used for this goal.
Possibilities of this dialog window are:
1. Add files of stimuli to the list of stimuli – button “Add from file…”. During this
procedure the selected files are copied automatically to work folder and their names are
added to the end of stimuli list.
2. Generate new sound using build-in sound generator – button “Add New Sound” (see
chapter “Stimuli preparation procedure” for details). The sound will be written to work
folder with the sound parameters file.
3. Modify selected sound – button “Modify Sound” using build-in sound generator. This
button is enabled if the sound parameters file is available. This means that the sounds
added from files can be modified.
4. Play existing sound – button “Play”.
18
5. Delete list of selected stimuli – button “Delete”. The selection of stimuli works very
similar to Windows Explorer.
6. Modify names of stimuli. This function works similar to Windows Explorer.
19
7.1.3. Modification of list of trials.
The next property page is used for creation and modification of trial list [Fig.16].
Fig.16.
Possibilities of this dialog window are:
1. Look at description of each trial and select list of trials. The selection of trials works very
similar to Windows Explorer.
2. Modify names of trials (the name of trial can include letters and digits only). This
function works similar to Windows Explorer.
3. Add new trial – buttons “Add Complex” and “Add simple” [Fig.16].
The complex trial is a trial that includes more then one stimulus. The next dialog window
is used to define the parameters of complex trial [Fig.17].
20
Fig.17.
The next set of parameters should be defined for complex trial: name – field “Trial
name” (letters and digits only), duration in milliseconds – field “Trial duration” and the
parameters of each stimulus. Each stimulus in the trial is described by its name (selected
from a list), offset from a beginning of trial to the stimulus onset and stimulus exposition
in milliseconds.
The simple trial includes single stimulus. If the timing parameters of trials are the same
there is a possibility to add a list of trials corresponding to list of selected stimuli. The
next dialog window is used to define the parameters of simple trial [Fig.18].
Fig.18.
21
In this case used stimuli should be marked. The trial duration (field “Duration”) and stimuli
parameters (fields “Start” and “Exposition”) should be also defined.
The buttons “Select all” and “Unselect all” help to mark stimuli.
4. Modify parameters of selected trials – button “Modify” [Fig.16]. The next dialog window is
used to modify the parameters of trials [Fig.19].
Fig.19.
Only modified parameters of trial should be defined during this procedure. Unfilled fields
will be ignored.
5. Delete selected trials – button “Delete” [Fig.16].
22
7.1.4. Modification of list of presentation commands.
The next property page is used for creation and modification of list of presentation commands
[Fig.20].
Fig.20.
Possibilities of this dialog window are:
1. View description of sequence of commands and select list of commands. The selection of
commands works very similar to Windows Explorer.
2. Add one or a number of trials to the list of presentation commands [Fig.20]. The next dialog
window is used to add trials [Fig.21].
In this case the added trials should be marked. The buttons “Select all” and “Unselect all”
help to mark stimuli.
The minimal and maximal after-trial delay (fields “Minimal after-trial delay” and
“Maximal after-trial delay”), numeric label of trials (field “Label”) and number of trials
that will be added (field “Number of each trial”) should be also defined.
If Minimal after-trial delay is not equal to Maximal after-trial delay the random after trial
delay will be specified for each added trial.
23
Fig.21.
If the list of marked trials includes more that one trial, the each trial will be added to list of
presentation commend the number of times being equal to parameter Number of each trial.
This means that 40 trials will be added in described example [Fig.21]: 20 “UU” trials and 20
“UD” trials.
Finally if you need to add trials with different digital labels this procedure should be repeated
many times.
3. Change parameters of selected presentation commands – button “Modify” [Fig.20]. The next
dialog window is used for this goal [Fig.22].
Fig.22.
Only modified parameters of presentation commands should be defined during this
procedure. Unfilled fields will be ignored.
24
4. Randomize the order of presentation command in selected list – button “Randomize”
[Fig.20].
5. Add command “Display Picture” – button “Display Picture” [Fig.20]. Usually this
command is used to display the description of subject task on the screen. The next dialog
window is used to select appropriate stimulus [Fig.23].
Fig.23.
6. Add command “Set Background” - button “Background” [Fig.20]. This command is used
to define the picture that will be displayed on the screen during inter-stimuli interval. The
next dialog window is used to select appropriate stimulus [Fig.24].
Fig.24.
7. Insert delay – button “Delay” [Fig.20]. The next dialog window is used to define the duration
of delay [Fig.25].
25
Fig.25.
8. Insert command “Pause” – button “Pause” [Fig.20]. This command sends a special code to
WinEEG program to temporary stop the data acquisition and stimuli presentation.
9. Copy list of selected presentation commands to local (PSYTASK) clipboard – button
“Copy” [Fig.20].
10. Insert list of presentation commands to local (PSYTASK) clipboard– button “Paste”
[Fig.20].
11. Delete list of selected presentation commands – button “Delete” [Fig.20].
26
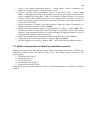
7.1.5. Modification of response processing parameters.
The next property page is used for creation and modification of subject response processing
command list [Fig.26].
Fig.26.
Possibilities of this dialog window are:
1. Look at description of subject response processing commands and select list of these
commands. The selection of commands works very similar to Windows Explorer.
2. Add new subject response processing command – button “Add” [Fig.26]. The next dialog
window is used to define parameters of subject response processing command [Fig.27].
27
Fig.27.
The next parameters should be defined in this dialog window:
• Name of subject response processing command – field “Name” (any text)
• List of numeric labels – field “Trial labels”. The labels should be entered using “Space”.
• Ordinal number of stimulus in the trial related to which the reaction time will be
calculated (usually the last stimulus in the trial) – button “Stimulus”.
• Minimal and maximal permitted latency of subject response in milliseconds – fields
“Minimal latency” and “Maximal latency”.
• Type of subject response and mouse button or keyboard key – fields “Type” and “Hot
key”.
It should be emphasized that there are three different types of subject response: 1) – press
one button, 2) - press two buttons simultaneously and 3) – ignore the trial. If the task is to
press only one button the reaction time its standard deviation, percent of omission errors and
percent of commission errors will be calculated. If the task is to press two buttons
simultaneously the reaction time its standard deviation will be calculated for both buttons
separately. The percent of omission errors and percent of commission errors will be
calculated. If the task is to ignore the trial the percent of commission errors will be
calculated.
3. Change parameters of subject response processing command – button “Modify” [Fig.26].
The same window as described above will be used for this goal [Fig.27].
4. Delete selected subject response processing command from list – button “Delete” [Fig.26].
28
7.2. Editing of stimuli presentation protocol manually.
In order to edit text of stimuli presentation protocol using simple text editor, press the button
“Edit” of “List of Task” dialog window [Fig.13]. The next dialog window will be displayed on
the screen [Fig.28].
Fig.28.
The commands, keywords and syntactic rules of stimuli presentation protocol will be described
below.
7.2.1. Definition of task name:
TaskName “<Test Name>"
Where TaskName – keyword, and <Test Name> - any text.
Generally this command is placed at the beginning of stimuli presentation protocol.
29
7.2.2. Definition of stimuli list:
The list of Stimuli starts with the keyword StimuliList and ends with the keyword EndStimuli.
Two types of stimuli are available for the user: picture (Image) and acoustic stimulus (Sound).
The list of stimuli is defined as follows:
StimuliList
Image <STIM_ID> <FileName>
Sound <STIM_ID> <FileName>
EndStimuli
where STIM_ID - the stimulus identifier (the letters and digits only) and FileName - the
name of file which stores a picture or a sound.
The stimuli list is placed at the beginning of stimuli presentation protocol. Only one stimuli
list can be described in stimuli presentation protocol.
7.2.3. Definition of trials list
Each trial is described separately. Its description starts with the keyword Trial and ends with the
keyword EndTrial. In between these words the stimuli are listed as follows:
Trial <TRIAL_ID> <TrialLength>
<STIM_ID> <StartTime> <Exposition>
<STIM_ID> <StartTime> <Exposition>
EndTrial
Where: TRIAL_ID - the identifier of the trial (the letters and digits only), TrialLength - trial
duration in milliseconds, STIM_ID - the stimulus identifier (see above), StartTime - the time
of the stimulus onset (in ms) from the beginning of the trial and Exposition - the stimulus
duration (in ms).
7.2.4. Definition of presentation command list.
The description of presentation command should be placed below the description of trials. The
list of presentation command defines the sequence of trials and inter-trial intervals. A number of
additional presentation commands can be used such as:
• Display a picture continuously (can be used as description of subject task),
• Set background picture (which is displayed on the screen between stimuli),
• Wait a number of seconds before continue to present next trial. The last command is
useful in case when it is necessary to make a delay after changing background picture.
Each presented trial is described by its name (text identifier), after trials delay and numeric label.
The after-trial delay helps to present trials with random inter-trial interval. The numeric labels
are used to sort the trials by means for computation of reaction time, omission and commission
errors.
The list of presentation commands starts with the keyword PsyTest and ends with the keyword
EndTest. In between these words presentation commands are listed as follows:
PsyTest <ScreenResolution> <ImageProcessing>
ShowPicture <STIM_ID>
SetBackground <STIM_ID>
Wait <Delay>
<TRIAL_ID> <AfterTrialDelay> <TrialLabel>
30
<TRIAL_ID> <AfterTrialDelay> <TrialLabel>
<TRIAL_ID> <AfterTrialDelay> <TrialLabel>
<TRIAL_ID> <AfterTrialDelay> <TrialLabel>
EndTest
Где:
ScreenResolution – keyword that defines video mode. It can be: 640x480x256Colors,
640x480xHiColor,
640x480xTrueColor, 800x600x256Colors,
800x600xHiColor,
800x600xTrueColor, 1024x768x256Colors, 1024x768xHiColor, 1024x768xTrueColor,
1280x1024x256Colors, 1280x1024xHiColor,
1280x1024xTrueColor, 1600x1280x256Colors, 1600x1280xHiColor, 1600x1280xTrueColor,
ImageProcessing - keyword that defines the mode of image positioning. It can be:
LeftTop – display picture at the left top corner of screen, Center – place picture at the center of
screen, FitToPage – expand or collapse picture to the size of the screen.
ShowPicture – keyword that define the beginning of Show the picture-Message on the
screen command.
<STIM_ID> - the stimulus identifier (the letters and digits only)
SetBackground - keyword that define the beginning of Set background picture
command.
<STIM_ID> - the stimulus identifier (the letters and digits only)
Wait - keyword that define the beginning of Wait delay command
<Delay> - time interval in milliseconds
<TRIAL_ID> - the trial identifier (the letters and digits only)
<AfterTrialDelay> - interval from the end of the given trial till the beginning of the next
trial in ms
<TrialLabel> - label of the trial, which is further used to determine the group of trials.
These labels should conventionally identify the category of stimulus or category of the subject's
response (for example, standard and deviant stimuli in the Odd Ball task).
7.2.5. Subject response processing commands list definition.
The list of subject response processing commands starts with the keyword ResponseProcessing
and ends with the keyword EndProcessing. In between these words subject response processing
commands are listed as follows:
ResponseProcessing
“<Name>” <STIM> <MIN_LAT> <MAX_LAT> <KEY1> <TYPE1> <KEY2> <TYPE2> <LAB1> <LAB2>…
“<Name>” <STIM> <MIN_LAT> <MAX_LAT> <KEY1> <TYPE1> <KEY2> <TYPE2> <LAB1> <LAB2>…
EndProcessing
Где:
Name – name of subject response processing command (or name of condition)
STIM – Order number of stimulus in the trial related which the reaction time will be calculated
MIN_LAT – minimal permissible latency of subject response in milliseconds
MAN_LAT – maximal permissible latency of subject response in milliseconds
KEY1 – keyword that defines a mouse button or keyboard key that is used as a “hot key” for the
“first” response.
31
TYPE1– keyword that defines a type “first” response.
KEY2 – keyword that defines a mouse button or keyboard key that is used as a “hot key” for
the “second” response
TYPE2– keyword that defines a type “second” response.
<LAB1> <LAB2>… - list of digital labels. The labels should be entered using “Space”
The next keywords are defined for mouse button or keyboard key:
None – not used,
VK_SPACE – Space Bar,
VK_LEFT – Left Arrow,
VK_UP – Up Arrow,
VK_RIGHT – Right Arrow,
VK_DOWN – Down Arrow,
MOUSE_LEFT – Left Mouse Button,
MOUSE_RIGHT – Right Mouse Button.
The next keywords are defined for type of subject response:
None – not used,
Press – press a button,
Skip – ignore,
7.3. Optimization of the stimuli presentation protocol.
These recommendations can be helpful to optimize the performance of stimuli presentation
protocol.
1. Switching of a video mode takes a lot of time (one or more seconds). That is why it is
strong recommended to place Wait command at the beginning of stimuli presentation
protocol. Otherwise the first visual stimulus can be invisible.
2. The setting of the background picture can be recognized as additional stimulus. That is
why it is strong recommended to place Wait command after this command.
3. If the stimuli list includes less than 16 stimuli, entire corresponding file will be loaded at
the beginning of task. Otherwise the next subset of stimuli will be loaded before the next
trial. That is why the after trial delay should not be very short.
4. The preparation of the next stimulus is performed during inter-stimulus interval. That is
why these intervals should not be very short.
5. If the picture will replace by the next stimulus without displaying of background picture,
the exposition of this stimulus should be equal to zero. In this case the picture will
replace the background picture. For example see “Reversionary patterns” task.
6. The picture is displayed with some delay being less or equal to the time interval, used to
display one screen frame. It depends on screen refresh rate. To minimize this delay try to
set maximal screen refresh rate in Control Panel.
7. The video and auditory stimuli can be presented simultaneously. But some delay between
video and auditory stimuli onsets can appear. The value of this delay depends on the
hardware but usually it is shorter than 10 ms.
8. Some problems with synchronization of stimuli presentation can occur if the sound onset
is very close to the visual stimulus offset.
9. There is no way to theoretically predict the possibility to run some of stimuli presentation
protocol on any computer. It depends on different factors. That is why it is strong
recommended to test each new stimuli presentation protocol and optimize its time
limitation if it is necessary.
32
8. How to start new task and carry out an investigation.
To start new task press button “Start New Task” in the main dialog window [Fig.29].
Fig.29.
The next dialog window will appear on the screen [Fig.30].
Fig.30.
Fill in the following items of the subject's card:
"Task Name" - is selected from the list by the keys "Up" and "Down".
"Date" and "Time" of the investigation are set automatically. However, they should be checked
and corrected if the calendar and clock of the computer are not set correctly.
"Subject Name" - subject's name.
"Date of birth" - the date of birth of the subject: day/month/year.
33
"Gender" - Gender of the subject ("Male" or "Female").
"Notes" - Any additional text. Can be left empty.
Press "OK" after the subject's card is filled in for starting the task.
34
9. How to display results of investigation (working with database).
To display results press button “Display Database” in the main dialog window [Fig.31].
Fig.31.
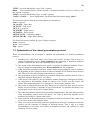
The next dialog window will appear on the screen [Fig.32].
35
Fig.32.
The list investigations are located in the upper part of the dialog window. Use "Arrow Up",
"Arrow Down", "Page Up", "Page Down", "Home", "End" or mouse to select an appropriate
item from the list.
The subject's card is located under the list of investigations.
The table of results is located under the subject's card. This table includes the eight columns.
“Condition” – the name for subject response processing command.
“Total” – the total amount of trials which correspond to this condition.
“Omission” – the percent of trials with omission errors.
“Commission” – the percent of trials with commission errors.
“RT1” – reaction time calculated for a first pressed key (button)
“RT2” – reaction time calculated for a second pressed key (button)
“StD[RT1]” – standard deviation of reaction time calculated for a first pressed key (button).
“StD[RT2]” – standard deviation of reaction time calculated for a second pressed key (button).
The button “Find…” is used for calling the automatic search of results of investigation using the
given features. The next dialog window will appear on the screen [Fig.33].
36
Fig.33.
This dialog window is used to set the parameters of records, used to make selection form the
database. Unfilled fields are not used. If all fields are not filled in, all records will be selected.
Fields "Task Name", "Subject", "Sex" are text fields. For each of them the algorithm of
comparison finds a part of line (substring). For example, if "Subject" stores Peter Kugler, and if
"Conditions of Subjects' stores just Kugler, this record will be selected.
For "Data", "Time" and "Date of Birth" the limits - from, to - should be set in format
day/month/year (DD/MM/YYYY) and hour/minute/second (HH:MM:SS).
Each of conditions for subject's search is compared "symbol to symbol" with the records in the
Data Base. If single symbol does not meet the whole record is excluded. Therefore, in the case
of incorrect condition set a selection with no selected records is quite possible. In this case
check the conditions of search carefully.
The conditions of search are kept unchanged continuously. Therefore, even after carrying out
new investigations the list of selected records could remain empty. In this case check the
conditions of search or press button "Clear" for erasing all old conditions of search.
The button “Delete…” is for calling deleting all selected records in the database [Fig.32].
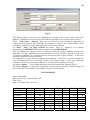
The button “Report” is calling for creating the textual report for currently selected record and
put it in the WS Word window. The example of report is located below.
FINAL REPORT
Name: John Smith
Date of Birth: 10.10.1990 Gender: "M"
Task: Tova
Data: 17/09/2004 Time: 20:01:09
Condition
Go
NoGo
Go (1 half)
NoGo (1 half)
Go (2 half)
NoGo (2 half)
Go (1 qua.)
NoGo (1qua.)
Go (2 qua.)
Total
5
7
5
7
0
0
5
7
0
Omission
0.0
0.0
0.0
0.0
0.0
0.0
0.0
0.0
0.0
Commission
0.0
0.0
0.0
0.0
0.0
0.0
0.0
0.0
0.0
RT1
274
0
274
0
0
0
274
0
0
RT2
0
0
0
0
0
0
0
0
0
StD(RT1) StD(RT2)
43
0
0
0
43
0
0
0
0
0
0
0
43
0
0
0
0
0
37
NoGo (2 qua.)
Go (3 qua.)
NoGo (3 qua.)
Go (4 qua.)
NoGo (4 qua.)
0
0
0
0
0
0.0
0.0
0.0
0.0
0.0
0.0
0.0
0.0
0.0
0.0
0
0
0
0
0
0
0
0
0
0
0
0
0
0
0
0
0
0
0
0
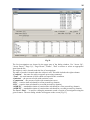
To create a new database or open an existing one use a command “Setup Database” of the main
dialog window [Fig 34].
Fig.34.
The standard File Box Dialog window helps to find an existing file of database or enter the name
of new database file. If the specified file does not exist, the empty database file will be created
automatically.
38
10. Working synchronously with the WinEEG or another program.
PSYTASK program is able to work synchronously with WinEEG program and some others. In
this case two computers on which PSYTASK and WinEEG (for examples) programs are
installed must be connected via COM port using NULL-modem cable. PSYTASK program can
work in two modes: master mode and slave mode. The synchronous work of two computer with
appropriate programs will be able only if the parameters of synchronization is specified
correctly.
10.1. Definition of parameters of synchronization.
To specify or change the parameters of synchronization press button “Modify Synchronization
Parameters” of main dialog window [Fig.35].
Fig.35.
The next dialog window will appear on the screen [Fig.36].
39
Fig.36.
The parameters of the synchronization port should be defined, such as port number
("Synchronization port to which a master computer is connected"), the speed of transfer
"Baud rate", the length of the transferring word "Number of bits", the number of stop-bits
("Stop bits"), checking parity "Parity".
Usually for WinEEG
Baud rate Number of bits Stop bits Parity -
program the following setting is needed:
57600
8
1
None
There is no way to automatically define number of COM port to which master computer is
connected. That is why the following steps should be done to specify this parameter:
1. Perform “Switch to Slave Mode” command of PSYTASK program.
2. Perform “Analysis: Stimuli Presentation Programs” command of WinEEG program
3. Click “Update” button. If synchronization COM ports are defined correctly the progress
bar will display a process of transferring of task protocols from PSYTASK program to
WinEEG program. Otherwise WinEEG program will report that the slave computer does
not respond.
4. Change the COM ports and their parameters if it is necessary using “Modify
Synchronization Parameters” command of PSYTASK program and “Setup:
Equipment configuration” command of WinEEG program and perform 1-3 steps. It is
necessary to find correct combination of COM ports.
Attention!!! It is necessary to perform steps 1-3 every time when the list of tasks or their
parameters is changed in PSYTASK program.
Attention!!! PSYTASK program is able to send correct task protocols. Please be attentive
and check new task protocols before updating list of protocols for WinEEG program.
There are different synchronization modes of PSYTASK program. This mode depends on how
the PSYTASK program will be used.
The field “Synchronization mode” is used to change synchronization mode. The following
modes can be selected:
1. “Don’t send synchronization codes (WinEEG control)” – this mode is used if
PSYTASK program works in “Slave Mode” together with WinEEG program. In this case
WinEEG program send control and synchronization code and PSYTASK program works
automatically.
2. “Send synchronously with beginning of each trial” – in this mode PSYTASK send
synchronization codes synchronously with beginning of each trial (one code for each
trial).
3. “Send synchronously with first stimulus onset” – in this mode PSYTASK send
synchronization codes synchronously with first stimulus onset of each trial (one code for
each trial).
4. “Send synchronously with each stimulus onset” – in this mode PSYTASK send
synchronization codes synchronously with each stimulus onset of each trial (a number of
codes being equal to number of stimulus in trial are sent for each trial).
Attention!!! The last modes are active if PSYTASK works in Master Mode only. If
PSYTASK works in Slave Mode this parameter is disabled.
40
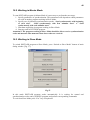
10.2. Working in Master Mode.
To start PSYTASK program in Master Mode it is necessary to perform the next steps:
1. Specify parameters of synchronization. This parameters will depend on which parameters
are used in another program working in Slave Mode.
2. Specify one of following synchronisation modes: “Send synchronously with beginning
of each trial”,
“Send synchronously with first stimulus onset” or “Send
synchronously with each stimulus onset”
3. Start data acquisition in program working in Slave Mode.
4. Start any task in PSYTASK program.
Attention!!! The program working in Slave Mode should be able to receive synchronization
codes and measure time moments when these codes are received.
10.3. Working in Slave Mode.
To switch PSYTASK program to Slave Mode, press “Switch to Slave Mode” button of main
dialog window [Fig. 37].
Fig.37.
In this mode PSYTASK program works automatically. It is waiting for control and
synchronization codes sent by WinEEG program and perform corresponding commands.
To exit from Slave Mode press “Esc” key on keyboard.
41
Appendix. The short description of tasks, included as examples.
1. Reversible chess patterns.
The reversible chess pattern tasks are used for recording visual evoked potentials.
There is a set of stimuli presentation protocols with different parameters of stimulation:
1. The visual stimuli differ by angle size of rectangular cells in the pattern. The angle size
can be 5,10,15,20,25,30,40,50,60 minutes. The angle size will be correct if 17” monitor is
used and subject’s location from monitor is about 1.5 meter.
2. The patterns stimulate different visual areas: left visual area (L), right visual area (R) and
both left and right areas (A). There are stimuli presentation protocols include stimulation
only entire visual area (A); the left area at the first part of task and right area at second
part of task (LR); and full visual area at the first part, left area at the second part of task
and right area at third part of task (ALR).
The patterns are switching with two per second rate.
Each session includes 100 switches of patterns.
The subject should look at the middle of screen or at the special filled circle.
2. Test of Variables of Attention (Tova).
One of two easily discriminated visual stimuli – a coloured square containing a small square
adjacent to either the top or bottom edge – is randomly presented for 100 milliseconds every 2
seconds. The stimulus with the inner square adjacent to the top edge is the designed target.
Subject is instructed to press a button (Right Arrow Key) every time they see this stimulus. The
target – non-target ratio differs in two halves of the TOVA. The target is presented on 22.5 % of
the trials during the first half, whereas the target is presented on 77.5 % of trial during the second
half. The total number of presented stimuli is equal to 640.
The parameters of performance are calculated for Go and Nogo condition for full test, for first
half and second half of task and for each quarter of task separately.
3. Visual Odd-Ball task (P300).
One of two easily discriminated visual stimuli – a coloured square containing a small square
adjacent to either the top or bottom edge – is randomly presented for 100 milliseconds every 2
seconds. The stimulus with the inner square adjacent to the top edge is the designed target.
Subject is instructed to press a button (Right Arrow Key) every time they see this stimulus. The
target is presented on 20 % of the trials during the task. The total number of presented stimuli is
equal to 500.
The parameters of performance are calculated for target (standard) stimulus and non-target
(deviant) stimulus separately.
4. Auditory Odd-Ball task (P300).
One of two easily discriminated auditory stimuli –the low frequency tone (1000 Hz) and high
frequency tone (1300 Hz) – is randomly presented for 100 milliseconds every 2 seconds. The
stimulus with high frequency tone is the designed target. Subject is instructed to press a button
42
(Right Arrow Key) every time they hear this stimulus. The target is presented on 20 % of the
trials during the task. The total number of presented stimuli is equal to 500.
The parameters of performance are calculated for target (standard) stimulus and non-target
(deviant) stimulus separately.
5. Visual GoNogo task.
One of two easily discriminated visual stimuli – a coloured square containing a small square
adjacent to either the top or bottom edge – is presented for 100 milliseconds Stimuli are
presented by pairs corresponding to trials. Inter-stimulus interval in a pair is equal to 1000 ms.
Two different pairs of stimuli are presented only: Top-Top pair (“Go” trial) and Top-Bottom pair
(“Nogo” trial). Trials are presented at random order with 50% probability. The interval between
trials is equal to 1500 ms. Subject has to press a button (Right Arrow Key) as soon as possible in
case of presentation of the Top-Top pair and ignore Top-Bottom pairs of stimuli. The total
number of trials is equal to 480.
The parameters of performance are calculated for Go and Nogo condition.
6. Auditory GoNogo task.
One of two easily discriminated auditory stimuli –the low frequency tone (1000 Hz) and high
frequency tone (1300 Hz) – is randomly presented for 100 milliseconds. Stimuli are presented by
pairs corresponding to trials. Inter-stimulus interval in a pair is equal to 1000 ms. Two different
pairs of stimuli are presented only: Low-Low pair (“Go” trial) and Low-High pair (“Nogo” trial).
Trials are presented at random order with 50% probability. The interval between trials is equal to
1500 ms. Subject has to press a button (Right Arrow Key) as soon as possible in case of
presentation of Low-Low pair and ignore Low-High pairs of stimuli. The total number of trials is
equal to 480.
The parameters of performance are calculated for Go and Nogo condition.
7. Left-Right task.
The three different stimuli – left adjacent filled circle, right adjacent filled circle and both left
and right adjacent filled circle – is randomly presented for 100 milliseconds every 1.1 seconds.
The subject has to press left button (Left Arrow Key) in response to presentation of left adjacent
circle, right button (Right Arrow Key) - right adjacent circle and both buttons (Left Arrow Key
and Right Arrow Key) – both circles. The total number of trials is equal to 300.
The parameters of performance are calculated for every condition separately.
8. VCPT task.
The VCPT task is GoNogo task. The tree types of visual stimuli are presented in this task:
pictures with animals, pictures with plants and pictures with peoples. Stimuli are presented by
pairs corresponding to trials. There are four different types of pairs: “Animal-Animal”, “AnimalPlant”, “Plant-Plant”, and “Plant-Human”. Trials are presented at random order with equal
probability. The duration of stimuli is equal 100 ms. Inter-stimulus interval in a pair is equal to
1100 ms. Interval between trials is equal to 3100 ms. Subject has to press a button (Right Arrow
43
Key) as soon as possible in case of presentation of Animal-Animal pairs and ignore other pairs
of stimuli. The total number of trials is equal to 400.
The parameters of performance are calculated for every condition separately.
9. Mathematical task.
The Mathematical task is GoNogo task. The visual stimuli are presented by pairs corresponding
to trials. The first stimulus is arithmetical equation, the second – integer number. There are two
types of pairs: in the first the result of arithmetical equation is equal to second number, in the
second – not equal. Subject has to press a button (Right Arrow Key) as soon as possible in
respond to first type pairs, and ignore second type pairs. The duration of first stimulus in the pair
is equal 400 ms, and second – 200 ms. Inter-stimulus interval in a pair is equal to 1100 ms.
Interval between trials is equal to 3100 ms. The total number of trials is equal to 200.
The parameters of performance are calculated for every condition separately.
10. Reading task.
The Reading task is GoNogo task. The visual stimuli are presented by pairs corresponding to
trials. The first stimulus is a word presented visually in the screen, and second – the same or
another word presented auditory. There are two types of pairs: in the first presented words are
the same, in the second are different. Subject has to press a button (Right Arrow Key) as soon as
possible in respond to first type pairs, and ignore second type pairs. The duration of first stimulus
in the pair is equal 200 ms, and second is about 700 ms. Inter-stimulus interval in a pair is equal
to 1100 ms. Interval between trials is equal to 3100 ms. The total number of trials is equal to
200.
The parameters of performance are calculated for every condition separately.
11. Auditory task.
One of eight easily discriminated auditory stimuli – four short tones (duration is equal to 100 ms)
with different frequency and four long tones (duration is equal to 400 ms) are presented every
1100 milliseconds. Inter-stimulus interval is equal to 1100 ms. Total number of stimuli is equal
to 994. There are 7 different sequences of stimuli presented randomly with equal probability: 2
short 1 long, 3 short – 1 long, 4 short 1 long, 5 short 1 long, 6 short 1 long 7 short 1 long and 8
short 1 long. The frequency of presented tones is selected randomly. Subject has to press a
button (Right Arrow Key) as soon as possible in respond to long tones.
The parameters of performance are calculated for all short tones, for all long tones, for long
tones after 2-4 short tones and for long tones after 5-8 short tones separately.
11. Mismatch negativity task.
One of two easily discriminated auditory stimuli –the low frequency tone (1000 Hz) and the high
frequency tone (1300 Hz), or one of twenty complex auditory stimuli (the combination of five
short tones with the frequency 500, 1000, 1500, 2000, 2500 ms) – is randomly presented for 100
milliseconds every 850 milliseconds. Total number of stimuli is equal to 2000. The probability
of the low frequency tone is equal to 0.8, the probability of the high frequency tone or complex
tone is equal to 0.1. There are two type of task: active and passive. In active task subject has to
44
press a button (Right Arrow Key) as soon as possible in respond to the high frequency tone and
ignore other stimuli. In passive task subject has to ignore all stimuli and has to read a book or
watch TV.
The parameters of performance are calculated for the low frequency tones (standard stimuli), for
the high frequency tones (deviant stimuli) and for complex tones (novel stimuli) separately.