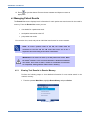
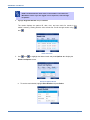
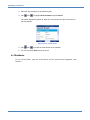
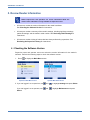
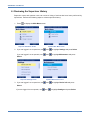
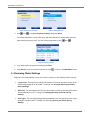
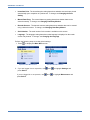
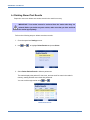
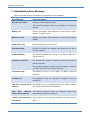
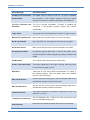
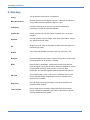
1
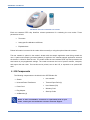
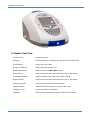
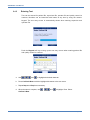
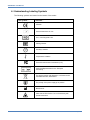
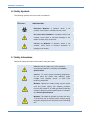
User Manual APPYReader User Manual Copyright This document discloses subject matter in which Venaxis, Inc. has certain proprietary rights. Neither receipt nor possession of this document confers or transfers any rights to reproduce, store in a retrieval syst em, transmit or translate in any form or by any means, electronic, mechanical, photocopying, recording or otherwise, without prior permission from Venaxis. The information contained in this User Manual is subject to change. Illustrations, including software screen illustrations, are representative, and may not reflect the most recently released updates. Copyright © 2013 Venaxis, Inc. All rights reserved. Venaxis, Inc. 1585 South Perry Street Castle Rock, CO 80104 USA www.venaxis.com Tel: +1-303-794-2000 Fax: +1-303-798-8332 Emergo Europe Molenstraat 15 2513 BH, The Hague, The Netherlands For U.S. Export Only Distributor To locate a distributor in your region, please visit Venaxis.com. Venaxis Inc. Page 2 APPYReader User Manual Table of Contents 1. HOW TO USE THIS MANUAL ........................................................................................................................... 5 2. READER OVERVIEW........................................................................................................................................ 5 3. 4. 2.1 KIT COMPONENTS .............................................................................................................................................. 6 2.2 READER FRONT VIEW .......................................................................................................................................... 7 2.3 READER REAR VIEW ............................................................................................................................................ 8 2.4 UNDERSTANDING SCREENS AND MENUS .................................................................................................................. 9 2.4.1 Header Bar ............................................................................................................................................. 9 2.4.2 Content Area ........................................................................................................................................ 10 2.4.3 Soft Key Selections................................................................................................................................ 10 2.4.4 Selecting Menu Items ........................................................................................................................... 10 2.4.5 Entering Text ........................................................................................................................................ 11 2.5 UNDERSTANDING LABELING SYMBOLS ................................................................................................................... 12 2.6 SAFETY SYMBOLS ............................................................................................................................................. 13 2.7 SAFETY INFORMATION ....................................................................................................................................... 13 SETTING UP THE READER ............................................................................................................................. 15 3.1 SUPPLYING POWER TO THE READER ...................................................................................................................... 15 3.2 USING AN OPTIONAL BARCODE SCANNER ............................................................................................................... 15 3.3 TURNING ON THE READER .................................................................................................................................. 15 3.4 SETTING OR CHANGING THE DATE AND TIME .......................................................................................................... 16 3.5 ADDING THE FIRST SUPERVISOR USER AND ADDITIONAL USERS ................................................................................... 18 3.6 CHANGING SETTINGS ........................................................................................................................................ 22 3.7 CHANGING THE LANGUAGE ................................................................................................................................. 23 3.8 CHANGING DATA E NTRY METHOD SETTINGS ........................................................................................................... 24 3.9 CHANGING THE PRINT SETTING ............................................................................................................................ 26 3.10 CHANGING SECURITY AND POWER SAVING SETTINGS ................................................................................................ 27 3.11 CONNECTING TO THE LIS.................................................................................................................................... 29 3.11.1 Setting Up the Network Connection ...................................................................................................... 29 3.11.2 Providing LIS Settings ........................................................................................................................... 31 DAILY OPERATIONS ...................................................................................................................................... 33 4.1 TURNING ON THE READER .................................................................................................................................. 33 4.2 LOGGING IN .................................................................................................................................................... 33 4.3 QUALITY CONTROL ........................................................................................................................................... 34 4.3.1 Running the QC Cassette ...................................................................................................................... 35 4.3.2 Running Liquid Quality Control (QC) ...................................................................................................... 37 4.4 TESTING A PATIENT SAMPLE ............................................................................................................................... 40 4.5 MANAGING PATIENT RESULTS ............................................................................................................................. 44 4.5.1 Viewing Test Results in Reader Memory ................................................................................................ 44 4.5.2 Viewing a Result Stored on a Test Cassette ........................................................................................... 46 Venaxis Inc. Page 3 APPYReader User Manual 4.6 5. 6. 7. REVIEW READER INFORMATION ................................................................................................................... 48 5.1 CHECKING THE SOFTWARE VERSION ...................................................................................................................... 48 5.2 REVIEWING THE SUPERVISOR HISTORY................................................................................................................... 50 5.3 REVIEWING GLOBAL SETTINGS ............................................................................................................................. 51 5.4 DELETING STORED TEST RESULTS ......................................................................................................................... 54 MAINTAINING THE READER .......................................................................................................................... 56 6.1 CLEANING THE READER ...................................................................................................................................... 56 6.2 CHANGING THE PAPER ....................................................................................................................................... 56 6.3 REPLACING THE BATTERIES ................................................................................................................................. 59 TROUBLESHOOTING TIPS ............................................................................................................................. 61 7.1 8. 9. SHUTDOWN .................................................................................................................................................... 47 UNDERSTANDING E RROR MESSAGES ..................................................................................................................... 62 SYSTEM SPECIFICATIONS .............................................................................................................................. 64 8.1 RETURNING THE READER .................................................................................................................................... 64 8.2 DISPOSING OF THE READER ................................................................................................................................. 65 8.3 ACCESSORIES AND PART NUMBERS ....................................................................................................................... 65 GLOSSARY ................................................................................................................................................... 66 Venaxis Inc. Page 4 APPYReader User Manual 1. How To Use This Manual The following conventions are used in this manual: – Each screen is referenced by the name that appears at the top of the screen. – Words on the screen (titles, on-screen options and soft key labels) are shown in bold. – Buttons are referenced only by their icon. For example: Use and to make the necessary changes. – To make instructions easy to read, soft keys are referenced only by t heir label. For example: Press Select to save this setting. – Sections with blue text contain useful information that is relevant to chapter content or important usage information. For example: IMPORTANT: To maintain the expected useful life of the QC cassette, avoid light exposure. Store and reseal the QC cassette in its original pouch immediately after each use. 2. Reader Overview The APPYReader™ Instrument (the reader) is a fluorescence instrument used to measure relative fluorescence units (RFU) generated by lateral flow immunoassay tests manufactured by Venaxis. The reader is designed for use in a laboratory setting. Light from the reader’s UV LED hits a test cassette once inserted into the reader. The UV light causes fluorescent dye in the test cassette to emit energy as relative fluorescence units (RFU). Based upon lot and analyte specific calibration coefficients programmed onto an RFID tag in each individual test cassette, the reader uses the measured RFU to calculate specific protein marker concentrations in a test sample. The concentrations of the two markers, in combination with White Blood Cell count (WBC) values obtained from a hospital’s hematology analyzer and entered into the dedicated reader, are used to determine the patient’s APPY1™ Test result according to a preprogrammed proprietary algorithm. Venaxis Inc. Page 5 APPYReader User Manual APPYReader Instrument and APPY1 Test Cassette Each test cassette RFID chip identifies relevant parameters for evaluating the test results. These parameters include: Test name Assay specific calibration coefficients Expiration date Patient information is entered in the reader either manually or using the optional barcode scanner. The test cassette is placed in the reader’s drawer with the sample application area facing toward the user. A patient test sample (processed plasma) is applied to the cassette sample application area and the drawer is closed to start the test. The reader reads the test cassette RFID chip and processes the test based on pre-programmed settings. The reader measures the level of protein markers, interprets, and reports the test result. Test results can be printed, sent to the LIS, or exported to an optional SD card. 2.1 Kit Components The following components are included in the APPYReader Kit: Reader QC Cassette Universal Power Transformer Thermal Paper Rolls (2) User Manual (CD) Warranty Card Start-Up Guide Power Cord Plug Adapter AA Batteries (4) NOTE: To order consumables, accessories or replacement parts for your reader, contact your local distributor or Venaxis Technical Support. Venaxis Inc. Page 6 APPYReader User Manual Front View 2.2 Reader Front View 1 Printer Cover Covers the printer. 2 Display Shows screens for navigating, entering data and reviewing data. 3 Eject Button Used to eject the drawer. 4 Paper Feed Button Used to advance the paper roll. 5 Main Menu Button Used to return to the Main Menu screen. 6 Left Soft Key Used to select the option shown above the key on the display. 7 Navigation Buttons Used to navigate within menus and reader screens. 8 Right Soft Key Used to select the option shown above the key on the display. 9 Numeric Keypad Used to enter numbers and decimal points. 10 Delete Button Used to delete the character to the left of the cursor. 11 Battery Cover Covers the battery compartment. 12 Drawer Used to insert prepared test and QC cassettes in the reader. Venaxis Inc. Page 7 APPYReader User Manual Reader Back View 2.3 Reader Rear View 1 PS/2 Port Used to connect the optional barcode scanner accessory to the reader. 2 Ethernet Port Used to connect the reader to the LIS network. 3 AC Power Port Used to connect the AC power adapter to the reader. 4 SD Card Slot Used for importing and exporting information via the SD card. 5 On/Off Switch Used to turn the reader on and off. Venaxis Inc. Page 8 APPYReader User Manual 2.4 Understanding Screens and Menus Each screen is divided into three areas: the header bar, the content area, and the soft keys. Main Menu Screen The information displayed in each area is described below. Header Bar 2.4.1 The dark blue bar at the top of the screen that provides the following information: – The icon at the far left indicates whether the user is logged in as a supervisor or an operator. – The number next to the user icon is the current operator ID. If the auto-login setting is enabled, the header bar shows “Auto-Login” instead of the operator ID. – The date and time are shown to the right of the user information. – The icon shown at the far right indicates whether the reader is using AC or battery power. This Icon… indicates that… The user is logged in as a supervisor. The user is logged in as an operator. The reader is using battery power and the batteries are fully charged. The battery icon is gradually filled with white as the battery life is depleted. The AC power adapter is being used to power the reader. Venaxis Inc. Page 9 APPYReader User Manual 2.4.2 Content Area The content area is the light blue area occupying the majority of the reader screen. This area displays menu options, settings and data. When you are logged in as a supervisor, the selected option is indicated by a yellow bar with black text. When you are logged in as an operator, the selected option is indicated by a blue bar with white text. Operator Main Menu Screen Supervisor Main Menu Screen 2.4.3 Soft Key Selections The soft key selections are the dark blue areas with white text displayed at the lower left and lower right of the reader screen. Some screens have two soft key selections, while other screens have only one option. To use a soft key selection, press the soft key below the desired option. 2.4.4 Selecting Menu Items Use navigation keys and to highlight the field. Press the right soft key to select the item. Use radio buttons to indicate the selected feature. Set Language Screen Venaxis Inc. Page 10 APPYReader User Manual Entering Text 2.4.5 Text can be entered for patient IDs, supervisor IDs, operator IDs and quality control lot numbers. Numbers can be intermixed with letters at any time by using the numeric keypad. The text entry screen is automatically shown when entering supervisor and operator IDs. Push the Keypad soft key to bring up the text entry screen when entering patient IDs and quality control lot numbers. a. Use , , and to highlight the desired character. b. Press Confirm & Next to add the highlighted character to the user name. c. Repeat Step a and Step b as necessary. d. When the name is complete, use Confirm & Next. Venaxis Inc. , , and to highlight Done. Select Page 11 APPYReader User Manual 2.5 Understanding Labeling Symbols The following symbols are located on the bottom of the reader: This symbol... indicates... CE Mark Consult Instructions for Use For In Vitro Diagnostic Use Catalog Number Humidity Limitation Temperature Limitation Federal Communication Commission (U.S.) Authorized Representative in the European Community The device requires safe disposal in conformance with the WEEE Directive, 2012/19/EU The polarity of the power supply tip is positive. Manufacturer Class 1M UV LED Product. Do not view directly with optical instruments. Venaxis Inc. Page 12 APPYReader User Manual 2.6 Safety Symbols The following symbols are used in this User Manual: This Icon… indicates that… BIOHAZARD W ARNING: A situation, which if not avoided, could result in a health risk to the user. ELECTRICAL SHOCK W ARNING: A situation, which if not avoided, could result in electrical damage to the reader or bodily injury to the user. C AUTION OR W ARNING: A situation, which if not avoided, could result in incorrect operation or damage to the reader. 2.7 Safety Information Review the safety information below before using the reader. C AUTION: Use the reader only in the operating environment specified. For details, see Product Specifications. C AUTION: To ensure proper operating temperature, do not place the reader near radiators, bright sunlight, heat registers, stoves, or other heatproducing equipment. W ARNING: Operate the reader using only the power cord and power supply (AC adaptor) provided. Connect the reader to an earth-grounded outlet that meets the product’s power specifications. For details, see Product Specifications. W ARNING: The reader is intended for indoor use only. To reduce the risk of electrical shock, always unplug the power supply from the AC power source following use. Venaxis Inc. Page 13 APPYReader User Manual C AUTION: Results are stored in the reader memory for temporary backup purposes only and may be overwritten. The reader memory stores results for up to 500 patient test results. When memory capacity is reached, the most recent result automatically overwrites the oldest result. W ARNING: When using the reader, observe universal safety and laboratory precautions, and follow laboratory operating procedures regarding personal protective equipment (i.e. lab coats, gloves) and safety. W ARNING: Handle and dispose of test cassettes in accordance with standard biohazard practices. W ARNING: Do not remove external panels to access the interior of the reader. The reader contains a Class 1M UV LED used to illuminate the test cassettes. Class 1M UV LEDs are not considered to be hazardous when used as intended. Venaxis Inc. Page 14 APPYReader User Manual 3. Setting Up The Reader 3.1 Supplying Power to the Reader Connect the AC power adapter that was supplied with the reader as follows: 1. Connect the AC power adapter to a power outlet. Connecting the AC Power Adapter 2. Insert the cylindrical end of the AC adapter into the back of the reader. IMPORTANT: Use of any other AC adapter than the supplied power adapter may void the reader warranty. 3.2 Using an Optional Barcode Scanner A barcode scanner with a PS/2 interface can be used for entering data. To use an optional barcode scanner, plug the end of the barcode scanner cable into the PS/2 port in the back of the reader. 3.3 Turning On the Reader The on/off switch is located on the back of the reader. To turn on the reader, push the on/off switch until the Initializing screen appears, then release it. The reader displays a splash screen during startup then displays the Set Date screen. Date and time must be set before running any quality control or patient samples. Venaxis Inc. Page 15 APPYReader User Manual Set Date Screen IMPORTANT: Allow the reader to warm up for at least 10 minutes before running any patient samples. 3.4 Setting or Changing the Date and Time Perform the following steps to set or change the date and time: 1. To set date and time, when the Set Date screen is first displayed, the Date Format field is highlighted. (Skip to Step #5) 2. To change date and time, press to display the supervisor Main Menu screen. Supervisor Main Menu Screen IMPORTANT: You must add the first supervisor user before you can change any reader settings. See Adding the First Supervisor User. NOTE: Only supervisor users can use this feature. If you are logged in as an operator, select Maintenance > Change to Supervisor. Venaxis Inc. Page 16 APPYReader User Manual 3. Use and to highlight Settings and press Select. Supervisor Settings Screen 4. Use and to highlight Set Date and Time and press Select. Set Date Screen 5. Use and to scroll through the following screen and printout date format options: ■ dd.mm.yyyy: Select this option to display the day, then the month, then the year with periods used as separators. ■ mm/dd/yyyy: Select this option to display the month, then the day, then the year with slashes used as separators. ■ yyyy/mm/dd: Select this option to display the year, then the month, then the day with slashes used as separators. When the preferred date format is displayed, press 6. To set the year, month and day use and and to highlight the Year field. to highlight the respective field. Use to change the setting. 7. When you have confirmed that the correct date is displayed, press Confirm & Next. Venaxis Inc. Page 17 APPYReader User Manual Set Time Screen 8. Use and to toggle between the following screen and printout time format options: ■ 12h: Select this option to display times in the 12-hour time format with a.m. and p.m. ■ 24h: Select this option to display times in the 24-hour time format. When the preferred time format is displayed, press 9. To set the hour and minute use and to highlight the Hour field. to highlight the respective field. Use and to change the setting. 10. When the correct time is displayed, press Confirm to accept all settings. 11. If the reader has been allowed to warm up for 10 minutes, you may begin running quality controls and patient samples. See Testing a Patient Sample for instructions. 3.5 Adding the First Supervisor User and Additional Users IMPORTANT: You must add the first supervisor user before you can change any reader settings. In order to add the first supervisor user, you need to obtain a one-time PIN by calling Venaxis Customer Care at 1-877-276-1976 or +1-303-794-2000. IMPORTANT: A one-time PIN can be used only on the day when it is provided. You should add the first supervisor user as soon as you obtain this PIN. . Venaxis Inc. Page 18 APPYReader User Manual With the one-time PIN, perform the following steps to create the first supervisor user: 1. Press to display the operator Main Menu screen. Operator Main Menu Screen 2. Select Maintenance. Maintenance Screen 3. Select Change to Supervisor. Enter One-Time PIN Screen 4. Use the numeric keypad to enter your one-time PIN in the One-Time PIN field. Press Confirm. Venaxis Inc. Page 19 APPYReader User Manual Create a Supervisor Confirmation Screen 5. Press OK. Enter Operator ID Screen 6. Use the numeric keypad to enter the ID for the first supervisor. The ID must be 4 digits. NOTE: To delete the last character entered, press 7. . Use the numeric keypad to enter the user PIN. The PIN must be 4 digits. 8. Use the numeric keypad to confirm the user PIN. 9. Press Confirm & Next. Enter User Name Screen 10. Enter the user name. 11. Use Venaxis Inc. , , and to highlight Done. Then press Confirm & Next. Page 20 APPYReader User Manual Barcode Screen 12. The following options are available on the Barcode screen: a. To assign a barcode for this user, use and to highlight Assign, then use the external barcode scanner to scan the barcode. The reader assigns the barcode and displays the RFID screen. NOTE: To delete this user’s barcode, return to the Barcode screen and use and to highlight Reset. Then press Confirm & Next. b. If you do not want to assign a barcode, use press Confirm & Next. and to highlight Skip. Then RFID Screen 13. If the facility uses RFID cards for laboratory personnel, the reader can be programmed to read the facility-supplied RFID card. The following options are available on the RFID Screen: NOTE: The facility-supplied RFID card must comply with ISO/IEC 15693. a. To assign an RFID for this user, use and to highlight Assign. Hold the user’s RFID card over the reader keypad then press Confirm. The reader assigns the RFID and displays the Operator Administration screen. b. If you do not want to assign an RFID, use Then press Confirm. Venaxis Inc. and to highlight Skip. Page 21 APPYReader User Manual NOTE: To delete this user’s RFID, return to the RFID screen and use and to highlight Reset. Then press Confirm. 14. After adding the first supervisor, you can change reader settings, add more users or set up the LIS connection. Refer to the appropriate section below for instructions: ■ Changing Reader Settings ■ Managing Users ■ Connecting to the LIS Supervisor users can modify the following reader settings: ■ Language: The language setting determines what language is displayed on the reader screen and printouts. To change, see Changing the Language. ■ Data Entry Method: The data entry method settings determine whether data can be entered using a barcode scanner and whether they can be entered manually. To change, see Changing Data Entry Method Settings. ■ Print Setting: The print setting determines whether test results are printed automatically upon completion of a patient test. To change, see Changing the Print Setting. ■ Logout Time: The logout time setting is the duration of inactivity after which a user will be automatically logged out of the reader. To change, see Changing Security and Power Saving Settings. ■ Power Off Time: The power off time is the duration of inactivity after which the reader will automatically turn off. To change, see Changing Security and Power Saving Settings. ■ Auto-Login Setting: The auto-login setting determines whether users are required to enter a login and PIN to use the reader. To change, see Changing Security and Power Saving Settings. NOTE: Only supervisor users can change reader settings. If you are logged in as an operator, select Maintenance > Change to Supervisor to change settings. 3.6 Changing Settings Supervisor users can change the reader’s settings. Settings are changed from the Settings screen. Venaxis Inc. Page 22 APPYReader User Manual Perform the following steps to get to the Settings screen: 1. Press to display the supervisor Main Menu screen. Supervisor Main Menu Screen 2. Use and to highlight Settings and press Select. Settings Screen 3.7 Changing the Language Supervisor users can change the reader’s language setting. The language setting determines what language is displayed on the reader screen and printouts. Perform the following steps to change the language: 1. Go to the Settings screen. Venaxis Inc. Page 23 APPYReader User Manual Supervisor Settings Screen 2. Use and to highlight Select Language and press Select. 3. Use and to highlight the desired language. 4. When the desired language is highlighted, press Select to save this setting. 5. Press Back to return to the supervisor Settings screen or press supervisor Main Menu screen. to return to the 3.8 Changing Data Entry Method Settings Supervisor users can change data entry method settings. The data entry method settings determine whether data can be input by an external barcode scanner and whether they can be input by manual entry. Perform the following steps to change data entry method settings: 1. Go to the Settings screen. 2. Use and to highlight Data Entry Method and press Select. Data Entry Method Screen 3. Perform the following steps to enable or disable use of the barcode scanner for data entry (such as patient ID, LQC ranges): a. Use Venaxis Inc. and to highlight Set Barcode Scanner and press Select Page 24 APPYReader User Manual The selected radio button indicates the current setting. Set Barcode Scanner Screen b. Use c. and to highlight the desired setting. – If you select Enabled, a barcode scanner can be used to enter data. – If you select Disabled, a barcode scanner cannot be used to enter data. When the desired setting is highlighted, press Select to save this setting. d. Press Back to return to the Data Entry Method screen. 4. Perform the following steps to enable or disable manual entry of the data: a. Use and to highlight Manual Data Entry and press Select. The selected radio button indicates the current setting. Allow Manual Entry Screen b. Use c. and to highlight the desired setting. – If you select Enabled, data can be entered using the keypad. – If you select Disabled, data cannot be entered manually. When the desired setting is highlighted, press Select to save this setting. d. Press Back to return to the Data Entry Method screen or press supervisor Main Menu screen. Venaxis Inc. to return to the Page 25 APPYReader User Manual 3.9 Changing the Print Setting Supervisor users can change the print setting. The print setting determines whether test results are printed automatically upon completion of a patient test. Perform the following steps to change the patient ID settings: 1. Go to the Settings screen. 2. Use and to highlight Printing Setup and press Select. Supervisor Settings Screen 3. Use and to highlight the desired setting. Printing Setup Screen o If you select Automatically, test results will be printed automatically upon completion of a patient test. o If you select Manually, test results will not be printed automatically upon completion of a patient test. Results will have to be printed manually by the user. 4. When the desired setting is highlighted, press Select to save this setting. 5. Press Back to return to the supervisor Settings screen or press supervisor Main Menu screen. Venaxis Inc. to return to the Page 26 APPYReader User Manual 3.10 Changing Security and Power Saving Settings Supervisor users can change the following security and power saving settings: ■ Logout Time: The logout time setting is the duration of inactivity after which a user will be automatically logged out of the reader. ■ Power Off Time: The power off time is the duration of inactivity after which the reader will automatically turn off. ■ Auto-Login Setting: The auto-login setting determines whether users are required to enter a login and PIN to use the reader. Perform the following steps to change the logout time, power off time, or auto-login setting: 1. Go to the Settings screen 2. Use and to highlight Set Login / Logout and press Select. Set Login / Logout Screen 3. Perform the following steps to change the logout time and/or power off time: a. Use Venaxis Inc. and to highlight Set Timeouts and press Select. Page 27 APPYReader User Manual Set Timeouts Screen When the Set Timeouts screen is first displayed, the Logout Time field is highlighted. If necessary, use logout time. and to increase or decrease the NOTE : Select a logout time of 0 minutes if you never want users to be automatically logged out of the reader. b. When the desired logout time is displayed, press Power Off Time field. to highlight the NOTE : Select a power off time of 0 minutes if you never want the reader to automatically turn off. c. If necessary, use and to increase or decrease the power off time. d. When the desired power off time is displayed, press Confirm to save these settings. 4. Perform the following steps to change the auto-login setting: a. Venaxis Inc. On the Set Login / Logout screen, use and press Select. and to highlight Set Auto-Login Page 28 APPYReader User Manual Set Auto-Login Screen b. Use c. and to highlight the desired setting. – If you select Enabled, users will not be required to enter a login and PIN to use the reader. – If you select Disabled, users will be required to enter a login and PIN to use the reader. When the desired setting is highlighted, press Select to save this setting. d. Press Back to return to the Set Login / Logout screen. Connecting to the LIS 3.11 The reader can send test results to the LIS over an Ethernet connection. Complete the following steps to set up the LIS connection. 3.11.1 Setting Up the Network Connection Perform the following steps to set up the network connection. If you are not using DHCP, you need to obtain the IP address, port number, subnet mask, and standard gateway for the reader from your network administrator. 1. Connect an Ethernet cable to the reader by inserting one end of the cable into the Ethernet port in the back of the reader. Connecting the Ethernet Cable Venaxis Inc. Page 29 APPYReader User Manual 2. Connect the other end of the Ethernet cable to the LIS network. 3. Go to the Settings screen. 4. Use and to highlight Network Setup and press Select to display the Network Setup screen. Network Setup Screen 5. Use and to highlight Network Configuration and press Select. Network Configuration Screen 6. The following options are available on the Network Configuration screen: To obtain the reader’s IP address, port number, subnet mask, and standard gateway automatically using DHCP, use press Select. and to highlight DHCP. Then The reader obtains the network information and displays the Network Setup screen. To enter the reader’s IP address, port number, subnet mask, and standard gateway manually, use and to highlight Manual. Then press Select. a. When the Manual Network Setup screen is first displayed, the IP address field is highlighted. Use the numeric keypad to enter the IP address for the reader. Then press number field. Venaxis Inc. to highlight the Port Page 30 APPYReader User Manual NOTE: To delete the last character entered, press . b. Use the numeric keypad to enter the port number for the reader. Then press c. to highlight the Subnet Mask field. Use the numeric keypad to enter the subnet mask for the reader. Then press to highlight the Standard Gateway field. d. Use the numeric keypad to enter the standard gateway for the reader. Review the IP address, port number, subnet mask, and standard gateway and confirm that the correct information is displayed. If you need to change a setting, use and to highlight the field, then use the numeric keypad to make the necessary changes. e. Press Confirm to save these settings and return to the Network Setup screen. 3.11.2 Providing LIS Settings Perform the following steps to configure the LIS reviewer settings for the reader. Yo u need to obtain the IP address and port number for the LIS reviewer from your network administrator. 1. Go to the Settings screen. 2. Use and to highlight LIS Reviewer Setup and press Select. Supervisor Settings Screen 3. When the LIS Reviewer Settings screen is first displayed, the Set Timeout field is highlighted. Use and to increase or decrease the timeout for the LIS reviewer. The timeout is the amount of time after which the reader will stop trying to communicate with the LIS. Venaxis Inc. Page 31 APPYReader User Manual 4. When the desired setting is displayed in the Set Timeout field, press highlight the Reviewer IP Address field. 5. Use and Then press 6. Use and to to increase or decrease the IP address for the LIS reviewer. to highlight the Port Number field. to increase or decrease the port number for the LIS reviewer. 7. Review the timeout, IP address, and port number and confirm that the correct information is displayed. If you need to change a setting, use highlight the field. Then use and and to to make the necessary changes. 8. Press Confirm & Exit to return to the supervisor Settings screen. Venaxis Inc. Page 32 APPYReader User Manual 4. Daily Operations This section provides information on preparing the reader for testing. The following tasks must be completed prior to testing patient samples: The reader must be powered on. A user must log in to the reader (unless the reader’s auto-login feature is enabled). Quality control must be performed as required by laboratory procedures. 4.1 Turning On the Reader The on/off switch is located on the back of the reader. To turn on the reader, push the on/off switch until the Initializing screen appears, then release it. The reader displays a splash screen during startup then displays one of the following screens: ■ The Login screen is displayed if the reader’s auto-login feature is disabled. ■ The Enter Patient ID screen is displayed if the reader’s auto-login feature is enabled. IMPORTANT: Allow the reader to warm up for at least 10 minutes before running any patient samples. 4.2 Logging In If necessary, perform the following steps to log in to the reader: 1. On the Login screen, enter your 4-digit user ID or barcode using one of the following methods: Use the numeric keypad to enter your user ID manually. Use the optional external barcode scanner to scan your barcode. Place your facility-supplied RFID card over the reader keypad. Go to Step 4. NOTE : Press the back space key Venaxis Inc. to delete the last character entered. Page 33 APPYReader User Manual Login Screen 2. Press to highlight the PIN field. 3. Enter your 4-digit PIN. 4. Press Login to log in as an operator NOTE: You can also press Supervisor Login to log in as a supervisor. If you log in as a supervisor, you will need to select Change to Operator to test patient samples. 4.3 Quality Control Quality control (QC) testing ensures that the reader is operating within acceptable ranges. QC routines are mandatory and patient tests should not be performed unless required QC is complete. Refer to the APPY1 Control Kit Instructions for Use for additional information. The reader performs initialization and self-checks each time it is powered on. These checks ensure that: Communication between the different reader modules is working. Reader settings and calibration integrity are verified. The optics are functioning properly. The carriage is free to move correctly. The carriage position is zeroed. IMPORTANT: On each day of testing, the reader should be powered on and allowed to complete its initialization and self-checks. Venaxis Inc. Page 34 APPYReader User Manual From the Check APPYReader screen, you can run the QC cassette (QCC) provided with the reader. You can also run liquid QC (LQC). The test result can be printed or sent to the LIS. IMPORTANT: Follow laboratory procedures regarding how frequently to perform QC checks and how to document the results. NOTE: To send QC results to the LIS, the reader must be connected to the LIS and the LIS must have been set up by a supervisor. See Connecting to the LIS. 4.3.1 Running the QC Cassette 1. If you are logged in as a supervisor, go to the Main Menu and change to operator. 2. From the Main Menu highlight Maintenance and press Select. Maintenance Screen 3. Use and to highlight Check Reader and press Select. Check APPYReader Screen 4. Use Venaxis Inc. and to highlight QC Cassette and press Select. Page 35 APPYReader User Manual 5. The reader drawer will open and the Insert Cassette screen will be displayed. Insert QC Cassette Screen 6. The APPYReader QC Cassette screen is displayed when the test finishes. APPYReader QC Cassette Result Screen 7. QC cassette result options: a. Press Options. APPYReader QC Cassette Options Screen b. Venaxis Inc. To print the result, Use Select. and to highlight Print Result and press Page 36 APPYReader User Manual c. To print all the QC cassette results stored in the reader, highlight Print All and press Select d. To send the result to a LIS system, highlight Send Result and press Select QC Cassette Result Sending to LIS Screen e. To send all the QC cassette results to a LIS system, highlight Send All and press Select IMPORTANT: The QC cassette is REUSABLE and should NOT be discarded until the end of its useful life. Avoid light exposure and reseal and store the QC cassette in its original pouch immediately after each use. 4.3.2 Running Liquid Quality Control (QC) IMPORTANT: Allow the reader to warm up for at least 10 minutes before running any QC samples. 1. If you are logged in as a supervisor, go to the Main Menu and change to operator 2. From the operator Main Menu highlight Maintenance and press Select. Venaxis Inc. Page 37 APPYReader User Manual Maintenance Screen 3. Use and to highlight Check APPYReader and press Select. Check APPYReader Screen 4. Use and to highlight Control 1 or Control 2 and press Select. Insert Cassette Screen - Liquid Control 5. Remove the test cassette from its pouch and place it into the cassette drawer. 6. Prepare the control sample in accordance with the APPY1 Control Kit Instructions for Use and apply the sample to the test cassette port. Venaxis Inc. Page 38 APPYReader User Manual 7. Gently close the drawer. The test will start automatically. Liquid Control Testing Screen 8. You will be prompted to enter the QC lot number after the test completes in about 11 minutes. Enter Control Lot # Screen 9. Use the keypad or optional barcode scanner to enter the QC lot number and press Confirm. Enter Control Ranges Screen 10. Use the keypad or optional barcode scanner to enter the QC ranges and press Confirm. Venaxis Inc. Page 39 APPYReader User Manual Control Result Screen 11. Press Next to return to the Check APPYReader screen. 12. Press to eject the drawer. Remove the test cassette and dispose or store as appropriate. 4.4 Testing a Patient Sample IMPORTANT: Allow the reader to warm up for at least 10 minutes before running any patient samples. Perform the following steps to test a patient sample: 1. From the operator Main Menu, Use and to highlight Run Test and press Select. Enter Patient ID Screen 2. Enter the patient ID using one of the following methods: a. To enter manually, press Keypad. b. To use a barcode scanner, scan the patient ID. 3. Press Confirm. Venaxis Inc. Page 40 APPYReader User Manual Enter WBC Result Screen 4. If the patient WBC result is available, enter it and press Confirm. Otherwise press Skip. If you press Skip, you will be asked to enter the patient WBC after the test. Insert Cassette Screen - Run Test 5. Remove the test cassette from its pouch and place it into the cassette drawer. 6. Prepare the sample in accordance with the APPY1 Test Kit Instructions for Use and apply the sample to the test cassette port. 7. Gently close the drawer. The test will start automatically. Test Cassette in Reader Drawer Venaxis Inc. Page 41 APPYReader User Manual 8. The reader displays the status of the test on the Run Test screen. 9. When the test is done, you will be asked to enter the WBC or to confirm the WBC entered prior to the test. IMPORTANT: WBC must be confirmed within 90 minutes or the test is automatically aborted. 10. Re-enter the patient WBC and press Confirm. Test Result Screen IMPORTANT: The test cassette must remain in the reader until the Patient ID is confirmed. Venaxis Inc. Page 42 APPYReader User Manual 11. Press Next, and the following screen will appear. Confirm Patient ID Screen 12. To confirm that the entered patient ID is correct, on the above screen you must do one of the following: If the displayed patient ID is correct, press Confirm to view the test result on the Result List screen. If the reader’s automatic printing feature is enabled, the result is printed automatically. Result List Screen If the displayed patient ID is incorrect: a. Enter the correct patient ID and press Confirm to display the Patient ID does not match screen. Patient ID Does Not Match Screen b. Review the displayed patient IDs, and re-enter the correct patient ID. Press Confirm to view the test result on the Result List screen. Venaxis Inc. Page 43 APPYReader User Manual 13. Press to eject the drawer. Remove the test cassette and dispose or store as appropriate. 4.5 Managing Patient Results The Result List screen displays basic information for each patient test result stored in the reader’s memory. From the Result List screen you can: view details for a patient test result send patient test results to the LIS print patient test results You can also view, send, and print an individual result stored on a test cassette. NOTE: To send a patient result to the LIS, the reader must be connected to the LIS and the LIS must have been set up by a supervisor. See Connecting to the LIS for instructions. IMPORTANT: The reader can store up to 500 patient test results. When the reader’s memory is full, a warning message is displayed prompting user action. If no action is taken, results are overwritten as new tests are completed, starting with the oldest result in memory. 4.5.1 Viewing Test Results in Reader Memory Perform the following steps to view detailed information for test results stored in t he reader’s memory: 1. From the operator Main Menu, highlight Result History and press Select. Result History Screen Venaxis Inc. Page 44 APPYReader User Manual NOTE: The Result History menu item is not available on the supervisor Main Menu screen. If you are logged in as a supervisor, select Change to Operator. 2. Highlight Organize Results and press Select. The reader displays the patient ID, date, time, and test result for results in the reader’s memory, starting with the most recent test. Scroll through results using and . Result List Screen 3. Use and to highlight the desired result and press Options ▲ to display the Result List Options screen. Result List Options Screen a. To see the result details, highlight Show Details and press Select Detailed Result Screen Venaxis Inc. Page 45 APPYReader User Manual The following information is available on the Detailed Result screen: Patient ID: The complete patient ID recorded for the test. Assay: The assay type that was performed (APPY1). Result: The result of the APPY1 Test. WBC Entered: The entered WBC count. Time: The time and date the test was performed. Lot #: The lot number of the cassette used for the test. Op ID: The ID for the operator that performed the test. Last LQC: The date of the last liquid QC performed on the reader. When you have finished viewing result details, press Back. b. To print the result, highlight Print Result and press Select. c. To print all the test results stored in the reader, highlight Print All and press Select d. To send the result to a LIS system, highlight Send Result and press Select e. To send all the test results to a LIS system, highlight Send All and press Select 4.5.2 Viewing a Result Stored on a Test Cassette Perform the following steps to view an individual result stored on a test cassette: 1. From the operator Main Menu, highlight Result History and press Select. Result History Screen NOTE: The Result History menu item is not available on the supervisor Main Menu screen. If you are logged in as a supervisor, select Change to Operator. Venaxis Inc. Page 46 APPYReader User Manual 2. Place the test cassette over the reader keypad. 3. Use and to highlight Read Cassette and press Select. The reader displays the patient ID, date, time, and test result for the result stored on the test cassette. Read Result on Cassette Screen 4. Use and to review the result stored on the cassette: 5. You can also press Print to print the result 4.6 Shutdown To turn off the reader, push the on/off switch until the screen menu disappears, then release it. Venaxis Inc. Page 47 APPYReader User Manual 5. Review Reader Information NOTE: Supervisors and operators can review information about the reader. Some information is only available to supervisor users. All users can review the version information for the reader’s software. See Checking the Software Version for instructions. All users can review a summary of the reader’s settings, including login/logout settings, patient ID settings, and the reader’s serial number. See Reviewing Global Settings for instructions. All users can review a listing of actions that have been performed by supervisors. See Reviewing the Supervisor History for instructions. 5.1 Checking the Software Version Supervisor users and operator users can review the version information for the reader’s software. Perform the following steps to check the software version: 1. Press to display the Main Menu screen. Supervisor Main Menu Screen 2. If you are logged in as a supervisor, use If you are logged in as an operator, use Select. Venaxis Inc. Operator Main Menu Screen and and to highlight Settings and press Select. to highlight Maintenance and press Page 48 APPYReader User Manual Supervisor Settings Screen Maintenance Screen 3. If you are logged in as a supervisor, use Select. If you are logged in as an operator, use Device Info Screen 4. Use and and and to highlight Device Info and press to highlight Settings and press Select. Operator Settings Screen to highlight Software Version and press Select. The version information for the reader’s software is displayed. Current Software Version Screen 5. Press Back to return to the previous screen or press screen. Venaxis Inc. to return to the Main Menu Page 49 APPYReader User Manual 5.2 Reviewing the Supervisor History Supervisor users and operator users can review a listing of actions that have been performed by supervisors. Perform the following steps to review supervisor history: 1. Press to display the Main Menu screen. Operator Main Menu Screen Supervisor Main Menu Screen 2. If you are logged in as a supervisor, use If you are logged in as an operator, use Select. Supervisor Settings Screen 3. If you are logged in as a supervisor, use Select. If you are logged in as an operator, use Venaxis Inc. and to highlight Settings and press Select. and to highlight Maintenance and press Operator Maintenance Screen and and to highlight Device Info and press to highlight Settings and press Select. Page 50 APPYReader User Manual Supervisor Device Info Screen 4. Use and Operator Settings Screen to highlight Supervisor History and press Select. The reader displays the user ID, date, time, and action identifier for actions that have been performed by supervisor users. You can scroll through actions using and . Supervisor History Screen 5. If you want to print the supervisor history, press Print. 6. Press Back to return to the previous screen or press to return to the Main Menu screen. 5.3 Reviewing Global Settings Supervisor users and operator users can review a summary of the following reader settings: Logout Time: The logout time setting is the duration of inactivity after which a user will be automatically logged out of the reader. To change, see Changing Security and Power Saving Settings. APO Time: The automatic power off time is the duration of inactivity after which the reader will automatically turn off. To change, see Changing Security and Power Saving Settings. Auto Login: The auto-login setting determines whether users are required to enter a login and PIN to use the reader. To change, see Changing Security and Power Saving Settings. Venaxis Inc. Page 51 APPYReader User Manual Immediate Print: The immediate print setting determines whether test results are printed automatically upon completion of a patient test. To change, see Changing the Print Setting. Manual Data Entry: The manual data entry setting determines whether data can be entered manually. To change, see Changing Data Entry Method. Barcode Scanner: The barcode scanner setting determines whether data can be entered using a barcode scanner. To change, see Changing Data Entry Method. Serial Number: The serial number for the reader is available on this screen. Language: The language setting determines what language is displayed on the reader screen and printouts. To change, see Changing the Language. Perform the following steps to review global settings: 1. Press to display the Main Menu screen. Supervisor Main Menu Screen 2. If you are logged in as a supervisor, use Operator Main Menu Screen and to highlight Settings and press Select. If you are logged in as an operator, use and to highlight Maintenance and press Select. Venaxis Inc. Page 52 APPYReader User Manual Supervisor Settings Screen Operator Maintenance Screen 3. If you are logged in as a supervisor, use and to highlight Device Info and press Select. If you are logged in as an operator, use and to highlight Settings and press Select. Supervisor Device Info Screen 4. Use and Operator Settings Screen to highlight Global Settings and press Select to display the Global Settings screen. The reader’s current settings are displayed. You can scroll through settings using and . Global Settings Screen 5. If you want to print the global settings, press Print. 6. Press Back to return to the previous screen or press Venaxis Inc. to return to the Main Menu screen. Page 53 APPYReader User Manual 5.4 Deleting Stored Test Results Supervisor users can delete test results stored in the reader’s memory. IMPORTANT: Test results cannot be retrieved from the reader after they are deleted. Before you delete any test results, make sure that you have archived the results appropriately. Perform the following steps to delete stored test results: 1. Go to the supervisor Settings screen. 2. Use and to highlight Delete Results and press Select. Delete Results Screen 3. Select Delete Patient Result to delete a patient test. The reader displays the patient ID, date, time, and test result for tests in the reader’s memory, starting with the most recent test performed. You can scroll through results using and . Delete Results Screen Venaxis Inc. Page 54 APPYReader User Manual 4. Use and to highlight the result you want to delete and press Options ▲to display the Delete Results Options menu. Results List Options Screen - Delete Results 5. To delete only the selected result, highlight Delete Result and press Select 6. To delete all test results, highlight Delete All and press Select 7. To delete all inconclusive test results, Delete Inconcl and press Select. 8. To delete all negative test results, highlight Delete Neg and press Select 9. After deleting, the reader displays the Delete Results confirmation screen to inform you that the selected results have been deleted. Delete Results Confirmation Screen 10. Press OK to return to the Delete Results screen or press Main Menu screen. Venaxis Inc. to return to the supervisor Page 55 APPYReader User Manual 6. Maintaining The Reader Standard maintenance activities for the reader, which can be performed by an operator, include: periodically cleaning the exterior of the reader changing the paper replacing the batteries Other maintenance activities that might be performed on occasion and can only be performed by a supervisor include: changing the date and time updating languages available in the reader upgrading the reader software If any other service or maintenance is required, the reader should be sent to the manufacturer. See Returning the Reader. 6.1 Cleaning the Reader The reader requires minimal maintenance. Occasional cleaning of the exterior is usually sufficient. If blood or other fluids are not allowed enough time to fully absorb into test devices, the reader drawer may occasionally require cleaning. Use a damp, not wet, lintfree cloth to apply a 70% ethanol solution on the outside of the reader or to the inside of the reader drawer. Do not allow water to seep into the printer. Do not immerse the reader in water or other liquids. If the reader is moved or returned for replacement or repair, the reader should be cleaned prior to transfer. NOTE: Never insert any tools, swabs, or cleaning materials beyond the open reader drawer. 6.2 Changing the Paper You can change the paper in the reader anytime. If the reader runs out of paper while in the middle of a printing task and displays the Empty Paper Tray message, the paper may be changed and the print job restarted. Venaxis Inc. Page 56 APPYReader User Manual To change the paper: 1. Remove the printer cover by pulling up on the blue handle on the top of the cover. Removing the Printer Cover 2. Remove the empty paper spindle and any unused paper. 3. If necessary, tear or cut the end of the new paper roll to form a straight edge. Insert the paper roll into the printer so that the end of the paper comes from under the roll toward the reader display, as shown below. Inserting the Paper Roll Venaxis Inc. Page 57 APPYReader User Manual 4. To replace the printer cover, insert the paper roller between the edge of the paper and the paper roll, as shown below. 5. Push down on the sides of the printer cover until you hear it snap into place. Replacing the Printer Cover 6. Press . The reader feeds the paper so that it extends out the top of the printer. Venaxis Inc. Page 58 APPYReader User Manual 6.3 Replacing the Batteries IMPORTANT: The reader is designed to perform a limited number of tests on a set of new batteries. If you are using batteries, turn the reader off when not in use. You can use the automatic Power Off Time setting to help preserve battery life. The battery power level is indicated by the icon displayed at the top right of the reader screen. The battery icon is gradually filled with white as the batteries are discharged. IMPORTANT: Rechargeable batteries are authorized for use with the reader. However, due to the nature of these types of batteries, it is expected they will require recharging more frequently. The reader does not contain a built-in battery charger, and rechargeable batteries must be recharged outside of the reader. To replace the batteries in the reader: 1. Turn the reader off by pushing the on/off button on the back of the reader, then releasing it. 2. Turn the reader over so that the back of the battery cover is visible. 3. To remove the battery cover, place your thumb in the middle of the cover and exert slight pressure as you slide it in the direction shown below. 4. Remove the old batteries. 5. Insert four size AA 1.5 volt batteries. Be sure that the plus (+) and minus (-) signs on the batteries match the signs embossed in the battery compartment. Installing the Batteries Venaxis Inc. Page 59 APPYReader User Manual 6. Replace the battery cover by positioning it at the edge of the battery compartment and sliding it into position. 7. When you have completed battery installation and replaced the battery cover, turn the reader right side up. IMPORTANT: If the reader does not power on after replacing the batteries, verify that the batteries are lined up according to the symbols in the battery compartment. Venaxis Inc. Page 60 APPYReader User Manual 7. Troubleshooting Tips Refer to the table below for instructions for troubleshooting problems. Problem Condition Paper Jam Corrective Actions 1. Remove the printer cover to reveal the paper compartment. 2. Remove and reinsert the paper roll so that the end of the paper comes from under the roll toward the reader display. 3. Replace the printer cover. 4. Press to advance the paper. 5. If the error continues, contact Technical Support for assistance. Keypad or other keys do Reset the reader by disconnecting the AC power adapter not work from the reader or removing the four batteries. Wait 30 seconds and reconnect the power adapter or reinsert the batteries. Reader will not turn on Ensure that the AC power adapter is connected securely to the reader and to the power outlet or that the four batteries are installed correctly. If the problem continues, connect the AC power adapter to a different power supply or replace the four AA batteries with all new batteries. Reader is locked up Reset the reader by disconnecting the AC power adapter from the reader or removing the four batteries. Wait 30 seconds and reconnect the power adapter or reinsert the batteries. Drawer / test cassette is Do not pull or force the drawer/test cassette out of the jammed reader. Reset the reader by disconnecting the AC power adapter from the reader or removing the four batteries. Wait 30 seconds and reconnect the power adapter or reinsert the batteries. If you are still unable to open the drawer and/or remove the test cassette, contact Technical Support. Venaxis Inc. Page 61 APPYReader User Manual 7.1 Understanding Error Messages Refer to the table below for instructions for responding to error messages. Error Message Corrective Action Barcode Scan Failed Attempt to read the barcode again. If the problem persists, check the connection to the barcode scanner. Replace the reader’s 4 AA batteries or connect the AC power Battery Low adapter. Try again to print. Replace the reader’s 4 AA batteries or connect the AC power Battery Too Low adapter. Empty Paper Tray Replace the paper roll in the reader. Expired Cassette Remove the expired test cassette and repeat the test with a new test cassette. ID Already Exists The selected operator ID is already in use. Enter a different 4digit operator ID. Invalid One–Time PIN The entered PIN is invalid. Try again to enter the one-time PIN that was provided. If the problem persists, contact Technical Support to obtain a new PIN. Each PIN is only valid for 24 hours. Invalid Patient ID The patient ID must be 1 to 15 digits. Try again to enter the patient ID. Invalid Op ID The operator ID must be 4 numbers. Try again to enter the operator ID. LAN Error (Cannot Get IP The DCHP server is not responding with an IP address. Contact Address) your network administrator for assistance. LAN Error (Network The network connection cannot be configured. Contact your Cannot Be Configured) network administrator for assistance. LIS Error (LIS Connection The connection to the LIS was interrupted. Try the operation Interrupted) again. Venaxis Inc. Page 62 APPYReader User Manual Error Message Corrective Action LIS Error (LIS Connection The reader failed to connect to the LIS. Try again to establish Not Available) the connection. If the problem persists, check the network settings or contact your network administrator for assistance. LIS Error (Reviewer Not The LIS is currently unavailable. Try again to establish the Available) connection. If the problem persists, contact your network administrator. Login Failed The operator ID / PIN combination is invalid. Try again to log in. Multiple ID Tags Detected Ensure that only one RFID chip is on or near the reader. No ID Tag Detected Place the RFID over the keypad of the reader and try again. No SD Card Found Make sure a valid SD card is properly inserted in the reader. No Upgrade Available No software upgrade was found on the SD card. Make sure a valid SD card with a software upgrade is properly inserted in the reader. PIN Mismatch The confirmed PIN must match the entered PIN. Printer Temperature High The printer temperature is too high for printing. Allow the printer to cool off and try again to print. RFID Error There was an error during RFID communication. Try again. If the problem persists, move the reader away from possible sources of RF interference. SD Card Read Error The SD card may be wrong type or may be damaged. Make sure a valid SD card is properly inserted in the reader. SD Card Write Error The SD card may be wrong type or may be damaged. Make sure a valid SD card is properly inserted in the reader. Temperature Error The ambient temperature is outside the measurement range of the reader (15°C to 30°C). Too Many Users Selected The user database is full. To import more users using the SD card, you must first delete existing users. Used Cassette Remove the test cassette and repeat the test with a new cassette. Venaxis Inc. Page 63 APPYReader User Manual 8. System Specifications Product Information APPYReader Part Number: Dimensions: Weight: F10009 24cm deep x 17cm wide x 12cm high 3 lbs. Power Requirements AC Operation: Battery Operation: 6 VDC at 4.16 A 4 AA / LR6 Cells (Nominal Voltage > 1.5 VDC) Operating Environment Altitude: Temperature: Humidity: 0 to 2000m 15°C to 30°C 30% to 80% non-condensing Storage Environment Temperature: Humidity: -20°C to 55°C for 24 hours 25% to 85% non-condensing External Barcode Scanner (optional) Connector: Power: Codes Supported: Model: PS/2 5 VDC < at 300 mA Any 1D code 20 characters or less in length Dialogic Touch 65 or equivalent Network Connectivity (optional) Connector: Communications: Data Protocol: RJ45 10(100)BASE-T using TCP/IP POTC 1-A2 8.1 Returning the Reader IMPORTANT: Contact your local distributor or Venaxis Technical Support for return authorization instructions. Venaxis Inc. Page 64 APPYReader User Manual 8.2 Disposing of the Reader In conformance with the WEEE (Waste Electrical and Electronic Equipment) Directive, do not dispose of this product in municipal waste. Please contact your local distributor to arrange disposal and recycling. 8.3 Accessories and Part Numbers The following are optional accessories for the reader: APPYReader Barcode Scanner (PS/2) Venaxis Inc. F10010 Page 65 APPYReader User Manual 9. Glossary Assay Test to determine the presence of a substance. Barcode Scanner Scanning device that can interpret a barcode - a series of vertical bars of varying widths that each represent a digit from 0 to 9. Calibration Process of checking the accuracy of a measuring instrument by comparison of a result to a reference standard. Internal QC Quality controls built into the reader’s software and / or the test cassette. Operator User with operator access privileges, which allows performance of day-today operations with the reader. QC Quality control. QC refers to steps taken to make sure that a system is of sufficiently high quality. Reader The Venaxis APPYReader Instrument used to run the APPY1 Test. Reagent Chemical substance that is used to create a reaction when combined with another substance for the purpose of analysis. RFID Radio frequency identification; a data collection technology that uses electronic tags for storing data and allows automatic identification of items. Unlike barcode technology, RFID provides ‘out of line of sight’ identification and operates at greater distances than barcode scanners. SD Card Secure digital memory card. An SD card is a small flash memory card used for portable storage of digital data that can be imported to and exported from the reader. Supervisor User with Supervisor access privileges, which allows performance of advanced reader activities. Test Cassette Device containing the necessary reagents that react with the patient sample. Results are measured by the reader to determine the specific chemical substances in the patient. . Venaxis Inc. Page 66 APPYReader User Manual FEDERAL COMMUNICATIONS COMMISSION INTERFERENCE STATEMENT This instrument complies with Part 15 of the FCC rules. Operations are subject to the follow ing two conditions: (1) this instrument may not cause harmful interference, and (2) this instrument must accept any interference received, including interference that may cause undesired operation. This instrument has been tested and found to comply with the limits for a Class B digital device, pursuant to part 15 of the FCC Rules. These limits are designed to provide reas onable protection against harmful interference in a residential installation. This instrument generates, uses, and can radiate radio frequency energy and, if not installed and used in accordance with the instruction, may cause harmful interference to radio communications. However, there is no guarantee that interference will not occur in a particular installation. If this instrument does cause harmful interference to radio or television reception, which can be determined by turning the equipment off and on, the user is encouraged to try to correct the interference by one or more of the following measures: – Reorient or relocate the receiving antenna. – Increase the separation between the equipment and the receiver. – Connect the equipment into an outlet on a circuit different from that to which the receiver is connected. – Consult Venaxis or an experienced radio/TV technician for help. CAUTION: Any changes or modifications not expressly approved by the grantee of this device could void the user’s authority to operate the equipment. Venaxis, APPY1 and APPYReader are trademarks of Venaxis, Inc. L10019EN-03 Venaxis Inc. Page 67