1
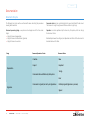
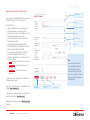
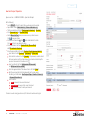
Business.Online
Electronic Banking System for Corporates
START
CONTENTS
Business.Online is an electronic banking system offered by UniCredit Group in countries of Central and
Eastern Europe including Russia and Ukraine.
Main advantages of the System:
Full compliance with
legislation of Russian
Federation
2
Business.Online
Up-to-date safety
standards (eToken,
SMS-confirmation)
Built-in templates
for any types
of documents including currency
control forms
Real-time information
on account
movements and
balance
Compatibility with
the Accounting/
ERP Systems for
automatic document
exchange
Flexible segregation
of users’ rights
(secure file
upload – restricting
certain users to
editing imported
documents,
limitations by
document types,
several levels of
signatures, etc)
Centralized
management of the
Group companies’
accounts through
a unified platform
(“managing
everything in one
window”)
Contents
System Connection ... 4
Installing the Necessary Components’ ... 4
Login ... 5
Generating Electronic Signature ... 5
Authorization Means ... 6
User’s Authorization When Logging into the System ... 6
Documents’ Authorization (Signature) ... 6
Login ... 6
Security Code ... 6
One-Time Codes ... 7
VASCO-token ... 7
Electronic Signature Keys ... 7
Document Authorization (Signature) ... 8
Signing Documents using Electronic Signature Key ... 9
Signing Documents using SMS-confirmation ... 9
Signing Documents
using Scratchcard ... 9
Cancelling signature of documents ... 10
Messages from the Bank ... 19
Inbox ... 19
Files Received from the Bank ... 19
Settings ... 20
Password Change ... 20
New Scratchcard ... 20
Maintain A&A Devices ... 20
Regeneration of Electronic Signature Certificate ... 20
Deactivation of Electronic Signature Certificate ... 20
Documentation ... 21
Document Life Cycle ... 21
Document Operations ... 22
Menu Structure ... 22
Domestic Payments ... 23
Menu Structure ... 23
Documents’ Overview ... 24
Making a new Domestic Payment order in RUB ... 25
Foreign Payments ... 26
Working in the System ... 11
Interface – Main Elements ... 11
Screen Form Elements ... 12
Message Display ... 14
Reports ... 15
Account Status ... 15
Statements ... 16
Transaction List ... 16
Viewing history of transactions for corporate cards ... 17
Viewing Corporate Cards statements ... 17
Creating New Term Deposits ... 18
Working with the List of Term Deposits ... 18
Working with previously created Deposit Requests ... 18
3
Business.Online
Menu Structure ... 26
New Foreign Standard Payment ... 27
New Buy Order ... 28
New Sell Order ... 28
Preparing new transit currency account order ... 29
Currency Control ... 30
Menu Structure ... 30
Contract & currency operations overview ... 31
Preparation of New Currency Operation Certificate ... 32
New Contract Preparation ... 33
New Deal Passport Preparation ... 34
Preparing a New Deal Passport for Credit Agreement ... 35
Preparing a New Confirming Document ... 36
Preparing Confirming Document Certificate ... 36
Bank Messages ... 37
Imports / Uploads ... 37
Using Templates and Lists of Beneficiaries ... 38
Copying Payments ... 38
New Templates ... 38
Using the Lists of Beneficiaries ... 38
Import Partners (importing database) ... 38
Recalling Documents ... 39
Cancel Payment ... 39
Delete Document ... 39
Cancel Several Payments ... 39
CONTENTS
System Connection
To start working in Business.Online you will need to open access for masks *.unicredit.
ru and *.unicreditbanking.net, HTTPS protocol (port 443).
To sign the documents you will need any type of browser (currently IOS browsers
are not supported)/
You can find technical requirements for the System here:
https://support.unicredit.ru/sc/v2/bo/download/pamyatka_businessonline_A4_eng.pdf
Installing the Necessary Components’
Prior to starting up Business.Online it is required to install e-Token (USB key) driver
along with the system components and to generate your electronic digital signature.
These actions are performed only once in order to set up the files necessary for proper
operation of Business.Online system and to generate your electronic signature keys
on your PC.
Please perform the following:
●
Start up Internet Explorer and enter the address https://support.unicredit.ru/
generation
●
Follow the instructions to install the components
●
Install the required components to work in the system
ATTENTION! Click “Yes” if asked whether you “trust the web page or certificate” when
installing various system components.
4
Business.Online >> System Connection >> Installing the Necessary Components’
CONTENTS
Login
Generating Electronic Signature
To enter the system you will need the following means of access: User ID and Security
Code.
To use the Electronic Digital Signature the user, who has the right to sign the e-documents, is to generate his or her Electronic Signature key.
User ID is issued by Client’s Relationship Manager in the Bank and Security Code is
sent by a text message to your indicated phone number.
Enter the menu section > SETTINGS > Maintain A&A devices
To enter Business.Online system you will need to do the following:
●
Open Internet Explorer and enter the address https://ru.unicreditbanking.net
●
Enter your User ID in the field [User ID]
●
Enter Security Code in the field [Security Code]
●
Select system language in the field [#Language]
●
Click button [Login >] to enter the system
ATTENTION! If Business.Online homepage does not open after you have entered the
indicated address, check your Internet connection and make sure that you meet the
indicated requirements.
ATTENTION! Business.Online system access is blocked after you have entered incorrect Security Code three times. Contact your Relationship Manager in the Bank to
recover your system access.
To generate your Electronic Signature key and to send request for certificate registration to the Bank do the following:
●
Connect e-Token USB key to your PC
●
Press Generate certificate > button
●
Select the device (eToken) for the new key
●
Enter the password for the current e-Token in the field
[Current password for e-token]. The password set by default is 1234567890
●
Enter the new password in the fields [New password for e-token] and
[Confirm]
●
In the window “Random Number Generator” press the keyboard keys or move
the mouse cursor within this window.
After the Electronic Signature keys are generated successfully, you will see the message “Your new key is generated! Print and sign the activation paper form”.
Highlight the required non-active certificate and click the button
Print activation form >.
The certificate needs to be printed out in two copies, signed and sent to the Bank.
IMPORTANT! The requests to register Electronic Signature keys are processed by the
Bank within two working days after the signed certificates are sent.
After the Bank has processed your request, the certificate status changes to “Active”.
5
Business.Online >> System Connection >> Login
CONTENTS
Authorization Means
Security is one of the most crucial requirements applied to the modern electronic
systems that allow managing accounts and organize payments.
The system supports various means of authorization, which provide high level of
security to our clients:
●
Login (User ID) is used for unique identification of the user
●
Static Password (Security Code) is used to confirm user’s identity
●
One-Time Codes are used for user’s identity authentication and documents’
authorization
●
Electronic Signature Keys are used for documents’ authorization
User’s Authorization When Logging into the System
The system supports the following methods of user’s authorization when logging:
●
Standard Procedure: Login + Static Password + One-Time Code
●
Simplified Procedure: Login + Static Password
HINT If you enter the System using public (not secured) network, we recommend
using the Standard Procedure set for user’s authorization.
Documents’ Authorization (Signature)
Combination of two elements is used for documents’ authorization (signature):
●
Electronic Signature Key to ensure legal value of the documents
●
One-Time Code to prevent documents’ forgery if the Electronic Signature Keys
get into malefactors’ hands
The signing procedure shall be described in details in section Documentation >
Documents’ Authorization (Signature)
Login
Login (User ID) is a unique user identifier. Login is issued together with the set of documents when the User connects to the System or in a different way agreed with the
Bank. Users need to memorize their Login.
Security Code
The first (temporary) security code as well as new codes (which are generated again
in case of loss) are sent via:
●
SMS message if the user indicates his or her phone number:
UniCredit
Business.Online 28.03 10:03:32
Your New Password: emzrdp10kz
Expires: 01.07 16:06:04
●
Or in a different way agreed with the Bank
When logging in for the first time using your new Security Code, the System will ask
you to change it. After changing your Security Code, please memorize it.
6
Business.Online >> Authorization Means >> User’s Authorization When Logging into the System
CONTENTS
One-Time Codes
VASCO-token
You can get the One-Time Code in the following ways:
●
SMS Password (SMS-confirmation) is a code sent as a message to the user’s phone. It is the most efficient authorization
means out of the existing ones. Apart from the code the message contains information
VASCO-token – is a compact password-generating device with a number pad.
Unicredit
Business.Online 28.03 10:03:32
Signature Code: bzk66
1xRUB-1.00
●
Scratch Card is a card with One-Time Codes covered with protective layer:
Before using it, you need to enter your pin code. The initial temporary
pin code is provided by the Bank, afterwards you will need to change it
to a permanent pin code of your choosing. After entering the pin code
on the device, push the “1” key to generate a new one-time password.
You need to indicate this password in the field for one-time code when
signing electronic documents.
●
Press Request new code>
●
Indicate the code in the field [Code No.>_]
●
Press Sign>
This code needs to be indicated in the corresponding field when signing documents
in Business. Online.
Electronic Signature Keys
Scratch Card is an alternative to SMS password if the user cannot use
his or her mobile phone for any reason.
HINT Considering the higher security level ensured by SMS Password,
we advise you not to use Scratch Card unless necessary.
Electronic Signature Keys are used to sign documents in the System. The keys are
issued on the basis of encryption facilities, enforcing the Electronic Signature. This
allows to identify people who signed the document.
The Electronic Signature Keys are generated by the users independently. The Bank
offers the special-purpose protective storage devices looking like USB Flash Drive
to store the Electronic Signature Keys safely.
ATTENTION! Keep the Electronic Signature Keys’ storage devices in a safe location.
Connect the carriers only within the time required to authorize the documents.
7
Business.Online >> Authorization Means >> One-Time Codes
CONTENTS
Document Authorization (Signature)
Hint
You can quickly go the document authorization screen by clicking the animated
icon
located in the upper control panel.
The System will inform that there are documents which need to be signed with
the animated icon located in the upper control panel.
In this section you can work with all the available documents which need to be signed.
To sign the documents open menu item > SIGNATURE
To authorize (sign) the documents do the following :
●
Set the search criteria using filter:
[Status]
: To sign
[Order type] : Domestic Payments
Enter other criteria if necessary
●
Click the button Search >
●
Tick the boxes on the left for the documents required to be authorized
●
Authorize the documents according to the procedures set for your authorization
method
ATTENTION! For safety reasons we recommend disconnecting the device with the
Electronic Signature Key after completing your work.
If a separate authorization combination has been set for you (for instance Electronic
Signature Key + SMS-confirmation) it is required to perform all actions consecutively
(perform all the actions for Electronic Signature Key and then authorize your document using SMS-confirmation).
8
Business.Online >> Authorization Means >> Document Authorization (Signature)
CONTENTS
Signing Documents using Electronic
Signature Key
●
Connect Electronic Signature Key if it has not been
connected earlier
Signing Documents using
SMS-confirmation
●
●
Click the button Receive Code
>
Wait for SMS message with your
code
Signing Documents
using Scratchcard
●
●
Click the button Request for new code >
Delete the protective layer from the box next to
the indicated number
UniCredit
Business.Online 28.03 10:03:32
Signature code: bzk66
1xRUB-1.00
40702800000000000005
LLC Recipient
●
●
Enter Token PIN code
Click Ok > button
Electronic Signature Key connection:
●
Connect the key storage device to your PC
●
Select key storage device (e-token)
●
Select required key in the list
●
Click Ok > button
●
●
Enter the received code in the
field
[Signature Code]
Click the button Sign
>
ATTENTION! SMS delivery depends on many factors. If
you have not received your authorization code within
one minute, send a new request (click the button Receive Code > again).
The SMS text will differ depending on what types of
documents are being signed. For instance, if you are
signing a document set including ten domestic payments, four foreign payments, two currency operation certificates and one confirming document certificate, the SMS message will include the following
information:
UniCredit
Business.Online 28.03 10:03:32
Signature Code: bzk66
10xRUB: -197899.00
4xUSD: -500.00
2xCOC1xCDC
9
Business.Online >> Authorization Means >> Signing Documents using Electronic Signature Key
●
●
Enter the code in the field [Code No.]
Click the button Sign >
CONTENTS
Cancelling signature of documents
If you want to delete electronic signature previously
placed on an electronic document:
●
Search for the necessary document in the Section
Signature
●
View the selected document
●
Click Save > button on the screen
The Document will be saved and all signatures
removed.
10
Business.Online >> Authorization Means >> Cancelling signature of documents
CONTENTS
Working in the System
2.1. Contacts of Support
Service
2.2. Language Selection box
2.3. Logout button
Interface – Main Elements
1. Menu is located on the left-hand side of the screen.
It is used to navigate between various sections and
is presented as a hierarchical menu. Clicking on
a menu item will open internal elements or the
corresponding page in the Workspace.
Hereinafter to define the menu items we shall use
the following sign: > Menu item
4.8. Hide/Show Hidden
sections
In case if a menu item is not a root object, a sequence of several items shall be indicated, for instance: > PAYMENTS > Domestic.
4.7. Bookmarks
4. Workspace is located on the right-hand side of the
screen. It includes data and control elements set
for the current session.
11
Business.Online >> Working in the System >> Interface – Main Elements
4.4. Current Screen
Description
4.5. Save as PDF
4.2. Current Screen
2. Upper control panel is located on the upper righthand side of the screen. It includes the contacts
of the Support Service (2.1), language-selection
menu (2.2) and Logout button (2.3).
3. Session information is located on the bottom
right-hand side of the screen. It includes data on
last login time (3.1) and current time (3.2).
4.3. Add to Favorites
4.6. Print
4.1. Open previous pages
1. System menu
4. Workspace
3.1. Last Login Time
3.2. Current Session Time
Workspace includes the following standard elements:
●
Links to open the previous pages (4.1)
●
Name of the current screen (4.2)
●
Buttons:
Add new item to “Favorites” (4.3): add current screen form to the Favorites menu
Show explanation for the current screen (4.4)
View current screen as PDF (4.5): save work area data in PDF format
Print (4.6): print workspace data
CONTENTS
Screen Form Elements
The following main elements might be used in the
workspace:
●
●
●
●
Buttons: click the control element designated as
Button> to perform an action
List and Input box
Input box: input information into the field designated as an [Input box]
Input box
Selection list: select data from an entries’ list designated as [#Drop-down list]
List and input box: you can select or enter information into the form element designated as
[#List and Input box_]
Workspace might include other elements, which
allow managing the way information is presented on
the screen:
●
●
12
Bookmarks: interface element, which allows
navigating between various sections of the screen
form. They are designated as a text in slashes, for
instance: \Bookmark/
Buttons to hide / open data (depending on current
position) are designated as + symbol enclosed in
parentheses, for instance: (+)
Business.Online >> Working in the System >> Screen Form Elements
Selection list
Buttons to perform an
action
Bookmarks
Buttons to hide / show
hidden sections
CONTENTS
Table: an integral element intended to show
information in table form. In this manual it is
designated as #Table#
Filter
Selection Criterion
It includes the following components:
●
Filter: a group of elements, which allow setting
the criteria and selecting the necessary data
●
Heading: name of each column of the table
●
Data space: rows of table data
●
●
Page selection: fields showing total number of
pages, the current page number as well as buttons to switch between the pages
Additional actions: drop-down list where you can
select other possible actions
Additional selection
criteria
Start Searching
According to Set Criteria
Clear Selection Criteria
Sorting indicator
Tick box (to select row)
Additional actions
13
Business.Online >> Working in the System >> Screen Form Elements
Column Name
Actions that can be
performed with the
table row
Navigation between pages
CONTENTS
Message Display
The System notifies you about various events through
the information messages, which are shown on the
upper side of the Workspace.
Successful operation:
The message is shown if an action was successful.
ATTENTION! If in several cases the workspace of the
current section exceeds the screen area, you may need
to scroll up to see the System message.
Alert:
The message is shown if an action was successful.
Error message:
The message is shown if an action has failed.
14
Business.Online >> Working in the System >> Message Display
CONTENTS
Reports
Account Status
Open menu item > ACCOUNTS
Click one of the bookmarks to see your account
information.
Open bookmark /Account overview\ for a brief overview of all your accounts’ balances.
Open bookmark /Financial overview\ to choose
type and currency of the shown accounts as well as to
download current balance.
Do the following:
●
Choose organization in the input box [#Clients]
●
Choose [#Account type]
●
Choose currency in the input box [#Currency] to
show the list of accounts in required currency
●
Click button
Update > to show the list of accounts with
preset parameters
Reset > to reset the search parameters
Calculate selected> to show your balance in
chosen currency
Export > to save information in PDF format
15
Business.Online >> Reports >> Account Status
CONTENTS
Statements
Transaction List
Open menu item > ACCOUNTS > Statements.
In the Transaction List (History) section you can review transactions from the account according to certain parameters as well as to download the list of such operations in .csv format.
Do the following:
●
Choose entity in the input box [#Clients]
●
Tick the necessary accounts in the list [#Chosen Account]
●
Choose currency in the input box [#Curr]
●
Indicate the required time period to present the account information using
[Statement History] section. Tag one either [Current day], [Previous day] or set
the desired period in the input boxes [From] – [To]
Click:
●
Search > to search for account movements with the set parameters
●
Reset > to clear the search parameters
Do the following to save statement as a file:
●
Choose document format in the field [#Download selected statements]
●
Click button:
Download > if you want to save statement in the chosen format
PDF > if you want read or save statement in PDF format
Advice > if you want read remittance advice for the chosen operation
Use the column names to filter the operations displayed on the screen. When printing the statement form and saving it as PDF, the order of the operations will be saved.
16
Business.Online >> Reports >> Statements
Open menu > ACCOUNTS > History.
Do the following:
Choose the Company in the input box [#Client] to see the related operations’
list.
●
Indicate account number in the input box [#Chosen Account]
●
Indicate the required time period to present the related account information using the menu item [History]. Choose the required value in the box
[#last days] or set the period in the input boxes [From] – [To]
●
Open section More search criteria (+) to choose additional search criteria.
●
Indicate search criteria.
You can search transactions according to the following parameters:
[Trans. Amount] (period range [From] [To]), [Direction] of the payment (whether it is incoming or outgoing), recipient bank’s details
[Bank Code/SWIFT], [Partner Name], [Partner account / IBAN], [Partner INN]
and [Payment details].
●
Click button:
●
Search > to search for account movements with set parameters
●
Reset > to clear search parameters
●
Export > to download chosen transaction in .csv format
CONTENTS
Viewing history of transactions for corporate cards
Viewing Corporate Cards statements
Open menu item > ACCOUNTS > Cards > History.
Open menu item > ACCOUNTS > Corporate Cards > Card Statements.
Users can see the list of all their corporate cards, connected to the card accounts.
Clicking on any card, you can see detailed information about the card.
You can view statement for all corporate cards for the past months.
The System allows you to see balance information, currency and card limit, as well as
additional information about the cardholder.
Apart from active cards, you can also view information about blocked cards
with their corresponding status.
Press arrow icon near the column’s name to sort the information as per each available parameter (card number, status, card product type, cardholder’s name, available
limit, currency)
Press clock icon to view transactions history for the card (on the right side of the row).
17
Business.Online >> Reports >> Viewing history of transactions for corporate cards
You can view statements for the given time period and given Client as per set individual parameters.
Statements are prepared in the format of regular card statements that Clients receive
on paper or in other Electronic Banking Systems.
In the drop-down list at the bottom of the table please select:
●
Download > to save statement as a separate file
●
View > to view the statement of the Screen
CONTENTS
Creating New
Term Deposits
Working with the List
of Term Deposits
Working with previously
created Deposit Requests
In the System you can view all previously created deposit agreements and create new ones.
For your convenience, you can set search criteria to
look for particular deposits.
To create a new request go to Term Deposits > New
Term Deposit Agreement.
Go to Term Deposits > Term Deposits Overview.
To view or edit previously created orders select them
from the list. On the new screen you should see the
following buttons:
●
Save and sign > to create a deposit order and
send it for signing
●
Save > to save the draft of the deposit order
●
Delete to delete the request
●
o>
print> the
Print
t request as per the Bank format
(prepared in PDF)
●
Back > to exit this screen without saving
Choose account number in the field [#From Account].
Choose the underlying Agreement in the field
[#According to] as the basis for making the deposit.
Indicate [Amount], [Interest rate], [Start Date_] and
desired [Maturity Date_] in the corresponding fields.
Press:
●
Save and sign > to create a deposit order and
send it for signing
●
Save > to save the draft of the deposit order
●
Back > to exit this screen without saving
18
Business.Online >> Reports >> Creating New Term Deposits
To conduct a search request choose account
[#From account] and Document [#Status]. To
expand your search parameters please click on More
search criteria section (+).
Press:
●
Seach > to search for results with given
parameters
●
Reset > to show results without preset criteria
For advanced search you can also indicate the range of
the deposit amount and Maturity Date. You can delete
a document or create a new one, using a drop-down
list at the bottom of the table with search results.
Create cancelation request (for orders that were signed
and sent to the Bank) – if you want to recall a placed
deposit.
CONTENTS
Messages from the Bank
Files Received from the Bank
Inbox
New messages from the Bank are shown on the Login screen in the form of an
information window, which can be viewed before logging into the System.
During your current session an animated icon
will be shown in the upper
con- trol panel to inform you about new message(s) from the Bank
You can set the following criteria to search for the Bank messages:
●
Choose message topic in the input box [#Topic]
●
Indicate the date of receipt in the input box [Sending date]. Choose the start
and end date of the period in the boxes [From] – [To]
●
Tick the box [Show deleted messages] to read the archives
●
Click button
Search > to search for the messages with the preset parameters
Reset > to reset the search parameters
●
To disable the notification after having read the message select the document
and choose “Set Unread” in the menu [Select action] located under the search
results.
HINT:
You can also use the animated icon
ately view new messages.
19
on the upper control panel to immedi-
Business.Online >> Messages from the Bank >> Inbox
If there are additional agreements signed with the Bank regarding rendering of
special services, you can also view Bank files downloaded from the Bank systems
in this section.
Open menu item > MESSAGES > Documents for Download.
Do the following to search for the files received from the Bank:
●
Tick one of the boxes [User], [Client] or [Account]
●
Choose addressee in the selected box [#Client] or [#Account]
●
Choose a value in the box [#Category]
●
Indicate time period in the box [Delivery Date]. Choose start and end date of
the period in the boxes [From] – [To]
●
Click button
Search > to search for the messages with the preset parameters
Reset > to reset the search parameters
●
To download the file archives, tick the document and choose “Download as Zip
file” in the box [Select action] located under the search results.
CONTENTS
Settings
HINT:
Choose settings of the System according to your
preferences: add most frequently used menu items
into the favorites menu, adjust how account list/
transaction history is presented on the screen to
suit your needs, etc.
In the SETTINGS menu the user can change his or her
contacts, the way the documents are presented, as
well as customize parameters for login notification
and for signing electronic documents.
Password Change
Open menu item >SETTINGS > Password Change
●
Enter the current Secure Code in the input box
[Old password]
●
Enter new Secure Code two times in
the input boxes [New password] and
[Retype new password]
●
Click the button Change password >
New Scratchcard
Open menu item > SETTINGS > Scratchcard.
●
Enter the number of your scratchcard in the input
box [Next card ID]
●
Enter password to activate the card in the input
box [Next card OTP]. The activation password
is indicated on your new scratchcard under
20
Business.Online >> Settings >> Password Change
●
a protective layer in the box “Next card activation
password”
Click the button Switch Card >
Maintain A&A Devices
In the Maintain A&A Devices section of the SETTINGS
menu, you can (re)generate the certificates of Electronic Signature Keys or deactivate them in case of
compromise or loss.
Regeneration of Electronic Signature Certificate
The user who has the right of signature can generate
a new electronic digital signature before the current
certificate expires without having to send a request to
the Bank.
Open menu item > SETTINGS > Maintain A&A Devices:
●
click button Generate certificate > if you want
to generate a new certificate of electronic digital
signature
●
click button Download new certificate > if you
want to download certificate generated earlier
using a disk storage unit
●
choose the active key storage device (e-token) and
confirm it with OK > button
●
choose a key in the active keys list and confirm
with OK > button
●
enter e-token PIN code and confirm with OK >
button
●
choose the new key storage device and confirm
with OK > button
Deactivation of Electronic Signature Certificate
If the electronic signature key is lost, the user can block
the active certificate themselves or contact the Bank
Support.
Open menu item > SETTINGS > Maintain A&A Devices.
Do the following:
●
Choose certificate with status “Active” from the
list
●
Choose De-activate function from the menu
[#Select action]
To regain the possibility of using the electronic signature, the User needs to regenerate and print the certificate activation form in two copies, sign it and send to
the Bank.
CONTENTS
Documentation
Document Life Cycle
The following basic terms will be used hereinafter when describing the procedures
covering documentation:
Document status is a term used to designate the current condition of the document.
The document can go through several Statuses within a single stage.
Document processing stage – every document undergoes one of the three main
stages:
●
Stage of document preparation
●
Stage of document authorization (signature)
●
Stage of document execution
Operation is an action performed by the User or by the System, which can change
the document status.
Stage
Relationship between these Stages, basic Operations and Status of the documents is
described below in the Table.
Document Operation / Action
Document Status
Creation
New
Import
Imported
Preparation
To sign
Document data verification by the System
Error
Document is signed, but not by all signatories
Partially signed (Signature in process)
Signature
Signed
21
Business.Online >> Documentation >> Document Life Cycle
CONTENTS
Document Operations
Menu Structure
The following basic document operations are provided:
●
Create means manual creation of a new document using the corresponding
screen
●
Create using template – to create a new document using template saved
earlier
●
Import – to load one or more documents from a specially structured file
prepared earlier. As a result, new documents are created, and can be edited if
necessary.
●
Upload – to load one or more documents from a specially structured file prepared earlier. As a result a document set is created, and cannot be edited.
●
Change a document created earlier using the corresponding screen.
●
Save as template – save a document as a template, which will help with creation of new documents.
●
Sign a document using your electronic signature key.
●
Decline – marking a document as a declined one will make further operations
unavailable.
●
Authorize a document by any means other than electronic signature key (when
multi-stage authorization procedure is required)
●
Recall function is to prepare a recall request to the Bank for a document that
was already transmitted earlier
●
Delete function is to delete a document created by mistake prior to its transmission to the Bank
For all types of documents available in the System there is a menu item which allows
you to overview all the relevant documents and separate menu items, which allow
creating new documents of the corresponding type. For instance, the following main
items are provided for payments in rubles:
22
Business.Online >> Documentation >> Document Operations
> PAYMENTS
> Domestic
The list of all created payments in rubles
> Domestic Standard
Creation of a new payment order in rubles
> Tax Payment
Creation of new ruble payment order to pay taxes
> Custom Payment
Creation of new payment order in rubles to pay customs
fees
Moreover, additional menu items may be present to allow special actions, for instance:
> Imports/Uploads
Payments’ import
> List of Beneficiaries
Managing beneficiaries lists
> Import Partners
Adding counterparties for all types of payment
> List of Templates
Payments’ templates
Furthermore, during signing and execution stages all document types are grouped
into two general lists, which are available from the menu:
> SIGNATURE
List of all documents to be signed
> ORDER ARCHIVE
List of all signed documents sent to the Bank
CONTENTS
Domestic Payments
Menu Structure
The system allows operating the following domestic payments:
●
Domestic payment order to execute domestic standard payment
●
Domestic payment order to pay taxes
●
Domestic payment order to pay customs fees
Menu items required to treat the domestic payments:
ATTENTION! If you need to transfer rubles outside Russian Federation, use Foreign
Standard document.
ATTENTION! Changing the type of payment (to tax or customs payment from
standard commercial payment or vice versa) may change the document
number or payer’s KPP .
HINT
Register all your beneficiaries in the reference list. It will facilitate the creation of new
documents as well as allow you to use the additional features of the System which
use data from these reference lists. Create templates of documents that you send on
a regular basis.
> PAYMENTS
> Domestic
List of any payments in rubles not sent to the
Bank
> Domestic Standard
Creation of new ruble payment order
> Tax Payment
Creation of new ruble payment order to pay taxes
> Custom Payment
Creation of new ruble payment order to pay
customs fees
> Imports & Uploads
Overview of sets of documents that have been
loaded /or being loaded
> Start Import
Documents’ import (with editing right)
> Start Upload
Uploading a set of documents (without editing
right)
> Profile Management
Settings for Import / Upload of Documents’ Sets
> List of Beneficiaries
> Domestic
List of Beneficiaries for domestic payments
> Import Partners
Registration of Beneficiaries for any payment type
> List of Templates
> Domestic
23
Business.Online >> Documentation >> Domestic Payments
Templates for payments in rubles
> SIGNATURE
List of documents to be signed
> ORDER ARCHIVE
List of signed documents that were sent to the
Bank for processing
CONTENTS
Documents’ Overview
To look through your ruble payments that have not
been yet sent to the Bank open menu item > PAYMENTS > Domestic.
Do the following to select the required documents:
●
Set the search criteria
●
Click Search > button
To clear the search criteria click Reset > button.
To change the pages click the buttons on the bottom
(in case if all the pages did not fit on one screen).
Click the required row to view the document.
Tick the box located on the left side to select the
document or to cancel selection.
To perform actions on selected documents or
to select all/unselect all documents use the list
[#Select action] and click (>) button on the right
side.
Click icon
document.
to
delete
the
Additional search criteria can be indicated in the box
“More search criteria (+)”.
24
Business.Online >> Documentation >> Documents’ Overview
CONTENTS
Making a new Domestic Payment in RUB
Template Selection
Open menu item > PAYMENTS > Domestic > Domestic
Standard (Tax Payment / Custom Payment)
Payment Type
Do the following:
●
Choose a template from the list [#Template]
(if you have previously created a template)
●
Enter account number in the list [#Payer Account]
from which the payment will be made
●
Select beneficiary from the beneficiaries’ list or
enter the required data
●
Fill in the banking details of the beneficiary
●
Fill in the fields [Amount], [Date], [Document No.],
[Delivery Type] and [Payment Details]
●
If it is required to add VAT data, use the fields
located in the additional details’ section.
●
Fill in the required fields in case of tax payments
●
Click the button:
Save > to save and close the current document
Save & Sign > to save and sign the current
document
Save & New > to save and create new
document
More fields related to Payer
Payer Account
Beneficiary Selection
Beneficiary
Hint
If you are more accustomed
to using paper-based forms of
Domestic Payment, you can
change the settings using the
menu item > Settings > Internet
Banking > Domestic payments >
Use paper form.
If errors occur when saving your document, fix them
and save document again.
If you want to save document as a template, use the
section “Save Template (+)”.
If you want to save a beneficiary in the List of Beneficiaries, use the section “Save Partner (+)”.
Change payment type in the field [#Payment Type]
if required.
25
Business.Online >> Documentation >> Documents’ Overview
Save and Sign
the Document
Save and Create a New
Document
Save Document
CONTENTS
Foreign Payments
Menu Structure
Open menu item > PAYMENTS > Foreign
Menu items required to treat foreign payments:
The system allows executing the following foreign payments:
●
Foreign standard payment order – to make payment in foreign currency (to a
foreign counterparty)
●
Buy order – to create order to purchase currency
●
Currency sell – to create order to sell currency
●
Transit currency account – to prepare new transit currency account order
●
Import – to import payment files in foreign currency
> PAYMENTS
You can find a more detailed description of the menu structure in the next section.
> Foreign
> Standard
> Buy
> Sell
> Transit currency
account
> Imports & Uploads
Creation of new order to sell currency
To prepare new transit currency account order
Overview of sets of documents which have been loaded
or are being loaded
Documents’ import (with editing right)
> Start Upload
Uploading a set of documents (without editing right)
> Profile Management
Settings for Import / Upload of Documents’ Sets
> List of Beneficiaries
> Foreign
List of Beneficiaries for foreign payments
> List of Templates
> Foreign
> Order archive
Business.Online >> Documentation >> Foreign Payments
Creation of order to purchase currency
> Start Import
> Import Partners
26
List of all foreign payments not sent to the Bank
Creation of new foreign payment order
Registration of Beneficiaries for any payment type
Templates for foreign payments
List of signed documents that were sent to the Bank for
processing
CONTENTS
New Foreign Standard Payment
Open menu item > PAYMENTS > Foreign > Standard
Do the following:
●
Select a template from the list [#Templates] (if you have previously prepared
a template)
●
In the list [#Payer Account] select account number from which the payment
will be made
●
Select beneficiary from the beneficiaries’ list or enter the required data
●
Fill in the banking details of the beneficiary
●
If the beneficiary bank does not have BIC (SWIFT)
Click (+) button to the right of Intermediary Bank Name
Enter the banking details
Enter account number of the beneficiary bank in the interm. Bank in the field
[Corr Account]
●
Fill in the fields [Amount], [Currency], [Date], [ [Document No.],
[Urgency of paym.] and [Payment Details]
●
Select the required value in the field [#Charges type]
●
If OUR and SHA types are chosen, enter account number to be charged in the
field [#Charges Account]
●
Click the button:
Save to save and close the current document
>
Save & Sign to save and sign the current document
>
Save & New to save and create new document
>
Save & create COC> to save and create Currency Operation Certificate
additionally
27
Business.Online >> Documentation >> Foreign Payments
If errors occur when saving your document, fix them and save the document again.
If you want to save document as a template, use the section “Save Template (+)”.
If you want to save a beneficiary in the List of Beneficiaries, use the section
“Save Partner (+)”.
ATTENTION! When paying in US dollars on terms “OUR – free of expenses for beneficiary”, to a beneficiary bank located outside the US, Beneficiary is not guaranteed to
receive the full amount, since in these cases the US banks practice withholding their
fees from the total payment amount despite the term “all expenses are covered by
payer”. We recommend you to tick the box Full pay when filling in your Foreign
Payment Order to make sure the Beneficiary receives full payment amount. Please
note that you will be charged an additional fee according to the Bank rates.
CONTENTS
New Buy Order
New Sell Order
Open menu item > PAYMENTS > Foreign > Buy
Open menu item > PAYMENTS > Foreign > Sell
Do the following:
●
In the field [#Payer Account] please choose account number that will be debited the ruble amount
●
Indicate in the fields contact information [Phone Official] and the Sender
[Sender Official] to negotiate deal conditions
●
Enter account number in the field [#Payee Account] to be credited with the
foreign currency amount
●
Enter the buy terms in the field [#Deal Type]
●
Enter the required values in the fields [Amount] (amount in rubles),
[Exchanged Amount] (amount in currency), [Maximum Rate] and
[Valid Till Date]
●
Click the button:
Save > to save and close the current document
Save & Sign > to save and sign the current document
Save & New > to save and create new document
Do the following:
●
In the field [#Payer Account] please choose account number that will be debited the foreign currency amount
●
Indicate in the fields contact information [Phone Official] and the Sender
[Sender Official] to negotiate deal conditions
●
Enter account number in the field [#Payee Account] to be credited with the
ruble amount
●
Enter the sell terms in the field [#Deal Type]
●
Enter the required values in the fields [Amount] (amount in currency),
[Exchanged Amount] (amount in rubles), [Minimum Rate] and [Valid Till Date]
●
Click the button:
Save > to save and close the current document
Save & Sign > to save and sign the current document
Save & New > to save and create new document
If errors occur when saving your document, fix them and save document again.
If errors occur when saving your document, fix them and save document again.
ATTENTION! Do not fill in the fields [Amount] and [Exchanged Amount]
simultaneously.
Value entered in the field [Maximum Rate] must be agreed preliminary with the
Bank dealers.
28
Business.Online >> Documentation >> Foreign Payments
ATTENTION! Do not fill in the fields [Amount] and [Exchanged Amount]
simultaneously.
Value entered in the field [Minimum Rate] is to be agreed preliminary with the Bank
dealers.
CONTENTS
Preparing new transit currency account order
To create a transit currency account order from transit accounts go to PAYMENTS >
Foreign > Transit currency account
Please indicate the following main parameters:
●
Choose [#Transit account to add a new beneficiary]
●
[#Document No.]
●
Name of [#Sender Official] and their contact number
●
Beneficiary’s information
●
The amount of foreign currency to be sold/transferred to the current account
●
Method for the fee to be charged (for external transfer)
●
Details regarding currency control: Currency Certificate and
[Date of advice for the amount credited_] (Date and number of the advice are
indicated in in the reference of the payment when the amount is credited);
●
Information about confirming documents
Using this request you can sell foreign currency from transit account or transfer
funds to the current or external account.
To sell foreign currency from transit account you need to indicate the amount and
choose the exchange rate (Bank rate or ETS rate).
●
29
Press:
Save > to save and close the current document
Save & Sign > to save and sign the current document
Exit > if you do not wish to save the document
Business.Online >> Documentation >> Preparing new transit currency account order
CONTENTS
Currency Control
Menu Structure
Our System allows working with the following documents related to the currency
control requirements:
●
Contracts
●
Deal Passports (for Commercial Contracts / Credit Agreements)
●
Currency Operation Certificates
●
Confirming Documents
●
Confirming Document Certificates
The menu items used to work with currency control documents:
> CURRENCY CONTROL
> Contract & currency operations
overview
List of all currency control documents
> Create contract
Contract creation
> Open Deal Passport
Creation of Deal Passports
> Create COC
Creation of Currency Operation Certificates
HINT
> Create Confirming Document
Creation of Confirming Documents
Following these rules will facilitate the creation of new documents and will allow
you to use the System functionality to its fullest.
> Create CDC
Creation of Confirming Document Certificates
When working with a contract that is subject to Currency Control legislation we
recommend to follow these steps during documents’ creation:
●
Create Contract and attach the electronic copies of the paper-based contract.
Send them to the Bank.
●
Create Request to open Deal Passport in line with the Contract created earlier.
Send it to the Bank.
●
When creating other currency control documents, use the references of the
Deal Passports and Contracts.
When working with Confirming Documents and the Confirming Document Certificates, we recommend to follow these steps for document creation:
●
Create Confirming Documents and attach the electronic copies of the corresponding paper-based documents. Send them to the Bank.
●
Create Confirming Document Certificate and add Confirming Documents
created previously.
30
Business.Online >> Documentation >> Currency Control
CONTENTS
Contract & currency operations overview
The list is used to view all documents related to Currency Control.
The overview allows to see the documents as a list,
predetermined by a set of criteria, as well in hierarchical form.
Structure of the attached documents:
> Contract
> Open Deal Passport Order
> Deal Passport
> Currency Operation Certificate
Account Transaction
> Confirming Document Certificate
Confirming Document
If you click a document that has a “>” sign on the left,
all the related documents will be shown below. For instance, you will be able to see the relevant Deal Passport by clicking the necessary Contract.
Certain document types have additional operations
available in the “Actions” column. For instance, when
you click [+DP], a creation form of Deal Passport Order
will be opened.
31
Business.Online >> Documentation >> Currency Control
CONTENTS
Preparation of New Currency Operation Certificate
Open menu item > CURRENCY CONTROL > Create COC
Do the following:
●
Select [#Client] for which the new Certificate will be created.
●
Select [#Account] for the operation
●
Enter [COC Doc No.] and [COC Doc Date]
●
Enter operation details by clicking the button Add New Line >
●
In the new window fill in the fields [#Line Type], [DocNr/Ref] or select
[Without number 1]
●
Fill in the fields [VO], [Operation date], [Amount], [Currency]
●
Select document type [Contract] / [DP]
●
Tick the box [Contract] or [Without number 2]
●
Click the button:
OK > to save and close current session
OK & Copy > to save and copy data
Back > if you do not want to save data
●
On the Currency Operation Certificate creation screen click the following
buttons::
Save > to save and close current document
Save and Sign > to save and sign current document
Print > to print the document
Exit > if you do not want to save your document
If errors occur when saving your document, fix them and save document again.
32
Business.Online >> Documentation >> Currency Control
CONTENTS
New Contract Preparation
Open menu item > CURRENCY CONTROL > Create Contract
Do the following:
●
Select [#Client] in the list for which the new contract
will be created.
●
Open section Client details (+).
●
Select [#Branch office], where you receive currency
control services. Click
to save your choice.
●
Enter [Document No.] and [Document Date].
●
Select your partner from the list in the field [#Partner]
or enter new partner name in the field [Partner Name]
●
Enter country code in the field [Country Code] or use the
reference list.
●
Select [#Contract Type]
●
Enter [Contract number], [Sign Date],
[Discharge of Obligation], [Amount], [Currency]
and [Valid Until].
●
If required, add attachment clicking the button
“Attachments”. Do the following for each attachment:
Click [#Browse] and select a file to be added
Click Add file >
Click:
OK > to save
Cancel > to cancel action without saving the
changes
●
Click the following button when operating in the section
“Create Contact”:
Save > to save and close current document
Save and Sign > to save and sign current document
Exit > if you do not want to save your document
If errors occur when saving your document, fix them and save
the document again.
33
Business.Online >> Documentation >> Currency Control
CONTENTS
New Deal Passport Preparation
Open menu item > CURRENCY CONTROL > Open Deal Passport
Do the following:
●
Select [#Client] in the list for which the new document will be created.
●
Open hidden sections Client details (+), Partner Information (+).
●
Tick the required box in the field [Deal passport is based on] – [Contract]
●
Enter [Document No.] and [Document Date].
●
Select [#Branch office], where you receive currency control services.
Click
to save your choice.
●
Enter Partner Information (+). Click button to add data to the table.
Click OK > button to save data in the table.
●
Enter information in the fields [Sender official], [Phone official]
and [DP number of other bank].
●
Enter the required data in the section [Contract / Credit agreement details]
Select data in the field [Contract] – [Numbered] or [No number]
Enter contract number in the field [Number]. If the previously created contract
has been saved successfully, information will be entered automatically after
you select a document in the reference list
Select a method in the fields [#Submission of document]
and [#Shipment to the resident]
Enter the supposed dates of the above actions in the fields [Date]
Add the necessary data to the table depending on the main reason
for adding such information: Deal Passport Open / Transfer / Closure (+)
or Renewal Information (+)
Click the button:
Save > to save and close current document
Save and Sign > to save and sign current document
Exit > if you do not want to save your document
If errors occur when saving your document, fix them and save document again.
34
Business.Online >> Documentation >> Currency Control
CONTENTS
Preparing a New Deal Passport for Credit Agreement
The procedures for preparing Credit Agreement Deal Passport are similar to the ones for Contract
Agreement Deal Passport.
Open menu item > CURRENCY CONTROL > Open Deal Passport:
●
Select document type in the field [Deal passport is based on] – [Credit agreement]
●
Open hidden sections Tranches information (+), Credit agreement contractual
details (+), Payments schedule for repayment of borrowed funds (+),
Information on residential receipts (+)
●
Fill in the required details following the instructions for preparing Contract Agreement Deal
Passport
●
Enter the required amounts in the fields [Transferred to foreign account]
and [Repay amount]
●
Select required terms in the field [#Maturity code]
●
Fill in the section [Tranches information]. Use icon to add data to the table. Click OK >
button to save data in the table.
●
Fill the credit rates information in the corresponding fields
●
Enter principle outstanding balance in the field [Principle amount outstanding]
●
Fill in the section [Payments schedule for repayment of borrowed funds]. Enter the required
data in the table and click Ok > button
●
Fill in the section [Reference information on credit agreement]
Tick one of the boxes [Information from credit agreement] or [Estimated data]
Add data to the table Payments schedule for repayment of borrowed funds (+).
Click Ok > button.
●
If required, tick the box [Direct investment] and enter [Amount of collateral or other security]
●
Enter counterparties information in the table Information on residents receipts (+)
and click Ok > button
●
Click the button:
Save > to save and close current document
Save and Sign > to save and sign current document
Exit > if you do not want to save your document
If errors occur when saving your document, fix them and save document again.
35
Business.Online >> Documentation >> Currency Control
CONTENTS
Preparing a New Confirming Document
Preparing Confirming Document Certificate
HINT
When scanning the original paper-based documents, try to use black-and-white
mode, and to set the scanning quality to the minimum value (100 DPI). This
will allow to significantly decrease the processing time for all actions with the
documents.
HINT
Prepare and send all confirming documents to the Bank prior to creating Confirming Document Certificate.
Open menu item > CURRENCY CONTROL > Create COC
Open menu item > CURRENCY CONTROL > Create CDC
Do the following:
●
Enter [#Client]
●
Enter [#Document Type]
●
Enter the other obligatory details: [Index Number], [Confirming Doc No.],
[Confirming Doc Date], [Currency]
●
Tick the box Paper-based no sign [ ] if the documents will be sent to the Bank
in paper form or click Attachments > to add the e-documents.
Do the following for every attached file:
Click [Choose File] and select a file to be attached
Click Add file >
Click the button:
Ok > to confirm attachments
Cancel > to go back without changes
●
Click the button:
Save > to save and close current document
Save and Sign > to save and sign current document
Exit > if you do not want to save your document
Do the following:
●
Enter [#Client]
●
Enter [Document Date], [Document no.]
●
Fill in the field [deal passport number]. If a deal passport has been previously
saved successfully, you might add it using the references
●
Enter the currency control branch office in the field [#Branch office] in the
section Client details (+) Click
button to save your choice.
●
Fill in the fields [Sender official] and [Phone official]
●
Add data in the table #Confirmation Documents#
●
Click the button:
Add document > to find and add the confirmation documents created
earlier from the reference list
Create document without attachment > to create and add a new
confirming document from scratch
●
Click the following button when operating in the Confirming Document Certificate window:
Save > to save and close current document
Save and Sign > to save and sign current document
Print > to print the document
Exit > if you do not want to save your document
36
Business.Online >> Documentation >> Currency Control
CONTENTS
Bank Messages
HINT
For any documents for which there is no structured form available in the system,
please use the Messages section to send free-format documents to the Bank.
Inbox messages and files from the Bank are also saved in this Menu section.
Imports / Uploads
Our system supports two download modes from the external files:
●
Start Import mode allows uploading documents from a document set separately, allowing these documents to be edited
●
Start Upload mode allows uploading the whole document set (which cannot be
edited)
To create new document or several documents from the file prepared earlier open
menu item > PAYMENTS > Start Import >Start Upload
Open menu item MESSAGES > New Free-Format Document
Do the following:
●
Enter [Document No.] and [Document Date]
●
Select [#Client] to send your request or document
●
Select [#Document Type]
●
Add short description in the field [Details]
●
Enter the text of the request in the field [Text]
●
Click the button Attachments > if it is required to attach a file. Click the following button for every attachment:
Click [#Browse] to select attaching files
Click Add file >
Click the following button:
Ok > to confirm attachments
Cancel > to go back without changes
Click the button Save & Sign > to save and sign the current document
If errors occur when saving your document, fix them and save document again.
Do the following:
●
Enter document type of the import files in the field [#Order Type]
●
Click the button Choose file and select a file to be loaded
●
Select file coding format in the dropdown list [#File encoding]
●
Select file format in the dropdown list [#File Structure]
●
Click the button Start >
●
The System will automatically open IMPORT screen showing the list of the documents / document sets which have been imported or are being imported.
●
Click the button Search > to view the current status of the document set
●
Please wait until the document status changes to ‘In preparation’ or ‘To Sign’
The Import / Upload process is performed in background mode.
HINT
Import / Upload of large number of documents can take time. You can continue
working in the System while the uploading process is done in the background.
After the process has been completed you can come back and start working with
the uploaded documents.
After import / upload process has been completed the documents will be shown in
the corresponding payment reports.
37
Business.Online >> Documentation >> Bank Messages
CONTENTS
Using Templates and Lists of Beneficiaries
You can create payment templates as well as lists of beneficiaries using several
methods:
Copying Payments
Open menu item > PAYMENTS > Domestic >
Do the following:
●
In the payments overview click the desired payment order to be copied
●
Click the button while in document browse mode:
Reuse to copy payment order as a new document
>
Back > to leave the document browse mode
Print to print the document
>
You can follow the same steps to copy any foreign payment using menu item > PAYMENTS > Foreign >
New Templates
Open menu item > PAYMENTS > Templates
●
Choose template type to be created (>Domestic or >Foreign payments)
●
On the new screen you can look through the previously prepared templates
using the search function
●
To create a new template press New > button
●
Enter banking details of the payment order in the open window
●
Click button
Save > to save your template
Back > if you do not want to save the document
Using these steps you can create both domestic and foreign templates, using the
corresponding menu items from the templates section.
38
Business.Online >> Documentation >> Using Templates and Lists of Beneficiaries
Using the Lists of Beneficiaries
Open menu item > PAYMENTS > List of Beneficiaries >
●
Choose a counterparty type to be created (for domestic or foreign payments)
●
You can look through the list of beneficiaries in the open window using the predefined search parameters
●
Click button New > to add a new beneficiary
●
Enter the necessary information of the beneficiary in the open window
●
Click button
Save > to save the new beneficiary
Back > if you do not want to save the information you entered
Import Partners (importing database)
To import the list of beneficiaries using .csv format do the following:
●
Open menu item > PAYMENTS > Import partners >
●
Click [Browse] button and choose the file you want to attach
●
Choose [#Type Parameter] and [#Format] of the file to be uploaded
●
Tick the box [Private] if you want to create the list of beneficiaries for your use
only or if you want to share the list with other users, choose a company in the
field [Public for]
●
Click button
Start > to start importing
●
Click button
OK > to confirm file import
Cancel > if you do not want to save data
CONTENTS
Recalling Documents
Our System provides several methods to recall your payments:
Cancel Payment
Cancel Several Payments
Payment order can be canceled after it was sent to the Bank if its status is “accepted”,
“accepted – wait for linked doc”, “pre-booked”, “on hold CC”, “no funds”, or “no funds
queue”.
Payment orders can be revoked using the corresponding payment reports (domestic
or foreign).
Open menu item > PAYMENTS > Domestic
Open menu item > ORDER ARCHIVE
Do the following:
●
Select the required documents using available search criteria
●
Open the required document
●
Click the button:
Cancel payment > to withdraw your payment from the Bank
Back > to go back to the search results
Delete Document
If the document’s status is “To Sign” or “Signature in process” you can delete document from the list of the documents.
Open menu item > SIGNATURE
Do the following:
●
Select the required documents using available search criteria
●
Tick the document that needs to be deleted
●
Click the icon
in the corresponding row of the
table
ALSO, you can delete the document selecting the action “Delete selected” in the
dropdown list under the search results.
39
Business.Online >> Documentation >> Recalling Documents
Do the following:
●
Select the required documents using available search criteria
●
Tick the payments that need to be canceled
●
Select action ”Cancel”
The same steps can be followed to cancel foreign payments.