1
Bank Reconciliation
Copyright© 2014 by Samco Software Inc.
PROPRIETARY RIGHTS NOTICE: All rights reserved. No part of this material may be reproduced or
transmitted in any form or by any means, electronic, mechanical, or otherwise, including photocopying and
recording or in connection with any information storage or retrieval system, without the permission in writing
from SAMCO Software Inc.
SAMCO Software Inc. ("SAMCO") has taken reasonable preventative measure to ensure the accuracy of the
information contained in this manual. However, SAMCO makes no warranties or representations with respect
to the information contained herein; and SAMCO shall not be liable for damages resulting from any errors or
omissions herein or from the use of the information contained in this manual.
SAMCO is a registered trademark of SAMCO Software Inc., Unit 61 - Building 6, 7789 - 134th Street,
Surrey, British Columbia V3W 9E9, Canada. Telephone (604) 597-4211. http://www.samco.com
Other product and company names are trademarks of their respective corporations.
Table of Contents
Understanding Bank Reconciliation .......................................................... 1.1
Definitions........................................................................................ 1
Product Description ............................................................................. 4
Getting Started.................................................................................. 2.1
Getting Bank Reconciliation Ready for Use ................................................. 1
Regular Use ...................................................................................... 2
Using Bank Reconciliation ..................................................................... 3.1
To Start Bank Reconciliation .................................................................. 2
Guide to the Menu .............................................................................. 4
Guide to Daily Operations ..................................................................... 4.1
Daily Operations Checklist ..................................................................... 1
Weekly Operations Checklist .................................................................. 2
Periodic/Monthly Operations Checklist ...................................................... 2
Cash Accounts ................................................................................... 5.1
Entering Cash Accounts ........................................................................ 1
Deleting Cash Accounts ........................................................................ 4
Printing a List of Cash Accounts .............................................................. 4
Control Information ............................................................................ 6.1
Bank Accounts ................................................................................... 7.1
Entering Bank Accounts ........................................................................ 1
Viewing the Status of the Account ........................................................... 4
Printing a List of Bank Accounts .............................................................. 5
Starting Up a Bankbook ........................................................................ 8.1
Adding Bank Accounts after B/R is Installed ................................................ 1
Set-up: Clear Entries ........................................................................... 2
Set-up: Purge Entries ........................................................................... 3
Checklist A ...................................................................................... 5
Checklist B ....................................................................................... 9
Checklist C ..................................................................................... 10
Checklist D ..................................................................................... 11
Transfer Checks/Deposits ..................................................................... 9.1
Bankbook Entries............................................................................... 10.1
Making Bankbook Entries ....................................................................... 1
Bank Reconciliation
Samco Power Accounting
Table of Contents
2
Bankbook Entries Report ....................................................................... 6
Transferring Cash from One Account to Another ........................................... 8
If you are using the G/L package .......................................................... 8
If you are not using the G/L package...................................................... 8
View Bank Account Information ............................................................. 11.1
Setting Up for a Reconciliation .............................................................. 12.1
Reconcile Statements ......................................................................... 13.1
Reports .......................................................................................... 14.1
Reconciliation Report .......................................................................... 1
Bankbook Report ................................................................................ 3
Account Activity Report ........................................................................ 3
Compress Cleared Entries .................................................................... 15.1
Close Bank Account ............................................................................ 16.1
Reset Bank Accounts .......................................................................... 17.1
Data Integrity Check .......................................................................... 18.1
Initializing Data Files ........................................................................... A.1
File Utilities ..................................................................................... B.1
Corrupted data files ............................................................................ 1
Handling ....................................................................................... 2
Export a file ...................................................................................... 2
Restore an exported file ....................................................................... 6
Rebuilding Data Files ........................................................................... 8
____________________
Bank Reconciliation
Samco Power Accounting
Table of Contents
3
Chapter 1
Understanding Bank Reconciliation
Introduction
NOTE: If you are upgrading from an earlier version of Check Reconciliation, see the
end of this chapter for new features for 6.5 Plus.
Definitions
Following are definitions of key words used in this manual.
Reconciliation
"Reconciliation" means "bringing into agreement".
Check Reconciliation
When "reconciliation" is applied to bank books, it means "bringing into agreement the
balance of your bank book and the balance shown on your bank statement".
To get to the point where you can decide whether they agree or not, you take into
account the entries you have performed which the bank didn't "know" about when
they prepared the statement: checks you have written which haven't shown up at the
bank yet, and deposits which were made later than the date the bank prepared your
statement.
There are also entries which the bank has performed and shown on the statement
which you didn't "know" about until you received the statement: interest they paid
you, service charges, and returned checks.
Clear
Bank Reconciliation
Samco Power Accounting
1.1
Understanding Bank Reconciliation
To "clear" means "to mark an entry as having been recognized and recorded by the
bank".
In the case of a check which you wrote, this means that the check was received by
the bank, which recognized your check as valid and transferred money from your
checking account to the bank that the payee deposited it in. (The "payee" is the
person or company that you wrote the check to.)
In the case of any other entry--a deposit, a bank charge, etc.--this means that the
bank has recognized the deposit or charge and has updated your account in its own
records.
At the point that an entry is "cleared", your account balance (the amount of money
you have in your checking account) is changed accordingly.
Transactions
As used in accounting, "transaction" means a business event involving money and
goods or services. For example, a transaction occurs each time you gas up your car:
you pay money in exchange for gasoline (goods).
Because computer software deals primarily with business events which have already
taken place, in Samco software, "transaction" means the record of a completed
business event involving money and goods or services.
The records of sales made and payments received are examples of transactions from
the area of accounting called "accounts receivable". The records of your purchases
and the payments you make for such purchases are transactions from the accounting
area called "accounts payable". The records of quantities of goods received or sold are
transactions from the area of accounting called "inventory control".
In Samco application software, when a transaction is entered into the system (into a
file), it is often referred to as an "entry".
Accounting
"Accounting" is the collection, categorization, and presentation of financial records.
Accounts Receivable
"Accounts Receivable" is the accounting area dealing with sales made by a company
and with money it is owed. As used here, "account" means "a record of financial
activity", and "receivable" means "due to be received" or "due you". Accounts
Receivable is often abbreviated "A/R" or "AR".
Accounts Payable
"Accounts Payable" is the accounting area dealing with purchases and disbursements
made by your company and the money your company owes. As used here, "payable"
Bank Reconciliation
Samco Power Accounting
1.2
Understanding Bank Reconciliation
means "that must be paid" or "due to someone else". Accounts Payable is often
abbreviated "A/P" or "AP".
Payroll
"Payroll" is the accounting area dealing with wages you pay as an employer to your
employees. The word means literally "the roll (list of names) to be paid". It is often
abbreviated "PC" or "PR".
Data Organization
Most of the information you enter into your computer is stored on your disk. In order
for computer programs to be able to locate specific pieces of information (within
large masses of information), and to be able to process it logically, information must
be organized in some predictable way. Samco accounting software organizes your
information for you automatically as it stores it on your disk.
There are five terms you should understand about the way the information is
organized:
Character: A "character" is any letter, number, or other symbol you can type on your
computer keyboard.
Field: A "field" is one or more characters representing a single piece of information.
For example, a name, a date, and a dollar amount are all fields.
Record: A "record" is a group of one or more related fields. For example, the fields
representing a customer's name, address, and account balance might be grouped
together into a record called the "customer record".
Entry: A record in a data file is often referred to as an "entry".
Data file: A "data file" is a group of one or more related records. A data file is often
referred to simply as a "file" (without the word "data").
The Customer File in Accounts Receivable is an example of a data file. Such a file is
made up of several records, each of which contains the name, address, etc. for one
customer.
Each file is kept separate from other files on the disk.
(There are other types of files in addition to data files. For example, programs are
stored on the disk as "program files". However, references to "file" in this User Manual
mean "data file" unless specifically stated otherwise.)
Purge
When you purge a file, you permanently remove information from it. Once the
information is purged, it cannot be recovered.
Bank Reconciliation
Samco Power Accounting
1.3
Understanding Bank Reconciliation
Balance Forward
"Balance forward" means "the balance in an account as of a certain date". A balance
forward amount is a lump-sum dollar amount, obtained by adding together several
individual dollar amounts. All these specific amounts were placed in the account on or
before a specified date called the balance forward date.
Compress
"Compress" means "to make smaller". The "compress" selection reduces the number of
records in a file by adding the dollar amounts of several cleared entries together and
creating a single balance forward entry with the same total amount.
Spool
SPOOL is a computer word meaning "Save Printer Output Off-Line". Spooling is a
technique that allows a report to be printed at a later time. Instead of reports going
directly to a printer, they are saved as a disk file (which is usually a lot faster).
When a printer is available, all or some saved reports can be printed in one long run
(for example, overnight).
SAM (Samco's Automated Manuals)
A revised edition of this and all Samco user manuals is available on-line from within
any function of Samco's business applications. Simply press [F10] ([F11] for the
Windows version) and SAM will guide you to whatever information you need. (Refer to
the chapter titled Help SAM !!! in the System Functions manual for details.)
Product Description
With these definitions in mind, here are the features of the "Bank Reconciliation"
package:
This package provides the means to apply the advantages of a computer to two
accounting tasks which every business must perform accurately:
1.
Keeping bank books for money deposited and disbursed in Accounts Receivable,
FishPro, Accounts Payable, and Canadian Payroll.
2. Reconciling bank books periodically with bank statements.
The Bank Reconciliation package can be integrated with any or all of the Accounts
Receivable, FishPro, Accounts Payable, and Canadian Payroll packages. You can
transfer information from these packages automatically into the Bank Reconciliation
package.
Bank Reconciliation
Samco Power Accounting
1.4
Understanding Bank Reconciliation
The package can also be used stand-alone.
This Bank Reconciliation package provides these features:
•
•
•
•
•
•
•
•
•
•
•
•
•
Automatically gets deposits and checks from Accounts Receivable, Accounts
Payable, and Canadian Payroll.
Handles an unlimited number of checking accounts, fully integrated with A/R,
A/P, FishPro, and Payroll.
Provides the ability to enter, change, delete, or print a list of bank book
entries.
For each checking account, offers the option of either "bank-to-book" or
"book-to-bank" reconciliation.
A Close bank book selection is provided to remove an obsolete bank book from
the system.
Allows reports to be stored on disk to save computer time, then printed later
at your convenience.
Provides the following reports:
Reconciliation Report
Bank book Report
Account Activity Report
Minimizes the amount of information which must be kept on disk by allowing
compression of entries which have been cleared.
Includes "on-line" user manuals, available to you at any time by pressing a
single key.
Handles stop-payment checks and checks that are voided after they have been
transferred to the bank book.
Allows you to pinpoint any particular check or type of check within seconds
with just a few key strokes.
Provides many safeguards against getting your information out of balance or
getting tangled up during the reconciliation process.
Has a start-up procedure that lets you set up the balances in your bank book
quickly and easily, whether or not you are using any of the other packages
(A/R, A/P, F/P, or P/C).
Bank Reconciliation also provides these features which are common to all Samco
packages:
Password Protection
You have the option to specify that passwords are required. A password is a unique
code you assign to each individual using your Samco application software. When
passwords are required, each potential user must first enter a valid password before
he or she will be allowed to use a protected selection.
Data Integrity Checks
A data integrity check compares the actual numbers in the system to the calculated
or projected numbers. If these numbers do not match, you are warned that data
(information) might have been lost due to a machine or power failure. By running this
Bank Reconciliation
Samco Power Accounting
1.5
Understanding Bank Reconciliation
selection at the start or end of the day, you can detect several possible types of data
file corruption (sometimes due to hardware or operating system errors).
File Utilities
This selection provides the capability to recover corrupted data files. You can also use
it to convert important data files to a format which can be easily transferred to
common data base and word processing packages.
Printers
You can easily select any one of more than two dozen of the most popular printers.
Additionally, instructions are given to allow you to interface the software to other
printers.
Upgrading from Earlier Versions
We have included the necessary instructions to allow you to upgrade from an earlier
version of this same package. Please refer to the Upgrade Guide for more
information.
New Features for 6.5 Plus
This section describes the features that have been added to Bank Reconciliation for
version 6.5 Plus.
Users who have upgraded from an earlier version will want to read this section after
installing version 6.5 Plus in order to obtain an overview of the increased capabilities
of the software. In order to take advantage of the new features, simply read the
relevant chapter(s) of the User Manual.
An unlimited number of cash accounts are supported. These cash accounts may
be shared with Accounts Receivable, and Accounts Payable.
Revised bank book entry makes it easier to locate existing bank book entries.
When transferring deposits from Accounts Receivable, details of the cash
receipts which make up each deposit may be printed.
Grand totals appear on the Account Activity Report.
Totals of un-cleared items now optionally appear on the Reconciliation Report.
A "close bank book" function is provided to remove an obsolete bank book from
the system.
____________________
Bank Reconciliation
Samco Power Accounting
1.6
Understanding Bank Reconciliation
Chapter 2
Getting Started
Introduction
We assume at this point that you have installed Bank Reconciliation on your computer
according to the Installation Guide. If you have not done so, refer to that manual and
install the B/R package before proceeding.
We also assume that you have familiarized yourself with the main features of this
package by reading the chapter titled Understanding Bank Reconciliation. If you have
not done so, read that chapter now, then return to this chapter.
Your Accountant
We advise you to consult with your accountant before using Samco's business
application software. Your accountant should be familiar with your accounting
software in order to serve you well, and may have good advice on converting from
your existing Bank Reconciliation system.
In order to use this package, you first need to enter into the Control File information
about your current accounting and bank book state of affairs.
The Bank Reconciliation Control File
This file contains certain "control information" which you must enter. This information
defines which other packages you are using, and whether you are in "regular use" or
"start-up" mode.
Getting Bank Reconciliation Ready for Use
You are now ready to begin making this package ready for use.
Do the following:
Bank Reconciliation
Samco Power Accounting
2.1
Getting Started
1.
Follow the instructions in the System Functions manual for setting up your
company information. If you are adding B/R to an existing installation, you will
want to read the chapter titled Company information for instructions on adding
B/R to your company ID's main menu.
2.
Start B/R according to the instructions in the chapter titled Using Bank
Reconciliation.
3.
Enter your control information into the Control File, using the chapter titled
Control Information.
4.
Perform the start-up procedure appropriate for your system. Start-up checklists
Have been provided in the chapter titled Starting Up a Bank book. When you
complete the start-up procedure, the package is ready for use.
5.
Read the chapter titled Guide to Daily Operations, which explains how you use
Bank Reconciliation to perform various daily, weekly, and periodic tasks.
Regular Use
The remaining chapters in this manual show how to:
•
•
•
•
•
•
•
•
Make entries (checks, deposit slips, etc.) that do not originate from the other
packages you may be using.
Rapidly view information in your checking accounts.
Reconcile your bank books with bank statements.
Print or view reports.
Compress cleared entries.
Close a bank book.
Reset a bank book.
Perform a data integrity check.
Appendix A explains how to initialize (create from scratch) your B/R data files. You
may never need this option, but it is included just in case.
Appendix B describes how to use the File utilities for exporting importing, and
rebuilding B/R data files.
Samco Support
You're ready to continue now. Build the data files per the above instructions, then
begin using B/R to process your work.
This manual, in combination with your Installation Guide and System Functions
manual, is designed to allow you to use Custom Labels without additional help.
However, if you encounter problems you cannot resolve by referring to these
Bank Reconciliation
Samco Power Accounting
2.2
Getting Started
manuals, you may want to get additional assistance. Your supplier may be able to
provide such assistance, or he may be able to recommend an independent source.
If all else fails, contact:
Samco Support Department
Unit 61 - 7789 - 134th Street
Surrey, B.C. V3W 9E9
Phone: (604) 597-4211
Fax: (604) 597-4878
There will be a fee for support services from Samco.
Bank Reconciliation
Samco Power Accounting
2.3
Getting Started
Chapter 3
Using Bank Reconciliation
About this Manual
This manual provides the information needed to learn and use Bank Reconciliation.
Organization
The next chapter is a guide to daily operations. It explains how you use Bank
Reconciliation to perform various daily, weekly, and periodic tasks. After the guide,
the next few chapters give instructions on how to enter the basic information which
will set up your package according to your needs and prepare you for daily operation.
Following those come chapters which you will use most frequently. They describe how
to use Bank Reconciliation on a daily basis.
The last few chapters describe selections which are used periodically, including such
selections as compressing cleared entries.
Additional information can be obtained from the System Functions manual, which
contains chapters that describe features common to all packages.
How to Use this Manual
When beginning, you will want to keep this manual handy so you can refer to it as
often as you need. Later, you may only need to refer to it occasionally.
Each chapter of this manual provides instructions on how to use a particular selection
of your software.
SAM (Samco's Automated Manuals)
This and all Samco application user manuals are available for your reference in an online format (the screens and sample reports have been removed). Simply press [F10]
Bank Reconciliation
Samco Power Accounting
Using Bank Reconciliation
3.1
([F11] for the Windows version) and you will have instant access to the information
you need with the help of SAM. (Refer to the chapter titled Help SAM !!! for
information on using SAM.)
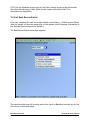
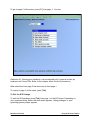
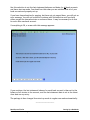
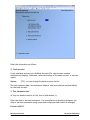
To Start Bank Reconciliation
From your company ID's main menu select Bank reconciliation. (If Bank reconciliation
does not appear on the main menu refer to the chapter titled Company Information in
the Systems Function manual for details.)
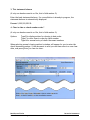
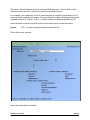
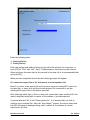
The Bank Reconciliation menu then appears:
The selections that you will be using most often (such as Bankbook entries) are on the
first screen of the main menu.
Bank Reconciliation
Samco Power Accounting
Using Bank Reconciliation
3.2
To get to page 2 of the menu, press [F1] from page 1. You see:
(Selection 10, Starting up a bankbook, can be selected only if you are in start-up
mode per the Control File. Refer to the chapter titled Control Information.)
Make selections from page 2 the same way as from page 1.
To return to page 1 of the menu, press [Tab].
To Exit the B/R Package
To exit the B/R package, press [Tab] from page 1 of the B/R menu. Depending on
your computer setup, either the main menu appears, listing packages, or your
operating system prompt appears.
Bank Reconciliation
Samco Power Accounting
Using Bank Reconciliation
3.3
Guide to the Menu
The B/R menu selections are shown below. To the right of each menu selection is the
page number in this manual where the menu selection is described.
Additional User Manual references are shown for some menu selections. These
references contain information which is related to the menu selection.
Bank accounts .......................................................................... 7.1
Bankbook entries .................................................................... 10.1
Transferring cash from one
checking account to another ......................................................... 10.9
Transfer checks/deposits ............................................................. 9.1
Reconcile statements ............................................................... 13.1
Interest received ....................................................................... 12.2
Returned checks ....................................................................... 12.2
Checks returned to vendors .......................................................... 12.5
View bank account information ..................................................... 11.1
Bank account reports ............................................................... 14.1
Reconciliation .......................................................................... 14.1
Bankbook ................................................................................ 14.3
Account activity ........................................................................ 14.4
Compress cleared entries .......................................................... 15.1
Cash accounts .......................................................................... 5.1
Control information
6.1
Data integrity check ................................................................. 18.1
Starting up a bankbook ............................................................... 8.1
Close bank accounts ................................................................. 16.1
Reset bank accounts ................................................................ 17.1
____________________
Bank Reconciliation
Samco Power Accounting
Using Bank Reconciliation
3.4
Chapter 4
Guide to Daily Operations
Introduction
The following checklists are provided as examples of how you might use Bank
Reconciliation to perform various daily, weekly, and periodic tasks.
While we attempt to present the tasks in a logical order, you should adjust the
checklist as necessary to meet your own needs. You may wish to consult with your
accountant for advice on organizing your own checklists to ensure the efficiency and
security of your business operations.
Daily Operations Checklist
EACH DAY
EACH DAY, AS NEEDED
____ Enter checks and deposits using
Bank book entries. (If you are
using other packages, you would
only enter checks and deposits
that were not entered using A/R,
A/P, FishPro or P/C.)
Bank Reconciliation
Samco Power Accounting
Guide To Daily Operations
4.1
EACH DAY
EACH DAY, AS NEEDED
____ View your current
checking account balances using
View checking information.
When viewing this information
you may optionally include unposted and un-transferred
entries from other Samco
packages in order to get a very
accurate statement of your
current checking account
balance.
____ Print the Account Activity Report
to obtain a cross-section of bank
book entries in several different
ways. For example, you can get
a report of all A/P checks to a
specific vendor using this report.
Weekly Operations Checklist
EACH WEEK
____ Transfer checks from
A/P, FishPro, and P/C.
____ Transfer deposits from
A/R.
NOTE: You may wish to transfer checks and deposits to B/R more frequently than
once a week. This information can be transferred twice weekly or even daily, if
needed.
Periodic/Monthly Operations Checklist
EACH PERIOD
EACH PERIOD, AS NEEDED
____ When you receive your bank
statement, enter any adjustments using Bankbook
entries and then reconcile
your bank statement using
Reconcile statements. Use
the Reconciliation Report, as
Bank Reconciliation
Samco Power Accounting
Guide To Daily Operations
4.2
needed, while reconciling
your checking account.
____ Print a complete report of all
checking account activity for a
period, using Bank book entries.
____ Reduce the number of entries in
your checking account files by
using Compress cleared entries
to combine the totals of cleared
entries into balance forward
entries.
____________________
Bank Reconciliation
Samco Power Accounting
Guide To Daily Operations
4.3
Chapter 5
Cash Accounts
Introduction
The Samco system allows for an unlimited number of cash accounts.
Cash accounts are used by Accounts Payable, Accounts Receivable, Job Cost and Bank
Reconciliation.
You enter your cash accounts here so that the cash account number can be verified
later when you post cash receipts in Accounts Receivable, cut computer checks in
Accounts Payable, or make bankbook entries in Bank Reconciliation.
If B/R is being used stand-alone, you must enter each cash account for which B/R will
be maintaining a bankbook. Otherwise, only those additional cash accounts not
already entered as a result of using A/R, and A/P need to be entered here. (Each cash
account must first be entered in the Valid G/L Account File.)
To Begin
From the B/R menu, select Set Up from the second screen and Cash accounts. Then
from the Cash accounts menu, select Enter.
Entering Cash Accounts
Bank Reconciliation
Samco Power Accounting
Cash Accounts
5.1
You can work with both new and existing cash accounts.
Enter the following information:
? *1. Cash account #
Enter the cash account number. If the account you enter does not already exist in the
Valid G/L Account File, you may add it here.
Options:
[F1]
to scan through the accounts on file
Description
Bank Reconciliation
Samco Power Accounting
Cash Accounts
5.2
Enter a description of the cash account.
Format: 30 characters
2. Last check #
The last check number is used by Accounts Payable to determine the next check
number to be used when A/P checks are cut. It is not used by Accounts Receivable,
Canadian Payroll, FishPro, or Bank Reconciliation.
If you are using only A/R or B/R (or both):
This field displays "(Not applicable)" and entry is not allowed.
If you are using A/P:
Enter the last check number used for a new cash account from which A/P checks will
be cut.
Format: 999999
NOTE: If you have been using A/R or B/R, and are now installing A/P, be sure to
enter a last check number for any cash accounts already entered for A/R or B/R, for
which you plan to cut computer checks.
3. Comments
Enter comments about the cash account.
Format: 10 lines of 65 characters each
You enter text in much the same way as most word processing programs, using the
[Enter] key, keys, [Del] key, [Tab] or [Esc] when done, etc. When you are finished
entering text, press [Tab] and follow the screen instructions.
When you press [Esc] or [Tab] while entering comments, you have these choices:
File
Save what I have just entered/changed. (Like pressing [Enter] at
"Field number to change ?" in other selections.)
Save & continue
Save what I have just entered/changed, but leave the information
on the screen because I want to continue to work with it.
Abandon changes Throw away what I have just entered/ changed. (Like pressing
[Esc] at "Field number to change ?" in other selections.)
Bank Reconciliation
Samco Power Accounting
Cash Accounts
5.3
Delete
Delete this entire comment from the screen. (Like Delete in
other selections.) The software will ask you to confirm the
deletion with an "OK to delete ?" message.
Deleting Cash Accounts
The [F3] key is used to delete a cash account. A cash account cannot be deleted if it
has been entered in the A/R, Order Entry Plus, or A/P Control File as a default cash
account. There are also other checks made. If you cannot delete a cash account for
some reason, the software will inform you through a message as to why.
Printing a List of Cash Accounts
From the Cash accounts menu, select Print.
From the screen which appears, enter the following information:
? 1. Starting account #
?2. Ending account #
Enter the starting and ending account numbers. Follow the screen instructions.
3. Print comments ?
Your answer here determines whether comments will be printed.
____________________
Bank Reconciliation
Samco Power Accounting
Cash Accounts
5.4
Chapter 6
Control Information
Introduction
Use this selection to set up the Bank Reconciliation package to fit your particular
requirements. The information entered here will "control" various operations
throughout this package.
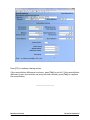
To Begin
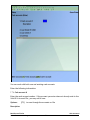
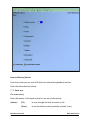
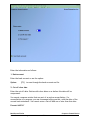
Select Control information from page 2 of the B/R menu.
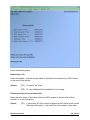
This is the screen you see:
Bank Reconciliation
Samco Power Accounting
Control Information
6.1
Bank Reconciliation
Samco Power Accounting
Control Information
6.2
Enter the information as follows:
1. Using Accounts Payable ?
Answer Y if you are using the A/P package; otherwise, answer N.
2. Using Payroll ?
Answer Y if you are using the Samco Canadian Payroll package; otherwise, answer N.
In Payroll Control Information, you must set “Use B/R to reconcile checks ?” to Y.
3. Using Accounts Receivable ?
Answer Y if you are using the Accounts Receivable package; otherwise, answer N.
4. Using FishPro ?
Answer Y if you are using the Samco FishPro package; otherwise answer N.
5. Using Point of Sale ?
Answer Y if you are using the Samco Point of Sale package; otherwise answer N.
Options allow you to select one or all stores, and whether or not to consolidate
registers. Consolidating registers will combine all entries (by cash type) into a single
deposit. The values entered when you close a drawer, not the individual ticket
amounts, are used for interfacing with Bank Reconciliation.
6. Start-up mode or regular use ?
Choose "start-up mode" when you first set up this package, then change to "regular
use" after fully setting up all of your bank books. However, you cannot change from
start-up mode to regular use here. To make this change, you must run Set last
balance. (See the Starting Up a Bank book chapter.)
NOTE: You can change from regular use to start-up mode only when there is no
reconciliation in progress (see the Reconcile Statements chapter).
Answer S for "start-up mode" or R for "regular use".
Format: 1 character
7. Print register of checks/deposits transferred from other packages ?
This question appears if you are using any one of the A/P, Payroll, FishPro, Point of
Sale or A/R packages. Answer Y if you want a register printed when you run Transfer
checks/deposits; otherwise, answer N.
____________________
Bank Reconciliation
Samco Power Accounting
Control Information
6.3
Chapter 7
Bank Accounts
Introduction
You must set up a bank account record here for each bank account which you are
going to use in B/R.
An earlier chapter described cash accounts. The basic differences between cash
accounts and bank accounts are:
Cash Accounts
The Cash Accounts File contains those G/L accounts which are cash accounts. This file
is shared by all packages which refer to cash accounts (A/R, A/P, and B/R).
Bank Accounts
The Bank Account File (which is part of B/R and not referenced by any other package)
contains records which describe each bank account. This description includes:
The appropriate account from the Cash Accounts File.
Basic information about the bank (such as bank number, name, and address).
The reconciliation method for the bank book.
To Begin
From the B/R menu, select Bank accounts. Then from the Bank accounts menu, select
Enter.
Entering Bank Accounts
Bank Reconciliation
Samco Power Accounting
Bank Accounts
7.1
You can work with both new and existing bank accounts.
Enter the following information:
? *1. Bank acct
Enter the bank account number or use one of the options:
Options:
[F1]
to scan through the bank accounts on file
[F2]
To scan through the cash accounts on file
2. Bank name
Enter the name of this bank or use the option:
Option:
[F1]
to use the bank name in the A/R Cash History File for this cash
account (if A/R is interfaced)
Format: 25 characters
3. Bank account
Enter your account number at this bank or use the option:
Option:
[F1]
to use the bank account number in the A/R Cash History File for
this cash account (if A/R is interfaced)
Format: 15 characters
4. Address 1
5. Address 2
6. Address
Enter the bank's address.
Format: 25 characters for each field
7. Contact
Enter a contact person at the bank
Format: 15 characters
8. Phone
Enter a phone number for the contact person at the bank.
Bank Reconciliation
Samco Power Accounting
Bank Accounts
7.2
Format: 12 characters
9. Recon method
Enter the reconciliation method you want to use: book-to-bank or bank-to-book
reconciliation.
In book-to-bank reconciliation, the bank statement is regarded as fixed, and the bank
book is brought into alignment with it. In bank-to-book reconciliation, the bank book
is regarded as fixed, and the bank statement is brought into alignment with it.
Your choice here is used in Reconcile statements. If you are unsure which to use, use
book-to-bank, which is the most common method.
Press [Enter] to use "book-to-bank" reconciliation, or enter 2 to use "bank-to-book"
reconciliation.
When you press [Enter] at "Field number to change ?", you are asked if you wish to
enter any notes about the bank account.
You can enter an unlimited number of notes about this bank account. Each note is
given a date/time stamp so that you can browse through the notes in time sequence
later.
A menu at the bottom of the "Notes" area shows three selections:
Menu
Pressing [F1] brings up a number of selections. Each selection is described below:
Save
After entering a note, this selection permanently saves the note
New
Start a new note. If you have made any changes to the current
note, those changes are lost.
Delete
Permanently deletes the note
Jump
Allows you to enter a specific date for viewing notes.
Change date Change the date and time this note was entered.
Abandon
Abandon any changes to the current note and exit the notes
function.
Exit
Exit the notes function.
[PgUp]
View an earlier dated note.
Bank Reconciliation
Samco Power Accounting
Bank Accounts
7.3
[PgDn]
View a later dated note.
[Home]
View the earliest dated note (oldest).
[End]
View the newest note on file.
Text entry
When you select to enter a note, the cursor is positioned for you to enter the first line
of the text of the note.
While entering a note the following keys and rules apply:
[Enter]
Completes the entry of a line of text and moves the cursor to the
next line.
AutoWrap
The text editor will automatically wrap the typed text to the next
line once you reach the end of the line. For example if you were
typing "superb" and only had enough room left on the line for
"sup" the entire word would be automatically moved to the next
line.
[F1]
Access the menu selections described in the previous section.
[Esc]
Exit the note function without saving the changes to the current
note.
[Tab]
Exit the note function and save the changes to the current note.
[F2]
Begin entering a new note.
[F3]
Edit the next note on file.
[F4]
Edit the previous note on file.
Format: 10 lines of 77 characters each
This concludes entry of a new bank account. When you subsequently view or change
an account, you may choose to view notes by using the [F6] key, or you may view
account status as described below.
Viewing the Status of the Account
"Status information" consists of the account number, reconciliation method, bank
book balance, statement date and reconciliation information.
Bank Reconciliation
Samco Power Accounting
Bank Accounts
7.4
When you press [Enter] at "Field number to change ?", you are asked whether you
wish to view the status of this bank account.
If you answer Y, a new screen appears, showing the account number, reconciliation
method, bank book balance, last bank statement date, and whether a reconciliation is
in progress.
Printing a List of Bank Accounts
From the Bank accounts menu, select Print.
From the screen which appears, enter the following information:
?1. Starting account #
?2. Ending account #
Enter the starting and ending account numbers. Follow the screen instructions.
3. Print notes ?
Your answer here determines whether any notes entered above will be printed.
Bank Reconciliation
Samco Power Accounting
Bank Accounts
7.5
Chapter 8
Starting Up a Bankbook
Introduction
Use this selection to initially set up all of your bankbooks.
This can be done only when the Bank Reconciliation (B/R) package is in start-up mode
(as defined in Control information).
For any cash account (and its corresponding bankbook), one of four situations can
occur:
A.
One or more of the A/P, A/R, F/P, P/S and Payroll packages has already been
in use, and the B/R package is being added.
B.
No other package has been in use yet.
C.
The B/R package and one or both of the A/P, F/P, and P/C packages are
already in use, and the A/R package is to be newly installed.
D.
You have just installed the B/R package, and you are using no other packages.
A checklist for each of these situations is located at the end of this chapter.
We suggest that you take the one that applies to your situation out of this User
Manual and check off the steps as you perform them.
The checklist steps will guide you through the correct sequence of actions to correctly
set up your checking accounts.
Adding Bank Accounts after B/R is Installed
If you are adding an entirely new bankbook which has no activity, it is not necessary
to go into start-up mode or use Checklist B. Simply do this:
Bank Reconciliation
Samco Power Accounting
Setting Up a Bankbook
8.1
1. Add the new cash account to the Cash Accounts File.
2. Add the bank account to the Bank Accounts File.
3. Make the cash account the default in the A/R, and A/P Control files, as
applicable. Then go on with your regular day-to-day processing.
If you are adding a bankbook which already has activity (not as a result of using A/R,
A/P, F/P, or PR), then follow Checklist B.
To Begin
Select Starting up a bankbook from the 2nd page of the B/R menu, then select
Set-up: clear entries.
Set-up: Clear Entries
NOTE: You will use this selection only if you are using at least one other package.
In your regular day-to-day use of this package (not in start-up mode), you will never
be "purging" (completely removing) bankbook entries from the Bankbook File. This
would be incorrect and is not allowed. Instead, you will be compressing groups of
cleared checks and deposits into what are called "balance forward" entries. In this
way, your bankbook balance will always be correct.
However, when you are in start-up mode, you are allowed to purge bankbook entries
at will - as well as enter or change them. This is so you can set up your bankbook
quickly, simply, and directly. Once you leave start-up mode and go into regular use
mode (by running Set-up: set last balance), you will no longer be allowed to purge
bankbook entries.
Use this selection to mark entries that you want to purge. (When you purge an entry,
you completely remove it from the file.)
A screen appears for you to enter the account number of the bank account to clear.
Enter the bank account (which must be in the Bank Accounts File), or use the option:
Option:
[F1]
to scan through the bank accounts on file
Either way, this is the next screen you see:
Bank Reconciliation
Samco Power Accounting
Setting Up a Bankbook
8.2
Select entries to clear using the keys.
Move forward to the next screen of entries by using the [PgDn] key. Move back to the
previous screen of entries by using the [PgUp] key.
To clear an entry so that it can be purged, answer Y to "Clear ?". To exclude an entry
from purging, skip it by using the arrow keys. If you had already answered Y to an
entry and want to change the answer, enter N for that entry.
Set-up: Purge Entries
Select Set-up: purge entries from the Starting up a bankbook menu.
A screen appears for you to enter the account number of the bank account to clear.
Enter the bank account (which must be in the Bank Accounts File), or use the option:
Option:
[F1]
to scan through the bank accounts on file
When you run Purge entries, any entries marked as cleared for purging are purged.
The processing occurs automatically.
Set-up: Set Last Balance
Select Set-up: set last balance from the Starting up a bankbook menu.
Bank Reconciliation
Samco Power Accounting
Setting Up a Bankbook
8.3
Use this selection to set the last statement balances and dates for all bank accounts
and leave start-up mode. You should run this when you are satisfied that all of your
bank accounts are properly set up.
If you have cleared entries for purging, but have not yet purged them, you will get an
error message. You will not be able to continue with this selection until you have
either purged the cleared entries or uncleared them. It may be necessary to do this
for more than one bank account.
If everything is OK, a screen with this message appears:
If you continue, the last statement balance for each bank account is then set to the
balance of all entries in the account, and the last statement date is set to the latest
clear date on any entry.
The package is then changed from start-up mode to regular use mode automatically.
____________________
Bank Reconciliation
Samco Power Accounting
Setting Up a Bankbook
8.4
Checklist A
One or more of the A/P, A/R, F/P, and Payroll packages has already been in use
and the Bank Reconciliation package is being added.
User Manual chapters you will be referring to:
•
•
•
•
•
Transfer Checks/Deposits
Bankbook Entries
Starting Up a Bankbook
Cash History chapter in the A/R User Manual (Deposits section)
Control Information chapter in the A/P User Manual
Follow steps 1 through 7 for each of your cash accounts.
Step 1. Make sure that you have entered a bank account,
using Bank accounts, for each cash account used
by A/P, and A/R.
_______
Make sure that you have entered a cash account
(using Cash accounts) and a bank account (using
Bank accounts) for any other bank accounts to
be maintained by B/R, which are not used by other
packages.
_______
Make sure that start-up mode is selected in the
Control File.
_______
Step 2. Transfer all checks and deposits from the other
existing packages to the Bankbook File,
using Transfer checks/deposits, as shown below:
Step 2a. If you are using Accounts Receivable:
You need to transfer cash receipts to the Bank
Reconciliation package, but first all cash receipts
must be gathered into deposit slips.
_______
See Prepare deposits in the A/R User Manual
chapter titled Process Cash History.
(Since the Bank Reconciliation package is in
start-up mode, you do not have to print deposit
slips before transferring cash receipts. Later,
during regular use of the Bank Reconciliation
package, any cash receipt will have to be printed
Bank Reconciliation
Samco Power Accounting
Setting Up a Bankbook
8.5
on a deposit slip before it can be transferred.)
Transfer these cash receipts, using Transfer
checks/deposits.
_______
The result is that all deposits in the Cash History
File are marked as transferred.
Step 2b. If you are using Payroll:
Transfer all payroll checks, using Transfer
checks/deposits.
_______
The result is that all checks in the Payroll Checks
File are marked as transferred.
Step 2c. If you are using Accounts Payable:
Look at your answer as it currently exists for field
"KEEP VENDOR HISTORY FILE ?" in the
A/P Control File. Use Control information,
as described in your A/P User Manual, to look
at your current answer.
If your current answer is yes (Y):
Transfer all checks, using Transfer
checks/deposits.
The result is that all checks in the Vendor History
File are marked as transferred.
If your current answer is no (N):
This means that there are no checks in your
Vendor History File to transfer.
Change your answer to Y, so that this file will
hold future A/P checks for transfer to Check
Reconciliation.
Since no A/P checks have been transferred,
skip steps 3 and 4 below. Go directly to step 5.
__________
_________
Step 2d. If you are using FishPro:
Transfer all checks, using Transfer checks/deposits.
Bank Reconciliation
Samco Power Accounting
_________
Setting Up a Bankbook
8.6
The result is that all checks in the FishPro Checks
File are marked as transferred.
Step 3. Now run Set-up: clear entries, and clear all entries
that are on your latest bank statement.
Then purge these entries using Set-up: purge entries.
_______
Step 4. Using Set-up: clear entries, clear all entries earlier
than the current bank statement, except for the entries
which have not cleared the bank yet.
_______
Then purge all cleared entries.
_______
The result is a Bankbook File that contains all checks
and deposits previously entered through A/P, FishPro,
Payroll, and A/R, that have not appeared yet on any
bank statement (have not cleared).
Step 5. Using Bankbook entries, enter any other
outstanding checks and deposits that were not
transferred and that have not yet appeared on
your bank statement. (These would be outstanding
checks and deposits that were no longer in the History
files when you did the transfer above. There might not
be any of these.)
_______
At this point, the Bankbook File contains only entries
that have not cleared the bank yet, as of the date of the
last bank statement. It should contain all of these entries,
at least up to the closing date of the last bank statement.
It might also contain entries after the last statement date.
Step 6. Go back to Bankbook entries and make a balance
forward entry. The amount is the closing amount
of your last bank statement. (You should have already
reconciled this statement manually. If this has not yet
been done, you can make any adjustments and corrections
later through Bankbook entries.)
_______
The date of the balance forward entry should be
the closing date of the last bank statement.
Step 7. Do the above procedure for each of your cash accounts.
Step 8. Run Set-up: set last balance.
Bank Reconciliation
Samco Power Accounting
_______
Setting Up a Bankbook
8.7
Your bankbooks are now set up for regular use and you are
no longer in start-up mode.
NOTE: If you have any uncleared entries dated before the
balance forward entry you entered above, the running balance
figure will not be accurate before the balance forward entry;
however, it will be accurate from the balance forward entry
onward. Once all entries before the date of the last bank
statement have finally been cleared, the running balance figure
will be accurate in all cases.
Step 9. Replace this checklist in the B/R User Manual.
Bank Reconciliation
Samco Power Accounting
_______
Setting Up a Bankbook
8.8
Checklist B
No other package has been in use yet.
User Manual chapters you will be referring to:
• Control Information
• Bankbook Entries
• Starting Up a Bankbook
Step 1. If you are going to be using any other
packages, install them first and build the data files
for each package, before starting this Bank
Reconciliation package.
_______
Step 2. Make sure that you have entered a bank account,
using Bank accounts, for each cash account used
by A/P, and A/R, (if one or more of these
packages are in use).
_______
Make sure that you have entered a cash account
(using Cash accounts) and a bank account (using
Bank accounts) for any other bank accounts to
be maintained by B/R, which are not used by other
packages.
_______
Make sure that start-up mode is selected in the
Control File.
_______
Step 3. Take the latest bank statement dated before any
checks or deposits are entered into the other
packages, and enter a balance forward entry, using
Bankbook entries. The date and amount of this entry
are the date and closing balance of the last bank statement.
_______
Step 4. Enter all checks and deposits that have not yet been
cleared as of the latest bank statement directly into
the Bank Reconciliation package. These will be checks
and deposits that you will not be entering into the other
packages. Use Bankbook entries.
_______
The result is a Bankbook File that has only outstanding
entries for each bank account, as of the date of the latest
bank statement, and has all of these outstanding entries.
Step 5. Run Set-up: Set last balance.
Bank Reconciliation
Samco Power Accounting
_______
Setting Up a Bankbook
8.9
Step 6. Replace this checklist in the B/R User Manual.
_______
Checklist C
The Bank Reconciliation package and one or any combination of the A/P, FishPro,
and Payroll packages is already in use, and the A/R package is to be newly
installed.
User Manual chapters you will be referring to:
• Control Information
• Bankbook Entries
• Starting Up a Bankbook
Preliminary
You have been entering deposits, up until now, directly into the Bank Reconciliation
package, and some deposits are already on file. Some might be marked as cleared
already, and some might not yet be marked as cleared.
Step 1. Install the A/R package, using the Installation Guide,
System Functions manual, and A/R User Manual.
_______
Step 2. Start entering cash through the A/R package.
_______
Step 3. Discontinue entering deposits directly through the
Bank Reconciliation package.
_______
That is all that is necessary to do. The balance forward
in the Reconciliation package will already be correct.
Step 4. Replace this checklist in the B/R User Manual.
Bank Reconciliation
Samco Power Accounting
_______
Setting Up a Bankbook
8.10
Checklist D
You have just installed the Bank Reconciliation package, and you are using no
other packages.
User Manual chapters you will be referring to:
• Bankbook Entries
• Starting Up a Bankbook
Step 1. Make sure that you have entered a cash account,
using Cash accounts, and a bank account,
using Bank accounts, for each bank account
to be maintained by B/R.
_______
Make sure that start-up mode is selected in the
Control File.
_______
Step 2. Enter a balance forward entry with the date and
closing amount of the last bank statement. Use
Bankbook entries.
_______
Step 3. Enter all checks, deposits, and adjustments that have
not yet cleared the bank as of the last bank statement.
Use Bankbook entries.
_______
Step 4. Run Set-up: set last balance.
_______
Step 5. Replace this checklist in the B/R User Manual.
_______
You will now be ready to use the Bank Reconciliation package for regular day-to-day
processing.
____________________
Bank Reconciliation
User Manual
Starting Up a Bankbook
8.11
Chapter 9
Transfer Checks/Deposits
Introduction
Use this selection to transfer checks from Accounts Payable, FishPro, and Canadian
Payroll, and deposits from Accounts Receivable and Point of Sale into the Bank
Reconciliation package.
This selection can be run only if you have specified (in the B/R Control File) to use
one or more of these packages.
To Begin
Select Transfer checks/deposits from the B/R menu.
This is the screen you see:
Bank Reconciliation
Samco Power Accounting
Transfer Checks/Deposits
9.1
NOTE: The date of the last transfer will not appear until at least one transfer has
been done for that package.
1. Transfer from Accounts Payable ?
This question appears if you are using A/P. Answer Y if you want to get checks from
A/P; otherwise, answer N.
Computer checks that have been printed and posted, and non-A/P checks and
hand-written checks that have been posted, will be transferred.
"Void" checks will be transferred. See the A/P User Manual chapter titled Void Checks.
No unposted checks will be transferred.
Bank Reconciliation
Samco Power Accounting
Transfer Checks/Deposits
9.2
2. Transfer from Payroll ?
This question appears if you are using Canadian Payroll. Answer Y if you want to get
checks from Payroll; otherwise, answer N.
Payroll checks that have been printed and posted, and hand-written checks that have
been posted, will be transferred.
No un-posted checks will be transferred.
3. Transfer from Accounts Receivable ?
This question appears only if you are using A/R. Answer Y if you want to get deposits
from A/R; otherwise, answer N.
If you are in start-up mode (per the Control File), all deposits prior to the cut-off date
(described below) will be transferred.
If you are not in start-up mode, only deposits for which a deposit slip has been
printed will be transferred. See the A/R User Manual chapter titled Cash History for
information on deposit slips.
Show deposit detail ?
This question appears only if you selected to transfer deposits from A/R.
Each deposit consists of one or more cash receipts. Answer Y to show the individual
cash receipts on the transfer report.
4. Transfer from FishPro ?
This question appears if you are using FishPro. Answer Y if you want to get checks
from FishPro; otherwise, answer N.
Checks that have been printed and posted, and hand-written checks that have been
posted, will be transferred.
No un-posted checks will be transferred.
5. Transfer from Point of Sale ?
This question appears only if you are using Point of Sale. Answer Y if you want to get
deposits from Point of Sale; otherwise, answer N.
Transfer options allow you to select one or all stores, and whether or not to
consolidate registers. Consolidating registers will combine all entries (by cash type)
into a single deposit.
Bank Reconciliation
Samco Power Accounting
Transfer Checks/Deposits
9.3
The values entered in Point of Sale » Tickets » Close drawer, not the individual
transactions themselves, are used for interfacing with Bank Reconciliation.
6. Check for entries earlier than the last transfer date ?
This question appears only if earlier transfers were done.
You can greatly speed up the transfer process if you answer N to this question. If all
the checks and deposits you have entered and posted in the other packages since your
last transfer have dates after the last transfer date, answer N. If you are unsure,
answer Y.
When you answer N, the software completely skips looking for un-transferred checks
and deposits with dates earlier than the last transfer date. If you did a transfer, then
posted a check in A/P (for example), dated earlier than the last transfer date, then
this check would not get transferred. In this case, you must answer Y to ensure that
such checks and deposits do get transferred.
Next enter the cut-off date. Only entries having dates on or before this date will be
transferred. You may use the option:
Option:
[F1]
to use "Latest" (no cut-off date)
If an entry was already transferred, it won't be transferred a second time.
When you are done, the entries are transferred automatically. If the Control File
specified to print a Transfer Register, it then prints.
____________________
Bank Reconciliation
Samco Power Accounting
Transfer Checks/Deposits
9.4
Chapter 10
Bankbook Entries
Introduction
Use this selection to make bankbook entries or print a list of them.
If you are not using any other packages, use this selection to enter all your bank
account activity.
If you are using the Accounts Payable, FishPro, Payroll, Point of Sale and/or Accounts
Receivable packages, you can also use this selection to change or delete entries
transferred to the Bank Reconciliation package from these other packages. You now
have the ability to enter manual bank transactions (interest, service charges, etc.)
built right into Bankbook entries, this new ability allows you to enter transactions into
B/R and then interface them with the G/L.
Instructions for using this selection to transfer funds between bankbooks are included
at the end of this chapter.
To Begin
Select Bankbook entries from the B/R menu, then select Enter.
Making Bankbook Entries
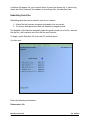
This is the screen you see:
Bank Reconciliation
Samco Power Accounting
Bank Book Entries
10.1
New and Existing Entries
From this screen you can work with both new and existing bankbook entries.
Enter the information as follows:
? * 1. Bank acct
For a new entry
Enter the number of the bank account or use one of the options:
Options:
[F2]
to scan through the bank accounts on file
[Enter]
to use the bank account previously entered, if any
Bank Reconciliation
Samco Power Accounting
Bank Book Entries
10.2
For an existing entry
To bring up a specific bankbook entry, enter the bank account, date, type, and
document number of the entry you want, or use the option:
Option:
[F1]
to scan through the entries on file
[F2]
to scan through the bank accounts on file
If the entry was transferred from Accounts Payable, FishPro, Payroll, Point of Sale or
Accounts Receivable, "A/P", "PR", "FP", “BR” or "A/R" displays for "SOURCE".
If the entry was made directly in Bankbook entries, "Direct Entry" displays for
"SOURCE".
If Bank Reconciliation is being used stand-alone, "SOURCE" does not appear.
* 2. Date
Enter the date for the entry or use one of the options:
Options:
[F1]
to scan through all entries (in date order) for the specific
bank account entered above in field 1.
[Enter]
to default to the last date entered, or (for the first entry)
to the current date
Format: MMDDYY
* 3. Type
Enter the type of entry as follows:
B
D
C
A
Balance forward
Deposit
Check
Adjustment
If the previous entry made was a check, you can press [Enter] to default to type C
(Check).
Or use the option:
Option:
[F1]
to scan through all entries for the specific bank account and date
entered. (This may be used to easily locate a particular entry
made on a specific date.)
NOTE: You can make a balance forward entry only when you are in start-up mode.
Bank Reconciliation
Samco Power Accounting
Bank Book Entries
10.3
Format: 1 character
NOTE: For an "adjustment" entry, you must also post the adjustment in General
Ledger (if you are using G/L).
* 4. Document #
For all types except "balance forward"
Enter the document number or use the option:
Option:
[F1]
to scan through documents for the specific bank account, date,
and type entered above
You can press [F2] to use the last document number plus 1. The incrementing of
document number works as follows:
For checks, deposits, and adjustments entered this run, the last document number is
stored for each type.
For subsequent entries, the default number is the last document number for that type
plus 1.
For "balance forward" type
Either an existing entry for the bank account and date is displayed (since only one
such entry per date is allowed per account), or (if no existing entry), the document
number field is skipped, as there may be only one balance forward entry for a bank
account on a particular date.
Format: 999999
5. Amount
Book balance:
The bankbook balance appears on the right.
Enter the amount or use the option:
Option:
[F1]
to scan through all documents for the specific bank account,
date, type, and document number entered. ([F1] is not available
for balance forward documents.)
For a balance forward entry:
Enter the current account balance.
For a check:
Bank Reconciliation
Samco Power Accounting
Bank Book Entries
10.4
If the entry is a check, enter a positive amount. The bankbook balance will be
decreased by this amount.
For a void check:
Entering zero for the check amount causes a void check status to be assigned to the
entry. Field 6, "Payee", is set to "*** Void check ***" and field 7, "Status", is set to
"Void". Fields 6, 7, and 8 are skipped and you are positioned at "Field number to
change ?".
If you enter a non-zero amount, you can mark the check as void in field 7, after
entering payee information in field 6.
For an adjustment:
If an adjustment increases the bankbook balance (for example, Interest Received),
enter a positive amount. If the adjustment reduces the balance (for example, Check
Charges), enter a negative amount.
After you enter the amount, the bankbook balance is adjusted and re-displayed on the
right.
Format: 9,999,999,999.996. Payee, Name, or Comment
For a check:
Enter a payee number, then a name.
Format:
6 characters for payee number
25 characters for payee name
25 characters for comment
For a void check:
The payee number is set to blank.
The payee name is set to "*** Void check ***".
For a balance forward, deposit or adjustment entry:
Enter a comment appropriate to the entry. You can press [Enter] to leave the
comment field blank.
7. Status
Enter the status as follows:
Bank Reconciliation
Samco Power Accounting
Bank Book Entries
10.5
(Blank) or N Not yet cleared
C
Cleared
V
Void
S
Stop-payment
You can enter a status of "C" only in start-up mode.
You can enter a status of "S" for a check only.
If the entry is a balance forward, a status of "C" is automatically displayed and cannot
be changed.
For a void check:
The status is set to "Void" and cannot be changed as long as field 5, "Amount" is zero.
If you want to "un-void" a check, you must reset field 5 to a non-zero amount, then
return here to change its status.
Format: 1 character
8. Account #
Enter the G/L distribution account number.
9. Clear date
For a balance forward entry, the clear date is automatically set to the date of the
entry and cannot be changed. (Balance forward entries are always considered
cleared.)
For other types of entries, this field is automatically skipped unless you entered a
status of "C" (cleared) above, and you are in start-up mode.
Format: MMDDYY
Bankbook Entries Report
Select Print from the Bankbook entries menu.
This is the screen you see:
Bank Reconciliation
Samco Power Accounting
Bank Book Entries
10.6
Enter the information as follows:
?1. Bank account
Enter the number of the bank account you want to print the report for, or use one of
the options:
Options:
[F1]
to scan through the bank accounts on file
[F2]
To print the report for "All" bank accounts
2. Starting date
3. Ending date
Enter the range of dates to show on the report. Follow the screen instructions.
Bank Reconciliation
Samco Power Accounting
Bank Book Entries
10.7
Format: MMDDYY
If you change the status of an entry to "Void" or "Stop-payment", the date that action
was taken will appear in the "CLEAR-DATE" column of the report.
A sample Bankbook Entries Report is shown at the end of this chapter.
Transferring Cash from One Account to Another
This section describes how to transfer cash from one bank account to another. There
are two different situations:
1.
2.
You are using the General Ledger (G/L) package.
You are not using the G/L package.
If you are using the G/L package
From the General Ledger menu, Get Distributions, interface with BR
If you are not using the G/L package
Adjusting the bank accounts
Using Bankbook entries in this package, make two entries:
1.
2.
The check written on the account you are transferring cash FROM.
The deposit of that check into the account you are transferring cash TO.
For clarity in keeping your records, you should deposit ONLY the single check from the
"FROM" account, and not include any other checks or cash in this deposit.
For example, suppose that you are transferring $5,000 from account 1100-000 to
account 1200-000 on December 31, 1999: You would make two entries as follows,
using Bankbook entries:
FROM
TO
Cash acct: 1100-000
Cash acct:
Type
Check
Type:
Date:
12/31/99
Date:
Doc #:
(Check #)
Doc #:
Amount:
5,000
Amount:
Payee:
TRNSFR
Comment:
Payee name: TRANSFER to 1200-000
Bank Reconciliation
Samco Power Accounting
1200-000
Deposit
12/31/99
(Deposit #)
5,000
TFR from 1100-000
Bank Book Entries
10.8
NOTE: We recommend you enter the payee name and comment as above, although
you can enter anything here that you like.
____________________
Bank Reconciliation
Samco Power Accounting
Bank Book Entries
10.9
Chapter 11
View Bank Account Information
Introduction
Use this selection for a quick review of a bank account. You will be able to see:
the reconciliation method of the account
the balance and date of the latest bank statement
the balance on the bank book
the date that bank book entries were last transferred from other packages
the total amounts of entries in other packages that have not been posted or
transferred to the Bank Reconciliation package
From the B/R menu, select Reconcile statements, then select View bank account
information.
If only one bank account is in use and no other packages are interfaced with Bank
Reconciliation, no questions are asked and the information displays automatically.
Otherwise, a screen appears for you to enter the number of the bank account to view.
Enter the information as follows:
? Bank account
You are asked this question only if there is more than one bank account defined.
Enter the number of the bank account or use the option:
Option:
[F1]
to scan through the bank accounts on file
Include unposted/untransferred entries ?
You are asked this question if at least one other package is being used. Enter Y to
include un-posted entries and un-transferred entries.
Bank Reconciliation
Samco Power Accounting
View Bank Account Information
11.1
For the A/P package, this is the total amount of un-posted non-A/P checks and
hand-written checks, plus checks in the Vendor History File not yet transferred to the
Bank Reconciliation package.
For Payroll, this is the total amount of un-posted hand-written payroll entries, plus
checks not yet transferred.
For FishPro, this is the total amount of un-posted checks not yet transferred.
For A/R, this is the total amount of un-posted cash receipts entries, plus deposits in
the Cash History File not yet transferred.
If a reconciliation is in progress for this account, you will be informed of this.
If you selected to include un-posted entries, processing may take some time. If you
wish, you can stop and either exit or resume processing. (See the screen instructions.)
If you use more than one bank account, you can press [Enter] to view the next one.
The following is a sample screen from this function:
Bank Reconciliation
Samco Power Accounting
View Bank Account Information
11.2
Chapter 12
Setting Up for a Reconciliation
Introduction
This chapter describes how to get ready to perform a reconciliation.
Before reconciling, make sure you have entered (or transferred from other packages)
any of these items:
Interest received
Returned customer checks which you have already deposited
Bank charges
Returned vendor checks which have already been posted
Use the appropriate instructions in this chapter before beginning a reconciliation
(next chapter).
Interest Received
If using A/R:
In A/R, enter any interest received as a cash receipt with the bank as the customer.
Enter it as non-A/R cash - it is cash received, but is not a check, and it doesn't reduce
accounts receivable. The credit account is "Interest Earned". Create a separate
deposit slip for it. (You could also enter this through the Bank Reconciliation package
directly, but then you would have to adjust your General Ledger manually.)
If not using A/R:
Enter interest received as an adjustment, using Bankbook entries. You will also have
to adjust your General Ledger accordingly.
Returned Customer Checks
If not using A/P and A/R:
Bank Reconciliation
Samco Power Accounting
Setting Up for a Reconciliation
12.1
Enter an adjustment, using Bankbook entries, for the amount of the returned check
plus any bank charges. You will also need to adjust your General Ledger accordingly.
If using A/P and A/R:
A returned check means that the entries that were previously paid are no longer paid.
The customer's balance must therefore be increased. Instead of reinstating all the
entries previously paid, you can enter the full returned check as a single debit memo,
using Sales of the Accounts Receivable package. Distribute the full amount to a
suspense account.
The next step is to reduce your bank account by the amount of the returned check,
plus any bank charges. The deposit (corresponding to the original cash receipt for the
check) should have already been made to the bank and should already be recorded in
the Bankbook File.
The total charge to your bank account includes the amount of the returned customer
check, plus any bank charges. Enter this total charge as a non-A/P check, using
Payables of the Accounts Payable package. Fill in the fields as follows:
The type of the entry is a non-A/P check.
The vendor is the bank.
The invoice number is a memo field.
The invoice amount is the amount of the returned customer check, plus any
bank charges.
The check number is a dummy number such as 999998 to indicate a returned
check.
The check date is the date on which the check was returned to you.
The distribution is to two valid G/L accounts:
(a) The suspense account (used above in A/R) for the amount of the
check; and
(b) Bank Charges (for the service charge).
When transferred to B/R, this non-A/P check will reduce the bank account balance to
account for both the returned check plus any service charge.
If using A/R but not A/P:
A returned check means that the entries that were previously paid are no longer paid.
The customer's balance must therefore be increased. Instead of reinstating all the
entries previously paid, you can enter the full returned check as a single debit memo,
using Sales of the Accounts Receivable package. Distribute the full amount to the
appropriate cash account.
The next step is to reduce your bank account by the amount of the returned check,
plus any bank charges. The deposit (corresponding to the original cash receipt for the
check) should have already been made to the bank and should already be recorded in
the Bankbook File.
Bank Reconciliation
Samco Power Accounting
Setting Up for a Reconciliation
12.2
Enter an adjustment, using Bankbook entries, for the amount of the returned check
plus any bank charges. You will need to make a General Ledger adjustment for the
amount of the bank charge.
If using A/P but not A/R:
Make a general journal entry as follows for the amount of the returned check:
DR Accounts receivable
CR
Suspense account
This entry is made to show that the customer owes you the amount of the returned
check.
The total charge to your bank account includes the amount of the returned customer
check, plus any bank charges. Enter this total charge as a non-A/P check, using
Payables of the Accounts Payable package. Fill in the fields as follows:
The type of the entry is a non-A/P check.
The vendor is the bank.
The invoice number is a memo field.
The invoice amount is the amount of the returned customer check, plus any
bank charges.
The check number is a dummy number such as 999998 to indicate a returned
check.
The check date is the date on which the check was returned to you.
The distribution is to two valid G/L accounts:
(a)
The suspense account (used above) for the amount of the check;
and
(b)
Bank Charges (for the service charge).
When transferred to B/R, this non-A/P check will reduce the bank account balance to
account for both the returned check plus any service charge.
Checks Returned to Vendors
If A/P is not used:
If a check you wrote to a vendor is returned due to insufficient funds, there is also a
service (penalty) charge. If this check has not already been entered using Bankbook
entries, it would be entered as void at this time. If it has already been entered, then
change the status of the check to "void". Additionally, you must enter an adjustment,
using Bankbook entries, for the service charge. Adjust your General Ledger
accordingly.
If A/P is used:
Bank Reconciliation
Samco Power Accounting
Setting Up for a Reconciliation
12.3
Use Void checks to void the check. See the A/P manual chapter titled Void Checks for
details on how to void checks.
Enter a positive non-A/P check for the amount of the bank charge, with the bank as
vendor, and a dummy check number to indicate that it is a returned check charge.
You must do this in the Accounts Payable package in order for the bank charge to be
properly recorded in G/L.
____________________
Bank Reconciliation
Samco Power Accounting
Setting Up for a Reconciliation
12.4
Chapter 13
Reconcile Statements
Introduction
Use this selection to bring together the bankbook and bank statement information and
either ensure that they match or make them match. This is the "reconciliation"
process - making the bank statement match your bankbook (or vice versa).
Use the appropriate instructions in the chapter titled Setting Up for a Reconciliation
before you use this selection.
If you are in start-up mode in the Control File, you cannot run this selection. To
change from start-up mode, see the chapter titled Starting Up a Bankbook.
Select Reconcile bank and bank book from the Reconcile statements menu.
This is the screen you see:
Bank Reconciliation
Samco Power Accounting
Reconcile Statements
13.1
Enter the information as follows:
?1. Bank account
If only one bank account is in the Bank Accounts File, that account number
automatically displays. Otherwise, enter the number of the bank account, or use the
option:
Option:
[F1]
to scan through the bank accounts on file
The last statement date, last statement balance, and reconciliation method display
for the bank account.
2. This statement date
(If only one bank account is on file, this is field number 1.)
Enter the date of the bank statement. If a reconciliation is already in progress, the
date of the bank statement being reconciled is displayed and cannot be changed.
Format: MMDDYY
Bank Reconciliation
Samco Power Accounting
Reconcile Statements
13.2
3. This statement balance
(If only one bank account is on file, this is field number 2.)
Enter the bank statement balance. If a reconciliation is already in progress, the
statement balance is automatically displayed.
Format: 9,999,999,999.994. Clear in date or check number order ?
(If only one bank account is on file, this is field number 3.)
Options:
Type D to display entries for clearing in date order
Type C to clear them in order by check number
Type M for manual entry of check/document numbers
When selecting manual clearing method a window will appear for you to enter the
check/document number. If the document is valid you can then enter in a new clear
date, and press [Enter] to clear/un-clear.
Bank Reconciliation
Samco Power Accounting
Reconcile Statements
13.3
If a reconciliation is already in progress, the number of entries already cleared, the
dollar amount cleared, and the reconciliation difference, all for the current
reconciliation, are displayed at the bottom of the screen.
The reconciliation difference is the difference between the current and last bank
statement balances, minus the dollar amount cleared. The reconciliation difference
will equal zero when the bank statement is fully reconciled.
On the next screen, you see:
Bank Reconciliation
Samco Power Accounting
Reconcile Statements
13.4
On this screen, you can mark entries as cleared or not cleared.
All entries for the bank account are displayed that either have not yet been cleared
or have a clear date equal to "This statement date" (above).
Move to the last entry on the screen by pressing the [PgUp] key. When you are at the
last entry on the screen, use the [PgDn] key to get the next screen of entries.
Move to the first entry on the screen by pressing the [PgUp] key. When you are at the
first entry on the screen, use the [PgDn] key to get the previous screen of entries.
If an entry has been cleared, a date will display in the "CLR-DATE" (clear date)
column. To unclear it, press [Enter] and the date will be cleared from the screen.
To clear an entry, press [Enter]. The "This statement date" (above) will display for
the clear date.
Before a stop-payment check can be cleared, its status must be changed to "uncleared" in Bankbook entries.
A void check cannot be un-cleared. A balance forward entry cannot be un-cleared.
As you clear and unclear entries, the reconciliation difference is recalculated and
displayed at the top of the screen. When the statement is fully reconciled, this
amount should equal zero.
Press [F1] to show only current entries for this bank account. Press [F1] again to go
back to showing all entries for this bank account, no matter what their clear dates.
When you are through clearing and un-clearing entries, either press [Esc] to end off
without completing the reconciliation, or press [F2] to view the reconciliation
summary. (You must view the reconciliation summary before you can complete the
reconciliation.)
The summary screen appears as follows if the reconciliation method for this account
is "book-to-bank" (the bankbook is being brought into agreement with the bank
statement).
You see:
Bank Reconciliation
Samco Power Accounting
Reconcile Statements
13.5
If the reconciliation method is "bank-to-book" (the bank statement is being brought
into agreement with the bankbook), the summary screen appears as:
Bank Reconciliation
Samco Power Accounting
Reconcile Statements
13.6
Press [F1] to continue clearing entries.
If the reconciliation difference is not zero, press [Tab] to end off. If the reconciliation
difference is zero (and at least one entry has been cleared), press [Tab] to complete
the reconciliation.
____________________
Bank Reconciliation
Samco Power Accounting
Reconcile Statements
13.7
Chapter 14
Reports
Introduction
Select Bank account reports from the B/R menu, then select a report from the menu
which appears.
Reconciliation Report
Select Reconciliation from the Bank account reports menu.
A screen appears for you to enter the bank account for which you want to print the
report. (If only one bank account is on file, this screen does not appear.) You can also
use the option:
Option:
[F1]
to scan through the bank accounts on file
This is the screen you see:
Bank Reconciliation
Samco Power Accounting
Reports
14.1
This report is designed to help you with a reconciliation that is in progress. Further to
a client request, the Reports » Reconciliation function now prints a grand total.
Before this a summary sheet was generated only if the account was being reconciled.
You can print previous reconciliations, as well as cleared and un-cleared entries.
Enter the information as follows:
1. Statement date
Enter the date of the bank statement. You can press [Enter] to default to the date of
the current statement if a reconciliation is in progress; otherwise, [Enter] defaults to
the date of the last statement that has been reconciled.
Format: MMDDYY
2. Show cleared entries this date ?
Answer Y if you want to show entries that have already been cleared on the
reconciliation date; otherwise, answer N.
3. Show uncleared entries ?
Answer Y if you want to show un-cleared entries; otherwise, answer N.
Bank Reconciliation
Samco Power Accounting
Reports
14.2
Cut-off date
If you selected to show un-cleared entries, enter the cut-off date. All un-cleared
entries having dates on or before this date will be shown on the report. You can press
[Enter] to default to the reconciliation date.
Format: MMDDYY
The Reconciliation Report normally has two parts:
1.
The list of bankbook entries.
2.
If a reconciliation is currently in progress, the reconciliation summary shows
the same information as is shown on the reconciliation summary screen of
Reconcile statements.
A sample Reconciliation Report is shown at the end of this chapter.
Bankbook Report
Select Bankbook from the Bank account reports menu.
This report shows bankbook entries in order by date, along with a running balance.
A screen appears for you to enter the bank account for which you want to print the
report. You can also use the option:
Option:
[F1]
to scan through the bank accounts on file
A screen appears for you to enter the following information:
1. Starting date
2. Ending date
Enter the range of dates to show on the report. Follow the screen instructions.
Format: MMDDYY in each field
A sample Bankbook Report is shown at the end of this chapter.
The "Starting balance" is the balance of all entries before the starting date.
Account Activity Report
Select Account activity from the Bank account reports menu.
Bank Reconciliation
Samco Power Accounting
Reports
14.3
This report shows bankbook activity in several different ways. You can look at just
about any cross-section of entries you have in your bank account.
For example, you could print a list of checks written to a specific payee and a list of
which of those checks have cleared. Or you could print a report showing which entries
originated from A/P, Payroll, or A/R, or which entries you entered directly in B/R.
Enter the bank account for which to print the activity report or use the option:
Option:
[F1]
to scan through the bank accounts on file
This is the screen you see:
Enter the information as follows:
Bank Reconciliation
Samco Power Accounting
Reports
14.4
1. Print in what order ?
Enter one of the following (or press [Enter] for date order):
1
2
3
4
Date
Document number
Payee number
Payee name
2. Starting
3. Ending
Enter the range of values to show on the report. The field names (and values to enter)
depend on what order has been entered above, as follows:
Date
Document number
Payee number
Payee name
Starting/Ending
Starting/Ending
Starting/Ending
Starting/Ending
date
document #
payee #
payee name
4. Which entries:
Press [Enter] at each type of entry you want to show on the report and answer N at
those types you don't want to show, or use the option:
Option:
[F1]
to show "All" types of entries
5. Which statuses:
Press [Enter] at each status you want to show and answer N at those types you don't
want to show, or use the option:
Option:
[F1]
To show "All" statuses
6. Which sources:
Press [Enter] at each source you want to show and answer N at those sources you
don't want to show. "(Not applicable)" displays for each package you are not using.
You can also use this option if any packages are interfaced:
Option:
[F1]
to show "All" sources
The entries shown for each source are:
Direct Entry: Shows entries entered directly into the Bank Reconciliation package.
Accounts Payable: Shows checks transferred from A/P.
Payroll: Shows checks transferred from Payroll.
Bank Reconciliation
Samco Power Accounting
Reports
14.5
Accounts Receivable: Shows deposits transferred from A/R.
FishPro: Shows checks transferred from FishPro.
Point of Sale: Shows deposits transferred from Point of Sale.
7. For a single payee ?
This question appears only if you selected to print in date order or document number
order, and you have selected to show checks. If neither A/P, FishPro nor Payroll is
being used, just enter Y or N; otherwise, select one of the following:
N
V
E
D
No (don't show checks for a single payee)
A/P Vendor (show checks from A/P for a single vendor)
PR Employee (show checks from Payroll for a single employee)
Direct Entry (show checks entered directly into the Bank Reconciliation
package for a single payee)
If you are not using A/P, you cannot select a single vendor. If you are not using
Canadian Payroll, you cannot select a single employee.
If you enter V, enter the vendor number (you can enter a vendor that is not on file),
or use one of the options:
Options:
[F1]
to scan through vendors on file
[Enter]
Leave the vendor number blank to look up the vendor by
name
If you enter E, you can select a single employee in the same way.
If you enter D or V, enter the payee number or use the option to look up the payee by
name. Checks having a payee number matching the number you entered, or having a
payee name matching the portion you entered, will be shown.
Format: 1 character
____________________
Bank Reconciliation
Samco Power Accounting
Reports
14.6
Chapter 15
Compress Cleared Entries
Introduction
Use this selection to compress cleared entries.
The only time entries can actually be removed ("purged") from the Bankbook File is
when you are in start-up mode, per the Control File.
During regular use, you can remove cleared entries using this selection.
When compression is done, all cleared entries in one unbroken sequence are added
together and made into one "balance forward" entry and then the original entries are
deleted. Compression is a way of reducing the number of entries in the Bankbook File.
If you are in start-up mode per the Control File, you will not be able to run this
selection. To get out of start-up mode, see the chapter titled Starting Up a Bankbook.
To Begin
Select Compress cleared entries from the B/R menu.
This is the screen you see:
Bank Reconciliation
Samco Power Accounting
Compress Cleared Entries
15.1
Enter the information as follows:
1. Bank account
Enter the bank account or use the option:
Option:
[F1]
to scan through the bank accounts on file
2. Cut-off clear date
Enter the cut-off date. Entries with clear dates on or before this date will be
compressed.
You cannot compress entries that are part of an active reconciliation. If a
reconciliation is in progress, you see a message telling you this, with the date of the
current bank statement. You cannot enter a cut-off date on or later than this date.
Format: MMDDYY
Bank Reconciliation
Samco Power Accounting
Compress Cleared Entries
15.2
3. Print report ?
Answer Y if you want to print a Compress Cleared Entries Report as the entries are
being compressed; otherwise, press [Enter].
This is your last opportunity to print bankbook entries as they currently exist. After
the compression, the detail will be lost and the compressed entries will exist in
summary (balance forward) form only.
The program now looks through all entries in the bank account, compressing cleared
entries with clear dates on or before the cut-off date into balance forward entries. In
order to be compressed, entries must be in an unbroken sequence (at least two
entries). Entries are compressed up to the point where the sequence is broken (an uncleared entry or an entry with a clear date after the cut-off date is encountered).
The cleared entries in that sequence are then deleted and a balance forward entry is
created. The date of the balance forward record is the date of the last cleared entry
in that sequence. The total of the balance forward entry is the sum of the cleared
sequence.
The next unbroken sequence of cleared entries is then found and compressed into
another balance forward entry.
If a void entry occurs in the middle of a sequence (group) of cleared entries that are
being compressed, the void entry is deleted. Any void entry dated on or before the
date of the last bank statement is also deleted.
The Compress Cleared Entries Report prints as entries are being compressed.
A sample Compress Cleared Entries Report is included at the end of this chapter.
____________________
Bank Reconciliation
Samco Power Accounting
Compress Cleared Entries
15.3
Chapter 16
Close Bank Account
Introduction
Use this selection to purge from the files a bank account which you have closed.
A bank account may be closed under these conditions:
1.
No reconciliation is in progress.
2.
The current bankbook balance and last statement balance are both zero.
3.
All entries on file for the account are either cleared, void, or "stop payment".
4.
The sum of the non-void entries on file is zero.
5.
There are no un-transferred checks or deposits in A/P, Payroll, FishPro, or A/R.
6.
There are no "modify" transactions on file in A/P (to pay a check manually).
7.
There are no un-posted manual Payroll adjustment entries.
NOTE: Before closing a bank account, you should print the Bankbook Report and
Account Activity Report to get final printed versions of information regarding the
bankbook before all traces of it are purged.
To Begin
Select Close bank accounts from the 2nd page of the B/R menu.
This is the screen you see:
Bank Reconciliation
Samco Power Accounting
Close Bank Account
16.1
Enter the information as follows:
? Please select bank account
Enter the bank account to close.
Option:
[F1]
to scan through the bank accounts on file
To purge this bank account from the files, answer Y to "Are you sure ?". If all of the
conditions for closing a bank account are met, as described at the beginning of this
chapter, then the bank account is purged from the files.
____________________
Bank Reconciliation
Samco Power Accounting
Close Bank Account
16.2
Chapter 17
Reset Bank Accounts
Introduction
The purpose of this selection is to allow you to reset the bankbook balance, last
statement date, and last statement amount.
You will probably never need to use this selection. However, if the Bank Accounts File
is inadvertently destroyed (for example, initialized by mistake), you will need to use
this selection to reset the above information, which is stored in that file.
Follow this sequence to reset bank accounts:
1.
Using Control information, put B/R in "start-up" mode.
2.
If a reconciliation was in progress for a bank account you plan to reset, set
each
bankbook entry already marked as "cleared" (for this reconciliation only) back
to "uncleared" status. Use Bankbook entries to do this.
3.
Obtain your last bank statement for each bankbook and note down the
statement date and the balance.
(If you have not yet used B/R to reconcile a bankbook, the last statement date and
balance would be the ones which were displayed by the software after you ran
Set-up: set last balance.)
4.
Use Reset bank accounts to reset each bank account, by entering the bank
account, last statement date, and last statement balance for each.
5.
When you exit from Reset bank accounts, you will be asked if it is OK to return
to regular use of B/R. Answer Y and B/R will return to "regular use" mode.
To Begin
Bank Reconciliation
Samco Power Accounting
Close Bank Account
17.1
Select Reset bank accounts from the B/R menu.
This is the screen you see:
Please enter:
1. Banking account
2. Last stmt date
3. Last stmt balance
F1 = next banking account
Enter the information as follows:
? 1. Bank account
Enter the bank account to reset or use the option:
Option:
[F1]
to scan through the bank accounts on file
2. Last stmt date
Enter the date of the last statement reconciled for this bank account.
Bank Reconciliation
Samco Power Accounting
Close Bank Account
17.2
Format: MMDDYY
3. Last stmt balance
Enter the balance of the last statement reconciled for this bank account.
Format: 999,999,999,999.99
When you press [Enter] at "Field number to change ?", the bank account will be reset.
After a period of processing, the software will indicate that the reset is complete.
Press [Tab], and you will be returned to the screen shown above to enter the
information for another bank account to reset.
To exit, press [Tab] at field 1. You are asked if it is OK to return to regular use of
B/R. Answer Y and B/R will return to "regular use" mode.
____________________
Bank Reconciliation
Samco Power Accounting
Close Bank Account
17.3
Chapter 18
Data Integrity Check
Introduction
This selection verifies the accuracy of the information in your files.
You should be sure that no one else is using your software when you run this check, so
that the results will be valid.
While transactions are being processed, their amounts are added together and the
totals are saved. These totals represent the "calculated" balance of the information
that should be in the data files.
When Data integrity check is run, the "actual" amount of information in the data files
is totalled, and the "actual" and "calculated" amounts are compared on a data
integrity report.
The "actual" and "calculated" amounts should always be equal. A difference between
the two indicates that an unexpected error has occurred.
Such errors could include:
Hardware failures
Turning off or rebooting the machine while processing is still going on. (Never
do this intentionally.)
Power surges due to electrical storms or other causes.
Because this report shows differences between the actual and calculated amounts,
you can locate errors by referring to edit lists and registers run since the data
integrity check was last run.
If a difference is noted between the actual and calculated amounts, you will be asked
if you want to reset the calculated amount to match the actual amount. If you answer
Bank Reconciliation
Samco Power Accounting
Data Integrity Check
18.1
Y, the calculated amount will then be set equal to the actual amount. This does not
mean the problem is fixed, only that the amounts are now equal.
To Begin
Select Data integrity check from page 2 of the B/R menu.
A sample of this report follows at the end of this chapter.
If any of the calculated values do not match the actual, you see a message saying so
and are asked if you want to reset the calculated values.
________________________
Bank Reconciliation
Samco Power Accounting
Data Integrity Check
18.2
Appendix "A"
Initializing Data Files
Introduction
"Initialize" means to create a new data file. When you initialize a data file which
already exists, any information in it is completely erased, and the file is newly
created.
This function allows you to initialize one or more data files. You probably won't need
to initialize data files very often, if ever. But this function is included just in case.
If you suspect you have a "corrupted" (fouled up) data file, don't initialize it without
first checking with your supplier and attempting other recovery actions (see the
appendix titled File Utilities at the end of this manual for information on rebuilding
corrupted data files).
CAUTION
DON'T USE THIS FUNCTION UNLESS YOU REALLY WANT TO INITIALIZE A DATA FILE. ANY DATA FILE
INITIALIZED WILL HAVE ITS INFORMATION COMPLETELY ERASED.
To Begin
Log into your Samco top-level directory and type BRINIT.
NOTE: If you are running under Xenix/Unix/HPUX/AIX or a similar operating system
and are logged on as root / super user, replace the above command with ./BRINIT
Enter the company ID you wish to initialize Bank Reconciliation data files for.
You will then see a screen similar to this:
Bank Reconciliation
Samco Power Accounting
Initializing Data Files
A.1
B/R Init
Please enter for each file:
Init ?
1.
2.
3.
4.
5.
Cash accounts file
B/R account file
B/R notes file
B/R control file
Bankbook file
Answer Y for each file you want to initialize, N to not initialize a file.
A brief description of each data file is shown below:
Cash Accounts file
This file contains all the G/L accounts which you have designated as cash accounts in
Cash accounts. It is shared by the A/R and A/P packages.
B/R Account file
This file contains the bank accounts maintained in Bank Reconciliation.
B/R Notes file
This file contains the notes you entered for your bank accounts.
B/R Control file
Contained within this file are parameters that define your bank reconciliation
structure.
Bankbook file
This file includes all bankbook items, including checks, deposits, adjustments, and
balance forward entries.
____________________
Bank Reconciliation
Samco Power Accounting
Initializing Data Files
A.2
Appendix "B"
File Utilities
Introduction
This function will allow you to:
•
"Recover" the data files that have become corrupted (fouled up).
•
Recover disk space by rebuilding data files with purged or deleted records that
are still taking up space.
•
Export your data into a format that can be used by many popular spreadsheet,
word processing and data base programs.
Corrupted data files
Data file corruption does not occur very often, but you do need to be aware of it just
in case one of your data files does become corrupted. This can occur for only a
handful of reasons. The most common being:
1.
2.
The power to your computer gets turned off when you are using your Samco
applications.
Your hard disk has developed a defect.
Corrupted data files can't be used reliably afterward, and any attempt to use them
causes unusual error messages and you are removed from running the Samco
applications.
If this occurs, or if you begin to get unusual results while using your software and
suspect that there may be a corrupted data file, you should get technical support.
Bank Reconciliation
Samco Power Accounting
File Utilities
B.1
Your supplier or an independent professional may be able to provide this support. If
not, contact Samco Software Inc.'s support department directly (there will be a fee).
Handling
Data file corruption does not mean that all of the data in the file is no longer usable.
Usually, just a few of the records in the file have become corrupted.
In File utilities, the function Rebuild a file will take out the good records in the data
file, place these in a temporary file, and then replace the old file with the good
records. In addition to this, any deleted or purged records which are taking up disk
space will also be permanently removed and the file compressed to its physical size.
To Begin
Select File utilities from the second page of the B/R main menu.
Export a file
This function is used to export data files from the internal format to a "flat" ASCII file.
The data file(s) is read in and an output file is created in the Samco root directory
with the name "xxxxxxnn.EXP". Where 'xxxxxx' is the file name, and where 'nn' is the
company number the file came from. (If you are running under Unix you will also have
the option of appending a drive designation to the front of the file.) To begin, select
Export a file from the File utilities sub-menu. A screen similar to the one below will
appear:
Bank Reconciliation
Samco Power Accounting
File Utilities
B.2
Enter the following data:
Please select file
Enter the number, from the list provided, of the file to be converted to ASCII format,
or use one of the options:
Options:
[F1]
To export "All" files.
[F2]
To view additional files available for converting.
Please enter device for converted file
Enter the drive letter of the device that the ASCII version of the data file will be
written to, or use the option:
Option:
[F1]
If you either (a) do not want to append a drive letter prefix to the
file name (Unix only), or (b) want the file created on your hard
Bank Reconciliation
Samco Power Accounting
File Utilities
B.3
drive.
For UNIX/XENIX users
The drive letter entered here will be attached to the front of the file name. The
letter A is recommended for consistency. The ASCII backup file name in the Samco
root directory will read A:xxxxxxnn.EXP.
Alternatively, if you do not want to add a drive letter, press [F1] for "none".
Please enter the device size in kilobytes
Enter the size of the disk the ASCII files are to be written to.
The following table shows some of the more common device sizes in kilobytes:
[F1]
Unlimited, Hard disk drive
If you enter a specific device size, once the disk is filled you will then be asked for
another diskette. This process will be repeated until all the data is written to the
disk.
The screen will then prompt you "Any change ?". Enter Y and all the entries that you
have made will be cleared and you will be returned to the "Please select file" prompt.
Press [Enter] to accept the default of N.
NOTE: If you choose to convert "All" files, the screen will move immediately into
displaying the file and record being backed up. It skips past the "(C) CREATE NEW
CONVERTED FILE OR (A) ADD RECORDS TO EXISTING CONVERTED FILE", "STARTING FILE
KEY", and "ENDING FILE KEY" prompts
The following screen will be displayed only if you did not select "All" files at the
"Please select file" prompt:
Bank Reconciliation
Samco Power Accounting
File Utilities
B.4
Enter the following data:
1. Starting file key
2. Ending file key
Enter the starting and ending file keys for the data file selected for conversion, or
press [F1] for "First" and "Last". Up to 37 alphanumeric characters may be entered.
Unless you know the exact key for the records in the data file it is recommended that
you press [F1].
When you have completed all entries the following prompt will appear:
(C) create new export file or (A) add records to existing export file
Enter C to create a new export file and over-write any pre-existing ASCII export for
this data file, or enter A to add the records selected for conversion to any preexisting ASCII export file on the device specified.
After selecting which type of file to create, the screen then clears and the ASCII file
name is displayed along with a counter of the number of records exported.
If you had selected "All" at the "Please select file", it is assumed that you wish to
create a new converted file. After the "Any change ?" prompt, the screen clears and
the ASCII file name is displayed along with a counter of the number of records
exported for all files.
Bank Reconciliation
Samco Power Accounting
File Utilities
B.5
The Export a file menu reappears after the file, or files, selected have been exported
so that you may choose another file.
After you have completed running the convert routine, press [Tab] at the "Please
select file" prompt. A window will appear for you to select how to print the export
log.
Restore an exported file
This function is used to restore one of more of the listed data files from the "flat"
ASCII file format to the internal format. The exported file is read in and an output file
is created in the company sub-directory with the name "xxxxxx.DAT". Where xxxxxx"
is the file name.
From the File utilities menu select Restore an exported file.
You see:
Bank Reconciliation
Samco Power Accounting
File Utilities
B.6
Enter the following information:
Please select file
Enter the file number, from the list provided, of the file to be restored from an ASCII
export format, or use the option:
Option:
[F1]
to restore "All" exported files.
Please enter device for exported file
Enter the drive letter of the device that the ASCII version of the data file will be read
from, or use the option:
Option:
[F1]
If you either (a) did not append a drive letter prefix to the file
name (Unix only), or (b) the file(s) reside on your computer's
default hard drive.
For UNIX/XENIX users
This is the drive letter attached to the front of the file name. For example, if the file
to restore is A:xxxxxxnn.EXP, you would enter A here. If no designation is at the
beginning of the file press [F1] for "none".
(C) Create New Data File Or (A) Add Records To existing Data File
If you answer C (Create new file), all of the existing data records in the original file
will be destroyed, and the data records contained in the converted file will be
transferred to the original file.
If you answer A (Add records to file), all of the existing records in the original file will
remain, and the data records contained in the converted file will be added to the
original file.
The following message will display:
"This function will now initialize the data file used in production. Its contents will
be fully replaced with data from the converted file. Please make sure you want to
do this. Are you sure?"
Answer Y or N, as appropriate.
The file(s) will now be restored. A message will be displayed on the screen, showing
the count of the records as they are restored. When the restoration of the file or files
is complete the 'Restore a converted file' menu will be displayed.
You may select another file to restore. You may continue to restore files or press
[Tab] to print the restore log and then return to the File Utilities sub-menu.
Bank Reconciliation
Samco Power Accounting
File Utilities
B.7
A window will appear for you to select where to print the restore log. A restore log
shows the file(s) restored, the number of records per file, the date and time.
Rebuilding Data Files
Rebuilding data files can be used for one of two reasons:
1. A data file has become corrupted and needs to be recovered.
2. To recover disk space and clean out deleted or purged records.
The Rebuild a file function essentially takes the good records out of a file, removes
the old file, and creates a new file with the good records.
To begin, select Rebuild a file from the File utilities menu.
You then see:
Enter the following information:
Please select file
Bank Reconciliation
Samco Power Accounting
File Utilities
B.8
Enter the number of the file you wish to rebuild, or use the option:
Option:
[F1]
to rebuild "All" of the data files.
A new screen will appear showing the status of each file as it is being rebuilt. Once
completed, you are returned to the Rebuild a file screen.
____________________
Bank Reconciliation
Samco Power Accounting
File Utilities
B.9