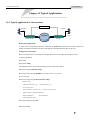
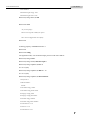
1
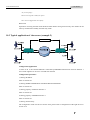
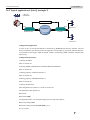
www.raisecom.com RC959-4FE16E1 Configuration Guide Legal Notices Raisecom Technology Co., Ltd makes no warranty of any kind with regard to this manual, including, but not limited to, the implied warranties of merchantability and fitness for a particular purpose. Raisecom Technology Co., Ltd shall not be held liable for errors contained herein or direct, indirect, special, incidental or consequential damages in connection with the furnishing, performance, or use of this material. Warranty. A copy of the specific warranty terms applicable to your Raisecom product and replacement parts can be obtained from Service Office. Restricted Rights Legend. All rights are reserved. No part of this document may be photocopied, reproduced, or translated to another language without the prior written consent of Raisecom Technology Co., Ltd. The information contained in this document is subject to change without notice. Copyright Notices. Copyright ©2007 Raisecom. All rights reserved. No part of this publication may be excerpted, reproduced, translated or utilized in any form or by any means, electronic or mechanical, including photocopying and microfilm, without permission in Writing from Raisecom Technology Co., Ltd. Trademark Notices is the trademark of Raisecom Technology Co., Ltd. Java™ is a U.S. trademark of Sun Microsystems, Inc. Microsoft® is a U.S. registered trademark of Microsoft Corporation. Windows NT® is a U.S. registered trademark of Microsoft Corporation. Windows® 2000 is a U.S. registered trademark of Microsoft Corporation. Windows® XP is a U.S. registered trademark of Microsoft Corporation. Windows® and MS Windows® are U.S. registered trademarks of Microsoft Corporation. Contact Information Technical Assistance Center The Raisecom TAC is available to all customers who need technical assistance with a Raisecom product, technology, or, solution. You can communicate with us through the following methods: Address: 2nd Floor, South Building of Rainbow Plaza, No.11 Shangdi Information Road, Haidian District, Beijing, China 100085 Tel: +86-10-82883305 Fax: +86-10-82883056 World Wide Web You can access the most current Raisecom product information on the World Wide Web at the following URL: http://www.raisecom.com Feedback Comments and questions about how the RC959-4FE16E1 device works are welcomed. Please review the FAQ in the related manual, and if your question is not covered, send email by using the following web page: http://www.raisecom.com/en/xcontactus/contactus.htm. If you have comments on the RC959-4FE16E1 specification, instead of the web page above, please send comments to: [email protected] We hope to hear from you! www.raisecom.com User Manual CONTENTS CONTENTS 1 Release Notes------------------------------------------------------------------------------------------------- 3 Chapter 1 System Overview -------------------------------------------------------------------------- 6 Chapter 2 How to Use the Command Line------------------------------------------------------- 7 2.1 Software and hardware environment ---------------------------------------------------------------------------------7 2.2 Command line mode--------------------------------------------------------------------------------------------------------7 2.3 Getting help--------------------------------------------------------------------------------------------------------------------8 2.4 Displaying historical commands ---------------------------------------------------------------------------------------9 2.5 Properties of editing --------------------------------------------------------------------------------------------------------9 Chapter 3 System Command Configuration ---------------------------------------------------10 3.1 Basic system commands and configurations ------------------------------------------------------------------- 10 3.2 The management of configuration file and startup file ------------------------------------------------------- 10 3.2.1 Configuration file ------------------------------------------------------------------------------------------------------------------------- 10 3.2.2 System file --------------------------------------------------------------------------------------------------------------------------------- 10 3.3 User management --------------------------------------------------------------------------------------------------------- 10 Chapter 4 E1 Interface Configuration ------------------------------------------------------------12 4.1 Set the E1 interface BERT switch ------------------------------------------------------------------------------------ 12 4.2 Clear E1 performance statistic ---------------------------------------------------------------------------------------- 12 4.3 Set E1 interface loop back mode------------------------------------------------------------------------------------- 13 4.4 Open/shutdown E1 interface------------------------------------------------------------------------------------------- 13 4.5 Monitor and maintenance of E1 interface ------------------------------------------------------------------------- 14 Chapter 5 Ethernet Interface Configuration --------------------------------------------------16 5.1 Open the interface--------------------------------------------------------------------------------------------------------- 16 5.2 Shutdown the interface -------------------------------------------------------------------------------------------------- 16 5.3 Set Auto-Negotiation function----------------------------------------------------------------------------------------- 17 5.4 Set the rate and duplex mode ----------------------------------------------------------------------------------------- 18 5.5 Set the flow control function ------------------------------------------------------------------------------------------ 18 5.6 Clear statistic function setting ---------------------------------------------------------------------------------------- 19 5.7 Auto-MDI function setting ---------------------------------------------------------------------------------------------- 19 5.8 Laser auto-shutdown function ---------------------------------------------------------------------------------------- 20 5.9 Set the maximal frame length ----------------------------------------------------------------------------------------- 20 5.10 Monitor and maintenance of Ethernet interface --------------------------------------------------------------- 21 Chapter 6 SFP Interface Configuration ----------------------------------------------------------23 6.1 Laser transmission enable/disable ---------------------------------------------------------------------------------- 23 6.2 Monitor and maintenance of SFP interface ----------------------------------------------------------------------- 23 Chapter 7 EOPDH Interface Configuration -----------------------------------------------------25 7.1 Add e1 ------------------------------------------------------------------------------------------------------------------------- 25 7.2 Delete e1 ---------------------------------------------------------------------------------------------------------------------- 25 7.3 Clear performance statistic -------------------------------------------------------------------------------------------- 26 7.4 Set CSF mode--------------------------------------------------------------------------------------------------------------- 26 7.5 Set FCS mode--------------------------------------------------------------------------------------------------------------- 27 7.6 Set LCAS mode------------------------------------------------------------------------------------------------------------- 27 7.7 Monitor and maintenance of EOPIF interface-------------------------------------------------------------------- 28 Chapter 8 Transmission mode Configuration -----------------------------------------------------30 8.1 Forward mode configuration ------------------------------------------------------------------------------------------ 30 8.2 Set outside tag-------------------------------------------------------------------------------------------------------------- 31 8.3 Add forward entry rule in vlan-unaware mode ------------------------------------------------------------------ 31 8.4 Add forward entry rule in vlan-aware mode ---------------------------------------------------------------------- 32 8.5 Add forward entry rule in Q-in-Q mode ---------------------------------------------------------------------------- 33 8.6 Delete forward entry rule------------------------------------------------------------------------------------------------ 34 8.7 Monitor and maintenance of the forward mode configuration--------------------------------------------- 35 Chapter 9 Network Protocol Configuration --------------------------------------------------------37 1 www.raisecom.com User Manual 9.1 ARP configuration --------------------------------------------------------------------------------------------------------- 37 9.1.1 Add ARP ------------------------------------------------------------------------------------------------------------------------------------ 37 9.1.2 Delete ARP -------------------------------------------------------------------------------------------------------------------------------- 37 9.2 Route configuration------------------------------------------------------------------------------------------------------- 38 9.2.1 Add a route -------------------------------------------------------------------------------------------------------------------------------- 38 9.2.2 Deleted a route --------------------------------------------------------------------------------------------------------------------------- 39 9.3 SNMP configuration ------------------------------------------------------------------------------------------------------ 39 9.3.1 Configure a SNMP server community ---------------------------------------------------------------------------------------------- 40 9.3.2 Configure a SNMP trap server-------------------------------------------------------------------------------------------------------- 40 9.3.3 Delete a SNMP trap server ------------------------------------------------------------------------------------------------------------ 40 9.3.4 Enable SNMP task----------------------------------------------------------------------------------------------------------------------- 41 9.3.5 Disable SNMP task ---------------------------------------------------------------------------------------------------------------------- 41 9.3.6 Configure interface IP address of SNMP------------------------------------------------------------------------------------------- 41 9.4 Device status and configuration-------------------------------------------------------------------------------------- 42 Chapter 10 Typical Applications -----------------------------------------------------------------------44 10.1 Typical application of vlan-unaware------------------------------------------------------------------------------- 44 10.2 Typical application of vlan-aware (example 1) ----------------------------------------------------------------- 50 10.3 Typical application of vlan-aware (example 2) ----------------------------------------------------------------- 52 10.4 Typical application of Q-in-Q (example 1) ----------------------------------------------------------------------- 53 10.5 Typical application of Q-in-Q (example 2) ----------------------------------------------------------------------- 55 2 www.raisecom.com User Manual Release Notes Date of Release Manual Version Software Version Revisions 20080423 200803 1.0.0 First draft 3 www.raisecom.com User Manual Preface Version Software version: 1.0.0 About This Manual This document is for technicians who have the professional knowledge of configuring RC959-4FE16E1 device. It introduces the principle and features of the function modules of RC959-4FE16E1 device and gives the configuration guides of these modules. Relevant manuals 《RC959-4FE16E1 User Manual》 《RC959-4FE16E1 Commands Notebook》 《RC959-4FE16E1 Configuration Guide》 《RC959-4FE16E1 EMS User Manual》 This document is《RC959-4FE16E1 Configuration Guide》. Organization The manual is composed of the following 10 chapters: Chapter 1 Overview This chapter briefly summarizes the function features of the RC959-4FE16E1 devices. Chapter 2 How to Use the Command Lines This chapter introduces the method of configuring RC959-4FE16E1 using command lines. Chapter 3 System Command Configuration This chapter introduces the function and configuration method of RC959-4FE16E1 system commands. Chapter 4 E1 Interface Configuration The chapter introduces the configuring method and commands line of the E1 interface on the device. Chapter 5 Ethernet Interface Configuration The chapter introduces the configuring method and commands line of the Ethernet interface on the device. 4 www.raisecom.com User Manual Chapter 6 SFP Interface Configuration The chapter introduces the configuring method and commands line of the SFP interface on the device. Chapter 7 EOPDH Configuration The chapter introduces the configuring method and commands line of the EOPDH interface on the device. Chapter 8 Transfer Commands Configuration This chapter introduces how to configure the transfer commands on the device. Chapter 9 Network Protocol Configuration This chapter introduces the network protocol function and how to configure it. Chapter 10 Typical Applications 5 www.raisecom.com User Manual Chapter 1 System Overview The RC959-4FE16E1 device is a new independence developed device of Raisecom which maps Ethernet frame to 16xE1/T1/J1. By the RS232 serial interface and network management interface to log on SNMP software, users can configure and manage RC959-4FE16E1 and on line upgrade is available. This type of device is in support of below features: ¾ ¾ ¾ ¾ ¾ Support protocol converter from Ethernet to E1; 16 inverse multiplex channels are available; In support of LCAS function of virtual concatenation group; GFP encapsulation format; 802.1Q and double tag are available. 6 www.raisecom.com User Manual Chapter 2 How to Use the Command Line 2.1 Software and hardware environment Hardware environment: RC959-4FE16E1 device platform PC serial port Software environment: WIN98/WIN2000/WINDOWS XP 2.2 Command line mode User EXEC mode Using the command enable under the user EXEC mode, users can enter the privileged EXEC mode. Privileged EXEC mode Using the command disable under the privileged EXEC mode, users can return to the user EXEC mode. Using the command config under the privileged EXEC mode, users can enter the config mode. Config mode Using the command exit under the config mode, users can return to the privileged EXEC mode. Using the command interface snmp under the config mode, users can enter the interface snmp mode. Interface snmp mode Using the command exit under the interface snmp mode, users can return to the config mode. Using the command slot 0 under the config mode, users can enter the slot mode. Slot mode Using the command exit under the slot mode, users can return to the config mode. Using the command interface e1 under the slot mode or remote mode, users can enter the interface e1 mode. Interface e1 mode Using the command exit under the interface e1 mode, users can return to the slot mode or remote mode. Interface eth mode Using the command interface eth under the slot mode or remote mode, users can enter the interface eth mode. Using the command exit under the interface eth mode, users can 7 www.raisecom.com User Manual return to the slot mode or remote mode. Using the command interface fx-eth under the slot mode or remote mode, users can enter the interface fx-eth mode. Interface fx-eth mode Using the command exit under the interface fx-eth mode, users can return to the slot mode or remote mode. Using the command interface sfp fx-eth under the slot mode or remote mode, users can enter the interface sfp mode. Interface sfp mode Using the command exit under the interface sfp mode, users can return to the slot mode or remote mode. Using the command interface eopif under the slot mode or remote mode, users can enter the interface eopif mode. Interface eopif mode Using the command exit under the interface eopif mode, users can return to the slot mode or remote mode. Using the command remote 0 <1-16> under the config mode, users can enter the remote mode. Remote mode Using the command exit under the remote mode, users can return to the config mode. 2.3 Getting help Command help abbreviated-command-entry ? Function Description Obtaining a brief description (in Chinese or English) from the help system. Obtaining a list of commands that begin with a specified string (abbreviated-command-entry): Example: Iscom> en? Enable Supplementing an unfinished command line. Example: abbreviated-command-entry<Tab> Iscom #show ver<TAB> Iscom #show version List all commands of the current mode. ? Example: Iscom #? command ? List all keywords and optional items for a specified 8 www.raisecom.com User Manual command line and give brief help information of the command line. Example: Iscom #show ? 2.4 Displaying historical commands By default, 20 pieces of historical commands will be temporarily saved in the buffer of the system. Users can set up the number of historical commands to be saved using the command line: raisecom# terminal history <0-20> Users can also user the command history to display all historical commands. 2.5 Properties of editing ¾ ¾ ¾ ¾ ¾ ¾ ¾ ¾ ¾ ¾ ¾ <up arrow>: the command last entered <down arrow>: the command entered next <left arrow>: move left by a character <right arrow>: move right by a character <Backspace>: delete the character before the cursor <CTRL+d>:delete the character after the cursor <CTRL+a>: move the cursor to the head of the row <CTRL+e>: move the cursor to the tail of the row <CTRL+k>: delete all the characters after the cursor <CTRL+x>: delete all the characters left to the cursor <CTRL+z>: quit the current unprivileged user mode and enter Privileged EXEC mode. 9 www.raisecom.com User Manual Chapter 3 System Command Configuration 3.1 Basic system commands and configurations clear Clear the information on the screen. list List all commands of the current mode. 3.2 The management of configuration file and startup file 3.2.1 Configuration file ¾ ¾ ¾ The name of the default configuration file of the current system is: “startup_config.conf”; The configuration file can be written into the flash file system using the command write. When restart the system, the configuration information written in the system will be configured automatically. User can use the command erase to delete the configuration file. 3.2.2 System file ¾ ¾ ¾ ¾ Same as program file. The name of the program file of the current system is: “RC959-4FE16E1.Z”; Program file can be downloaded to the system via FTP/TFTP protocols using the command download and can also be uploaded to the server via TFTP/FTP protocols; Command dir can be used to view files in flash file system; The version information of the program file will be shown using the command show version. 3.3 User management Default user name: raisecom Default password: raisecom To add a new user in the privileged EXEC mode, please follow the steps in the table below: Step Command Description USERNAME: the user name 1 user USERNAME password PASSWORD Password: keyword of the user password PASSWORD: password information USERNAME: the user name 2 user USERNAME privilege <1-15> Privilege: keyword of privilege <1-15>: user privilege 3 write Save the configuration information 10 www.raisecom.com User Manual 4 show user Show user information 11 www.raisecom.com User Manual Chapter 4 E1 Interface Configuration Configurations of E1 interface function: Set the E1 interface BERT switch (bert (enable|disable)) Clear E1 performance statistic (clear statistic) Set E1 interface loop back (e1-loopback (internal|external)) mode Open/shutdown E1 interface ([no] shutdown) Monitor and maintenance of E1 interface 4.1 Set the E1 interface BERT switch Steps Commands Description 1 config Enter global configuration mode 2 slot 0 Enter slot mode 3 interface e1 <1-16> Enter E1 interface configuration mode 4 bert (enable|disable) Set E1 interface BERT switch 5 show interface Show interface configuration Raisecom# config Configuration mode, one conmmand input per time. End with CTRL-Z. Raisecom(config)# slot 0 Raisecom(config-slot/0)# interface e1 1 Raisecom(config-e1/0/1)# bert enable Set successfully Raisecom(config-e1/0/1)# 4.2 Clear E1 performance statistic Steps Commands Description 1 config Enter global configuration mode 2 slot 0 Enter slot mode 3 interface e1 <1-16> Enter E1 interface configuration mode 4 clear statistic Clear E1 interface performance statistic 12 www.raisecom.com User Manual 5 Show interface configuration show interface This command can only clear the current statistic data, the history statistic data won’t be cleared by this command. Raisecom# config Configuration mode, one conmmand input per time. End with CTRL-Z. Raisecom(config)# slot 0 Raisecom(config-slot/0)# interface e1 1 Raisecom(config-e1/0/1)# clear statistic Set successfully Raisecom(config-e1/0/1)# 4.3 Set E1 interface loop back mode Steps Commands Description 1 config Enter global configuration mode 2 slot 0 Enter slot mode 3 interface e1 <1-16> Enter E1 interface configuration mode 4 e1-loopback (internal|external) 5 Configure the loop back mode of E1 interface show interface Show interface configuration E1 interface can be configured to internal loop back or external loop back. Use the command of no e1-loopback can cancel loop back of E1 interface. Raisecom# config Configuration mode, one conmmand input per time. End with CTRL-Z. Raisecom(config)# slot 0 Raisecom(config-slot/0)# interface e1 1 Raisecom(config-e1/0/1)# e1-loopback external Set successfully Raisecom(config-e1/0/1)# 4.4 Open/shutdown E1 interface Steps 1 Commands config Description Enter global configuration mode 13 www.raisecom.com User Manual 2 slot 0 Enter slot mode 3 interface e1 <1-16> Enter E1 interface configuration mode 4 [no] shutdown 5 show interface Open or shutdown E1 interface Show interface configuration All interfaces are open by default. Raisecom# config Configuration mode, one conmmand input per time. End with CTRL-Z. Raisecom(config)# slot 0 Raisecom(config-slot/0)# interface e1 1 Raisecom(config-e1/0/1)# shutdown Set successfully Raisecom(config-e1/0/1)# 4.5 Monitor and maintenance of E1 interface Use the command of show interface under interface e1 mode can view E1 current status and configuration. Raisecom(config-e1/0/1)# show interface Interface ID: 1 Interface Descr: slot0-e1-1 PortSendcode: e1NRZ Interface type: balance LoopbackConfig config: no Loopback LoopbackConfig status: no Loopback Alarm mask config: none Alarm mask status: LOMF CRCER Frame mode config: framed Frame mode status: framed PCM mode config: PCM31 PCM mode status: PCM31 LineStatus: LOS LOF Bert config: disable Bert status: disable Raisecom(config-e1/0/1)# Use the command of show statistic in interface e1 mode can show current statistic data of E1 14 www.raisecom.com User Manual interface. Raisecom(config-e1/0/1)# show statistic Interface ID :1 Descr :slot0-e1-1 Error Seconds :0 Severe Error Seconds :0 Unavailable Seconds :0 Raisecom(config-e1/0/1)# 15 www.raisecom.com User Manual Chapter 5 Ethernet Interface Configuration Open the interface ([no] shutdown) Shutdown the interface (shutdown) Set Auto-Negotiation function ([no] autonegotiate) Set the rate and duplex mode (speed (10|100) duplex (full-duplex|half-duplex)) Set the flow control function (flow-control (on|off)) Clear statistic function setting (clear statistic) Auto-MDI function setting ([ no ] automdi) Laser auto-shutdown function (als ( enable | disable )) Set the maximal frame length (max-frame-length <64-12000>) Monitor and maintenance of Ethernet interface 5.1 Open the interface All interfaces are enabled by default. Users need to configure the interface enable or disable for some certain purpose to shutdown physical interface. Steps Commands 1 config Enter global configuration mode 2 slot 0 Enter slot mode interface e1 <1-3> Enter eth configuration mode or interface fx-eth 1 fx-eth configuration mode 4 [no] shutdown Open or shutdown E1 interface 5 show interface Show interface configuration 3 Description Raisecom# config Configuration mode, one conmmand input per time. End with CTRL-Z. Raisecom(config)# slot 0 Raisecom(config-slot/0)# interface fx-eth 1 Raisecom(config-fx-eth/0/1)# no shutdown Set successfully Raisecom(config-fx-eth/0/1)# 5.2 Shutdown the interface Steps Commands Description 1 config Enter global configuration mode 2 slot 0 Enter slot mode 16 www.raisecom.com User Manual interface eth <1-3> Enter eth configuration mode or interface fx-eth 1 fx-eth configuration mode 4 shutdown Shutdown Ethernet interface 5 show interface Show interface configuration 3 Raisecom# Raisecom# config Configuration mode, one conmmand input per time. End with CTRL-Z. Raisecom(config)# slot 0 Raisecom(config-slot/0)# interface eth 1 Raisecom(config-eth/0/1)# shutdown Set successfully Raisecom(config-eth/0/1)# 5.3 Set Auto-Negotiation function The rate and duplex can not be configured in Auto-Negotiation mode. All interfaces are Auto-Negotiation by default. Steps Commands Description 1 config Enter global configuration mode 2 slot 0 Enter slot mode 3 interface eth <1-3> Enter eth configuration mode 4 autonegotiate Set Auto-Negotiation for Ethernet interface 5 show interface Show interface configuration Use no autonegotiate command can shutdown Auto-Negotiation function. Set Auto-Negotiation: Raisecom# Raisecom# config Configuration mode, one conmmand input per time. End with CTRL-Z. Raisecom(config)# slot 0 Raisecom(config-slot/0)# interface eth 1 Raisecom(config-eth/0/1)# autonegotiate Set successfully Raisecom(config-eth/0/1)# 17 www.raisecom.com User Manual 5.4 Set the rate and duplex mode Steps Commands Description 1 config Enter global configuration mode 2 slot 0 Enter slot mode 3 interface eth <1-3> Enter eth configuration mode 4 speed (10|100) duplex (full-duplex|half-duplex) Set working rate and duplex mode for Ethernet interface 5 show interface Show interface configuration This command can be used to configure rate and duplex mode for Ethernet interface in condition that Auto-Negotiation function disable. Raisecom# Raisecom# config Configuration mode, one conmmand input per time. End with CTRL-Z. Raisecom(config)# slot 0 Raisecom(config-slot/0)# interface eth 1 Raisecom(config-eth/0/1)# speed 100 duplex full-duplex Set successfully Raisecom(config-eth/0/1)# 5.5 Set the flow control function The flow status of receiving and transmitting direction of the interface is controlled at the same time, that means, flow control enable/disable of the two directions at the same time. Flow control enable by default. Steps Commands 1 config Enter global configuration mode 2 slot 0 Enter slot mode 3 Description interface eth <1-3>, interface fx-eth 1 Enter eth configuration mode or fx-eth configuration mode 4 flow-control (on|off) Set flow control mode 5 show interface Show interface configuration Raisecom# Raisecom# config Configuration mode, one conmmand input per time. End with CTRL-Z. Raisecom(config)# slot 0 Raisecom(config-slot/0)# interface eth 1 Raisecom(config-eth/0/1)# flow-control on Set successfully 18 www.raisecom.com User Manual Raisecom(config-eth/0/1)# 5.6 Clear statistic function setting Steps Commands 1 config Enter global configuration mode 2 slot 0 Enter slot mode 3 Description interface eth <1-3>, interface fx-eth 1 Enter eth configuration mode or fx-eth configuration mode 4 clear statistic Clear the statistic of the interface counter 5 show interface Show interface configuration Raisecom# Raisecom# config Configuration mode, one conmmand input per time. End with CTRL-Z. Raisecom(config)# slot 0 Raisecom(config-slot/0)# interface eth 1 Raisecom(config-eth/0/1)# clear statistic Set successfully Raisecom(config-eth/0/1)# 5.7 Auto-MDI function setting Auto-MDIX function can make Ethernet interface Auto-sensing pin arrangement of network cable. This function is disabled by default. Steps Commands Description 1 config Enter global configuration mode 2 slot 0 Enter slot mode 3 interface eth <1-3> Enter eth configuration mode 4 [ no ] automdi Set Auto-MDIX function for Ethernet interface 5 show interface Show interface configuration Raisecom# Raisecom# config Configuration mode, one conmmand input per time. End with CTRL-Z. Raisecom(config)# slot 0 Raisecom(config-slot/0)# interface eth 1 Raisecom(config-eth/0/1)# automdi Set successfully Raisecom(config-eth/0/1)# 19 www.raisecom.com User Manual 5.8 Laser auto-shutdown function ALS enable by default. When laser transmission is disabled, ALS is not available and if ALS function enable, this command will shutdown TX when there is RXLOS after enabling laser transmission function, and the TX will be turned on when RXLOS disappears. Steps Commands Description 1 config Enter global configuration mode 2 slot 0 Enter slot mode 3 interface fx-eth 1 Enter fx-eth configuration mode 4 als (enable | disable) Set laser auto-shutdown function for optical interface 5 show interface Show interface configuration Raisecom# config Configuration mode, one conmmand input per time. End with CTRL-Z. Raisecom(config)# slot 0 Raisecom(config-slot/0)# interface fx-eth 1 Raisecom(config-fx-eth/0/1)# als enable Set successfully Raisecom(config-fx-eth/0/1)# 5.9 Set the maximal frame length Steps Commands 1 config Enter global configuration mode 2 slot 0 Enter slot mode 3 Description interface eth <1-3>, interface fx-eth 1 Enter eth configuration mode or fx-eth configuration mode 4 max-frame-length <64-12000> Set the maximal frame length for optical interface 5 show interface Show interface configuration Raisecom# Raisecom# config Configuration mode, one conmmand input per time. End with CTRL-Z. Raisecom(config)# slot 0 Raisecom(config-slot/0)# interface eth 1 Raisecom(config-eth/0/1)# max-frame-length 1916 Set successfully Raisecom(config-eth/0/1)# 20 www.raisecom.com User Manual 5.10 Monitor and maintenance of Ethernet interface Use the command of show interface in interface eth configuration mode can view current status and configuration of Ethernet interface: Raisecom(config-eth/0/1)# show interface Interface ID :1 Descr :Slot 0 eth interface 1 Interface type :electrical Port enable(command) :enable Port enable status :enable AutoMdi config :enable AutoMdi status :enable Link status :cross Autonego config :enable Autonego status :enable Autonego work status :success Duplex config :full-duplex Duplex config status :half-duplex Duplex status :half-duplex Speed config :100M Speed config status :10M Speed status :10M Flow control config:on Flow control status:on Link :linkdown MaxFrameLength config :1916 MaxFrameLength status :1916 Use the command show interface in interface fx-eth configuration mode can view current status and configuration of optical interface: Raisecom(config-fx-eth/0/1)# show interface Interface ID :1 Descr :Slot 0 fx-eth interface 1 Interface type :optical Port enable(command) :enable Port enable status :enable Flow control config:on Flow control status:on 21 www.raisecom.com User Manual Tlink :linkdown Rlink :linkup Als config:enable Als status:enable MaxFrameLength config :1916 MaxFrameLength status :1916 Use the command of show statistic in interface eth and interface fx-eth configuration mode can show current statistic data of the electrical or optical interface: Raisecom(config-fx-eth/0/1)# show statistic Interface ID :1 Descr :Slot 0 fx-eth interface 1 OutOctets :0 OutUcastPkts :0 OutDiscards :0 OutErrors :0 OutBroadcastPkts :0 OutMulticastPkts :0 InOctets :0 InUcastPkts :0 InDiscards :0 InErrors :0 InBroadcastPkts :0 InMulticastPkts :0 22 www.raisecom.com User Manual Chapter 6 SFP Interface Configuration Laser transmission enable/disable Monitor and maintenance of SFP interface 6.1 Laser transmission enable/disable SFP transmission enable by default. Steps Commands Description 1 config Enter global configuration mode 2 slot 0 Enter slot mode 3 interface fx-eth 1 Enter SFP interface configuration mode 4 sfp-switch (on | off) Enable/disable SFP transmission function 5 show interface Show interface configuration Raisecom# config Configuration mode, one conmmand input per time. End with CTRL-Z. Raisecom(config)# slot 0 Raisecom(config-slot/0)# interface sfp fx-eth 1 Raisecom(config-sfp-fx-eth/0/1)# sfp-switch on setup successfully! Raisecom(config-sfp-fx-eth/0/1)# 6.2 Monitor and maintenance of SFP interface Use the command of show interface in interface sfp fx-eth mode can view current status and configuration of SFP interface. Raisecom(config-sfp-fx-eth/0/1)# show interface Sfp Exist :exist Sfp Tx status :enable Sfp Rx :LOS Laser Tx :Fault Media type :fiber_9_125 Module type :sfp Optical Interface :LC Rated speed :1250M Transmit distance :30 km 23 www.raisecom.com User Manual Wave length :1310 nm Product Type :RTXM191C Version :000 Water Mask :I020152 24 www.raisecom.com User Manual Chapter 7 EOPDH Interface Configuration Add e1 (add e1 {1-16}) Delete e1 (delete e1 {1-16}) Clear performance statistic (clear statistic) Set CSF mode (csf (enable|disable)) Set FCS mode (gfp-fcs (enable|disable)) Set LCAS mode (lcas (on|off)) Monitor and maintenance of EOPIF interface 7.1 Add e1 Add an assigned e1 to EOPDH interface as one member of the interface. Steps Commands Description 1 config Enter global configuration mode 2 slot 0 Enter slot mode 3 interface eopif 1 Enter EOPIF configuration mode 4 add e1 {1-16} Add e1 5 show interface Show interface configuration Raisecom# Raisecom# config Configuration mode, one conmmand input per time. End with CTRL-Z. Raisecom(config)# slot 0 Raisecom(config-slot/0)# interface eopif 1 Raisecom(config-eopdh/0/1)# add e1 1-16 Set successfully Raisecom(config-eopdh/0/1)# 7.2 Delete e1 Delete an assigned e1 member from EOPDH interface. Steps Commands Description 1 config Enter global configuration mode 2 slot 0 Enter slot mode 3 interface eopif 1 Enter EOPIF configuration mode 4 delete e1 {1-16} Delete e1 25 www.raisecom.com User Manual 5 Show interface configuration show interface Raisecom# Raisecom# config Configuration mode, one conmmand input per time. End with CTRL-Z. Raisecom(config)# slot 0 Raisecom(config-slot/0)# interface eopif 1 Raisecom(config-eopdh/0/1)# delete e1 1-16 Set successfully Raisecom(config-eopdh/0/1)# 7.3 Clear performance statistic Steps Commands Description 1 config Enter global configuration mode 2 slot 0 Enter slot mode 3 interface eopif 1 Enter EOPIF configuration mode 4 clear statistic Clear performance statistic 5 show interface Show interface configuration Raisecom# Raisecom# config Configuration mode, one conmmand input per time. End with CTRL-Z. Raisecom(config)# slot 0 Raisecom(config-slot/0)# interface eopif 1 Raisecom(config-eopdh/0/1)# clear statistic Set successfully Raisecom(config-eopdh/0/1)# 7.4 Set CSF mode Steps Commands Description 1 config Enter global configuration mode 2 slot 0 Enter slot mode 3 interface eopif 1 Enter EOPIF configuration mode 4 csf (enable|disable) Set CSF mode 5 show interface Show interface configuration Raisecom# 26 www.raisecom.com User Manual Raisecom# config Configuration mode, one conmmand input per time. End with CTRL-Z. Raisecom(config)# slot 0 Raisecom(config-slot/0)# interface eopif 1 Raisecom(config-eopdh/0/1)# csf enable Set successfully Raisecom(config-eopdh/0/1)# 7.5 Set FCS mode Steps Commands Description 1 config Enter global configuration mode 2 slot 0 Enter slot mode 3 interface eopif 1 Enter EOPIF configuration mode 4 gfp-fcs (enable|disable) Set FCS mode 5 show interface Show interface configuration Raisecom# Raisecom# config Configuration mode, one conmmand input per time. End with CTRL-Z. Raisecom(config)# slot 0 Raisecom(config-slot/0)# interface eopif 1 Raisecom(config-eopdh/0/1)#gfp-fcs enable Set successfully Raisecom(config-eopdh/0/1)# 7.6 Set LCAS mode Steps Commands Description 1 config Enter global configuration mode 2 slot 0 Enter slot mode 3 interface eopif 1 Enter EOPIF configuration mode 4 lcas (on|off) Set LCAS mode 5 show interface Show interface configuration Raisecom# Raisecom# config Configuration mode, one conmmand input per time. End with CTRL-Z. 27 www.raisecom.com User Manual Raisecom(config)# slot 0 Raisecom(config-slot/0)# interface eopif 1 Raisecom(config-eopdh/0/1)# lcas on Set successfully Raisecom(config-eopdh/0/1)# 7.7 Monitor and maintenance of EOPIF interface Use the command of show interface in interface EOPIF mode can view current status and configuration of EOPIF interface. Raisecom(config-eopdh/0/1)# show interface Interface ID :1 VCG ErrorStatus : Normal LCAS mode config :enable LCAS mode config status:disable Encapstype config :GFP Encapstype config status:GFP FCS mode config :FCS FCS mode config status:NOFCS Provisioned size rx:16 Actual size rx:16 Provisioned size tx:16 Actual size tx:16 CSF config :enable CSF config status :disable Member Info : Config Status Rx Tx Error 1 1 FAIL OK LOM 2 2 FAIL OK LOM 3 3 FAIL OK LOM 4 4 FAIL OK LOM 5 5 FAIL OK LOM 6 6 FAIL OK LOM 7 7 FAIL OK LOM 8 8 FAIL OK LOM 9 9 FAIL OK LOM 10 10 FAIL OK LOM 28 www.raisecom.com User Manual 11 11 FAIL OK LOM 12 12 FAIL OK LOM 13 13 FAIL OK LOM 14 14 FAIL OK LOM 15 15 FAIL OK LOM 16 16 FAIL OK LOM Use the command show statistic in interface EOPIF mode can show current statistic data of the interface. Raisecom(config-eopdh/0/1)# show statistic Interface ID :1 Rx user bytes:0 Rx user frames:0 Rx ctrl&mgmt frames:0 Tx user bytes:0 Tx user frames:0 Tx ctrl&mgmt frames:0 cHec error frames:0 tHes error frames:0 FCS error frames:0 Type header mismatch frames:0 Exceed max PDU frames:0 29 www.raisecom.com User Manual Chapter 8 Transmission mode Configuration Forward mode configuration Set outside tag Add forward entry rule in vlan-unaware mode Add forward entry rule in vlan-aware mode Add forward entry rule in Q-in-Q mode Delete forward entry rule Monitor and maintenance of the forward mode configuration 8.1 Forward mode configuration RC959-4FE16E1 device must work in one of the below three forward modes: ¾ Vlan-unaware mode This is a transparent transmission mode from single point to single point for transmitting Ethernet service to EOPDH interface. No matter Ethernet service flow of users is tag or untage message, data flow can transmit by the device without any change. ¾ Vlan-aware mode In this mode, TPID 0x8100 tag will be recognized and transmitted as vlan in tag from Ethernet interface to EOPDH interface, it can also make tag or unpack tag for the transmitting message. ¾ Q-in-Q mode This mode is very similar with vlan-aware mode, but the recognized TPID of tag can be set. Forward entry rule in different mode is not always the same, clear the history rules in the device before configure again to avoid of different meanings. Steps Commands Description 1 config Enter global configuration mode 2 slot 0 Enter slot mode 3 forward-mode Configure forward mode (vlan-unaware|vlan-aware|q-in-q) 4 show interface Show interface configuration Raisecom# Raisecom# config Configuration mode, one conmmand input per time. End with CTRL-Z. Raisecom(config)# slot 0 Raisecom(config-slot/0)# forward-mode vlan-unaware Set successfully Raisecom(config-slot/0)# 30 www.raisecom.com User Manual 8.2 Set outside tag Users can configure TPID of all recognized tag in Q-in-Q forward mode. This function is usually used to pack tag or unpack tag for outside tag message in actual application. This command is only available in Q-in-Q forward mode, in any other forward mode when users execute this command, system will show “set unsuccessfully”. Steps Commands Description 1 config Enter global configuration mode 2 slot 0 Enter slot mode 3 double-tagging tpid HHHH 4 show forward Configure outside tag Show interface configuration Raisecom# Raisecom# config Configuration mode, one conmmand input per time. End with CTRL-Z. Raisecom(config)# slot 0 Raisecom(config-slot/0)# forward-mode q-in-q Set successfully Raisecom(config-slot/0)# double-tagging tpid 0x9100 Set successfully Raisecom(config-slot/0)# 8.3 Add forward entry rule in vlan-unaware mode Users just need to assign the in let interface and out let interface for configuring forward entry rule in vlan-unaware mode. Be noted that forward rule is unidirection, so users need configure two rules to ensure bidirectional message can forward normally. Steps Commands Description 1 config Enter global configuration mode 2 slot 0 Enter slot mode 3 forward-entry eth <1-4> to vcg <1-16> Add forward rule from Ethernet interface to EOPDH interface 4 forward-entry vcg <1-16> to eth <1-4> Add forward rule from EOPDH interface to Ethernet interface 5 show forward Show interface configuration Configure forward rule in vlan-unaware mode to make message transparent transmitting between Ethernet interface 1 and EOPDH interface 1. Raisecom# Raisecom# config Configuration mode, one conmmand input per time. End with CTRL-Z. 31 www.raisecom.com User Manual Raisecom(config)# slot 0 Raisecom(config-slot/0)# forward-mode vlan-unaware Set successfully Raisecom(config-slot/0)# forward-entry eth 1 to vcg 1 Set successfully Raisecom(config-slot/0)# forward-entry vcg 1 to eth 1 Set successfully Raisecom(config-slot/0)# 8.4 Add forward entry rule in vlan-aware mode Forward rules configured in vlan-aware mode is complex, besides assigning in let interface and out let interface, users have to assign tag filter condition and processing operations for message to transmit. The forward rule is unidirection, users have to configuration at least two rules to ensure bidirectional message can be transmitted normally. Steps Commands Description 1 config Enter global configuration mode 2 slot 0 Enter slot mode 3 forward-entry (tagged| untagged) eth <1-4> to vcg <1-16> [pri <0-7>] vlanid <1-4095> (tag|untag) Add forward rule from Ethernet interface to EOPDH interface 4 forward-entry (tagged| untagged) vcg <1-16> to eth <1-4> [pri <0-7>] vlanid <1-4095> (tag|untag) Add forward rule from EOPDH interface to Ethernet interface 5 show forward Show interface configuration Explanations of parameters in the above table: (tagged|untagged): filter conditions for messages enter the in let interface, receive tag or untag message, discard the message fall short of conditions. [pri <0-7>]: process the forwarded messages. Assign privilege parameter for tag if the forward message from out let interface is tag. Default to be 0. vlanid <1-4095>: this parameter is a filter condition when forwarding tag, it indicates the permitted forward tag vlanid, those messages fall short of conditions will be discarded. When forwarding untag message, this is a parameter for processing message, it indicates the added tag vlanid if need to pack tag for untag message. (tag|untag): this parameter is for processing forwarded message. It indicates the type of message from out let interface is tag or untag. Unpack or pack tag process may need to do with the message. Configure forward rule in vlan-aware mode to make message of vlan 101 be forwarded between Ethernet interface 1 and EOPDH interface 1. Ethernet interface 1 receives tag and untag message, transmits tag message; EOPDH interface 1 receives and transmits tag message. 32 www.raisecom.com User Manual Raisecom# Raisecom# config Configuration mode, one conmmand input per time. End with CTRL-Z. Raisecom(config)# slot 0 Raisecom(config-slot/0)# forward-mode vlan-aware Set successfully Raisecom(config-slot/0)# forward-entry untagged eth 1 to vcg 1 vlanid 101 tag Set Successfully. Raisecom(config-slot/0)# forward-entry tagged eth 1 to vcg 1 vlanid 101 tag Set Successfully. Raisecom(config-slot/0)# forward-entry tagged vcg 1 to eth 1 vlanid 101 tag Set Successfully. Raisecom(config-slot/0)# 8.5 Add forward entry rule in Q-in-Q mode Forward entry rule configuration in Q-in-Q mode is almost the same as in vlan-aware mode, but the operations of recognizing tag and process of tag are according to out side tag of TPID configured in section 8.2. Steps Commands Description 1 config Enter global configuration mode 2 slot 0 Enter slot mode 3 forward-entry (tagged| untagged) eth <1-4> to vcg <1-16> [pri <0-7>] vlanid <1-4095> (tag|untag) Add forward rule from Ethernet interface to EOPDH interface 4 forward-entry (tagged| untagged) vcg <1-16> to eth <1-4> [pri <0-7>] vlanid <1-4095> (tag|untag) Add forward rule from EOPDH interface to Ethernet interface 5 show forward Show interface configuration Configuration forward entry rule in Q-in-Q mode makes message from Ethernet interface 1 to EOPDH interface 1 will be marked with TPID of 0x9100 vlanid for out side tag is 101, the relevant out side tag will be released when forward from EOPDH interface 1 to Ethernet interface 1. Raisecom# Raisecom# config Configuration mode, one conmmand input per time. End with CTRL-Z. Raisecom(config)# slot 0 Raisecom(config-slot/0)# forward-mode q-in-q Set successfully 33 www.raisecom.com User Manual Raisecom(config-slot/0)# double-tagging tpid 0x9100 Set successfully Raisecom(config-slot/0)# forward-entry untagged eth 1 to vcg 1 vlanid 101 tag Set Successfully. Raisecom(config-slot/0)# forward-entry tagged eth 1 to vcg 1 vlanid 101 tag Set Successfully. Raisecom(config-slot/0)# forward-entry tagged vcg 1 to eth 1 vlanid 101 tag Set Successfully. Raisecom(config-slot/0)# 8.6 Delete forward entry rule Users can delete rules according to index or according to interface number. When deleting according to interface number, there is no differentiate in direction, that is, assign one pair of interface as Ethernet interface a and EOPDH interface b, system will delete all rules from a to b and from b to a. Steps Commands 1 config Enter global configuration mode 2 slot 0 Enter slot mode 3 Description no forward-entry index {1-32} Delete forward rule no forward-entry eth <1-4> vcg <1-16> 4 show forward Show interface configuration Raisecom# Raisecom# config Configuration mode, one conmmand input per time. End with CTRL-Z. Raisecom(config)# slot 0 Raisecom(config-slot/0)# show forward Config Info: Forward Mode:vlan-unaware Index eth vcg Direction -------------------------------------------------------------------------1 1 1 eth->vcg 2 1 1 vcg->eth Running Info: Forward Mode:vlan-unaware Index eth vcg Direction -------------------------------------------------------------------------34 www.raisecom.com User Manual 1 1 1 eth->vcg 2 1 1 vcg->eth Raisecom(config-slot/0)# show forward Config Info: Forward Mode:vlan-unaware Index eth vcg Direction -------------------------------------------------------------------------- Running Info: Forward Mode:vlan-unaware Index eth vcg Direction -------------------------------------------------------------------------- Raisecom(config-slot/0)# 8.7 Monitor and maintenance of the forward mode configuration Use the command of show forward in slot mode can view all forward configuration at present: Raisecom(config-slot/0)# show forward Config Info: Forward Mode:vlan-unaware Index eth vcg Direction -------------------------------------------------------------------------1 2 2 eth->vcg 2 1 1 vcg->eth 3 1 1 eth->vcg 4 2 2 vcg->eth Running Info: Forward Mode:vlan-unaware Index eth vcg Direction -------------------------------------------------------------------------1 2 2 eth->vcg 2 1 1 vcg->eth 3 1 1 eth->vcg 4 2 2 vcg->eth Users can also view bidirectional forward rules between specified Ethernet interface and EOPDH interface as the below example shows: 35 www.raisecom.com User Manual Raisecom(config-slot/0)# show forward-entry eth 1 vcg 1 Config Info: Forward Mode:vlan-unaware Index eth vcg Direction -------------------------------------------------------------------------2 1 1 vcg->eth 3 1 1 eth->vcg Running Info: Forward Mode:vlan-unaware Index eth vcg Direction -------------------------------------------------------------------------2 1 3 1 1 vcg->eth 1 eth->vcg 36 www.raisecom.com User Manual Chapter 9 Network Protocol Configuration ARP configuration Route configuration SNMP configuration Device status and configuration 9.1 ARP configuration ¾ ¾ Add ARP Delete ARP 9.1.1 Add ARP Steps Commands 1 config Enter global configuration mode 2 arp add A.B.C.D MACADDRESS Configure IP address map to physical address 3 Description Delete forward rule show arp Raisecom #config Raisecom (config)# arp add 192.168.4.28 00:00:01:02:03:04 Successfully add an entry to ARP table Raisecom (config)# show arp LINK LEVEL ARP TABLE destination mac-addr flags(0x)Rfc Use Interface -------------------------------------------------------------------------192.168.4.28 00:00:01:02:03:04 2200c05 0 0 lo0 -------------------------------------------------------------------------Raisecom (config)# 9.1.2 Delete ARP Steps Commands Description 1 config Enter global configuration mode 2 arp add A.B.C.D Configure IP address map to physical address 3 show arp Delete forward rule Raisecom #config Raisecom (config)# arp delete 192.168.4.28 Successfully delete an entry from ARP table 37 www.raisecom.com User Manual Raisecom (config)# show arp LINK LEVEL ARP TABLE destination mac-addr flags(0x)Rfc Use Interface --------------------------------------------------------------------------------------------------------------------------------------------------- Raisecom (config)# 9.2 Route configuration ¾ ¾ Add a route Delete a route 9.2.1 Add a route Steps Commands 1 config Description Enter global configuration mode Add a route. A.B.C.D : The first parameter is sub-net of destination network or host IP, it is in decimal format. 2 ip route A.B.C.D A.B.C.D A.B.C.D A.B.C.D: The second parameter is sub-net of destination network or sub-net mask of host IP, it is in decimal format. A.B.C.D: The third parameter is gateway IP, it is in decimal format. 3 Delete route information Show ip route Raisecom #config Raisecom (config)# ip route 192.168.6.0 255.255.255.0 192.168.4.28 Successfully add a route Raisecom (config)# show ip route ROUTE NET TABLE destination gateway flags(0x)Rfc Use pro Interface ---------------------------------------------------------------------------192.168.4.0/24 192.168.4.28 2010101 0 0 1 motfec0 192.168.5.0/24 192.168.5.20 2000101 0 0 2 motfek0 192.168.6.0/24 192.168.4.28 2010101 0 0 1 motfec0 ---------------------------------------------------------------------------ROUTE HOST TABLE destination gateway flags(0x)Rfc Use pro Interface ---------------------------------------------------------------------------38 www.raisecom.com User Manual 127.0.0.1 127.0.0.1 2200005 0 0 2 lo0 ---------------------------------------------------------------------------- Raisecom (config)# 9.2.2 Deleted a route Steps Commands 1 config Description Enter global configuration mode Add a route. 2 ip route A.B.C.D A.B.C.D A.B.C.D : The first parameter is sub-net of destination network or host IP, it is in decimal format. A.B.C.D: The second parameter is sub-net of destination network or sub-net mask of host IP, it is in decimal format. 3 Delete route information Show ip route Raisecom #config Raisecom (config)# no ip route 192.168.6.0 255.255.255.0 Successfully delete a route Raisecom (config)# show ip route ROUTE NET TABLE destination gateway flags(0x)Rfc Use pro Interface ---------------------------------------------------------------------------192.168.4.0/24 192.168.4.28 2010101 0 0 1 motfec0 192.168.5.0/24 192.168.5.20 2000101 0 0 2 motfek0 ---------------------------------------------------------------------------ROUTE HOST TABLE destination gateway flags(0x)Rfc Use pro Interface ---------------------------------------------------------------------------127.0.0.1 127.0.0.1 2200005 0 0 2 lo0 ---------------------------------------------------------------------------- Raisecom (config)# 9.3 SNMP configuration ¾ ¾ ¾ ¾ ¾ ¾ Configure a SNMP server community Configure a SNMP trap server Delete a SNMP trap server Enable SNMP task Disable SNMP task Configure interface IP address of SNMP 39 www.raisecom.com User Manual 9.3.1 Configure a SNMP server community Steps Commands 1 2 config Snmp-server community COMMUNITY (ro|rw) 3 show snmp-server community Description Enter global configuration mode Configure read only community and write community Show SNMP configuration information Raisecom #config Raisecom (config)# snmp-server community public ro Set successfully Raisecom (config)# show snmp-server community 9.3.2 Configure a SNMP trap server Steps Commands config 1. snmp trap-server A.B.C.D [<1-65535>] 2. show snmp trap-server Description Enter global configuration mode Set SNMP trap MANAGER. A.B.C.D: IP address of trap manager; [<1-65535>]: trap manager alarm receiving port Show SNMP configuration information Raisecom #config Raisecom (config)# snmp trap-server 192.168.1.1 162 Set successfully Raisecom (config)# show snmp trap-server 9.3.3 Delete a SNMP trap server Steps Commands Description 1 config Enter global configuration mode 2 snmp trap-server A.B.C.D Delete TRAP MANAGER 3 show snmp Show SNMP configuration information Raisecom #config Raisecom (config)# no snmp trap-server 192.168.1.1 Set successfully Raisecom (config)# show snmp trap-server 40 www.raisecom.com User Manual 9.3.4 Enable SNMP task Steps Commands Description 1 config Enter global configuration mode 2 snmpd Enable SNMP task Raisecom #config Raisecom (config)# snmpd Set successfully Raisecom (config)# 9.3.5 Disable SNMP task Steps Commands Description 1 config Enter global configuration mode 2 no snmpd Disable SNMP task Raisecom #config Raisecom (config)# no snmpd Set successfully Raisecom (config)# 9.3.6 Configure interface IP address of SNMP Steps Commands 1 config 2 interface snmp 3 4 ip address A.B.C.D [A.B.C.D] show interface snmp Description Enter global configuration mode Enter local SNMP configuration mode of RC959-4FE16E1 Modify IP and mask. A.B.C.D: set IP address; [A.B.C.D]: set IP mask, can leave be default Show interface SNMP configuration information Raisecom# config Configuration mode, one conmmand input per time. End with CTRL-Z. Raisecom(config)# interface snmp Raisecom (config-snmp)# ip address 192.168.4.29 255.255.255.0 Set successfully Raisecom (config-snmp)# show int Raisecom (config-snmp)# show interface snmp Interface:snmp 41 www.raisecom.com User Manual Administration Status :up Operation Status :down Description: snmp Internet address: 192.168.4.29 Netmask: 255.255.255.0 Ethernet address: 00:00:01:02:03:04 Duplex:half-duplex Speed:100baseT Autonegotiation:enable Raisecom (config-snmp)# 9.4 Device status and configuration Users can view current status and configuration of SNMP COMMUNITY by the command of show snmp-server community in USER EXEC mode. Steps Commands Description 1 config Enter global configuration mode 2 show snmp-server community Show SNMP community configuration information Raisecom #config Raisecom (config)# show snmp-server community ID COMMUNITYNAME RIGHT -----------------------------1 private rw 2 public ro Raisecom (config)# Users can view current status and configuration of SNMP trap-server by the command of show snmp trap-server in USER EXEC mode. Steps 2 Commands Description config Enter global configuration mode show snmp trap-server Show SNMP trap-server configuration information Raisecom #config Raisecom (config)# show snmp trap-server Trap server: ADDRESS PORT ---------------------------------------- Raisecom (config)# 42 www.raisecom.com User Manual Users can view current status and configuration of SNMP by the command of show interface snmp in SNMP configuration mode. Steps Commands Description config Enter global configuration mode 3. interface snmp Enter SNMP configuration mode 4. show interface snmp Raisecom #config Raisecom (config)# interface snmp Raisecom (config-snmp)# show interface snmp Interface:snmp Administration Status :up Operation Status :down Description: snmp Internet address: 192.168.4.28 Netmask: 255.255.255.0 Ethernet address: 00:00:01:02:03:04 Duplex:half-duplex Speed:100baseT Autonegotiation:enable Raisecom (config-snmp)# 43 www.raisecom.com User Manual Chapter 10 Typical Applications 10.1 Typical application of vlan-unaware VCG-A1 10/100Bas e 10/100Bas e EthA1 EthA2 PDH/SDH 16xE1/T1 RC959-4FE16E1 16xE1/T1 RC9594FE16E1 Deployment application: 16 lines of E1 of two RC959-4FE16E1 connected by PDH/SDH transmission network, each device enable one Ethernet interface, the data is transparent transmitted between the two devices. Configuration procedure: Here we take the device on the left for example, the device on the right can configure as this. 1) Setting IP address Raisecom# Raisecom# config Configuration mode, one conmmand input per time. End with CTRL-Z. Raisecom(config)# interface snmp Raisecom(config-snmp)# ip address 192.168.12.90 255.255.255.0 Set successfully Raisecom(config-snmp)# show interface snmp Interface:snmp Administration Status : up Operation Status : up Description: snmp Internet address: 192.168.12.90 Netmask: 255.255.255.0 Ethernet address: 00:00:01:02:03:04 Duplex:full-duplex Speed:100baseT Autonegotiation:enable Raisecom(config-snmp)# end Raisecom# write 44 www.raisecom.com User Manual Are you sure[Y/N]:y Please wait..Copy OK: 2561 bytes copied Save current configuration successfully! Raisecom# 2) Setting SNMP community and TRAP MANAGER address Raisecom# Raisecom# config Configuration mode, one conmmand input per time. End with CTRL-Z. Raisecom(config)# snmp-server community public ro Set successfully Raisecom(config)# snmp-server community private rw Set successfully Raisecom(config)# show snmp snmp-server snmp Raisecom(config)# show snmp-server community ID COMMUNITYNAME RIGHT -------------------------------------------1 public ro 2 private rw Raisecom(config)# Raisecom(config)# snmp trap-server 192.168.12.89 162 Set successfully Raisecom(config)# show snmp trap-server Trap server: ADDRESS PORT ---------------------------------------192.168.12.89 162 Raisecom(config)# end Raisecom# wr Raisecom# write 45 www.raisecom.com User Manual Are you sure[Y/N]:y Please wait..Copy OK: 2669 bytes copied Save current configuration successfully! Raisecom# 3) Setting property of Ethernet interface 1 Raisecom# Raisecom# config Configuration mode, one conmmand input per time. End with CTRL-Z. Raisecom(config)# slot 0 Raisecom(config-slot/0)# interface eth 1 Raisecom(config-eth/0/1)# autonegotiate Set successfully Raisecom(config-eth/0/1)# flow-control on Set successfully Raisecom(config-eth/0/1)# show interface Interface ID :1 Descr :Slot 0 eth interface 1 Interface type :electrical Port enable(command) :enable Port enable status :enable AutoMdi config :enable AutoMdi status :enable Link status :direct Autonego config :enable Autonego status :enable Autonego work status :success Duplex config :full-duplex Duplex config status :half-duplex Duplex status :half-duplex Speed config :100M Speed config status :10M Speed status :10M Flow control config:on Flow control status:on 46 www.raisecom.com User Manual Link :linkdown MaxFrameLength config :1916 MaxFrameLength status :1916 Raisecom(config-eth/0/1)# end Raisecom# write Are you sure[Y/N]:y Please wait..Copy OK: 2669 bytes copied Save current configuration successfully! Raisecom# 4) Setting property of EOPDH interface 1 Raisecom# Raisecom# config Configuration mode, one conmmand input per time. End with CTRL-Z. Raisecom(config)# slot 0 Raisecom(config-slot/0)# interface eopif 1 Raisecom(config-eopdh/0/1)# lcas on Set successfully Raisecom(config-eopdh/0/1)# add e1 1-16 Set successfully Raisecom(config-eopdh/0/1)# show interface Interface ID :1 VCG ErrorStatus : Normal LCAS mode config :enable LCAS mode config status:enable Encapstype config :GFP Encapstype config status:GFP FCS mode config :NOFCS FCS mode config status:NOFCS Provisioned size rx:16 Actual size rx:16 Provisioned size tx:16 47 www.raisecom.com User Manual Actual size tx:16 CSF config :disable CSF config status :disable Member Info : Config Status Rx Tx Error 1 1 FAIL OK LOM 2 2 FAIL OK LOM 3 3 FAIL OK LOM 4 4 FAIL OK LOM 5 5 FAIL OK LOM 6 6 FAIL OK LOM 7 7 FAIL OK LOM 8 8 FAIL OK LOM 9 9 FAIL OK LOM 10 10 FAIL OK LOM 11 11 FAIL OK LOM 12 12 FAIL OK LOM 13 13 FAIL OK LOM 14 14 FAIL OK LOM 15 15 FAIL OK LOM 16 16 FAIL OK LOM Raisecom(config-eopdh/0/1)# end Raisecom# write Are you sure[Y/N]:y Please wait..Copy OK: 2715 bytes copied Save current configuration successfully! Raisecom# LCAS mode configuration should be taken before add e1. Users can modify LCAS mode of those EOPDH interface without add e1; for those EOPDH interfaces have already finished adding e1, it is better for users to save configuration and reboot device after modify LCAS mode, otherwise the data line may occurs malfunction. 5) Setting forward entry Raisecom# Raisecom# config 48 www.raisecom.com User Manual Configuration mode, one conmmand input per time. End with CTRL-Z. Raisecom(config)# slot 0 Raisecom(config-slot/0)# forward-mode vlan-unaware Set successfully Raisecom(config-slot/0)# forward-entry eth 1 to vcg 1 Set successfully Raisecom(config-slot/0)# forward-entry vcg 1 to eth 1 Set successfully Raisecom(config-slot/0)# show forward Config Info: Forward Mode:vlan-unaware Index eth vcg Direction -------------------------------------------------------------------------1 1 1 eth->vcg 2 1 1 vcg->eth Running Info: Forward Mode:vlan-unaware Index eth vcg Direction -------------------------------------------------------------------------1 1 1 eth->vcg 2 1 1 vcg->eth Raisecom(config-slot/0)# end Raisecom# write Are you sure[Y/N]:y Please wait..Copy OK: 2779 bytes copied Save current configuration successfully! Raisecom# Operations of setting forward mode should be taken before setting forward entry rule. Delete all old rules by manual before modify forward entry mode. 49 www.raisecom.com User Manual 10.2 Typical application of vlan-aware (example 1) Eth-A-HQ VCG-A-A1A2 VLAN100 VLAN200 VLAN100 eth1 eth1 PDH/SDH RC9594FE16E1 16xE1/T1 Eth-Branch-A1 16xE1/T 1 RC9594FE16E1 eth2 VLAN200 Eth-Branch-A2 Configuration application: 16 lines of E1 of two RC959-4FE16E1 connected by PDH/SDH transmission network. Ethernet 1 and 2 of the right device access to vlan100 and vlan 200, then uplink to switch by transmission network and Ethernet interface 1 of the left device. Configuration procedure: 1) Setting IP address Same as section 10.1 2) Setting SNMP COMMUNITY and TRAP MANAGER address Same as section 10.1 3) Setting property of Ethernet interface 1 Same as section 10.1 4) Setting property of EOPDH interface 1 Same as section 10.1 5) Setting forward entry The configuration of left device is same as section 10.1 Configuration of the right device: Raisecom# Raisecom# config Configuration mode, one conmmand input per time. End with CTRL-Z. Raisecom(config)# slot 0 Raisecom(config-slot/0)# forward-mode vlan-aware Set successfully Raisecom(config-slot/0)# forward-entry untagged eth 1 to vcg 1 vlanid 100 tag 50 www.raisecom.com User Manual Set Successfully. Raisecom(config-slot/0)# forward-entry tagged eth 1 to vcg 1 vlanid 100 tag Set Successfully. Raisecom(config-slot/0)# forward-entry tagged vcg 1 to eth 1 vlanid 100 untag Set Successfully. Raisecom(config-slot/0)# forward-entry untagged eth 2 to vcg 1 vlanid 200 tag Set Successfully. Raisecom(config-slot/0)# forward-entry tagged eth 2 to vcg 1 vlanid 200 tag Set Successfully. Raisecom(config-slot/0)# forward-entry tagged vcg 1 to eth 2 vlanid 200 tag Set Successfully. Raisecom(config-slot/0)# show forward Config Info: Forward Mode:vlan-aware Index eth vcg Direction Ingress-type Egress-type Vlanid PRI -------------------------------------------------------------------------1 1 1 eth->vcg untagged tagged 100 0 2 1 1 eth->vcg tagged tagged 100 0 3 1 1 vcg->eth tagged untagged 100 0 4 2 1 eth->vcg untagged tagged 200 0 5 2 1 eth->vcg tagged tagged 200 0 6 2 1 vcg->eth tagged tagged 200 0 Running Info: Forward Mode:vlan-aware Index eth vcg Direction Ingress-type Egress-type Vlanid PRI -------------------------------------------------------------------------1 1 1 eth->vcg untagged tagged 100 0 2 1 1 eth->vcg tagged tagged 100 0 3 1 1 vcg->eth tagged untagged 100 0 4 2 1 eth->vcg untagged tagged 200 0 5 2 1 eth->vcg tagged tagged 200 0 6 2 1 vcg->eth tagged tagged 200 0 Raisecom(config-slot/0)# end Raisecom# write 51 www.raisecom.com User Manual Are you sure[Y/N]:y Please wait..Copy OK: 3049 bytes copied Save current configuration successfully! Raisecom# Operations of setting forward mode should be taken before setting forward entry rule. Delete all old rules by manual before modify forward entry mode. 10.3 Typical application of vlan-aware (example 2) Configuration application: 16 lines of E1 of two RC959-4FE16E1 connected by PDH/SDH transmission network. Ethernet 1 and 2 of the right device access to vlan100 and vlan 200. Configuration procedure: 1) Setting IP address Same as section 10.1 2) Setting SNMP COMMUNITY and TRAP MANAGER address Same as section 10.1 3) Setting property of Ethernet interface 1 Same as section 10.1 4) Setting property of EOPDH interface 1 Same as section 10.1 5) Setting forward entry The configuration of the two devices are the same, please refer to configuration of the right device in section 10.2. 52 www.raisecom.com User Manual 10.4 Typical application of Q-in-Q (example 1) Eth-A VCG-A-A1A2 VLAN 101-106 VLAN-Q eth1 eth1 PDH/SDH RC959-4FE16E1 16xE1/T1 Eth-User-B1 16xE1/T1RC959-4FE16E1 eth2 VLAN 201-206 Eth-User-B2 Configuration application: 16 lines of E1 of two RC959-4FE16E1 connected by PDH/SDH transmission network. The left device work under Q-in-Q mode, export Ethernet interface with out side tag Q (TPID is 0x9100, vlanid is 100); the right device work under vlan-aware mode, Ethernet interface 1 and 2 accessing vlan101-106 and vlan201-206 data respectively. Configuration procedure: 1) Setting IP address Same as section 10.1 2) Setting SNMP COMMUNITY and TRAP MANAGER address Same as section 10.1 3) Setting property of Ethernet interface 1 Same as section 10.1 4) Setting property of EOPDH interface 1 Same as section 10.1 5) Setting forward entry The configuration of right device is same as section 10.2 Configuration of the left device: Raisecom# Raisecom# config Configuration mode, one conmmand input per time. End with CTRL-Z. Raisecom(config)# slot 0 Raisecom(config-slot/0)# forward-mode q-in-q Set successfully Raisecom(config-slot/0)# double-tagging tpid 0x9100 Set successfully 53 www.raisecom.com User Manual Raisecom(config-slot/0)# forward-entry tagged eth 1 to vcg 1 vlanid 100 untag Set Successfully. Raisecom(config-slot/0)# forward-entry untagged vcg 1 to eth 1 vlanid 100 tag Set Successfully. Raisecom(config-slot/0)# show forward Config Info: Forward Mode:q-in-q TPID Index :9100 eth vcg Direction Ingress-type Egress-type Vlanid PRI -------------------------------------------------------------------------1 1 1 vcg->eth untagged tagged 100 0 7 1 1 eth->vcg tagged untagged 100 0 Running Info: Forward Mode:q-in-q TPID Index :9100 eth vcg Direction Ingress-type Egress-type Vlanid PRI -------------------------------------------------------------------------1 1 1 vcg->eth untagged tagged 100 0 7 1 1 eth->vcg tagged untagged 100 0 Raisecom(config-slot/0)# end Raisecom# write Are you sure[Y/N]:y Please wait..Copy OK: 2853 bytes copied Save current configuration successfully! Raisecom# 54 www.raisecom.com User Manual 10.5 Typical application of Q-in-Q (example 2) Eth User A headquater Q1 VCG-A-A1A2 eth1 eth1 Eth User A1 PDH/SDH RC959-4FE16E1 16xE1/T1 16xE1/T1 RC9594FE16E1 eth2 Q2 Eth User A2 Configuration application: 16 lines of E1 of two RC959-4FE16E1 connected by PDH/SDH transmission network. The left device work under vlan-unaware mode; the right device work under Q-in-Q mode, Ethernet interface 1 and 2 with out side tag Q1 (TPID is 0x9100, vlanid is 100) and Q2 (TPID is 0x9100, vlanid is 200) respectively. Configuration procedure: 1) Setting IP address Same as section 10.1 2) Setting SNMP COMMUNITY and TRAP MANAGER address Same as section 10.1 3) Setting property of Ethernet interface 1 Same as section 10.1 4) Setting property of EOPDH interface 1 Same as section 10.1 5) Setting forward entry The configuration of left device is same as section 10.1 Configuration of the right device: Raisecom# Raisecom# config Configuration mode, one conmmand input per time. End with CTRL-Z. Raisecom(config)# slot 0 Raisecom(config-slot/0)# forward-mode q-in-q Set successfully 55 www.raisecom.com User Manual Raisecom(config-slot/0)# double-tagging tpid 0x9100 Set successfully Raisecom(config-slot/0)# forward-entry untagged eth 1 to vcg 1 vlanid 100 tag Set Successfully. Raisecom(config-slot/0)# forward-entry tagged vcg 1 to eth 1 vlanid 100 untag Set Successfully. Raisecom(config-slot/0)# forward-entry untagged eth 2 to vcg 1 vlanid 200 tag Set Successfully. Raisecom(config-slot/0)# forward-entry tagged vcg 1 to eth 2 vlanid 200 untag Set Successfully. Raisecom(config-slot/0)# show forward Config Info: Forward Mode:q-in-q TPID Index :9100 eth vcg Direction Ingress-type Egress-type Vlanid PRI -------------------------------------------------------------------------1 1 1 vcg->eth tagged untagged 100 0 2 1 1 eth->vcg untagged tagged 100 0 3 2 1 eth->vcg untagged tagged 200 0 4 2 1 vcg->eth tagged untagged 200 0 Running Info: Forward Mode:q-in-q TPID Index :9100 eth vcg Direction Ingress-type Egress-type Vlanid PRI -------------------------------------------------------------------------1 1 1 vcg->eth tagged untagged 100 0 2 1 1 eth->vcg untagged tagged 100 0 3 2 1 eth->vcg untagged tagged 200 0 4 2 1 vcg->eth tagged untagged 200 0 Raisecom(config-slot/0)# end Raisecom# write Are you sure[Y/N]:y Please wait..Copy OK: 2853 bytes copied 56 www.raisecom.com User Manual Save current configuration successfully! Raisecom# 57 Address: 2nd Floor, South Building of Rainbow Plaza, No.11 Shangdi Information Road, Haidian District, Beijing Postcode: 100085 Tel: +86-10-82883305 Fax: +86-10-82883056 Email: [email protected] http://www.raisecom.com