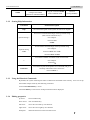
1
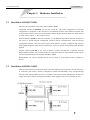
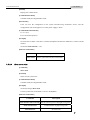
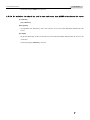
www.raisecom.com
RC002-NMS1 (REV.C) User Manual
Legal Notices
Raisecom Technology Co., Ltd makes no warranty of any kind with regard to this manual,
including, but not limited to, the implied warranties of merchantability and fitness for a particular
purpose. Raisecom Technology Co., Ltd shall not be held liable for errors contained herein or direct,
indirect, special, incidental or consequential damages in connection with the furnishing, performance,
or use of this material.
Warranty.
A copy of the specific warranty terms applicable to your Raisecom product and replacement parts
can be obtained from Service Office.
Restricted Rights Legend.
All rights are reserved. No part of this document may be photocopied, reproduced, or translated to
another language without the prior written consent of Raisecom Technology Co., Ltd. The
information contained in this document is subject to change without notice.
Copyright Notices.
Copyright ©2009 Raisecom. All rights reserved.
No part of this publication may be excerpted, reproduced, translated or utilized in any form or by any
means, electronic or mechanical, including photocopying and microfilm, without permission in
Writing from Raisecom Technology Co., Ltd.
Trademark Notices
is the trademark of Raisecom Technology Co., Ltd.
Java™ is a U.S. trademark of Sun Microsystems, Inc.
Microsoft® is a U.S. registered trademark of Microsoft Corporation.
Windows NT® is a U.S. registered trademark of Microsoft Corporation.
Windows® 2000 is a U.S. registered trademark of Microsoft Corporation.
Windows® XP is a U.S. registered trademark of Microsoft Corporation.
Windows® and MS Windows® are U.S. registered trademarks of
Microsoft Corporation.
Contact Information
Technical Assistance Center
The Raisecom TAC is available to all customers who need technical assistance with a Raisecom
product, technology, or, solution. You can communicate with us through the following methods:
Address:
2nd Floor, South Building of Rainbow Plaza, No.11 Shangdi Information Road,
Haidian District, Beijing 100085
Tel:
+86-10-82883305
Fax:
+86-10-82883056
World Wide Web
You can access the most current Raisecom product information on the World Wide Web at the
following URL:
http://www.raisecom.com
Feedback
Comments and questions about how the RC002-NMS1 device works are welcomed. Please review
the FAQ in the related manual, and if your question is not covered, send email by using the following
web page:
http://www.raisecom.com/en/xcontactus/contactus.htm.
If you have comments on the RC002-NMS1 specification, instead of the web page above, please
send comments to:
[email protected]
We hope to hear from you!
CONTENTS
Chapter 1
1.1
1.2
1.3
1.4
1.5
Chapter 2
2.1
2.2
Chapter 4
Configuration of Ethernet interface ----------------------------------------------------------------------------------------------- 10
Configuration of clock, time zone and daylight saving time ---------------------------------------------------------------- 12
Configuration of SNMP -------------------------------------------------------------------------------------------------------------- 17
Configuration of SNTP--------------------------------------------------------------------------------------------------------------- 21
Setup RADIUS ------------------------------------------------------------------------------------------------------------------------- 22
System Maintenance --------------------------------------------------------------------24
Maintenance Tasks ----------------------------------------------------------------------------------------------------- 24
Configuration File Management ------------------------------------------------------------------------------------- 24
4.2.1
4.2.2
4.2.3
4.2.4
4.2.5
4.2.6
4.2.7
4.2.8
4.3
Basic System Commands ------------------------------------------------------------------------------------------------------------ 8
User Management ---------------------------------------------------------------------------------------------------------------------- 8
Configuration of Network Management Functions-------------------------------------------------------------- 10
3.5.1
3.5.2
3.5.3
3.5.4
3.5.5
4.1
4.2
Command Line Mode ------------------------------------------------------------------------------------------------------------------ 6
Getting Help Information -------------------------------------------------------------------------------------------------------------- 7
Using the Historical Commands ----------------------------------------------------------------------------------------------------- 7
Editing properties ----------------------------------------------------------------------------------------------------------------------- 7
System Command --------------------------------------------------------------------------------------------------------8
3.4.1
3.4.2
3.5
Management through the CONSOLE interface --------------------------------------------------------------------------------- 5
Remote Management through TELNET------------------------------------------------------------------------------------------- 5
Instructions on BOOTROM ---------------------------------------------------------------------------------------------5
Instruction for Using the Command Lines---------------------------------------------------------------------------6
3.3.1
3.3.2
3.3.3
3.3.4
3.4
Agent Setup --------------------------------------------------------------------------------- 5
General Connection ------------------------------------------------------------------------------------------------------5
3.1.1
3.1.2
3.2
3.3
Hardware Installation--------------------------------------------------------------------- 4
Installation of RC002-NMS1 --------------------------------------------------------------------------------------------4
Installation of RC001-NMS2 --------------------------------------------------------------------------------------------4
Chapter 3
3.1
Overview ------------------------------------------------------------------------------------- 1
Chassis RC002-16 --------------------------------------------------------------------------------------------------------1
RC002-NMS1 Master Network Management Modules----------------------------------------------------------2
RC001-NMS2 Slave Network Management Module -------------------------------------------------------------3
Agent Program -------------------------------------------------------------------------------------------------------------3
Network Management Platform and Element Management System-----------------------------------------3
View Information of Configuration Files ----------------------------------------------------------------------------------------- 24
Save the Current Configuration --------------------------------------------------------------------------------------------------- 25
Delete the Configuration ------------------------------------------------------------------------------------------------------------ 25
Export Current Configuration------------------------------------------------------------------------------------------------------- 25
Import System Configuration ------------------------------------------------------------------------------------------------------- 26
Delete the configuration files of local cards ------------------------------------------------------------------------------------ 27
Delete the configuration file on the first-layer remote card ----------------------------------------------------------------- 27
Delete the configuration file on the second-layer remote card ------------------------------------------------------------ 28
Start File Management (the Agent Program) --------------------------------------------------------------------- 28
4.3.1
4.3.2
4.3.3
View information of the Agent Program------------------------------------------------------------------------------------------ 29
Export the Agent Program ---------------------------------------------------------------------------------------------------------- 29
Import Agent Program (Agent program upgrade) ----------------------------------------------------------------------------- 29
General Safety Instructions
The following instructions serve as a general guide for the safe installation and operation of telecommunications
products. Additional instructions, if applicable, are included inside the manual.
Safety Symbols
This symbol may appear on the equipment or in the text. It indicates potential
safety hazards regarding product operation or maintenance to operator or service
personnel.
Danger of electric shock! Avoid any contact with the marked surface while the
product is energized or connected to outdoor telecommunication lines.
Protective earth: the marked lug or terminal should be connected to the building
protective earth bus.
Some products may be equipped with a laser diode. In such cases, a label with
the laser class and other warnings as applicable will be attached near the optical
transmitter. The laser warning symbol may be also attached.
Please observe the following precautions:
• Before turning on the chassis with optic module, make sure that the fiber optic
cable is intact and is connected to the transmitter.
• Do not attempt to adjust the laser drive current.
• Do not use broken or unterminated fiber-optic cables/connectors or look straight at the
laser beam.
• The use of optical devices with the equipment will increase eye hazard.
• Use of controls, adjustments or performing procedures other than those specified herein, may
result in hazardous radiation exposure.
ATTENTION: The laser beam may be invisible!
Always observe standard safety precautions during installation, operation and maintenance of this
product. Only qualified and authorized service personnel should carry out adjustment, maintenance
or repairs to this product. No installation, adjustment, maintenance or repairs should be performed by
either the operator or the user.
All extension slots are not hot-swappable
Before operating modules in the electricity conditions, please be noticed that optical modules shall
be connected with optical fiber wires or shield with optical module cover for fear that laser light
harms to operator’s eyes. Handling Energized Products
General Safety Practices
Do not touch or tamper with the power supply when the power cord is connected. Line voltages may
be present inside certain products even when the power switch (if installed) is in the OFF position or
a fuse is blown. For DC-powered products, although the voltages levels are usually not hazardous,
energy hazards may still exist.
Before working on equipment connected to power lines or telecommunication lines, remove jewelry
or any other metallic object that may come into contact with energized parts.
Unless otherwise specified, all products are intended to be grounded during normal use. Grounding
is provided by connecting the mains plug to a wall socket with a protective earth terminal. If an earth
lug is provided on the product, it should be connected to the protective earth at all times, by a wire
with a diameter of 18 AWG or wider. Rack-mounted equipment should be mounted only in earthed
racks and cabinets.
Always make the ground connection first and disconnect it last. Do not connect telecommunication
cables to ungrounded equipment. Make sure that all other cables are disconnected before
disconnecting the ground.
Connection of AC Mains
Make sure that the electrical installation complies with local codes.
Always connect the AC plug to a wall socket with a protective ground.
Always connect the power cord first to the equipment and then to the wall socket. If a power switch
is provided in the equipment, set it to the OFF position. If the power cord cannot be readily
disconnected in case of emergency, make sure that a readily accessible circuit breaker or emergency
switch is installed in the building installation.
Connection of DC Mains
Unless otherwise specified in the manual, the DC input to the equipment is floating in reference to
the ground. Any single pole can be externally grounded.
Due to the high current capability of DC mains systems, care should be taken when connecting the
DC supply to avoid short-circuits and fire hazards.
DC units should be installed in a restricted access area, i.e. an area where access is authorized only to
qualified service and maintenance personnel.
Make sure that the DC supply is electrically isolated from any AC source and that the installation
complies with the local codes.
Before connecting the DC supply wires, ensure that power is removed from the DC circuit. Locate
the circuit breaker of the panel board that services the equipment and switch it to the OFF position.
When connecting the DC supply wires, first connect the ground wire to the corresponding terminal,
then the positive pole and last the negative pole. Switch the circuit breaker back to the ON position.
A readily accessible disconnect device that is suitably rated and approved should be incorporated in
the building installation.
Preventing Electrostatic Discharge Damage
Modules which can be plugged into chassis are sensitive to damage from static electricity.
Conversely, static voltages as high as 35,000V can be generated just by handling plastic or foam
packing material, or by sliding assemblies across plastic and carpets. Not exercising the proper
electrostatic discharge (ESD) precautions can result in intermittent or complete component failures.
To minimize the potential for ESD damage, observe the following guidelines:
• Always use an ESD-preventive antistatic wrist strap or ankle strap and ensure that it makes good
skin contact.
• When removing or installing a component, make sure the equipment end of your antistatic strap
leash is connected to the ESD connection sockets on the front of the chassis or to a bare metal
surface on the chassis. Avoid contact between the component and your clothing. The wrist strap only
protects the component from ESD voltages on the body; ESD voltages on your clothing can still
cause component damage.
• Always place a card component-side-up on an antistatic surface, in an antistatic card rack, or in a
static shielding bag. If you are returning the item to the factory, immediately place it in a static
shielding bag.
• Handle Modules by the metal card carrier edges only; Avoid touching the board or any connector
pins.
www.raisecom.com
User Manual
Chapter 1 Overview
1.1
Chassis RC002-16
RC002-16 is a 3U 16-slot chassis that can accommodate all kinds of 3U-height service modules
developed by Raisecom, including media converters, optical multiplexer, and interface converters,
and etc.
The device models listed in the table below:
Model
Description
Dimension (mm)
Power Supply Requirement
RC002-16AC
16-slot, AC power supply,
network manageable
440x131x410
220V AC,50Hz,80W
RC002-16DC
16-slot, DC power supply,
network manageable
440x131x410
-48V DC,80W
The front panel:
Indicator Definition:
PWR:
Steady ON: the power supply for the chassis is working in order
PS1-5V:
OFF: the power supply module PS1 is supplying the modules normally
ON: the power supply module PS1 is NOT supplying the modules normally
PS1-12V:
OFF: the power supply module PS1 is supplying the fans normally
ON: the power supply module PS1 is NOT supplying the fans normally
PS2-5V:
OFF: the power supply module PS2 is supplying the modules normally
ON: the power supply module PS2 is NOT supplying the modules normally
PS2-12V:
OFF: the power supply module PS2 is supplying the fans normally
ON: the power supply module PS2 is NOT supplying the fans normally
1
www.raisecom.com
1.2
User Manual
RC002-NMS1 Master Network Management Modules
RC002-16 is in support of SNMP management. The network management function is realized via the
master network management module RC002-NMS1 in slot 0 of RC002-16.
Device Model
RC002-NMS1 (REV.C): master network management module for rack-mountable chassis
Panel:
Indicators on the Front Panel
SYS: indicator shows the working status of the network management module
Flickering: the network management module is working in order
OFF: the network management module is NOT working in order
PWR: indicator shows the power supply status of the network management module
Steady ON: the power supply is supplying the network management module normally
LNK/ACT: indicator shows the status of 10M/100M Ethernet signal.
Steady ON: the Ethernet cable is correctly connected
Flickering: data is being transmitted or received
100M: indicator shows the status of 10M/100M Ethernet signal.
ON: the Ethernet port is working at the rate of 100Mbps;
OFF: the Ethernet port is working at the rate of 10Mbps.
RJ-45 Interfaces on the Front Panel
UPLNK: Connectors of RC002-16-NMS1 module and RC001-NMS2 module, complies with
RS-232.
CONSOLE: CONSOLE interface for the connection with PC serial port via RS-232 cable.
SNMP: 10/100M Ethernet interface, connected with Ethernet switches via straight-through network
cable and connect with host PC via crossover network cable.
The Ethernet interface “SNMP” on the master network management module RC002-NMS1 has an IP
address. By default, the IP address is 192.168.1.254. The master network management modules in
one LAN are not allowed to share one IP address. Please configure the initial status of the master
network management module RC002-NMS1 via its CONSOLE interface and assign an IP address
for it before connecting the network cable.
Main functions of RC002-NMS1
2
www.raisecom.com
User Manual
¾
¾
¾
¾
1.3
A 10/100M Ethernet port is available for the connection with a PC (the manager of network
management system)
The communication with slave network management module RC001-NMS2 enables the
forming of RC002 cascade.
Collect working status information and alarm information of the service modules in the slot
1~15 in both the RC002-16 with RC002-NMS1 and other RC002-16 in a cascade, and
complete some configurations of these service modules.
Collect status information, like chassis temperature, fan rotation speed, power supply status,
and etc., of the RC002-16 with RC002-NMS1 and other RC002-16 in the same cascade.
RC001-NMS2 Slave Network Management Module
In a rack-mountable 16-slot chassis master network management module RC002-NMS1 can form a
cascade with a rack-mountable 16-slot chassis which has three slave network management modules
RC001-NMS2; it means that slave network management module can manage at most 60 service
modules. There is no limitation on master network management module in a LAN.
1.4
Agent Program
The Agent program resides and runs in RC002-NMS1. It is the drive of the realization of all network
management functions. The Agent program may be required to be upgraded every now and then to
be able to manage over new service modules.
For RC002-NMS1 (REV.C), the Agent program should above version 7.0.0. Please note that
different versions of Agent program have to be working with different BOOTROM program.
1.5
Network Management Platform and Element Management System
RC002-16 can be managed on the NView NNM (Network Node Management) system developed by
Raisecom. NView NNM is a new generation product of integrated network node management system
based on SNMP protocol. It aims at access network and emphasizes on centralized configuration and
fault detection of all-series network manageable devices of Raisecom. With NView NNM and EMS
(Element Management System) installed on a PC, RC002-16 and all service modules in it as well as
the remote devices connection to there service modules can be monitored and managed on a GUI
interface, which makes the network management simple and easy.
3
www.raisecom.com
User Manual
Chapter 2 Hardware Installation
2.1
Installation of RC002-NMS1
There are three interfaces on the front panel of RC002-NMS1.
CONSOLE interface CONSOLE (in the form of RJ-45): The initial configuration of network
management is completed via the connection of CONSOLE interface and simulation terminal. The
connection parameters are the same as the default values in Hyper Terminal (baud rate: 9600; data bit:
8; parity: None; stop bit: 1; flow control: None).
Ethernet interface SNMP (in the form of R-J45): A 10/100M auto-negotiation Ethernet interface for
the access to TCP/IP network management interface and the communication with the network
management platform. Note that when connect with Ethernet switches, straight-through network
cable should be applied; when connect with host PC, crossover network management cable should be
applied.
Cascade interface UPLNK (in the form of RJ-45): Comply with RS-232. Connected with the
RC001-NMS2 modules with in other RC002-16 using serial cable can form RC002 cascade. Please
note that straight-through network cable should be applied.
RC002-NMS1 can only be installed into the slot 0 (which is on the leftmost side) of RC002-16
chassis.
2.2
Installation of RC001-NMS2
There are three interfaces on the front panel of RC001-NMS2 and all of them are cascade interfaces.
It connected with master network management module RC002-NMS1 using straight-through
network cable, which enables more service modules. One master network management modular can
support three slave network management modules, which supports sixty service modules at most.
4
www.raisecom.com
User Manual
Chapter 3 Agent Setup
3.1
3.1.1
General Connection
Management through the CONSOLE interface
Please connect the CONSOLE interface on RC002-NMS1 with the COM interface on the PC. In
Windows operation system, run the “Hyper Terminal” program or a third-party serial port connection
tool, and configure the parameters as follows:
Baud rate: 9600
Data bit: 8
Parity bit: None
Stop bit: 1
Flow control: None
Press ‘Enter’ for several times and the system CLI interface will be ready for the network
management.
3.1.2
Remote Management through TELNET
After assigning an IP address for the RC002-NMS1 via the CONSOLE interface, RC002-NMS1 can
be managed remotely via TELNET.
3.2
Instructions on BOOTROM
In BOOTROM mode, users are able to perform management and maintenance operations on the
FLASH memory and the files stored in it.
When the RC002-NMS1 is just connected to the power supply and is starting, there will be a prompt
on the system interface to ask the user whether to enter the BOOTROM mode or not. The prompt
will last for 3 seconds. Please press the space key if you decide to enter the BOOTROM mode.
System Prompt
raisecom
Commands in BOOTROM mode
?- list all available commands
c- Change parameters when upgrading the firmware through FTP download
e- Format the flash sector where the firmware (AGENT program) resides
h- List all available commands
r- Reboot the system
5
www.raisecom.com
User Manual
u- Upgrade the firmware through FTP download
Below is an example of using command “c”. The contents in “/*
information input by users.
*/” are comments, that is,
raisecom: c
'.' = clear field; '-' = go to previous field;
boot device
: sng0
processor number
:0
host name
: host
file name
: RC002
inet on ethernet (e)
: 192.168.223.64
^D = quit
/*the name of the file to be downloaded*/
/*the IP address of this equipment, can be specified by user*/
inet on backplane (b) :
host inet (h)
: 192.168.223.98
gateway inet (g)
:
user (u)
:target
ftp password (pw) (blank = use rsh): target
flags (f)
: 0x0
target name (tn)
: agent
startup script (s)
other (o)
3.3
3.3.1
/*the IP address of FTP server*/
/*FTP user name*/
/*FTP password*/
:
:
Instruction for Using the Command Lines
Command Line Mode
Access (Default User
Name and Password)
Mode
Description
User EXEC
Users are authorized to have
basic information and
parameters be shown.
User name: raisecom
Users are authorized to
configure basic information.
Configuring running
information is not authorized.
Using command enable in
the User EXEC mode
Privileged EXEC
CONFIG
Users are authorized to
configure the interface
parameters of RC002-NMS1
Prompt
raisecom>
Password: :raisecom
raisecom#
Password: raisecom
Using command config in
the Privileged EXEC mode
raisecom(config)#
6
www.raisecom.com
User Manual
Users are authorized to
configure the SNMP
parameters of RC002-NMS1
SNMP
3.3.2
Using the command SNMP
in the CONFIG mode.
raisecom
(config-SNMP)#
Getting Help Information
Command
Function Description
help
Get a brief description of the system in Chinese or English
Get a list of commands that begin with a specified string
(abbreviated-command-entry)
For example:
Specific String ?
raisecom>en?
enable
Get the whole command begin with a specified string
For example:
Specific String
<Tab>
raisecom #show ver<TAB>
raisecom#show version
List all the available commands in the current mode.
?
For example:
raisecom#?
command ?
List all the keywords and options of a command, and get a
brief help information at the same time.
raisecom#show ?
3.3.3
Using the Historical Commands
By default, the system will keep 20 entries of historical commands in the memory. Users can set up
the number of kept entries by the following command.
raisecom#terminal history <0-20>
Command history is used to have all kept command entries displayed.
3.3.4
Editing properties
up arrow:
last command entry
down arrow: next command entry
left arrow:
move the cursor left by one character
right arrow:
move the cursor right by one character
backspace:
delete the character on the left of the cursor
7
www.raisecom.com
3.4
3.4.1
3.4.2
User Manual
Ctrl+d:
delete the character on the right of the cursor
Ctrl+a:
move the cursor to the beginning of the line
Ctrl+e:
move the cursor to the end of the line
Ctrl+k:
delete all characters on the right of the cursor
Ctrl+z:
quit from a non-privileged mode and enter the Privileged EXEC mode
System Command
Basic System Commands
clear
Clear the screen
enable
Enter the Privileged EXEC mode
exit
Back to the last command line mode or log out
help
Show help information of the system
history
Show historical commands
list
List all available commands in the current command line mode
show ip
Show IP address, subnet mask and gateway configuration
show sntp
Show relevant information of SNTP
ping A.B.C.D
Ping the device with IP address A.B.C.D
quit
Back to the mode of upper level or log out
terminal history <1-20>
Change the number of command entries kept in the memory
terminal time-out <0-65535>
Change the configuration of terminal timeout
disable
Quit from the Privileged EXEC mode and back to the initial mode
logout
Log out
reboot
Reboot the master network management module RC002-NMS1
show version
Show the version information of the system
show terminal
Show the running status of the terminal of the system
write
Save the current configuration information
hostname HOSTNAME
hange hostname
no hostname
Restore to the default hostname
User Management
By default, the user name of the system is “raisecom”, and the password is “raisecom” too. This user
is the super user.
8
www.raisecom.com
User Manual
3.4.2.1. User Login
[Command]
user login { local-user | radius-user | local-radius | radius-local }
[Command Line Mode]
CONFIG mode
Privileged EXEC mode (privilege 15)
[Function]
Set up user login authentification mode.
[Parameters]
local-user: using local user configuration file to authenticate user profile
radius-user: using RADIUS server to authenticate user profile
local-radius: authenticate the user firstly using the local configuration file, if failed, using
RADIUS server to authenticate the user again
radius-local: authenticate the user firstly using the RADIUS server, if failed, using local
configuration file to authenticate the user again
[Default]
Using local user configuration file to authenticate user profile
[Instructions]
For the users that authenticate via RADIUS protocol, the hostname is “Raisecom”, the prompt is
“ENTER” and “Newline” by default. The privilege of the user is 15 by default.
[Command Execution Echo]
Set User Login Method unsuccessfully.
The above information will appear when the setup failed. Please check whether the input
parameters are correct or not.
Set User Login Method successfully.
The above information will appear when the setup succeeded.
[Example]
Set that the user login authentification mode is local-user authentification.
Raisecom# user login local-user
[Relevant Commands]
Command
Description
radius host
Set the IP address of the RADIUS authentication server.
radius-key
Set up the shared key of the user and the server when
RADIUS authenticates the server.
9
www.raisecom.com
User Manual
3.4.2.2. Add a New User
Command
Description
USERNAME: user name
user USERNAME password
PASSWORD
1
password: password keyword
PASSWORD: password content
USERNAME: user name
2
user USERNAME privilege
<1-15>
<1-15>: user privilege, can be from 1 to 15
3
password
Change the password of the current user
4
no user USERNAME
5
write
Save the configuration information
6
show user
Display user information
Delete the user with the specified user name.
USERNAME: user name
3.4.2.3. Delete a User
[Command]
no user USERNAME
[Command Line Mode]
CONFIG mode
Privileged EXEC mode (privilege 15)
[Instructions]
There must be a user with user privilege 15 in the system user database. Only users with user
privilege 15 are authorized to delete a user.
[Command Execution Echo]
You have no enough right to change user information!
The message will be shown when a user with user privilege lower than 15 tries to add a new
user. Log out and log in as a user with user privilege 15, the same operation will succeed.
3.5
3.5.1
Configuration of Network Management Functions
Configuration of Ethernet interface
The IP related configurations are completed in the CONFIG mode.
3.5.1.1
Enter the CONFIG mode
[Command]
10
www.raisecom.com
User Manual
In the Privileged EXEC mode
config
[Command Execution Echo]
raisecom(config)#
3.5.1.2
Assign IP address
[Command]
ipaddr A.B.C.D mask A.B.C.D gateway A.B.C.D
[Command Execution Echo]
Set successfully!
please execute "write" to save!
[Example]
Set the IP address of RC002-NMS1 to 192.168.223.89, subnet mask to 255.225.255.0, and
gateway to 192.168.223.1
Raisecom(config)# ipaddr 192.168.223.89 mask 255.225.255.0 gateway 192.168.223.1
3.5.1.3
Enable/Disable auto-negotiation function of Ethernet port
[Command]
autonego (enable|disable)
[Command Execution Echo]
set command success
if you want to save it, please execute "write" to save!
[Example]
raisecom(config)#auto enable
3.5.1.4
Set the rate and duplex mode of Ethernet port
[Command]
speed (10|100) duplex (full|half)
[Command Execution Echo]
set command success
if you want to save it, please execute "write" to save!
[Example]
raisecom(config)#speed 100 duplex full
11
www.raisecom.com
3.5.1.5
User Manual
Show Ethernet port information
[Command]
show eth
[Command Execution Echo]
STAUS:
link up
AUTO:
enable
Speed:
100M
Duplex:
FULL
[For Example]
raisecom(config)# show eth
3.5.2
Configuration of clock, time zone and daylight saving time
All the following commands are available in the CONFIG mode.
3.5.2.1
Enter the CONFIG mode
[Command]
In the Privileged EXEC mode
config
[Command Execution Echo]
raisecom(config)#
3.5.2.2
Configuration of clock
[Command]
clock set
[Function]
Change the date and time of system
clock set <0-23> <0-59> <0-59> <2000-2099> <1-12> <1-31>
[Parameter]
<0-23>: hour;
<0-59>: minute;
<0-59>: second;
<2000-2099>: year;
<1-12>: month;
12
www.raisecom.com
User Manual
<1-31>: day;
[Command Line Mode]
CONFIG mode; Privileged EXEC mode
[Command Execution Echo]
System time changed successfully
Current system time:
06/06/2006
13:34:00 +08:00(DST)
For a successful operation.
Current system time:
06/06/2006
13:34:00 +08:00(DST)
The message will be shown when the date or time set is invalid. The date and time information
shows the current system time.
No 30th or 31th in Feb. in leap year
The message will be shown when try to set the date to Feb.30 or Feb.31 in a leap year.
No 29th, 30th or 31th in Feb.
The message will appear when try to set the date to Feb.29, Feb.30 or Feb.31 in a year that is not a
leap year.
No 31th in the month
The message will be shown when try to set the date to Apr.31, Jun.31, Sep.31 or Nov.31.
[Example]
Change the system date to September 30th, 2003 and time to 8:30 0 second
raisecom # clock set 8 30 0 2003 9 30
[Relevant Commands]
3.5.2.3
Command
Description
show clock
Show current system date and time information.
Enable the daylight saving time
[Command]
clock summer-time {enable|disable}
[Function]
Enable or disable daylight saving time.
[Parameter]
enable: enable daylight saving time
disable: disable daylight saving time
[Default]
disabled
13
www.raisecom.com
User Manual
[Command Line Mode]
CONFIG mode; Privileged EXEC mode
[Instructions]
When the daylight saving time function is enabled, users can save the configuration to the FLASH
of the system and the configuration will not change even if the power supply is down.
[Command Execution Echo]
Set successfully
[Example]
Enable the daylight saving time function.
raisecom # clock summer-time enable
[Relevant Commands]
3.5.2.4
Command
Description
show clock
Show system date and time information.
clock summer-time recurring
Set the beginning and end of the daylight
saving time period.
Set the beginning and end of summer-time period
[Command]
clock summer-time recurring <1-5> (sun | mon | tue | wed | thu | fri | sat)} <1-12> <0-23>
<0-59> <1-5> ( sun | mon | tue | wed | thu | fri | sat ) <1-12> <0-23> <0-59> <1-1440>
[Function]
Set the start/stop time and the shifting of summer-time.
[Parameter]
<1-5>: summer-time begins from which week of this month, 5 means the last week
Week day: summer-time begins from which weekday (Sunday:sun, Saturday: sat)
<1-12>: summer-time begins from which month
<0-23>: summer-time begins from which clock of the day
<0-59>: summer-time begins from which minute of the hour
<1-5>: summer-time stops form which week of this month, 5 means the last week
Weekday: summer-time stops from which weekday (Sunday: sun, Saturday: sat)
<1-12>: summer-time stops from which month
<0-23>: summer-time stops from which clock of the day
<0-59>: summer-time stops from which minute of the hour
<1-1440>: shifting minutes of the summer-time
14
www.raisecom.com
User Manual
[Default]
The daylight saving time is disabled in default.
[Command mode]
CONFIG mode ; Privileged EXEC mode
[Instructions]
This command is used to set the start/stop time and shifting of summer-time. The format of start
and stop time is like: xx month, the nth (or last) weekday, hh hour and mm minutes. Eg:
summer-time has been used in China is that: In each year from 2 o’clock of the second Sunday of
April to 2 o’clock of th second Sunday of September, the clock should be changed one hour faster
than before, that is to say the time shifting is 60. Users can save the configuration in the system
FLASH using commands “write”, and the configuration will not disappear even if the power
supply is down.
[Command Execute Echo]
Set successfully
For a successful operation.
Error start week
When input weekday is invalid.
[Example]
Configure the summer-time like: In each year from 2 o’clock of the second Sunday of April to 2
o’clock of the second Sunday of September, the clock should be changed one hour faster than
before.
raisecom# clock summer-time recurring 2 sun 4 2 0 2 sun 9 2 0 60
[Relevant Commands]
3.5.2.5
Command
Description
show clock
Show system date and time information
clock summer-time
Enable or disable daylight saving time.
Configure the time zone
[Command]
clock timezone (+|-) <0-11> <0-59>
[Function]
Set time zone
[Parameters]
(+|-): “+” indicates the Eastern Hemisphere, “-”: the Western Hemisphere
<0-11>: time difference by hour between local time and UTC
<0-59>: time difference by minute between local time and UTC
15
www.raisecom.com
User Manual
[Default]
Beijing time: GMT+08:00
[Command Line Mode]
CONFIG mode; Privileged EXEC mode
[Instructions]
Users can save the configuration in the system FLASH using commands “write”, and the
configuration will not disappear even if the power supply is down.
[Command Execution Echo]
Set successfully
For a successful operation.
[Example]
Set time zone to GMT -5:40, that is, western hemisphere and the time difference is 5 hours and 40
minutes.
raisecom# clock timezone - 5 40
[Relevant Commands]
3.5.2.6
Command
Description
show clock
Show system date and time information.
Show system time
[Command]
show clock
[Function]
Show current system time
[Command Line Mode]
CONFIG mode; Privileged EXEC mode
[Example]
raisecom(config)# show clock
Current system time: 05/23/2006 17:01:22 +08:00(DST)
[Relevant Commands]
Command
Description
clock summer-time recurring Set the start/stop time of daylight saving time.
clock summer-time
Enable/Disable daylight saving time.
clock timezone
Set time zone.
16
www.raisecom.com
User Manual
Set current system time.
clock set
3.5.2.7
Show configuration information of daylight saving time
[Command]
show clock summer-time-recurring
[Function]
Show the current configuration information of system time, time zone and daylight saving time.
[Command Line Mode]
CONFIG mode
Privileged EXEC mode
[Example]
raisecom# show clock summer-time-recurring
Current system time:
06/06/2006 13:31:44 -08:00
Summer time recurring:
Disable
raisecom#show clock summer-time-recurring
Current system time:
06/06/2006
14:01:04 -08:00(DST)
Summer time recurring: Enable
Summer time start:
Summer time end:
week 1 Tuesday June 12 00
week 1 Tuesday June 15 00
Summer time Offset: 30 min
[Relevant Commands]
3.5.3
Command
Description
clock summer-time recurring
Set the start/stop time of daylight saving time.
clock summer-time
Enable/Disable daylight saving time.
clock timezone
Set time zone.
clock set
Set current system time.
Configuration of SNMP
The commands for the configuration of SNMP are available in the CONFIG-SNMP mode.
17
www.raisecom.com
3.5.3.1
User Manual
Enter SNMP mode
[Command]
In CONFIG mode
snmp
[Command Execution Echo]
raisecom(config-SNMP)#
3.5.3.2
Configure community name
[Command]
snmp-server community COMMUNITY (ro|rw)
[Parameter]
ro: read only
rw: read&write
[Example]
raisecom(config-SNMP)# snmp-server community public ro
3.5.3.3
Enable/disable TRAP
[Command]
snmp-server trap (enable|disable)
[Function]
Enable/disable TRAP
[Example]
raisecom(config-SNMP)# snmp-server trap enable
3.5.3.4
Assign MANAGER and port number of a TRAP
[Command]
snmp-server trap <1-8> target A.B.C.D port <1-65536>
[Parameter]
trap: the number of MANAGER (8 at most)
target: the IP address of Manager
port: the port number
[Example]
Set the first TRAP address, IP 192.168.1.1; Port 162
18
www.raisecom.com
User Manual
raisecom(config-SNMP)# snmp-server trap 1 target 192.168.1.1 port 162
3.5.3.5
Delete the Trap Manager
[Command]
no snmp-server trap <1-8>
[Function]
Delete a Trap Manager
[Example]
raisecom(config-SNMP)# no snmp-server trap 1
3.5.3.6
Remove all the TRAP Manager configuration
[Command]
snmp-server trap clear
3.5.3.7
Set Contact information
[Command]
snmp-server contact STRING
[Example]
Set the contact information to “admin”
raisecom(config-SNMP)# snmp-server contact admin
3.5.3.8
Set ID information
[Command]
snmp-server id <0-65536>
[Description]
Set ID information
[Example]
Set the ID to “5”
raisecom(config- SNMP)# snmp-server id 5
3.5.3.9
Set location information
[Command]
snmp-server location LOCATION
19
www.raisecom.com
User Manual
[Function]
Set the location information of the equipment
[Example]
Set the location of the equipment to “haidian”
raisecom(config- SNMP)# snmp-server location haidian
3.5.3.10
Set the Name information
[Command]
snmp-server name NAME
[Description]
Set the name of the equipment
[Example]
Set the name of the equipment to “RC002”
raisecom(config-SNMP)# snmp-server name RC002
3.5.3.11
Set the threshold of system temperature
[Command]
snmp-server temperature <0-100>
[Function]
Set the threshold of the chassis temperature. When the temperature exceeds the threshold, the
system will send TRAP to the network management platform.
[Example]
Set the temperature of the chassis to 20
raisecom(config-SNMP)# snmp-server temperature 20
3.5.3.12
Restore to the default SNMP community
[Command]
load default community
[Description]
Restore to the default settings of SNMP community
[Example]
raisecom(config-SNMP)#load default community
20
www.raisecom.com
3.5.3.13
User Manual
Query SNMP information
[Command]
show snmp
[Function]
Show SNMP configuration information.
[Example]
raisecom(config- SNMP)# show snmp
System name:
unknown
System contact:
unknown
System location:
unknown
System ID:
1
System level:
1
System Temperature Alarm Threshold: 50
Read Community:
public
Write Community: private
Send trap status:
3.5.4
Enable
Trap sink
Target Address
Target Port
1
0.0.0.0
162
2
0.0.0.0
162
3
0.0.0.0
162
4
0.0.0.0
162
5
0.0.0.0
162
6
0.0.0.0
162
7
0.0.0.0
162
8
0.0.0.0
162
Configuration of SNTP
The system supports SNTP (Simple Network Time Protocol) Client to acquire current system time.
All the commands for the SNTP configuration are available in the CONFIG mode.
3.5.4.1
Enter CONFIG mode
[Command]
In the Privileged EXEC mode
config
[Command Execution Echo]
raisecom(config)#
21
www.raisecom.com
3.5.4.2
User Manual
Obtain time from a specified SNTP server
[Command]
sntp server A.B.C.D
[Example]
Obtain time from the host with IP address 192.168.1.10
raisecom(config)# sntp server 192.168.1.10
3.5.4.3
Stop obtaining time from a specified SNTP server
[Command]
no sntp server
[Example]
Stop obtaining time from the host with IP address 192.168.1.10
raisecom(config)# no sntp server
3.5.5
Setup RADIUS
The system supports RADIUS user login authentication. It will send the user name and the password
of the login user to the RADIUS server to process the authentification. The corresponding
configuration must be completed in the CONFIG mode.
3.5.5.1 Enter the CONFIG Mode
[Command]
config
[Command Execution Echo]
raisecom(config)#
3.5.5.2 Set up/Delete the IP Address of the RADIUS Server
[Command]
[no] radius A.B.C.D
[Description]
Set up/Delete the IP address of the RADIUS server, and send user name and password to the
server for authentication.
[Example]
Set 192.168.1.10 to be the IP address of the RADIUS server:
22
www.raisecom.com
User Manual
raisecom(config)# radius 192.168.1.10
3.5.5.3 Set up/Delete the shared key used by user and server when RADIUS authenticates the server
[Command]
[no] radius-key
[Description]
Set up/Delete the shared key of the user and the server used when RADIUS authenticates the
server.
[Example]
Set up the shared key of the user and the server used when RADIUS authenticates the server to be
“raisecom”.
raisecom(config)# radius-key raisecom
23
www.raisecom.com
User Manual
Chapter 4 System Maintenance
4.1
Maintenance Tasks
Management of configuration files: view and store configuration files in the system, export
configuration files to external storage, and import configuration files from external storage.
Management of Agent program: view the information of the program, export Agent program to
external storage, and upgrade Agent program.
When the configuration file or Agent program goes between RC002-NMS1 and the external storage,
RC002-NMS1 is considered as a FTP client and the PC where the external storage resides is
configured to be a FTP server. After specifying an account on the server, the client (RC002-NMS1)
should have corresponding settings.
4.2
Configuration File Management
¾
The current configuration of the system is stored in the following files.
system.txt
hostconf.txt
slotconf.txt;
¾
¾
4.2.1
Users can use command “write” to save the configuration files to FLASH memory. The
system will load the configuration information during the next startup automatically.
Users can use command “download/upload” to exchange configuration files between
RC002-NMS1 and external storage, via FTP or TFTP
View Information of Configuration Files
[Command]
dir (c:|d:)
[Function]
View information of the files in the FLASH memory.
[Parameters]
c: files in the system file section
d: files in the configuration file section
[Example]
Read the configuration file section
raisecom#dir d:
size
date
time
name
24
www.raisecom.com
User Manual
--------------------------------------------
4.2.2
269
Jan-01-1980
00:00:00
hostconf.txt
1340
Jan-01-1980
00:00:00
system.txt
81
Jan-01-1980
00:00:00
usercfg.txt
7680
Jan-01-1980
00:00:00
slotconf.txt
Save the Current Configuration
[Command]
write
[Function]
Save current system configuration.
[Command Line Mode]
Privileged EXEC mode
[Example]
raisecom# write
Writing running-config to flash, please wait...
Successfully write to flash
4.2.3
Delete the Configuration
[Command]
del FILENAME
[Function]
Delete the specified configuration file
[Command Line Mode]
Privileged EXEC mode
[Example]
raisecom#del slotconf.txt
delete file slotconf.txt successfully.
4.2.4
Export Current Configuration
[Command]
upload startup-config (tftp | ftp)
[Function]
Export the current system configuration file to an external storage, via TFTP or FTP protocol.
25
www.raisecom.com
User Manual
[Command Line Mode]
Privileged EXEC mode
[Additional Parameter]
File name (system.txt; hostconf.txt; slotconf.txt)
system.txt: SNMP-relevant information in the Agent, including IP address and port number for
TRAP receiving, system contact information, system name, location, community string,
temperature threshold, and alarm enabling status.
hostconf.txt: information about the Agent, including IP address, subnet mask, bit rate at the
Ethernet port, duplex mode, auto-negotiation enabling status, and SNTP configuration information
slotconf.txt: the configuration information of all the service modules in chassis.
[Example]
raisecom#upload startup-conf ftp
Please input server IP Address: 192.168.1.251
Please input FTP User name:target
Please input FTP Password:target
Please input FTP Server File Name: slotconf.txt
4.2.5
Import System Configuration
[Command]
download startup-config (tftp | ftp)
[Function]
Import configuration files save on an external storage to RC002-NMS1 system, via TFTP or FTP
protocol.
[Command Line Mode]
Privileged EXEC mode
[Additional Parameters]
File name (system.txt; hostconf.txt; slotconf.txt)
[Example]
raisecom#download startup-config ftp
Please input server IP Address: 192.168.1.251
Please input FTP User name:target
Please input FTP Password:target
Please input FTP Server File Name: hostconf.txt
Loading, please wait...
Loading: 268 ... done
26
www.raisecom.com
User Manual
Writing to flash, please wait...
.finished
You've successfully download new config file
new config works after the device reboots ...
4.2.6
Delete the configuration files of local cards
[Command]
erase slot <1-4> <1-15>
[Function]
Delete the configuration information of the local card in chassis <1-4> slot <1-15>.
[Parameter]
<1-4>: chassis index
<1-15>: slot index
[Command Line Mode]
Privileged EXEC mode
[Command Execution Echo]
Set successfully!
please execute “write” to save!
[Example]
Delete the configuration information of the card in chassis 1 slot 4.
raisecom# erase slot 1 4
4.2.7
Delete the configuration file on the first-layer remote card
[Command]
erase device1 <1-4> <1-15> <1-2>
[Function]
Delete the configuration information of the first-layer remote card with device ID <1-2> and is
connecting to the card in chassis <1-4> slot <1-15>.
For point-to-point application, the device ID is always 1.
[Parameter]
<1-4>: chassis index
<1-15>: slot index
<1-2>: remote device ID
[Command Line Mode]
27
www.raisecom.com
User Manual
Privileged EXEC mode
[Command Execution Echo]
Set successfully!
please execute “write” to save!
[Example]
Delete the configuration information of the first-layer remote card with the device ID 1 and is
connecting to the card in chassis 1 slot 4.
raisecom# erase device1 1 4 1
4.2.8
Delete the configuration file on the second-layer remote card
[Command]
erase device2 <1-4> <1-15> <1-4>
[Function]
Delete the configuration information of the second-layer remote card with device ID <1-4> and is
connecting to the card in chassis <1-4> slot <1-15>.
[Parameter]
<1-4>: chassis index
<1-15>: slot index
<1-4>: second-layer remote device ID
[Command Line Mode]
Privileged EXEC mode
[Command Execution Echo]
Set successfully!
please execute “write” to save!
[Example]
Delete the configuration information of the second-layer remote card with the device ID 1 and is
connecting to the card in chassis 1 slot 4.
raisecom# erase device2 1 4 1
4.3
Start File Management (the Agent Program)
¾
¾
¾
Agent program file is based on embedded operation system. The SNMP function will be
loaded when the power supply is on.
Use command “dir”, users can view the files in FLASH memory.
Use command “show version”, users can view the software version information.
28
www.raisecom.com
4.3.1
User Manual
View information of the Agent Program
[Command]
dir (c:|d:)
[Function]
View files information in the FLASH memory.
[Parameters]
c: files in system file section
d: files in configuration file section
4.3.2
Export the Agent Program
[Command]
upload system-boot (tftp | ftp)
[Function]
Export the current Agent program to an external storage, via TFTP or FTP protocol.
[Command Line Mode]
Privileged EXEC mode
[Additional Parameters]
File name
[Example]
The text in “/* */” is the comments. The corresponding parameter is specified by users.
raisecom# upload system-boot ftp
Please input server IP Address: 1.0.0.1
Please input FTP User name:test
Please input FTP Password:test
Please input FTP Server File Name: /* Any file name*/
4.3.3
Import Agent Program (Agent program upgrade)
[Command]
download system-boot (tftp | ftp)
[Function]
Upgrade the Agent program, via TFTP or FTP protocol.
[Command Line Mode]
Privileged EXEC mode
[Additional Parameters]
29
www.raisecom.com
User Manual
The text in “/* */” is the comments. The corresponding parameters are left for user to specify.
[Example]
raisecom# download system-boot ftp
Please input server IP Address: 1.0.0.1
Please input FTP User name:test
Please input FTP Password:test
Please input FTP Server File Name: /* the Agent program name on external storage*/
30
Address: 2nd Floor, South Building of Rainbow Plaza, No.11 Shangdi Information Road, Haidian
District, Beijing
Postcode: 100085
Tel: +86-10-82883305
Fax: +86-10-82883056
Email:
[email protected] http://www.raisecom.com