1
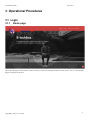
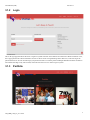
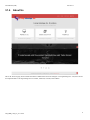
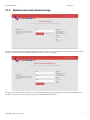
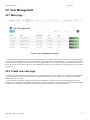
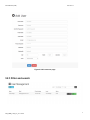
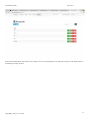
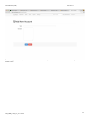
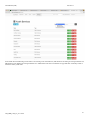
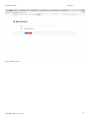
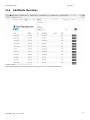
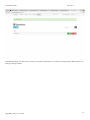
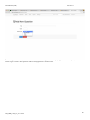
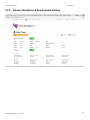
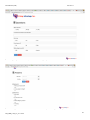
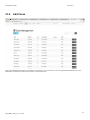
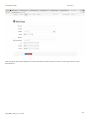
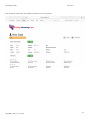
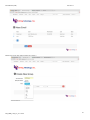
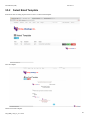
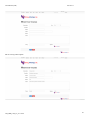
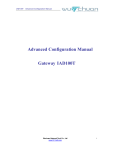
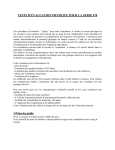
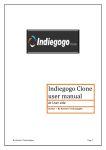
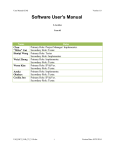
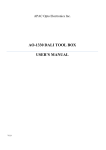
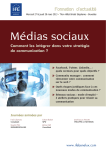
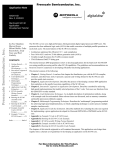
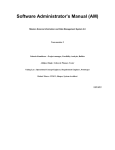
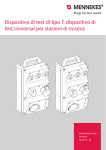
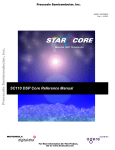
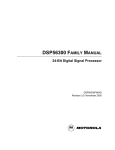
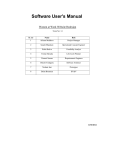
User Manual (UM)
Version 1.1
Software User's Manual
E-Lockbox
Team 08
Development Team
Jian Lei
Role(s): Project Manager / Builder
Contact: [email protected]
Da Lu
Role(s): Prototyper / System/Software Architect
Contact: [email protected]
Cheng Cheng
Role(s):Feasibility Analyst / Tester
Contact: [email protected]
Hanadi Omar A Mardah
Role(s): Life Cycle Planner / UML modeler
Contact: [email protected]
Mu Bai
Role(s): Requirements Engineer / Builder
Contact: [email protected]
Xiaochen Wang
Role(s): Operational Concept Engineer / Builder
Contact: [email protected]
Garret Catron
Role(s): IIV&V / Quality Focal Point
Contact: [email protected]
12/1/2014
UM_TRR_F14a_T8_V1.1.docx
i
Version Date: 12/1/2014
Table of Contents
Version History
Date
Author
Version
Changes made
11/21/14
Hanadi Mardah
1.0
• Initial User manual draft
• The initial user Manual draft its
created as a guideline for the CCD
clients presentation
12/1/14
Hanadi Mardah
1.1
• User Manual second version
• Create new functions (mass email,
security questions) and modify login
page
UM_TRR_F14a_T8_V1.1.docx
Rationale
ii
Table of Contents
Table of Contents
VERSION HISTORY .................................................................................................................................... II TABLE OF CONTENTS ............................................................................................................................. III TABLE OF TABLES .................................................................................................................................. III TABLE OF FIGURES ................................................................................................................................. III 1. 2. Introduction......................................................................................................................................................... 1 1.1 System Overview ........................................................................................................................................ 1 1.2 System Requirements ................................................................................................................................. 1 Installation Procedures........................................................................................................................................ 1 2.1 Initialization procedures ............................................................................................................................. 1 2.2 Re-installation ............................................................................................................................................. 1 2.3 De-installation............................................................................................................................................. 1 3. Operational Procedures ....................................................................................................................................... 2 4. Troubleshooting ................................................................................................................................................ 44 4.1 Frequently Asked questions ...................................................................................................................... 44 4.2 Error Codes and Messages........................................................................................................................ 44 4.3 Note........................................................................................................................................................... 44 Table of Tables
No table of figures entries found.
Table of Figures
No table of figures entries found.
UM_TRR_F14a_T8_V1.1.docx
iii
User Manual (UM)
Version 1.1
1. Introduction
1.1 System Overview
The purpose of our system E-Lockbox is to help employees working at Living Advantage manage their documents securely and
conveniently. E-Lockbox will be secure, yet accessible to gather and hold records on youth in the foster care system. E-Lockbox will
help recruit such youth and mentors, both directly and indirectly. This allows them to be identifiable and able to receive services and
resources from the community on a consistent basis. They can better advocate for themselves as we assist in setting up a database for
their personal history of information. They will be provided with access to continuous on line education and offered independent
living skills and employment resources.
The website will serve as a virtual online community for youth to voice their opinions, achievements, be engaged at our events and
activities that help promote lifelong connections to supportive adults and peers for a higher rate of self sufficiency
1.2 System Requirements
1.2.1
Hardware Requirements
There is no specific hardware needed for running the system except a computer with Internet access.
1.2.2
Software Requirements
Although E-Lockbox is going to be deployed in Go Daddy and use Amazon S3 to store vital documents and no specific requirements
are needed, E-Lockbox has been tested on the following and desirable software configurations:
Software Required
Operative system
Web Browser
1.2.3
Name and Version
Windows 8, Mac OS 10.8
Chrome, Safari, Firefox
Other Requirements
2. Installation Procedures
No installation is needed.
2.1 Initialization procedures
2.2 Re-installation
2.3 De-installation
UM_TRR_F14a_T8_V1.1.docx
1
User Manual (UM)
Version 1.1
3. Operational Procedures
3.1 Login
3.1.1
Home page
This is the home page of the E-lockbox system, which gives users more friendlily introduction of the system. Also, it is more modern
design of interface for the users.
UM_TRR_F14a_T8_V1.1.docx
2
User Manual (UM)
3.1.2
Version 1.1
Login
This is the login page that allows the users to login into system with more secure features are used such as Email verification. Also,
this is page provides the contact information for users to direct contact LivingAdvantage office. Moreover, if the user forgot the
password, then he or she can use link Forgot your password? That is to reset the password through emailed link. Email verification
will send the four-digit verify code to email, which the user has to use it in order to login to system.
3.1.3
Portfolio
UM_TRR_F14a_T8_V1.1.docx
3
User Manual (UM)
3.1.4
Version 1.1
About Us
This is the About as page, which includes the names of administrator and case managers in Livingadvantage Inc. Also, there are the
four important links of Livingadvantage Inc into Twitter, Facebook, Youtube, and Linkedln.
UM_TRR_F14a_T8_V1.1.docx
4
User Manual (UM)
3.1.5
Version 1.1
Remind and reset password page
This page is about the forgot password and reminded it. When user press link “Forgot password?” then this page is showed to user to
reset his or her password via email address. Otherwise the user can return to login page
This page is when the user wants to change or reset a new password. This page is showed when the user press emailed link in his or
her email. Also, the user can return back to login if he or she remembered the password.
UM_TRR_F14a_T8_V1.1.docx
5
User Manual (UM)
Version 1.1
3.2 User Management
3.2.1 Main page
Figure 1 User management home page
After clicking the new button under the label ‘User Management’, the system would redirect to creating a new user page(Chapter
1.2). At the right of the home page, there is a level filter and a search text field for searching(Chapter 1.3). The system lists all users
sorted by their level and status, including users’ name, email, phone-number, level and status. There are two buttons at the right of a
item. The view button is used for viewing one user’s information (Chapter 1.4). The edit button is used for editing user’s information
(Chapter 1.5).
3.2.2 Create new user page
Creating a new user needs user’s basic information, like first name, last name, email, address, etc...Furthermore, an administrator
can set a username and a password for the new user. The system would set the new user’s status as active, and the administrator
should set the new user’s level.
The save button at the bottom of the page is used for saving information of the new user. The system would provide success
messages or error messages for the administrator according to the process responses. The information in the form like phone number
or email have fixed format, and the system would check them when the administrator submit the information.
UM_TRR_F14a_T8_V1.1.docx
6
User Manual (UM)
Version 1.1
Figure 2 Add a new user page
3.2.3 Filter and search
UM_TRR_F14a_T8_V1.1.docx
7
User Manual (UM)
Version 1.1
Figure 3 Results after using filters and search field
In the system, we have two kinds of filters. One is a level filter. The administrator can choose people with a same level. The other
one is a text field. The administrator can use a user’s first name, last name or email as a search criteria. After clicking the search
button, the system would return expected information.
3.2.4 View user information
Figure 4 View user information
There are two buttons in the view user information page, edit button and reset password button. Edit button is same to the edit button
in the home page. Reset password button is used for the administrator resetting password for a specific user.
Figure 5 Reset password page
UM_TRR_F14a_T8_V1.1.docx
8
User Manual (UM)
Version 1.1
3.2.5 Edit user information
Administrator can change all information for a user. In Figure 6.
Figure 6 Edit user information
UM_TRR_F14a_T8_V1.1.docx
9
User Manual (UM)
Version 1.1
3.3 Case Management
3.3.1
Add/Delete Activity Codes
Under Settings dropdown menu, admistrators can click Activity Codes to go to Activity Codes Main Page.
UM_TRR_F14a_T8_V1.1.docx
10
User Manual (UM)
Version 1.1
After clicking the New button, administrator can enter Name and Description to create a new Activity Code. Editing an exiting
Activity Code is similar to this.
UM_TRR_F14a_T8_V1.1.docx
11
User Manual (UM)
3.3.2
Version 1.1
Add/Delete Accounts
Under Settings dropdown menu, admistrators can click Accounts to go to Accounts Main Page.
UM_TRR_F14a_T8_V1.1.docx
12
User Manual (UM)
Version 1.1
In the Accounts Main Page, New button is for creating a new Account, Edit button is for editing an exiting Account, Delete button is
for deleting an exiting Account.
UM_TRR_F14a_T8_V1.1.docx
13
User Manual (UM)
Version 1.1
After clicking the New button, administrator can enter Name and Description to create a new Account. Edit an exiting Account is
similar to this.
UM_TRR_F14a_T8_V1.1.docx
14
User Manual (UM)
3.3.3
Version 1.1
Search/Add/Delete Youth Services
Under Settings dropdown menu, admistrators can click Youth Services to go to Youth Services Main Page.
UM_TRR_F14a_T8_V1.1.docx
15
User Manual (UM)
Version 1.1
In the Youth Services Main Page, New button is for creating a new Youth Service, Edit button is for editing an exiting Youth Service;
Delete button is for deleting an exiting Youth Service. Administrator can select a Youth Service type and enter certain key words to
search for certain youth cases.
UM_TRR_F14a_T8_V1.1.docx
16
User Manual (UM)
Version 1.1
After clicking the New button, administrator can enter Name and select a Type to create a new Youth Service. Edit an exiting Youth
Service is similar to this.
UM_TRR_F14a_T8_V1.1.docx
17
User Manual (UM)
3.3.4
Version 1.1
Add/Delete Questions
Under Settings dropdown menu, admistrators can click Questions to go to Questions Main Page.
UM_TRR_F14a_T8_V1.1.docx
18
User Manual (UM)
Version 1.1
In the Questions Page, New button is for creating a new Question, Edit button is for editing an exiting Questions, Delete button is for
deleting an exiting Question.
UM_TRR_F14a_T8_V1.1.docx
19
User Manual (UM)
Version 1.1
After clicking the New button, administrator can enter Title and Integer Order for displaying Question in the nth place, and select an
Answer Type to create a new Question. Edit an exiting Question is similar to this.
UM_TRR_F14a_T8_V1.1.docx
20
User Manual (UM)
3.3.5
Version 1.1
Answer Questions & See Answers History
In View Case page, Questionnaire button is for answering questions, Answers button is to show all question answering history record.
UM_TRR_F14a_T8_V1.1.docx
21
User Manual (UM)
Version 1.1
After clicking the Questionnaire button, user can answer all assigned questions.
User can use Begin Date and End Date filter to see all Answers history record during the selected period.
UM_TRR_F14a_T8_V1.1.docx
22
User Manual (UM)
3.3.6
Version 1.1
Add Cases
In the Case Mangement Main Page, New button is for creating a Case. View button is for viewing detailed information of a Case.
Admistrator can enter keywords in the search bar to find certain Cases.
UM_TRR_F14a_T8_V1.1.docx
23
User Manual (UM)
Version 1.1
After clicking the New button, admistrator can enter information required to create a new Case. Account type is from Accouts
described above.
UM_TRR_F14a_T8_V1.1.docx
24
User Manual (UM)
Version 1.1
After clicking the View button, the complete information of a Case is diplayed.
UM_TRR_F14a_T8_V1.1.docx
25
User Manual (UM)
UM_TRR_F14a_T8_V1.1.docx
Version 1.1
26
User Manual (UM)
Version 1.1
In the View Case Page, Edit button is for editing related fields information, Add button is for adding related fields information.
UM_TRR_F14a_T8_V1.1.docx
27
User Manual (UM)
3.3.7
Version 1.1
Generate Username and Password
In the View Case Page, admistrator can click Generate username & password button to generate Username and Password for the target
person of this specific Case.
UM_TRR_F14a_T8_V1.1.docx
28
User Manual (UM)
Version 1.1
After clicking the Generate username & password button, admistrator can enter Username and Password to generate Username and
Password for the target person of this specific Case.
UM_TRR_F14a_T8_V1.1.docx
29
User Manual (UM)
3.3.8
Version 1.1
Upload Vital Documents
At the bottom of View Case Page, admistrator can Upload Vital Documents and View Vital Documents throught clicking the Upload
button and View button.
UM_TRR_F14a_T8_V1.1.docx
30
User Manual (UM)
Version 1.1
After clicking the Upload button, admistrator can select a document Type, enter a Description and choose a file from his/her disk to be
uploaded.
UM_TRR_F14a_T8_V1.1.docx
31
User Manual (UM)
Version 1.1
3.4 Report
3.4.1
Case Report
From the menu bar the user can choose the Reports tap to add new report as you see in the following.
Select Type of report to be generated.
UM_TRR_F14a_T8_V1.1.docx
32
User Manual (UM)
Version 1.1
Case Report generation path, user can select which attributes to be displayed.
After select Cases in the previous step, Case Report generation path will be displayed, user can select by which attribute the Report
results will be grouped.
UM_TRR_F14a_T8_V1.1.docx
33
User Manual (UM)
UM_TRR_F14a_T8_V1.1.docx
Version 1.1
34
User Manual (UM)
Version 1.1
Select Account filter and Show Only filter to get the results user needs.
User can also add other filters if he/she needs. All filters can be gotten by clicking the Add Filter button.
UM_TRR_F14a_T8_V1.1.docx
35
User Manual (UM)
Version 1.1
After clicking Next button in above step, report results user needs is displayed. After clicking the Export to CSV button, user can save
the report results as .csv extension file to his/her computer.
UM_TRR_F14a_T8_V1.1.docx
36
User Manual (UM)
Version 1.1
The Summarize button is for expanding or collapsing all the report results.
3.4.2
Activity Report
UM_TRR_F14a_T8_V1.1.docx
37
User Manual (UM)
UM_TRR_F14a_T8_V1.1.docx
Version 1.1
38
User Manual (UM)
Version 1.1
After selecting Activities in Reports type selection step, Activity Report path will be displayed, it is similar to Case Report part except
that user can select Start Date and End Date filter.
The Activity Report results is displayed after clicking Next button in previous step. Export to CSV and Summarize button do the same
thing as Case Report results part.
UM_TRR_F14a_T8_V1.1.docx
39
User Manual (UM)
Version 1.1
3.5 Frequently Asked questions
3.5.1
Specific Recipients
This is Step 1 of send mass email; you can choose one group that you want to send email. Click button click to select specific youth
users that you want to send an email.
Click or unclick the checkbox before the uses info to include or exclude specific user in the group email receivers
UM_TRR_F14a_T8_V1.1.docx
40
User Manual (UM)
Version 1.1
Add an new group using filter contains and equal(=)
UM_TRR_F14a_T8_V1.1.docx
41
User Manual (UM)
3.5.2
Version 1.1
Select Email Template
From menu click on Setting tap then click on ‘select’ to add an email template
View the template
Add an new Email Template
UM_TRR_F14a_T8_V1.1.docx
42
User Manual (UM)
Version 1.1
Edit an existing email template
UM_TRR_F14a_T8_V1.1.docx
43
User Manual (UM)
Version 1.1
4. Troubleshooting
4.1 Frequently Asked questions
<< List Frequently Asked Questions by operators, and answers to those questions.>>
4.2 Error Codes and Messages
Error/ Message
User creation fields
uncompleted
Case creation fields
uncompleted
Report generation attributes
not selected
Meaning of the message
One or more fields of the user creation fields
cannot be empty or incorrect
One or more fields of the case creation fields
cannot be empty or incorrect
At least one attribute should be selected
Action to be taken
Complete or modify the information in the
pointed field
Complete or modify the information in the
pointed field
Select at least one attribute
4.3 Note
Term
Accounts
Summarize
Meaning
Accounts used to show the types of cases.
Expand or Collapse All Fields of a block in Report Results
UM_TRR_F14a_T8_V1.1.docx
44