1
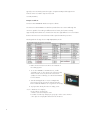
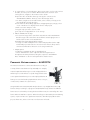
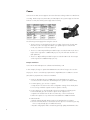
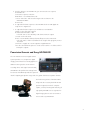
Avid Postproduction
HD Cameras and Decks Workflow Guide
Avid® Media Composer ®, Avid Xpress® Pro, Avid NewsCutter ®
Table of Contents
Introduction . . . . . . . . . . . . . . . . . . . . . . . . . . . . . . . . . . . . . . . . . . . . . . . . . . . . . . . . . . . . . . . . . . . . . . . . . . . . . . . . .1
Sony XDCAM . . . . . . . . . . . . . . . . . . . . . . . . . . . . . . . . . . . . . . . . . . . . . . . . . . . . . . . . . . . . . . . . . . . . . . . . . . . . . . . .2
Sony XDCAM – HD . . . . . . . . . . . . . . . . . . . . . . . . . . . . . . . . . . . . . . . . . . . . . . . . . . . . . . . . . . . . . . . . . . . . . . . . . . .3
Panasonic P2 . . . . . . . . . . . . . . . . . . . . . . . . . . . . . . . . . . . . . . . . . . . . . . . . . . . . . . . . . . . . . . . . . . . . . . . . . . . . . . . . .3
Panasonic Varicam camera - AJ-HDC27H . . . . . . . . . . . . . . . . . . . . . . . . . . . . . . . . . . . . . . . . . . . . . . . . . . . . . . . . .5
JVC . . . . . . . . . . . . . . . . . . . . . . . . . . . . . . . . . . . . . . . . . . . . . . . . . . . . . . . . . . . . . . . . . . . . . . . . . . . . . . . . . . . . . . . .7
Canon . . . . . . . . . . . . . . . . . . . . . . . . . . . . . . . . . . . . . . . . . . . . . . . . . . . . . . . . . . . . . . . . . . . . . . . . . . . . . . . . . . . . . .8
Panavision Genesis and Sony HDCAM-SR . . . . . . . . . . . . . . . . . . . . . . . . . . . . . . . . . . . . . . . . . . . . . . . . . . . . . . . .9
Conclusion . . . . . . . . . . . . . . . . . . . . . . . . . . . . . . . . . . . . . . . . . . . . . . . . . . . . . . . . . . . . . . . . . . . . . . . . . . . . . . . . .10
Introduction
The following document is a workflow guide to using several popular cameras and decks
with Avid editing products. Organized by manufacturer, a step-by-step example for each
of these representative cameras or decks will be shown. Although there can be many
ways to work with the myriad of devices available, this document focuses on the most
popular recommended practices for Avid editing systems.
NOTE: Avid Liquid™ editing products are in a separate document.
1
Sony XDCAM
Sony XDCAM decks and camcorders use an
optical disc with a capacity of up to 23.3 GB
to store recorded media. XDCAM SD devices
can record media in high-resolution MPEG
IMX and DVCAM formats. At the same time, XDCAM devices create corresponding
low-resolution proxy media (MPEG-4). This allows you to work quickly with the proxy
media in an off-line editing session and then later conform the proxy media to the
corresponding high-resolution media. Avid Media Composer and NewsCutter systems
support all XDCAM SD resolutions, while Avid Xpress Pro software supports the DVCAM
resolution only.
Although a connection can be made via either IEEE-1394 (Sony iLink) or Ethernet, the
following example will address the direct 1394 connection workflow.
Example workflow 1394 Connection:
Sony PDW-1500 XDCAM deck with Media Composer Adrenaline™ PC
The following example workflow for an i.Link 1394 FAM (file access mode) connection can
be used for all Sony XDCAM cameras and decks:
1. Make sure the deck is set to FAM mode (Deck must be set to “PC remote” and
Sony ProDisc driver loaded on PC)
2. Optional - Check import settings for desired behavior
• Automatic proxy import
• Import essence marks as locators
• Import proxy, high-res, or both from disk
3. Connect the XDCAM device via 1394 to the computer (XDCAM disc will mount as
a drive in operating system)
4. Import the proxy media by any of the following methods:
• Using the File menu command “import XDCAM proxy”
• Automatically – based on “import settings”
• Drag and drop XDCAM clips to bin – based on “import settings”
Note: it is also possible to import proxies from a drive other than the XDCAM
disc, even from an FTP server. The XDCAM disk structure must be maintained and
located at the root level of the given volume/drive. Be sure to copy the XML data
at the root level when doing this. See Avid help or User Guide for more
information
5. Enter a “disk label” at the prompt (this disk label name will be used later in the
high resolution import step)
6. Edit the proxy media (MPEG-4).
• For best performance, use “draft quality” from the video display settings and
deselect 10-bit processing (video display settings).
2
7. With sequence highlighted in the bin, select the “Clip > Batch Import” command
to import native DVCAM or MPEG IMX media, replacing the proxy media with the
high-resolution media.
• This will import only those portions of the high resolution clip necessary for
the sequence
8. Output the finished sequence:
• Play the high-resolution sequence out as standard “digital cut”
• Send to playback server (if using Transfer Manager)
Note: direct file-based “write back” to an XDCAM is planned for a future release
Sony XDCAM – HD
Sony’s new XDCAM HD format uses the MPEG HD codec for video recording and
uncompressed audio. Frame rates supported are 59.94i, 50i, 25p, 29.97p and 23.976p.
The recording bit rate is 35, 25 (HDV), and 18 Mb/s. Avid plans to introduce XDCAM HD
support in the next major release for all XDCAM resolutions. (29.97p support is planned
for a future release)
The workflow for Sony XDCAM HD devices is identical to the XDCAM SD workflow with
the following differences:
1. Sony “Slow and Quick motion” capability is planned for a future release
2. Avid Xpress Pro software will support the 25 Mb/s CBR (HDV) resolution only
3. Native XDCAM HD files must be transcoded to Avid DNxHD® media to be output
over HD-SDI
Note: direct XDCAM HD write back support is planned for a future release
Panasonic P2
Panasonic P2 decks and camcorders record DVCPRO at 25 and 50 Mb/s (also known as
DV25 and DV50) to solid-state memory cards. With the introduction of the AG-HVX200
camera, Panasonic has added support for DVCPRO HD at 100 Mb/s (also known as
DV100). Avid editing applications offer the fastest possible workflow with direct editing
of P2 media without the need to capture or
import. Since P2 card media is expensive, many
users also like to transfer P2 media to local or
shared storage. Panasonic has created an external
60 GB hard drive called “P2 Store” for this
purpose. P2 cameras (such as the AG-HVX200)
3
typically connect to Avid systems through a computer’s USB port although SD DV
formats can be recorded to tape and accessed
via 1394 (FireWire).
Example workflow:
Panasonic AG-HVX200 with Media Composer software
The Panasonic AG-HDX200 is a multi-format, multi-frame rate camera. Although this
camera is capable of recording 21 different video formats, the formats currently
supported by Avid software are shown below. Note the slight difference in nomenclature
between the Panasonic named format and the equivalent Avid Project name.
Working with HD footage shot in 720p 24pN (Native) mode:
1. Make sure the Panasonic P2 drivers are installed on
the editing system
2. To use the HVX200 as a FireWire device, enable
“PC/Dub mode” on the camera. The camera’s media
switch must be set to P2, which will cause the P2
card(s) to mount as a drive(s); see camera User Manual
for more details
3. Start the Avid application. Create a 720p/23.976
project (if necessary, select File> Mount all and/or
File>Load Media Database to recognize the P2 card(s)
4. To play media directly from the P2 card(s), select
“Tools > Media Tool” to display
the P2 “drives” and projects
a. Make a selection and press “OK”
b. Double click the clip and play in a pop-up or in the source monitor
c.The clips are now playable direct from the P2 device
4
5. To copy P2 files to a local media drive, there are two steps, one for video and one
for audio, since they are recorded to different directories on the P2 card:
a. Using the OS, navigate to the P2 device video folder
b. Open the video media files directory, and copy the contents to the
“Avid MediaFiles\MXF\1” directory on the Avid storage device
c. For audio, navigate to the P2 audio folder, select contents, and copy to the
same Avid folder used for the video
d. From within the Avid editing application and appropriate project type, select
“Tools > Media Tool” to display the P2 “drives” and projects
e. Make a selection and press “OK”
f. Drag the clips you wish to use into a bin
g. The clips are now playable from “local” storage
6. Edit the DVCPRO HD footage
a. You can mix footage of the same frame rate with SD and/or Avid DNxHD
based footage of the same frame rate and frame structure (progressive or
interlaced) in real time on the Avid timeline
b. Variable Frame Rate (VFR) workflow example:
i. Footage recorded at 720p 60 on the camera and played back in the 720p
23.976 Avid project will result in a smooth 2.5x slow motion effect; refer to
camera’s User Manual for directions on shooting in VFR mode
7. Output options
a. Output to a DVCPRO HD deck via 1394 digital cut
i. Select “DVCPRO HD” as the output mode in the Digital Cut tool.
b. Output to HD-SDI by first transcoding the sequence to Avid DNxHD
Note: “Writeback” to the P2 card is planned for a future release.
Panasonic Varicam camera – AJ-HDC27H
The Panasonic Varicam is a camera that allows the recording of
a variety of frame rates between 1 fps and 60 fps. For example,
material captured at 24 frames per second and played back at
24 frames per second will have no speed change, but the same
action captured at 48 frames per second and played back at 24
frames per second will result in playback that is twice as long or,
in video terms, a 50% slo-mo (slow motion).
Using Variable Frame Rate (VFR) with Avid products is very straightforward. The 720p
format is always recording to a progressive 60 (59.94) frame tape format. The different
frame rates are achieved by selecting the desired frame rate; the camera flags the “true”
frames within the 60 frame sequence. When these flags are detected by the Avid editing
system, only those frames are captured and stored to disk. When played back at the
project’s frame rate, either a slow motion or fast motion will result.
5
Example workflow:
AJ-HDC27H Camera with Avid Media Composer Adrenaline
In this example, there are several shots the will be filmed at the 59.94 rate in order to be
used as “slo-mo” shots at the project rate of 23.976. Final delivery is to DVCPRO HD.
1. Create an Avid project at 720p 59.94 or 23.976
a. For maximum flexibility of VFR, create a 720p 23.976 project; slo-mo will only
result in a project type that is of a slower frame rate than the shooting frame rate
2. Connect the Varicam camera to the Avid editing system via 1394 (FireWire)
3. Open the “Capture tool”
a. There is a “Preserve Varicam Frames” check box in the Capture Tool Interface
b. If turned off (the default state of the button), the capture will observe the flags
in the video stream and only capture those frames
c. This type of capture will result in a slow motion or fast motion depending on
original recording speed
d. If it is turned on, then every frame is captured (all 60 frames), essentially
ignoring the flagged frames
4. Edit the footage
a. Footage flagged as 59.94 plays back 2.5x slower
5. The final sequence can be output via 1394 “digital cut” to DVCPRO HD
Because of the nature of tape-based recording formats for VFR, there are some caveats
the user needs to be aware of when capturing and using VFR material:
a. The first time a capture is performed, it must be done on-the-fly or from a
START point. The user cannot log ahead of time the first time a capture is
done, because the duration of the logged clip will be different than the actual
duration of the captured clip depending on frame rate. The true duration of
the clip will be known once the first capture is done.
b. Once the first capture is done, it is possible to go back and “batch capture”
the original master clip at any point in the process.
c. Since the duration is properly logged for the clip on the master clip, a re-batch
capture of a VFR clip in a sequence will not be possible because the system
needs the START point of the original master clip. The same goes for a
consolidation; as long as the user keeps the bin with the original master clip or
does a “set bin display” for a sequence that has never been consolidated or
decomposed, it will be possible to recapture.
6
JVC
JVC has recently announced a “Pro HD” line with the
GY-HD100U and BR-HD50 Deck. The line supports SD via
DV format recording and HD via HDV format recording.
Media Composer, NewsCutter, and Avid Xpress Pro systems
support all SD DV formats. For HD, these Avid systems support the following:
In this example, footage is captured at 720p 30 direct to the DR-HD100U direct-to-disk
recorder unit (made by Focus Enhancements.)The HDV files are stored as .M2t files on
the HDD. 4:3 SD Stock footage is also used in the project. Client approval is via a
Windows Media HD clip. Final delivery is to HDCAM.
1. Create an Avid a 720p 29.97 HDV project on the Avid Xpress Pro system
2. Connect the hard disk recorder to the Avid system via FireWire (1394)
Note: The disk recorder must be in HDD mode to mount as a drive.
3. Use the OS to navigate to the HDV media on the drive and drag and drop the
M2T media files into a bin
a. This will cause a fast import of the media to the local Avid storage
i. The media is copied bit-for-bit in its native form to the Avid system.
Note: it is currently not possible to play back .M2T media directly on the Avid system
4. Edit the media
a. Mix the HDV media with NTSC media on the Avid timeline in real time
b. Use the reformat effects to reformat the SD 4:3 for a 16:9 delivery
c. Any titles and graphics will be created using the high-quality
Avid DNxHD codec
d. SD clips will be rendered to Avid DNxHD for the final output
5. Output the final sequence via one of the following:
a. Output a WM9 (VC1) HD file from “File > Export > Windows Media”
b. Output to HDCAM via HD-SDI by taking the sequence to a Media Composer
Adrenaline system with an Avid DNxcel™ board
7
Canon
Canon’s XL H1 HDV camera supports SD via DV format recording and HD via HDV format
recording. Media Composer, Newscutter, and Avid Xpress Pro systems support all SD DV
formats. For HD, these Avid systems support the following:
The following caveats apply when using this camera:
• The XL H1 has a mode that allows for the recording of 4 channels of audio with
HDV. This mode is not supported. When you capture tapes recorded in this
mode, only channels 1 and 2 are captured.
• There is no native 24p workflow provided for tapes recorded in 24F mode. These
tapes can be ingested in a 1080i 59.94 project only. This will retain the film look
(with pulldown).
• There is no 30p workflow provided for tapes recorded in 30F mode. These tapes
can be ingested in a 1080i 59.94 project only.
Example Workflow:
Canon XL H1 with Avid Xpress Pro software with Avid Mojo® SDI
In this example, footage is captured at 1080i 60. 4:3 SD archive footage is also used in
the project. There is a 4:3 delivery requirement to Digital Betacam in addition to an HD
(16:9) delivery requirement to Panasonic DVCPRO.
1. Create an Avid HDV project at 1080i 59.94 on the Avid Xpress Pro system
a. Connect the XL H1 camera to the Avid Xpress Pro system via 1394 (FireWire)
2. For HDV capture, go to Toolset > Capture
a. Setup the XL H1 camera in the deck configuration settings if not already done
b. You can log and batch capture media or capture on the fly
3. For SD capture, go to the format tab in the project window, and change the
format to 30i (this gives SD resolution options in the capture tool)
a. Capture SD material from the XL H1 in DV mode, or from another deck
b. When SD capture is over, switch the format tab back to 1080i 59.94 HDV
4. Edit the Media
a. Mix the HDV media with NTSC media on the Avid timeline in real time
b. Use the reformat effects to reformat the SD 4:3 clips for a 16:9 delivery (use clip
color to easily identify clips of a different format)
c. Any titles and graphics will be created using the high quality Avid DNxHD codec
8
5. Since the delivery is to DVCPRO HD, you can transcode our sequence
to DVCPRO HD
a. Select the sequence in the bin
b. Bin Menu > Consolidate/Transcode
c. Select “transcode” and select the target video resolution to be
“DVCPRO HD MXF”
d. Transcode
6. To output the final HD sequence to the DVCPRO deck via 1394 digital cut:
a. Clip menu > Digital Cut
7. To output the final SD sequence, we will deliver a 16:9 letterbox
a. Make a copy of the HD sequence
b. Switch the format tab to “30i”
i. This will “turn on” the Avid Mojo SDI downconvert SD output
c. Create a new video track
d. Place a 16:9 Letterbox effect (reformat effect) across the entire track
i. This will create a “filler” track effect for the length of the program; monitor
that track
e. Perform a “Digital cut” via SDI outputs to Digital Betacam
f. Use the other Reformat options to create center cut 4:3 or no effect at all for
anamorphic outputs
Panavision Genesis and Sony HDCAM-SR
The new Panavision Genesis Digital Camera
System provides a no-compromises digital
imaging environment for cinematographers. In
addition to being used as an HD Telecine
recording device and original camera format,
HDCAM SR is the preferred recording format
for Genesis. HDCAM SR provides the option for 10-bit 4:4:4 HD-RGB recording, which is
ideal for capturing the dynamic range and color gamut of all these acquisition formats.
The forthcoming release of Avid DS Nitris®
will provide the necessary dual-link HD-SDI
input and output channels for complete
capture, conform, finishing and mastering of
high-quality HD-RGB sources originated on
digital imaging devices such as Panavision
Genesis and Sony HDCAM SR.
9
Conclusion
Avid strives to develop and adopt leading industry standards, so its customers can
integrate Avid products into unique workflow solutions that are tailored to the individual
needs of their businesses. This holistic approach is already paying dividends to Avid
customers who are experiencing unparalleled efficiency and productivity. Our mission
is to continually advance Avid solutions to enable truly nonlinear workflows, so the post
production process itself can be as flexible, dynamic, and creative as each of the
individual tools in the collaborative workgroup.
10
Corporate Headquarters 800 949 AVID (2843)
Asian Headquarters
+ 65 6476 7666
European Headquarters + 44 1753 655999
To find your regional Avid office, visit www.avid.com/contact
©2006 Avid Technology, Inc. All rights reserved. Product features,
specifications, system requirements and availability are subject to change
without notice. Adrenaline, Avid, Avid Liquid, Avid Mojo, Avid Xpress,
Avid DNxHD, Avid DNxcel, do more, Media Composer, NewsCutter, and
Nitris are either registered trademarks or trademarks of Avid Technology, Inc.
or its subsidiaries in the United States and/or other countries. All other
trademarks contained herein are the property of their respective companies.
HCDWGWP0606