1
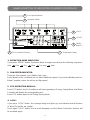
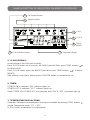
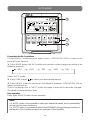
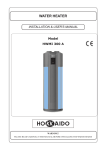
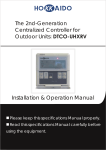
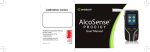
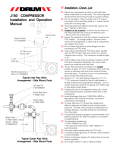
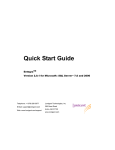
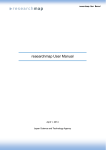
WIRED CONTROLLER
USER'S MANUAL
DTW - IHXR Model
WARNING!
PLEASE READ CAREFULLY THIS MANUAL BEFORE USING YOUR NEW WIRED CONTROLLER.
-1-
Table of Contents
SAFETY PRECAUTIONS.......................................................................................................... 3
NAME & FUNCTION OF INDICATORS ON WIRED CONTROLLER....................................... 4
NAME & FUNCTION OF BUTTONS ON WIRED CONTROLLER............................................ 6
CLOCK SETTING...................................................................................................................... 9
AUTO MODE........................................................................................................................... 10
COOL, HEAT, FAN MODES.....................................................................................................11
DRY MODE............................................................................................................................. 12
TIMER ON............................................................................................................................... 13
TIMER OFF ............................................................................................................................ 14
TIMER ON/OFF....................................................................................................................... 15
WIRED CONTROLLER'S USAGE CONDITIONS & CONNECTION ..................................... 16
-2-
SAFETY PRECAUTIONS
Please read the Safety Precautions carefully before using DTW - IHXR Wired Controller.
Do observe the following Safety Precautions, for they are very important.
Before reading the text, please be familiar with the following markers and icons, and comply
with the Precautions.
Markers
Icons
Indication
Markers
!
!
Icons
Indication
WARNING
The sign shows the risk of
death or serious injury will
be caused due to the wrong
operation.
FORBID. Action or procedure not allowed,
with serious effects on objects and people.
CAUTION
The sign shows the risk of
injury or the damage to the
property will ba caused due
to the wrong operation.
ENFORCE. Compulsory acton or procedure.
The missed observance could bring serious
effects on objects and people.
• A strict observance of the following instructions will prevent personal hurt and incidents to the
User. Moreover, correct operation and long life of the appliance will be ensured.
• The User must never attempt to install or repair the Wired Controller by himself.
WARNING
MOVE AND REPAIR
CAUTION
OPERATION
CAUTON
INSTALLATION
WARNING
!
• Please always contact the Retailer or the Authorized
Technical Service for installation of the Wired Controller.
Installation
commitment
Users must not install the Wired Controller by themselves.
A wrong installation may cause electric shocks, injuries
or fire.
Do not spray inflammable liquid on the Wired Controller, or fire
may be caused.
FORBID
Do not operate with wet hands.
Do not let water go into the Wired Controller, to avoid the danger
of electric shocks.
If you want to move or re-install your Wired Controller, please
always contact the Authorized Technical Service.
!
FORBID
Do not disassemble your Wired Controller.
If you need to disassemble the Wired Controller, please
contact the Authorized Technical Service.
A wrong disassembly may cause abnormal operation or
overheating, which may result in fire.
-3-
NAME & FUNCTION OF INDICATORS ON WIRED CONTROLLER
2
Fan Speed Indicator
1
Operation Mode
MODE AUTO COOL
SET
DRY
HEAT
FAN
LOCK
CLOCK SET
FAN
TEMP
SET
TIMER ON OFF
3
ECO Operation Display
7
4
LOCK
5
CLOCK
6
TIMER
ON/OFF
Temperature Display
1. OPERATION MODE INDICATOR:
If you press “MODE” button, Operation Mode changes according to the following sequence:
Auto
Cool
Dry
Heat
Fan only
Auto.
2. FAN SPEED INDICATOR:
There are 4 fan speeds: Low, Middle, High, Auto.
Some Models of air conditioner do not have Middle fan speed: if you select Middle speed on
Wired Controller, indoor fan will run at High speed.
3. ECO OPERATION DISPLAY:
Press ECO button: the Air Conditioner will start operating in Energy Saving Mode and Wired
Controller will display the corresponding icon.
Press ECO button again to exit Energy Saving Mode.
4. LOCK:
If you press “LOCK” button, the corresponding icon lights up, and indicates that all buttons
of Wired Controller are unable.
Press again “LOCK” button: the icon will disappear and the Wired Controller’s buttons will
be enabled again.
-4-
NAME & FUNCTION OF INDICATORS ON WIRED CONTROLLER
2
Fan Speed Indicator
1
Operation Mode
MODE AUTO COOL
SET
FAN
DRY
HEAT
FAN
LOCK
CLOCK SET
TEMP
SET
TIMER ON OFF
3
7
ECO Operation Display
4
LOCK
5
CLOCK
6
TIMER
ON/OFF
Temperature Display
5. CLOCK DISPLAY:
Usually displays the clock set currently.
Press CLOCK button for 4 seconds, the HOUR part will flash: press TEMP buttons
to adjust HOUR.
Press CLOCK button again, the MINUTE part flash: press TEMP buttons
to adjust
MINUTE.
After setting current time, please press CONFIRM button to complete the set.
6. TIMER:
If TIMER ON is selected, “ON” Indicator lights up.
If TIMER OFF is selected, “OFF” Indicator lights up.
If both TIMER ON & TIMER OFF are selected, both “ON” & “OFF” Indicators light up.
7. TEMPERATURE DISPLAY ZONE:
Generally, it displays set temperature, that may be modified by pressing TEMP buttons
and . Temperature range: 17°C ~ 30°C.
In “Fan” mode, temperature is not displayed.
-5-
NAME & FUNCTION OF BUTTONS ON WIRED CONTROLLER
MODE
1
TIME ON
2
TIME OFF
3
CLOCK
4
OK
5
RESET
6
TIME
ON
CLOCK
TIME
OFF
OK
7
ON/OFF
8
FAN SPEED
9
TEMP
10
TEMP
ECO
FAN SPEED
MODE
RESET
LOCK
SWING
TEMP
11
SWING
12
ECO
13
COOL ONLY/
COOL & HEATING
14
LOCK
COOL/HEAT
1. MODE BUTTON:
If you press this button, Operation Mode changes according to the following sequence:
AUTO
COOL
DRY
HEAT
FAN
2. TIME ON BUTTON:
Press this button once: TIMER ON function (Programmed Start) will be enabled.
The Wired Controller’s TIMER is not a clock, so it is necessary to set the time period not the exact time - at the end of which you would like the Air Conditioner to start automatically.
At each press of the button, setting time interval will increase by half an hour till 10 hours, and
by an hour from 10 to 24 hours.
To cancel TIMER ON function, set time to “0.0”.
3. TIME OFF BUTTON:
Press this button once: TIMER OFF function (Programmed Stop) will be enabled.
The Wired Controller’s TIMER is not a clock, so it is necessary to set the time period not the exact time - at the end of which you would like the Air Conditioner to stop automatically.
At each press of the button, setting time interval will increase by half an hour till 10 hours, and
by an hour from 10 to 24 hours.
To cancel TIMER ON function, set time to “0.0”.
-6-
NAME & FUNCTION OF BUTTONS ON WIRED CONTROLLER
4. CLOCK BUTTON:
To set current time.
When the air conditioner is electrified for the first time, or a reset of settings is carried out,
the Wired Controller displays “12:00”.
Press CLOCK button for 4 seconds. The HOUR part on the clock display flashes, push
TEMP buttons
to adjust hour.
Press CLOCK button again. The MINUTE part on the clock display flashes, push TEMP
buttons
to adjust minutes.
After clock setting, press OK button to complete the setting.
5. OK BUTTON:
To confirm current time setting.
After clock setting, press OK button and the setting
will be memorized. The clock will show current time.
6. RESET BUTTON:
Hidden button. Please use the point of a pencil or a pointed article to press this button:
all current settings will be cancelled and default settings will be restored.
7. ON/OFF BUTTON:
When the Wired Controller is off, press this button to switch it on and send setting information
to indoor PCB.
When the Wired Controller is on, press ON/OFF button to switch it off.
Warning!
If TIMER ON (Programmed Automatic Start) or TIMER OFF (Programmed
Automatic Stop) has been set, these settings will be cancelled. Therefore, never switch off
the Wired Controller (do not press ON/OFF button) after setting TIMER ON/OFF.
8. FAN SPEED BUTTON:
By pressing this button, it is possible to select fan speed: you can choose among “AUTO”,
“LOW”, “MED” and “HIGH”.
At each press of FAN SPEED button, fan speed changes according to the following sequence:
Automatic
Low
Medium
High
Note: Some Models of air conditioner do not have Middle fan speed: if you select Middle speed on
Wired Controller, indoor fan will run at High speed.
-7-
NAME & FUNCTION OF BUTTONS ON WIRED CONTROLLER
9. TEMP BUTTON :
• If you press this button, setting temperature will increase. If the button is kept pressed,
temperature value will increase rapidly (1°C per 0.5 seconds).
• This button is used also for adjusting clock (current time).
10. TEMP BUTTON :
• If you press this button, setting temperature will decrease. If the button is kept pressed,
temperature value will decrease rapidly (1°C per 0.5 seconds).
• This button is used also for adjusting clock (current time).
11. SWING BUTTON:
This button is enabled according to the Model of air conditioner.
If you press this button, the automatic swinging of the motorized louver will be enabled.
Press this button again to stop the automatic swinging of the louver.
12. ECONOMY BUTTON:
Press this button to start the air conditioner’s operation in Economy (Energy Saving) mode.
Press this button again to exit Economy mode.
This operation mode is suitable for sleeping time.
13. COOL ONLY/COOLING & HEATING SELECTION BUTTON:
Hidden button. Please use the point of a pencil or a pointed article to press this button.
For COOLING ONLY type, it will be no heating mode when pressing MODE button.
Factory default setting is COOLING & HEATING.
14. LOCK BUTTON:
Hidden button. Please use the point of a pencil or a pointed article to press this button: all
current settings are blocked and all buttons on Wired Controller are disabled.
Use this button to prevent accidental change of settings.
Press LOCK button again to exit lock mode.
-8-
CLOCK SETTING
MODE
SET
AUTO COOL
DRY
HEAT
FAN
CLOCK
TIME
OFF
OK
LOCK
CLOCK
TEMP
SET
TIME
ON
FAN
1
ECO
MODE
FAN SPEED
SWING
TEMP
2
3
RESET
LOCK
COOL/HEAT
Connecting the Air Conditioner
As the Air Conditioner is electrified for the first time, or a reset of setting is carried out,
the Wired Controller displays “12:00”.
1. Press CLOCK button for 4 seconds.
The HOUR part on the clock display flashes.
2. Press TEMP buttons
to adjust hour.
Press CLOCK button again: now the MINUTE part on the clock display flashes.
Press TEMP buttons
to adjust minutes.
3. Press OK button to confirm current time setting.
Note
• Before setting TIMER, set current time. TIMER setting is relative to the standard
time of operating Wired Controller.
After setting TIMER, it is not possible to modify current time.
-9-
AUTO MODE
3
MODE AUTO COOL
SET
DRY
HEAT
FAN
CLOCK
TIME
OFF
OK
LOCK
CLOCK
TEMP
SET
TIME
ON
FAN
ECO
MODE
FAN SPEED
SWING
TEMP
2
1
RESET
LOCK
COOL/HEAT
Connecting the Air Conditioner
Connect the Air Conditioner to the power source: “OPERATION” LED on Indoor Unit’s
panel will start flashing
1. Press MODE button: the Air Conditioner’s operation mode changes according to the
following sequence:
AUTO
COOL
DRY
HEAT
FAN
Select “AUTO” mode.
2. Press TEMP buttons
to select your desired temperature.
3. Press ON/OFF button to start the Air Conditioner’s operation: “OPERATION” LED on
Indoor Unit will light up.
The Air Conditioner runs in “AUTO” mode; fan speed is Auto and it cannot be changed.
The Wired Controller displays “Auto”.
Stop operation
Press again ON/OFF button to stop operation.
Notes
• In “AUTO” mode, it is not possible to select your desired fan speed, as it is automatically
selected by the inner electronics.
• In “AUTO” mode, it is possible to select the ECONOMY (Energy Saving) function (on
the Models of Air Conditioner which are provided of this function).
- 10 -
COOL, HEAT, FAN MODES
4
MODE AUTO COOL
SET
DRY
HEAT
FAN
CLOCK
TIME
OFF
OK
LOCK
CLOCK
TEMP
SET
TIME
ON
FAN
3
ECO
FAN SPEED
MODE
SWING
2
TEMP
1
RESET
LOCK
COOL/HEAT
Connecting the Air Conditioner
Connect the Air Conditioner to the power source: “OPERATION” LED on Indoor Unit’s
panel will start flashing.
1. Press MODE button: the Air Conditioner’s operation mode changes according to the
following sequence:
AUTO
COOL
DRY
HEAT
FAN
Select “COOL”, “HEAT” or “FAN” mode.
2. Press TEMP buttons
to select your desired temperature (except in “FAN” mode).
3. Press FAN SPEED button to select your desired fan speed:
Automatic
Low
Medium
High
Warning! Some Models of air conditioner do not have Middle fan speed: if you select Middle speed
on Wired Controller, indoor fan will run at High speed.
4. Press ON/OFF button to start the Air Conditioner’s operation: “OPERATION” LED on
Indoor Unit will light up.
The Air Conditioner will run in “COOL”, “HEAT” or “FAN” mode.
Stop operation
Press again ON/OFF button to stop operation.
Note
• In “FAN” mode, it is not possible to select your desired temperature.
- 11 -
DRY MODE
3
MODE AUTO COOL
SET
FAN
DRY
HEAT
CLOCK
TIME
OFF
OK
LOCK
CLOCK
TEMP
SET
TIME
ON
FAN
ECO
MODE
FAN SPEED
SWING
TEMP
2
1
RESET
LOCK
COOL/HEAT
Connecting the Air Conditioner
Connect the Air Conditioner to the power source: “OPERATION” LED on the Indoor Unit’s
panel will start flashing.
1. Press MODE button: the Air Conditioner’s operation mode will change according to the
following sequence:
AUTO
COOL
DRY
HEAT
FAN
Select “DRY” mode.
2. Press TEMP buttons
to select your desired temperature.
3. Press ON/OFF button to start the Air Conditioner’s operation: “OPERATION” LED on
the Indoor Unit will light up.
The Air Conditioner will run in “DRY” mode.
Stop operation
Press again ON/OFF button to stop operation.
Notes
• In “DRY” mode, FAN SPEED button is not enabled, therefore it is not possible to select
your desired fan speed.
• In “DRY” mode, it is not possible to select the ECONOMY (Energy Saving) function (on the
Models of Air Conditioner which are provided of this function).
- 12 -
TIMER ON
TIMER ON function allows to program the automatic start of the Air Conditioner, according
to your comfort needs. In this way, the Air Conditioner will start running at your desired time.
MODE
SET
AUTO
COOL
DRY
HEAT
FAN
FAN
Programmed Start - TIMER ON
Warning!
The Wired Controller’s TIMER is not a clock, so it
is necessary to set the time period - not the exact
time - at the end of which you would like the Air
Conditioner to start automatically.
TIMER setting is relative to the standard time of
operating Wired Controller.
Set current time before setting TIMER.
After setting TIMER, it is not possible to change
current time.
LOCK
SET
TEMP
SET
HOUR ON
TIME
ON
CLOCK
TIME
OFF
OK
1. Press TIME ON button: the display shows “SET”
and HOUR ON digits.
ECO
MODE
RESET
FAN SPEED
LOCK
SWING
TEMP
2. Press TIME ON button several times, till reaching
the time interval at the end of which you would like
to start the Air Conditioner’s operation.
At each press of the button, time interval increases
by 30 minutes till 10 hours, and by 60 minutes from
10 to 24 hours.
COOL/HEAT
3. The Wired Controller will send the signal to the
Indoor Unit 0.5 seconds after TIMER ON setting has
been completed.
To change/cancel TIMER ON setting
• To change TIMER ON setting, press TIME ON button again and repeat the setting procedure.
• To cancel TIMER ON setting, set time to “0.0”.
Exemple of setting for TIMER ON
SET
If you would like the Air Conditioner to start operation 6 hours after
the setting:
HOUR ON
Start
Off
Setting
1. Press TIME ON button: the display shows “SET” and HOUR ON
digits.
2. Press TIME ON button till the display shows “6:0”.
After 6 hours
3. Wait for 0.5 seconds, and TIMER ON will be set.
NOTES
1. Unlike operation modes, TIMER settings are not kept in memory by the microcomputer, therefore if a power
failure occurs, TIMER settings will be cancelled and need to be set again.
2. Before selecting TIMER settings, it is possible to choose your desired operation mode.
3. TIMER max. range is 24 hours, i.e. it is not possible to operate weekly settings.
4. To modify TIMER settings, press TIME ON button again and repeat the above procedure for TIMER ON setting.
- 13 -
TIMER OFF
TIMER OFF function allows to program the automatic stop of the Air Conditioner, according
to your comfort needs. In this way, the Air Conditioner will stop operation at your desired time.
MODE
SET
AUTO
COOL
DRY
HEAT
FAN
FAN
LOCK
SET
TEMP
SET
HOUR
TIME
ON
CLOCK
TIME
OFF
OK
OFF
ECO
FAN SPEED
MODE
RESET
LOCK
SWING
TEMP
COOL/HEAT
To change/cancel TIMER OFF setting
Programmed Stop - TIMER OFF
Warning!
The Wired Controller’s TIMER is not a clock, so it
is necessary to set the time period - not the exact
time - at the end of which you would like the Air
Conditioner to stop automatically.
TIMER setting is relative to the standard time of
operating Wired Controller.
Set current time before setting TIMER.
After setting TIMER, it is not possible to change
current time.
1. Press TIME OFF button: the display shows “SET”
and HOUR OFF digits.
2. Press TIME OFF button several times, till reaching
the time interval at the end of which you would like
to stop the Air Conditioner’s operation.
At each press of the button, time interval increases
by 30 minutes till 10 hours, and by 60 minutes from
10 to 24 hours.
3. The Wired Controller will send the signal to the
Indoor Unit 0.5 seconds after TIMER OFF setting has
been completed.
• To change TIMER OFF setting, press TIME OFF button again and repeat the setting
procedure.
• To cancel TIMER OFF setting, set time to “0.0”.
Example of setting for TIMER OFF
HOUR
SET
If you would like the Air Conditioner to stop operation 10 hours after
the setting:
OFF
1. Press TIME OFF button: the display shows “SET” and HOUR OFF
Stop
Operation
After 10 hours
digits.
2. Press TIME OFF button till “10” is displayed.
3. Wait for 0.5 seconds, and TIMER OFF will be set.
NOTES
1. Unlike operation modes, TIMER settings are not kept in memory by the microcomputer, therefore if a power
failure occurs, TIMER settings will be cancelled and need to be set again.
2. Before selecting TIMER settings, it is possible to choose your desired operation mode.
3. TIMER max. range is 24 hours, i.e. it is not possible to operate weekly settings.
4. To modify TIMER settings, press TIME OFF button again and repeat the above procedure for TIMER OFF setting.
- 14 -
TIMER ON/OFF
TIMER ON/OFF function allows you to program the automatic start of the Air Conditioner
in combination with the automatic stop, according to your comfort needs.
The Wired Controller’s TIMER is not a clock, so it is necessary to set the time period - not the
exact time - at the end of which you would like the Air Conditioner to start/stop automatically.
TIMER ON → TIMER OFF (Automatic Start followed by the Automatic Stop)
This function is useful if you would like the Air Conditioner to start operation before you wake
up in the morning and stop after you leave home.
Example
Setting automatic start after 2 hours and automatic stop after 5 hours.
Start
Stop
OFF
Setting
2 hours
after setting
5 hours
after setting
1. Press TIME ON button.
2. Press again TIME ON button several times, till the
displays shows “SET 2.0 HOUR ON”.
Wait for 0.5 seconds, and the setting is completed.
3. Press TIME OFF button.
4. Press again TIME OFF button several times, till the
display shows “ SET 5.0 HOUR OFF”.
Warning! Time interval for TIMER OFF setting must
be longer than time interval for TIMER ON.
Wait for 0.5 seconds, and the setting is completed.
TIMER OFF → TIMER ON (Automatic Stop followed by Automatic Start)
This function is useful if you would like the Air Conditioner to stop operation after you go to bed
and start operation before you wake up in the morning or before you go home in the evening.
Example
Setting automatic stop after 2 hours and automatic start after 10 hours.
Start
Stop
Operation
Setting
NOTES
2 hours after
setting
10 hours
after setting
1. Press TIME OFF button.
2. Press again TIMER OFF button several times, till the
display shows “SET 2.0 HOUR OFF”.
Wait for 0.5 seconds, and the setting is completed.
3. Press TIME ON button.
4. Press again TIME ON button several times, till the
display shows “SET 10 HOUR ON”.
Warning! Time interval for TIMER ON setting must
be longer than time interval for TIMER OFF.
Wait for 0.5 seconds, and the setting is completed.
1. To modify TIMER settings, press TIME ON/TIME OFF buttons again and repeat time interval settings.
To cancel TIMER ON/OFF settings, set time to “0.0”.
2. Unlike operation modes, TIMER settings are not kept in memory by the microcomputer, therefore if a power
failure occurs, TIMER settings will be cancelled and need to be set again.
3. Before selecting TIMER settings, it is possible to choose your desired operation mode.
4. TIMER max. range is 24 hours, i.e. it is not possible to operate weekly settings.
- 15 -
WIRED CONTROLLER'S USAGE CONDITIONS & CONNECTION
USAGE CONDITIONS OF DTW - IHXR WIRED CONTROLLER:
1. Power Supply: 5V DC.
2. Operation Temperature: -15°C ~ +43°C.
3. Operation Humidity: 45% - 90% RH.
FUNCTIONS’ SUMMARIZE:
Main Functions:
1. Connecting to Indoor Unit by A, B, C, D, E terminals.
2. Buttons for setting action modes.
3. LCD Display.
4. TIMER setting for the Air Conditioner’s automatic Start/Stop.
CONNECTING METHOD:
5-way terminal
DISPLAY
Wired Controller
+5
5-core shielded wire, the
length is decided by
installation
INDOOR UNIT
Connect the Wired Controller’s cable to the cable of Indoor Unit’s Display..
- 16 -
EC DECLARATION OF CONFORMITY
We TERMAL Srl - 14, Via della Salute - 40132 Bologna - Italy
dECLARE
under our sole responsibility that HOKKAIDO Product
Wired Controller
• DTW - IHXR
conforms with the following directives:
• EMC Directive 89/336/EEC and its following 92/31 EEC by L.D. No. 476 dated Decdmber 4th, 1992.
• LV Directive 73/23 EEC and applied Standards EN 60335-2-40.
NOTES
NOTES
TERMAL Srl
14, Via della Salute
40132 Bologna - Italy
Tel. +39.051.41.33.111
Fax +39.051.41.33.112
www.termalgroup.com
Due to on-going technological development of the products by the Manufacturer, we
reserve the right to vary the technical specifications at any time without notice.