1
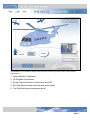
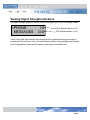
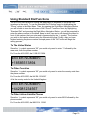
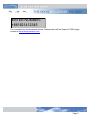
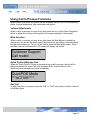
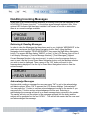
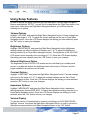
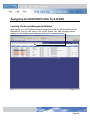
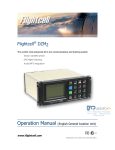
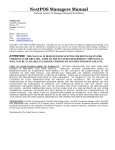
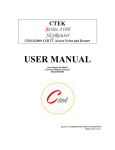
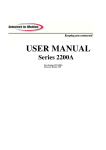
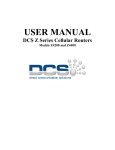
ACH1000 Advanced Control Head
User Guide
Unit 11 – 33 Riley Road – Woodmead
+ 27 11 612 3660
[email protected]
www.gc-sat.com
Revision: 1.2
February, 2006
Contents
System Overview .......................................................................................................................................... 4
This User Guide........................................................................................................................................ 4
System requirements................................................................................................................................ 4
Navigating The Front Panel .......................................................................................................................... 6
Turning the ACH1000 On and Off ............................................................................................................ 6
Viewing Signal Strength Indicators ............................................................................................................... 7
Using Speed-Dial Functions.......................................................................................................................... 8
Quick Keys for Speed Dialing................................................................................................................... 8
Menu Navigation....................................................................................................................................... 8
To call Blue Sky Network Customer Support (toll free) ............................................................................ 9
Using Standard Dial Functions ................................................................................................................... 10
To The United States.............................................................................................................................. 10
To Other Countries ................................................................................................................................. 10
To Other Iridium Satellite Phones........................................................................................................... 10
Receiving A Call.......................................................................................................................................... 12
How Do I Call The Aircraft?......................................................................................................................... 12
Inside the United States.......................................................................................................................... 12
Outside the United States....................................................................................................................... 12
Using Call In Process Functions ................................................................................................................. 13
Volume Adjustments............................................................................................................................... 13
Mute Function ......................................................................................................................................... 13
Quick Position/Mayday Alert................................................................................................................... 13
End Call .................................................................................................................................................. 13
Using Short Code Functions ....................................................................................................................... 14
Quick Keys for sending a Short Code Message..................................................................................... 14
Menu Navigation..................................................................................................................................... 14
Handling Incoming Messages ..................................................................................................................... 16
Retrieving & Reading Messages ............................................................................................................ 16
Acknowledge Messages ......................................................................................................................... 16
Delete Messages .................................................................................................................................... 17
Using The Flight Plan Function................................................................................................................... 18
Sending A Flight Plan ............................................................................................................................. 18
FLIGHT RULE ........................................................................................................................................ 18
ETE ......................................................................................................................................................... 18
POB ........................................................................................................................................................ 19
FUEL....................................................................................................................................................... 19
CRUISING ALT....................................................................................................................................... 19
DEPARTURE TIME ................................................................................................................................ 19
Using Quick Position/Mayday Alert............................................................................................................. 20
Page 2
Using Setup Features ................................................................................................................................. 21
Volume Options ...................................................................................................................................... 21
Brightness Options ................................................................................................................................. 21
External Brightness Option ..................................................................................................................... 21
Contrast Options..................................................................................................................................... 21
Impedance Options................................................................................................................................. 21
Version Display....................................................................................................................................... 21
Reset....................................................................................................................................................... 22
Creating ACH1000 Profiles Using SkyRouter............................................................................................. 23
Locating The ACH1000 Profile Management Section............................................................................ 23
Customizing Section 1: “ACH Profile Settings” ...................................................................................... 24
Customizing Section 2: “Phone” ............................................................................................................. 25
Customizing Section 3: “Short Code” ..................................................................................................... 26
Customizing Section 4: “Trip Plan” ......................................................................................................... 27
Saving Your Profile ................................................................................................................................. 27
Assigning An ACH1000 Profile To A D1000 ............................................................................................... 28
Locating The Assets Management Window ........................................................................................... 28
Adding A Profile To A D1000.................................................................................................................. 29
Updating Your D1000 With An ACH1000 Profile ........................................................................................ 30
How Do I Know That the Updating Process Was Successful?................................................................... 31
More help needed? ..................................................................................................................................... 32
Proprietary Notice
Information contained in this document is proprietary and confidential to Blue Sky
Network and Gilcom Technologies, Inc.
Warning
Blue Sky Network reserved the right to update this documentation at any time. Users
are directed to our web-site (www.blueskynetwork.com) for the most current version of
this document.
Page 3
System Overview
In our continuing effort to provide innovative satellite communication solutions to the
aviation world, Blue Sky Network is proud to introduce our newest and most enabling
product to date, the ACH1000 Advanced Control Head.
The ACH1000 is an upgrade for our D-series products and is the perfect tool for pilots,
operators and fleet managers around the globe. Pilots can be in easy voice contact with
dispatch centers and other operations offices through an integrated audio system/phone
feature. Using the Speed Dial or Standard Dial features the pilot can, with the push of a
button, place a call to dispatch. Dispatch can also place calls to the aircraft directly.
Imagine a world with clear, reliable and private communication between the aircraft and
the ground – anywhere on the planet.
Using the pre-programmed Short Codes pilots will be able to, at the push of a button,
signal special events on any trip such as: Request Wx, Diverting Route, Special Interest
Point, and others. The Short Codes are completely configurable and unique to each
user.
Additionally, the unit offers a simple Flight Plan option. Prior to a flight the pilot will be
able to send information to dispatchers/fleet manager’s SkyRouter asset management
portal with integrated global mapping.
The ACH1000 integrates with the on-board intercom system. This allows the pilot or copilot to easily dial or receive calls directly through the headset. This unique and
exceptional D-series upgrade will make managing your fleet safer, more accurate and
more efficient.
This User Guide
This user guide describes the ACH1000’s physical attributes, its features and use. A
separate user guide will cover the installation of the ACH1000 Advanced Control Head,
and the SkyRouter asset management portal.
System requirements
IMPORTANT: The ACH1000 requires a Blue Sky Network D1000 (Serial Numbers
ending in “A”) or D1000C asset tracking product. If your D1000 serial number does not
end with an “A” you will need to get the product upgraded. Also, the firmware version
installed on your D1000 unit must be 2.1.24 or newer. Firmware is available at
http://www.blueskynetwork.com/FAQs/Firmware.html
For programming the ACH1000 locally a laptop or similar device is required.
Programming can also be performed remotely via the SkyRouter asset management
portal (See SkyRouter help menu for additional information.
Page 4
For illustration only. The SkyRouter network works equally well with fixed wing aircraft, marine vessels and land
mobile vehicles.
1. Iridium Satellite Constellation
2. GPS Satellite Constellation
3. Single Channel Antenna for both Iridium and GPS
4. Blue Sky Network Iridium terminals and control heads
5. The SkyRouter asset management portal
Page 5
Navigating The Front Panel
A
B
D
C
E
F
G
H
A. Menu Navigation Button
E. Clear Button
B. LCD Display Screen
F. Numerical Keypad
C. Quick Position/Mayday Alert
Button
G. Customer Support Speed Dial (*)
H. Mute/Un-Mute(#)
D. Power/OK Button
Turning the ACH1000 On and Off
Using the “OK/PWR” button, you can turn the ACH1000 on or off by holding the button
for a period of three seconds. This will reset the unit to the main menu. All parameters
are stored.
Page 6
Viewing Signal Strength Indicators
The signal strength indicators can be found on the right side of the LCD Display screen.
>PHONE
MESSAGES
I:5
G:8
Iridium Signal Indicator (0-5)
GPS Signal Indicator (0-12)
*Note: If the letter that precedes the strength level is capitalized the signal strength is
considered fully functional, and in the rare instance that the letter preceding the strength
level is displayed as lowercase the signal is operating at a minimal level.
Page 7
Using Speed-Dial Functions
The combination of the ACH1000 and the D1000 or D1000C, allows the user to easily
pre-program up to 10 speed-dial numbers. Each number can be given a name, such as
“Dispatch”, for a more intuitive display to the pilot. Speed-dial numbers can be
configured directly on the system, or remotely via SkyRouter. Specifically there are two
different methods that can be used to dial the stored speed-dial numbers. One method
is through menu navigation, the other is the quick keys.
Quick Keys for Speed Dialing
When the “Phone” option is highlighted in the Main Menu, the user may simply press
the corresponding Speed Dial key on the numerical keypad, numbered from 1-10, that
references the pre-configured phone number. Then, you will see on the LCD display
screen a confirmation message asking you to verify that the name being shown is the
correct name for the number to be dialed, a simple press of the “OK” button will result in
a phone call being initiated. For example, if you were to press the ‘1’ button on the
numerical keypad while “Phone” is highlighted from the Main Menu, and then press the
“OK” button, a call would be made to the phone number stored in field one of your
custom speed-dial list.
>PHONE
MESSAGES
I:5
G:8
Menu Navigation
If you would like to see the complete list of Speed-dial numbers configured, Menu
Navigation is the best method. Using the Menu Navigation buttons from the Main Menu,
highlight “PHONE” by using the Up or Down Menu Navigation Button and then press the
Right Menu Navigation Button. Then, highlight “Speed Dial” and again use the Right
Menu Navigation Button to be forwarded to the “Speed Dial” sub menu. Next, using the
Up and Down Menu Navigation Button highlight the Speed Dial number you like to dial
and press the “OK” button. Finally, the LCD screen will ask for your confirmation to dial
the number being displayed, press the “OK” button to accept, and begin calling. For
Example, you have stored the phone number to “Dispatch” inside Speed Dial field ‘1’,
after highlighting “Phone” you would press the Right Menu Navigation Button three
times and then the “OK” Button once to begin calling “Dispatch”.
Page 8
2: DISPATCH
3: MAINTENANCE
To call Blue Sky Network Customer Support (toll free)
Users can call Blue Sky Network customer support directly using our speed dial feature.
Highlight “PHONE” in the main menu and click the “*” button. Then hit “OK” to place the
call. This is a toll free call.
SPEEDDIAL OK?
Customer Support
Page 9
Using Standard Dial Functions
The ACH1000 also allows for normal dial pad dialing to anywhere in the world from
anywhere in the world. To use the Standard Dial Function, begin by highlighting the
“Phone” option in the Main Menu. Then, by pressing the Right Menu Navigation Button
you will be able to view the sub menu of the “Phone” Functions. Next, by highlighting
“Standard Dial” and pressing the Right Menu Navigation Button, you will be prompted to
enter the phone number to be dialed. Keep in mind, two zero’s will already be placed in
front of the numbers that you enter and is represented by the ‘+’ symbol. The number
you wish to dial can be entered using the Numerical Keypad. Finally, after you have
finished entering the phone number a simple press of the “OK” button will begin the
calling process.
To The United States
Since the ‘+’ symbol represents “00” you would only need to enter ‘1’ followed by the
area code, then the phone number.
Ex: From the ACH1000, dial 1 858 551 3894
ENTER NUMBER:
+18585513894
To Other Countries
Since the ‘+’ symbol represents “00” you would only need to enter the country code then
the phone number.
Ex: From the ACH1000, dial 44 208 123 4567
44 is the country code for the United Kingdom.
ENTER NUMBER:
+442081234567
To Other Iridium Satellite Phones
Since the ‘+’ symbol represents “00” you would only need to enter 8816 followed by the
phone number.
Ex. From the ACH1000, dial 8816 214 12345
Page 10
ENTER NUMBER:
+881621412345
For a complete list of International Access Codes please visit the Support & FAQ’s page
located on www.blueskynetwork.com
Page 11
Receiving A Call
When there is an incoming call, the LCD display screen will display “Incoming Call”.
Also, if an LED indicator light has been installed with the ACH1000 it will begin to pulse
on and off. To accept an incoming call, press the “OK” button. To ignore an incoming
call, press the “CLR” button.
Incoming Call
<OK> to answer
How Do I Call The Aircraft?
Inside the United States
Originating a call from a landline phone in the United States, & terminating to an Iridium
satellite phone (like an ACH1000 or D-Series product.), would use the following format
& it doesn't matter where the satellite phone is located, & the dialing is the same.
From the landline phone, dial: 011 8816 XXX XXXXX
011, International Direct Dial (IDD) access code for United States/8816 XXX XXXXX,
the MSISDN
Outside the United States
Originating a call from a landline phone outside the United States, & terminating to an
Iridium satellite phone (like an ACH1000 or D-Series product.), would use the following
format & it doesn't matter where the satellite phone is located, & the dialing is the same.
From the landline phone, (i.e. France) dial: 00 8816 XXX XXXXX
00 International Direct Dial (IDD) access code for France/ 8816 XXX XXXXX, the
MSISDN
Page 12
Using Call In Process Functions
When a call is in process the options that are available include, Quick Position/Mayday
Alerts, Volume Adjustments, and a disconnect call button.
Volume Adjustments
When a call is in process you may at any time press the Up or Down Menu Navigation
Button to adjust the volume of the signal that is being transmitted to the headset.
Mute Function
When a call is in process you may at any time press the Mute Button to disable the
microphone, you will still be able to hear if the person you are calling is communicating,
but they will not hear you. To turn off this feature press the Mute button again. When
the Mute Feature is activated the LCD screen will display “call muted”.
Customer Support
Call muted
Quick Position/Mayday Alert
When the “Quick Position” button is pressed during a call in process, the call will be
disconnected and the system will start sending a Quick Position Report to the
SkyRouter asset management portal immediately.
QuickPOS Mode
***ACTIVE****
End Call
To end a call that is in process, press the “OK” or “CLR” button and you will be returned
to the Main Menu.
Page 13
Using Short Code Functions
The ACH1000 allows the user to send pre-programmed Short Code messages to
dispatch via the SkyRouter asset management portal. Specifically there are two
different methods that can be used to send Short Code Messages. One method is
through menu navigation, but for the advanced user the quick key commands will prove
to be very useful. Both methods will be explained in this section.
Quick Keys for sending a Short Code Message
When the “Messages” option is highlighted in the main menu screen, the user may
simply press the corresponding key on the numerical keypad that references the preconfigured Short Code. Then, the user will see on the LCD display screen a
confirmation request message asking the user to verify that the name being shown is
the correct name for the Short Code message to be sent, a simple press of the “OK”
button will result in the message being sent. For example, while the “Message” option
is highlighted in the main menu the user could press the ‘1’ button on the Numerical
Keypad followed by pressing the “OK” button, these actions would result in sending
“Short Code 1” to the SkyRouter Web Portal.
PHONE
> MESSAGES
I:5
G:8
Menu Navigation
If you would like to see the complete list of available Short Codes currently configured
on your ACH1000, Menu Navigation is the best method. Using the Menu Navigation
buttons from the Main menu, highlight “Messages” by using the Up or Down Menu
Navigation Button and press the Right Menu Navigation Button. Then, highlight “Short”
and again use the Right Menu Navigation Button to be forwarded to the Short Code sub
menu. Next, using the Up and Down Menu Navigation Button highlight the “Short Code”
you would like to send and press the “OK” button.
2: Request Wx
3: In-Gate
Page 14
Finally, the LCD screen will ask for your confirmation to send the “Short Code” being
displayed, press the “OK” button accept and send your message. For Example, If you
set Short Code 1 to send an “In-Gate” message, you would be able to send the
message by first highlighting the “Messages” option by using the Up or Down Menu
Navigation Button then pressing the Right Menu Navigation Button three times, this
would result in that message being sent.
Page 15
Handling Incoming Messages
When there is an unread message available, an blinking cursor will be displayed on the
ACH1000 LCD Screen (over the “:” in the Iridium signal strength indicator. Also, if the
optional LED Indicator light has been installed it will remain in a solid on state when
there is an unread message available.
> PHONE
MESSAGES
I:5
G:8
Retrieving & Reading Messages
In order to view the Messages that have been sent to you, highlight “MESSAGES” in the
main menu and press the Right Menu Navigation button. Next, using the Menu
Navigation button highlight “READ MESSAGES” then press the Right Menu Navigation
button. The screen will then display ”INBOX” on line 1 of the LCD Screen, then on line 2
it will display “Message = [Current Message Number] \ [Total Messages]”(Highest
Current Message Number is the most recent). In order to view the message that you
want to read, use the Up and Down Menu Navigation button until the Message number
you wish to read is displayed. Then a press of the “OK” button will result in your
message being displayed. Use the Up or Down Menu Navigation button to view the
entire message.
SHORT
> READ MESSAGES
Acknowledge Messages
Anytime while reading a message the user can press “OK” to get to the acknowledge
and delete options. When “OK” is pressed the LCD Screen displays “Acknowledge?”.
You can press the ‘1’ button to send an acknowledgement receipt to the sender or you
may press the ‘2’ button and no acknowledgement will be sent. Selecting to
acknowledge the message will result in an email message being returned to the sender.
The sender will only see the subject of the message returned (not the body) and the
subject will be preceded but the text “ACKN: “. This will tell the sender that the user read
and acknowledged the message.
Page 16
ACKNOWLEDGE?
1=YES 2=NO
Delete Messages
After you have been prompted to send an acknowledgement receipt you will be
prompted with a delete option. To delete the message you have just finished viewing,
press the ‘1’ button, otherwise press the ‘2’ button and you will be returned to the
“READ MESSAGES” menu.
DELETE?
1=YES 2=NO
Page 17
Using The Flight Plan Function
A simple Flight Plan can be sent to SkyRouter from the ACH1000. Send information
such as ETE, People on Board, Fuel, Cruising Altitude and Departure Time. The
information will be displayed in the SkyRouter asset management portal. Please note
that this is not a formal filing of a flight plan, and the feature should be used for
informational purposes only.
Sending A Flight Plan
First highlight “Flight Plan” from the Main Menu. Then press the Right Menu Navigation
Button. Depending on how the Flight Plan option is configured some or all of the
following Flight Plan data may be displayed. For the purpose of this user guide we will
assume all options have been activated. During the time of inputting the information for
the fields configured, you may use the Left or Right Menu Navigation button to go back
or forward to edit the information in the order you wish. Remember by pressing the
“CLR” button all previous data entered in the field in view will be erased. Also, press the
“OK” button to store the data you have entered in the field and progress to the next data
field. Below is a list of the possible fields that can be activated and there acceptable
input formats. After you have completely filled out your Flight Plan, the screen will
display ”OK?”, once you press the “OK” button your Flight Plan will be sent to the
SkyRouter Web Portal.
FLIGHT RULE
Instrument Flight Rules and Visual Flight Rules are the only two options for this field,
press ‘1’ for IFR or ‘2’ for VFR.
FLIGHT PLAN
1=IFR 2=VFR: _ _
ETE
Estimated time En-route, this field will accept data in the format of hours and minutes.
This information will be used to calculate the ETA displayed on skyrouter.
Ex: 2:35 (= 2 hours and 35 minutes)
FLIGHT PLAN
ETE:__:__
Page 18
POB
People on board, this field requires a number between 1 and 999.
Ex: 12 (=12 people on board)
FLIGHT PLAN
POB:___
FUEL
This field will accept the hours of fuel remaining on the aircraft in hours and minutes
format.
Ex: 2:15 (2 hours and 15 minutes of fuel remaining)
FLIGHT PLAN
FUEL:__:__
CRUISING ALT
This field requires a 1-5 digit number, and is represented in feet.
Ex. 6500 (= cruising altitude will be 6500 feet)
FLIGHT PLAN
ALT:_____
DEPARTURE TIME
This field will accept data in the format of a 24 hour clock. This information will be used
to calculate the ETA displayed on SkyRouter.
Ex. 13:30 (= departure set for 13:30 or 1:30PM)
FLIGHT PLAN
DEPART:__:__
Page 19
Using Quick Position/Mayday Alert
When the pilot activates the “Quick Position” button, all other actions will be
discontinued and the system will start sending a special alert. Ground personnel can be
notified via e-mail SMS, pager, or via the SkyRouter asset management portal. Since
the “Quick Position” button will override all other functions, you can press the “Quick
POS” button to begin sending Quick Position Reports immediately. When the “Quick
Position” button is activated the LCD Screen will display “Quick Pos Mode Active”, and
the “Quick Pos” button will flash. To deactivate the “Quick Position” function, press the
“Quick Pos” button again.
QuickPOS Mode
***ACTIVE****
Page 20
Using Setup Features
In order to access the Setup Features from the Main Menu, use the Menu Navigation
Buttons and highlight “SETUP”, you will find it located below the Flight Plan option in the
main menu. Next, press the Right Menu Navigation Button, you will then see the
following list of options.
Volume Options
Highlight “VOLUME” and press the Right Menu Navigation button. Volume settings can
be set in the range of 1-10. To adjust the volume settings use the Up or Down Menu
Navigation button. Once the LCD Screen displays the setting you have selected, press
the “OK” button to save your changes.
Brightness Options
Highlight “BRIGHTNESS” and press the Right Menu Navigation button. Brightness
settings can be set with the options of Dimmer, and 1-10. To adjust the Brightness
settings use the Up or Down Menu Navigation button. The brightness of the ACH1000
LCD screen can be manually set in the range of 1-10. Once the LCD Screen displays
the setting you have selected, press the “OK” button to save your changes.
External Brightness Option
The brightness of the ACH1000 LCD screen can be controlled by an outside power
source, to enable this feature the brightness level must be set to “Dimmer” and the
proper installation procedure must be used.
Contrast Options
Highlight “CONTRAST” and press the Right Menu Navigation button. Contrast settings
can be set in the range of 1-10. To adjust the contrast settings use the Up or Down
Menu Navigation button. Once the LCD Screen displays the setting you have selected,
press the “OK” button to save your changes.
Impedance Options
Highlight “IMPEDANCE” and press the Right Menu Navigation button. Impedance
settings have two options 600Ω & 8Ω. To adjust the Impedance settings use the Up or
Down Menu Navigation button. Once the LCD Screen displays the setting you have
selected, press the “OK” button to save your changes.
Version Display
To view the version of firmware that is currently controlling your ACH1000 & D1000,
highlight “Version” and press the Right Menu Navigation button. In order to go back to
the previous menu press the Left Menu Navigation button or the “OK” button.
Page 21
Reset
Highlight “RESET” and press the Right Menu Navigation button. You will then notice
that the screen displays “Updating…”, once the ACH1000 is done updating its
parameters from the D1000, you will be returned to the previous menu, this process
usually takes about 30 seconds.
Page 22
Creating ACH1000 Profiles Using SkyRouter
This section will cover how to customize an ACH1000 profile using your SkyRouter
asset management portal. The ACH1000 profile allows you to customize personal
Speed Dial options, Short Code options, and Flight Plan options.
Locating The ACH1000 Profile Management Section
After signing in to the SkyRouter asset management portal you will by default see the
Map section. First, you will need to click on the “Pref” tab (1). After the preferences
section loads you will see three links above the user preferences information, click on
the link titled “ACH Profile” (2). Finally, you will see the profile management section
(example below)
2
1
Page 23
Customizing Section 1: “ACH Profile Settings”
In the “ACH profile settings” section you will find two fields; “Set Selection” & “Set
Name”. (Example below)
Set Selection: This field is an identifier as to which profile you are currently
viewing & editing. You will have the option to customize up to five ACH1000 profiles. By
clicking and filling in the box next to the profile number displayed you will see & be able
to edit the custom information for that profile selection.
Set Name: This field must be filled out to identify a name for the profile selection
number you are currently editing. This name field is important to remember because
you will have to assign an ACH1000 profile to a D1000 unit in order to begin using your
profile, which will be covered later in this user guide.
Page 24
Customizing Section 2: “Phone”
In the “Phone” section you will find two main parts; Phone option activation and
deactivation and your customizable list of speed dial numbers. (Example Below)
Speed Dial: This check box will allow you to specify in your profile whether or not
“Speed dial” will be available to the user or appear as disabled. Check this box to
enable Speed Dial.
Standard Dial: This check box will allow you to specify in your profile whether or
not “Standard Dial” will be available to the user or appear as disabled. Check this box
to enable Standard Dial.
Speed Dial Numbers: In the ten fields below you will be able to specify in the
“Number section” the speed dial number you would like to save and in the box to the
right you will be able to enter a thirteen character display. Remember that the number
entered must be in the following format.
Page 25
Customizing Section 3: “Short Code”
In the “Short Code” section you will find two main parts; Short Code option activation
and deactivation and your customizable list of Short Codes. (Example Below)
Short Code: This check box will allow you to specify in your profile whether or
not “Short Code” will be available to the user or appear as disabled. Check this box to
enable Short Codes.
Short Code Settings: You will have the ability to customize what your ten Short
Codes using the drop down menu for each code field. The drop down menu contains
seven different short code types; None, Text, Take-off, Landing, Min. Enroute Alt., OffGate, In-Gate. All of these functions send a short code containing exactly what they are
labeled with the exception of None & Text. The None type will send no short code at all
while, the Text option will send a short code that will display the information contained in
its display box to the right. Remember that the Text option is the only option that can be
customized.
List of Short Code Types
Page 26
Customizing Section 4: “Trip Plan”
In the “Trip Plan” section you will find two main parts; Trip Plan option activation and
deactivation and your customizable list of Trip Plan Fields. (Example Below)
Trip Plan: This check box will allow you to specify in your profile whether or not
“Trip Plan” will be available to the user or appear as disabled. Check this box to enable
Trip Plans.
Trip Plan Field: These fields can either be disabled or enabled. Check any of
these boxes to include them in filing your trip plan. The particular type of information to
be filled was covered in the “Using the Flight Plan Function” section of this guide.
Saving Your Profile
After you have completed filling out the information that is contained in your ACH profile
you need to click the save button at the bottom of the page.
Page 27
Assigning An ACH1000 Profile To A D1000
Locating The Assets Management Window
After signing in to the SkyRouter asset management portal you will by default see the
Map section. First, you will need to click on the “Assets” tab. After the page is done
loading you will see the assets Management section (example below)
Page 28
Adding A Profile To A D1000
First, locate the asset from the asset display list and click the “edit” link that is contained
in the row where the asset name appears.(example below)
Above the asset list will appear a grey box that says “Editing:” followed by the name of
the asset you are editing. (example below).
Inside this grey box is a field labeled ACH Profile, from the drop down box select the
name of the profile you would like to use for that asset and click the “Save” button.
After this is done you have successfully added an ACH1000 Profile to the Asset.
Page 29
Updating Your D1000 With An ACH1000 Profile
After you have assigned an ACH1000 Profile to a D1000 unit it is still necessary to send
that profile to the D1000 box itself. From, the “Assets” page you will need to click the
“Send” link.
After clicking on this link a Pop-up will appear (example below). Read and then click
“OK”
*Note, You must have a version of firmware on your D1000 that is equal to or greater
than 2.1.24. After clicking “OK”, it may take up to double the reporting interval of that
unit for the change to be completed.
Page 30
How Do I Know That the Updating Process Was
Successful?
After you have sent the profile to the D1000 you can check the history of use of the
“Send command by clicking on the “History” link.
After clicking on the “History” link, a new page will load which you will provide you with
the information of when the command was sent and when the D1000 acknowledged
that the change was successful. (example below)
Page 31
More help needed?
Please do not hesitate to contact us either via email or on the phone number listed
below. Thank you for using Blue Sky Network for your airborne communications needs.
Users can call Blue Sky Network customer support directly from the ACH1000 using our
speed dial feature. Highlight “PHONE” in the main menu and click the “*” button. Then
hit “OK” to place the call. This is a toll free call.
Blue Sky Network, 1298 Prospect Street, Suite 1D, La Jolla, CA 92037
Phone: +1 858 551 3894 | Fax: +1 858 551 3891
E: [email protected] | W: www.blueskynetwork.com
Page 32