1
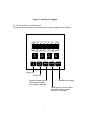
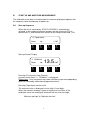
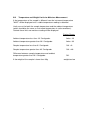
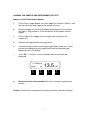
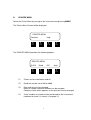
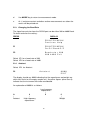
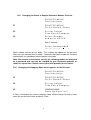
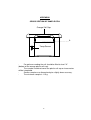
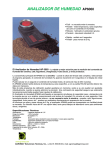
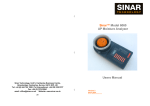
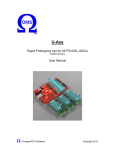
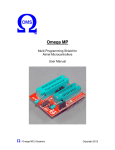
Sinar Technology
Unit 5 Camberley Business Centre, Bracebridge, Camberley, Surrey.
GU15 3DP
United Kingdom
Tel UK: 0844 745 1999 Tel International: +44 208 328 0727
Fax: +44 (0)1276 29941
GRAINPRO 6310 MOISTURE ANALYZER
USER GUIDE
CONTENTS
Page
I
INTRODUCTION AND CALIBRATIONS
2
II
BASIC PRINCIPLE OF OPERATION
4
III
START UP AND MOISTURE MEASUREMENT
5
III:1 Start Up Sequence
III:2 Temperature and Weight Limits
for Moisture Measurement
Loading the sample and performing the test
IV
V
PRINTER MENU
IV:1 Print Format
IV:2 Using the Printer
IV:3 Changing the Baud Rate
IV:4 Autotest
IV:5 Changing the Batch or
Sample Reference Number
IV:6 Changing the Company Name
which appears on the Print out
IV:7 Changing the Date
IV:8 Printer Menu Help Screen
AUDIT TRAIL MENU
5
6
7
8
9
9
10
10
11
11
12
13
13
APPENDIX 1
CROSS SECTION OF SAMPLE CELL
14
APPENDIX 2
15
REPLACEMENT OF BATTERIES
APPENDIX 3
TECHNICAL SPECIFICATION
16
APPENDIX 4
ERROR CODE SUMMARY
17
I
INTRODUCTION AND CALIBRATIONS
The Sinar GrainPro Moisture Analyzer is one of the most advanced instruments
in the range of Sinar Moisture Analyzers. It is menu driven with a 2 x 20
character alphanumeric display and provides a help screen for every main menu.
Moisture measurements can be made on samples up to 40% moisture content
and for up to 50 different products.
The GrainPro is fully compatible with all other Sinar Moisture Analyzers allowing
easy transfer of calibration data for standardized testing.
Results can be processed and stored using Sinar MoistureNet Communications
and Data Capture Software which has the facility to automatically capture test
results into a log. Captured data can be exported to the most popular databases.
Using the MoistureNet Communications Software, calibrations can be transferred
between the GrainPro and a PC or if so wished networked over the telephone
line using the 6230 Intelligent Acoustic Modem. Calibrations can be viewed on a
VGA screen before being transferred to the GrainPro using a computer interface
cable.
Each instrument is built using only the highest quality materials. After testing
continuously for 16 hours, a rigorous quality control check is made to ensure
each GrainPro meets our very high standards.
Sinar Technology provides a comprehensive laboratory back up service which
includes assistance with oven testing to develop calibration curves and any other
support that may be required to assist you in obtaining good results.
GrainPro and MoistureNet are registered Trade Marks of Sinar Technology
2
Figure 1. GrainPro™ keypad
F1, F2, F3 and F4 are function keys.
These are used to choose a command that is being shown on the display
^
F1
II
^
^
O
O
^
F2
^
F3
F4
^
MODE
CLEAR
CLEAR
ENTER
ENTER
Power On
Power Off
I
Used to change menus
Can also be used as
an Escape or Exit key.
Used to enter values
Used to clear current values
on display. Also used to
clear the " Average".
3
II
BASIC PRINCIPLE OF OPERATION
The design concept of the GrainPro Moisture Analyzer is based on the
simultaneous sensing of capacitance, weight and temperature of the sample
being tested, providing a corrected moisture (%) reading in a few seconds. It
works accurately on products with moisture content ranging from approximately
1% to 40% depending on the application.
The instrument incorporates 3 sensors:
Capacitance
The moisture in a sample absorbs the electrical energy between the walls of the
sample cell. This electrical signal, the capacitance, increases with the moisture
content of the sample and the size of the sample.
Oscillating Weight Balance
The oscillating weight balance, which was developed from space technology,
uses frequency measurement to determine mass (weight in grams). The weight
is measured by reference to a frequency, which varies with mass and is detected
through an electro-magnetic system and processed by the Intel Microprocessor.
This weighing technique offers users flexibility in sample size (115 - 240 grams).
The weight balance still works accurately if it is not exactly horizontal or
subjected to vibrations.
Temperature Correction
Capacitance of a sample increases with temperature. A temperature sensing
thermistor is mounted in the sample cell and the microprocessor carries out an
automatic correction to the moisture measurement.
The amount of correction is programmable.
The capacitance corrected for weight and temperature is known as the
instrument reference reading but in practice it is commonly referred to as simply
the capacitance value.
A calibration is made by obtaining capacitance and reference (e.g. oven test,
Karl Fisher) data on a range of samples with different moisture contents. Using
the two sets of data a calibration curve can be produced automatically using the
MoistureNet Graphics and Communication Software. Once produced, the
calibration values (known as byte values) are programmed into the Analyzer from
the PC using a computer interface cable.
4
III
START UP AND MOISTURE MEASUREMENT
The calibration curve data is checked and its checksum displayed, together with
the company name immediately on power-up.
III.1
Start up Sequence
When the unit is switched on, START-UP MODE is automatically
selected. In this mode the channel number may be increased (F2) or
decreased (F1) and the Moisture content of the sample measured (F4).
O Capacitance
Down
^
F1
Up
% MC
^
^
^
F2
F3
F4
Start-up Screen Display
3 HRWheat
Down
Up
^
F1
13.5
% MC
^
^
F2
F3
^
F4
Pressing F2 increases Crop Channel
eg. press three times " 3 HRWheat " is displayed.
Please note - Your instrument may show a different crop name depending
upon the commodity calibrations programmed into it.
Pressing F4 performs moisture test.
The moisture value is displayed in extra high, 11mm digits.
When the moisture reading is lower or higher than the limits of the
calibration curve the reading will alternate with an error message:
"Moisture too high" or "Moisture too low".
5
III.2
Temperature and Weight Limits for Moisture Measurement
If the temperature of the sample is different from the instrument temperature
"WAIT" will be displayed until a stable temperature reading is obtained.
Limits are set for both the sample temperature and the ambient temperature
(which should be the same as instrument temperature in static conditions).
Outside these limits no moisture reading will be displayed.
Display Shows
Ambient temperature less than 10° Centigrade:
Amb < 10
Ambient temperature greater than 30° Centigrade:
Amb > 30
Sample temperature less than 0° Centigrade:
Cell < 0
Sample temperature greater than 40° Centigrade:
Cell > 40
Difference between sample temperature and ambient
temperature greater than 20° Centigrade:
Diff.
If the weight of the sample is lower than 30g
6
weight too low
LOADING THE SAMPLE AND PERFORMING THE TEST
Always use the Sinar Sample beaker.
a.
Fill the Sinar sample beaker just to the edge (this volume is 290 ml. and
fills the cell to the lower edge of the orange cell cup.)
b.
Place the hopper on the GrainPro body locating pillars ensuring that
the slider is fully pushed in. Pour the content of the beaker into the
hopper.
c.
Lift the slider of the hopper so the sample flows evenly into the
sample cell.
d.
Remove the hopper before running the test.
e.
To measure the moisture content of the commodity under test, select
the correct calibration by pressing F1or F2 until the required crop
appears on the LCD display.
f.
Press F4 ( "% mc test") and 6 seconds later the result will be
displayed.
3 HRWheat
Down
Up
^
F1
g.
13.5
% MC
^
^
F2
F3
^
F4
Do not touch the cell assembly whilst the instrument is performing
the test.
Caution: Overfilling the sample cell will lead to erroneous moisture readings.
7
IV.
PRINTER MENU
Select the Printer Menu by turning on the instrument and pressing MODE.
The Printer Menu Screen will be displayed.
PRINTER MENU
Continue
Help
^
F1
^
^
^
F2
F3
F4
The PRINTER MENU provides the following options:
PRINTER MENU
On/Off
^
F1
Baud
^
F2
O/P
Auto
^
F4
F3
^
F1
Printer can be switched on and off
F2
Baud rate can be set to 300 or 4800
F3
Date and time can be changed
Batch or sample reference number can be changed
Company name which appears on the print-out can be changed
F4
"Auto" enables an Autotest to be performed on the instrument's
hardware to check it is correct. (see page 11)
8
IV:1
Print Format
An example of the printer output format is as follows:
Sinar Technology
16 Feb 94 17:26:44
Channel 2
HRWWHEAT 506
Batch No.: 4
Moisture : 17.4%
IV:2
Using the Printer
Normally the Baud rate of the instrument is set to 300 Baud for printing (see next
page).
a
Connect the printer cable to the RS232 port on the left hand side of the
GrainPro Moisture Analyzer.
b
Connect the "D" type connector of the cable to the input of the serial
printer.
c
Turn on printer.
PRESS
DISPLAY
Use Mode
to select
PRINTER MENU
PRINTER MENU
Continue Help
F1
PRINTER MENU
On Off Baud O/PAuto
Select F1 for the
On/Off option
PRINTER Switched On
On
Off
Exit
F1
Select F1 to turn Printer On
F2 to turn Printer Off.
F3 to exit
9
d
Use MODE key to return to measurement mode.
e
As % moisture content and other routine measurements are taken the
results will be printed out.
IV:3
Changing the Baud Rate
The signal transmission from the RS232 port can be either 300 or 4800 Baud.
To check and alter the setting PRESS
DISPLAY
PRINTER MENU
Continue Help
F1
PRINTER MENU
On Off Baud O/P
F2
Baud rate = 300
300 4800 Exit
Select F1 for a baud rate of 300
Select F2 for a baud rate of 4800
IV:4
Autotest
Select F4 for Autotest
Autotest
F4
A000
EXIT
The display should say A000 indicating that the capacitance and weight are
within their limits for the empty sample cell. Any other figures (other than 0)
indicate that the instrument has to be recalibrated.
An explanation of A000 is as follows:
A
|
Autotest
0
|
High frequency
capacitance
Low frequency
capacitance
|
0
10
0
|
Weight
IV:5
Changing the Batch or Sample Reference Number Print-out.
PRINTER MENU
Continue Help
F1
PRINTER MENU
On Off Baud O/PAuto
F3
Printer Output
Time Batch Company
F2
Select Number
and press ENTER
After 2 seconds
Select Number0000
<-------> <--------> +
Batch number can be up to 4 digits. This number will appear on the print-out
when the next measurement is made. Thereafter the Batch number will increase
automatically as subsequent measurements are made.
Note: For reasons of instrument security the following modes are protected
by a password and can only be changed by your instrument provider or
under his supervision. Please contact your local provider for assistance.
IV:6
Changing the Company Name which appears on the Print-out.
PRINTER MENU
Continue Help
F1
PRINTER MENU
On Off Baud O/PAuto
F3
Printer Output
Time Batch Company
F3
COMPANY NAME
Down Up Right Left
If Clear is held down the current company name will be cleared. To clear a letter
move the cursor to the letter and press Clear.
11
Example:
Enter SINAR
Using F3 and F4 move the cursor to the position required for the first letter.
Press F2 (Up) until the letter "S" appears.
Press F3 in order to move 1 letter to the right and press F2 until the letter " I "
appears.
Repeat this process until "SINAR" is displayed, i.e.
SINAR
Down Up Right Left
After the company name has been entered, press ENTER
IV:7
Changing the Date and Time.
PRESS
DISPLAY
PRINTER MENU
Continue Help
F1
PRINTER MENU
On Off Baud O/PAuto
F3
Printer Output
Time Batch Company
F1
1 Mar 95
< --
^
F1
14: 50: 40
-->
^
-
^
F2
F3
+
^
F4
The F3 and F4 keys will change the values and the F1 and F2 keys will move
across to the different values. This enables very easy changing of the date.
Press ENTER when the date has been changed.
12
Example:
Change from 11 Nov 94 to 11 Dec 94
F1 ( x 3)
1 1 N O V 94 10: 47: 53
F4
1 1 D E C 94 10: 47: 53
As the date is now correct press ENTER.
IV:8
Printer Menu Help Screen
Start the printer by connecting the printer interface cable to the RS232 port on
the left hand side of the Analyzer. Connect the "D" type connector of the cable
to the input of the serial printer. This menu can be used to switch the printer on
and off; change the Baud rate from 300 to 4800 and vice versa; change the date,
batch number and the company name which appears on the print-out.
V
AUDIT TRAIL MENU
A record of all changes which will affect the unit's calibration is kept (after
password protection). This data cannot be erased.
13
APPENDIX I
CROSS SECTION OF SAMPLE CELL
Orange Cell Cap
_________________A
Temp Sensor
For optimum reading the cell should be filled to level "A"
(bottom of the orange plastic cell cap).
The sample should not cover the plastic cell cap or inaccuracies
will be introduced.
Smaller samples are allowed and give slightly lower accuracy.
The minimum sample is 115 g.
14
APPENDIX 2
REPLACEMENT OF BATTERIES
Battery Low
The alkaline batteries in your Moisture Analyzer should last for at least 1000
readings.
Battery Low indicator
Should the batteries begin to fail, a warning signal will appear when the
instrument is switched on.
***WARNING!***
Battery Low!!!
To replace the batteries:
remove the sample cell from the instrument.
unscrew the battery cover from the underside of the instrument.
remove the old batteries and replace with four standard 1.5V
alkaline batteries (Size C, MN 1400 or equivalent). BE SURE TO
INSERT BATTERIES THE CORRECT WAY ROUND - AS MARKED IN
BATTERY BOX - replace the battery cover and screw into position.
Important! Always use alkaline batteries. If you are not going to use
the moisture analyzer for some time, remove the batteries from the
instrument.
If the optional (factory fitted) 1900-6358 12v Power Kit is fitted the correct DC
voltage to operate the GrainPro is provided from a 115v or 220v/240v Power
supply.
Note: Fitting of this Kit means that the GrainPro will nolonger be able to be
powered by batteries.
15
APPENDIX 3
Technical Specification
Dimensions:
325mm x 164mm x 120mm
Weight:
2.1kg
Construction:
Polyurethane Reaction Injection Moulding
Operating
Environment:
0 C to 55 C ; 32 to 131 F
Storage
Temperature:
-20 C to +55 C ; -4 to 131 F
Humidity:
Up to 95% non condensing
Display:
Alphanumeric 2 x 20 characters
Power Supply:
Four C size 1.5V alkaline batteries or Optional 12v
Power Kit.
Processor:
Intel 80C31 Microprocessor
Memory:
32K. EPROM and 32K. RAM
Measurement
Range:
1-40% moisture, wet basis (depending on application)
Printer Output:
RS232 C 300 or 4800 Baud
Accuracy:
Manufactured in accordance with ISO 7700/1, OIML
International tolerances for Class 1 meters & Handbook 44
Repeatability:
Standard deviation 0.05 to 0.15 (dependent on application)
Weight balance:
Oscillating weight balance. Measures and corrects for
weights between 115-240 grams
Temperature
Correction:
Thermistor sensor. The correction is software programmable
Cell volume:
290 ml.
16
APPENDIX 4
ERROR CODE SUMMARY
Error Code
Explanation
Recommended Action
Err.0
Sample weight too low
Use large sample (greater than 115g)
Err.1
Sample cell not correctly
mounted
Remount the sample cell firmly
on to the interface
Err.2
Capacitance reading is
too high (over 100)
Check hardware. If necessary,
scale down capacitance by
changing byte 28
Err.3
Capacitance reading is
too high at low moisture
Check hardware. If necessary,
scale down capacitance by
changing byte 28
Err.4
High moisture reading at
low capacitance reading
Check hardware. If necessary,
this can be rectified by shifting
the calibration
Err.5
Capacitance reading is
Check hardware.
too low for the calibration Check calibration curve
curve (i.e. %MC would be
negative)
Err.6
Communication error
in RS232
Check cable and start again
batt
Battery low indicator
Replace the batteries
17
SINAR™
GRAINPRO™ 6310
MOISTURE ANALYSER
USER GUIDE
GPr. Rev. 5. 10/08
For Version 5.1 & 6.0 software
18