1
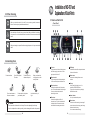
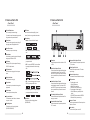
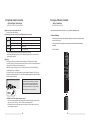
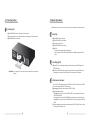
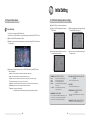
USER MANUAL
Contents
Contents
1. Getting Started
ōōōōōōōōōōōōōōōōōōōōōōōōōōōōōōōōō
3
1.1 Features ōōōōōōōōōōōōōōōōōōōōōōōōōōōōōōōōōōōō 3
1.2 Accessories ōōōōōōōōōōōōōōōōōōōōōōōōōōōōōōōōōōō 5
2. Cautions and Attentions
2.1 When Install
ōōōōōōōōōōōōōōōōōōōōōōōōōōō
6
ōōōōōōōōōōōōōōōōōōōōōōōōōōōōōōōōōō 7
ōōōōōōōōōōōōōōōōōōōōōōōōōōōōōōōōō 8
2.2 When Utilizing
2.3 When Cleaning ōōōōōōōōōōōōōōōōōōōōōōōōōōōōōōōō 10
ōōōōōōōōōōōōōōōōōōōōōōōōōōōōōōōō 10
2.4 Handling Discs
3. Installation of HDD Karaoke and Explanation of Each Parts
3.1 Name of Each Part
ōōōōōōōōōōō
11
ōōōōōōōōōōōōōōōōōōōōōōōōōōōōōō 11
3.2 Basic Connection ōōōōōōōōōōōōōōōōōōōōōōōōōōōōōōō 20
3.3 Optional Audio Connection ōōōōōōōōōōōōōōōōōōōōōōōōōōō 23
3.4 Usage of Remote Controller ōōōōōōōōōōōōōōōōōōōōōōōōōō 25
3.5 Microphone Connection ōōōōōōōōōōōōōōōōōōōōōōōōōōōō 28
4. Playing Discs
ōōōōōōōōōōōōōōōōōōōōōōōōōōōōōōōōō
29
4.1 Inserting a Disc ōōōōōōōōōōōōōōōōōōōōōōōōōōōōōōōō 29
4.2 Basic Operations
5. Karaoke
ōōōōōōōōōōōōōōōōōōōōōōōōōōōōōōō 31
ōōōōōōōōōōōōōōōōōōōōōōōōōōōōōōōōōōōōō
34
5.1 Basic Operation ōōōōōōōōōōōōōōōōōōōōōōōōōōōōōōōō 34
5.2 Karaoke DVD Operations
5.3 Special Operations
ōōōōōōōōōōōōōōōōōōōōōōōōōōō 35
ōōōōōōōōōōōōōōōōōōōōōōōōōōōōōō 37
1
Getting Started
)HDWXUHV
Contents
ְ Karaoke Function
6. Initial Setting
ōōōōōōōōōōōōōōōōōōōōōōōōōōōōōōōōō
41
ōōōōōōōōōōōōōōōōōōōōō 41
6.1 DVD Initial settings / General settings
6.2 DVD Initial settings / Speaker settings ōōōōōōōōōōōōōōōōōōōōō 42
6.3 DVD Initial settings / Audio settings ōōōōōōōōōōōōōōōōōōōōōōō 43
6.4 DVD Initial settings / Karaoke settings ōōōōōōōōōōōōōōōōōōōōō 44
6.5 DVD Initial settings / Basic conditions ōōōōōōōōōōōōōōōōōōōōōō 45
7. For Your Reference
You can enjoy home karaoke with one Hard disc which includes Thailand and pop songs and
designed with high quality Video and Audio.
ōōōōōōōōōōōōōōōōōōōōōōōōōōōōōō
ְ DVD Player Function
DVD which stands for Digital Versatile Disc or Digital Video Disc is a storage media can be
recorded as much as 135minutes video, maximum 8 languages audio sound track and also
record 32 languages subtitles.
It has MPEG-2(more than LD level) video quality and Dolby Digital surround. You can enjoy
Home theater environments.
46
7.1 Trouble shooting ōōōōōōōōōōōōōōōōōōōōōōōōōōōōōōōō 46
ְ Compatible Discs
DVD, Video CD, CD, CDG, NEO+G, WMA, MP3 can be played in this machine.
8. Specifications
ōōōōōōōōōōōōōōōōōōōōōōōōōōōōōōōōō
48
ְ Dolby Digital(AC-3)
A high quality multi-channel digital audio code developed by Dolby Laboratories. Also known
as Dolby Digital.
AC-3 delivers CD-quality digital audio and provides five full-bandwidth channels for front left,
front right, center, surround left and surround right speakers, plus an LFE (low frequency
effect) subwoofer, for a total of 5.1 channels.
ְ 24bit/96KHz Audio D/A Converter
To maximize superior audio quality, convert to analog from digital is necessity process.
This unit replay Dynamic Range and Zero Cross Distortion by 24bit/96KHz audio convert
technology.
2
3
)HDWXUHV
$FFHVVRULHV
ְ 10bit Video D/A Converter
The unit adopts 10bit video D/A convert technology to reproduce the highest video quality.
It is not like the exist 8bit circuit, 10bit circuit convert the standard 8bit component signal to 10
bit signal and replays same as the original one.
Ӑ Remote Control Unit : 1
Check and identify the supplied
accessories
(Optional Unit)
Ӑ Batteries for remote control unit
(SizeŗAAAŘ) : 2ea
Ӑ Video/Audio Cable : 3 Terminal:1 set
Ӑ User’s Manual : 1 vol
Ӑ Songbook : 1 vol
Notes
This unit is designed for home appliance with good appearance, high quality, function and
userŖs convenience also.
4
5
Cautions and Attentions
:KHQ,QVWDOO
Danger
ҮDo use 110V or 220V power outlet only.
Point of notice for safety
To utilize the unit as a safe and properly and to precaution the risk or physical damage,
please read this manual carefully and follow the instructions. After reading, please keep it at
the safe place for the future reference.
Prohibition
ҮIf not, it may cause fire, electric leakage or electric shock.
Warning
Do not install the unit at the places which make extreme vibration or be inclined.
Prohibition
The meaning of the signs
Do not install the unit in high humidity.
Danger
This sign says “it contains the possibility the fire or death Or
severe wound.”
Warning
This sign says “it contains the possibility death or severe
Wound.”
Caution
This sign says “it contains the possibility the injuries or Physical
damages.”
Examples of sign
Risk of
Electric shock
This sign is for danger, warning, caution.
(The drawing means, risk of electric shock)
Do not
disassembly
This sign is for prohibition of actions.
(The drawing means, do not disassembly)
Prohibit the
Humidity
ҮWhen you connect the unit to the other peripherals, Please try after read each instruction guide. If
not, It may cause fire, electric leakage or electric shock.
Forced
This sign is for the items which must be kept.
(The drawing means, unplug the power cord)
6
ҮInstall the unit in a safe and endure the unitŖs weight. Do not install the unit in the shake place or
higher place. It may cause unit damage.
ҮInstall the unit with enough space from the wall or other materials. Especially please keep more
than 10cm from the wall. If not, It may cause fire, electric shock.
Caution
ҮDo not install around electric heater or heart source. Especially, Do not place the power cord
close to electric heater. It may cause fire, electric leakage or electric shock.
ҮDo not hurt or damage the power cord and not place any materials which can damage the power
cord. If not, It may cause fire, electric leakage or electric shock.
ҮDo not install in the severe temperature change area. If not, It may cause fire, electric leakage or
electric shock.
Prohibition
Unplug The
power cord
and do not place the vase or any watered materials on top of the unit
ҮDo not plug the power cord before the installation Finished. It will be caused fire or unit malfunction.
ҮDo not install under the direct ray of lights. It will be caused electric leakage, electric shock. Also
caused deformation or discoloration of the product.
ҮDo install TV set(monitor) with a certain distance from the speaker unit since it can get magnetic
forces easily.
7
:KHQ8WLOL]LQJ
:KHQ8WLOL]LQJ
Warning
Caution
ҮDo not pour the water into the product or avoid the product from the wet. It may cause
fire, electric leakage or electric shocks.
ҮDo not move the product from the cold to hot area. The unit will be malfunctioned due
to the pick-up part is wet with dew. In this case, turn power the unit off, and then keep
the unit under room temperature(25oC) during 1~2 hours and then turn the power on
again.
ҮDo not put any metals such as hairpin, coin or the materials which can be burned into
the unit. It may cause fire, electric leakage or electric shocks.
ҮDo not open disc tray by force. Also do not move the System when disc is inserted
ҮDo not put the container with the water or metals on top of the unit. It can be get into
the unit and may cause fire, electric leakage or electric shocks.
Prohibition
ҮDo not spray water, beverages, alcohol to the unit. It may cause fire, electric leakage or
electric shocks.
ҮDo not deform, twist, bent or heat the power cord.
ҮDo not touch the unit or the power cord with wet Hands. It may cause fire, electric
leakage or electric shocks. Also the unit can be damaged.
Prohibit
ҮDo not step or hang on the unit. Especially, keep out of reach of children. It can be injured if
the unit is fall down or destroyed.
ҮDo not throw the bundled accessories toward people. It can be injured.
Unplug
the power cord
ҮDo not move the unit when something is on the topside. It can be injured if the unit is fall
down or destroyed.
ҮWhen you hear some strange sound or smell or smoke something, shut off the power
immediately (Use thick gloves or dry cloth) and unplug the power cord.
ҮDo not push the buttons by force. The unit can be damaged.
ҮUnplug the power cord when the unit is not used for a Long time. It may cause fire.
Prohibit
Touches
ҮDo not touch the power cord when thunder or lighten.
Unplug
the power
cord
ҮIf the unit is fallen down or chassis is damaged, turn power off the unit, unplug the
power cord. If you use as it is, It may cause fire, electric leakage or electric shocks.
ҮWhen moving the unit, unplug the power cord and disconnect all the peripheral
devices. It may cause fire, electric shock if the power cord is damaged.
Caution
ҮDo not insert the multi plug into one outlet. If you must do, do not exceed total power
more than 30W. especially, do not use with electric heater, Monitor, TV set, hair dryer,
electric cooker absolutely. It may cause fire from electric leakage.
Caution
ҮDo not unplug the power cord with cord itself, use cord head. It may cause fire, electric
leakage or electric shocks due to the power cord trouble.
Prohibition
ҮDo not utilize the damaged the power cord or the outlet is not fixed firmly. It may cause
fire, electric leakage or electric shocks.
ҮBefore you turn the power on, reduce the volume to minimize. Loud sound can
damage to your hearing.
ҮDo not disassemble or remodel the unit. It may cause fire or electric shock.
Do not
disassembly
ҮThe company has not responsibility all kinds of accidents by unauthorized person’s
activities.
ҮDo not put the product on amplifier. Also it may cause fire, electric shock from the
flame of the components
ҮThis player is a class 1 laser product.
ҮDo not impact on microphone severely. Also it may cause deterioration or damage of
the product When you close to speaker unit, it will make strange sound.
ҮDo not install in the dust area. it may cause fire.
ҮDo not close the ventilation which is located topside. Also Do not place the product
badly ventilated. it may cause fire.
8
Caution
ҮUse of controls adjustment or performance of product other than those specified
herein may result in hazardous radiation exposure.
ҮAs the laser beam used in this player is harmful to the eyes, refer servicing to
qualified only
9
Installation of HD-787 and
Explanation of Each Parts
:KHQ&OHDQLQJ
1DPHRI(DFK3DUW
Forced
ҮWhen you clean the exterior of the unit, Do not use water, gasoline, benzene or
thinner. Also do not spray Insecticide around the unit.
ҮClean the interior of the unit in every year and consult with your distributor for cleaning.
Caution
Unplug
the power
cord
Front Panel
17
ҮIt may cause fire or unit malfunction when the excretions of insects accumulate in the
interior.
18 19
20 21 1
5
8
15
ҮWhen you cleaning, turn power off and then unplug the power cord. It may cause electric
shock.
22 23
2
13
3
4
7
6
14 11 12
9
10 16
+DQGOLQJ'LVFV
1 Power button
5 FND display
Plug the power cord to the wall outlet and press
this button to supply power to the unit. Press
again, power will be shut off.
Do not bent discs.
Do not fall or impact
The discs
Do not write on the
surface with pencil.
When you clean dust
or finger print, use soft
and dry cloths
It indicates the status of disc and operation status
of various other functions.
6 Remote sensor
2 Microphone Jack
It receives the infrared signal from remote
controller.
Plug the microphone into this microphone jack.
You can use 2 microphones at the same time.
7 Disc tray
3 Microphone volume
Do not use benzene or
thinner as a cleanser
Do not scratch or dirty when
you handle by hand.
Avoid the direct ray of
light
It is the place for disc being in or out. It is
controlled by OPEN/CLOSE button.
Trying to open or close the disc tray directly by
hands will cause trouble.
A knob which adjusts the ratio of microphone
input. Turn the knob clockwise for increasing the
volume, turn the knob anticlockwise for
decreasing the volume.
8 Numeric buttons
4 Echo volume
Caution
1. Do not move the unit when disc is in the tray. Disc can be departing from the tray.
2. If you do not place disc on the tray exactly, it can be damaged to the disc or the product.
10
It is to input numbers what you want.
A knob which adjust the echo effect of
microphone input. Turn the knob clockwise for
increasing the echo effect and turn the knob
anticlockwise for decreasing the echo effect.
9 Reserve button
This button is used for reserving the next songs. If
you want to reserve the next song, press the song
number and then this button.
You can reserve maximum 99 songs.
11
1DPHRI(DFK3DUW
1DPHRI(DFK3DUW
Front Panel
Rear Panel
10 R-Cancel/Delete button
4
21 MPX button
It is for canceling the reserved songs.
If you want to cancel the reserved song, press the
song number and the press this button.
1 11
Use to select the audio output(left, right and
stereo). If the disc or song contains the contents.
22 Repeat button
11 Pause button
ҮKaraoke : There are four kinds of modes.
Press this button to pause the current playing. To
play again, press the Replay/Start button.
12 Open /Close button
ҮDVD : Press this button while the disc is being
read.
Use when you open or close the tray.
13 Search button
10
2 3
Use this button to scan the contents of disc rapidly
during replay DVD/Video CD/CD.
You will have the options below at each time
you press the button.
14 Skip button
When play DVD, it skips the chapter. When play
VCD/CD, it skips the track.
ҮMP3 : You can use REPEAT function as follows
by pressing this button while the disc is being
read.
15 Play/Start button
Press this button to play again from the pause
status.
16 Stop/Cancel button
5 6 7
8
9
6 Component Video Output Terminal
1 Power Input
Connect this terminal to component input terminal
of TV or monitor.
Connect this power cord to the wall outlet of 110V
or 220V.
7 S-Video Output Terminal
2 Optical Audio Output Terminal
Connect S-video input terminal of TV to view a
superior image.
Connect this terminal to digital amplifier which has
optical audio input terminal. In the case of DVD
and VIDEO CD, signal is output from this terminal
but no operation can be performed in the case of
Karaoke.
8 External microphone input
It is connected to external wireless microphone.
Press this button to stop play.
ҮVCD : You can activate repeat only after you set
PBC off by pressing the PBC button.
17 Tempo button
You can speed up or slow down the song, when
play karaoke.
ҮCD : By pressing REPEAT during the playback,
you can repeat desired pieces as follows:
18 Volume button
You can adjust the volume up/down.
9 USB operations
3 Coaxial Audio Output Terminal
ҮFile playing when no disc
1. Connect USB memory.
2. SMART NAVI is displayed.
3. Select the file that you want to play.
ҮFile playing when the disc is playing
1. Connect USB memory and stop the disc
playing.
2. Press GOTO button and select USB DEV1.
3. Select the file that you want to play.
Connect this terminal to digital amplifier which has
coaxial digital input terminal. In the case of DVD
and VIDEO CD, signal is output from this terminal
but no operation can be performed in the case of
Karaoke.
4 5.1ch Analog Audio Output Terminal
19 Key control button
23 Mode button
To increase tone, press # button, to decrease
tone, press Ⱦbutton.
This button is used for changing devices.
(HDD/DVD/USB)
20 Recording button
This button is used for copying the discs.
(DVD/VCD/CDG/NEO+G)
Connect this terminal to amplifier which has 5.1ch
analog input terminal.
10 Remote In Terminal
5 Composite Video Output Terminal
Insert the remote sensor that is offered on option to
Remote In Terminal.
Connect this terminal to composite input terminal
of TV or monitor.
11 Power switch
You can switch AC power on and off.
12
13
1DPHRI(DFK3DUW
1DPHRI(DFK3DUW
Remote Controller
Remote Controller
1 Power button
2
1
4
5
This button converts standby mode and power on.
3
2 Mute button
6
7
You will have mute on/off alternatively at each time you
press this button.
3 Open/Close button
Use to open or close the disc tray.
4 Setup button
8
11
10
Use to change the configuration or setup of the system
from the stop status.
9
12
5 Title button
ҮDVD : To select of the Title menu contains in the disc.
13
6 Menu button
15
14
16
17
18
19
20
22
21
25
24
27
30
32
ҮDVD : To select the Root menu contains in the disc.
7 Numeric button
Use to enter the number what you want.
8 R-Cancel button
ҮKaraoke : After enter the number and then press this
button to cancel song which is reserved already. If you
don’t enter the number reserved, the latest song
reserved is canceled.(NEO+G: The latest song
reserved is only canceled)
23
26
28
29
31
9 Reserve button
ҮKaraoke : To reserve the song, input the number and
press this button. You can reserve max 99 songs.
33
10 Song List/Goto button
ҮKaraoke : To search the titles of song or singer to play.
ҮDVD/VCD : Used for jumping to the desired title,
chapter or track or time by pressing numeric and
direction buttons.
14
11 Keypad/Zoom button
21 Volume button
You can adjust the volume up / down.
ҮKaraoke : To search the titles of song or singer
by virtual keypad.
ҮDVD/VCD: Enlarge the scene what you want.
When you press at the pause status, you can
search with direction buttons.
22 Skip/Page button
ҮDVD/VCD/CD: Use to move chapter or track.
ҮKaraoke : In song list menu, you can search by
every 1page by pressing this button.
12 PBC button
23 Search Forward/Backward button
ҮVCD 2.0 : Enable or disable the PBC function.
ҮDVD/VCD: Use to search the scene what you
want or fast forward/backward the play.
13 Direction/Enter button
Use to select, set up, confirm of menu item. you
can do index down and up by pressing Ȝ/Ȟ
button.
24 Copy button
This button is used for copying the discs.
(DVD/VCD/CDG/NEO+G)
14 Mode button
25 Modify/Display button
This button is used for changing devices.
(HDD/DVD/USB)
ҮKaraoke : To modify the song list registered.
ҮDVD/VCD : Press this button to display
information of title or chapter.
15 Genre button
Use to select karaoke, movie and music mode.
16 Title button
You can select title sort list in the song list mode.
17 Artist button
You can select singer sort list in the song list
mode.
18 Pause button
When you press this button the playing is paused
from the play status.
19 Stop button
Press this button to stop the playing.
20 Play button
From the pause status, press this button to restart.
15
1DPHRI(DFK3DUW
1DPHRI(DFK3DUW
Remote Controller
Remote Controller
ҮYou can select the vocal mode for VOB files in
HDD.
28 Repeat button
ҮKaraoke : There are four kinds of modes.
31 Video Output button
This button is used for changing video output.
(NTSC/PAL)
32 Tempo button
ҮKaraoke : Used for changing the tempo of the
song. To increase tempo press + button, to
decrease tempo, press - button.
ҮDVD : Press this button while the disc is being
read.
33 P-SCAN button
By pressing this button, you can select
“Progressive” and “Interlace Scan” repetitively.
You will have the options below at each time
you press the button.
ҮMP3 : To display chapter, elapsed time and
chapter, remaining time.
ҮMP3 : You can use REPEAT function as follows
by pressing this button while the disc is being
read.
26 Delete/Subtitle button
ҮKaraoke : It is for canceling the reserved songs.
If you enter wrong number, you can delete the
number.
ҮDVD : If the disc contains subtitle, you can
choose a language by pressing the button.
According to the disc, you can have different
language options for subtitle.
ҮDivX : You can set up display about the subtitle
for playing. You can choose subtitle which you
want for stopping.
ҮVCD : You can activate repeat only after you set
PBC off by pressing the PBC button.
ҮCD : By pressing REPEAT during the playback,
you can repeat desired pieces as follows:
27 MPX/Audio button
ҮKaraoke : Use to select the audio output(left,
right and stereo). If the disc or song contains
the contents.
ҮDVD : If the disc contains sequences recorded
from different audio language, the kinds of
Audio appears showing the number of available
audios, and the audio being shown. You can
change the audio language if you wish.
29 Video Input button
This button is used for changing video input.
(RGB/S-VHS/YPbPr)
30 Key Control button
ҮKaraoke : To increase tone, press # button, to
decrease tone, press Ⱦ button.
16
17
1DPHRI(DFK3DUW
1DPHRI(DFK3DUW
Remote Controller
FND Display
4
1
3
2
1 Elasped Time
It displays the elapsed playing time DVD title or Video CD track in Hour and Min.
2 Title/Chapter & Song numbers
It displays the title/chapter & Song numbers of the disc which is running.
3 Microphone/Music Level Meter
It displays the levels of the microphone/music volume.
4 Disc rotation
It shows that the disc is running.
18
19
3
%DVLF&RQQHFWLRQ
%DVLF&RQQHFWLRQ
Ү(QVXUHWKDWWKHSRZHUVZLWFKRIRWKHUHTXLSPHQWEHFRQQHFWHGLVVHWWRRIIEHIRUHFRPPHQFLQJFRQQHFWLRQ
Ү'RQRWEORFNYHQWLODWLRQKROHVRIDQ\RIWKHHTXLSPHQWVVRWKDWDLUFDQFLUFXODWHIUHHO\
Ү5HDGWKHLQVWUXFWLRQVEHIRUHFRQQHFWLQJRWKHUHTXLSPHQWV
ҫ 1RWH 'XULQJ'9'SOD\WKH79YROXPHPD\EHDORZHUOHYHOWKDQ79EURDGFDVWV,QWKLVFDVHDGMXVWVWKH
YROXPHWRWKHGHVLUHGOHYHO
,IWKLVPDFKLQHLVFRQQHFWHGWRWKH79YLDDYLGHRFDVVHWWHUHFRUGHUWKHSLFWXUHPD\QRWEHSOD\HGZHOO
ZLWKVRPH'9'V,QWKLVFDVHGRQRWFRQQHFWWKHSOD\HUYLDWKH9&5
Ү(QVXUHWKDW\RXREVHUYHWKHFRORUFRGLQJZKHQFRQQHFWLQJDXGLRDQGYLGHRFDEOHV
Ү6HOHFWWKHDSSURSULDWHVFUHHQW\SHDWWKHLQLWLDOVHWWLQJ³79´DFFRUGLQJWR\RXU79VHW
&RQQHFWLQJWRD$XGLR(TXLSPHQW
&RQQHFWLQJWRD6WHUHR796HW
20
21
%DVLF&RQQHFWLRQ
2SWLRQDO$XGLR&RQQHFWLRQ
&RQQHFWLQJWRWKH$PSOLILHUKDVFK,QSXW
&RQQHFWLQJWRD'HFRGHUZLWK'ROE\'LJLWDO3URFHVVLQJ
:KHQ'9'VUHFRUGHGLQ'ROE\'LJLWDODUHSOD\HG'ROE\'LJLWDOELWVWUHDPLVRXWSXWIURPSOD\HU¶V237,&$/
GLJLWDODXGLRRXWSXWFRQQHFWRU:KHQWKHSOD\HULVFRQQHFWHGWRD'ROE\'LJLWDOGHFRGHU\RXFDQHQMR\WKHDWHU
TXDOLW\DXGLRLQ\RXUKRPH>$Q237,&$/GLJLWDODXGLRFDEOHRSWLRQDOLVUHTXLUHGZKHQDQRSWLRQDO'ROE\
'LJLWDOGHFRGHULVXVHG@
22
23
2SWLRQDO$XGLR&RQQHFWLRQ
8VDJHRI5HPRWH&RQWUROOHU
2SWLRQDO'LJLWDO$XGLR2XWSXW
%DWWHU\,QVWDOODWLRQ
͈ :KHQFRQQHFWLQJWKHRSWLFDOGLJLWDODXGLRFDEOH
Ү&RQQHFWWKHWHUPLQDODQGFDEOHH[DFWO\
,QVHUWWKHEDWWHULHVDIWHUPDNHVXUHWKHFRUUHFWDQGSRODULWLHVDVLOOXVWUDWHGDVEHORZ
͉ &RQQHFWLQJWKHDXGLRRXWSXWIURPWKHXQLW¶VRSWLFDOGLJLWDODXGLRRXWSXWFRQQHFWRU
/LIHWLPHRIEDWWHULHV
'LVF
'9'
6RXQGUHFRUGLQJIRUPDW
2SWLFDOGLJLWDODXGLRRXWSXWIURPFRQQHFWRU
'ROE\'LJLWDO
'ROE\GLJLWDOELWVWUHDPFKRU3&0FK.+]ELW
/LQHDU3&0.+]ELW
/LQHDU3&0FK.+]ELWRQO\ſ RUQRRXWSXWſ
ſ
Ү7KHEDWWHULHVORQJODVWIRUDERXWRQH\HDUDOWKRXJKLWGHSHQGVRQKRZRIWHQDQGIRUZKDWRSHUDWLRQV
WKHUHPRWHFRQWUROLVXVHG
9LGHR&' 03(*
3&0.+]
Ү,IWKHUHPRWHFRQWUROOHUIDLOVWRRSHUDWHHYHQLWLVRSHUDWHGQHDUWKHPDFKLQHUHSODFHWKHEDWWHULHV
LPPHGLDWHO\
&'
/LQHDU3&0.+]
Ү8VH³$$$´EDWWHULHV
ſ
ſ
/LQHDU3&0
7KHW\SHRIDXGLRRXWSXWIURPWKHFRQQHFWRUFDQEHVHOHFWHGE\WKHLQLWLDOVHWWLQJ
6RXQGKDYLQJ.+]VDPSOLQJUDWHLVFRQYHUWHGLQWR.+]VDPSOLQJUDWHZKHQLWLVRXWSXWIURPWKHXQLW¶V
GLJLWDODXGLRRXWSXWFRQQHFWRU
͊ 5HIHUHQFH
Ү'ROE\'LJLWDOLVDGLJLWDOVRXQGFRPSUHVVLRQWHFKQLTXHGHYHORSHGE\WKH'ROE\/DERUDWRULHV/LFHQVLQJ
&RUSRUDWLRQ6XSSRUWLQJFKDQQHOVXUURXQGVRXQGDVZHOODVVWHUHRRUPRQRVRXQGWKLVWHFKQLTXHHQDEOHVD
ODUJHTXDQWLW\RIVRXQGGDWDWREHHIILFLHQWO\UHFRUGHGRQGLVF
Ү/LQHDU3&0LVDVLJQDOUHFRUGLQJIRUPDWXVHGLQ&'V:KLOH&'VDUHUHFRUGHGLQ.+]ELW'9'VDUH
UHFRUGHGLQ.+]ELWXSWR.+]ELW
Ү,I\RXKDYHD'ROE\3UR/RJLF6XUURXQGGHFRGHU\RXZLOOREWDLQWKHIXOOEHQHILWRI3UR/RJLFIURP
WKHVDPH'9'PRYLHVWKDWSURYLGHIXOOFKDQQHO'ROE\'LJLWDOVRXQGWUDFNVDVZHOODVIURPWLWOHV
ZLWKWKH'ROE\6XUURXQGPDUN
0DQXIDFWXUHGXQGHUOLFHQVHIURP'ROE\/DERUDWRULHV
³'ROE\´DQGWKHGRXEOH'V\PERODUHWUDGHPDUNVRI
'ROE\/DERUDWRULHV&RQILGHQWLDO8QSXEOLVKHG:RUNV
'ROE\/DERUDWRULHV,QF$OOULJKWVUHVHUYHG
ʪ 'ROE\/DERUDWRULHV,QF$OOULJKWVUHVHUYHG
ҫ &$87,21IRUWKH237,&$/GLJLWDODXGLRRXWSXWFRQQHFWRU :KHQFRQQHFWLQJDQDPSOLILHUZLWKDQ237,&$/GLJLWDOLQSXWFRQQHFWRUZKLFKGRHVQRWFRQWDLQWKH'ROE\
GLJLWDOEHVXUHWRVHOHFW³3&0´DW³',*,7$/$8',2´RIWKHLQLWLDOVHWWLQJ³$8',2´
2WKHUZLVHDQ\DWWHPSWWRSOD\'9'VPD\FDXVHVXFKDKLJKOHYHORIQRLVHWKDWLWPD\EHKDUPIXOWR\RXU
HDUVDQGGDPDJH\RXUVSHDNHUV
24
25
8VDJHRI5HPRWH&RQWUROOHU
8VDJHRI5HPRWH&RQWUROOHU
Remote Controller Operating Range
Warning
ҮThe remote controller unit should be with in 7m (23feet) and operating angle should be with in 60
degree at the front of the remote control sensor
ҮDo not charge the batteries. It may cause fire, wound.
ҮThe operating distance can be varied with the brightness of the room.
ҫ 1RWH : 1. Do not flash the bright light.
Prohibit
2. Do not place objects between the remote control sensor and remote controller.
3. Do not use with the other remote controller.
Caution
ҮKeep out of reach of children. If children take them, they need to see a doctor
immediately.
The remote control sensor
Warning
ҮDo not use unauthorized batteries. Do not mix old and new batteries. The leak of
electrolyte may cause the injury, environmental pollution
ҮDo not attempt to short-circuit, the leak of electrolyte may cause the injury.
Prohibit
ҮDo not attempt to disassemble or throw into fire or water, The leak of electrolyte
may cause the injury, environmental pollution
ҮInsert the batteries after make sure the correct (+) and (-) polarities. The leak of
electrolyte may cause the injury, environmental pollution
Caution
ҮIf the remote controller is not going to used for a long periods, remove the
batteries, otherwise, electrolyte may leak and it may cause unit malfunction and
environment pollution.
ҮCollect the spent batteries separately. Otherwise, it may Cause the environmental
pollution.
26
27
Playing Discs
0LFURSKRQH&RQQHFWLRQ
,QVHUWLQJD'LVF
͈ Connect the Microphone
ҮYou can connect the microphone with 6.3mm stereo plug at the front side.
1
Playing a DVD Video Disc
You will recognize DVD Video discs by the logo. Depending on the material on the disc (a movie, video
clips, a drama series, etc.), it may have one or more titles, and each title may have one or more chapters.
ҮYou can connect a wireless microphone at the rear side.
͉ Adjust the Microphone Volume Level
ҫ 1RWH: Since it is usual for DVD movies to be released at different times in different regions of the world, all players
have region codes, and discs can have an optional region code. If you insert a disc of a different region
code to your machine, the disc will not play, and should be removed.
͊ Adjust the Echo Volume Level
2
Playing a Video CD
You will recognize Video CDs by the logo. Depending on the material on the disc(a movie, video clips, a
drama series, etc.) it may have one or more TRACKs as indicated on the disc case.
Some Video CDs have Playback Control(PBC), which is a predefined playback sequence stored on the
disc.
3
Playing an Audio CD
Audio CDs contain music TRACKs only. You will recognize CDs by their logo.
4
ҫ1RWH : When you are using the microphone, be sure to connect analog audio output terminal. (It does not make
any sound from the digital audio output terminal)
28
CDG/NEO+G Karaoke Disc
͈ The CDG is audio CD that is added the words of a song. You can use like karaoke.
͉ The NEO+G is compressed CDG. A DVD disc contains 1500 songs. The disc is Automatically worked
like karaoke disc. Press title button, you can select song.
29
,QVHUWLQJD'LVF
5
%DVLF2SHUDWLRQV
ҫ Note : SEARCH, STEP, SLOW, and using disc menu functions may lead to the trembled screen display with some discs.
Inserting a Disc
͈ Press OPEN/CLOSE on the front of the player. The disc tray opens.
͉ Lay your chosen disc in the tray, label side up. Make sure it is sitting properly in the correct recess.
1
Basic Play
͈ Press POWER to switch on the power.
͊ Press OPEN/CLOSE, to close the tray.
͉ Press OPEN/CLOSE to open the disc tray.
͊ Place a disc onto the disc tray.
͋ Press OPEN/CLOSE to close the disc tray.
͌ Press PLAY.
• The disc tray is automatically closed and begins playing.
• In case of interactive DVDs or Video CDs with playback control, a MENU screen appears on the TV
monitor.
2
Stop Playing(DVD)
͈ Press STOP button. When Playing is stopped, the unit records the point where STOP was pressed
(PRE-STOP mode).
͉ Press PLAY in PRE-STOP mode to resume from this point. When the tray is opened, STOP button is
pressed again, or the power is turned OFF and then ON, the resume function will be cleared.
ҫ :$51,1*: A bad or scratched disc can cause troubles such as disc loading failure or unexpected actions
during play.
3
Skip forward or backward
When a TITLE on a DVD disc has more than one CHAPTER or a Video CD/CD has more than one TRACK,
you can move to another CHAPTER or TRACK as follows:
͈ Press ȞȞ֥ during play to step forward to the next CHAPTER or TRACK.
͉ Skip leftward while being played
Press (֥ȜȜ) button to move to the current CHAPTER for DVD, and to the initial position of the current
track for VIDEO CD and CD.
When elapsed time of currently selected CHAPTER of track is less than 3 seconds, it skips to the left.
Press (֥ȜȜ) button to move to the previous CHAPTER for DVD, and to the previous track for VIDEO CD
and CD.
͊ Tracks are selectable using numeric buttons at the stop mode for VIDEO CD and CD. In case of the fault
of setting, press STOP button to reset.
30
31
%DVLF2SHUDWLRQV
%DVLF2SHUDWLRQV
MP3
4
Search Forward or Backward
Once you insert the MP3 Disc in the tray, smart navigation starts to operate automatically.
͈ To search forward or backward through the disc, press ȞȞ or ȜȜ during play.
• Search begins, and sound is muted.
͉ To return to play, press PLAY button.
• The speed of search is relatively slow at first. When the button is pressed again, the speed becomes
faster.
5
1
Disc Play
After pointing out desired title using Ɗ or ƌ buttons,
press the ENTER button.
Pause
͈ Press PAUSE ( ֥֥ ) button to stop temporarily.
͉ Press PLAY (Ȟ) button to restart from the “PAUSE”.
6
Zoom (DVD/Video CD)
If you want to choose a title existing in the folder, you
can do it using Ɗ or ƌ buttons and pressing ENTER
button.
You can get magnified scene by twice on TV, but this function is slightly different according as the play
modes when ZOOM button is pressed, are NORMAL PLAY mode or STILL mode.
͈ To get the magnified scene, press ZOOM.
͉ If in STILL mode, move to the desired scene position by using the direction buttons.
͊ To return to the normal size scene, press ZOOM again.
ҫ Note : The zoomed scene may tremble depending on the discs.
7
MENU Function (DVD)
͈ Press MENU button either at STOP and PLAY mode.
͉ Press Ɗ or ƌ to choose items.
͊ Press ENTER or PLAY buttons to carry out the function of selected item.
͋ Press MENU to return to the MENU mode.
ҫ Note : MENU screen only appears with the disc which includes MENU function.
32
Play Mode
REP-ONE
FOLDER REPEAT
FOLDER
Play repeatedly the selected song.
Play the songs in the folder repeatedly in order.
Play the songs in the folder one by one.
33
Karaoke
The karaoke player plays contained contents, copied songs in HDD and karaoke disc like CDG and
NEO+G.
%DVLF2SHUDWLRQ
.DUDRNH2SHUDWLRQV
1
Microphone (Volume) Control
• The function controls Microphone Volume.
1
• By turning the Microphone Volume Controller clockwise on the front side of main body, the voice gets
louder.
Play
• The voice gets smaller when it turns counterclockwise.
Press the song number using numeric buttons.
• Press PLAY or ENTER buttons to start the song.
2
Echo Control
• It gives Echo Effect to the microphone.
• By turning the Echo Controller clockwise on the front side of main body, the effect gets increased.
2
Stop
• The effect gets decreased when it turns counterclockwise.
Press STOP button while the song is playing.
This function cancels the song currently playing.
3
Key Control
͈ STOP button stops the current song being played.
• The key of the current song can be chosen using the KEY (Ⱦ) button.
͉ Press STOP button in case that wrong number is pressed while booking for a song and the number
disappears to return to the initial stage.
• By pushing the button once, the key of the song gets higher/lower by semitone.
• It changes to another by pressing each button.
4
Tempo Control
• The tempo of the song can be varied using TEMPO (+)button.
• By pushing the TEMPO (+)button, the song plays faster.
• By pushing the TEMPO ()button, the song plays slower.
• The tempo varies by pressing each button.
5
Reserve
Press RESERVE button to reserve the song after pressing desired song numbers and RESERVE button
subsequently. Maximum 99 songs can be memorized. (Only HDD karaoke mode)
6
Reserve Cancel
• Press R-CANCEL button to cancel previously reserved song following pressing song numbers desired to
cancel.
34
35
.DUDRNH2SHUDWLRQV
6SHFLDO2SHUDWLRQV
7
1
Repeat
Song Listing Function
The mode includes One Song, Repeat One, Repeat All, Random.
Choose desired mode.
The function “Song List” enables easy search for desired song from the disc.
• One Song : The system is pre-set with One tune mode from the start and it plays and stops only chosen
song.
• You can start or reserve the song by pressing ENTER or RESERVE button.
• You can change the item in the selected index by pressing( , ), ( , ) button.
• You can search songs by virtual keypad.
• Repeat One : It enables to play selected song repeatedly.
• Repeat All : It enables to play next songs subsequently by song numbers after playing selected song.
• Random : It enables to play in randomized order.
͈ Song listing by genre
8
Press the genre button to display song listing by genre.
Chorus/Singer
If the disc contains chorus or singer songs which is divided into left or right channel, you can select left,
right, stereo channel using MPX button, and enjoy chorus or singer.
9
Mute
• Press MUTE button to mute the melody indicating MUTE ON on the screen. By pressing the button once
again, MUTE ON function is removed indicating MUTE OFF on the screen.
10
Volume
(Karaoke/Movie/Music/Loader)
It controls volume of the current song with volume -/+ buttons.
11
System restriction
ҮHD-787 HDD must be formatted as FAT32 system.
ҮIt could have only 1 partition.
12
How to change the HDD karaoke operation
If you are on HDD karaoke state, you should escape the HDD karaoke mode using mode or open button.
Automatically change to DVD player state using open button.
If you are on DVD player state, you should change device using the mode button on remote controller and
then you can select the HDD karaoke state.
36
37
6SHFLDO2SHUDWLRQV
6SHFLDO2SHUDWLRQV
͉ Song listing by title
͋ Virtual keypad
Press the title button to display song list by title.
Press the keypad button to use the virtual keypad.
ҮYou can enter the character by pressing enter and direction button.
ҮIf Press the play button, the song is played. and you can reserve.
ҮYou should go out this state by pressing stop or cancel button.
(Screen of song list by title)
͊ Song listing by singer
Press the singer button to display song list by singer.
2
How to copy disc
If you want to move the data of disc to HDD, press copy button.(DVD/VCD/CDG/NEO+G)
(Screen of song list by singer)
(Insert the disc)
38
(select the file and genre)
39
Initial Setting
6SHFLDO2SHUDWLRQV
'9',QLWLDOVHWWLQJV*HQHUDOVHWWLQJV
͈ Press SETUP button in stopped or playback state.
3
Karaoke Setup
͉ Point out the SETUP by Ɗor ƌ buttons and press
ENTER button.
͋ Select a desired setting by pressing Ɗor ƌ buttons
and press ENTER button to apply it.
͊ Select desired setting by Ɗor ƌ button and enter
the detailed setting with Ȟ button.
͌ You can come out of the detailed settings page by
pressing Ȝ button.
The function is only available with HDD Karaoke mode.
Various functions of the HDD Karaoke can be set as desired along with “Karaoke INITIAL SETUP” function.
͈ Enter your PASSWORD.(Initial password is ‘0000’)
͉ Displayed on the screen while setup mode appears on the screen by pressing “SET UP” when the state
is karaoke mode.
͊ Press cursor Up(Ɗ), Down(ƌ) buttons to move to “SETUP MENU” and then press ENTER button to
select the desired item.
ҫ Shadow : This function enables to set the lyrics to be displayed in the black strips.
ҫ Singer : This function enables to set the singer to High, Middle, Low or off.
ҫ Coin/Time : This function enables to set the number of coin to sing one song or the time for singing.
ҫ Tray Lock : While user plays you can’t choose to move the disc tray.
ҫ Ruby Config : This function enables to set the screen display of ruby playing a song functioned with ruby.
• PIC MODE : IMAGE DETAILS SETTINGS
AUTO
FILM
VIDEO
SMART
ҫ Default Setup : This function restores the settings to initial state of purchase.
ҫ Power setup : It setup power of Karaoke player.
(NONE/FRONT/SMALL RCU/BIG RCU/FRONT_SMALL/FRONT_BIG/SMALL_BIG/ALL)
S - SMART
• OSD LANG : SCREEN INDICATION LANGUAGE
SETTING
Sets the screen resolution automatically.
Setting for a film or a progressive
Sets to the high Resolution Mode
Sets to the high Resolution Mode that support
the Progressive.
Sets to the High Resolution Mode that
supports the Progressive.
You can select a language of the screen.
• CAPTIONS
Translation of foreign dialogue of a movie.
• SCREEN SAVER : SCREEN PROTECTOR
SETTING
• ANGLE MARK : CAMERA MARK
After certain duration of STOP/PAUSE state, screen protector
stats to work.
If you have some TITLES filmed from different angles, you will
see a camera icon on the screen by pressing ON button. This
icon means that you can see different pieces of TITLES.
• MAIN PAGE : RETURN TO MAIN SETUP PAGE
You can return to the Main MENU on the SETUP page.
40
41
'9',QLWLDOVHWWLQJV6SHDNHUVHWWLQJV
͈ Press SETUP button in stopped or playback state.
'9',QLWLDOVHWWLQJV$XGLRVHWWLQJV
͈ Press SETUP button in stopped or playback state.
͉ Point out the SETUP by Ɗor ƌ buttons and press
ENTER button.
͋ Select a desired setting by pressing Ɗor ƌ buttons
and press ENTER button to apply it.
͉ Point out the SETUP by Ɗor ƌ buttons and press
ENTER button.
͋ Select a desired setting by pressing Ɗor ƌ buttons
and press ENTER button to apply it.
͊ Select desired setting by Ɗor ƌ button and enter
the detailed setting with Ȟ button.
͌ You can come out of the detailed settings page by
pressing Ȝ button.
͊ Select desired setting by Ɗor ƌ button and enter
the detailed setting with Ȟ button.
͌ You can come out of the detailed settings page by
pressing Ȝ button.
• DOWNMIX : AUDIO CHANNEL COMPOSITION
• CENTER DELAY : CENTRAL SPEAKER DELAY
SETTING
This allows you to have a proper Audio output when the Audio
channel composition recorded in the Disc is different from the
one that should be output.
LT/RT
When connected to Dolby Pro Logic Decoder
Amp.
STEREO When connected to STEREO Amp.
OFF
It is able to setup for 5.1 channel audio.
SPDIF/RAW
You can select central speaker’s delay duration up to 0 ~ 5ms.
• REAR DELAY : REAR SPEAKER DELAY SETTING
You can select rear speaker’s delay duration up to 0 ~ 15ms.
• TEST TONE : TEST TONE SETTING
You can select test tone’s ON or OFF.
• CENTER : CENTRAL SPEAKER SETTING
• BASS : BASS SPEAKER SETTING
You can set the central speaker for use by pressing ON button.
You can select bass speaker’s config1 or config2.
• REAR : REAR SPEAKER SETTING
You can set the rear speaker for use by pressing ON button.
Ȟ L-MONO
• SPDIF OUTPUT : SPDIF OUTPUT SETTING
SPDIF/PCM
OFF
In case of Coaxial/optical output, connection
to the Amp(Dolby digital/DTS) with digital
decoder.
In case of Coaxial output, connection to the
Amp(channel 2) with digital decoder.
Only analog audio output can be used.
Ȟ R-MONO
Ȟ MIX-MONO
• COMPRESSION
• OP MODE
You can use this function to enjoy Dolby Digital sound when
watching movies at low volume at night.
You can adjust the Compression effect which being greater of
smaller.
LINE OUT : Line out mode, with digital dialog normalization.
DEFAULT
RF REMOD : RF remodulation mode, with heavy compression
and digital dialog normalization.
• PRO LOGIC SETTING
• DUAL MONO SETTING
There are three modes of OFF/ON/Auto.
This is similar to the Multiplex television and can work only for
the Disc designed for DUAL MONO program.
Ȟ STEREO
Outputs proper channels through both right
and left speakers.
• SUB WOOFER : SUB WOOFER SPEAKER
SETTING
You can set the central speaker for use by pressing ON button.
42
Outputs the channel of the left side
through both right and left speakers.
Output the channel of the right side
through both right and left speakers.
Outputs through both right and left
speakers by mixing up two channels.
• LPCM OUTPUT : LPCM OUTPUT SETTING
It uses the LPCM 48K/LPCM 96K format of Audio data.
43
'9',QLWLDOVHWWLQJV.DUDRNHVHWWLQJV
͈ Press SETUP button in stopped or playback state.
'9',QLWLDOVHWWLQJV%DVLFFRQGLWLRQV
͈ Press SETUP button in stopped or playback state.
͉ Point out the SETUP by Ɗ or ƌ buttons and press
ENTER button.
͋ Select a desired setting by pressing Ɗ or ƌ buttons
and press ENTER button to apply it.
͉ Point out the SETUP by Ɗ or ƌ buttons and press
ENTER button.
͋ Select a desired setting by pressing Ɗ or ƌ buttons
and press ENTER button to apply it.
͊ Press Ȟ button.
͌ You can come out of the detailed settings page by
pressing Ȝ button.
͊ Select desired setting by Ɗ or ƌ button and enter
the detailed setting with Ȟ button.
͌ You can come out of the detailed settings page by
pressing Ȝ button.
• TV DISPLAY : TV SCREEN RATIO SETTINGS.
NORMAL/PS
• KARAOKE SETTING
This setting enable to adjust the key control function and set the chapter play for use the another consumer Karaoke.
(DVD/VCD Karaoke, MP3, CD)
NORMAL/LB
WIDE
• SUBTITLE LANGUAGE SETTING
16:9 Displays only the central part at the
ratio of 4:3.
4:3 Although you can watch the 16:8 screen
from the 4:3 screen, the upper and
bottom parts appear black.
You can enjoy 16:9 wide screen.
You can set the subtitle in the language of your choice.
• DISC MENU
Where available - languages depend on disc.
• LOCALE SETTING
You can set your locale.
• TV TYPE SETTING
MULTI
NTSC
PAL
• PARENTAL SETTING
Sets for Multiplex TV mode.
Sets NTSC TV mode.
Sets for PAL TV mode.
You can set the subdivision grades up to 9 levels.
Higher levels are for the adults.
• PASSWORD SETTING
• VIDEO OUTPUT SETTING
S-VIDEO
YPbPr
RGB
You set a password. Initial value is ‘3308’.
Sets the Output signals for S-VIDEO.
Sets the Output signals for YPbPr.
RGB.(Component)
You can connect to the TV via the
component terminals.
• DEFAULTS SETTING
You can restore the settings to initial state of purchase.
• SMART NAV : MP3 NAVIGATION MENU
You set the MENU contents for MP3.
• AUDIO LANGUAGE SETTING
You can play the Disc in the language of your choice.
SUBTITLE LANGUAGE SELECTION
You can set the subtitle in the language of your choice.
44
45
For Your Reference
7URXEOHVKRRWLQJ
7URXEOHVKRRWLQJ
Before requesting service for this unit, check the chart below for a possible cause of the problem you are
experiencing. Some simple checks or a minor adjustment on your part may eliminate the problem and restore
proper operation.
Symptom (Common)
Remedy
• No power.
• Insert the AC power plug securely into the power outlet.
• Play fails to start even when PLAY is
pressed.
• Play starts but then stops immediately.
• Condensation has formed: wait about 1 to 2 hours to allow the player to dry
out.
• This player cannot play discs other than DVDs, Video CDs and CDs.
• The disc may be dirty and may require cleaning.
• No picture.
• Ensure that the disc is installed with the label side up.
• Ensure that the equipment is connected properly.
• No sound.
• Distorted sound.
• Ensure that the input setting for the TV is “Video”.
• Ensure that the equipment is connected properly.
• Ensure that the input settings for the TV and stereo system are correct.
• Picture is distorted during rapid advance
or rapid reverse.
• The picture will be somewhat distorted at times:this is normal.
• No rapid advance or rapid reverse play.
• Some discs may have sections which prohibit rapid advance(or rapid reverse).
• No 4:3(16:9) picture.
• Choose the correct setup "TV" item which matches the TV set used.
• No operations can be performed with the
remote control.
• Check the batteries are installed with the correct polarities (+ and -).
• The batteries are depleted:replace them with new ones.
• Point the remote control unit at the remote control sensor and operate.
• Operate the remote control unit at a distance of not more than 7 meters(23
feet) from the remote control sensor.
• Remove the obstacles between the remote control unit and remote control
sensor.
• No key operation (by the unit and/or the
remote control) is effective.
• Set the POWER button to OFF and then back to ON. Alternatively, turn off
the power, disconnect the power plug and then re-connect it. (The player
may not be operating properly due to lightning, static electricity or some other
external factor.)
• On-Screen Menu lcons not displayed or only
partially displayed on the TV Screen.
• Select the appropriate TV screen type by consulting the operating manual for
the TV.
Symptom (DVD)
• No operations can be performed
regardless of inserting the DVD
• Assure the region code for DVD.
• Assure the item “PARENTAL” in the INITIAL setup.
• Audio Language or Screen Caption is not
existing in the INITIAL SET menu.
• Assure if DVD provides Audio Caption and Screen Caption.
• No Screen Caption.
• Assure if DVD provides Screen Caption.
• Assure if the set for TV screen is appropriate.
• Audio Language or Screen Caption is not
convertible.
• Assure if DVD provides Screen Caption and Audio Language.
• Screen Angle is not transformable.
• Assure if DVD is saved with various screen angles.
Symptom (Video CD)
• No Menu Popped Up
46
Remedy
Remedy
• Check if PBC (Play back control) function of video CD is off.
47
Specifications
Classification
System
Description
Karaoke Player
DVD
CDG, NEO+G
Compatible Discs
Video CD 1.1
Video CD 2.0 (PBC Function)
SVCD
Audio CD, MP3 CD
Input Terminal
MIC
10mV(600ѳ), 2EA
Video Out Terminal
Output Terminal
Video
S-VHS
Component
Power Supply
1Vp - p(75ѳ)
Y
1Vp - p(75ѳ)
C
0.286Vp - p(75ѳ)
Y
1Vp - p(75ѳ)
Pb
0.7Vp - p(75ѳ)
Pr
0.7Vp - p(75ѳ)
Audio
2Vrms
Supply Voltage
AC 110V-220V, 50/60Hz
Power Consumption
30W
Size
420(W)Ŧ90(H)Ŧ340(D)mm
Weight
4.5Kg(net, include HDD)
ҫ This unit is designed for home appliance with good appearance, high quality, function and user's convenience also.
ҫ The specifications and design of this product are subject to change without notice, due to improvement.
48