1
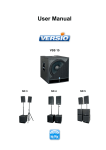
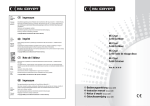
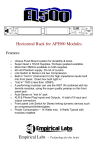
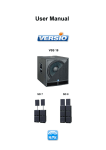
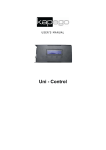
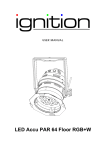
Manual
Mixer MXA 4600
Table of contents
1.
Safety instructions ............................................................................................................................ 3
1.1.
2.
3.
FOR SAFE AND EFFICIENT OPERATION ............................................................................ 3
Introduction ....................................................................................................................................... 4
2.1.1.
Product features .............................................................................................................. 4
2.1.2.
Technical Data ................................................................................................................. 5
Controls/Connections ....................................................................................................................... 6
3.1.
Front View................................................................................................................................ 6
3.2.
Back view................................................................................................................................. 8
2 / 10
1. Safety instructions
•
Read the safety instructions and also this manual carefully.
•
Keep the manual.
•
Observe all red flags.
•
Observe the manual.
•
To prevent fire or electric shocks, protect the device against rain and
humidity
•
Pull the plug before opening the housing.
•
To prevent an electric shock you should not remove the cover.
•
Do not operate the device in the near of water.
•
Use only a dry cloth for cleaning.
1.1. FOR SAFE AND EFFICIENT OPERATION
Be careful with heat and extreme temperature
Avoid exposing it to direct rays of the sun or near a heating appliance.
Not put it in a temperature bellow 32°F /0°C, or exceeding 104°F /40°C.
To avoid placing on un-stable location
Select a level and stable location to avoid vibration.
Do not use chemicals or volatile liquids for cleaning
Use a clean dry cloth to wipe off the dust, or a wet soft cloth for stubborn dirt. Pull the plug before
cleaning.
If out of work, contact sales agency immediately
Any troubles arose, remove the power plug soon, and contact with an engineer for repairing, do not
open the cabinet by yourself, it might result a danger of electric shock.
Take care with the power cable
Never pull the power cable to remove the plug from the receptacle, be sure to hold the plug. When not
using the device for an extended period of time, be sure to disconnect the plug from the receptacle.
Ventilation
It is not allowed cover fans and air in and outlets.
3 / 10
Safety
Do not remove the grounding. It is for your safety. If you remove the grounding it can cause electric
shocks.
Hearing
To avoid hearing damages, you should not operate a sound system with high levels. This applies to
monitor systems, which are in the near of the ear, headphones or IEMs also.
Accessory
Please use only the accessory which is set by the manufacturer.
Important
Damages caused by the disregard of this user manual are not subject to warranty. The dealer will not
accept liability for any resulting defects or problems. Make sure the electrical connection is carried out
by qualified personnel. All electrical and mechanical connections have to be carried out according to
the European safety standards.
2. Introduction
Thank you very much for buying this device. This device was developed for professional applications.
Please read and keep this manual carefully.
2.1.1.
Product features
-
4 Channel mixer
-
2HU mixer for rack fitting
-
Inputs: 2xPhono/3xAUX, 4xLine and 3xMic
-
SD Card Slot (max. 32GB could be readout )
-
SD source could be assigned to every channel
-
Every channel has its own gain
-
Output for headphones
-
Balanced XLR outputs
-
Balance regulation for master outputs
-
Volume, highs and lows regulation for microphone outputs
-
Selectable folders
-
LED meters
-
Repeat of all songs, only one song and random playback possible
-
Playback of USB, SD and Bluetooth sources possible
-
Good SNR (Signal to Noise Ratio)
4 / 10
2.1.2.
Technical Data
Audio Inputs
Mic
Mic 1,2
Phono 1, 2
AUX 1, 2, 3
Line 1, 2, 3, 4
Audio Outputs
Master
Booth
Tape
XLR balanced
Equalizer (+/- 8dB)
Stereo Treble
Stereo Bass
Mic Treble
Mic Bass
1,5mV/10kΩ
1,5mV/10kΩ
2mV/50kΩ
200mV/10kΩ
200mV/10kΩ
1V
1V
400mV
1V Type, 125mΩ @ 1% THD
+/- 15dB @10kHz
+/- 15dB @50Hz
+/- 12dB @7kHz
+/- 12dB @100Hz
5 / 10
3. Controls/Connections
3.1. Front View
1. Mode Key
With this button you can choose the required source (USB, SD or Bluetooth).
2. PLAY/Pause Key
With this button you can start or pause the playback.
3. Stop Key
With this button you can stop the playback.
4. Loop Key
With this button you can repeat a single song, if you press the button again the repeat
function is stopped.
5. Previous Key
Press this button to get to the previous song. If you depress the button you can wind back.
6. Next Key
Press this button to get to the next song. If you depress the button you can wind forward.
7. Previous Folder Key
Press this button to get to the previous folder.
8. Next Folder Key
Press this button to get to the next folder.
9. EQ Key
With this button, another sound can be generated.
10. SD Player & LCD
USB/SD Card Slot, and LCD display. Below the display are the buttons which were
described before.
11. Channel Gain
With this control you can adjust the preamping of the input level. The control is pre-fader
and pre-EQ.
12. Channel High
With this control you can edit the high frequencies of the current channel.
6 / 10
13. Channel Bass
With this control you can edit the low frequencies of the current channel.
14. Input Selector
With this switch you can choose the signal source.
15. Channel Fader
With this fader you can control the output level of the current channel.
16. Booth Fader
This fader adjusts the output level. .
17. Balance
With this control you can adjust the balance between right and left between the RCA and
XLR master outputs.
18. Master Fader
With this fader you can adjust the level of the master output.
19. LED VU meters
The meters show the output level. Which output level is shown is depending on the
position of master/PFL button.
20. MIC Input
At this combined input you can connect a microphone.
21. MIC Volume Control
With this control you can adjust the output level of the microphone.
22. MIC Treble
With this control you can adjust the amount of high frequencies.
23. Mic Bass
With this control you can adjust the amount of low frequencies.
24. Crossfader Assign
With this switch you can assign the channels 1, 2, 3 to channels 2, 3, 4 to the crossfader.
25. Crossfader
With this control you can cross-fade between two channels. Which channels would be
cross-fade depends on you settings (14.).
26. CH1 Monitoring
If this button is pressed you can read out the output level of the first channel on the meters
(19.)
27. CH 2 Monitoring
If this button is pressed you can read out the output level of the second channel on the
meters (19.)
28. CH 3 Monitoring
If this button is pressed you can read out the output level of the third channel on the
meters (19.)
7 / 10
29. CH 4 Monitoring
If this button is pressed you can read out the output level of the fourth channel on the
meters (19.)
30. Master Monitoring
If this button is pressed you can read out the output level of the master on the meters (19.)
31. Headphones Volume Control
With this control you can adjust the output level of the headphones.
32. Headphones
At this input you can connect headphones with 6.35mm chain and use them as
monitoring.
33. Power Switch
With this switch you can switch the mixer on and off. First turn the amplifier off. The mixer
should be the device which is turned on at first and turned off at last.
3.2. Back view
34. Channel 1: Phono 1 Input
The input type has to be chosen at the Input Selector (14.).
35. Channel 1: Line 1 Inputs (RCA)
Here you can connect CD-or DVD-Player, Tape Decks and other devices with line level.
At the Input Selector (14.) has Line to be chosen.
36. Channel 2: AUX1 Inputs RCA
37. Here you can connect CD-or DVD-Player, Tape Decks and other devices with line level.
At the Input Selector (14.) Line has to be chosen.
38. Channel 2: Phono 2 Input
At the Input Selector (14.) the input type has to be chosen.
39. Channel 2: Line 2 Inputs (RCA)
Here you can connect CD-or DVD-Player, Tape Decks and other devices with line level.
At the Input Selector (14.) the input type has to be chosen.
40. Channel 3: AUX2 Inputs (RCA)
Here you can connect CD-or DVD-Player, Tape Decks and other devices with line level.
At the Input Selector (14.) has Line to be chosen.
41. Channel 3: Line 3 Inputs (RCA)
8 / 10
Here you can connect CD-or DVD-Player, Tape Decks and other devices with line level.
At the Input Selector (14.) the input type has to be chosen.
42. Channel 3: MIC Inputs (RCA)
Here you can connect microphones. At the Input Selector (14.) has microphone to be
chosen.
43. Channel 4: AUX 3 Inputs (RCA)
Here you can connect CD-or DVD-Player, Tape Decks and other devices with line level.
At the Input Selector (14.) the input type has to be chosen.
44. Channel 4: Line 4 Inputs (RCA)
Here you can connect CD-or DVD-Player, Tape Decks and other devices with line level.
At the Input Selector (14.) the input type has to be chosen.
45. Channel 3: MIC 2 Inputs
Here you can connect microphones. At the Input Selector (14.) has microphone to be
chosen.
46. RCA REC Outputs
Use this outputs to record your music with the help of Tape deck, DAT recorder… Instead
of the master and booth outputs the line level cannot be adjust at these outputs.
47. RCA Master Outputs
As outputs there are balanced XLR or chain outputs and also RCA outputs. You should
use the RCA outputs for short distances, for signals to processors or another mixer.
48. Balanced XLR Master Outputs
These XLR outputs are sending a high-balanced signal. You should use these outputs to
control the amplifier or other balanced audio equipment.
49. Booth Outputs
These are 6,35mm jack outputs for monitoring. You can control the output level with the boothmonitor-control independent of the master. (The outputs are TRS jacks, so you can connect
balanced and unbalanced devices.
50. Power in
9 / 10
Importer:
B & K Braun GmbH
Industriestraße 2
D-76307 Karlsbad
www.bkbraun.com
[email protected]
10 / 10