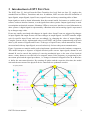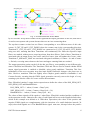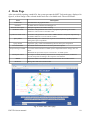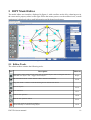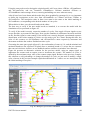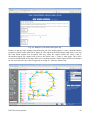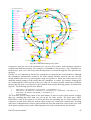
1
IOPT Tools
User Manual
Version 1.1
Authors:
V1.0 – Fernando Pereira - Initial version
V1.1 – Fernando Pereira, Filipe Moutinho, Luis Gomes – General revision
2014 (C) GRES Research Group
IOPT Tools user manual
1
1 IOPT Tools
The IOPT Tools integrated development environment offers a complete tool-chain to support the
development and testing of embedded system controllers, industrial automation applications and
other digital systems, available online under a Web-based graphical user interface.
Systems are specified using IOPT-Nets, a class of Petri nets extended with input and output
capabilities necessary to communicate with the external world, to allow reading sensors, manipulate
actuators, communicate with other systems and implement user interfaces.
The framework consists of an editor to design IOPT models, a simulator to test system behavior, a
state-space generator and a query system to automate model-checking and property verification, and
finally, several automatic code generation tools (C, VHDL, JavaScript), used to generate code to
deploy on physical embedded devices and implement the real controllers.
The simulator and model-checking tools enable early detection of design errors, allowing the
correction of most errors before reaching the prototype implementation phase, leading to faster
development cycles. The automatic code generation tools eliminate the need to manually write low
level code, except for some device specific operations, as micro-controller or FPGA pin assignment,
minimizing errors during the target implementation phase due to low level coding.
Finally, the tools have been tested with recent versions of popular Web browsers, including Mozilla
Firefox, Chrome, Opera and Safari, both using personal computers and tablets. All computational
intensive operations, like state-space generation, are executed on the server and are not affected by
client computer performance, but editor responsiveness may vary depending the Web browser, due
to different JavaScript execution engines. Google Chrome's just-in-time JavaScript compiler has
been tested to provide the best editor performance. On the opposite, although current versions of
Internet Explorer can execute the other tools, it fails to run the editor due to XSLT engine
incompatibilities.
The tools can be used for free and are available online at http://gres.uninova.pt. Users can log-in
anonymously using a “guest” account or can create personalized accounts to store private models. A
“models” account is also available providing access to examples used in several publications.
Fig. 1: GRES Web Page
IOPT Tools user manual
2
2 Introduction to IOPT Petri Nets
The IOPT class [1], derived from the Place-Transition low level Petri net class [2], employs the
standard Petri net Places, Transitions and Arcs. In addition, IOPT nets also allow the definition of
input Signals, output Signals, input Events, output Events and Arrays containing tables of data.
Input signals are used to obtain information from the external world, for instance to read the state of
sensors, read user interface buttons, or read signals from other systems. Output signals may be used
to manipulate mechanical actuators, illuminate LEDs to create user interfaces or send information to
other systems. A digital signal is represented by a Boolean value and an analog signal is represented
by an Integer range value.
Events are usually associated with changes in signal values. Input Events are triggered by changes
in input Signals and output Events will cause changes in output Signals. An IOPT controller might
wait for specific input Events and react accordingly, by changing the value of output Signals.
Complex systems can be implemented using several IOPT sub-systems communicating with each
other by the means of Signals and Events. A sub-type of input Events, called autonomous Events,
not associated with any input Signal, are used exclusively for inter-subsystem communication.
Figure 2 presents an example model used to implement a quadrature decoder hardware component.
This model interprets a sequence of digital electrical pulses on two input signals, channel A and
channel B, used to encode the position of a moving mechanical part, as the rotor of an electrical
motor, a rotary button or even the ball of a computer mouse. Pulse frequency is proportional to the
movement speed and the signal precedence, i.e. changes in channel A happen before B, or B before
A, define the movement direction. By counting all pulses and the respective direction, the model
can track the movement of the physical device connected to a quadrature encoder.
Fig. 2: IOPT Model - Quadrature decoder
IOPT Tools user manual
3
This model contains 5 places shown as yellow circles, 12 transitions drawn as cyan rectangles, 2
input signals depicted as cyan circles, one output signal represented as a green circle, 4 input events
drawn as cyan triangles and 2 output events presented as green triangles. The arrow lines
connecting Places and Transitions are Arcs.
Places are used to hold tokens, also called marks. A place with one or more tokens is considered
«marked». In the example, Place Init has a number 1 drawn inside the yellow circle, indicating that
this place holds one token. A sequence of numbers specifying the number of marks on each Place is
called the net «marking» and generally define the state of a Petri net model. The initial marking of
the example would be (1, 0, 0, 0, 0), representing 1 token in place Init and none in the other Places.
As IOPT nets extend P/T nets with input and output signals, the entire system state vector may also
include the value of certain output signals, as described at the end of this section. In the model
presented above, the system state vector contains the net marking and also the value of the Counter
output signal, corresponding to the instantaneous position of the sensed mechanical part.
The evolution of a Petri net model is defined by the behavior of the Transitions: When certain
conditions happen, a Transition may fire, removing tokens from certain Places and adding new
tokens to other Places, according to the Arcs connected to that Transition.
An Arc is represented by a line with an arrow defining the Arc direction. An Arc starting in a Place
and ending in a Transition is called an Input Arc. An Arc starting in a Transition and ending in a
Place is called an Output Arc. Each Arc may have an inscription number representing a number of
tokens. If the inscription is omitted, a default value of 1 is assumed.
A Transition can only fire when all Places connected to input Arcs have a number of tokens greater
or equal the corresponding Arc inscriptions. When this condition is satisfied, the Transition is said
to be “enabled”. In addition, Transitions can also be associated with input Events and guard
conditions. When all the guard conditions are true and input Events happen, the Transition is
“ready”. A transition will only fire when it is simultaneously both enabled and ready.
In the previous example all the 4 transitions connected to place Init are enabled because place Init
holds one token. However, each of these Transitions also contains a different guard condition,
placing different restrictions on the value of the input signals CH_A and CH_B. This way, only one
of the 4 enabled transitions will fire. For example, Transition T1A1B0 has the guard condition
«CH_A = 1 AND CH_B = 0», indicating that this Transition will only fire if the initial values of
both signals satisfy this condition.
When a Transition fires, it will remove tokens from the Places connected to input Arcs and add new
tokens to the Places connected through output Arcs, resulting in a new net marking. If the transition
is associated with output events, these events will be triggered, resulting in changes in the value of
output signals. In the example, all transitions in the outer ring of the drawing are associated with
both input and output Events. These transitions may only fire when one of the A_UP, A_DOWN,
B_UP or B_DOWN input Events happen, corresponding to changes in the input signals CH_A or
CH_B. These events detect a change in the position of the sensed object, whose position must be
immediately updated by a triggering CNT_UP or CNT_DOWN output event, that will respectively
IOPT Tools user manual
4
increment or decrement the Counter output Signal. Observing the example, the drawing presents
two circular rings of Transitions and Arcs, where the Arc directions intuitively correspond to the
two directions or rotation on the physical device. The ring formed by curved Arcs rotate in the
clockwise direction and all Transition fire CNT_UP events, as opposed to the ring formed by
straight lines, rotating in the opposite direction and producing CNT_DOWN events.
In addition to output Events, Transitions may also be associated with output Actions, that is,
mathematical expressions used to assign new values to output signals. In a similar way, Places may
also be associated with output Actions that are executed when the Place is marked. However, while
a Transition output action is only executed once whenever a Transition is fired, a Place output
action is repeatedly executed on every execution step while the Place is marked. This way, IOPT
output signals are divided into two categories: combinatorial output Signals associated with Place
output Action expressions, and the remaining output signals, associated with output Events or
Transitions output actions, that exhibit a memory behavior and are a part of the IOPT system state
vector along with the net marking.
Contrary to other Petri net classes, IOPT nets were specifically designed with the goal of automatic
code generation for the implementation of embedded system controllers and other digital systems.
As a consequence, an IOPT model is executed in steps, as in cycle accurate systems (clock cycle for
hardware implementations) where all Transitions and output Actions are evaluated, using a maximal
step execution semantics: on every execution step, all transitions that are enabled and ready will be
immediately fired. A single server semantics is used when firing transitions, in the sense that if one
transition can be fired several times according with the marking of input places, it will be fired only
one time per step. In the situations where multiple transition might conflict with each other, that is,
when more than one transition is enabled, but the firing of some of them would remove tokens
necessary to the firing of others, priorities must be assigned to each Transition, resulting in a
deterministic and predictable execution behavior.
A special type of Arc, called test Arc, may also be used to manage conflict situations and other
modeling situations: if a test Arc is used, the tokens of input places will not be consumed and these
tokens can be used by other transitions connected through regular arcs. A test Arc is drawn with an
arrow in the middle of the Arc, instead of at the end.
Besides input and output Signals, IOPT nets also include the concept of Arrays. Arrays are unidimensional or bi-dimensional tables of data, indexed by signals associated with Place output
actions, they may contain variable of constant data. In the most simple form, with constant data,
arrays may be used as a very easy way to implement complex mathematical functions by storing
tables of values. When using variable data, an IOPT model might dynamically change the table
contents leading to the implementation of complex solutions with large data sets.
Figure 3 presents other example, including test Arcs, Place output Actions and different signal
types. The external interface of this model is composed by three input Signals named Period,
DutyCycle, and OutEnable, and five output Signals: POS_PWM_OUT, NEG_PWM_OUT,
UpdCLK, BlankSwNoise and Counter. The Period, DutyCycle and Counter signals hold Integer
values in the range 0 to 1023, while all other signals hold Boolean values. This model is composed
IOPT Tools user manual
5
Fig. 3: A PWM Generator IOPT Model
by two sections: an up-down counter on the right and the output generation on the left, that can be
viewed as two separate sub-systems because there are no Arcs connecting them.
The up-down counter section has two Places corresponding to two different states of this subsystem: P_CNT_UP and P_CNT_DOWN where the counter runs in the corresponding direction.
Transitions T_CNT_UP and T_CNT_DOWN are connected to P_CNT_UP and P_CNT_DOWN
using test Arcs, meaning that these Transitions will continuously fire while the respective input
Places are marked, without never removing tokens from these Places. Each of these Transitions is
associated with an output Event, IncCounter and DecCounter, that will update the Counter value.
Transitions T_MIN and T_MAX are associated with guard conditions, «Counter = 0» and «Counter
>= Period», reversing states whenever the lower and upper counting limits are reached.
The output generation section on the left also has two Places, corresponding to two different substates: PDisabled and PEnabled. The Transitions TEnb and Tdis are used to control whether PWM
output signal generation is enabled or disabled, using guard conditions. Transition Tdis fires
immediately in the next execution step after input Signal OutEnable changes value from true to
false. However, transition TEnb has slightly more complex guard condition «OutEnable=1 and
Counter=Period», meaning that the PWM signal generation can only start at the begin of every
counting cycle after the value of Counter reaches the maximum.
Place PEnabled contains 3 output Action expressions to define the values of the POS_PWM_OUT,
NEG_PWM_OUT and BlankSWNoise:
POS_PWM_OUT = 1 when ( Counter < DutyCycle )
NEG_PWM_OUT = 1 when ( Counter > DutyCycle + 30 )
BlankSWNoise = 1 when ( Counter > DutyCycle – 40 )
The values of these signals will be equal to 1 when Place PEnabled is marked and the conditions of
each expression are true. Otherwise the value of each Signal will revert to the Signal's default value,
which in this example was defined as 0. With these expressions, the values of the positive and
negative PWM signals are complementary with the insertions of a small dead-time interval (30
steps) where both signals are 0. The BlankSWNoise signal turns true, 40 steps before the positive
IOPT Tools user manual
6
PWM signal switches, to inform other sub-systems that possible EMI (electromagnetic interference)
peaks are about to happen.
The UpdCLK output signal has a wrap-around option enabled, meaning that any increment or
decrement operation on this signal that would pass above the maximum or below the minimum
values, will revert to the opposite end of the valid range. As this is a Boolean Signal, the output
Event with the same name will produce the effect of effectively toggling the Signal value. This way,
whenever one of the Transitions T_MIN and T_MAX fires, the value of UpdCLK will be toggled.
When «Counter=0» both transitions T_MIN and T_CNT_DOWN are enabled and ready to fire. If
T_MIN fires before T_CNT_DOWN then T_CNT_DOWN will not be able to fire because the
token on Place P_CNT_DOWN is removed. However, if T_CNT_DOWN is fired before T_MIN,
then both Transitions would be able to successfully fire, and the DecCounter output Event would
produce an undesirable Counter value of -1. To prevent this error, transition T_MIN was assigned a
higher priority than T_CNT_DOWN, 1 versus 2. The same consideration applies to T_MAX and
T_CNT_UP.
NOTE: It is important to notice that although these two example models are very simple, the
models implement real world hardware components that were designed with IOPT tools, simulated
and checked for errors, and the resulting VHDL components produced by the automatic code
generation tools were used in a real FPGA. By connecting multiple simple components, it is
possible to create complex systems. In this case, the components have been used to implement a
complete Brushless-DC motor controller, using only IOPT models [3].
2.1 GALS Extension
IOPT nets have been extended with the concepts of Time Domains (TDs) and Asynchronous
Channels (ACs) to create Globally-Asynchronous Locally-Synchronous (GALS) systems. GALS
systems are implemented as a distributed set of synchronous components, that communicate with
each other asynchronously. TDs are node annotations that associate each node to a specific
synchronous component. ACs specify components interaction and are represented by special type of
places, drawn as clouds, that are connected to transitions through special type of arcs, drawn as
dashed arcs. Three types of ACs are available: «Simple AC», «Acknowledged AC” and «Notenabled AC».
The IOPT Tools were extended with the mentioned concepts to support the development of GALS
systems. The model edition tool enables the creation of models with TDs and ACs (GALS models).
The simulation and the model-checking tools enable the verification of GALS models. Finally, a
decomposition tool automatically decomposes GALS models into several component sub-models,
to be used as inputs in other tools that automatically generate code to implement each synchronous
component. For more information about IOPT GALS extension please refer to [4].
IOPT Tools user manual
7
3 Log-in
As previously stated, the IOPT Tools development environment offers a Web based user interface
available online at http://gres.uninova.pt. To try the tools, users can log-in anonymously under a
“guest” account with the same password “guest”. The guest account has no functionality restrictions
but offers no privacy, as all model files created are available to other users and may be modified by
other persons using the system. This way, it is highly recommended to create a personal user
account, using the «New User» button. Personal accounts are free, and just require an email address
necessary for future data recovery in case of forgotten passwords. Figure 4 presents the Log-in page
and figure 5 presents the user account creation page.
Fig. 4: Log-in start page
Fig. 5: Creating a new user account
IOPT Tools user manual
8
Fig. 6: Available Models List
Example models are available under another account, “models” (password “models”). As the
model files are read-only and cannot be modified by the user, it is recommended to use the
download and upload functionality to copy the files to another user account. The copy&paste
mechanism of the editor may also be used to copy models to personal user accounts.
Before start using IOPT Tools it is necessary to use a supported browser. The tools have been tested
with the current versions of Chrome, Firefox, Opera and Safari, covering must platforms and
operating systems, including mobile systems. Different browser versions may not work correctly.
After successfully log-in, a mode list page is presented with a list of all model files in this user
account, as displayed on figure 6. This page offers other options to manage existing model files,
including file rename and deletion.
After creating a new user account, the model list is empty as there are no files to open. In this case,
another page is presented with options to start new models or upload an existing IOPT PNML file,
as displayed in figure 7.
Fig. 7: New user - empty user account
IOPT Tools user manual
9
4 Main Page
After successfully opening a model file, the system presents the IOPT Tools main page, displayed in
figure 8, with an image of the selected model and a list of available tools. The tools include:
Tool
Description
Edit Model
The IOPT Petri net graphical editor
Simulator
An IOPT Petri net simulator and debugger too
Generate State-Space
Generate C Code
Synthesize VHDL Code
State-space generator for model-checking
Automatic code generation tool. Create a C program implementing the model's
behavior to run on a micro-controller or PC.
Automatic code generation tool. Create a VHDL hardware component implementing
the model's behavior to run on a FPGA or ASIC.
Query Editor
Model-checking tool – Define a list of queries to automatically validate properties
during state-space computation.
Query Results
Inspect the query results calculated during the last state-space computation
Download Model
Export Snoopy C/VHDL
Decompose GALS
HIPPO
Model list
Download selected model file to the user's personal computer.
Covert the selected model to a PNML syntax compatible with the Snoopy Petri net
editor.
Mathematical expressions may be converted to C or VHDL syntax.
Decompose a GALS (Globally-Asynchronous Locally-Synchronous ) model into
several components according to the respective time domains.
Export the model to the HIPPO tool-chain and calculate the incidence matrix.
Manage files and select another model.
Fig. 8: IOPT-Tools main page
IOPT Tools user manual
10
5 IOPT Model Editor
The model editor user interface, displayed in figure 9, with a toolbox on the left, a drawing area in
the center and a property editor on the right. When the mouse passes over the toolbox icons, a small
caption text is displayed with a small information and keyboard accelerators.
Fig. 9: The IOPT Editor
5.1 Editor Tools:
The editor toolbox contains the following tools:
Tool
Description
Select mode - Select single objects with a click or multiple objects with a rectangular selection.
Shift adds new objects / Ctrl – Toggle selected objects
Edit Annotations mode – Select and move Place/Transition annotations
Shortcut
Escape
Ctrl-N
Drag / Pan mode – Useful to scroll the drawing area on touchscreen devices
Select all objects
Invert Selection
Undo the last operation
Ctrl-A
Ctrl-I
Ctrl-Z
Redo the last operation undone
Ctrl-Y
Erase mode: point on one object to delete it
Use the shift key to continue erasing objects
Ctrl-E
IOPT Tools user manual
11
Delete the selected objects
Cut selection to the clipboard
Copy the selection to the clipboard
Paste the clipboard contents to the current drawing
The contents of the clipboard are displayed on a separate window and may be used to copy data
between different models. The clipboard window has buttons to download and upload data to the
server. The server copy may be uploaded and downloaded by different users, to share data and
perform collaborative work.
Back Space
Ctrl-X
Ctrl-C
Ctrl-V
Rotate selection 90º clockwise
Rotate selection 90º counter-clockwise
Duplicate selection (without changing the cut&paste clipboard contents)
Ctrl-D
Mirror selection horizontally
Mirror selection vertically
Node fusion: Join two Places or two Transitions in a single node, maintaining all arcs
Place: Draw one Place or multiple Places by holding the Shift key
Transition: Draw one Transition or multiple Transitions by holding the Shift key
Arcs: Draw arcs by picking consecutive Place and Transition pairs
Asynchronous-channel – Draw asynchronous channels for GALS systems
[Used only on GALS systems]
Ctrl-P
Ctrl-T
Ctrl-R
Ctrl-H
Assign a GALS time-domain for the selected nodes
[Used only on GALS systems]
Complementary Place: Create a new Place complementary of the selected Place
All Arcs connected to the original Place are replicated in the opposite direction
Semaphore: Create new Place and a set of Arcs, forming as a semaphore for a critical section
The critical section is defined by the set of Places currently selected
Marking-Invariant Lock: Create new Place and a set of Arcs to lock a marking-invariant section
The section is defined by the set of Places currently selected
Input Signal: Insert a new Input Signal
Output Signal: Insert a new Output Signal
Ctrl-B
Ctrl-L
Array: Create a new uni-dimensional or bi-dimensional array / table
Input Event: Create a new Input Event
Ctrl-M
Output Event: Create a new Output Event
IOPT Tools user manual
12
Save model to server
Exit editor
Option to save changes.
Ctrl-S
Ctrl-Q
Finally, in the bottom left corner, bellow the toolbox, a list of available plug-ins is presented. Plugins are custom functions, developed by third parties that operate transformations on the edited
nodes, according to the selected nodes and custom user-interface form dialog windows.
5.2 Node properties
Immediately after creating a new node, or when a single node is
selected, a properties form is presented in the right side of the editor
window. Each type of node employs a different set of properties.
Figures 10 to 13 display the Place, Transition, Arc and Channel
property forms. In all cases the first property, ID, is an unique
identifier number automatically assigned by the editor when a new
node is created. This value is used internally by the tools and cannot
be changed by the user. As identifier numbers are difficult to
remember, Place and Transition nodes have a «name» field that can
be filled with a short text, describing the node's purpose or
behavior. When a more detailed description is necessary, a
«comment» field is also available.
Fig. 10: Place properties
Both the «name» and «comment» properties are presented in the net
drawing as annotations. By default these annotations are
automatically placed near the respective node. However, if the
default placing collides with other nodes, an «Edit annotations» tool
is available to select an manually move the annotations.
Place nodes have two important attributes: initial-marking and
bound. Initial marking is initial number of tokens in the Place when
a net starts execution. Bound is the maximum number of tokens a
place can hold during the net execution. This value is just an hint
for the automatic code generators, to allocate the memory elements
used to store tokens, and can be calculated using the state-space Fig. 11: Transition properties
calculations tools. The time-domain field is used by the GALS extension tools.
Finally, a list of output actions can be used the define the state of output Signals. Whenever the user
defines one action, the form will automatically grow with fields to define another action. An action
is defined by three items: a Signal name, value expression and a condition.
For example: «OutSig1 = Not IntSig3 when InSig1 > InSig2» or: «OutSig2 = OutSig2 + 1 when
OutSig2 < 100». The second example would create a counter up to 100, incrementing after each
execution step.
IOPT Tools user manual
13
The output expression is only evaluated when the Place is marked and the condition is true. If either
the condition holds false or the Place has no tokens, then the output Signal reverts to a default value.
It is possible to define more than one output action affecting the same output Signal. If more than
one actions is simultaneously applied, then the result most far away for the default value is chosen.
Transition firing can be inhibited with guard conditions and input events. A guard condition is a
logic expression, that can use input and output signals, place marking (equivalent to test or inhibit
Arcs), and literal values. By default, an undefined guard condition is true. A list of all input events is
presented: selections can be none, a single event or multiple events (using the shift key). If more
than one event is selected, the transition can only fire if all events occur in the same execution step.
Output events and output actions can be associated with transitions. When a transition fires, the
associated output events are fired. If more than one event affects the same output signal, the effects
are accumulated. Output actions associated with transitions are executed when the Transition fires.
As with the Place output actions, when multiple actions simultaneously affect the same Signal, the
value more distant from the default is selected.
Contrary from Place output actions, when the Transitions are not fired, the output Signals hold the
last value calculated by any Transition action and do not revert to a default value. As a consequence
of this behavioral difference, it is not possible to affect the same signal from Place output actions,
Transition output actions or output Events: each signal can only be affected by one of them. This
way, as soon as a Signal is affected by one type of action, it will automatically disappear from the
list of available Signals in the other types of actions.
Transition nodes have a priority, used to solve conflict situations where several enabled transitions
compete for the same tokens. Smaller number correspond to higher priority. Time-domain values
are used by GALS tools.
The Arc properties form presents only two options: an arc type
(normal, test or channel) and an inscription value. Test arcs can only
be used as input Arcs, i.e. starting in a Place node and ending in a
Transition node, indicating that when the transition fires tokens are
not consumed from the input Place. Inscriptions indicate a number
of tokens: in the case of input Arcs, the number of tokens necessary
to fire a Transition. In the case of output Arcs, the number of tokens
added to the output Place. Type “channel” will be automatically
selected when connecting to Asynchronous channel nodes.
Fig. 12: Arc properties
Figure 13 presents the Asynchronous channel properties, including
name and comment fields, plus a channel type: Simple async.
channel, Acknowledge async. channel and Not-enable async channel. Fig. 13: Channel properties
Detailed information about the GALS extension can be found in [4].
Input and output Signal property forms are presented in figures 14 and 15. Signal properties include
a Signal name, an input or output mode a type, a default value and a min/max range. The Signal
name functions as an identifier used internally inside IOPT models to define mathematical
IOPT Tools user manual
14
expressions, but is also used by the automatic code generator tools
producing code using these names. As a consequence, the Signal
names should be chosen to be valid identifiers in the target
language (C, VHDL, JavaScript, etc.) and should not conflict with
any reserved words in that language. Signal mode, input or output,
is defined when a signal is created and cannot be changed by the
user.
Signal type can be Boolean or an Integer range. Boolean signals
have a fixed range from 0 to 1. Range Signals can hold integer
Fig. 14: Input Signal prop.
values in the range defined by the Min and Max fields. The default
value applies only to output signals and has different semantics
according to signal usage: for signals defined by Place output
actions, the default value is applied when the corresponding Places
are not marked or the associated conditions hold false; for signals
defined by output Events or Transition output actions, the default
value is just the initial value. Output signals associated with output
Events and Transition output actions also have a Wrap limits
property that defines the signal behavior when an decrement or
increment operation produces a result beyond the defined limits. Fig. 15: Output signal prop.
When this option is applied to Boolean signals, increment and
decrement operations produce a toggle effect.
The name field is read-only and cannot be directly changed in the
Signal propertied form. To rename an existing Signal, a «Change
Id» button must be used. As Signal names are used as identifiers,
this function will search the entire model for any Signal references
and replace the old name by new name everywhere. For
Fig. 16: Input Event prop.
information purposes, a list of all signal references is also presented
at the bottom of the properties form.
Figures 16 and 17 present the input and output Event property
forms. In the same way as Signals, the name and mode fields are
read-only and cannot be changed after an Event is created. A
«Change ID» button can also be used to rename Events. Both input
and output Events can be autonomous or associated with a Signal.
Autonomous events are mainly used for implementations composed
Fig. 17: Output event prop.
by multiple models, where an output event from a component is
directly associated to other components as input events, ensuring event propagation in the same
execution step (clock cycle in hardware solutions).
A non-autonomous event is always associated with a Signal. Two properties, Edge and Level define
the Event semantics. In the case of input Events, an event is triggered when the associated Signal
crosses the predefined Level in the direction defined by Edge: Up or Down. In the case of output
IOPT Tools user manual
15
Events a different semantics is applied: when a Event is triggered, the
associated Signal is incremented or decremented by the amount defined
by Level according to the Edge: Up increments and Down decrements the
Signal. The result will be confined to the defined limits or wrapped
around limits according to the Signal properties.
Finally, figure 18 presents the Array property form. Arrays can store unidimensional vector data or bi-.dimensional matrix data. The contents of
an Array may be constant or variable. Constant arrays usually store tabled
data an can be used to implement general purpose functions with integer
arguments. Uni-dimensional arrays can be used to implement single
argument functions and matrices to implement functions with two
arguments. Variable content arrays can be used as general purpose
variables and the value of the selected item is read or written by Place
output actions.
Array indexing is performed using one or two range Signals, according to
the array dimensions. When the index signals are selected, the array
dimensions are automatically defined from the index Min and Max range
properties. Array indexing is always performed using this index signals: Fig. 18: Array prop.
to access a specific array element, it is necessary to first change the value of the index signals. The
index Signals must be created as output Signals, even if the signal value is ignored by external
components, and the value of the index signals can only be defined by Place output actions. If a
signal is affected by output Events or Transition output actions, then it cannot be used as an index.
In the same way as input and output Signals, the contents of the arrays elements can also hold
Boolean values or integer ranges.
At the bottom of figure 18, below the Array properties form, a table with the array contents can be
seen and it is possible to change individual values by clicking on it. These contents are the final
values for constant tables and the initial values of variable arrays. A button «F(x,y)» can be used to
automatically fill the table data using a mathematical formula. These formulas employ JavaScript
syntax, where the first index is called «x» and for bi-dimensional arrays, the second index is «y».
In the example from figure 18, a sine table was filled using the formula «Math.sin( x / 180 *
Math.PI) * 1023», where «Math.sin()» and «Math.PI» are trigonometric functions defined in the
JavaScript Math package. It is important to notice that index angle as a range from 0 to 359, storing
a complete sine range with 360 degrees. The integer results, scaled from 0 to 1023 can be seen as 10
bit fixed point fraction number from 0 to 1.
Finally, two buttons, «Import CSV» and «Export CSV» can be used to read or export data from
spreadsheet applications, in the form of comma separated text files. Any spreadsheet program as
Open-office or Excel, or application specific software can easily generate data in this format.
Figure 19 presents the clipboard window used to store the contents from the cut, copy and paste
editor tools. It is a persistent window, that is not closed when the editor exits. This way, the contents
IOPT Tools user manual
16
of the clipboard are saved and can be pasted again, after
opening another model or log-in as a different user,
enabling the transference of information between
different models.
This dialog can also be used as a collaboration tool,
letting multiple users share information. At the bottom of
the dialog, two buttons, «Save» and «Open Saved» can
be used to store the contents of the clipboard at a central
server. Other persons logged-in using the same username can open the saved contents, inspect it and paste
into different models, to easily discuss details and share
common components.
Figure 20 presents the Expression Editor dialog. This
dialog is used to create and edit mathematical
Fig. 19: Clipboard window
expressions and is automatically called when the user
clicks over an expression on any property form. This dialog was designed to be touch-device
friendly, being easily used from tablet or mobile devices, and has several lists containing all
available operators and operands.
Operand:
Values
Example
Places
Place marking value. If used in Transition guards, can be PEnabled = 0
used as a test Arc (Place>N) or Inhibit arc (Place=0)
Inputs
Input Signal value
In3 > 2
Output Signal value
Out1 + 2
Value of the selected Array element
sine_table[angle] / 1024
Outputs 1
Arrays
1
Fig. 20: Expression Editor
1 The output Signal list and Array list will only show valid names according to the expression being edited.
For instance, output Signals affected by Place output action cannot be used inside Transition action expressions.
IOPT Tools user manual
17
Number
Literal integer values
17
Lists containing the available operators are also present:
Operator:
Arithmetic
Values
Example
+ - * / %
In1 + 5 * In2
Addition, Subtraction, Multiplication, Division and
Remainder (Module)
Compare
< ≤ = > ≥ ≠
X>2
Logic
AND OR XOR
X > 2 AND X < 5
() NOT() and -()
Logic negation and unary - apply to sub-expressions
NOT( X > 2 AND X < 5)
-(5)
Sub Expression
During edition, a red ♦ cursor symbol indicated the current insertion position. At any moment, only
the valid tokens are enabled. For example, after entering a number, the editor expects an operator
and all operands are automatically disabled. The user can delete the last inserted token, or edit
previously entered tokens by selecting them with a mouse/touch click. To return to the insertion
point and continue adding text, just select the ♦ cursor.
After edition is finished is important to use the Save button. The same applies to any changes made
in the node properties forms: after finishing edition the Save button must always be used. If the
selected nodes are unselected or the selection in the drawing area is changed by any way, all
unsaved property changes will be lost. Do not forget to use the save button.
5.3 Plug-ins
Plug-ins are third party tools used inside the IOPT editor, to perform specific functions. For
instance, a project to design a VHDL hardware component might use a VHDL validation plug-in to
check if all Signal and Event names are valid VHDL identifier or collide with any VHDL reserved
words, correcting any invalid identifiers and their references in the entire model.
The list of installed plug-in is available below the toolbar, at the bottom left corner and, depending
on the display size, might require scrolling the toolbar frame down. The item presented in this list
are the list of plug-ins installed in the tools server being used.
Each plug-in will present a dedicated user interface dialog, with fields according to the plug-in
parameters. A list of selected nodes is also automatically passed to the plug-ins that may use this
information or not.
Contrary to the other Editor tools that work inside the user browser, plug-ins are executed in the
IOPT tools servers and require a network connection to operate. Plug-ins work as filters, receiving
as input the entire IOPT model plus a list of parameters, transform the received model and upload it
back to the editor. This operation might take just fractions of a second, or many seconds according
to the algorithms being used and the network latency. When a plug-in is executed and the results
produced were not the intended, the user can undo the operation and revert to the previous version.
IOPT Tools user manual
18
6 IOPT Simulator
After designing a model it is important to test if it behaves correctly. To reduce development time,
the debug phase should occur as soon as possible, before reaching the prototype phase. Design
errors detected during the prototype test phase are usually very costly due to the manpower wasted
to implement incorrect solutions, difficulty to check if the errors are caused by design flaws or
hardware faults and may lead to the conclusion that the selected hardware platform is not adequate.
Figure 21 displays the IOPT Simulator application, used to execute and debug IOPT models directly
in the Web browser. The simulator offers the capability to execute models step by step or run
continuously. All executed steps are recorded in a execution history, saving the state of all input
Signals, output Signals, Place marking, Events and fired Transitions. The user can later replay and
navigate through the recorded history to better inspect the system state on each execution step.
The user interface is divided into three parts: a toolbox on the left, a status form in the right and a
synoptic with a model drawing in the center. The synoptic displays the system state in real time,
dynamically displaying the current marking and changing node colors.
The user can interact with the model and change the system state both in the status form or directly
in the synoptic. The value of an Boolean input Signals can be toggled by clicking in the synoptic
signal drawing or by changing the corresponding toggle button in the status form. Range input
Signals can also be changed on the synoptic, using respectively the left or the right mouse buttons to
increment or decrement the signal value. Autonomous input Events can also be triggered on the
Synoptic, just by clicking on it. Autonomous events are automatically reset after every execution
step, as opposed to input Signals that always maintain the previous value.
Fig. 21: IOPT Simulator / Debugger
IOPT Tools user manual
19
Node type:
Place
Transition
Color scheme:
0 tokens: Yellow
1 token: Red
> 1 token: Violet
I/O Ready: Yellow
Enabled: Orange
Ready&Enabled: Green (about to fire in the next step)
Otherwise: Cyan
Red border: Transition has a breakpoint set.
Red fill: Transition triggered a breakpoint in the last executed step.
Input Signal
Cyan: Boolean false or range zero
Green: Boolean true or range > 0
Input Event
Cyan: false
Green: true (triggered)
Output Signal
Pale green: Boolean false or range zero
Red: Boolean true or range > 0
Output Event
Pale green: false
Red: true (triggered)
The toolbox contains a set of icons for step by step execution, continuous running and history
replay and navigation.
Continuous execution can be integrated using breakpoints associated with transitions. When a
breakpoint transition fires, execution is immediately stopped. After stopping, the system state will
reflect the step immediately after the breakpoint Transition fired, but the system state immediately
before the breakpoint can be obtained by undoing the last executed step or simply by navigating one
step back through the recorded history. A breakpoint can be set or reset just by clicking on any
transition. Transitions with breakpoints enabled are displayed with a red border and the Transition
that caused the last breakpoint is filled with the color red.
Each time a step is executed, the entire simulator status is recorded into a history, including the net
marking, input Signal values, input Events triggered, output Signal values and output Events. A
history section in the toolbox has several icons for history navigation, replay and information
displaying the current history position and history size. It is possible to jump directly to any history
position just by entering a step number in the history position entry and pressing enter.
History replay starts from the current position with a speed defined in the replay speed toolbox
selector, and it is possible to replay at different speeds than the original execution speed. Each
execution step is displayed in two phases: first the inputs are updated and transition enable/ready
evaluated, followed by the step execution results.
For better analysis of execution results it is possible to view the recorded history in a spreadsheet
format. Figure 22 presents the history window. To reduce the table size and increase readability, the
data is presented in a compressed form, where repeated duplicate lines were replaced by a single
line, with a step count «Rep» column indicating the number of repeated steps. The first column,
containing step numbers can also be used for history navigation: clicking on a step number on this
column will automatically perform a history jump in the simulator window, changing the current
history step number and displaying the corresponding state. Finally, the history data can also be
IOPT Tools user manual
20
exported to other software. An export tool saves the contents of the recorded history as a text CSV
file, ready to be opened by spreadsheet applications or dedicated software, to draw wave-forms or
apply personalized analysis algorithms.
Tool
Description
Undo one execution step.
System state reverts to the previous execution step and the undone step is removed from history.
Execute a single step.
System state is added to the simulation history.
Execute N execution steps. N is defined in the entry bellow.
Every step is stored in the history. Breakpoints are not checked.
Start running continuously. Speed / step rate selectable f the list above: 10ms, 100ms, 500ms, 1, 2, 5 and 10s.
Execution may be interrupted when a breakpoint transition fires. Steps are recorded to history.
Stop continuous run execution.
Reset simulator state and revert to initial state.
Previous history is not erased.
Force a new system state: the new marking must be previously manually changed in the state form.
Execution history is erased and reset with the new state.
History navigation: Rewind to first recorded step.
History navigation: Move back one step.
History navigation: Move forward one step.
History navigation: Forward to last recorded step.
Reset history: clear all recorded steps.
Replay history starting from current position.
Replay speed defined in the list above.
Pause / stop replay
Open history window, presenting the recorded history as a spreadsheet.
Drag / Pan mode – Useful to scroll the drawing area on touchscreen devices
Save/export history to a CSV text file.
This file can later be opened using a spreadsheet application to draw wave-forms, etc.
Exit the simulator.
IOPT Tools user manual
21
Fig. 22: History table
IOPT Tools user manual
22
7 State-space generation
The Simulator described in the previous sections is very useful to verify if the designed IOPT
models behave as expected with typical use cases: with the expected input sequences the system
should behave correctly. However, there are many situations where unexpected sequences on input
Signals or unexpected user interaction can lead to undesired results, including dead-lock and livelock situations or reaching states that could cause physical device malfunctions or violate safety
regulations imposing safety risks to the users. To help detect such situations, a model-checking tool
composed by an automatic state-space generation tool and a query system, described in the next
section, provide the capability to detect such errors and check important system properties.
Figure 23 presents the state space graph of the quadrature encoder model described in the
introductory section. This graph, also called a reachability tree, contains an hierarchic set of all
reachable states, starting from an initial state. New states are presented as yellow circles, with
information about the respective net marking and output signal status. Duplicate states, equal to
other previously found states, are presented as cyan rectangles with the number of the original state
inscribed, linking to the original state. The graph lines connecting parent states to child states
contain information about the fired Transitions that causes the state changes. States containing deadlocks are presented as red and states where conflicts between Transitions were detected, are
presented as magenta. In the example presented there are conflicts in all states. States that can only
be reached by the firing of multiple Transitions with incompatible I/O guard functions or Events,
are marked as invalid and drawn with color gray, because these states can never be reached.
Inspecting the state-space graph it is possible to search for deadlocks, conflicts between transitions
and search for unexpected states. However, state space graphs typically contain millions of states
Fig. 23: State Space graph
IOPT Tools user manual
23
Fig. 24: State space initial marking
and in practice, cannot be visually inspected by the user. Because of this problem, the state-space
generation tool stores the results internally and only presents a report containing some statistics.
However, the user has options to download the results file or when the number of states is small
enough, view the output graph. Finally, the query system described in the next section automates
state-space inspection.
Before calculating the state-space graph, the user can select the initial marking of the net. By default
the system uses the initial marking defined with the Editor. Figure 24 shows the initial state
selection form. It may be useful to select other initial states, for instance to expand the view of
certain branches of the graph, or when a problem was detected after reaching a known state.
After initiating the state space generation, the report window presented in figure 25, displays
information about the calculation evolution in real time. A Stop button, only visible during
calculation, is not shown in this image and may be used to interrupt the generation of very large
Fig. 25: State space generation report
IOPT Tools user manual
24
state-spaces, that could take many minutes or hours to calculate. After state-space computation is
finished, several statistics are presented and two new buttons appear, to view the state-space graph
or download the results file.
The statistics include the number of states reached, the number of loops to repeated states, the
number of deadlocks, conflicts, invalid states and the depth of the reachability tree. Minimal and
maximal bound for each Place are calculated, indicating the minimum and maximum number of
Place tokens calculated over the entire state-space. Bounds are very important because these values
can be used to calculate the optimal number of memory elements to store Place marking in
hardware implementations.
State space computation is performed on a IOPT Tools server and does not consume resources on
the user's terminal compute. Because of this effect, the tools can be used in low end computing
devices including tables and smart phones. However, even if the state-space generation software is
very efficient, sometimes calculating many thousand states per second, computation can consume
many time and occupy many server resources. For this reason, state-space generation can be
interrupted by the used or due to resource exhaustion on the server.
Statistics are displayed even in the case of interrupted calculations, but in this case a warning about
partial results is presented. The same applies to query results that are always calculated after the
state-space computation finishes, even in the case of an interruption.
Finally, the resulting state-space graph can be downloaded to the user's PC. Results are stored in a
XML file, that can be easily converter to other formats using standard XML tools and processing
languages, in order to be manually inspected or analyzed by foreign tools. File transfer is performed
using double ZIP compression, to minimize bandwidth and avoid automatic decompressing
attempts by the browser. Figure 26 presents part of a state-space XML file.
Fig. 26: XML State space file
IOPT Tools user manual
25
8 Queries
Real world applications typically have very large state-space graphs, with many million states and it
is not feasible to visually inspect them. Furthermore, during development the models frequently
suffer modifications and the state-space must be rechecked many times to ensure that previously
solved mistakes do not appear again. To automate this process, the state-space generator was
augmented with a query system, working together as a model-checking subsystem.
The query system is composed by a query editor and a query results filter page, displayed in figures
27 and 28 respectively. Queries are a set of user-defined conditions applied to each state of statespace graph, based on the net marking, the state of output Signals and Transitions fired. In addition,
it is possible to specify reachability questions to detect live-lock conditions, for example to verify if
certain final states are always reachable from any node in the graph or if the system is reversible,
that is, the system can return to the initial state from any node in the entire state-space graph.
A table of queries is stored for each model, being automatically checked each time the state-space
generator is executed, after all stated have been calculated. In case the state-space calculation is
interrupted, queries continue to be executed, but some results might not be accurate. For instance,
the results of reachability questions over incomplete graphs will often produce wrong answers.
The Query editor user interface is similar to the expression editor of the IOPT model editor. A list of
available queries is available at the bottom of the editor. The current version of the Tool supports up
to 30 queries per model, but this number might be increased in future versions.
To define a new query or change an existing one, first select the desired query from the query list.
The selected query text expression should appear immediately at the query filed. This field is readonly and cannot be changed directly, as the queries can only be edited through the available buttons,
operator lists and operand lists. In the example in figure 27, query 6 is selected and the expression
«REACH(0)» appears on the query field. This query searches for states that can reach the initial
Fig. 27: The query editor
IOPT Tools user manual
26
state number 0. At the end of state-space generation, the query engine will traverse the entire graph
to verify which states satisfy this condition.
In the same way as the Editor's expression editor, there are lists of operators and operands. The user
can build query expressions by selecting the next operand or operator to add at the end of the
selected query. The lists of operands or operators are only enabled when they can fit syntactically at
the end of the expression. Available operands are literal numbers, Place marking, Transitions fired
and output Signals affected by output Events or Transitions output actions:
Operand:
Place Marking
Output
Transition
Number
Values
Example
Place marking value
PA1B0 = 0
Output Signal value
Only Signals affected by events or transition actions
Counter > 1023
Transition fired to generate the present state from the TAUp1 OR TBDn1
parent state
Literal integer values
17
The following operators are available:
Operator:
Values
Arithmetic
Example
+ - * / %
P_A1B1 < 2 * P_A0B0
Addition, Subtraction, Multiplication, Division and
Remainder (Module)
Compare
< ≤ = > ≥ ≠
X>2
Logic
NOT AND OR
X > 2 AND X < 5 OR X = 0
()
3*(2+4)
Reach-ability function
Find states that can reach state number N
REACH(0)
Sub Expression
REACH(N)
In order to use the reachability function, it is necessary to know the number corresponding to the
desired state in the state-space graph. The initial state is always assigned the number 0. However, to
know the number of other states, it may be necessary to run the state-space generator twice: the first
with a query to identify the desired state number N and a second time with a query “REACH(N)” or
“NOT REACH(N)”.
In the example on figure, the following queries were defined:
1: A0B0 > 0 AND A1B1 > 0
2: A1B0 > 0 AND A0B1 > 0
3: Init > 0
4: COUNTER > 4095 OR COUNTER < 0
5: A0B0 = A1B0 AND A1B0 = A1B1 AND A1B1 = A0B1
6: REACH(0)
The first two queries correspond to impossible situations, because under correct working conditions
only one of those Places should be marked at any time. The same happens to query number 4, as the
value of the Counter output should never fall outside of the 0..4095 range. This way, if any of these
queries, 1, 2 and 4 produces any result, it means the model has errors. Observing figure 28,
containing the results of the previous queries, it is possible to see that none of these queries
produced any results.
IOPT Tools user manual
27
Fig. 28: Query results filter
Queries number 3, 5 and 6 produced one result each, meaning that only one state verified each of
these conditions. In all of these cases, it was only the initial state that verified those conditions.
Observing the model on figure 2, the only situation where Place init is marked is in the initial state
(Query 3) and the only state where the Places A0B0, A1B0, A1B1 and A0B1 have the same
marking (Query 5) is also the initial state where all of these Places have zero tokens. Finally, as
there are any transitions that add tokens to Place Init, it is impossible to return to the original state
after any Transition has fired. This way, query 6 also shows only one result, as no other state can
reach the original state.
The query results page, presented in figure 28, has options to filter results according to specific
queries, hiding or showing the results of desired queries and also sort by query or by state number.
After identifying states that indicate potential design mistakes, it is usually necessary to inspect the
entire state-space graph or results file, to detect the exact sequence of events that triggered the error
situation. This sequence of events can later be replicated in the simulator, to better understand the
error and make the necessary changes to the model.
IOPT Tools user manual
28
9 Automatic code generation
IOPT Tools contains three automatic code generation tools that produce C, VHDL or JavaScript
code to implement controllers implementing the behavior of an IOPT model. The IOPT tools main
page, presented in fig. 8, has two buttons to call the C and VHDL code generators. Both automatic
code generator produce a compressed ZIP on the fly, containing the source code files.
The JavaScript automatic code generator is used internally by the Simulator tool, but the generated
code can be easily read and saved using the browser source code navigation tools inside the
Simulator window («js_gen.php» script in the main document).
9.1 The C Code generator
The automatic C code generator tool produces a compressed archive file containing the following
source code files:
File:
Description:
net_types.h
Data-type definition and function declarations
It includes data-types for Place marking, input and output Signals and Events.
net_main.c
Main execution loop (main function).
net_io.c
Input and output code used do read the values of input signals from physical hardware
inputs and write output Signals to hardware.
net_functions.c
Functions implementing all IOPT semantics and rules: transition firing, guards,
events, output actions, etc.
net_exec_step.c
Function that executes one entire IOPT execution step, using the various functions
defined in net_functions.c
Makefile
Optional: Gnu Make / Unix project makefile with instructions to build the project.
For compatibility reasons, the output code uses ANSI C syntax rules, but may be inserted in C++
projects, as for example, when building Arduino projects. All code produced should compile
directly on most systems and should not need any changes, except the «net_io.c» file that must be
adapted to each target architecture.
The «net_io.c» file, presented in figure 29, contains 4 functions: InitialzeIO(), GetInputSignals(),
PutOutputSignals(), LoopDelay() and finishExecution() that must be manually filled by the
developer using target architecture specific code.
– The InitializeIO function is executed only once when the program is initialized and can be
used to configure I/O pins, for instance to configure certain pins as Input or Output.
– GetInputSignals() is executed in the begin of every execution step, to read the current value
of input signals and autonomous Events, from physical I/O pins or other device or read data
from other software.
– PutOutputSignals() is called twice on every execution step: at the begin and at the end. It is
called immediately after reading inputs and recalculating the combinatorial Place output
actions. It is called again after finishing the execution step to update all output Signals.
IOPT Tools user manual
29
– LoopDelay() is used define a fixed execution speed, inserting a delay or waiting for a
execution step timer, in order to reduce the CPU load and minimize energy consumption.
For maximal performance, leave this function empty.
– FinishExecution() is used to terminate the model execution. For instance, when a certain
ending state is reached, this function will return 1, indicating that the program must finish.
The default files are automatically filled with
comments containing references to the names
of all available input and output Signals. For
example, in figure 29, there are references to
«inputs->CH_A» and «inputs->CH_B». This
minimizes coding errors while implementing
this functions.
For example, if the target platform was an
Arduino board, the InitializeIO function could
use the «pinMode(pin, mode)» Arduino
function to define which pins are used as input
or output. The GetInputSignals function could
use «digitalRead(pin)» to read inputs and the
PutOutputSignals function could use the
«digitalWrite(pin, value)» to write outputs.
The GetInputSignals and PutOutputSignals
functions receive pointers to several data
Fig. 29: The net_io.c file.
structures containing input and output Signals
and Events. The Event data structures are used to manage autonomous Events. However, when
there is no need to use events, the functions may be called with null Event pointers and these
functions must verify if the pointer is not null before using events.
Usually the «net_main.c» file does not need to be changed, but in case more than one IOPT model
is going to run simultaneously on the same device, or is going to run along with foreign code, then
the main loop functions may need to be rewritten. For this purpose, the execution of an entire IOPT
execution step is realized on a single function and exists immediately, without locking the processor
in time consuming operations.
Both the «net_io.c» and the «net_main.c» files do not usually change after model modifications,
except in the case of more input or output Signals have been added. As a result, the models may be
changed without concerns of loosing hand written code: just call the code generator again and
replace all files except «net_io.c» and «net_main.c».
IOPT Tools user manual
30
9.2 The VHDL code generator
The VHDL generator produces 2 files, one containing a VHDL component architecture
implementation and other file (name ending with “defs”) containing sample component declaration
code to insert in the final projects.
The generated component has an external interface containing all input and output Signals declared
in the IOPT model, plus any autonomous events. Furthermore, three additional signals are added to
the external interface: Reset, Enable and Clk. Boolean Signals are assigned the VHDL
«STD_LOGIC» type and range Signals are assigned the corresponding VHDL «INTEGER
RANGE».
It is important to notice that the output code is just a component and should not be directly used as
a main project. The code assumes that all Input signals are synchronized with the component clock
and do not change in the middle of a clock cycle. This way, Input signals should not be directly
connected to external FPGA/ASIC pins. In case an external pin, or any signal not synchronized with
Clk, needs to be connected to a component's input signal, it must be explicitly synchronized.
For example, if an external signal InA must to be connected to a IOPT component, it can be
synchronized with Clk using:
SyncInA <= InA when rising_edge(Clk);
and then connect SyncInA into the component's port map.
IOPT Tools user manual
31
10 Work-flow
Figure 30 presents the typical development work-flow of an application using IOPT-Tools.
The first design step consists in the system specification, with the identification of the typical use
cases, often involving the help from expert users. After the desired system behavior has been
specified, a first IOPT model can be designed. The typical use-case scenarios identified before must
be replicated using the Simulator tool to test if the designed model behaves correctly. Any design
mistakes detected must be corrected using the editor.
After all the first stage design mistakes have been corrected, the mode-checking phase starts by
calculating the state-space graph. Observing the state-space statistics it is immediately possible to
detect many errors, including deadlocks, unexpected transition conflicts and unexpected place
bounds. For example, if the maximal bound of a specific Place is 2 but the Place was not expected
to hold more than one token, an error was found. Observing the state-space graph (or file) it is
usually easy to find sequences of input values leading to the error condition. As the state-space
graph is usually too large for visual inspection, a set of Queries might be defined to search for
additional mistakes. For example, if the system was designed to be reversible, it is possible to
define a query «NOT REACH(0)» to find live locks containing states that can never revert to the
initial state. If certain net markings or sets of output values are considered invalid, may cause
mechanical malfunctions or can pose safety risks to users, those situations must be searched using
queries.
When all properties have been verified, the prototype testing phase can begin, generating code for
the target device: C code for software
implementations or VHDL for re-configurable
hardware devices. This phase generally requires a
certain degree of user interaction, assigning
physical I/O pins to IOPT Signals and additional
resource allocation, including clock signals and
memory devices. Several errors may be detected,
including invalid signal names or insufficient
hardware resources on the target device.
After that prototype is successfully working, the
original use cases must be checked again. If
everything is correct, the prototype is ready for
beta testing. In this phase, it is not uncommon to
finally realize that the original specifications were
incorrectly defined due to communication
problems between users and the system designers,
forcing a complete redesign. To avoid this
problem, it is a good idea to get feedback from the
users during the simulation phase.
IOPT Tools user manual
Fig. 30: Typical IOPT-Tools work-flow
32
11 Other tools
The tools presented in the previous sections constitute the core of IOPT-Tools, with a development
work-flow presented in the previous section. In addition, other tools that manipulate IOPT models
are also available online, although not integrated in the Web interface:
Snoopy IOPT 5]
Split [6]
Animator [7]
Alternative IOPT Petri net editor application for Windows
Tool to decompose one IOPT model into several sub-models using
synchronous communication channels, according to a valid cutting set and
a set of rules
Application to build animated synoptic and graphical user interfaces for
IOPT models, according to a set of rules combining the net marking and
the current value of I/O Signals
GUI Generator
for FPGA [8]
Automatic code generator to create GUI code from Animator to run on
FPGA devices
Configurator [9]
Tools to automatically assign I/O pins and hardware resources to IOPT
models. Available only for certain hardware platforms.
HIPPO [10]
Petri net analysis tool that calculates the incidence matrix of an IOPT
model.
NOTE: Future versions of IOPT-tools might include updated versions of the tools listed above,
under the same Web user-interface. Work is in progress.
IOPT Tools user manual
33
12 Example Application
Figure 31 presents the diagram of a concrete mixing plant, where a bucket cart travels over a
circular rail, transporting cement, sand and gravel, that are subsequently dumped into a mixer
deposit. In parallel, a water pipe directly discharges water into the mixer.
The cart is powered by an electrical motor and each station is equipped with a sensor, indicating
that the cart has arrived to the respective loading position. The cement, sand and gravel deposits are
equipped with conveyor belts that load materials into the cart and weight sensors to detect when the
desired material amount has been loaded. In the same way, the water pipe can be opened or closed
and a sensor detects when the correct amount of water has been discharged. As the concrete mixer
volume is much larger than the cart's bucket, the cart must complete N travels in order to fill the
mixer deposit. Plant operation can be described by the following steps:
1 – The bucket cart is parked near to the concrete mixer, waiting until a start button is pressed
2 – The water pipe is opened
3 – The cart starts moving until the cement loading position is reached
4 – The cement conveyor belt is enabled until the desired amount has been loaded
5 – The cart moves until the sand loading position is reached
6 – The sand conveyor belt is activated until the correct amount has been loaded
7 – The cart moves until arriving to the gravel loading position
8 – The gravel conveyor belt is enabled until the cart bucket if full
9 – The cart moves to the mixer unloading position
10 – The cart unloads it's contents to the mixer deposit
11 – In parallel with the previous steps, the water will be closed when the correct volume is reached
12 – Operation finishes when the cart is empty and the water level is reached, returning to step 1
Except for the water level management, a controller to implement the steps listed above can be
designed using a very simple state machine. The water level management can be controlled using a
separate state machine running in parallel. The controller will require several input and output
signals connected to sensors and actuators:
Sensors:
StartBtn
Start Button – Start operation
CementArrive
Cart arrived at cement position
CementLevel
Cement load finished
SandArrive
Cart arrived at sand position
SandLevel
Sand load finished
GavelArrive
Cart arrived at sand position
GravelLevel
Gravel load finished
MixerArrive
Cart arrived at mixer position
BucketEmpty
Bucket unload finished
WaterLevel
Water level reached
Fig. 31: Concrete Mixer Plant Diagram
IOPT Tools user manual
34
Actuators:
CartMotor
CementOpen
SandOpen
GravelOpen
BucketUnload
WaterOpen
Move cart forward
Cement conveyor belt enabled
Sand conveyor belt enabled
Gravel conveyor belt enabled
Turn bucket upside-down (unload)
Open the water pipe valve
Fig. 32: Concrete mixer controller - version 1
12.1Model edition
A first attempt to solve the problem presented in the previous page can be viewed in fig. 32.
To create this model, please use the following steps:
1 – Log-in into IOPT Tools (http:/gres.uninova.pt). If necessary create a new account, as described in section 3.
2 – Select an existing model
3 – At the bottom of the main page, create a new model named «concrete_mixer», as displayed in figure 33.
Fig. 33: Create a new model
Enter the model name and press the «create» button. After a new model has been created the image on the main
page should be empty.
IOPT Tools user manual
35
4 – Enter the IOPT Editor using the «Edit Model» button.
5 – Using the
toolbox button, create 10 input signals, named according to the table in the previous page.
The input signals can be seen in fig. 32, starting at the top left corner.
The StartBtn, BucketEmpty and Arrive signals must be defined as Boolean signals.
The Level inputs can be defined as Boolean or Range signals, according to the type of sensors employed: digital
or analog sensors. This choice will later have influence in the definition of guard functions: digital sensors will
simply produce a true value when the desired level is reached, while the value of the analog sensors must be
explicitly compared with predefined threshold values (literal integer values).
6 – Using the
toolbox button, create 6 Boolean output signals with default value 0, according to the
actuator table presented in the previous page. The output signals can be views in fig. 32, near the bottom left
corner.
7 – Using the
toolbox button, create one input event named StartEvt, associated with the signal InputBtn.
This event is used to detect when the user presses the Start button, detecting transitions from 0 to 1,
corresponding to an Up edge and level 0.
8 – Select the
figure 32.
«Place» toolbox button. Holding the Shift key, draw 10 Places, positioned according to
9 – Select each of the drawn Places and define the respective names in the Place properties form, located at the
right side of the editor. After typing each name, do not forget the use the Save button at the bottom of the
properties form, before selecting another Place.
10 - Select place «PReady» and change the Initial marking to 1. Save properties.
11 – Select the
«Transition» toolbox button. Holding the Shift key, draw 10 Transitions, positioned
according to figure 32
12 – Select each Transition and define the respective names in the Transition properties form, located at the right
side of the editor. After entering each name, do not forget the use the Save properties button.
13 – Transition «TStart» should only fire whenever a StartEvt is triggered. To associate this transition to the
event, select the «TStart» transition, find the Input events list in the Transition properties form and check the
StartEvt input event. Save properties again.
14 – Select the
«Arcs» toolbox button. Arcs are drawn by consecutively clicking in two nodes. For
example, clicking in the «PReady» place and the «TStart» transition, will create a new Arc from «PReady» to
«TStart». Repeat the same procedure for all arcs presented in figure 32.
15 – By default, the arc from «TStart» to «PWaterRun» is drawn as a straight line,
covering the text StartEvt on transition «TStart». To change the arc shape, select the arc
and move the control points (drawn as circles).
Moving the control points away from the respective nodes, the Arc shape becomes a curve. Moving both points
back to the respective nodes the shape returns to a straight line.
16 – Places «PGotoCement», «PGotoSand», «PGotoGravel» and «PGotoMixer»,
correspond to states where the Cart is moving over the rail from one position to the next.
When these places are marked, the Cart motor must be enabled.
Select place «PGotoCement» and find the first output action on the properties form: Choose CartMotor on the
output signals list and click on the value box to enter in the expression editor and define an output value of 1.
After saving properties, the text «CartMotor = 1» should appear immediately below place «PGotoCement».
IOPT Tools user manual
36
Repeat the same procedure for places «PGotoSand», «PGotoGravel» and «PGotoMixer».
17 – When place «PWaterRun» is marked, the output signal WaterOpen must be enabled. Repeat the previous
procedure, selecting place «PWaterRun» and define an output action «WaterOpen = 1».
18 – In the same way, places «PLoadCement», «PLoadSand» and «PLoadGravel» must activate outputs to
enable the respective conveyor belts. Repeat the same procedure to assign the output action «OpenCement = 1»
to place «PLoadCement», «OpenSand = 1» to «PLoadSand» and «OpenGravel = 1» to «POpenGravel».
19 – Finally, assign an output action «BucketUnload = 1» to place «PUnloadMixer».
20 – When place «PGotoCement» is marked, the cart is moving to towards the Cement deposit and transition
«TCementArrive» should only fire when the Cart reaches a sensor located under the cement conveyor belt.
Select transition «TCementArrive» and find the guard expression on the properties form.
Click on the guard, enter into the expression editor and define an expression
«CementArrive = 1». Save properties and repeat the same procedure for transitions
«TSandArrive», «TGravelArrive» and «TMixerArrive»: «SandArrive = 1», «GravelArrive = 1» and
«MixerArrive = 1» respectively.
21 – Transitions «TCementFull», «TSandFull» and «TGravelFull» should only fire when the respective sensors
detect that the predefined material amount has been successfully loaded into the cart. This is achieved by
assigning guard expressions to these transitions: «CementLevel = 1», «SandLevel = 1» and «GravelLevel = »
respectively.
NOTE: In case the level inputs were associated to analog sensor instead of digital sensors, these guards would
need to compare sensed values with predefined thresholds. For example «CementLevel >= 200».
22 – Transition «TDone» can only fire when the cart bucket is empty: this effect is obtained by assigning the
guard expression «BucketUnload = 1» to transition «TDone».
23 – Finally, assign a guard «WaterLevel <> 0», or «WaterLevel = 1», to Transition «TCloseWater» to close the
water valve when the desired amount of water has been dumped in the mixer.
24 – Save the model and exit the editor.
NOTE: All models discussed in this example are available under the «models» user account.
IOPT Tools user manual
37
12.2 Debug and simulation
After the model has been successfully designed, it can be executed in the simulator to verify if it
behaves correctly under an expected use case.
Open the simulator tool, displayed in figure 34, starting with a initial state where only place
«PReady» is marked.
Enable the continuous run mode
to start executing the new model.
Clicking on the StartBtn input, located at the top left corner, immediately triggering a StartEvt event
and firing transition «TStart». Places «PGotoCement» and «PWaterRun» will be marked, and
output signals CartMotor and WaterOpen will be enabled. Transition «TCementArrive» is enabled
and waiting for the guard «CementArrive = 1».
Clicking on the CementArrive signal, the guard is satisfied and place «PLoadCement» is marked.
Sequentially clicking on all other input signals, from top to bottom, the system will execute a
complete cycle, returning to the initial state. In fact, if all input signals are left in the on state, each
time a start event is triggered by changing the state of the StartBtn input from 0 to 1, the system will
execute a full cycle. Figure 35 presents the entire execution sequence.
As a conclusion, the system behaved correctly under the expected sequence of input signals.
However, the behavior must also be verified under different conditions to detect possible design
errors, using the state-space generation tool.
Fig. 34: Test the model using the simulator tool
IOPT Tools user manual
38
Fig. 35: Execution Sequence (left to right, top to bottom)
IOPT Tools user manual
39
12.3 State-space generation
To generate the model's state-space graph, it is necessary to exit the simulator window and execute
the state-space generation tool, as displayed in figure 36. In the initial marking editor, the default
values should be maintained. As the resulting graph is not very big, a «View Graph» button is
presented in the log page. The graph window is presented in figure 37.
Fig. 36: State space generation log
Fig. 37: State space graph
IOPT Tools user manual
40
Observing either the log window or the graph window, we can immediately notice several facts.
First, there were no deadlocks and no conflicts found. However, the total number of calculated
states is 2304, much larger than expected, as the simulation use-case only produced a dozen states
(fig. 35), indicating a possible modeling mistake.
Observing the minimal and maximal bound for each place, the error becomes obvious: place
«PWaterRun» has a maximal bound of 255, the maximal number produced by the state-space
generation tool, indicating that the marking on this place can grow to infinite. All other bounds
seem correct: all places exhibit a minimal bound of zero and maximal bound of just one token, as
seen during simulation.
To locate the error situation, we must find the first state in
the state-space graph where the marking of place
«PWaterRun» is larger than 1.
Observing figure 38, we can see that state 35 has a marking
of 2 in «PWaterRun» while the parent state 32, had a
marking of just 1. This means that transition «TStart» fired
before «TCloseWater», indicating that the user pressed the
Start button again, after the Cart has completed the entire
cycle but the water level had not reached the desired value.
Such a situation could happen for instance, when there is a
lack of water: the valve can be open but as the water does
not flow through the pipe, the desired level is never reached.
Fig. 38: Error situation
To solve this mistake, the model must be changed: transition «TStart» can only fire when the water
level has been reached and place «PWaterRun» has no marks. To implement this test, we will create
a complementary place to «PWaterRun», named «PWaterRun_comp». When «PWaterRun» has no
tokens the complementary place will have one token and vice-versa. If we add a new arc from the
complementary place to transition «TStart», then this transition will only be able to file when
«PWaterRun» has no marks. The corrected model can be viewed in figure 39.
Fig. 39: Error corrected
IOPT Tools user manual
41
The editor has a tool to automatically create complementary places. In this example, place
«PWaterRun» was selected and the tool
was executed.
After creating the complementary place, it was only necessary to remove any output actions from
the new place and adjust the arc curves and annotations to un-clutter the drawing.
Running the new model though the simulator, we can see that the Start button is only active after
the water stops running and the cart has completed an entire cycle. The state-space graph of the
corrected model has only 18 states and the maximal bound off all Places is just 1, indicating that the
problem was successfully corrected. Figure 40 presents the new graph.
12.4 Counting the number of cart cycles
The state-space graph is small enough for visual inspection, and the designed controller seems to
perform according to the intended design. However, there is still one problem: as previously stated,
the cart size isn't large enough to fill the concrete mixer in a single travel. To completely fill the
mixer, the cart must perform 6 cycles and the user must press the Start button six times to fill the
mixer tank.
Fig. 40: Corrected model's state-space graph
IOPT Tools user manual
42
To solve this problem, a new controller with the capability to count the number cart travel cycles
must be created. IOPT nets offer two different solutions to implement counters: the first solution
relies on the number of tokens on specific counter Places to perform the counting. The second
solution is based on output events associated with an output signal that is used as a counter. Token
based counting is the solution traditionally used with other Petri net classes that lack input and
output capabilities and is generally only used for small counter values. When the counters reach
larger values, the output events solution is preferable. Figure 41 presents a revised IOPT model with
the capability to counter the number or cart cycles, based on token counters.
This model has two counter places: «PCountDone» initialized with 6 tokens and «PCountToGo»
initialized without any tokens. When the Start button is pressed and the transition «TStart» is fired,
the 6 tokens available in «PCountDone» are removed and added to «PCountToGo». This way,
immediately after starting, the counter of done cycles is reset to zero and the missing cycles counter
is initialized to 6. At the begin of each cycle, transition «TStartMove» removes one token from
place «PCountToGo» until there are no more tokens available. At the end of each cycle, transition
«TUnloadDone» adds one token to place «PCountDone». As the arc from place «PCountDone» to
transition «TStart» has an inscription with the number 6, the Start button will be ignored until the
total number of cycles has been completed.
To create this model, it is a good idea to make a copy of the previous model under a different name
using the copy and paste mechanism of the editor. This way, open the previous model in the editor,
use the select-all tool
and copy everything to the clipboard window with the copy tool
.
Next, exit the editor without saving and create a new model named «concrete-mixer-6x».
Open the editor again, and paste the contents of the clipboard into the new model with the paste tool
. The new model should be an exact clone of the previous one. Save the model
and start
adding the new nodes.
Fig. 41: Revised model with multiple cart cycles
IOPT Tools user manual
43
Using the same tools used to design the original model, add 3 new places «PWait», «PCountDone»
and «PCountToGo» and one Transition «TStartMove». Rename transition «TDone» to
«TUnloadDone» and rearrange all arcs, removing and adding new ones when necessary.
After all arcs have been drawn and the nodes have been graphically rearranged, it is very important
to define the inscriptions on the Arcs from «PCountDone» to «TStart» and from «TStart» to
«PCountToGo». The inscription value in these Arcs must be the same as the initial marking of
«PCountDone», corresponding to the desired number of cart cycles.
When edition is done, save the model and exit the editor.
The best way to verify if the new model works as intended, is to execute the model with the
simulation tool, as presented on figure 42.
To verify if the model correctly counts the number of cycles, first toggle all input signals to true
except StartBtn, as presented in the figure. Next, put the simulator in continuous run mode and click
on the StartBtn signal to start running. If the model was correctly designed, an animated sequence
should start, with a token running in circles over the main cycle for 6 times. During this time, the
value of the counters on «PCountDone» and «PCountToGo» must respectively increment and
decrement each time the «token» finished an entire cycle.
Generating the state-space graph (figure 43), the total number of states is 110, and the minimal and
maximal bounds are the expected: all places have a maximal bound of 1 except the two counters
that can reach 6 tokens. As there are no deadlocks and no conflicts, no mistakes were detected.
Figure 44 presents an alternative solution for the previous model, using an output signal to
implement the counter and an output event to increment the counter. The number of cycles is
defined by the maximum range value of the counter output signal. Relative to the previous example,
this solutions as a big advantage: to change the number of cycles we just need to modify a single
value, whereas in the previous example required modifications in 3 values: two arc inscriptions and
the initial marking of one place.
Fig. 42: Multiple cycle model simulation
IOPT Tools user manual
44
Fig. 43: Multiple cycle model state-space log
Relative to the previous example, this model has one extra output signal, Counter, defined with the
properties visible on the right side of figure 44. The signal can hold an integer range from 1 to 6 and
the wrap limits options was activated. This way, when the signal reaches the value 6 and is
incremented again, the counter will revert to the initial value 1, ready to start again. The CntEvt
event was defined with an Up edge and level 0, meaning that the Counter signal will be incremented
by one unit each time the event is triggered, reverting to 1 when the limits wrap.
Fig. 44: Multiple cycle model using an output events based counter
IOPT Tools user manual
45
The CntEvt event was associated with transition «TUnloadDone», incrementing the counter each
time a cycle is finished. When a cycle terminates and place «PDone» is marked, one of two
situations might happen: if the Counter value is higher than 1, then transition «TNextCycle» will
immediately fire to start executing a new cycle. On the opposite, if the Counter value is equal to 1,
it means that the previous counting has finished and the system stops until the user presses the start
button again. Although both transitions «TStart» and «TNextCycle» compete for the same token in
«PDone» there is no conflict between the two transitions as the two guard functions are
incompatible, «Counter = 1» vs «Counter > 1» and cannot be simultaneously enabled .
Performing the same tests using the Simulator and the State-space generator should produce results
equivalent to the previous solution and if the model was correctly inserted, no mistakes should be
detected.
Finally, the new solution has another advantage: the value of the output signal Counter is accessible
on the external interface of the automatically generated hardware modules or software solutions and
can eventually be used to display the number of cart cycles on the user interface.
12.5 Concurrent controller for two carts
A more complex problem arises when there are more than one cart operating on the same rail, as
shown in figure 45. From on side, a system with two carts offers much better performance as the
two carts can load different material during the same time period. From another side, controller
complexity grows and concurrency problems must be solved: it is necessary to avoid physical
collisions between the two carts and it is not possible to have both cards on the same material
loading station. Fortunately the IOPT tools editor has a semaphore tool that automatically creates
semaphores to protect the critical sections.
Figure 46 presents a controller model to control the two carts. The outer ring controls the first cart
and the inner ring controls the second cart. Comparing to the previous models, additional input and
output signals have been added: a new output to control the second cart motor and other to unload
the second cart's bucket. An extra input was added to check if the second cart's bucket is empty at
the end of each cycle.
Between both rings, three semaphore places can be seen. These semaphores are used to prevent
more than one cart on each material loading station. For example, semaphore 0 protects a critical
section containing places «PGotoCement», «PLoadCement», «PGotoCement2» and
«PLoadCement2». To create these semaphores, simply select the places contained in each critical
section and execute the editor's semaphore tool
The unload station, near the cement mixer was
not protected by any semaphore because this station has enough
space to physically store the two carts.
In the same way as previously, this model should be simulated
using the simulator to check if it behaves correctly under a
standard use case and checked with the model-checking tools.
This model continues to produce a very small state-space graph,
with only 676 states, presents no dead-locks and produces the
expected minimal and maximal bound: all places exhibit a
maximal bound of 1 except the counters with 6.
However, the state space statistics list 12 conflicts between
transitions. Inspecting the state space graph, we can find that
these conflicts happen when both carts are at the begin of every
cycle, near the mixer station and both transitions «TStartMove»
and «TStartMove2» are simultaneously enabled, but Fig. 45: Two bucket carts plant
IOPT Tools user manual
46
Fig. 46: Controller model for two carts.
semaphore0 only lets one of the transitions fire. To solve this conflict, both transitions should be
assigned with different priorities. For example, if «TStartMove» has priority 1 and «TStartMove2»
has priority 2, then cart 1 will always start moving before cart 2 and the opposite if the priorities are
inverted.
Finally, it is very important to check if the semaphores are imposing the correct behavior. Although
the semaphores automatically created by the editor usually function correctly, the user can still
design models with errors, by selecting the wrong set of places to define the critical section, or by
manually making changes to the model after the semaphore is created, for example, changing the
arcs connecting the critical section to the rest of the net. To detect possible concurrency problems
between the two carts, several queries can be defined in the model-checking system, as presented in
figure 47. The following queries were defined:
1
2
3
4
PGotoCement + PLoadCement + PGotoCement_2 + PLoadCement_2 > 1
PGotoGravel + PLoadGravel + PGotoGravel_2 + PLoadGravel_2 + PGotoMixer + PGotoMixer_2 > 1
PGotoSand + PLoadSand + PGotoSand_2 + PLoadSand_2 > 1
NOT REACH(0)
The first three queries simply check if the total number of tokes in each critical section is higher
than one, meaning that more than one cart in the the same section. The final query «NOT
REACH(0)» verify if the system is reversible and does not containing any live locks composed by
sequences of states from which the system cannot escape nor return to the original state. If during
state space computation any of these queries holds true, then the model has errors. In this case, node
of the queries produced any results, indicating that none of the searched errors was detected.
IOPT Tools user manual
47
Fig. 47: Model-checking queries
IOPT Tools user manual
48
13 Published work related to IOPT nets and tools
-Fernando Pereira, Filipe Moutinho, Luís Gomes. "IOPT-Tools - Towards cloud design automation of digital
controllers with Petri nets". ICMC'2014 International Conference on Mechatronics and Control. July 03-05
2014, Jinzhou, China
- Gomes, Luís, Filipe Moutinho, and Fernando Pereira. "IOPT-tools—A Web based tool framework for
embedded systems controller development using Petri nets." Field Programmable Logic and Applications
(FPL), 2013 23rd International Conference on. IEEE, 2013.
- Ribeiro, José, et al. "An Ecore based Petri net type definition for PNML IOPT models." Industrial
Informatics (INDIN), 2011 9th IEEE International Conference on. IEEE, 2011.
- Pereira, Fernando, et al. "Web based IOPT Petri net Editor with an extensible plugin architecture to support
generic net operations." IECON 2012-38th Annual Conference on IEEE Industrial Electronics Society. IEEE,
2012.
- Campos-Rebelo, R.; Pereira, F.; Moutinho, F.; Gomes, L., "From IOPT Petri nets to C: An automatic code
generator tool," Industrial Informatics (INDIN), 2011 9th IEEE International Conference on , vol., no.,
pp.390,395, 26-29 July 2011 doi: 10.1109/INDIN.2011.6034908
- Pereira, F.; Gomes, L., "Automatic synthesis of VHDL hardware components from IOPT Petri net models,"
Industrial Electronics Society, IECON 2013 - 39th Annual Conference of the IEEE , vol., no., pp.2214,2219,
10-13 Nov. 2013 doi: 10.1109/IECON.2013.6699475
- Pereira, Fernando, Filipe Moutinho, and Luís Gomes. "Model-checking framework for embedded systems
controllers development using IOPT Petri nets." Industrial Electronics (ISIE), 2012 IEEE International
Symposium on. IEEE, 2012.
- Pereira, Fernando, et al. "IOPT Petri net state space generation algorithm with maximal-step execution
semantics." Industrial Informatics (INDIN), 2011 9th IEEE International Conference on. IEEE, 2011.
- Pereira, Fernando, Filipe Moutinho, and Luís Gomes. "A State-Space Based Model-Checking Framework
for Embedded System Controllers Specified Using IOPT Petri Nets." Technological Innovation for Value
Creation. Springer Berlin Heidelberg, 2012. 123-132.
- Moutinho, Filipe, and Luís Gomes. "Asynchronous-channels and time-domains extending Petri nets for
GALS systems." Technological Innovation for Value Creation. Springer Berlin Heidelberg, 2012. 143-150.
- Gomes, Luís, João Paulo Barros, and Rui Pais. "From non-autonomous Petri net models to code in
embedded systems design." Second International Workshop on Discrete-Event System Design (DESDes’
04), Zielona Gora, Polónia.(Citado na pág. 16). 2004.
- Costa, Anikó, and Luís Gomes. "Partitioning of Petri net models amenable for Distributed Execution."
Emerging Technologies and Factory Automation, 2006. ETFA'06. IEEE Conference on. IEEE, 2006.
- Gomes, Luis, and Aniko Costa. "Cloud based development framework using IOPT Petri nets for embedded
systems teaching." Industrial Electronics (ISIE), 2014 IEEE 23rd International Symposium on. IEEE, 2014.
- Campos-Rebelo, Rogerio, A. Costa, and L. Gomes. "Enhanced Event Modeling for Human-System
Interactions Using IOPT Petri Nets." Human-Computer Systems Interaction: Backgrounds and Applications
3. Springer International Publishing, 2014. 39-50.
- Costa, Anikó, et al. "Petri nets tools framework supporting FPGA-based controller implementations."
Industrial Electronics, 2008. IECON 2008. 34th Annual Conference of IEEE. IEEE, 2008.
- Dezani, Henrique, et al. "Optimizing urban traffic flow using Genetic Algorithm with Petri net analysis as
fitness function." Neurocomputing 124 (2014): 162-167.
IOPT Tools user manual
49
14 References
[1] Gomes, Luís, et al. "The Input-Output Place-Transition Petri Net Class and Associated Tools."
Industrial Informatics, 2007 5th IEEE International Conference on. Vol. 1. IEEE, 2007.
[2] Desel, Jörg, and Wolfgang Reisig. "Place/transition Petri nets." Lectures on Petri Nets I: Basic
Models. Springer Berlin Heidelberg, 1998. 122-173.
[3] Pereira, Fernando, and Luís Gomes. "FPGA based speed control of Brushless DC Motors using
IOPT Petri Net models." Industrial Technology (ICIT), 2013 IEEE International Conference on.
IEEE, 2013.
[4] Moutinho, F.; Gomes, L., "Asynchronous-channels within Petri net based GALS distributed
embedded systems modeling," Industrial Informatics, IEEE Transactions on , vol.PP, no.99,
pp.1,1 doi: 10.1109/TII.2014.2341933
URL: http://ieeexplore.ieee.org/stamp/stamp.jsp?tp=&arnumber=6862891&isnumber=4389054
[5] Nunes, Ricardo, Luís Gomes, and João Paulo Barros. "A graphical editor for the input-output
place-transition petri net class." Emerging Technologies and Factory Automation, 2007. ETFA.
IEEE Conference on. IEEE, 2007.
[6] Costa, Anikó, and Luıs Gomes. "Petri net partitioning using net splitting operation." Industrial
Informatics, 2009. INDIN 2009. 7th IEEE International Conference on. IEEE, 2009.
[7] Lourenço, João, and Luís Gomes. "Animated Graphical User Interface Generator Framework for
Input-Output Place-Transition Petri Net Models." Applications and Theory of Petri Nets.
Springer Berlin Heidelberg, 2008. 409-418.
[8] Moutinho, Filipe, and Luís Gomes. "From models to controllers integrating graphical animation
in FPGA through automatic code generation." Industrial Electronics, 2009. ISIE 2009. IEEE
International Symposium on. IEEE, 2009.
[9] Gomes, Luís, et al. "From Petri net models to VHDL implementation of digital controllers."
Industrial Electronics Society, 2007. IECON 2007. 33rd Annual Conference of the IEEE. IEEE,
2007.
[10] http://fa.iie.uz.zgora.pl/contact/
IOPT Tools user manual
50