1
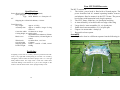
HT– Tom (Special)
Harvester
User Manual
Manufactured by:-
REID LINE EAST RD 5 FEILDING 4775 New Zealand
Phone +(646)323 2509 Fax +(646)323 2709
Email [email protected]
10/2013
© Jenquip 2005
HT– Tom (Special) Harvester
Introduction
Congratulations on the purchase of your Harvester Concepts Ltd HT—
Tom (special)Harvester. This machine is of high quality and will
reward you with reduced effort and a great harvest
Learning to operate your HT—Tom Harvester won't take long. You
will soon find it to be an invaluable tool.
This handbook is for the standard HT-Tom but has been slightly
modified for your special harvester.
Important Safety Note
Read and understand all the instructions before using the HT—Tom
Harvester (HT-T).
The HT-T should only be used for the purposes for which it
was designed. Use it for no other purpose (e.g. it is not a
grader blade or battering ram!). The HT-T is a light weight
machine and if not used with care can easily be damaged. We
have manufactured the HT-T using quality materials and
manufacturing techniques however if faults do occur please
have them corrected before you use it.
- Please read the Power Head instructions on page 8 before use.
Pay particular attention to running in notes.
- Please read this instruction book before use and retain it for
future reference.
- Unless mentioned in the instructions, it requires only one person
to operate the HT-Tom Harvester—keep all others away!
- Always turn the Power Head off before adjusting its position in
the frame.
- Immediately after turning the power head off, fit the cutter bar
cover. It should be removed last, before restarting the power
head.
16
1
Conditions of Sale and Guarantee
Your HARVESTER CONCEPTS LTD product is guaranteed to be free from
defects in materials and/or workmanship under normal use and service for a
period of 6 months from date of initial purchase.
HARVESTER CONCEPTS LTD’S liability and obligation is limited to problems
which HARVESTER CONCEPTS LTD acknowledges to be defective under the
guarantee conditions either to
- the free replacement or repair (where practicable) at the HARVESTER
CONCEPTS LTD
premises of any parts returned within the guarantee period
- or shipment of replacement parts to the customer, as mutually agreed to.
Supply of non standard parts or services from other than HARVESTER
CONCEPTS LTD are not covered under the guarantee conditions unless
prearranged, in writing, with HARVESTER CONCEPTS LTD
Shipment of product to HARVESTER CONCEPTS LTD is the consumers
responsibility and cost Guarantee conditions are void for any of the following
reasons:Abnormal use of the product
Accident damage or vandalism
Modifications or unauthorised repairs to the product or its components
Where component "seconds" have been supplied
Normal wear and tear
HARVESTER CONCEPTS LTD cannot be liable for any damage caused to
people or other property during use of the product or as a result of any defect or
malfunction of product or components supplied by HARVESTER CONCEPTS
LTD. Use of the product is solely the users responsibility. Other losses such as
delays in work, incorrect or misleading information, omissions and errors,
HARVESTER CONCEPTS LTD is not liable for.
This guarantee is expressed in lieu of all other guarantees expressed or implied
and all other obligations and liabilities on HARVESTER CONCEPTS LTD's part
and specifically excluding consequential damage. HARVESTER CONCEPTS
LTD makes no guarantee of merchantability or fitness for purpose and is not
responsible to any purchaser of its products for any undertaking, representation
or guarantee, except those stated in these terms, made by any person, dealer or
body corporate selling or dealing with its products in any manner whatsoever.
2
HT-Tom (Special) Notes
Assembly
For transport the power head is removed. Unfold the main
frame and assemble with leg / wheel assemblies. See the picture on page 8—unlock the lever and offer the power head up
to the mounting frame. (The 2 tubular clamps are like cam
locks—they lock in both directions with the unclamped position in the middle). Slide the tubular clamps over the mounting frame and clamp tight.
Lift the other end of the power head up until it’s mounting
frame aligns with the main frame mount—bolt in place. Now
lock the lever as shown on page 8.
Position the control cables in a gentle arc to either the left or
right hand mounting position. Secure control levers in position and clamp the cables to the main frame with the reusable
cable tie. Mount the on / off switch
Drive engage
Throttle
On/Off switch
Stop button
The position of the cutter head cannot be changed, simply
raised or lowered using the lynch pins in each wheel mounting leg. Adjust each leg to the same height, maybe rear legs
slightly higher.
Being so wide it is envisaged that two operators will use the
harvester. The controls can be mounted on the left or right
hand sides.
15
Your HT-TOM Harvester
Specifications
Power Head: Ochiai V8X2HD-1210 (standard)
Spark plug gap
0.6—0.7mm
Type NGK BPM7A or Champion CJ6Y
Shipping box 1500x525x490mm, 0.386m³
Total Harvester
Dry weight
Assembly time
approx. 45.5 Kg
approx 2 minutes, longer if sling
removed
Cutter bar width 1210mm in arc shape
Cutting height, at outside edges,
adjustable from 100mm to 550mm
Blade curve
1150mm radius (135mm Higher in
centre)
Wheel track
1610mm front, 1435 rear
Overall width
1700mm
Shipping pallet
1600L x 1385W x 750H, 1.66m³
Packed weight
120Kg
Freighting
The HT-T consists of
1.
The Ochiai power head is fitted with a Zenoah engine. The
power head has had it’s manual operating handles removed
and adapters fitted to mount it in the HT-T frame. The power
head comes with instruction book, bag & spanners.
2.
The HT-T frame, folded up, c/w lynch pins and sling
3.
A 6mm Allen Key is located in the rear edge of the sling
4.
Large wheels / strut assemblies (2), c/w lynch pins
5.
Small wheel strut assemblies (2), c/w lynch pins
6.
Fingers c/w mount tube / clamps (2)
7.
Bag quick release system
Assembly
Assembly can be done in a different sequence but the following is a
Handlebar
Engine controls
Bag support rod
Levelling
Adjustment
Pruning
adjustment
Freighting on the back of a utility vehicle is preferred. The HTTom is very light and if transporting on a trailer it is not heavy
enough by itself to make the trailer springs work i.e. it will get
badly shaken about. On rough road / tracks this could cause
structural damage. One solution is to put a extra weight on the
trailer as well as the harvester so the springs actually work!
Finger
14
3
Maintenance
good starting point:1.
Remove lynch pins from the handle bar hinge area and
carefully unfold the handlebars into the straight out
position. Refit lynch pins to lock handlebars.
2.
Fit the two front wheel strut
assemblies by sliding them into
the holders on each end of the
cutting head. Select a suitable
cutting head height and fit a lynch
pin to secure each leg.
3.
Fit the two rear wheel strut
assemblies by sliding them into
the holders on each at rear of
harvester. Select a position so
harvester frame is relatively level
and fit a lynch pin to secure each
leg.
4.
Fit handle bar at a suitable height
5.
If removed, fit the cutting head
into the frame. Fit engine controls
on frame mount ensuring cables
are routed in gentle curves. Tighten wing bolt
6.
If removed fit bag support rod. It may have to be
sprung to fit.
7.
Fit finger support assembly.
Note It is easiest to feed this into
4
During continuous use, lubrication should be applied as
follows
1.
Every time the engine is refueled, using an oil can
apply some oil to each of the holes just behind the
cutting blades.
2.
Every 20 hours use a grease gun to lubricate the grease
nipple on the gearbox below the engine.
Original Ochiai grease should be used.
After use it is a good idea to wash the blades (Be Careful!!)
using a stiff bristle brush, water & detergent and allow to dry.
If the machine is to be stored for some time the blades can be
sprayed or brushed with a light oil. The fuel should be
drained from the fuel tank and the engine operated until it
runs out of fuel
WARNING* Ensure the fan housing is kept clear of
debris, particularly underneath. This can be a problem
particularly if the machine or power head only, is moved
back and forth. Failure to do so can cause overheating
and engine seizing.
13
3.
4.
Remove “end of Bar” bracket
(retains wheel mount)
Fit adapter frame. It mounts on
“end of Bar” bolt, one adjacent to
the gearbox and 2 bolts under the
handlebar rubber mounts
To fit the E7B1 follow these steps:1.
Fit mounts to the HT-Tom frame
(if not already fitted). Note that
these are handed (4 bolts)
2.
Place E7B1 on the ground, roughly in position under
the mounts
3.
Lower each adjusting leg down through the mount and
use a lynch pin to connect it to the adapter frame.
4.
Raise the E7B1 assembly to the desired cutting height
and retain with lynch pins through the mounts (cutter
bar should be level). Note that there are 2 holes in each
mount enabling small height adjustments to be made
.
position from the rear ensuring the
fingers are positioned across the
machine in roughly the correct
position. Ensure lift lever is
vertical. Fit the support tube on
the spigot at the left hand side and
secure the right hand end in
position with the triknob
Throttle (bottom)
and cutter controls
Finger Lift Lever
Triknob
Removing the E7B1 or reverting to using it as a hedge
trimmer is the reverse of above procedures.
Latch bolt
Finger Support Tube (underneath)
8.
12
With the finger clamp
screws undone, move the
fingers side ways to suit the
row width being cut. As a
rough guide the finger width
should be similar to the
pruned width of the plant
being harvested. The clamps
are also lift travel stops—
see below:-
Finger clamp screws
5
9.
10.
11.
A latch is provided for holding the fingers up for travel
or when they are not required. Set the finger lift lever
into the forward hole. Move the finger clamps
anticlockwise (as viewed from RH side) until not quite
hitting fingers. Use a 6mm allen key (supplied—in rear
seam of sling), to lock each clamp in position. If
positioned correctly, when the latch lever is moved
rearwards into the recess it will lift the fingers fully up,
evenly. If this is not achieved reposition the finger
clamps. Note:- The Tom is a light weight machine and
if not used with care can easily be damaged. Don’t force
anything. Whenever possible lower the fingers to
ground level.
Adjust the sling straps as
required. The sling should
be a snug fit up to the
cutter head. Other straps
should be adjusted so sling
is roughly level and not
sagging.
Fit the collection bag. This
should come fitted to the
quick release frame (QRF).
Unroll the bag and lay out on
sling with frame at front end.
To fit, the QRF is simply
lowered over the spigot also
ensuring the end supports fit
over frame tubes and lower
edge of QRF fits snuggly in
recess in cutting head panel
End support (2)
area.
6
2.
(TP). Put handle in horizontal position and tighten lock
lever.
Throttle assembly; undo wing bolt and remove from
handle. With TP in frame, reposition throttle assembly
onto main frame, routing cables in front of main frame
cross member. Tighten wing bolt.
To Convert from Frame Mounted to Manual
Operation
This is a reversal of the above procedure taking note that:1.
Handles will need positioning for use
2.
The frame LH mount can stay attached to the TP at all
times.
Optional Hedge Trimmer Mount
This allows a Ochiai E7B1AT-880 to be mounted on the HTTom frame. The purpose of this is for heavy top pruning of
shrubs or for low cutting of certain crops i.e. Peppermint.
Adjusting
Leg
Spigot
Adapter
Frame
Mount
To convert the E7B1 for use with the HT-Tom:1.
Remove RH handgrip (2 bolts)
2.
Remove wheel mount / handlebar
11
Recess
Throttle Assembly
LH Handle
Stop Switch
RH Handle
Lock
Lever
Lock Lever
Cam lock
To Convert from Manual to Frame Mount
Operation
Pruning
The HT-Tom can also be used for pruning the crop. Simply
lowering it down, with or without using the fingers will prune
but if you wish to shape the bushes more then the pruning
position can be used.
The pruning position allows the left hand end of the cutter bar
to be close to ground level resulting in a more vertical cut in
that area. Prune one side of bushes as you travel down the
row and then the other side on the way back.
RH Handles:1.
2.
3.
4.
5.
Remove 2 plastic bungs off bottom ends of handle (use
crescent spanner over tube and tap with hammer)
Loosen 2 camlock clamps (central position loose—LH
or RH tightens)
Slide handle tube out, refit bungs so they don't get lost.
Loosen lock lever, rotate serrated couplings until marks
on couplings line up. Tighten lock lever
Insert RH frame mount adapter fully into camlock
clamps and tighten clamps.
Level lock
lever
LH Handle:1.
Loosen lock lever and move handle and clamps as far
as possible to the centre of the tea plucker power head
10
Triknob
7
LH end
NOTE:- the sling / collection bag are not usually fitted when pruning.
To select the pruning position:- Remove collection bag and sling.
Unlock level lock lever. Support cutting head and remove triknob
holding the left hand end of cutter head to the main frame.
Carefully lower LH end of cutting head ensuring level lock
disengages. Reposition mounting strut and fit to lowest hole in wheel
strut using triknob. Tighten level lock lever.
Unlocked
Fit harvesting bag / Quick release frame over spigot /
frame at front and clothes pegs over bag support rod.
Loop rear of bag over handle bars and hold by hand
when in use. A small opening in the bag can be used to
remove excess air from the bag.
3.
After filling the engine with the petrol mix, press the
brown rubber blister next to the square red stop button
until it is full of fuel
4.
Ensure stop switch (on LH carry frame) is switched on.
Remove safety cover off cutter bar.
5.
Apply choke and pull starting cable a few times until
engine starts. Allow to warm up for a few minutes
before revving the engine.
6.
On the throttle control assembly, one lever is the
throttle for engine / blade speed. The other lever dis/
engages the drive to the cutter bar
Locked
Dismantling For Transport or Storage
Dismantling is a reversal of the assembly procedure. It is not
necessary to remove the sling to fold the frame up. The power head
can be totally removed or left in the frame
Operation
The original power head instruction book is not in good English but
the following notes should help:1.
2.
Ensure the engine is stopped before refuelling. Refuel the
engine using a Fuel / oil mix of 25:1 91 octane fuel with a
good quality 2 stroke oil for air cooled engines.
8
7.
When new, the power head requires some running in.
Always allow the engine to warm up before revving it.
During running in, don’t rev for long periods of time
To stop the engine press the square red button on the engine.
There is also a stop switch on the LH manual carry handle.
8.
Refit safety cover on cutter bar
*WARNING* Ensure the fan housing is kept clear of
debris, particularly underneath. This can be a problem
particularly if the machine or power head only, is moved
back and forth. Failure to do so can cause overheating
and engine seizing.
9