1
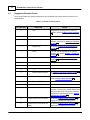
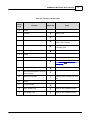
SCADAPack E Conitel Slave
Interface
2
SCADAPack E Conitel Slave Interface
Table of Contents
Part I SCADAPack ER Conitel Slave Interface
3
1 Technical
...................................................................................................................................
Support
3
2 Safety ...................................................................................................................................
Information
4
3 Preface
................................................................................................................................... 6
4 Overview
................................................................................................................................... 8
5 Conitel...................................................................................................................................
Protocol Configuration
9
5.1 Supported Function
..........................................................................................................................................................
Codes
10
5.2 Physical Interface
.......................................................................................................................................................... 14
5.3 Conitel Port Configuration
.......................................................................................................................................................... 15
.........................................................................................................................................................
& Control/Execute Timeout
16
5.3.1 PTM and Squelch
.........................................................................................................................................................
Timing & Protocol Select
17
5.3.2 Communication
Address & Raise/Low er Control Settings
18
5.3.3 Function 9 .........................................................................................................................................................
5.4 Conitel Slave Point
..........................................................................................................................................................
Mapping
19
.........................................................................................................................................................
Function
20
5.4.1 Adding a Scan
.........................................................................................................................................................
Function
22
5.4.2 Adding a Trip/Close
.........................................................................................................................................................
er Function
25
5.4.3 Adding a Raise/Low
Analog Setpoint Function
27
5.4.4 Adding an .........................................................................................................................................................
5.5 Conitel Type Descriptions
.......................................................................................................................................................... 28
......................................................................................................................................................... 29
5.5.1 Notes/Restrictions
6 Baker...................................................................................................................................
Protocol
30
6.1 Bit Ordering, Address
..........................................................................................................................................................
Header, & Notes and Restrictions
31
6.2 Function Codes
..........................................................................................................................................................
and Data Types
32
7 Appendix
...................................................................................................................................
- System Points
33
8 Appendix
...................................................................................................................................
- Conitel Protocol Summary
35
8.1 Conitel Fram es
.......................................................................................................................................................... 36
8.2 Address Header
.......................................................................................................................................................... 37
SCADAPack ER Conitel Slave Interface
I
3
SCADAPack ER Conitel Slave Interface
©2013 Control Microsystems Inc.
All rights reserved.
Printed in Canada.
Version: 8.05.4
The information provided in this documentation contains general descriptions and/or technical
characteristics of the performance of the products contained herein. This documentation is
not intended as a substitute for and is not to be used for determining suitability or reliability of
these products for specific user applications. It is the duty of any such user or integrator to
perform the appropriate and complete risk analysis, evaluation and testing of the products
with respect to the relevant specific application or use thereof. Neither Schneider Electric nor
any of its affiliates or subsidiaries shall be responsible or liable for misuse of the information
contained herein. If you have any suggestions for improvements or amendments or have
found errors in this publication, please notify us.
No part of this document may be reproduced in any form or by any means, electronic or
mechanical, including photocopying, without express written permission of Schneider
Electric.
All pertinent state, regional, and local safety regulations must be observed when installing and
using this product. For reasons of safety and to help ensure compliance with documented
system data, only the manufacturer should perform repairs to components.
When devices are used for applications with technical safety requirements, the relevant
instructions must be followed. Failure to use Schneider Electric software or approved
software with our hardware products may result in injury, harm, or improper operating results.
Failure to observe this information can result in injury or equipment damage.
1
Technical Support
Support related to any part of this documentation can be directed to one of the following
support centers.
4
SCADAPack E Conitel Slave Interface
Technical Support: The Americas
Available Monday to Friday 8:00am – 6:30pm Eastern Time
Toll free within North America
1-888-226-6876
Direct Worldwide
+1-613-591-1943
Email
[email protected]
Technical Support: Europe
Available Monday to Friday 8:30am – 5:30pm Central European Time
Direct Worldwide
+31 (71) 597-1655
Email
[email protected]
Technical Support: Asia
Available Monday to Friday 8:00am – 6:30pm Eastern Time (North America)
Direct Worldwide
+1-613-591-1943
Email
[email protected]
Technical Support: Australia
2
Inside Australia
1300 369 233
Email
[email protected]
Safety Information
Read these instructions carefully, and look at the equipment to become familiar with the
device before trying to install, operate, or maintain it. The following special messages may
appear throughout this documentation or on the equipment to warn of potential hazards or to
call attention to information that clarifies or simplifies a procedure.
The addition of this symbol to a Danger or Warning safety label
indicates that an electrical hazard exists, which will result in personal
injury if the instructions are not followed.
This is the safety alert symbol. It is used to alert you to potential
personal injury hazards. Obey all safety messages that follow this
symbol to avoid possible injury or death.
SCADAPack ER Conitel Slave Interface
5
DANGER
DANGER indicates an imminently hazardous situation which, if not avoided, will
result in death or serious injury.
WARNING
WARNING indicates a potentially hazardous situation which, if not avoided, can
result in death or serious injury.
CAUTION
CAUTION indicates a potentially hazardous situation which, if not avoided, can
result in minor or moderate.
CAUTION
CAUTION used without the safety alert symbol, indicates a potentially hazardous
situation which, if not avoided, can result in equipment damage..
PLEASE NOTE
Electrical equipment should be installed, operated, serviced, and maintained only by qualified
personnel. No responsibility is assumed by Schneider Electric for any consequences arising
out of the use of this material.
A qualified person is one who has skills and knowledge related to the construction and
operation of electrical equipment and the installation, and has received safety training to
recognize and avoid the hazards involved.
BEFORE YOU BEGIN
Do not use this product on machinery lacking effective point-of-operation guarding. Lack of
effective point-of-operation guarding on a machine can result in serious injury to the operator
of that machine.
CAUTION
EQUIPMENT OPERATION HAZARD
Verify that all installation and set up procedures have been completed.
Before operational tests are performed, remove all blocks or other temporary
holding means used for shipment from all component devices.
6
SCADAPack E Conitel Slave Interface
Remove tools, meters, and debris from equipment.
Failure to follow these instructions can result in injury or equipment
damage.
Follow all start-up tests recommended in the equipment documentation. Store all equipment
documentation for future references.
Software testing must be done in both simulated and real environments.
Verify that the completed system is free from all short circuits and grounds, except those
grounds installed according to local regulations (according to the National Electrical Code in
the U.S.A, for instance). If high-potential voltage testing is necessary, follow
recommendations in equipment documentation to prevent accidental equipment damage.
Before energizing equipment:
Remove tools, meters, and debris from equipment.
Close the equipment enclosure door.
Remove ground from incoming power lines.
Perform all start-up tests recommended by the manufacturer.
OPERATION AND ADJUSTMENTS
The following precautions are from the NEMA Standards Publication ICS 7.1-1995 (English
version prevails):
Regardless of the care exercised in the design and manufacture of equipment or in the
selection and ratings of components, there are hazards that can be encountered if such
equipment is improperly operated.
It is sometimes possible to misadjust the equipment and thus produce unsatisfactory or
unsafe operation. Always use the manufacturer’s instructions as a guide for functional
adjustments. Personnel who have access to these adjustments should be familiar with the
equipment manufacturer’s instructions and the machinery used with the electrical
equipment.
Only those operational adjustments actually required by the operator should be accessible
to the operator. Access to other controls should be restricted to prevent unauthorized
changes in operating characteristics.
3
Preface
Purpose
The purpose of this document is to describe the SCADAPack ER RTU driver for the Conitel protocol, and
using it for communicating with Conitel or Baker capable master station equipment.
SCADAPack ER Conitel Slave Interface
7
References
Schneider Electric SCADAPack ER-P620 Processor Hardware Manual
Glossary
The terms in this glossary are described in the context of Conitel operation on SCADAPack E RTUs.
ACRONYM
DESCRIPTION
Byte
Unsigned 8-bit value
CD
Carrier Detect from Modem – connects to serial port CTS
CTS
Clear to send –indicates carrier detected on serial port
COS
Change of state
FC
Function Code in header of a Conitel message
LSB
Least Significant Bit
MSB
Most Significant Bit
PTM
Pre-Transmission Mark
PTT
Push-To-Talk output (for keying transmission)
R/L
Raise / Lower
RTC
Real time clock
RTS
Ready to send – keys an external Conitel modem
Word
Unsigned 16-bit value
8
4
SCADAPack E Conitel Slave Interface
Overview
Conitel is a half duplex (master/slave) bit-stream protocol developed by Leeds & Northrup. It is in wide
use internationally, providing communication with RTU devices.
This document describes how the SCADAPack E firmware on the SCADAPack ER - P620 Processor
Module communicates as a slave unit on a Conitel network.
The SCADAPack ER - P620 processor interfaces to Conitel communication circuits through V.28
(RS232 level) serial interfaces (see the SCADAPack ER - P620 hardware manual for more information).
Up to 4 Conitel communication interfaces are supported simultaneously on the SCADAPack ER - P620
processor.
Operation with ITU-T V.23 or Bell-202 (FSK) interfaces for leased circuits requires the use of external
modems.
Baker protocol is a variant of Conitel, compatible at the physical and framing level, and utilizing some of
the same concepts as the Conitel protocol. The SCADAPack E firmware supports both Conitel and
Baker protocol. Although the SCADAPack E configuration selects either Conitel or Baker operation,
throughout this document the use of the both Conitel and Baker protocol is generally referred to simply
as “Conitel”. See Section Baker Protocol 30 for information specific to Baker protocol.
This document outlines the following:
Description of the Conitel and Baker protocols
Physical interfaces to the Conitel network
Mapping of Conitel data to SCADAPack E RTU points
Processing and responding to received messages in the SCADAPack E firmware
The Conitel Slave protocol is supported on multiple ports on the SCADAPack ER - P620 processor
module. Any combination of Ports 5~8 can be used. Where multiple Conitel ports are used
simultaneously, they access a single RTU Conitel configuration and mapping database.
SCADAPack ER Conitel Slave Interface
5
Conitel Protocol Configuration
Supported Function Codes
Physical Interface
10
14
Conitel Port Configuration
15
Conitel Slave Point Mapping
Conitel Type Descriptions
28
19
9
10
5.1
SCADAPack E Conitel Slave Interface
Supported Function Codes
The Function Codes (FC) that are supported by the SCADAPack E Conitel driver are outlined in the
following table:
Table 5.1: Conitel Function Codes
Fn Code (Hex)
0
FUNCTION
Scan
NOTES
Configurations for Responses to Scan are
detailed in Section Adding a Scan Function
20
1
Execute
2
Trip
Only 1 bit can be controlled in each Trip
message. See Section Adding a Trip/Close
Function 22
3
Setpoint (A)
See Section Adding an Analog Setpoint
Function 27
4
Close
Only 1 bit can be controlled in each Close
message. See Section Adding a Trip/Close
Function 22
5
Setpoint (B)
See Section Adding an Analog Setpoint
Function 27
6
--------
7
--------
8
--------
9
Master Station Request
See Table 5.2: Function 9 Group Codes
for Group Codes
A
New SOE Events
Configurations for SOE points are detailed in
Section Adding a Scan Function 20
B
Repeat SOE Events
C
--------
D
Unit Raise/Lower
E
Freeze and Scan Accumulators
See Section Adding a Scan Function
mapping Accumulators to scan groups
20
for
F
Freeze/Scan Accumulators and
Reset
See Section Adding a Scan Function
mapping Accumulators to scan groups
20
for
11
When a Raise/Lower is currently being
executed, a concurrently received Raise/Lower
command replaces the in-progress command.
Configuration is described in Section Adding
a Raise/Lower Function 25
SCADAPack ER Conitel Slave Interface
11
Table 5.2: Function 9 Group Codes
Group
Function
Code
Supported
Notes
0
Unused
1
Test RAM
Returns good
2
Test PROM checksum
Returns good
3
Test EPROM checksum
Returns good as Conitel driver only
boots if check passes
4
Test I/O Controller Data Bus
Returns the state of the RTU's I/O
Processing CPU
5
Download Data (Download Time)
6
Unused
7
Unused
8
Remote Status Request
See Table 5.3 Remote Status
Information 12 for supported status
bits
9
Read Input Directly
Not implemented
A
Read Comms parameters and time
correction factor.
B
Repeat last message
C
Unused
D
Loop-back mode
E
‘Warm’ Restart RTU
Sends an RTU hardware Restart
F
‘Cold’ Restart RTU
Sends an RTU hardware Restart
Valid if previous message has been
sent
12
SCADAPack E Conitel Slave Interface
Table 5.3: Remote Status Information
Fn 9 Group 8 Remote Status Frame Bits
Bit
Description
SCADAPack ER P620 Notes
1-4 (MSBs)
Error Code
See Table 5.4: Remote Status Frame Error Code
12 for error codes
5
Controls Isolated
Not supported
6
RTU Reset has occurred
Returns True (1) on the first status request after a
reset then False (0) thereafter
7
Field Interrogator Supply is low.
Not implemented (0)
8
Power low
Internal Battery low or Input Supply low
9
Accumulator Overflow Change.
10
Accumulator Overflow Status.
These 2 bits are represented by ‘one-bit MCD’ data
type
11
SOE events overflow
Set if Conitel Event buffer has filled
12 (LSB)
SOE events present
Set when a Conitel event is generated. Cleared
when all Conitel events are read
Table 5.4: Remote Status Frame Error Code
Fn 9 Group 8 Remote Status Frame 4-bit Error Code value
Error code
(Hex)
Description
SCADAPack ER - P620 Notes
0
Normal Operation
1
Power fail
2
Spare
3
Control Error
Set if control cannot be executed. E.g. if sent to
a point under ISaGRAF control, or point not
configured correctly
4
Comms Error
Not implemented
5
Configuration/Scan Error
Set if there is an error in the Conitel table
configuration.
6
Timer Overrun
Not implemented
7
Address Error
Not implemented
8
Bus Error
Not implemented
From power low bits (see table above)
SCADAPack ER Conitel Slave Interface
9
Software Error
Set if a software watchdog was previously
detected (and not cleared)
A
Spare
B
RAM Error
Not implemented
C
I/O Controller Hardware error
Set if an error is returned from RTU’s I/O
processing CPU
D
Configuration PROM Checksum test Not implemented
failure
E
Program PROM Checksum test
failure
F
Reset Operation (Fn 9, Code E or F) Not implemented
in progress.
Not implemented
13
14
5.2
SCADAPack E Conitel Slave Interface
Physical Interface
The physical interface provided by the SCADAPack ER - P620 processor for Conitel ports is 4 x RJ-12
ports, using V.28 (RS232 levels). These can be used on a direct V.28 Conitel interface, or connected to
a V.23 or Bell 202 modem. Conitel is usually transmitted over 4-wires using Bell 202 or ITU-T V.23 at
1200 baud. The RTS line from the RJ-12 port acts as RTS (also known as PTT) for the modem. The CTS
line on the RJ-12 port is used as a CD line from the modem.
See the SCADAPack ER Hardware User Manual for cable wiring information for RJ-12 ports.
Two configuration parameters are provided for each Conitel port: PTM Time and Squelch Time. For
received Conitel data to be validated, the carrier needs to be received for a period longer than the
configured Squelch Time, and the data needs to pass the Conitel framing checks.
When transmitting messages out a Conitel port, the driver will first key the RTS line and then assert the
PTM for the configured length of time. See Section Communication Timing & Control/Execute
Timeout (Communication Timing) 17 for more information.
SCADAPack ER Conitel Slave Interface
5.3
15
Conitel Port Configuration
To configure a SCADAPack ER - P620 processor for Conitel operation, select the SCADAPack ER then
P620 model processor module when you first start SCADAPack E Configurator.
You can also select this later by using “View->Change RTU Model…” and select SCADAPack ER, then
SCADAPack ER - P620.
On the “Ports 5-8” page, configure at least one port for Conitel Slave. Set the required Conitel
configurations, as in the example below. Download the configurations to the RTU when you have
completed the RTU configuration.
Connect the SCADAPack ER - P620 processor to a suitable V.28 interface, V.23 or Bell 202 modem
using the hardware lines as described in Section Physical Interface 14 .
Figure 5.1: Conitel Port Configuration
PTM and Squelch & Control/Execute Timeout
Communication Timing & Protocol Select
16
17
Function 9 Address & Raise/Lower Control Settings
18
16
5.3.1
SCADAPack E Conitel Slave Interface
PTM and Squelch & Control/Execute Timeout
PTM and Squelch
The PTM and Squelch values required will depend on the physical network that you are transmitting
across. The PTM is transmitted at the start of a message and its value is dependant on the
transmission delays across the network and the delays inherent in stabilizing transmitting and receiving
modems. The Squelch time is used to determine if a valid message is being received. When Carrier
Detect is received by the RTU, the Conitel driver will verify that the inbound PTM is longer than the
configured Squelch. It does this by starting the squelch timer following reception of the CTS (CD) signal,
then starts looking for a Conitel frame Start Bit following the squelch time period. The Squelch time at
the receiver is therefore dependent on not only the transmission times on the network, but also the PTM
at the other (transmitting) end. See Figure 5.2 Conitel Communication Timing 17 .
Control/Execute Timeout
This timer is started when a valid Trip/Close or Setpoint A/B function code is received. If the
corresponding Execute command is not received within this timeout, then the control is discarded.
SCADAPack ER Conitel Slave Interface
5.3.2
17
Communication Timing & Protocol Select
Communication Timing
The following diagrams show the relationship between the various timing parameters
Figure 5.2: Conitel Communication Timing
For information on Post Transmission Mark (Post TM) parameters, see Section Appendix - System
Points 33 (Post Transmission Mark) 33 .
Protocol Select
Select whether the system is running Conitel or Baker protocol. Also see Section Baker Protocol
30
.
18
5.3.3
SCADAPack E Conitel Slave Interface
Function 9 Address & Raise/Lower Control Settings
Function 9 Address
This address needs to be configured if you require the SCADAPack E firmware Conitel driver to respond
to Conitel Function 9 requests. If configured, then this RTU will respond to Function 9 requests directed
at this address.
As the SCADAPack E firmware Conitel driver can respond to multiple Conitel Station and Group
addresses (see below), this field is available to allow operation of Function 9 in conjunction with multidropping of RTU’s.
Raise/Lower Control Settings
These settings relate to Raise/Lower (R/L) controls. A Raise/Lower control for a single point in Conitel
consists of 4-bits of information. One bit determines whether it is a raise or lower control, and the other
three bits determine the number of periods (N) to pulse the point for. The total period of time that the
point is pulsed, is calculated by the following formula:
Pulse Period = R/L Offset(ms) + (R/L Timebase x N)(ms).
For example, if R/L Offset = 250ms and R/L Timebase = 150ms, then for a Raise control received with
N=3, the Raise output will be pulsed for 250 + 150*3 = 700ms.
Generally, R/L controls are used so that a Raise command pulses one physical output point, and a
Lower command pulses a different physical output point. However, R/L controls may be passed through
a data concentrator to remote devices. See Section Adding a Raise/Lower Function 25 for further
information on point mapping for Raise / Lower controls.
SCADAPack ER Conitel Slave Interface
5.4
19
Conitel Slave Point Mapping
To map RTU points through to the Conitel Slave interface, a “Conitel Slave” page is provided in the RTU
configuration software. To access this page, check that the hardware type is set as SCADAPack ER P620 in the “Change RTU Model” wizard and that Conitel Slave is also selected in the “RTU Features”
dialog.
The Conitel Slave page consists of 2 graphical tables:
The first table is used for adding station/groups that the RTU is to respond to for various function
codes. Once a station/group/function entry has been added to this table, then points can be mapped
to it using the Point Mapping table.
This second table maps RTU points to positions in the selected Conitel response frame.
Figure 5.3: Conitel Point Configuration
The following functions are supported for Conitel station/group entries:
Scan Fn
Trip/Close Fn
Raise/Lower Fn
Setpoint Fn
The function menu includes “Reset Fn (Baker)” but this is specifically for Baker protocol only (see
Section Function Codes and Data Types [Reset] 32 ) and is not supported by Conitel.
Adding a Scan Function
20
Adding a Trip/Close Function
22
Adding a Raise/Lower Function
25
Adding an Analog Setpoint Function
27
20
5.4.1
SCADAPack E Conitel Slave Interface
Adding a Scan Function
Press the “Add Group” button and select Scan Fn as the Response Type. Give the response group
appropriate Conitel Station and Group numbers. A new row will be added to the table on the left. Select
this row and then the available 31 frames will be shown in the Point Mapping table on the right.
RTU points can now be added to the Scan response Point Mapping table by first selecting a Type from
the available drop-down list and then attaching an appropriate RTU database point for this type.
For a list and description of the various Conitel Point types see Table 5.7 Conitel Point Type
28
.
Figure 5.4: Scan Function Configuration
The following restrictions apply when selecting the Conitel Type:
A Conitel scan response can maximally return 31 frames. Each frame contains 12 bits
Frames containing user specified data are labeled 1B, 2A, 2B, …. 16A, 16B
SOE ID’s can only be set when the Conitel Type is binary (i.e. 1-bit binary or 2-bit MCD). Each RTU
has a limit of 120 unique SOE ID’s
2-Bit MCD types consume 2-bits in the frame, and can only be located at odd bit numbers in the
frame
Analog points, Status frame, and 12-bit Accumulators consume a whole frame (12-bits). The
remainder of the bits in the frame will not be shown if these types are selected. They can only be
selected on the first bit in a frame
The status register does not require a database point number
RTU database Analog Point scaling should be used to scale physical analog inputs into the 12-bit
SCADAPack ER Conitel Slave Interface
21
range -2048 to 2047.
24-bit Accumulators consume 2 frames. This type also can only be located as the first bit in a
frame, and it cannot be located in the last frame (frame 16B).
RTU Database points are selected by their DNP3 address (even if they are not being used for DNP3
communications)
If the selected point currently does not exist in the RTU point database, then the user will be prompted
to add the point, if desired.
22
5.4.2
SCADAPack E Conitel Slave Interface
Adding a Trip/Close Function
Press the “Add Group” button and select Trip/Close Fn as the Response Type. Give the response
group appropriate Conitel Station and Group numbers. Select this row in the response group table, and
then the available frame will be shown in the Point Mapping table on the right hand side. Trip/Close
controls can only utilize 12 control points (i.e. a single frame).
To pulse physical output points using the Trip/Close function code, two points are required in the
SCADAPack E RTU database. A main point and a partner point needs to be configured. In this case,
the pulse duration for the outputs is determined by the output point’s configured “Output Pulse Time”
attribute, which needs to be non-zero to operate correctly.
Figure 5.5: Trip/Close Function Configuration
Conitel Trip/Close commands may operate as Pulse, Latch or Unlatch commands to the SCADAPack E
RTU or RTUs remote from the RTU using Conitel, depending upon the configuration of the mapped
SCADAPack E RTU points. See Table 5.5 23 .
Where SCADAPack E RTU is used as a Conitel Slave and where points on its local output modules are
used for Trip / Close commands, the 2 Trip points need to be configured as partner points in the RTU.
Only one of the two points needs to be mapped to the Trip/Close control in the RTU configuration. For
more information on partner points see the SCADAPack E Configuration Technical Reference.
Where an SCADAPack E RTU is used as a Conitel Slave and a data concentrator to other devices (e.g.
DNP3 RTUs), a partner point MAY be defined but is NOT required to be defined for Trip / Close controls.
This allows controls to be sent to remote RTU devices using either “single index” or “dual index”
addressing.
SCADAPack ER Conitel Slave Interface
23
The following table describes the result of receiving Conitel Trip / Close controls.
Table 5.5: SCADAPack E RTU Trip / Close Command Results
Operation as /
Output point
location
End node RTU /
Physical output
on RTU module
Conitel Output point’s
Control
Pulse Time
Receiv
field value:
ed
TRIP
Non-zero
Output point’s
Partner Point
Result
field value:
Valid index of
partner point
(not 65535)
Timed PULSE operation on
the physical output point
(lowest point number of the
partner point pair)
MANDATORY
CLOSE
Non-zero
Valid index of
partner point
(not 65535)
Timed PULSE operation on
the physical output point
(highest point number of the
partner point pair)
MANDATORY
End node RTU /
Physical output
on RTU module
TRIP
CLOSE
Data concentrator TRIP
/ Output on
remote RTU
CLOSE
Data concentrator TRIP
/ Output on
remote RTU
CLOSE
Data concentrator TRIP
/ Output on
remote RTU
CLOSE
0
IGNORED
UNLATCH operation on the
local output point mapped in
the Conitel Slave table
IGNORED
LATCH operation on the local
output point mapped in the
Conitel Slave table
0
Non-zero
65535 (disabled)
Timed DNP3 TRIP command
sent to (single index) remote
RTU point
Non-zero
65535 (disabled)
Timed DNP3 CLOSE
command sent to (single
index) remote RTU point
Non-zero
Valid index of
partner point
(not 65535)
Timed TRIP command sent to
(dual index) remote RTU
output point equivalent to
lowest point number of the
partner point pair
Non-zero
Valid index of
partner point
(not 65535)
Timed CLOSE command
sent to (dual index) remote
RTU output equivalent to the
highest point number of the
partner point pair
0
IGNORED
UNLATCH command sent to
remote RTU point
0
IGNORED
LATCH command sent to
24
SCADAPack E Conitel Slave Interface
Operation as /
Output point
location
Conitel Output point’s
Control
Pulse Time
Receiv
field value:
ed
Output point’s
Partner Point
Result
field value:
remote RTU point
SCADAPack ER Conitel Slave Interface
5.4.3
25
Adding a Raise/Lower Function
Press the “Add Group” button and select Raise/Lower Fn as the Response Type. Give the response
group appropriate Conitel Station and Group numbers. Select this row in the response group table, then
the available frame will be shown in the Point Mapping table on the right hand side. Raise/Lower
controls from the master can only utilize 3 control points, as each control in the frame uses 4-bits.
For the pulse to work correctly in Raise/Lower controls, the appropriate timing parameters need also be
setup (see Section Function 9 Address & Raise/Lower Control Settings 18 [Raise/Lower Control
Settings] 18 ).
Figure 5.6: Raise/Lower Function Configuration
Where an RTU is used as a Conitel Slave and where points on its physical output modules are used for
R/L commands, the 2 R/L points needs to be configured as partner points in the RTU. Only one of the
two points needs to be mapped to the R/L control in the RTU configuration. For more information on
partner points see the SCADAPack E Configuration Technical Reference.
Where an SCADAPack E RTU is used as both a Conitel Slave and a data concentrator to other devices
(e.g. DNP3 RTUs), a partner point MAY be defined but is NOT required to be defined for R/L controls.
This allows controls to be sent to remote RTU devices using either “single index” or “dual index”
addressing.
The following table describes the result of receiving Conitel Raise / Lower controls.
Table 5.6: SCADAPack E RTU Raise / Lower Command Results
Operation as /
Output point
location
End node RTU /
Physical output
Physical RTU
module
Conitel Output point’s
Control
Partner Point
Received
field value:
RAISE
Valid index of
partner point
(not 65535)
Result
Timed PULSE operation on the
physical output point (lowest point
number of the partner point pair)
MANDATORY
LOWER
Valid index of
Timed PULSE operation on the
26
SCADAPack E Conitel Slave Interface
partner point
(not 65535)
physical output point (highest point
number of the partner point pair)
MANDATORY
Data concentrator RAISE
/ Output on
remote RTU
LOWER
Data concentrator RAISE
/ Output on
remote RTU
LOWER
65535
(disabled)
DNP3 CLOSE command with
calculated pulse time sent to (single
index) output point on remote RTU
65535
(disabled)
DNP3 TRIP command with
calculated pulse time sent to (single
index) output point on remote RTU
Valid index of
partner point
(not 65535)
DNP3 CLOSE command with
calculated pulse time sent to (dual
index) remote RTU output point
equivalent to the highest point
number of the partner point pair
Valid index of
partner point
(not 65535)
DNP3 TRIP command with
calculated pulse time sent to (dual
index) remote RTU output equivalent
to the (lowest point number of the
partner point pair)
SCADAPack ER Conitel Slave Interface
5.4.4
27
Adding an Analog Setpoint Function
Press the “Add Group” button and select Setpoint Fn as the Response Type. Give the response group
appropriate Station and Group numbers. Select this row in the response group table, and then the
available frames will be shown in the Point Mapping table on the right hand side. There are 2 separate
Analog setpoints available for each Station/Group combination. These are referred to as Setpoint A and
Setpoint B controls and they utilize different function codes in the Conitel protocol. Each setpoint may
be mapped to an SCADAPack E RTU database analog point.
Figure 5.7: Analog Setpoint Function Configuration
28
5.5
SCADAPack E Conitel Slave Interface
Conitel Type Descriptions
The table below outlines the various Conitel data Types available when mapping SCADAPack E RTU
points to Conitel frames.
Table 5.7: Conitel Point Types
Conitel Type
Description
Number of
bits
Notes
NIL
1-Bit Binary
Single binary value
1
2-Bit MCDA
Binary
OFF to ON transition detection. Status
of input is inverted
2
2-Bit MCDB
Binary
ON to OFF transition detection
2
2=Bit MCDC
Binary
More than 1 transition detected
2
12-Bit ANALOG Analog point (range –2048~2047)
12
12-Bit
Accumulator
Accumulator (range 0~4095)
12
24-Bit
Accumulator
Accumulator (range 0~16777216)
24
TRIP/CLOSE
Output
Digital Output bit – single binary
ANALOG
Output
Analog Output point (range 0~4095)
RAISE/LOWER Raise/Lower pulsed output
Output
STATUS Frame RTU status frame (known as Conitel
Remote Status) - see Table 5.3
Remote Status Information 12
Must be allocated
to an odd bit
number in the
configuration
1
12
4
12
Status frame can
only be mapped
once in an
SCADAPack E
RTU
MCD = Momentary Change Detect. MCDA = MCD type A; MCDB = MCD type B; MCDC = MCD type C.
Notes/Restrictions 29
SCADAPack ER Conitel Slave Interface
5.5.1
29
Notes/Restrictions
The RTU’s Conitel driver performs configuration validation on start-up. RTU Error Code 3005 is generated
if a Conitel configuration is found to be invalid.
The following items describe the operation of the SCADAPack E RTU Conitel driver:
Station address 0 will be processed by the RTU as this is a broadcast address. No response will be
generated.
If the Conitel Driver encounters an error while in the process of decoding or responding to a valid
request from the master station, then it will cancel the current transmission (i.e. drop PTT).
The SOE buffer in the Conitel driver will store up to 500 events. There are 2 of these buffers, one for
the current (unreported) events, and one for the previously reported events (used with Function Code
B).
A ‘frozen accumulator’ buffer stores the last frozen accumulator values.
When FC 9 is used then the Group address becomes a sub-code. This means that the only way to
identify a device address for a FC 9 request is by using the Station address bits. However, multiple
physical devices may share the same Station address so they would respond to a FC 9 request at a
given Station address. (In many cases devices are segregated by Station address AND Group
address. In the case of FC 9 the group address is used for a different purpose, potentially causing a
problem). A separate FC 9 address configuration is provided by the SCADAPack E RTU to
overcome this. Where function code 9 is used in a system, the configuration of this field needs to be
unique between RTUs multi-dropped on the same Conitel communications link.
Accumulators that internally can have values larger than their type can represent (i.e. either larger
than 12 or 24 bits) will wrap when the limit for that type is reached. I.e. the least significant 12 or 24
bits will be presented.
If a Raise or Lower operation for a given point is already executing and concurrently a new Raise or
Lower command is received for the same point, the SCADAPack E RTU will replace the currently
executing operation with the newly received operation, as per the Conitel specification.
Raise/Lower command: A Raise command translates to a CLOSE control when mapped to other
protocols in an SCADAPack E RTU (DNP3, IEC60870-5 suite, etc). A Lower command translates to
a TRIP control.
30
6
SCADAPack E Conitel Slave Interface
Baker Protocol
The Baker Slave Protocol is very similar to the Conitel Slave Protocol. The RTU’s Conitel Driver can be
configured to interpret frames in Baker compatible format. This section outlines the differences in the
two protocols, and the aspects of the configuration that change when Baker Protocol is selected.
Bit Ordering, Address Header, & Notes and Restrictions
Function Codes and Data Types
32
31
SCADAPack ER Conitel Slave Interface
6.1
31
Bit Ordering, Address Header, & Notes and Restrictions
Bit Ordering
In Baker Protocol, the bits in each frame are numbered 12(MSB) – 1(LSB), with bit 12 is the first bit
transmitted. This is the opposite of the Conitel Protocol which numbers 1(MSB) – 12(LSB) and
transmits bit 1 first. The Conitel Point Mapping table has bit numbers going from 1(MSB) to 12(LSB).
The user needs to be aware of this and convert numbering in the Point Mapping table appropriately when
using Baker protocol.
Address Header
The Address Header frame has 3-bits for the function code, 6-bits for the Station Address, and 3-bits for
the Set Address. The most significant bit of the station address is set aside for the execute function
code (see Section Select Execute 32 ). The functions codes specified for the first 3-bits match the
same function codes as described by the Conitel Protocol above. The 5-bit Station Address specifies
one of up to 32 RTU’s on a communication channel.
The Set Address for the Baker Protocol selects which particular set of inputs or outputs are to be
accessed. Typically, Baker protocol requires mapping as follows:
000 – AI Scan (or Control Activate)
001 – 1st set of 12 control points available for Trip/Close
010 – 2nd set…
011 – 3rd set…
100 – 4th set…
101 – 5th set…
110 – MCD and SDI Scan
111 – SDI Scan
Notes and Restrictions
When selected for operation with the Baker protocol, the following Conitel configurations are not used
(as they are not supported by Baker protocol):
Fn9 Address
R/L Timebase
R/L Offset
The RTU’s Conitel / Baker driver performs configuration validation on start-up. RTU Error Code 3006 is
generated if a data type is configured that is not supported by Baker protocol.
32
6.2
SCADAPack E Conitel Slave Interface
Function Codes and Data Types
The Baker protocol supports the following Function Codes:
0 – Scan
1 – Execute
2 – Trip
4 – Close
8 – Reset
The user should not configured other Function Codes (i.e. Raise/Lower and Setpoint functions are not
supported in Baker protocol mode)
Scan
The data types supported for the Scan function with Baker protocol are:
BIN1 – Single bit binaries
MCC – Multiple change detect
ANALOG – Signed 12-bit analog
STATUS – 12-bit Status register supported
The user should not configure other data types when using Baker protocol.
Select Execute
The most significant bit of the BAKER address bits is set aside for the EXECUTE command. This is
issued following a TRIP/CLOSE select. This effectively means the function code is a 4-bit number and
an execute command will set the first bit (along with the select function code).
For example, when a Select/Execute control is performed on the RTU, the sequence of function codes
sent to the RTU would be:
For a TRIP, fn code 0x2, followed by an EXECUTE-TRIP fn code 0x3.
For a CLOSE, fn code 0x4, followed by an EXECUTE-CLOSE fn code 0x5.
The SCADAPack E firmware manages the Baker protocol differences for Execute. The user does not
required to make any additional considerations compared with its use with Conitel protocol.
Reset
The RESET function code will send a pulse command to the mapped RTU database point. For this
control to work successfully, the point configuration for the output point needs to include a pulse time.
The Reset command will operate in the RTU without receiving an Execute command.
SCADAPack ER Conitel Slave Interface
7
33
Appendix - System Points
Configuration System Points
The following table defines the SCADAPack E Conitel driver configuration System Points. These points
are 16-bit analogs.
Table 7.1: SCADAPack E Conitel Slave RTU System Points
DNP Point
Number
Default
Value
Name
57300
200
Port 5 PTM
Pre-transmission mark (ms)
57301
200
Port 6 PTM
Pre-transmission mark (ms)
57302
200
Port 7 PTM
Pre-transmission mark (ms)
57303
200
Port 8 PTM
Pre-transmission mark (ms)
57304
10
Port 5 Squelch
Squelch time (ms)
57305
10
Port 6 Squelch
Squelch time (ms)
57306
10
Port 7 Squelch
Squelch time (ms)
57307
10
Port 8 Squelch
Squelch time (ms)
57308
10
Ctrl Execute
Timeout
Timeout between a control and execute (S)
57309
0
Fn 9 Address
Address to respond to Fn 9 requests
57310
100
R/L Timebase
Raise Lower Timebase (see Section Function 9
Address & Raise/Lower Control Settings [Raise/
Lower Control Settings] 18 )
57311
100
R/L Offset
Raise Lower Offset (see Section Function 9
Address & Raise/Lower Control Settings [Raise/
Lower Control Settings] 18 )
57312
0
Protocol
Select between slave protocols:
0 – Conitel Slave
1 – Baker Slave
57313
1
Port 5 Post TM
Post-transmission mark (ms)
57314
1
Port 6 Post TM
Post-transmission mark (ms)
57315
1
Port 7 Post TM
Post-transmission mark (ms)
57316
1
Port 8 Post TM
Post-transmission mark (ms)
Post Transmission Mark
Description
34
SCADAPack E Conitel Slave Interface
The Post Transmission Mark parameters shown in Table 7.1 SCADAPack E Conitel Driver System
Points 33 are not brought out to the RTU Configuration software directly. In many circumstances the
default value for a port’s Post TM is sufficient (1 ms). However, if data corruption is occurring at the end
of messages, this time can be extended by setting the RTU System point for the appropriate port.
Also see communication-timing diagrams in Section Communication Timing & Protocol Select
(Communication Timing) 17 .
SCADAPack ER Conitel Slave Interface
8
Appendix - Conitel Protocol Summary
Conitel Frames 36
Address Header
37
35
36
8.1
SCADAPack E Conitel Slave Interface
Conitel Frames
The Conitel protocol is a bit-wise protocol where 32-bits comprise a Block. In a single Conitel message
there is a maximum of 16 Blocks (therefore maximum Conitel message size is 512 bits).
The first Conitel 32-bit Block has the following format. The PTM and Start-bit are not included in
subsequent Blocks:
Figure 8.1: Conitel Header Block
The PTM and Start-bit pre-pend the first Block in a message. The Start-bit is 0.
The first A Section of a message will be an address header frame (see Section Address Header 37 ),
then subsequent Sections will be data (Sections are also referred to as Frames). The A-bit will be 0 if
the A-section contains the address header or 1 otherwise for data sections.
The B Section contains data. The B-bit is zero.
The BCH is a cyclic error check algorithm, but can be conveniently calculated by XORing the values
from the following table if the corresponding bit in the message is set:
Table 8.1: BCH Codes
Bit
Code
Bit
Code
Bit
Code
Bit
Code
A1
12
A8
0F
B1
13
B8
11
A2
09
A9
15
B2
1B
B9
1A
A3
16
A10
18
B3
1F
B10
0D
A4
0B
A11
0C
B4
1D
B11
14
A5
17
A12
06
B5
1C
B12
0A
A6
19
B6
0E
A7
1E
B7
07
B-bit
05
A-bit
03
The EOM bit is 1 for the final Block in the message, or 0 otherwise.
SCADAPack ER Conitel Slave Interface
8.2
37
Address Header
The address is always the first frame in a message. The format of the 12-bit address header is as
follows:
Figure 8.2: Conitel Address Header
The Function Codes are described below.
The Conitel protocol allows for 15 Station Addresses (1-15) with 0 reserved for a broadcast address.
Each of these 15 individual station addresses can utilize 16 separate Groups. In theory, this means that
the 240 unique 8-bit Station/Group numbers can be used for logical RTU’s, or, conversely, a single RTU
may be configured to respond to up to 240 combinations.
38
SCADAPack E Conitel Slave Interface