1
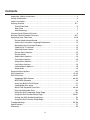
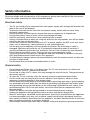
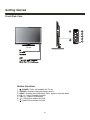
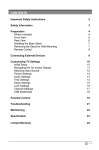
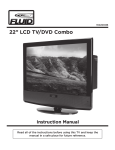
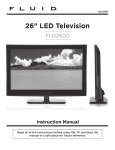
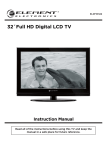
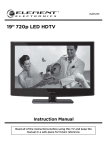
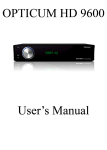
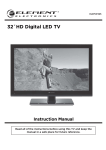
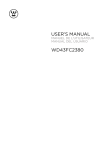
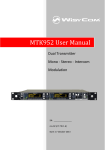
8008201A
24 LED Combo
Television/DVD Player
FLDC 2400
Instruction Manual
Read all of the instructions before using this TV and keep the
manual in a safe place for future reference.
Important Safety Instructions
• Read these instructions – All the safety and operating instructions should be read before this product is
operated.
• Keep these instructions – The safety and operating instructions should be retained for future reference.
• Heed all warnings – All warnings on the appliance and in the operating instructions should be adhered to.
• Follow all instructions – All operating and use instructions should be followed.
• Do not use this apparatus near water – The appliance should not be used near water or moisture – for
example, in a wet basement or near a swimming pool, and the like.
• Clean only with dry cloth.
• Do not block any ventilation openings. Install in accordance with the manufacture’s instructions.
• Do not install near any heat sources such as radiators, heat registers, stoves, or other apparatus (including
amplifiers) that produce heat.
• Do not defeat the safety purpose of the polarized or grounding plug. A polarized plug has two blades
with one wider than the other. A grounding plug has two blades and a third grounding prong. The wide
blade or the third prong is provided for your safety. If the provided plug does not fit into your outlet,
consult an electrician for replacement of the obsolete outlet.
• Protect the power cord from being walked on or pinched particularly at the plugs, convenience
receptacles, and at the point where they exit from the apparatus.
• Only use attachments/accessories specified by the manufacturer.
• Use only with the cart, stand, tripod, bracket, or table specified by the manufacturer,
or sold with the apparatus. When a cart or rack is used, use caution when moving
the cart/apparatus combination to avoid injury from tip-over.
• Unplug the apparatus during lightning storms or when unused for long periods of time.
• Refer all servicing to qualified personnel. Servicing is required when the apparatus has been damaged in
any way, such as power supply cord or plug is damaged, liquid has been spilled or objects have fallen into
the apparatus has been exposed to rain or moisture, does not operate normally, or has been dropped.
• Please keep the unit in a well-ventilated environment.
• WARNING: To reduce the risk of fire or electric shock, do not expose this apparatus to rain or moisture.
The apparatus shall not be exposed to dripping or splashing and that objects filled with liquids, such as
vases, shall not be placed on apparatus.
• WARNING: The main plug is used as disconnect device, the disconnect device shall remain readily
operable.
• WARNING: The batteries shall not be exposed to excessive heat such as sunshine, fire or the like.
• This lightning flash with arrowhead symbol within an equilateral triangle is intended to alert the user
to the presence of non-insulated “dangerous voltage” within the product’s enclosure that may be of
sufficient magnitude to constitute a risk of electric shock.
• To reduce the risk of electric shock, do not remove cover (or back) as there are no user-serviceable parts
inside. Refer servicing to qualified personnel.
• The exclamation point within an equilateral triangle is intended to alert the user to the presence of
important operating and maintenance instructions in the literature accompanying the appliance.
• Adapter model: AY036A-A120US
Adapter company: Dongguan Aoyuan Electronic Technology Co.,Ltd
2
Contents
Important Safety Instructions. . . . . . . . . . . . . . . . . . . . . . . . . . . . . . . . . . . . . . . . . . . . . . 2
Safety Information. . . . . . . . . . . . . . . . . . . . . . . . . . . . . . . . . . . . . . . . . . . . . . . . . . . . . . . 4
What’s Included. . . . . . . . . . . . . . . . . . . . . . . . . . . . . . . . . . . . . . . . . . . . . . . . . . . . . . . . . 5
Getting Started. . . . . . . . . . . . . . . . . . . . . . . . . . . . . . . . . . . . . . . . . . . . . . . . . . . . . . . . 6-7
Front/Side View. . . . . . . . . . . . . . . . . . . . . . . . . . . . . . . . . . . . . . . . . . . . . . . . . . . . . 6
Rear View . . . . . . . . . . . . . . . . . . . . . . . . . . . . . . . . . . . . . . . . . . . . . . . . . . . . . . . . . . 7
Wall Mounting. . . . . . . . . . . . . . . . . . . . . . . . . . . . . . . . . . . . . . . . . . . . . . . . . . . . . . . 7
Connecting to External Devices. . . . . . . . . . . . . . . . . . . . . . . . . . . . . . . . . . . . . . . . . . . . 8
Remote Control Button Functions. . . . . . . . . . . . . . . . . . . . . . . . . . . . . . . . . . . . . . . . 9-11
Operating Your Television. . . . . . . . . . . . . . . . . . . . . . . . . . . . . . . . . . . . . . . . . . . . . . 12-19
Picture Mode Setup Wizard . . . . . . . . . . . . . . . . . . . . . . . . . . . . . . . . . . . . . . . . . . 12
Select Your Onscreen Language Preference . . . . . . . . . . . . . . . . . . . . . . . . . . . . 13
Navigating the Onscreen Display. . . . . . . . . . . . . . . . . . . . . . . . . . . . . . . . . . . . . . 14
Choosing a TV Channel. . . . . . . . . . . . . . . . . . . . . . . . . . . . . . . . . . . . . . . . . . . . . . 14
Selecting Input Source . . . . . . . . . . . . . . . . . . . . . . . . . . . . . . . . . . . . . . . . . . . . . . 15
Picture Menu Options . . . . . . . . . . . . . . . . . . . . . . . . . . . . . . . . . . . . . . . . . . . . . . . 15
Picture Mode. . . . . . . . . . . . . . . . . . . . . . . . . . . . . . . . . . . . . . . . . . . . . . . . . . . . . . . 15
Audio Menu Options . . . . . . . . . . . . . . . . . . . . . . . . . . . . . . . . . . . . . . . . . . . . . . . . 16
Time Menu Options . . . . . . . . . . . . . . . . . . . . . . . . . . . . . . . . . . . . . . . . . . . . . . . . . 16
Setup Menu Options. . . . . . . . . . . . . . . . . . . . . . . . . . . . . . . . . . . . . . . . . . . . . . . . .17
Lock Menu Options . . . . . . . . . . . . . . . . . . . . . . . . . . . . . . . . . . . . . . . . . . . . . . . . . 18
Channel Menu Options. . . . . . . . . . . . . . . . . . . . . . . . . . . . . . . . . . . . . . . . . . . . . . . 19
Show/Hide. . . . . . . . . . . . . . . . . . . . . . . . . . . . . . . . . . . . . . . . . . . . . . . . . . . . . . . . . 19
Parental Menu Options . . . . . . . . . . . . . . . . . . . . . . . . . . . . . . . . . . . . . . . . . . . . . . . . . . 20
DVD Operation. . . . . . . . . . . . . . . . . . . . . . . . . . . . . . . . . . . . . . . . . . . . . . . . . . . . . . 21-23
DVD Functions . . . . . . . . . . . . . . . . . . . . . . . . . . . . . . . . . . . . . . . . . . . . . . . . . . . . . . 24-31
Supported DVD Format. . . . . . . . . . . . . . . . . . . . . . . . . . . . . . . . . . . . . . . . . . . 24-25
MP3/JPEG Playback. . . . . . . . . . . . . . . . . . . . . . . . . . . . . . . . . . . . . . . . . . . . . . . . . 26
Using the Built-in DVD Player. . . . . . . . . . . . . . . . . . . . . . . . . . . . . . . . . . . . . . . . . 27
Compatible Disc types. . . . . . . . . . . . . . . . . . . . . . . . . . . . . . . . . . . . . . . . . . . . . . . 27
Basic DVD Playback Functions. . . . . . . . . . . . . . . . . . . . . . . . . . . . . . . . . . . . . 28-29
Playing Multimedia Discs. . . . . . . . . . . . . . . . . . . . . . . . . . . . . . . . . . . . . . . . . . . . . 30
Using the DVD Language Setup Page. . . . . . . . . . . . . . . . . . . . . . . . . . . . . . . . . . 30
Using the DVD Screen Setup Page . . . . . . . . . . . . . . . . . . . . . . . . . . . . . . . . . 30-31
Ussing the DVD Audio Setup Page . . . . . . . . . . . . . . . . . . . . . . . . . . . . . . . . . . . . 32
Using the DVD Custom Setup Page. . . . . . . . . . . . . . . . . . . . . . . . . . . . . . . . . . . . 33
Troubleshooting. . . . . . . . . . . . . . . . . . . . . . . . . . . . . . . . . . . . . . . . . . . . . . . . . . . . . 34-36
Specifications. . . . . . . . . . . . . . . . . . . . . . . . . . . . . . . . . . . . . . . . . . . . . . . . . . . . . . . . . . 37
Warranty . . . . . . . . . . . . . . . . . . . . . . . . . . . . . . . . . . . . . . . . . . . . . . . . . . . . . . . . . . . . . . 38
3
Safety Information
To ensure reliable and safe operation of this equipment, please read carefully all the instructions
in this user guide, especially the safety information below.
Electrical safety
• The TV set should only be connected to a main power supply with voltage that matches the
label at the rear of the product.
• To prevent overload, do not share the same power supply socket with too many other
electronic components.
• Do not place any connecting wires where they may be stepped on or tripped over.
• Do not place heavy items on them, which may damage the leads.
• Hold the main plug, not the wires, when removing from a socket.
• During a thunderstorm or when not using the television for long periods, turn off the power
switch on the back of the television.
• Do not allow water or moisture to enter the TV or power adapter. Do NOT use in wet, moist
areas, such as bathrooms, steamy kitchens or near swimming pools.
• Pull the plug out immediately, and seek professional help if the main plug or cable is
damaged, liquid has spilt onto the set, if accidentally exposed to water or moisture, if
anything accidentally penetrates the ventilation slots or if the set does not work normally.
• Do not remove the safety covers. There are no user serviceable parts inside.
Trying to service the unit yourself is dangerous and may invalidate the product’s warranty.
Only qualified personnel should service this apparatus.
• To avoid battery leakage, remove exhausted batteries from the remote control, or when not
using for a long period.
• Do not break open or throw exhausted batteries in a fire.
Physical safety
• Do not block ventilation slots in the back cover. The TV may be placed in a cabinet, but
ensure at least 5 cm (2˝) clearance all around.
• Do not tap or shake the TV screen, this may damage the internal circuits. Take good care of
the remote control.
• To clean the TV use a soft dry cloth. Do not use solvents or petroleum based fluids.
• Do not install near any heat sources such as radiators, heat registers, stoves or other
apparatus (including amplifiers) that produce heat.
• Do not defeat the safety purpose of the polarized or grounding-type plug. A polarized plug
has two blades with one wider than the other. A grounding type plug has two blades and a
third grounding prong, the wide blade, or the third prong is provided for your safety. If the
provided plug does not fit into your outlet, consult an electrician for replacement of the
obsolete outlet.
• Protect the power cord from being walked on or pinched particularly at plugs.
• Unplug the apparatus during lightning storms or when unused for long periods.
• Refer all servicing to a qualified service personnel. Servicing is required when the apparatus
has been damaged in any way, such as power-supply cord or plug is damaged, liquid has
been spilled, or objects have fallen into the apparatus, has been exposed to rain or moisture,
does not operate normally, or has been dropped.
• Please always connect your television to a power outlet with protective ground connection.
4
What’s Included
Unit and Accessories
Remote Control with Batteries
TV Set
8008201A
24˝ LED Combo
Television/DVD Player
FLDC 2400
Initial Assembly
• Main accessories:
8008201
8008201A
• Installation Steps:
1. Remove the main unit, the
stand support and the base
stand from the carton.
2. Connect the stand support
to the base stand using 4
screws.
Main Unit
Connect the main unit and
the stand support using the
other 4 screws.
x8 Screws
Stand Support
User’s Manual
Base Stand
Base Stand
Initial Assembly
Stand Support
5
Screw (x 8)
Getting Started
Front/Side View
TV Set
Button Functions
1.
POWER : Turns on/standby the TV set
2. SOURCE : Displays the input source menu
3. MENU : Displays the OSD menu. Press again to exit the menu
4. CH -/+ : Scans through channels
5. VOL -/+ : Adjusts the volume
6. II : Play/Pause button for DVD
7.
: Open/Close button for DVD
6
Getting Started
Rear View
10
9
1. DC 12V power input
2. SERVICE port
3. HDMI input
4. VGA input
5. PC audio input
6. Component and audio input terminal
7 . Antenna input (75 Ohm VHF/UHF)
8. Headphone output
9. Coaxial audio signal output plug
10. AV input
Wall Mounting
The TV is provided with mounting holes for a VESA approved wall mounting bracket (NOT
SUPPLIED). The VESA mounting pattern is 100 x 100. Remove the screws holding the base to
the base bracket and lift the base away (do not remove the base mounting brackets). Mount the
VESA bracket using 4 x M4 x 10 isometric threaded screws (not supplied). Do not use screws
longer than 10 mm; damage will occur to the internal components.
Caution: Your new TV is heavy; please consult with a professional wall mount installer to perform
this installation.
7
Connecting to External Devices
Connecting external devices to your TV
8
Remote Control Button Functions
1
Power button
18
Mute button
Numeric buttons
2
Channel setup/DVD 10+ button
Sound mode button
Picture mode button
3
4
5
19
20
21
Return channel/DVD SUBTITLE
MTS/AUDIO button
SLEEP button
Signal SOURCE selection button
6
22
Channel selection buttons
7
23
Information button
Volume adjust buttons
EPG/GOTO button
8
24
AUTO/A-B button
FREEZE/REPEAT button
UP button
9
25
ASPECT button
10
LEFT button
11
26
27
ENTER button
RIGHT button
DOWN button
28
TV setup MENU button
OPEN/CLOSE/CH.LIST button
CC/DVD MENU button
NEXT button
PREV/V-CHIP button
DVD.SETUP button
12
29
13
30
14
15
31
32
16
33
TITLE/EXIT OSD menu button
FAV/Play/Pause button
ADD/ERASE/STOP button
REWIND button
FORWARD button
17
If there is light around the TV, the remote control may fail or work abnormally.
If not using the remote for a long period of time, please remove the batteries.
9
Remote Control Button Functions
Button
Position TV Functions
DVD Functions
8
POWER: Power on/off button, press once to turn
TV on and press again to turn TV off.
0, 1-9:
TV channel selection button.
— :
Press this button to enter a program
number for multiple program channels
such as 2-1, etc.
S.MODE: Sets the sound mode.
P.MODE: Sets the picture mode.
SOURCE: Signal source selection button (TV/AV/
Component/DVD/HDMI/VGA).
CH +/- : Channel selection button, to increase or
decrease the channel.
EPG:
Electronic Program Guide Function.
9
FREEZE: Freeze picture for TV.
1
2
3
4
5
6
7
10/28
11/27
12
13
14
e / d :
(Up/Down) Up and Down button of OSD
menu. To change the OSD menu items.
f / g :
(Left/Right) Left and right button of
the OSD menu. To select the OSD menu
items.
MENU:
OSD menu button, to enter the TV set up
menu.
CH.LIST: Display program list.
15
CC/DVD MENU: Closed Caption select button OFF,
ON or CC ON Mute.
NEXT
16
V-CHIP: MUTE: :
Press OPEN/CLOSE with the power on. The
disc label should be facing towards the back.
Press OPEN/CLOSE again to close.
I : When playing a DVD disc, press NEXT to
go to the next chapter. When playing SVCD,
VCD disc, press NEXT to go to the next
track.
I
: When playing a DVD disc, press PREV to
go to the previous chapter. When playing
SVCD, VCD, CD disc, press PREV to go to
the previous track.
DVD.SETUP : Press SETUP button to open DVD
setting menu.
Parental control set-up.
17
18
GOTO: Press GOTO button and then
or to
choose Title, Chapter or Time, then press OK
button to enter the selected play mode.
REPEAT: Press REPEAT button to repeat a title,
chapter, track, chapter repeat or whole
disc. When playing DVD disc, press REPEAT
button continually, the TV screen shows
chapter repeat, title repeat, all repeat,
repeat cancel. When playing VCD, CD disc,
the options are track repeat, all repeat,
repeat cancel. When playing MP3 disc, the
options are single repeat, track repeat, file
repeat, all repeat, repeat cancel.
Mute button, press once to disable the
audio and press again to enable the
audio.
10
Button
Position TV Functions
19
:
20
MTS:
21
22
23
24
25
26
27
28
29
30
31
32
DVD Functions
Previous channel button, return to the
previous channel watched.
SUBTITLE: (for DVD and Super VCD discs)
-Press the SUBTITLE button once to
display the current subtitle.
-Press again to toggle between different
subtitle modes in sequence.
Note: For Multi-language or subtitle DVD
and Super VCD discs, press SUBTITLE
button to select your desired subtitle
language.
AUDIO: Press AUDIO button to choose a different
audio channel.
Press to select the audio channel.
• Make sure the TV has searched the
channels and that there is an Analog
Stereo/Dual Sound Signal shown on the
program.
• Press the MTS (Multichannel Television
Sound) button to select STEREO and
MONO.
SLEEP:
Sleep button, sets TV power off time.
INFO:
Press the info button to view the current INFO: Press INFO button for DVD information.
channel. Press again to exit channel
information.
VOL +/-: Volume adjusting button, to increase and
decrease the volume.
A-B: When playing DVD, VCD, CD, MP3 disc,
AUTO:
Auto adjust (only for use with VGA
press A-B button to repeat certain
source).
contents. Pres A-B key at the start point
(A) and again at the end point (B) to select
the repeated section. Press A-B a third
time to cancel the A-B repeat and return to
normal play.
ASPECT: Select display mode: Wide/Zoom/
Cinema/Normal.
OK:
Confirms the selection of the highlighted
menu item.
Right button.
Left button.
TITLE: When playing DVD, press TITLE to return
EXIT:
To exit operation.
to the main title page.
II
:
When
playing the disc, press PLAY/PAUSE
FAV:
Display favourite of program list.
once to pause, press PLAY/PAUSE again
to return to normal play.
:
When
playing DVD, SVCD, VCD, CD, press
ADD/ERASE: Add or delete favourite channel.
STOP once, the unit will retain in memory
the stop point. Press PLAY/PAUSE button
to continue play. Press STOP a second time
to stop the play and end the memory.
: Press
for a quick rewind search
33
: Press
11
button for quick forward search.
Operating Your Television
Basic Operations
Turning Your TV On and Off
TURN ON TV
1. Connect to power with the main power cable. The TV will enter STANDBY mode and the
LED indicator light will be red.
2.From the STANDBY mode, use the POWER button either on the main unit or on the
remote, to turn the television on.
TURN OFF TV
From ON mode, use the POWER button either on the main unit or on the remote control to
turn the television to STANDBY mode.
Picture Mode Setup Wizard
If using your TV for the first time, select the desired picture mode as shown below.
ENERGY STAR® is a joint program of the U.S. Environmental Protection Agency and the
U.S. Department of Energy helping us all save money and protect the environment through
energy efficent products and pratices.
Home Mode (Energy Saving): The energy saving mode will show a darker picture as it
requires less energy power consumption, as required by the ENERGY STAR® qualification.
Standard Mode: Shows the picture more brightly as it requires more energy to operate
volume, sound mode, picture mode and change source.
The power consumption may exceed the requirements of the ENERGY STAR® qualification.
The ON-MODE power under Home Mode should be less than 27W.
The SLEEP-MODE Power should be less than 0.5W.
12
Operating Your Television
Press “Yes” to confirm.
Note: If you wish to change between Home Mode (energy saving) and Standard Mode later,
this can be changed under the Display mode in the Setup menu.
Natural Resources Canada’s (NRCan’s) Office of Energy Efficiency (OEE) promotes the
international ENERGY STAR® symbol in Canada and monitors its use.
ENERGY STAR® is the international symbol of premium energy efficiency. Products
that display the ENERGY STAR® symbol have been tested according to prescribed
procedures and have been found to meet or exceed higher energy efficiency levels without
compromising performance.
Select Your Onscreen Language Preference
Note: If using your TV for the first time, select the onscreen language which will be used to
display menus and information boxes.
• Press the / button to select Menu Language.
• Press the / button to select the desired language.
• When satisfied with the selection, press EXIT to exit.
Volume Adjustment
1. Press VOL +/- to adjust the volume
2. To turn the sound off, press MUTE
. Press again to resume sound.
13
Operating Your Television
Navigating the Onscreen Display
• Press the MENU button to display the main menu.
• Use the / buttons to navigate and select the available menus.
Choosing a TV Channel
1. Use the CH-/CH+ buttons on the side panel or CH+/CH- on the remote control.
• Press CH+ to increase the channel.
• Press CH- to decrease the channel.
2. Using 0-9 remote buttons
Enter the channel number with the 0-9 remote button, then press “OK” to select the channel.
For example:
1. Press 4, then press “OK” to select channel 4.
2. Press 4, press 5, then press “OK” to select channel 45.
3. Press 1, then 2, press 1, and then press “OK” to select channel 121.
14
Operating Your Television
Selecting Input Source
Display the input screen menu by pressing SOURCE on the
remote control or SOURCE on the side of the TV. Press the e /d button to
select your choice, then press “OK” to enter using the remote, or press
SOURCE or VOL+ directly on the side of the TV.
Picture Menu Options
Press MENU on the side panel or MENU on the remote
control, then use / to move within the PICTURE menu. Press
or OK to enter (see picture).
Picture Mode
Select the type of picture which best corresponds to your viewing preferences by selecting Picture Mode in
the PICTURE menu, or enter picture mode directly by pressing the P.MODE button on the remote control.
Contrast
Press / then use / to adjust the contrast of the picture.
Brightness
Press / then use / to adjust the brightness of the picture.
Colour
Press
Tint
Press
/
then use / to adjust the colour of the picture.
/
then use / to adjust the tint of the picture.
Sharpness
Press / then use / to adjust the sharpness of the picture.
Colour Temperature
Press / to select mode: Cool, Warm, Normal.
Blue Screen
Press / then use / to select On or Off.
15
Operating Your Television
Audio Menu Options
Press MENU on the side panel or on the
remote control then use / to select the AUDIO
menu. Press or OK to enter (see picture).
Sound mode
Press / then use / to select User, Standard, Music
and Movie.
Bass
/
then use / increase or decrease the level of the lower-pitched sounds.
/
then use / to increase or decrease the level of higher-pitched sounds.
Balance
Press /
then use / to adjust the audio output between left and right speakers.
Press
Treble
Press
Surround
Press / to switch Surround On or Off.
AVC (Auto Volume Control)
Press / to switch auto volume control On or Off. This function allows volume to be controlled
automatically.
SPDIF Type
Press / to select between PCM or RAW.
Audio Language
Press / to select the audio language from: English, French and Spanish.
Time Menu Options
Press MENU on the side panel or on the remote control
then use / to select the TIME menu. Press or OK to enter
(see picture).
Sleep Timer
Press / then use / to set the sleep timer from the following
selections:
Off, 5 min, 10 min, 15 min, 30 min, 45 min, 60 min, 90 min, 120 min, 180 min or 240 min.
Time Zone
Press / then use / to set up the time zone:
Pacific, Alaska, Hawaii, Eastern, Atlantic, Newfoundland, Central or Mountain.
Daylight Saving Time
Press / then use / to set up the daylight saving time On or Off.
16
Operating Your Television
Setup Menu Options
Press MENU on the side panel or MENU on the remote control and then use / to select the SETUP
menu. Press or OK to enter (see picture).
Menu Language
Press / then use / to select menu language for either
English, Français or Español.
Transparency
Press / then use / to turn On or Off the transparency function.
Zoom Mode
Press / then use / to select the zoom to either Wide, Zoom, Just Scan,
(HDMI), Cinema or Normal.
Noise Reduction
Press / then use / to adjust the noise reduction mode to either
Weak, Middle, Strong or Off.
Advanced
Press / then use / to select the advanced options between
H-POS, V-POS, Clock, Phase, Auto (only used in VGA source mode).
H-POS
Press
V-POS
Press
Clock
Press
Phase
Press
/
then use / to adjust the H-POS of the picture.
/
then use / to adjust the V-POS of the picture.
/
then use / to adjust the Clock of the picture.
/
then use / to adjust the Phase of the picture.
Auto
/ then use to adjust the Auto of the picture.
Closed Caption
Press / to navigate and highlight the closed caption item, then press
Press
the g button to enter into the following menu.
CC Mode
Select the CC mode options from: On, Off, or CC on Mute.
Basic Selection
Select the basic selection from: CC1, CC2 CC3, CC4, Text1 Text2,
Text3, Text4.
Advanced Selection
Press / then use / to select the advanced selection from:
Service1, Service2, Service3, Service4, Service5, or Service6.
Option
Press
Press
/
/
then use to enter into the following menu.
then / to select.
DLC
/ then use / to turn dynamic luminance control On or Off.
Display Mode
Press / then use / to select Home Mode or Standard Mode.
Restore Default
Press
Select “Restore Default”, press OK and it will display “Are you sure?”
Select “Yes” to select the factory default settings.
17
Operating Your Television
Lock Menu Options
Press Menu on the side panel or MENU on the remote control, then use / to select the LOCK menu.
Press d button or OK to enter.
Use the button to go to the “Enter Password” selection and use the numeric buttons to input a 4-digit
password. The screen will display the sub-menu. After setting, press the Menu button to exit.
NOTE: The factory password is 0000.
4-digit password
Change Password
Press the button to select the “Enter New Password” selection and then
press the button to enter into the following menu. Input the 4-digit
password once and again to confirm.
System Lock
Allows you to turn On or Off the system lock. If you turn off the system
lock, then the following options (US, Canada, RRT Setting and Reset
RRT) are unavailable for use.
US
Use the
button to highlight the “US” selection, then press the
button to enter into the menu.
Canada
Use the button to highlight the “Canada” selection, then press the
button to enter into the following menu.
Canada English
Use / buttons to select among: E, C, C8+, G, PG, 14+ and 18+.
Canada French
Use / buttons to select among: E, G, 8ans+, 13ans+, 16ans+
et 18ans+.
RRT Setting
Rating Region Table setting. (Note: This option is valid in DTV.)
Reset RRT
Allows you to reset the RRT setting.
18
Operating Your Television
Channel Menu Options
Press MENU on the side of the TV or remote control, then use / to select
the CHANNEL menu.
Press to select your choice, then press OK to enter using the remote, or
press SOURCE or VOL+ directly on the side of the TV.
Air/Cable
Allows you to select the input signal between Air and Cable.
If you select “Air” as the input signal in the “Antenna” option
press the button to search the channels automatically.
The receiver channels will be stored automatically.
When searching channels, press MENU to stop.
If you select “Cable” as the input signal in the “Antenna” option, this
allows you to select the Cable System between: AUTO, STD, IRC and HRC.
Use the button to highlight “Start to Scan”, then press the button
to search the channels automatically. The receivable channels will be
stored automatically.
When searching channels, press MENU to stop.
Auto Scan
Use the button to highlight “Auto Scan”, then press the
into the menu.
button to enter
Favourite
Allows you to add any channels that you flag to your favourite channel list.
Use the / button to highlight the “Favourite” channel, then press the
button to enter the menu.
Use the / button to highlight the desired channel, then press the OK
button to add or remove the highlighted channel as a favourite.
Show/Hide
Allows you to show or hide the channels.
Use the / button to highlight the “Show/Hide” item,
then press the button to enter the menu.
Use the / button to highlight the desired item, then
press the OK button to show or hide the highlighted channel.
Channel No.
Displays the number of the current channel.
Channel Label
Displays the label of the current channel.
DTV Signal
Displays the quality of the current DTV signal.
19
Parental Menu Options
Parental Control
Press Enter to enter the sub-menu and then use the 0-9 to enter the correct password: 0,0,0,0. If used, this option feature can
“block” undesirable programming from appearing on the TV. Parental Control offers the user a wide variety of options and settings
that restrict or “block” the programming that can appear on the TV. Parental Control allows the user the capability of defining which
program rating they consider acceptable, to the younger more sensitive viewer. It can be preset and turned either on or off by the
user who specifies the secret 4-number code, the password. The number of hours blocked are specified. General audiences and
children blocks should be both programmed into the TV’s memory. Viewer ratings are specified for both TV and the motion picture
industry; both rating systems should be used, for complete coverage. The ratings are based on the ages of children.
Overview
To ensure complete coverage for all TV programs, (movies and regular TV shows) choose a rating for MPAA, from the selections
below, as well as ratings from the TV Parental Guidelines Rating Systems below, using the Age Block option for General Audiences,
and for children. In addition to those, you may wish to add additional restrictions from the content block menu, and submenus
examples below.
Things to Consider before Setting up Parental Control
Determine which rating you consider acceptable to the viewer. (For example, if you choose TV-PG, more restrictive ratings will be
automatically blocked; the viewer will not be able to see: TV-PG, TV-14, or TV-MA rated programming.) Do you want to block the
auxiliary video source entirely? (Blocks the signal sent by the equipment, such as VCR, connected to the TV Audio/Video input jacks)
Or leave unblocked, then choose allowable ratings. Block program “Content” based on individual parameters such as: Strong Dialog,
Bad Language, Sex Scenes, Violence Scenes, or Fantasy. Violent Scenes; in Content Blk option. Select a secret password, in the Set
Password option, using the numbers keys on the remote. Do not forget the password, it is the only way you can access the Parental
Control menu and change rating selections, or turn Parental Control off. Do you want the Parental Control to be active at all times? If
not, you can turn it on or off with the Lock On/Off option.
• You can set different Parental Control viewing restrictions for general audiences and for children, both can be active at the same time.
• Simply specifying one content block such as Sex Scenes, will not automatically restrict the programming that appears from the video sources.
• Even if you choose to leave the AUX inputs unblocked, the ratings you specify will automatically restrict the programming that appears from
the video sources.
• You can not disable Parental Control by disconnecting the TV from power. Block hours will be automatically reset to the original block time
setting specified if power is disconnected.
Information
Motion Picture Association of America (MPAA) Rating System
Grade
G
General Audiences
Meaning
Content not offensive to most viewers
PG
Parental Guidance Suggested
Content is such that parents may not want their children to view the program
PG-13
Parental Guidance Cautioned
Program is inappropriate for preteens, with a greater degree of offensive material suggested than a PG
rated program
R
Restricted viewing
NC-17
No Children Under age 17
X
Hard Core Films
No Rating
No Rating
Not for children under 17, Strong element of sex and/or violence
Not for children under 17 under any circumstances. Strong sexual content
Same as NC-17 rating
MPAA Not Rated
TV Parental Guideline Rating System
Grade
TV-Y
Young Children
TV-Y7
Children 7 and over
Meaning
Content not offensive to most viewers
Considered suitable for children over 7, may contain Fantasy Violence Scenes
TV-G
Parental Audience
Considered suitable for all audiences; children may watch unattended
TV-PG
Parental Guidence
Suggested Unsuitable for younger children, may contain; Suggestive Dialogue, Bad Language, Sex, and Violence Scenes
TV-14
Parents Strongly Cautioned
TV-MA
Mature Audience Only
Unsuitable for children under 14, may contain: Strong Dialogue, Bad Language, Sex, and Violence Scenes
Adults only, may contain Strong Dialogue, Bad Language, Sex, and Violent Scenes
Canadian Rating:Canadian English is used throughout all English-speaking Canada (C, C8+, G, PG, 14+, 18+).
Canadian French is used in Quebec (G, 8 ans+, 13 ans+, 16 ans+, 18 ans+)
Note: The V-Chip will automatically block certain categories that are “more restrictive”. If you block TV-Y
category, then TV-Y7 will be automatically blocked. Similarly, if you block TV-G category, then all the categories
in the “young adult” will be blocked (TV-G, TV-PG, TV-14, and TV-MA).
20
DVD Operation
Preparation before playing disc
• The display language is set to English. Please refer to setup operation.
• Most functions are operated by the remote control or use the buttons on the front panel.
Preparation
• Turn the TV on and select DVD as the TV input.
• Turn on any related system power if the player has been connected to amplifier equipment, etc.
PLAY
1. Turn on the power, the display shows “LOADING”. (Note: the disc information appears after several
seconds if a disc has been inserted. Otherwise NO DISC appears.)
2. To insert a disc, place the disc with the printed label side facing the back, into the DVD slot. The disc
will automatically be loaded into the player.
3. To remove the disc, press the OPEN/CLOSE button and the disc will eject.
4. Press PLAY on playback disc. You may also start playback according to the MENU screen once the
MENU displays. Press ENTER button to start playback. Some discs may play automatically once loaded.
Disc Type
Disc Size
(Diameter)
Recorded Time
Recorded Content
Remarks
DVD
12 cm
Single side:
120 mins. Approx
Double side:
240 mins. Approx
DVD format:
Compressed digital
audio and video
Super VCD
12 cm
45 mins. Approx
MPEG2
Compressed digital
audio and video
Includes SVCD
VCD
12 cm
74 mins.Approx
MPEG1
Compressed digital
audio and video
Includes:
VCD2.0/VCD1.1
VCD1.0/DVCD
CD
12 cm
74 mins.Approx
CD-DA: Digital audio
HD-CD
12 cm
75 mins.Approx
HD-DA: Digital audio
MP3/JPEG
12 cm
600 mins.Approx
Digital audio
NOTE: Also supports DVD-R, CD-R, CD-RW playback
WARNING! DO NOT INSERT OR PLAY 8 CM DISCS, THEY WILL GET STUCK!
Region Code 1
As it is usual for DVD movies to be released at different times in different regions of the
world, all players have region codes and discs that have an optional region code. If you load
a disc of a different region code into your player you will see the region code notice on the
screen. The disc will not playback and should be unloaded. The region code for this player
is 1 (refer to the symbols).
21
DVD Operation
• STOP
Press STOP button to stop playing (TV show “ , ”). When playback is stopped the unit keeps in memory
the point where STOP was pressed (resume function). Press PLAY again, and play will resume again at this
point. Press the STOP button twice, the resume function will be cancelled. The resume function is suitable
for discs showing playing time during playback.
• PRESS PREV I
NEXT
I
Press PREV button or NEXT button on the remote control when playing a disc, a chapter (DVD) or a track
(CD) to skip backward or forward correspondingly each time the button is pressed.
Note: When skipping backward, playback starts at the beginning of the previous track, NOT the beginning
of the current track.
• REWIND
/FORWARD
Press the Rewind/Forward button on the remote control during playback, the disc will be played forward
or backward correspondingly. The forward or reverse speed is relatively slow at first. When pressed again,
the speed becomes faster. The more times the buttons are pressed, the faster the Fast Forward or Reverse
speed will be. There are five levels of speed: X2, X4, X8, X16 and X32. To return to normal play, press the
PLAY button on the player or the remote control.
• DVD.SETUP
Press the DVD.SETUP button during play, the player will enter into the DVD set up menu.
• PAUSE
Press the pause button to stop playing. Restore play by pressing the PLAY button again.
• NUMBER (0-9, 10+) Buttons
Press the number (0-9) buttons, to go directly to the desired track or chapters while a disc is being
played. For a track or chapter over 10, press 10+ first and then the 0-9 button.
• MUTE
Press the MUTE button during play, the player shows mute and there is no audio output (silence).
Press again to cancel MUTE.
• VOL+/VOL
Press the VOL+/VOL- button to change the volume for audio output.
• A-B
Press the A-B button during playback at the point where repeat play is to commence (A), then press again
at the point where repeat play is to be concluded (B). Repeat playback between point (A) and point (B)
starts. Press A-B button once more where TV screen appears REP OFF to return to normal play.
• REPEAT
Press the repeat button to choose to repeat play chapter or title (DVD) and play single audio or full disc
(VCD, CD, MP3). Note: Some VCDs do not have repeat function with PBC ON state.
22
DVD Operation
• GO TO
During play, press the GO TO button on the remote control. You can search the disc based on its title/
chapter/track. Press the GO TO button and a search menu will be displayed. Use the or button to select
the search item/time/title/chapter. The selection will be shown as highlighted. Use the number button to
select the search item time/title/chapter, and press the ENTER button to play.
For example:
• Time search (press “GO TO” button twice while playing a DVD): To search 16 min 50 seconds, input 1, 6, 5
and 0. To search 1 hour 14 minutes: input 1, 1, 4, 0, 0. Title/chapter search: To search title 1, chapter 2, input
1 in the highlight title column, move the cursor right to the highlighted area and input 2.
Notes:
•For some DVD discs which cannot be searched, “invalid” will appear on the TV screen.
•Input the time, title and chapter of the disc to be searched.
•For VCDs with the PBC mode ON, it can only search for a time.
• AUDIO
Press AUDIO button to switch the audio output among L/L, R/R and L/R.
• MENU
•
Press MENU button to show the setup information of DVD disc source.
I
Press OPEN/CLOSE when power is on and insert disc with label towards the back.
Press OPEN/CLOSE to close.
• TITLE
When playing the DVD, press TITLE to return to the main title page.
• SUBTITLE (FOR DVD AND SUPER VCD DISCS)
To change the subtitle language, refer to Language Setup.
23
DVD Functions
Supported DVD Format
1. PLAY (for DVD/Super VCD/VCD/CD/CD-G/HD-CD and MP3/JPEG discs). For DVD disc, press the II
button from the root or title menu. While playing the DVD, play a favourite title directly by the title
selection by pressing the TITLE button. For Super VCD and VCD discs, while playing the disc, play a
favourite track by using numeric buttons. For CD, CD-G and HD-CD discs, while playing the disc, play a
favourite track by using numeric buttons. For MP3/JPEG discs, play a favourite track by using numeric
buttons from the content menu. If the input track numbers are not valid, it will not function.
Note: From track 1-10, use numeric buttons directly; for tracks over 10, Press 10+ button first.
(e.g. Track 15, press 10 + 5).
2.
PREVIOUS/NEXT (for DVD/Super VCD/VCD/CD/CD-G/HD-CD and MP3/JPEG discs)
While playing the disc:
Press
button to play the previous Title/Chapter/Track.
Press
button to play the next Title/Chapter/Track.
For Super VCD and VCD discs, in PBC OFF status;
If current track is the first one, press
button to stop the playback.
If the current track is the last one, press button to stop the playback.
For DVD discs, the above functions may vary due to different DVD disc’s structure.
3.
FORWARD/BACKWARD (for DVD/Super VCD/CD/CD-G/HD-CD and MP3)
While playing the disc, you can use the skip forward or backward function.
There are 4 speeds for forward. Press
to toggle between different speeds in sequence.
(FORWARD X2/FORWARD x4/FORWARD X8/FORWARD X20/Play).
Press II to resume normal speed.
For CD, HD-CD, MP3, backward also has audio output.
For DVD discs, if moving backward to the first title/chapter, it will resume from the beginning.
For Super VCD and VCD discs, in PBC ON status, if moving backward to the first track, it will start from
the beginning.
NOTE: During Forward or Backward functions, the sound will be off.
4. PAUSE (for DVD/Super VCD/VCD/CD/CD-G/HD-CD and MP3/JPEG discs)
FOR CD, CD-G, HD-CD and MP3/JPEG discs, press the II button to pause; press the II button to
resume. For DVD, Super VCD, VCD discs, press the II button to pause; press the II button to resume.
5. REPEAT (for DVD/Super VCD/VCD/CD/CD-G/HD-CD and MP3/JPEG discs)
Press REPEAT button once to display the current repeat mode.
For Super VCD, VCD, CD, CD-G, HD-CD, discs, while playing in sequence, you may use the repeat
playback. There are 2 repeat modes, press REPEAT to toggle between different modes in sequence.
(REPEAT (OFF)/REPEAT (1)/REPEAT (ALL)).
For DVD discs, you may setup the repeat playback mode. There are 3 repeat modes, press REPEAT to
toggle between different modes in sequence (REP: (OFF)/REP: (CHAPTER)/REP (TITLE)/REP: (ALL)).
For MP3/JPEG discs, while playing the disc, you may use the repeat playback. There are 3 repeat modes,
press REPEAT to toggle between different modes in sequence (REPEAT (OFF)/REPEAT (DIR)/REPEAT
(ALL)).
6. INFO (for DVD/Super VCD/VCD/CD/CD-G/HD-CD and MP3/JPEG discs)
Press INFO button to activate the on screen roll-down menu for the current Title, Chapter, Time, and
other information.
24
DVD Functions
Supported DVD Format
For DVD discs with 5 pages, press INFO button once to display the first page as shown below:
Once
Twice
Three times
Four times
Title Elapsed
Title Remain
Chapter Elapsed
Chapter Remain
TT: 01/08 CH:01/01
0:00:47
TT: 01/08 CH:01/01
0:04:47
TT: 01/08 CH:01/01
0:00:16
TT: 01/08 CH:01/01
0:04:41
Five times
Display off
7. GOTO (for DVD/Super VCD/VCD/CD/CD-G/HD-CD and MP3/JPEG discs)
This function allows you to play your favorite Title/Chapter/Time. Press GOTO button to activate
Title/Chapter/Time to edit. According to the highlighted area, input your favorite Title/Chapter/Time
number using the numeric buttons or input the playback time. After editing, press OK to start. If the
input in invalid, it will not function.
Note: While editing, the GOTO button does not function.
8.
If in PBC ON status, this function will switch to OFF.
AUDIO (for VCD/CD/CD-G/HD-CD and MP3/JPEG discs)
Press Audio button once to display current audio mode.
Press again to toggle between different audio modes in sequence.
For CD/VCD/MP3/HD-CD discs: (stereo/monoL/monoR).
Note: Switching to Auto L/R audio channel may vary due to different disc contents.
Bilingual VCD discs can use the Audio button to switch between different languages.
9. MUTE (for DVD/Super VCD/VCD/CD/CD-G/HD-CD and MP3/JPEG discs)
Press MUTE button to mute the audio output, there will be an onscreen symbol to indicate “MUTE”.
Press again to cancel, or press VOL+/VOL- to cancel and adjust the volume.
In case there is no audio output, press MUTE button to cancel mute.
10.REPEAT A-B (for DVD/Super VCD/VCD/CD/CD-G/HD-CD and MP3 discs)
When playing DVD, VCD, CD disc, press the A-B button to repeat a certain content. Press the A-B button
at the start point (A) and again at the end point (B) to select the repeat section.
Press the A-B button a third time to cancel the A-B repeat function and return to normal play.
11. VOLUME (for DVD/Super VCD/VCD/CD/CD-G/HD-CD and MP3/JPEG discs)
Press VOL +/VOL – buttons to adjust the output volume.
25
DVD Functions
MP3 / JPEG Playback
After loading the MP3/JPEG disc, it will start to scan for the stored MP3/JPEG folders. The folder will
display the MP3 contents automatically and start to play the first file (highlighted file). Screen will show as
below:
MP3 File
JPEG File
Use the navigation buttons to check for your favourite folder and playback the first file or move to your
favourite file.
NOTE:
Press the / buttons to move the highlight to folders, documents or mode selection.
Press the numeric buttons to select the contents directly. For numbers over 10, press the - button first
(eg. for file number 15, press - and 5).
When playing MP3 files, there is no picture display, only audio output.
When playing or pausing with picture playback, you may use the navigation buttons to flip/rotate the picture.
button to flip horizontally
button to flip vertically
button to rotate left 90°
button to rotate right 90°
Press /
pictures.
buttons to select next/previous page or press numeric buttons to view the corresponding
26
DVD Functions
Using the Built-in DVD Player
Compatible Disc Types
sD
1. Press the SOURCE button on the remote control
to display the source list. Use the / buttons
to select DVD and then press the OK button to
confirm.
2. Insert a disc with the label side facing towards the
rear of the TV. (CD-R, CD-RW, DVD-R, DVD-RW,
CD, DVD+R, or DVD+RW). Allow 10 seconds for
the player to load the disc. If you insert the disc
incorrectly, an error message will be displayed.
Label side at
the back
Supported Formats
JPEG
• The file extensions has to be .jpg and not
.jpeg.
• Pictures encoding must comply with JPEG/
ISO format.
• This DVD player can only display DCFstandard still pictures or JPEG pictures such
as TIFF.
Region Code
3. After the disc is inserted, press the II button on
the unit or the II button on the remote control to
start playing.
4. Press the button if you want to remove the disc.
Both the DVD player and the discs are coded
by region. These regional codes must match
in order to play the disc. If the codes do not
match, the disc will not play.
The region number for this DVD player is
described on the rear panel of the TV.
• Only insert 12cm discs. Do not
insert or play 8cm discs; they will
get stuck.• Ensure disc is fully
ejected before removing it, or else
you risk damaging the DVD player.
27
DVD Functions
Basic DVD Playback Functions
• Press the button to play the next Title/
Chapter/Track.
Playing the DVD
Depending on the disc, a menu may appear on
the TV screen once the disc has loaded. When
playing the disc, you may use the II button to
toggle between Play and Pause mode. This product
also supports Menu/Title/Sequential/Programme
Playback.
If the current track is the first one,
pressing the
button will restart the
disc from the beginning.If the current
track is the last one, pressing the
button will stop the playback.
• For DVD discs, the above functions may very
due to different DVD disc’s structure.
Menu Playback (for DVD)
• For DVD discs, the screen will display the DVD
Disc Menu (Root Menu). Press / to choose the
content.
• Press the II button or the OK button to start from
the highlighted content.
• Press the DVD MENU/SUBPAGE button to return
to the Root Menu when playing the disc.
• For some DVD discs you may need to press the
DVD MENU/SUBPAGE button or the TITLE button
to display the Disc Menu.
Stopping Playback
Forward/Backward
(for DVD/CD/Multimedia discs)
• There are 5 speeds for forward. Press the
button to toggle between the different
forward options in sequence. (FORWARD x 2/
FORWARD x 4/FORWARD x 8/FORWARD x 16/
FORWARD x 32/Play).
• Press the II button to return to normal speed
playback.
• Press the button once to stop. Press the II
button to resume from where you stopped.
• For DVD discs, when selecting backward to
first title/chapter, the disc will start from the
beginning.
• Press the button twice to stop. Press II the
button to start from the beginning.
There will be no sound during
forward or backward.
• In order to protect the disc, press the button
twice and then press the button to eject the
disc. When the disc is ejected, hold the disc edge
slightly and remove it from the disc slot.
Pause (for DVD / CD / Multimedia discs)
• When not using the DVD function (in stand-bymode or using others modes for a long period of
time), please take out the disc to protect the DVD
loader and the disc.
Previous/Next (for DVD/CD/Multimedia
discs)
• Press the
Track
button to play the last Title/Chapter/
28
• For CD/JPEG discs, press the II button to
pause; press the II button again to resume
playback.
• For DVD discs, press the II button to pause;
press the II button again to resume playback.
DVD Functions
Basic DVD Playback Functions
• Press the INFO button four times to display the
fourth page as shown below:
Repeat (for DVD/CD/Multimedia discs)
Press the REPEAT button once to display the current
repeat mode.
• For CD discs, while playing in sequence, you
may use the repeat playback. There are 4 repeat
modes, press the REPEAT button to toggle
between the different repeat modes in sequence.
(Repeat Off/Repeat One/All/Single ).
Info (for DVD/CD/Multimedia discs)
Display off
Aspect
Allows you to select the video size of programme
stream.
• Press the Aspect button to select the size you
want.
Goto (for DVD/CD/Multimedia discs)
Press the INFO button to activate the on screen rolldown menu for the current Title, Chapter, Time and
other information.
This function allows you to play your favourite
Title/Chapter/Time. Press the GOTO button to
activate Title/Chapter/Time content for selecting.
Input your Title/Chapter/Time by pressing the 0-9
buttons or input the playback time. After editing,
press the OK button to start. If the input is
invalid, it will not function.
For DVD discs, press the button once to display the
first page as shown below:
• For DVD discs, press the INFO button once to
display the first page as shown below:
Title Elapsed
TT: 01/08 CH:01/01
0:00:09
For some discs, only Time can be
selected in the GOTO function.
• Press the INFO button twice to display the second
page as shown below:
Chapter Remain
1TT: 01/08 CH:01/01
0:04:4
• Press the INFO button five times to display the
fifth page as shown below:
• For DVD discs, you may setup the repeat playback
mode. There are 4 repeat modes, press the
REPEAT button to toggle between the different
repeat modes in sequence. (Repeat:Off /Repeat:
Chapter/Repeat:Title/Repeat:All).
Title Remain
TT: 01/08 CH:01/01
0:04:47
Audio (for DVD /CD)
Press the AUDIO button to toggle between
different audio modes in sequence.
• For CD discs: Mono Left/Mono Right/Mix Stereo/Mono
• Press the INFO button three times to display the
third page as shown below:
Some discs may contain multiple
languages which can be selected by
pressing the AUDIO button.
Chapter Elapsed
TT: 01/08 CH:01/01
0:00:16
A-B
When playing DVD,CD disc, press the A-B button
to repeat certain content. Press the A-B button on
the start point (A) and the end point (B) to select
the repeat part. Press the A-B button a third time
to cancel the A-B button function and return to
normal playback.
29
DVD Functions
Playing Multiamedia Discs
Using the DVD Language Setup Page
After loading the multimedia disc, the disc contents
will automatically be displayed and sorted by
different file formats into Music/Picture/Video
folders.
Menu
DISC MENU: Select the Disc Menu language.
The default language is English.
1. Press the / / / buttons to navigate
through the folders and files.
Audio
Set the Audio language to your language of
choice.
2. Press the 0-9 buttons to select the contents
directly .
Not all DVD discs support multiple
audio languages.
3. When playing or pausing with picture playback,
you may use the / or / buttons to flip/
rotate the picture.
Using the DVD Language Setup Page
In the DVD mode, press the DVD.SETUP button on
the remote control. Press the / buttons to select
the Language Setup menu and then press the /
buttons to select the menu options. Press the DVD.
SETUP button to exit the menu.
In Setup mode, the disc playback
function will not be available.
Subtitle
Select the Subtitle language.
OSD
Not all DVD discs support multiple
audio languages.
Set the OSD language to your language of choice.
30
DVD Functions
Using the DVD Language Setup Page
Using the DVD Screen Setup Page
Encoding
• 4:3 Letter box
Wide screen picture shown in the full screen
with black bars on the top and bottom of the
screen.
Select the encoding subtitle between Western
European and Central European.
• 16:9.
Wide screen pictures shown in the full screen.
Using the DVD Screen Setup Page
In the DVD mode, press the DVD.SETUP button
on the remote control. Press the / buttons to
select the screen setup menu, and then press the
/ buttons to select the menu options. Press the
DVD.SETUP to exit the menu.
ScreenSaver
In Setup mode, the disc playback
function will not be available.
When the player stops or the picture becomes
motionless for a couple of minutes, there will be
a screen saver to prevent damage to the display
screen.
TV Display
• ON: To activate screen saver.
• OFF: To disable screen saver.
• 4:3 Pan Scan
Widescreen picture shown in the full screen
with some part cut.
31
DVD Functions
TV System
Contrast
In order for the disc to play, the colour system of the
DVD player disc and TV should match.
Select the contrast of the screen in DVD mode.
• NTSC:
This format is used by some other countries, e.g.
USA.
• PAL:
This is the format used in the UK.
• AUTO:
This format can be used if your TV/DVD is
capable of both PAL and NTSC formats and
AUTO is used as the default setting.
Last Memory
• ON: Continues DVD play from the last stop.
• OFF: Closes the memory function and starts
DVD play from the beginning.
PAL format is generally used for TV’s
in the UK. If NTSC is selected with a
non-compatible television, you may
experience interference or picture
scrolling.
Using the DVD Audio Setup Page
In the DVD mode, press the DVD.SETUP button
on the remote control. Press the / buttons to
select the Audio Setup menu, and then press the
/ buttons to select the menu options. Press the
DVD.SETUP to exit the menu.
Brightness
Select the brightness of the screen in DVD mode.
In Setup mode, the disc playback
function will not be available.
Downmix
• Lo/Ro: Mixed stereo surround output.
• Lt/Rt: Mixed stereo Lt/Rt output.
32
DVD Functions
Using the DVD Custom Setup Page
If you forget your DVD password,
enter the master password “8899”.
In the DVD mode, press the DVD.SETUP button
on the remote control. Press the / buttons to
select the Custom Setup menu, and then press the
/ buttons to select the menu options. Press the
DVD.SETUP to exit the menu.
In Setup mode, the disc playback
function will not be available.
Parental Control
Allows the user to set a maximum rating level for a
movie that can be played (e.g. PG rating). Movies
rated higher than the level set will not be played.
The parental lock can only be changed after
inputting the correct password.
This function is available only when the
discs have ratings encoded on them.
Default
To restore all setup parameters to the factory
settings EXCEPT the password.
This function is available in stop state or when the
tray is opened.
Password
Press OK once, LED turns green, press once again
to enter setup.
To change password, you need to:
1. Input old password. (For initial use, enter the
factory default password “8899”).
2. Input a new 4-digit password and then press
the OK button to confirm.
33
Troubleshooting
If your television does not operate normally or does not turn on, please check the following
troubleshooting questions. Remember to also check the other connected electronic devices, such as DVDs
or Blu-ray players to pinpoint any problem. If the television still fails to operate normally, please contact
Customer Service (refer to Warranty page).
SYMPTOM
POSSIBLE CAUSE
Dead. No LED light
No power to the TV
Check all connections to the TV’s
AC socket
Set in Standby mode
Press the Power button or the
Standby button on the remote
control
Blue Screen
No signal
REMEDY
Press SOURCE button to select the
correct source.
Incorrect source selected
Noisy, snowy, ghosting picture (TV)
Poor antenna signal
If using an indoor antenna, try
adjusting the antenna position.
Check antenna connections
No Sound
“Mute” is activated
Turn “Mute” OFF
Volume set too low
Check volume settings
External leads not connected
“if used”
Check that all external leads are
connected properly
34
Troubleshooting
Check the chart below for a possible cause of the problem you are experiencing before requesting service
for this unit. Some simple checks or minor adjustments on your part may eliminate the problem and restore
proper operation. Keep away from static electricity.
PROBLEM
POSSIBLE SOLUTION
No Power
- Plug the power cord into the power outlet tight to turn
on/off once
Cannot read disc
- Disc access time between 10-20 seconds is normal.
- The disc is scratched or defiled (change the disc).
- The code of the disc is different from the code of the
unit (change the disc).
- PAL to NTSC error (set video output as AUTO).
No picture
- If your TV does not have a P-Scan function, pressing the
video button on the remote may be the cause.
Press the VIDEO button again.
No sound
-Ensure the equipment is connected properly.
-Ensure the TV or audio equipment is not muted.
-Ensure the audio output setting is correct.
Picture is distorted during fast-forward or reverse
- The picture will be somewhat distorted at times. This is
normal when advancing or reversing.
No (4:3) (16:9) picture
-Choose the correct setup in TV Type to an item that
matches the TV set.
Remote control does not function
-Check the batteries are installed with correct polarities.
-Turn the unit off and then back on. Alternately, turn
off the unit, disconnect the AC power cord for 5 to 10
minutes and then reconnect it.
Unit or remote not functioning or other abnormal
phenomena
-Turn the unit off and then back on. Alternately, turn
off the unit, disconnect the AC power cord for 5 to 10
minutes and then reconnect it.
Audio sound track and/or subtitle language not found in
settings
- If the audio soundtrack and/or subtitle language does
not exist in the disc, the language selected at the initial
setting will not be seen or heard.
Cannot change angle
- This function depends on software availability. Even if
the disc has a number of angles recorded, these angles
may be available for specific scenes only.
No playback menu
- This function is suitable for VCD with playback control
disc.
Miscellaneous
- In program playback mode, no repeat, A-B functions are
available.
35
Troubleshooting
NOTE: When there is a problem in VGA mode (only when VGA mode is applied)
PROBLEM
POSSIBLE SOLUTION
The signal is out of range
- Adjust resolution, horizontal frequency, or vertical
frequency
- Check whether the signal cable is connected or loose
- Check the input source
Vertical bar or stripe on background, horizontal noise and Set the auto configure or adjust clock, phase or H/V
incorrect position
position
Screen colour is unstable or is a single colour
- Check the signal cable
- Re-install the PC video card
Maintenance
Early malfunctions can be prevented. Careful and regular cleaning can extend the amount of time you will
have with your new TV. Be sure to turn the power off and unplug the power cord before you begin any
cleaning.
• Do not use your TV in areas that are too hot or too cold, because the cabinet may warp or the screen
may malfunction. Your TV works best in temperatures that are comfortable to you.
• Storage temperatures are 0˚ to 50 ˚C (32˚ to 122˚F)
• Working temperatures are 0˚ to 40 ˚C (32˚ to 104˚F)
• Do not place your TV in direct sunlight or near a heat source.
Cleaning the screen
1. A great tip to dust off your screen. Wet a soft cloth in a mixture of lukewarm water and a little fabric
softener or dish washing detergent. Wring the cloth until it’s almost dry, and then use to wipe the
screen.
2. Make sure the excess water is off the screen, then let air-dry before you turn on the TV.
Cleaning the Cabinet
To remove dirt or dust, wipe the cabinet with a soft, dry, lint-free cloth. Please be sure not to use a wet
cloth.
Extended Absence
If you expect to leave your TV dormant for a long time (such as a vacation), it is a good
idea to unplug the power cord to protect against possible damages from lightning or
power surges.
36
Specifications
Specifications
Panel Size
24 inches diagonally
Display Type
LED
Panel Technology
TFT
Panel 60 Hz vs 120 Hz
60 Hz
Display Resolution
1080P
HD Compatible
up to 1080p
Panel Resolution (min.)
1920*1080
TV Demodulator
Air/Cable
Aspect Ratio
16:9
Contrast Ratio (typ.)- panel
800 :1
Brightness (Centre Typ.) cd/m2
200
Respons Timee (G to G)
5 ms
Lamp Life (Typ. Hours)
25 000 hours
Horizontal Viewing Angle (At CR≥10)
170
Vertical Viewing Angle (At CR≥10)
160
Power On Consumption
33 W
CAN ICES-3(B).
Canadian DOC Statement
Standard Television Receiving Apparatus Canada BETS-7
This Class B digital apparatus complies with Canadian ICES-003.
37
Warranty
THE SOURCE – WARRANTY
The Source warrants that this product will be free from defects in
materials and workmanship for a period of one (1) year from the date
of purchase. Within this period, simply take the product and your
proof of purchase to any The Source store or participating dealer and
the product will be replaced (where available) without charge. Any
product which has been subject to misuse or accidental damage is
excluded from this warranty.
This warranty is only applicable to a product purchased through The
Source company-owned stores or participating dealers in Canada
where the warranty is included with the product. While this warranty
does not confer any legal rights other than those set out above, you
may have additional statutory rights which will vary under the laws
of the various countries, states, provinces and other governmental
entities in which The Source operates. This warranty is subject to all
statutory rights you may have in Canada.
Please Recycle
Imported by:
The Source,
Barrie, Ontario, Canada, L4M 4W5
Manufactured in China
For product support please visit
www.thesource.ca
© 2014 The Source
All rights reserved.
38
Revision 8