1
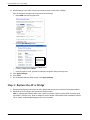
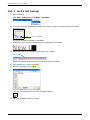
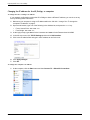
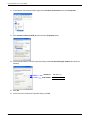
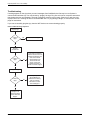
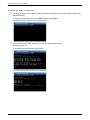
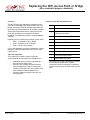
Replacing the WiFi Access Point or Bridge
(AP pn 12883004SP, Bridge pn 12883003SP)
Overview
The WiFi Access Point transmits messages from the
computer to the Bridge unit located near the sign. The
Bridge receives the wireless message signal from the
the Access Point and sends them to the sign for display.
Contents of the WiFi Replacement kit
Qty
Description
1
Wireless Access Point or Bridge unit
1
* 48V, 0.375A AC/DC adapter with
wall-plug power cable
1
* Inline Power Injector (PoE)
1
* 1.8m Grounding cable
1
User’s manual CD-ROM
1
* Wall mounting kit
1
* Mast mounting kit
1
* Waterproof kit
Tools and equipment
1
* 25ft CAT5 Outdoor cable
The following is a guideline, specific tools and
equipment shall be assessed at the installation site:
1
Replacement instructions
These instructions explain how to replace an Access
Point (AP) or Bridge unit connected to an Excite,
RoadStar, or StreetSmart sign that is using Ooh!Media
software.
Replacing the AP or Bridge unit consists of three steps:
•
•
•
Step 1 - Configure the AP or Bridge
Step 2 - Replace the AP or Bridge
Step 3 - Send a test message
If you need assistance during the replacement, contact
Adaptive’s Technical Support team at (414) 357-2020
extension 519.
•
•
•
Appropriate tools to remove and install the
Access Point or Bridge units.
Access to the computer that will be used to
send messages to the sign to verify proper
operation of the WiFi unit. This computer must
have ooh!Media software installed on it.
Current IP address settings of the WiFi unit
being replaced.
* Not all items in the WiFi replacement kit will be
used during the replacement. Replace
components that look damaged or weathered.
Items not used may be kept and used as spare
parts.
Adaptive Micro Systems • 7840 North 86th Street • Milwaukee, WI 53224 USA • 414-357-2020 • 414-357-2029 (fax) • http://www.adaptivedisplays.com
March 27, 2008
© Copyright 2008
Part Number 1288610102 rev. C
Replacing the WiFi Access Point or Bridge
Step 1: Configure the AP or Bridge
Connect the hardware
1. Plug the Ethernet cable from the AP or Bridge unit into the AP/Bridge port of the PoE injector.
2. Plug an Ethernet cable from your computer or network into the Network port of the PoE injector.
3. Plug the DC-inlet of the power adapter into the DC48V port of the PoE injector and the other end into a
power socket in the wall.
Login and configure security
Locate and write down the encryption key used during the original or previous installation so the new Access
Point or Bridge can be configured.
Note:The same encryption key must be used or the two wireless units will be unable to communicate with each
other and the messages will not reach the sign.
26 character encryption key:
1. Open a web browser, type one of the following in the Address bar, and press the ENTER key.
• Access Point: 192.168.1.2
• Bridge: 192.168.1.1
2. At the login prompt, type admin for the Username and admin for the Password.
A screen similar to the following appears:
Access Point unit screen
Bridge unit screen
3. Click Wireless and then click Security.
2
Part Number 1288610102 rev. C
Replacing the WiFi Access Point or Bridge
4. Set the settings to the same values used for the previous Access Point or Bridge.
If the 26-character encryption key was used, do the following:
•
Select WEP from the Encryption list.
•
Click the Set WEP Key button.
Only use letters A-F
and numbers 0-9
for Encryption Key
values.
• For Key Length, select 128-bit.
• In the Encryption 1 field, type the 26-character encryption value previously used.
5. Click Apply Changes.
6. Click Close.
7. On the Wireless Security Setup screen, click Apply Changes.
Step 2: Replace the AP or Bridge
1. Disconnect the Ethernet cable from the AP or Bridge and remove the unit from the mounting hardware.
2. Mount the new AP or Bridge and connect the Ethernet cable.
Note: If replacing the Ethernet cable, leave a sufficient amount of slack near the cable connection point
and create a “Service Loop”. Refer to Adaptive’s service bulletin “SB 08-0002 Excite Installation Practice
Tip for Cables” at www.adaptivedisplays.com for more details.
Part Number 1288610102 rev. C
3
Replacing the WiFi Access Point or Bridge
Step 3: Send a test message
1. Start Ooh!Media.
Click Start > All Programs > Ooh!Media > Ooh!Media.
2. In the lower portion of the Ooh!Media window under Run-time Objects, click the insert new text button.
Insert new text button
A new text message box appears in Ooh!Media.
3. Highlight the text inside the message and type an appropriate test message.
4. Extend the length of the message by stretching it in the Timeline.
Time in seconds
Extend the message long enough for you to go to the sign and look at it.
5. Click the disk icon to save the message.
6. Name the message and click Save.
7. Click the send message icon to send the message to the sign.
8. Verify the message appears on the sign.
4
Part Number 1288610102 rev. C
Replacing the WiFi Access Point or Bridge
Changing the IP address for the AP, Bridge, or computer
To change the AP’s or Bridge’s IP address
If your network configuration requires the AP or Bridge to have a different IP address, you can do so at any
time by following these instructions.
1. Make sure your computer is using an IP address within the 192.168.1.X range. See “To change the
computer’s IP address” on page 5.
2. Open a web browser, type one of the following in the Address bar, and press the ENTER key.
• For an Access Point: 192.168.1.2
• For a Bridge: 192.168.1.1
3. At the login prompt, type admin for the Username and admin for the Password and click OK.
4. In the left menu area, click TCP/IP Settings and then click LAN Interface.
5. Click in the IP Address field and type in the IP address to use for the unit.
6. Click Apply Changes.
7. Click OK.
To change the computer’s IP address
1. At the computer, click the Start button and then Connect To > Show All Connections.
Part Number 1288610102 rev. C
5
Replacing the WiFi Access Point or Bridge
2. In the Network Connections window, right-click Local Area Connection and choose Properties.
3. Click Internet Protocol (TCP/IP) and then click the Properties button.
4. In the Internet Protocol (TCP/IP) Properties dialog, select Use the following IP address and enter the
following:
IP Address:
Subnet Mask:
192.168.1.10
255.255.255.0
5. Click OK.
6. In the Local Area Connection Properties dialog, click OK.
6
Part Number 1288610102 rev. C
Replacing the WiFi Access Point or Bridge
Troubleshooting
If nothing appears on the sign when you send messages from Ooh!Media, the first step is to verify there is
communication with the sign. You can do this by “pinging” the sign. Ping is a tool used on computer networks to
test whether devices are reachable. The goal of pinging a device is to get a reply. If there is no reply, the ping
request “times out” meaning the device is unreachable. See “To ping the sign, Bridge, or Access Point” on this
page for instructions.
If you can successfully ping the sign, then the WiFi devices are communicating properly.
Basic troubleshooting sequence:
Ping the sign
Ping the sign
Is there a
reply?
Is there a
reply?
Yes
Contact Technical Support.
Yes
Contact Technical Support.
No
No
Ping the
Access
Ping Point
the
Bridge
Is there a
reply?
Is there a
reply?
No
No
Yes
Yes
There may be a problem
with the Access Point’s IP
There may be a problem
address, the wireless unit
with the Bridge's IP
itself, or the internal
address, the wireless unit
network. Refer to the
itself, or the internal
manual for the W iFi
network. Refer to the
device, contact your
manual for the W iFi
network technician, or
device, contact your
contact Technical Support.
network technician, or
contact Technical Support.
Ping the Bridge
Ping the Access Point
Is there a
reply?
Is there a
reply?
No
No
Yes
There may be a problem
with the Bridge's IP
There may be a problem
address or the cabling.
with the A ccess Point's IP
See your network
address or the cabling.
technician or contact
See your network
Technical Support.
technician or contact
Technical Support.
Yes
Try resending the
message. If the
Try resending the
problem continues,
message. If the
contact Technical
problem continues,
Support.
contact Technical
Support.
Part Number 1288610102 rev. C
7
Replacing the WiFi Access Point or Bridge
To ping the sign, Bridge, or Access Point
1. The ping command is performed from within the Windows command prompt window (also referred to as
the DOS window).
To open the command prompt, click the Start button and select Run.
A command window similar to the following appears.
2. Type ping followed by the IP address of the unit as in the following example.
ping 192.168.1.2
A successful ping looks similar to the following:
An unsuccessful ping looks similar to the following:
8
Part Number 1288610102 rev. C