1
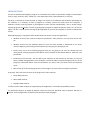
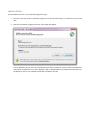
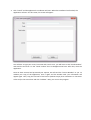
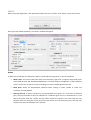
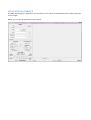
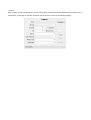
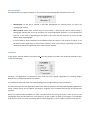
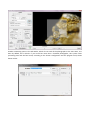
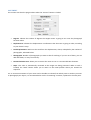
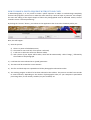
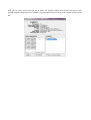
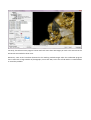
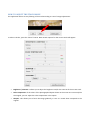
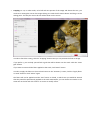
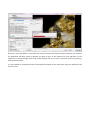
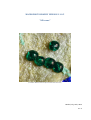
MACROPHOTOGRAPHY VERSION 1.1.0.5
"All in one"
(Cornwallita. Mazarrón. Murcia. Spain. Each ball measures 0.3 mm)
Madrid, July, 15th, 2013
rev. 3
Content
INTRODUCTION ................................................................................................................................................ 1
INSTALLATION ................................................................................................................................................. 3
SETUP............................................................................................................................................................... 5
REQUIREMENTS ............................................................................................................................................. 10
APPLICATION'S INTERFACE ............................................................................................................................ 11
CAMERA ..................................................................................................................................................... 12
PHOTOGRAPHY .......................................................................................................................................... 16
MOVEMENT ............................................................................................................................................... 18
POSITIONING. Assistant. ............................................................................................................................ 19
HOW TO MAKE A PHOTO SEQUENCE WITH JUST ONE CLICK ....................................................................... 21
STACK SCREEN ............................................................................................................................................... 23
HOW TO MAKE MORE THAN ONE STACK...................................................................................................... 27
HOW TO TOUCH UP A STACK ........................................................................................................................ 32
APPENDIX 1. Compatibility with reflex cameras. .......................................................................................... 34
INTRODUCTION
The aim of the Macrophotography program is to facilitate the creation of spectacular images of small objects
such as: bugs, minerals, coins, stamps, etc., with dimensions from a few millimeters, to microns.
Currently, to be able to create this kind of image, you need a set of software and hardware. Specifically for
the software, it is necessary to have a program to remotely control the camera from the computer, a
hardware remote control program to photograph at exact intervals automatically, one or several imagestacking programs and, finally, a touch up photography program to adjust the photo's shade, etc., to the real
object. All this is a slow process forcing the photographer to go from one program to another to obtain best
results.
Macrophotography is a program that includes these five actions in only one application:
• Absolute control of the camera to adjust its parameters, take previews, use Live View, mirror lock,
etc.
• Absolute control over the hardware device so you can move forward or backwards as you need,
mark the beginning and ending of the sequence you are going to photograph, etc.
• Control over one or more stacking programs that you are going to use. You can choose from the
more popular stacking programs, like Helicon Focus, Combine ZP and Zerene Stacker, with your own
parameters.
• Production of more stacks. You can add to your sequence as many photos as you want, in case you
haven’t added enough photos to the sequence. You will be able to stack them again with any of the
programs mentioned before with the parameters you want, until you finally reach the expected
result.
• Basic touch up of the stack(s) generated, so the image is as close to the real object as possible.
At present, there are three versions of the program for reflex cameras:
• Canon DSLR cameras.
• Nikon DSLR cameras.
• Olympus DSLR cameras.
In order to know which models are supported by this application, consult the Compatibility section.
The application appears in English by default, unless you have your Windows setup in Spanish, German, or
Russian, then the application is shown automatically in these languages.
INSTALLATION
The installation process is very easy following these steps:
1. Get your own copy of the installation program in ZIP format and unzip it in a directory of your hard
disk.
2. Start the installation program setup.exe. This image will appear:
If your Windows version does not include Microsoft .NET Framework 4 Client Profile and Microsoft
Visual Basic PowerPacks 10.0, those programs will be downloaded and installed automatically. For
the Olympus version you need Microsoft .NET Framework 3.5 SP1.
3. Click “Install” and the application's installation will start. When the installation has finished, the
application will start. The first time, this screen will appear:
You will have to type your name, last name and e-mail. Later, you will have to click “Serial Number”
and send the text that is in the “Serial number” box to [email protected]. After that, close the
application.
Once we have received and processed your request, we will send the “License Number” to you. To
validate your copy of the application, start it again and the window with your information will
appear again. Then, copy the five lines of the license (without empty lines in between or characters
at the end) in the License box and click “Validate”. Now, you can use the program..
SETUP
Before using the application, a few parameters need to be set. To do this, click “Setup” on the start screen:
Once you have clicked the button, the “Setup” window will appear:
DEVICE
It allows you to indicate your Macrorail’s data or motorized focusing system, to set the resolution.
•
Motor steps. You have to select the motor your device has; right now, it supports single-pole motor
steps of 48, 96, 100, 200, 400, 600 and 800 steps. If it needs another configuration or has a different
motor, contact our customer service by sending an e-mail to [email protected].
•
Shaft pitch. Shows the displacement obtained when turning its shaft, spindle or screw one
revolution. 1mm by default.
•
Gearing ratio (Z). It shows, if necessary, any gearing with worm gears, etc. If you have a reduction
gear, you must introduce a ratio, for example: for a reduction gear of 1:10, it would be 10. In a case
where the motor shaft has a pulley and the shaft's spindle has another, you must show the ratio
between them. For example, if every three turns the motor turns the shaft only once, then the ratio
will be of 1:3 and you should put a 3 in this box.
•
Stabilizing time. With this parameter you can indicate the time in milliseconds that your device
needs to be completely stabilized without any kind of vibration generated by the engine.
•
Type of engine. At the moment, the program accepts devices that work with Unipolar step motors,
like MacroRail, focusing tracks created by oneself, tracks with Bipolar motors, either of simple
electronic (Bipolar A) or complex electronic, as CNC (Bipolar B), or with focusing tracks Stack Shot.
The resolution of your machine is defined by the formula:
Resolution = Shaft pitch / Engine steps / Gear ratio(Z).
Example:
Shaft pitch = 1mm
Motor steps = 200 per revolution
Gear ratio (Z) = 1:2 (using pulleys) = 2
Resolution = 1mm / 200 / 2 = 0.0025 mm = 2.5 microns. This is the value that your shaft will
move for each motor step or movement you make in the application.
PHOTOGRAPHY
It allows you to provide information related to the photographs you take with the application.
•
Photos. Dir.: Directory where the photographs and stacks you make will be stored.
•
Photo num.: This shows the initial or current number of photos. Every photo taken has a name
“Image_000000.jpg” where the zeros are replaced by consecutive numbers following this value.
•
Live View. This allows you to set the camera in video mode to see directly whatever it is focusing. If
you select the automatic mode it shows the video if the camera supports it. For cameras without
Live View, you have the semiautomatic mode which takes a preview photograph automatically every
time that you move the engine to focus in the “Positioning” section of the main screen.
•
Output size. Usually the cameras work with high resolution, depending on its configuration. This
means that, for example, an EOS 600D with high resolution could work with 18 Mpx (megapixel) or,
in other words, with a resolution of 5,184 x 3,456 pixels.
In many cases it is not needed such a high resolution, so in this application you can indicate if the
final result is presented with the Original size or with 1/2, 1/4 or 1/8 of the Original result. This saves
a lot of time when making a stack because these applications will work with a smaller version of the
Original image. Besides, you can use the 1/8 parameter to make a previous stack really fast.
•
Flipped images. It shows all the images and stacks made vertically reversed. It is useful when having
the camera upside down in microscopes, etc.
DEBUGGING
This is an application's special starting mode that may be required by our customer service in case there is
any problem with the application. For example, that you don't recognize some of you camera's parameters,
etc.
HELICON FOCUS
Heliconsoft's stacking program (http://www.heliconsoft.com). In here you could indicate the directory, if you
have it, where the application has been installed and which parameters you will use by default.
COMBINE ZP
Alan Hadley's free stacking program (http://www.hadleyweb.pwp.blueyonder.co.uk/). In here, you can also
show the setup's directory and preferences when stacking with the program.
ZERENE STACKER
Zerene Systems’s stacking program (http://zerenesystems.com/cms/stacker). Just like in the other stacking
programs, you can indicate the default directory and parameters.
REQUIREMENTS
This application needs the following software and hardware requirements to work correctly.
SOFTWARE
•
The installation of Windows XP, Windows 7 or Windows 8.
•
During the installation, if necessary, Microsoft .NET Framework will be automatically installed.
HARDWARE
•
A device, known as a machine used to move the camera or object automatically with constant
movements defined by the user.
At present, the application can control a single-pole stepper motor through a standard USB cable
FTDI (http://www.ftdichip.com/Products/Cables/USBTTLSerial.htm). For this to happen, four cable
direct signals are used to excite the motor's coil in “double step” mode.
If you don't have a device, you can get one in MacroRail.com or build one yourself, by consulting the
section “Tu Taller” from the discussion forum http://www.tuplaneta.es/, see
http://www.photomacrography.net/forum/viewtopic.php?t=19824. Should you need help, please
contact with us through [email protected].
In the future, it is expected that it will support other focusing tracks, like Stack Shot, or tracks based
on Arduino's open platforms..
•
A computer. For now, the application works with a desktop computer, laptop, netbook, etc. It
requires two USB connections, one for the FTDI cable, indicated in the previous point, and the other
to connect the reflex camera to the computer. The most important part is having installed the
drivers from the FTDI USB cable (http://www.ftdichip.com/Drivers/D2XX.htm) and from the camera.
APPLICATION'S INTERFACE
The Macrophotography's application tries to present in one screen all the essential tools to easily make your
macro images.
Below, you can see the application's main screen:
CAMERA
Here we have all your reflex camera's current information. If when starting the application the camera is not
switched on, a message of “Camera not found” will be shown, as seen in the following image:
CAMERA
Here we have all your reflex camera's current information. If when starting the application the camera is not
switched on, a message of “Camera not found” will be shown, as seen in the following image:
Preview photo. The “Preview photo” button allows you to take a photograph to be presented on the screen
without being saved on the hard disk:
Photo. It allows to take a photograph saving it in your hard disk.
Live View. Allows you to see the area where the photographs are presented, what the camera is seeing in
that moment, like a video. This mode is very useful when using the “Positioning” functions:
When you are in Live View mode you cannot take a Preview photograph.
Olympus cameras do not show Live View on the computer's screen but on the led's screen, or in another
screen using the video's cable, so if you are not comfortable with this mode, you should use the
semiautomatic mode.
Live View's automatic mode presents the video on screen only if the camera supports Live View. It is
recommended that you use the semiautomatic mode, which takes a photograph automatically when the
motor is moved from the “Positioning” section. Working this way, you can see whether or not the object is
focused.
PHOTOGRAPHY
The tick-box tells the program whether or not you want to take photographs and what it has to do:
•
Photography. Of the box is marked, it will take photographs for stacking when you press the
“Photograph” button.
•
Mirror lockup. Most reflex cameras have a mirror which is lifted by the camera before taking a
photograph. Moving the mirror up and down can cause undesirable vibrations, so you should mark
this box. If you mark it, depending on the camera, the mirror will be raised one or more seconds
before taking a photograph.
In some cameras, these parameters are established from the camera’s own controls. In others, it can
be done from the application. In some Canon cameras, if the mirror lockup is specified, it should be
marked, otherwise the application won't take pictures normally.
STACKING
In this option, indicate whether you desire that, once the pictures are taken, they should be stacked to form
a fully focused image:
Currently, the application is prepared to select from the most popular applications in stacking images:
Helicon Focus, Combine ZP and Zerene Stacker.
It is possible to make more than one stacking program choosing the box you are interested in.
The manufacturers of these applications have been asked to include in the Macrophotography application's
setup, a demo version for the Helicon and Zerene's program, and a complete free version of Combine ZP's
program.
One of the new functions available is to take a Previous Photo and, using the mouse, select an area in the
photograph which will be stacked in each sequence. So the number of pixels in the images is considerably
reduced. This leads to a faster processing speed in these applications. Up to a 300% of speed can be gained.
Another interesting option is the Sub-Stacks, which do not stack all the photographs at the same time, as it
does by default, but in blocks. If your stack has more than a hundred photographs, this system saves
processing time and the final result, according to the chosen configuration and the program used, shows
better results.
MOVEMENT
This section sets what the program does when the “Process” button is clicked:
•
Degrees. Indicate the number of degrees the stepper motor is going to turn once the photograph
has been taken.
•
Displacement. Indicates the displacement in millimeters that the motor is going to make, according
to your device's setup.
•
Total displacement. Works out the total from the displacement, above, multiplied by the number of
photographs, indicated below.
•
Photographs. Number of photographs you want to take for stacking. If you run out of these, you can
add afterwards, as many as necessary.
•
Counterclockwise turn. Allows you to instruct the motor to turn in a counterclockwise direction.
•
Steps. This value is automatically increased as the images are being processed. When a stack is
finished, the “Back” button allows you to return to the initial position where you started the
sequence.
For an accurate movement of your motor and to be able to indicate from which point to another you want
to photograph your object, it is recommended to use the “Positioning” assistant, explained in the next point.
POSITIONING. Assistant.
“Positioning” is an assistant that lets you easily tell the application, through motor movements, the initial
and final position of your object's depth of field.
One of the main problems encountered in macro photography is that when so close to the object, cameras
can't fully focus the whole object and its background.
To solve this, photograph sequences are made from an initial point to a final focus or depth of field point, so
once the sequence is done, it can be stacked using a stacking program and this program will produce a
completely focused image. It is better to activate the Live View mode automatically or semi automatically.
Please see chapter “Setup” and “Interface” in the “Camera” section.
•
INI. Shows the initial position in millimeters of your depth of field from wherever you desire your
object to be focused. In order to indicate said position, it is necessary to have moved the engine to
get closer or further to the object and pressed the “Set INI” button.
•
END. Allows you to show the final focus or depth of field of your object by pressing the “Set END”
button. In order to indicate that position, it should have been indicated before the initial point in the
previous option.
•
Motor movement. By means of double buttons 1, 5, 10, 20, 50, 100, 200 and 500 you can indicate
the number of steps for the motor to be moved either to get closer or to move away from the
object. When an motor movement is made, the camera or the object moves closer or further,
depending on your MacroRail’s configuration. The displacement for each step is defined by your
device's resolution. Should you need more information, please consult this manual's “Configuration”
section.
•
CURRENT and Difference. The current position of your displacement is shown by the value
presented in “CURRENT”. This may be either positive or negative. The difference shows the relative
distance to the current.
•
Reset. “Reset” button clears the measurements for the initial and final positions. It is recommended
to press the “Reset” button when the initial position is established and before clicking the “Set INI”
button.
For the assistant to work, when the initial and final points are set, the number of photographs to be taken
should be indicated first.
When the number of photographs to be taken is established, click “Make adjustments”. The first thing it
does is to check if the initial position matches up with the initial position indicated. If it does not, a message
will appear on the screen as a warning of this situation:
Do you want to move the motor to INI position?
Then, your data will be processed using a special positioning algorithm which will do the following:
1st.
Divide the total displacement by the number of photographs.
2nd.
Calculate the displacement of each photograph according to your device's resolution.
3rd.
Adjust the sequence's total displacement as for the second point with an upward calculation
to avoid the need of more displacement when making the sequence.
4th.
Select in “Degrees” the accurate movement for each photograph.
5th.
Adjust the total number of photographs to the best calculation possible from point 3.
Once the algorithm is applied, click the “Process” button to start the photos' sequence or to adjust manually
the parameters in the “Movement” section.
HOW TO MAKE A PHOTO SEQUENCE WITH JUST ONE CLICK
In Macrohotography, it is very useful to make a photo sequence to obtain a stacked image completely
focused. This program's main aim is to make this action easier by a series of steps or processes. For example,
the start and ending of the object's depth of field to be photographed must be indicated. Please, see this
manual's section “Assitant positioning”.
By clicking the “Process” button, you indicate to the application that it has to do the whole job for you:
Next, this will happen:
1) Start the process.
a)
b)
c)
d)
There is a pause of Stabilization time;
the camera's mirror will lift, if this option is selected;
it will wait to allow the camera to become stable;
and a photo of your object will be taken, which will be automatically called “Image_” followed by
the number of the photograph.
2) It will wait the time indicated in TV (speed) parameter.
3) The motor will be moved the correct amount.
4) The first and third steps are repeated until all the photographs indicated are taken.
5) The stacking program is called if it has been selected in the tick-box. This process can take from seconds
to several minutes, depending on the number of photographs taken, on your computer's speed while
processing them, on the memory installed, on your hard disk, etc.
POSITIONING. Assistant.
“Positioning” is an assistant that lets you easily tell the application, through motor movements, the initial
and final position of your object's depth of field.
One of the main problems encountered in macro photography is that when so close to the object, cameras
can't fully focus the whole object and its background.
To solve this, photograph sequences are made from an initial point to a final focus or depth of field point, so
once the sequence is done, it can be stacked using a stacking program and this program will produce a
completely focused image. It is better to activate the Live View mode automatically or semi automatically.
Please see chapter “Setup” and “Interface” in the “Camera” section.
•
INI. Shows the initial position in millimeters of your depth of field from wherever you desire your
object to be focused. In order to indicate said position, it is necessary to have moved the engine to
get closer or further to the object and pressed the “Set INI” button.
•
END. Allows you to show the final focus or depth of field of your object by pressing the “Set END”
button. In order to indicate that position, it should have been indicated before the initial point in the
previous option.
•
Motor movement. By means of double buttons 1, 5, 10, 20, 50, 100, 200 and 500 you can indicate
the number of steps for the motor to be moved either to get closer or to move away from the
object. When an motor movement is made, the camera or the object moves closer or further,
depending on your MacroRail’s configuration. The displacement for each step is defined by your
device's resolution. Should you need more information, please consult this manual's “Configuration”
section.
•
CURRENT and Difference. The current position of your displacement is shown by the value
presented in “CURRENT”. This may be either positive or negative. The difference shows the relative
distance to the current.
•
Reset. “Reset” button clears the measurements for the initial and final positions. It is recommended
to press the “Reset” button when the initial position is established and before clicking the “Set INI”
button.
For the assistant to work, when the initial and final points are set, the number of photographs to be taken
should be indicated first.
STACK SCREEN
The stacking screen is shown when a sequence of photographs has been processed and it has been chosen
that they are going to be stacked. Please, see the previous section of this document.
SUMMARY
Select your stack's characteristics:
PHOTOGRAPHS
A list of photographs added to the current stack:
You can click an image's name to see it. You can also unmark one or more photographs to discard them in
new stacks.
Finally, you can add more photographs to the sequence from the current focused position. By pressing the
up and down buttons you indicate the number of photographs to be added and then click the “Add” button.
The main screen will appear showing the following window:
In this example, three new photographs will be added to the list and will be marked by default to be included
in a new stack:
STACKS
It presents a list of all the stacks done for the moment:
If you click one of the stacks, you will see the image. You can create as many stacks as desired.
In every stack, you can change the stacking parameters as well as the images composing it.
STACKING
This screen shows the configuration of new stack(s) you want to make.
If you like the result obtained, you can save the current configuration applied to the stack pressing “Save
settings”.
STACK SCREEN
The stacking screen is shown when a sequence of photographs has been processed and it has been chosen
that they are going to be stacked. Please, see the previous section of this document.
SUMMARY
Select your stack's characteristics:
Now, you can see a new stack in the list of stacks. The original stacked name matches up with the first
stacked image but it will appear as “Stacked”. The subsequent stacks will bring a sub number as seen on the
list:
ADVANCED STACK. SUB-STACK
From a hundred or less photographs to stack, this technique is very useful. For example, there are cases in
which it is needed the stack of 1,500 or more photographs so the bug’s antennae, minerals’ acicular crystals,
etc. are well-defined.
The management of the stacking programs with such a high number of photographs takes a long processing
time, so dividing the work in small blocks is a good option. For example, of a 1/10 of the total, called SubStack, like that you get a final result stacking the Sub-Stacks.
An example of this is the program Helicon Focus, in which you can reduce the processing time up to a 40%
using this technique. You will get a better result than you would get by stacking all the images at once.
This application allows the indication of the number of photographs in every Sub-Stack, the number of
overlapped photos among each Sub-Stack, the method to be used in each Sub-Stack, as well as the method
to be used in the final stack, as shown in the following image:
In the following image you can see how a Sub-Stacked is being processed in the screen, where the current
progress is shown.
Of course, in the Sub-Stacks is also taken into account whether the image has been previously cut, whether
the application has been setup or whether you want to do it at this moment for your Sub-Stack, so the
output size or stacked image is the same as the Original, with a 1/2, 1/4 or 1/8 of the actual size, gaining a
lower processing time.
It is not possible to Crop before and use the Output Size option at the same time. Only one method can be
used at a time.
Currently, the Helicon Focus program cannot work with more than 255 images per stack. This means that the
Sub-Stacks are needed in these cases.
Moreover, some errors have been detected in the resulting stacked images when the CombineZP program
has to work with a large number of photographs, more than 200, so the use of Sub-Stacks is recommended
to avoid this problem.
HOW TO ADJUST THE STACK IMAGE
This application allows an easy filtering of the stack according to a set of image adjustments:
In order to do this, press the “Filters” button. New retouch options for the current stack will appear:
•
Brightness / Contrast. It allows you to adjust the brightness and/or the contrast of the current stack.
•
Color temperature. If the colors of the photographed object shown on the screen are not exactly like
the original, you can adjust the color temperature in this option.
•
Sharpen. This allows you to focus the image gradually, in case it is toned down compared to the
original.
•
Cropping. To cut, in other words, to be left with one portion of the image and dismiss the rest, you
can draw a rectangular area on the image clicking on it with the left mouse button and drag it to the
ending point. This way the area to be cut will be shown on the screen:
In order to finish the cutting, click the “Cropping” button. Now you can preview the final cut image.
If you prefer it, you can help yourself with a grid that will be drawn over the stack. Click the “Draw
grid” button.
If you want to remove all the filters applied to the stack, click “Reset” button.
In order to apply the filters on the stack and return to the “Summary” screen, click the “Apply filters
on stack” button or click “Filters” again.
The filters will not be applied until the “Exit” button is clicked, in which case you would be warned
that they would be permanently applied to the stack. Meanwhile, you can choose new stacks or the
same one on the list and click “Filters” to correct or modify a filter.
APPENDIX 1. Compatibility with reflex cameras.
Currently, there are three versions of the Macrophotography program. Each version works with a
manufacturer of reflex cameras. The manufacturer supplies enough SDK (Software Development Kit) to
develop applications that the cameras' applications can use.
Even though every SDK has multiple camera control functions, we have only included those that are relevant
to take photographs for stacking. However, each manufacturer gives support only to a few of their cameras
among all the existing ones. You can find below a list of all the compatible cameras, following the program
used.
Canon Macrophotography
This version dedicated to Canon's reflex cameras is compatible with the following cameras:
•
•
•
•
•
•
•
•
•
•
•
•
•
•
•
•
•
•
•
•
•
•
•
•
•
•
•
EOS-1D C (*)
EOS-1D Mark II
EOS-1D Mark II N
EOS-1Ds Mark II
EOS-1D Mark III
EOS-1Ds Mark III
EOS-1D Mark IV
EOS 1D X (*)
EOS 5D
EOS 5D Mark II
EOS 5D Mark III (*)
EOS 6D (*)
EOS 7D
EOS 20D
EOS 30D
EOS 40D
EOS 50D
EOS M (*)
EOS Kiss Digital N/350D/REBEL XT
EOS Kiss Digital X/400D/REBEL XTi
EOS DIGITAL REBEL Xsi/450D/ Kiss X2
EOS Kiss X3/EOS REBEL T1i /EOS 500D
EOS Kiss X4/EOS REBEL T2i /EOS 550D
EOS Kiss X5/EOS REBEL T3i /EOS 600D
EOS Kiss X6i/EOS 650D/EOS REBEL T4i
EOS DIGITAL REBEL XS/ 1000D/ KISS F
EOS Kiss X50/EOS REBEL T3 /EOS 1100D
At present, the program's version uses the SDK v. 2. 10. For the indicated cameras with (*), please contact
with [email protected] for us to provide you with a valid version that uses the last available version of
Canon's SDK v. 2.12.
Nikon Macrophotography
The Nikon version supports the following cameras:
•
•
•
•
•
•
•
•
•
•
•
•
•
•
•
•
•
•
D3
D3S
D3X
D4
D40
D60
D80
D90
D200
D300
D300S
D600
D700
D800
D5000
D5100
D5200
D7000
For Nikon cameras you need to indicate whether the camera is connected to your computer, selecting it on
the “Configuration” screen.
Currently, this version uses a NikonC#Wrappper provided by Thomas Dideriksen <[email protected]>,
http://sourceforge.net/projects/nikoncswrapper/.
Of course, in the Sub-Stacks is also taken into account whether the image has been previously cut, whether
the application has been setup or whether you want to do it at this moment for your Sub-Stack, so the
output size or stacked image is the same as the Original, with a 1/2, 1/4 or 1/8 of the actual size, gaining a
lower processing time.
It is not possible to Crop before and use the Output Size option at the same time. Only one method can be
used at a time.