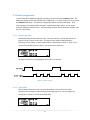
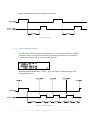
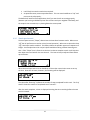
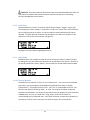
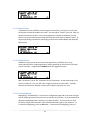
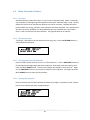
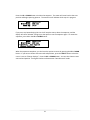
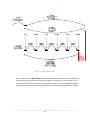
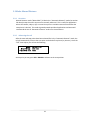
1
 Patent Pending Turning ordinary moments into extraordinary pictures Owner’s Manual Revision 1.5 Copyright 2011 Cognisys, Inc. Table of Contents 1. SAFETY INSTRUCTIONS ............................................................................................................................... 5 2. GETTING STARTED ..................................................................................................................................... 5 3. OPERATION ............................................................................................................................................... 7 3.1 OVERVIEW ....................................................................................................................................................... 7 3.2 THE USER INTERFACE ......................................................................................................................................... 7 3.3 GLOBAL CONFIGURATION ................................................................................................................................... 8 3.3.1 Pictures per Step ...................................................................................................................................... 8 3.3.2 Settle Time ............................................................................................................................................... 8 3.3.3 Time Off Between Pictures ....................................................................................................................... 9 3.3.4 Loading/Saving Settings ........................................................................................................................ 10 3.3.5 Automatic Return ................................................................................................................................... 11 3.3.6 Motor Speed .......................................................................................................................................... 11 3.3.7 Time Lapse Interval ................................................................................................................................ 12 3.3.8 Pulse Time .............................................................................................................................................. 13 3.3.9 Ramp Time ............................................................................................................................................. 13 3.3.10 Units of Measure ............................................................................................................................... 13 3.3.11 Motor Torque .................................................................................................................................... 14 3.3.12 High Precision .................................................................................................................................... 14 3.3.13 LCD Backlighting ................................................................................................................................ 14 3.4 MOVING THE RAIL ........................................................................................................................................... 16 3.5 SHUTTER DISABLE ........................................................................................................................................... 16 3.6 OPERATING MODES ......................................................................................................................................... 16 3.7 MODE: AUTOMATIC STEP ................................................................................................................................. 17 3.7.1 Overview ................................................................................................................................................ 17 3.7.2 Number of Steps .................................................................................................................................... 17 3.7.3 Selecting the Start/End Positions ........................................................................................................... 17 3.7.4 Starting the Sequence ............................................................................................................................ 18 3.8 MODE: AUTOMATIC DISTANCE .......................................................................................................................... 20 3.8.1 Overview ................................................................................................................................................ 20 3.8.2 Distance per Step ................................................................................................................................... 20 3.8.3 Selecting the Start/End Positions ........................................................................................................... 20 3.8.4 Starting the Sequence ............................................................................................................................ 20 3.9 MODE: MANUAL DISTANCE .............................................................................................................................. 23 3.9.1 Overview ................................................................................................................................................ 23 3.9.2 Advancing the rail .................................................................................................................................. 23 3.10 MODE: TOTAL TRAVEL DISTANCE ....................................................................................................................... 24 3.10.1 Overview ............................................................................................................................................ 24 3.10.2 Number of Steps ................................................................................................................................ 24 3.10.3 Total Distance .................................................................................................................................... 24 3.10.4 Starting the Sequence ........................................................................................................................ 24 2 3.11 MODE: DISTANCE PER STEP .............................................................................................................................. 26 3.11.1 Overview ............................................................................................................................................ 26 3.11.2 Number of Steps ................................................................................................................................ 26 3.11.3 Distance per Step ............................................................................................................................... 26 3.11.4 Starting the Sequence ........................................................................................................................ 26 3.12 MODE: MANUAL STEP ..................................................................................................................................... 28 3.12.1 Overview ............................................................................................................................................ 28 3.12.2 Distance per Step ............................................................................................................................... 28 3.12.3 Starting the Sequence ........................................................................................................................ 28 3.13 MODE: CONTINUOUS MOVEMENT ..................................................................................................................... 30 3.13.1 Overview ............................................................................................................................................ 30 3.13.2 Total Distance .................................................................................................................................... 30 3.13.3 Starting the Sequence ........................................................................................................................ 30 3.14 ADVANCED SETTINGS ....................................................................................................................................... 32 3.14.1 Distance per Revolution ..................................................................................................................... 32 3.14.2 Backlash ............................................................................................................................................. 32 3.15 USB INTERFACE .............................................................................................................................................. 33 3.14.1 Helicon Soft ........................................................................................................................................ 33 3.14.2 Zerene Stacker ................................................................................................................................... 33 3.14.3 Cognisys Reflash ................................................................................................................................ 33 4. ACCESSORIES ............................................................................................................................................ 35 5. CONNECTIONS & CABLES .......................................................................................................................... 36 5.1 5.2 6. SHUTTER TRIGGER OUTPUT ............................................................................................................................... 36 MOTOR CABLE ............................................................................................................................................... 36 SETUP EXAMPLES ...................................................................................................................................... 37 6.1 6.2 6.3 6.4 MIRROR LOCK‐UP ........................................................................................................................................... 37 100MM VS. THE ORCHID ................................................................................................................................. 38 MP‐E 65 VS. THE ANT .................................................................................................................................... 42 THE RAIL ....................................................................................................................................................... 44 7. TROUBLESHOOTING .................................................................................................................................. 45 8. SPECIFICATIONS ........................................................................................................................................ 47 9. WARRANTY .............................................................................................................................................. 48 10. GLOSSARY ............................................................................................................................................ 49 11. REVISION HISTORY ................................................................................................................................ 50 3 Table of Figures Figure 1 ‐ Typical Connection Diagram ......................................................................................................... 6 Figure 2 ‐ Pictures per Step ........................................................................................................................... 8 Figure 3 ‐ Settle Time .................................................................................................................................... 9 Figure 4 ‐ Total Timing Diagram .................................................................................................................... 9 Figure 5 ‐ Auto Return ................................................................................................................................. 11 Figure 6 ‐ Steps Vs. Pictures ........................................................................................................................ 17 Figure 7 ‐ Automatic Step Mode ................................................................................................................. 19 Figure 8 ‐ Automatic Distance Mode .......................................................................................................... 22 Figure 9 ‐ Total Distance Mode ................................................................................................................... 25 Figure 10 ‐ Manual Mode ............................................................................................................................ 29 Figure 11 ‐ Continuous Mode ..................................................................................................................... 31 Figure 12 ‐ Universal IR Remote .................................................................................................................. 35 Figure 13 ‐ RCA connector .......................................................................................................................... 36 Figure 14 ‐ StackShot Orchid Setup ............................................................................................................ 38 Figure 15 ‐ Orchid Sequence ....................................................................................................................... 40 Figure 16 ‐ Orchid Stack .............................................................................................................................. 41 Figure 17 ‐ Ant Setup .................................................................................................................................. 42 Figure 18 ‐ Ant Stack ................................................................................................................................... 43 4 1. Safety Instructions WARNING indicates a potentially hazardous situation which, if not avoided, could result in death or serious injury. Follow all CAUTION notices to reduce the risk of personal injury, prevent damage to the StackShot module, accessories, and devices (cameras, flashes, etc). Failure to follow all CAUTION notices may void your warranty. CAUTION may also indicate a potentially hazardous situation which, if not avoided, may result in personal injury. The safety alert symbol precedes a general CAUTION or WARNING statement. The electrical hazard symbol statement. precedes an electric shock hazard CAUTION or WARNING 2. Getting Started The latest version of this manual is available at http://www.cognisys‐inc.com. The StackShot package contains the following: 1. StackShot Control Module (1) 2. AC/DC Power Adapter (1) 3. Operation Manual CD (1) – including a free trial of Helicon and Zerene focus stacking software 4. Motor cable (1) 5. StackShot Rail Assembly (1) The StackShot motor cable connects to the four‐pin connector on the control module. The connector labeled “Trigger” should connect to your camera using the appropriate shutter cable or universal IR remote. CAUTION: Only connect the motor cable to the control module when the control module is not powered. 5 Power to the StackShot module is provided through an AC to DC power adapter or a 12V battery (purchased separately). A standard sealed lead‐acid battery with a 1‐5 amp/hour capacity is acceptable. Plug the power adapter into the StackShot module power jack and plug the adapter into the wall. The unit will power up, display a splash screen, and then continue to the main screen. AC adapters are available for other plug types as well (UK, EU, and AUS). Figure 1 ‐ Typical Connection Diagram CAUTION: Only use the power adapter (cube) that came with the StackShot module. Use of other power adapters may damage the module and/or motor. 6 3. Operation 3.1 Overview With macro photography all too often pictures have a shallow depth of field (DOF). This is where StackShot (and widely available focus‐stacking software) shine. StackShot allows precise control over a camera’s position intended for use with macro photography. It automates the process of taking several pictures in incremental steps. The subsequent images are then processed by focus‐stacking software to merge the shallow DOF images into a single crisp and highly detailed picture. While this same process can be accomplished manually, getting precise steps is difficult, time consuming, and frustrating. Decreasing the time spent taking the images also allows you to focus‐stack things that just wouldn’t cooperate or stay still long enough. By combining a simple user‐interface with behind‐the‐scenes extreme flexibility, StackShot is a necessity for any serious macro photographer. CAUTION: Always keep your body, cables, and equipment clear of the rail while it is in motion. Be aware of the environment you are operating in. The center of gravity will change as StackShot moves the camera. Moving the rail can potentially cause a tipping hazard. Be sure that your tripod is secured and balanced properly to prevent damage to equipment. Monitor your camera, lens, and other equipment at all times while the rail is moving to prevent damage to your equipment. The motor cable may pose as a tripping hazard. Use caution. 3.2 The User Interface There are seven buttons to control StackShot. The SELECT button moves the cursor (“>” indicator) from line to line on the display. The UP and DOWN button adjust the values for each line. CONFIG will display a (lengthy) list of user‐
specified configurations. FWD manually moves the motor assembly forward while BACK moves it backward. SHUTTER will manually fire the shutter on the camera. Note: If the motor is moving or a sequence is active, any button press will stop the motor immediately and abort the active sequence. User settings will be saved across power cycles. The different modes of operation are listed in the following sections. 7 3.3 Global Configuration To enter StackShot’s Global Configuration, quickly press and release the CONFIG button. The display will change and list the available user configurations. To return to the main screen press the CONFIG button again. The different configuration options are discussed below. All of these settings are maintained when using the “Load/Save Settings” option. This provides maximum flexibility and ease of use. The last settings used are also retained over a power cycle for your convenience. 3.3.1
Pictures per Step StackShot defaults to one picture per step. You may, however, increase the number of pictures (“# pics”) taken at each step. This gives you the option of doing exposure bracketing, mirror lockup, or other camera effects. Valid values are from 1 – 1000. This is not the total number of pictures taken – just how many at each step. == Global Config ==
> # pics: 1
Tsettle: 500.0 ms
Toff: 500.0 ms
->
See Figure 2 below for a timing diagram with “# pics” set at three. Figure 2 ‐ Pictures per Step 3.3.2
Settle Time After StackShot finishes moving, it may be desirable to have it wait for the motor assembly/camera/tripod to stop moving prior to taking a picture. You may adjust this settling time (“Tsettle”) to force the desired delay. == Global Config ==
# pics: 1
> Tsettle: 500.0 ms
Toff: 500.0 ms
->
8 Figure 3 below shows where the settling time takes place. Figure 3 ‐ Settle Time 3.3.3
Time Off Between Pictures Time off (“Toff”) is the time between multiple pictures. This only applies when the number of pictures (“# pics”) is greater than one unless the operating mode is set to “Continuous”. In “Continuous” mode, “Toff” is the time between pictures. == Global Config ==
# pics: 3
Tsettle: 500.0 ms
>
Toff: 500.0 ms
->
See below to demonstrate where “Tsettle”, “Toff”, and “Tpulse” all come into play when taking multiple pictures. Figure 4 ‐ Total Timing Diagram 9 3.3.4
Loading/Saving Settings StackShot automatically saves the last settings used, but sometimes it is more convenient to save different configurations for different setups (one configuration for insects, for flowers, or even specific lenses). To load or save the settings, press the SELECT button until the cursor is next to “Load/Save Config” and press the UP or DOWN button to enter the next screen. == Global Config ==
> Load/Save Settings
Auto Return: No
Speed: 800 mils/sec
->
From this screen you have two options – to either load or save the configuration. Press the SELECT button to change between the two options. Under the “Load” screen, you will see the following: == Load Config ==
1. <empty>
Up/down to select.
Using the UP or DOWN buttons, you can scroll through the ten available configurations to retrieve. If they have never been loaded with a configuration before it will show up as “empty” otherwise it will show the name you had previously saved. Once you have highlighted the desired configuration to load, press the SELECT button. This will take you to the main screen for this configuration. You can abort the loading screen by simply pressing the CONFIG button. The process is similar for saving a configuration. Once “Save” is selected, you will see the following screen: == Save Config ==
1. <empty>
Up/down to select.
Use the UP or DOWN buttons to select which configuration you would like to save. You can overwrite previously stored configurations. Once the desired configuration is selected, press the SELECT button. At this point you can enter a name. The cursor underlines your current position. The UP and DOWN buttons may be used to change the characters. Each time SELECT is pressed it will take you to the next character position. Keep pressing select 10 until all the characters have been entered (A total of 12 may be used). Not all spaces need to be filled, just keep pressing select to finish the entry. Upon saving the configuration the screen will show: == Save Config ==
1. 5X Spiders
Saved. Cfg exits.
Up/down to select.
In this case the setting name was set to “5X Spiders”. Press the CONFIG button to exit to the main screen. 3.3.5
Automatic Return When StackShot finishes a series of steps you have the option of returning to the beginning position automatically (“Auto Return” set to “Yes”). This is useful if you want to change a camera setting and begin another set of pictures. To change this setting, use the UP or DOWN buttons. When set to “No”, StackShot will leave the camera at the final position. == Global Config ==
Load/Save Settings
> Auto Return: No
Speed: 800 mils/sec
->
Below in Figure 5 is an example of when StackShot is configured for five steps. At the completion of the five steps (and with “Auto Return” set to “Yes”), the rail will move back to its initial position. If “Auto Return” had been set to “No”, the rail would have remained at the final position. Figure 5 ‐ Auto Return 3.3.6
Motor Speed The motor speed (“Speed”) is an adjustable parameter. Why not set the speed to the maximum? There are two drawbacks from going faster: 11 1. It will likely increase the settle time required. 2. As speed increases, motor torque decreases. This can cause StackShot to “slip” and not move the rail properly. The default will work for most applications, but if you see the rail not moving properly (because you’re using a 12000mm prime lens to focus‐stack your neighbor’s forehead), and the torque is set at maximum, try slowing down the motor speed. == Global Config ==
Load/Save Settings
Auto Return: No
> Speed: 800 mils/sec
3.3.7
->
Time Lapse Interval The time lapse interval (“Tlapse”) determines the time taken between stacks. When set to “off” the rail performs one stack at a time (normal operation). When set to value other than “off”, time‐lapse mode is enabled. This feature allows the periodic capture of a sequence of images. An example where this may be helpful would be stacking a flower blooming over time. If the “Tlapse” time is faster than the time it takes to complete a stack it will skip that time‐lapse event and wait for the next interval. The interval may be adjusted from 100ms up to 24 hours. == Global Config ==
> Tlapse: off
Tpulse: 500.0 ms
Tramp: 1.0 sec
->
When the time‐lapse interval is set StackShot will show the normal main screen to set up the shot. Once the rail starts, however, the following will be displayed: Time Lapse Mode
Running: 0/10
# of Stacks: 0
The value after “Running:” indicates the number of steps completed for this stack. The “# of Stacks” shows the number of completed stack “intervals”. After the stack completes, a timer is displayed showing the time remaining before the next stack is initiated. Time Lapse Mode
Remaining: 4.7 sec
# of Stacks: 0
12 CAUTION: Time‐lapse mode will potentially cause the un‐attended operation of the rail. Use caution to avoid situations where someone may be seriously hurt or something seriously damaged due to this feature. 3.3.8
Pulse Time The pulse duration (“Tpulse”) is the time that the shutter output “Trigger” is active (on). This setting may come in handy in “Continuous” mode since “Tpulse” and “Toff” effectively set how rapidly pictures are taken. For other modes this setting would typically not be adjusted. The pulse duration should be long enough for your camera to respond. If the pulse time is set too short your camera may ignore it. == Global Config ==
Tlapse: off
> Tpulse: 500.0 ms
Tramp: 1.0 sec
->
See Figure 4 for more details regarding pulse time. 3.3.9
Ramp Time StackShot allows you to adjust how fast the motor ramps up or down in speed (“Tramp”). Increasing the ramp time effectively decreases the acceleration of the camera. Similarly to the overall speed of the motor (“Speed”), this increases the torque and decreases wobble. == Global
Tlapse:
Tpulse:
> Tramp:
Config ==
off
500.0 ms
1.0 sec
->
3.3.10 Units of Measure The default unit of measure (“Units”) is set to “Metric/mm”. If you are more comfortable with inches, you can change the displayed distances/speeds from metric to English (“English/mils”). The display will show “mils”. One “mil” is a thousandth of an inch. You also have the option of selecting “Steps”. A “step” is the highest resolution method of movement for StackShot. One step is the equivalent to 0.1125 degrees of motor revolution, 0.000496 mm (~0.5 um), or 0.0195 mils. Using “Steps” as the unit of measure is recommended only for advanced users. Such small resolution increases the probability of running into “stiction” which may cause non‐uniform steps in the rail movement. 13 == Global Config ==
> Units: Metric/mm
Torque: 5
Hi Precision: Off
->
3.3.11 Motor Torque If StackShot is having a difficult time moving your camera/lens, you may have to increase the amount of torque provided to the motor. You may adjust “Torque” from 1‐10. Why not always use maximum torque? If you are using batteries to power up StackShot, you will want to use the minimum torque setting that allows the camera/lens to properly move. At high torque settings, StackShot is quite hungry and will more readily deplete the (optional) battery pack. == Global Config ==
Units: Metric/mm
> Torque: 5
Hi Precision: Off
->
3.3.12 High Precision StackShot is quite precise but there are some applications, specifically when using microscope objectives at high magnification, where squeezing out that last bit of precision may be necessary. Using the UP or DOWN button will toggle this feature. == Global Config ==
Units: Metric/mm
Torque: 5
> Hi Precision: Off
->
With “Hi Precision” set to “On” resolutions of 1μm are possible. As with most things in life there are trade‐offs. First, you will notice a high‐pitch whine from the motor. Secondly, there will be a dramatic reduction in battery life (if battery operation is in use). 3.3.13 LCD Backlighting Backlighting (“LCD Backlight”) is on the fourth configuration page and is the amount of light that the display generates so that you can see the text on the screen. It may be beneficial to adjust the backlighting lower if working in low light situations. This preserves your eyes sensitivity to light and also doesn’t cause unwanted secondary light in your exposure. To increase the backlighting, press the UP button. To decrease the backlighting, press the 14 DOWN button. The backlighting may be adjusted from a range of 1 – 10. == Global Config ==
> LCD Backlight: 10
->
15 3.4 Moving the Rail The macro‐rail may be moved in and out manually using the FWD/BACK buttons. These two buttons will always give you control over the rail unless a capture is currently taking place. If StackShot is currently running a capture sequence any button press will abort the sequence. If the camera carriage is run into one of the stops at either end a clicking noise will be heard. This will not cause damage to the rail. CAUTION: Always keep your body, cables, and equipment clear of the rail while it is in motion. The rail can pinch and crush. Be aware of the environment you are operating in. The center of gravity will change as StackShot moves the camera. Moving the rail can potentially cause a tipping hazard. Be sure that your tripod is secured and balanced properly to prevent damage to equipment. Monitor your camera, lens, and other equipment at all times while the rail is moving to prevent damage to your equipment. The motor cable may pose as a tripping hazard. Use caution. 3.5 Shutter Disable By pressing down the CONFIG button, and then simultaneously pressing the SHUTTER button, you can activate the “Shutter Disable” feature. StackShot will function normally except that it will not allow the shutter to fire (nor will the shutter LED illuminate). To indicate that this feature is active, “SD” will flash in the upper right‐hand corner of the LCD Display. Use the above button combination to revert back to normal operations. Pressing the SHUTTER button will also de‐activate the “Shutter Disable” feature. 3.6 Operating Modes From the main screen, the first line of the LCD display shows which operating mode StackShot is currently using. Press the SELECT button to move the indicator next to “Mode”. To change the operating mode press and release the UP or DOWN button. The different modes are discussed below. 16 3.7 Mode: Automatic Step 3.7.1 Overview Automatic Step mode (“Auto‐Step”) simplifies the picture taking process. It allows the user to determine the beginning and end position by using the FWD and BACK buttons, and also the number of steps desired. After that the capturing process is started. There is no need to enter any distance – just choose the appropriate start and end position that you desire. 3.7.2 Number of Steps “# Steps” is the number of steps between the beginning and end position. Use the UP/DOWN buttons to choose the number of steps desired. StackShot always takes a picture prior to moving the motor so the total number of pictures taken will always be: “# Steps” + 1. See below: >
Mode: Auto-Step
# Steps: 5
Select Start Pos
As you can see in Figure 6 below, there are five steps (movements) of the rail. The first picture starts prior to moving it, and the final picture occurs after the last step. Five steps ‐‐ six pictures. Pictures Taken
Pic 1
Pic 2
Step 1
Pic 3
Step 2
Pic 4
Step 3
Pic 5
Step 4
Pic 6
Step 5
Figure 6 ‐ Steps Vs. Pictures 3.7.3 Selecting the Start/End Positions Press the SELECT button until the cursor is on “Select Start Pos”. Use the FWD/BACK buttons to find the appropriate beginning of the picture sequence. Once happy with that position, press 17 either the UP or DOWN button. The text on the display will change to “Select End Pos”. Again, use the FWD/BACK buttons to choose the final position of the sequence. Once again press the UP or DOWN button to select this final position. 3.7.4 Starting the Sequence Once the final position has been selected, the status will change to “Up/Down to start” and the last line on the display will show “Change Settings”. Mode: Auto-Step
# Steps: 10
>
Up/Down to start
Change Settings
Press the UP or DOWN button to initiate the sequence. The motor will move back to the start position and begin capturing pictures. The status line will indicate which step is in progress: Mode: Auto-Step
# Steps: 10
Running: 3/10
If you press any button during this time it will stop the motor, abort the sequence, and the display will show “Aborted” and give you the option to run the sequence again. To restart the sequence, press either the UP or DOWN button. >
Mode: Auto-Step
# Steps: 10
Aborted. Run Again?
Change Settings
When the sequence completes, you also have the option to restart by pressing the UP or DOWN button. If you want to choose new start and end positions, press the SELECT button so that the cursor is next to “Change Settings”. Press the UP or DOWN button. You can then choose a new start and end position. See Figure 7 below to demonstrate “Auto‐Step” mode. 18 Figure 7 ‐ Automatic Step Mode Note: If you press the FWD or BACK buttons after the stack has completed, the rail will move in the direction desired. If you then choose “Run Again?” from the menu, it will use the current position of the rail as the start rather than the original position. This allows adjustments to the starting point without having to go through and choose a new start and end point for the stack. 19 3.8 Mode: Automatic Distance 3.8.1 Overview Automatic Distance mode (“Auto‐Dist”) is very similar to “Automatic Step” mode. It allows the user to determine the beginning and end position exactly like “Automatic Step” mode. The only difference is that the user specifies the distance to travel for each step. StackShot will take a picture before first moving, and then at every distance increment specified. If the total distance desired is not evenly divisible by the desired distance per step, StackShot will “round down”, that is, it will not move the last partial distance. See Figure 8 below as an example. 3.8.2 Distance per Step “Dist/Step” is the distance the rail should move for every step. Use the UP/DOWN buttons to choose the desired distance. Mode: Auto-Dist
> Dist/Step: 200 um
Select Start Pos
3.8.3 Selecting the Start/End Positions Press the SELECT button until the cursor is on “Select Start Pos”. Use the FWD/BACK buttons to find the appropriate beginning of the picture sequence. Once happy with that position, press either the UP or DOWN button. The text on the display will change to “Select End Pos”. Again, use the FWD/BACK buttons to choose the final position of the sequence. Once again press the UP or DOWN button to select this final position. 3.8.4 Starting the Sequence Once the final position has been selected, the status will change to “Up/Down to start” and the last line on the display will show “Change Settings”. Mode: Auto-Dist
> Dist/Step: 200 um
Up/Down to start
Change Settings
20 Press the UP or DOWN button to initiate the sequence. The motor will move back to the start position and begin capturing pictures. The status line will indicate which step is in progress: Mode: Auto-Dist
Dist/Step: 200 um
Running: 3/10
If you press any button during this time it will stop the motor, abort the sequence, and the display will show “Aborted” and give you the option to run the sequence again. To restart the sequence, press either the UP or DOWN button. Mode: Auto-Dist
Dist/Step: 200 um
> Aborted. Run Again?
Change Settings
When the sequence completes, you also have the option to restart by pressing the UP or DOWN button. If you want to choose new start and end positions, press the SELECT button so that the cursor is next to “Change Settings”. Press the UP or DOWN button. You can then choose a new start and end position. See Figure 8 below to demonstrate “Auto‐Distance” mode. 21 Figure 8 ‐ Automatic Distance Mode Note: If you press the FWD or BACK buttons after the stack has completed, the rail will move in the direction desired. If you then choose “Run Again?” from the menu, it will use the current position of the rail as the start rather than the original position. This allows adjustments to the starting point without having to go through and choose a new start and end point for the stack. 22 3.9 Mode: Manual Distance 3.9.1 Overview Manual Distance mode (“ManualDist”) is identical to “Automatic Distance” mode (see section 3.8 above) except that each step must be manually advanced. This is useful for applications where the camera, subject, dye, or material may have a variable amount of time before the next picture is desired. This mode is geared toward specialized applications and we would recommend the use of “Automatic Distance” under most circumstances. 3.9.2 Advancing the rail After the start and stop points have been selected like in the “Automatic Distance” mode, the rail will automatically move to the start point and take the first picture (or pictures). Once the “Toff” time expires you will see the following: Mode: ManualDist
Dist/Step: 200 um
> Up/Down for next
At this point you may press UP or DOWN to advance to the next position. 23 3.10
Mode: Total Travel Distance 3.10.1 Overview In this operating mode (“Total Dist”) you can select the total distance the rail will travel and the number of steps to use in that given distance. To navigate through the options, press the SELECT button. 3.10.2 Number of Steps The “# Steps” option functions identically to the “Automatic Step” mode. It is the number of steps (movements of the rail) in the specified distance below. Use the UP/DOWN buttons to adjust the number of steps desired. >
Mode: Total Dist
# Steps: 5
Distance: 10.0 mm
Start (up/down)
3.10.3 Total Distance Total distance (“Distance”) specifies the complete distance to move the rail. StackShot will automatically calculate the distance of each step required to result in the total distance desired. >
Mode: Total Dist
# Steps: 5
Distance: 10.0 mm
Start (up/down)
3.10.4 Starting the Sequence Press the SELECT button until it is next to the “Start (up/down)” text. Mode: Total Dist
# Steps: 5
Distance: 10.0 mm
Start (up/down)
>
The direction that the rail travels is completely dependent on which button you press to initiate the sequence. If you press the UP button, the rail will move toward the subject. If you press the DOWN button, it will move away. Pressing any button will stop the motor from moving the rail and abort the sequence. 24 See Figure 9 below. The 2mm step size is determined by StackShot. Just like “Automatic Step” mode, the number of pictures taken is always “# Steps” + 1. Figure 9 ‐ Total Distance Mode 25 3.11
Mode: Distance per Step 3.11.1 Overview The “Dist/Step” operating mode lets you specify the distance to travel per step. 3.11.2 Number of Steps The “# Steps” option functions identically to the “Automatic Step” mode. It is the number of steps (movements of the rail) in the specified distance below. Use the UP/DOWN buttons to adjust the number of steps desired. >
Mode: Dist/Step
# Steps: 5
Dist/Step: 2.0 mm
Start (up/down)
3.11.3 Distance per Step The distance the rail travels per step (“Dist/Step”) is the amount traveled each time the rail is moved. Use the UP/DOWN buttons to adjust the distance. >
Mode: Dist/Step
# Steps: 5
Dist/Step: 2.0 mm
Start (up/down)
3.11.4 Starting the Sequence Press the SELECT button until it is next to the “Start (up/down)” text. Mode: Dist/Step
# Steps: 5
Distance: 2.0 mm
Start (up/down)
>
The direction that the rail travels is completely dependent on which button you press to initiate the sequence. If you press the UP button, the rail will move toward the subject. If you press the DOWN button, it will move away. This is, of course, based off of the standard orientation of the rail with the motor facing away from the subject. Pressing any button during the capturing process will stop the motor from moving the rail and abort the sequence. 26 This mode functions similarly to the “Total Distance” mode. The total distance traveled is the number of steps multiplied by the distance per step. With the above configuration, StackShot would perform identically as shown in Figure 9. 27 3.12
Mode: Manual Step 3.12.1 Overview “Manual” mode is similar to “Distance Per Step” mode in that it lets you specify the distance to travel per step, but it will only step the specified distance when a button is pressed. This gives the opportunity to make small adjustments to camera settings if necessary. 3.12.2 Distance per Step The distance the rail travels per step (“Dist/Step”) is the amount traveled each time the rail is moved. Use the UP/DOWN buttons to adjust the distance. >
Mode: Manual
Dist/Step: 10.0 mm
Start (up/down)
3.12.3 Starting the Sequence Press the SELECT button until it is next to the “Start (up/down)” text. >
Mode: Manual
Distance: 10.0 mm
Start (up/down)
The direction that the rail travels is completely dependent on which button you press to initiate the manual step. If you press the UP button, the rail will move toward the subject. If you press the DOWN button, it will move away. Pressing any button will stop the motor from moving the rail. See Figure 10 below to show how “Manual” mode functions. 28 Figure 10 ‐ Manual Mode 29 3.13
Mode: Continuous Movement 3.13.1 Overview For Continuous mode (“Continuous”) you select the total distance the rail will travel. The rail will not stop until it reaches its final position. During this time the shutter trigger will fire continuously. The shutter trigger pulse time (“Tpulse”) and the off time (“Toff”) ultimately set the number of pictures that may be taken during the rail move. Those parameters are available under the “Global Configuration”. See section 3.3 for more details. Because the number of pictures is dependent upon the time selected, a picture at the final position is not guaranteed. Also keep in mind that the rail accelerates and de‐accelerates. If the ramp time that is set in the “Global Configuration” screen is long it will affect the amount of distance traveled between pictures (the time is fixed between pictures, not the distance). 3.13.2 Total Distance Total distance (“Distance”) specifies the complete distance to move the rail. >
Mode: Continuous
Distance: 10.0 mm
Start (up/down)
Up=fwd / Down=back
3.13.3 Starting the Sequence Press the SELECT button until it is next to the “Start (up/down)” text. >
Mode: Continuous
Distance: 10.0 mm
Start (up/down)
Up=fwd / Down=back
The direction that the rail travels is completely dependent on which button you press to initiate the sequence. If you press the UP button, the rail will move toward the subject. If you press the DOWN button, it will move away. Pressing any button will stop the motor from moving the rail and abort the sequence. See Figure 11 below to show how “Continuous” mode operates. 30 Figure 11 ‐ Continuous Mode 31 3.14
Advanced Settings Advanced settings are used to couple the StackShot controller with another device or rail. Modifying these settings may cause StackShot to not function properly and should not be changed by the novice user. To enter StackShot’s Advanced Configuration, press and hold the CONFIG button for three seconds. The display will change and list the available advanced settings. To return to the main screen press the CONFIG button. The different configuration options are discussed below. All of these settings are maintained when using the “Load/Save Settings” option and through power‐cycles. The SELECT button will move to the next available configuration. The default settings may be restored by holding the DOWN button when StackShot is powered up. 3.14.1 Distance per Revolution This configuration specifies the distance the rail travels in the linear direction per revolution of the motor. The default is shown below. Use the UP and DOWN buttons to adjust this value as needed. == Custom Config ==
> Dist/Rev: 1.59 mm
Backlash: 220 um
3.14.2 Backlash This parameter allows the adjustment of the backlash compensation. When the motor reverses direction there (in most applications) will be some “play” in the drive mechanism. StackShot has the capability to compensate for this gear backlash “play”. Backlash compensation is applied during “Automatic Step” mode, “Automatic Distance” mode, and any time that “Auto Return” is enabled. Use the UP and DOWN buttons to adjust the backlash for your specific application. The default is shown below. == Custom Config ==
Dist/Rev: 1.59 mm
> Backlash: 220 um
32 3.15
USB interface StackShot has a USB interface for enhanced connectivity. Through this interface StackShot can be remotely controlled via a computer. There are numerous advantages with this capability: 1. Automatic image collection from the camera 2. Advanced user interfaces 3. Easy reprogramming of the controller Cognisys does not itself provide the photo stacking software but has partnered with two companies that provide excellent stacking results and an automated interface. 3.14.1 Helicon Soft Using Helicon Soft’s Helicon Focus coupled with their Helicon Remote camera interface software, StackShot’s precision control shines. Using Live View, Helicon Remote commands StackShot to move a user‐specified distance to collect the series of images. Because it uses Live View and a tethered camera, a shutter cable may not be required for StackShot. Evaluation versions of Helicon Focus with Helicon Remote are included on the CD shipped with StackShot and also available at: http://www.heliconsoft.com/focus_downloads.html 3.14.2 Zerene Stacker Zerene Systems Stacker application specializes in deep stacks for those who want to push the limits of focus stacking. This incredibly flexible program has an excellent StackShot interface featuring a rotary‐style knob control for positioning the rail. There is a course and fine adjustment knob ensuring total control. Zerene does not require Live View mode which significantly opens up the number of supported cameras. You will, however, require a StackShot shutter cable. An additional bonus is that Zerene Stacker is Mac‐friendly with StackShot! An evaluation version of Zerene Stacker is included on the CD shipped with StackShot and available at: http://www.zerenesystems.com/stacker/downloads/ 3.14.3 Cognisys Reflash We tried to anticipate every option that a person would want in StackShot. Sometimes though a feature comes out that would be fantastic to have out there in the field. With our Reflash program you can easily upgrade your StackShot firmware when a new feature is released. This 33 3.11 MODE: DISTANCE PER STEP .............................................................................................................................. 26 3.11.1 Overview ............................................................................................................................................ 26 3.11.2 Number of Steps ................................................................................................................................ 26 3.11.3 Distance per Step ............................................................................................................................... 26 3.11.4 Starting the Sequence ........................................................................................................................ 26 3.12 MODE: MANUAL STEP ..................................................................................................................................... 28 3.12.1 Overview ............................................................................................................................................ 28 3.12.2 Distance per Step ............................................................................................................................... 28 3.12.3 Starting the Sequence ........................................................................................................................ 28 3.13 MODE: CONTINUOUS MOVEMENT ..................................................................................................................... 30 3.13.1 Overview ............................................................................................................................................ 30 3.13.2 Total Distance .................................................................................................................................... 30 3.13.3 Starting the Sequence ........................................................................................................................ 30 3.14 ADVANCED SETTINGS ....................................................................................................................................... 32 3.14.1 Distance per Revolution ..................................................................................................................... 32 3.14.2 Backlash ............................................................................................................................................. 32 3.15 USB INTERFACE .............................................................................................................................................. 33 3.14.1 Helicon Soft ........................................................................................................................................ 33 3.14.2 Zerene Stacker ................................................................................................................................... 33 3.14.3 Cognisys Reflash ................................................................................................................................ 33 4. ACCESSORIES ............................................................................................................................................ 35 5. CONNECTIONS & CABLES .......................................................................................................................... 36 5.1 5.2 6. SHUTTER TRIGGER OUTPUT ............................................................................................................................... 36 MOTOR CABLE ............................................................................................................................................... 36 SETUP EXAMPLES ...................................................................................................................................... 37 6.1 6.2 6.3 6.4 MIRROR LOCK‐UP ........................................................................................................................................... 37 100MM VS. THE ORCHID ................................................................................................................................. 38 MP‐E 65 VS. THE ANT .................................................................................................................................... 42 THE RAIL ....................................................................................................................................................... 44 7. TROUBLESHOOTING .................................................................................................................................. 45 8. SPECIFICATIONS ........................................................................................................................................ 47 9. WARRANTY .............................................................................................................................................. 48 10. GLOSSARY ............................................................................................................................................ 49 11. REVISION HISTORY ................................................................................................................................ 50 3 3.3 Global Configuration To enter StackShot’s Global Configuration, quickly press and release the CONFIG button. The display will change and list the available user configurations. To return to the main screen press the CONFIG button again. The different configuration options are discussed below. All of these settings are maintained when using the “Load/Save Settings” option. This provides maximum flexibility and ease of use. The last settings used are also retained over a power cycle for your convenience. 3.3.1
Pictures per Step StackShot defaults to one picture per step. You may, however, increase the number of pictures (“# pics”) taken at each step. This gives you the option of doing exposure bracketing, mirror lockup, or other camera effects. Valid values are from 1 – 1000. This is not the total number of pictures taken – just how many at each step. == Global Config ==
> # pics: 1
Tsettle: 500.0 ms
Toff: 500.0 ms
->
See Figure 2 below for a timing diagram with “# pics” set at three. Figure 2 ‐ Pictures per Step 3.3.2
Settle Time After StackShot finishes moving, it may be desirable to have it wait for the motor assembly/camera/tripod to stop moving prior to taking a picture. You may adjust this settling time (“Tsettle”) to force the desired delay. == Global Config ==
# pics: 1
> Tsettle: 500.0 ms
Toff: 500.0 ms
->
8 CAUTION: Time‐lapse mode will potentially cause the un‐attended operation of the rail. Use caution to avoid situations where someone may be seriously hurt or something seriously damaged due to this feature. 3.3.8
Pulse Time The pulse duration (“Tpulse”) is the time that the shutter output “Trigger” is active (on). This setting may come in handy in “Continuous” mode since “Tpulse” and “Toff” effectively set how rapidly pictures are taken. For other modes this setting would typically not be adjusted. The pulse duration should be long enough for your camera to respond. If the pulse time is set too short your camera may ignore it. == Global Config ==
Tlapse: off
> Tpulse: 500.0 ms
Tramp: 1.0 sec
->
See Figure 4 for more details regarding pulse time. 3.3.9
Ramp Time StackShot allows you to adjust how fast the motor ramps up or down in speed (“Tramp”). Increasing the ramp time effectively decreases the acceleration of the camera. Similarly to the overall speed of the motor (“Speed”), this increases the torque and decreases wobble. == Global
Tlapse:
Tpulse:
> Tramp:
Config ==
off
500.0 ms
1.0 sec
->
3.3.10 Units of Measure The default unit of measure (“Units”) is set to “Metric/mm”. If you are more comfortable with inches, you can change the displayed distances/speeds from metric to English (“English/mils”). The display will show “mils”. One “mil” is a thousandth of an inch. You also have the option of selecting “Steps”. A “step” is the highest resolution method of movement for StackShot. One step is the equivalent to 0.1125 degrees of motor revolution, 0.000496 mm (~0.5 um), or 0.0195 mils. Using “Steps” as the unit of measure is recommended only for advanced users. Such small resolution increases the probability of running into “stiction” which may cause non‐uniform steps in the rail movement. 13 either the UP or DOWN button. The text on the display will change to “Select End Pos”. Again, use the FWD/BACK buttons to choose the final position of the sequence. Once again press the UP or DOWN button to select this final position. 3.7.4 Starting the Sequence Once the final position has been selected, the status will change to “Up/Down to start” and the last line on the display will show “Change Settings”. Mode: Auto-Step
# Steps: 10
>
Up/Down to start
Change Settings
Press the UP or DOWN button to initiate the sequence. The motor will move back to the start position and begin capturing pictures. The status line will indicate which step is in progress: Mode: Auto-Step
# Steps: 10
Running: 3/10
If you press any button during this time it will stop the motor, abort the sequence, and the display will show “Aborted” and give you the option to run the sequence again. To restart the sequence, press either the UP or DOWN button. >
Mode: Auto-Step
# Steps: 10
Aborted. Run Again?
Change Settings
When the sequence completes, you also have the option to restart by pressing the UP or DOWN button. If you want to choose new start and end positions, press the SELECT button so that the cursor is next to “Change Settings”. Press the UP or DOWN button. You can then choose a new start and end position. See Figure 7 below to demonstrate “Auto‐Step” mode. 18 3.9 Mode: Manual Distance 3.9.1 Overview Manual Distance mode (“ManualDist”) is identical to “Automatic Distance” mode (see section 3.8 above) except that each step must be manually advanced. This is useful for applications where the camera, subject, dye, or material may have a variable amount of time before the next picture is desired. This mode is geared toward specialized applications and we would recommend the use of “Automatic Distance” under most circumstances. 3.9.2 Advancing the rail After the start and stop points have been selected like in the “Automatic Distance” mode, the rail will automatically move to the start point and take the first picture (or pictures). Once the “Toff” time expires you will see the following: Mode: ManualDist
Dist/Step: 200 um
> Up/Down for next
At this point you may press UP or DOWN to advance to the next position. 23 3.12
Mode: Manual Step 3.12.1 Overview “Manual” mode is similar to “Distance Per Step” mode in that it lets you specify the distance to travel per step, but it will only step the specified distance when a button is pressed. This gives the opportunity to make small adjustments to camera settings if necessary. 3.12.2 Distance per Step The distance the rail travels per step (“Dist/Step”) is the amount traveled each time the rail is moved. Use the UP/DOWN buttons to adjust the distance. >
Mode: Manual
Dist/Step: 10.0 mm
Start (up/down)
3.12.3 Starting the Sequence Press the SELECT button until it is next to the “Start (up/down)” text. >
Mode: Manual
Distance: 10.0 mm
Start (up/down)
The direction that the rail travels is completely dependent on which button you press to initiate the manual step. If you press the UP button, the rail will move toward the subject. If you press the DOWN button, it will move away. Pressing any button will stop the motor from moving the rail. See Figure 10 below to show how “Manual” mode functions. 28 3.15
USB interface StackShot has a USB interface for enhanced connectivity. Through this interface StackShot can be remotely controlled via a computer. There are numerous advantages with this capability: 1. Automatic image collection from the camera 2. Advanced user interfaces 3. Easy reprogramming of the controller Cognisys does not itself provide the photo stacking software but has partnered with two companies that provide excellent stacking results and an automated interface. 3.14.1 Helicon Soft Using Helicon Soft’s Helicon Focus coupled with their Helicon Remote camera interface software, StackShot’s precision control shines. Using Live View, Helicon Remote commands StackShot to move a user‐specified distance to collect the series of images. Because it uses Live View and a tethered camera, a shutter cable may not be required for StackShot. Evaluation versions of Helicon Focus with Helicon Remote are included on the CD shipped with StackShot and also available at: http://www.heliconsoft.com/focus_downloads.html 3.14.2 Zerene Stacker Zerene Systems Stacker application specializes in deep stacks for those who want to push the limits of focus stacking. This incredibly flexible program has an excellent StackShot interface featuring a rotary‐style knob control for positioning the rail. There is a course and fine adjustment knob ensuring total control. Zerene does not require Live View mode which significantly opens up the number of supported cameras. You will, however, require a StackShot shutter cable. An additional bonus is that Zerene Stacker is Mac‐friendly with StackShot! An evaluation version of Zerene Stacker is included on the CD shipped with StackShot and available at: http://www.zerenesystems.com/stacker/downloads/ 3.14.3 Cognisys Reflash We tried to anticipate every option that a person would want in StackShot. Sometimes though a feature comes out that would be fantastic to have out there in the field. With our Reflash program you can easily upgrade your StackShot firmware when a new feature is released. This 33 6.2 100mm vs. The Orchid In this setup example we have a Canon 7D, EF 100mm macro lens, and of course StackShot. Figure 14 ‐ StackShot Orchid Setup The StackShot controller coordinates the camera position, settling time, exposure (and potentially exposure bracketing), and automatic return upon completion. The optional auto‐
return feature allows adjustment of the camera’s parameters and lighting without having to re‐
position the camera. For the Orchid it was decided that “Auto Step” mode be used (see section 3.7 for more details). “# Steps” was adjusted to 10 steps (11 pictures) which would result in an outstanding final stacked image. >
Mode: Auto-Step
# Steps: 10
Select Start Pos
The FWD button was pressed until the camera reached the desired starting point of the stack. Pick the closest object you want in focus for the stack and move the camera such that this is in sharp focus. The SELECT button was then pressed to acknowledge the starting position. Then the BACK button was pressed to move the camera to the end point of the stack. Move the camera to the point where the furthest away element in your composition is in focus. Again the SELECT button was pressed to confirm the final position. The display then showed the following: 38 For this sequence 37 pictures were captured. Here is the final stacked image: Figure 18 ‐ Ant Stack 43 9. Warranty Limited Warranty
All products are warranted to be free from defects in materials or workmanship for one (1) year
from the date of purchase. Within this period, Cognisys Inc. will, at its sole option, repair or
replace any components which fail in normal use. Such repairs or replacement will be made at no
charge to the customer for parts or labor, provided that the customer shall be responsible for any
transportation cost. This warranty does not cover failures due to abuse, misuse, accident or
unauthorized alterations or repairs.
THE WARRANTIES AND REMEDIES CONTAINED HEREIN ARE EXCLUSIVE AND IN
LIEU OF ALL OTHER WARRANTIES, WHETHER EXPRESS, IMPLIED OR STATUTORY,
INCLUDING ANY LIABILITY ARISING UNDER ANY WARRANTY OF
MERCHANTABILITY OR FITNESS FOR A PARTICULAR PURPOSE, STATUTORY OR
OTHERWISE. THIS WARRANTY GIVES YOU SPECIFIC LEGAL RIGHTS, WHICH MAY
VARY FROM STATE TO STATE.
IN NO EVENT SHALL COGNISYS BE LIABLE FOR ANY INCIDENTAL, SPECIAL,
INDIRECT OR CONSEQUENTIAL DAMAGES, WHETHER RESULTING FROM THE USE,
MISUSE OR INABILITY TO USE THE PRODUCT OR FROM DEFECTS IN THE
PRODUCT. SOME STATES DO NOT ALLOW THE EXCLUSION OF INCIDENTAL OR
CONSEQUENTIAL DAMAGES, SO THE ABOVE LIMITATIONS MAY NOT APPLY TO
YOU.
Cognisys retains the exclusive right to repair or replace the product or offer a full refund of the
purchase price at its sole discretion. SUCH REMEDY SHALL BE YOUR SOLE AND
EXCLUSIVE REMEDY FOR ANY BREACH OF WARRANTY.
48 6.4 The Rail Here is a close‐up of the StackShot rail: Yes, this is a shameless plug for Really Right Stuff’s ARCA clamp. For macro‐photography a high quality tripod, clamp, camera equipment, and most importantly – the rail, are essential for the “best in class” final images. 44 7. Troubleshooting Problem Display is not lit. Trigger LED is constantly on and dim. Camera or flash does not trigger Motor does not spin Motor makes clunking noise Cause Power cord is not inserted properly into the power jack. Solution Insert the power cord properly into the power jack. It needs to be fully seated in the connector. Power cord is not plugged into Plug power adapter into the the wall. wall. Wrong AC/DC adapter used. Be sure to use the AC/DC adapter that was included with your StackShot module. Backlighting is turned down If the backlighting was turned too low. down to use in the dark, you may not be able to see it in bright light. In a room with less light, adjust the backlighting per the manual. The trigger output has a short Disconnect the load (flash, circuit. accessory, etc) from StackShot and see if the light goes out. If it does, something is wrong with the load. Your load (camera, flash, The load may have a slightly accessory, etc) is not powered resistive path to ground. up. Power up the load. Equipment in sleep mode. Ensure equipment is in ready mode. Shutter Disable feature is Turn off the “Shutter Disable” active. (SD blinking) feature. Motor cable is unplugged. Plug in motor cable. Motor cable not seated. With new products the connectors can be quite stiff. Be sure the connectors are fully seated in the controller and to the rail. Motor Torque setting is too Increase the motor torque low. setting. Object is jamming the rail. Inspect the rail and make sure that nothing is jamming the path of movement, gear, etc. Motor cable not seated. With new products the connectors can be quite stiff. 45 Motor squealing when not in use High Precision option is enabled Camera takes multiple pictures per step # pics set to greater than one Camera in continuous mode Need to restore factory settings Operator Error Be sure the connectors are fully seated into the controller and to the rail. In the “Global Configuration”, turn the “hi precision” option to “off”. In the “Global Configuration”, adjust “# pics” to “1” StackShot defaults to a 500ms shutter press. Make sure the camera is in single‐shot mode With StackShot powered off, hold down the DOWN button, and apply power. Once the splash screen shows up, release the DOWN button. This will load the factory defaults. It will NOT erase your saved settings. If you cannot resolve a problem with StackShot, please contact us at support@cognisys‐inc.com. We want to make sure that you are completely satisfied with our product. 46 8. Specifications Specifications are intended for reference only. The design may be modified to improve features or functionality
without notice.
Specifications
Input Voltage
Input Current
Output Current Sink
Max Voltage on Trigger Out Port (Steady State)
Operating Temperature
Rail Dimension – Width
Rail Dimension – Length (Standard)
Rail Dimension – Length (Extended)
Rail Dimension – Height
Total Rail Travel (Standard)
Total Rail Travel (Extended)
Weight (Standard)
Weight (Extended)
Camera carriage thread
Base-plate mounting options:
Quantity: 3
Quantity: 2
Quantity: 1
AC adapter input voltage
AC adapter input frequency
MIN
11
100
-20
NOM
12
120
25
86
200
300
80
100
200
MAX
16
2000
1
60
50
1100
1360
¼-20
UNITS
Vdc
mAdc
Adc
Vdc
C
mm
mm
mm
mm
mm
mm
grams
grams
1/4-20
3/8-16
ARCA1
Software Settings:
# Steps
# pics
Distances allowed
Settle time
Tpulse (shutter duration)
Toff (time between shutter pulses)
Speed
Tramp (ramp time)
90
47
264
63
Vac
Hz
1
1
1um
100us
100us
100us
99um/sec
10ms
1000
1000
999.9mm
24 hours
24 hours
24 hours
4.96mm/sec
10 sec
Steps
Pics
Notes: 1. Dove‐tail ARCA mount may not be compatible with all quick‐release styles. There is no industry standard. Use care when using quick‐release styles to ensure the equipment is mounted securely. 47 9. Warranty Limited Warranty
All products are warranted to be free from defects in materials or workmanship for one (1) year
from the date of purchase. Within this period, Cognisys Inc. will, at its sole option, repair or
replace any components which fail in normal use. Such repairs or replacement will be made at no
charge to the customer for parts or labor, provided that the customer shall be responsible for any
transportation cost. This warranty does not cover failures due to abuse, misuse, accident or
unauthorized alterations or repairs.
THE WARRANTIES AND REMEDIES CONTAINED HEREIN ARE EXCLUSIVE AND IN
LIEU OF ALL OTHER WARRANTIES, WHETHER EXPRESS, IMPLIED OR STATUTORY,
INCLUDING ANY LIABILITY ARISING UNDER ANY WARRANTY OF
MERCHANTABILITY OR FITNESS FOR A PARTICULAR PURPOSE, STATUTORY OR
OTHERWISE. THIS WARRANTY GIVES YOU SPECIFIC LEGAL RIGHTS, WHICH MAY
VARY FROM STATE TO STATE.
IN NO EVENT SHALL COGNISYS BE LIABLE FOR ANY INCIDENTAL, SPECIAL,
INDIRECT OR CONSEQUENTIAL DAMAGES, WHETHER RESULTING FROM THE USE,
MISUSE OR INABILITY TO USE THE PRODUCT OR FROM DEFECTS IN THE
PRODUCT. SOME STATES DO NOT ALLOW THE EXCLUSION OF INCIDENTAL OR
CONSEQUENTIAL DAMAGES, SO THE ABOVE LIMITATIONS MAY NOT APPLY TO
YOU.
Cognisys retains the exclusive right to repair or replace the product or offer a full refund of the
purchase price at its sole discretion. SUCH REMEDY SHALL BE YOUR SOLE AND
EXCLUSIVE REMEDY FOR ANY BREACH OF WARRANTY.
48 10.
Glossary Term # Pics LCD Backlight Load Defaults mil mm ms Short Circuit (short) Shutter lag Toff Trigger um us DOF Torque Description Number of pictures to take at each individual step. The backlighting for the LCD allows the text to be visible. It is adjustable so that for low‐light conditions it won’t ruin long exposures. Load the factory defaults for all the settings. One thousandth of an inch. Not to be confused with a millimeter. Millimeter. One thousandth of a meter. Abbreviation for milliseconds. A thousandth of a second (1/1000 seconds). To connect two wires together. Provide a path for current to flow with low resistance. This is the delay from when a camera is told to take a picture and when it actually takes it. The camera performs several functions prior to taking the picture (focusing, metering, etc) which can all add a delay. To make matters worse it may even be a variable delay. The time the shutter output “Trigger” remains off between pictures. This is the shutter output from StackShot. Micrometer. One millionth of a meter. 1000um = 1mm Abbreviation for microseconds. A millionth of a second. Depth of Field. The depth in an image where it appears sharp. A force applied to a lever. In the case of StackShot, it is a configurable setting that determines how much current is applied to the motor to cause rotation. 49 11.
Revision History Revision 1.0 1.1 1.2 1.3 1.4 1.5 Date 01/25/10 03/26/10 05/18/10 12/06/10 Change Initial Release Added time‐lapse feature, new cover graphic Added setup examples FWD and BACK pressed after an auto‐mode run will allow the stack to be re‐run from the current position, rather than moving back to the start. Added high‐
precision feature and menu structure change. Additional trouble‐shooting scenarios added. 01/10/11 Added USB section 10/03/11 Added Manual Distance mode, changed display to “um”. This document was archived November 2013 for
photomacrography documentation purposes at the
http://extreme-macro.co.uk extreme macro website.
All rights reserved by the document authors
50