1
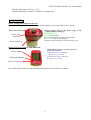
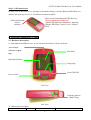
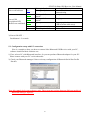
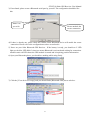
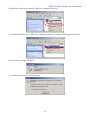
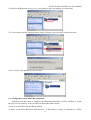
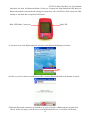
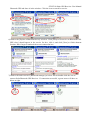
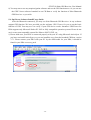
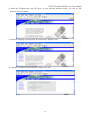
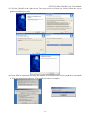
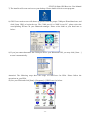
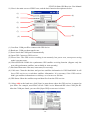
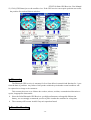
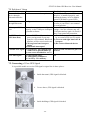
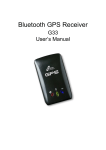
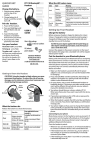
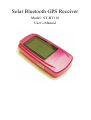
Solar Bluetooth GPS Receiver Model : ST-BT110 User’s Manual ST-BT110 Solar GPS Receiver User Manual Contents Caution------------------------------------------------------------------------------------------------------------ 2 0. Quick Start----------------------------------------------------------------------------------------------------- 2 0.1. Inside the package------------------------------------------------------------------------------------ 2 0.2. Connect to your PC/PDA---------------------------------------------------------------------------- 2 1. Introduction---------------------------------------------------------------------------------------------------- 3 2. Features and Functions--------------------------------------------------------------------------------------- 3 3. Technical Specification-------------------------------------------------------------------------------------- 4 3.1. General------------------------------------------------------------------------------------------------- 4 3.2. Acquisition Time (Average)------------------------------------------------------------------------- 4 3.3.Precision/Accuracy------------------------------------------------------------------------------------ 4 3.4. Dynamic Condition----------------------------------------------------------------------------------- 5 3.5. Power Management---------------------------------------------------------------------------------- 5 3.6. Protocol & Interface---------------------------------------------------------------------------------- 5 3.7. Dimension /Specification---------------------------------------------------------------------------- 5 4. Start to Use----------------------------------------------------------------------------------------------------- 6 5. Software/Hardware Usage----------------------------------------------------------------------------------- 7 5.1. Hardware description -------------------------------------------------------------------------------- 7 5.2. Configuration setup with PC connection --------------------------------------------------------- 7 5.3. Configuration setup with PDA connection------------------------------------------------------ 11 5.4. GpsViewer Software Install/Usage Guide--------------------------------------------------------14 6. Warranty------------------------------------------------------------------------------------------------------ 19 7. Trouble Shooting---------------------------------------------------------------------------------------------20 7.1. Problem of Setup-----------------------------------------------------------------------------------20 7.2. Concerning of Poor GPS Signal-------------------------------------------------------------------20 -1- ST-BT110 Solar GPS Receiver User Manual Caution Read before you start to use: ¾ Global position system (GPS) is obtained by American Ministry of National Defense, and they got the full responsibility about the preciseness and the maintenance. Any changes may cause the capacity and preciseness of GPS differed. ¾ If you use this device inside of buildings, tunnels, or any huge objects beside you, the GPS signals might be cut-off or disturbed. Please do not consider that the receiver is malfunction. ¾ Sometimes the speed-test alarm system may interfere with GPS signal. If it really do, please suspend it temporary. ¾ The receiver is made by high-technology electronic components. Please do not make it exposed in sunshine for a long time. 0、Quick Start 0.1 Inside the Package Thank you for purchasing our GPS product, and wish you have the best experience in using. Please open the package, and check if everything in the list exist once you got it. Please tell our salesman if anything missing. A. Basic package 1. Solar Bluetooth GPS Receiver x 1 2. High capacity rechargeable lithium-ion battery x 1 3. Manual/software CD-Rom x 1 4. Travel charger x1 B. Optional package In order to support various computers and handheld devices, you may need some accessories inside the package also: 1. Mobile charger x1 0.2 Connect to your PC/PDA A. Push the power button for 2 seconds, power on the Bluetooth GPS receiver . B. Put the Bluetooth GPS receiver at proper place (open to sky) to receive the GPS signal. C. Turn on the power of your PC/PDA. D. Search for Blue tooth device by your Blue tooth manager on your PC/PDA. The GPS device required no passkey for connection. But some Blue tooth system is forced to enter passkey, please use [0000] in such case. E. Connect to Solar Bluetooth GPS Receiver and then make sure baud rate set at 9600 bps(standard) in your application program. F. In firstly Use of this Solar Bluetooth GPS Receiver ,we strongly recommend you to bring -2- Bluetooth GPS receiver ST-BT110 Solar GPS Receiver User Manual outdoor or open sky at least 15~20 minutes for sure 3D position fixed and almanac updated. 1. Introduction Solar Bluetooth GPS Receiver is a total solution of GPS receiver. High capacity rechargeable lithium-ion battery and solar charger circuit build-in, GPS antenna, Blue tooth transmit/receive system are included. It is designed on the most advantage GPS kernel(FirstGPSTM), got the fullfunction, industry-level locating capacity and low prices. You can use Solar Bluetooth GPS Receiver as vehicles navigator, security system, geographic measurement, investigations or agriculture purpose. Solar Bluetooth GPS Receiver operation requirement is a proper power supply and the open sky-view. Solar Bluetooth GPS Receiver can communicate with other electronic devices by Blue tooth interface. Built-In Flash Memory can save satellite information and do almanac refresh periodically .This will shorten Time To First Fix(TTFF) effectively. Patent protected Solar Cell design can extend the device usage time up to 30 hrs. This is much longer than competitors’. Lithium-ion battery can be re-charged reasonably under nature or artificial sunlight no matter Solar7 receiver is turned on or off. Most of time ,you are free of charger! Solar Bluetooth GPS Receiver is designed as a ultra low power consumption device, and high position accuracy. It will update the satellite position every second. The Solar Bluetooth GPS Receiver auto-locating feature is capable of automatically determining a navigation solution without intervention. However, acquisition performance could be interfered and do cold start if the receiver were initialized with occurrence of the following events: 1) First in use 2 )The GPS receiver is not in use for more than 3 months or transportation over distances further than 500 kilometers. 3) Failure of the internal memory battery without system standby power. 2. Features and Functions 1)Total solution in power management. Unique Solar Cell re-charging design (patent protected) can extend your GPS operation up to 30 hrs . 2)Green solution in exactly wireless GPS receiver application Always charge your lithium-ion battery under nature or artificial sunlight. Spare your charger, Spare your space 3) Considerate LED/switch button design easy look, easy touch !one-touch button design keep your hand free 4)Act as WARM/HOT start with built-in battery back-up power design will keep flash memory and RTC clocking always. -3- ST-BT110 Solar GPS Receiver User Manual Shorten TTFF effectively 5)Automatically almanac/ ephemeris update in flash mmory programmable flash utility to do refresh on satellite orbit data information every 10 minutes. 6) Smart power management solution. GPS Device will automatically shutdown in case of bluetooth un-detected over default time(30 min). 7) Compatible with Bluetooth Serial Port Profile (SPP) completely. 8)Support RTCM (Radio Technical Commission for Maritime Services) real-time deviation correction capacity, can provide the precision smaller then 1 meter. 9)Easy to combine with vehicle, voyage navigation, vehicle management, AVL, personal navigation, tracking system and map applications. 3. Technical Specification 3.1. General Core Module: firmware by Trimmble FirstGPSTM ,chipset by Ultra low power Xemics Solution Satellite channel number: all-in-view 8 parallel satellites; GPS frequency: 1575.42 MHz Receiver: L1, C/A code. Antenna type : built-in active antenna External connector: standard MMCX 3.2. Acquisition Time Refresh: 1 sec Code start: <90~120 secs(average, normally occurred in first use of GPS receiver life) Warm start <42 secs(average) Hot start: <10 secs(average) Position information update period: 1 sec 3.3. Precision/ Accuracy A) None-DGPS Position accuracy: <5m(50% CEP) or <7m(95% CEP) Speed: 0.05m/sec, typical Time: 1 sec(satellite time) B) DGPS (Difference GPS) Location accuracy: <1m Speed: 0.05m/sec, typical 3.4. Dynamic condition -4- ST-BT110 Solar GPS Receiver User Manual Altitude: 18,000m(60,000 feet) Velocity: 515m/sec(700knod) Acceleration: 4G(G for gravity unit) Jerk: 20m/sec 3.5. Power management A)Applied External Voltage : 5V DC +/- 5%(via charge cable) B)Power system: Main battery: Rechargeable Lithium-ion 3.7V battery, as the main power. Solar Panel: auxiliary power provider C)Power consumption: 45mA(typical) D)Battery endurance: Charged with 4 hours(firstly in use), more than 20 hours of working time; with solar charger enabled, up to 30 hours. 3.6. Protocol &Interface A) Output format NMEA 0183 V3.01, Baud rate: 9600 bps(standard) Data bit: 8 Parity: None Stop bit: 1 B)Output terminal :Mini -USB C)NMEA code support: GPGGA(1 sec interval) GPGSV(1 sec interval) GPGSA(1 sec interval) GPRMC(1 sec interval) D) Compatible with Blue tooth devices with Serial Port Profile (SPP) ‧Blue tooth version 1.1 compliant ‧Blue tooth Class 2 operation (up to 10 meter range) ‧Frequency : 2.400 to 2.480 GHz ‧Modulation: FHSS / GFSK ‧RF channels: 79 ‧Input Sensitivity: -80dBm ‧Output Level: 4dBm 3.7. Dimension/Environment Specification: Dimension size: 103mm× 55 mm× 22 mm Weight: < 85gm(battery excluded) o o Operation temperature: -10 C to + 70 C -5- o ST-BT110 Solar GPS Receiver User Manual o Storage temperature: -40 C to + 85 C Operation humidity: 5%R.H. to 95%R.H. no compressed 4. Start to Use Step 1: Charge the battery in first use Please fully-charge the battery with at least 4 hours before you use the GPS receiver firstly. Bluetooth indicator Power plug (opened) Power indicator Connect charge cable to the power plug at the bottom and start charging Power Indicator: (1)Green LED blinking ÆPower low/charging(see below detail described) (2) Green LED stop to blink &light up Æcharge completed (LED will vanish when cable away) Step 2: Power on, connect with Bluetooth Push the power switch 1~2 seconds to Power on Bluetooth indicator : (1) Bluetooth host searching: Æ3 pulses per second (2) Bluetooth host connected: Æ1 pulse per second Power indicator Bluetooth indicator Power ON/OFF switch Note: Some PDA needs to restart the Bluetooth function if you need to re-connect. -6- ST-BT110 Solar GPS Receiver User Manual Step 3: GPS function test In firstly Use of this Receiver,we strongly recommend to bring your Solar Bluetooth GPS Receiver outdoor and open sky at least 15~20 minutes for almanac update. Power on the Solar Bluetooth GPS Receiver GPS Acquisition Fix Indicator (1)Red LED lights up continuously: Inquiring (2)Red LED blinks (1 pulse/3 secs): Position fixed GPS Acquisition & Power indicator 5. Software/Hardware Usage 5.1. Hardware description 1). Solar Bluetooth GPS Receiver device function description is shown as below: Active antenna inside(face to open Solar Panel sky) Bluetooth indicator Charge plug Power/GPS LED Power switch Top View External Antenna MMCX Plug Side View 2). LED display description Symbol Color Behavior Description -7- Blue tooth Indicator Blue Green Green Power/GPS Acquisition LED Green (Red/Green combined) Red Red ST-BT110 Solar GPS Receiver User Manual Blinking in 3 pulses/sec Searching for Bluetooth host Blinking in 1 pulse/sec Connected with host& communicating Blinking with 3 secs Battery low interval Blinking with 2 sec Charging interval Light up Charge completed (LED off when cable away) Light up continously Positioning Blink in 1pulse/ 3secs Position fixed 3).Power ON/OFF: Push button 1~2 seconds 5.2. Configuration setup with PC connection Here is a sample to show you how to connect Solar Bluetooth GPS Receiver with your PC, software install and basic function test. 1) First, select a PC with Bluetooth interface. Or you can purchase Bluetooth adapter for your PC. Please contact with your PC’s sales about this. 2) Check your Bluetooth manager if there exist any configuration of Bluetooth Serial Port Profile like this: Note: this sample is for your reference only. The screen may various between different models of Bluetooth manager software. -8- ST-BT110 Solar GPS Receiver User Manual 3) If not found, please create a Bluetooth serial port by yourself. The configuration should be like this: Name it as you wish Please uncheck the secure connection 4) If there is already one, please check the content. Some Bluetooth device will enable the secure connection. Please refer to the configuration as above to uncheck it. 5) Power on your Solar Bluetooth GPS Receiver . If the battery is ready, you should see 2 LED light up: the blue LED blink 3 times/sec means Bluetooth is activated and waiting for connection. Another static red LED shows the GPS module is started and is inquiring position information. 6) Open your Bluetooth places; you should see nothing while using firstly. 7) Click the [View devices in range] and you should find a [Bluetooth GPS] show as below: -9- ST-BT110 Solar GPS Receiver User Manual 8) Right click on the icon, select the [Discover Available Services]: 9) You should find the service SPP slave, right click and select [Connect to Bluetooth Serial Port]: 10) The follow message will show: 11) And the connection successful message: -10- ST-BT110 Solar GPS Receiver User Manual 12) Back to the Bluetooth service view, you should see the icon changed to [Connected]: 13) If you wish to use the connection more easily next time, you can create a shortcut for this: 14) You will see the shortcut you just created: 5.3. Configuration setup with PDA connection Following will show how to configure the Bluetooth connection on PDA, and how to install the GPS Viewer software. It may be different from other PDA models. 1) Power on your PDA and the Bluetooth host. 2) Power on the Solar Bluetooth GPS Receiver . If the battery is ready, you should see 2 LEDs -11- ST-BT110 Solar GPS Receiver User Manual indication: the blue for Bluetooth blinks 3 times/sec. It means the Solar Bluetooth GPS Receiver Bluetooth module is activated and waiting for connection. The red LED for GPS, means the GPS module is activated and is inquiring GPS signal. Blue LED blinks 3 times/sec Red LED 3) See the screen, click Bluetooth mark at bottom, and [Bluetooth Manager] as below: 4) If this is your first time to use Bluetooth GPS, click the Bluetooth mark at the bottom as below: 5)Then the Bluetooth connection wizard show up, select [Explore a Bluetooth device] and click [Next]. In the next page, click the box to search Bluetooth devices. Your PDA will find the -12- ST-BT110 Solar GPS Receiver User Manual Bluetooth GPS and show it in the window. Click the icon to search for service. 6) Back to the [Explore a Bluetooth device] as below. Click [Next] to list service on Bluetooth GPS. [SPP slave] should appear in the service list box, click it and click [Next] to finish shortcut creation. Don’t forget to uncheck the secure connection box. 7) Back to the main screen of [Bluetooth manager] as below. Please double-click the icon to connect Solar Bluetooth GPS Receiver . If connection successful, a green arrow will show as below at right. -13- ST-BT110 Solar GPS Receiver User Manual 8) You may start to use any map/navigation software and use the GPS function now. Or you can use the GPS Viewer software bounded in our CD-Rom to verify the function of Solar Bluetooth GPS Receiver as you wish. 5.4. GpsViewer Software Install/Usage Guide After the Bluetooth connected, you may use Solar Bluetooth GPS Receiver in any software support GPS function. We have provided you the software: GPS Viewer, for you to test the basic function of GPS. You may use it to verify if your GPS device works. Attention! GPSViewer for PDA supports only Microsoft Pocket PC 2002 or fully compatible operation systems. Please do not use it on any non-compatible system like Palm or SONY CLIE, etc 1) Please make sure your PDA is connected properly with your PC using Microsoft ActiveSync. If you have not install ActiveSync yet, you can install the copy from the bounded CD-Rom, version 3.7.1. Please connect your PDA with your PC by the cable/cradle for your PDA, it should be found in your PDA accessory pack. -14- ST-BT110 Solar GPS Receiver User Manual 2) Insert the CD-Rom into your CD drive. If your auto-run function works, you will see the welcome screen as below: 3) Select the language you preferred. We choose the “English” here: 4) Click the [Useful tools and PocketPC utility] at the left: -15- ST-BT110 Solar GPS Receiver User Manual 5) Click the [Install] at the right screen. The setup screen will show up. Please follow the screen guide to install step by step: 6) If your PDA is connected correctly, the installer will call Microsoft active synchronize and install it. You can install them right now. The install procedure is complete. -16- ST-BT110 Solar GPS Receiver User Manual 7) The installer will create an icon on your desktop. Please double-click it to start program: 8) GPS Viewer main screen will shows up, please select the proper COM port ID and baud rate, and click [Open GPS] to begin the test. The COM port id is COM5 in our PC; please select the corresponding ID base on your Bluetooth manager. Please select 9600 as your baud rate as below: 9) If you just cannot determine the COM port ID for your Bluetooth GPS, you may click [Scan…] to scan it automatically: Attention! The following steps show the usage of GPSViewer for PDA. Please follow the operations on your PDA. 10) See your PDA and click [Start]->[Programs]->[GPSViewer] as below: -17- ST-BT110 Solar GPS Receiver User Manual 11) Here is the main screen of GPSViewer, and the basic function description as below: (1) (4) (2) (3) (6) (5) (7) (8) (9) (1) Com Port: COM port ID to connect with GPS device. (2) Baud rate: COM port data transfer rate. (3) Scan: Search the COM port ID automatically. (4) Open GPS: Connect to GPS receiver. (5) Power Save: The GPS receiver working in an extremely low power cost, extra power saving mode is not necessary. (6) WAAS/EGNOS: Enable the synchronous GPS satellite receiving function (Support only the area with synchronous satellites, not available in Asia currently) (7) Hot Start/Warm start: Hot start, warm start (For test only) (8) Cold start: Clean the date/time and previous satellites information in GPS flash ROM. It will force GPS receiver to re-calculate satellites information. It is necessary if the GPS receiver didn’t get satellites information over 60 days, or re-locate over 500 km. (9) GPS Status: Show the satellites map and data flow from the GPS receiver. 12) Select 9600 as the baud rate, click [Scan] to auto-detect where the GPS receiver is mapped to your PDA. For example, most PDA will set COM 8 as its Bluetooth SPP slave COM port ID. After the COM port found, you can click [Open GPS] to start test. As blow: -18- ST-BT110 Solar GPS Receiver User Manual 13) Click [GPS Status] to see the satellite view. If the GPS receiver can acquire position successful, the position fix result will show as below: 6. Warranty The Bluetooth GPS receiver is warranty for free from defect in material and function for 1 year from the date of purchase. Any failure of this product within the period under normal conditions will be replaced at no charge to the customers. This warranty does not cover failures due to abuse, misuse, accident, or unauthorized alteration or repairs, inappropriate disassemble. ¾ ¾ Since the Solar Bluetooth GPS Receiver got high performance rechargeable lithium-ion battery, we are strongly recommend you not to place it under the sunshine for a long time. The warranty will become invalid if any mis-operation found. 7. Trouble Shooting -19- ST-BT110 Solar GPS Receiver User Manual 7.1 Problem of Setup Error/Problem Cause Can not find the GPS Install not correct or battery low device through Bluetooth interface Unable the connect through Bluetooth Configuration incorrect Fail to open COM Port Bluetooth manager is not configured properly, or the COM port is adopted by another software. Trouble shooting Check if Solar Bluetooth GPS Receiver is installed properly, and confirm the battery level is suitable (green LED blinks or none LED) Please refer section 5.2 to re-install. Or refer to your PDA’s user manual for configuration. Please check your Bluetooth manager settings, close the software may use COM ports and try again. Or check if there is any password protection. (1) Disable the power saving mode, try to connect GPS receiver again. (2) Correct with right baud rate & com port (3) Re-connect bluetooth device (1) Some PC/PDA will enter the power saving mode if you stop input for a few minutes. Bluetooth interface will be reset in such case. (2) Wrong baud rate/com port setting (3) Bluetooth interrupted Unstable GPS signal (1) degraded by anti-sunlight film Plug External antenna and place on with receiver placed inside car car roof (2) some cases described in sec7.2 Poor GPS signal (1) Solar Storm effect NA (2) Atmosphere turbulences (3) SA ON by USA military . No NMEA code (GPS data flow) 7.2 Concerning of Poor GPS Signal It is possible unable to receive GPS signal or signal low in these places: ¾ Inside the tunnel, GPS signal is blocked. ¾ Covers above, GPS signal is blocked. ¾ Inside buildings, GPS signal is blocked. -20- ST-BT110 Solar GPS Receiver User Manual ¾ Beside some buildings, GPS signal is disturbed. ¾ Inside forests, or too many covers, GPS signal is disturbed. If you use Solar Bluetooth GPS Receiver inside the car, some anti-sunlight windscreen film will makes the GPS signal degrade or signal lost . GPS satellite is owned by America military, sometimes they will tune-down the accuracy by some reason. In such cases, the GPS position may not fixed exactly. -21-