1
Textura – CMS Interface Setup Manual
Version 1.1
January 4, 2007
This user manual contains confidential information of Textura, LLC and is protected by all applicable patents,
copyright, trademark trade secret and similar intellectual property laws. Neither this document nor any of the
information contained in this document may be reproduced or disclosed to any person under any
circumstances without the express written permission of Textura, LLC. Copyright 2006. All rights reserved.
Textura, LLC. Processes and technologies described in this document have US and Global Patents Pending.
Table of Contents
1 Setting up the CMS Interface on the iSeries .....................................................................4
A.
B.
C.
D.
E.
F.
G.
Creating a Textura User Profile on the iSeries .........................................................................4
Determining an already defined In-House Program Library ...................................................6
Identifying a New In-House Program Library ...........................................................................8
Checking for Object and Member Locks ................................................................................10
Attaching the Trigger Programs ..............................................................................................12
Setting up Java Program Variable Values...............................................................................15
Releasing Auto Schedule Job Entries.....................................................................................16
2 iSeries Internet Access .....................................................................................................17
A. Configuring iSeries for a Domain Name Server .....................................................................17
3 Digital Certificate Manager ...............................................................................................23
A. Accessing the Digital Certificate Manager .............................................................................23
Index.................................................................................................................................................25
1/4/2007 2:02:00 PM
CMS Interface Setup Manual v1.1
Page 3 of 25
1 Setting up the CMS Interface on the iSeries
A. Creating a Textura User Profile on the iSeries
This profile will own all of the Textura/CMS interface objects that will be installed on your system.
To create the User Profile,
1.
Using a profile that has the Master Security Officer authority, sign on to the iSeries.
2.
Type the command CRTUSRPRF TEXTURA.
3.
Press F4.
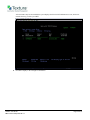
The system displays the Create User Profile (CRTUSRPRF) screen.
1/4/2007 2:02:00 PM
CMS Interface Setup Manual v1.1
Page 4 of 25
The following values should be defined for this user profile:
Field
Value
User Password
*none
User Class
*USER
Initial program to call
*NONE
Initial Menu
* signoff
Limit user capabilities
*NO
Special Authorities
*ALLOBJ
Group Profile
*NONE
Owner
*USRPRF
Supplemental Groups
*NONE
All other values for the user profile
default values
4.
After entering *none for the User password, *signoff for the Initial menu, and the Text description, press F10
for more parameters.
5.
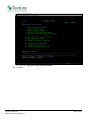
Page down to access additional parameters.
The system displays the Create User Profile (CRTUSRPRF) Additional Parameters screen.
1/4/2007 2:02:00 PM
CMS Interface Setup Manual v1.1
Page 5 of 25
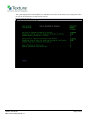
6.
Type *allobj for Special authorities. All other parameters for this user profile will be the default values shown.
7.
Press Enter to create the user profile.
The system displays a message stating “User class and special authorities do not match system supplied values.”
Note:
This is displayed because the special authorities of *Allobj are not routinely associated with a user
class of *User. It is only an information message and will NOT cause any problems.
By setting up the user profile in this way no one will be able to sign on to the system as user “Textura.” When the
interface programs are run; however, the Textura user ID will have access to all necessary security objects to allow
the Java programs to securely exchange files with the Textura web site.
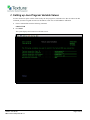
B. Determining an already defined In-House Program Library
As the system master security officer,
1.
Type CALL SYS955.
2.
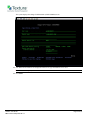
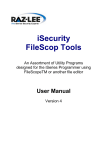
Press Enter.
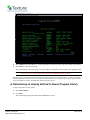
The system displays the System Environment Maintenance screen.
1/4/2007 2:02:00 PM
CMS Interface Setup Manual v1.1
Page 6 of 25
Use this screen to determine if an In-House program library has already been defined to your CMS
configuration. If the In-House program library is not blank, this is the library in which to place all of the Textura
interface programs and related objects.
3.
Record this library name for use during the installation process.
If the In-House program library name is blank, you need to identify a new In-House program Library.
1/4/2007 2:02:00 PM
CMS Interface Setup Manual v1.1
Page 7 of 25
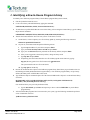
C. Identifying a New In-House Program Library
To identify a new In-House program Library if the In-House program library name is blank,
1.
Exit the Update Environment screen.
2.
Create a new library called TEXTURA by typing the command:
CRTLIB LIB(TEXTURA) TEXT('Textura/CMS Interfaces').
3.
To make the user profile TEXTURA the owner of the library, after creating the Textura library, type the Change
Object Owner command:
CHGOBJOWN OBJ(TEXTURA) OBJTYPE(*LIB) NEWOWN(TEXTURA)
4.
Transfer the Textura Interface Save File from your PC to the iSeries via FTP.
a.
On the iSeries, create a temporary save file in library QGPL by entering the following command:
CRTSAVF QGPL/TXTURASAVF.
b. On your PC, enter DOS mode and perform following actions:
i.
Type the ftp (IP address of your iSeries) and press Enter.
ii. Type your iSeries Security Officer user ID and press Enter.
iii. Type your user Password (iSeries password for the Security Officer) and press Enter.
iv. After you are logged on as the Security Officer, change to binary mode.
v.
Type ftp>bin and press Enter.
vi. Temporarily place the Textura Interface save file in library QGPL on the iSeries by typing:
ftp>put (directory path of save file/Textura.savf) qgpl/txturasavf.
The system transfers the save file to the iSeries.
vii. Type ftp>quit to end the ftp.
5.
Restore the Textura Interface objects to the In-House program library found when you performed section “B.
Determining an already defined In-House Program Library.” If no In-House program library was previously
defined, the library name of TEXTURA will be used.
6.
Type the Restore Object command to place all of the Textura/CMS interface objects in to the In-House library
as follows:
RSTOBJ OBJ(*ALL) SAVLIB(TEXTURA) DEV(*SAVF) SAVF(QGPL/TXTURASAVF)
MBROPT(*ALL) RSTLIB({In House Library})
If no In-House library was previously defined to CMS,
a.
7.
Type CALLSYS955, press Enter and repeat step 2 above to define TEXTURA as your In-House
program library.
After the TEXTURA programs have been restored to your system, type the following command to perform a
series of installation activities:
{In House Library}/INSTALLTXT
1/4/2007 2:02:00 PM
CMS Interface Setup Manual v1.1
Page 8 of 25
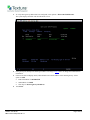
8.
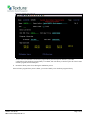
Press F4.
The system displays the Textura/CMS Interface Install screen.
9.
Type the name of the CMS file library, usually CMSFIL, and the In-House library containing the Textura/CMS
interface objects.
10. Press Enter.
The installation process performs the following activities:
•
Create Job Queue TEXTURA in library QGPL.
•
Create Job Description TEXTURA in library QGPL.
•
Add Job Queue Entry to the appropriate subsystem based on how the iSeries is configured. This will either
be subsystem QBATCH or QBASE.
•
Add and place on hold two Job Schedule Entries, TEXTURARCV and TEXTURASND, to automatically
start the send and receive jobs on Monday through Friday.
•
Restore the Textura directory to the IFS.
•
Place all Textura/CMS interface files into the CMS File library.
•
Add the TXTURA menu to the CMS menu system.
1/4/2007 2:02:00 PM
CMS Interface Setup Manual v1.1
Page 9 of 25
D. Checking for Object and Member Locks
After the install process has completed, use the following command to insure that no users are currently working
with the three CMS files to which Textura trigger programs are going to be attached.
Note:
You cannot attach the trigger programs while the files are in use.
Trigger programs will be attached to the following CMS files:
JCPCGO – Change Orders
APPCNS – Subcontract Status
APPCTD – Subcontract Text Detail
After the install process has completed,
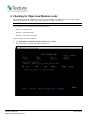
1.
Type WRKOBJLCK CMSFIL/JCPCGO *FILE and press Enter.
The system displays the Work with Object Locks screen.
1/4/2007 2:02:00 PM
CMS Interface Setup Manual v1.1
Page 10 of 25
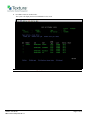
2.
Press F6 to check for member locks.
The system will display the Work with Member Locks screen.
Note:
Do not attempt to attach the trigger programs until all three files show there are no locks.
1/4/2007 2:02:00 PM
CMS Interface Setup Manual v1.1
Page 11 of 25
E. Attaching the Trigger Programs
Once you have identified that the three files are not being used,
1.
Type the following command to attach the trigger programs:
CALL PGM({In House Library}/TXTTRIG) PARM(‘{CMS File library}’ ‘{In House Library}’)
2.
After the triggers have been attached, enter CMS and go to the TXTURA menu.
1/4/2007 2:02:00 PM
CMS Interface Setup Manual v1.1
Page 12 of 25
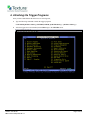
3.
Type TXTURA in the Fastpath.
The system displays the Textura Interfaces menu.
4.
Select option 1, Work with Send/Receive Schedule.
1/4/2007 2:02:00 PM
CMS Interface Setup Manual v1.1
Page 13 of 25
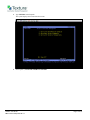
The system displays the Textura Send/Receive Scheduler screen. This screen enables you to manage how often
the system will send and receive data to/from Textura.
1/4/2007 2:02:00 PM
CMS Interface Setup Manual v1.1
Page 14 of 25
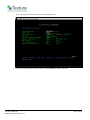
F. Setting up Java Program Variable Values
You now need to set up the variable values used by the Java program to send and receive data. In order to run this
command, you must be signed on with a user ID that has a user class of *SECADM or *SECOFR.
1.
From a command line enter the following command:
CHGJAVVAR
2.
Press Enter.
The system displays the Textura Java Variables screen.
1/4/2007 2:02:00 PM
CMS Interface Setup Manual v1.1
Page 15 of 25
G. Releasing Auto Schedule Job Entries
During the installation process, two Auto Schedule Job Entries were placed on the system, but are being held until
testing and user training have been completed. When production implementation is ready, these two schedule entries
will need to be released.
1.
At that time, enter the command WRKJOBSCDE to work with the entries.
2.
Press Enter.
The system displays the Work with Job Schedule Entries screen.
3.
Page down until the two Textura jobs are found, TEXTURARCV and TEXTURASND.
4.
Select option 6 = Release, for both of these jobs.
5.
Press Enter.
The status of both of the jobs will change to SCD, meaning scheduled.
1/4/2007 2:02:00 PM
CMS Interface Setup Manual v1.1
Page 16 of 25
2 iSeries Internet Access
A. Configuring iSeries for a Domain Name Server
Check to see if the iSeries has been configured for a domain name server.
1.
Type the command CFGTCP.
2.
Press Enter.
The system displays the Configure TCP/IP screen.
1/4/2007 2:02:00 PM
CMS Interface Setup Manual v1.1
Page 17 of 25
3.
To verify that a gateway address has been configured, select option 2 = Work with TCP/IP routes.
The system displays the Work with TCP/IP Routes screen.
4.
If the gateway has already been defined, press F3 to exit and go to step 9 below to change the TCP/IP domain
information.
5.
If this screen does not display entries, add a default route to the IP address of the internet gateway. Select
option 1 = Add.
6.
•
Route Destination of *DFTROUTE
•
Subnet Mask of *NONE
•
Next Hop of <desired gateway IP address>
Press Enter.
1/4/2007 2:02:00 PM
CMS Interface Setup Manual v1.1
Page 18 of 25
The system displays the Add TCP/IP Route (ADDTCPRTE) screen.
7.
Leave all of the default values on this screen as is and press Enter to add the route entry.
1/4/2007 2:02:00 PM
CMS Interface Setup Manual v1.1
Page 19 of 25
After the Route entry has been added, the system displays the Work with TCP/IP Routes screen, which now
includes the entry you have just added.
8.
Press F3 to display to the Configure TCP/IP menu.
1/4/2007 2:02:00 PM
CMS Interface Setup Manual v1.1
Page 20 of 25
9.
Select option 12 = Change the TCP/IP domain information.
10. Press Enter.
1/4/2007 2:02:00 PM
CMS Interface Setup Manual v1.1
Page 21 of 25
The system displays the Change TCP/IP Domain (CHGTCPDMN) screen.
11. If no DNS internet addresses are displayed on this screen, type the addresses to be used.
Note:
Do not change any other values on this screen!
12. Press Enter.
1/4/2007 2:02:00 PM
CMS Interface Setup Manual v1.1
Page 22 of 25
3 Digital Certificate Manager
A. Accessing the Digital Certificate Manager
To access the Digital Certificate Manager
1.
Start the HTTP Admin server on the iSeries by typing the command:
STRTCPSVR SERVER(*HTTP) HTTPSVR(*ADMIN)
2.
Press Enter.
It may take several minutes for the server to start.
3.
While waiting for the server to start, open a browser session and prepare to enter the following url:
http://{the address of the iSeries}:2001
The system will prompt you to type a User ID and Password.
4.
Type the iSeries Security Officer ID and Password.
The system displays the iSeries Tasks page.
1/4/2007 2:02:00 PM
CMS Interface Setup Manual v1.1
Page 23 of 25
5.
Click the Digital Certificate Manager.
The system displays the Digital Certificate Manager page.
6.
Click Get Started.
7.
After the CA certificate has been added, close the browser session.
8.
Type the command ENDTCPSVR SERVER(*HTTP) HTTPSVR(*ADMIN) to end the HTTP Administrative
server.
9.
Press Enter.
1/4/2007 2:02:00 PM
CMS Interface Setup Manual v1.1
Page 24 of 25
Index
Accessing the Digital Certificate Manager, 23
Attach the Trigger Programs, 12
Change TCP/IP Domain (CHGTCPDMN), 22
Check for Object and Member Locks, 10
Commands
CRTUSRPRF TEXTURA, 4
Configure iSeries for a Domain Name Server,
17
Configure TCP/IP, 17
Create a Textura User Profile, 4
Create User Profile (CRTUSRPRF), 4
Create User Profile (CRTUSRPRF) Additional
Parameters, 5
Determine an already defined In-House
Program Library, 6
Digital Certificate Manager, 23, 24
Accessing, 23
Digital Certificate Manager Setup, 17
Identify a New In-House program library, 8
In-House program library
New, 8
In-House Program Library
Defined, 6
iSeries
Create a Textura, 4
iSeries Internet Access, 17
iSeries Tasks, 23
1/4/2007 2:02:00 PM
CMS Interface Setup Manual v1.1
Release Auto Schedule Job Entries, 16
Screens
Change TCP/IP Domain (CHGTCPDMN), 22
Configure TCP/IP, 17
Create User Profile (CRTUSRPRF), 4
Create User Profile (CRTUSRPRF)
Additional Parameters, 5
Digital Certificate Manager, 24
iSeries Tasks, 23
System Environment Maintenance screen, 6
Textura Interfaces menu, 13
Textura Java Variables, 15
Textura Send/Receive Scheduler, 14
Textura/CMS Interface Install screen, 9
Work with Job Schedule Entries, 16
Work with Member Locks, 11
Work with Object Locks, 10
Set up Java Program Values, 15
Setting up your CMS Interface on the iSeries, 4
System Environment Maintenance screen, 6
Textura Interfaces menu, 13
Textura Java Variables, 15
Textura Send/Receive Scheduler, 14
Textura/CMS Interface Install screen, 9
Work with Job Schedule Entries, 16
Work with Member Locks, 11
Work with Object Locks, 10
Page 25 of 25