1
Implementing Secure
Sockets Layer on iSeries
Presented by
Barbara Brown
Alliance Systems & Programming, Inc.
September 28, 2004
Agenda
• SSL Concepts
• Digital Certificate Manager
–
–
–
–
Local Certificate Authority
Server Certificates
User Certificates
Signing Certificates
• Applications supporting SSL
• Tips on using SSL
– Browsers
– Firewalls
September 28, 2004
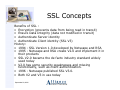
SSL Concepts
Benefits of SSL :
• Encryption (prevents data from being read in transit)
• Ensure Data Integrity (data not modified in transit)
• Authenticate Server identity
• Authenticate Client identity (SSL V3)
History:
• 1994 - SSL Version 1.0 developed by Netscape and RSA
• 1995 - Netscape and RSA create V2.0 and implement it in
their products
• SSL V2.0 became the de facto industry standard widely
used today
• V2.0 has some security weaknesses and missing
functionality, such as client authentication.
• 1996 - Netscape published SSL V3.0.
• Both V2 and V3 in use today
September 28, 2004
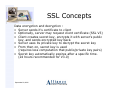
SSL Concepts
Data encryption and decryption :
• Server sends it's certificate to client
• Optionally, server may request client certificate (SSL V3)
• Client creates secret key, encrypts it with server’s public
key, and sends encrypted key back.
• Server uses its private key to decrypt the secret key
• From then on, secret key is used
(requires less computation that public/private key pairs)
• Secret key automatically expires after a specific time.
(24 hours recommended for V3.0)
September 28, 2004
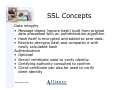
SSL Concepts
Data integrity
• Message digest (secure hash) built from original
data processed with an authentication algorithm
• Hash itself is encrypted and added to sent data.
• Receiver decrypts hash and compares it with
newly calculated hash
Authentication
• Optional
• Server certificate used to verify identity
• Certifying authority consulted to confirm
• Client certificate can also be used to verify
client identity
September 28, 2004
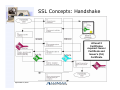
SSL Concepts: Handshake
At least 2
Certificates
required: Server
Certificate and
Issuer’s (CA)
Certificate
September 28, 2004
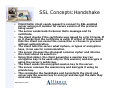
SSL Concepts:Handshake
•
•
•
•
•
•
•
•
•
Client Hello: client sends request to connect to SSL-enabled
server using port number for secure version of the protocol
being used.
The server sends back its Server Hello message and its
certificate.
The client checks if the certificate was issued by a CA it trusts. If
so it checks that the certificate is valid. If either of these checks
fails the client can cancel the connection or choose to proceed
without authentication.
The client tells the server what ciphers, or types of encryption
keys, it can use for communication.
The server chooses the strongest common cipher and informs
the client about its selection.
Using that cipher, the client generates a session key (an
encryption key to be used only for this session) and encrypts it
using the server's public key.
The client sends the encrypted session key to the server.
The server receives the session key and decrypts it using its
private key.
This completes the handshake and henceforth the client and
server use the session key to encrypt and decrypt the data they
send and receive.
September 28, 2004
iSeries Requirements for SSL
• OS/400 V4R1 or higher (some applications must be
at higher release levels)
• One of the IBM Cryptographic Access Provider
products 5722-AC1 (40-bit), 5722-AC2 (56-bit), or
5722-AC3 (128-bit)
• Digital Certificate Manager (DCM), option 34 of
OS/400 (5722-SS1)
• TCP/IP Connectivity Utilities for AS/400 (5722TC1)
• IBM HTTP Server for AS/400 (5722-DG1)
• If you want to use SSL with any iseries access
component, including iSeries Navigator, you must
also install at least one of the AS/400 Client
Encryption products: 5722-CE1 (40-bit), 5722-CE2
(56-bit), or 5722-CE3 (128-bit).
• Client must also support SSL
September 28, 2004
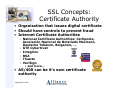
SSL Concepts:
Certificate Authority
• Organization that issues digital certificate
• Should have controls to prevent fraud
• Internet Certificate Authorities
– National Certificate Authorities: Certiposte,
Asociación Nacional de Notariado Mexicano,
Deutsche Telekom, Belgacom, …
– GTE Cybertrust
– Integrion
– RSA
– Thawte
– VeriSign
• and more...
• AS/400 can be it's own certificate
authority
September 28, 2004
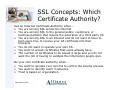
SSL Concepts: Which
Certificate Authority?
Use an Internet Certificate Authority when...
• You are serving SSL across the Internet
• You are serving SSL to the general public, customers, or
business partners that require the assurance of a third party CA
• You are serving SSL to an intranet and do not want to have to
train users how to receive your CA certificate into their
browsers.
• You do not want to operate your own CA.
• You want to accept certificates that users already have.
• The number of certificates to be issued is large and you do not
want the job of having to validate the information people give.
Be your own certificate authority when...
• You want to operate your own CA to control the issuing process.
• You want to identify users in advance.
• Trust is based on organization.
September 28, 2004
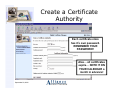
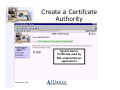
Create a Certificate
Authority
http://your400:2001
September 28, 2004
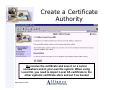
Create a Certificate
Authority
Each certificate store
has it’s own password.
REMEMBER YOUR
PASSWORD!!
Alas… all certificates
expire… NOTE IT ON
YOUR CALENDAR a
month in advance!
September 28, 2004
Create a Certificate
Authority
Do receive the certificate and save it on a server
somewhere and in your own file system: When using
Local CA, you need to import Local CA certificate to the
other systems certificate store and set it as trusted
September 28, 2004
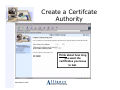
Create a Certifcate
Authority
Think about how long
you want the
certificates you issue
to last.
September 28, 2004
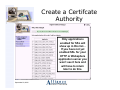
Create a Certifcate
Authority
Only applications
enabled for SSL will
show up in this list…
If you have not yet
enabled SSL for your
HTTP or Websphere
application server you
won’t see it here and
will have to return
later to do this.
September 28, 2004
Create a Certifcate
Authority
System Server
Certificate used by
SSL enabled Server
applications
September 28, 2004
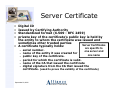
Server Certificate
•
•
•
•
Digital ID
Issued by Certifying Authority
Standardized format (X.509 - RFC 2459)
private key of the certificate’s public key is held by
the entity to whom the certificate was issued and
sometimes other trusted parties
Server Certificates
• A certificate typically holds:
–
–
–
–
–
–
are specific to
serial number.
one server and
name of the entity it was created for
one name
public key of the certificate.
period for which the certificate is valid.
name of the CA that issued the certificate
digital signature from the CA that issued the
certificate. (used to prove the validity of the certificate)
September 28, 2004
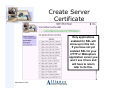
Create Server
Certificate
Another password to
remember.
September 28, 2004
Create Server
Certificate
Only applications
enabled for SSL will
show up in this list…
If you have not yet
enabled SSL for your
HTTP or Websphere
application server you
won’t see it here and
will have to return
later to do this.
September 28, 2004
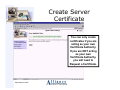
Create Server
Certificate
You can only create
certificates if you are
acting as your own
Certificate Authority.
If you are NOT acting
as your own
Certificate Authority,
you will need to
Request a Certificate.
September 28, 2004
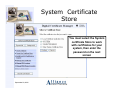
System Certificate
Store
You must select the System
certificate Store to work
with certificates for your
system, then enter the
password on the next
screen
September 28, 2004
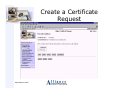
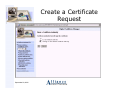
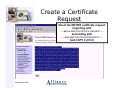
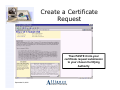
Create a Certificate
Request
September 28, 2004
Create a Certificate
Request
September 28, 2004
Create a Certificate
Request
September 28, 2004
Create a Certificate
Request
Select the ENTIRE certificate request,
beginning with
-----BEGIN NEW CERTIFICATE REQUEST-----
and ending with
-----END NEW CERTIFICATE REQUEST-----
And COPY it (Ctl C)
September 28, 2004
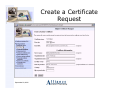
Create a Certificate
Request
Then PASTE it into your
certificate request submission
to your chosen Certifying
Authority
September 28, 2004
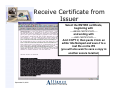
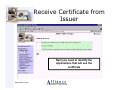
Receive Certificate from
Issuer
Select the ENTIRE certificate,
beginning with
-----BEGIN CERTIFICATE-----
and ending with
-----END CERTIFICATE-----
And COPY it, then paste it into an
editor like Notepad and save it to a
text file on the IFS
(you will also want to save a copy in
another secure location)
September 28, 2004
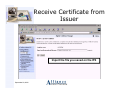
Receive Certificate from
Issuer
Import the file you saved on the IFS
September 28, 2004
Receive Certificate from
Issuer
Next you need to identify the
applications that will use the
certificate
September 28, 2004
Work with Certificates
• Renew Certificate
– make sure you have a reminder on your calendar!
• Validate Certificate
– certificate is not expired
– not listed in a Certificate Revocation List (CRL) as
revoked
– CA certificate for the issuing CA in the current
certificate store
– CA certificate is enabled and marked as trusted
• Import Certificate
– from another 400 or from Internet CA
• Export Certificate
– Only for another 400 (Bummer!)
– Windows Server has Certificate Authority for working
with certificates in Windows environment
September 28, 2004
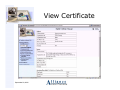
View Certificate
September 28, 2004
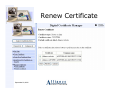
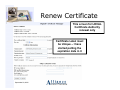
Renew Certificate
September 28, 2004
Renew Certificate
September 28, 2004
Renew Certificate
This screen for LOCAL
Certificate Authority
renewal only
Certificate Label must
be Unique – I have
started putting the
expiration date in it
September 28, 2004
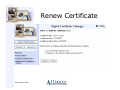
Renew Certificate
This screen for Internet
Certificate Authority
renewal only
Yes – creates a new
request
No – import a new
certificate from the CA
September 28, 2004
Renew Certificate
Remember to assign the
renewed certificate to
all the applications that
used to use the old one!
September 28, 2004
Manage Applications
• Update Certificate Assignment
– Make sure all your applications that will use
SSL have a valid certificate assigned!
• Validate Application
– certificate is assigned for the application
– ensures that assigned certificate is valid
– if the application is configured to use a
Certificate Authority (CA) trust list, that trust
list contains at least one CA certificate
– CA certificates in the application CA trust list
are valid
–
• View Application Definition and Add
Application
– Can define your OWN applications & configure
SSL
September 28, 2004
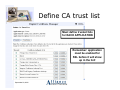
Define CA trust list
Must define trusted CAs
for EACH APPLICATION
Remember: application
must be enabled for
SSL before it will show
up in the list!
September 28, 2004
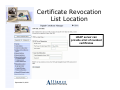
Certificate Revocation
List Location
LDAP server can
provide a list of revoked
certificates
September 28, 2004
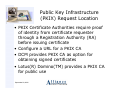
Public Key Infrastructure
(PKIX) Request Location
• PKIX Certificate Authorities require proof
of identity from certificate requester
through a Registration Authority (RA)
before issuing certificate
• Configure a URL for a PKIX CA
• DCM provides PKIX CA as option for
obtaining signed certificates
• Lotus(R) Domino(TM) provides a PKIX CA
for public use
September 28, 2004
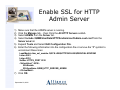
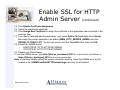
Enable SSL for HTTP
Admin Server
1)
2)
3)
4)
Make sure that the ADMIN server is running.
Click the Manage tab …then Click the All HTTP Servers subtab.
Select ADMIN from the Server list.
Select Include /QIBM/UserData/HTTPA/admin/conf/admin-cust.conf from the
Server area list.
5) Expand Tools and Select Edit Configuration File.
6) Enter the following information into the configuration file or remove the "#" symbol to
uncomment these lines:
LoadModule ibm_ssl_module /QSYS.LIB/QHTTPSVR.LIB/QZSRVSSL.SRVPGM
Listen 2001
Listen 2010
SetEnv HTTPS_PORT 2010
<VirtualHost *:2010>
SSLEnable
SSLAppName QIBM_HTTP_SERVER_ADMIN
</VirtualHost>
7) Click OK.
September 28, 2004
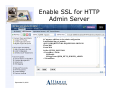
Enable SSL for HTTP
Admin Server
# Customer additions to the admin configuration
LoadModule ibm_ssl_module
/QSYS.LIB/QHTTPSVR.LIB/QZSRVSSL.SRVPGM
Listen 2001
Listen 2010
SetEnv HTTPS_PORT 2010
<VirtualHost *:2010>
SSLEnable
SSLAppName QIBM_HTTP_SERVER_ADMIN
</VirtualHost>
September 28, 2004
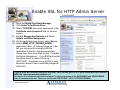
Enable SSL for HTTP Admin Server
(continued)
8) Go to the Digital Certificate Manager.
9) Click Select a Certificate Store.
10) Select *SYSTEM, then enter a password in the
Certificate store password field on the next
screen.
11) Expand Manage Applications and Select
Update certificate assignment.
12) On the application type screen, select Server.
13) Select QIBM_HTTP_SERVER_ADMIN
application name. (If it doesn’t show up in the
list, you may need to manually ADD the
Application to the list using the parameters
shown here, then come back to step 11 Update
Certificate Assignment... If you END and restart
the admin server to make it show up,…
GOTCHA!!! the admin server will fail to start
because it doesn’t have a certificate assigned!!
Catch-22!)
If you’re stuck with an admin config file that won’t start, you can get to it on a green screen with the command
WRKLNK ‘/qibm/userdata/httpa/admin/conf’
Use option 2 to edit admin-cust.conf and put a # in the first position of the SSLENABLE and SSLAPPNAME
lines to comment them out. Then save the file and STRTCPSVR *HTTP HTTPSVR(*ADMIN)
September 28, 2004
Enable SSL for HTTP
Admin Server (continued)
14) Click Update Certificate Assignment.
15) Select the appropriate certificate.
16) Click Assign New Certificate to assign the certificate to the application name selected in the
previous step.
17) If you had to manually add the application, next select Define CA Trust List, select Server,
then select the server application you added (QIBM_HTTP_SERVER_ADMIN) and click
DEFINE CA TRUST LIST. On the next screen click the Trust All button, then click OK.
18) Restart the ADMIN server
•
ENDTCPSVR *HTTP HTTPSVR(*ADMIN)
•
STRTCPSVR *HTTP HTTPSVR(*ADMIN)
19) Restart your Web browser.
To use the ADMIN server, type http://[iSeries_hostname]:2001 for a non-secure connection or
https://[iSeries_hostname]:2010 for a secure connection.
Note: If you have trouble getting the secure connection working, check the ADMIN error log file
located in the (\QIBM\UserData\HTTPA\admin\logs\ directory for information.
September 28, 2004
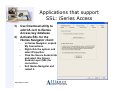
iSeries Server Applications
that Support SSL
• iSeries Access
–
–
–
–
–
–
–
dataqueue
database
file server
network printer
Remote command
management central
signon
• DRDA & DDM (database
access)
• FTP (file transfer)
• Telnet (terminal access)
• HTTP (original & Apache)
• Host on Demand
• Host Access Transform
Server (HATS) & HATSLE
September 28, 2004
• Websphere Application
Server
• Domino
• LDAP (directory
services)
• EIM (Enterprise Identity
Mapping)
• Applications written
with:
– Java Developer Kit or
IBM Toolbox for Java
– iSeries Access for
Windows APIs
– Global Secure Toolkit
(GSKit)
– SSL_iSeries Native APIs
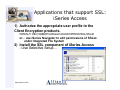
Applications that support SSL:
iSeries Access
1) Authorize the appropriate user profile to the
Client Encryption products.
WRKAUT OBJ('/QIBM/ProdData/CA400/EXPRESS/SSL/SSL40
or... use iSeries Navigator to edit permissions of SSLxx
under Integrated File System
2) Install the SSL component of iSeries Access
- Use Selective Setup…
September 28, 2004
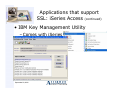
Applications that support
SSL: iSeries Access (continued)
• IBM Key Management Utility
– Comes with iSeries Access
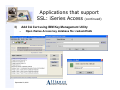
September 28, 2004
Applications that support
SSL: iSeries Access (continued)
3)
Add CA Cert using IBM Key Management Utility
–
Open iSeries Access key database file: cwbssldf.kdb
September 28, 2004
Applications that support
SSL: iSeries Access
3)
4)
Use Download utility to
add CA cert to iSeries
Access key database
Activate SSL for the
iSeries Navigator client:
–
–
–
–
In iSeries Navigator, expand
My Connections.
Right-click the system, and
select Properties.
Click the Secure Sockets tab
and select Use Secure
Sockets Layer (SSL) for
connection.
Exit iSeries Navigator and
restart it.
September 28, 2004
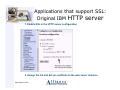
Applications that support SSL:
Original IBM HTTP server
1. Enable SSL in the HTTP server configuration
2. Assign the CA and Server certificate to the web server instance
September 28, 2004
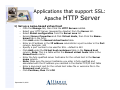
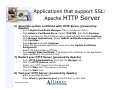
Applications that support SSL:
Apache HTTP Server
1) Set up a name-based virtual host
–
–
–
–
–
–
–
–
–
–
–
–
Click the Manage tab, then Click the HTTP Servers subtab.
Select your HTTP Server (powered by Apache) from the Server list.
Select Global configuration from the Server area list.
Expand Server Properties and Click Virtual Hosts, then Click the Namebased tab in the form.
Click Add under the Named virtual hosts table.
Enter an IP address in the IP address columnEnter a port number in the Port
column. Example: 443
Specify a port number to be used for SSL – default is 443
Click Add under the Virtual host containers table in the Named host
column. Note: This is a table within the Named virtual hosts table in the
Named host column.
Enter the fully qualified server hostname for the virtual host in the Server
name column.
Note: Make sure the server hostname you enter is fully qualified and
associated with the IP address you selected in the iSeries TCP/IP host table
Enter a document root for the virtual host index file or welcome file in the
Document root column.
Click Continue, then Click OK
September 28, 2004
Applications that support SSL:
Apache HTTP Server (continued)
2) Set up Listen directive for virtual host
– Expand Server Properties, Click General Server Configuration,
then Click the General Settings tab
– Click Add under the Server IP addresses and ports to listen on
table.
– Select the IP address you entered for the virtual host in the IP
address column.
– Enter the port number you entered for the virtual host in the Port
column.
– Click Continue, then Click OK.
3) Set up the virtual host directories
– Select the virtual host from the Server area list.
– Expand HTTP Tasks and Wizards, Click Add a Directory to the
Web, then Click Next.
– Select Static web pages and files and Click Next.
– Enter a directory name for the virtual host in the Name field. Click
Next.
– Enter an alias for the virtual host in the Alias field. Example:
/earnings/
– Click Next, then Click Finish.
The document root and directory for the virtual host has been created.
September 28, 2004
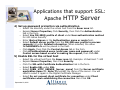
Applications that support SSL:
Apache HTTP Server
4) Set up password protection via authentication
– Select the directory under the virtual host from the Sever area list.
– Expand Server Properties, Click Security, then Click the Authentication
tab in the form.
– Select Use OS/400® profile of client under User authentication method
for 400 native security
– Enter iSeries Signon in the Authentication name or realm field.
– Select Default server profile from the OS/400 user profile to process
requests list under Related information. When selected, the value
%%SERVER%% will be placed in the field.
– Click Apply, then Click the Control Access tab in the form.
– Click All authenticated users (valid user name and password) under
Control access based on who is making the request, then Click OK.
5) Enable SSL for the virtual host
–
–
–
–
–
Select the virtual host from the Sever area list. Example: Virtual Host *:443
Expand Server Properties, then Click Security.
Click the SSL with Certificate Authentication tab in the form.
Select Enable SSL under SSL.
Select QIBM_HTTP_SERVER_[server_name] from the Server certificate
application name list. Note: Remember the name of the server. You will
need to select it again in the Digital Certificate Manager.
– Select Do not request client certificate for connection under Client
certificates when establishing the connection then Click OK.
September 28, 2004
Applications that support SSL:
Apache HTTP Server
6) Associate system certificate with HTTP Server (powered by
Apache)
–
–
–
–
–
–
–
–
Go to Digital Certificate Manager (http://yourserver:2001)
Click Select a Certificate Store, Select *SYSTEM, then Click Continue.
Enter a password in the Certificate store password field and Click Continue.
Click Manage Applications, Select Update certificate assignment, then
Click Continue.
Select Server and Click Continue.
Select the appropriate application name and Click Update Certificate
Assignment.
Select the appropriate certificate.
Click Assign New Certificate. This assigns the certificate to the application
name selected in the previous step.
7) Restart your HTTP Server (powered by Apache)
–
–
–
–
–
Go to HTTP Administration and Click the Manage tab.
Click the HTTP Servers subtab.
Select your HTTP Server from the Server list.
Click the Stop icon if the server is running.
Click the Start icon.
8) Test your HTTP Server (powered by Apache)
– Start a new Web browser.
– Enter https://yourserver:port in the location or URL field.
September 28, 2004
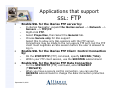
Applications that support
SSL: FTP
•
–
–
–
–
•
•
–
–
–
–
Enable SSL for the iSeries FTP server by:
In iSeries Navigator, expand the iSeries server --> Network -->
Servers --> TCP/IP.
Right-click FTP.
Select Properties, then Select the General tab.
Choose Secure only for SSL support
Select this to allow only SSL sessions with the FTP server.
Connections may be made to the non-secure FTP port, but the FTP
client must negotiate an SSL session before the user is allowed to
log in.
Enable SSL for the iSeries FTP Client Control Connection
by:
On the STRTCPFTP (FTP) command, specify SECCNN (*SSL)
Within your FTP client session, use the SECOPEN subcommand
Enable SSL for the iSeries FTP Data Connection
For the STRTCPFTP (FTP) command, enter DTAPROT
(*PRIVATE)
When you have a secure control connection, you can use the
SECDATA subcommand to change the data connection protection
level.
September 28, 2004
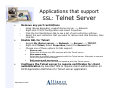
Applications that support
SSL: Telnet Server
•
•
–
–
–
–
–
–
–
Remove any port restrictions
Using iSeries Navigator, expand iSeries server --> Network.
Right-click TCP/IP Configuration and select Properties.
Click the Port Restrictions tab to see a list of port restriction settings.
Select the port restriction that you want to remove and click Remove, then
click OK.
Enable SSL for Telnet
Expand My iSeries server --> Network --> Servers --> TCP/IP.
Right-click Telnet, Select Properties, Select the General tab.
Choose one of these options for SSL support:
•
•
•
•
Secure only
Select this to allow only SSL sessions with the Telnet server.
Non-secure only
Select this to prohibit secure sessions with the Telnet server. Attempts to connect
to an SSL port will not connect.
Both secure and non-secure
Allows both secure and non-secure sessions with the Telnet server.
Configure the Telnet server to require certificates for client
authentication by selected YES to require client authenitication on
DCM Application Definition for Telnet server application
September 28, 2004
Applications that support
SSL: Telnet Client (continued)
•
Enable iSeries Access Client for SSL
–
–
–
–
–
•
Open iSeries Navigator.
Right-click the name of your system, Select Properties.
Select the Secure Sockets tab. Note: This tab will not appear unless you have
completed a selective install of iSeries Client Encryption (128-bit), 5722-CE3.
Click Download to download the CA certificate into the key database.
Enter your key database password (default is ca400)
Configure telnet
session to use SSL
and port 992
This is all that is required to
encrypt the session and
validate the server certificate.
If you want to also validate the
user, you must use User
Certificates
September 28, 2004
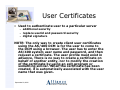
User Certificates
• Used to authenticate user to a particular server
– additional security
– replace userid and password security
– digital signature
NOTE: The only way to create client user certificates
using the AS/400 DCM is for the user to come to
the DCM using a browser. The user has to enter the
AS/400 system user name and password, and then
request a certificate. The user profile must exist in
advance. There is no way to create a certificate on
behalf of another entity, nor to modify the creation
of the certificate by using an exit program or
something similar. When the certificate has been
created, it is automatically associated with the user
name that was given.
September 28, 2004
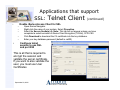
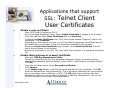
Applications that support
SSL: Telnet Client
User Certificates
•
–
–
–
–
–
–
–
•
–
–
–
–
–
–
Obtain a user certificate
Start DCM (http://yourserver:2001)
In the left-hand navigation frame, select Create Certificate to display a list of tasks.
From the task list, select User Certificate and click Continue.
Complete the User Certificate form. Only those fields marked "Required" need to be
completed. Click Continue.
Depending on the browser you use, you will be asked to generate a certificate that will
be loaded into your browser. Follow the directions provided by the browser.
When the Create User Certificate page reloads, click Install Certificate. This will
install the certificate in the browser.
Export the certificate to your PC. You must store the certificate in a password-protected
file.
Enable iSeries Access to present certificate
Start the IBM Key Management Utility
You will be prompted for your key database password. Unless you have previously
changed the password from the default, enter ca400. A confirmation message displays.
Click OK.
From the pull-down menu, select Personal certificates.
Click Import.
In the Import key display, enter the file name and path for the certificate. Click OK.
Enter the password for the protected file. This is the same password that you specified
when you create a user certificate in DCM. Click OK. When the certificate has been
successfully added to your personal certificates in IBM Key Management, you can use
PC5250 emulator or any other Telnet application.
September 28, 2004
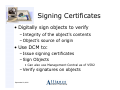
Signing Certificates
• Digitally sign objects to verify
– Integrity of the object's contents
– Object’s source of origin
• Use DCM to:
– Issue signing certificates
– Sign Objects
• Can also use Management Central as of V5R2
– Verify signatures on objects
September 28, 2004
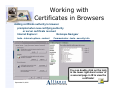
Working with
Certificates in Browsers
Adding certificate authority to browser
prompted when new certifying authority
or server certificate received
Internet Explorer:
Netscape Navigaor
tools...internet options...content
Communicator...tools...security info
You can double click on the lock
in the lower right-hand corner of
a secured page in IE to view the
certificate!
September 28, 2004
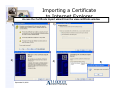
Importing a Certificate
to Internet Explorer
Access the Certificate Import wizard from the view certificate window
3)
1)
2)
4)
September 28, 2004
5)
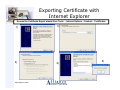
Exporting Certificate with
Internet Explorer
Access the Certificate Export wizard from Tools… Internet Options…Content… Certificates
1)
2)
September 28, 2004
3)
4)
5)
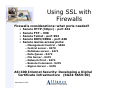
Using SSL with
Firewalls
Firewalls considerations: what ports needed?
•
•
•
•
•
Secure
Secure
Secure
Secure
Secure
HTTP (https:) - port 443
FTP – 990
Telnet - port 992
DDM/DRDA - port 448
iseries access ports:
— Management Central – 5566
— Central server - 9470
— Database server - 9471
— Data Queue - 9472
— File Server - 9473
— Network Print - 9474
— Remote Command - 9475
— Signon Server – 9476
AS/400 Internet Security: Developing a Digital
Certificate Infrastructure (SG24-5659-00)
September 28, 2004