1
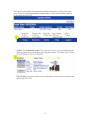
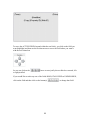
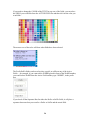
AdBuilder User Manual
This guide will help you understand the layout and new features of AdBuilder. AdBuilder is a
great tool that will allow you to have total control over your advertisement and let you create an
instant proof of your page(s).
1
2
3
4
5
6
7
From the ADV Detail page you will see your Ad Builder button.
8
To create your
own ad in
seconds, first go
to the ADV
Detail where
you used to
select your
listings.
Once you click on the AdBuilder Button, you will get a screen like this:
You can either click USE LISTINGS FROM LAST AD, or NO LISTINGS PREFERENCE. If you click
USE LISTINGS from last ad, you will be using the EXACT layout and listings from your previous ad. If
you click on NO LISTING PREFERNCE, you will only use the Template and Design preferences from
your last ad, you will need to select all new listings.
9
Once you click on the AdBuilder button you will see a page layout similar to the one below.
Use “Template
Options” to define
page size and layout.
Use “Design Option”
to define the colors,
fonts, and listing block
layout choices that
will appear on your
page.
Use “Inventory
Option” to select
which listings will
appear in your ad.
Return to
ADV Detail
Page.
Use the
“Information”
button to display the
information below.
Color Status: Each page’s number is a color to indicate
the status that page is in.
I. Page Navigation Section:
Blue- The page you are working on now.
Green- Page has been approved and is completed.
Yellow- Page is started but not complete.
Red- Page has not been started yet.
Page Navigation (On the left side of the AdBuilder
page): This section displays your page(s) for this
issue along with whether or not you choose header,
footer, and layout showing the number of blocks.
+
There is a
that allows you to add another advertising page.
There is a
-
that can remove a page.
Note: The first page can only be deleted by going
back into the ADV Detail Page.
10
II. Options Section (Template, Design and Inventory):
A. Setting Up Your Template: Use 'Template Options' to define the size of your page, Layout and Header
and Footer artwork that will appear on your page.
Page Size: Use “Page Size” to tell AdBuilder the size of your ad (Half or Full).
Blocks: Use “Blocks” to tell AdBuilder how many list blocks your page will have in your listing
template (grid).
Header: Use “Header” to tell AdBuilder if your ad will include a masthead at the top of your
page. Click on the header you wish to place on the top of your advertisement. To see the header
in full size view click “View Full Size” found under the image.
11
Footer: Use “Footer” to tell AdBuilder if your ad will include a masthead at the bottom of your page.
Click on the footer you wish to place on the bottom of your advertisement. To see the footer in full size
view click “View Full Size” found under the image.
Layout: Use “Layout” to select the listing block layout or page grid. Click on the layout you wish to use
for your advertisement. If you find that your layout is not included in AdBuilder, please contact your Area
Sales Manager, Jason Leet or Sarah Smith and supply them with a sample of how you would like the layout
to appear. The AdNet team will review the layout and schedule it to be built if it conforms to AdBuilder
rules as soon as possible.
12
B. Selecting Your Inventory: Use “Inventory Options” to select which listings will appear in your ad.
Once a listing is placed and saved you can edit the listing and upload additional photos.
You can use “Auto-Flow”
to schedule listings with a
single click. Sort your
You can use the
inventory in the order you
“Listings” button
wish your ads to appear
to select listings
and click Auto-Flow.
and place them
into position on
your page. To
select a listing,
point to the listing
in your inventory,
click, then point
to the position
(block) you want
it to appear in
your layout and
click to place it on
the template.
Note: Auto-Flow can start at
any place on the list
depending on how you sort.
Use the Fill/Promo Button to select fill and
agent promos blocks and place into the
position (block) on your page. AdNet has
a variety of generic fill blocks available
under the Global dropdown.
Clear Grid can be used to remove all
listings already placed in your layout
with a single click so you can start over.
Use the “View Proof”
button to create a PDF
proof of your page. After
reviewing your ad, you can
either “Approve Page” or
go back to any of the
previous steps and make
changes.
13
To show a listing with MULTIPLE Photos, click on the EDIT button for the listing…..
14
15
Here is an
example of a
PDF proof.
16
After you upload your
proof (by viewing it), a
proofing checklist will help
guide you while proofing
your ad.
Note: Pop Up Blockers
must be off to see proofs or
you can change your
settings to accept pop ups
from this site.
C. Selecting Your Design Options: Use “Design Options” to define the colors that will appear on your
page, fonts and listing block layout choices.
Use “Page Options” to define
border and background color.
17
When you click on the Outer Background, the background options display below. If your background
image does not display, please contact your Area Sales Rep so that they can get the images set up for you.
When you click
on the Images
button, the
background
images that the
graphic center
uploaded will
display. Then
click on the image
you wish to use in
your ad.
18
Use “Listing Options” to define
colors that appear within your
listing block such as border,
background, and font colors.
Use “Text Options” to
define how the text
should appear
throughout the page.
19
Text Format: Use “Text Format” to choose which fields are to be printed in your ad. Each row of
AdBuilder text format choices offers a town, price, caption and copy theme. Point and click on the text
format you wish to use in your ad.
Font Style: Use “Font Style” to choose the font throughout the entire page.
Field Format: Use “Field Format” to choose which fields you would like to make bold, italic, upper case
and visible on your ad. You can also choose whether or not to append the MLS number, Hotline and /or
the WebID to the copy. In addition, if you have a bottom banner that splits, you can choose what you
would like it display on the left and right bottom banner.
20
Text Format Builder will allow you to design the layout of the text block for your entire
page or for just one block.
To access the Text Format Builder for the ENTIRE PAGE, you will go to AdBuilder,
Click on the DESIGN TAB and then click on TEXT OPTIONS, then TEXT FORMAT
BUILDER.
Once you are into Text Format Builder, you will see the screen with the Available Fields,
Active Fields, Position, Font, Prefix, Suffix and Color Chart.
The upper right corner of the AdBuilder screen displays the layout you are designing.
21
To layout the TEXT FORMAT BUILDER you can select any of the AVAILABLE
FIELDS and then the ARROW to the RIGHT to get them to the ACTIVE FIELD.
You can select several AVAILABLE FIELDS at once by holding down the CONTROL
key on your keyboard and clicking on the fields you want.
Once you have all the AVAILABLE FIELDS to the ACTIVE FIELDS box
You can begin to layout the text block area.
22
To move the ACTIVE FIELDS around within the text block, you click on the field you
want (highlight) and then use the Position arrows to move the field where you want it
with the text format box
Or you can click on the
or right justified.
boxes to auto justify the text block as centered, left
If you would like to make any one of the fields BOLD, ITALICIZED or UNDERLINED,
click on the field and then click on the button(s)
23
to change that field.
If you need to change the COLOR of the TEXT for any one of the fields, you can select
the FIELD you would like from the ACTIVE FIELD list and then click on the color you
would like:
The mouse-over of the color will show what fields have been selected:
The Prefix/Suffix fields can be used to place a prefix or suffix on any of the Active
Fields….for example, if you want to have WEBID placed in front of the WebID number,
you would select WebID from the Active Field and they type “WEBID”, in the prefix
box.
If you check off the Separator Box for either the Prefix or Suffix fields, it will place a
separator between what you want for a Prefix or Suffix and the actual field.
24
Banner Size: You are now able to select the size of the banner that will appear on a listing. You can find
this by clicking on design, then click on Text Options, from the menu select Banner Size.
Default setting is Medium. You can select other options, Small, Medium Small, Medium, Medium Large,
or Large.
This will allow for more or less text based on what you select.
25
Copy Fitting: If you do not have enough text to fill the box you can just add white space between each of
the lines or you can keep all the text together and put it to the top of the box... that is top or the bottom....
(bottom) or center it in the middle of the box.... (center) some people like to have all the text put to the top
of the box, but the agent name and agent phone to the bottom.... that's the white space after copy option
Use “Block Style”
to select how you
want the border
around your listing
to appear. Choices
include square and
rounded boxes and
some with
dropdown shadows.
See screen below for
Listing Box
available options.
26
Use “Template” to
select the default text
and photo orientation
and size. The larger
your photo the less
space you will have
for text.
Use “Template” to select
the default text and photo
orientation and size. The
larger your photo the less
space you will have for
text.
27
Note: The ratios can be
changed in 5% increments.
To edit an individual listing: Click on
the “Edit” button on the layout. The listing
information will display below where you
can make changes as well as any Design
Option changes.
You can have the information on the listing
that you edit, written back to AdNet as a
permanent change. If you only want the
change to be a ONE TIME change, then
remove the tick from the check box by
clicking on the check mark.
Once you are satisfied with the page, you must click the APPROVE PAGE button!
CAUTION!
If you do not approve the page, the ad
will not run in the book, and graphics
will REPEAT your PREVIOUS ad.
YOU MUST APPROVE THE PAGE
YOU HAVE JUST COMPLETED
FOR IT TO APPEAR IN PRINT.
28