1
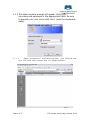
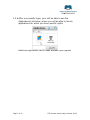
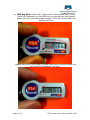
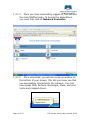
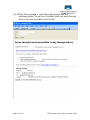
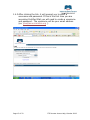
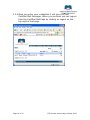
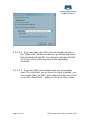
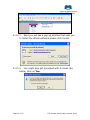
ITS Remote Access
User Manual
Welcome
This User Manual is divided into two parts:
The first section shows how to connect under normal conditions
The second section is devoted to first-time setup and troubleshooting. Please
place a call to the Helpdesk at 212-408-1545 or 888-596-6296 x1545 before
turning to this section.
If the Helpdesk is unavailable, first verify that ABS systems are up at the “IT Systems Status and Remote Help” section of http://abs.info. Current status is under
the heading “Current Conditions”.
Quick Reference*
Application:
IT Systems
Status and
Remote Help
If New York is up, go to:
http://www.abs.info/ITSystemsS
tatusandRemoteHelp.dsp
If New York is down, go to:
(same)
Helpdesk
[email protected]
tel: 212-408-1545 or 888-5966296 x1545
(same)
(same)
MSGP, etc.
Project
Staffnet
Secure Mail
https://remote.americanbible.org
https://remote.americanbible.org
http://staffnet.americanbible.org
https://securemail.americanbible.org
(same)
(same)
http://staffnet-dr.americanbible.org
(same)
Webmail
http://webmail.americanbible.org
http://webmail-dr.americanbible.org
To Report a
Crisis
Facilities
Status (New
York)
1-800-308-6297
(same)
1-800-242-5375
(same)
*Items in the far right column are planned, but not yet active as of
March, 2007.
Contents
1 Connecting via Remote Access ................................................ 3 1.1 Webmail ......................................................................... 3 1.2 Remote.americanbible.org ................................................. 5 1.3 Staffnet .......................................................................... 8 1.4 Certified Mail ................................................................. 11 2 Setup and Troubleshooting ................................................... 15 Page 2 of 22
ITS Remote Access Help, October 2006
2.1 2.2 2.3 Webmail ....................................................................... 15 Remote.americanbible.org ............................................... 16 Staffnet ........................................................................ 20 1 Connecting via Remote Access
Normal Operation
1.1 Webmail
Steps on how to check your ABS email from any location provided you
have internet access.
1.1.1 Launch Microsoft Internet Explorer by doubleclicking on its icon on the desktop.
1.1.2 In the address bar, type
http://webmail.americanbible.org. Note that, in
this case, one does not precede the address with
www.
Page 3 of 22
ITS Remote Access Help, October 2006
1.1.3 The above window prompt will appear. Enter your
username and password in the appropriate fields. Be sure
to precede your user name with ‘abs\’ (note the backwards
slash).
1.1.4
Upon successful authentication, you should see
the Outlook web interface as shown below:
Page 4 of 22
ITS Remote Access Help, October 2006
1.2 Remote.americanbible.org
Web-Based Citrix Applications such as Great Plains, H: Drives, and
more
1.2.1 On your desktop, double-left-click the Internet Explorer
Web browser icon.
1.2.2 In the address bar of your browser, type in the following:
http://remote.americanbible.org
Page 5 of 22
ITS Remote Access Help, October 2006
1.2.3 The following login window will appear
1.2.4 Enter your username where it states ‘Username’ and
password where it states ‘Password’.
1.2.5 For the last field ‘Secondary Password,’ type in the 6-digit
number currently displayed on your RSA SecureID key, and
then click on the ‘Log In’ Button.
Page 6 of 22
ITS Remote Access Help, October 2006
1.2.6 After a successful login, your will be able to see the
Applications List below, where you will be able to launch
applications for which you have specific rights.
Additional applications can be made available upon request.
Page 7 of 22
ITS Remote Access Help, October 2006
1.3 Staffnet
Note: ITS recommends that you use Microsoft’s Internet Explorer
when accessing Staffnet; IE will allow you full-access to all of
Staffnet’s features.
1.3.1 Logging on to Staffnet
1.3.1.1
Open Internet Explorer (IE).
1.3.1.2
Type staffnet.americanbible.org/ in the address
bar.
1.3.1.3
Press Enter on your keyboard or click on Go in
the address bar.
The browser will take you to the login screen; please enter your:
User name: usually your first initial and last name
ABS password: the one you use to log into your computer
SecureID Password: the number that appears on your RSA
key
Page 8 of 22
ITS Remote Access Help, October 2006
RSA Key Note: Left of the “tokencode” (the number that is your
SecureID Password) on the RSA key is a vertical bar that counts
down until the next tokencode change. If the bar is at or near the
bottom like this:
…please wait until the number changes and enter the new number as
your SecureID password, as here:
Page 9 of 22
ITS Remote Access Help, October 2006
1.3.1.4
Once you have successfully logged on, you will see
the main Staffnet page. To access the applications,
you must first click on Network Connector.
1.3.1.5
Once connected, you will see a pop-up window on
the bottom of your screen; this lets you know you that
you successfully connected to the network. You may
now access CRM, Outlook, Messenger, Muse, and your
home and mapped drives.
Page 10 of 22
ITS Remote Access Help, October 2006
1.4 Certified Mail
1.4.1 Compose a New Message like you normally would. Once the
message is composed and ready to be sent you would
simply click on Send Certified Mail Button instead of regular
Send Button in Outlook.
Page 11 of 22
ITS Remote Access Help, October 2006
1.4.2 Once the message is received it would look like the
message below. To get your Certified Mail you would simply
click on the link provided in the email.
Page 12 of 22
ITS Remote Access Help, October 2006
1.4.3 After clicking the link, it will prompt you to enter a
username and password. If this is the first time you are
accessing Certified Mail you will need to create a username
and password. The username will be your email address
(ex. [email protected] ).
Page 13 of 22
ITS Remote Access Help, October 2006
1.4.4 Once you enter your credentials it will give you your
Certified Mail Messages. When you are done you can Logout
from the Certified Mail Page by clicking on Logout on the
top right of that page.
Page 14 of 22
ITS Remote Access Help, October 2006
2 Setup and Troubleshooting
ABS computers are set up with the necessary software to connect from
a remote location. This section will apply to you only if that software
becomes damaged or your connections persistently fail despite
following instructions.
Note: This is only a rough guide. Please see the end of this guide for
information on contacting the ABS Helpdesk, which will be able to
provide comprehensive support.
2.1 Webmail
2.1.1 Setup: No setup.
2.1.2 Troubleshooting
2.1.2.1
Logon Credentials Fail
The most common issue here is the format of the username. In the
dialog that pops up asking for your username and password, enter
it in the form “abs\username”, like this:
If this fails, a lesser-common trick is to use your americanbible.org
email address (with the ‘@’ sign) in the username field. If this
works when the standard “abs\username” format does not, please
notify the Helpdesk as soon as possible so that they can rectify the
issue.
Page 15 of 22
ITS Remote Access Help, October 2006
2.2 Remote.americanbible.org
2.2.1 Setup
2.2.1.1
Check the right-hand side of the main screen you
see immediately after login. If you see a message like
the following, click the link “ICA Web Client for 32-bit
Windows” to download the Windows web client.
Page 16 of 22
ITS Remote Access Help, October 2006
2.2.1.2
In the following dialog, choose a download
location, then run the file ica32t.exe after download
completes in order to install the web client. You will
have to restart your Internet browser after installation
for the plugin to work.
2.2.2 Troubleshooting
2.2.2.1
Browser Prompts You for What to do with the file
“launch.asp”
2.2.2.1.1 When you click on an application after logging in, you
see a prompt like the following:
Page 17 of 22
ITS Remote Access Help, October 2006
2.2.2.1.2 If you see that your Citrix client is already chosen in
the “Open with” window (as above), go ahead and leave
that selected and say OK. Your browser will pass this file
off to your Citrix client and launch the application
normally.
2.2.2.1.3 If you see that your browser does not know about
your Citrix client but you do have the client installed, you
can choose “Save to Disk”, then launch the file from there
or use the “Open with…” dialog to find your Citrix client.
Page 18 of 22
ITS Remote Access Help, October 2006
2.2.2.1.4 Macintosh Clients – Sometimes Macs incorrectly save
the file as “Launch.asp” or try to open it inside the
browser instead of launching Citrix. To correct this, save
the file, then rename it, adding the filename extension
“.ICA”.
2.2.2.2
After logging in successfully, an application you
need is not listed
If you do not see an application you need to use after successfully
logging in, an administrator’s intervention is required to give you
access.
Please send a message to [email protected] stating the
issue and follow up by calling 212-408-1545 or 888-596-6296 x1545
for resolution status.
Page 19 of 22
ITS Remote Access Help, October 2006
2.3 Staffnet
2.3.1 Setup
1.1.1
The first time you access Staffnet
The first time you go to staffnet.americanbible.org, your browser will
go through some initial installations. These will only occur once; after
that, your browser will keep the settings, and you will not go through
these the next time you access Staffnet from this computer.
2.3.1.1
The first pop up will display a Security Alert. Click
on Yes at that prompt.
2.3.1.2
At this time you may see an alert asking you to
install ActiveX controls. When this happens, click on
the message under the address bar and select Install
ActiveX Control.
Page 20 of 22
ITS Remote Access Help, October 2006
2.3.1.3
Next you will see a pop-up window that asks you
to install the Whale software please click Install
2.3.1.4
You might also get prompted with a screen like
below, click on Yes.
Page 21 of 22
ITS Remote Access Help, October 2006
2.3.1.5
At this point—if your Windows Firewall is ON—the
Windows Firewall will prompt you with a Security Alert
like the one below. If you see this window, click on
Unblock.
Page 22 of 22
ITS Remote Access Help, October 2006