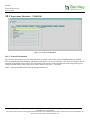
1
EXOR
TMA Admin Guide
March 2014
Version: 4.7
Submitted by:
Bentley Systems (UK) Ltd. ,
9th Floor,
20 Gracechurch Street,
London
EC3V 0BG
EXOR
TMA ADMIN GUIDE
DOCUMENT TRACKER
EXOR TMA Admin Guide
Trademark
Bentley and the "B" Bentley logo are either registered or unregistered trademarks or service marks of
Bentley Systems, Incorporated, or one of its direct or indirect wholly-owned subsidiaries.
Other brands and product names are trademarks of their respective owners.
Copyright
Copyright © 2013 Bentley Systems, Incorporated.
All Rights Reserved.
Including software, file formats, and audiovisual displays; may only be used pursuant to applicable
software license agreement; contains confidential and proprietary information of Bentley Systems,
Incorporated and/or third parties which is protected by copyright and trade secret law and may not be
provided or otherwise made available without proper authorization.
Restricted Rights Legend
If this software is acquired for or on behalf of the United States of America, its agencies and/or
instrumentalities ("U.S. Government"), it is provided with restricted rights. This software and
accompanying documentation are "commercial computer software" and "commercial computer software
documentation", respectively, pursuant to 48 C.F.R. 12.212 and 227.7202, and "restricted computer
software" pursuant to 48 C.F.R. 52.227-19(a), as applicable. Use, modification, reproduction, release,
performance, display or disclosure of this software and accompanying documentation by the U.S.
Government are subject to restrictions as set forth in this Agreement and pursuant to 48 C.F.R. 12.212,
52.227-19, 227.7202, and 1852.227-86, as applicable.
Contractor/Manufacturer is Bentley Systems, Incorporated, 685 Stockton Drive, Exton, PA 19341-0678.
Unpublished - rights reserved under the Copyright Laws of the United States and International treaties.
Version: 4.7
i
CONFIDENTIALITY STATEMENT
The contents of this document, including system ideas and concepts, are confidential and proprietary in nature and are not to be
distributed in any form without the prior written consent of Bentley, Inc.
EXOR
TMA ADMIN GUIDE
DOCUMENT TRACKER
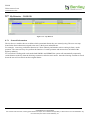
Document Tracker
Document Details
File:
Prepared by:
TMA Admin Guide V4.7.docx
A Hammond
Manual Name:
Reviewed by:
TMA Admin Guide
Version:
Approved for issue by:
1. 0
T. C. Stewart
Date of Issue:
Product Manager:
18 February 2008
Pete Rogers
File Name:
Document Centre/Exor/Product Manuals/4.7 Product Manuals/4.7 completed documentation/TMA Admin Guide v4.7.docx
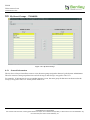
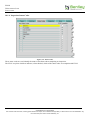
Document Version Control
Revision
Date
By
Chapter/Page
Description
2
May 2008
AH
All
4. 0. 4. 4
3
May 2008
AH
All
4. 0. 4. 5
4
July 2008
AH
All
4. 0. 4. 6 + fix 1
5
Oct 2008
AH
All
Update 4. 0. 5. 0
6
Dec 2008
AH
All
Update 4. 0. 5. 1
7
March 2009
AH
All
Update 4. 0. 5. 2
8
May 2009
AH
Pages 10,11,102
Update 4. 0. 5. 4
9
Sept 2009
AH
All
Update 4. 1. 0. 0
10
Feb 2010
AH
All
Update 4. 2. 0. 0
11
Nov 2010
AH
Chapter 2
Update 4. 3. 0. 0 Process Framework
12
Nov 2010
AH
11
Update 4. 3. 0. 0 Product Options
13
Nov 2010
AH
42
Update 4. 3. Monitor Web Service
14
Nov 2010
AH
107
Update 4. 3 Administer User Districts
15
Nov 2010
AH
110
Update 4. 3 My Districts
16
Nov 2010
AH
113
Update 4. 3 Notice Review Rules
17
Nov 2010
AH
120
Update 4. 3 Valid Notice Recipients
18
Nov 2010
AH
138
Update 4. 3 Inspection metadata
19
May 2011
AH
32
Update 4. 4 Standard text
20
June 2011
AH
11
Update 4. 4 Product Options
21
June 2011
AH
27
Update 4. 4 Monitor Web Services
22
June 2011
AH
43
Update 4. 4 Inspection Upload
Version: 4.7
ii
CONFIDENTIALITY STATEMENT
The contents of this document, including system ideas and concepts, are confidential and proprietary in nature and are not to be
distributed in any form without the prior written consent of Bentley, Inc.
EXOR
TMA ADMIN GUIDE
DOCUMENT TRACKER
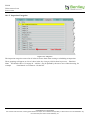
23
June 2011
AH
46
Update 4. 4 Auto Insp Upload
24
June 2011
AH
49
Update 4. 4 Insp Files Summary
25
June 2011
AH
117
Update 4. 4 Notice Warnings
26
June 2011
AH
123
Update 4. 4 Inspection Metadata
27
June 2011
AH
133
Update 4. 4 Defect Insp Schedule
28
Nov 2011
IS
Various
Changes for version 4. 5 including Lane Rental (Interim
Solution) p29
29
Oct 2012
AH
15
Update 4. 6 Product Options
30
Oct 2012
AH
77
Update 4. 6 TMA Performance Indicators
31
Oct 2012
AH
139
Update 4. 6 Inspection Deletion Rules
32
Mar 2014
BA/IS
All
Re-formatted into Bentley template for 4.7 release
33
Mar 2014
AH
16
Update to Product Options
Version: 4.7
iii
CONFIDENTIALITY STATEMENT
The contents of this document, including system ideas and concepts, are confidential and proprietary in nature and are not to be
distributed in any form without the prior written consent of Bentley, Inc.
EXOR
TMA ADMIN GUIDE
TABLE OF CONTENTS
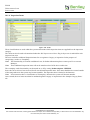
Table of Contents
1
2
Introduction ........................................................................................................................................... 1
Process Framework ............................................................................................................................... 2
2.1
Scheduling Frequencies – HIG2530 ............................................................................................. 3
2.1.1
General Information .............................................................................................................. 4
2.2
Process Types – HIG2500............................................................................................................. 5
2.2.1
General Information .............................................................................................................. 6
2.3
Submit Process – HIG2510 ........................................................................................................... 8
2.3.1
General Information .............................................................................................................. 9
2.3.2
TMA Configuration Check ................................................................................................... 9
2.3.3
Deeming of Permits .............................................................................................................. 9
2.4
Process Monitor – HIG2520 ....................................................................................................... 10
2.4.1
General Information ............................................................................................................ 11
2.4.2
Queuing mechanism for forwarding of notices ................................................................... 11
2.4.3
Warnings in Monitor Web Service Transactions (TMA3000)............................................ 13
3 Configuration ...................................................................................................................................... 15
3.1
Product Options – HIG9130 ....................................................................................................... 16
3.1.1
General Information ............................................................................................................ 16
3.1.2
Product Options................................................................................................................... 18
3.2
Domains – HIG9120 ................................................................................................................... 24
3.2.1
General Information ............................................................................................................ 24
3.3
User Contact Details – HIG1834 ................................................................................................ 25
3.3.1
General Information ............................................................................................................ 25
3.4
View Archived Works/Sites – TMA1010 ................................................................................... 27
3.4.1
General Information ............................................................................................................ 28
3.5
Lane Rental (Interim Solution) ................................................................................................... 30
3.5.1
Solution ............................................................................................................................... 30
4 Web Services ...................................................................................................................................... 32
4.1
Monitor Web Service Transactions – TMA3000 ........................................................................ 33
4.1.1
General Information ............................................................................................................ 33
4.1.2
Sorting Results .................................................................................................................... 34
4.1.3
Restrict ................................................................................................................................ 35
4.1.4
Transactions ........................................................................................................................ 36
4.1.5
Review ................................................................................................................................ 40
4.1.6
Transaction Errors tab ......................................................................................................... 42
4.1.7
Recipients tab ...................................................................................................................... 42
4.1.8
Review History tab.............................................................................................................. 43
Version: 4.7
iv
CONFIDENTIALITY STATEMENT
The contents of this document, including system ideas and concepts, are confidential and proprietary in nature and are not to be
distributed in any form without the prior written consent of Bentley, Inc.
EXOR
TMA ADMIN GUIDE
TABLE OF CONTENTS
4.1.9
Links ................................................................................................................................... 44
4.2
Send OD Data – TMA3030 ........................................................................................................ 47
4.2.1
General Information ............................................................................................................ 47
5 Batch Processing, Inspections ............................................................................................................. 48
5.1
Inspection Download – TMA5500 ............................................................................................. 49
5.1.1
General Information ............................................................................................................ 49
5.1.2
Inspection Download .......................................................................................................... 49
5.2
Inspection Upload – TMA5600 .................................................................................................. 51
5.2.1
General Information ............................................................................................................ 51
5.2.2
Directories ........................................................................................................................... 52
5.2.3
File Selection ...................................................................................................................... 53
5.2.4
Message Log ....................................................................................................................... 54
5.3
Automatic Inspection Upload – TMA5610................................................................................. 55
5.3.1
General Information ............................................................................................................ 55
5.3.2
Directories ........................................................................................................................... 56
5.3.3
Message Log ....................................................................................................................... 57
5.4
Inspection Batch File Summary – TMA5510 ............................................................................. 58
5.4.1
General Information ............................................................................................................ 58
5.4.2
Sorting Results .................................................................................................................... 58
5.4.3
Inspection Batch Files ......................................................................................................... 59
5.4.4
Links ................................................................................................................................... 60
5.5
Inspection Upload Transaction Summary – TMA5620 .............................................................. 62
5.5.1
General Information ............................................................................................................ 62
5.5.2
Sorting Results .................................................................................................................... 62
5.5.3
Inspection Upload Transaction Summary ........................................................................... 63
6 Batch Processing, DCD Inspections ................................................................................................... 64
6.1
DCD Extract – TMA5515 ........................................................................................................... 65
6.1.1
General Information ............................................................................................................ 65
6.1.2
Sorting Results .................................................................................................................... 66
6.1.3
File Destination ................................................................................................................... 66
6.1.4
File Destination ................................................................................................................... 67
6.1.5
Works Extract ..................................................................................................................... 68
6.1.6
Street Extracts ..................................................................................................................... 69
6.2
Inspections Download to DCD – TMA5520 .............................................................................. 70
6.2.1
General Information ............................................................................................................ 70
6.2.2
Inspection Download – All ................................................................................................. 72
6.2.3
Inspection Download – Inspectors ...................................................................................... 74
6.3
Automatic Inspection Download to DCD – TMA5530 .............................................................. 76
Version: 4.7
v
CONFIDENTIALITY STATEMENT
The contents of this document, including system ideas and concepts, are confidential and proprietary in nature and are not to be
distributed in any form without the prior written consent of Bentley, Inc.
EXOR
TMA ADMIN GUIDE
TABLE OF CONTENTS
6.3.1
General Information ............................................................................................................ 76
6.3.2
Automatic Inspection Download – All ............................................................................... 78
6.3.3
Automatic Inspection Download – Inspectors .................................................................... 80
7 Batch Processing, TPI – TMA Performance Indicators ...................................................................... 82
7.1
TPI Quarterly Extract – TMA5540 ............................................................................................. 83
7.1.1
General Information ............................................................................................................ 83
7.1.2
TMA Performance Indicator Quarterly Extract .................................................................. 84
8 Administration .................................................................................................................................... 86
8.1
Contacts – TMA0010 .................................................................................................................. 87
8.1.1
General Information ............................................................................................................ 87
8.1.2
Filter .................................................................................................................................... 88
8.1.3
Contacts............................................................................................................................... 89
8.1.4
Further Details..................................................................................................................... 90
8.1.5
Contact Roles ...................................................................................................................... 91
8.2
Street Groups – TMA0020.......................................................................................................... 92
8.2.1
General Information ............................................................................................................ 92
8.2.2
Work with Existing Groups ................................................................................................ 93
8.2.3
Sorting Results .................................................................................................................... 97
8.2.4
Create New Group .............................................................................................................. 99
8.2.5
Sorting Results .................................................................................................................. 102
8.3
Unassigned Streets – TMA0030 ............................................................................................... 104
8.3.1
General Information .......................................................................................................... 104
8.3.2
Unassigned Streets ............................................................................................................ 104
8.4
User Street Groups – TMA0040 ............................................................................................... 106
8.4.1
General Information .......................................................................................................... 106
8.4.2
User Street Groups ............................................................................................................ 107
8.5
My Street Groups – TMA0050 ................................................................................................. 108
8.5.1
General Information .......................................................................................................... 108
8.5.2
My Street Groups .............................................................................................................. 109
8.6
Administer User Districts – NSG0120...................................................................................... 110
8.6.1
General Information .......................................................................................................... 110
8.6.2
Users ................................................................................................................................. 111
8.6.3
User Districts .................................................................................................................... 112
8.7
My Districts – NSG0130........................................................................................................... 113
8.7.1
General Information .......................................................................................................... 113
8.7.2
My Districts ...................................................................................................................... 114
9 Activities ........................................................................................................................................... 115
9.1
Notice Review Rules – TMA2000 ............................................................................................ 116
Version: 4.7
vi
CONFIDENTIALITY STATEMENT
The contents of this document, including system ideas and concepts, are confidential and proprietary in nature and are not to be
distributed in any form without the prior written consent of Bentley, Inc.
EXOR
TMA ADMIN GUIDE
TABLE OF CONTENTS
9.1.1
General Information .......................................................................................................... 116
9.1.2
Notice Review Rules ......................................................................................................... 117
9.1.3
Notice Forwarding Rules .................................................................................................. 118
9.1.4
Recipient Groups............................................................................................................... 119
9.2
Notice Types – TMA2010 ........................................................................................................ 120
9.2.1
General Information .......................................................................................................... 120
9.2.2
Notice Types ..................................................................................................................... 121
9.2.3
Valid Works Categories .................................................................................................... 122
9.3
Valid Notice Recipients – TMA2015 ....................................................................................... 123
9.3.1
General Information .......................................................................................................... 123
9.3.2
Notice Recipients .............................................................................................................. 123
9.3.3
Recipient Details ............................................................................................................... 124
9.4
Work Categories – TMA2020................................................................................................... 126
9.4.1
General Information .......................................................................................................... 126
9.4.2
Works Categories .............................................................................................................. 127
9.4.3
Valid Notice Types tab ..................................................................................................... 128
9.4.4
Valid Durations ................................................................................................................. 129
9.5
Status Transitions – TMA2030 ................................................................................................. 130
9.5.1
General Information .......................................................................................................... 130
9.5.2
Status Transitions .............................................................................................................. 131
9.5.3
FPN Transitions ................................................................................................................ 132
9.5.4
Restriction Transitions ...................................................................................................... 133
9.6
Agreement Types – TMA2040 ................................................................................................. 134
9.6.1
General Information .......................................................................................................... 134
9.6.2
Allowable Agreement Types ............................................................................................ 135
9.7
Notice Warnings – TMA2050................................................................................................... 136
9.7.1
General Information .......................................................................................................... 136
9.7.2
Notice Warnings ............................................................................................................... 137
9.8
Section 74 Charges Profile – TMA2060 ................................................................................... 138
9.8.1
General Information .......................................................................................................... 138
9.8.2
S74 Charge Regime .......................................................................................................... 139
9.9
Spatial Relationships – TMA2065 ............................................................................................ 140
9.9.1
General Information .......................................................................................................... 140
10
Inspections .................................................................................................................................... 141
10.1 Inspections Metadata – TMA5200 ............................................................................................ 142
10.1.1 General Information .......................................................................................................... 142
10.1.2 Inspection Types ............................................................................................................... 143
10.1.3 Inspection Outcomes ......................................................................................................... 144
Version: 4.7
vii
CONFIDENTIALITY STATEMENT
The contents of this document, including system ideas and concepts, are confidential and proprietary in nature and are not to be
distributed in any form without the prior written consent of Bentley, Inc.
EXOR
TMA ADMIN GUIDE
TABLE OF CONTENTS
10.1.4 Inspection Status Codes .................................................................................................... 145
10.1.5 Inspection Categories ........................................................................................................ 146
10.1.6 Inspection Items ................................................................................................................ 147
10.1.7 Inspection Sample Category items .................................................................................... 148
10.1.8 Inspection Messages ......................................................................................................... 149
10.1.9 Deletion Rules ................................................................................................................... 150
10.2 Inspectors – TMA5290 ............................................................................................................. 151
10.2.1 General Information .......................................................................................................... 151
10.2.2 Inspectors .......................................................................................................................... 152
10.3 Inspection Rulesets – TMA5300............................................................................................... 153
10.3.1 General Information .......................................................................................................... 153
10.3.2 Inspection Rulesets ........................................................................................................... 154
10.4 Defect Inspection Schedules – TMA5270 ................................................................................ 156
10.4.1 General Information .......................................................................................................... 156
10.4.2 Defect Inspection Schedules ............................................................................................. 157
Version: 4.7
viii
CONFIDENTIALITY STATEMENT
The contents of this document, including system ideas and concepts, are confidential and proprietary in nature and are not to be
distributed in any form without the prior written consent of Bentley, Inc.
EXOR
TMA ADMIN GUIDE
INTRODUCTION
1
Introduction
The New Roads and Street Works Act 1991 went a long way towards coordinating works occurring on the
Streets. This was achieved by a strict Noticing regime, where the Utility had to inform the Street Authority of
the work they were proposing to do, thus allowing the Street Authority to coordinate within their area. Other
notices had to be sent during the life of that works.
Streets are defined within a national standard called the NSG (National Street Gazetteer).
NRWSA itself has been improved through the years with the introduction of such ‘features’ as EToN
(Electronic Transfer of Notices), which enabled organisations to transfer data electronically where previously
it had been purely paper-based; Section 74 charges, which were charges incurred by Utilities for overrunning
their proposed time in the Street.
All these additions were introduced to further prevent as much as possible the disruption caused by works
occurring in our Streets.
The Traffic Management Act 2004 (TMA) takes the original legislation a stage further, still with the same
purpose of avoiding disruption on our Streets. The noticing procedures have been completely overhauled and
whereas Section 74 charging still occurs, there have been a couple of significant additions.
Fixed Penalty Noticing, which enables the Street Authority to impose further financial penalties for a
variety of misdemeanours by the Utilities digging holes in our Streets;
Permit Schemes, where an Authority can operate a scheme whereby, Utilities must effectively apply
for space on the road and will have to pay for the privilege. This is different to a non-permitting
situation where a Utility (who is known as a Statutory Undertaker) has the right to occupy the street as
long as they follow the notification procedure.
The purpose of this is to allow for better coordination and planning of activities, and thus cause less
disruption.
The latest Code of Practice and EToN Technical Specification are still published under the auspices of the
New Road and Street Works Act 1991. TMA can be seen as an addendum to this.
Note: Any data shown in example screenshots does not represent any customers live data; it is test data set
up by Exor.
Version: 4.7
1
CONFIDENTIALITY STATEMENT
The contents of this document, including system ideas and concepts, are confidential and proprietary in nature and are not to be
distributed in any form without the prior written consent of Bentley, Inc.
EXOR
TMA ADMIN GUIDE
PROCESS FRAMEWORK
2
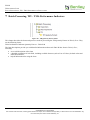
Process Framework
This chapter describes the forms and processes used for the process framework. They are the following forms:
Process Types – HIG2500
Submit Process – HIG2510
Process Monitor – HIG2520
Scheduling Frequencies – HIG2530
The form descriptions provide you with detailed information about each form including:
an overall description of the form.
a detailed explanation of each field, including available features (such as List of Values), default
values and other characteristics.
helpful information for using the form.
Version: 4.7
2
CONFIDENTIALITY STATEMENT
The contents of this document, including system ideas and concepts, are confidential and proprietary in nature and are not to be
distributed in any form without the prior written consent of Bentley, Inc.
EXOR
TMA ADMIN GUIDE
PROCESS FRAMEWORK
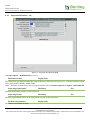
2.1
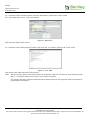
Scheduling Frequencies – HIG2530
Figure 1 – Scheduling Frequencies menu
Figure 2 – Scheduling Frequencies
Version: 4.7
3
CONFIDENTIALITY STATEMENT
The contents of this document, including system ideas and concepts, are confidential and proprietary in nature and are not to be
distributed in any form without the prior written consent of Bentley, Inc.
EXOR
TMA ADMIN GUIDE
PROCESS FRAMEWORK
2.1.1
General Information
This form allows the set of frequencies/repeat intervals to be specified. Frequencies shipped by Exor will be
flagged as ‘protected’ and cannot be removed or amended.
For further information on the Scheduling Frequencies module refer to the Exor General System
Administration Guide.
Version: 4.7
4
CONFIDENTIALITY STATEMENT
The contents of this document, including system ideas and concepts, are confidential and proprietary in nature and are not to be
distributed in any form without the prior written consent of Bentley, Inc.
EXOR
TMA ADMIN GUIDE
PROCESS FRAMEWORK
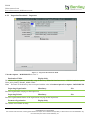
2.2
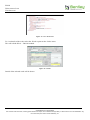
Process Types – HIG2500
Figure 3 – Process Types menu
Figure 4 – Process Types
Version: 4.7
5
CONFIDENTIALITY STATEMENT
The contents of this document, including system ideas and concepts, are confidential and proprietary in nature and are not to be
distributed in any form without the prior written consent of Bentley, Inc.
EXOR
TMA ADMIN GUIDE
PROCESS FRAMEWORK
2.2.1
General Information
The process types form is where existing process types for TMA can be viewed. TMA process types shipped
with the system are flagged as protected and certain attributes pertaining to these cannot be amended.
In order to be able to create or amend a process the user must have been granted the role PROCESS_ADMIN
in form Roles – HIG1836. (Refer to the General System Administration Manual.)
The process framework allows the processes to be easily:
initiated
monitored
amended
disabled/enabled
For example; an Administrator could disable the processes which send/receive transactions whilst system
maintenance and or gazetteer loading are taking place.
Process types within the system used for TMA are as follows:
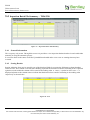
Table 1
Process Type
Default Allowable Frequencies
TMA Receive Transactions
5 Minutes
10 Minutes
15 Minutes
20 Minutes
30 Minutes
Hourly On the Hour
TMA Send Transactions
5 Minutes
10 Minutes
15 Minutes
20 Minutes
30 Minutes
Hourly On the Hour
TMA Housekeeping
Daily at Midnight
Daily
TMA Reset Forwarding Errors
Daily at Midnight
Daily
TMA Upload Inspections
5 Minutes
10 Minutes
15 Minutes
20 Minutes
30 Minutes
Hourly On the Hour
TMA Evaluate Applied Notices
Daily
TMA Works Phase Master Refresh
Daily at Midnight
TMA Inspection Deletion
Daily at Midnight
TMA ADHoc Inspection Scheduler
Scheduled through Schedule Inspections – TMA5100
TMA Forward Notice Bpel Queue
30 seconds
Version: 4.7
6
CONFIDENTIALITY STATEMENT
The contents of this document, including system ideas and concepts, are confidential and proprietary in nature and are not to be
distributed in any form without the prior written consent of Bentley, Inc.
EXOR
TMA ADMIN GUIDE
PROCESS FRAMEWORK
Other values for frequencies can be associated to a process type if required. These values can be defined using
form Scheduling Frequencies – HIG2530.
For further information on the Process Types module refer to the Exor General System Administration Guide.
Version: 4.7
7
CONFIDENTIALITY STATEMENT
The contents of this document, including system ideas and concepts, are confidential and proprietary in nature and are not to be
distributed in any form without the prior written consent of Bentley, Inc.
EXOR
TMA ADMIN GUIDE
PROCESS FRAMEWORK
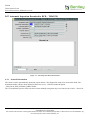
2.3
Submit Process – HIG2510
Figure 5 - Submit Process menu
Figure 6 - Submit Process
Version: 4.7
8
CONFIDENTIALITY STATEMENT
The contents of this document, including system ideas and concepts, are confidential and proprietary in nature and are not to be
distributed in any form without the prior written consent of Bentley, Inc.
EXOR
TMA ADMIN GUIDE
PROCESS FRAMEWORK
2.3.1
General Information
This form is used for the submission of any process of any type. Tabs on the form are enabled/disabled
depending on:
how the form has been invoked
the process type that has been selected
Note: For TMA processing an Administrator must submit a Process of each relevant type at the desired
frequency.
For further information on the Submit Process module refer to the Exor General System Administration
Guide.
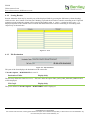
2.3.2
TMA Configuration Check
When form Works – TMA1000 (and other key forms are opened) a check is carried out to see if TMA is
correctly configured.
This check will look for the existence of a process of each given type.
Table 2
Process Type
Checking Rule
TMA Receive Transactions
Mandatory – always checked for
TMA Send Transactions
Mandatory – always checked for
TMA Housekeeping
Mandatory – always checked for
TMA Reset Forwarding Errors
Only checking for if Product Option FWD_NOTICE = Y
TMA Upload Inspections
Only checking for if Product Option INSPAUTIMP = Y
TMA Evaluate Applied Notices
Mandatory – always checked for
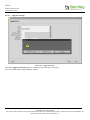
If the process is expected to exist and it is either missing or is not ‘Running’ no ‘Scheduled’, an error will be
flagged.
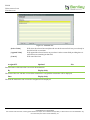
Figure 7 -Warning
2.3.3
Deeming of Permits
When processing transactions and reporting on permit data, whether or not a permit is considered as ‘Deemed’
is derived on a daily basis.
To automate this process, a ‘TMA Evaluate Applied Notices’ process type is used.
Note: ‘TMA Evaluate Applied Notices’ process must be submitted to be executed on a daily frequency after
midnight but before the working day commences.
It is essential that it is scheduled in this manner, so that the permit data is refreshed before the working
day commences.
Version: 4.7
9
CONFIDENTIALITY STATEMENT
The contents of this document, including system ideas and concepts, are confidential and proprietary in nature and are not to be
distributed in any form without the prior written consent of Bentley, Inc.
EXOR
TMA ADMIN GUIDE
PROCESS FRAMEWORK
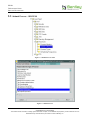
2.4
Process Monitor – HIG2520
Figure 8 - Process Monitor menu
Figure 9 - Process Monitor
Version: 4.7
10
CONFIDENTIALITY STATEMENT
The contents of this document, including system ideas and concepts, are confidential and proprietary in nature and are not to be
distributed in any form without the prior written consent of Bentley, Inc.
EXOR
TMA ADMIN GUIDE
PROCESS FRAMEWORK
2.4.1
General Information
This module shows the status of all processes that have been submitted. It shows the outcome of the process as
well as the status of the scheduled job. It shows both process and scheduler related details.
An Administrator could use this form to disable a process whilst system maintenance and/or gazetteer loading
are taking place.
For further information on the Process Monitor module refer to Exor General System Administration Guide.
2.4.2
Queuing mechanism for forwarding of notices
The basic functionality of these changes is to add a queue type mechanism to the Forwarding notice process.
This Queue will feed the Forwarding Bpel process a steady stream of notices, smoothing out any peaks. The
queue will be supported by some new processes written to report its health back to the user
The queue size should be determined via the product option TMABPELQUE which can be modified. Please
note however, that regardless of TMABEPLQUE’s value, the Web Service will only currently process 10
notices every 5 seconds (60 in 30 seconds, etc. ).
The queue process will be driven from a process framework process that initially should run every 30 seconds
to refresh the queue, but again this is configurable.
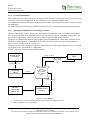
The basic flow of the process can be summarised with
Normal Notice
processed
BPEL
Ready_To_Send
Bpel_Locked,
Bpel_Sending,
Error,
Ok
Notice_Staus = ‘OK’
Bpel_Queue
Forwarding
Status
Set to Pending
Pending
Pending,
Ready_To_Send,
Bpel_Locked,
Bpel_Sending,
Error
Ready_To_Send
Process
framework
Queue Job
Tma Bpel Queue
Process
Figure 10 – Flow Diagram
A notice gets processed normally and its notice status gets updated to ‘OK’.
The Fwd_Status is set to ‘Pending’.
Version: 4.7
11
CONFIDENTIALITY STATEMENT
The contents of this document, including system ideas and concepts, are confidential and proprietary in nature and are not to be
distributed in any form without the prior written consent of Bentley, Inc.
EXOR
TMA ADMIN GUIDE
PROCESS FRAMEWORK
Every 30 seconds (initially) the process frame work queue job will fire and call the Queue process
logic.
The queue process logic will interrogate the outstanding Bpel Queue to determine if more notices
need adding.
If more notices are needed then they will have their statuses amended to Ready_to_Send, where the
Bpel will pick them up and process them. If they are processed correctly then their status will be set to
‘OK’ thus removing them from the queue.
Below are examples of the Process Type and its execution:-
Figure 11 – Process Types
Version: 4.7
12
CONFIDENTIALITY STATEMENT
The contents of this document, including system ideas and concepts, are confidential and proprietary in nature and are not to be
distributed in any form without the prior written consent of Bentley, Inc.
EXOR
TMA ADMIN GUIDE
PROCESS FRAMEWORK
Figure 12 – Process Monitor
2.4.3
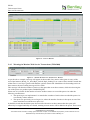
Warnings in Monitor Web Service Transactions (TMA3000)
Figure 13 – Monitor Web Services Transactions - Restrict
As per the above example a message will appear in this module if any notice in the queue is at any of the
active Bpel statuses (Ready_To_Send, Bpel_Locked, Bpel_Sending) or at a state of Error and the created date
of that notice is one day or greater older than the systems current date. Should there be forwarding notices at
these statuses, then no warning message will be visible.
This message will show the number of notices in the queue that are at these statuses, whilst also showing the
size of the queue (see product option TMABPELQUE).
Please note it is possible for the number of notices at these statuses to exceed the queue size under the
following circumstances:
The queue logic was implemented / or started after a number of notices that exceeded the queue size
were already at these statuses.
The queue was previously set at a larger size, where the number of notices in the queue at one of the
status mentioned exceeds the new queue size.
It should be noted that should the queue become full with notices at these statuses then the queue will
affectively be stopped until they are cleared, meaning no more notice will be added to the queue. These errors
Version: 4.7
13
CONFIDENTIALITY STATEMENT
The contents of this document, including system ideas and concepts, are confidential and proprietary in nature and are not to be
distributed in any form without the prior written consent of Bentley, Inc.
EXOR
TMA ADMIN GUIDE
PROCESS FRAMEWORK
will need to be addressed, either by resolving the issue of why they are unable to be forwarded or simply by
setting their status to Ignore within this module.
Figure 14 – Monitor Web Services Transactions - Transactions
Version: 4.7
14
CONFIDENTIALITY STATEMENT
The contents of this document, including system ideas and concepts, are confidential and proprietary in nature and are not to be
distributed in any form without the prior written consent of Bentley, Inc.
EXOR
TMA ADMIN GUIDE
CONFIGURATION
3
Configuration
This chapter describes the forms and processes used for the configuration in TMA by Exor. They are the
following forms:
Product Options – HIG9130
Domains – HIG9120
User Contact Details – HIG1934
View Archived Works/Sites – TMA1010
Lane Rental (Interim Solution)
The form descriptions provide you with detailed information about each TMA Works form in TMA by Exor,
including:
an overall description of the form
a detailed explanation of each field, including available features (such as List of Values), default
values and other characteristics
helpful information for using the form
Version: 4.7
15
CONFIDENTIALITY STATEMENT
The contents of this document, including system ideas and concepts, are confidential and proprietary in nature and are not to be
distributed in any form without the prior written consent of Bentley, Inc.
EXOR
TMA ADMIN GUIDE
CONFIGURATION
3.1
Product Options – HIG9130
Figure 15 - Product Options
3.1.1
General Information
Product Options allow ‘switches’ or default values to be set, which defines how certain functionality operates
within the Exor suite of Products. The following TMA Manager related Product Options should be set to suit
your organisational requirements. Product Options are set using Product Options – HIG9130.
The values for Product Options are normally defined during Product Implementation or Upgrade and should
not be amended without consultation with Exor support staff.
Product Options values are maintained using Product Options – HIG9130.
The Product Options themselves are 'registered' and defined using Product Option List – HIG9135.
Several Product Options may have a User Option of the same name. The Product Option will act as the default
settings. The system will check for the existence of a User Option value that will take precedence over the
Product Option value. If no User Option value has been defined for the User the Product Option value will be
used. Product Options that also have an accompanying User Option are marked with an Asterisk (*) below.
Version: 4.7
16
CONFIDENTIALITY STATEMENT
The contents of this document, including system ideas and concepts, are confidential and proprietary in nature and are not to be
distributed in any form without the prior written consent of Bentley, Inc.
EXOR
TMA ADMIN GUIDE
CONFIGURATION
Figure 16 – Product Options Menu
Version: 4.7
17
CONFIDENTIALITY STATEMENT
The contents of this document, including system ideas and concepts, are confidential and proprietary in nature and are not to be
distributed in any form without the prior written consent of Bentley, Inc.
EXOR
TMA ADMIN GUIDE
CONFIGURATION
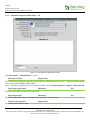
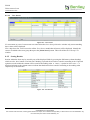
3.1.2
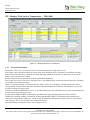
Product Options
The following Product Options must be defined in Product Options – HIG9130 to ensure that your system meets both your and current TMA
requirements.
PRODUCT OPTIONS ARE SET-UP DURING INSTALLATION AND SHOULD NOT BE CHANGED WITHOUT FIRST CONSULTING WITH
EXOR SUPPORT STAFF.
Table 3
Product
Option Id
Option Name
Sample Value
Usage Remarks
TMA
APEXURL
APEX reports
URL
http://exdl7vm13/quar
tz/reports
This option should display the base URL for running APEX reports.
API Do Not
Issue
N
If set to N the External API will operate as normal. Notices will be issued or held for review if required.
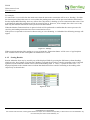
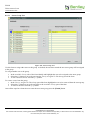
TMA
TMA
TMA
TMA
APINOISSUE*
BATCHDIST*
BATCHORG*
BATCHPREF*
NB the application and module name are appended at runtime.
If set to Y only Works and Phase details will be created. No Notices will be created and issued or held for
review.
Inspection
Batch Dist Ref
Set this option to the District reference to put into inspections files batch header.
Inspection
Batch Org Ref
Set this option to the District reference to put into inspections files batch header.
If left null then the inspection owner district reference will be used
If left null then the inspection owner organisation reference will be used
Batch File
Prefix
A
This option defines the batch file prefix.
Options are either A or S
TMA
BATCHVER
TMA batch
header version
3. 0
This option defines the EtoN batch header version number
TMA
BPELTMOUT*
BPEL timeout
duration
30
Maximum time (in minutes) to wait for a BPEL send time out.
TMA
CATDSTPOV
Category D
Stop Overrun
N
This flag is set to indicate the Inspection Date used when scheduling Category D Stop Overrun Inspections.
If set to ‘N’ this will be the Schedule Date.
If set to ‘Y’ this will be the day after the Works has completed (regardless whether it’s a working day or not),
provided that this date is after todays date. If not it will be todays date + 1.
Version: 4.7
18
CONFIDENTIALITY STATEMENT
The contents of this document, including system ideas and concepts, are confidential and proprietary in nature and are not to be distributed in any form without the prior written consent of
Bentley, Inc.
EXOR
TMA ADMIN GUIDE
CONFIGURATION
TMA
CHARGEBAND
N
This is used in conjunction with Category D Ad Hoc inspections.
This controls when the Phase Charge Band will be downloaded to the Mobile as a comment.
If set to Y then for users who issue Permit Response notices, any changes made to the phase record will be
saved in the same action. If set to ‘N’ then any changes to the phase record will not be saved. The Default
Value is ‘N’
TMA
CHGBNDLABL
TMA
DCD41
Charge Band
This is a User defined label when displaying the Charge Band. The default value is Charge Band.
Using DCDs for
inspection
N
Set this flag to denote whether DCDs are being used for Inspections.
Options are either Y or N
TMA
DCDFILPRFX*
DCD Extract
File Prefix
ALL
This option defines the DCD extract file prefix. When DCDINSPCT is set to N then the file prefix will default to
ALL
TMA
DCDINSPCTR*
DCD Extract
per Inspector?
N
This option defines how the DCD Extract files are to be created.
DCD Insp.
Export
directory
TMA_DCD_INSP_EXP
ORT_DIRECTORY
This option defines the name of the Oracle directory which is the destination for TMA DCD inspection batch
files
Charge Band
This holds the default charge band to be used to update the Phase Charge Band when found to be
inappropriate for the resulting Inspection
If set to N this will be for all data. If set to Y this will be by available inspectors.
TMA
DCDINSPEXP*
TMA
DEFCHRGBND
TMA
DISUSEDEFR
DIS uses defect
response
N
This flag denotes whether or not the Defect Inspection Schedule refers to the Defect Response Period for the
defect code(s) applied to the inspected site(s) when determining the start date of any follow up inspection.
TMA
FORMSTART*
Forms Startup
Defaults
2
This option defines whether the organisation and district details are defaulted in forms.
1 = Insert no defaults
2 = Insert organisation and district defaults
TMA
FWD_NOTICE*
Forward
Notices?
N
This option defines whether the forwarding notice functionality is used.
Y = activate forward noticing functionality
N = do not activate forward noticing functionality
TMA
HOLDPNDNG*
Hold back
pending
transactions
Y
Holding back pending transactions if a previous transaction has not arrived/been successfully processed.
TMA
IADDTELNO*
Add Inspection
telephone
number
Y
This option defines whether the inspectors telephone number is added to the Inspectors name in the
Appendix E Batch file.
Y = Yes, N = No.
Version: 4.7
19
CONFIDENTIALITY STATEMENT
The contents of this document, including system ideas and concepts, are confidential and proprietary in nature and are not to be distributed in any form without the prior written consent of
Bentley, Inc.
EXOR
TMA ADMIN GUIDE
CONFIGURATION
TMA
IAUTOSCHED
Auto Inspection
Schedule Date
0
This flag is set to indicate the number of days to add to the current date when scheduling Category D Ad Hoc
Inspections through the Automated Process Framework. For example; if set to 0 the schedule date will be
today’s date. If set to 1 the schedule date will be today’s date + 1 etc. .
TMA
ICOPYDEFCT*
Copy
Inspection
Defect Data
1
This option defines whether inspection defect details are to be copied on to the follow up inspection.
Inspections
Exemplary
Nature
N
TMA
IEXEMP
0 = No copy
1 = Copy all defects when creating Defect Site Visit, Defect Followup or Defect Followup Completion
inspections.
This option determines whether the inspections of exemplary nature checkbox is displayed or not.
Y = Display the checkbox
N = Do not display the checkbox
TMA
INSPAUTIMP
Auto Import
Inspections
N
This option defines whether or not the application is expected to be configured to allow automatic importing of
inspection batches.
TMA
INSPDOCLOC*
Insp document
location name
TMA INSPECTIONS
PHOTOS
This option defines the document location name that is used to support TMA inspection documents
TMA
INSPDOCS*
Inspections
document
directory
TMA_INSP_IMPORT_
DOCS_DIRECTORY
This option defines the Oracle Directory which is the destination for TMA inspections batch document files
TMA
INSPDOCTYP*
Inspection
document type
PHOTO
This option defines the document type that is used to support the TMA inspections document
TMA
INSPEXP*
Inspections
export directory
TMA_INSP_EXPORT_
DIRECTORY
This option defines the name of the Oracle directory which is the destination for TMA inspection batch files
TMA
INSPFAIL*
Inspection fail
directory
TMA_INSP_FAIL_DIR
ECTORY
This option defines the name of the Oracle directory where TMA inspection batch files that fail to be
successfully imported into the TMA application are moved to.
TMA
INSPIMP*
Inspection
import
directory
TMA_INSP_IMPORT_
DIRECTORY
This option defines the name of the Oracle directory which is the source for TMA inspection batch files that
are to be imported into the TMA application.
TMA
INSPPASS*
Inspection pass
directory
TMA_INSP_PASS_DI
RECTORY
This option defines the name of the Oracle directory where TMA inspection batch files that are successfully
imported into the TMA application are moved.
TMA
INSPREG
Inspection
Regime
2
This option determines the TMA inspection regime.
1 = 1,2,3,4,5
2 = A, B, C
Version: 4.7
20
CONFIDENTIALITY STATEMENT
The contents of this document, including system ideas and concepts, are confidential and proprietary in nature and are not to be distributed in any form without the prior written consent of
Bentley, Inc.
EXOR
TMA ADMIN GUIDE
CONFIGURATION
TMA
INSPTELTYP*
Inspectors
Telephone No.
Type
Mobile
This option determines the method used to define which telephone number is to be used for the Inspectors
telephone number.
TMA
IPRNTFLAG*
Inspection Print
Flag
Y
This flag indicates whether to update the inspection as being printed when called from TMA5000 Inspections
module. When set to Y the Inspection will be marked as printed.
TMA
ISEND
Inspection
ready for
sending
N
This flag indicates whether an inspection is ready for sending during batch creation process.
Lock noticing
asst recipients
Y
TMA
LOCKRECIPS
Y = Ready for sending
N = Not ready for sending
Used by the Noticing Assistant
If set to 'Y' it will enable/disable recipients fields depending on notice type
If set to 'N' it will always enable recipients fields
TMA
NOTSCHLABL*
Not
schedulable
label
Not Schedulable
This option is used to define the label on forms and reports as ‘Not Schedulable’ or a label of the customers
choosing. N. B. this must be in the same context as ‘Not Schedulable’.
TMA
OSWRKHRS
Default outside
working hours
flag
0
Default flag setting for outside working hours.
0 = flag unticked
1 = flag ticked
TMA
PNDNGTIME*
Max time to
hold pending
TRX
720
Maximum time (in minutes) to hold pending transactions.
TMA
S74DEFCHRG
S74 Default
charge
calculation
S
This option determines which Section 74 charges are to apply to an overrun.
S74 charges for
HA promoters
N
TMA
S74HAPROM
N = Not in carriageway
S = Standard
This option determines whether Section 74 charges will be calculated on Works for Road Purposes carried
out on behalf of the Highway Authority. The default is ‘N’.
Y = Yes
N = No
TMA
S74MINPRD
TMA
SCHEDADHOC
TMA
SEQUIVRULE*
Section 74 Min
works period
Site
3
Minimum works period used in Section 74 charging calculation
N
This controls if further Category D Ad-Hoc Inspections can be created by the Scheduler for the same phase
but for a different day. The default value is ‘N’
0
This option defines the site equivalence function.
Version: 4.7
21
CONFIDENTIALITY STATEMENT
The contents of this document, including system ideas and concepts, are confidential and proprietary in nature and are not to be distributed in any form without the prior written consent of
Bentley, Inc.
EXOR
TMA ADMIN GUIDE
CONFIGURATION
Equivalence
Rule
0 = None (when sites are created the equivalence flag is not set)
1 = Set all sites (when sites are created the equivalence flag is set to a value of 1. This means that all sites
on a works will be grouped together for inspection scheduling purposes. )
2 = Set to site location code (when sites are created the equivalence flag is set to the value of the site
location code. Eg 1=carriageway, 2=footway, 3=verge, 4=cycleway, 5=footpath. This means that all sites on a
works with the same location code will be grouped together for inspection scheduling purposes.
TMA
SHAREDSTR*
TMA
Shared Streets
N
This flag is used to indicate if shared streets functionality is active. When set to Y the system will check if
more than one Primary Noticing Authority for the street exists upon receipt of either an initial or confirmation
notice.
STREETINT
Street Group
This is User defined and if utilised will hold the name of the corresponding User defined Street Group for your
‘Streets of Interest’. Once populated with a Street Group name, a ‘Streets of Interest’ check box will be
displayed on the Works (TMA1000) Module
TMA
STRINTLABL
Street of Interest
is a User defined label when displaying the ‘Streets of Interest’ checkbox. The default value is Street of
Interest
TMA
SWAPNOTICE*
N
This option defines whether to use the swap notice functionality. If set to Y, the notice will be swapped if the
incorrect notice is specified.
Swap notice if
relevant
e. g. , if issuing 0200 notice on a wholly permitted street it will be swapped to a 0210 notice.
TMA
SXTRACTAUT*
Auto DCD
download STR
XTRACT
U – Update
This option defines the streets extract mode to employ when automatically downloading DCD inspections.
TMA
SXTRACTMAN*
Man DCD
download STR
XTRACT
U – Update or MMaster
the streets extract mode to employ when manually downloading DCD inspections.
TMA
TMABPELQUE
50
This is the size of the notice queue that is sent to Bpel at any one time when dealing with forward notices.
Default is 50.
TMA
TMABUFFERR*
Gross error
buffer size
250
This option is used to determine the buffer around the street dimensions for gross error validation of the load
geometry against that street. I. e. to check data of poor quality before any other check is performed.
TMA
TMABUFFPRX*
Proximity
buffer size
20
This option is used to determine the buffer around the street dimensions for validation of the location
geometry against that street.
TMA
TMABUFFTOL*
Tolerance
buffer size
0. 5
This option is used in the spatial analysis to determine equality of the location to the street. This option
should not be changed without advice from Exor support.
TMA
TMACOPYPHS*
Copy Phase
2
This option defines how a phase is to be copied.
1 = create a new phase with empty fields.
2 = prompt to either copy existing phase to new phase or create a new phase with empty fields.
Version: 4.7
22
CONFIDENTIALITY STATEMENT
The contents of this document, including system ideas and concepts, are confidential and proprietary in nature and are not to be distributed in any form without the prior written consent of
Bentley, Inc.
EXOR
TMA ADMIN GUIDE
CONFIGURATION
TMA
TMAORUNPRD*
Overrun Period
TMA
TMAPROVGRP*
Dflt provisional
street group
TMA
TMAPROXVAL*
Proximity
Validation?
N
This option validates that the location of a works is in the proximity of the ASD. Y = perform proximity
validation, N = do not perform proximity validation.
TMA
RECVTRANSQ
Received
Transaction
Queue
100
This option is used to set the number of transactions at a status of WE_COMPLETE to be processed at any
one time. If the value is Null then all WS_COMPLETE transactions will be processed.
Copy phase
coords to site
N
TMA
TMASITCORD*
14
This option determines the default TMA overrun period (in days) which is used by the form Query
Overrunning Works – TMA1080 to limit the amount of overrun records returned for performance
considerations. I. e. limit the records returned to the previous TMAORUNPRD days from the Effective Date.
This option defines the default street group into which newly created provisional streets should be assigned.
If set to 100 then only the first 100 transactions will be processed in that iteration.
This option populates the site feature type and coordinates with the phase feature type and coordinates on
creation of a new site.
Y = on creation of any site then auto-populate the site coordinates and feature type with the phase
coordinates and feature type.
N = on creation of any site then never auto-populate the site coordinates and feature type with the phase
coordinates and feature type.
TMA
TMAVALTOL
Timing
Validation
Tolerance
0
This option defines the number of minutes allowed as the timing validation tolerance used when calculating if
Notices are late.
TMA
TMAWIPROFO
Works
inspection pro
forma TMA
Y
This option indicates whether to print an additional page for each site on the Works Inspection reports for
inspections with ‘Unknown’ outcome.
TMA
WARNIFOK*
Return
warnings if no
errors
Y
If set to Y the system will return warnings raised by the API even if the call to the API resulted in no errors.
TMA
WKENDDAY1
Weekend day 1
Saturday
This option defines the name of the day used for the first weekend day.
TMA
WKENDDAY2
Weekend day 2
Sunday
This option defines the name of the day used for the second weekend day.
TMA
WXTRACTAUT*
Auto DCD
download WKS
XTRACT
U – Update
This option defines the works extract mode to employ when automatically downloading DCD inspections.
TMA
WXTRACTMAN*
Man DCD WKS
XTRACT
U – Update or MMaster
This option defines the works extract mode to employ when manually downloading DCD inspections.
Version: 4.7
23
CONFIDENTIALITY STATEMENT
The contents of this document, including system ideas and concepts, are confidential and proprietary in nature and are not to be distributed in any form without the prior written consent of
Bentley, Inc.
EXOR
TMA ADMIN GUIDE
CONFIGURATION
3.2
Domains – HIG9120
Figure 17 - Domains
3.2.1
General Information
TMA Manager uses various sets of reference values known as Domains. Each domain has its own set of values.
The Domain Values form is used for entering new values or modifying or deleting values associated with the
reference domain in the Reference Domain field. These values appear in list of values in the TMA forms.
Note: Domains with associated Domain Values (Lookups flagged as 'System Data') must not be amended in any
way.
Refer to the General System Administrator User Manual for further information.
Domain values that can be amended in the TMA module are:
NOTICE_REVIEWSTATUS – used in Review Notices – TMA1030
PERMIT_FEE_RV_STATUS – used in Permit Fees – TMA2070
PERMIT_SCHEME_ORDER – used in printing FPN Notice/FPN Withdrawal
S74_REVIEW_STATUS – used in S74 Charges – TMA1080
TRANS_REVIEWSTATUS – used in Monitor Web Services Transactions – TMA3000
Version: 4.7
24
CONFIDENTIALITY STATEMENT
The contents of this document, including system ideas and concepts, are confidential and proprietary in nature and are not to be distributed in any
form without the prior written consent of Bentley, Inc.
EXOR
TMA ADMIN GUIDE
CONFIGURATION
3.3
User Contact Details – HIG1834
Figure 18 - User Contact Details
3.3.1
General Information
This form can also be accessed for a particular user from form Users – HIG1832 and pressing the [User Details]
button.
Users are set up using form Users – HIG1832. This information will be displayed in the User Details part of the form.
In the Address Details part of the form further contact details can be added to the user record including address and
contact numbers. The contact number list are defined in Domains – HIG9120 under the option
USER_CONTACT_TYPES.
If the user has been logged as an inspector in form Inspectors – TMA5290 then the contact number will be recorded
against the Inspector in form Inspections – TMA5000 and will be printed on the Works Inspection Report – TMA6000.
Product Option – INSPTELTYP should be set to specify which telephone number is to be used.
Refer to the General System Administrator User Manual for further information.
Initials
(Display Only)
The user initials of the user will be displayed.
Job Title
(Display Only)
The job title of the user will be displayed.
Version: 4.7
25
CONFIDENTIALITY STATEMENT
The contents of this document, including system ideas and concepts, are confidential and proprietary in nature and are not to be distributed in any
form without the prior written consent of Bentley, Inc.
EXOR
TMA ADMIN GUIDE
CONFIGURATION
Name
(Display Only)
The name of the user will be displayed.
Username
(Display Only)
The username of the user will be displayed.
Address
(Optional)
Enter the address of the user.
Postcode/Zip Code
(Optional)
Enter the postcode of the address for the user.
The options for the next 4 fields are defined in Domains – HIG9120 under the option USER_CONTACT_TYPES.
The system values for these fields are:
WORK – work number
MOBILE – mobile number
HOME - home number
FAX – fax number
These can be added to as appropriate.
Primary Contact
(Checkbox)
Only one number can be selected as the primary contact number.
If the user has been logged as an inspector in form Inspectors – TMA5290 then the contact number will be recorded
against the Inspector in form Inspections – TMA5000 and will be printed on the Works Inspection Report – TMA6000.
Version: 4.7
26
CONFIDENTIALITY STATEMENT
The contents of this document, including system ideas and concepts, are confidential and proprietary in nature and are not to be distributed in any
form without the prior written consent of Bentley, Inc.
EXOR
TMA ADMIN GUIDE
CONFIGURATION
3.4
View Archived Works/Sites – TMA1010
Figure 19 – View Archived Works/Sites Menu
Figure 20 – View Archived Works/Sites
Version: 4.7
27
CONFIDENTIALITY STATEMENT
The contents of this document, including system ideas and concepts, are confidential and proprietary in nature and are not to be distributed in any
form without the prior written consent of Bentley, Inc.
EXOR
TMA ADMIN GUIDE
CONFIGURATION
3.4.1
General Information
This form is used to see if the Works existed prior to the TMA being introduced.
If the Works does exist then a notice cannot be sent under the TMA unless the EToN 3 phase has been finished
correctly.
An EToN 3 works will be deemed to have reached the end of the current phase when the following conditions have
been met in sending systems:
For notices sent to English authorities:
Works Status Code is either:
Works Clear (Interim Reinstatement)
Works Closed (Permanent Reinstatement)
Permanent Reinstatement – Barholes
Site Status Code is either:
Interim Reinstatement
Permanent Reinstatement
Site Closed
Site Closed (No Excavation)
Site Abandoned
Remedial Reinstatement (Reset Guarantee)
Remedial Reinstatement (Do Not Reset Guarantee)
For notices sent to Welsh authorities:
Works Status Code is either:
Interim Reinstatement Complete
Permanent Reinstatement Complete
Works Clear (Interim Reinstatement)
Works Closed (Permanent Reinstatement)
Permanent Reinstatement – Barholes
Site Status Code is either:
Interim Reinstatement
Permanent Reinstatement
Site Closed
Site Closed (No Excavation)
Site Abandoned
Remedial Reinstatement (Reset Guarantee)
Remedial Reinstatement (Do Not Reset Guarantee)
All sites must have one of the site status codes listed above.
Note: Receiving systems may still reject notices if Works_Status_Code and Site_Status_Code combinations are
illogical, e. g. , the works is closed but one or more sites is at status interim reinstated.
The [Refresh] button
should be used on a daily basis to keep the archived works up to date within the TMA
product.
For example, if an inspection is done or received on a works that was created before TMA was implemented the works
must exist in the Archived Works/Sites table. If not then the inspection load will fail.
Note: The process of refreshing the archived works can be automated.
A script to automate the process of refreshing archived works will be shipped:
Exorbase\tma\admin\utl\create_job_to_populate_taw_tas_from_swm. sql
Version: 4.7
28
CONFIDENTIALITY STATEMENT
The contents of this document, including system ideas and concepts, are confidential and proprietary in nature and are not to be distributed in any
form without the prior written consent of Bentley, Inc.
EXOR
TMA ADMIN GUIDE
CONFIGURATION
DECLARE
-------------------------------------------------------------------------- PVCS Identifiers :--PVCS id
: $Header:
//vm_latest/archives/tma/admin/utl/create_job_to_populate_taw_tas_from_swm. sql-arc 3. 0 Jan 08 2008
12:31:16 gjohnson $
-Module Name
: $Workfile: create_job_to_populate_taw_tas_from_swm. sql $
-Date into PVCS : $Date: Jan 08 2008 12:31:16 $
-Date fetched Out : $Modtime: Jan 08 2008 12:30:56 $
-Version
: $Revision: 3. 0 $
-Based on SCCS version :
---- Kick off a refresh of TMA_ARCHIVED_WORKS and TMA_ARCHIVED_SITES
-- based on data in Streetworks Manager tables every 30 minutes
-------------------------------------------------------------------------l_job_id pls_integer ;
BEGIN
nm3dbms_job. make_sure_processes_available;
dbms_job. submit( job => l_job_id
,what => 'begin
tma_inspections. populate_taw_tas_from_swm;
end;'
,interval => 'SYSDATE+30/1440 ' ) ;
commit;
END;
/
By default this will run every 30 minutes. If this needs to be run more often then the line
,interval => 'SYSDATE+30/1440 ' ) ;
needs to be changed – ie if every 15 minutes then change it to
,interval => 'SYSDATE+15/1440 ' ) ;
Version: 4.7
29
CONFIDENTIALITY STATEMENT
The contents of this document, including system ideas and concepts, are confidential and proprietary in nature and are not to be distributed in any
form without the prior written consent of Bentley, Inc.
EXOR
TMA ADMIN GUIDE
CONFIGURATION
3.5
Lane Rental (Interim Solution)
‘Lane Rental’ legislation is to be implemented in April 2012 for TfL managed streets in order to encourage Works
promoters to avoid particular times for street occupation.
This specification is for the interim solution which:
Allows TfL to trial functionality prior to the definition of the full requirements for managing the ‘Lane Rental’
legislation.
Provides a limited amount of additional functionality that all TMA customers could use.
The mechanism to be used to define the ‘Lane Rental’ areas will be by the use of the Type 63 special designation
code. The existing Code 16 ‘Strategic Route’ is expected to be used.
As some ‘Lane Rental’ areas are expected to have different limitations at different times of the day it is expected that
the extent of the areas will have to be defined for separate carriageways of dual carriageways that share the same NSG
USRN.
Each defined ‘Lane Rental’ area will have an associated ‘Charge Band’. The maximum charge that is expected to be
permitted under ‘Lane Rental’ is £2,500 per ‘Calendar Day’ (i.e , not Working Day). Some streets will have more than
one ‘lane rental’ area and more than one ‘Charge Band’.
There is no provision under the existing ASD Type 63 to indicate the ‘Charge Band’ other than in free text. Free text
description will be the mechanism adopted for the interim solution prior to the full requirements being identified.
3.5.1
Solution
To meet the requirements stated above, it has been decided that a new Category D type inspection will be created;
namely:
Category D – Ad-Hoc
This new category of inspection can only be defined as an ‘Investigatory’ inspection
The outcomes for this inspection will be ‘Promoter on Site’ or ‘No Promoter on Site’
The status codes will be ‘Yes’ and ‘No’
The inspection category items will be:
43 – Working in Designated Criteria
44 – Working at Designated Time
45 – Working in Footway
46 – Working in Carriageway
47 – Working in Verge
The associated item status codes will be ‘Unknown’, ‘Unseen’, ‘Yes’ or ‘No’.
The inspection scheduler will be subject to user entered criteria for an individual organisation (i.e., an ‘Inspection
Profile’ will be created for each organisation for an ‘Inspection Year’).
Overall, the selection criteria for an ‘Inspection Profile’ will include:
One or more ‘Works Categories’
One or more ‘Phase Activity Types’
One or more ‘Charge Categories’
One or more words, which if found in the works description result in the works being excluded from the
schedule
One or more ‘Charge Bands’
One of more ‘Street Designations’
The scheduler will use the ‘Estimated’ or ‘Actual’ start date and ‘Estimated’ end date in scheduling these
inspections as it is important to schedule the inspection if the Works might have started or be in progress (As
Version: 4.7
30
CONFIDENTIALITY STATEMENT
The contents of this document, including system ideas and concepts, are confidential and proprietary in nature and are not to be distributed in any
form without the prior written consent of Bentley, Inc.
EXOR
TMA ADMIN GUIDE
CONFIGURATION
the ‘Actual Start’ (0400) and ‘Works Stop’ (0600) notices can arrive a ‘Working Day’ after the Works has
started or finished).
Only Works where the ‘Schedulable Flag’ is set to ’Y’ will be included.
An inspection ‘Rule Set’ will be associated with the ‘Category D’ profile so scheduled inspections will be
divided amongst the inspectors on the rule set.
There will be No follow-up inspections created as a result of Category D Ad_Hoc inspection.
Version: 4.7
31
CONFIDENTIALITY STATEMENT
The contents of this document, including system ideas and concepts, are confidential and proprietary in nature and are not to be distributed in any
form without the prior written consent of Bentley, Inc.
EXOR
TMA ADMIN GUIDE
WEB SERVICES
4
Web Services
This chapter describes the forms and processes used for web services in TMA by Exor. They are the following forms:
Monitor Web Service Transactions – TMA3000
Send OD Data – TMA3030
The form descriptions provide you with detailed information about each TMA Works form in TMA by Exor,
including:
an overall description of the form
a detailed explanation of each field, including available features (such as List of Values), default values
and other characteristics
helpful information for using the form
Figure 21 – Monitor Web Service Transactions Menu
Version: 4.7
32
CONFIDENTIALITY STATEMENT
The contents of this document, including system ideas and concepts, are confidential and proprietary in nature and are not to be distributed in any
form without the prior written consent of Bentley, Inc.
EXOR
TMA ADMIN GUIDE
WEB SERVICES
4.1
Monitor Web Service Transactions – TMA3000
Figure 22 – Monitor Web Service Transactions
4.1.1
General Information
The Monitor Web Service Transaction form is used to monitor notices being sent/received.
Date ranges can be specified on the first section of the form. When the Restrict checkbox is selected the run query
function will return all notices within the specified date range. When the restrict box is unselected a record of all
notices in the system will be returned.
Records returned can be restricted by recipient organisation and district.
The Include Successful Transactions? checkbox can be used additionally to restrict transactions queried by including
or excluding successful transactions.
If there is a problem loading a transaction then the ‘Status’ will be set to ‘Pending’. Pending transactions will be
retried until the timeout period ends. Once the timeout period ends then the transaction will attempt to be processed,
possibly resulting in a timeout error.
If Product Option HOLDPNDING is set to ‘Y’ pending transactions will be held back if a previous transaction has not
arrived or been successfully processed.
Product Option PNDNGTIME will determine, in minutes, how long a pending transaction will be held for.
If BPEL has a problem sending a transaction, Product Option BPELTMOUT will determine the maximum time
allowed for retrying before timing out. After this time the transaction will fail with a status of ‘Error’ and a timeout
error message. This is relevant only when sending transactions.
This functionality will minimise notice out of sequence errors.
Version: 4.7
33
CONFIDENTIALITY STATEMENT
The contents of this document, including system ideas and concepts, are confidential and proprietary in nature and are not to be distributed in any
form without the prior written consent of Bentley, Inc.
EXOR
TMA ADMIN GUIDE
WEB SERVICES
For example:
If a start notice is received before the initial notice then the start notice transaction will be set to ‘Pending’. If within
the timeout period the initial notice is received then the pending start notice will be processed after the initial notice.
Product Option RECTRANSQ, when set, will act like a drip-feed if a backlog of receive transactions has arisen. If set
to null then all applicable transactions will be processed in one go. However, if for example, the value is set to 100,
then only the first 100 transactions will be processed in that iteration.
When the Monitor Transaction form is opened a check will be performed to confirm that the correct processes for
receiving and sending transactions have been created and are active.
If the process is expected to exist and is either missing or is not ‘Running’ or ‘Scheduled’ the following message will
appear.
Figure 23 - Message
When a notice/transaction fails sending to a copy recipient the ‘Transaction Status’ will be set to ‘Copy Recipient
Fail’. Further notices for the works/phase can continue to be issued.
4.1.2
Sorting Results
Results within the form may be sorted by any of the displayed fields by pressing the field name (column heading)
which are also ‘Sort’ buttons. The first time a heading is pressed the records are sorted in ascending order. If pressed
again the records within the column will be sorted in descending order. A ‘carat’ (^) symbol or lower case ‘v’ is
displayed adjacent to the column name to indicate that the data has been sorted in ascending or descending order
respectively as shown below.
Figure 24 - Sort
Version: 4.7
34
CONFIDENTIALITY STATEMENT
The contents of this document, including system ideas and concepts, are confidential and proprietary in nature and are not to be distributed in any
form without the prior written consent of Bentley, Inc.
EXOR
TMA ADMIN GUIDE
WEB SERVICES
4.1.3
Restrict
Figure 25 - Restrict
The notice transactions viewed can be restricted by any of the following fields. The ‘Restrict’ checkbox has to be
ticked.
Date From
Optional
Date
Enter the date from which to return transaction records.
Date To
Optional
Date
Enter the date to which to return transaction records.
Recipient
Optional
Date
Enter the recipient organisation to restrict the return of transaction records.
District
Optional
Date
Enter the recipient district to restrict the return of transaction records.
Modified Date
Optional
Date
Check this box if the dates entered apply to the modified date of the transaction.
Created Date
Checkbox
Check this box if the dates entered apply to the created date of the transaction.
Include Successful Transactions?
Checkbox
Check this box if the records returned are to include successful transactions.
Version: 4.7
35
CONFIDENTIALITY STATEMENT
The contents of this document, including system ideas and concepts, are confidential and proprietary in nature and are not to be distributed in any
form without the prior written consent of Bentley, Inc.
EXOR
TMA ADMIN GUIDE
WEB SERVICES
4.1.4
Transactions
Figure 26 - Transactions
TMA notices are transferred between organisations via Web Services (transactions).
Each transaction record has a checkbox against it that enables the selection of multiple transactions that require action.
This could be [Retry Transaction], [Send Error Response], [Retry Forward Transaction] or [Set Forward Status
Ignore].
Created Date
Display Only
The created date of the transaction will be displayed. If the transaction has been re-processed using the [Retry
Transaction] button this will be shown in the modified date (i.e., the date the notice was re-processed).
Works Reference
Display Only
The works reference will be displayed.
Notice Seq
Display Only
The transaction sequence of the notice sent/received will be displayed.
Notice Type
Display Only
List
The notice type of the works will be displayed.
Sent/Received
Display Only
This field will show whether the notice is to be sent or if it has been received.
Transaction Status
Display Only
List
This field will show the transaction status of the works.
Transaction status codes will have been defined in form Domains – HIG9120 under the option
TRANSACTION_STATUS.
Modified Date
Display Only
The modified date of the transaction will be displayed. If the transaction has been re-processed using the [Retry
Transaction] button this date will be shown. (i.e., the date the notice was re-processed).
Use the scroll bar to display these columns:
Works Category
Display Only
List
The works category of the works will be displayed.
Version: 4.7
36
CONFIDENTIALITY STATEMENT
The contents of this document, including system ideas and concepts, are confidential and proprietary in nature and are not to be distributed in any
form without the prior written consent of Bentley, Inc.
EXOR
TMA ADMIN GUIDE
WEB SERVICES
Processing Seq
Display Only
This field will show the order the transactions were processed.
Send Org
Display Only
This field will display the sending organisation of the transaction.
Send Dist
Display Only
This field will display the sending operational district of the transaction.
USRN
Display Only
The USRN of the street on which the work is to take place will be displayed.
Status Context
Display Only
This field will display information, for example, information regarding the waiting for arrival of another notice (i.e., a
notice has been received out of sequence).
Timeout Deadline
Display Only
Calendar
This field will display the date and time up to which a pending transaction will be reprocessed before the transaction
status is set to ‘Error’.
The calendar button can be used to extend the deadline.
Forward Status
Display Only
The forward status of the transaction will be displayed.
This field will be available only if the Product Option – FWD_NOTICE is set to Y.
Note: If the Transaction Status is set to ‘Rejected by Web Services’ it will have failed the XSD validation. The user
will not be able to retry these transactions.
The [Retry Transaction] button will allow failed transactions to be reprocessed. The transaction will go only to those
organisations that have not successfully received it on a previous occasion. It will be active only if the ‘Transaction
Status’ is ‘Pending Send’ or ‘OK’.
Figure 27 – Retry Transaction button
A transaction at a status of ‘Pending Send’ can be re-tried to allow the user to bypass the hold that has been placed on
the transaction whilst a prior transaction is at a status or ‘Error’.
A transaction at a status of ‘OK’ can be re-tried to allow the user to re-send a transaction to another organisations
system if the original transaction has been lost or misplaced.
Version: 4.7
37
CONFIDENTIALITY STATEMENT
The contents of this document, including system ideas and concepts, are confidential and proprietary in nature and are not to be distributed in any
form without the prior written consent of Bentley, Inc.
EXOR
TMA ADMIN GUIDE
WEB SERVICES
The [Send Error Response] button will allow the user to send a response to a transaction received in error. It will be
active only if the transaction status is ‘Error’.
Figure 28 – Send Error Response button
Figure 29 - Transaction Text
For each transaction selected the user will be prompted for text to send in the response. This is defaulted to the error
message but can be updated. Select [OK] to send a Comment to the sender of the transaction.
The [Retry Forward Transaction] button will set the Forward Status to ‘Ready to Send’ from any other forward
status that is set. This is to allow the BPEL process to retry sending the transaction.
Figure 30 – Retry Forward Transaction button
Note: This button will be available only if the Product Option – FWD_NOTICE is set to Y.
The [Set Forward Status] button will set the Forward Status to ‘Ignore’ only if the Forward Status is set to ‘Error’.
This is to prevent the retry job from trying to resend the transaction.
Figure 31 – Set Forward Status Ignore button
Note: This button will be available only if the Product Option – FWD_NOTICE is set to Y.
Version: 4.7
38
CONFIDENTIALITY STATEMENT
The contents of this document, including system ideas and concepts, are confidential and proprietary in nature and are not to be distributed in any
form without the prior written consent of Bentley, Inc.
EXOR
TMA ADMIN GUIDE
WEB SERVICES
Figure 32 - Send Permit Refusal button
The [Send Permit Refusal] button will allow the user to refuse a Permit that has been received resulting in a
Transaction with a status of ‘Error’.
Figure 33 – Send Permit Refusal button
The Permit transactions that can be refused if in error are:
PAA(Major)/Permit Application (Non-Major)
Permit Application
Variation Application
Duration Variation Application
The button will be visible when the current transaction is:
Of a Notice Type listed above
It has been received in error
A refusal has not yet been sent
When the button is pressed a Refusal Notice (1613) will be sent back automatically to the sender of the Permit notice.
If the Street Authority refuses a Permit using this functionality then it will be expected that the Street Authority
contact the Promoter to explain that the receipt of the initial Permit Application (0210) notice failed.
The Promoter must cancel the Works that have been refused and create a new Works with another Permit Application.
Version: 4.7
39
CONFIDENTIALITY STATEMENT
The contents of this document, including system ideas and concepts, are confidential and proprietary in nature and are not to be distributed in any
form without the prior written consent of Bentley, Inc.
EXOR
TMA ADMIN GUIDE
WEB SERVICES
4.1.5
Review
Figure 34 – Review
The review part of the form allows each transaction to be reviewed. The task of reviewing the transaction can be
assigned to a particular user.
Status
Optional
List
Enter the review status for the selected transaction.
Review status codes can be added using form Domains – HIG9120 under the option TRANS_REVIEWSTATUS.
Text
Optional
Enter the review comments for the selected transaction.
Standard text may be defined in form Standard Text Maintenance – HIG4010 and assigned to a user in form Standard
Text Usage – HIG4020. (Refer to the General System Administration manual for further details)
If standard text has been set up for this field right click with the mouse and select the [Standard Text] option.
Figure 35 – Standard Text
This will bring up form Standard Text – HIG4030 form where the relevant text can be selected.
The content of this picklist is defined on a user by user basis and is controlled by the system administrator.
Version: 4.7
40
CONFIDENTIALITY STATEMENT
The contents of this document, including system ideas and concepts, are confidential and proprietary in nature and are not to be distributed in any
form without the prior written consent of Bentley, Inc.
EXOR
TMA ADMIN GUIDE
WEB SERVICES
Figure 36 – Standard Text
[Select Value]
[Append Value]
[Cancel]
Assigned To
Will select the selected text and place the text in the current field. Any text already in
the field will be overwritten.
Will append the selected text to any text that is in the current field providing there is
sufficient room remaining in that field.
Will cancel the form.
Optional
List
Enter the name of the user who is to review the transaction.
By
Display Only
The name of the user who has reviewed the transaction or assigned the transaction will be displayed.
Date
Display Only
The date the transaction was reviewed or assigned will be displayed.
Version: 4.7
41
CONFIDENTIALITY STATEMENT
The contents of this document, including system ideas and concepts, are confidential and proprietary in nature and are not to be distributed in any
form without the prior written consent of Bentley, Inc.
EXOR
TMA ADMIN GUIDE
WEB SERVICES
4.1.6
Transaction Errors tab
Figure 37 - Transaction Errors
The Transaction Errors tab will display any errors associated with the works highlighted in the Transactions part of
the form.
Error/Warning
Display Only
The error or warning of the transaction error will be displayed if applicable.
Type
Display Only
The type of the file with the transaction error will be displayed.
Message
Display Only
The error message of the transaction error will be displayed.
Additional Information
Display Only
Additional information associated with the transaction error will be shown.
Source
Display Only
The source of the transaction error will be displayed.
4.1.7
Recipients tab
Figure 38 - Recipients
The Recipients tab will display the primary and copy recipients of the notice. Errors during the transaction will be
detailed for each recipient if applicable.
Primary/Copy Recipient
Display Only
The organisation code of the primary and copy (optional) recipient of the transaction will be displayed.
A description will be displayed in the adjacent field.
Version: 4.7
42
CONFIDENTIALITY STATEMENT
The contents of this document, including system ideas and concepts, are confidential and proprietary in nature and are not to be distributed in any
form without the prior written consent of Bentley, Inc.
EXOR
TMA ADMIN GUIDE
WEB SERVICES
District
Display Only
The operational district code of the primary and copy (optional) recipient of the transaction will be displayed.
A description will be displayed in the adjacent field.
Fault Code
Display Only
The fault code of the transaction error will be displayed.
Fault Reason
Display Only
The fault reason of the transaction will be displayed.
Response Date
Display Only
Details of the response date and time from the receiving web server will be displayed.
4.1.8
Review History tab
Figure 39 - Review History
The Review History tab will display details of all reviews carried out on the selected transaction.
Review Date
Display Only
The date of the review will be displayed.
Review Status
Display Only
The review status of the review will be displayed.
Review By
Display Only
The name of the user who carried out the review will be displayed.
Assigned To
Display Only
The name of the user who has been assigned to carry out the review will be displayed.
Review Text
Display Only
Details of the comments associated with the review will be displayed.
Version: 4.7
43
CONFIDENTIALITY STATEMENT
The contents of this document, including system ideas and concepts, are confidential and proprietary in nature and are not to be distributed in any
form without the prior written consent of Bentley, Inc.
EXOR
TMA ADMIN GUIDE
WEB SERVICES
4.1.9
Links
Figure 40 - Links
There are a number of forms that can be accessed from the Monitor Web Services Transactions form. This is done
using the ‘Links’ menu on the top of the form.
To view details of the street associated with the works select the ‘Gazetteer’ option on the ‘Links’ menu.
This will call the Gazetteer – NSG0010 module.
Figure 41 - Gazetteer
Full details of the street associated with the selected works will be shown.
To view details the notice for the works, highlight the transaction and select the ‘Notices’ option on the ‘Links’ menu.
This will call the View Notice – TMA1810 module.
Figure 42 - View Notice
Details of the selected notice will be shown.
Version: 4.7
44
CONFIDENTIALITY STATEMENT
The contents of this document, including system ideas and concepts, are confidential and proprietary in nature and are not to be distributed in any
form without the prior written consent of Bentley, Inc.
EXOR
TMA ADMIN GUIDE
WEB SERVICES
To view details of the restrictions notice select the ‘Restrictions’ option on the ‘Links’ menu.
This will call the Restrictions – TMA1100 module.
Figure 43 - Restrictions
Full restriction details will be shown.
To view details of the XML transaction of the works select the ‘View XML’ option on the ‘Links’ menu.
Figure 44 - View XML
Full details of the XML transaction will be shown.
Note: When receiving a notice, if the batch job has not run then the XML file will not have been transformed into
data. To view details of the notice use the [View in Browser] button.
For example; the notice failed to load because the promoter details are not registered in the form NSG0110 –
Organisations and Districts.
Version: 4.7
45
CONFIDENTIALITY STATEMENT
The contents of this document, including system ideas and concepts, are confidential and proprietary in nature and are not to be distributed in any
form without the prior written consent of Bentley, Inc.
EXOR
TMA ADMIN GUIDE
WEB SERVICES
Figure 45 - View in Browser
To view details of the works select the ‘Works’ option on the ‘Links’ menu.
This will call the Works – TMA100 module.
Figure 46 - Works
Details of the selected works will be shown.
Version: 4.7
46
CONFIDENTIALITY STATEMENT
The contents of this document, including system ideas and concepts, are confidential and proprietary in nature and are not to be distributed in any
form without the prior written consent of Bentley, Inc.
EXOR
TMA ADMIN GUIDE
WEB SERVICES
4.2
Send OD Data – TMA3030
Figure 47 - Send OD Data
4.2.1
General Information
The ‘Send OD Data’ form is used to send operational district data to a specified recipient. A validation is performed
on the file and if, for instance, there are any mandatory fields missing, the details will be displayed in the ‘Validation
Results’ tab.
Primary Recipient
Mandatory
List
Enter the recipient of the operational district file.
Version: 4.7
47
CONFIDENTIALITY STATEMENT
The contents of this document, including system ideas and concepts, are confidential and proprietary in nature and are not to be distributed in any
form without the prior written consent of Bentley, Inc.
EXOR
TMA ADMIN GUIDE
BATCH PROCESSING, INSPECTIONS
5
Batch Processing, Inspections
Figure 48 – Batch Processing Menu
This chapter describes the forms and processes used for batch processing inspections in TMA by Exor. They are the
following forms:
Inspection Download – TMA5500
Inspection Upload – TMA5600
Automatic Inspection Upload – TMA5610
Inspection Batch File Summary – TMA5510
Inspection Upload Transaction Summary – TMA5620
The form descriptions provide you with detailed information about each TMA Works form in TMA by Exor,
including:
an overall description of the form
a detailed explanation of each field, including available features (such as List of Values), default values and
other characteristics
helpful information for using the form
Version: 4.7
48
CONFIDENTIALITY STATEMENT
The contents of this document, including system ideas and concepts, are confidential and proprietary in nature and are not to be distributed in any
form without the prior written consent of Bentley, Inc.
EXOR
TMA ADMIN GUIDE
BATCH PROCESSING, INSPECTIONS
5.1
Inspection Download – TMA5500
Figure 49 - Inspection Download
5.1.1
General Information
This form is used to manually download (export data to a file) inspections for a given organisation and district. The
destination folder will have been defined in form Directories – HIG1895 under the option
TMA_INSP_EXPORT_DIRECTORY’ an example of this form is shown in Figure 51.
5.1.2
Inspection Download
Destination Folder
Display Only
This field will be populated automatically using the directory defined in form Directories – HIG1895 under the option
TMA_INSP_EXPORT_DIRECTORY.
Note: The name of the directory must correspond with the value in Product Option/User Option - INSPEXP.
Inspecting Organisation
Mandatory
List
Enter the organisation carrying out the inspections.
Inspecting District
Mandatory
List
Enter the organisational district of the organisation carrying out the inspections.
Version: 4.7
49
CONFIDENTIALITY STATEMENT
The contents of this document, including system ideas and concepts, are confidential and proprietary in nature and are not to be distributed in any
form without the prior written consent of Bentley, Inc.
EXOR
TMA ADMIN GUIDE
BATCH PROCESSING, INSPECTIONS
Promoter Organisation
Optional
List
Enter the organisation that owns the works to be inspected.
Promoter District
Optional
Enter the organisational district of the organisation to be inspected.
Message Log
Display Only
This field will detail the download process and list the files produced as a result of the download operation.
The [Download] button will start the manual inspection download.
Version: 4.7
50
CONFIDENTIALITY STATEMENT
The contents of this document, including system ideas and concepts, are confidential and proprietary in nature and are not to be distributed in any
form without the prior written consent of Bentley, Inc.
EXOR
TMA ADMIN GUIDE
BATCH PROCESSING, INSPECTIONS
5.2
Inspection Upload – TMA5600
Figure 50 - Inspection Upload
5.2.1
General Information
This form is used to manually upload (load data into the TMA system) inspections.
Existing TMA Mobile inspection software allows an inspector to associate an inspection (or inspection item) with a
file on the mobile device. This could be, for example, a picture or video).
Both inspection batch files and associated documents can be downloaded from the mobile device. However, the TMA
upload functionality processes only inspection batch files.
The TMA inspection loader plugs into the Document Bundle Loader to facilitate linking a document to an inspection.
Product Option – INSPDOCTYP is used to define the document type used to support TMA inspection documents.
Product Option – INSPDOCLOC is used to define the document location name used to support TMA inspection
documents.
The Import, Pass and Fail directories will have been defined in form Directories – HIG1895 under the options
‘TMA_INSP_IMPORT_DIRECTORY’ ‘TMA_INSP_PASS_DIRECTORY’ and
‘TMA_INSP_FAIL_DIRECTORY’.
The import document directory will have been defined under the option
‘TMA_INSP_IMPORT_DOCS_DIRECTORY. An example of this form is shown in Figure 51.
Version: 4.7
51
CONFIDENTIALITY STATEMENT
The contents of this document, including system ideas and concepts, are confidential and proprietary in nature and are not to be distributed in any
form without the prior written consent of Bentley, Inc.
EXOR
TMA ADMIN GUIDE
BATCH PROCESSING, INSPECTIONS
5.2.2
Directories
Figure 51 - Directories
Import Directory
Display Only
This field will be populated automatically using the directory defined in form Directories – HIG1895 under the option
TMA_INSP_IMPORT_DIRECTORY.
Note: The name of the directory must correspond with the value in Product Option/User Option - INSPIMP.
Pass Directory
Display Only
This field will be populated automatically using the directory defined in form Directories – HIG1895 under the option
TMA_INSP_PASS_DIRECTORY.
Note: the name of the directory must correspond with the value in Product Option/User Option INSPPASS.
Fail Directory
Display Only
This field will be populated automatically using the directory defined in form Directories – HIG1895 under the option
TMA_INSP_FAIL_DIRECTORY.
Note: The name of the directory must correspond with the value in Product Option/User Option INSPFAIL.
Documents Directory
Display Only
This field will be populated automatically using the directory defined in form Directories – HIG1895 under the option
TMA_INSP_IMPORT_DOCS_DIRECTORY.
Note: The name of the directory must correspond with the value in Product Option/User Option - INSPDOCS.
Version: 4.7
52
CONFIDENTIALITY STATEMENT
The contents of this document, including system ideas and concepts, are confidential and proprietary in nature and are not to be distributed in any
form without the prior written consent of Bentley, Inc.
EXOR
TMA ADMIN GUIDE
BATCH PROCESSING, INSPECTIONS
5.2.3
File Selection
Figure 52 - File Selection
The File Selection tab allows the user to select files individually by using the tick box or to select all files by using the
[Select All] button
on the bottom of the form you can also unselect all by using the [Deselect All] button
.
Select the [List Files in Directory] button to give a complete list of available to load.
Once the required files have been selected then the [Import] button can be pressed to start the load process.
Version: 4.7
53
CONFIDENTIALITY STATEMENT
The contents of this document, including system ideas and concepts, are confidential and proprietary in nature and are not to be distributed in any
form without the prior written consent of Bentley, Inc.
EXOR
TMA ADMIN GUIDE
BATCH PROCESSING, INSPECTIONS
5.2.4
Message Log
Figure 53 - Log
The Log tab will show the actions taken during the import process.
This will list the files processed and whether they have been moved into the [Pass] directory or the [Fail] directory.
If documents have been associated to the inspection it will show whether they have been processed successfully.
Version: 4.7
54
CONFIDENTIALITY STATEMENT
The contents of this document, including system ideas and concepts, are confidential and proprietary in nature and are not to be distributed in any
form without the prior written consent of Bentley, Inc.
EXOR
TMA ADMIN GUIDE
BATCH PROCESSING, INSPECTIONS
5.3
Automatic Inspection Upload – TMA5610
Figure 54 - Automatic Inspection Upload
5.3.1
General Information
This form is used to automatically upload (load data into the TMA system) inspections.
Existing TMA Mobile inspection software allows an inspector to associate an inspection (or inspection item) with a
file on the mobile device. This could be, for example, a picture or video).
Both inspection batch files and associated documents can be downloaded from the mobile device. However, the TMA
upload functionality processes only inspection batch files.
The TMA inspection loader plugs into the Document Bundle Loader to facilitate linking a document to an inspection.
Product Option – INSPDOCTYP is used to define the document type used to support TMA inspection documents.
Product Option – INSPDOCLOC is used to define the document location name used to support TMA inspection
documents.
The Import, Pass and Fail directories will have been defined in form Directories – HIG1895 under the options
‘TMA_INSP_IMPORT_DIRECTORY’ ‘TMA_INSP_PASS_DIRECTORY’ and
‘TMA_INSP_FAIL_DIRECTORY’.
The import document directory will have been defined under the option
‘TMA_INSP_IMPORT_DOCS_DIRECTORY.
An example of this form is shown in Figure 51.
Version: 4.7
55
CONFIDENTIALITY STATEMENT
The contents of this document, including system ideas and concepts, are confidential and proprietary in nature and are not to be distributed in any
form without the prior written consent of Bentley, Inc.
EXOR
TMA ADMIN GUIDE
BATCH PROCESSING, INSPECTIONS
Figure 55 – Automatic Inspection Upload
5.3.2
Directories
Import Directory
Display Only
This field will be populated automatically using the directory defined in form Directories – HIG1895 under the option
TMA_INSP_IMPORT_DIRECTORY.
Note: The name of the directory must correspond with the value in Product Option/User Option - INSPIMP.
Pass Directory
Display Only
This field will be populated automatically using the directory defined in form Directories – HIG1895 under the option
TMA_INSP_PASS_DIRECTORY.
Note: The name of the directory must correspond with the value in Product Option/User Option - INSPPASS.
Fail Directory
Display Only
This field will be populated automatically using the directory defined in form Directories – HIG1895 under the option
TMA_INSP_FAIL_DIRECTORY.
Note: The name of the directory must correspond with the value in Product Option/User Option - INSPFAIL.
Documents Directory
Display Only
This field will be populated automatically using the directory defined in form Directories – HIG1895 under the option
TMA_INSP_IMPORT_DOCS_DIRECTORY.
Note: The name of the directory must correspond with the value in Product Option/User Option - INSPDOCS.
Version: 4.7
56
CONFIDENTIALITY STATEMENT
The contents of this document, including system ideas and concepts, are confidential and proprietary in nature and are not to be distributed in any
form without the prior written consent of Bentley, Inc.
EXOR
TMA ADMIN GUIDE
BATCH PROCESSING, INSPECTIONS
5.3.3
Message Log
Figure 56 - Log
The Log tab will show the actions taken during the upload process.
This will list the files processed and whether they have been moved into the [Pass] directory or the [Fail] directory.
If documents have been associated to the inspection it will show whether they have been processed successfully.
The date and time of the next upload cycle will also be shown.
Cycle Interval
Optional
List
Enter the interval that the system will use to load available inspection files.
Press the [Start] button to start the automatic inspection upload process.
Press the [Stop] button to stop the automatic inspection upload process.
Version: 4.7
57
CONFIDENTIALITY STATEMENT
The contents of this document, including system ideas and concepts, are confidential and proprietary in nature and are not to be distributed in any
form without the prior written consent of Bentley, Inc.
EXOR
TMA ADMIN GUIDE
BATCH PROCESSING, INSPECTIONS
5.4
Inspection Batch File Summary – TMA5510
Figure 57 - Inspection Batch File Summary
5.4.1
General Information
This is a query only screen. Through this screen it is possible to view inspection batches that have been loaded either
manually or using the automatic process.
It is used to check on the status of all files Uploaded/Downloaded and to view errors or warnings that may have
occurred.
5.4.2
Sorting Results
Results within the form may be sorted by any of the displayed fields by pressing the field name (column heading)
which are also ‘Sort’ buttons. The first time a heading is pressed the records are sorted in ascending order. If pressed
again the records within the column will be sorted in descending order. A ‘carat’ (^) symbol or lower case ‘v’ is
displayed adjacent to the column name to indicate that the data has been sorted in ascending or descending order
respectively as shown below.
Figure 58 - Sort
Version: 4.7
58
CONFIDENTIALITY STATEMENT
The contents of this document, including system ideas and concepts, are confidential and proprietary in nature and are not to be distributed in any
form without the prior written consent of Bentley, Inc.
EXOR
TMA ADMIN GUIDE
BATCH PROCESSING, INSPECTIONS
5.4.3
Inspection Batch Files
The Inspection Batch Files form lists each inspection batch file record.
File Id
Display Only
The Id of the batch file will be displayed.
Filename
Display Only
The filename of the batch file will be displayed.
Date
Display Only
The date and time of the batch file will be displayed.
Username
Display Only
The username of the user initiating the batch file load will be displayed.
Read/Write Error
Display Only/Checkbox
This box will be checked if there were any warnings in the batch file load.
TRX Error(s)
Display Only/Checkbox
This box will be checked if there were any transaction errors in the batch file load.
Further details of the transaction can be viewed by using the [Transactions] option under the [Links] menu on the
toolbar.
Documents
Exist
Display Only
This box will be checked if there were documents to be loaded in the batch file.
Error(s)
Display Only
This box will be checked if there were errors loading the documents.
Further details of the document load errors can be viewed by using the [Document Bundles] option under the [Links]
menu on the toolbar.
Message
Display Only
This box will show information concerning any errors in the batch file load.
Version: 4.7
59
CONFIDENTIALITY STATEMENT
The contents of this document, including system ideas and concepts, are confidential and proprietary in nature and are not to be distributed in any
form without the prior written consent of Bentley, Inc.
EXOR
TMA ADMIN GUIDE
BATCH PROCESSING, INSPECTIONS
5.4.4
Links
Figure 59 - Links
To view details of the documents associated with an inspection batch file, highlight the filename and select the
‘Document Bundles’ option on the ‘Links’ menu.
This will call the Document Bundles – DOC0310 module.
Figure 60 – Document Bundles
Details of all the documents associated with the selected file will be shown.
To view details of the inspection associated with an inspection batch file, highlight the filename and select the
‘Inspections’ option on the ‘Links’ menu.
This will call the Inspections – TMA5000 module.
Figure 61 - Inspections
Details of all the inspections associated with the selected file will be shown.
Version: 4.7
60
CONFIDENTIALITY STATEMENT
The contents of this document, including system ideas and concepts, are confidential and proprietary in nature and are not to be distributed in any
form without the prior written consent of Bentley, Inc.
EXOR
TMA ADMIN GUIDE
BATCH PROCESSING, INSPECTIONS
To view details of the transactions associated with an inspection batch file, highlight the filename and select the
‘Transactions’ option on the ‘Links’ menu.
Figure 62 - Transactions
This will call the Inspections Upload Transaction Summary – TMA5620 module.
Details of the transactions associated with the selected file will be shown.
Version: 4.7
61
CONFIDENTIALITY STATEMENT
The contents of this document, including system ideas and concepts, are confidential and proprietary in nature and are not to be distributed in any
form without the prior written consent of Bentley, Inc.
EXOR
TMA ADMIN GUIDE
BATCH PROCESSING, INSPECTIONS
5.5
Inspection Upload Transaction Summary – TMA5620
Figure 63 - Inspection Upload Transaction Summary
5.5.1
General Information
This is a query only screen. Through this screen it is possible to view inspection batches either uploaded manually or
uploaded using the batch interface.
Each Inspection Batch will have its own transaction Reference, Sequence and Status of the load.
Any Batch with an error that is selected in the top half of the form will have the relevant reason displayed in the Error
box at the bottom.
5.5.2
Sorting Results
Results within the form may be sorted by any of the displayed fields by pressing the field name (column heading)
which are also ‘Sort’ buttons. The first time a heading is pressed the records are sorted in ascending order. If pressed
again the records within the column will be sorted in descending order. A ‘carat’ (^) symbol or lower case ‘v’ is
displayed adjacent to the column name to indicate that the data has been sorted in ascending or descending order
respectively as shown below.
Version: 4.7
62
CONFIDENTIALITY STATEMENT
The contents of this document, including system ideas and concepts, are confidential and proprietary in nature and are not to be distributed in any
form without the prior written consent of Bentley, Inc.
EXOR
TMA ADMIN GUIDE
BATCH PROCESSING, INSPECTIONS
Figure 64 - Sort
5.5.3
Inspection Upload Transaction Summary
Filename
Display Only
The filename containing the inspection that has been uploaded will be displayed. There will be a separate entry for
each inspection within the file.
Transaction Reference
Display Only
This field will display a transaction reference for the file.
Seq
Display Only
The sequence number of the inspection within the file will be displayed.
Status
Display Only
The status of either PASS or FAIL will be displayed.
Error
Display Only
If the status for the inspection is set to FAIL details of the error will be displayed.
Version: 4.7
63
CONFIDENTIALITY STATEMENT
The contents of this document, including system ideas and concepts, are confidential and proprietary in nature and are not to be distributed in any
form without the prior written consent of Bentley, Inc.
EXOR
TMA ADMIN GUIDE
BATCH PROCESSING, DCD INSPECTIONS
6
Batch Processing, DCD Inspections
Figure 65 – DCD Extract Menu
This chapter describes the forms and processes used for processing inspections for DCD use in TMA by Exor. They
are the following forms:
DCD Extract – TMA5515
Inspection Download to DCD – TMA5520
Automatic Inspection Download to DCD – TMA5530
The form descriptions provide you with detailed information about each TMA Works form in TMA by Exor,
including:
an overall description of the form
a detailed explanation of each field, including available features (such as List of Values), default values and
other characteristics
helpful information for using the form
Version: 4.7
64
CONFIDENTIALITY STATEMENT
The contents of this document, including system ideas and concepts, are confidential and proprietary in nature and are not to be distributed in any
form without the prior written consent of Bentley, Inc.
EXOR
TMA ADMIN GUIDE
BATCH PROCESSING, DCD INSPECTIONS
6.1
DCD Extract – TMA5515
Figure 66 - DCD Extract
6.1.1
General Information
This DCD Extract form is used to download to the DCD (data capture device) either:
all street or works data into a Master or Update file
or
street or works data for inspectors into separate Master or Update files for those inspectors.
Product Option – DCDINSPCTR is used to control the files that are extracted.
If the option is set to Y the download will create an extract a file for each inspector.
If the option is set to N the download will create an extract file for all data.
Product Option – DCDFILPRFX can be set to define the prefix on a file when Product Option - DCDINSPCTR is
set to N. The default value for this will be ALL.
The DCD is used for the electronic collection of works inspections out in the field.
All extract files will be written to the directory defined in form Directories – HIG1895 under the option
TMA_DCD_INSP_EXPORT_DIRECTORY.
Note: The name of the directory must correspond with the value in Product Option/User Option - DCDINSPEXP.
Version: 4.7
65
CONFIDENTIALITY STATEMENT
The contents of this document, including system ideas and concepts, are confidential and proprietary in nature and are not to be distributed in any
form without the prior written consent of Bentley, Inc.
EXOR
TMA ADMIN GUIDE
BATCH PROCESSING, DCD INSPECTIONS
6.1.2
Sorting Results
Results within the form may be sorted by any of the displayed fields by pressing the field name (column heading)
which are also ‘Sort’ buttons. The first time a heading is pressed the records are sorted in ascending order. If pressed
again the records within the column will be sorted in descending order. A ‘carat’ (^) symbol or lower case ‘v’ is
displayed adjacent to the column name to indicate that the data has been sorted in ascending or descending order
respectively as shown below.
Figure 67 - Sort
6.1.3
File Destination
Figure 68 - File destination
This part of the form displays the destination of the extract file.
If Product Option – DCDINSPCTR is set to N:
Destination Folder
Display Only
The directory defined in form Directories – HIG1895 under the option TMA_DCD_INSP_EXPORT_DIRECTORY
will be displayed.
File Prefix
Display Only
The prefix defined in Product Option – DCDFILPRFX will be displayed.
Version: 4.7
66
CONFIDENTIALITY STATEMENT
The contents of this document, including system ideas and concepts, are confidential and proprietary in nature and are not to be distributed in any
form without the prior written consent of Bentley, Inc.
EXOR
TMA ADMIN GUIDE
BATCH PROCESSING, DCD INSPECTIONS
6.1.4
File Destination
Figure 69 - File destination
If Product Option – DCDINSPCTR is set to Y:
Destination Folder
Display Only
The directory defined in form Directories – HIG1895 under the option TMA_DCD_INSP_EXPORT_DIRECTORY
will be displayed.
Inspectors
Display Only
The prefix for files will be based on the available Inspectors Name.
The [Inspectors] button can be used to call the Inspectors – TMA5290 module to view available inspectors.
Note: Works and street data created in both the Master and Update files for an Inspector is based on the street
groups defined against that Inspector.
Version: 4.7
67
CONFIDENTIALITY STATEMENT
The contents of this document, including system ideas and concepts, are confidential and proprietary in nature and are not to be distributed in any
form without the prior written consent of Bentley, Inc.
EXOR
TMA ADMIN GUIDE
BATCH PROCESSING, DCD INSPECTIONS
6.1.5
Works Extract
Figure 70 - Works Extract
The [Works Extract] tab shows details of previous extracts that have been created and allows new extracts to be
created.
Work files will contain archived works and TMA works.
If the Master flag is ticked this is a complete list of all works. If not ticked the list will only contain updates for the
existing files on the DCD.
Filename
Display Only
The filename created will be displayed.
Date
Display Only
The date the file was created will be displayed.
No. of Recs
Display Only
The number of records in the extract file will be displayed.
Master File
Checkbox
The checkbox will be ticked if the created file is a master file.
The [Works Master File] button will create a new masterwork file based on the parameters specified.
For example, this would be used for the initial set up a new DCD.
The [Works Update File] button will create a work file of updates only of the main master file.
As the master file could potentially be very large and take some time both to create and to load into the DCD, the
update file is used to update the DCD of changes only of the master file.
Version: 4.7
68
CONFIDENTIALITY STATEMENT
The contents of this document, including system ideas and concepts, are confidential and proprietary in nature and are not to be distributed in any
form without the prior written consent of Bentley, Inc.
EXOR
TMA ADMIN GUIDE
BATCH PROCESSING, DCD INSPECTIONS
6.1.6
Street Extracts
Figure 71 - Street Extract
The [Streets Extracts] tab will show details of previous extracts that have been created.
If the Master flag is ticked this is a complete list of all streets. If not ticked the list will only contain updates for the
existing files on the DCD.
Filename
Display Only
The filename created will be displayed.
Date
Display Only
The date the file was created will be displayed.
No. of Recs
Display Only
The number of records in the extract file will be displayed.
Master File
Checkbox
The checkbox will be ticked if the created file is a master file.
The [Streets Master File] button will create a new master street file based on the parameters specified.
For example, this would be used for the initial set up a new DCD.
The [Streets Update File] button will create a street file of updates only of the main master file.
As the master file could potentially be very large and take some time both to create and to load into the DCD, the
update file is used to update the DCD of changes only of the master file.
Version: 4.7
69
CONFIDENTIALITY STATEMENT
The contents of this document, including system ideas and concepts, are confidential and proprietary in nature and are not to be distributed in any
form without the prior written consent of Bentley, Inc.
EXOR
TMA ADMIN GUIDE
BATCH PROCESSING, DCD INSPECTIONS
6.2
Inspections Download to DCD – TMA5520
Figure 72 - Inspection Download To DCD
6.2.1
General Information
This form is used to manually download (export data to a file) inspections ready to be used on the DCD. The
destination folder will have been defined in form Directories – HIG1895 under the option
‘TMA_DCD_INSP_EXPORT_DIRECTORY’.
Version: 4.7
70
CONFIDENTIALITY STATEMENT
The contents of this document, including system ideas and concepts, are confidential and proprietary in nature and are not to be distributed in any
form without the prior written consent of Bentley, Inc.
EXOR
TMA ADMIN GUIDE
BATCH PROCESSING, DCD INSPECTIONS
Figure 73 - Directories
The fields shown on the form are dependent on the value entered into Product Option – DCDINSPCTR.
The user can then select the organisation and district to export to the DCD.
The process can be done automatically using form Automatic Inspection Download to DCD – TMA5530.
Version: 4.7
71
CONFIDENTIALITY STATEMENT
The contents of this document, including system ideas and concepts, are confidential and proprietary in nature and are not to be distributed in any
form without the prior written consent of Bentley, Inc.
EXOR
TMA ADMIN GUIDE
BATCH PROCESSING, DCD INSPECTIONS
6.2.2
Inspection Download – All
Figure 74 - Inspection Download To DCD
If Product Option – DCDINSPCTR is set to N:
Destination Folder
Display Only
This field will be populated automatically using the directory defined in form Directories – HIG1895 under the option
TMA_DCD_INSP_EXPORT_DIRECTORY.
Note: The name of the directory must correspond with the value in Product Option/User Option - DCDINSPEXP.
Inspecting Organisation
Mandatory
List
Enter the organisation carrying out the inspections.
Inspecting District
Mandatory
List
Enter the organisational district of the organisation carrying out the inspections.
Promoter Organisation
Display Only
This field is not available for entry.
Version: 4.7
72
CONFIDENTIALITY STATEMENT
The contents of this document, including system ideas and concepts, are confidential and proprietary in nature and are not to be distributed in any
form without the prior written consent of Bentley, Inc.
EXOR
TMA ADMIN GUIDE
BATCH PROCESSING, DCD INSPECTIONS
Promoter District
Display Only
This field is not available for entry.
SEXTRACTMAN
Display Only
The value entered into Product Option – SXTRACTMAN will be displayed. Values could be either M – Master or U –
Update.
WEXTRACTMAN
Display Only
The value entered into Product Option – WXTRACTMAN will be displayed. Values could be either M – Master or
U – Update.
File Prefix
Display Only
The prefix defined in Product Option – DCDFILPRFX will be displayed.
Message Log
Display Only
This field will detail the download process and list the files produced as a result of the download operation.
The [Download] button will start the manual inspection download. Inspections with a DCD status of ‘Ready for
Download’ and an inspection outcome of ‘Unknown’ will be downloaded.
Version: 4.7
73
CONFIDENTIALITY STATEMENT
The contents of this document, including system ideas and concepts, are confidential and proprietary in nature and are not to be distributed in any
form without the prior written consent of Bentley, Inc.
EXOR
TMA ADMIN GUIDE
BATCH PROCESSING, DCD INSPECTIONS
6.2.3
Inspection Download – Inspectors
Figure 75 - Inspection Download To DCD
If Product Option – DCDINSPCTR is set to Y:
Destination Folder
Display Only
This field will be populated automatically using the directory defined in form Directories – HIG1895 under the option
TMA_DCD_INSP_EXPORT_DIRECTORY.
Note: The name of the directory must correspond with the value in Product Option/User Option - DCDINSPEXP.
Inspecting Organisation
Mandatory
List
Enter the organisation carrying out the inspections.
Inspecting District
Mandatory
List
Enter the organisational district of the organisation carrying out the inspections.
Promoter Organisation
Display Only
This field is not available for entry.
Version: 4.7
74
CONFIDENTIALITY STATEMENT
The contents of this document, including system ideas and concepts, are confidential and proprietary in nature and are not to be distributed in any
form without the prior written consent of Bentley, Inc.
EXOR
TMA ADMIN GUIDE
BATCH PROCESSING, DCD INSPECTIONS
Promoter District
Display Only
This field is not available for entry.
SEXTRACTMAN
Display Only
The value entered into Product Option – SXTRACTMAN will be displayed. Values could be either M – Master or
U – Update.
WEXTRACTMAN
Display Only
The value entered into Product Option – WXTRACTMAN will be displayed. Values could be either M – Master or
U – Update.
File Prefix
Display Only
The prefix for files will be based on the available Inspectors Name.
The [Inspectors] button can be used to call the Inspectors – TMA5290 module to view available inspectors.
Message Log
Display Only
This field will detail the download process and list the files produced as a result of the download operation.
The [Download] button will start the manual inspection download. Inspections with a DCD status of ‘Ready for
Download’ and an inspection outcome of ‘Unknown’ will be downloaded.
Version: 4.7
75
CONFIDENTIALITY STATEMENT
The contents of this document, including system ideas and concepts, are confidential and proprietary in nature and are not to be distributed in any
form without the prior written consent of Bentley, Inc.
EXOR
TMA ADMIN GUIDE
BATCH PROCESSING, DCD INSPECTIONS
6.3
Automatic Inspection Download to DCD – TMA5530
Figure 76 - Auto Inspection Download to DCD
6.3.1
General Information
This form is used to automatically download (export data to a file) Inspections ready to be used on the DCD. The
destination folder will have been defined in form Directories – HIG1895 under the option
‘TMA_DCD_INSP_EXPORT_DIRECTORY’.
This is an automatic process which can also be done manually using form Inspection Download to DCD – TMA5520.
Version: 4.7
76
CONFIDENTIALITY STATEMENT
The contents of this document, including system ideas and concepts, are confidential and proprietary in nature and are not to be distributed in any
form without the prior written consent of Bentley, Inc.
EXOR
TMA ADMIN GUIDE
BATCH PROCESSING, DCD INSPECTIONS
Figure 77 - Directories
The user can then select the organisation and district to export to the DCD.
The frequency by which this process is run is controlled by the cycle drop down at the bottom of the form.
Version: 4.7
77
CONFIDENTIALITY STATEMENT
The contents of this document, including system ideas and concepts, are confidential and proprietary in nature and are not to be distributed in any
form without the prior written consent of Bentley, Inc.
EXOR
TMA ADMIN GUIDE
BATCH PROCESSING, DCD INSPECTIONS
6.3.2
Automatic Inspection Download – All
Figure 78 - Auto Inspection Download to DCD
If Product Option – DCDINSPCTR is set to N:
Destination Folder
Display Only
This field will be populated automatically using the directory defined in form Directories – HIG1895 under the option
TMA_DCD_INSP_EXPORT_DIRECTORY.
Note: The name of the directory must correspond with the value in Product Option/User Option - DCDINSPEXP.
Inspecting Organisation
Mandatory
List
Enter the organisation carrying out the inspections.
Inspecting District
Mandatory
List
Enter the organisational district of the organisation carrying out the inspections.
Promoter Organisation
Display Only
This field is not available for entry.
Version: 4.7
78
CONFIDENTIALITY STATEMENT
The contents of this document, including system ideas and concepts, are confidential and proprietary in nature and are not to be distributed in any
form without the prior written consent of Bentley, Inc.
EXOR
TMA ADMIN GUIDE
BATCH PROCESSING, DCD INSPECTIONS
Promoter District
Display Only
This field is not available for entry.
SEXTRACTAUT
Display Only
The value entered into Product Option – SXTRACTAUT will be displayed. Values could be either M – Master or U
– Update.
WEXTRACTAUT
Display Only
The value entered into Product Option – WXTRACTAUT will be displayed. Values could be either M – Master or
U – Update.
File Prefix
Display Only
The prefix defined in Product Option – DCDFILPRFX will be displayed.
Message Log
Display Only
This field will detail the download process and list the files produced as a result of the download operation.
The [Download] button will start the automatic inspection download. Inspections with a DCD status of ‘Ready for
Download’ and an inspection outcome of ‘Unknown’ will be downloaded.
The date and time of the next upload cycle will also be shown.
Cycle Interval
Optional
List
Enter the interval that the system will use to download available inspections.
Press the [Start] button to start the automatic inspection download to DCD process.
Press the [Stop] button to stop the automatic inspection download to DCD process.
Version: 4.7
79
CONFIDENTIALITY STATEMENT
The contents of this document, including system ideas and concepts, are confidential and proprietary in nature and are not to be distributed in any
form without the prior written consent of Bentley, Inc.
EXOR
TMA ADMIN GUIDE
BATCH PROCESSING, DCD INSPECTIONS
6.3.3
Automatic Inspection Download – Inspectors
Figure 79 - Auto Inspection Download to DCD
If Product Option – DCDINSPCTR is set to Y:
Destination Folder
Display Only
This field will be populated automatically using the directory defined in form Directories – HIG1895 under the option
TMA_DCD_INSP_EXPORT_DIRECTORY.
Note: The name of the directory must correspond with the value in Product Option/User Option - DCDINSPEXP.
Inspecting Organisation
Mandatory
List
Enter the organisation carrying out the inspections.
Inspecting District
Mandatory
List
Enter the organisational district of the organisation carrying out the inspections.
Promoter Organisation
Display Only
This field is not available for entry.
Version: 4.7
80
CONFIDENTIALITY STATEMENT
The contents of this document, including system ideas and concepts, are confidential and proprietary in nature and are not to be distributed in any
form without the prior written consent of Bentley, Inc.
EXOR
TMA ADMIN GUIDE
BATCH PROCESSING, DCD INSPECTIONS
Promoter District
Display Only
This field is not available for entry.
SEXTRACTAUT
Display Only
The value entered into Product Option – SXTRACTAUT will be displayed. Values could be either M – Master or U
– Update.
WEXTRACTAUT
Display Only
The value entered into Product Option – WXTRACTAUT will be displayed. Values could be either M – Master or
U – Update.
File Prefix
Display Only
The prefix for files will be based on the available Inspectors Name.
The [Inspectors] button can be used to call the Inspectors – TMA5290 module to view available inspectors.
Message Log
Display Only
This field will detail the download process and list the files produced as a result of the download operation.
The [Download] button will start the automatic inspection download. Inspections with a DCD status of ‘Ready for
Download’ and an inspection outcome of ‘Unknown’ will be downloaded.
The date and time of the next upload cycle will also be shown.
Cycle Interval
Optional
List
Enter the interval that the system will use to download available inspections.
Press the [Start] button to start the automatic inspection download to DCD process.
Press the [Stop] button to stop the automatic inspection download to DCD process.
Version: 4.7
81
CONFIDENTIALITY STATEMENT
The contents of this document, including system ideas and concepts, are confidential and proprietary in nature and are not to be distributed in any
form without the prior written consent of Bentley, Inc.
EXOR
TMA ADMIN GUIDE
BATCH PROCESSING, TPI – TMA PERFORMANCE INDICATORS
7
Batch Processing, TPI – TMA Performance Indicators
Figure 80 – TPI Quarterly Extract Menu
This chapter describes the forms and processes used for processing the TPI Quarterly Extract in TMA by Exor. They
are the following forms:
TMA Performance Indicator Quarterly Extract – TMA5540
The form descriptions provide you with detailed information about each TMA Works form in TMA by Exor,
including:
an overall description of the form
a detailed explanation of each field, including available features (such as List of Values), default values and
other characteristics
helpful information for using the form
Version: 4.7
82
CONFIDENTIALITY STATEMENT
The contents of this document, including system ideas and concepts, are confidential and proprietary in nature and are not to be distributed in any
form without the prior written consent of Bentley, Inc.
EXOR
TMA ADMIN GUIDE
BATCH PROCESSING, TPI – TMA PERFORMANCE INDICATORS
7.1
7.1.1
TPI Quarterly Extract – TMA5540
General Information
The process named Tma_Works_Phase_Master_Refresh is a database job that is responsible for keeping the data for
TPI up to date. By default this database job should run once a day at midnight. This can be changed to suit the needs
of each installation but frequent running of this during the day or during peak load times may cause the system to run
slower.
Note: Before TPI can be used this job must be run once after the installation is completed.
By default if the process is left to run on its own, TPI will be available on the system the next day.
If TPI is required immediately after installation then the database job should be run once using the [Run Now] button
on the Process Monitor – HIG2520. Refer to the Chapter 2 for further information.
7.1.1.1 Authorities
Authorities running the TPI Extract would by default populate only the Authority, Year and Quarter fields, leaving the
Promoter field blank, which indicates all Promoters are wanted. However should an Authority require (for their own
purposes) to just extract a single Promoters TPI details then they can optionally provide a Promoter organisation in the
relevant field.
However should the Authority choose to supply a Promoter organisation to the TPI process, the associated filename
generated will not reflect it in its value and will remain in the standard format.
7.1.1.2 Promoters
Much like the way an Authority runs the TPI Extract, so would a Promoter. The difference being that they would by
default populate only the Promoter, Year and Quarter fields, leaving the Authority field blank, which indicates all
Authorities are wanted. However should a Promoter require (for their own purposes) to just extract a single Authority
TPI details then they can optionally provide an Authority organisation in the relevant field.
Because the TPI extract is mainly an Authority tool the filename will only ever reflect a Promoters Organisation code
if only a Promoter Organisation is provided. If an Authority Organisation code is supply at any point, the filename will
reflect that code.
Version: 4.7
83
CONFIDENTIALITY STATEMENT
The contents of this document, including system ideas and concepts, are confidential and proprietary in nature and are not to be distributed in any
form without the prior written consent of Bentley, Inc.
EXOR
TMA ADMIN GUIDE
BATCH PROCESSING, TPI – TMA PERFORMANCE INDICATORS
7.1.2
TMA Performance Indicator Quarterly Extract
Figure 81 - TMA Performance Indicators Report
Destination Folder
Display Only
This field will be populated automatically using the directory defined in form Directories – HIG1895 under the option
TMA_TPI_DIRECTORY.
Note: On install of the TPI an Oracle directory is created to store the TPI result files onto the database server. By
default this directory refers to ‘/’ location on the database server. The directory will need to be changed to a
location that suits organisational requirements. This must be somewhere the Oracle Database server can
access.
Authority Organisation
Optional
List
Enter the organisation for the report.
By default this will be populated if it is the default organisation associated with the person running the report.
Promoter Organisation
Optional
List
Enter the promoter organisation for the report.
By default this will be populated if it is the default organisation associated with the person running the report.
Year
Mandatory
Enter the year for the report.
Quarter
Mandatory
List
Enter the quarter for the report.
Filename
Display Only
Enter the quarter for the report.
The filename is generated and cannot be changed. It is made up of the following components:
ETONTPI – This is a static prefix as mentioned in the TPI specification.
YYYY – The TPI year the report was for as shown in the Year field.
QQ – The TPI quarter the report was run for as shown in the Quarter field.
Version: 4.7
84
CONFIDENTIALITY STATEMENT
The contents of this document, including system ideas and concepts, are confidential and proprietary in nature and are not to be distributed in any
form without the prior written consent of Bentley, Inc.
EXOR
TMA ADMIN GUIDE
BATCH PROCESSING, TPI – TMA PERFORMANCE INDICATORS
OOOO – The organisation code that the TPI report was run for as shown in the Authority Organisation or
Promoter Organisation field.
ETONTPI2012030001.
[Run TPI]
Press the [Run TPI] button to run the TPI extract and place onto the database server in the destination specified.
If the file already exists on the database server in the location specified then a message will appear.
Figure 82 - Message
[Yes] will delete the existing file and generate a new one.
[No] will halt the process and return to the TPI input screen.
Once the process is complete the following screen will appear. This allows for the retrieval of the file from the
database server onto a local directory.
Figure 83 - Save to File
Version: 4.7
85
CONFIDENTIALITY STATEMENT
The contents of this document, including system ideas and concepts, are confidential and proprietary in nature and are not to be distributed in any
form without the prior written consent of Bentley, Inc.
EXOR
TMA ADMIN GUIDE
ADMINISTRATION
8
Administration
Figure 84 – Administration Menu
This chapter describes the forms and processes used for administration in TMA by Exor. They are the following forms:
Contacts – TMA0010
Street Groups – TMA0020
Unassigned Streets – TMA0030
User Street Groups – TMA0040
My Street Groups – TMA0050
Administer User Districts – NSG0120
My Districts – NSG0130
The form descriptions provide you with detailed information about each TMA Works form in TMA by Exor,
including:
an overall description of the form
a detailed explanation of each field, including available features (such as List of Values), default values and
other characteristics
helpful information for using the form
Version: 4.7
86
CONFIDENTIALITY STATEMENT
The contents of this document, including system ideas and concepts, are confidential and proprietary in nature and are not to be distributed in any
form without the prior written consent of Bentley, Inc.
EXOR
TMA ADMIN GUIDE
ADMINISTRATION
8.1
Contacts – TMA0010
Figure 85 - Contacts
8.1.1
General Information
The Contacts form is used to keep a central list of all people that could be used in a Street works environment.
This form is used to associate contacts with selected organisations and to view a summary of the contact information.
This form is automatically populated via the import of an operational district batch file (ODB) where contacts are
present.
The contact is entered on the left of the page and further details can be entered and viewed on the right. If the right
hand panel can’t be seen click on the arrow in the middle right of the page to expand the tab.
Figure 86 – Contacts-Expand Information
Version: 4.7
87
CONFIDENTIALITY STATEMENT
The contents of this document, including system ideas and concepts, are confidential and proprietary in nature and are not to be distributed in any
form without the prior written consent of Bentley, Inc.
EXOR
TMA ADMIN GUIDE
ADMINISTRATION
8.1.2
Filter
Figure 87 - Filter
Use the filter to view only those contacts for the specified criteria.
Organisation
Optional
List
Enter the organisation on which to filter the contact names.
District
Optional
List
Enter the organisational district on which to filter the contact names.
Role
Optional
List
Enter the role on which to filter the contact names.
Version: 4.7
88
CONFIDENTIALITY STATEMENT
The contents of this document, including system ideas and concepts, are confidential and proprietary in nature and are not to be distributed in any
form without the prior written consent of Bentley, Inc.
EXOR
TMA ADMIN GUIDE
ADMINISTRATION
8.1.3
Contacts
Figure 88 - Contacts
Id
Mandatory
A contact Id will be generated when the record is saved.
Contact Name
Mandatory
Enter the name of the contact.
Version: 4.7
89
CONFIDENTIALITY STATEMENT
The contents of this document, including system ideas and concepts, are confidential and proprietary in nature and are not to be distributed in any
form without the prior written consent of Bentley, Inc.
EXOR
TMA ADMIN GUIDE
ADMINISTRATION
8.1.4
Further Details
Figure 89 - Further Details
Telephone
Mandatory
Enter the telephone number of the contact.
Address
Mandatory
Enter the address of the contact
Postcode
Optional
Enter the postcode for the contact.
End Date
Optional
Enter the date the contact is no longer valid.
Version: 4.7
90
CONFIDENTIALITY STATEMENT
The contents of this document, including system ideas and concepts, are confidential and proprietary in nature and are not to be distributed in any
form without the prior written consent of Bentley, Inc.
EXOR
TMA ADMIN GUIDE
ADMINISTRATION
8.1.5
Contact Roles
Figure 90 - Contact Roles
Organisation
Mandatory
List
Enter the organisation to which the contact is associated.
District
Optional
List
Enter the organisational district to which the contact is associated.
Role
Mandatory
List
Enter the role the contact has within the organisation and district entered in the previous fields.
Version: 4.7
91
CONFIDENTIALITY STATEMENT
The contents of this document, including system ideas and concepts, are confidential and proprietary in nature and are not to be distributed in any
form without the prior written consent of Bentley, Inc.
EXOR
TMA ADMIN GUIDE
ADMINISTRATION
8.2
Street Groups – TMA0020
Figure 91 - Street Groups
8.2.1
General Information
The Street Groups form is used to view and amend existing street groups as well as create new street groups.
Streets are not exclusive to a street group and may exist in more than one street group. A street must belong to at least
one street group.
Street groups are assigned to users to enable them to view and amend the data (including notices and inspections)
associated with a street. If a street does not belong to a street group then the data associated with the street will not be
available to view.
On implementation a street group of ALL_STREET_GROUPS may be created.
Street groups can also be created using Locator to select the area of interest.
Version: 4.7
92
CONFIDENTIALITY STATEMENT
The contents of this document, including system ideas and concepts, are confidential and proprietary in nature and are not to be distributed in any
form without the prior written consent of Bentley, Inc.
EXOR
TMA ADMIN GUIDE
ADMINISTRATION
8.2.2
Work with Existing Groups
Figure 92 - Work with Existing Groups
Work with Existing Groups
Optional
List
Select this radio button to modify an existing street group.
To go on to the next step in amending an existing street group press the [Next] button. This will call the Street Group
Members window.
8.2.2.1
Street Group Members
Figure 93 - Street Group Members
From this window it is possible to amend the street group by selecting criteria in the Populate Groups From Criteria
window.
To amend the street group tick the Populate Using Criteria checkbox and press the [Next] button.
Version: 4.7
93
CONFIDENTIALITY STATEMENT
The contents of this document, including system ideas and concepts, are confidential and proprietary in nature and are not to be distributed in any
form without the prior written consent of Bentley, Inc.
EXOR
TMA ADMIN GUIDE
ADMINISTRATION
Figure 94 - Populate
This will call the Populate Group Form Criteria window.
8.2.2.2
Populate Group Form
Figure 95 - Populate Group Form
Use the criteria available to restrict the streets that are to be added to the street group.
County
Optional
List
Enter the county from which the streets are to be selected.
Town
Optional
List
Enter the town from which the streets are to be selected.
Locality
Optional
List
Enter the locality from which the streets are to be selected.
Version: 4.7
94
CONFIDENTIALITY STATEMENT
The contents of this document, including system ideas and concepts, are confidential and proprietary in nature and are not to be distributed in any
form without the prior written consent of Bentley, Inc.
EXOR
TMA ADMIN GUIDE
ADMINISTRATION
Naming Authority
Optional
List
Enter the naming authority to select the streets belonging to that authority.
Highways Authority
Optional
List
Enter the highways authority to select the streets belonging to that authority.
Maintainer
Optional
List
Enter the maintainer to select the streets belonging to that authority.
USRN Range
Optional
Enter the start of the USRN range from which the streets are to be selected.
To
Optional
Enter the end of the USRN range from which the streets are to be selected.
To go on to the next step in creating a new street group press the [Next] button.
This will call the Append to Group window.
8.2.2.3
Append to Group
Figure 96 – Append to Group
Select the [Append to Group] option to add the new streets to the existing street group.
Version: 4.7
95
CONFIDENTIALITY STATEMENT
The contents of this document, including system ideas and concepts, are confidential and proprietary in nature and are not to be distributed in any
form without the prior written consent of Bentley, Inc.
EXOR
TMA ADMIN GUIDE
ADMINISTRATION
Select the [Refresh Group] option to replace the existing streets within the street group with the new selection of
streets.
This will call the Street Group Members window.
Further streets can be added at this point by selecting a street from the Streetworks gazetteer. This can be achieved in
two ways.
Select the [Create Record] button on the toolbar then:
Enter a street name or part of a street name in the Description field and press the [Enter] key.
Press the ‘drop down list’ icon.
This will call the View Streets – TMA1340 module.
8.2.2.4
View Streets
Figure 97 – View Streets
If a street name or part of a street name was entered into the Street Groups Members window only streets matching
these values will be displayed.
If he ‘drop down list’ icon was used to call the View Streets module then all streets will be displayed. Identify the
street to be added to the street group then press the [Select Street] button. This will call the Street Group User
window.
Version: 4.7
96
CONFIDENTIALITY STATEMENT
The contents of this document, including system ideas and concepts, are confidential and proprietary in nature and are not to be distributed in any
form without the prior written consent of Bentley, Inc.
EXOR
TMA ADMIN GUIDE
ADMINISTRATION
8.2.3
Sorting Results
Results within the form may be sorted by any of the displayed fields by pressing the field name (column heading)
which are also ‘Sort’ buttons. The first time a heading is pressed the records are sorted in ascending order. If pressed
again the records within the column will be sorted in descending order. A ‘carat’ (^) symbol or lower case ‘v’ is
displayed adjacent to the column name to indicate that the data has been sorted in ascending or descending order
respectively as shown below.
Figure 98 - Sort Results
Streets can be removed from the street group by selecting the street and pressing the [Delete Record] on the toolbar.
To go on to the next step in amending the street group press the [Next] button.
Version: 4.7
97
CONFIDENTIALITY STATEMENT
The contents of this document, including system ideas and concepts, are confidential and proprietary in nature and are not to be distributed in any
form without the prior written consent of Bentley, Inc.
EXOR
TMA ADMIN GUIDE
ADMINISTRATION
8.2.3.1
Street Group User
Figure 99 - Street Group User
Use this form to assign other users to this group. As default, the user that created the new street group will be assigned
to the group.
To assign another user to the group:
1. In the Available User(s) side of the form identify and highlight the user to be assigned to the street group.
2. Select the [>] button to move the user into the User(s) Assigned To This Group part of the form.
3. To move all users across select the [>>] button.
To remove a user from the group:
1. In the User(s) Assigned To This Group part of the form highlight the user to be removed from the street group.
2. Select the [<] button to move the user back to the Available User(s) part of the form.
3. To remove all users select the [<<] button.
Once all the steps have been taken to create the new street group press the [Finish] button.
Version: 4.7
98
CONFIDENTIALITY STATEMENT
The contents of this document, including system ideas and concepts, are confidential and proprietary in nature and are not to be distributed in any
form without the prior written consent of Bentley, Inc.
EXOR
TMA ADMIN GUIDE
ADMINISTRATION
8.2.4
Create New Group
Figure 100 - Create New Group
Create New Group
Optional
Select this radio button to create a new street group.
Name
Mandatory
Enter a name for the new street group.
To go on to the next step in creating a new street group press the [Next] button. This will call the Populate Group
From Criteria window.
8.2.4.1 Populate Group Form
Use the criteria available to restrict the streets that are to be added to the new street group.
County
Optional
List
Enter the county from which the streets are to be selected.
Town
Optional
List
Enter the town from which the streets are to be selected.
Locality
Optional
List
Enter the locality from which the streets are to be selected.
Naming Authority
Optional
List
Enter the naming authority to select the streets belonging to that authority.
Highways Authority
Optional
List
Enter the highways authority to select the streets belonging to that authority.
Maintainer
Optional
List
Enter the maintainer to select the streets belonging to that authority.
USRN Range
Optional
Enter the start of the USRN range from which the streets are to be selected.
To
Optional
Enter the end of the USRN range from which the streets are to be selected.
To go on to the next step in creating a new street group press the [Next] button.
This will call the Append to Group window.
Version: 4.7
99
CONFIDENTIALITY STATEMENT
The contents of this document, including system ideas and concepts, are confidential and proprietary in nature and are not to be distributed in any
form without the prior written consent of Bentley, Inc.
EXOR
TMA ADMIN GUIDE
ADMINISTRATION
8.2.4.2
Append to Group
Figure 101 - Append to Group
Select the [Append to Group] option to continue to create the new street group.
This will call the Street Group Members window.
Version: 4.7
100
CONFIDENTIALITY STATEMENT
The contents of this document, including system ideas and concepts, are confidential and proprietary in nature and are not to be distributed in any
form without the prior written consent of Bentley, Inc.
EXOR
TMA ADMIN GUIDE
ADMINISTRATION
8.2.4.3
Street Group Members
Figure 102 – Street Group Members
From this window it is possible to add further streets to the new street group. Streets can be removed from the group
by selecting the [Delete Record] button.
To add further streets to the new street group either:
1. Select criteria in the Populate Groups From Criteria window.
To do this tick the Populate Using Criteria checkbox and press the [Next] button.
Figure 103 – Populate Using Criteria
2. Select a street from the Streetworks gazetteer with the [Create Record] button on the toolbar then either:
Enter a street name or part of a street name in the Description field and press the [Enter] key.
or
Press the ‘drop down list’ icon.
This will call the View Streets – TMA1340 module.
Version: 4.7
101
CONFIDENTIALITY STATEMENT
The contents of this document, including system ideas and concepts, are confidential and proprietary in nature and are not to be distributed in any
form without the prior written consent of Bentley, Inc.
EXOR
TMA ADMIN GUIDE
ADMINISTRATION
8.2.4.4
View Streets
Figure 104 - View Streets
If a street name or part of a street name was entered into the Street Groups Members window only streets matching
these values will be displayed.
If he ‘drop down list’ icon was used to call the View Streets module then all streets will be displayed. Identify the
street to be added to the street group then press the [Select Street] button. This will call the Street Group User
window.
8.2.5
Sorting Results
Results within the form may be sorted by any of the displayed fields by pressing the field name (column heading)
which are also ‘Sort’ buttons. The first time a heading is pressed the records are sorted in ascending order. If pressed
again the records within the column will be sorted in descending order. A ‘carat’ (^) symbol or lower case ‘v’ is
displayed adjacent to the column name to indicate that the data has been sorted in ascending or descending order
respectively as shown below.
Figure 105 - Sort Results
Version: 4.7
102
CONFIDENTIALITY STATEMENT
The contents of this document, including system ideas and concepts, are confidential and proprietary in nature and are not to be distributed in any
form without the prior written consent of Bentley, Inc.
EXOR
TMA ADMIN GUIDE
ADMINISTRATION
8.2.5.1
Street Group User
Figure 106 - Street Group User
Use this form to assign other users to this group. As default, the user that created the new street group will be assigned
to the group.
To assign another user to the group:
1. In the Available User(s) side of the form identify and highlight the user to be assigned to the street group.
2. Select the [>] button to move the user into the User(s) Assigned To This Group part of the form.
3. To move all users across select the [>>] button.
To remove a user from the group:
1. In the User(s) Assigned To This Group part of the form highlight the user to be removed from the street group.
2. Select the [<] button to move the user back to the Available User(s) part of the form.
3. To remove all users select the [<<] button.
Once all the steps have been taken to create the new street group press the [Finish] button.
Version: 4.7
103
CONFIDENTIALITY STATEMENT
The contents of this document, including system ideas and concepts, are confidential and proprietary in nature and are not to be distributed in any
form without the prior written consent of Bentley, Inc.
EXOR
TMA ADMIN GUIDE
ADMINISTRATION
8.3
Unassigned Streets – TMA0030
Figure 107 - Unassigned Streets
8.3.1
General Information
The Unassigned Streets form will list all streets in the Streetworks gazetteer that do not currently belong to a street
group.
Note: A street must belong to at least one street group in order to view the data associated with the street. This
includes provisional streets.
This form allows an unassigned street to be selected and assigned to a current street group using the [Assign To
Group] button. This will call the Street Groups – TMA0020 form.
8.3.2
Unassigned Streets
USRN
Display Only
The USRN of the unassigned street will be displayed.
Description
Display Only
The name of the street will be displayed.
Select
Checkbox
Check this box in order to assign the street to a street group.
Version: 4.7
104
CONFIDENTIALITY STATEMENT
The contents of this document, including system ideas and concepts, are confidential and proprietary in nature and are not to be distributed in any
form without the prior written consent of Bentley, Inc.
EXOR
TMA ADMIN GUIDE
ADMINISTRATION
County
Display Only
The county associated with the street will be displayed.
Town
Display Only
The town associated with the street will be displayed.
Locality
Display Only
The locality associated with the street will be displayed.
HA
Display Only
The highway authority associated with the street will be displayed.
NA
Display Only
The naming authority associated with the street will be displayed.
Select the [Assign to Group] button to assign the selected streets to a street group.
A warning message will appear.
Figure 108 - Warning
The Street Groups – TMA0020 form will appear allowing the user to add the selected streets to an existing street group
or create a new street group.
Version: 4.7
105
CONFIDENTIALITY STATEMENT
The contents of this document, including system ideas and concepts, are confidential and proprietary in nature and are not to be distributed in any
form without the prior written consent of Bentley, Inc.
EXOR
TMA ADMIN GUIDE
ADMINISTRATION
8.4
User Street Groups – TMA0040
Figure 109 - User Street Groups
8.4.1
General Information
The User Street Groups form allows the System Administrator to assign street groups to a user. This will allow the
user to view or amend data associated with the street.
For example: an inspector may only be interested in streets in a particular area. If these streets were associated with a
street group then the administrator would assign the group to the inspector. The inspector then would only be able to
view notices and do inspections on these particular streets.
Version: 4.7
106
CONFIDENTIALITY STATEMENT
The contents of this document, including system ideas and concepts, are confidential and proprietary in nature and are not to be distributed in any
form without the prior written consent of Bentley, Inc.
EXOR
TMA ADMIN GUIDE
ADMINISTRATION
8.4.2
User Street Groups
To assign groups to a user:
User
Mandatory
List
Enter the user to which the street group is to be assigned.
Available Group(s) part of the form:
Groups
Display Only
Highlight the group to be assigned to the user.
Select the [>] button to move the group into the Group(s) Assigned To This User part of the form.
To move all groups across select the [>>] button.
To remove a group from a user:
Group(s) Assigned To This User part of the form:
Group
Display Only
Highlight the group to be removed from the user.
Select the [<] button to move the group back to the Available Group(s) part of the form.
To remove all groups select the [<<] button.
Version: 4.7
107
CONFIDENTIALITY STATEMENT
The contents of this document, including system ideas and concepts, are confidential and proprietary in nature and are not to be distributed in any
form without the prior written consent of Bentley, Inc.
EXOR
TMA ADMIN GUIDE
ADMINISTRATION
8.5
My Street Groups – TMA0050
Figure 110 - My Street Groups
8.5.1
General Information
The My Street Groups form allows a user to view the street groups assigned to the user by the System Administrator.
The user can move street groups between Available Group(s) and Group(s) Assigned to This User.
For example: if an inspector is to cover another inspector’s area, the street group for that area can be moved to the
Group(s) Assigned to This User for the period of the cover.
Version: 4.7
108
CONFIDENTIALITY STATEMENT
The contents of this document, including system ideas and concepts, are confidential and proprietary in nature and are not to be distributed in any
form without the prior written consent of Bentley, Inc.
EXOR
TMA ADMIN GUIDE
ADMINISTRATION
8.5.2
My Street Groups
To assign groups to the user:
User
Display Only
The username of the user logged on to the system will be displayed.
The Available Group(s) part of the form will display all groups that have been assigned to the user by the System
Administrator.
Groups
Display Only
Highlight the group to be assigned to this user.
Select the [>] button to move the group into the Group(s) Assigned To This User part of the form.
To move all groups across select the [>>] button.
To remove a group from the user:
Group(s) Assigned To This User part of the form:
Group
Display Only
Highlight the group to be removed from this user.
Select the [<] button to move the group back to the Available Group(s) part of the form.
To remove all groups select the [<<] button.
Version: 4.7
109
CONFIDENTIALITY STATEMENT
The contents of this document, including system ideas and concepts, are confidential and proprietary in nature and are not to be distributed in any
form without the prior written consent of Bentley, Inc.
EXOR
TMA ADMIN GUIDE
ADMINISTRATION
8.6
Administer User Districts – NSG0120
Figure 111 – Administer User Districts
8.6.1
General Information
The Administer User Districts form enables the System Administrator to define which operational districts are
available to a specific user.
For example: a user may perform the function of a street authority and monitor notices coming in from a works
promoter. The same user may also perform the function of a works promoter and enter notices on behalf of the
highway authority.
The user then has the option of swapping from one district function to another by using the My Districts – NSG0130
form.
The Administer User Districts form is available from either the Street Gazetteer Manager menu or the TMA Manager
menu.
A user can be constrained to the districts defined in their user districts. In form Works – TMA1000 a user that is
constrained can raise works only against the organisations and districts that they can represent. However, the form will
still query back works for all organisations and districts.
For a user that is constrained but is dealing with works that has not been promoted by one of their organisation and
districts the Noticing Assistant – TMA1001 will restrict the types of notices that can be sent.
It will only the following notice types to be sent under the appropriate circumstances:
Works Comment – TMA1500
Unattributable Works Response – Acceptance – TMA2000
Unattributable Works Response -Non Acceptance – TMA2001
Version: 4.7
110
CONFIDENTIALITY STATEMENT
The contents of this document, including system ideas and concepts, are confidential and proprietary in nature and are not to be distributed in any
form without the prior written consent of Bentley, Inc.
EXOR
TMA ADMIN GUIDE
ADMINISTRATION
8.6.2
Users
Figure 112 - Users
User
Display Only
The username of the user as defined in form Users – HIG1832 will be displayed.
To set up a user refer to the General System Administration Guide
Initials
Display Only
The initials of the user as defined in form Users – HIG1832 will be displayed.
Name
Display Only
The name of the user as defined in form Users – HIG1832 will be displayed.
Constrained?
Checkbox
This checkbox is used to define whether the user is constrained to the districts defined in the ‘User Districts’ part of
the form.
If this box is checked the user is prevented from amending/inserting data into form Works – TMA1000 for a district
other than the one(s) they are associated with.
Version: 4.7
111
CONFIDENTIALITY STATEMENT
The contents of this document, including system ideas and concepts, are confidential and proprietary in nature and are not to be distributed in any
form without the prior written consent of Bentley, Inc.
EXOR
TMA ADMIN GUIDE
ADMINISTRATION
8.6.3
User Districts
Figure 113 - User Districts
Organisation
Optional
List
Enter the organisation to be available to the selected user.
District
Optional
List
Enter the organisational district to be available to the selected user.
District Function
Display Only
The function of the selected district will be displayed.
Current
Checkbox
The current district assigned to the user will be checked.
Use the [Set as Current] button to change the current district.
Figure 114 – Set as Current button
Note: The new district must be selected before the [Set as Current] button is available.
The following alert prevents the district being changed for a user.
Figure 115 - User Districts
All forms should be closed before changing the district of the user.
Version: 4.7
112
CONFIDENTIALITY STATEMENT
The contents of this document, including system ideas and concepts, are confidential and proprietary in nature and are not to be distributed in any
form without the prior written consent of Bentley, Inc.
EXOR
TMA ADMIN GUIDE
ADMINISTRATION
8.7
My Districts – NSG0130
Figure 116 – My Districts
8.7.1
General Information
The My Districts enables the user to define which operational district they are currently using. The user can swap
between the district functions assigned to the user by the System Administrator.
For example: a user may perform the function of a street authority and monitor notices coming in from a works
promoter. The same user may also perform the function of a works promoter and enter notices on behalf of the
highway authority.
For a user that is dealing with works under both NRSWA and PERMIT the system will automatically temporarily
switch districts on the fly when the Noticing Assistant is called to send a notice. Once the Noticing Assistant is closed
down the user will revert back to their original district.
Version: 4.7
113
CONFIDENTIALITY STATEMENT
The contents of this document, including system ideas and concepts, are confidential and proprietary in nature and are not to be distributed in any
form without the prior written consent of Bentley, Inc.
EXOR
TMA ADMIN GUIDE
ADMINISTRATION
8.7.2
My Districts
Organisation
Display Only
The organisation set as available to the selected user will be displayed.
District
Display Only
The organisational district set as available to the selected user will be displayed.
District Function
Display Only
The function of the selected district will be displayed.
Current
Checkbox
The current district assigned to the user will be checked.
Use the [Set as Current] button to change the current district.
Figure 117 – Set as Current button
Note: The new district must be selected before the [Set as Current] button is available.
Note: All forms should be closed before changing the district.
The following alert prevents the district being changed for a user.
Figure 118 - My Districts
Version: 4.7
114
CONFIDENTIALITY STATEMENT
The contents of this document, including system ideas and concepts, are confidential and proprietary in nature and are not to be distributed in any
form without the prior written consent of Bentley, Inc.
EXOR
TMA ADMIN GUIDE
ACTIVITIES
9
Activities
Figure 119 – Activities Menu
This chapter describes the forms and processes used for the administration of metadata in TMA by Exor. They are the
following forms:
Notice Review Rules – TMA2000
Notice Types – TMA2010
Valid Notice Recipients – TMA2015
Works Categories – TMA2020
Status Transactions – TMA2030
Agreement Types – TMA2040
Notice Warnings – TMA2050
S74 Charge Profiles – TMA2060
Spatial Relationships – TMA2065
The form descriptions provide you with detailed information about each TMA Works form in TMA by Exor,
including:
an overall description of the form
a detailed explanation of each field, including available features (such as List of Values), default values and
other characteristics
helpful information for using the form
Version: 4.7
115
CONFIDENTIALITY STATEMENT
The contents of this document, including system ideas and concepts, are confidential and proprietary in nature and are not to be distributed in any
form without the prior written consent of Bentley, Inc.
EXOR
TMA ADMIN GUIDE
ACTIVITIES
9.1
Notice Review Rules – TMA2000
Figure 120 - Notice Review Rules
9.1.1
General Information
This form is used to set up notice review rules. Different rules may apply to notices being sent or received.
If a notice matches any of the appropriate rules then that notice will be flagged as requiring a review.
When a notice is sent, if any rules are matched then the notice is not sent via the Web Service until the reviewer
allows it.
When a notice is received, if any rules are matched then the notice can be reviewed but no other processing on the
works is stopped.
If the Product Option - FWD_NOTICE is set to Y then the Notice Forwarding Rules tab will appear. This tab allows
the definition of Notices that are required to be forwarded to one or more Organisation/District.
The forwarding process will apply to any received transactions that match the criteria.
Version: 4.7
116
CONFIDENTIALITY STATEMENT
The contents of this document, including system ideas and concepts, are confidential and proprietary in nature and are not to be distributed in any
form without the prior written consent of Bentley, Inc.
EXOR
TMA ADMIN GUIDE
ACTIVITIES
9.1.2
Notice Review Rules
Works Category
Optional
List
Enter the works category for the notice review rule.
Notice Type
Optional
List
Optional
List
Enter the notice type for the notice review rule.
Sent
Indicate if the notice review rule applies to notices being sent or notices being received.
Street Reinstatement Type
Optional
List
Enter the street reinstatement type for the street for the notice review rule.
Special Designation
Optional
List
Enter the special designation of the street for the notice review rule.
Notice Warning
Optional
List
Enter the notice warning for the notice review rule.
Organisation
Optional
List
Optional
List
Enter the organisation for the notice review rule.
User
Enter the user that created the notice for the notice review rule.
Active
Optional/Checkbox
Tick the checkbox to indicate that the notice review rule is active.
Version: 4.7
117
CONFIDENTIALITY STATEMENT
The contents of this document, including system ideas and concepts, are confidential and proprietary in nature and are not to be distributed in any
form without the prior written consent of Bentley, Inc.
EXOR
TMA ADMIN GUIDE
ACTIVITIES
9.1.3
Notice Forwarding Rules
Figure 121 - Notice Forwarding Rules
Organisation
Mandatory
List
Enter the Organisation for the notice forwarding rule.
District
Mandatory
List
Enter the Organisations District for the notice forwarding rule.
Notice Type Description
Mandatory
List
Enter the notice type description for the notice forwarding rule.
Notice Type
Display Only
The notice type will be displayed.
Version: 4.7
118
CONFIDENTIALITY STATEMENT
The contents of this document, including system ideas and concepts, are confidential and proprietary in nature and are not to be distributed in any
form without the prior written consent of Bentley, Inc.
EXOR
TMA ADMIN GUIDE
ACTIVITIES
9.1.4
Recipient Groups
Figure 122 - Recipient Groups
The Recipient Groups tab will display the recipient group information used in form Valid Notice Recipients –
TMA2015. This information is display only and cannot be changed.
Recipient Group Name
Display Only
This field will display ‘Restrictions and Licenses’.
Notice Type(s)
Display Only
This field will display the notice types relating to restrictions.
Description
Display Only
A description of the notice type will be displayed.
Version: 4.7
119
CONFIDENTIALITY STATEMENT
The contents of this document, including system ideas and concepts, are confidential and proprietary in nature and are not to be distributed in any
form without the prior written consent of Bentley, Inc.
EXOR
TMA ADMIN GUIDE
ACTIVITIES
9.2
Notice Types – TMA2010
Figure 123 - Notice Types
9.2.1
General Information
The notice types form identifies the types of notice that are valid with work categories.
It also defines which type of authority can send or receive the notice.
Version: 4.7
120
CONFIDENTIALITY STATEMENT
The contents of this document, including system ideas and concepts, are confidential and proprietary in nature and are not to be distributed in any
form without the prior written consent of Bentley, Inc.
EXOR
TMA ADMIN GUIDE
ACTIVITIES
9.2.2
Notice Types
Figure 124 - Notice Types
Notice Type
Display Only
List
The notice type code will be displayed.
Type Description
Display Only
The notice type description of the code will be displayed.
Notice Group
Display Only
The notice group to which the notice type belongs to will be displayed.
Sent By Auth
Display Only/Checkbox
The checkbox will be ticked if the notice type can be sent by a street authority.
Sent By Prom
Display Only/Checkbox
The checkbox will be ticked if the notice type can be sent by a promoter.
Primary Recipient Auth
Display Only/Checkbox
The checkbox will be ticked if the primary recipient of the notice type is a street authority.
Primary Recipient Prom
Display Only/Checkbox
The checkbox will be ticked if the primary recipient of the notice type is a promoter.
Copy Recipient Auth
Display Only/Checkbox
The checkbox will be ticked if the copy recipient of the notice type is a street authority.
Copy Recipient Prom
Display Only/Checkbox
The checkbox will be ticked if the copy recipient of the notice type is a promoter.
Version: 4.7
121
CONFIDENTIALITY STATEMENT
The contents of this document, including system ideas and concepts, are confidential and proprietary in nature and are not to be distributed in any
form without the prior written consent of Bentley, Inc.
EXOR
TMA ADMIN GUIDE
ACTIVITIES
Amend Primary Recipient
Display Only/Checkbox
The checkbox will be ticked if the primary recipient of the notice type can be amended.
Amend Copy Recipient
Display Only/Checkbox
The checkbox will be ticked if the copy recipient of the notice type can be amended.
Seq
Display Only
The sequence number of the notice type will be displayed.
Short Name
Display Only
The short name of the notice type will be displayed.
Section Of Act
Display Only
The section of the act that the notice type applies to will be displayed.
9.2.3
Valid Works Categories
Figure 125 – Works Categories
Works Category
Display Only
List
The allowable works categories that apply to the notice type highlighted in the ‘Notice Type’ part of the form will be
displayed.
Works Category Description Display Only
A description of the works categories will be displayed.
Version: 4.7
122
CONFIDENTIALITY STATEMENT
The contents of this document, including system ideas and concepts, are confidential and proprietary in nature and are not to be distributed in any
form without the prior written consent of Bentley, Inc.
EXOR
TMA ADMIN GUIDE
ACTIVITIES
9.3
Valid Notice Recipients – TMA2015
Figure 126 - Valid Notice Recipients
9.3.1
General Information
This form allows the user to define specific recipients for Restriction notices.
On implementation this form will be blank. In order to send Restriction notices the recipients MUST be defined.
Recipients can be defined individually using the ‘Organisation’ list of values.
Recipients can be defined by using the [Set to Default] button to auto-populate the list.
9.3.2
Notice Recipients
Figure 127 - Notice Recipients
Notice Recipient Group
Display Only
This field will display ‘Restrictions and Licenses’.
Notice Type(s)
Display Only
This field will display the notice types relating to restrictions.
Version: 4.7
123
CONFIDENTIALITY STATEMENT
The contents of this document, including system ideas and concepts, are confidential and proprietary in nature and are not to be distributed in any
form without the prior written consent of Bentley, Inc.
EXOR
TMA ADMIN GUIDE
ACTIVITIES
9.3.3
Recipient Details
Figure 128 Recipients Details
This part of the form is used to define the recipients of the notices shown in the ‘Notice Type(s) field.
Org
Mandatory
List
Enter the organisation that is to receive the restriction notices.
Name
Display Only
The name of the organisation that is to receive the restriction notices will be displayed.
District
Mandatory
List
Enter the district of the organisation that is to receive the restriction notices.
Name
Display Only
The name of the district of the organisation that is to receive the restriction notices will be displayed.
Notice URL
Display Only
The notice URL of the organisation/district that is to receive the restriction notices will be displayed.
Figure 129 - [Set to Default]
This button is used to auto-populate a default list of recipients based on the following rules:
For each unique Notice URL of Organisation/District the first Organisation/District is chosen (in Organisation/District
order).
The current users default Organisation/District is excluded.
Any Organisation/District with the same URL as the default Organisation/District is excluded.
The list can then be amended to suit requirements. One or more recipients can be removed and additional recipients
can be added.
Note: By pressing the [Set to Default] button any existing defined recipients will be removed and replaced by the
default set.
If recipients already exist in the form an alert will be displayed.
Version: 4.7
124
CONFIDENTIALITY STATEMENT
The contents of this document, including system ideas and concepts, are confidential and proprietary in nature and are not to be distributed in any
form without the prior written consent of Bentley, Inc.
EXOR
TMA ADMIN GUIDE
ACTIVITIES
Figure 130 - Alert
Figure 131 - [Validation Warnings (2)]
As recipients are added to the list the system will validate the data. If there are any validation issues the [Validation
Warnings] button will be active.
Select the button to call a ‘Warnings’ window where the validation warnings can be viewed.
Figure 132 -Warnings
Select [Exit] to close the warning window and return to the main form.
Version: 4.7
125
CONFIDENTIALITY STATEMENT
The contents of this document, including system ideas and concepts, are confidential and proprietary in nature and are not to be distributed in any
form without the prior written consent of Bentley, Inc.
EXOR
TMA ADMIN GUIDE
ACTIVITIES
9.4
Work Categories – TMA2020
Figure 133 - Work Categories
9.4.1
General Information
This form details all work categories that are available for use in the creation of a notice.
The Notice Period details the minimum time, in days, allowable for the notice type.
Version: 4.7
126
CONFIDENTIALITY STATEMENT
The contents of this document, including system ideas and concepts, are confidential and proprietary in nature and are not to be distributed in any
form without the prior written consent of Bentley, Inc.
EXOR
TMA ADMIN GUIDE
ACTIVITIES
9.4.2
Works Categories
Figure 134 - Work Categories
Works Category
Display Only
List
The works categories will be displayed.
Works Category Description Display Only
A description of the works categories will be displayed.
Version: 4.7
127
CONFIDENTIALITY STATEMENT
The contents of this document, including system ideas and concepts, are confidential and proprietary in nature and are not to be distributed in any
form without the prior written consent of Bentley, Inc.
EXOR
TMA ADMIN GUIDE
ACTIVITIES
9.4.3
Valid Notice Types tab
Figure 135 – Valid Notice Types
Notice Type
Display Only
List
The notice type code that can be used with the works category highlighted in the ‘Works Category’ part of the form
will be displayed.
Notice Type Description
Display Only
The notice type description of the notice type code will be displayed.
Notice Period
The notice period required for the notice type will be displayed.
Notice Period Type
List
The notice period type will be displayed.
Validity Period
The validity period for the notice type will be displayed.
Validity Period Type
List
The validity period type will be displayed.
Version: 4.7
128
CONFIDENTIALITY STATEMENT
The contents of this document, including system ideas and concepts, are confidential and proprietary in nature and are not to be distributed in any
form without the prior written consent of Bentley, Inc.
EXOR
TMA ADMIN GUIDE
ACTIVITIES
9.4.4
Valid Durations
Figure 136 - Valid Durations
Traffic Order
Display Only
This field will indicate whether the valid duration for the work category refers to a traffic order.
Minimum Duration
Display Only
The minimum duration number for the work category will be displayed.
Minimum Period Type
Display Only
The minimum period type for the work category will be displayed.
Maximum Duration
Display Only
The maximum duration number for the work category will be displayed.
Maximum Period Type
Display Only
The maximum period type for the work category will be displayed.
Version: 4.7
129
CONFIDENTIALITY STATEMENT
The contents of this document, including system ideas and concepts, are confidential and proprietary in nature and are not to be distributed in any
form without the prior written consent of Bentley, Inc.
EXOR
TMA ADMIN GUIDE
ACTIVITIES
9.5
Status Transitions – TMA2030
Figure 137 – Status Transitions
9.5.1
General Information
The main screen of this form identifies work transition rules that are valid for different stages of a phase of a works.
There are two additional tabs that define FPN Transitions and Restriction Transactions.
Version: 4.7
130
CONFIDENTIALITY STATEMENT
The contents of this document, including system ideas and concepts, are confidential and proprietary in nature and are not to be distributed in any
form without the prior written consent of Bentley, Inc.
EXOR
TMA ADMIN GUIDE
ACTIVITIES
9.5.2
Status Transitions
Works Category
Display Only
List
The works categories will be displayed.
Works Category Description Display Only
A description of the works categories will be displayed.
Phase Status From
Display Only
List
The phase status from which the notice type is to be issued will be displayed.
Notice Type
Display Only
List
The notice type code that can be used with the works category will be displayed.
Notice Type Description
Display Only
The notice type description of the notice type code will be displayed.
Seq
Display Only
The sequence of the notice that can be used with the works category will be displayed.
Phase Status To
Display Only
List
The phase status to which the notice type will take the work category will be displayed.
Version: 4.7
131
CONFIDENTIALITY STATEMENT
The contents of this document, including system ideas and concepts, are confidential and proprietary in nature and are not to be distributed in any
form without the prior written consent of Bentley, Inc.
EXOR
TMA ADMIN GUIDE
ACTIVITIES
9.5.3
FPN Transitions
Figure 138 – FPN Transitions
FPN Status From
Display Only
List
The FPN status from which the FPN notice type is to be issued will be displayed.
Notice Type
Display Only
List
The notice type code that can be used at the FPN status will be displayed.
Notice Type Description
Display Only
The notice type description of the notice type code will be displayed.
Seq
Display Only
The sequence of the notice that can be used with the FPN status will be displayed.
FPN Status To
Display Only
List
The FPN status to which the notice type will take the FPN notice will be displayed.
Version: 4.7
132
CONFIDENTIALITY STATEMENT
The contents of this document, including system ideas and concepts, are confidential and proprietary in nature and are not to be distributed in any
form without the prior written consent of Bentley, Inc.
EXOR
TMA ADMIN GUIDE
ACTIVITIES
9.5.4
Restriction Transitions
Figure 139 – Restriction Transitions
Works Type
Display Only
List
Display Only
List
The works type will be displayed.
Restrict Status From
The restrict status from which the restriction notice type is to be issued will be displayed.
Notice Type
Display Only
List
The notice type code that can be used with the works type will be displayed.
Notice Type Description
Display Only
The notice type description of the notice type code will be displayed.
Seq
Display Only
The sequence of the restriction notice that can be used with the works type will be displayed.
Restrict Status To
Display Only
List
The restrict status to which the notice type will take the work type will be displayed.
Version: 4.7
133
CONFIDENTIALITY STATEMENT
The contents of this document, including system ideas and concepts, are confidential and proprietary in nature and are not to be distributed in any
form without the prior written consent of Bentley, Inc.
EXOR
TMA ADMIN GUIDE
ACTIVITIES
9.6
Agreement Types – TMA2040
Figure 140 - Agreement Types
9.6.1
General Information
This form identifies which agreement types are applicable to which notice type.
Version: 4.7
134
CONFIDENTIALITY STATEMENT
The contents of this document, including system ideas and concepts, are confidential and proprietary in nature and are not to be distributed in any
form without the prior written consent of Bentley, Inc.
EXOR
TMA ADMIN GUIDE
ACTIVITIES
9.6.2
Allowable Agreement Types
Works Category
Display Only
List
The works categories will be displayed.
Works Category Description Display Only
A description of the works categories will be displayed.
Notice Type
Display Only
List
The notice type code that can be used with the works category will be displayed.
Notice Type Description
Display Only
The notice type description of the notice type code will be displayed.
Agreement Type
Display Only
List
The agreement type that can be used with the works category/notice type combination will be displayed.
Agreement types will have been defined in form Domains – HIG9120 under the option AGREEMENT_TYPE.
Agreement Type Description Display Only
A description of the agreement type will be displayed.
Version: 4.7
135
CONFIDENTIALITY STATEMENT
The contents of this document, including system ideas and concepts, are confidential and proprietary in nature and are not to be distributed in any
form without the prior written consent of Bentley, Inc.
EXOR
TMA ADMIN GUIDE
ACTIVITIES
9.7
Notice Warnings – TMA2050
Figure 141 - Notice Warnings
9.7.1
General Information
This form details the different error and warning messages that may appear as part of the validation of works and
inspections.
The list can be ordered using the ‘Show by Display Order on’ checkbox and selecting either ‘Send’ or ‘Receive’.
Version: 4.7
136
CONFIDENTIALITY STATEMENT
The contents of this document, including system ideas and concepts, are confidential and proprietary in nature and are not to be distributed in any
form without the prior written consent of Bentley, Inc.
EXOR
TMA ADMIN GUIDE
ACTIVITIES
9.7.2
Notice Warnings
Warning Number
Display Only
List
The warning number will be displayed.
Warning Message
Display Only
A description of the warning message will be displayed.
Display Order
Display Only
List
The display order of the warning will be displayed.
Error Type Send
Display Only
List
This field will indicate whether the system will show a warning or an error when the notice is sent.
Error types will have been defined in form Domains – HIG9120 under the option ERROR_TYPE.
Error Type Receive
Display Only
List
This field will indicate whether the system will show a warning or an error when the notice is received.
Error types will have been defined in form Domains – HIG9120 under the option ERROR_TYPE.
Compulsory
Checkbox
The checkbox will be ticked if the error or warning is compulsory.
Version: 4.7
137
CONFIDENTIALITY STATEMENT
The contents of this document, including system ideas and concepts, are confidential and proprietary in nature and are not to be distributed in any
form without the prior written consent of Bentley, Inc.
EXOR
TMA ADMIN GUIDE
ACTIVITIES
9.8
Section 74 Charges Profile – TMA2060
Figure 142 - Section 74 Charges Profile
9.8.1
General Information
The section 74 Profile page is a view only information page which shows.
The S74 Charges Profile form details the current charges based on the Works Category, Road Category and Traffic
Sensitivity and values of section 74 charges that can be raised in accordance with a works overrunning. These rules
are configured in the metadata as part of the installation and are not user configurable, as they adhere to the TMA
legislation. In order to amend the value a new rule set must be imported and the current rule set end dated, by
populating the end date.
The section 74 charges that can be raised in accordance with a works overrunning vary according to the type of works,
the reinstatement category of the carriageway and whether the street is traffic sensitive. If a works with more than one
site overruns then the charges will be levied in accordance with the values of the highest reinstatement category on
that works.
Version: 4.7
138
CONFIDENTIALITY STATEMENT
The contents of this document, including system ideas and concepts, are confidential and proprietary in nature and are not to be distributed in any
form without the prior written consent of Bentley, Inc.
EXOR
TMA ADMIN GUIDE
ACTIVITIES
9.8.2
S74 Charge Regime
Regime Id
Display Only
The Id of the section 74 will be displayed.
Start Date
Display Only
The start date of the section 74 regime will be displayed.
End Date
Display Only
The end date of the section 74 regime will be displayed.
Works Category
Display Only
The works category of the section 74 charge will be displayed.
Road Category
Display Only
The road category of the section 74 charge will be displayed.
Traffic Sensitive
Display Only
The traffic sensitive of the section 74 regime will be displayed.
S74 Charge £
Display Only
The charge for overrun of works based on the previous fields will be displayed.
Version: 4.7
139
CONFIDENTIALITY STATEMENT
The contents of this document, including system ideas and concepts, are confidential and proprietary in nature and are not to be distributed in any
form without the prior written consent of Bentley, Inc.
EXOR
TMA ADMIN GUIDE
ACTIVITIES
9.9
Spatial Relationships – TMA2065
Figure 143 - Spatial Relationships
9.9.1
General Information
The Spatial Relationships module holds metadata that defines the control of the valid location of a works.
Note: The values must not be changed unless under advisement of Exor support.
A location is deemed as invalid (i.e., not schedulable), if:
The whole of the location geometry is outside the street (including the TMABUFFPRX buffer).
Any part of the location geometry ‘touches’ the street (including the TMABUFFPRX buffer) as this is deemed
as being wholly outside the street.
Spatial Relationships
Display Only
This field shows valid Oracle Spatial Relationships. These are used to determine whether a location is valid or not.
Relationship Description
Display Only
A description of the spatial relationship will be displayed.
Valid Location
Checkbox
This checkbox shows which relationships determine whether a location is valid or not when using the Proximity
Validation functionality.
Version: 4.7
140
CONFIDENTIALITY STATEMENT
The contents of this document, including system ideas and concepts, are confidential and proprietary in nature and are not to be distributed in any
form without the prior written consent of Bentley, Inc.
EXOR
TMA ADMIN GUIDE
INSPECTIONS
10 Inspections
Figure 144 – Inspections Menu
This chapter describes the forms and processes used for setting up inspections in TMA by Exor. They are the
following forms:
Inspection Metadata – TMA5200
Inspectors – TMA5290
Inspection Rulesets – TMA5300
The form descriptions provide you with detailed information about each TMA Works form in TMA by Exor,
including:
an overall description of the form
a detailed explanation of each field, including available features (such as List of Values), default values and
other characteristics
helpful information for using the form
Version: 4.7
141
CONFIDENTIALITY STATEMENT
The contents of this document, including system ideas and concepts, are confidential and proprietary in nature and are not to be distributed in any
form without the prior written consent of Bentley, Inc.
EXOR
TMA ADMIN GUIDE
INSPECTIONS
10.1 Inspections Metadata – TMA5200
Figure 145 - Inspections Metadata
10.1.1 General Information
The reference data in the Inspections Metadata form is created as part of the system installation and uses standard
EToN compliant inspection metadata. The Inspection Regime is set to the current the A B C Inspection Regime and all
metadata is applicable to that regime. The form manages the majority of the metadata used in the inspections process
and provides the lookup values in the list of values in form Inspections – TMA5000.
Note: Existing metadata MUST NOT be changed in this form.
Version: 4.7
142
CONFIDENTIALITY STATEMENT
The contents of this document, including system ideas and concepts, are confidential and proprietary in nature and are not to be distributed in any
form without the prior written consent of Bentley, Inc.
EXOR
TMA ADMIN GUIDE
INSPECTIONS
10.1.2 Inspection Types
Figure 146 - Types
The inspection types create a list of values to choose from when creating an inspection.
Where the checkbox is selected for Unattributable Works, this type of inspection can be used against and
unattributable works.
Version: 4.7
143
CONFIDENTIALITY STATEMENT
The contents of this document, including system ideas and concepts, are confidential and proprietary in nature and are not to be distributed in any
form without the prior written consent of Bentley, Inc.
EXOR
TMA ADMIN GUIDE
INSPECTIONS
10.1.3 Inspection Outcomes
Figure 147 - Outcomes
The values in the matrix list allowable inspection outcomes.
The EToN complaint checkbox indicates, when checked, which of the outcome types are complaint with EToN.
These groupings will appear as a list of values in the Insp Outcome field in form Inspection – TMA5000.
Version: 4.7
144
CONFIDENTIALITY STATEMENT
The contents of this document, including system ideas and concepts, are confidential and proprietary in nature and are not to be distributed in any
form without the prior written consent of Bentley, Inc.
EXOR
TMA ADMIN GUIDE
INSPECTIONS
10.1.4 Inspection Status Codes
Figure 148 - Status Codes
These status codes are used identify the status of Site Items when completing an inspection.
The EToN complaint checkbox indicates, when checked, which of the status codes are complaint with EToN.
Version: 4.7
145
CONFIDENTIALITY STATEMENT
The contents of this document, including system ideas and concepts, are confidential and proprietary in nature and are not to be distributed in any
form without the prior written consent of Bentley, Inc.
EXOR
TMA ADMIN GUIDE
INSPECTIONS
10.1.5 Inspection Categories
Figure 149 - Categories
The inspection categories create a list of values to choose from when creating or scheduling an inspection.
These groupings will appear as a list of values in the Insp Category field in form Inspections – TMA5000.
Note: The default value of “Category D – Ad-Hoc”, may be updated by the user to one of their choosing, for
example
‘Lane Rental’ or to whatever ‘fits the bill’.
Version: 4.7
146
CONFIDENTIALITY STATEMENT
The contents of this document, including system ideas and concepts, are confidential and proprietary in nature and are not to be distributed in any
form without the prior written consent of Bentley, Inc.
EXOR
TMA ADMIN GUIDE
INSPECTIONS
10.1.6 Inspection Items
Figure 150 - Items
These classifications are used within the system to determine which inspection items are applicable to the inspection
category.
This form can also be used to determine whether the SLG Improvement Notice flag in Inspection is enabled for each
inspected site item.
The user can define additional Inspection items for use against a Category A inspection for the purposes of
categorising a works as ‘Exemplary’.
Note: This functionality is licensed at additional cost; for further information please contact your Exor Account
Manager.
Note: These additional inspection items will not be transferred to a DCD device at this time.
The exemplary works functionality can be turned on or off by setting Product Option - IEXEMP.
Item codes 60 to 99 have been reserved for all user-defined inspection items. New items should not be created outside
of this range otherwise the system may become unstable. The inspection item is limited to 40 characters.
Note: New items must have a classification of ‘Exemplary’ otherwise the system will become unstable.
Once created, the new items must then be attributed against Category A inspections in the ‘Sample Category Items’
tab.
Version: 4.7
147
CONFIDENTIALITY STATEMENT
The contents of this document, including system ideas and concepts, are confidential and proprietary in nature and are not to be distributed in any
form without the prior written consent of Bentley, Inc.
EXOR
TMA ADMIN GUIDE
INSPECTIONS
Figure 151 - Exemplary Items
10.1.7 Inspection Sample Category items
Figure 152 - Sample Category Items
These sample inspection items are used within the system to identify which item has caused a defect on an inspection.
They are defined for each inspection category. When completing an inspection the status of each of these items is
required to be declared.
All inspection categories and the items relevant to the categories can be reviewed by selecting the category name in
the Cat Name panel. The Inspection Item Types will be detailed in the panel below.
These items will then appear on printed checklists and when results are being entered into the system using Inspection.
Valid category types will have been defined using the Categories type.
New items of a classification of ‘Exemplary’ must be attributed against Category A inspection.
Version: 4.7
148
CONFIDENTIALITY STATEMENT
The contents of this document, including system ideas and concepts, are confidential and proprietary in nature and are not to be distributed in any
form without the prior written consent of Bentley, Inc.
EXOR
TMA ADMIN GUIDE
INSPECTIONS
10.1.8 Inspection Messages
Figure 153 - Messages
This form displays the allowable defect messages which can be selected when choosing a defect code on the
Inspection form.
In order to ensure that any defect is processed according to the correct level of urgency a response time is specified,
which the organisation responsible for a defect must respond within before allowing an inspection to lapse. This is
specified by entering a numerical value in the Response field and by selecting the appropriate value from the Required
Period field list of values. This form is may used to maintain the required response periods for each defect code.
Version: 4.7
149
CONFIDENTIALITY STATEMENT
The contents of this document, including system ideas and concepts, are confidential and proprietary in nature and are not to be distributed in any
form without the prior written consent of Bentley, Inc.
EXOR
TMA ADMIN GUIDE
INSPECTIONS
10.1.9 Deletion Rules
Figure 154 - Deletion Rules
Since the introduction of Category D Ad Hoc Inspections there could be a large number of scheduled inspections that
may never be resolved. This form gives the user the option for unresolved inspections to be deleted.
This form allows the user to specify the deletion rules.
For each required category the user can specify a data type and the number of days passed the selected data type for
deletion of the category’s inspection.
For example in Figure 147:
Category A - Inspections will be deleted 21 days after the date the inspection was created.
Category D – Start Inspections will be deleted 7 days after the Works/Phase Actual Start Date.
Note: As specified in the Information box, only inspections with an outcome of ‘Unknown’ will be eligible for
deletion and defect inspections will never be deleted.
Note: Once the deletion rules have been set up the process TMA Inspection Deletion must be set to run out-of-hours.
Note: Refer to Chapter 2 for further information.
Version: 4.7
150
CONFIDENTIALITY STATEMENT
The contents of this document, including system ideas and concepts, are confidential and proprietary in nature and are not to be distributed in any
form without the prior written consent of Bentley, Inc.
EXOR
TMA ADMIN GUIDE
INSPECTIONS
10.2 Inspectors – TMA5290
Figure 155 - Inspectors
10.2.1 General Information
The Inspectors form is used to identify a list of system users that are also inspectors.
The Available checkbox when ticked means that scheduled inspections will be allocated to that inspector if the
scheduling is run against a ruleset that the inspector belongs to.
For instance, if an inspector is on leave, the tick may be removed from the checkbox to prevent scheduled inspections
being allocated to that inspector.
Version: 4.7
151
CONFIDENTIALITY STATEMENT
The contents of this document, including system ideas and concepts, are confidential and proprietary in nature and are not to be distributed in any
form without the prior written consent of Bentley, Inc.
EXOR
TMA ADMIN GUIDE
INSPECTIONS
10.2.2 Inspectors
Inspector Username
Mandatory
List
Enter the username of the user set up by the System Administrator that is to be registered as an inspector.
Users will have been defined in form Users – HIG1832.
Inspector Name
Display Only
The name of the user as set up by the System Administrator will be displayed.
Telephone No
Display Only
The telephone number of the user will be displayed as set up by in module HIG1834 – User Contact Details and
Product Option – INSPTELTYP.
Available
Checkbox
When ticked this checkbox means that scheduled inspections will be allocated to the inspector if scheduling against a
ruleset that the inspector belongs to.
Inspection rulesets are set up using form Inspection Rulesets – TMA5300.
Version: 4.7
152
CONFIDENTIALITY STATEMENT
The contents of this document, including system ideas and concepts, are confidential and proprietary in nature and are not to be distributed in any
form without the prior written consent of Bentley, Inc.
EXOR
TMA ADMIN GUIDE
INSPECTIONS
10.3 Inspection Rulesets – TMA5300
Figure 156 – Inspection Rulesets
10.3.1 General Information
The Inspection Rulesets form is used define rulesets for use in the Annual Inspection Profiles – TMA5110 form. The
ruleset then dictates how the resulting scheduled inspections are to be divided amongst the available inspectors.
The Ratio to Schedule is used by the scheduler to work out the proportion of inspections to allocate to an inspector
within a ruleset. Once the scheduler has allocated the inspections the inspectors name will be appear on the
Inspections – TMA5000 form.
Version: 4.7
153
CONFIDENTIALITY STATEMENT
The contents of this document, including system ideas and concepts, are confidential and proprietary in nature and are not to be distributed in any
form without the prior written consent of Bentley, Inc.
EXOR
TMA ADMIN GUIDE
INSPECTIONS
10.3.2 Inspection Rulesets
Ruleset Name
Mandatory
Enter the name for the ruleset
Notes
Optional
Enter notes to be attached to the ruleset.
Inspector
Mandatory
List
Enter the username of the inspector to be associated with the ruleset.
Inspectors are defined using form Inspectors – TMA5290.
Ratio to Schedule
Mandatory
Enter the proportions of inspections to be allocated to the inspector when scheduling inspections.
For example:
Rulesets can be set up to include each inspector. However, when one inspector is on leave, a different ruleset can be
used.
Rule Set Inspector Ratio
Roger on
Leave
1
1
2
2
2
3
3
3
3
4
4
5
5
5
Bob
Jamie
Bob
Roger
Phil
Bob
Roger
Phil
Jamie
Bob
Phil
Bob
Phil
Jamie
25
75
10
30
60
10
25
25
40
25
75
25
30
45
Figure 157 - Ruleset
By combining the use of street groups and rulesets it means that the entire street authority network is covered, even
when an inspector is not available.
Version: 4.7
154
CONFIDENTIALITY STATEMENT
The contents of this document, including system ideas and concepts, are confidential and proprietary in nature and are not to be distributed in any
form without the prior written consent of Bentley, Inc.
EXOR
TMA ADMIN GUIDE
INSPECTIONS
In the example below, the network is broken down into 8 distinct areas (A, B, C, D, E, F, G, H). Each area is allocated
to an inspector, but when one inspector is on leave, that inspector’s area is shared between the remaining inspectors.
Inspector Street Group
Bob
Roger
A, B, C
D, E
Phil
F, G, H
Jamie
Bob
Phil
D, E, F, G, H
A, B, C, D
E, F, G, H
Roger on Leave
Figure 158 - Ruleset
Combining the allocation of street groups with the set up of rulesets will keep the continuity of inspections over the
whole of the network.
Version: 4.7
155
CONFIDENTIALITY STATEMENT
The contents of this document, including system ideas and concepts, are confidential and proprietary in nature and are not to be distributed in any
form without the prior written consent of Bentley, Inc.
EXOR
TMA ADMIN GUIDE
INSPECTIONS
10.4 Defect Inspection Schedules – TMA5270
Figure 159 – Defect Inspection Schedules
10.4.1 General Information
The Defect Inspection Schedules form displays the matrix containing the defect inspection schedule for all inspection
types.
It is populated by default on the installation of the system. Only the ‘No. Days’ or ‘Cost £’ fields may be updated in
accordance with an organisation’s requirements or updated costs.
Version: 4.7
156
CONFIDENTIALITY STATEMENT
The contents of this document, including system ideas and concepts, are confidential and proprietary in nature and are not to be distributed in any
form without the prior written consent of Bentley, Inc.
EXOR
TMA ADMIN GUIDE
INSPECTIONS
10.4.2 Defect Inspection Schedules
Inspection Regime
Required/Default
This value will show the inspection regime.
Start Date
Required
The start date of the inspection regime entered in the previous field will be shown.
End Date
Optional
Enter the end date of the inspection regime. If the inspection regime is current this field will remain blank.
Inspection Type
Display Only
The inspection type will be displayed. Inspection types will have been defined in form Inspection Metadata –
TMA5200 under the Types tab.
Category
Display Only
The category for the inspection type will be displayed.
Outcome
Display Only
The outcome of the inspection type entered in the previous field will be displayed. Inspection outcomes will have been
defined in form Inspection Metadata – TMA5200 under the Outcomes tab.
Next Inspection Type
Display Only
The inspection type to follow the inspection and outcome of inspection defined in the previous fields will be
displayed. Inspection types will have been defined in form Inspection Metadata – TMA5200 under the Types tab.
Next Category
Display Only
The next category for the inspection type will be displayed.
No Days
Required
Enter the number of days to elapse before the next inspection.
Cost £
Required
Enter the cost of the inspection.
Version: 4.7
157
CONFIDENTIALITY STATEMENT
The contents of this document, including system ideas and concepts, are confidential and proprietary in nature and are not to be distributed in any
form without the prior written consent of Bentley, Inc.
EXOR
TMA ADMIN GUIDE
INSPECTIONS
10.4.2.1 Create New Schedule
When the cost of inspections is increased it is possible to copy the current schedule and then update the costs in new
schedule. This will keep a history of the previous costs and allow inspections to be charged at the rate relevant to the
date inspected.
To update the cost of inspections the following steps should be taken.
1. Select the [Create New Schedule from Latest Schedule] button.
2. In the ‘End Date’ field of the current schedule enter the date the current cost of inspections changes.
3. In the ‘Start Date’ for the new schedule enter the date the new charges become effective. This should be the
date after the ‘End Date’ of the previous schedule.
4. In the ‘Cost £’ field of the new schedule make the relevant changes to reflect the new charges.
Version: 4.7
158
CONFIDENTIALITY STATEMENT
The contents of this document, including system ideas and concepts, are confidential and proprietary in nature and are not to be distributed in any
form without the prior written consent of Bentley, Inc.