1
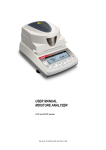
USER MANUAL
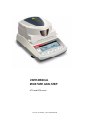
MOISTURE ANALYZER
ATS and BTS series
Plik: 2011-04-06-BTS_ATS-150 BTS0002 GB
2
USER MANUAL
Content:
1.
Security rules _________________________________________________________________ 3
2.
Set__________________________________________________________________________ 3
3.
Navigation – fast start ___________________________________________________________ 4
4.
Moisture analyzer menu diagram __________________________________________________ 6
5.
General description _____________________________________________________________ 7
6.
Technical data _________________________________________________________________ 7
7.
Keys and indicators _____________________________________________________________ 8
8.
Preparation to work _____________________________________________________________ 9
9.
Interfaces ___________________________________________________________________ 11
10.
General working rules __________________________________________________________ 11
11.
Description of thermogravimetric analysis ___________________________________________ 11
11.1 Infrared radiation source ________________________________________________________ 12
11.2 Infrared radiation drying description _______________________________________________ 12
11.3 Drawing and preparation of a sample ______________________________________________ 13
11.4 Tools requirements ____________________________________________________________ 13
11.5 Single-use pans ______________________________________________________________ 13
11.6 Placing a sample ______________________________________________________________ 14
11.7 Glass fibre filter _______________________________________________________________ 14
11.8 Practical notes________________________________________________________________ 14
12.
Moisture analyzer start _________________________________________________________ 15
13.
Drying parameters settings ______________________________________________________ 16
13.1 Setting drying temperature ______________________________________________________ 17
13.2 Calculation methods ___________________________________________________________ 17
13.4 Drying profiles ________________________________________________________________ 19
13.5 Moisture analyzer memory ______________________________________________________ 20
13.5.1 Saving settings _______________________________________________________________ 21
13.5.2 Loading saved settings_________________________________________________________ 21
13.6 Initial moisture analysis _________________________________________________________ 23
14.
Proper moisture_______________________________________________________________ 25
15.
Connecting to a printer or computer – drying report ___________________________________ 26
16.
Moisture analyzer options _______________________________________________________ 28
17.
Testing and calibration _________________________________________________________ 29
18.
Moisture analyser as a balance___________________________________________________ 30
18.1 Units _______________________________________________________________________ 30
18.2 Auto-zeroing _________________________________________________________________ 31
18.3 Calibration ___________________________________________________________________ 32
19.
Maintenance and repairs of small defects ___________________________________________ 34
Declaration of Conformity __________________________________________________________ 36
Appendix __________________________________________________________________________ 37
USER MANUAL
3
1. Security rules
To avoid electrical shock or damage of the balance or
connected peripheral devices, it is necessary to follow
the security rules below.
• To feed the analyser use only mains socket with ground contact. A Fuse is
situated under the analyzer cover.
• During heating, the halogen heaters warm up to very high temperature. Avoid
touching the heaters as it may cause severe burns!
• Dryer chamber cover heats up to 40°C, but perforated cover at the top may heat up
over 60°C. Do not touch the cover top during drying as it may cause severe burns.
• All repairs and necessary regulations can be made by authorised personnel only.
• Do not use the analyser when its cover is opened.
• Do not use the analyser in explosive conditions.
• Do not use the analyser in high humidity.
• If the device seems not to operate properly, plug it out of the mains and do not use
it until checked by authorised service.
• Please return wasted device to the point of purchase or other company specialised
in recycling of wasted electronic components.
According to legal regulations it is forbidden to
dispose wasted electronic equipment in waste
containers.
2. Set
The full set user get is:
1. Moisture analyzer,
2. Pan shield, pan support, pan handle,
3. Single-use pans – 10 pcs.,
4. Power supply cord,
5. User manual,
6. Guarantee card
USER MANUAL
4
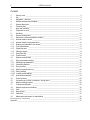
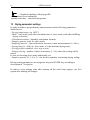
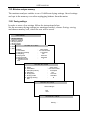
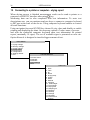
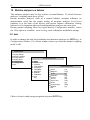
3. Navigation – fast start
After turning on the moisture analyzer, after autotests and tare, moisture analyzer
starts initial heating until the drying chamber heats up to 105°C. The moisture
analyzer is now ready to measure density with inscribed earlier heating parameters.
To set heating parameters use USER MENU and choose Drying settings.
To move cursor between
positions use ↑ and ↓ key.
1. Drying settings
2. Memory settings
3. Drying options
4. Drying raport
5. Configuration
6. Settings default
menu
Entering chosen menu position is made
by using → or ENTER key.
Return ←.
USER MENU
1. Drying settings
2. Memory settings
3. Drying options
4. Drying raport
5. Configuration
6. Settings default
Entrance to parameters is made after
choosing → or ENTER key.
DRYING SETTINGS
1. Drying temp.
: 160 C
2. Mode
: Time mode
3. Calculation
: m0-m/m*100%
4. Samples quantity.
: 3
5. Sampling interv.
: 1 sek
: 00:15:00s
6. Drying time
Parameter value modification is made
by using ↑ and ↓ key, moving to
another digit by → key.
Confirmation using ENTER key.
DRYING SETTINGS
1. Drying temp.
: 160 C
2. Mode
: Time mode
: m0-m/m*100%
3. Calculation
4. Samples quantity.
: 3
5. Sampling interv.
: 1 sek
: 00:15:00s
6. Drying time
ENTER
DRYING SETTINGS
1. Drying temp.
2. Mode
3. Calculation
4. Samples quantity.
5. Sampling interv.
6. Drying time
: 160 C
: Time mode
: m0-m/m*100%
: 3
: 1 sek
: 00:15:00s
ENTER
Selection of one of the available
parameter options is made by
→ and ← key.
Confirmation using ENTER.
USER MANUAL
5
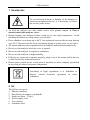
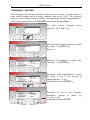
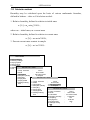
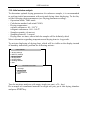
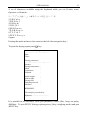
Moisture analyzer can work in one of two modes, changed by key:
1) Drying (density measurement)
formula evaluation
drying
profile
inscribed drying
temperature
sample time
actual temperature
actual drying time
mass on pan
initial mass
closed (CSD)
/open(OPN)
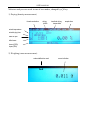
2) Weighing (mass measurement)
scale stabilization mark
mass indication
6
USER MANUAL
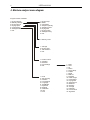
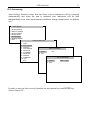
4. Moisture analyzer menu diagram
Program version: BTS002
1. Drying settings
2. Memory settings
3. Drying options
4. Drying raport
5. Configuration
6. Settings default
7. Exit
1. Drying temp.
2. Mode
3. Calculation
4. Samples quantity
5. Sampling interv.
6. Drying time
7. Drying profile
8. Settings storing
9. Exit
1. Memory locat.
1. Average
2. Drying chart
3. Transmission
4. Exit
1. Product name
2. Operator
3. Remarks
4. Print settings
5. Exit
1. Units
2. Auto-zeroing
3. Interface
4. LCD settings
5. Language
6. Time&Date
7. Keyboard
8. Defaults
9. Calibration
10. Info
11. Exit
1. Date
2. Time
3. Nr
4. Name
5. Drying temp.
6. Profile
7. Mode
8. Method
9. Finished
10. Initial weight
11. Final weight
12. Drying time
13. Sampling int.
14. Moisture
15. Quantity
16. Average
17. Remarks
18. Performance
19. Signature
USER MANUAL
7
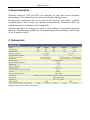
5. General description
Moisture analyzers ATS and BTS are designed for fast and precise moisture
determination of a sample based on mass loss during heating process.
Drying proces parameters are set by user on the basis of law norms, available
chemical-physics data or they are matched experimentally. Parameters table for
typical materials is contained in the A appendix.
Moisture analyzers are designed to work in food industry, construction materials
industry, biotechnology, pharmacy, environment protection and others. Main field
of use is quality control.
6. Technical data
Supply protection: fuse WTA-T 3,15A 250V
USER MANUAL
8
7. Keys and indicators
I/
MENU
CLR
←
START
↑
STOP
↓
→
ENTER
→T←
Indicator
- on / off (standby),
-
enter to menu,
deleting operation,
switching modes drying/ weighing,
navigation key,
measurement start (drying),
navigation key,
natychmiastowe zakończenie suszenia,
navigation key,
printout (transmission) of the result,
navigation key,
confirmation / option choice,
tare (zeroing) scale,
signalling stabilization of measurement result,
USER MANUAL
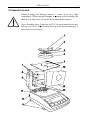
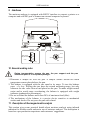
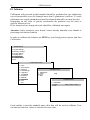
8. Preparation to work
During heating, the halogen heaters 1 warm up to very high
temperature. When drying chamber is opened avoid touching the
heaters as it may cause severe burns or damage the heaters!
Dryer chamber cover 3 heats up to 40°C, but perforated cover may
heat up over 60°C. Do not touch the top cover during drying as it
may cause severe burns!
9
10
USER MANUAL
1. Take all contents out of a package: the moisture analyser and packed separately:
the tin pan shield, single use pans, the pan handle and the pan support. It is
recommended to keep the original scale package in order to transport the
balance safely in future.
2. Place the balance on a stable ground not affected by mechanical vibrations and
airflows.
3. Level the balance with rotating legs 9 so that the air bubble in water-level 10 at
the back of the balance is in the middle and the moisture analyser rests on all
four legs.
4. Open the drying chamber 3 by lifting it by a grip at the front. Insert the window
13 into chamber cover, edges of the window should be located in the latch
grooves 14 (push the window until You hear a “click” from all four latches).
5. Put drying chamber floor board 12 on four position pegs in moisture analyzer
cover. Put covering plate 4 on three distance pegs 8. Put carefully pan mandrel 5
into scale mechanism hole.
6. Put on empty single-use pan 7 on grip 6 and using the grip place the single pan
on scale’s carrying pan (grip ring 6 will be located inside the plate but due to
longer diameter it will not rest on carrying pan 5).
7. Close the moisture analyzer chamber 3 and connect the scale to 230V supply.
8. This will start moisture analyzer autotests and after stabilization zero indication
will show up. Moisture analyzer will start initial heating signalled by a proper
communicate on the screen. After initial heating moisture analyzer is ready to
work.
When temperature during initial heating exceeds 105°C or heating
time is longer than 1 minute, terminate initial heating with CLR
key and check if the temperature sensor 2 works properly
and if both halogen heaters light 1 (see chapter 15).
In case any defect occurs contact an authorised service point.
9. Moisture analyzer shouldn’t be used to weigh ferromagnetic materials due to
deterioration of measurement precision.
The fuse 11 is available after cover opening and putting out floor
board 12. During damaged fuse exchange use a fuse with
parameters presented in technical data (ch. 6). Using other fuse
may cause electrical shock.
USER MANUAL
11
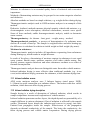
9. Interfaces
The moisture analyser is equipped with RS23C interface to connect a printer or a
computer and with PS2 port to connect an external computer keyboard.
RS232C
1
RxD (receive)
TxD (transmission)
2
PS2
Clock
6
7
3
8
4
mass
USB
5
+5V
6
5
4
3
2 1
mass
9
housing
Data
10. General working rules
During transportation remove the pan, the pan support and the pan
shield and place it in a separate package..
1. Distribute a sample all over the pan. A sample surface should not touch
temperature sensor placed above the pan.
2. The balance is equipped with the tare equal to its range. To tare the balance
press →T← key. Writing the tare does not extend measuring range, but only
subtracts the tare value from a load placed on the pan. To make weight control
easier and to avoid range overdrawing, the balance is equipped with weight
indicator (graduated in percentages).
3. Do not overload the balance more then 20% of maximum load (Max).
4. The mechanism of the balance is a precise device sensitive to mechanical
strokes and shocks. Do not press the pan with a hand.
11. Description of thermogravimetric analysis
This section gives some practical details about moisture analysis using infrared
radiation for reliable results and easier use of moisture analyser. The description is
based on a pre-production experience and customers’ suggestions.
12
USER MANUAL
Moisture in substances is an essential quality factor of technical and economical
importance.
Methods of determining moisture may be grouped in two main categories: absolute
and deductive.
Absolute methods are based on simple relations, e.g. weight decline during drying.
Thermogravimetric analysis used in AXIS moisture analyser is an example of this
method.
Deductive (indirect) methods measure physical quantity related with moisture, e.g.
electromagnetic waves absorption, electrical conductance, acoustic wave speed.
Some of these methods, unlike thermogravimetric analysis, enable to determine
water content.
Thermogravimetry - lat. thermo – heat, gravi – weight, metry – method
Thermogravimetric analysis – a process of determination of a substance mass
decline as a result of heat-up. The sample is weighed before and after heating-up,
the difference is calculated in relation to initial weight or final weight (dry mass).
Moisture in substances
Thermogravimetric analysis includes all ingredients evaporating from substances
during heating-up, which results in weight decrease.
In result of the above, determining of moisture content in substances is not equal
water content. Beside water, moisture consists of all other volatile matter: fats,
alcohol, aromas, organic dissolvent and other substances resultant as en effect of
thermal decomposition.
Thermogravimetric analysis does not distinguish water from other volatile matters.
Infrared radiation drying is more effective than traditional methods (e.g. in an
oven) as the radiation deeply penetrates the substance, which shortens drying time.
11.1 Infrared radiation source
ADS series moisture analyser uses 2 halogen heaters (rated power 200W,
l=118mm) in serial connection as a radiation source. The heaters emit also visible
radiation, which does not affect drying process.
11.2 Infrared radiation drying description
Sample drying is a result of absorption of infrared radiation, which results in
sample temperature increase and evaporation of volatile matters.
Infrared radiation penetrates surface layers, the depth depends on penetrability of a
sample (different in various substances). Part of radiation is reflected by the sample
surface. Penetrated layers absorb the radiation and convert its energy into heat.
Emitted heat propagates inside the sample. Effectiveness of the propagation
depends on thermal conductivity of the sample. The better the conductivity, the
faster drying process and volatile matter evaporation. During drying process
USER MANUAL
13
sample parameters change, its thermal conductivity decreases so there is a risk of
burning the sample. Some parameters may be estimated “by sight”, e.g. smooth
and light surfaces reflect radiation better. This must be taken into account when
setting drying parameters.
11.3 Drawing and preparation of a sample
As sample of given substance must be representative, drawing and preparing a
sample is very important process as it affects repeatability of measurements. The
most common method of homogenizing a sample is mixing. The other method is to
draw few samples from different but specific points in a substance and calculate an
average value. Another – to draw few samples from different points in a substance,
mix them and draw a sample from the mixed samples.
Sampling method depends on the object of a research. For quality purpose many
representative samples are analysed. In production control it is enough to assure
sampling repeatability, which enables to study a tendency.
While preparing and drawing, it is important that the sample does not absorb
moisture from the environment – it is advised that operation time is as short as
possible.
If it is necessary to analyse more than one sample at the same time, the samples
should be closed in plastic bags or other isolated containers. Give attention that
samples must not lose moisture inside the container (the container should not
consist of to much air, the moisture condensed on the sides of the container should
be mixed with the sample again).
11.4 Tools requirements
Tools and instruments used in preparation process may affect measurement
accuracy, so it is advised not to use tools that transmit heat, as it makes the sample
lose moisture before analysis.
Use only special mills and pestles.
In case of liquids with consisting of solid materials use a glass mixer, a spoon or a
magnetic mixer.
11.5 Single-use pans
To analyse the moisture, put a sample on a single-use pan and place it in the dryer
chamber.
Using non-reusable pan helps to avoid false results by remains of previous
samples.
10 single use pans are provided with the moisture analyser. Any quantity may be
delivered on demand.
USER MANUAL
14
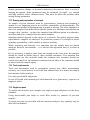
11.6 Placing a sample
A sample should be placed uniformly all over the pan, so that heat propagates
equally all over the sample and dries whole sample effectively and quickly without
leaving “wet” places.
Correct
Incorrect
Attention:
Due to temperature sensor localisation, max sample height is 10mm.
When substance ply is too thick, surface layers will be heated too much and
internal – not enough. This may result in burning the sample or surface
incrustation, which will make drying process difficult and measuring result false.
A sample should be placed in uniformed layers 2÷5mm thick, weighing 5÷15g,
depending on a substance.
11.7 Glass fibre filter
When drying liquids, pastes or substances that may melt or loose liquid during
drying, it is advised to use glass fibre filters.
Filters ensure equal liquid distribution or, in case solid materials, avoiding burning
a sample.
11.8 Practical notes
Put a sample on the pan as quickly as possible to avoid losing moisture.
Temperature inside the chamber is much higher than outside, so the sample may
evaporate partly before measurement begins, which will result in a false result.
When analysing the same substance quantity in successive measurements, use the
same tools to put a sample to be sure that samples are each time of the same size.
Before putting a sample, tare a single-use pan and take it out of the chamber. Right
after putting a sample on the pan, place it inside the analyser chamber, close the
chamber and press START.
Be sure that no dirt sticks under the pan, as it may increase sample weight and
result in false values.
USER MANUAL
15
12. Moisture analyzer start
After switching-on the moisture analyser proceeds with self-tests.
Model
Program version
CPU
EEPROM
A/D
TEMP_1
TEMP_2
HEATER
Next the moisture analyzer is taring (- - - - - -). After taring initial heating starts in
order to create proper conditions inside drying chamber.
m0-m/m0*100%
Ts=105°C
tp= 10s
T= 32.23°C
m=0.000g
INITIAL HEATING …
Initial heating should warm the drying chamber up to 105°C within 1 minute.
When temperature during initial heating exceeds 105°C or heating time is longer
than 1 minute, terminate initial heating with STOP key and check if the analyser is
not damaged (see chapter 15).
After initial heating is completed (or terminated), the device displays the following
information:.
m0-m/m0*100%
T = 32.23°C
t =0:00:00s
m= 0.000g
m0= 0.000g
CSD
Ts=105°C
tp= 10s
0.00 %
00:02:00s
Legend:
m0-m/m0*100% - formula used to calculate the moisture
Ts – defined drying temperature
ts – defined drying time
T – current temperature in the drying chamber
m – current weight,
t – current drying time
m0 – initial weight
16
USER MANUAL
- Graphical marking of drying profile
CSD – closed cover indication
(centrally in lower line) – inscribed drying time
13. Drying parameters settings
In order to achieve proper density measurement results following parameters
should be set:
- Drying temperature (to 160oC),
- Mode : time mode (ends after inscribed time) or short mode (ends after fulfilling
drying criterion),
- Calculation method – humidity calculation formula,
- Samples quantity (only for short mode),
- Sampling interval – interval between successive mass measurements (1÷180s.),
- Drying time (1s.÷10h) (in short mode it’s the maximal drying time),
- Drying profile (standard, slow, step or fast),
- Settings storing– number of place in memory (1÷10), where the setting will be
stored.
In case of choosing short mode additionally set:
- Samples quantity (2, 3, 4 or 5) – the decisive quantity concerning drying ending.
During setting parameters use navigation keys and ENTER key according to
description in Navigation.
In order to save settings (also after turning off the scale from supply), use Exit
option after making all changes.
USER MANUAL
17
13.1 Setting drying temperature
During setting drying temperaturę set successively values of individual digits.
USER MENU
1. Drying settings
2. Memory settings
3. Drying options
4. Drying raport
5. Configuration
6. Settings default
7. Exit
DRYING SETTINGS
1. Drying temp.
:
60°C
2. Mode
:
short mode
3. Calculation
:
m0-m/m0*100%
4. Samples quantity :
2 samples
5. Samplingkowania: DRYING SETTINGS
10s
6. Drying timeenia
:
0:00:10s
7. Drying profileil
suszenia......:
wolny 20°C
1. Drying
temp.
:
8. Settings storing
ustawień :
1 short mode
2. Mode
:
Exit
3. Calculation
:
m0-m/m0*100%
DRYING SETTINGS
4. Samples quantity :
2 samples
5. Samplingkowania:
10s
1. Drying temp.
:
160°C
6. Drying timeenia
:
0:00:10s
2. Mode
:
short mode
7. Drying profileil suszenia......:
wolny
3. Calculation
:
m0-m/m0*100%
8. Settings storing ustawień :
1
4. Samples quantity :
2 samples
Exit
5. Samplingkowania:
10s
6. Drying timeenia
:
0:00:10sSETTINGS
DRYING
7. Drying profilei
.:
wolny
8. Settings storing : 1. Temp. suszenia
1
:
120°C
Exit
2. Mode
:
short mode
3. Calculation
: m0-m/m0*100%
4. Samples quantity
:
2 samples
5. Sampling
:
10s
6. Drying time
:
0:00:10s
7. Drying profile
:
slow
8. Settings storing
:
1
Exit
USER MANUAL
18
13.2 Calculation methods
Humidity may be calculated upon the basis of various mathematic formulas,
defined in balance – drier as Calculation method:
1. Relative humidity, defined in relation to initial mass
w [%] = m0-m/m0*100% ,
where m0 – initial mass, m- current mass
2. Relative humidity, defined in relation to current mass
w [%] = m0-m/m*100% ,
3. Percent current mass content in sample
w [%] = m/ m0*100% .
USER MENU
1. Drying settings
2. Memory settings
3. Drying options
4. Drying raport
5. Configuration
6. Settings default DRYING SETTINGS
7. Exit
1. Temp. suszenia
:
120°C
2. Mode
:
short mode
3. Calculation
: m0-m/m0*100%
4. Samples quantity
:
2 samples
5. Sampling
:
10s
DRYING
SETTINGS
6. Drying time
:
0:00:10s
7. Drying profile
slow
1. :Temp. suszenia
:
120°C
8. Settings storing
:
1
2. Mode
:
short mode
Exit
3. Calculation
: m0-m/m0*100%
4. Samples quantity
:
2 samples
5. Sampling
:
10s
DRYING SETTINGS
6. Drying time
:
0:00:10s
7. Drying profile
: Temp.
slow
1.
suszenia
:
120°C
8. Settings storing
: Mode 1
2.
:
short mode
Exit
3. Calculation
: m0-m/m0*100%
4. Samples quantity
:
2 samples
5. Sampling
:
10s
6. Drying time
:
0:00:10s
7. Drying profile
:
slow
8. Settings storing
:
1
Exit
USER MANUAL
19
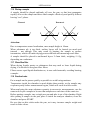
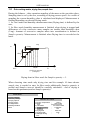
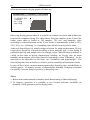
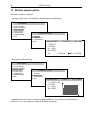
13.3 Drier working modes, drying time, sample time
During the balance – drier operation sampling of the mass on the pan takes place.
Sampling time is set by the user, according to drying process speed. As a result of
sampling the current humidity value is calculated and displayed. Measurement is
finished depending on selected Drying mode:
1. In Time mode total humidity measurement time (Drying time) is defined by the
user,
2. In Short mode humidity measurement is finished, when drying is stopped and
differences of a few successive mass samples are smaller than threshold value
(2 mg). Amount of successive samples taken into consideration is defined as
Samples quantity. Measurement is finished when Drying time is exceeded at the
latest.
Stop
m
<2mg
>2mg
Ts
Start
t
Qualifying amount
(3 samples)
Drying chart in Short mode for Samples quantity = 3.
When choosing time mode only drying time and for example 10 times shorter
sample time is needed to start. In Short mode additionally Samples quantity is
needed and Samples interval should be carefully calculated – end of drying is
based on this parameter(and on Samples quantity).
USER MENU
1. Drying settings
2. Memory settings
3. Drying options
4. Drying raport
5. Configuration
6. Settings default
7. Exit
DRYING SETTINGS
1. Drying temperature
2. Mode
3. Calculation
4. Samples quantity
5. Sampling
6. Drying time
7. Drying profile
8. Settings storing
Exit
:
120°C
:
short mode
: m0-m/m0*100%
:
2 samples
:
10s
:
0:00:10s
:
slow
:
1
USER MANUAL
20
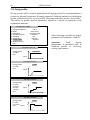
13.4 Drying profiles
Drying profile will be used to optimization of drying process by accommodation a
process to physical properties of sample material. Oxidized materials or thickening
on the surface need slow or step profile. Resistant materials can use fast profile .
The choice of profile and his parameters should be a result of experience with
examinated material.
DRYING SETTINGS
1. Drying temperature
2. Mode
3. Calculation
4. Samples quantity
5. Sampling
6. Drying time
7. Drying profile
8. Settings storing
Exit
:
120°C
:
short mode
: m0-m/m0*100%
:
2 samples
:
10s
:
0:00:10s
:
standard
:
1
After choosing a profile set proper
parameters for example t1 and T1.
Attention:
Final
drying
temperaturę is inscribed only in
Standard profile or in Drying
setting (main menu).
DRYING PROFILE
Drying profile
T=120°C
Exit
:
<standard>
T
120°C
DRYING PROFILE
Drying profile
t1=100s
Exit
:
t
<slow>
T
120°C
t1
DRYING PROFILE
Drying profile
:
<step>
t1=100s
T
T1=60°C
t2=100s
120°C
T2=90°C
Exit
t1 t2
t
DRYING PROFILE
Drying profile
:
t1=100s
T1=140°C
Exit
120°C
<fast>
T1
T
t1
t
USER MANUAL
21
13.5 Moisture analyzer memory
The moisture analyser enables to save 10 different drying settings. Saved settings
are kept in the memory even after unplugging balance from the mains.
13.5.1 Saving settings
In order to store a few settings follow the instructions below:
Set the necessary drying settings (as mentioned earlier), choose Settings storing
and choose memory cell, where the sets will be saved.
USER MENU
1. Drying settings
2. Memory settings
3. Drying options
4. Drying raport
5. Configuration
6. Settings default DRYING SETTINGS
7. Exit
2. Mode
: short mode
3. Calculation
: m0-m/m0*100%
4. Samples quantity
:
2 samples
5. Sampling
:
10s
6. Drying time
:
0:00:10s
7. Drying profile
:
standard
8. Settings storing
:
1
Exit
DRYING SETTINGS
2. Mode
3. Calculation
4. Samples quantity
5. Sampling
6. Drying time
7. Drying profile
8. Settings storing
Exit
: short mode
: m0-m/m0*100%
:
2 samples
:
10s
:
0:00:10s
:
standard
:
1
DRYING SETTINGS
Save settings?
NO
YES
DRYING SETTINGS
Saving . . .
USER MANUAL
22
13.5.2 Loading saved settings
In order to call earlier settings saved in memory, You enter the menu and choose
option Memory settings and choose memory cell number where settings where
earlier made.
USER MENU
1. Drying settings
2. Memory settings
3. Drying options
4. Drying raport
5. Configuration
6. Settings default
7. Exit
MEMORY SETTINGS
Memory locat.:
Settings:
<1>
Time mode
m0-m/m0*100%
IK = wyłączone
Ts = 45°C
ts = 0:05:45s
tp = 10s
MEMORY SETTINGS
Memory locat.:
Settings:
Time mode
m0-m/m0*100%
IK = wyłączone
<1>
Ts = 45°C
ts = 0:05:45s
tp = 10s
USER MANUAL
23
13.6 Initial moisture analysis
To determine optimal drying parameters for unknown sample, it is recommended
to perform initial measurement with activated drying chart displaying. To do this,
set the following drying parameters (see Drying parameters setting):
- Operation Mode: Time mode
- Calculation method: m0-m/m0*100%
- Drying temperature:
organic substances: 80 - 120 0C
inorganic substances: 140 - 160 0C
- Samples quantity: do not set
- Sampling interval: 1 second
- Drying time: set time, after which the sample will be definitely dried
More information regarding temperature and drying time in A appendix.
To activate displaying of drying chart, which will be visible on the display instead
of humidity indication, perform the following actions:
USER MENU
1. Drying settings
2. Memory settings
3. Drying options
4. Drying raport
5. Configuration
6. Settings default
7. Exit
DRYING OPTIONS
1. Average
2. Drying chart
3. Transmission
4. Exit
Tare the moisture analyzer with empty single-use pan (→T← key).
Put a sample of examinated material on single-use pan, put it into drying chamber
and press START key.
USER MANUAL
24
After measurement a drying graph will show up:
m0-m/m0*100%
Ts=120°C
ts= 0:10:00s
T = 118.34°C 30%
t =0:00:00s
m= 1.020g
m0= 1.020g
Observing drying process chart it is possible to evaluate its course and define time
required for complete drying. The chart shows 160 time samples on the X axis (for
longer times chart is scaled to 360 samples, 720, etc.) and humidity value
according to selected formula on the Y axis (chart is automatically scaled to 10%,
30%, 50%, etc.). Selecting 1 s of sampling time allows for more precise chart.
Achieved chart allows for initial settings selection for main measurement. Drying
temperature should be selected according to dries material type, so the drying is
performed quickly and sample does not change colour. Material drying moment is
visible on the chart as drying characteristic bending. As Drying time for main
humidity measurement select time from the beginning to chart “flattening”. As the
time axis is not described on the chart, use “evaluation with high margin”. Too
short drying time does not allow to achieve precise humidity measurement results.
In case of Short mode, in main measurement select Sampling time, which allows to
include approx. 10 samples in time of characteristic bending. If drying is finished
too quickly, increase Samples quantity or Sampling time.
Notes:
1. Before main measurement remember about deactivating of chart displaying.
2. To improve operation it is possible to use Promas software (available on
demand), which generates precise drying chart.
USER MANUAL
25
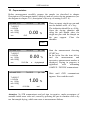
14. Proper moisture
Before measurement carefully prepare the sample (as described in chapter
Description of Thermogravimetric Analysis) and set correct drying parameters (see
the diagram in chapter 11.6, description of the way of settting is in 11.4)..
m0-m/m0*100%
Ts=120°C
T = 80.23°C
t =0:00:00s
m= 1.020g
m0= 1.020g
CSD
tp= 1sek
0.00 %
00:02:00s
Place an empty single-use pan and
tare the balance with →T← key.
The indication should be m=0,00g.
Open the drying chamber and
using the pan handle place the
single-use pan with the sample on
the pan support. Close the
chamber.
START
m0-m/m0*100%
Ts=120°C
T = 80.23°C
t =0:00:00s
m= 1.020g
m0= 1.020g
CSD
m0-m/m0*100%
T = 80.23°C
t =0:00:00s
m= 1.020g
m0= 1.020g
CSD
tp= 1sek
0.00 %
00:01:29s
nr
Ts=120°C
drying/sample
Start the measurement choosing
START key.
In the lower line the time left to
end
the
measurement
and
successive measurement number is
displayed. Drying in progress is
signalised
with
alternating
SAMPLE / DRYING communicate.
tp= 1sek
Wait until END communicate
appears. Now read the result.
1.00 %
00:01:29s
end
Attention: No STB communicate and m0 sign in negative, marks acceptance of
unstable initial mass value m0, caused by pressing the pan to chamber wall or by
too fast sample drying, which can cause to measurement failures.
USER MANUAL
26
15. Connecting to a printer or computer – drying report
When drying process is finished measurement result can be send to printer or a
computer via RS232C interface after using
key.
Measuring data can be also completed with text information. To enter text
descriptions user can use moisture analyzer keys or connect a computer keyboard
to PS2 port at the back of the device. Using computer keyboard enables to control
all scale functions.
Using navigation keys and ENTER key choose Drying chart and disable or enable
printing and displaying the chart. Set necessary options: Product name, Operator
and with the connected computer keyboard enter text information for printed
report( maximally 19 signs). The set of available signs is presented on next site.
Option Remarks is designed to inscribe bigger amount of text.
USER MENU
1. Drying settings
2. Memory settings
3. Drying options
4. Drying raport
5. Configuration
6. Settings default
7. Exit
DRYING REPORT
1. Product name
2. Operator
3. Remarks
4. Print settings
5. Exit
:
:
PRINTOUT
1. Date
2. Time
3. Nr
4. Name
5. Drying temp.
6. Profile
7. Mode
8. Method
9. Finished
10. Initial weight
11. Final weight
12. Drying time
13. Sampling int.
14. Moisture
15. Quantity
16. Average
17. Remarks
18. Performance
Wyjście
USER MANUAL
27
A set of characters available using the keyboard while you use Product name,
Operator or Remarks:
1 . , ’ ? ! ” - ( ) @ / : _ ; + & % * = < > $ [ ] { }\ ~ ^ ‘ # |
2ABCabc
3DEFdef
4GHIghi
5JKLjkl
6MNOmno
7PGRSpgrs
8TUVtuv
9WXYZwxyz
0 space
Erasing the mark and move the cursor to the left: the navigation key <.
To print the drying report press
key.
Drying started:
- - - - - - - - - - - - - - - - - - -- - - - Date:
Time.:
Drying parameters
- - - - - - - - - - - - - - - - - - -- - - - Product
Drying temperature :
Mode
:
Calculation
:
Finished
:
Initial weight
Final weight
Drying time
Sampling interval:
Moisture
:
:
:
:
:
REMARKS:
The analysis proceeded by:
Signature ....................................
It is possible to set necessary serial port parameter values (8bit, 1stop, no parity,
4800bps). To use RS232C Settings option press key (weighing mode) and pres
MENU key.
USER MANUAL
28
16. Moisture analyzer options
Moisture analyzer options:
- average from series of humidity measurements displaying,
USER MENU
1. Drying settings
2. Memory settings
3. Drying options
4. Drying raport
5. Configuration
6. Settings default
7. Exit
DRYING OPTIONS
1. Average
2. Drying chart
3. Transmission
4. Exit
m0-m/m0*100%
Ts=120°C
tp= 1sek
T = 80.23°C
t =0:00:00s
m= 1.020g
m0= 1.020g
CSD
00:02:00s
Σ 000 X= 0.00%
- Drying chart displaying
USER MENU
1. Drying settings
2. Memory settings
3. Drying options
4. Drying raport
5. Configuration
6. Settings default
7. Exit
DRYING OPTIONS
1. Average
2. Drying chart
3. Transmission
4. Exit
m0-m/m0*100%
Ts=120°C
ts= 0:10:00s
T = 118.34°C 30%
t =0:00:00s
m= 1.020g
m0= 1.020g
- transmission of all mass (samples) measurements by serial port (possibility to
print or to save on computer using PROMAS program).
USER MANUAL
29
17. Testing and calibration
To check the weighing function of balance – drier, switch it to the simple weighing
( key) and check it by putting precisely weighed object, e.g. calibration weight
F2 (OIML), equal to device measurement range. In case of any inaccuracies
perform the balance calibration. It is performed by activating the calibration
function, available in special functions menu, and putting the calibration weight on
the pan according to indications on the display (see Sensitivity calibration
function).
Control of humidity measurement precision requires use of standard substance –
disodium tartrate (di-Sodium tartrate dihydrate C4H4Na2O6*H2O). For the control
use 5 g sample, setting: step mode, calculations method: m/ m0*100% ,
temperature 150oC, sampling time 10 s, samples amount 4 and drying time
00:15:00s.
The result should be contained in range 15.61 – 15.71%.
USER MANUAL
30
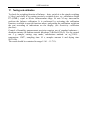
18. Moisture analyser as a balance
The moisture analyser may be also used as a normal balance. To switch between
analyser / weighing mode press key.
During moisture analyzer work as a normal balance essential influence on
measurement result has the proper setting of moisture analyzer level (level
indicator is at the back of the device) and precise balance calibration. Setting
balance level is important after each putting moisture analyzer into new place .
During normal weighing Menu key opens directly Configuration window, where
the Units option is available, Auto-zeroing, scale calibration and default settings.
18.1 Units
In order to change the unit used in balance and moisture analyzer use MENU key, in
Configuration window (User Menu window shows up when the normal weighing
mode is off).
USER MENU
1. Drying settings
2. Memory settings
3. Drying options
4. Drying raport
5. Configuration
6. Settings default
7. Exit
CONFIGURATION
1. Units
2. Auto-zeroing
3. Interface
4. LCD settings
5. Language
6. Time&date
7. Keyboard
8. Defaults
9. Calibration
10. Info
Exit
CONFIGURATION
Carat
Miligram
Gram
Kilogram
Pound
Ounce
Ounce troy
Grain
Pennyweight
Newton
Exit
Choice of unit is made using navigation keys and ENTER key.
[ct]
[mg]
[g]
[kg]
[lb]
[oz]
[ozt]
[gr]
[dwt]
[N]
USER MANUAL
31
18.2 Auto-zeroing
Auto-zeroing function causes that the close to zero indication will be corrected
automatically and when the pan is unbiased zero indication will be hold
independently even when environment conditions change (temperature, air density
etc).
USER MENU
1. Drying settings
2. Memory settings
3. Drying options
4. Drying raport
5. Configuration
6. Settings default
7. Exit
1. Units
2. Auto-zeroing
3. Interface
4. LCD settings
5. Language
6. Time&date
7. Keyboard
8. Defaults
9. Calibration
10. Info
Exit
CONFIGURATION
AUTO-ZEROING
1. Status:
2. Exit
OFF
AUTO-ZEROING
1. Status:
2. Exit
<ON> <OFF>
In order to turn on Auto-zeroing function use navigation keys and ENTER key,
choose Status ON.
USER MANUAL
32
18.3 Calibration
Calibration with external weight standard should be performed in case indications
exceed permissible error (for example more than 5 graduation overflow). To scale
calibration use weight standard presented in technical data table (or more precise).
Depending on the value of gravity acceleration the producer sets the scale to
specific location of use.
If the location of use change the scale should be calibrated once again
Attention: Scale sensitivity error doesn’t cause directly humidity error thanks to
percentage calculation formula.
In order to calibrate the balance use MENU key and Configuration option, and then
Calibration.
USER MENU
1. Drying settings
2. Memory settings
3. Drying options
4. Drying raport
5. Configuration
6. Settings default
7. Exit
CONFIGURATION
1. Units
2. Auto-zeroing
3. Interface
4. LCD settings
5. Language
6. Time&date
7. Keyboard
8. Defaults
9. Calibration
10. Info
Exit
CALIBRATION
1. Calibration:
2. Load :
3. Exit
100g
CALIBRATION
1. Calibration:
2. Load :
3. Exit
<20g><50g><100g><...>
Load enables to inscribe standard mass value that will be used to calibrate. User
can choose from few values or inscribe his own value.
USER MANUAL
33
After setting the standard of mass prepare single-use pan, put the standard and
choose Calibration option by pressing ENTER.
CONFIGURATION
1. Units
2. Auto-zeroing
3. Interface
4. LCD settings
5. Language
6. Time&date
7. Keyboard
8. Defaults
9. Calibration
10. Info
Exit
CALIBRATION
1. Calibration:
2. Load :
3. Exit
100g
CALIBRATION
Please wait ...
CALIBRATION
Taring
CALIBRATION
Put load
Put the standard of mass
on the pan.
CALIBRATION
Please wait ...
100.000g
Displaying standard of
mass value means that
the calibration is done.
USER MANUAL
34
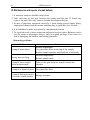
19. Maintenance and repairs of small defects
1. A moisture analyser should be kept clean.
2. Take care that no dirt gets between the casing and the pan. If found any,
remove the pan (lift it up), remove dirt and then replace the pan.
3. In case of improper operation caused by a short-lasting power supply decay,
unplug the balance from the mains and then plug it again after few seconds.
4. It is forbidden to make any repairs by unauthorised persons.
5. To repair the scale, please contact an authorised service centre. Balances can be
sent for repair as messenger delivery only in original package, if not, there is a
risk of damaging the balance and loosing guarantee.
Measuring problems:
Problem
Solution
A sample burns down
Reduce temperature
Use glass fibre filter on the top of the sample
Reduce sample quantity and distribute it uniformly
Drying lasts too long
Increase temperature
Reduce sample mass
A sample loses weight
before measurement
Take out the pan and put a sample outside the
chamber
A sample is liquid or paste Use glass fibre filter
A sample does not consist
of enough volatile matters
Enlarge a sample
USER MANUAL
35
Troubleshooting:
Display indication
Possible cause
Initial
heating
Ts
The temperature sensor is
temperature
exceeds
damaged.
105°C, the sensor does
not react when touched
with a finger
Initial
heating
Ts
The heater is damaged.
temperature does not
reach
105°C,
the halogen heater(s)
do not light.
"Test ..."
Auto-tests in progress / electronic
unit damage
"----"
The balance is during zeroing
/ mechanical damage
„Tare range exceeded”
„Zeroing range
exceeded”
„Weighing range
exceeded”
„Measuring range
exceeded (+)”
„Measuring range
exceeded (-)”
Tare key pressed during zero
indication
Permissible zeroing range was
exceeded
Permissible weighing range
(Max +9e) was exceeded
Upper limit of analog-digital
transducer measuring range was
exceeded
Lower limit of analog-digital
transducer measuring range was
exceeded
Remedy
Contact an authorised service
point.
Replace the heater.
wait for 1 minute
wait for 1 minute
check if the balance is placed on
stable ground, not affected by
vibrations
Balance indications must be
different than zero
Remove the load from the pan
Reduce the load
Remove the load from the pan
Check if there are all necessary
pan elements
USER MANUAL
36
Declaration of Conformity
We:
AXIS Spółka z o.o. 80-125 Gdańsk, ul.Kartuska 375B, Poland
confirm with all responsibility that moisture analysers:
ATS60, ATS120, ATS210 oraz BTS110 i BTS100D
marked with CE mark comply with the following:
1. EN 61010-1 standard Safety requirements for electrical equipment for
measurement, control and laboratory use. General requirements harmonized
with the directive 73/23/EEC (Low Voltage Directive).
2. EN 55022:2000 standard Limits and methods of measurement of radio
disturbance characteristics of information technology equipment and
IEC 61000-4-3 Electromagnetic compatibility (EMC) - Part 4-3: Testing and
measurement techniques - Radiated, radio-frequency, electromagnetic field
immunity test, harmonised with the Council Directive 89/336/EEC.
Additional information
Conformity evaluation for the Council Directive 73/23/EWG and 89/336/EWG
was carried out by Research Laboratory of Electrotechnology Institute Division
Gdańsk, accredited by Polish Centre for Accreditation.
Gdańsk, 15.02.2011 r.
Per pro Director of AXIS Ltd:
Production Manager
Jan Kończak
_________________
Signature
USER MANUAL
37
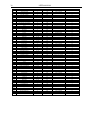
Appendix
Drying parameters for different substances (examples)
Temperature
(°C)
Acrylate seal
Initial weight
(g)
3
Granulated sugar
Icing sugar
Butter
Margarine
Ketchup
Mustard
3
5
2
2
2
3
90
130
140
160
120
80
Peanuts
Nuts in shells
Nuts
Peanuts
3
3
2
3
100
100
100
100
Cheese
Cottage cheese
Cottage cheese (rural)
Mozzarella cheese
Melted cheese
2
6
1
2
3
160
140
130
160
160
Dry beans
Bean
Pea
Dry peas
Dry carrot
Dry corn
Dry potato pieces
Lentil
Corn starch
Oily seeds
Rice
Rye
Beetroot
Sesame seeds
Soya-bean flour
Sunflower seeds
Cotton seeds
Wheat flour
Wheat flakes
Water to flour
Plastic rag
Natural rag
3-4
5
4
5-7
5.5-6
5-7
3
4
2
3-4
4
5
5
3
5
4
3-4
6
4
2-3
1
1
105
150
135
110
120
110
130
135
160
90
105
150
150
130
95
100
110
130
150
90
160
160
Feeding stuff
Pig feeding stuff
3-4
4-5
150
160
Coffee
Instant coffee
Coffee seeds
Cocoa
2
5
4
3
150
120
105
52.
Cocoa seeds
4-5
130
53.
54.
55.
56.
57.
58.
59.
60.
61.
62.
Chocolate
Grinded chocolate
Almonds with caramel
Normal almonds
Almonds
2
2-3
4
3
3
103
90
80
100
100
grind into thick powder
grind into thick powder
grind into thick powder
10
10
5
5
5
Tobacco
2
100
tear up into pieces
16
Multivitamin bars
Mint pastilles
3
3
115
90
grind into thick powder
grind into thick powder
3
3
No
1.
2.
3.
4.
5.
6.
7.
8.
9.
10.
11.
12.
13.
14.
15.
16.
17.
18.
19.
20.
21.
22.
23.
24.
25.
26.
27.
28.
29.
30.
31.
32.
33.
34.
35.
36.
37.
38.
39.
40.
41.
42.
43.
44.
45.
46.
47.
48.
49.
50.
51.
Substance
Preparation
Analysing time (min)
mix a sample
9
tear up a foil
grind into thick powder
grind into thick powder
grind into thick powder
grind into thick powder
3
20
4
4
18
19
6
4
4
4
13
mix a sample
mix a sample
grind a sample
grind a sample
grind for 30 sec.
grind a sample for 10 sec.
grind a sample
grind a sample
divide a mass
grind a sample for 30 sec.
grind a sample for 1 min
grind a sample for 30 sec.
grind a sample
grind a sample
grind a sample for 2 min
grind a sample for 1 min.
grind a sample
mix a sample
8
11
5
5
10
8
10
3
10
6
6
5
8
13
12
9
8
5
4
6
7
10
4
14
6
21
mix a sample
grind a sample for 1 min.
8
10
8
4
grind a sample for
powder
8
USER MANUAL
38
63.
64.
65.
66.
67.
68.
69.
70.
71.
72.
73.
74.
75.
76.
77.
78.
79.
80.
81.
82.
83.
84.
85.
86.
87.
88.
89.
90.
91.
92.
93.
94.
95.
96.
97.
98.
99.
100.
101.
102.
103.
104.
105.
106.
107.
108.
109.
110.
111.
112.
113.
114.
115.
116.
117.
118.
119.
120.
121.
122.
123.
Sticks
3-4
75
grind into powder
Skimmed milk
Skimmed milk powder
Fat milk powder
Whole milk
5
5
5
5
110
90
100
110
mix a sample
mix a sample
Concentrated orange juice
2-3
115
mix a sample
Dry chicken excrements
4
140
Soap
Starch derivatives
Starch glue
Detergent
3
3
2
2
120
150
100
160
pinch some pieces
Textile
Materials for bricks
Silicon sand
Dolomite
Loess soil
Ceramics clay
Limestone
Glass powder
River water
1
7
10-14
10-12
3
3
12-14
8-10
4
85
160
160
160
160
160
160
160
160
separate fibres
distribute a sample
Active coal
Coal powder
Natural chalk
Granulated acryl
Acryl ester
10
4
8
10-15
2
80
160
160
80
Cellulose matter
Photo paper
Dialyse membrane
2
2
1
130
150
80
Drawing ink
Toner
Powder paint
2
3-4
2
120
40
120
Dialyse membrane
Leak stopper
Glue dissolvent
0.5-0.7
3
2
80
160
140
Latex
Natural latex
Balsam
Soda bihydrate
Ultramid
Silicon gel
Macrolon
Plexiglas 6N
Polypropylene
Polypropylene
Polystyrene solution
Polystyrene
1-2
2
1
2
10
10
10-12
10
13
3
2
10
160
160
130
160
60
115
80
70
130
120
120
80
Dissolvent
Resin dissolvent
2
2
155
160
9
6
6
13
8
mix a sample
6
12
9
12
mix a sample
3.6
20
1.9
6
15
9
5
5
20
mix a sample
10
4
2
12
19
tear up into pieces
tear up in 1 cm2 pieces
cut into thin slices
5
6
2
cut into small pieces
cut into thin slices
10
4
cut into thin slices
mix a sample
mix a sample
mix a sample
2
7
10
5
6
8
12
10
5
15
10
9
2
9
10
8
6