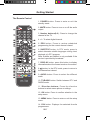
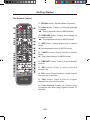
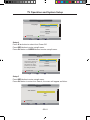
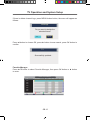
1
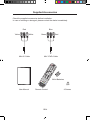
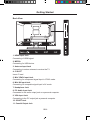
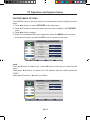
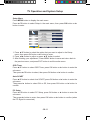
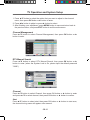
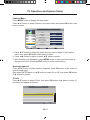
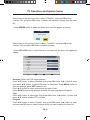
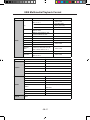
LEDTV
MIIAVISION
24”
Full HD
MIIA MTV-B24LEFHD
ENG
Instruction manual
Before operating this product, please read user manual completely.
Mounting the Stand
1. Place the TV with display side down on the table or desk (flat surface), and
attach the Part B of stand to the Part A of the TV.
A
B
2. Insert the stand and secure the stand to the TV by using included 4 screws.
Note: Be sure to store the screws in a safe place. Keep the screws away from
small children.
manuale_MTV-B22LEHD/MTV-B24LEHD_ITA+ENG.indd 3
12/10/13 11.39
Table of Contents
Table of Contents.....................................................................................................1
Safety Informations..................................................................................................2
Supplied Accessories...............................................................................................4
Getting Started.........................................................................................................5
TV Operation and System Setup...........................................................................10
Media Operation.................................................................................................... 34
Recorder Operation...............................................................................................36
USB Multimedia Playback Format.........................................................................37
PC Setting..............................................................................................................38
Troubleshooting.....................................................................................................39
GB-1
manuale_MTV-B22LEHD/MTV-B24LEHD_ITA+ENG.indd 3
12/10/13 11.39
Safety Instructions
CAUTION MARKING WAS LOCATED AT THE REAR OF THE APPARATUS.
The lightning flash with arrowhead symbol, within an equilateral
triangle, is intended to alert the user to the presence of uninsulated
"dangerous voltage" within the product's enclosure that may beof
sufficient magnitude to constitute a risk of electric shock to persons.
The exclamation point within an equilateral Triangle is intended to
alert the user to the presence of important operating and maintenance
(servicing) instructions in the literature accompanying the appliance.
CAUTION
DANGER OF EXPLOSION IF BATTERY IS INCORRECTLY REPLACED.
REPLACE ONLY WITH THE SAME OR EQUIVALENT TYPE.
USE OF CONTROLS OR ADJUSTMENTS OR PERFORMANCE OF
P R O C E D U R E S O T H E R T H A N T H O S E S P E C I F I E D M AY R E S U LT I N
HAZARDOUS RADIATION EXPOSURE.
WARNING
TO REDUCE THE RISK OF FIRE OR ELECTRIC SHOCK, DO NOT EXPOSE
THIS APPLIANCE TO RAIN OR MOISTURE.
TO REVENT FIRE OR SHOCK HAZARD, DO NOT EXPOSE THIS UNIT TO RAIN
OR MOISTURE. DO NOT PLACE OBJECTS FILLED WITH LIQUIDS ON OR
NEAR THIS UNIT.
SHOULD ANY TROUBLE OCCUR, DISCONNECT THE AC POWER CORD AND
REFER SERVICING TO A QUALIFIED TECHNICIAN.
GB-2
manuale_MTV-B22LEHD/MTV-B24LEHD_ITA+ENG.indd 3
12/10/13 11.39
Safety Instructions
1) Read these instructions.
2) Keep these instructions.
3) Heed all warnings.
4) Follow all instructions.
5) Do not use this apparatus near water.
6) Clean only with a dry cloth.
7) Do not block any ventilation openings.
Install in accordance with the manufacturer's instructions.
8) Do not install near any heat sources such as radiators, heat registers,
stoves, or other apparatus (Including amplifiers) that produce heat.
9) Do not defect the safety purpose of the polarized or grounding-type plug.
A polarized plug has two blades with one wider than the other.
A groundingtype plug has two blades and a third grounding prong.
The wide blade or the third prong is provided for your safety.
If the provided plug does not fit into your wall outlet, consult an electrician for
replacement of the obsolete outlet.
10) Protect the power cord from being walked on or pinched particularly at plugs,
convenience receptacles, and the point where they exit from the apparatus.
11) Only use attachments / accessories specified by the manufacturer.
12) Use only with the cart, stand, tripod, bracket, or table specified by the
manufacturer, or sold with the apparatus.
When a cart is used, use caution when moving the cart / apparatus
combination to avoid injury from tip-over.
13) Unplug this apparatus during lightning Storms or when unused for long
periods of time.
14) Refer all servicing to qualified service personnel. Servicing is required when
the apparatushas been damaged in any way, such as the power cord or plug
is damaged, liquid has been spilled or objects have fallen into the apparatus,
the apparatus has been exposed to rain or moisture, does not operate normally,
or has been dropped.
15) To prevent electric shock, ensure the grounding pin on the AC cord power plug
is securely connected.
GB-3
manuale_MTV-B22LEHD/MTV-B24LEHD_ITA+ENG.indd 3
12/10/13 11.39
Supplied Accessories
Check the supplied accessories before installation.
In case of missing or damaged, please contact the dealer immediately.
Red
Yellow
Blue
White
Green
Mini AV Cable
Red
Mini YPbPr Cable
2AAA Batteries
User Manual
Remote Control
4 Screws
GB-4
manuale_MTV-B22LEHD/MTV-B24LEHD_ITA+ENG.indd 3
12/10/13 11.39
Getting Started
Front View
1
2
1. Remote Sensor
Do not block this sensor or the remote control will not work.
2. Standby Indicator
Indicates whether the unit is ON or in STANDBY (OFF) mode.
3. The functions of the buttons are described as bellows:
POWER: Press to turn the unit on or off.
SOURCE: Press to select the input source of the TV.
MENU: Press to display the OSD menu, Press again to exit the menu.
CH+/-: Press to scan through channels.
VOL+/-: Press to adjust the volume.
Note: When select the input source, press VOL+ button on the panel to confirm.
GB-5
manuale_MTV-B22LEHD/MTV-B24LEHD_ITA+ENG.indd 3
12/10/13 11.39
Getting Started
Back View
1. HDMI Input Jack
Connecting of HDMI signal
2. MEDIA
Connecting for USB device.
3. Antenna Input Jack
Connecting to extern antenna to receive the TV.
4. CI SLOT
Insert CI card.
5. Mini YPbPr Input Jack
Connecting for component signal input in YPbPr mode.
6. Mini AV Input Jack
Connecting for composite signal input in AV mode.
7. Headphone Jack
8. PC Audio Input Jack
Connected to the audio output jack on a personal computer.
9. VGA Input Jack
Connecting to the PC output jack a personal computer.
10. SCART Jack
11. Coaxial Output Jack
GB-6
manuale_MTV-B22LEHD/MTV-B24LEHD_ITA+ENG.indd 3
12/10/13 11.39
Getting Started
The Remote Control
1. POWER button: Press to enter or exit the
standby mode.
1
2
3. Number buttons(0~9): Press to change the
channel of the TV.
3
4
5
6
7
8
9
10
11
12
13
14
18
15
19
16
17
20
21
24
25
28
29
32
33
2. MUTE button: Press to turn on or off the audio
output.
22
23
26
27
30
31
34
35
36
4. -/--: To select digital channel.
5. EPG button: Press to review scheduled
programming for the current channel viewed.
6. SUBTITLE button: In DTV mode, press to
select altermate subtitle languages during view/
playback of a DTV program.
Note: Subtitle and teletext is only available if the
service is provided by broadcast.
7. DISPLAY button: press this button to display
information about the current mode on the screen.
8.
button: ln the DTV mode, press to return to
the channel last viewed.
9. AUDIO button: Press to select the different
audio.
10. TV/RADlO button: Switch between DTV and
RADIO mode.
11. Direction buttons: Press the direction
buttons to select menu options or settings.
12. OK button: Press to confirm selection in the
setup menu.
13. MENU button: Press to enter or exit the setup
menu.
14. FAV button: Displays the selected favorite
programmers.
GB-7
manuale_MTV-B22LEHD/MTV-B24LEHD_ITA+ENG.indd 3
12/10/13 11.39
Getting Started
The Remote Control
15. VOL+/- button: Press to increase or decrease
the volume.
1
2
3
4
5
6
7
8
9
10
11
12
13
14
18
15
19
16
17
20
21
24
25
28
29
32
33
22
23
26
27
30
31
34
35
36
16. AUTO button: Press to do auto configuration
directly(PC-RGB MODE).
17. ASPECT button: Select from the following
modes settings: Auto / 16:9 /4:3 / Full Screen /
Zoom.
18. EXIT button: Press to exit all the OSD on the
screen.
19. CH+/- button: Press to skip the next/previous
channel.
20. SOURCE button: Press to select enter the
source selecting menu.
21. PMODE button: Press to select the picture
mode.
22. SMODE button: Press this button to change
the audio mode.
23. SLEEP button: This feature allows you to set
up sleep time.
24. TEXT button: Switch on or off the teletext
mode.
►;: Press to start playback or pause (ln MEDIA
mode).
25. INDEX button: Request the index page
(Teletext mode).
■ button: Press to stop playing (ln MEDIA mode).
26. MIX button: Mix function in teletext mode.
GB-8
manuale_MTV-B22LEHD/MTV-B24LEHD_ITA+ENG.indd 3
12/10/13 11.39
Getting Started
The Remote Control
27. REVEAL button: Reveal hidden information.
1
2
3
4
5
6
7
8
9
10
11
28. HOLD button: Freeze a multi-page passage
in Teletext.
◄◄ : Playing backward fast.(ln MEDIA Mode)
29. SUBPAGE button: Display the subpage on
the teletext screen.
►►: Playing backward fast.(ln MEDIA Mode)
30. SIZE button: Change display size in teletext
mode.
9: Skip backward button.(ln MEDIA mode)
12
13
14
18
15
19
31. CANCEL button: Cancel function in teletext
mode.
:: Skip forward button.(ln MEDIA mode)
16
17
20
21
24
25
28
29
32
33
36
22
23
26
27
30
31
34
35
32. TIMESHIFT button: Press it to enter timeshift
function.
33. REC button: Press to select enter the
recorded file.
34. FAV- button: Press to scan to a lower channel
from your list of favorites.
35. FAV+ button: Press to scan to a higher
channel from your list of favorites.
36. Color buttons: Access the Teletext items
or program edit when using Digital/Freeview TV
channels.
GB-9
manuale_MTV-B19LEHD_ITA+ENG.indd 3
26/07/13 10.39
TV Operation and System Setup
Auto Installation
If this is the first time you are turning on the TV and there are no programs in the
TV memory, the "Auto Installation" menu will appear on the screen.
These are 5 setups as follow:
Setup1
Press ▼/▲ button to select TV Location.
Press OK button or GREEN button to enter setup2 menu.
Auto Installation
- Setup 1 Home
Home Mode:
Dynamic
Standard
Mild
Auto Installation
- Setup 1 Home
Next Page
Home
Mode:
Move
OK
Dynamic
Exit
Exit
Enter
Standard
Mild
Setup2
Auto Installation
Pres ▼/▲button to select country.
- Setup 2 Next Page
Press RED button to enter
setup1
menu.
Country:
Germany
Move
Enter
Exit
Press OK button or GREEN button to enter
UK setup3 menu.
OK
Exit
France
Auto Installation
Italy
- Setup 2 Country:
Previous Page
Move
Poland
Next PageGermany
OK
Enter
Exit
UK
Exit
France
Italy
Auto Installation
Previous Page
Poland
- Setup
3Next Page
OK
Language:
Move
Enter
Exit
English
Exit
French
Italian
Setup3
Auto Installation Spanish
Press ▼/▲ button to select Language.
- Setup 3 Press RED button to enter setup2 menu.Dutch
Language:button
Previous Page
Next Page English
Press OK button
or GREEN
to enter setup4 menu.
Move
OK
Enter
French
Exit
Exit
Italian
GB-10
Spanish
Auto Installation
Previous Page
- Setup
4Next Page
AutoMove
Power Off:
OK
Enter
Hours can be chosen for a
manuale_MTV-B22LEHD/MTV-B24LEHD_ITA+ENG.indd 3
Dutch
Exit
Off
Exit
12/10/13 11.39
Country:
Germany
UK
Next Page
Move
France
Exit
AutoEnter
Installation
OK
Exit
Italy
- Setup 2 -
Poland
Germany
Country:
Auto Installation
- Setup 2 - andUKSystem Setup
TV Operation
Previous Page
Next Page
Move
Exit
Exit
France
Germany
Italy
UK
Poland
France
Auto Installation
OK
Country:
Previous Page
Enter
Next Page
- Setup 3 - Italy
OK
Exit
Move
Enter
Exit
Poland
English
Language:
Previous Page
Next Page
Move
French
Exit
Enter
Exit
Italian
Auto Installation
OK
Spanish
- Setup 3 -
Dutch
English
Language:
Auto Installation
Previous Page
Move
Next Page
- Setup 3 -
French
Exit
Exit
Italian
English
Spanish
French
Dutch
AutoPower
InstallationItalian
select Auto
Off.
OK
Language:
Enter
Setup4
Press ▼/▲ button
to
Previous Page
Next Page
- Setup
4 - Spanish
Press RED button to enter setup3
menu.
Move
Enter
Exit
Dutch
Auto Power
Off: to enter
Off
Press OK button or GREEN
button
setup5 menu.
OK
Exit
Previous
Page
Hours can
be chosen for aNext Page
1 Hour
continuous viewing, and
OK
Exit 2
Move
Enter
Exit
Hours
after that the TV will beAuto Installation
powered off, “off” means
4
Hours
- Setup 4 the viewing is timeless.
Auto Power Off:
Off
Auto Installation
Previous
Next Page
Hours
can bePage
chosen for a
1 Hour
- Setup 4 continuous viewing, and OK
Exit
Move
Enter
Exit
2
Hours
after Auto
that thePower
TV will be
Off:
Off
powered off, “off” means
4
Hours
Hours can be chosen for a
1 Hour
the viewing is timeless.
continuous viewing, and
2 Hours
Auto Installation
after that the TV will be
Previous Page
Next Page
- Setup 5 -4 Hours
powered off, “off” means
the viewing is timeless.
Move
OK
Auto Search
Previous Page
Enter
Exit
Exit
All
Next Page
Setup5
ATV
Move
Enter
Auto Installation
Press RED button to enter
setup4
menu. Exit
DTV
Setup 5 - the menu will appear as follow:
Press OK button to enter Auto -Search,
OK
Exit
Auto Installation
AutoPage
Search
Previous
Move
All
- Setup 5 OK
ATV
Exit
Exit
Enter
DTV
All
Auto Search
ATV
DTV
Previous Page
Move
OK
Enter
Exit
Exit
Previous Page
Move
OK
Enter
Exit
Exit
GB-11
manuale_MTV-B22LEHD/MTV-B24LEHD_ITA+ENG.indd 3
12/10/13 11.39
TV Operation and System Setup
VIDEO MENU OPTIONS (PICTURE)
Press MENU button on the front panel or on the remote control to display the main
menu.
1. Press ▲/▼ button to select PICTURE in the main menu.
2. Press ► button and ▲/▼ button to select the option that you want to adjust in
the PICTURE menu.
3. Press ▲/▼ button to adjust.
4. When you are satisfied with your adjustment, press the MENU button to return
to the previous menu or press the EXIT button to exit the main menu.
Picture
Picture Mode
Standard
Brightness
50
Contrast
50
Picture
Sound
Channel
Feature
Sharpness
5
Colour
50
Tint
50
Colour Temperature
Standard
Aspect Ratio
Setup
Move
OK
Enter
16:9
Exit
Exit
Menu
Return
Picture Mode
Select Picture Mode in PICTURE menu.
EASY WAY: You may select the picture mode directly by pressing PMODE button
repeatedly.
Brightness
Press ▲/▼ button and then use ◄/► to adjust the brightness of the picture.
Contrast
Press▲/▼ button and then use to ◄/► adjust the contrast of the picture.
Contrast
GB-12
manuale_MTV-B22LEHD/MTV-B24LEHD_ITA+ENG.indd 3
12/10/13 11.39
TV Operation and System Setup
Colour
Press ▲/▼ button and then use ◄/► to adjust the colour saturation.
NOTE: This option is invalid in PC mode, and it will be shown in gray.
Sharpness
Press ▲/▼ button and then use ◄/► to adjust the sharpness of your TV.
The suitable sharpness can make the picture look more clearer.
Tint
Press ▲/▼ button and then use ◄/► to adjust the tone of colour when your
system is in NTSC.
Colour temperature
Press ▲/▼ button and then use ◄/► to adjust the optimum colour temperature
mode to suit your eyes for viewing.
The picture looks more brighter when the COLOUR TEMPERATURE is higher.
Aspect Ratio
Press▼/▲button to select Aspect Ratio, then press OK button or ► button to
enter.
Noise Reduction
Press▼/▲button to select Noise Reduction, then press OK button or ► button to
enter and press▼/▲ button to select Off, Low, Middle, High.
AUDIO MENU OPTIONS (SOUND)
Press MENU button on the front panel or on the remote control to display the main
menu.
1. Press ▲/▼ button to select SOUND in the main menu.
2. Press ►button and ▲/▼ button to select the option that you want to adjust in
the SOUND menu.
3. Press ▲/▼ button to adjust.
4. When you are satisfied with your adjustment, press the MENU button to return
to the previous menu or press the EXIT button to exit the main menu.
GB-13
manuale_MTV-B22LEHD/MTV-B24LEHD_ITA+ENG.indd 3
12/10/13 11.39
TV Operation and System Setup
Sound
Picture
Sound
Channel
Feature
Sound Mode
Standard
Bass
50
Treble
50
Balance
0
Surround
Off
AVL
Off
SPDIF
PCM
Setup
Move
OK
Enter
Exit
Exit
Menu
Return
Sound mode
Select Sound Mode in SOUND menu. (Available sound mode: User, Standard,
Movie, Music, Speech)
EASY WAY: You can press SMODE button repeatedly on the remote control to
select the Sound Mode directly.
BASS
Press ▲/▼ button and then use ◄/► to increase or decrease the level of the
lower-pitched sounds.
TREBLE
Press ▲/▼ button and then use ◄/► to increase or decrease the level of the
higher-pitched sounds.
BALANCE
Press ▲/▼ button and then use ◄/► to adjust the audio output between left and
right speakers.
Surround
Press ▲/▼ button to select Surround, then press OK button or ► button to enter
and press ▲/▼ button to select On or Off.
AVL
Press ▲/▼ button to select AVL, then press OK button or ► button to enter and
press ▲/▼ button to select On or Off.
SPDIF
Press ▲/▼ button to select SPDIF, then press OK button or ► button to enter and
press ▲/▼ button to select.
GB-14
manuale_MTV-B22LEHD/MTV-B24LEHD_ITA+ENG.indd 3
12/10/13 11.39
TV Operation and System Setup
CHANNEL MENU OPTIONS
Press MENU button on the front panel or on the remote control to display the main
menu.
1. Press ▲/▼ button to select CHANNEL in the main menu.
2. Press ►button and ▲/▼ button to select the option that you want to adjust in
the CHANNEL menu.
3. Press ▲/▼ button to adjust.
4. When you are satisfied with your adjustment, press the MENU button to return
to the previous menu or press the EXIT button to exit the main menu.
Channel
Picture
Channel Management
ENTER
Favorite Managemet
ENTER
Sound
Channel
Country
Italy
Auto Search
ENTER
DTV Manual Search
ENTERENTER
ATV Manual Search
ENTER
Feature
Setup
Move
OK
Enter
Exit
Exit
Menu
Return
Channel Management
Press ▲/▼ Abutton to select Channel Management, then press OK button or ►
button to enter.
Channel - Channel Manager
NO.
Program Name
Type
√
0001
√
√
√
√
√
√
√
√
√
√
0002
0003
0004
0005
0006
0007
Move
CH+-
Del
Page + -
Lock
Exit
Exit
Skip
Swap
Return
Menu
Press RED button to set the current channel to delete, if the current channel
already delete, Press RED button again will cancel delete.
Press GREEN button to set the current channel to lock, if the current channel
already lock, press GREEN button again cancel lock.
Press YELLOW button to skip the current channel. If the current channel already
skip, press YELLOW button again wil cancel skip.
Press BLUE button to swap the channel posttion.
GB-15
manuale_MTV-B22LEHD/MTV-B24LEHD_ITA+ENG.indd 3
12/10/13 11.39
TV Operation and System Setup
If there is delete channel logo, press MENU button button, the menu will appear as
follows:
Message
Do you want to delete the
selected items?
OK
Cancel
Press ◄ button to choose OK, press ► button choose cancel, press OK button to
confirm.
TV
Successfully updated...
Favorite Manager
Press ▲/▼ button to select Favorite Manager, then press OK button or ► button
to enter.
Channel - Favorite Manager
NO.
Program Name
0001
Fav1
Fav2
Fav3
√
√
√
√
√
√
√
√
√
√
√
0002
0003
0004
0005
0006
0007
Move
CH+-
Favorite1
Page + -
OK
Favorite2
Exit
Fav4
Favorite3
Return
Type
Favorite4
Menu
GB-16
manuale_MTV-B22LEHD/MTV-B24LEHD_ITA+ENG.indd 3
12/10/13 11.39
TV Operation and System Setup
Press ▲/▼ button to select Channel, press RED button to set to Favl.
Press ▲/▼ button to select Channel, press GREEN button to set to Fav2.
Press ▲/▼ button to select Channel, press YELLOW button to set to Fav3.
Press ▲/▼ button to select Channel, press BLUE button to set Fav4.
if the current channel already be one of your favorite channel, press the RED/
GREEN /YELLOW/BLUE button again will set it to a normal channel.
Press MENU button or EXIT button, the successfully updated menu will appear.
Country
Press OK button or ► button to enter, then press ▲/▼ button to select appropriate
country, and press OK or ► button to confirm.
TV Connection
Press OK button or ► button to enter, then press ▲/▼ button to select appropriate
TV connection, and press OK or ► button to confirm.
Auto Search
Press ▲/▼ button to select Auto Search, then press OK button or ► button to
enter (When the System Lock is on, please input the default password "0000").
Channel-Auto Search
Picture
All
ENTER
DTV
ENTER
ATV
ENTER
Sound
Channel
Feature
Setup
Move
OK
Enter
Exit
Exit
Menu
Return
Press ▲/▼ button to select All, DTV, ATV, then press OK button or ► button to
enter.
GB-17
manuale_MTV-B22LEHD/MTV-B24LEHD_ITA+ENG.indd 3
12/10/13 11.39
TV Operation and System Setup
Message
Are you sure?
OK
Cancel
Auto Search selected items if select "OK' and press OK button, otherwise select
CANCEL to return back to previous page. After a few second, the menu will
appearas follows:
Channel Tuning
Picture
ATV channels found:
21
DTV channels found:
10
Radio channels found:
5
Sound
Channel
ATV:
Process:
Feature
63%
18%
Setup
Menu
Skip
Exit
Exit
When auto search finish, the save successful menu will appear a few second.
ATV Manual Search
Press ▲/▼ button to select Analog Manual Search, then press OK button
or ► button to enter (When the System Lock is on, please input the default
password"0000").
Channel - ATV Manual Search
Current Channel
001
Frequency
48.25MHz
Picture
Sound
Channel
Search
ENTER
Fine Tune
ENTER
Color System
Auto
Sound System
BG
Feature
Setup
Save
Move
OK
Enter
Exit
Exit
Menu
Return
Current Channel
Press OK or ► to enter. Then press ▲/▼ button to select Current Channel.
Press ▲/▼ button to select Current Channel, then press OK button or ► button to
select.
GB-18
manuale_MTV-B22LEHD/MTV-B24LEHD_ITA+ENG.indd 3
12/10/13 11.39
TV Operation and System Setup
Search
Press ▲/▼ button to select Search, then press OK button or ► button to enter,
the menu will appear as follows, and then press ◄/► to scan the channel.
Search
48.25MHz
Adjust
Menu
Return
Fine Tune
Press ▲/▼ button to select Fine Tune, then press OK button or ► button to enter,
the menu will appearas follows:
Fine Tune
48.25MHz
Adjust
Menu
Return
Press ◄/► button shortly to adjust programe frequency, press MENU button to
return back to the previous menu.
Note: Press RED button to save the result of the adjustment.
Color System
Press ▲/▼ button to select Color System, press OK button or ► button to enter
the sub menu.
Press ▲/▼ button to select Auto/PAL/SECAM, then press OK button or ► button
to confirm.
Sound System
Press ▲/▼ button to select Sound System, and press OK button or ► button to
enter the sub menu.
Press ▲/▼ button to select BG, DK, L, L'. then press OK or ► button to confirm.
GB-19
manuale_MTV-B22LEHD/MTV-B24LEHD_ITA+ENG.indd 3
12/10/13 11.39
TV Operation and System Setup
FEATURE MENU OPTIONS
Press MENU button on the front panel or on the remote control to display the main
menu.
1. Press◄/► bbutton to select FEATURE in the main menu.
2. Press ▲/▼ button to select the option that you want to adjust in the FEATURE
menu.
3. Press◄/► button to adjust.
4. When you are satisfied with your adjustment, press the MENU button to return
to the previous menu or press the EXIT button to exit the main menu.
Feature
√ 1)
√ 2)
Picture
Sound
Channel
ENTER
ENTER
Clock
ENTER
Sleep Timer
Off
Auto Power Off
Off
Hearing Impaired
Off
CI Info
ENTER
PVR/Timeshift
ENTER
Feature
Setup
Move
Lock
Language
OK
Enter
Exit
Exit
Menu
Return
Lock
Press ▲/▼ button to select Lock, press OK button or ► button to enter the sub
menu.
Then press ▲/▼ button to select On or Off (please input the default password
"0000").
And press OK button or ► button to confirm.
Feature - Lock
√ 1)
√ 2)
Lock Channel
Picture
Off
Parental Guidance
Off
Change Pin Code
ENTER
Hotel Mode
ENTER
Sound
Channel
Feature
Setup
Move
OK
Enter
Exit
Exit
Menu
Return
GB-20
manuale_MTV-B22LEHD/MTV-B24LEHD_ITA+ENG.indd 3
12/10/13 11.39
TV Operation and System Setup
Parental Guidance
Press ▲/▼ button to select Parental Rating, press OK button or ► button to enter
the sub menu.
Then press ▲/▼ button to select Rate (From 4-18, or OFF). Then press OK button
or ► button to confirm.
Change Pin Code
Press ▲/▼ button to select Change Pin Code, then press OK button or ► button
to enter, and Change Pin Code menu will appear as follows:
Feature - Change Pin Code
√ 1)
√ 2)
Old Password
____
New Password
____
Confirm New Password
____
Picture
Sound
Channel
Feature
Setup
Exit
Exit
Menu
Return
Input old password at "Old Password", (if the old password is incorrect, the
password will not be allowed to modify).
Input new password at "New Password".
Input new password again at "Confirm New Password", if new password and
confirm new password consistent.
The successfully updated menu will appear a few second, otherwise, the menu will
display the password mismatch.
Language
Press ▲/▼ button to select Language, then press OK button or ► button to enter
the sub menu.
Feature - Language
√ 1)
√ 2)
Picture
Sound
Channel
OSD Language
English
Preferred Subtitle
English
Preferred Audio
English
DTV Teletext Language
English
ATV Teletext Language
West
Feature
Setup
Move
OK
Enter
Exit
Exit
Menu
Return
GB-21
manuale_MTV-B22LEHD/MTV-B24LEHD_ITA+ENG.indd 3
12/10/13 11.39
TV Operation and System Setup
OSD Language
Press ▲/▼ button to select OSD Language, press OK button or ► button to enter
the sub menu.
then press ▲/▼ button to select, then press OK button or ►button to confirm.
Preferred Subtitle
Press ▲/▼ button to select Preferred Subtitle, press OK button or ► button to
enter the sub menu.
Then press ▲/▼ button to select, then press OK button or ► button to confirm.
Preferred Audio
Press ▲/▼ button to select Preferred Audio, press OK button or ► button to enter
the sub menu.
then press ▲/▼ button to select, then press OK button or ► button to confirm.
DTV Teletext Language
Press ▲/▼ button to select DTV Teletext language, press OK button or ► button
to enter the sub menu.
Then press ▲/▼ button to select, then press OK button or ► button to confirm.
ATV Teletext Language
Press ▲/▼ button to select ATV Teletext language, press OK button or ► button
to enter the sub menu.
Then press ▲/▼ button to select, then press OK button or ► button to confirm.
GB-22
manuale_MTV-B22LEHD/MTV-B24LEHD_ITA+ENG.indd 3
12/10/13 11.39
TV Operation and System Setup
Setup Menu
Press MENU button to display the main menu.
Press ▲/▼ button to select Setup in the main menu, then press OK button or ►
button to enter.
Setup
OSD Timer
Picture
ON
PC Setup
ENTER
Blue Screen
Off
Home Mode
Home
Reset TV Satting
ENTER
Sound
Channel
Never
Auto SCART
Feature
Setup
Move
OK
Enter
Exit
Exit
Menu
Return
1. Press ▲/▼ button to select the option that you want to adjust in the Setup
menu, then press OK button or ► button to enter.
2. Press ◄/► button to adjust or press ▲/▼ button to select.
3. After finishing your adjustment, Press MENU button to save and return back to
the previous menu, and press EXIT button to exit the entire menu.
OSD Timer
Press ▲/▼ button to select OSD Timer, press OK button or ► button to enter the
sub menu.
Then press ▲/▼ button to select, then press OK button or ► button to confirm.
Auto SCART
Press ▲/▼ button to select Auto SCART, press OK button or ► button to enter the
sub menu.
Then press ► button to select ON or Off, then press OK button or ► button to
confirm.
PC Setup
Press ▲/▼ button to select PC Setup, press OK button or ► button to enter the
sub menu.
Then press ► button to enter, then press OK button or ► button to confirm (when
the PC Signal is connected).
GB-23
manuale_MTV-B22LEHD/MTV-B24LEHD_ITA+ENG.indd 3
12/10/13 11.39
TV Operation and System Setup
Blue Screen
Press ▲/▼ button to select Blue, Press OK button or ► button to enter the sub
menu.
Then press ▲/▼ button to select On or Off, then press OK button or ► button to
confirm.
Home Mode
Press ▲/▼ button to select Home Mode, Press ► button to adjust.
Reset TV Setting
Press ▲/▼ button to select Reset TV Setting, then press OK button or ► button to
enter.
the password menu will appear (when the Child Lock is on).
Password
-
At the cursor input password to enter default password is "0000".
Message
Do you want to reset
Database to default?
OK
Cancel
Return back to the previous menu if select "CANCEL" and press OK button.
If select "OK" and press OK button, the resetting menu will appear a few second.
Then the first time installation menu will appear.
GB-24
manuale_MTV-B22LEHD/MTV-B24LEHD_ITA+ENG.indd 3
12/10/13 11.39
TV Operation and System Setup
DTV
Press DISPLAY button on the remote control to display program information.
Radio Roo
English
0001 BBC CHOICE
576i
Parent Rating None
MPEG2
Subtitle
16:45-17:00
16:59
Press DISPLAY button on the remote control again to display detailed information.
Signal:
Quality:
100%
100%
Frequency: 722000KHZ
BandWidth: 8M
The CHildren’s Entertainer: Dennis and Clive look for Mr Big’s rabbit, under threat from Luigi
Bolognese. For some reason this means they have to entertain children with a magic act.
Radio Roo
English
0001 BBC CHOICE
576i
Parent Rating None
MPEG2
Subtitle
16:45-17:00
16:59
Notes: 1. Picture menu and description are the same as that for TV source.
2. Sound menu and description are the same as that for TV source
3. Setup menu and description are the same as that forTV source.
CHANNEL MENU
Press MENU button to display the main menu.
Press ▲/▼ button to select Channel in the main menu. Then press OK button or
► button to enter.
Channel
Picture
Channel Management
ENTER
Favorite Managemet
ENTER
Sound
Channel
Country
Italy
Auto Search
ENTER
DTV Manual Search
ENTERENTER
ATV Manual Search
ENTER
Feature
Setup
Move
OK
Enter
Exit
Exit
Menu
Return
GB-25
manuale_MTV-B22LEHD/MTV-B24LEHD_ITA+ENG.indd 3
12/10/13 11.39
TV Operation and System Setup
1. Press ▲/▼ button to select the option that you want to adjust in the channel
menu, then press OK button or ► button to enter.
2. Press◄/► button to adjust or press ► button to select.
3. After finishing your adjustment, press MENU button to save and return back to
the previous menu, and press EXIT button to exit the entire menu.
Channel Management
Press ▲/▼ button to select Channel Management, then press OK button or ►
button to enter.
Channel - Channel Manager
NO.
Program Name
Type
√
0001
√
√
√
√
√
√
√
√
√
√
0002
0003
0004
0005
0006
0007
Move
CH+-
Del
Page + -
Lock
Exit
Exit
Skip
Swap
Return
Menu
DTV Manual Search
Press ▲/▼ button to select DTV Manual Search, then press OK button or ►
button to enter. (when the System Lock is On, please input the default password
"0000")
Channel - DTV Manual Search
Picture
Channel
21
Frequency(KHz)
177500
BandWidth(MHz)
7
Sound
Start
Channel
Strength:
Quality:
Feature
63%
18%
Setup
Move
OK
Enter
Exit
Exit
Menu
Return
Channel
Press ▲/▼ button to select Channel, then press OK button or ► button to enter
and press ▲/▼ to select channel, then press OK button or ► button to confirm.
Start
Press ▲/▼ button to select start, then press OK button or ► button to start scan,
the channel tuning menu will appear a few second.
GB-26
manuale_MTV-B22LEHD/MTV-B24LEHD_ITA+ENG.indd 3
12/10/13 11.39
TV Operation and System Setup
Feature Menu
Press MENU button to display the main menu.
Press ▲/▼ button to select Feature in the main menu, then press OK button or ►
button to enter.
Feature
√ 1)
√ 2)
Picture
Sound
Channel
ENTER
ENTER
Clock
ENTER
Sleep Timer
Off
Auto Power Off
Off
Hearing Impaired
Off
CI Info
ENTER
PVR/Timeshift
ENTER
Feature
Setup
Move
Lock
Language
OK
Enter
Exit
Exit
Menu
Return
1. Press ▲/▼ button to select the option that you want to adjust in the Feature
menu, then press OK button or ► button to enter.
2. Press ◄/► button to adjust or press ▲/▼ button to select.
3. After finishing your adjustment, press MENU button to save and return back to
the previous menu, and press EXIT button to exit the entire menu.
Hearing Impaired
Press ▲/▼ button to select Hearing Impaired, press OK button or ► button to
enter the sub menu.
then press ENTER button or ▲/▼ button to select On or Off, then press OK button
or ► button to confirm.
Cl lnfo
Press ▲/▼ button to select Cl Info, then press OK button or ► button to enter, Cl
lnfo menu will appear as follows:
Common Interface
Siot0: Viaccess Access
MENU
Return
Exit
Exit
GB-27
manuale_MTV-B22LEHD/MTV-B24LEHD_ITA+ENG.indd 3
12/10/13 11.39
TV Operation and System Setup
Press OK button or ► button to enter.
Common Interface
Viaccess Conditional Access
Main menu
Smart card management
System information
Language setting
Press ‘OK’ to enter; Press ‘EXIT’ to return
MENU
Return
Exit
Exit
Notes:
1. This is just an example for reference, different Cl module will have different CI
menu.
2. Other menu and description are the same as that for TV source.
PVR/Timeshift
Press ▲/▼ button to select PVR/Timeshit, then press OK button or ► button to
enter.
Feature - PVR/Timeshift
√ 1)
√ 2)
Partition Select
Picture
ENTER
Auto Timeshift
Off
Timeshift Buffer
Auto
Timer
ENTER
Record List
ENTER
Recorder Start
ENTER
Sound
Channel
Feature
Setup
Move
OK
Enter
Exit
Exit
Menu
Return
Partition Select
Press ▲/▼ button to select Partition Select, then press OK button or ► button to
enter.
Then will appear as follows:
GB-28
manuale_MTV-B22LEHD/MTV-B24LEHD_ITA+ENG.indd 3
12/10/13 11.39
TV Operation and System Setup
Partition List
Total Size: ---,-G Free Size: ---,-G
01
/udska0
Format
Set Default Partition
Move
OK
Enter
Auto Timeshift
Press ▲/▼ button to select Auto Timeshift, Press OK button or ► button to enter
the sub menu.
then press ▲/▼ button to select the 'Off' or 'Auto', then press OK button or ►
button to confirm.
Timeshift Buffer
Press ▲/▼ button to select Timeshift Buffer, press OK button or ► button to enter
the sub menu.
then press ▲/▼ button to select ( Auto, 30 Mins, lhr, or 2hr), then press OK button
or ► button to confirm.
Timer
Press ▲/▼ button to select Timer, then press OK button or ► button to enter.
Then will appear as follows:
Timer
01/11/2011 06:51:13
.01
CH No. Channel
0803 SZTVM04
Start
Duration
Date
Mode
09:08:00 00:08 15/09/2011 Once
02
03
04
05
06
07
08
09
Del
Del All
Move
Add
Exit
Exit
Edit
Menu
Return
GB-29
manuale_MTV-B22LEHD/MTV-B24LEHD_ITA+ENG.indd 3
12/10/13 11.39
TV Operation and System Setup
Return back to the previous menu if select "CANCEL" and press OK button.
If select "OK' and press OK button to delete the selected program from the timer
list.
• Press GREEN button to delete all timers, the menu will appear as follows:
Message
Delete all timers?
OK
Cancel
Return back to the previous menu if select "CANCEL" and press OK button.
If select "OK" and press OK button to delete all timers.
• Press YELLOW button to add channel to the timer list, the menu will appear as
follows:
Timer Edit
13/01/2008 18:02:25
Recorder
Off
Type
DTV
Channel
0001 YLETV1
Start Time
09:36
Duration
10:15
Date
13/01/2008
Mode
Once
Move
0~9
0~9
OK
Enter
Menu
Save
Recorder (When the PVR format support)
Press ▲/▼ button to select Recorder, then press OK button or ► button to enter
and press ▲/▼ button to select Recorder or Reminder. Press MENU button to
save the settings, press EXIT button to exit.
Press ▲/▼ button to select channel that you want to edit.
Press BLUE button to edit selected channel, the timer edit menu will appear.
Type
Press ▲/▼ button to selectType, then press OK button or ► button to enter and
press ▲/▼ button to select DTV or Radio.
Program
Press ▲/▼ button to select Channel, then press OK button or ► button to enter
and press ▲/▼ button to select channel which you want to add to the timer list.
GB-30
manuale_MTV-B22LEHD/MTV-B24LEHD_ITA+ENG.indd 3
12/10/13 11.39
TV Operation and System Setup
Start Time
Press ▲/▼ button to select Start Time, then press OK button or ► button to enter
and press 0-9 button to input time.
Duration
Press ▲/▼ button to select Duration then press OK button to enter and press 0-9
button to input duration.
Date
Press ▲/▼ button to select Date, then press OK button to enter and press 0-9
button to input date.
Mode
Press ▲/▼ button to select Mode, then press OK button or ► button to enter and
press ▲/▼ to select Once, Daily, Weekly, Monthly.
Record List
Press ▲/▼ button to select Record List, then press OK button or ► button to
enter. Then will appear as follows:
Record List
0001
Delete
SZTVM04 2011/09/15 09:06:00_09:11:59
Menu
Return
Move
OK
Enter
GB-31
manuale_MTV-B22LEHD/MTV-B24LEHD_ITA+ENG.indd 3
12/10/13 11.39
TV Operation and System Setup
PC
SETUP menu of VGA input (for setting the PC picture position).
PICTURE:
Picture
Picture Mode
Standard
Brightness
50
Contrast
50
Picture
Sound
Sharpness
5
Colour
50
Channel
Feature
Tint
50
Colour Temperature
Standard
Aspect Ratio
16:9
Setup
Move
OK
Enter
Exit
Exit
Menu
Return
PICTURE menu is the same as that of TV mode expect the SHARPNESS,
COLOR, and TINT are invalid (in gray), and COLOUR TEMPERATURE is valid
( Available options: WARM, COLD and NORMAL).
The SOUND menu and FUNCTION menu are the same as those of TV mode.
( video size, TT language are invalid in function and they are in gray).
PC MENU
Press MENU button on the front of panel or on the remote control to display the
main menu.
Press ▲/▼ button to select the Setup in the main menu, then press ▲/▼ button
to select PC Setup.
Setup - PC Setup
Auto Adjust
ENTER
H Position
0
Picture
Sound
Channel
V Position
0
Phase
25
Clock
0
Feature
Setup
Move
OK
Enter
Exit
Exit
Menu
Return
GB-32
manuale_MTV-B22LEHD/MTV-B24LEHD_ITA+ENG.indd 3
12/10/13 11.39
TV Operation and System Setup
1. Press ▲/▼ button to select the option that you want to adjust in the PC menu.
2. Press ◄/► button to adjust.
4. When you are satisfied with your adjustment, press the MENU button.
AUTO Adjust
Press ▲/▼ button to select the AUTO Adjust, press OK button to adjust.
This option can set the above setting well automaticly.
H Position
Press ▲/▼ button to select the H Position, you can adjust the horizon position
of the picture by pressing ◄/► button.
V Position
Press ▲/▼ button to select the V Position, you can adjust the vertical position
of the picture by pressing ◄/► button.
PHASE
Press ▲/▼ button to select the PHASE, press ◄/► button to adjust the picture.
(The picture will shake if the PHASE sets unsuitable).
CLOCK
Press ▲/▼ button to select the CLOCK, press ◄/► button to adjust the signal's
transfer speed to make the picture looks well.
GB-33
manuale_MTV-B22LEHD/MTV-B24LEHD_ITA+ENG.indd 3
12/10/13 11.39
Media Operation
Press SOURCE button and ▲/▼ button to select the MEDIA in the Source menu.
Press ◄/► buttons to select available device, then press OK to confirm your
selected.
Compatible With: Photo, Music, Movie, e-Book.
Photo player
Photo
/udska1
/udska2
001/002
Move
CH+-
Page+/-
OK
Enter
Exit
Exit
The user can play Photo files via the Photo Player. ln left interface you can press
to select your desired photo and press ▲/▼◄/► enter to play.
Music player
Music
/udska1
/udska2
001/002
Move
CH+-
Page+/-
OK
Enter
Exit
Exit
The user can play Moive files via the Music player ln left interface you can press
▲/▼ to select your desired file and press OK to play.
GB-34
manuale_MTV-B22LEHD/MTV-B24LEHD_ITA+ENG.indd 3
12/10/13 11.39
Media Operation
While the Movie is playing, you can operate as below:
Press ▲/▼ to play Previous/Next file.
Press Vol+/- to control volume.
Press to play/pause the movie.
Press to return the upper menu.
Movie player
Movie
/udska1
/udska2
001/002
Move
CH+-
Page+/-
OK
Enter
Exit
Exit
The user can play Moive files via the Movie Player. ln left interface you can press
▲/▼ to select your desired file and press OK to play.
While the Movie is playing, you can operate as below:
Press ▲/▼ to play Previous/Next file.
Press Vol+/- to control volume.
Press to play/pause the movie.
Press to return the upper menu.
E-Book player
e-Book
/udska1
/udska2
001/002
Move
CH+-
Page+/-
OK
Enter
Exit
Exit
The user can play electronic book files via the E-BOOK. ln left interface you can
press ▲/▼ to select your desired file and press OK to play.
GB-35
manuale_MTV-B22LEHD/MTV-B24LEHD_ITA+ENG.indd 3
12/10/13 11.39
Recorder Operation
Note: You should insert the mobile hard disk or USB before you start to record.
Recorder
When watching DTV programme, you can press REC button on the remote control
to record the current playing program.
RECORNDING
RECORDING
If you want to stop RECORDING, press ■ button on you remote control.
Then you'll see the picture below to decide whether to stop.
RECORD
DO YOU WANT TO STOP RECORDING?
Yes
No
Timeshift Start
Press TIMESHIFT button to enter timeshift function. lt's used when you out or
want to watch the game again.
You can continue to watch the game from where you missed.
There will be a Prompt box on the left when you start to time shift. Press ■ button
to stop timeshift.
GB-36
manuale_MTV-B22LEHD/MTV-B24LEHD_ITA+ENG.indd 3
12/10/13 11.39
USB Multimedia Playback Format
Type
Container
AVI
MOVIE
Type
PHOTO
Video Decoder
Max Resolution
MPEG-4 ASP;H.264;DivX;Xvid
WMV 9 / VC - 1
1920 x 1080
MPEG-4 SP
CIF (352 x 288)
QCIF (176 x 144)
MJPEG
1280 x 720
MPEG 1/2
MPEG-1 Video
MPEG-2 Video
1920 x 1080
MPEG4
MPEG-2 Video;MPEG-4 ASP;
H.264;Xvid;MJPEG;H.264
1920 x 1080
WMV
WMV 9 / VC-1
1920 x 1080
Real Media
RV30 / RV40
1920 x 1080
Flash
Sorenson H.263; H.264
1920 x 1080
QuickTime
MPEG-4 ASP; H.264;MJPEG
ASF
WMV3 / WVC1; MP4S / M4S2
Matroska
Video
MPEG-2 Video; MPEG-4 ASP;
H.264;Xvid; DivX;DivX Plus HD;
RV30 / RV40; WMV9 / VC-1;
1920 x 1080
DivX
MPEG-4 ASP; DivX; Xvid;
1920 x 1080
TS Stream
MPEG-2 Video;H.264;
WMV 9 / VC-1;
1920 x 1080
1920 x 1080
Container
Max Resolution
JPEG
165370
Progressive JPEG
61648
BMP
101439
PNG
101439
GIF
TIFF
WAVE
WMA STD; WMA Prof
AAC
AAC-LC / HE-AAC
AC 3
MUSIC
e-Book
LPCM; ADPCM
WMA
MPEG
AC3; E-AC3
MP1; MP2; MP3; AAC-LC;
HE-AAC;
Read Audio
AAC / HE AAC; Cook
Ogg
Vorbis
FLAC
FLAC
TEXT
GB-37
manuale_MTV-B22LEHD/MTV-B24LEHD_ITA+ENG.indd 3
12/10/13 11.39
PC Setting
GB-38
manuale_MTV-B22LEHD/MTV-B24LEHD_ITA+ENG.indd 3
12/10/13 11.39
Troubleshooting
Carry out the problem-solving measures described in the following section before
contacting Customer Support.
Turn off the device immediately as soon as you suspect a malfunction and unplug
the power plug.
Do not attempt to repair the device yourself.
SYMPTOM
CHECK ITEM
LED screen
stays dark.
Make sure the unit is turned on and the connections are correct.
There is no
sound.
Make sure the system connection is correct.
Make sure the power of speakers is turned on.
There is no
picture or
picture move
up and down
unsteady.
Check if the connections with the extemal AV signal source are
correct.
Correctly set the items in the picture menu.
Check if the video type input signal is not corresponding to the
unit.
Make sure the unit is turned on and in correct video type.
The remote
control does
not work.
Make sure there no obstructions between the remote control
and the unit.
Make sure the remote control is pointing at the unit.
Make sure the batteries are inserted or the polarity is correct.
Make sure the batteries are not weak.
Replace the weak battery.
Other Notes:
Static or other external interfere may cause the player to behave abnormally. ln
this occurs, unplug the power-supply cord from the outlet and plug it in again to
reset the player.
lf the problems persist, then please disconnect the power and consult a qualified
technician.
GB-39
manuale_MTV-B22LEHD/MTV-B24LEHD_ITA+ENG.indd 3
12/10/13 11.39
MTV-C32DLEHD
MTV-B24LEFHD
Produced, imported e distributed by Futura Grafica spa
Via Domenico Fontana 12
00185 - Rome - Italy
MADE IN PRC