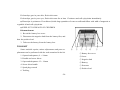
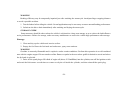
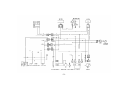
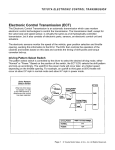
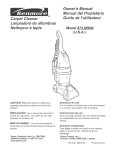
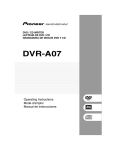
1
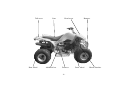
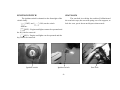
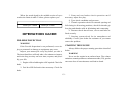
ATTENTION Break-in of New ATV Your ATV requires 800km break-in when you start to drive it. During the break-in period, do not run the ATV at a speed over 35km/h or the engine will be seriously damaged. Do remember to replace the gear oil after the break-in period . The grade of oil recommended is: 10w-40 for winter time and 15w-40 for summer time. PREFACE Thank you for choosing a motorcycle of the company. May you riding all the time. The manual contains the necessary instructions and guidance with respect to the operation and maintenance of the motorcycle, and RESURE TO READ IT CAREFULLY BEFORE YOU RIDE THE MOTORCYCLE. Proper operation and maintenance can guarantee a safe riding to minimize troubles of the motorcycle and keep it in a sound condition, which can extend the engine service life. Your dealer will provide you with technical inquiry and after service. The technical data in the manual are the latest, and we reserve absolute right to amend them. The revision will be made without notice. Please check carefully the product nameplate, VIN record and engine code in the motorcycle, which you have bought, and they are helpful for you to get the motorcycle a license plate and for future inquiry. IMPORTANTNOTICE Operator and passenger This motorcycle is designed to carry the operator only. Never exceed the maximum loading capacity as specified in the manual. Maximum loading cap 75kg. On-road use This motorcycle is designed only for level, off-road surface, free of obstacles. Operation on public streets, roads or highways is illegal. READ THIS OWNER’S MANUAL CAREFULLY Pay special attention to statements preceded by the following words: WARNING A warning is used to alert the user to fact that hazardous operating and maintenance procedures may result in injury or death of personnel if not strictly observed. CAUTION A caution is used to alert the user to fact that hazardous operating and maintenance procedures may result in damage or destruction of equipment if not strictly observed. NOTE A note is used to give helpful information. This manual should be considered as a permanent part of the motorcycle and should remain with the motorcycle when resold. CONTENTS VEHICLE SAFE RINING ............................................... 1 Notes for safety .......................................................... 1 Refitting ....................................................................... 2 Accessories .................................................................. 2 SPECIFICATIONS ......................................................... 3 DESCRIPTION ............................................................... 4 Parts Location ............................................................. 5 Ignition Switch ............................................................ 8 Seat Lock ..................................................................... 8 Fuel and Fuel Tank ..................................................... 9 Fuel Handlebar Control ............................................ 10 Safety Switch ............................................................ 10 Speed-Limited Device ............................................... 11 Engine Oil .................................................................. 11 OPETATION GUIDE .................................................... 13 Pre-ride Inspection ................................................... 13 Starting the Engine .................................................... 13 Breaking-in ................................................................ 15 Riding ......................................................................... 15 Parking ....................................................................... 16 Check and Change of Engine Oil .............................. 16 Spark Plug ................................................................. 17 Air Cleaner ................................................................ 18 Check Leaks along Air Supply Line ........................ 18 Throttle Operation .................................................... 19 Idle Speed .................................................................. 19 Inspection of Front Suspension ............................... 20 Front Mechanical Drum Brake ................................ 21 Check of Brake System ............................................ 22 Reverse Gear Operation System .............................. 23 Exhaust Muffler ........................................................ 24 Battery....................................................................... 25 Tool Kit… ................................................................. 26 Self-Recovered Overload Protector.......................... 27 Troubleshooting ........................................................ 27 Cleaning ..................................................................... 27 Storage Guide ............................................................ 28 Removal from Storage ............................................... 29 MAINTERANCE ........................................................... 30 Mainterance Schedule ............................................... 30 ELECTRIC DIAGRAM ................................................. 31 VEHICLE SAFE RIDING WARNING Vehicle riding requires special efforts on your part to ensure your safety. Know these requirements below before you ride. NOTES FOR SAFETY 1. This vehicle is designed for the rider of 12-16 year-old. 2. Both parents and their children must fully understand everything in this Owner’s Manual before riding. 3. This vehicle is for OPERATOR ONLY. 4. For OFF-ROAD USE ONLY. This vehicle is designed to be operated only on level, off-road surface, free of obstacles. 5. It is illegal to ride this vehicle on public roads or highways. If it is necessary to cross a public road, please get off this vehicle and push it across. 6. Do not operate this vehicle while under the influence of alcohol or drugs. This can impair judgment and result in serious injury or even death. 7. Keep a safe distance between your vehicle and other off-road vehicle. 8. Never ride this vehicle unless it has been properly adjusted and maintained. 9. Do not allow your child to ride without your supervision. 10.Never run the engine in closed area. The exhaust gas contains poisonous carbon monoxide gas(CO). 11.Don’t touch any part of the engine and muffler during and even after riding, because it is very hot. -1- PROTECTIVE THINGS 1. Most motorcycle accident fatalities are due to head injuries. ALWAYS wear a helmet. You should also wear a face shield and protective clothing. 2. The exhaust system becomes hot during riding, and it remains hot for a while after stopping the engine. Be careful not to touch the exhaust system since it is hot. Wear clothing that fully covers your legs. 3. Do not wear loose clothing that could catch on the control levers, kick-starter, footrests or wheels. REFITTING WARNING Refitting of the motorcycle ,or removal of original parts may make the vehicle unsafe or illegal. Obey all national and local equipment regulations. ACCESSORIES Genuine accessories by our Co. have been specifically designed and tested on the motorcycle. Because our Co. won’t test and accessories manufactured by other company/factory, you are personally responsible for selection, installation, and use of them. Always follow the guidelines below: 1. Carefully inspect the accessory to make sure that it does not obscure any lights, reduce ground clearance and banking angel, or limit suspension travel, steering travel or control operation. 2. Accessories may increase the time that hands of feet operate controls, resulting in increased reaction time in an emergency. 3. Do not add electrical equipment that will exceed the vehicle’s electrical system capacity. Do not add device cooling the engine. -2- SPECIFICATIONS ATV150-M Model ATV150-3 Model Length 1650mm Fuel tank cap 7.8L Width 920mm Type 4-stroke,single cylinder with air-cooled Height 1080mm Max power 5.5KW/7500r/min/6.5KW/7500R/min Ground clearance 160mm Max. torpue 7.5N.M/6000r/min/9N.m/6000r/min Wheel base 1100mm Idle speed 1700 ± 100r/min Dry weight 140kgs Start mode Electric/Kick Steering bar angle 30° Clutch Dry¢rifugal Top speed 45km/h Spark plug type C7HSANGK Front brake type Mechanical drum Engine oil cap 0.9L Rear brake type Hydraulic disc Engine oil 15W/40-SE Tire size(front&rear) 19×7-8/18×9.5-8 Oil pump Inner-outer totor type displacement 124.6/149.5 Magnet Permanent magnet Compression ratio 9.2:1/1 Ignition mode CDI lubrication Press/splash -3- DESCRIPTION Rear brake lever Decorative cover on handlebar Fuel tank Throttle grip Front brake lever Switch assy.L. Throttle assy -4- Head cover Bumper Shock absorber Seat Front wheel Tail cover Footrest -5- Rear wheel Tail cover Rear wheel Seat Adiabatic bar Head cover Footrest -6- Bumper Front wheel Shock absorber VIN RECORD Please fill the VIN and engine code of your motorcycle in blank below. They will help order spare parts and find out the vehicle once stolen. ① VIN ② Nameplate VIN: ☆□□□□□□□□□□□□□□□□□☆ Engine code:☆□□□□□□□□☆ NOTES ① The VIN is stamped on the front transversal beam. ② The vehicle nameplate is fixed on the upper support of the front frame. The engine code is stamped on the bottom-left of the crankcase. -7- ③ Engine Number IGNITIONSWITCH SEAT LOCK The ignition switch is situated on the front right of the vehicle body. The seat lock is set below the cushion. Pull backward the seat lock rope ,the seat will spring out of its support; to lock the seat, put it down and depress downwards. “ ”(OFF) and “ ” (ON) on the switch indicate: (OFF) : Engine and lights cannot be operated and the key can be removed. (ON): Engine and lights can be operated and the key cannot be removed. Ignition switch Ignition switch -8- Seat Lock FUELAND FUEL TANK Fuel Selection Fuel is a key factor in deciding the exhaust emissions amount from the engine, so selection of fuel must follow the rules below. Selected fuel must be unleaded or low-leaded gasoline with octane No.RQ-90 or higher. The fuel tank capacity is 7.8L. WARNING ● Gasoline is extremely flammable and is explosive under certain conditions. Refuel in a well-ventilated area with the engine stopped. Do not smoke or allow flames or sparks in the area where gasoline is stored or where the fuel tank is refueled. ● Before refueling, make sure to filter fuel first. Do not overfill the tank (there should be no fuel in the filler neck). After refueling, make sure the fuel tank cap is closed securely. ● Be careful not to spill fuel when refueling. Spilled fuel or fuel vapor may ignite. If any fuel is spilled, make sure the area is dry before starting the engine. ● Avoid repeated or prolonged contact with skin or breathing of vapor. ● KEEP OUT OF REACH OF CHILDREN. -9- LEFT HANDBAR CONTROLS Emergency Switch In normal, the switch is set in middle position; to stop the engine, set the switch to left or right. Parking button When stopping the vehicle , depress it to lock the rear wheel; restarting the vehicle, pull in the rear brake lever to spring it up. Starter button Depress the button with the vehicle in braking to start up the engine. ① Parking button ② Emergency switch ③ Starter button -10- SPEED-LIMITINGDEVICE Turn loose the lock nut and screw in the adjusting screw, Engine oil recommended: gasoline engine oil Class at last, tighten the locknut. SAE15W/40-SE or Class SE, SF, SC from API Service CAUTION Classification. The vehicle has been filled with the engine oil Class It’s better for inexperienced riders to set the top speed SAE15W/40-SE Class before being been delivered, and the lower so as to avoid accidents. lubricant is only suitable at a temperature range from +40°C to -10°C. If other motor oil is to be used instead, the alternative must be technically in every respect. Viscosity varies with regions and temperatures, so the lubricant has to be selected according to our recommendation. If the gasoline engine oil Class ASE15W/40-SE can not be obtained when in need, the gasoline engine oil No. HQB-10 (or No. HQB-6 ② Adjusting screw ① Lock nut in regions where the temperature is under -10°C ) is available. ENGINEOIL Before replacing the lubricant, please drain the oil out The quality of the engine oil plays a vital role in decid- completely remaining in the crankcase, and clean the inside by cleansing kerosene, then fill new one inside. ing the engine performance and service life. Engine oil must be selected in accordance with the rules below and other oils, are forbidden to be used. -11- NOTE Tyre pressure should be checked before you ride while the tyres are cold. Check the tyres for cuts, embedded nails, or other sharp objects. Check the rims for dents or deformation. See your dealer for change of damaged tyres or punctured inner tubes. WARNING ● CAUTION Running the engine with insufficient oil can cause serious damage to engine. TYRES Proper air pressure will provide maximum stability, riding comfort and tyre life. Check tyre pressure frequently and adjust if necessary. Select the right replacement tyres in accordance with the specifications shown in the table1. tube, otherwise wheel balance and tyre reliability may be impaired. ● Front: 200 Front:19×7-8 REAR:200 REAR:18×9.5-8 Improper tyre inflation will cause abnormal tread wear and create a safety hazard. The tyre pressure less than the rated value may result in the tyre slipping on the ground, or coming off from the rim, even the vehicle being out of control. ● Operation with excessively worn tyres is hazardous and will adversely affect traction and handling. ● Pressure (kPa) Tyre size Do not attempt to patch a damaged tyre or inner The use of tyres other than those listed on the table 1 may adversely affect handling. -12- When the tread depth in the middle section of tyres reaches the limits in table 2 below, please replace tyres. Tread depth limits Front tyre 2.0mm Rear tyre 2.0mm OPERATION GUIDE PRE-RIDE INSPECTION 3. Front and rear brakes-check operation and if necessary, adjust free play. 4. Tyres-check condition and pressure. 5. Throttle operation-check for smooth opening and full closing in all steering positions; check for throttle grip free play and throttle cable in lubricating and connecting. 6. Fastener-check that all nuts, screws and bolts are fixed securely. 7. Steering system-check for its smoothness and reliability. Correct your dealer for assistance if you cannot correct the problem. WARNING If the Pre-ride Inspection is not performed, severe injury to personnel or damage to equipment may occur. Inspect your motorcycle every day before you ride it. The items listed here will only take a few minutes to inspect, and in the long run they can save time, expense, and possibly your life. 1. Engine oil level-add engine oil if required. Check for leads. 2. Fuel level-fill fuel tank when necessary. Check for leaks. STARTING THE ENGINE Always follow the proper starting procedure described below. WARNING Never run the engine in an enclosed area. The exhaust emissions contain poisonous carbon monoxide (CO) gas that can cause loss of consciousness and lead to death. -13- Rear brake lever Handlebar Ignition switch ☆ Starting procedure by the starter button 1. Place the vehicle on a level ground and lock the rear brake by depressing down the parking button. 2. Insert the ignition key switch and turn to (ON). 3. Set the emergency switch to “ON”. 4. Depress the starter button while rotate the throttle grip slightly to start the engine. Release the starter button once the engine starts. NOTE Do not use the electric starter for more than 5 seconds at a time. Release the starter button for approximately 10 seconds before pressing it again. 5. When starting and warming up the engine, make sure to maintain the throttle slightly open. 6. Before riding the vehicle, make sure that the engine Engine is well warmed up. CAUTION Opening or closing the throttle fully and rapidly may make the vehicle’s sudden moving forwards, resulting in it out of control. -14- BREAKING-IN Help assure your vehicle’s future reliability and performance by paying extra attention to how you ride during the first two-week riding. During this period, avoid full-throttle riding and loading the engine heavily ;be sure to keep changing speed. NOTE After the breaking –in period, be sure to conduct maintenance according to the maintenance schedule so as to keep the vehicle in a sound condition, which will extend the service, which will extend the service life of the engine obviously. RIDING Review Vehicle Safe Riding before you ride. 1. After the engine has been warmed up, the vehicle is ready for riding. 2. End braking state of the vehicle. CAUTION Riding with only one hand may cause the vehicle out of control. 3. Open the throttle gradually so the vehicle moves forward. 4. To slow down the vehicle, reduce the throttle while carry out braking. Coordinate the throttle with brakes for smooth deceleration. NOTE Both the front and rear brakes should be used at the same time and should not be applied strongly enough to lock the wheel, or braking effectiveness will be reduced and control of the vehicle be difficult. -15- PARKING 1. Close the throttle while apply the brakes to slow down the vehicle until it stops. 2. Turn the ignition key to (OFF), and remove the key once the engine stops. 3. press down the parking button at the left handlebar. Apply the parking brake. engine service life. Change the engine oil as specified in the maintenance schedule. 1. Drain out the engine oil in the crankcase completely. 2. Clean the crankcase inside with cleaning lerosene. 3. Add specified engine oil about 0.8L. CH EC K AN D CH AN G E O F EN G I NE O LL Check of Engine Oil Level Check the engine oil level each day before riding the vehicle. The level must be maintained between the upper and lower level marks on the dipstick. 1. Start the engine and let it idle for a few minutes. 2. Stop the engine and put the vehicle on a level ground. 3. After a few minutes, remove the oil filler cap/ dipstick, wipe it clean, and reinsert the dipstick without screwing it in, remove the dipstick. The oil level should be between the upper and lower level marks on the dipstick. Change of Engine Oil The engine oil quality is the chief factor affecting the -16- ③ Oil filter cap/Dipstick ① Upper level mark ② Lower level mark CAUTION Running the engine with insufficient oil can cause serious damage to the engine. NOTES When running in very dusty conditions, oil changes should be performed more frequently than specified in the maintenance schedule. Please dispose of used engine oil in a manner that is compatible with the environment. We suggest you take it in a sealed container to your local recycling center or service station for reclamation. Do not throw it in the rubbish or pour it on the ground or down a drain. deposits, erosion or carbon fouling. If the erosion or deposit is heavy, replace the plug. Clean a carbon or wet-fouled plug with a plug cleaner, or use a wire brush. 4. Check the spark plug gap using a wire-type feeler gauge. If adjustment is necessary, bend the side electrode carefully. The spark plug gap should be 0.6-0.8mm. Make sure the plug washer is in good condition. 5. With the plug washer attached, thread the spark plug in by hand first to prevent cross threading, and then tighten up it by the spark plug wrench. 6. Reinstall the spark plug cap. SPARK PLUG 0.7 ± 0.1mm Selection Plug recommended: C7HSA NGK Check and Replace 1. Disconnect the spark plug cap from the spark plug. 2. Clean any dirt from around the spark plug base. Remove the spark plug using the plug wrench containing in the tool kit. 3. Inspect the electrodes and center porcelain for -17- ① ② ① Side electrode ② Center eletrode AIR CLEANER The air cleaner should be serviced at least once every 30-day1s drive. Service more frequently when riding in unusually wet or dusty areas. See your dealer for further information. 1. Remove the air cleaner from the frame. 2. Disassemble it and take out filter element. 3. Wash the filter element in clean, nonflammable or high flash point solvent and let it dry. WARNING Never use gasoline or low flash point solvents for cleaning the filter element, otherwise, a fire or explosion could result. 4. Soak it in gasoline engine oil Class 15W/40Qeuntil saturated, and then squeeze out the excess oil. Explosion could result. 5. Clean the inside and outside of the air cleaner housing. 6. Install the removed parts in the reverse order of removal. CAUTION ● cleaner core, or premature wear of the piston and cylinder may produce. ● Make sure the air cleaner core is intact. ● Prevent the air cleaner core from getting water when washing the vehicle. CHECK LEAKS ALONG AIR SUPPLY LINE Check leaks regularly along air supply line, and repair or replace related parts once there are some to assure a normal air supply. It is forbidden to start the engine without the air -18- THROTTLEOPERATION 1. Check for smooth rotation of the throttle lever from the fully open to the fully closed position at both full steering positions. 2. Measure the throttle lever free play at the throttle lever flange. The standard free play should be within 2-6mm. To adjust the free play, loosen the lock nut and turn the adjust of the arrowhead A) will increase idle speed while will decrease it turning counterclockwise (in the direction of the arrowhead B). 3. When the engine has no idle speed or runs at a decreased speed, set the throttle stop screw in the middle between the two limit positions to help mix air and fuel. 4. Run the engine again; readjust the throttle stop screw if necessary. IDLE SPEED The engine must be at normal operating temperature for accurate idle speed adjustment. NOTE Do not attempt to compensate for faults in other systems by adjusting idle speed. See your dealer for regularly carburetor adjustments. 1. Warm up the engine. 2. Connect a tachometer to the engine (a remote-controlled one can be used). Turn the throttle stop screw clockwise (in the direction -19- Throttle lever CAUTION Since the carburetor is a precision apparatus, don1t disassemble it without the professional knowledge. WARNING The balance pipe of carburetor should be often checked to make sure there is no dust or other impurity inside it, otherwise, an accident may occur. INSPECTION OF FRONT SUSPENSION 1. Check the front fork assembly by locking the front brake and pumping the fork up and down vigorously. Suspension action should be smooth. 2. Check the front shock absorber for oil leaks and deformation. 3. Carefully inspect front suspension fasteners for tightness. CAUTION Before checking, support the vehicle firmly to prevent it from falling over. -20- Carbuter Adjustment Screw FRONT MECHANICALDRUM BUAKE The distance the front brake lever moves before the brake starts to engage is called free play. Measured at the tip of the front brake lever, free play should be within 10-20mm. 1. Adjustment should be made using the adjusting bolt at the right handlebar. 2. Apply the brake several times and check for free wheel rotation when release the brake lever. One should bear in mind, that the front brake lever, brake arm and fasteners are in a sound condition. NOTES ● ● Make sure the curved slot in the adjusting nut is seated on the brake arm pin after making final free play adjustment. If such adjustment is still unsatisfactory, see your dealer for help. 60~80mm ① Adjusting bolt ② Front brake -21- ③ Front brake lever CHECK OF BRAKE SYSTEM The brake system should be checked every day before you ride the vehicle. 1. Check the brake main cylinder for proper oil level. 2. Check to see there is no leakage from the system. 3. Check the brake hose and main cylinder for cracks. 4. Check the brake disc for wear. 5. Check the brake lever for proper free play. CAUTION The hydraulic disc is designed to operate under high pressure. For the sake of safety and reliability, the service life of brake hose, main cylinder and brake liquid must not be beyond the limit specified in manual. If the hydraulic disc brake system needs to be maintained or repaired, conduct the problem by your dealer only. If you feel soft when operating the brake lever, it means there is air inside the brake system. In this case, air should be discharged from the brake system before riding the vehicle, otherwise, the brake feature will drop considerably, even cause an accident. For which purpose, see the your dealer. Brake oil Roservoir REAR HYDRAULIC DISC BRAKE The motorcycle is equipped with a set of single-cylinder disc brake. BRAKELIQUID Be care to check the brake liquid in the main cylinder located on the right handlebar for proper level, and add the specified liquid if necessary. As the brake pads wear, the brake liquid level drops. The brake should be inspected periodically. -22- REVERSE GREAR OPERATION SYSTEM Gear shift lever The reverse gear is built-in the engine.shifting the drive gear,neutral gear,reverse gean via a gean shift,shift the lever to reverse gear position for forward.Shift the gear lever to reverse gear position for baekword .Shift the gear leven to neutral gear positon for parking. Drive Gear position CONDITION Neutral Gear Position 1.Shift the gear lever to drive gear position forforward while the road is smooth.widely,non-obstacle and good view. 2.Shift the gear lever to reverse gear position for back ward and pass-by while the road is rough,obstack and nowany go throgh. 3.Shift the gear lever to neutral gear position and use panking bution for parking. 4.Must Start the enyine with,the broking while the gear shaft in for forward reverse position.start the enyine directly while the gear shaft in neutral positivn. Reverse Gear Position CAUTION 1.Do not shift gear at high spend. must shift gear at idle spead. 2.Must be sure the gear shift at reverse gear position or drive gear position at driving. -23- WARNING ● Brake liquid is strong irritant. Avoid contact with skin or eye. In case of contact, flush thoroughly with water and call a doctor if four eye were exposed. ● Keep out of reach of children. Brake liquid used for the brake system is non-petroleum brake oil No.4604. Never mix with other oil such as silicon oil, or serious damage to the brake system may occur. CAUTION ● It is forbidden to use the used liquid or the liquid placed in the open container. ● Never use the liquid which has been stored for long time, because it contains moisture inhaled inhaler from air ● Handle brake liquid with care because it can damage plastic and painted surface. EXHAUSTMUFFLER Clear away regularly carbon deposit in the exhaust pipe; check the exhaust pipe inside for crack and washer damage, and repair or replace if necessary. -24- Brake main cylinder Down Brake disc BATTERY Battery electrolyte is poisonous, so be sure not to discard it at will. Handle in accordance with national or local environmental protection rules. Check The battery electrolyte level be between the UPPER level mark and the LOWER level mark. If battery electrolyte is below the LOWER level mark, add proper distilled water to the UPPER level mark. CAUTION Before handing the vehicle over for long-term storage, remove the battery from the vehicle and charge it fully, and then store it in a cool, dry place. If the battery is to be left in the motorcycle, disconnect the negative lead (-) from the battery terminal first and then the positive lead (+). Do not touch the positive and negative leads with metal objects to prevent short-circuiting during the operation above. Level mark WARNING ● The battery gives off explosive gases; keep sparks, flames, and cigarettes away. Provide adequate ventilation when charging or using the battery in an enclosed space. ● The battery contains sulfuric acid (electrolyte). Contacting with skin or eyes may cause severe burns. Wear protective clothing and a face shield -25- If electrolyte gets in your skin, flush with water. If electrolyte gets in your eyes, flush with water for at least 15 minutes and call a physician immediately. ● Electrolyte is poisonous. If swallowed, drink large quantities of water or milk and follow with milk of magnesia or vegetable oil and call a physician. ● KEEP OUT OF REACH OF CHILDREN Dismantlement 1. Reveal the battery box cover. 2. Disconnect the negative lead from the battery first, and then the positive lead. 3. Take out the battery from the battery box. TOOL KIT Some roadside repairs, minor adjustments and parts replacement can be performed with the tools contained in the kit. 1. Opened-end spanner, 8 × 10mm ② ③ ① ④ ⑥ ① Battery box cover ② Screw 2. Double-end screw driver ③ Negative lead 3. Open-ended spanner 12 × 14mm ④ Battery 4. Screw driver handle ⑤ Protector 5. Spark plug wrench ⑥ Positive lead 6. Tool bag -26- ⑤ TROUBLESHOO TING If the vehicle has some troubles, see your dealer for help. CAUTION Do not dismantle or maintain to protect the surface finishes and inspect for damage, wear, and oil or brake fluid leakage. CAUTION High-pressure water (or air) can damage certain parts of the motorcycle. Avoid spraying high-pressure water at the following areas: Wheel Hubs; Ignition Switch; Carburetor; Handlebar Controls; Muffler Outlets; Under Fuel Tank; drive chain; Under Seat 1. Wash the vehicle completely with a great deal of water. 2. Dry up the vehicle, start the engine, and let it run for several minutes. -27- WARNING Braking efficiency may be temporarily impaired just after washing the motorcycle. Anticipate linger stopping distance to avoid a possible accident. 1. Test the brakes before riding the vehicle. Several applications may be necessary to restore normal braking performance. 2. Lubuicate the drive chain immediately after washing and drying the motorcycle. STORACG GUIDE Some measures should be taken when the vehicle is subjected to a long term storage so as to reduce the bad influence on its performance. Before the storage, make necessary maintenance to ensure the vehicle high performance after-storage. Storage 1. Clean and dry up the vehicle and wax its surface. 2. Empty the fuel from the fuel tank and carburetor, spray some antirust. WARNING Gasoline is extremely flammable and is explosive under certain conditions. Perform this operation in a well-ventilated area with the engine stopped. Do not smoke or allow flames or sparks in the area where gaslift is drained or stored and where the fuel tank is refueled. 3. Drive off the spark plug to fill a little of engine oil (about 15-20millilitre) into the cylinder; turn off the ignition switch and tread the kick-starter several times to scatter evenly the oil inside the cylinder, and then reinstall the spark plug. -28- 4. Clean and oil the drive chain. 5 Lubricate all the cables. CAUTION When removing the battery, dismantle the negative lead first, and then the positive lead. When installing it, the procedure is just opposite. During the operations above, the ignition switch must be turned off. 6. Seal the muffler outlet with plastics cloth to protect the former from moisture. 7. Cover the vehicle (don t use or other coated materials) and store in an unheated area, free of dampness. Do not store the vehicle in direct sunlight. REMOVALFROM STORAGE 1. 2. 3. 4. Take off the cover shielding the vehicle and clean it. Charge the battery as required. Install the battery. Clear away the antirust inside the fuel tank, and fill fresh gasoline instead. Perform all Pre-ride Inspection checks. Try the vehicle at low speeds in a safe riding area away from traffic. -29- MAINTENANCE The Maintenance Schedule specifies how often you should have your motorcycle served, and what things need attention. It is essential that your motorcycle be served as scheduled to retain its high level of safety, dependability, and emission control performance. MAINTENANCESCHEDULE The following Maintenance Schedule specifies all maintenance required under normal conditions to keep your vehicle in sound condition. Riding under unusually dusty or wet conditions, service of the vehicle should be made more often than the specified in the schedule. Maintenance work should be performed by properly trained and equipped technicians. I: INSPECTAND CLEAN, ADJUST, LUBRICATE OR REPLACE IF NECESSARY C: CLEAN L: LUBRICATE INTERVAL ITEM Fuel system Operation of throttle Air cleaner Spark plug Idle speed of carburetor Drive chain Brake shoe wear Brake system Nuts, bolts, and fasteners Wheel Steering system Suspension system First week Every 30-day’s ride Every year I I 1&L I C I I 1&L I I I I I I I I -30- I I I -31-