1
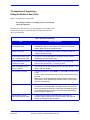
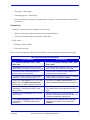
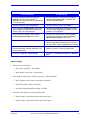
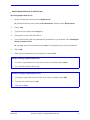
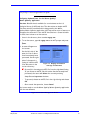
Handout
The “How To” of “How To’s”:
Writing Procedures Like a Pro
STC 47th Annual Conference
Orlando, Florida
May 22, 2000
Handout
The “How To” of “How To’s”:
Writing Procedures Like a Pro
STC 47th Annual Conference
Orlando, Florida
May 22, 2000
Prepared by
Rebecca Edgerton
Woolpert LLP
409 East Monument Avenue
Dayton, Ohio 45402-1261
Phone 937.341.9376
[email protected]
Jill Nicholson
J&H Communications
P.O. Box 79
Roseville, Australia
NSW 2069
[email protected]
QUALITY
At Woolpert LLP, quality is the cornerstone of our business. We invite your comments and suggestions
for improving this document.
TRADEMARKS
All brand names and product names are trademarks or registered trademarks of their respective
companies.
NOTICE OF PROPRIETARY INFORMATION
© 2000, Woolpert LLP, Dayton, Ohio.
All rights reserved to Woolpert.
This document was designed, prepared, and submitted by Woolpert to be used only by the recipient.
None of this material is permitted to be reproduced in any way or distributed to anyone other than
authorized representatives of the recipient.
TABLE OF CONTENTS
The “How To” of “How To’s”: Writing Procedures Like a Pro . . . . . . . . . . . . . . . . . . . . . . . . . . . . . . . . 1
Introduction (5 min) . . . . . . . . . . . . . . . . . . . . . . . . . . . . . . . . . . . . . . . . . . . . . . . . . . . . . . . . . . . . . . 1
Why Procedural Writing Is Important (1 min) . . . . . . . . . . . . . . . . . . . . . . . . . . . . . . . . . . . . . . . . . . 2
How a Process Description Differs from a Set of Procedures (5 min) . . . . . . . . . . . . . . . . . . . . . . . . 2
{ Process Description Exercise (10 min) . . . . . . . . . . . . . . . . . . . . . . . . . . . . . . . . . . . . . . . 4
How to Identify Good Procedural Writing (5 min) . . . . . . . . . . . . . . . . . . . . . . . . . . . . . . . . . . . . . . . 5
How to Write Good Procedures (5 min) . . . . . . . . . . . . . . . . . . . . . . . . . . . . . . . . . . . . . . . . . . . . . . . 6
The Importance of Active, Imperative Steps—Telling Them Where to Go (5 min) . . . . . . . . . . 9
The Importance of Parallelism—Marching Two by Two (5 min) . . . . . . . . . . . . . . . . . . . . . . . . 9
{ Active Voice/Parallelism Exercise (5 min) . . . . . . . . . . . . . . . . . . . . . . . . . . . . . . . . . . . 11
The Importance of Sequencing—Putting the Ducks in a Row (5 min) . . . . . . . . . . . . . . . . . . . 12
{ Step Sequence Exercise (5 min) . . . . . . . . . . . . . . . . . . . . . . . . . . . . . . . . . . . . . . . . . . . . 14
A Questionnaire for Planning and Critiquing Procedures—Staying on Track . . . . . . . . . . . . . . 15
{ Prose to Numbered Steps Exercise (5 min) . . . . . . . . . . . . . . . . . . . . . . . . . . . . . . . . . . . 18
{ Detailed Sequence Exercise (15 min) . . . . . . . . . . . . . . . . . . . . . . . . . . . . . . . . . . . . . . . 19
Additional Information . . . . . . . . . . . . . . . . . . . . . . . . . . . . . . . . . . . . . . . . . . . . . . . . . . . . . . . . . . . 20
Document-Planning Pyramid: The Relationship between Purpose and Type . . . . . . . . . . . . . . 20
Document Purpose . . . . . . . . . . . . . . . . . . . . . . . . . . . . . . . . . . . . . . . . . . . . . . . . . . . . . . . . 20
Document Type . . . . . . . . . . . . . . . . . . . . . . . . . . . . . . . . . . . . . . . . . . . . . . . . . . . . . . . . . . 21
Audience Analysis . . . . . . . . . . . . . . . . . . . . . . . . . . . . . . . . . . . . . . . . . . . . . . . . . . . . . . . . 22
Assumptions . . . . . . . . . . . . . . . . . . . . . . . . . . . . . . . . . . . . . . . . . . . . . . . . . . . . . . . . . . . . . 23
Acknowledgments . . . . . . . . . . . . . . . . . . . . . . . . . . . . . . . . . . . . . . . . . . . . . . . . . . . . . . . . 23
Schedule, Budget, and Production . . . . . . . . . . . . . . . . . . . . . . . . . . . . . . . . . . . . . . . . . . . . 23
The Rest of the Story . . . . . . . . . . . . . . . . . . . . . . . . . . . . . . . . . . . . . . . . . . . . . . . . . . . . . . . . . 24
z Active Voice/Parallelism Exercise—A Solution (3 min) . . . . . . . . . . . . . . . . . . . . . . . . 24
z Step Sequence Exercise—A Solution (3 min) . . . . . . . . . . . . . . . . . . . . . . . . . . . . . . . . . 25
z Prose to Numbered Steps Exercise—A Solution (3 min) . . . . . . . . . . . . . . . . . . . . . . . . 26
z Detailed Sequence Exercise—A Solution (5 min) . . . . . . . . . . . . . . . . . . . . . . . . . . . . . . 27
Additional Exercises . . . . . . . . . . . . . . . . . . . . . . . . . . . . . . . . . . . . . . . . . . . . . . . . . . . . . . . . . . 28
{ The Good, the Bad, and the Ugly Exercise . . . . . . . . . . . . . . . . . . . . . . . . . . . . . . . . . . . 28
{ Passive-to-Active Exercise . . . . . . . . . . . . . . . . . . . . . . . . . . . . . . . . . . . . . . . . . . . . . . . . 32
z Passive-to-Active Exercise—A Solution . . . . . . . . . . . . . . . . . . . . . . . . . . . . . . . . . . . . . 33
Selected Bibliography . . . . . . . . . . . . . . . . . . . . . . . . . . . . . . . . . . . . . . . . . . . . . . . . . . . . . . . . . 34
Acknowledgment . . . . . . . . . . . . . . . . . . . . . . . . . . . . . . . . . . . . . . . . . . . . . . . . . . . . . . . . . . . . 34
About the Presenters . . . . . . . . . . . . . . . . . . . . . . . . . . . . . . . . . . . . . . . . . . . . . . . . . . . . . . . . . . 35
Woolpert
May 22, 2000
STC 47th Annual Conference
The “How To” of “How To’s”: Writing Procedures Like a Pro
i
LIST OF FIGURES
Figure 1. Example Process Description . . . . . . . . . . . . . . . . . . . . . . . . . . . . . . . . . . . . . . . . . . . . . . . . . . . 2
Figure 2. Example Set of Procedures . . . . . . . . . . . . . . . . . . . . . . . . . . . . . . . . . . . . . . . . . . . . . . . . . . . . . 3
Figure 3. Example Flow Chart for a Very Complex Process (Original Chart Is Color-Coded) . . . . . . . . 8
Figure 4. Example Procedure Dialog . . . . . . . . . . . . . . . . . . . . . . . . . . . . . . . . . . . . . . . . . . . . . . . . . . . . . 9
Figure 5. The More Technical the Purpose (Left Side), the More Structured the Form (Right Side) . . 20
Figure 6. Procedural Passage 1 for Review . . . . . . . . . . . . . . . . . . . . . . . . . . . . . . . . . . . . . . . . . . . . . . . 28
Figure 7. Procedural Passage 2 for Review . . . . . . . . . . . . . . . . . . . . . . . . . . . . . . . . . . . . . . . . . . . . . . . 29
Figure 8. Procedural Passage 3 for Review . . . . . . . . . . . . . . . . . . . . . . . . . . . . . . . . . . . . . . . . . . . . . . . 30
Figure 9. Procedural Passage 4 for Review . . . . . . . . . . . . . . . . . . . . . . . . . . . . . . . . . . . . . . . . . . . . . . . 31
LIST OF TABLES
Table 1. Our Criteria for Good Procedural Writing . . . . . . . . . . . . . . . . . . . . . . . . . . . . . . . . . . . . . . . . . 5
Table 2. Techniques for Good Procedural Writing . . . . . . . . . . . . . . . . . . . . . . . . . . . . . . . . . . . . . . . . . . 6
Table 3. Our Rules of Sequencing . . . . . . . . . . . . . . . . . . . . . . . . . . . . . . . . . . . . . . . . . . . . . . . . . . . . . . 12
Table 4. Process Description Versus Procedures . . . . . . . . . . . . . . . . . . . . . . . . . . . . . . . . . . . . . . . . . . 21
Woolpert
May 22, 2000
STC 47th Annual Conference
The “How To” of “How To’s”: Writing Procedures Like a Pro
ii
THE “HOW TO” OF “HOW TO’S”:
WRITING PROCEDURES LIKE A PRO
By Rebecca Edgerton and Jill Nicholson
Introduction (5 min)
As you’re getting settled, please find a partner nearby. You’ll need a
partner for some of the exercises we’ll do.
Consider these two passages:
“Press F12. Unless you don’t want to delete everything
you have entered.”
“Determine the number of hours of sick leave which
may be credited to an employee, other than a part-time
employee, by multiplying the total months of service of
the subject employee by four and subtracting therefrom
the sum total of the number of hours of sick leave
previously taken by the subject employee.”
This workshop will cover these topics:
•
The difference between a process description and procedures
•
The characteristics of good procedural writing
•
The mechanics of procedural writing (like active voice,
parallelism, and sequencing)
Woolpert
May 22, 2000
STC 47th Annual Conference
The “How To” of “How To’s”: Writing Procedures Like a Pro
1
Why Procedural Writing Is Important
(1 min)
Activities—other than typical procedures documents—that good
procedural writing can help:
•
Telling someone how to drive to your office
•
Writing a scope of services for a contract
How a Process Description Differs
from a Set of Procedures (5 min)
Here are two examples using the same topic.
Entering Multiple Addresses
With this application, the user can submit up to 20 addresses. The
software geocodes as many addresses as it can and then identifies any
addresses that can’t be geocoded. The user can print a list of the
addresses that weren’t geocoded, print a form that describes each
address’s situation, identify addresses for researching, or print a report
on the addresses.
Figure 1. Example Process Description
Woolpert
May 22, 2000
STC 47th Annual Conference
The “How To” of “How To’s”: Writing Procedures Like a Pro
2
Entering Multiple Addresses
1. On the Street Address screen, click Enter a List of Addresses.
2. Then on the Multiple Address Entry screen shown in Figure 1,
enter a house number, street name, and street type for each line of
the screen. You can enter up to 20 addresses.
3. When you have finished entering the addresses, click the Submit
button. After a few seconds, the results of the entered addresses
display, as shown in Figure 2.
The results are in groups. An explanation of each group is above
the group, and a checkbox with an action is below the group.
Actions include these checkboxes:
w Print this list prints a list of addresses that couldn’t be
Figure 1. Multiple Address Entry Screen
geocoded or prints a form describing each address’s situation.
w Research these addresses adds that group’s addresses to a
database for county staff to research.
w Print a report for these addresses prints a report for all
addresses that can be found by geocoding or by searching the
databases.
4. Finally, click the box or boxes corresponding to each group and
click Submit addresses to perform those actions.
Figure 2. Batch Process Results Screen
Figure 2. Example Set of Procedures
Woolpert
May 22, 2000
STC 47th Annual Conference
The “How To” of “How To’s”: Writing Procedures Like a Pro
3
{ Process Description Exercise (10 min)
Work with your partner for this exercise. You have 10 minutes.
Write a paragraph or two to describe one of the following processes. An example process is done for you,
so don’t choose that topic. Remember not to write procedures, and focus on telling what rather than
how.
Process Example: Reconciling a Checking Account
Reconciling a checking account begins with assembling the materials, such as
the most recent bank statement, the check register, the latest batch of canceled
checks, and a calculator. Before beginning the reconciliation, the
account-holder enters any outstanding transactions into the check register.
Then he or she compares the recent deposits, canceled checks, and other
transactions from the statement with the check register. Next, the
account-holder adds up outstanding transactions and adds or subtracts them to
the statement balance, as appropriate. As a result, the adjusted statement
balance should match the register balance. If the two balances don’t match,
the account-holder should review the process to identify the error.
•
Process 1: Changing a Tire
•
Process 2: Heating a Can of Soup
•
Process 3: Mowing the Lawn
•
Process 4: Washing Dishes
Woolpert
May 22, 2000
STC 47th Annual Conference
The “How To” of “How To’s”: Writing Procedures Like a Pro
4
How to Identify Good Procedural Writing
(5 min)
How many of these characteristics apply to the short procedural
example we looked at a few minutes ago?
Table 1. Our Criteria for Good Procedural Writing
Criterion
8
w
1. Is the format comfortable to use and appropriate to the audience, the type of use, and the topic?
w
2. Is the overall document well organized?
w
3. Is it divided into logical sections or chapters?
w
4. Is each section or chapter organized with logical, parallel, consistent headings?
w
5. Is there an apparent hierarchy in the headings and subheadings?
w
6. Do the headings and subheadings follow a pattern?
w
7. Is the text supported by effective navigational aids, like a table of contents, an index, tabs?
w
8. Is the text organized into paragraphs or steps?
w
9. Are bulleted or numbered lists used effectively?
w
10. Is the writing clear and accurate?
w
11. Does the writing use parallel construction?
w
12. Is the level of detail appropriate to the task and the audience?
w
13. Is it written in active, imperative sentences?
w
14. Does the text use effective transitions?
w
15. Does it use consistent terminology (a menu is always a menu, never a screen or a selection list)?
w
16. Is the vocabulary appropriate to the task and the audience?
w
17. Does the document show and tell, and not just tell?
w
18. Is the text supported by visual aids, like screen shots, icons, workflow diagrams, and tables?
w
19. Is it supported by notes, cautions, and warnings that are used and displayed effectively?
w
20. Bottom line—is the document usable? If your job—or your life—depended on the success of the
procedure, could you do it?
Woolpert
May 22, 2000
STC 47th Annual Conference
The “How To” of “How To’s”: Writing Procedures Like a Pro
5
How to Write Good Procedures (5 min)
JoAnn Hackos of Comtech Services, Inc., recommends these
techniques, which we’ve adapted for this presentation:
Table 2. Techniques for Good Procedural Writing
Technique
Rationale and Discussion
Put the steps in the order
in which they should be
done.
This makes sense, since you want the reader to do the steps in the right
order. This technique eliminates the dreaded “do this after you do that”
problem, which is where sequencing comes in. We’ll talk about that later.
Use a modular design if
the procedure is
particularly long.
A procedure with lots of steps can be daunting. And how many that is
depends on your audience, the task, and the setting in which the
procedures will be used. In some cases, five steps could be too many; in
others, 20 could be fine. Even with step numbers, readers can have a hard
time keeping their place. So use “chunking” or modules to separate the
procedure into unified components. You may find, down the line, that you
need to refer back to a single component anyway.
For a procedure that
diverges and then links
back again, draw a flow
chart.
This is one of those times when it’s much better to show and tell than just
to tell. Be sure the flow chart and the text use the same step numbers and
titles. See the next figure for an example of a very complex flowchart.
If the procedure has
aspects that can go
wrong, use these signs,
each formatted in a
particular and identifiable
way.
You are responsible for effectively notifying the reader about these
circumstances. In some cases, your level of responsibility could amount to
legal liability. And remember that the formatting of these signs is part of
the recognition signal for the reader. So special icons, color, or other
formatting can be useful.
•
DANGER for steps that may lead to personal injury or death. Some
•
WARNING for steps that could result in damage to equipment.
•
Caution for steps where incorrect results or a loss of time could occur.
•
Note for alerts to possible problems. The icon we used in this
document is
, although many writers use just the word Note in a
common icons to use are 0 and 1, often quite large and in red.
prominent font and size.
Write using the
Nothing is more annoying than a step the reader can’t understand. So
vocabulary of your reader. don’t say “expunge” when you mean “delete.”
Woolpert
May 22, 2000
STC 47th Annual Conference
The “How To” of “How To’s”: Writing Procedures Like a Pro
6
Table 2. Techniques for Good Procedural Writing
Technique
Write short explicit
sentences.
Use command-style
sentences that begin with
a verb, such as “do this”
and “open that.”
Woolpert
May 22, 2000
Rationale and Discussion
They’re much easier for the reader to follow. Sentences that are overly
long can signal one of two conditions:
•
An “if-then” or even “if-then-else” structure, which would be better
handled as a set of parallel bullets
•
A step that actually contains multiple actions, which would be better
handled in separate steps
That’s the imperative. If you use “you should” or “you might,” the reader
may think there is an alternative to what you’re describing. Even worse, if
you use passive voice—”will be copied” or “will be opened”—the reader
may not be able to tell what to do and what happens automatically. Using
imperative verbs can also help prevent problems with nonparallel
construction. We’ll get to that in a bit, too.
STC 47th Annual Conference
The “How To” of “How To’s”: Writing Procedures Like a Pro
7
A1. Develop daily
assignments for GPS crews.
A2. Begin the primary sweep
GPS survey to locate utility
structures.
A3. Can
utility structure
be found within a
two-minute
search?
No
B1. Pentop System:
Digitize the structure on
the pentop PC as Not
Found in its apparent
location on the scanned
atlas sheet. Skip to
Step A10.
Yes
C1. Knock at the door and
spend a maximum of two
minutes attempting to
gain access.
No
A4. Is
structure
accessible?
Yes
C2. Were
surveyors able to
gain safe access to
the structure?
Yes
A5. Is
structure
observable by
GPS?
No
D1. Pentop System:
Digitize the structure on
the pentop PC as
Obscured in its
apparent location on the
scanned atlas sheet.
Skip to Step A10.
Yes
No
C3. Pentop System:
Digitize the structure on
the pentop PC as
Inaccessible/Impeded in
its apparent location on
the scanned atlas sheet.
Skip to Step A10.
A6. Observe the structure by
GPS.
A7. Handheld Data
Recorder: Mark the
structure as GPS on the
office source map.
A8. Download the GPS data
at the end of each day.
C4. Handheld Data
Recorder: Develop daily
assignments to digitize
the Inaccessible/
Impeded utility structures.
A9. Perform quality control
on the GPS survey data.
D2. Handheld Data
Recorder: Develop
daily assignments to
digitize the Obscured
utility structures.
B2. Handheld Data
Recorder: Develop
daily assignments to
digitize the Not Found
utility structures.
A10. Run the datacheck
macro on the ASCII file.
Figure 3. Example Flow Chart for a Very Complex Process (Original Chart Is Color-Coded)
Woolpert
May 22, 2000
STC 47th Annual Conference
The “How To” of “How To’s”: Writing Procedures Like a Pro
8
The Importance of Active, Imperative
Steps—Telling Them Where to Go (5 min)
One technique uses imperative sentences for actions the reader
takes and declarative sentences for “responses” by the
software, the swing set, the soufflé, or whatever is the receiver
of the action.
You can even formalize this technique into a dialog structure,
which is helpful for entry-level users.
1.
JSoft: The screen displays the
Options Menu.
2.
The Importance of Parallelism—
Marching Two by Two (5 min)
3.
•
All items in a list should have the same grammatical
structure. In other words, all items should be either
fragments or complete sentences, but no list should mix
fragments and complete sentences.
All headings of the same level should be parallel. They can
all begin
•
With “-ing” words (“Creating a File,” “Deleting a File”)
•
With imperatives (“Create a File,” “Delete a File”)
•
With nouns (“Creation of a File,” “Deletion of a File”)
•
With infinitives (“To Create a File,” “To Delete a File”)
You: Select the options you want
to use. Then press Enter.
JSoft: The software reorganizes
the list according to the options
you’ve selected. JSoft automatically
saves the new list as ADNEW.TXT
in the default directory.
Parallelism—parallel structure—is a technique of using the
same types of words (such as imperative verbs) or the same
grammatical structure to emphasize similar items.
•
You: Press F2 to select the address
list options.
You: Press F7 to see and print the
new address list.
JSoft: The screen displays the
new address list with print options at
the bottom of the box.
Figure 4. Example Procedure Dialog
What important advantage do the first three methods have
over the fourth method?
•
Parallelism is important within sentences, within headings, and
in lists:
•
•
Bad: “Taking all the parts out of the box and check them
with the parts list to make sure you received everything.”
Good: “Take all the parts out of the box and check them
with the parts list to make sure you received everything.”
Parallelism is especially important in phrases with “and” or
“or”:
Woolpert
May 22, 2000
STC 47th Annual Conference
The “How To” of “How To’s”: Writing Procedures Like a Pro
9
•
Bad: Open, inspect, and assembling the toy
Good: Open, inspect, and assemble the toy
•
Bad: Either they work or are fired
Good: Either they work or they are fired.
•
Bad: Whether at home or working, he was always busy.
Good: Whether at home or at work, he was always busy.
Woolpert
May 22, 2000
STC 47th Annual Conference
The “How To” of “How To’s”: Writing Procedures Like a Pro
10
{ Active Voice/Parallelism Exercise (5 min)
Work on your own for this exercise. You have five minutes.
Part A: From this mixed-up list, create a set of active, imperative items in parallel structure:
1. Run the software
2. The file should be selected
3. Digitizing the feature
4. To plot the file
5. Review of the plot
Part B: Fix the faulty parallelism in these sentences:
1. Opening and to close files are easy to do.
2. Identify the type of disk and how disks should be handled.
3. The error is due either to a lack of disk space or a power interruption.
4. The application begins by opening the file, displaying the list, and then calculates the total.
5. Use F7 to generate a new chart but not for editing an existing one.
The appendix at the end of this handout includes a more detailed passive-to-active exercise.
Woolpert
May 22, 2000
STC 47th Annual Conference
The “How To” of “How To’s”: Writing Procedures Like a Pro
11
The Importance of Sequencing—
Putting the Ducks in a Row (5 min)
What’s wrong with this instruction?
Press Escape to delete everything you have entered and
cancel the operation.
It breaks one of the basic rules of sequencing. It’s an example of the
dreaded do-this-if-you-want-to-do-that. This table lists the basic
rules for sequencing.
Table 3. Our Rules of Sequencing
Rule
Notes and Exceptions
Put all steps in
chronological order.
•
In a document like a reference manual, options might be in
alphabetical order or in the order they’re listed on a computer
screen rather than in chronological order.
Number every step.
•
Use numbers for steps, but use bullets or letters for options or
components within a step.
Put information within each
step in chronological order.
•
As above, it may be advisable to list options or other items in
alphabetical (or some other) order.
Avoid the dreaded do-this-ifyou-want-to-do-that.
•
This construction is illogical, like a “then-if” in programming.
Structure the step like this: “To do this, do that.”
Avoid the dreaded do-thisafter-you-do-that.
•
This construction is also illogical. Structure the step like this: “First
do this, and then do that.”
Use one action per step.
•
Tack the instruction to “press Enter” or “select OK” onto the end of
a step.
Combine closely related actions in one step: “Click in this box and
type that.”
Make sure every numbered step contains at least one action for
every reader. So an optional step shouldn’t have its own number.
(See “Or” loops below.)
•
•
Watch the number of steps.
•
Make sure the number of steps fits the task and the reader. Will
the reader be comfortable with a 50-step process, or would it be
better to separate the steps into individually numbered modules? If
you’re writing instructions on how to install a hearing aid battery,
would 25 steps be too many?
Use transitions to build
connections between steps.
•
Transitions might seem unnecessary since the steps are
numbered. But transitions help orient the reader, who may not
actually be reading the step numbers.
Woolpert
May 22, 2000
STC 47th Annual Conference
The “How To” of “How To’s”: Writing Procedures Like a Pro
12
Table 3. Our Rules of Sequencing
Rule
Notes and Exceptions
Use a special convention for
“or” loops.
•
When a step contains an “or” loop, use this type of convention,
starting with the most common (default) action, and setting off the
Or for emphasis:
7. Then use one of these steps:
• If you received a floppy disk, insert it into the floppy drive
(drive A).
• Or if you received a CD, insert it into the CD drive
(drive E).
Use loops as necessary.
•
•
•
Minimize the number of loops.
Always loop to something recognizable, like a step number.
Support the step text with a flow chart that uses the same step
numbers.
For one or more optional steps, consider using a box to separate
them from the rest of the process.
•
Woolpert
May 22, 2000
STC 47th Annual Conference
The “How To” of “How To’s”: Writing Procedures Like a Pro
13
{ Step Sequence Exercise (5 min)
Work with your table for this exercise. You have five minutes.
Change the order of the steps in this procedure to make it sequential. The procedure is for finding and
replacing formatting in Word (thanks to Running Microsoft Word 97 from Microsoft Press for the
inspiration for these steps).
______ First choose the Edit Replace command.
______ Click Format to open the format list.
______ Click Format to open the format list.
______ To display the whole Find and Replace dialog box, click the More button.
______ Delete any text from the Find What box.
______ With the format list open, select the type of formatting you want to use as a replacement. You
can select as many different types of formatting as you need.
______ Click Find Next to decide about the first replacement.
______ To continue finding, click Replace, or click Find Next again. Or click Replace All at any time to
replace all instances.
______ In each formatting dialog box, select the formatting you want to find, and click OK.
______ With the format list open, select the type of formatting you want to replace. You can select as
many different types of formatting as you need.
______ Delete any text from the Replace With box.
______ In each formatting dialog box, select the formatting you want to use as a replacement, and click
OK.
Woolpert
May 22, 2000
STC 47th Annual Conference
The “How To” of “How To’s”: Writing Procedures Like a Pro
14
A Questionnaire for Planning and Critiquing
Procedures—Staying on Track
If you have trouble working out the sequence of a procedure, the
parts of the procedure that are important, or the parts of the
procedure that may need to be divided into smaller parts, try asking
these questions.
This information is adapted from Designing Effective Standards and
Procedures, a course presented by JoAnn Hackos. ©1994 JoAnn
Hackos and Associates, Inc.
1.
Why do you perform this procedure?
Example: If you are sending a notice to a borrower, why are
you sending it? You might send a notice to tell the
borrower that his or her loan has been approved.
If you are completing a form, why are you filling
it out? You might fill out an adjusting entry
request form to ask that the accounting department
review the entry.
2.
What causes you to begin the procedure?
Example: A call from a borrower causes you to fill out a
request form asking that a letter be sent to the
borrower.
3.
How do you know when you’re finished?
Example: When getting information from a file, you’re
finished when you find the information. When
filling out a form, you’re finished when the form
is complete.
4.
What do you do with the information after you’ve
completed the procedure?
Example: After you complete a request form, you send it to
the information services department.
5.
What steps do you follow to complete this procedure?
It is important that you describe all the steps as thoroughly and
carefully as possible. Describe the steps as if you were
explaining them to a person just hired to perform the
procedure.
Woolpert
May 22, 2000
STC 47th Annual Conference
The “How To” of “How To’s”: Writing Procedures Like a Pro
15
Don’t leave out the steps that are performed by people in other
departments or by the computer, even if you don’t know the
details of what they do.
Number all the steps—that way you can refer back to them by
number.
It will probably take you some time to do this. You
might want to write each step on a separate page
before you write the final version.
6.
Look at all the steps you have just written down. Some
may be more complicated than others. For example, you
may have to calculate an account balance or identify a
trend. In detail, how do you do that?
Example: If you calculate an account balance, explain all the
steps. Where do the numbers come from? How do
you make the calculation? Do you check your
work?
You don’t need to answer this question if you’ve
described all the steps thoroughly in Question 5.
Look over the steps once more. Note any steps where you
must make a decision. Explain how you make the decision for
each step.
Example: If you must decide whether to approve a request,
explain under what conditions you would approve
it and under what conditions you would deny it.
7.
How much time does it ordinarily take you to perform the
entire procedure?
Estimate as carefully as possible the amount of time you take
to complete this procedure and its steps. If applicable, give a
range of possible times—for example, between 15 and 30
minutes—and explain the reasons for the extremes. You might
explain that you can complete a procedure in 15 minutes if the
information is available on the computer, but that it takes you
30 minutes if you have to consult a file.
What we’re looking for is the time you spend on the
procedure. If you have to wait for information from
someone else, don’t include that time.
Woolpert
May 22, 2000
STC 47th Annual Conference
The “How To” of “How To’s”: Writing Procedures Like a Pro
16
8.
Some of the steps you perform may take a lot more time
than others. What are those steps, and about how long
does it take to perform them?
Example: Out of the 30 minutes it takes you to fill out a
form, you might spend 20 minutes calculating one
number.
9.
What can go wrong when you perform the procedure?
Example: Maybe you or someone else entered the wrong
social security number.
10.
What do you have to do to correct the mistake? If other
people are involved, explain as much as you can about
what they do.
Example: To correct a social security number, you might go
back to the borrower’s file and check the original
promissory note.
Woolpert
May 22, 2000
STC 47th Annual Conference
The “How To” of “How To’s”: Writing Procedures Like a Pro
17
{ Prose to Numbered Steps Exercise (5 min)
Work with your table for this exercise. You have five minutes.
Convert the following paragraph to structured text with numbered steps:
The number of hours of sick leave which may be credited to an
employee, other than a part-time employee, shall be determined by
multiplying the total months of service by four and subtracting
therefrom the sum total of the number of hours of sick leave
previously taken.
Then can you think of an even shorter way to convey that information?
Woolpert
May 22, 2000
STC 47th Annual Conference
The “How To” of “How To’s”: Writing Procedures Like a Pro
18
{ Detailed Sequence Exercise (15 min)
Work with your table for this exercise. You have 15 minutes.
In the following procedures, find sequence errors like multiple actions in one step, the dreaded
“do-this-after-you-do-that,” and so on. Also think about how many tasks (or modules) this list includes.
(Thanks to the WordPerfect User’s Guide from Novell, Inc., for these procedures, which we’ve
mutilated.)
Specifying Replacement Words
1.
Choose Replacements after opening the Dictionaries menu.
2.
Or open the Dictionaries menu, choose Select Dictionaries, and then choose Replacements.
3.
Choose Add, type the incorrect word in the Change box, and then type the correct work in the To
box.
4.
If you would like this word to be automatically substituted in every document, select AutoReplace
during grammar check. Or you might want to add a comment in the Advice box explaining when to
use the replacement.
5.
Choose OK.
6.
Choose Close when you have completed your replacements list.
9.
To delete a replacement word, choose Delete after you select the word in the list.
10.
Choose Yes to confirm the deletion.
10.
To change a replacement word, select the word in the list. Then choose Edit.
11.
Type the new word.
12.
Choose OK.
13.
Then choose Close.
Woolpert
May 22, 2000
STC 47th Annual Conference
The “How To” of “How To’s”: Writing Procedures Like a Pro
19
Additional Information
fo
fo
rm
ee
ee
Fr
Fr
rm
Document-Planning Pyramid: The Relationship between Purpose and Type
To Letter,
inform memo
To Letter,
inquire memo
To Letter, memo,
convince proposal
To document Report, scope
a process of services
To build Tutorial,
skills online training
al
ic
ru
ct
hn
St
To tell how to Procedures
perform a process manual, user guide
/T
ec
/T
ed
ed
al
ct
ru
St
ic
Document Purpose
hn
To troubleshoot Reference guide, online
or repair help system, repair manual
ec
ur
ur
To answer questions Reference guide,
about a process online help system
Document Type
Figure 5. The More Technical the Purpose (Left Side), the More Structured the Form (Right Side)
In the figure, Document Purpose (on the left) gets increasingly technical from top to bottom, and
Document Type (on the right) gets increasingly structured from top to bottom. The document purposes
and types shown in bold white text are the most likely candidates for procedural writing.
Document Purpose
• Why are you writing?
• What need should the document fulfill?
• What problem should it prevent or solve?
• You and the recipient/user/client must agree.
• The more you know about the purpose, the more focused the document will be. Don’t start writing
until you can express the purpose for the document in one to four sentences. Don’t start writing
until you can express the purpose for each chapter, section, and page in one sentence.
Woolpert
May 22, 2000
STC 47th Annual Conference
The “How To” of “How To’s”: Writing Procedures Like a Pro
20
• No purpose = showstopper.
• Too many purposes = showstopper.
• Can you identify the real reason, as opposed to the “contract” reason? But what does the contract
say about it?
Document Type
• What type of document do you intend to or need to write?
• The level of structure ranges from freeform to structured/technical.
• The type of document ranges from memo to online help.
• What “venue”?
• Hardcopy, online, or both?
• Can it really be both?
Here’s a table that summarizes the differences between a process description and procedural writing:
Table 4. Process Description Versus Procedures
A Process Description
• Is a description that tells “what,” rather
than “how”
Procedural Writing
• Is a set of instructions that tells “how” rather
than “what”
• Documents what someone did (or will do),
• Tells exactly how to get from point A to point B;
without telling exactly how; may also persuade
assumes that no persuasion is necessary
• Assumes that the reader may not be the
person to carry out the process
• Assumes that the reader probably will be the
person to carry out the process
• Assumes that the reader will read the entire
document, or at least major chunks of it
• Assumes that the reader will read only the parts
(maybe just the single item) needed
• Usually has a third-person (he, she, the user,
they) focus or a modified second-person
(the county, you, ABC Company, we) focus
• Always has an implied second-person (you)
focus, but never a third-person (the user) focus
• Uses the indicative mood (regular
statements): The technician traced (or will
trace) the line
• Uses the imperative mood (commands): Use
the mouse pointer to trace the line from left to
right
• Sometimes uses the passive voice: The file
will be copied
• Uses the active voice for actions taken by
someone or something other than the user: The
software automatically copies the file
• Uses regular paragraph structure, such as
topic sentence + explanatory/developing
sentences
• Uses short, often single-sentence paragraphs
introduced by bullets or—more commonly—
numbers
Woolpert
May 22, 2000
STC 47th Annual Conference
The “How To” of “How To’s”: Writing Procedures Like a Pro
21
Table 4. Process Description Versus Procedures
A Process Description
Procedural Writing
• Contains paragraphs that are organized
logically, such as chronologically, in
ascending or descending order of importance,
or some other way
• Contains bulleted or numbered items that are
organized chronologically, sometimes with
internal jumps and loops
• Typically describes a fairly big picture
• Contains technical, gnat’s-eye details
• Often integrates supplementary discussions
about background, justification, alternatives,
research done, and related topics
• Usually tells exactly what the reader will need
for the process; supporting information is often
omitted or in an appendix
• Can be formal or informal—even chatty—
reflecting the personality of the writer
• Is usually very structured (but not necessarily
formal) and is usually not chatty—reflecting
little of the personality of the writer
• Often has illustrations and tables
• Often has screens, color-coding, icons, and
special typographic conventions (such as bold
for menu items, italics for database field names)
• May follow a variety of standards, including
in-house standards, industry standards, and
various style guides
• May follow a standard such as The Microsoft
Manual of Style for Technical Publications
• Is used for a report or a general plan
• Is used for a procedures manual or a detailed
plan
Audience Analysis
•
•
•
Whom are you writing for?
•
Don’t know (nobody) = showstopper.
•
Many people (everybody) = showstopper.
What must the reader know, and how necessary is that knowledge?
•
Basic computer skills (mouse, keyboard) are required.
•
Particular software skills are desirable.
•
Specialized organizational knowledge is helpful.
What does the reader expect from the document?
•
Do the reader’s expectations follow the contract specs?
•
Do the reader’s expectations follow some verbal specs?
Woolpert
May 22, 2000
STC 47th Annual Conference
The “How To” of “How To’s”: Writing Procedures Like a Pro
22
Assumptions
•
In addition to any assumptions you’ve made about the audience, what do you assume about the
project, the data, the participants, the schedule?
•
Do you consider a certain dataset as the authority or assume that a certain piece of software will
be installed by a particular date?
•
Are you relying on the accuracy of information given by a particular client employee,
department, or committee?
Acknowledgments
•
What other documents/resources can you consult?
•
Acknowledge any significant material used directly or indirectly.
•
Get written permission—and keep the document!
•
Don’t rewrite what’s already been written and is available from another source.
Schedule, Budget, and Production
•
•
•
What’s the deadline?
•
Does the deadline specify when must it be in the client’s hands and when must it leave your
office?
•
Is it specified by the contract or by something else?
What’s the budget?
•
For basic writing (or rewriting), allow at least one hour per page.
•
For technical writing (or rewriting), allow at least two hours per page.
•
For substantive editing, allow at least 30 minutes per page.
In planning for the deadline and the budget, consider these things:
•
The evils of documenting too early: You may have to do the whole documentation job over
again.
•
The benefits of documenting too early: The documentation can serve as an informal type of
usability testing while the process or product is developed.
Woolpert
May 22, 2000
STC 47th Annual Conference
The “How To” of “How To’s”: Writing Procedures Like a Pro
23
The Rest of the Story
Here are the answers to the exercises in the main part of this document.
z Active Voice/Parallelism Exercise—A Solution (3 min)
Part A: Here are three different versions of the list showing parallel construction:
1. Run the software
1. Running the software
1. To run the software
2. Select the file
2. Selecting the file
2. To select the file
3. Digitize the feature
3. Digitizing the feature
3. To digitize the feature
4. Plot the file
4. Plotting the file
4. To plot the file
5. Review the plot
5. Reviewing the plot
5. To review the plot
You might wonder why there were only three examples of parallel lists and no example showing
the “noun + of” construction used in “Review of the plot.” The reason is that the “noun + of”
construction tends to be heavy, whether it occurs in a list, a heading, or text. In all those cases,
it’s better to say “Review the plot” than to say “Review of the plot.” This is even more important
with bigger words and longer phrases, as in “I will perform the estimation of the costs,” which is
much improved when revised to “I’ll estimate the costs.”
Part B: Here are the corrected versions of the sentences:
1. Opening and closing files are easy to do.
2. Identify the type of disk and the way to handle it.
3. The error is due either to a lack of disk space or to a power interruption.
4. The application begins by opening the file, displaying the list, and calculating the total.
5. Use F7 to generate a new chart but not to edit an existing one.
Woolpert
May 22, 2000
STC 47th Annual Conference
The “How To” of “How To’s”: Writing Procedures Like a Pro
24
z Step Sequence Exercise—A Solution (3 min)
1.
First choose the Edit Replace command.
4.
Click Format to open the format list.
8.
Click Format to open the format list.
2.
To display the whole Find and Replace dialog box, click the More button.
3.
Delete any text from the Find What box.
9.
With the format list open, select the type of formatting you want to use as a replacement. You can
select as many different types of formatting as you need.
11.
Click Find Next to decide about the first replacement.
12.
To continue finding, click Replace, or click Find Next again. Or click Replace All at any time to
replace all instances.
6.
In each formatting dialog box, select the formatting you want to find, and click OK.
5.
With the format list open, select the type of formatting you want to find. You can select as many
different types of formatting as you need.
7.
Delete any text from the Replace With box.
10.
In each formatting dialog box, select the formatting you want to use as a replacement, and click
OK.
Woolpert
May 22, 2000
STC 47th Annual Conference
The “How To” of “How To’s”: Writing Procedures Like a Pro
25
z Prose to Numbered Steps Exercise—A Solution (3 min)
Here’s one way:
To compute the number of sick days credited to a full-time employee,
use these steps:
1. First, count the total number of months of service.
2. Multiply by 4.
3. Subtract the number of sick leave hours already taken.
Here’s a shorter way:
Sick leave for full-time employees = (months of service x 4) – hours already taken
•
What kind of audience would respond better to the first way?
•
What kind of audience would respond better to the second way?
Woolpert
May 22, 2000
STC 47th Annual Conference
The “How To” of “How To’s”: Writing Procedures Like a Pro
26
z Detailed Sequence Exercise—A Solution (5 min)
Specifying Replacement Words
1.
Open the Dictionaries menu and choose Replacements.
Or open the Dictionaries menu, choose Select Dictionaries, and then choose Replacements.
2.
Choose Add.
3.
Type the incorrect word in the Change box.
4.
Then type the correct work in the To box.
5.
If you would like this word to be automatically substituted in every document, select AutoReplace
During Grammar Check.
Or you might want to add a comment in the Advice box explaining when to use the replacement.
6.
Choose OK.
7.
When you have completed your replacements list, choose Close.
Optional: Deleting a Replacement Word
1.
To delete a replacement word, select the word in the list and then choose Delete.
2.
To confirm the deletion, choose Yes.
Optional: Changing a Replacement Word
1.
To change a replacement word, select the word in the list and then choose Edit.
2.
Type the new word and choose OK.
3.
Then choose Close.
Woolpert
May 22, 2000
STC 47th Annual Conference
The “How To” of “How To’s”: Writing Procedures Like a Pro
27
Additional Exercises
{ The Good, the Bad, and the Ugly Exercise
Select at least one of the following passages to review. Evaluate the passage, using the criteria listed in
the table called Our Criteria for Good Procedural Writing. Be prepared to discuss your evaluation.
This passage is from the map sheet work procedures section of a document called
Procedures and Quality Control for Planimetric Mapping.
Task 2—Perform Analytic Triangulation
Task Overview: Horizontal and vertical control points that are marked
in the field will be identified on contact prints. Pass points and tie points will
be marked on diapositives. Diapositives will be drilled with a point-transfer
device. On a stereoplotter, the operator will measure the pass points and tie
points on each photo. Fully analytic triangulation calculations will be
performed.
Before aerial photography is obtained, experienced field crews will
place markers on existing or supplementary horizontal and vertical control.
These markers must be large enough to be seen on the aerial photography
and must be adequately pinned to the ground so that they will remain in
place until the aerial photography has been completed.
After the aerial photography is obtained, the contact prints will be
carefully inspected to ensure that all premarked control is properly visible and
identifiable on the aerial photography. If critical points cannot be seen clearly
on the photography, or if a premark has been removed, it will be necessary to
return to the field to tie in a nearby natural photo-identifiable point.
Figure 6. Procedural Passage 1 for Review
Woolpert
May 22, 2000
STC 47th Annual Conference
The “How To” of “How To’s”: Writing Procedures Like a Pro
28
This passage is from a user manual.
AtekEdit Menu
Access the AtekEase menu by selecting AE MENU on the Banner menu shown previously in Figure 1.
Use the AtekEase menu shown in Figure 2 to execute a variety of common AtekEase tasks.
Figure 2. AtekEase Menu
•
DEVICES: Use this button to display a pulldown menu that includes standard AtekEase
commands and AMLs for setting up a drawing and activating the digitizer, mouse, and keyboard.
•
DATA: Use this button to set the editcoverage, editfeature, and structure. The screen displays a
pulldown menu with three choices:
•
EDITCOVERAGE: The screen displays a popup scrolling list of available editcoverages for
the current production area. Use the mouse to select the editcoverage. The COVERAGE field
on the DATA SETS portion of the KWIK user interface displays the editcoverage you select.
•
EDITFEATURE: The screen displays a popup scrolling list of editfeatures. Use the mouse to
select the editfeature. The FEATURE field on the DATA SETS portion of the KWIK user
interface displays the editfeature you select.
•
STRUCTURE: The screen displays a popup scrolling list of structures. Use the mouse to
select the structure. The STRUCTURE field on the DATA SETS portion of the KWIK user
interface displays the structure you select.
•
SETTINGS: Use this button to display a customized Edit Settings menu to edit various settings
(see Figure 3 below).
•
SELECTS: Use this button to display a pulldown menu to choose between various
feature-selecting options.
•
EDITS: Use this button to display a pulldown menu of commonly used AtekEase edit function
commands.
•
MISCELLANEOUS: Use this button to display a pulldown menu of informational AtekEase
commands.
•
DISMISS: Use this button to exit from the AtekEase menu and return to the Banner menu (see
Figure 1 earlier in this section).
Figure 7. Procedural Passage 2 for Review
Woolpert
May 22, 2000
STC 47th Annual Conference
The “How To” of “How To’s”: Writing Procedures Like a Pro
29
This passage is an excerpt from a user manual.
Step 11. Choosing a Service
After you select Service in Step 10, the County Services Menu displays:
Figure 11. The County Services Menu
The dialog box displays a list of county services. This is a special kind of list—a
scrolling list. The scroll bar (the vertical gray bar at the right of the list) indicates
that only part of the list fits in the box.
Move the mouse pointer through the list to find the service you want more
information on. To move down quickly in the list, click in the gray vertical scroll
bar area, above the
button.
•
When you find the service you want, select it.
•
Then click OK and continue with Step 12.
•
Figure 8. Procedural Passage 3 for Review
Woolpert
May 22, 2000
STC 47th Annual Conference
The “How To” of “How To’s”: Writing Procedures Like a Pro
30
This passage is from an application user guide.
Configuring Updated Data for the Water Quality/
Water Quantity Application
Overview: Rainfall data is available for certain dates on the U.S.
Geological Survey (USGS) web site. The data exists as simple ASCII
files that must be processed before being used by the Water
Quality/Water Quantity application. XYZ has written a set of macros to
automate the conversion of the ASCII textfiles into a format suitable
for GIS. Here is how to run the macros:
1. Start in the directory that contains rngage.exe.
2. To run the macro, type &r rngage.exe at an ACT prompt and press
Enter.
3. A menu will appear on
the screen.
On the left side of the
menu is a list of dates
that have already been
processed. On the right
side of the menu is a
listing of USGS ASCII
files that exist in the
current directory.
Figure 17. Raingage and Rainfall
Coverage Creation Menu
0 Be careful in choosing an ASCII file from the righthand listing.
If you choose an ASCII file with a date that has already been
processed, the macro will delete the currently existing
shapefiles and reprocess the data.
•
To proceed, choose an ASCII file in the right listing and choose
OK.
•
Or to cancel the operation, choose Cancel.
You’re now ready to run the Water Quality/Water Quantity application
with the new datasets.
Figure 9. Procedural Passage 4 for Review
Woolpert
May 22, 2000
STC 47th Annual Conference
The “How To” of “How To’s”: Writing Procedures Like a Pro
31
{ Passive-to-Active Exercise
Turn this tangled passive-voice material to sparkling clear active-voice procedures. If you find any gaps
in the process, fill them in as well as you can. Assume that the user is quite new to computers but knows
basic mouse and Windows operations. Also assume that the user might not know how to load a disk or
CD but will know how to run and use Windows Explorer.
The process is begun with the startup disk that was included in the blue envelope marked
“Startup.”
The disk medium should never be touched, including the recording material under the metal slider.
The startup disk is inserted in drive A (if the received medium is a 3.5-inch floppy) or in the CD
drive (if the received medium is a CD), which is configured as drive E, and the door is closed with
the green label facing up.
Install is typed and Enter is pressed in the Windows 95 Start Run box.
The project files BxxPyy are loaded onto the hard drive after a few minutes, where xx is referenced
to the book number and yy is referenced to the page number.
The new directory is called Sheets.
The 63 files should be verified to be on the hard drive after Installation complete is displayed on the
screen and after Clear is clicked.
Windows Explorer should be used. If any problems or questions are encountered, the system
administrator should be informed.
Woolpert
May 22, 2000
STC 47th Annual Conference
The “How To” of “How To’s”: Writing Procedures Like a Pro
32
z Passive-to-Active Exercise—A Solution
1. Find the blue envelope marked “Startup.” It contains the startup disk.
0 Caution:
If you received a 3.5-inch floppy disk, never touch the recording medium under the
metal slider. If you received a CD, handle it as little as possible and only by the very
edge.
2. Remove the startup disk from the envelope.
3. Then use one of these steps:
•
If you received a floppy disk, hold it with the green label facing up and insert it into drive A.
•
Or if you received a CD, hold it with the green label facing up and insert it into the CD drive.
4. Close the drive door.
5. On the Windows 95 taskbar, click Start and then Run.
6. Then use one of these steps:
•
For a floppy disk, make sure the box says A:\install and click OK.
•
Or for a CD, make sure the box says E:\install and click OK.
7. Wait while the installation proceeds. The process automatically creates a directory called Sheets on
your hard drive and loads the project files.
When the process is done, Installation complete displays on the screen.
8. Click Clear.
9. Use Windows Explorer to make sure that the Sheets directory on your hard drive contains 63 project
files.
Note: The project file names use the pattern BxxPyy where
•
xx is the book number.
•
yy is the page number.
For Help: If you have any problems or questions, contact the system administrator at
_____________.
Woolpert
May 22, 2000
STC 47th Annual Conference
The “How To” of “How To’s”: Writing Procedures Like a Pro
33
Selected Bibliography
Alred, Gerald, Charles Brusaw, and Walter Oliu. The Professional Writer: A Guide for Advanced
Technical Writing. New York: St. Martin’s, 1992.
Anderson, Paul. Technical Writing: A Reader-Centered Approach. 3rd ed. New York: Harcourt Brace
Jovanovich, 1995.
Borland, Russell. Running Microsoft Word 97. Redmond, WA: Microsoft, 1997.
Cormier, Robin. Error-Free Writing: A Lifetime Guide to Flawless Business Writing. Englewood Cliffs,
NJ: Prentice Hall, 1995.
Hackos, JoAnn, and Dawn Stevens. Standards for Online Communication. New York: John Wiley &
Sons, 1997.
Jones, Dan. Technical Writing Style. Boston: Allyn & Bacon, 1998.
Microsoft Corporation. Microsoft Manual of Style for Technical Publications. 2nd ed. Redmond, WA:
Microsoft, 1998.
Novell, Inc. WordPerfect User’s Guide. Orem: UT: Novell, 1994.
Weiss, Edmond. How to Write Usable User Documentation. Phoenix, AZ: Oryx, 1991.
Acknowledgment
The presenters thank JoAnn Hackos, Ph.D., for permission to use portions of her material in this
document and in the workshop. Dr. Hackos is President of Comtech Services, Inc., 710 Kipling Street,
Suite 400, Denver, Colorado 80215, phone 303.232.7586, email [email protected].
Woolpert
May 22, 2000
STC 47th Annual Conference
The “How To” of “How To’s”: Writing Procedures Like a Pro
34
About the Presenters
Rebecca Edgerton is the GIS documentation group manager for Woolpert LLP. A senior STC member
and long-time STC presenter, her technical documentation accomplishments over the last 20 years
include database and software user manuals, training materials, implementation plans, and policy and
procedure manuals. With more than two decades’ experience in technical writing, Rebecca has won
international, national, and local awards for the Woolpert Desk Reference as well as for a variety of
hardware and software users’ manuals, procedure guides, and technical implementation plans.
Jill Nicholson is an experienced technical and business communicator who lectured on science and
technical communication skills for many years at the University of Technology, Sydney, Australia. She
now presents business and technical communication courses to government departments and the private
sector in Australia, New Zealand, and Singapore, as well as providing technical writing services. Since
leaving the university in 1995, Jill has worked for herself and has contracted teaching and technical
writing services to a number of major companies. Since 1994, she has also organized the annual JoAnn
Hackos Seminars, presented in Australia. Jill is a senior member of STC and has served as President of
the Australian Society for Technical Communication (NWS) Inc.
Woolpert
May 22, 2000
STC 47th Annual Conference
The “How To” of “How To’s”: Writing Procedures Like a Pro
35