1
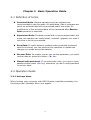
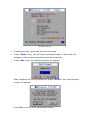
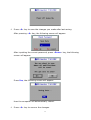
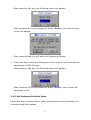
User’s Manual
Version 7.50
http://www.HDDGuarder.com
Disclaimer
We have done our best to ensure that the material in this manual is both
accurate and useful; however, please be aware that errors maybe exist, and
it dose not make any guarantee concerning the accuracy of information
found here or in the use to which it may be put.
Before you install HDD Guarder, please backup all your important
files and ensure that it is stored separately.
CONTENTS
CHAPTER 1
INTRODUCTION ............................................................................ 4
1-1 Function ......................................................................................................... 4
1-2 Features ......................................................................................................... 4
CHAPTER 2
INSTALLATION............................................................................... 6
2-1 System requirements ..................................................................................... 6
2-2 Before installation........................................................................................... 6
2-3 Start installation.............................................................................................. 6
2-3-1 Installation of driver for Windows 2000/NT/XP (software
installation) .......................................................................... 6
2-3-2 Installation of Guarder card (hardware installation)............ 6
2-4 Express test ................................................................................................... 9
CHAPTER 3
BASIC OPERATION GUIDE....................................................... 10
3-1 Definition of terms ........................................................................................ 10
3-2 Operation Guide........................................................................................... 10
3-2-1 Hotkeys Menu..............................................................10
3-2-2 Set Protected Partition Menu..........................................14
3-2-3 Set Parameters Menu....................................................15
3-2-4 Protect CMOS ..............................................................16
3-2-5 How to modify the password..........................................17
3-2-6 How to uninstall Guarder...............................................18
3-3 Unique Serial Number and Serial-Number Password .................................. 18
3-4 How to set Multi-Boot ................................................................................... 18
3-4-1 Setting Multi-Bootable-Partition Booting by BootMagic .......18
3-4-2 Setting Multi-OS Booting by System Commander..............19
3-4-3 How to Skip Possible Virus Warning ................................19
CHAPTER 4
TROUBLESHOOTING .................................................................. 20
I forgot the password.......................................................................................... 20
As if no Guarder card is plugged in .................................................................... 20
Displaying blue screen and Windows breaks down............................................ 21
Chapter 1
Introduction
1-1 Function
An express installation can be performed by pressing the <Enter> key 3
times, it cost you only five seconds.
Once hard disk data is destroyed by any mistake, virus and/or hacker,
only press <9> key one time to recover it in half a second.
Support IDE and SCSI hard disk controller.
Support PIO, DMA33, DMA66, Ultra DMA66, ATA-100 , Ultra ATA-100 IDE
and SATA interface.
Support FAT16/16E, FAT32/32E, NTFS/HPFS partitions and file systems.
Support 256GB hard disk.
Guarder whole hard disk or selected partitions.
Support multi-OS booting by System Commander and
multi-bootable-partition booting by BootMagic.
Support not only DOS, Windows 3x/95/98/ME, but also Windows
NT/2000/XP/2003 server better.
Guard CMOS intelligently.
1-2 Features
When first set up, saved, or recovered, Guarder uses only 5KB of hard
disk; when running , it uses 1.33MB of hard disk at most.
Dynamic Virtual Hard Disk Drive (DVHDD) is one created and managed
by Guarder in guarded partitions for new data saving. Theoretically
Guarder supports a DVHDD of 1207GB, practically it supports a 12GB
one, so it better supports Windows NT/2000/XP/2003 server and
ensures that the Defrag routine can run and large data can be saved
when any partition is guarded.
The magic Save function is best suitable for such application
environment about government, business, institute, home, finance,
securities, accounting and the military. When any partition is guarded, all
4
writing on it will be recorded as new data. Once we use recovery or
uninstallation function, all new data will be cleaned. Guarder provides
Save function to write data onto hard disk.
Anti-Evil-Attack function is best suitable for cyber cafe and the computer
labs of schools and colleges. When the attacker deletes all installation
information on the guarded partitions, and reboots the computer,
Guarder will enter a Security Check routine. OS can only be booted when
the manager inputted the correct serial-number password.
5
Chapter 2
Installation
2-1 System requirements
CPU: 386 or above
Memory: 8M or more
Hard-disk: IDE, EIDE and SCSI
2-2 Before installation
Make sure that your computer meets the above-mentioned system
requirements.
If a similar product has been installed, remove it and its drivers.
Scan and clean viruses with anti-virus software.
Make sure there is no static electricity.
2-3 Start installation
There are two steps of installation (hardware installation and software
installation) separately for HDDGuarder.
2-3-1 Installation of driver for Windows 2000/NT/XP
(software installation)
Boot the computer with Windows® 2000/NT/XP/2003.
Run Install.exe in the driver disk or CD supplied with the product.
Reboot your computer to complete the installation.
2-3-2 Installation of Guarder card
(hardware installation)
Make your computer turn off.
Insert the card into one of empty PCI slots on the motherboard of the
computer.
Turn on your computer.
Check the setting of CMOS to make sure the parameters of hard disk are
6
correct:
If there is Boot From LAN First or similar item, enable it.
Disable the Virus Warning item in CMOS setting.
If there is a Hard Disk Recovery program in CMOS, disable it.
Reboot your computer, the following screen (Installation menu) will
appear:
(Installation Menu)
Press <Enter> key three times, express installation will be finished with
default parameters setting.
Press Install, the following screen (Set Parameters Menu) will appear:
7
(Set Parameters Menu)
Press <Tab> key to move.
Press <Space Bar> or <PgUp> <PgDn> to modify the setting.
Press OK to save the setting and press Cancel to give up the change of
setting.
After pressing OK, the following screen will appear (Set Protected
Partition Menu):
(Set Protected Partition Menu)
Press <Tab> key to move.
8
Press <Space Bar> to modify the setting.
Press OK to save the setting and press Cancel to give up the change of
setting.
After pressing OK, The computer will reboot automatically. Now, you
have finished the installation of the Guarder.
2-4 Express test
Create a folder at the root of drive C, and create another at Windows
desktop.
Reboot your computer, if the folders disappear, it means that the Guarder
functions well and has automatically finished recovery.
9
Chapter 3
Basic Operation Guide
3-1 Definition of terms
Protected Mode: General operators such as students are
recommended to use this mode. All useful data, files or programs are
set to be protected and will be protected under this mode. All
modification of the protected data will be recovered after Restore
Data operation is executed.
Supervisor Mode: The data on hard disk is not protected under this
mode, the operator can really install, uninstall, upgrade, etc. even if
the drive is set to be protected.
Save Data: If useful data are created under protected mode and
need to be saved, you can perform this operation to update the
changes you made during last session.
Recover Data: No matter how do you set the parameter, you could
recover data by press this hotkey <9> key.
Manual with password: If you select this item, you have to input
password after press <9> key, otherwise, you don’t need password
to recover data.
3-2 Operation Guide
3-2-1 Hotkeys Menu
When booting your computer with HDD Guarder installed completely, the
following screen (Hotkeys Menu) will appear:
10
(Hotkeys Menu)
Pressing any key could stop the time counting.
Press <Enter> key, you will enter protected mode, in this mode, all
changes in the protected partitions will be protected.
Press <Esc> key, the following screen will appear:
After inputting the correct password, press <Enter> key, the following
screen will appear:
Press Yes, you will enter Operating System.
11
Press <5> key to enter Set Protected Partition Menu, in which you could
set protection or not for each drive.
After pressing <5> key, the following screen will appear:
After inputting the correct password, press <Enter> key to enter Set
Protected Partition menu.
Press <0> key to uninstall Guarder.
After pressing <0> key, the following screen will appear:
After inputting the correct password, press <Enter> key, the following
screen will appear:
If you click Yes, the Guarder will automatically delete all the installation
information, then the following screen appears:
12
Press <6> key to save the changes you made after last saving.
After pressing <6> key, the following screen will appear:
After inputting the correct password, press <Enter> key, the following
screen will appear:
Press Yes, the following screen will appear:
then the computer will automatically reboot.
Press <9> key to recover the changes.
13
After pressing <9> key, the following screen will appear:
After inputting the correct password, press <Enter> key, the following
screen will appear:
After pressing Yes, you will enter into Operating System.
Press <8> key to enter Set Parameters menu, in which you could set the
parameters of HDD Guarder.
After pressing <8> key, the following screen will appear:
After inputting the correct password, press <Enter> key to enter Set
Parameter menu.
3-2-2 Set Protected Partition Menu
Press <5> key in Hotkeys Menu, after inputting the correct password, the
following screen will appear:
14
the default setting is protected all drives.
Press <Tab> to move and press <Space Bar> to mark or not mark V for
every drive.
If there is mark of V, this drive will be protected, otherwise will not be
protected.
3-2-3 Set Parameters Menu
Press <8> key in Hotkeys Menu, the following screen will appear:
15
The default settings are as the above settings.
You could set the recover interval from every 1-99 boot, or every 1/2 day,
or every 1-99 days, or every week, or manual recover.
If you mark V in the item of manual with password, that means you have
to input password when you press <9> key to recover data; otherwise,
you do not need.
If you mark V in the item of protect CMOS, that means the setting of
CMOS is protected.
If you mark V in the item of protect BIOS, the BIOS will be protected,
otherwise, not be protected.
If you mark V in the item of boot from HD only, that means the computer
has to boot from hard disk, otherwise not.
If you choose Booting Display as none, that means when the computer
booting, there will be no any screen about HDD Guarder and the
computer will enter directly operating system. While you could get the
Hotkeys Menu by pressing <8> key when booting your computer.
If you choose Booting Display as hotkeys, the Hotkeys menu will appear
when booting your computer.
The displaying time could be modified from 15 seconds to 1 second, the
default time is 9 seconds.
You could press <Tab> to move from one item to another, press <Space
Bar> or <PgUp>/<PgDn> to modify the setting.
3-2-4 Protect CMOS
If you choose protect CMOS in Set Parameters menu, and if there are any
changes for the setting of CMOS, the following screen will appear:
Press Yes, the changes of CMOS will be saved.
16
Press No, the changes of CMOS will be recovered.
Press Cancel, the computer will reboot three times, you could make any
change for CMOM during the three reboots, and all changes will be saved
permanently.
3-2-5 How to modify the password
The default password is function, all letters are in smaller case.
Press Change Password in the Set Parameters menu, the following screen
will appear:
After inputting the new password, press <Enter> key, the following screen
will appear:
Input the new password again, then press <Enter> key, the following
screen will appear:
Press OK, the password is modified now.
If the two passwords you enter are not consistent, or you pressed key Esc,
the following screen will appear to indicate that the password is not
changed.
17
3-2-6 How to uninstall Guarder
Press <0> key in Hotkeys Menu, please refer to 3-2-1.
3-3 Unique Serial Number and Serial-Number Password
If you press key F1 when entering the password, Guarder will display its
serial number.
20040214.8899AABB.CCDDEEFF
20040214 is the manufacture date of your HDD Guarder card.
8899AABB.CCDDEEFF is the serial number. It is unique.
By the serial number, you can get the serial number password. The serial
number password is an all-purpose password corresponding with your
unique serial number, it is used in case you forgot the password, or Guarder
carries security check to prevent evil-attack, and it can be only got from the
distributors.
3-4 How to set Multi-Boot
3-4-1 Setting Multi-Bootable-Partition Booting by BootMagic
BootMagic is a software packed with PQmagic. It is specially used in
installing Multi Bootable Partitions.
Please set HD partitions in PQmagic first, and then install BootMagic, OS,
applications and the Guarder in this order.
18
3-4-2 Setting Multi-OS Booting by System Commander
At the first, install OS and applications. At the second, install System
Commander. At last, install Guarder.
3-4-3 How to Skip Possible Virus Warning
At the first time System Commander starts after Guarder installation, the
Possible Virus Warning window will appear as follows.
Press <U> key to update. Reboot the computer and save hard disk data, and
then as long as you do not uninstall the Guarder, this window will not appear
whenever you recover hard disk data.
19
Chapter 4
Troubleshooting
Legends
Detailed description of the problems.
☺
#
Analysis of possible causes.
Ways to solve the problems.
Further notes.
Caution.
I forgot the password
☺
Try default password first. If that won’t do, please get the
serial-number password from your distributor.
As if no HDDGuarder card is plugged in
After rebooting, no installation menu appears, and the computer
starts OS as usual.
☺
For the case, the possible causes may be
The card is not properly plugged.
The power supply has poor loading capacity.
CMOS is not properly configured.
The boot mode does not match BIOS. Please refer to Boot Mode
section in the Advanced Guide chapter to change the Boot Mode by
pressing <Ctrl+B>.
#
Plug the card again, or change a slot, or clean the slot/the card.
Retry it with another HDDGuarder card. If the power supply does
20
not work, contact your computer distributor or the manufacturer,
and replace either the power supply or the computer itself.
For some AMI BIOS motherboard, set the CMOS parameter “BIOS
FEATURES SETUP” as follows:
Set First boot device to LAN. Or
set Boot from LAN first to Enable.
Certain motherboards or BIOS may also require
Set PnP OS installed to Yes.
Update BIOS.
There is little possibility that the above causes concur combinedly.
Improper CMOS configuration or Boot Mode not matching BIOS
perhaps occurs with motherboards using AMI BIOS.
Displaying blue screen and Windows breaks down
After rebooting, PC displays blue screen with error message.
☺
The free space in hard disks is limited. There is no cache for the
HDDGuarder.
Anti-Virus software or System Performance Administration
software has been installed.
#
Recover the hard disk data, or set it to Automatic Recovery.
Uninstall the HDDGuarder, Anti-Virus software and System
Performance Administration software.
Reinstall it after the system is Ok.
PC always requires to input SN password
☺
HDDGuarder provides special anti-evil uninstallation and haker
affection, if HDDGaurder is not normally uninstalled, it will require to
input SN password before enter into OS
#
Only after inputting correct SN password that is provided from your
distributors. You could enter into OS.
21
If you have no SN password on hand, please contact with your
distributor in time for the solutions.
After installation of HDDGuarder, the PC always
reboot before Windows loading
☺
HDDGaurder provides three kinds of Boot mode, each kind could meet
#
After reboot, Press <Ctrl+B> just after CMOS setting list while
difference BIOS setting.
before OS loading, HDDGaurder Boot mode menu will appear.
Choose the second or third Boot mode to try.
When I set hotkey menu as hidden, how could I
have it shown back when I want to check the
Hotkey operation
#
After reboot, press <Ctrl+M> just after CMOS setting list while
before OS loading, and reconfig HDDGuarder to show Hotkeys
menu.
22